

Page 1

SoundPoint Pro User’s Guide
Table of Contents
Conventions Used in this User’s Guide
The following summarizes the conventions used in this User’s Guide:
▼ Initial Caps are used for SoundPoint Pro features such as the Speed Dial
directory and Call History directory.
▼ I t a l i c s a re used for notes to provide additional info rm ation about a function
or process.
▼ UPPERCASE BOLD is used to indicate buttons found on SoundPoint Pro.
Chapter 1 SoundPoint Pro Getting Started................................... 1-1
Unpacking................................................................................... 1-3
Installation................................................................................... 1-4
Preparing for Installation..................................................... 1-4
Installing the Phone............................................................. 1-5
Setup 1: Three Lines, Three Wall Jacks...................... 1-5
Setup 2: One or more lines, One Wall Jack................. 1-6
Setup 3: Two Lines on One Jack,
Single on Another.......................................... 1-7
Connections for the Phone, Power,
Handset, and Headset........................................................... 1-8
SoundPoint Pro Keys and Operational Features.................. 1-10
Explanation of Visual Indicators: LEDs and LCD............. 1-11
Chapter 2 SoundPoint Pro Operation .............................................. 2-1
Making Calls,Answering Calls, Hanging Up............................ 2-2
Operation Tips for Using the Line Keys.............................. 2-2
Changing Modes........................................................... 2-3
Making Calls................................................................. 2-3
Answering Calls ........................................................... 2-4
Speaker Mode ............................................................................. 2-5
Microphones ........................................................................ 2-5
Individual Modes.......................................................... 2-5
Group Conference Mode.............................................. 2-5
Headset Mode ............................................................................. 2-6
Conference Mode........................................................................ 2-7
Lines..................................................................................... 2-7
Operations............................................................................ 2-7
Initiating a Conference Call ......................................... 2-7
Adding a Caller on an Inactive Line............................ 2-8
Volume Control........................................................................... 2-9
Headset, Handset, Speaker .................................................. 2-9
Dial Tone.............................................................................. 2-9
Directory Screens........................................................................ 2-10
Page 2

Table of Contents
Chapter 2 SoundPoint Pro Operation (cont’d)
Displays and Directories............................................................. 2-11
Speed Dial Directory ........................................................... 2-11
Call History Directory ......................................................... 2-11
Viewing Phone Numbers in Call History..................... 2-12
Dialing Phone Numbers in Call History ...................... 2-12
Dialing Stored Phone Numbers in Call History........... 2-12
Programming Call History Entries for Speed Dial ...... 2-12
Local Phone Number Directory........................................... 2-13
Programming............................................................................... 2-14
Options and General Operation........................................... 2-14
Sequence for Entering Choices............................................ 2-14
Basics for Speed Dial Numbers........................................... 2-14
Speed Dial Numbers ........................................................... 2-15
Ring Volume ........................................................................ 2-17
Time of Day......................................................................... 2-17
Telephone Numbers............................................................. 2-18
LCD Contrast....................................................................... 2-18
Primary Line........................................................................ 2-19
Caller ID On/Off.................................................................. 2-19
Chapter 3 SoundPoint Pro Troubleshooting .................................. 3-1
No Dial Tone............................................................................... 3-2
Speaker Mode ............................................................................. 3-2
Difficulty Hearing....................................................................... 3-2
Blank Display.............................................................................. 3-3
Physical Damage......................................................................... 3-3
Chapter 4 SoundPoint Pro Safety, Regulatory
and Warranty........................................................................ 4-1
Safety .......................................................................................... 4-2
U.S. Regulatory Information/FCC.............................................. 4-3
Warranty...................................................................................... 4-5
Limitation of Liability................................................................. 4-6
Chapter 5 Appendix................................................................................. 5-1
Types of Headsets....................................................................... 5-2
Headset Selection........................................................................ 5-3
SoundPoint Pro Introduction
Chapter 1
Page 3
Welcome
Unpacking
And thank you for selecting SoundPoint Pro®. SoundPoint Pro combines Po ly c o m ’s
c o rp o rat e - q u a l i t y audioconferencing and a full business feature set for the home or
small office. SoundPoint Pro is clearly the best choice in office communications.
Here are some of the features SoundPoint Pro delivers:
▼ Full-Duplex Conference Phone
▼ Up to 4-way Integrated Conference Bridging
▼ 20 Number Programmable Speed Dial
▼ RCA Jack for Recording Calls
▼ Integrated Caller ID and Caller ID on Call Waiting
▼ 99 Number Caller History
▼ 4-Way Independent Volume Control with Memory
▼ Distinctive Rings for Each Line
▼ Integrated headset amplifier, key pad activation, and headset hanger
▼ Any Key Dialing
▼ Key pad-activated rear mic for group conferencing
SoundPoint Pro is designed for you by Polycom—the World’s number one provider
of audioconferencing products. From small companies to the Fortune 500, from the
smallest c o n fe rence rooms to the largest board ro o m s , you will find more Po lycom
c o n fe re n c i n g products in more places than all of our competitors combined.
And now we ’ve designed SoundPoint Pro for yo u , with the same proven tech n o l ogy and
high-quality standards that has made us the most widely used conferencing product
line in the World.
The Quick Setup Guide enclosed will have you up and running right away. The Quick
Reference Guide p rovides a summary of the most commonly used fe at u re s , i n cluding a
d e s c ription of the functionality of each key on the phone. Detailed information about
features and using your SoundPoint Pro is available in this User’s Guide.
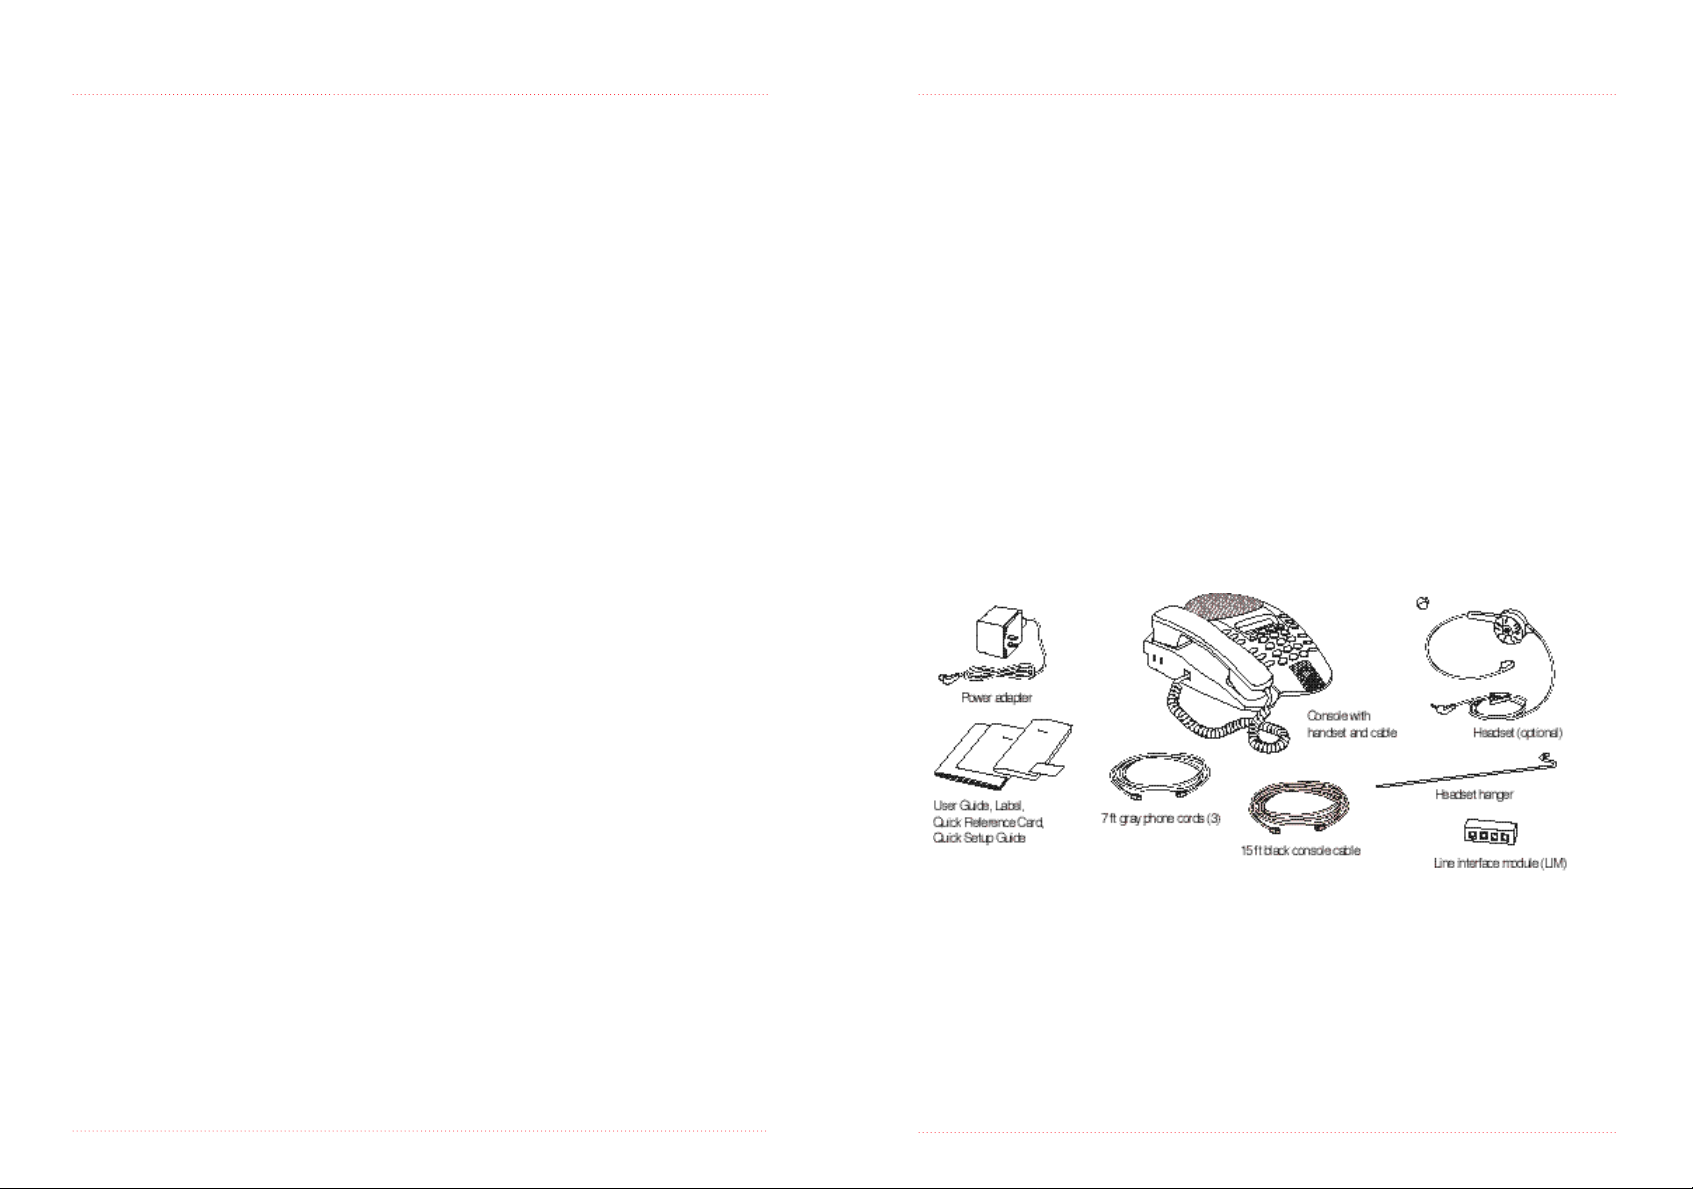
The following items are included in your SoundPoint Pro. Check the list before
installation to assure that all items are accounted for. If you are missing any items,
contact your SoundPoint Pro distributor.
1. Quick Setup Guide
2. SoundPoint Pro console
3. Handset and Handset cord
4. Power adapter
5. Line Interface Module (LIM)
6. (3) 7 ft Gray Phone Cords
7. (1) 15 ft Black Console Phone Cable
8. Label (Quick Reference Numbers)
9. User Guide
10.Quick Reference Card
11.Headset Hanger
1 –2 GETTING STA RT E D
GETTING STA RTED 1 –3
Page 4
Installation
Installation
Installation of SoundPoint Pro is easy. Refer to the Quick Installation Sheet that came
with your phone, or follow the directions below.
Preparing for Installation
Preparing to install your phone includes deciding where you want to install the phone,
locating the power outlet closest to your phone, locating your existing telephone wall
j a ck(s) in your home or offi c e, and determining how your telephone lines are confi g u re d
with your telephone jacks. Three examples are shown, with 3 different configurations
of wall jack(s).
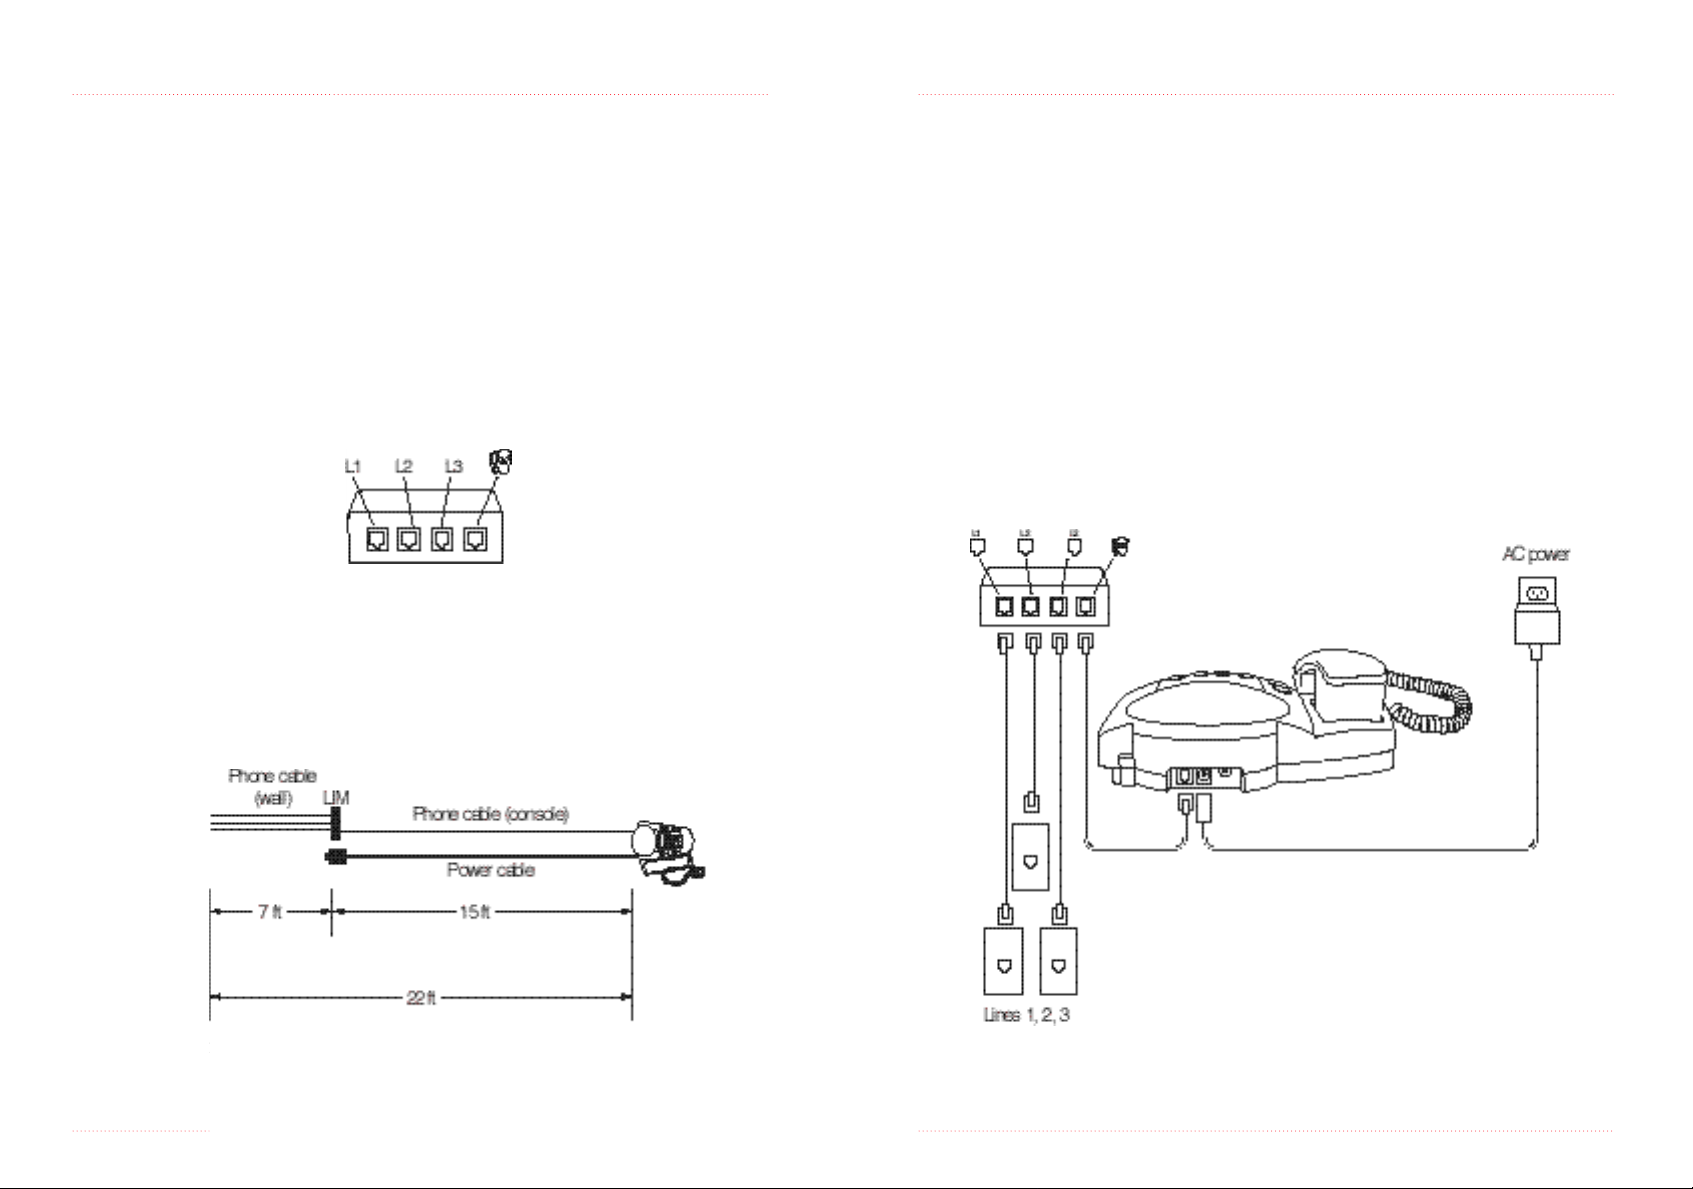
S o u n d Point Pro ’s Line Interface Module (LIM) allows you to connect multiple telep h o n e
lines to SoundPoint Pro, with only one cable connecting to the console.
Note: If one or more
of your telephone lines
are terminated on one
telephone cable, you
may wish to connect
the console cable
directly to the single
telephone jack, without
using the LIM (see
Setup 2).
The following diagram shows the standard cable lengths to help you plan your
configuration. If you require longer cables, you can find them at most hardware and
electronics stores.
Installing the Phone
Setup 1 - Three lines, three jacks.
1. Plug one end of a gray telephone cord into the wall jack and the other end into
line port L1 of the LIM.
2. Repeat step 1 for lines 2 and 3:
▼ For line 2, connect a second wall jack to port L2 of the LIM.
▼ For line 3, connect a third wall jack to port L3 of the LIM.
3. Connect one end of the SoundPoint Pro black console telephone line to the LIM
and the other end to the console.
4. Connect the Power Adapter cord to the SoundPoint Pro console, and plug the
power brick into the electrical outlet.
Note: All telephone
cables are 6-wire RJ11.
1 –4 GETTING STA RT E D
GETTING STA RTED 1 –5
Page 5
Installation
Installation
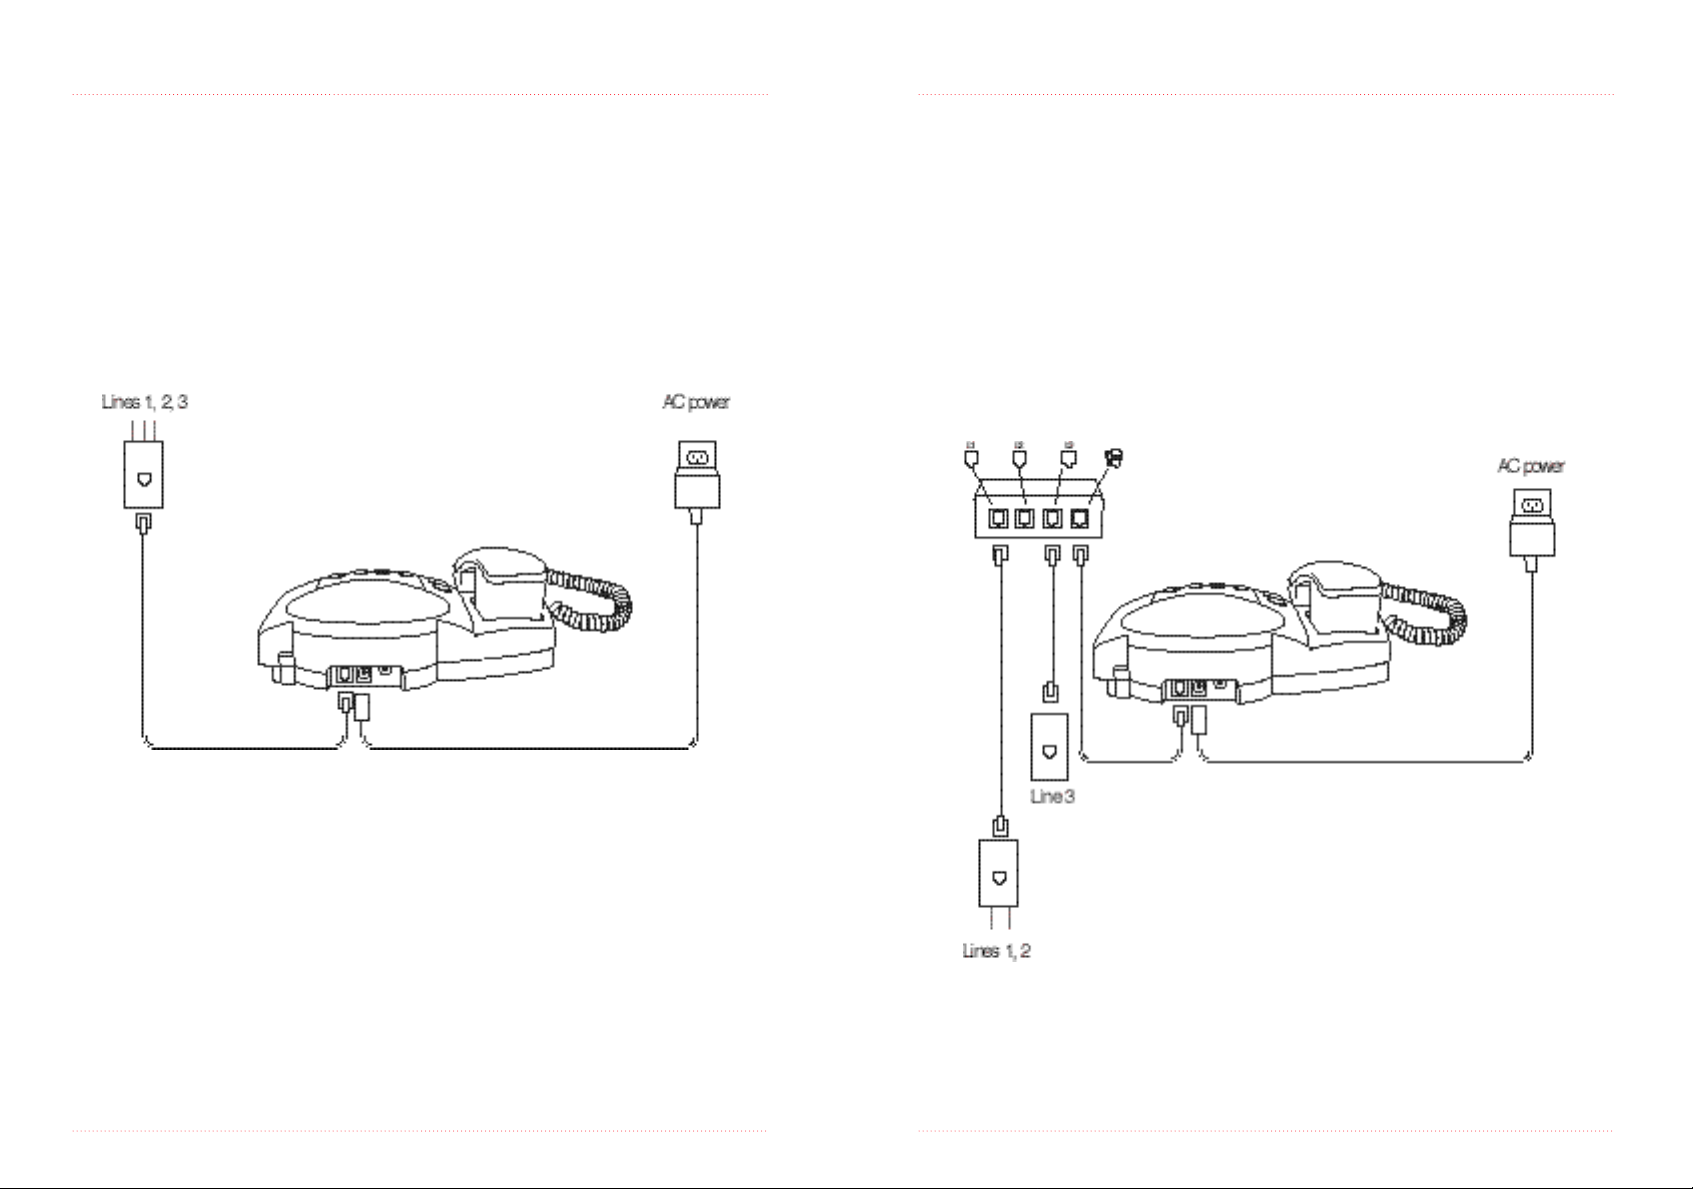
Setup 2 - One or more lines, one phone jack.
1. Plug one end of the bl a ck console cable into the wall jack and the other end dire c t ly
into the console.
2. Connect the Power Adapter cord to the telephone console, and plug the power
brick into the electrical outlet.
Setup 3 - Two lines on one jack, single line on another
1. Plug one end of a gray telephone cord (for both lines 1 and 2) into a wall jack and
the other end into line port L1 of the LIM.
2. Plug one end of a gray telephone cord for line 3 into the wall jack and the other
end into line port L3 of the LIM.
3. Connect one end of the SoundPoint Pro black console telephone line to the LIM
and the other end to the console.
4. Connect the Power A d apter cord to the telephone console, and plug the power bri ck
into the electrical outlet.
1 –6 GETTING STA RT E D
GETTING STA RTED 1 –7
Page 6
Installation
Installation
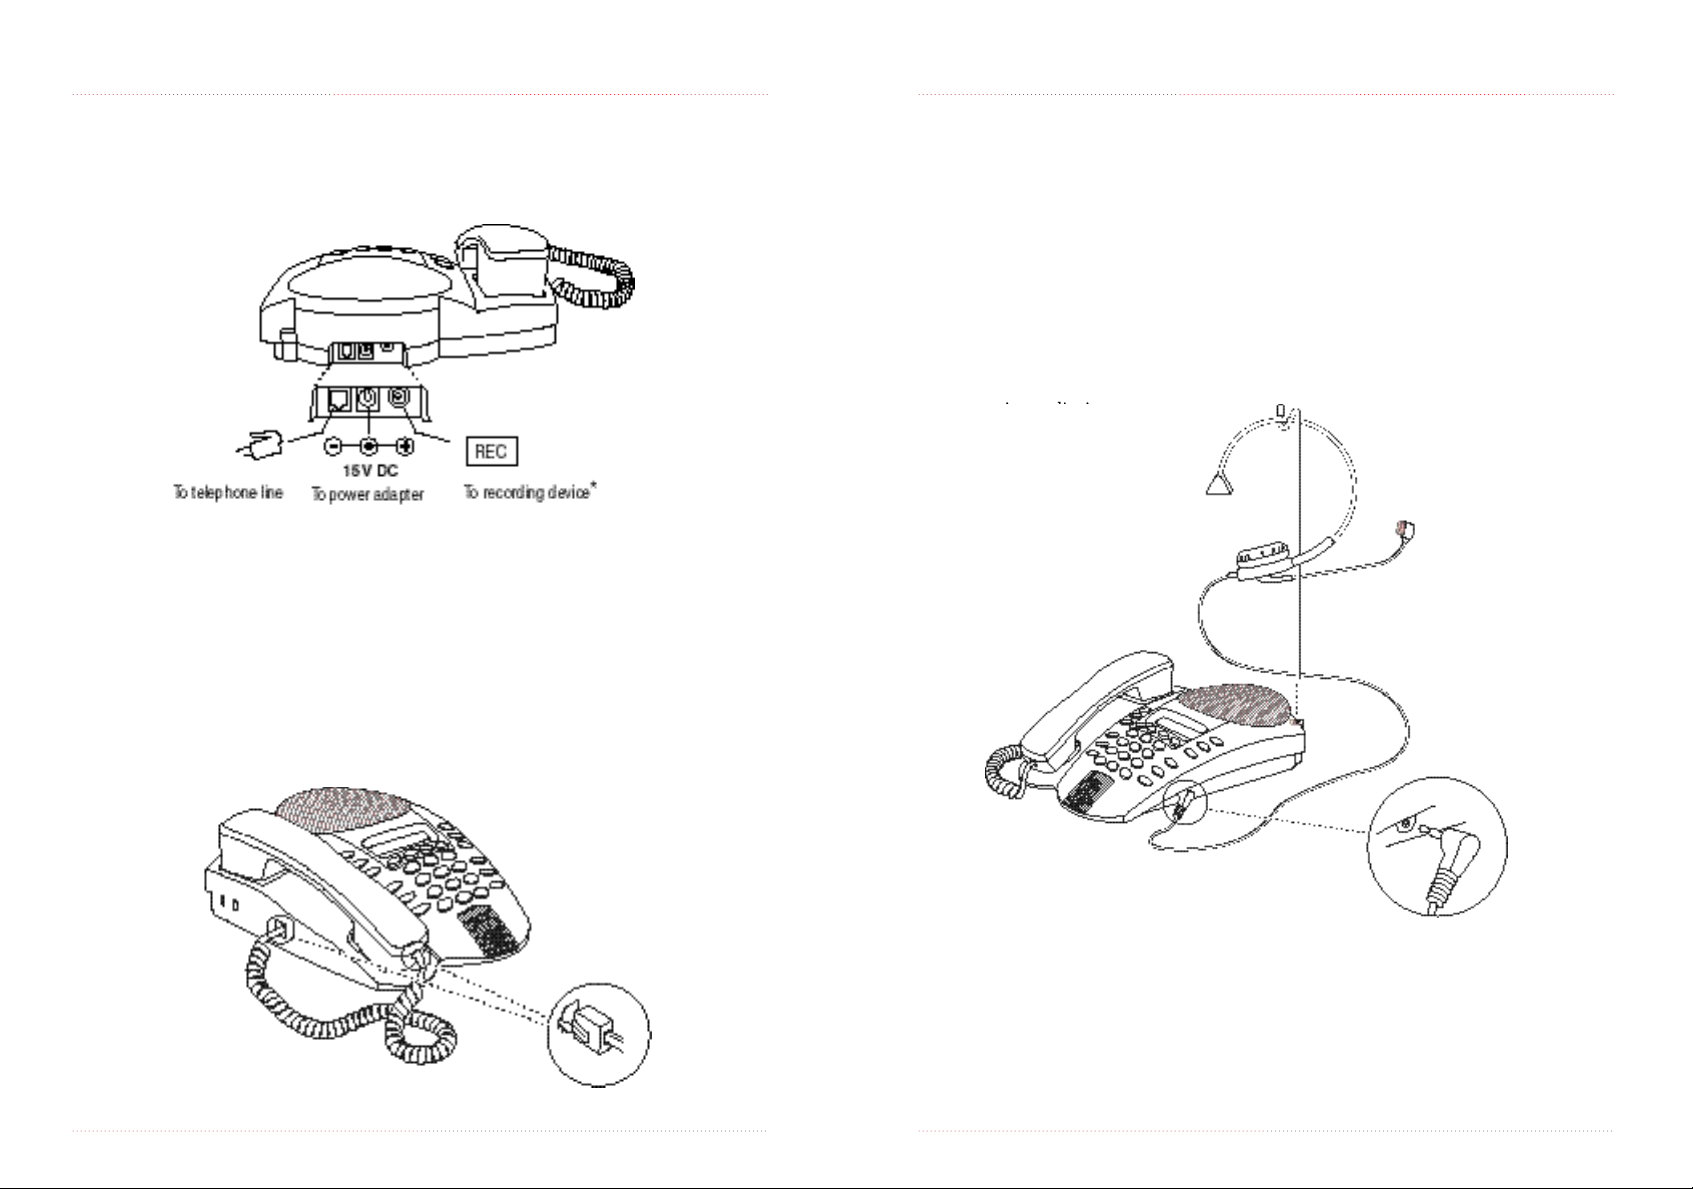
Connections for Phone, Power, Headset,
and Tape Recorder
Phone and Power Connections
Note: Plug one end of
*
an RCA-type connector
into the jack on a tape
recorder unit labeled
AUX IN and the other
end into the recording
device connector on
SoundPoint Pro.
Headset Connection (Headset purchased separately)
2.5mm (standard) headsets plug into the jack at the right front of the console. No
amplifier is required for headsets with a 2.5mm stereo interface cable.
Headsets that connect to a handset port require their own audio amplifier installed
according to directions from the manufacturer. The H E A D S E T activation key on the
console will not work with headsets connected to the Handset port.
Hanger
To keep the headset out of the way when not in use, insert the hanger into the opening
at the right rear of the console.
Note: See Appendix A
for information about
headsets.
Handset Connection
1 –8 GETTING STA RT E D
GETTING STA RTED 1 –9
Page 7
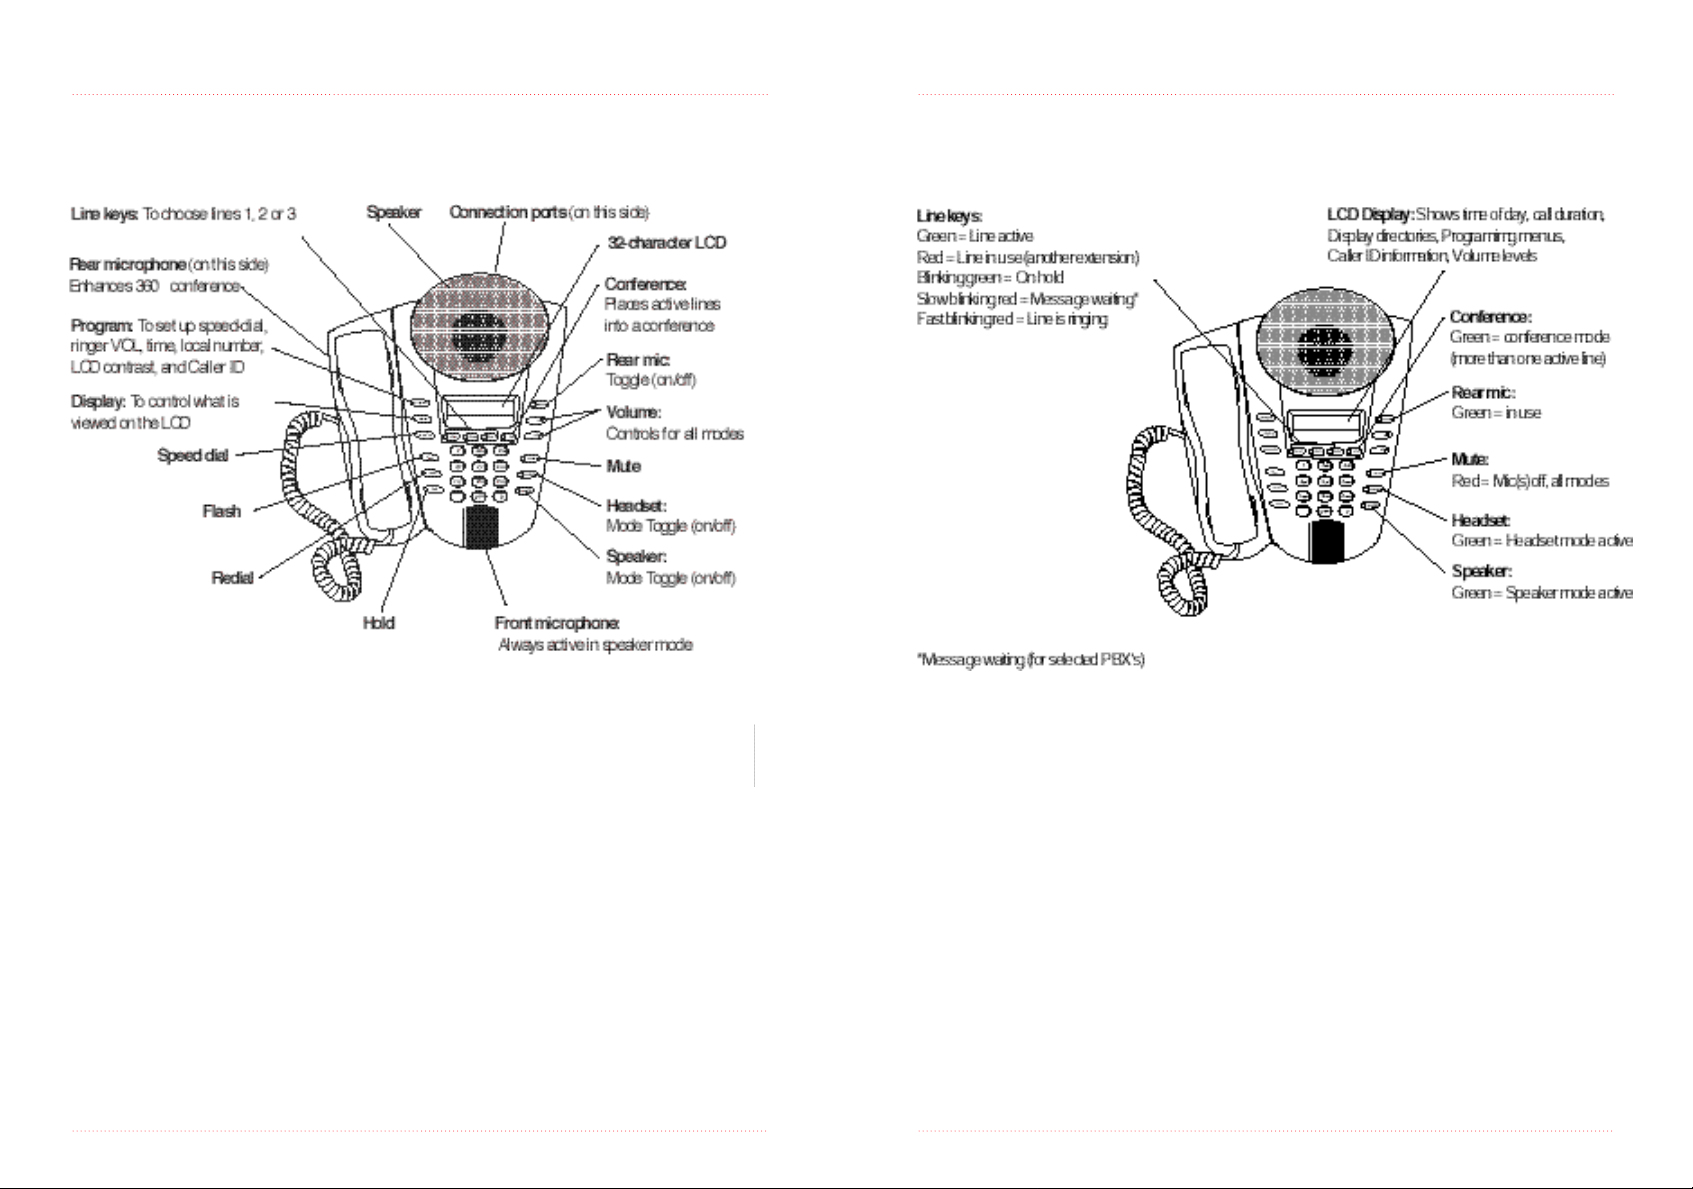
Keys and Operational Features
Visual Indicators
Keys/Features
°
LEDs and LCD
1 –1 0 GETTING STA RT E D
GETTING STA RTED 1 –1 1
Page 8
SoundPoint Pro Operation
Chapter 2
1 –1 2 GETTING STA RT E D
Page 9

Making Calls, Answering Calls, Hanging Up
Making Calls, Answering Calls, Hanging Up
Operation Tips for Using the Line Keys
Tip 1: When a LINE key is pressed while another line is active (but not on Hold), the
line that was active will disconnect automatically. Place active line(s) on Hold
prior to activating another line.
Tip 2: When the CONFERENCE key is pressed all active lines and lines on Hold are
linked in the conference.
Tip 3: When the HOLD key is pressed, all active lines are placed on Hold. Inactive
lines remain inactive.
Tip 4: If no LINE key is selected, SoundPoint Pro defaults to the Primary Line.
(See programming for setting Primary Line.)
Tip 5: If SoundPoint Pro is hung up (placed on-hook in any mode, or an active line
key is pressed), active lines are disconnected, but lines on Hold remain on Hold.
(You must hang up any lines on Hold, or they will continue holding.)
Making Calls Answering Calls Hanging Up
Handset Pick up the handset; Pick up the handset Hang up (replace)
listen for the dial tone. the receiver
Headset Put on headset, press Press the HEADSET key Press the HEADSET
the HEADSET key, and on the console (make key.
listen for the dial tone. sure our headset is
on first!)
Changing Modes
To switch between modes at any time during a call
From To Action
Handset Speaker Press SPEAKER key; hang up handset
Handset Headset Press HEADSET key; hang up handset
Headset Speaker Press SPEAKER key
Headset Handset Pick up handset
Speaker Handset Pick up handset
Speaker Headset Press HEADSET key
More on Making Calls
Selecting a line
Pressing a LINE key under the LCD screen will activate that line for the mode you are
currently using: handset, speaker, or headset. If no mode is selected, pressing a LINE
key will cause that line to go active in Speaker mode by default.
The green LED on the LINE key indicates that it is in use.
IMPORTANT: As a rule, once a line is activated it must be placed on Hold prior to
activating another LINEkey, or that line will be disconnected.
Speaker Press the SPEAKER key; Press the SPEAKER key Press the SPEAKER
listen for the dial tone. on the console. key.
Notes Pressing a LINE key will Pressing a LINE key Pressing a LINE key
activate the phone in for a line that is ringing for an active line
Speaker Mode for will cause the phone to will hang up the
that line. go off-hook in Speaker line as well.
Mode for that line.
2 –2 O P E R AT I O N
O P E R ATION 2 –3
Page 10

Making Calls, Answering Calls, Hanging Up
Speaker Mode
More on Answering Calls
SoundPoint Pro will automatically select the ringing line when you answer. It is not
necessary to select the ringing line first.
Answering when more than one incoming line is ringing
The line that is engaged first will ring and the red LED will blink. The second line’s
LED will blink, but no audible ring will be heard.
When the phone is answered, preference will be given to the primary line. If no
primary line has been programmed, the lowest-numbered line will be selected first
(i.e. line 1 before line 2).
Second calls on an inactive line
If you are already engaged in a call and another call comes in on a line you are not
using, you will be prompted with a low volume ring, and the LED indicator for the
incoming line will blink. If you subscribe to Caller ID on call waiting, SoundPoint
Pro will display Caller ID information for the incoming call. To answer the call:
Place your call on hold with the H O L D key, then press the L I N E key with the red bl i n k i n g
LED (ringing), and begin speaking.
Microphones
S o u n d Point Pro has two microphones. The rear microphone is activated from the key pad
to maximize microphone coverage for group conferences. When it is not activated,
SoundPoint Pro is optimized for individual use with the front microphone.
When using Speaker Mode individually, turning off the rear microphone reduces
background noise.
Individual Mode
The rear microphone is off, and audio pickup and quality are optimized for 180°.
2 –4 O P E R AT I O N
Group Conference Mode
The rear microphone is activated for
360° coverage.
O P E R ATION 2 –5
Page 11

Headset Mode
Conference Mode
Activation
Pressing the HEADSET key on the console activates Headset Mode. The VOL keys
adjust the headset volume.
Lines
The LINE keys and CONFERENCE key located below the LCD screen control your
conference. Calls can be initiated by:
1. Placing outbound call(s)
2. Receiving inbound call(s)
3. A combination of inbound and outbound call(s)
Operations
Initiating a Conference Call
Pressing the CONFERENCE key when lines are active establishes a conference in all
modes—Speaker, Handset, or Headset. (Pressing CONFERENCE takes callers off Hold
and brings them into the conference.)
Example: Setting up 3-way or 4-way conference calls (Conference Bridge)
1. Press LINE 1 and dial the number of the first conference participant. When the
party answers, ask him to hold while you add the other participants. Press the
HOLD key.
2. Press LINE 2 and dial the number of the second participant. When the party
answers, ask him to hold while you add the last participant. Press the HOLD key.
3. Press LINE 3 and dial the number of the third participant. When the party answers,
tell him he is being added to the conference.
4. Press the CONFERENCE key.All participants are now in the conference.
2 –6 O P E R AT I O N
O P E R ATION 2 –7
Page 12

Conference Mode
Volume Control
Adding a Caller on an Inactive Line
Incoming Call
1. When a new call comes in, ask active participant(s) to hold. Press the HOLD key.
2. Press the LINE key for the incoming call, to answer the call.
3. Tell the incoming caller you will add him to the conference.
4. Press the CONFERENCE key.
Outgoing Call
1. Ask the active participant(s) to hold while you call another participant. Press the
HOLD key.
2. Press an inactive LINE key, and dial the number of the person you wish to add.
3. When the party answers, tell him he is being added to the conference.
4. Press the CONFERENCE key.
Conference on Hold
To put a conference call on hold, press the HOLD key. Participants will not be able to
talk to each other. Press CONFERENCE to return to the conversation.
Dropping a participant
Press the LINE key of the participant you wish to drop from the call.
Services of a Telephone Service Provider
When you use a telephone service to set up a conference call, the FLASH key connects
each participant. Until all participants are connected, no one can use the line.
Handset, Headset, Speaker
Press the VOL keys at any time during a call to adjust volume. SoundPoint Pro will
store the volume level until changed.
Dial Tone
Listen for the dial tone; press the VOL keys to adjust the level. Then hang up or
make a call.
2 –8 O P E R AT I O N
O P E R ATION 2 –9
Page 13

Directory Screens
Displays and Directories
The DISPLAY key cycles through the default LCD display and 3 directories in both
active and standby modes. The displays show:
Speed Dial SPDL
Call History CALL
Local Phone Number(s) TEL#
Default LCD shows time
To setup information in a directory, press the PROGRAM key and follow the screen
p ro m p t s , or read instructions in this User Guide under Progra m m i n g. During progra m m i n g,
p ressing the D I S P L AY key will re t u rn you to the default display and ab o rt progra m m i n g.
Speed Dial Directory
Pressing the DISPLAYkey once will display:
Use the VOL keys to scroll through the speed dial numbers, or if you know the
two-digit speed dial number you wish to dial, enter the two-digit number. When you
have located or entered the desired speed dial number, press the SPEED DIAL key.
Entering the first digit of a two-digit number in the prompt displays that digit and a
prompt for the second digit.
To change an entry in the Speed Dial directory, press PROGRAM, and follow the
screen prompts or read the instructions under Programming.
2 –1 0 O P E R AT I O N
Call History Director y
If you subscribe to a Caller ID service, the Call History directory displays the last 99
Caller ID entries of callers who have called you.
Pressing the DISPLAY key twice will display:
O P E R ATION 2 –1 1
Page 14

Displays and Directories
Displays and Directories
The Call History directory operates in the same manner as the Speed Dial Directory,
with entries ranging from 01-99. Use the VOL keys, or enter a two-digit number, to
view caller information.
When viewing the entries in the Call History Directory, the name of the caller will be
d i s p l ayed on the top line of the LCD display, with the bottom line of the LCD show i n g
(1) the line number upon which the call was received, (2) date, and (3) time the call
was received.
Viewing Phone Numbers in the Call History Director y
To view the phone number for a Call History entry, press the # key once.
Dialing Phone Numbers in the Call History Directory via
Speed Dial
Ty p i c a l ly, phone number strings are stored in the call history dire c t o ry in 10-digit fo rm at ,
exactly as they appear in the Caller ID information sent over the telephone line by the
Phone Company (i.e. with a 3-digit area code and 7-digit phone number). However,
for the 10-digit Caller ID number to be dialed:
1. The 3-digit area code must be removed for local calls, or
2. A “1” must be added to the string for long distance calls
SoundPoint Pro allows you to do both easily.
Follow These Steps to Dial a Number Stored in the
Call History Director y
1. Locate the person/entry in the call history directory you wish to call.
2. Press the # key once to display the 10-digit phone number string.
3. Press the # key once again to remove the area code (local number) or, press the
# key twice to add a “1” in front of the area code (long distance).
4. Press the speed dial key.
5. Select the Speed Dial entry you wish to program using VOL OR 01-20
6. Press the PROGRAM key. When you see the Caller ID number, press PROGRAM to
enter it into the Speed Dial directory. When the Caller ID name appears, Press
PROGRAM again.
Local Phone Number Director y
Pressing the DISPLAY key 3 times will display:
The local number directory displays the local phone numbers for your home or office,
which can be entered via the local number programming menu. Use the VOL keys or
enter 1-3 to view the local number entries. When the line is active, that local number
will be shown on the bottom of your LCD display.
Programming Call History Entries into Speed Dial Director y
1. Locate the call history entry you wish to program as a Speed Dial entry.
2. Press # to display the 10-digit phone number string.
3. Press the # key once again to remove the area code (local number) or, press the
# key twice to add a “1” in front of the area code (long distance).
4. Press the PROGRAM key to display Speed Dial programming.
2 –1 2 O P E R AT I O N
O P E R ATION 2 –1 3
Page 15

Programming
Programming
Options and General Techniques
Pressing the PROGRAM key in Standby Mode will bring up the following options in
this order:
1. Speed Dial phone numbers (20)
2. Ring Volume (can be programmed differently for each line)
3. Time of day
4. Telephone numbers (home/office—local number of each line can be displayed)
5. LCD Contrast
6. Primary Line selection
7. Caller ID On/Off (for each line)
Sequence for Entering Choices
1. Press the PROGRAM key to advance through the 7 options.
2. Respond to the prompts on the LCD screen for the option you wish to program.
3. To enter your options and advance to the next step, press the PROGRAM key.
4. When all programming options are entered, press PROGRAM to save and exit.
Note: Pressing the
DISPLAY key at any time
during the PROGRAM
process, will exit you
from the Program Mode
without saving any
data.
Programming Basics for Speed Dial Numbers
SoundPoint Pro allows you to have 20 speed dial numbers, from 01-20. Entries can
have up to 23 digits for the telephone number, and 8 characters for the name. Speed
Dial numbers can also be imported from the Call History directory (see page 2-12).
To set up a Speed Dial number, press PROGRAM to bring up the Speed Dial directory
screen, then:
1. Enter a number from 01-20 (must be 2 digits).
2. Enter the telephone number to be dialed.
3. Enter a name to associate with the speed dial number.
Programming Speed Dial Numbers
Pressing the PROGRAM key once will display:
Locate the Speed Dial number you wish to program by using the VOL keys, or
entering a 2-digit Speed Dial number from 01-20. If the Speed Dial entry you select
has been previously programmed, the number and name will be displayed.
Press PROGRAM. You will then see the following display (example).
Note: Any previously
stored number will
appear on the botton
line.
Enter the Speed Dial telephone number.After the last digit is entered, press the
PROGRAM key to save the entry.
Note: You can enter a
2-second pause, which
will appear as a space
on the LCD, by pre s s i n g
the HOLD key.
2 –1 4 O P E R AT I O N
O P E R ATION 2 –1 5
Page 16

Programming
Programming
After the Speed Dial telephone number is entere d, the LCD screen will display (ex a m p l e ) :
Enter the 8 characters for the Speed Dial name using keys 2-9,
Note: Use *for
entering spaces,
or # for entering
hyphens, if desired.
When a number 2-9 is pressed, the alphabetic characters associated with that number
are displayed on the LCD with the first character flashing.
Pressing the same key again cycles through the characters associated with that k ey, in
order.
When the first letter of the name you wish to enter is flashing, press PROGRAM to
enter the letter. Press the next key 2-9 to locate the next letter in the name using the
same method. When the next desired letter is flashing, press PROGRAM again. Repeat
for all the letters. When up to 8 characters of the desired name appear on the LCD
screen, press PROGRAM twice to save the entry.
Ring Volume
Press the PROGRAM key until you see:
1. Select line 1, 2, or 3 on the k ey pad (Selecting a LINE key under the LCD screen
will abort programming and make the selected line active).
2. When the Ring Volume bar is displaye d,use the V O L keys to adjust the audible ri n g.
3. Press the PROGRAM key to save and exit.
Repeat this process as desired for other lines.
Time of Day
Press the PROGRAM key until you see:
2 –1 6 O P E R AT I O N
1. Enter the correct time.
2. Press the Program key again to save and exit.
O P E R ATION 2 –1 7
Page 17

Programming
Programming
Telephone Number
Press the PROGRAM key until you see:
1. Select line 1, 2, or 3 on the k ey pad. (Selecting a LINE key under the LCD screen
will abort programming and make the selected line active). Any previously
programmed number will be displayed.
2. Enter the phone number
3. Press the PROGRAM key again to save and exit.
Repeat this process as desired for other lines.
LCD Contrast
Press the PROGRAM key until you see:
Primary Line
Press the PROGRAM key until you see:
1. Enter the line number you wish to be your Primary Line.
2. Press the PROGRAM key again to save and exit.
Caller ID On/Off
Press the PROGRAM key until you see:
1. Use the VOL keys to adjust the LCD to the desired contrast.
2. Press the PROGRAM key again to save and exit.
LCD Contrast actually adjusts the optimal view angle for the LCD, depending on your
juxtaposition to the LCD. Experiment with raising and lowering your eye level while
adjusting the LCD, until you find the optimal setting.
2 –1 8 O P E R AT I O N
1. Caller ID defaults to On, press *to turn it Off, or # to turn it On.
Note: If you do not
have Caller ID services
on the line, turning
Caller ID Off will
eliminate the message
“NO CALLER ID
MSG” on your LED
display.
2. Press the PROGRAM key again to save and exit.
O P E R ATION 2 –1 9
Page 18

SoundPoint Pro Troubleshooting
Chapter 3
2 –2 0 O P E R AT I O N
Page 19

Troubleshooting
Troubleshooting
Troubleshooting will help you overcome difficulties occurring during installation and
normal use.
No Dial Tone
1. Check the connections of the telephone lines to the LIM, and make sure that the
connections are secure at both the wall jack, and on the LIM. Repeat the process
for the telephone connection from the LIM to the console, and make sure both
ends of the console cable are securely plugged in.
2. Make sure the power cable is connected to the console, and the power adapter is
plugged securely into a working wall outlet or power strip.
3. If you are not receiving dial tone on a headset, but you can hear dial tone on the
handset and speaker, make sure the 2.5mm connector is plugged securely into the
headset jack on the console.
4. Try a different phone line.
In Speaker Mode: Short Silences, Echoes,
or Clipped Speech
▼ At the beginning of a call, allow someone at each location to speak in turn for a
few moments, to enable SoundPoint Pro to adapt to its environment.
▼ Don’t move the SoundPoint Pro console when it is in use.
▼ Do not cover or bl o ck the microphone(s) with hands, p ap e rs , c u p s , e t c. during use.
You Can’t Hear
Use the VOL keys to adjust the volume of the handset, headset, or speaker.
Your Caller Can’t Hear You
1. If using the handset, check the handset cord connections.
2. Be sure that the phone is not on Mute, as indicated by the lit LED on the M U T E key.
3. If using a headset, check the connection to the console and make sure that the
microphone is properly positioned in front of your mouth.
4. If using the speaker, and the listener is having trouble hearing participants seated
behind the phone, activate the rear microphone.
Blank Display
▼ Check that the power adapter is plugged into a working outlet, and the power plug
is securely plugged into the console.
Physical Damage
▼ If physical damage is severe enough that the internal parts become visible,
disconnect SoundPoint Pro immediately. Do not reconnect it to the network until
SoundPoint Pro has been repaired.
▼ If you need more help, call your dealer, or call Polycom Technical Support
at: 1-800-451-0995.
Difficulty for You and The Other Party
to Hear Each Other
▼ Noisy equipment, such as a copy machine, may make it difficult for you to hear
the other party. Both parties should turn off any noisy equipment.
▼ Try calling again to see if another line provides a better connection.
▼ Check that the power adapter is plugged into a working outlet, and the power
plug is securely plugged into the console.
3 –2 T R O U B L E S H O O T I N G
TROUBLESHOOTING 3 –3
Page 20

SoundPoint Pro Safety, Regulatory and Warranty
Chapter 4
3 –4 T R O U B L E S H O O T I N G
Page 21

Safety, Regulatory and Warranty
Safety, Regulatory and Warranty
Intended Use
Important Safeguards
Before operating this product, please read the entire manual thoroughly. The
SoundPoint Pro was designed, built and tested for use indoors using Polycom brand
accessories and peripherals and nominal local voltages. The use of other equipment
with this product, outdoor operation or different voltages has not been tested and
could damage it or peripheral equipment and/or create a potentially unsafe operating
condition.
1. Read and understand all instructions before using. Pay particular attention to areas
labeled as Warnings or Cautions.
▼ Warning - Indicates a potentially hazardous situation which, if not avoided,
could result in death or injury.
▼ Caution - Indicates a potentially hazardous situation which , if not avoided,
could result in minor or moderate injury. It may also be used to alert against
unsafe practices.
2. Close supervision is necessary when any equipment is used by or near children.
3. Do not operate this product with a damaged cord or if it has been dropped or
damaged - until it has been examined by a qualified service technician.
4. Position the cord so that it will not be tripped over, pulled or contact hot surfaces.
5. If an extension cord is necessary, a cord with a current rating at least equal to that
of the product should be used. Cords rated for less amperage than the product may
overheat.
6. To reduce the risk of electric shock, do not immerse this product in water or other
liquids.
7. To reduce the risk of electric shock, do not disassemble this product. Take it to a
qualified technician when service or repair work is required. Incorrect reassembly
can cause electric shock.
8. The use of an accessory attachment not recommended by the manufacturer may
cause a risk of fire, electric shock or injury.
9. Keep ventilation openings free of any obstructions.
10.Do not place this product on an unstable cart, stand or table. Doing so may cause
the product to fall, causing serious damage.
11.If this product does not operate normally, see “In Case of Difficulty” on page 1-5.
12.Do not overload wall outlets and extension cords as this can result in increased
risk of fire or electric shock.
13.Do not disassemble this product, but return to Polycom Certified Service Center
when service or repair is required.
14. Avoid using this product during an electrical storm. There may be a remote risk of
electric shock from lightening.
15.Do not use a telephone in the vicinity of a gas leak.
Save these Instructions
The information contained in this manual will help you operate and maintain your
SoundPoint Pro.
FCC Rules
This equipment complies with Part 68 of the FCC Rules. On the bottom of the base of
this equipment is a label that contains, among other information, the FCC Registration
Number and Ringer Equivalence Number (REN) for the equipment. You must, upon
request, provide this information to your telephone company. (Note: REN is not
required for some types of analog or digital facilities.)
This equipment uses an RJ11.
An FCC compliance telephone cord and modular plug is provided with this equip-
ment. This equipment is designed to be connected to the telephone network or premises wiring using a compatible modular jack which is Part 68 compliant. See installation
instructions for details.
The REN is useful to determine the quantity of devices you may connect to your telephone line and still have all those devices ring when your telephone number is called.
In most, but not all areas, the sum of the REN’s of all devices connected to one line
should not exceed five (5). To be certain of the number of devices you may connect to
your line, as determined by the REN, you should contact your local telephone company to determine the maximum REN for your calling area. (NOTE: REN are associat-
ed with loop-start and ground-start ports. Do not use for E&M or digital ports.)
If your telephone equipment causes harm to the telephone network, the Telephone
Company may discontinue your service temporarily. If possible, they will notify you
in advance. But if advance notice is not practical, you will be notified as soon as possible. You will be informed of your right to file a complaint with the FCC.
Your telephone company may make changes in its facilities, equipment, operations or
procedures that could affect the proper functioning of your equipment. If they do,
you will be notified in advance to give you an opportunity to maintain uninterrupted
telephone service.
4 –2 SAFETY AND REGULAT I O N S
SAFETY AND REGULATIONS 4 –3
Page 22

Safety, Regulatory and Warranty
Safety, Regulatory and Warranty
If you experience trouble with the SoundPoint Pro, please contact Polycom for
information on obtaining service or repairs. The telephone company may ask that you
disconnect this equipment from the network until the problem has been corrected or
until you are sure that the equipment is not malfunctioning.
No user serviceable parts are contained in this equipment.
This equipment may not be used for coin service provided by the telephone company.
Connection to party lines is subject to state tariffs (contact the state public utility
commission, or corporation for information).
Canadian Department of
Communication Notice
N o t i c e : The Canadian Dep a rtment of Commu n i c ations (DOC) label identifies cert i fi e d
equipment. This cert i fi c ation means that the equipment meets certain telecommu n i c at i o n
network protective, operational and safety requirements. The department does not
guarantee the equipment will operate to the user’s satisfaction.
B e fo re installing this equipment make sure you are permitted to connect it to the fa c i l i t i e s
of the local telecommunications company. You must install the equipment using an
acceptable method of connection. In some cases you may also extend the company’s
inside wiring for single line individual service by means of cert i fied connector assembly
(telephone extension cord). You should be aware, however, that compliance with the
above condition may not prevent degradation of service in some situations.
R ep a i rs to cert i fied equipment should be made by an authori zed Canadian maintenance
facility designed by the supplier.Any repairs or alterations made by a user to this
e q u i p m e n t , or equipment malfunctions,m ay give the telephone commu n i c ations company
cause to request the user to disconnect the equipment.
For your own protection, make sure that the electrical ground connections of the
power utility, telephone lines and internal metallic water pipe system, if present, are
connected together. This precaution may be particularly important in rural areas.
Caution: Do not attempt to make electrical ground connections yourself, contact the
appropriate electric inspection authority or an electrician.
N o t i c e : The load number (LN) assigned to each terminal device denotes the perc e n t age
of the total load to be connected to the telephone loop used by the device to prevent
overloading. The termination on a loop may consist of any combination of devices,
subject to the requirement that the total of the load numbers of all the devices does
not exceed 100.
Polycom Limited Warranty and
Limitation of Liability
Polycom warrants you, the customer, that your system will be in good working order
on the date Polycom or its authorized reseller delivers or installs the system, whichever is later (“Warranty Date”). If you notify Polycom or its Authorized Dealer within
one year of the Warranty Date that your system is not in good working order, Polycom
will, without charge to you, repair or replace, at its option, the system components
that are not in good working order. Repair or replacement parts may be new or
refurbished and will be provided on an exchange basis. If Polycom determines that
your system cannot be repaired or replaced, Polycom will remove the system and, at
your option, refund the purchase price of your system or apply the purchase price
towards the purchase of another Polycom system. If you purchased your system
directly from Polycom, Polycom will perform warranty repair in accordance with the
terms and conditions of the specific type of Polycom maintenance coverage you
selected. A written explanation of Polycom’s types of maintenance coverage may be
obtained from Polycom by calling 1.800.451.0995 (in the continental U.S. only). If
you purchased your system from an Polycom Authorized Dealer, contact your reseller
for the details of the maintenance plan applicable to your system.
This Polycom limited warranty covers damage to the system caused by power surges.
Unless otherwise expressly agreed to in a written agreement signed by Polycom,
Polycom will not be responsible under this limited warranty for damages resulting
from:
▼ Failure to follow Polycom’s installation, operation, or maintenance instructions.
▼ Unauthorized system modification, movement, or alteration.
▼ Unauthorized use of common carrier communication services accessed
through the system.
▼ Abuse, misuse, negligent acts or omissions of the customer and persons under
the customer’s control; or
▼ Acts of third parties and acts of God.
Polycom’s obligation to repair, replace, or refund, as set forth above, is your exclusive
remedy.
Except as specifically set forth above, Polycom, its affiliates, suppliers, and dealers
make no warranties, express or implied, and specifically disclaim any warranties of
merchantability or fitness for a particular purpose.
4 –4 SAFETY AND REGULAT I O N S
SAFETY AND REGULATIONS 4 –5
Page 23

Safety, Regulatory and Warranty
Limitation of Liability
Except as provided below, the liability of Polycom and its affiliates and suppliers for
any claims, losses, damages, or expenses from any cause whatsoever (including acts
or omissions of third parties), regardless of the form of action, whether in contract,
tort, or otherwise, shall not exceed the lessor of: (1) the direct damages proven; or (2)
the repair cost, replacement cost, license fee, annual rental charge, or purchase price,
as the case may be, of the equipment that gives rise to the claim. Except as provided
below, Polycom and its affiliates and suppliers shall not be liable for any incidental,
special, reliance, consequential, or indirect loss or damage incurred in connection with
the equipment. As used in this paragraph, consequential damages include, but are not
limited to, the fo l l ow i n g : lost pro fi t s , lost reve nu e s , and losses arising out of unauthori ze d
use (or ch a rges for such use) of common carrier telecommu n i c ations services or fa c i l i t i e s
accessed through or connected to the equipment. For personal injury caused by
Po ly c o m ’s neg l i ge n c e, Po ly c o m ’s liability shall be limited to proven damages to pers o n .
No action or proceeding against Po lycom or its affi l i ates or suppliers may be
commenced more than twenty-four (24) months after the cause of action accrues.
THIS PARAGRAPH SHALL SURVIVE FAILURE OF AN EXCLUSIVE REMEDY.
SoundPoint Pro Appendix
Chapter 5
4 –6 SAFETY AND REGULAT I O N S
Page 24

Appendix
Appendix
Three Basic Types of Headsets
Binaural Headsets
B i n a u ral headsets are held on by a “ h e a d b a n d ” and provide sound
t o , and cove rs , both ears. This usually blocks out
background noise better than the other types.
Monaural Headsets
Monaural headsets are also held in place by a headband, but
c over just one ear. The single earpiece can sit in the ear, a c t u a l ly
fitting into the ear canal with a microphone at t a ch e d, or another
style fits outside the ear, and uses an earpad, or “leatherette”.
“In-The-Ear” Headsets
“In-the-ear” headsets actually fit in, or over the ear, or grasp the
ear itself to stay in place. These headsets are popular with people who would like to avoid the adverse effects of the other
types of headsets on hairstyles, etc.
Headset Selection
If you are interested in purchasing a headset, you should decide which type is best for
you (above), and also base your decision on:
Sound Quality
Some headset manufacturers use noise reduction technology to enhance sound quality.
Like high-quality conferencing equipment, good sound quality on a headset can
improve productivity, and the make daily business communications more enjoyable.
Comfort/Wearability
Headsets are traditionally worn by people who are on the phone a lot, so choosing one
that’s comfortable, and stays that way, makes a big difference. Make sure that the
headset you chose is comfortable to wear, and maintains its shape when it’s not on
your head.
Durability
Make sure that the headset you chose is tough enough to withstand a fair amount of
punishment. Headsets should stand up to twisting and stretching, and in home offices,
being played with by the kids!
Cleanability
Headsets that have removable microphone and earpads allow for easy cleaning or even
replacement. If you will be using your headset a lot, be sure to look for one that is
easy to keep clean.
5 –2 A P P E N D I X
Warranty
If your headset breaks, you will want to get it replaced. Look for a headset with a
good warranty—it often reflects how confident the manufacturer is in the durability of
the product!
A P P E N D I X 5 –3
 Loading...