

Page 1

Configuring Video and Audio
Devices for Use with Polycom PVX
You can select from a number of different audio and video input devices to use
with your Polycom® PVX™ application, version 8.0.1 or later.
This document lists the advantages and disadvantages of various devices so you
can choose the correct one for your environment. It also describes the factors you
should consider when selecting a video input device.
Once you have selected your audio and video devices, you need to configure
them for optimum performance. This document describes how to use the PVX
user interface to specify the audio and video device settings. If you plan on using
PVX with the Computer Calling Kit for SoundStation2™ and
SoundStation2W™, this document also describes how to configure the PVX
settings for use with this kit.
The final section of this document provides information on how to resolve audio
and video issues.
Choosing and Configuring Video Input Devices
Polycom PVX supports a wide variety of video input devices. The quality of your
PVX video largely depends on the quality and design of your video input device.
These common devices have been tested with Polycom PVX version 8.0.1 or later:
• AVerMedia AVerTV GO 007 FM Plus PCI
• Creative WebCam Live! Motion
• Creative WebCam Live! Pro
• GlobalMedia iREZ KD 1394
• GlobalMedia iREZ K2 USB 2.0
• Logitech QuickCam Pro 4000
• LogiTech QuickCam for Notebooks Pro
• Logitech QuickCam Pro 5000
• Logitech QuickCam Fusion
• Logitech QuickCam Orbit MP
• Veo Velocity Connect
• V-Stream TV2800 (V-Stream Xpert DVD Maker USB 2.0)
July 2006
3725-22724-003/A
Page 2
Selecting Audio and Video Devices for Use with Polycom PVX
Determining the CPU Load for Your System
Polycom PVX is a CPU-intensive application. It was originally designed to
accommodate the CPU requirements of third-party video capture devices, so
that the total CPU load results in acceptable performance. As modern devices
have become more capable in resolution and supported features, they have
sometimes also become more CPU intensive. Using some of these devices can
cause the total CPU load to surpass optimal levels. For these CPU-intensive
devices, you can adjust the PVX CPU requirements to accommodate the
device’s requirements.
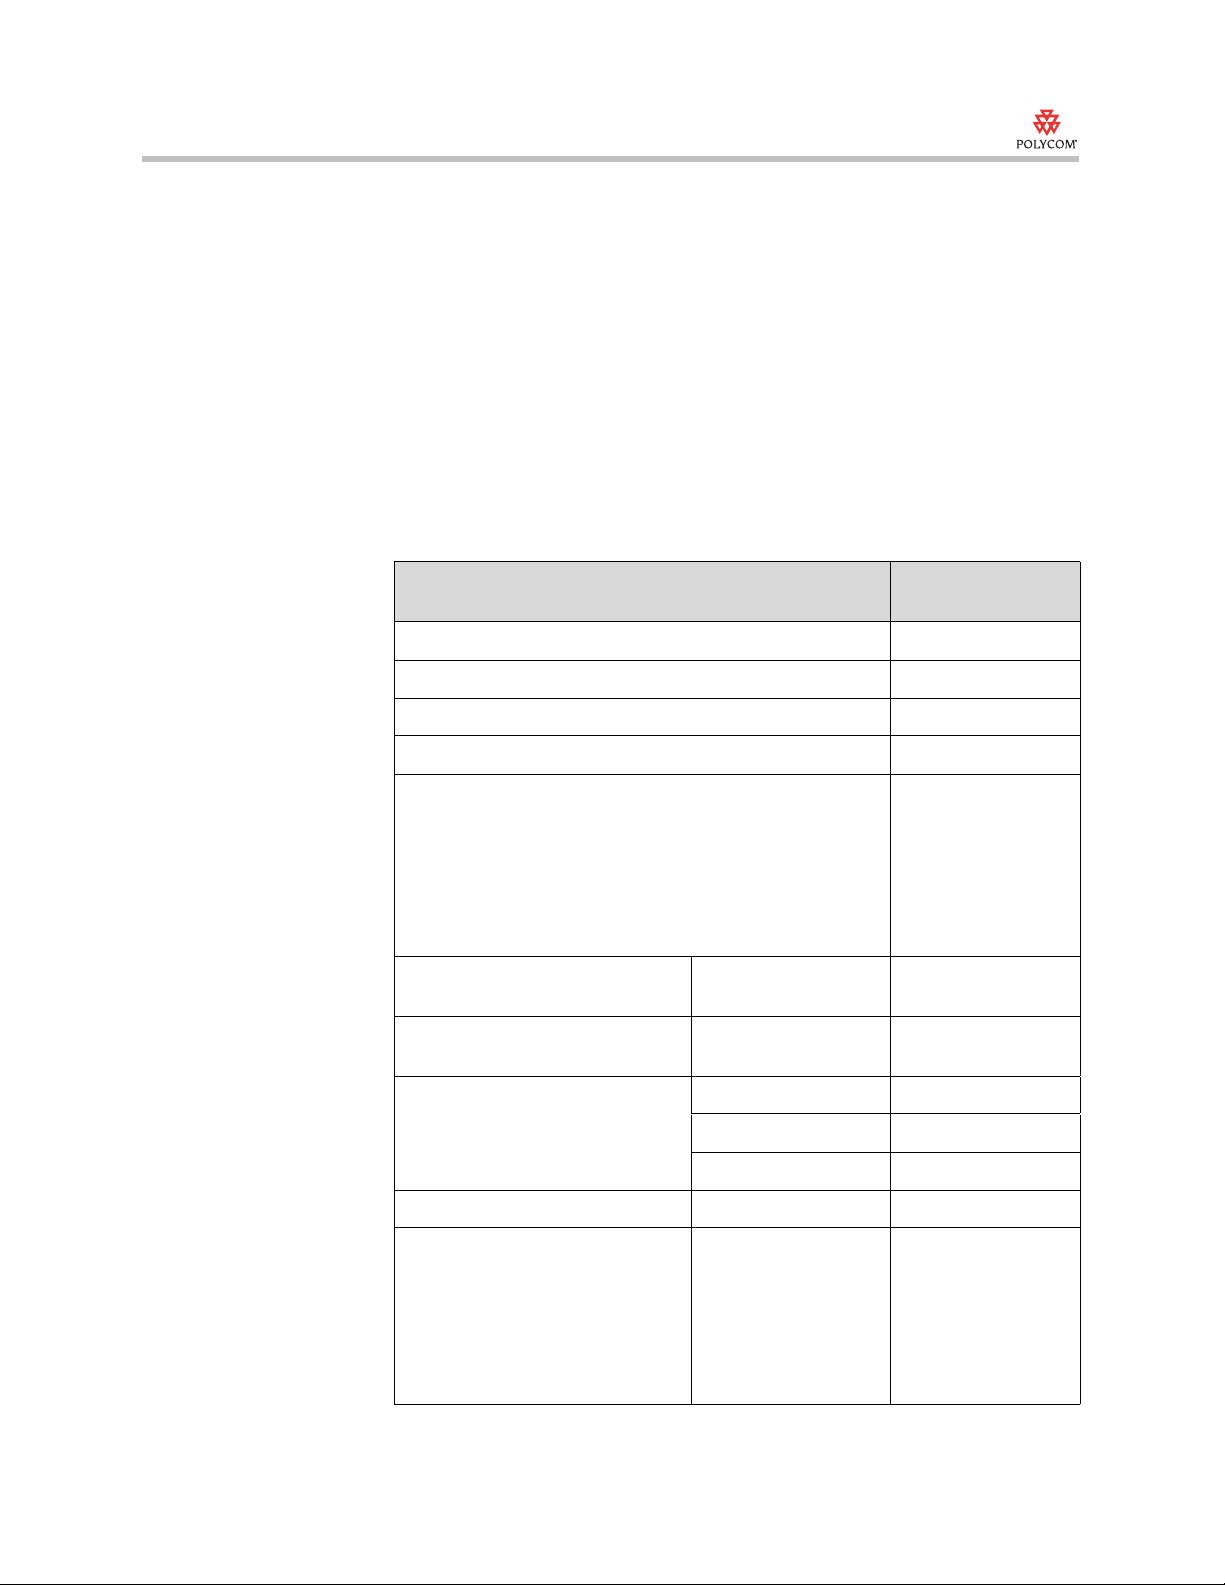
The following table lists the CPU load levels for some of the video input
devices supported by PVX. You will need this information to configure your
device. If your input device is not listed here, refer to the information which
follows this table.
This device...
AVerMedia AVerTV GO 007 FM Plus PCI Low
Creative WebCam Live! Motion High
Uses this CPU load
level...
Creative WebCam Live! Pro Medium
GlobalMedia iREZ KD 1394 Low
GlobalMedia iREZ K2 USB 2.0
Note that the GlobalMedia iREZ K2 USB 2.0 camera was
tested using quality setting B (the default setting). Higher
quality settings offer additional image processing capability,
but the increased load on the CPU may adversely affect
system performance.
Logitech QuickCam for Notebooks
Pro
Logitech QuickCam Pro 4000 Driver version 7.3.0 Low
Logitech QuickCam Pro 5000 Driver version 9.0.2 Low
Logitech QuickCam Fusion
Note that, as of driver version
9.0.2, the Logitech QuickCam
Fusion audio echo canceller
appears to add delay and
introduce audible artifacts into the
audio.
P/N 961398-04030
Driver version 9.5.0
P/N 961240-04030
Driver version 8.4.1
Driver version 8.4.8 Low
Driver version 9.0.2 Medium
Driver version 9.0.2 Medium
Medium
High
Medium
Note: If the Logitech
Audio Echo
Canceller (AEC) is
enabled, select
High.
2
Page 3

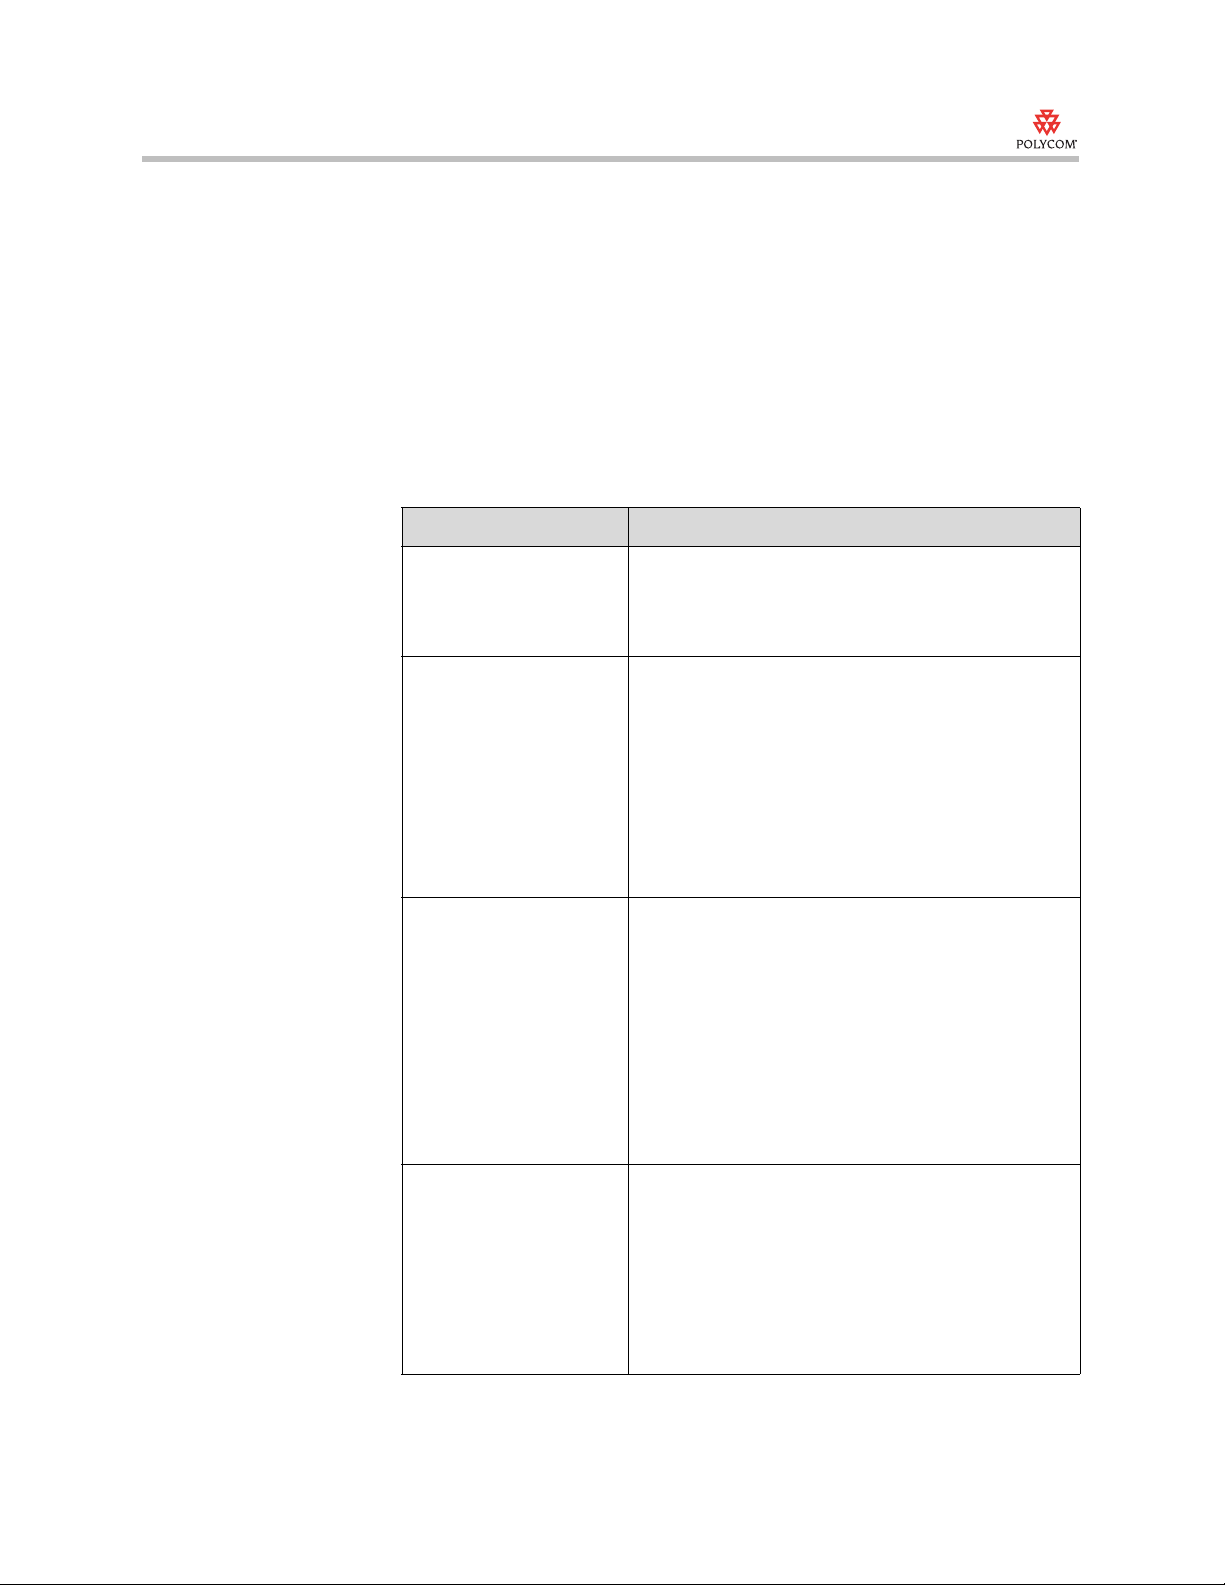
Selecting Audio and Video Devices for Use with Polycom PVX
This device...
Logitech QuickCam Orbit MP Driver version 9.0.2 Medium
Veo Velocity Connect Medium
V-Stream TV2800 (V-Stream Xpert DVD Maker USB 2.0) Low
If your device is not listed, you can calculate the CPU load level yourself.
To determine your video input device’s CPU load:
1. With no other applications running, start Polycom PVX. Make sure that
there is no call in progress and that you can see video.
2. Right-click an empty area in the Windows Task Bar, and choose Task
Manager.
3. Click the Performance tab, and make a note of the CPU Usage, expressed
as a percentage of the total CPU.
4. To determine the CPU usage in MHz, multiply the system’s CPU speed
by the CPU Usage.
Uses this CPU load
level...
5. Use this table to determine the level of CPU usage:
CPU Load
CPU Usage
< 200 MHz Low The device’s driver load is equivalent to the load
200 - 600 MHz Medium Newer devices that support VGA resolutions and
> 600 MHz High The device is using CPU-intensive features, such
Level Description
for devices supported in earlier versions of PVX.
For example: A webcam that captures 320 x 240
video or a PCI video capture card.
higher usually compress the video. The device
drivers must then decode the video before
sending it to PVX, which increases the CPU load.
For example: A webcam that captures 640 x 480
at 30 fps or a DV input device, such as a digital
camcorder or webcam that supports Firewire
IEEE-1394.
as face tracking, video special effects, wide-angle
lens distortion correction, or audio echo
cancellation.
/
For example, suppose your 2.8 GHz computer is running at just over 25% of
the CPU with no call in progress. Determine the CPU load level as follows:
2.8 GHz x 25% = 700 MHz of CPU resources in use
Referring to the table, you see that the camera driver’s load is High.
3
Page 4
Selecting Audio and Video Devices for Use with Polycom PVX
Specifying Advanced Video Properties
To optimize the video from your PVX, you need to correctly specify the PVX
video settings. Before you start, you need to know the CPU load level of your
video input device. Refer to Determining the CPU Load for Your System for
more information.
To specify the advanced video properties:
1. From the PVX Main page, select Setup > Video > Advanced.
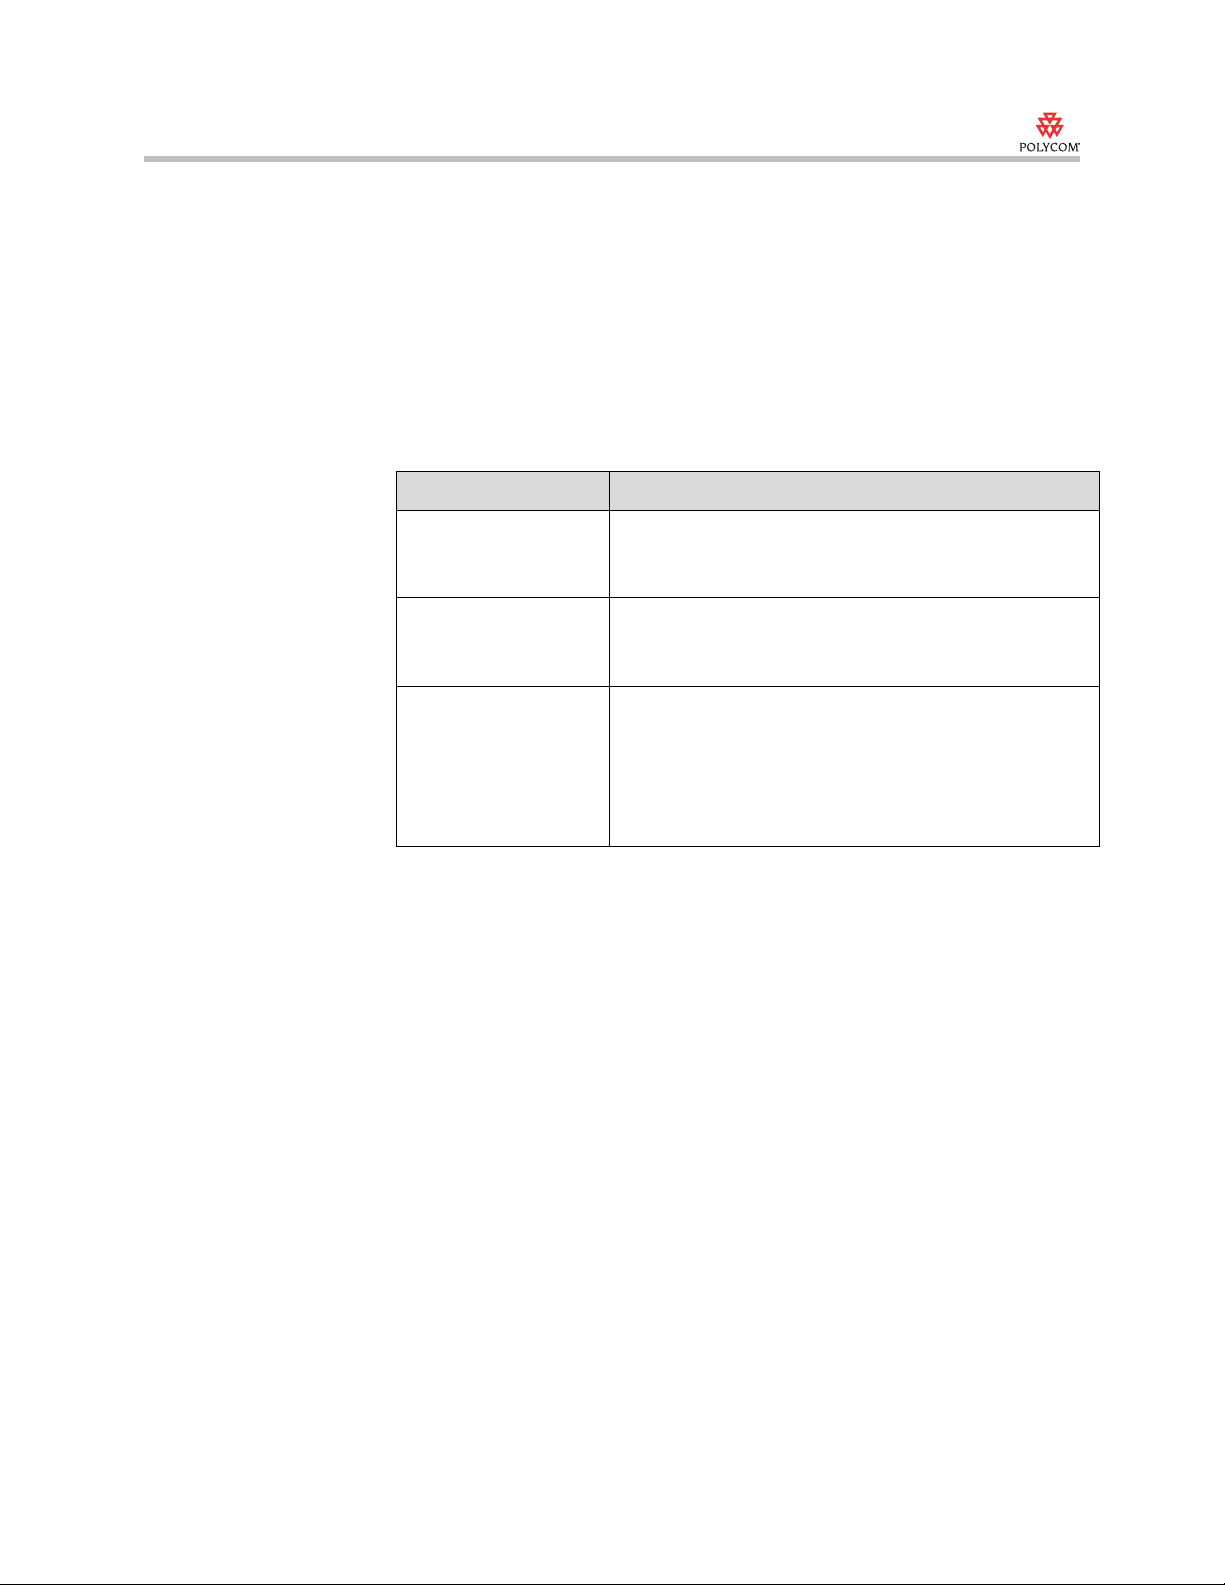
2. Configure these settings:
Setting Description
Enable VGA People
Encoding
Video Quality Select Smoother Motion to make video motion
Enable VGA 30 frames
per second
Select if your computer uses less than 15% of the
CPU when PVX is running and no call is in progress.
Clear if your computer uses more than 15% of the
CPU while not in a call.
appear smooth, even though the picture may lose
detail. Select this option when the call includes
participants moving around the room and no shared
documents.
Select Sharper Image for a sharp, clear picture, even
though the motion may not be as smooth. Select this
option when all participants are seated and you need
to show slides or another type of document during the
call.
Clear this setting in most cases.
Select if your device can support VGA at 30 frames
per second while maintaining a low CPU load. Most
cameras are not capable of doing this. Supported
video input devices with this capability include:
• PCI video capture cards
• AVerMedia AVerTV GO 007 FM Plus PCI
• GlobalMedia iREZ K2 USB 2.0
• V-Stream TV2800 (V-Stream Xpert DVD Maker
USB 2.0)
For the camera you
have selected, specify
the camera driver’s
load on the system
Select Low if the device’s driver has little impact on
the total CPU load.
Select Medium if the device’s driver moderately
increases the CPU load.
Select High if the device’s driver significantly
increases the CPU load.
Refer to Determining the CPU Load for Your System
for more information.
4
Page 5

Selecting Audio and Video Devices for Use with Polycom PVX
Choosing and Configuring Audio Input Devices
Note that some special versions of Polycom PVX provide only the video
portion of calls, while other devices handle audio. This section does not apply
to these special video-only versions of Polycom PVX.
Choosing an Audio Input Device
Polycom PVX offers you the flexibility of choosing from a number of different
audio input devices. You can use the webcam’s built-in microphone (if your
webcam includes one), your computer’s built-in microphone, an external
analog microphone, or a headset.
The advantages and disadvantages of each of these audio input devices are
listed in the following table:
Audio Input Device Advantages Disadvantages
Webcam’s built-in
microphone
Laptop computer’s
built-in microphone
• Does not require an external
microphone
• Does not occupy additional desk space
• Distance between microphone and
speakers is usually sufficient to avoid
interference with audio quality
• Does not require an external
microphone
• Does not occupy additional desk space
Some webcams may experience the following:
• Limited audio quality
Audio is comparable to traditional
telephone quality.
• Slower computer function
The camera’s built-in audio echo canceller
may cause additional CPU load.
• Extended audio delay
This is caused by the camera’s built-in
audio echo canceller. It results in a loss of
synchronization between the video and
audio, also known as a “lip sync” problem.
• Problems with the Windows® XP echo
canceller
This can be caused by routing audio input
and output through different devices.
• Louder than expected far site sound
• Ineffective audio echo cancellation
This occurs in calls using cameras with
sensitive microphones (such as the
Logitech QuickCam Pro 4000).
• Limited audio quality
Audio is comparable to traditional
telephone quality.
• Possible feedback or echo
The structure of the laptop and low quality
of most laptop speakers can cause
problems that the Windows XP echo
canceller cannot correct.
5
Page 6

Selecting Audio and Video Devices for Use with Polycom PVX
Audio Input Device Advantages Disadvantages
External analog
microphone
Headset with
microphone
• Provides excellent synchronization
when plugged into the same device as
the speakers
Connecting both the audio and video
to the computer provides the best echo
cancellation from the Windows XP
echo canceller
• Provides maximum flexibility in the
distance between the speakers and the
microphone
• Offers a range of choices when
selecting a high-quality microphone
with good directionality and frequency
response
• Full 14 kHz audio experience in some
headsets, since no echo cancellation is
required
• Provides a range of choices when
selecting a high-quality microphone
with good directionality and frequency
response
• Provides maximum privacy
• Occupies additional desk space
• Limited audio quality
The Windows XP echo canceller limits
audio to 7 kHz. This is comparable to
traditional telephone quality.
• Limited audio quality in some headsets
Cellphone and Bluetooth® headsets
provide quality that is lower than wideband
PVX audio and is comparable to traditional
telephone quality.
• Possible discomfort of wearing a headset
Supported Headsets
These common headsets have been tested with Polycom PVX version 8.0.1 or
later:
• GlobalMedia AMH-300V headset
• GN Netcom 2110-ST 01 USB headset
• Plantronics DSP-400 USB headset
When a headset is connected, the ring tone for incoming calls is played through the
default Windows speakers.
6
Page 7
Selecting Audio and Video Devices for Use with Polycom PVX
Configuring Audio Input Devices
After you connect your hardware, you need to specify the audio input and
output devices in the Polycom PVX application.
To specify the audio devices:
1. From the PVX Main page, select Setup > Audio.
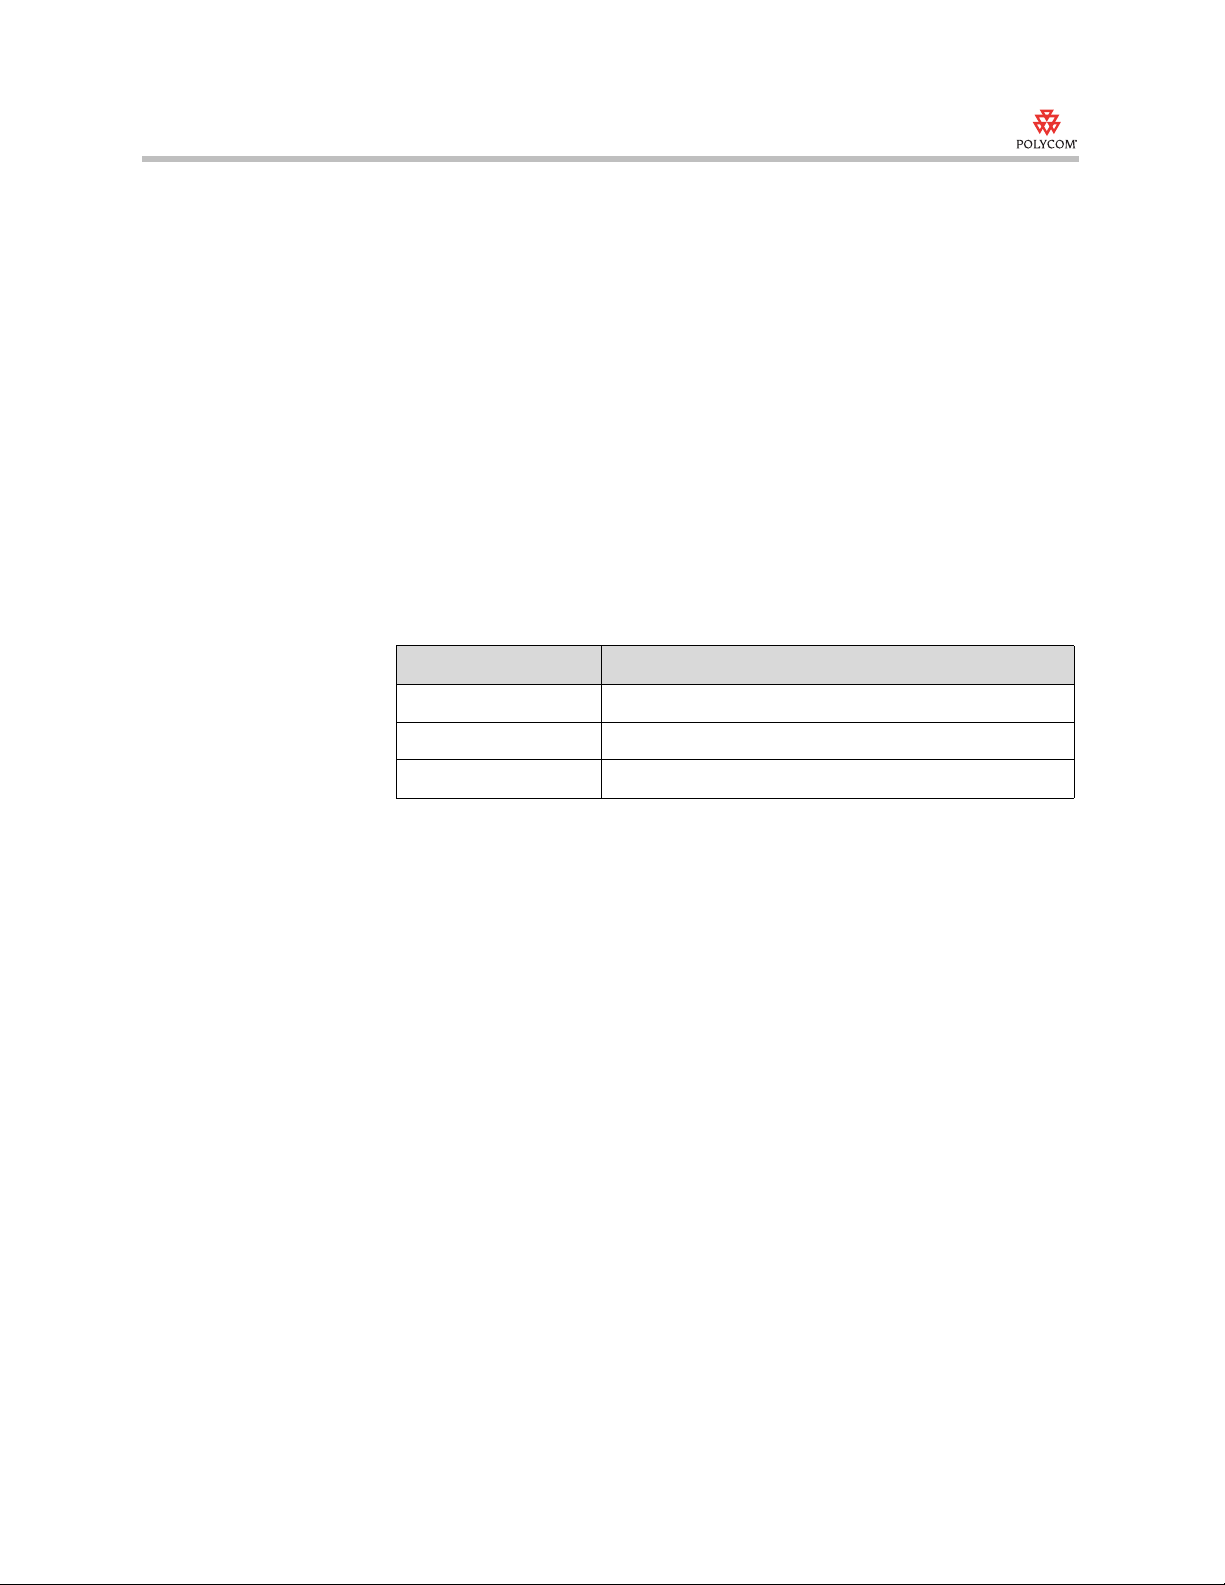
2. Configure these settings:
Setting Description
Audio Output Device Select Auto to use the sound playback device specified in
Audio Input Device Select Auto to use the sound recording device specified in
Echo Cancellation Select Internal (when using Windows XP) to use the
the Windows Sounds and Audio Devices control panel.
Select None to use no audio output device.
the Windows Sounds and Audio Devices control panel.
Select None to use no audio input device.
Windows XP echo canceller.
Select External (when provided by external device) to use
echo cancellation provided by another device.
Select None to disable echo cancellation if you are using a
headset.
7
Page 8
Selecting Audio and Video Devices for Use with Polycom PVX
Using PVX with the Computer Calling Kit for SoundStation2 or
SoundStation2W
The Computer Calling Kit allows you to make calls with PVX using a Polycom
SoundStation2 or SoundStation2W phone. The minimum software
requirements to use this kit are:
• SoundStation2 conference phone version SS2.CON.01.115 or later
• SoundStation2W conference phone version S2W.CON.01.2xx or later
To use PVX with the Computer Calling Kit:
1. Install the Computer Calling Kit as described in the Instructions for
Computer Calling Kit document, which you received with the kit.
2. From the PVX Main page, select Setup > Audio.
3. Configure these settings:
Setting Description
Audio Output Device Select your computer’s sound card from the list.
Audio Input Device Select your computer’s sound card from the list.
Echo Cancellation Select External.
8
Page 9

Selecting Audio and Video Devices for Use with Polycom PVX
Troubleshooting
Video
Symptom Cause Solution
The CPU usage is at or above 95%
when PVX is sending video to the
far site.
Slow or freezing video. The total CPU Load is too high. Adjust PVX to accommodate the video
This is normal operation.
The desktop capture and encoder are busy running to provide the best
desktop video quality.
input device’s high CPU usage. To do
this:
1. Go to Setup > Video > Advanced.
2. Configure the setting correctly for
your system and camera.
For complete information about how to
set these settings for your particular
system and camera, refer to the
Specifying Advanced Video Properties
section on page 4.
The system is less than a 2.0
GHz Pentium 4 or equivalent, and
it is using most of its resources for
media processing, leaving few
resources for other applications.
The device driver for the video
capture device is using a high
percentage of the CPU when the
system is idle.
Note: This problem can occur
with some USB 2.0 cameras.
Adjust PVX to allocate fewer system
resources to video processing. To do
this:
1. Go to Setup > General >
Performance.
2. To reduce the system resources
allocated to video, select Other
Applications.
Adjust PVX to allocate fewer system
resources to video processing. To do
this:
1. Go to Setup > General >
Performance.
2. To reduce the system resources
allocated to video, select Other
Applications.
Verify that you have the latest video
capture drivers for your device.
Multiple USB cameras are
connected to the computer.
Connect only one USB camera at a time
to your computer.
9
Page 10

Selecting Audio and Video Devices for Use with Polycom PVX
Audio
Symptom Problem Solution
Unable to access audio adjustment
settings, such as the Microphone
Volume slidebar on the Setup >
Audio page.
The audio from a system using the
computer’s built-in microphone and
a webcam is loud and distorted.
Far-site participants hear an echo. The volume is too loud. Reduce the volume.
These adjustments are not available
when the system is in a call.
The microphone’s audio gain is set
too high.
The microphone and speakers are
too close together.
The microphone’s audio gain is set
too high.
If you use a laptop’s integrated
speakers with the laptop’s
integrated microphone or with a
webcam’s microphone, the
structure of the laptop computer and
the quality of the laptop speakers
may cause problems that the
Windows XP echo canceller cannot
correct.
Make audio adjustments when the
system is not in a call and not
muted.
Enable the Automatic Gain Control
setting on the Setup > Audio page.
If this does not work, clear the
Automatic Gain Control check box.
Then click the Calibrate
Microphone button and manually
adjust the gain control using the
Microphone Volume slidebar.
Separate the microphone and
speakers as far as possible.
Go to Setup > Audio and enable
Automatic Gain Control.
Connect external speakers and use
them instead of the integrated
speakers.
In a multipoint call, the audio from a
Polycom PVX with a webcam
sounds either too loud or too soft
compared to the other sites in the
call.
The microphone’s audio gain is set
too high.
Go to Setup > Audio and enable
Automatic Gain Control.
Adjust the microphone manually. To
do this:
1. Clear the Automatic Gain
Control check box.
2. Click Calibrate Microphone.
3. Use the Microphone Volume
slidebar to adjust the
microphone.
10
Page 11

Selecting Audio and Video Devices for Use with Polycom PVX
Symptom Problem Solution
The audio volume level increases or
decreases slightly when you start
the Polycom PVX application.
When using a SoundStation2 or
SoundStation2W with the Computer
Calling Kit, the volume from the
SoundStation2 or SoundStation2W
is too loud or too soft.
The audio is delayed (lip sync is off). The camera is using a large
This is normal operation. The audio returns to its normal level
The speaker volume is not adjusted
correctly.
percentage of the CPU.
Note: This can happen with new
cameras (such as the Logitech
QuickCam Fusion or the Logitech
QuickCam Pro 5000).
automatically.
Adjust your Windows volume control
settings:
1. Click Start and go to Settings >
Control Panel > Sounds and
Audio Devices.
2. Click the Volume tab.
3. In the Speaker Settings section,
click Speaker Volume.
4. In the Speaker Volume dialog
box, adjust the volume, and
then click OK.
5. In the Device Volume section,
click Advanced.
6. Adjust the Line In volume, and
then choose Options > Exit.
Determine whether the camera has
built-in echo cancellation. If it does,
disable echo cancellation using the
camera's configuration software.
If the camera is using other special
features (such as face tracking), use
the camera’s configuration software
to disable these features.
If you are using Windows XP, you
can use PVX internal echo
cancellation instead. To do this, go
to Setup > Audio and set Echo
Cancellation to Internal.
Copyright Information
© 2006 Polycom, Inc. All rights reserved.
No part of this document may be reproduced or transmitted in any form or by any
means, electronic or mechanical, for any purpose, witho ut the express written
permission of Polycom, Inc.
Polycom, Inc. retains title to, and ownership of, all proprietary rights with respect to the
software contained within its products. The software is protected by United States
copyright laws and international treaty provision.
11
Page 12

Selecting Audio and Video Devices for Use with Polycom PVX
Disclaimer
This software is provided ‘as is’ with no explicit or implied warranties in respect of its
properties, including, but not limited to, correctness and fitness for purpose.
Trademark Information
Polycom® and the Polycom logo design are registered trademarks of Polycom, Inc.
PVX™ is a trademark of Polycom, Inc.
All other brand and product names are trademarks or registered trademarks of their
respective companies.
12
 Loading...