

Page 1
Polycom® Digital Signage™
™
(PDS
) 2000
Administrator Guide
1.0 | August 2010 | 3725-78600-004A2
Page 2

Trademark Information
Polycom®, the Triangles logo, ReadiManager®, SoundPoint®, SoundStation®, ViaVideo®, VoiceStation®,
Vortex®, and VSX® are registered trademarks of Polycom, Inc. Convene™ , Global Management System™,
iPower™, MGC™, People+Content™, People On Content™, Polycom Conference Suite™, Polycom Converged
Management Application™ (CMA™), Polycom Distributed Media Application™ (DMA™), Polycom HD Voice™,
Polycom PathNavigator™, Polycom VideoPlus™, Polycom VoicePlus™, PVX™, RAS™, ReadiConvene™, RMX
2000™, RSS™, V2iU™, VBP™, VS4000™, and VTX™ are trademarks of Polycom, Inc.
All other trademarks are the property of their respective owners.
Patent Information
The accompanying product is protected by one or more U.S. and foreign patents and/or pending patent
applications held by Polycom, Inc.
© 2010 Polycom, Inc. All rights reserved.
Polycom, Inc.
4750 Willow Road
Pleasanton, CA 94588-2708
USA
No part of this document may be reproduced or transmitted in any form or by any means, electronic or
mechanical, for any purpose, without the express written permission of Polycom, Inc. Under the law, reproducing
includes translating into another language or format.
As between the parties, Polycom, Inc., retains title to and ownership of all proprietary rights with respect to the
software contained within its products. The software is protected by United States copyright laws and international
treaty provision. Therefore, you must treat the software like any other copyrighted material (e.g., a book or sound
recording).
Every effort has been made to ensure that the information in this manual is accurate. Polycom, Inc., is not
responsible for printing or clerical errors. Information in this document is subject to change without notice.
ii
Page 3

Contents
Contents
About this Guide . . . . . . . . . . . . . . . . . . . . . . . . . . . . . . . . . 7
Purpose . . . . . . . . . . . . . . . . . . . . . . . . . . . . . . . . . . . . . . . . . . . . . . . . . . . . . . . . . 7
Documentation . . . . . . . . . . . . . . . . . . . . . . . . . . . . . . . . . . . . . . . . . . . . . . . . . . . 7
Audience . . . . . . . . . . . . . . . . . . . . . . . . . . . . . . . . . . . . . . . . . . . . . . . . . . . . 8
Customer Support . . . . . . . . . . . . . . . . . . . . . . . . . . . . . . . . . . . . . . . . . . . . . . . . 8
Polycom Global Services Telephone . . . . . . . . . . . . . . . . . . . . . . . . . . . . . 8
Polycom Digital Signage Solution . . . . . . . . . . . . . . . . . . . . . . . . . . . . . . . . . . . 1
Polycom Digital Signage Player . . . . . . . . . . . . . . . . . . . . . . . . . . . . . 1
Polycom Digital Signage Server . . . . . . . . . . . . . . . . . . . . . . . . . . . . . 1
Polycom Digital Signage Remote Manager . . . . . . . . . . . . . . . . . . . . 1
Polycom Digital Signage Web Controller . . . . . . . . . . . . . . . . . . . . . 2
Polycom Digital Signage Agent . . . . . . . . . . . . . . . . . . . . . . . . . . . . . 2
Architecture Overview . . . . . . . . . . . . . . . . . . . . . . . . . . . . . . . . . . . . . . . . . . . . 2
1 Configuring the PDS Player . . . . . . . . . . . . . . . . . . . . . . . . . 5
About the PDS Player . . . . . . . . . . . . . . . . . . . . . . . . . . . . . . . . . . . . . . . . . . . . . 5
Accessing the Player . . . . . . . . . . . . . . . . . . . . . . . . . . . . . . . . . . . . . . . . . . . . . . 5
Configuring the Player Directly . . . . . . . . . . . . . . . . . . . . . . . . . . . . . . . . . . . . 6
Configuring PDS Player Video Settings . . . . . . . . . . . . . . . . . . . . . . . . . . . . . . 6
Output Windows Settings . . . . . . . . . . . . . . . . . . . . . . . . . . . . . . . . . . 7
Capture Settings . . . . . . . . . . . . . . . . . . . . . . . . . . . . . . . . . . . . . . . . . . 8
Startup Settings . . . . . . . . . . . . . . . . . . . . . . . . . . . . . . . . . . . . . . . . . . . . . . . . . . 8
Startup Properties . . . . . . . . . . . . . . . . . . . . . . . . . . . . . . . . . . . . . . . . . 9
Startup Options . . . . . . . . . . . . . . . . . . . . . . . . . . . . . . . . . . . . . . . . . . . 9
Options . . . . . . . . . . . . . . . . . . . . . . . . . . . . . . . . . . . . . . . . . . . . . . . . . . . . . . . . 10
General . . . . . . . . . . . . . . . . . . . . . . . . . . . . . . . . . . . . . . . . . . . . . . . . . 11
Messages . . . . . . . . . . . . . . . . . . . . . . . . . . . . . . . . . . . . . . . . . . . . . . . . 11
Audio . . . . . . . . . . . . . . . . . . . . . . . . . . . . . . . . . . . . . . . . . . . . . . . . . . . 12
Configuring PDS Player Advanced Settings . . . . . . . . . . . . . . . . . . . . . . . . . 12
Renderer Settings . . . . . . . . . . . . . . . . . . . . . . . . . . . . . . . . . . . . . . . . 13
File Locations . . . . . . . . . . . . . . . . . . . . . . . . . . . . . . . . . . . . . . . . . . . . 13
Playout Settings . . . . . . . . . . . . . . . . . . . . . . . . . . . . . . . . . . . . . . . . . . 14
2 Using the PDS Player . . . . . . . . . . . . . . . . . . . . . . . . . . . . . 15
Getting Started . . . . . . . . . . . . . . . . . . . . . . . . . . . . . . . . . . . . . . . . . . . . . . . . . . 15
Loading a Template . . . . . . . . . . . . . . . . . . . . . . . . . . . . . . . . . . . . . . 15
Loading a Playlist . . . . . . . . . . . . . . . . . . . . . . . . . . . . . . . . . . . . . . . . 16
Polycom, Inc. 1
Page 4

Polycom Digital Signage Administrator Guide
The PDS Player Interface . . . . . . . . . . . . . . . . . . . . . . . . . . . . . . . . . . . . . . . . . 17
Scheduling Events with the PDS Player . . . . . . . . . . . . . . . . . . . . . . . . . . . . . 20
Controlling the VertigoCG Renderer . . . . . . . . . . . . . . . . . . . . . . . . . . . . . . . 25
3 Using the Remote Manager . . . . . . . . . . . . . . . . . . . . . . . . 29
Main Window . . . . . . . . . . . . . . . . . . . . . . . . . . . . . . . . . . . . . . . . . . . . . . . . . . . 29
Networks and Groups Pane . . . . . . . . . . . . . . . . . . . . . . . . . . . . . . . . . . . 30
Events Pane . . . . . . . . . . . . . . . . . . . . . . . . . . . . . . . . . . . . . . . . . . . . . . . . . 30
Current Incidents Pane . . . . . . . . . . . . . . . . . . . . . . . . . . . . . . . . . . . . . . . 31
Status Bar . . . . . . . . . . . . . . . . . . . . . . . . . . . . . . . . . . . . . . . . . . . . . . . . . . . 31
Tool Bar . . . . . . . . . . . . . . . . . . . . . . . . . . . . . . . . . . . . . . . . . . . . . . . . . . . . . . . . 31
Connect/Disconnect . . . . . . . . . . . . . . . . . . . . . . . . . . . . . . . . . . . . . . . . . 31
Auto-Refresh Menu . . . . . . . . . . . . . . . . . . . . . . . . . . . . . . . . . . . . . . . . . . 32
Refresh . . . . . . . . . . . . . . . . . . . . . . . . . . . . . . . . . . . . . . . . . . . . . . . . . . . . . 32
Publish Content . . . . . . . . . . . . . . . . . . . . . . . . . . . . . . . . . . . . . . . . . . . . . 32
Remove Old Content . . . . . . . . . . . . . . . . . . . . . . . . . . . . . . . . . . . . . . . . . 35
Execute Actions . . . . . . . . . . . . . . . . . . . . . . . . . . . . . . . . . . . . . . . . . . . . . . 35
Publish Software Update . . . . . . . . . . . . . . . . . . . . . . . . . . . . . . . . . . . . . . 36
Network and Groups Pane . . . . . . . . . . . . . . . . . . . . . . . . . . . . . . . . . . . . . . . . 37
Network and Player Management . . . . . . . . . . . . . . . . . . . . . . . . . . . . . . 37
Network Pane . . . . . . . . . . . . . . . . . . . . . . . . . . . . . . . . . . . . . . . . . . . . . . . . . . . 44
Connections . . . . . . . . . . . . . . . . . . . . . . . . . . . . . . . . . . . . . . . . . . . . . . . . . 45
Player Status . . . . . . . . . . . . . . . . . . . . . . . . . . . . . . . . . . . . . . . . . . . . . . . . 46
Current Playlist . . . . . . . . . . . . . . . . . . . . . . . . . . . . . . . . . . . . . . . . . . 17
Default Layer . . . . . . . . . . . . . . . . . . . . . . . . . . . . . . . . . . . . . . . . . . . 17
Default Transition . . . . . . . . . . . . . . . . . . . . . . . . . . . . . . . . . . . . . . . . 18
Events . . . . . . . . . . . . . . . . . . . . . . . . . . . . . . . . . . . . . . . . . . . . . . . . . . 18
Control Buttons . . . . . . . . . . . . . . . . . . . . . . . . . . . . . . . . . . . . . . . . . . 18
Playlist Controls . . . . . . . . . . . . . . . . . . . . . . . . . . . . . . . . . . . . . . . . . 18
Message Control . . . . . . . . . . . . . . . . . . . . . . . . . . . . . . . . . . . . . . . . . 19
Current Output Window . . . . . . . . . . . . . . . . . . . . . . . . . . . . . . . . . . 19
Using VertigoCG . . . . . . . . . . . . . . . . . . . . . . . . . . . . . . . . . . . . . . . . . 25
Publish New Content . . . . . . . . . . . . . . . . . . . . . . . . . . . . . . . . . . . . . 33
Manage Groups . . . . . . . . . . . . . . . . . . . . . . . . . . . . . . . . . . . . . . . . . . 37
Manage Players . . . . . . . . . . . . . . . . . . . . . . . . . . . . . . . . . . . . . . . . . . 39
Delete Offline Players . . . . . . . . . . . . . . . . . . . . . . . . . . . . . . . . . . . . . 40
Create New Network . . . . . . . . . . . . . . . . . . . . . . . . . . . . . . . . . . . . . 41
Delete Network . . . . . . . . . . . . . . . . . . . . . . . . . . . . . . . . . . . . . . . . . . 41
Manage Users . . . . . . . . . . . . . . . . . . . . . . . . . . . . . . . . . . . . . . . . . . . . 42
Download Agent Setup . . . . . . . . . . . . . . . . . . . . . . . . . . . . . . . . . . . 43
Broadcast Message . . . . . . . . . . . . . . . . . . . . . . . . . . . . . . . . . . . . . . . 43
Manager List . . . . . . . . . . . . . . . . . . . . . . . . . . . . . . . . . . . . . . . . . . . . 44
2 Polycom, Inc.
Page 5

Contents
Screenshots . . . . . . . . . . . . . . . . . . . . . . . . . . . . . . . . . . . . . . . . . . . . . . . . . 47
System Info . . . . . . . . . . . . . . . . . . . . . . . . . . . . . . . . . . . . . . . . . . . . . . . . . 48
Network Packages . . . . . . . . . . . . . . . . . . . . . . . . . . . . . . . . . . . . . . . . . . . 49
Remote Player Management Console . . . . . . . . . . . . . . . . . . . . . . . . . . . . . . . 50
Tools Menu . . . . . . . . . . . . . . . . . . . . . . . . . . . . . . . . . . . . . . . . . . . . . . . . . 51
Tool Bar . . . . . . . . . . . . . . . . . . . . . . . . . . . . . . . . . . . . . . . . . . . . . . . . . . . . 51
Start Process . . . . . . . . . . . . . . . . . . . . . . . . . . . . . . . . . . . . . . . . . . . . . 51
File Manager . . . . . . . . . . . . . . . . . . . . . . . . . . . . . . . . . . . . . . . . . . . . . 52
Reboot . . . . . . . . . . . . . . . . . . . . . . . . . . . . . . . . . . . . . . . . . . . . . . . . . . 52
Set License . . . . . . . . . . . . . . . . . . . . . . . . . . . . . . . . . . . . . . . . . . . . . . 52
Monitoring Settings . . . . . . . . . . . . . . . . . . . . . . . . . . . . . . . . . . . . . . . 53
Edit Config . . . . . . . . . . . . . . . . . . . . . . . . . . . . . . . . . . . . . . . . . . . . . . 54
Restart Polycom Player . . . . . . . . . . . . . . . . . . . . . . . . . . . . . . . . . . . . 54
Playlist . . . . . . . . . . . . . . . . . . . . . . . . . . . . . . . . . . . . . . . . . . . . . . . . . . 54
Command . . . . . . . . . . . . . . . . . . . . . . . . . . . . . . . . . . . . . . . . . . . . . . . 54
Status Detail Panel . . . . . . . . . . . . . . . . . . . . . . . . . . . . . . . . . . . . . . . . . . . 55
Player Status . . . . . . . . . . . . . . . . . . . . . . . . . . . . . . . . . . . . . . . . . . . . . 55
Running Processes . . . . . . . . . . . . . . . . . . . . . . . . . . . . . . . . . . . . . . . . 56
Windows Services . . . . . . . . . . . . . . . . . . . . . . . . . . . . . . . . . . . . . . . . 57
File Manager . . . . . . . . . . . . . . . . . . . . . . . . . . . . . . . . . . . . . . . . . . . . . 58
4 Using the Web Controller . . . . . . . . . . . . . . . . . . . . . . . . . 61
About the PDS Web Controller . . . . . . . . . . . . . . . . . . . . . . . . . . . . . . . . . . . . 61
Installing the Web Controller . . . . . . . . . . . . . . . . . . . . . . . . . . . . . . . . . . . . . . 62
Pre-Installation Procedures on Windows Vista and Windows 7 . 62
Installation . . . . . . . . . . . . . . . . . . . . . . . . . . . . . . . . . . . . . . . . . . . . . . 62
Opening the Web Controller . . . . . . . . . . . . . . . . . . . . . . . . . . . . . . . . . . . . . . 64
Licensing the Web Controller . . . . . . . . . . . . . . . . . . . . . . . . . . . . . . 65
Web Controller Interface Guide . . . . . . . . . . . . . . . . . . . . . . . . . . . . . . . . . . . 66
Main Panel . . . . . . . . . . . . . . . . . . . . . . . . . . . . . . . . . . . . . . . . . . . . . . 67
Player Monitor Panel . . . . . . . . . . . . . . . . . . . . . . . . . . . . . . . . . . . . . 68
Events Panel . . . . . . . . . . . . . . . . . . . . . . . . . . . . . . . . . . . . . . . . . . . . . 69
Changing the Layout . . . . . . . . . . . . . . . . . . . . . . . . . . . . . . . . . . . . . 70
Style . . . . . . . . . . . . . . . . . . . . . . . . . . . . . . . . . . . . . . . . . . . . . . . . . . . . 70
Control Panel . . . . . . . . . . . . . . . . . . . . . . . . . . . . . . . . . . . . . . . . . . . . . . . . . . . 71
Player Controls . . . . . . . . . . . . . . . . . . . . . . . . . . . . . . . . . . . . . . . . . . 71
Selection Wizard . . . . . . . . . . . . . . . . . . . . . . . . . . . . . . . . . . . . . . . . . 73
Editing the Announcement and Emergency Crawls . . . . . . . . . . . 73
Playlist Editor . . . . . . . . . . . . . . . . . . . . . . . . . . . . . . . . . . . . . . . . . . . . . . . . . . . 76
Adding Content through the Playlist Editor . . . . . . . . . . . . . . . . . . . . . 79
Content Directory . . . . . . . . . . . . . . . . . . . . . . . . . . . . . . . . . . . . . . . . 79
Default Playlist . . . . . . . . . . . . . . . . . . . . . . . . . . . . . . . . . . . . . . . . . . 80
Templates . . . . . . . . . . . . . . . . . . . . . . . . . . . . . . . . . . . . . . . . . . . . . . . 81
Polycom, Inc. 3
Page 6

Polycom Digital Signage Administrator Guide
Crawling Ticker . . . . . . . . . . . . . . . . . . . . . . . . . . . . . . . . . . . . . . . . . . . . . . . . . 92
Slide Show Tickers . . . . . . . . . . . . . . . . . . . . . . . . . . . . . . . . . . . . . . . . . . . . . . . 94
Video Slide Content . . . . . . . . . . . . . . . . . . . . . . . . . . . . . . . . . . . . . . . . . . . . . . 96
Message Board/Webcast . . . . . . . . . . . . . . . . . . . . . . . . . . . . . . . . . . . . . . . . . 97
Alerts . . . . . . . . . . . . . . . . . . . . . . . . . . . . . . . . . . . . . . . . . . . . . . . . . . . . . . . . . . 99
Settings . . . . . . . . . . . . . . . . . . . . . . . . . . . . . . . . . . . . . . . . . . . . . . . . . . . . . . . 101
5 Using Template Maker . . . . . . . . . . . . . . . . . . . . . . . . . . 103
About Polycom Template Maker . . . . . . . . . . . . . . . . . . . . . . . . . . . . . . . . . 103
Installing Template Maker . . . . . . . . . . . . . . . . . . . . . . . . . . . . . . . . . . . . . . . 103
Licensing Template Maker . . . . . . . . . . . . . . . . . . . . . . . . . . . . . . . . . . . . . . . 104
Navigating the Template Maker Interface . . . . . . . . . . . . . . . . . . . . . . . . . . 105
Template Maker Output Settings . . . . . . . . . . . . . . . . . . . . . . . . . . . . . . . . . 108
Video Settings . . . . . . . . . . . . . . . . . . . . . . . . . . . . . . . . . . . . . . . . . . . . . . 108
Advanced Settings . . . . . . . . . . . . . . . . . . . . . . . . . . . . . . . . . . . . . . . . . . 110
Reviewing Template Maker Settings . . . . . . . . . . . . . . . . . . . . . . . . . . . 111
Adding and Working with Slides . . . . . . . . . . . . . . . . . . . . . . . . . . . . . . . . . 112
Adding and Editing Text, Images, and Media . . . . . . . . . . . . . . . . . . . . . . 117
General Object Properties . . . . . . . . . . . . . . . . . . . . . . . . . . . . . . . . . . . . 117
Working with Text . . . . . . . . . . . . . . . . . . . . . . . . . . . . . . . . . . . . . . . . . . 118
Working with Images . . . . . . . . . . . . . . . . . . . . . . . . . . . . . . . . . . . . . . . . 121
Working with Media . . . . . . . . . . . . . . . . . . . . . . . . . . . . . . . . . . . . . . . . 124
Working with Flipbooks . . . . . . . . . . . . . . . . . . . . . . . . . . . . . . . . . . . . . 127
Style Sheet . . . . . . . . . . . . . . . . . . . . . . . . . . . . . . . . . . . . . . . . . . . . . . 101
Customization . . . . . . . . . . . . . . . . . . . . . . . . . . . . . . . . . . . . . . . . . . 101
The Template Maker Companion Window . . . . . . . . . . . . . . . . . . 106
Style Browser . . . . . . . . . . . . . . . . . . . . . . . . . . . . . . . . . . . . . . . . . . . 107
Renderer Settings . . . . . . . . . . . . . . . . . . . . . . . . . . . . . . . . . . . . . . . 110
File Locations . . . . . . . . . . . . . . . . . . . . . . . . . . . . . . . . . . . . . . . . . . . 110
Playout Settings . . . . . . . . . . . . . . . . . . . . . . . . . . . . . . . . . . . . . . . . . 111
Modifying General Slide Properties . . . . . . . . . . . . . . . . . . . . . . . . 112
Modifying Background Slide Properties . . . . . . . . . . . . . . . . . . . . 113
Modifying Actions on a Slide . . . . . . . . . . . . . . . . . . . . . . . . . . . . . 115
Adding Audio to a Slide . . . . . . . . . . . . . . . . . . . . . . . . . . . . . . . . . . 116
Applying a Text Style . . . . . . . . . . . . . . . . . . . . . . . . . . . . . . . . . . . . 119
Modifying Text Properties . . . . . . . . . . . . . . . . . . . . . . . . . . . . . . . . 120
Inserting Images . . . . . . . . . . . . . . . . . . . . . . . . . . . . . . . . . . . . . . . . 121
Modifying Image Properties . . . . . . . . . . . . . . . . . . . . . . . . . . . . . . 123
Inserting Media . . . . . . . . . . . . . . . . . . . . . . . . . . . . . . . . . . . . . . . . . 124
Modifying Media Properties . . . . . . . . . . . . . . . . . . . . . . . . . . . . . . 124
The Video Properties Dialog . . . . . . . . . . . . . . . . . . . . . . . . . . . . . . 125
Inserting Flipbooks . . . . . . . . . . . . . . . . . . . . . . . . . . . . . . . . . . . . . . 127
4 Polycom, Inc.
Page 7

Contents
Modifying Flipbook Properties . . . . . . . . . . . . . . . . . . . . . . . . . . . . 128
Adding and Editing a Crawl . . . . . . . . . . . . . . . . . . . . . . . . . . . . . . . . . . . . . 128
Basic Crawl Configuration . . . . . . . . . . . . . . . . . . . . . . . . . . . . . . . . 128
Creating a Manual Crawl . . . . . . . . . . . . . . . . . . . . . . . . . . . . . . . . . 129
Creating a Data-Driven Crawl . . . . . . . . . . . . . . . . . . . . . . . . . . . . . 130
Crawl Properties . . . . . . . . . . . . . . . . . . . . . . . . . . . . . . . . . . . . . . . . 131
Setting the Position of a Crawl . . . . . . . . . . . . . . . . . . . . . . . . . . . . 133
Adding Clocks and Tickers . . . . . . . . . . . . . . . . . . . . . . . . . . . . . . . . . . . . . . 134
Adding a Clock . . . . . . . . . . . . . . . . . . . . . . . . . . . . . . . . . . . . . . . . . 134
Adding a Ticker . . . . . . . . . . . . . . . . . . . . . . . . . . . . . . . . . . . . . . . . . 136
Working with Objects . . . . . . . . . . . . . . . . . . . . . . . . . . . . . . . . . . . . . . . . . . . 139
Inserting Objects on a Slide . . . . . . . . . . . . . . . . . . . . . . . . . . . . . . . 139
Working with Object Groups . . . . . . . . . . . . . . . . . . . . . . . . . . . . . 140
Working with Animations . . . . . . . . . . . . . . . . . . . . . . . . . . . . . . . . . . . . . . . 140
Animating Objects on a Slide . . . . . . . . . . . . . . . . . . . . . . . . . . . . . 140
Types of Animations . . . . . . . . . . . . . . . . . . . . . . . . . . . . . . . . . . . . . 141
Saving a Template . . . . . . . . . . . . . . . . . . . . . . . . . . . . . . . . . . . . . . . . . . . . . . 142
6 Using the Data Parser . . . . . . . . . . . . . . . . . . . . . . . . . . . 147
About the PDS Data Parser . . . . . . . . . . . . . . . . . . . . . . . . . . . . . . . . . . . . . . 147
Creating a Data Source . . . . . . . . . . . . . . . . . . . . . . . . . . . . . . . . . . . . . . . . . . 147
Licensing Data Parser . . . . . . . . . . . . . . . . . . . . . . . . . . . . . . . . . . . . . . . . . . . 152
Using a Data Source . . . . . . . . . . . . . . . . . . . . . . . . . . . . . . . . . . . . . . . . . . . . 153
7 Non-Standard Installations . . . . . . . . . . . . . . . . . . . . . . . 159
The PDS Server Configuration Utility . . . . . . . . . . . . . . . . . . . . . . . . . . . . . 159
Renaming the Server . . . . . . . . . . . . . . . . . . . . . . . . . . . . . . . . . . . . . 161
Port Configuration . . . . . . . . . . . . . . . . . . . . . . . . . . . . . . . . . . . . . . 161
Downloading and Installing the Agent . . . . . . . . . . . . . . . . . . . . . . . . . . . . 162
Changing Agent Settings on a Player . . . . . . . . . . . . . . . . . . . . . . . 164
A Appendix A: Player Commands . . . . . . . . . . . . . . . . . . . . 167
Standard Commands . . . . . . . . . . . . . . . . . . . . . . . . . . . . . . . . . . . . . . . . . . . . 167
Player-Specific Commands . . . . . . . . . . . . . . . . . . . . . . . . . . . . . . . . . . . . . . 169
B Appendix B: Data Parser . . . . . . . . . . . . . . . . . . . . . . . . . 171
Data Source Definition File Overview . . . . . . . . . . . . . . . . . . . . . . . . . . . . . 171
The General Element . . . . . . . . . . . . . . . . . . . . . . . . . . . . . . . . . . . . . 172
The ParsingRule Element . . . . . . . . . . . . . . . . . . . . . . . . . . . . . . . . . 173
The DataItem Element . . . . . . . . . . . . . . . . . . . . . . . . . . . . . . . . . . . 175
Data Source Tutorial . . . . . . . . . . . . . . . . . . . . . . . . . . . . . . . . . . . . . . . . . . . . 177
Polycom, Inc. 5
Page 8

Polycom Digital Signage Administrator Guide
Parsing Rule Reference Guide . . . . . . . . . . . . . . . . . . . . . . . . . . . . . . . . . . . . 192
General Settings . . . . . . . . . . . . . . . . . . . . . . . . . . . . . . . . . . . . . . . . . 178
GetImage . . . . . . . . . . . . . . . . . . . . . . . . . . . . . . . . . . . . . . . . . . . . . . . 192
GetTag . . . . . . . . . . . . . . . . . . . . . . . . . . . . . . . . . . . . . . . . . . . . . . . . . 192
GetUrl . . . . . . . . . . . . . . . . . . . . . . . . . . . . . . . . . . . . . . . . . . . . . . . . . 193
InitCaps . . . . . . . . . . . . . . . . . . . . . . . . . . . . . . . . . . . . . . . . . . . . . . . . 193
Lcase . . . . . . . . . . . . . . . . . . . . . . . . . . . . . . . . . . . . . . . . . . . . . . . . . . 193
Left . . . . . . . . . . . . . . . . . . . . . . . . . . . . . . . . . . . . . . . . . . . . . . . . . . . . 194
LeftTrim . . . . . . . . . . . . . . . . . . . . . . . . . . . . . . . . . . . . . . . . . . . . . . . 194
Mid . . . . . . . . . . . . . . . . . . . . . . . . . . . . . . . . . . . . . . . . . . . . . . . . . . . 195
ParseDelimited . . . . . . . . . . . . . . . . . . . . . . . . . . . . . . . . . . . . . . . . . . 195
ReadTextFile . . . . . . . . . . . . . . . . . . . . . . . . . . . . . . . . . . . . . . . . . . . . 196
Replace . . . . . . . . . . . . . . . . . . . . . . . . . . . . . . . . . . . . . . . . . . . . . . . . 196
ReplaceCharacterCodes . . . . . . . . . . . . . . . . . . . . . . . . . . . . . . . . . . 197
ReplaceTag . . . . . . . . . . . . . . . . . . . . . . . . . . . . . . . . . . . . . . . . . . . . . 197
Right . . . . . . . . . . . . . . . . . . . . . . . . . . . . . . . . . . . . . . . . . . . . . . . . . . 197
RightTrim . . . . . . . . . . . . . . . . . . . . . . . . . . . . . . . . . . . . . . . . . . . . . . 198
SetValue . . . . . . . . . . . . . . . . . . . . . . . . . . . . . . . . . . . . . . . . . . . . . . . 198
StrCat . . . . . . . . . . . . . . . . . . . . . . . . . . . . . . . . . . . . . . . . . . . . . . . . . . 199
Trim . . . . . . . . . . . . . . . . . . . . . . . . . . . . . . . . . . . . . . . . . . . . . . . . . . . 199
TrimFromEnd, TrimFromStart, TrimToEnd and TromToStart . 200
Ucase . . . . . . . . . . . . . . . . . . . . . . . . . . . . . . . . . . . . . . . . . . . . . . . . . . 200
C Appendix C: Configuration Files . . . . . . . . . . . . . . . . . . . 201
Changing Output Settings with the XPT.ini Configuration File . . . . . . . 201
6 Polycom, Inc.
Page 9

About this Guide
This introduction provides a brief overview of the Polycom Digital Signage
Administrator Guide, describes the conventions used in this manual, and
explains how to get additional information or support.
Purpose
Documentation
The Polycom Digital Signage Administrator Guide describes how to configure
and use the Polycom Digital Signage Player and Remote Manager for a
complete digital signage solution.
The Polycom Digital Signage Administrator Guide is part of the Polycom Digital
Signage documentation set, which includes:
• Polycom Digital Signage Administrator Guide - This document.
• Polycom Digital Signage Server Getting Started Guide - Describes set-up and
installation of the Polycom Digital Signage Server.
• Polycom Digital Signage Player Getting Started Guide - Describes set-up and
installation of the Polycom Digital Signage Player.
• Polycom Digital Signage Content Management Guide - Describes publication
of content via the Polycom Digital Signage Web Controller. This document
is intended for Polycom Digital Signage Content Managers.
• Polycom Digital Signage Release Notes - Describes the product release. This
document also identifies known problems and their workarounds,
information not covered in the manuals or that has been modified since
publication, as well as problems that have been fixed since previous
releases.
Polycom, Inc. 7
Page 10

Polycom Digital Signage Administrator Guide Customer Support
Audience
This guide is primarily for:
• Polycom Digital Signage Administrators - Responsible for configuring
and managing the Polycom appliance. You should have a working
knowledge of media publication, peripheral ports, network protocols, and
media streaming and editing. You should also be familiar with Web
fundamentals, such as URLs and HTML.
Customer Support
Recognizing that technology alone cannot solve today’s complex challenges,
Polycom Global Services provides the industry’s best technical support staff
and programs to let you concentrate on the task at hand. Polycom users can
select from a variety of support solutions to obtain the level of support that
best meets their needs.
Before contacting your Polycom Global Services representative for technical
assistance, gather as much information as possible about your situation. Any
information you can provide helps us assess the problem and develop an
appropriate solution.
Polycom Global Services Telephone
If you have comments or questions about Polycom or if you need technical
assistance, contact:
• Polycom Global Services in U.S.A. 888-248-4143
8 Polycom, Inc.
Page 11

About Polycom Digital Signage
This chapter explains the Polycom Digital Signage architecture. This chapter
includes the following sections:
• Polycom Digital Signage Solution
• Architecture Overview
Polycom Digital Signage Solution
The Polycom Digital Signage solution is a combination of powerful
applications, including the following components:
Polycom Digital Signage Player
The Polycom Digital Signage Player is a powerful broadcast rendering engine
that delivers the highest quality output with the highest level of reliability.
Unlike simple video playback devices, the Polycom Digital Signage Player
dynamically arranges and composes signage elements, objects or zones in real
time to generate the final video output. This means individual content
elements can be changed at any time, without requiring entire video segments
to be re-rendered whenever a change is needed.
Polycom Digital Signage Server
The Polycom Digital Signage Server automatically distributes new content to
remote locations and receives continuous status updates from all Polycom
Digital Signage Players.
Polycom Digital Signage Remote Manager
The Polycom Digital Signage Remote Manager application works with the
Polycom Digital Signage Server to enable administration of networks of
players.
Polycom, Inc. 1
Page 12
Polycom Digital Signage Administrator Guide Architecture Overview
Polycom Digital Signage Web Controller
The Polycom Digital Signage Web Controller software lets users easily update
and manage content on the Players in a Polycom Digital Signage network,
with point-and-click simplicity.
Polycom Digital Signage Agent
The Polycom Digital Signage Agent software is the link between Players and
the Server, enabling network status and health monitoring.
Architecture Overview
The image above presents an overview of the Polycom Digital Signage
solution, depicting the overarching architecture for the various components of
the solution. Content, in the form of templates, assets, and playlists, is created,
assembled and managed using the Polycom Digital Signage Web Controller.
Users can easily update content using the Web Controller’s point-and-click
interface.
The content is automatically distributed to Polycom Digital Signage Players
via the Polycom Digital Signage Server, which acts as the central hub for the
Polycom Digital Signage system.
The Polycom Digital Signage Player renders content in real time for display to
a monitor, with the Polycom Digital Signage Agent linking Players to the
Server. The Polycom Digital Signage Agent also monitors the status of the
2 Polycom, Inc.
Page 13

Architecture Overview About Polycom Digital Signage
Polycom Digital Signage Player, and sends regular heartbeat and status
messages to the Polycom Digital Signage Server. The Agent can also take steps
to "heal" the Player if it detects a problem.
Administrators monitor and manage the system using the Polycom Digital
Signage Remote Manager application. This software displays the status and
details of all the Players connected to the system.
Administrators can also use the Polycom Digital Signage Remote Manager to
distribute and manage content packages, as well as issue commands to
individual players or groups of players, although content updates and
distribution are typically handled via the Polycom Digital Signage Web
Controller.
The Web Controller is used for day-to-day updates to content appearing on the
monitors in a given Polycom Digital Signage network.
Polycom, Inc. 3
Page 14

Polycom Digital Signage Administrator Guide Architecture Overview
4 Polycom, Inc.
Page 15

Configuring the PDS Player
This chapter explains the basic configuration processes for the Polycom Digital
Signage Player. This chapter includes the following sections:
• About the PDS Player
• Accessing the Player
• Configuring the Player Directly
1
• Configuring PDS Player Video Settings
• Startup Settings
• Options
• Configuring PDS Player Advanced Settings
About the PDS Player
The PDS Player is a powerful real-time broadcast rendering engine that
delivers the highest quality output with the highest level of reliability. It offers
reliable playback for 24x7 operation.
Unlike simple video playback devices, the PDS Player dynamically arranges
slide elements in real time to generate the final video output. This means
individual elements of the content can be changed at any time, without
requiring that entire video segments be re-rendered whenever a change is
required.
Accessing the Player
After installation, the PDS Player can be configured directly or through
Windows Remote Desktop Protocol (RDP).
Polycom, Inc. 5
Page 16
Polycom Digital Signage Administrator Guide Configuring the Player Directly
If using RDP to access a Player, you will not be prompted to enter login
credentials. Please note, however, that to reboot a PDS Player using RDP you
will need to enter A
you must select Restart.
NOTE: Accessing the Player via RDP locks the Player output. As a result, RDP is
not a recommended tool for routine player management. If you wish to make
content and configuration changes while the Player is running, use the Polycom
Remote Manager and Polycom Web Controller.
LT + F4. This will launch a shut down dialog, from which
Configuring the Player Directly
After a Player has been set up, connected to an output, and connected to the
network via the Polycom Digital Signage Agent, administrators can configure
the Player for their particular implementation. The following sections outline
the various configuration possibilities. Please note that the following process
applies for all configuration changes:
1 Launch the PDS Player from the desktop, if it is not already running.
2 Stop Player output by hitting A
3 Navigate to Tools > Settings. The Settings window will appear.
4 Choose which tab in the Settings window you wish to edit. The specifics
of each tab are detailed below.
5 When configuration has been completed, click Apply and then OK.
6 Reload the Playlist in the Player.
LT + ESC, if necessary.
Configuring PDS Player Video Settings
PDS Player Video Settings is divided into two sections: Output Window and
Capture Settings.
Settings defined in Output Window let you configure the properties of the
PDS Player output window on the Player output display.
Settings defined in Capture Settings let you configure how the PDS Player
communicates with 3rd-party capture devices.
6 Polycom, Inc.
Page 17
Configuring PDS Player Video Settings Configuring the PDS Player
Output Windows Settings
The Output Window section of Video Settings includes the following
configuration options:
• Standard: Specifies the dimensions of the video output window. Choose
from a list of standard resolutions: 640x480, 720x480 (DV-NTSC), 720x486
(NTSC SMPTE), 720x576 (PAL), 800x600, 1024x768, 1280x720, 1280x1024,
1600x1200, and 1920x1080.
•Custom: Specifies the dimensions of the video output window according
to the specified Width (W) and Height (H).
• Orientation: Specifies whether the video output window should be
displayed in either Landscape or Portrait format, in conjunction with the
Standard or Custom output window dimensions.
• Auto size output to match slide dims: When selected, the resolution of the
video output window will scale to match the slide template dimensions.
• Auto size slide to match output: When selected, the resolution of the slide
template is automatically scaled to match the resolution of the video
output window.
• Dual monitor mode: When selected, configures the PDS Player display
output to appear on a second monitor. This mode can also be used for
cloning the display. This supports multiuple monitors from one Player.
See the Polycom Digital Signage Player Getting Started Guide for more details.
Polycom, Inc. 7
Page 18
Polycom Digital Signage Administrator Guide Startup Settings
• Full screen: When selected, the PDS Player output will be displayed in full
screen mode (either on the primary or secondary display). When
unselected, the PDS Player output will be displayed in a separate window.
• Output Window Zoom: Select to resize the CG Rendering window to
100% (full size) or 50% half size when the Full screen mode is disabled.
•Wait on VSync: Depending on the features and the performance of your
system's graphics card adapter, select one of the following options:
—True: Significant loss of system performance with a high-quality
graphics output result.
—Hybrid: Improved system performance with some loss in the quality
of the graphics output result.
— False: Best possible performance with a low-quality graphics output
result.
Capture Settings
Capture Settings determine how video and audio are interpreted for input to
the PDS Player.
NOTE: Only custom implementations support changes to capture settings.
• Video Capture Filter: Select the device for inputting video to the PDS
Player. This list depends on the video devices connected to the
workstation.
• Video Crossbar Setting: Select the port for the video input to the
workstation, for example SVideo In or Composite In.
• Audio Capture Filter: Select the device for inputting audio. This list
depends on the audio card and audio devices connected to the
workstation, for example SoundMAX Digital Audio.
• Audio Crossbar Setting: Select the port for the audio input to the
workstation.
• TV Tuner Channel: Select the channel to tune to when capturing from a
TV Tuner card. Select channel 0 if no TV Tuner card is present.
Startup Settings
The PDS Player Startup Settings tab is divided into two sections: Startup
Properties and Startup Options.
8 Polycom, Inc.
Page 19
Startup Settings Configuring the PDS Player
Settings defined in Startup Properties let you specify templates or scripts that
may load when PDS Player initially launches, as well as application functions
that may occur when PDS Player initially launches.
Startup Properties
The Startup Properties settings of Startup Settings are described as follows:
• Default Background Template: Specifies a template to load by default in
the background layer of the CG output when the PDS Player first
launches.
• Default Foreground Template: Specifies a template to load by default in
the foreground layer of the CG output when the PDS Player first launches.
• Startup Image Filename: Specifies an image to load in the CG output
when PDS Player first launches.
• Startup Script Filename: Specifies a script to execute when the PDS Player
first launches.
Startup Options
The Startup Options settings of Startup Settings are described as follows:
Polycom, Inc. 9
Page 20
Polycom Digital Signage Administrator Guide Options
• Load previously loaded playlist on startup: When enabled, loads the
previously loaded playlist when the PDS Player launches. When disabled,
the PDS Player launches remaining in a ready state with no content
displayed on the CG output.
TIP: Enable Load previously loaded playlist on startup to automatically resume
playback of your content on-air and recover from system anomalies or power
failures
• Minimize on startup: When enabled, hides the PDS Player interface from
the system desktop.
• Auto launch renderer on startup: When enabled, automatically launches
the CG rendering engine.
Options
The PDS Player Options tab is divided into three sections: General, Messages,
and Audio Settings. Settings defined in General let you specify options
available to the PDS Player. Settings defined in Messages let you specify
options related to the Messages window. Settings defined in Audio Settings let
you specify options related audio output from the PDS Player.
10 Polycom, Inc.
Page 21

Options Configuring the PDS Player
General
The General Settings panel allows administrators to dictate certain general
configuration settings for the CG Rendering engine that is launched by default
from the PDS Player. The settings are described as follows:
• Show renderer control panel: When enabled, displays the CG rendering
engine control panel.
• Enable auto screenshot: When enabled, takes screenshots of the content
being displayed by the PDS Player. These screenshots are then displayed
in the “Current Output Window” section of the PDS Player.
• Close renderer on exit: When enabled, closes the CG rendering engine
when the PDS Player quits.
• Prerender next slide in presentation: When enabled, stores the next event
in system memory while the current event is displayed on the output.
• Restrict cursor to primary display: When enabled, prevents the system
mouse cursor from appearing on the secondary output of the the PDS
Player.
Messages
The Messages Settings panel is described as follows:
• Show Messages Box: The Messages dialog in the PDS Player interface
provides moment-by-moment details regarding functioning of the PDS
Player. The frequency of messages can be determined in the Show
Messages Box. Select one of the following options:
—On Error: Displays messages in the Messages dialog only when an
error has occurred.
— Always: Displays all messages-errors, information, status-in the
Messages dialog.
— On Request Only: Displays messages only upon request when you
click the Show Messages button in the PDS Player.
— Log All Messages: Writes all PDS Player events to the log file.
• Message Filter Box: Select one of the following options:
— Show Critical Messages Only: Displays messages in the Messages
dialog only when an error has occurred.
— Show All Messages: Displays messages only when you click the
Show Messages button in the Settings dialog. Messages displayed
include content updates, configuration changes, output changes, and
updates to data-driven templates, as well as error messages displayed
in red text.
Polycom, Inc. 11
Page 22
Polycom Digital Signage Administrator Guide Configuring PDS Player Advanced Settings
Audio
The Audio Settings of the Options window are described as follows:
• Adjust volume on slide load: When enabled, increases or decreases the
audio output level based on the number configured in the Player Default
Volume.
• Use Default Volume From Box: Select one of the following options:
— System Volume: the PDS Player will output audio based on the
volume of the system's mixer settings
— PDS Setting: the PDS Player will output audio based on the default
volume specified.
•PDS Default Volume: Audio level (from 0 - 100) to use for audio output.
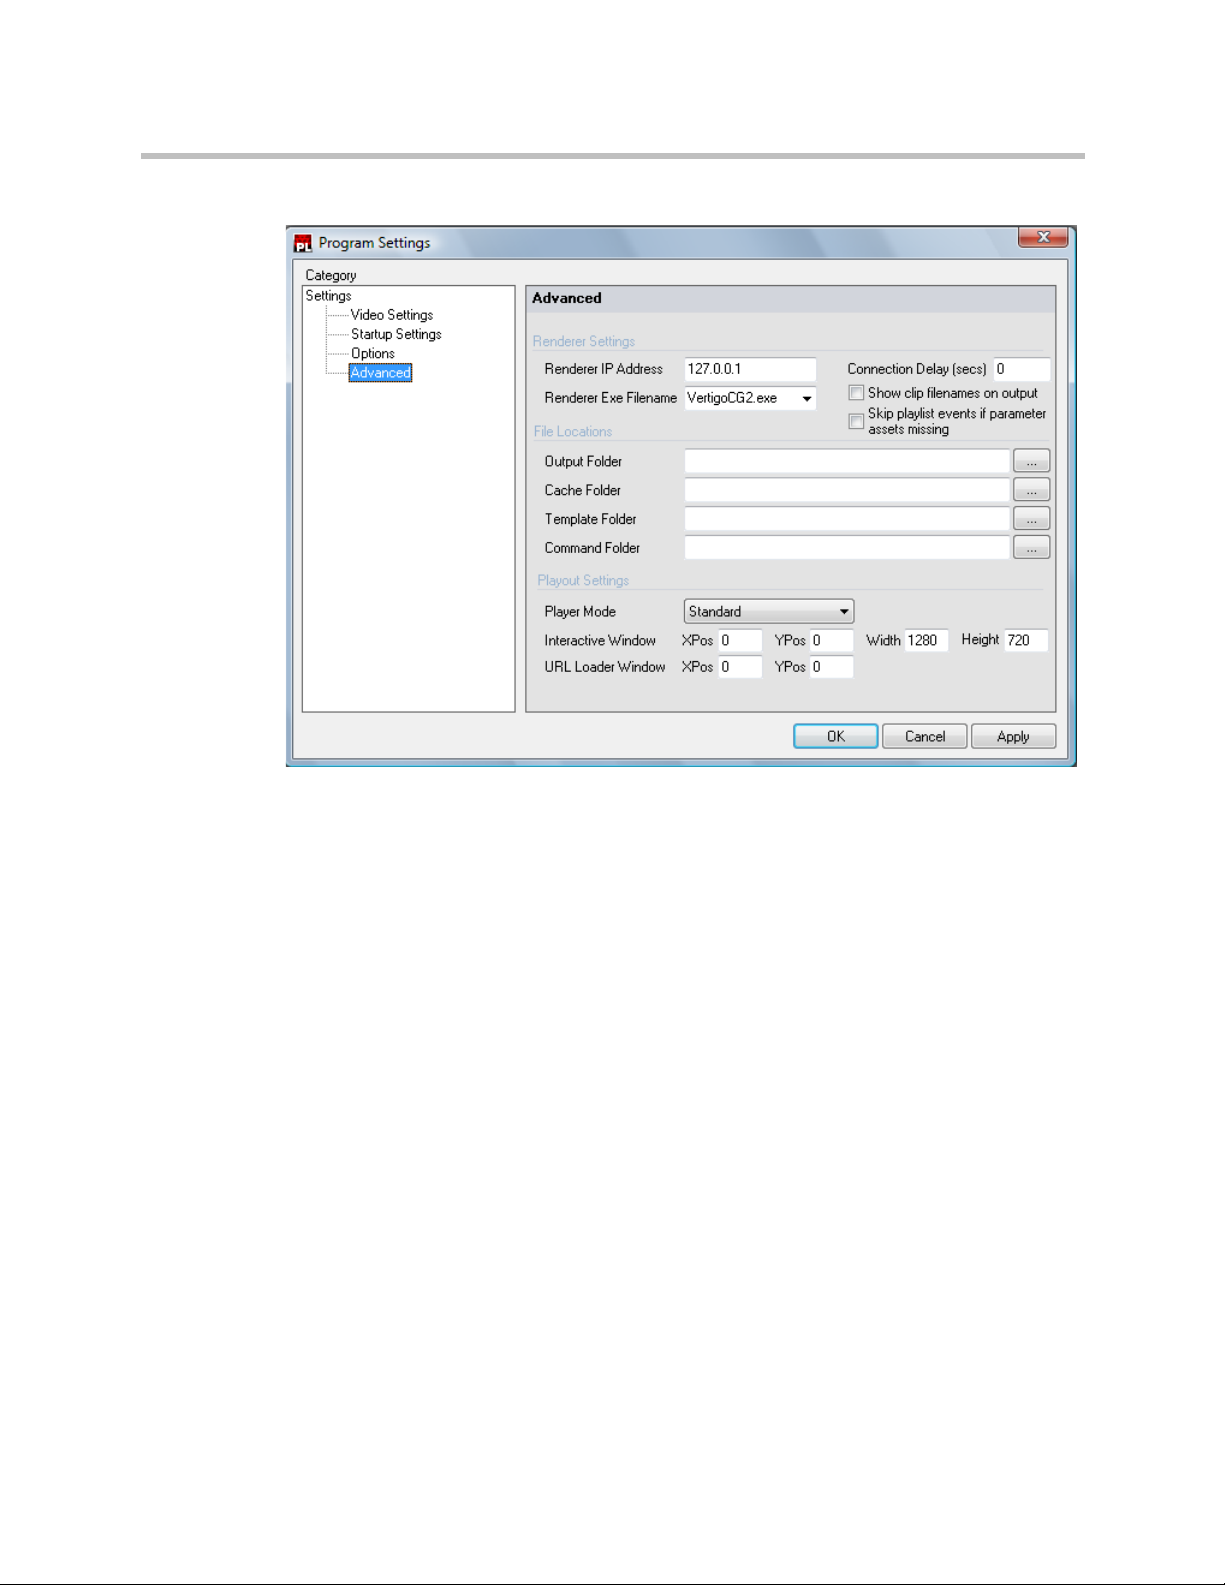
Configuring PDS Player Advanced Settings
The PDS Player Advanced Settings tab allows users to change system defaults.
These settings should not be changed without consulting Polycom Support.
The PDS Player Advanced tab is divided into three sections: Renderer
Settings, File Locations, and Playout Settings.
NOTE: Please avoid modifying these values unless instructed to do so by Polycom
support.
12 Polycom, Inc.
Page 23
Configuring PDS Player Advanced Settings Configuring the PDS Player
Renderer Settings
The Renderer Settings options of Advanced Program Settings are described as
follows:
• Renderer IP Address: Displays the IP address of the rendering engine.
• Renderer Executable Filename: Displays the executable filename that
corresponds to the PDS rendering engine.
• Connection Delay: Displays the delay, in seconds, from the time you click
the Render button until the scene is submitted CG rendering engine.
File Locations
The File Locations configuration in Advanced Program Settings allow users to
dictate which directories the PDS Player uses:
•Output folder: Displays the folder to which the CG Renderer sends
rendered output that is displayed in the output monitor.
• Cache folder: Displays the folder to which the CG Renderer caches
information while rendering the output.
• Template folder: Displays the default folder to which the PDS Player
saves exported templates.
Polycom, Inc. 13
Page 24
Polycom Digital Signage Administrator Guide Configuring PDS Player Advanced Settings
• Command folder: Displays the folder to which the commands are stored
on the system for use with other PDS applications such as Remote
Manager, or Web Screens.
Playout Settings
The Playout Settings of the Advanced Program Settings are as follows:
• Player Mode box:
— Standard: Configures the PDS Player to function as an authoring
station.
— Interactive: Configures the PDS Player to function as an
interactive/kiosk station.
NOTE: Interactive mode is not supported in most implementations. Please do not
select this option without input from Polycom support.
• Interactive Window: When in Interactive Player Mode, defines the
topmost and leftmost location (XPos/YPos) and size (Width/Height), in
pixels, of the interactive window.
• URL Loader Window: When displaying an internet browser window,
defines the topmost and leftmost location (XPos/YPos) in pixels, of the
Loader window.
14 Polycom, Inc.
Page 25

Using the PDS Player
This chapter outlines local control of the Polycom Digital Signage Player. In a
typical implementation, however, all configuration and content management
will be performed through the PDS Remote Manager and PDS Web Controller.
Please note that these tools are described in subsequent chapters.
This chapter includes the following sections:
• Getting Started
2
Getting Started
• The PDS Player Interface
• Scheduling Events with the PDS Player
• Controlling the VertigoCG Renderer
When the PDS Player application is opened, it will immediately begin
displaying the default playlist.
Loading a Template
1 To load a PDS Template, in the PDS Player choose File > Load
Template…
2 Locate a PDS Template (.xtmpl) on your computer and choose Open.
The template plays in the PDS Player output.
Polycom, Inc. 15
Page 26
Polycom Digital Signage Administrator Guide Getting Started
3 If you have elected not to use full-screen mode, the content will be
displayed on the CG Rendering Window. To disable the CG Rendering
Window, open Tools > VertigoCG and select Stop. Alternatively, press
LT + ESC.
A
Further controls for the CG Renderer are detailed below.
Loading a Playlist
1 To load a PDS Playlist, in the PDS Player choose File > Load Playlist…
2 Browse to a PDS Playlist (.xplst) on your computer and choose Open.
The playlist plays in the CG Rendering window.
3 To playback a PowerPoint slide in the PDS Player, with a PowerPoint
presentation loaded, select a slide and choose Tools > Render
PowerPoint Slide.
The slide plays in the CG Rendering window.
16 Polycom, Inc.
Page 27

The PDS Player Interface Using the PDS Player
The PDS Player Interface
The PDS Player is designed to facilitate the task of playing out either
individual templates, playlists, or creating schedules of events.
Current Playlist
Displays the directory path and name of the currently active playlist.
NOTE: Previously loaded playlists can be quickly loaded by clicking on the Current
Playlist filename bar and choosing a playlist from the drop-down list that appears.
Default Layer
Polycom, Inc. 17
Page 28

Polycom Digital Signage Administrator Guide The PDS Player Interface
Specifies the rendering layer in which a template loads. Options available
are Background and Foreground.
Default Transition
Specifies the default transition effect to be used in between templates
loaded in a playlist. Transitions from which you can select include Cut,
Fade, Crossfade, Push Right, Push Left, and Random.
Events
• Last Event: The time of the last event loaded or executed in the Player.
• Next Event: The time of the next planned event to occur in the Player.
• Time to Next Event: Countdown timer of the next planned event to occur
in the Player.
Control Buttons
•Load: Opens a dialog box to load templates or playlist files.
• Clear: Removes the contents of a previously loaded playlist from the
Player.
•Reset All: Clears the output of the CG rendering window.
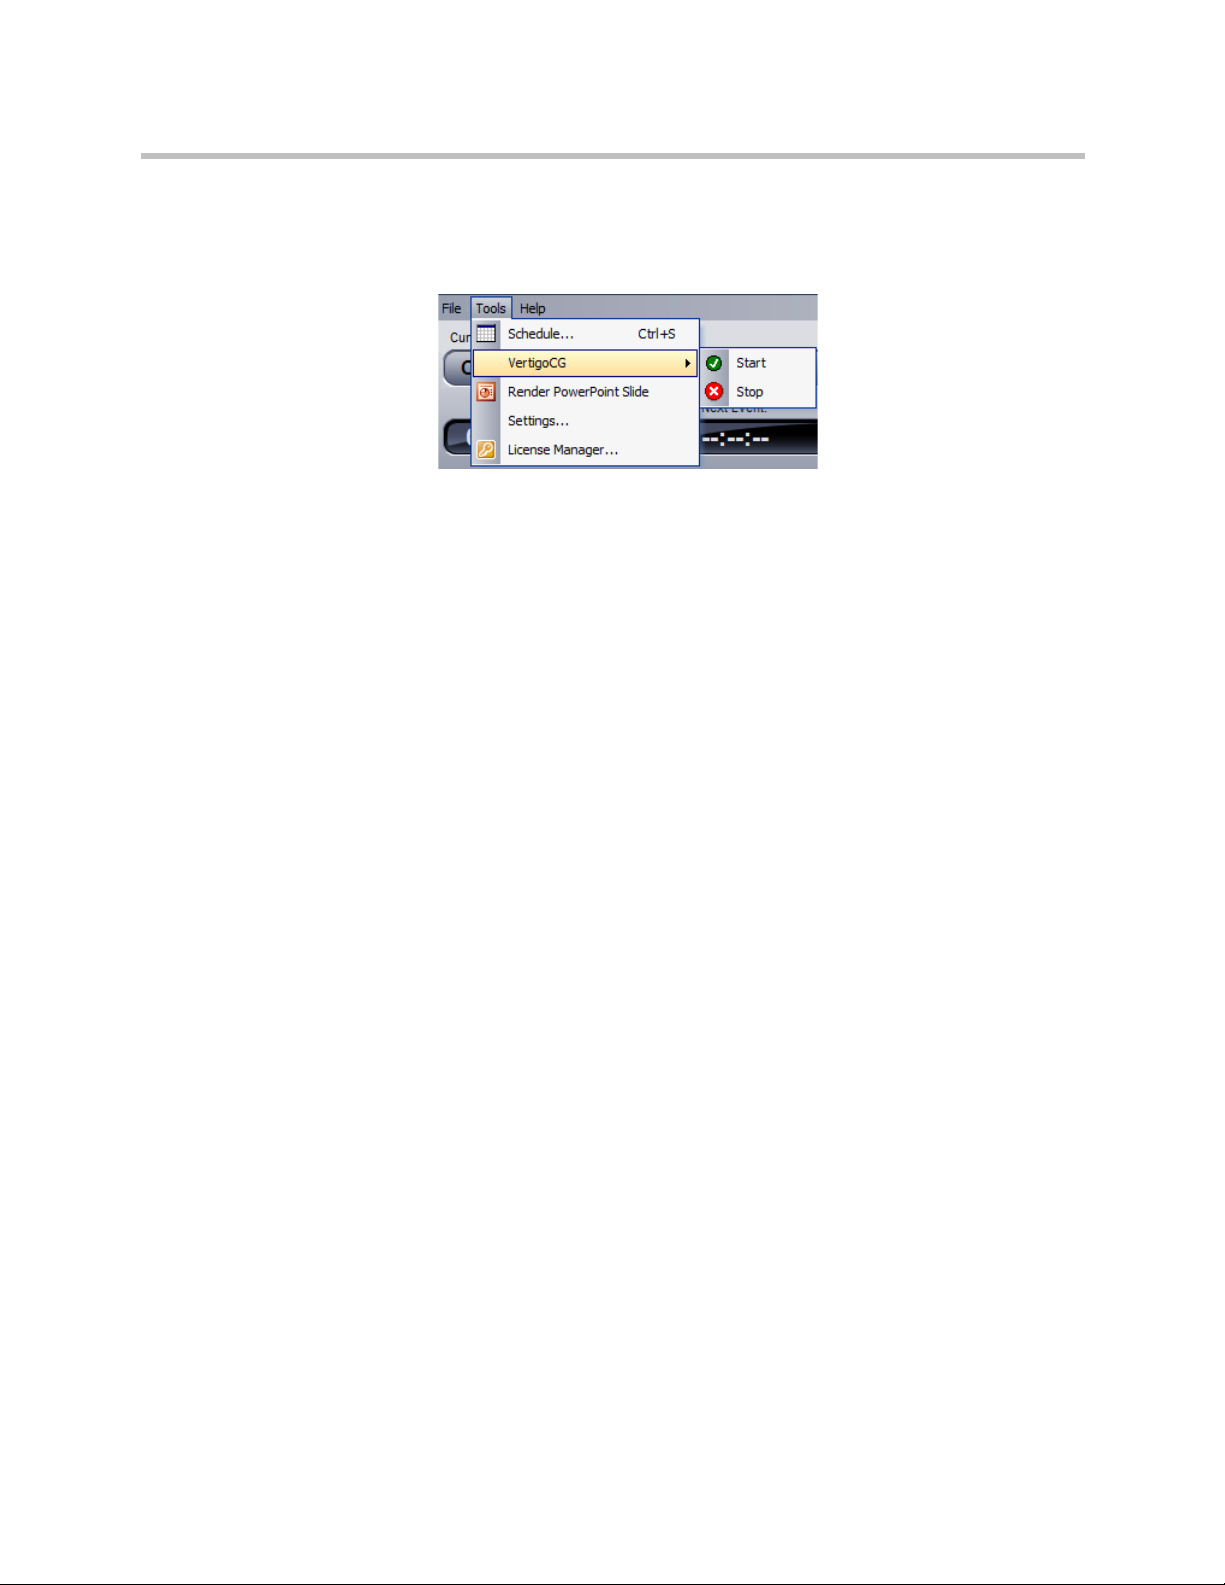
Playlist Controls
The PDS playlist controls are described as follows:
18 Polycom, Inc.
Page 29
The PDS Player Interface Using the PDS Player
:
Button Function
Pauses the playback of the currently loaded playlist.
When paused, resumes playback of the currently loaded
playlist.
Plays the previous event in the currently loaded playlist.
Plays the next event in the currently loaded playlist.
Jumps to the first event in the currently loaded playlist.
Jumps to the last event in the currently loaded playlist.
Message Control
• When Show Messages is enabled, displays messages from the PDS Player.
The Clear button clears the contents of the Messages window.
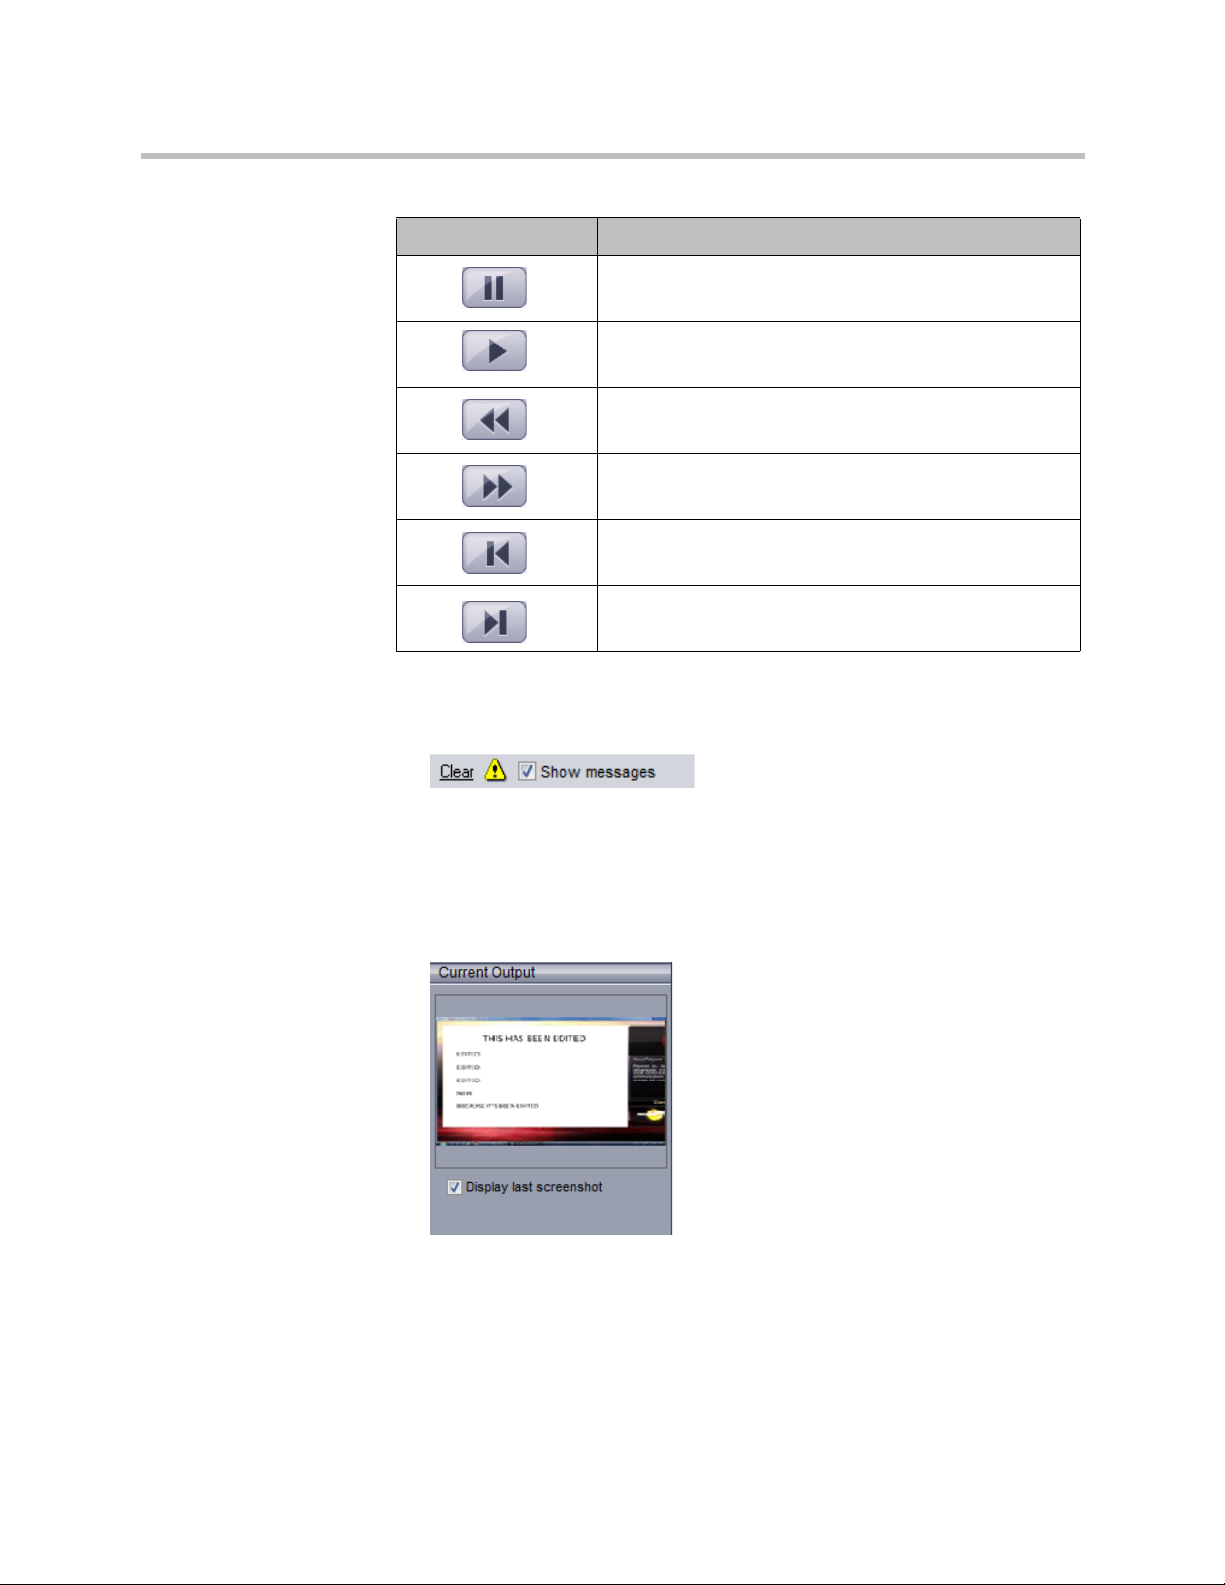
Current Output Window
• When Enable Auto Screenshot is enabled, displays a preview of the
current output of the PDS Player.
Polycom, Inc. 19
Page 30
Polycom Digital Signage Administrator Guide Scheduling Events with the PDS Player
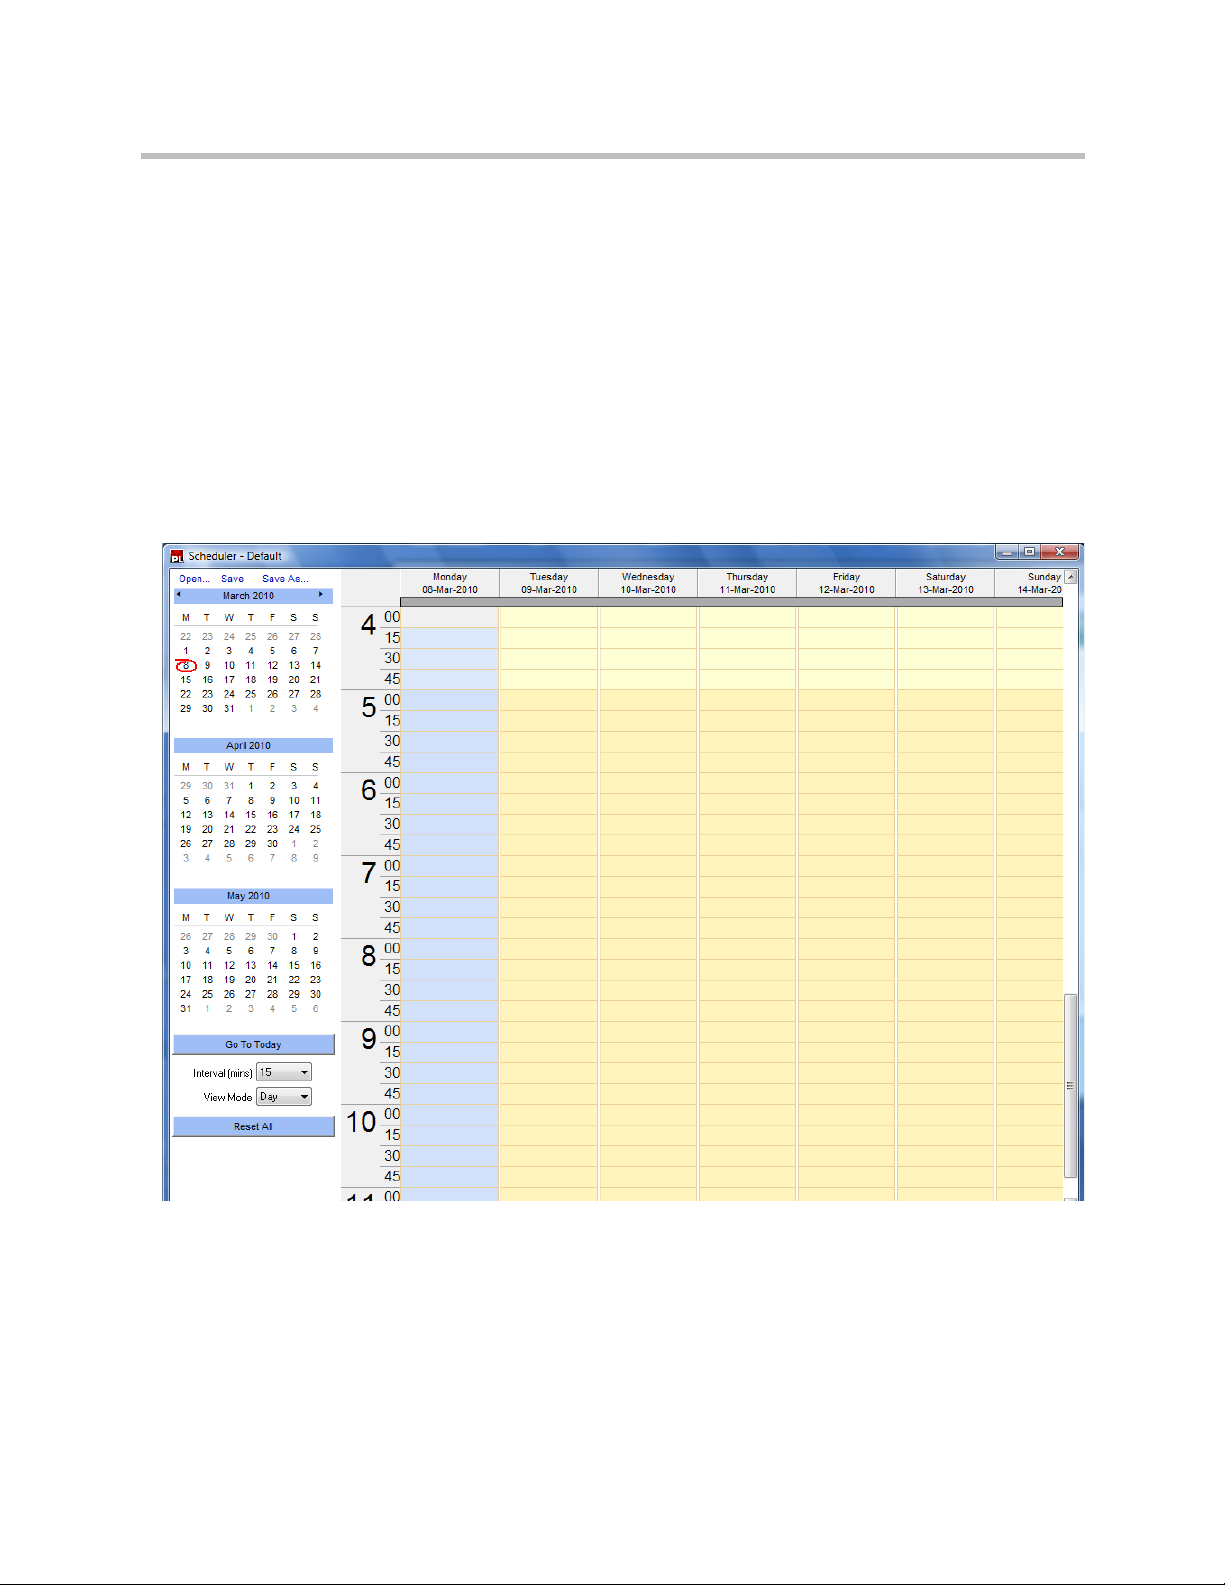
Scheduling Events with the PDS Player
With the PDS Scheduler, you can create playout schedules for several different
playlists, or assign PDS commands to occur at specific times throughout the
day.
Schedules can also include control events, such as starting a crawling ticker on
the output screen. This allows users in the central location to schedule any
kind of control event by assigning the appropriate event in the schedule.
To activate PDS Scheduler:
1 In the PDS Player, choose Tools > Schedule…. The PDS Scheduler
window appears.
20 Polycom, Inc.
Page 31

Scheduling Events with the PDS Player Using the PDS Player
2 If the Schedule is presented by Month rather than Day, go to the View
Mode box and select Day.
3 In the Day view, right-click on the date and time at which to start playing
the slideshow. From the Scheduler menu that appears, select Add
Event…. The Add Schedule Event dialog appears.
Polycom, Inc. 21
Page 32

Polycom Digital Signage Administrator Guide Scheduling Events with the PDS Player
4 In the Event box, select Load Presentation.
You can also select any of the following and schedule its playout:
Load Presentation: Schedules playout of a complete presentation.
Load Slide: Schedules playout of an individual slide. You must select
the presentation and specific slide.
Load Playlist: Schedules playout of a playlist. Browse to select a
playlist (.xplst) file.
Execute Script: Schedules when to execute a script (.xsc) file that
controls a slideshow presentation for broadcast.
Run Program: Schedules when to launch an executable program.
Unload All Presentations: Removes any loaded presentations or
slides that have been loaded into the PDS Player.
Reset All: Clears the output of the CG renderer.
Unload and Reset All: Removes any loaded presentations or slides
that have been loaded into the PDS Player and clears the output of
the CG renderer.
5 In the Filename field, click Browse and select a presentation.
6 If you want to change the time, in the Event Time box, set the time at
which to start playing the presentation.
7 In the Preroll box, set the number of seconds.
8 Set the start date in the Event Date box.
9 If you want to repeat the presentation playout, enable Recurring Event.
The Recurrence Pattern options appear.
22 Polycom, Inc.
Page 33

Scheduling Events with the PDS Player Using the PDS Player
10 From the Recurrent Pattern options, set the frequency of recurrence.
Choosing Daily, Weekly, and Monthly will appear.
11 From the Range of Recurrence options, set start and end dates.
12 Click OK.
13 The scheduled presentation and any recurrences you specified appear in
the PDS Scheduler calendar.
To delete a scheduled event:
1 In the PDS Scheduler, select the event you want to delete and right-click.
2 In the menu that appears, select Delete Event.
To delete a scheduled recurrence:
1 In the PDS Scheduler, select any one event from a recurrence you want to
delete and right-click.
2 In the menu that appears, select Delete Recurrence.
Polycom, Inc. 23
Page 34

Polycom Digital Signage Administrator Guide Scheduling Events with the PDS Player
To edit a scheduled event:
1 In the PDS Scheduler, select the event you want to edit and right-click.
2 In the menu that appears, select Edit Event… The Add Schedule Event
dialog appears.
To immediately execute a scheduled event:
1 In the PDS Scheduler, select the event you want to execute and
right-click.
2 In the menu that appears, select Run Event Now.
To save and activate a schedule:
1 In the PDS Scheduler, click Save As….
2 In the Save As dialog box, provide a name for the schedule and choose
Save.
3 The name of the schedule appears at the bottom of the PDS Player next to
Active Schedule.
24 Polycom, Inc.
Page 35

Controlling the VertigoCG Renderer Using the PDS Player
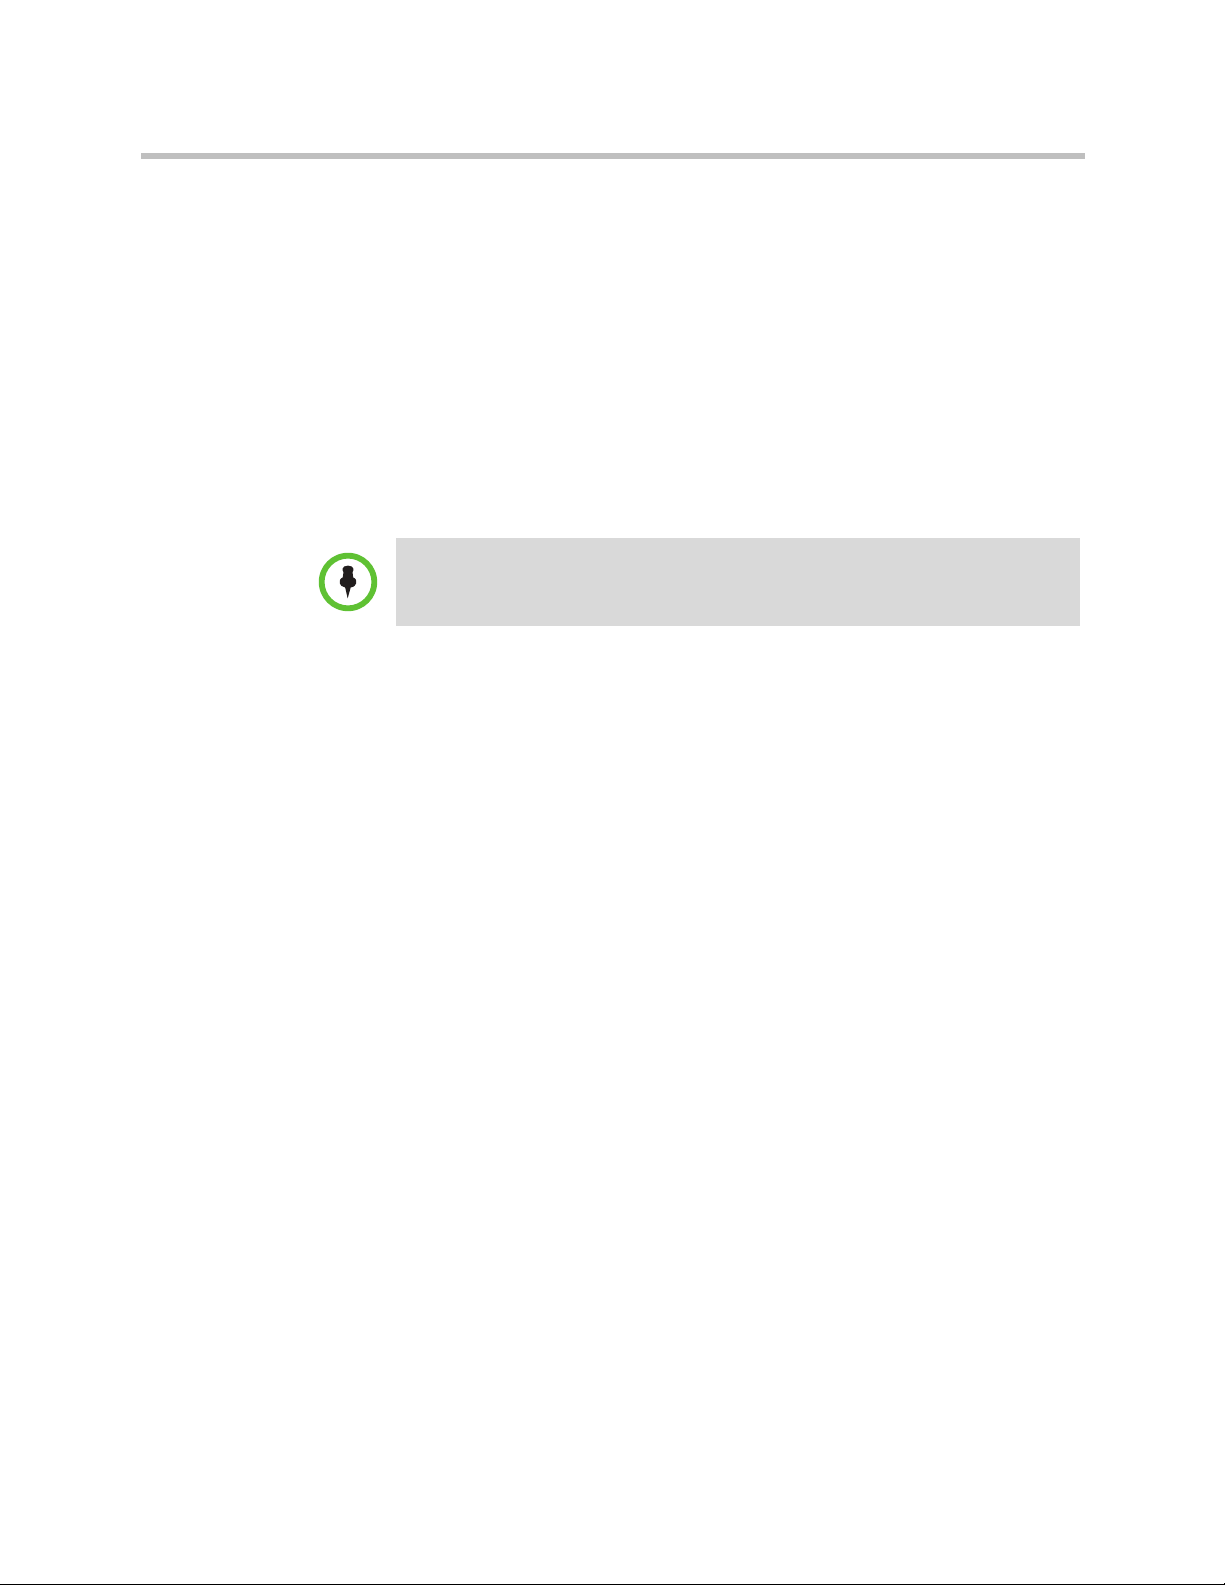
Controlling the VertigoCG Renderer
The PDS Player lets you gain access to the CG rendering engine directly. This
lets you start and stop the CG as desired.
To start and stop the VertigoCG, do the following:
1 In the PDS Player, choose Tools > VertigoCG > Start.
2 The CG rendering window appears.
3 When ready to stop the CG rendering engine, choose Tools > VertigoCG
> Stop.
4 The CG rendering window disappears.
Using VertigoCG
The VertigoCG renderer allows direct configuration via a control interface, if
enabled in the PDS Player Renderer Settings. When the VertigoCG rendering
engine launches, a small interface launches.
1 The Load feature allows you to directly load .xml files in the CG
Renderer.
2 Click Disconnect to disconnect the renderer from the Player.
3 Click Exit to close the Renderer.
Polycom, Inc. 25
Page 36

Polycom Digital Signage Administrator Guide Controlling the VertigoCG Renderer
4 Click Control Panel to launch the VertigoCG Control Panel.
Hardware Settings allow users to choose a video card device for output,
select video and audio capture devices, whether to display the Renderer
in full screen or in a moveable window, the TV output format (NTSC, PAL,
etc.), and whether to display FPS along with the output.
Under Output, users can choose to view the output in Monitor or
Windows Media 9 formats, if possible.
Under Video, users can choose whether to display Video on top and how
many Video Buffers are present.
NOTE: The default PDS Player does not support changes in the hardware settings
of the VertigoCG Renderer. Please contact Polycom Support before making any
changes.
26 Polycom, Inc.
Page 37

Controlling the VertigoCG Renderer Using the PDS Player
5 The Software Settings tab provides another set of configuration options.
Users can change the scene directory, dictate a log file, change the TCPIP
Port for the CG Renderer, change the Cel Cache Size, and enable
MipMapping, a faster but more memory-intensive form of rendering. If
MipMapping is enabled, users can adjust the negative level of detail bias.
NOTE: The default PDS Player does not support changes in the software settings
of the VertigoCG Renderer. Please contact Polycom Support before making any
changes.
6 When configuration has been completed, click OK. Click exit on the
VertigoCG interface and reopen it.
NOTE: Changes made in the VertigoCG settings do not apply across PDS Player
sessions and will be lost if the PDS Player application is closed and reopened.
Polycom, Inc. 27
Page 38

Polycom Digital Signage Administrator Guide Controlling the VertigoCG Renderer
28 Polycom, Inc.
Page 39

Using the Remote Manager
This chapter explains the interface and use cases for the Polycom Digital
Signage Remote Manager. The installation of the Remote Manager is detailed
in the Polycom Digital Signage Server Getting Started Guide.
This chapter contains the following sections:
• Main Window
3
Main Window
• Tool Bar
• Network and Groups Pane
• Remote Player Management Console
The PDS Remote Manager interface consists of the toolbars and four panes, as
shown in the image below:
Polycom, Inc. 29
Page 40

Polycom Digital Signage Administrator Guide Main Window
The toolbars provide the buttons used for a number of high-level operations
within PDS Remote Manager. Most other operations are available through
dialog boxes that will be displayed (e.g., on a Player name or thumbnail
image).
Networks and Groups Pane
The Networks & Groups pane shows a tree view of the hierarchy of networks
and groups you can manage that are running on the PDS Server. Each network
contains one or more groups (which may in turn have sub-groups).
The Network pane shows the Players defined within the network or group
that is currently selected in the Networks & Groups pane. All the Players that
are defined in the network or group will be shown, whether they are currently
online or offline.
The Network pane has five tabs, allowing you to manage different aspects of
these Players' operations:
• The Connections tab shows you the Players that are currently connected
to the PDS Server (online) as well as those offline Players that have been
connected recently. The Player list is tabular, and you can select the sorting
order for the list by clicking a field heading.
Events Pane
— In the lower portion of the pane, the Connections tab will show you
the list of users currently connected to the PDS Server.
• The Player Status tab relates information on Player connectivity.
• The Screenshots tab shows thumbnail views of the screenshots from the
Players in the selected network or group. These thumbnails are refreshed
regularly and will show the output from the Player as taken from the
computer's graphics card. (The thumbnail refresh interval is set by the
Auto-Refresh menu in the toolbar.)
• The System Info tab provides some basic system information, such as
software and operating system versions, for each Player.
• The Packages tab shows the file download packages that have been
defined for the selected network.
The Events pane shows a table of recent system events on the Players in the
selected network, much like a shared log file. The most recent events will
appear at the top of the table.
30 Polycom, Inc.
Page 41

Tool Bar Using the Remote Manager
Current Incidents Pane
The Current Incidents pane shows the actual log messages from PDS Server
and the PDS Remote Manager. The events shown here are all major and minor
log messages from the Polycom PDS Server and the PDS Remote Manager,
including the events shown in the Events pane.
Status Bar
Finally, the status bar (at the very bottom of the PDS Remote Manager
window) shows you the current status of PDS Remote Manager, indicating:
— the name of the PDS Server;
— the number of Players and managers currently connected to the PDS
Server; and
— the name of your currently selected network.
In addition to the PDS Remote Manager main window shown here, PDS
Remote Manager will bring up smaller windows for specific tasks, such as
managing a Player or creating a file package. The PDS Remote Manager main
window will still be available while the task windows are open.
Tool Bar
Connect/Disconnect
The Connect…/Disconnect button allows you to connect PDS Remote
Manager to a PDS Server and to disconnect from the Server. Clicking Connect
brings up the following dialog:
The default User Name/Password credentials are Administrator /
Polycom123.
Polycom, Inc. 31
Page 42

Polycom Digital Signage Administrator Guide Tool Bar
Auto-Refresh Menu
The Auto-Refresh menu allows you to select the interval at which the status
information in Remote Manager is refreshed. This includes refreshing the
screenshots as well as all other system information displayed in the different
tabs in the Network pane.
NOTE: Please remember that each refresh requires data, including a screenshot
image, to be sent from the Player system to the PDS Server and then from the PDS
Server to your PDS Remote Manager. When managing a medium-sized or large
network of Players, you can create a high level of network traffic and risk
overloading your network simply by making your refresh interval too short.
Refresh
Click Refresh to refresh the network information and screenshots manually.
This button is particularly useful when the Auto-Refresh interval is set to Off.
Publish Content
The PDS Remote Manager includes a Publish Content dialogue. This tool is
used to move content packages to PDS Player systems. Please note that, in
most implementations, content updates will be performed through the PDS
Web Controller rather than the Remote Manager.
The Remote Manager communicates directly with remote Players through the
PDS Server. The publication process performs an inventory check against
contents stored on remote Players. If content is missing, the Remote Manager
creates a package to transfer to the Players. A package is a compressed archive
containing all assets missing from the remote Player as well as all content
added through the Publish Content tool.
32 Polycom, Inc.
Page 43

Tool Bar Using the Remote Manager
Publish New Content
Click Publish Content to bring up the Publish Content dialog. The dialog has
a Package Name field at the top (enter the name of your content package here)
and three tabs in the main section:
To publish content:
1 Click Add Files… to select files from your computer to be added to the
package. You may select multiple files in the file browser by holding
down Shift and clicking the file icons.
In the Assets view, you may also drag and drop the files you wish to
publish.
Polycom, Inc. 33
Page 44

Polycom Digital Signage Administrator Guide Tool Bar
a The Assets tab and the Detail File List tab allow you to select from two
different views of the list of files in the package.
2 Click Remove All to remove all of the assets from the package. (Select an
asset and press the Delete key to remove only one asset from the
package.)
3 Click Reset Target Paths to reset the destination paths for all assets back
to their default values.
4 To set individual destination paths, use the Assets view. The Assets view
shows a small thumbnail image and size/resolution information.
Right-click on an asset to bring up a context menu. Select Change Target
Path… to bring up the Set Remote Destination Path dialog box:
5 In the dialog box, enter the destination directory for the selected asset.
You may then click Cancel, click OK to apply the change only to the
selected asset, or click Apply to All Assets In This Package to apply the
change to all the assets in the package.
6 The Detail File List view shows more details, similar to the Details view
in the Windows Explorer; click a column heading to sort by that column.
34 Polycom, Inc.
Page 45

Tool Bar Using the Remote Manager
Remove Old Content
If there is old content to be removed from the Players receiving the package,
you can specify the file names for the old content in the Remove Old Content
tab.
Click "Add Files" to add files to the removal list and bring up the deletion
dialog:
Execute Actions
After you have selected your assets and made any required changes to the
destination paths, click Next to bring up the Package Properties dialog:
Polycom, Inc. 35
Page 46

Polycom Digital Signage Administrator Guide Tool Bar
Publish Software Update
Polycom Digital Signage Remote Manager can be used to publish routine
software maintenance updates to the network of Players.
To publish a software update:
1 Click Publish Software Update.
2 The Open Executable File dialog will appear. Choose a file and click
Open.
3 The Package Properties dialog will appear.
If you wish to designate a specific timeframe in which to extract the
package after publishing, do so in the Package Processing Schedule area.
The Command line should not be altered from the default.
4 Click OK. The Package will be compressed and published.
5 Consult the Events tab to ensure that the package has published and run.
6 Upon installing a software update, the PDS Player application will not
automatically relaunch. Access the PDS Player via RDP and relaunch the
Player application manually, or enter RESTART in the command space in
Remote Manager and direct it to the Player.
36 Polycom, Inc.
Page 47

Network and Groups Pane Using the Remote Manager
Network and Groups Pane
The Networks & Groups pane shows a tree view of the hierarchy of networks
and groups of Players managed by the PDS Server. The network or group you
select here will select the Players shown in the Network pane and the
operations performed on those Players.
If you select a network or group which contains sub-networks or subgroups,
then the Network pane will show the Players in the selected group as well as
the Players in all its sub-networks and subgroups.
The title of the Network pane will change to show the name of the selected
network and the selected group (if any).
Network and Player Management
The Network and Groups Pane is the main interface for network and player
management. Right-clicking a network, group, or server in the Network and
Groups pane will call up the following context menu:
The following sections will explain each function within this context menu.
Manage Groups
The Polycom Digital Signage solution offers two forms of hierarchical
organization for players: networks and groups. Each player is associated with
only one network or subnetwork. User permissions are determined by
network: networks can have unique administrators, agents, and content
Polycom, Inc. 37
Page 48

Polycom Digital Signage Administrator Guide Network and Groups Pane
managers. One potential use case for multiple networks is for an organization
with multiple geographic locations and unique content managers for each
location.
Groups can incorporate players across multiple networks. Players can also be
associated with multiple groups. Groups could be useful for an organization
with multiple player roles -- internal, customer-facing, marketing-driven, and
news-driven players could be grouped across networks and receive massede
content updates.
1 Right click on a Server, Network, or subnetwork in the Networks and
Groups Pane. Select Manage Groups from the context menu.
2 The Manage Groups window will appear.
3 Click Create Group. Name the group and click OK.
4 Drag and drop the PDS Players you wish to include in the group.
5 If you wish to delete or rename a group, right-click on the group.
6 Click Apply and OK. The groups you have created (and any changes you
have made to the groups) should appear in the Networks and Groups
pane.
38 Polycom, Inc.
Page 49

Network and Groups Pane Using the Remote Manager
Manage Players
The Networks and Groups Pane allows direct configuration changes to the
Players on a Server.
1 Right click on a Server, Network, or subnetwork in the Networks and
Groups Pane. Select Manage Players from the context menu.
2 The Edit Properties of Players menu will appear.
3 Click within the Player Name region to edit the name of a given PDS
Player.
4 The Notes section automatically records recent network changes for each
player; this section can be user-edited.
5 Click Save.
Polycom, Inc. 39
Page 50

Polycom Digital Signage Administrator Guide Network and Groups Pane
Delete Offline Players
Offline Players can be deleted individually by right-clicking on the Player in
the Connections tab of the Network pane. Alternatively, selecting Delete
Offline Players will delete all offline Players in a network. Please note that
online Players cannot be deleted.
1 Selecting the Delete Offline Players dialogue will launch the Offline
Players menu.
2 All Players not currently connected to the PDS Server, or Players that
have been removed from a given Network or subnetwork, will appear in
the Offline Players dialogue.
3 Select the Players you wish to delete and click Delete Selected to remove
them from the Remote Manager interface. Please note that when
reconnected these Players will reappear in the Remote Manager.
4 Click Close when completed.
40 Polycom, Inc.
Page 51

Network and Groups Pane Using the Remote Manager
Create New Network
New Networks can be created by right-clicking on a Server in the Remote
Manager. Subnetworks can be created by right-clicking on a Network.
1 Right click on a Server, Network, or subnetwork in the Networks and
Groups Pane. Select Create Network from the context menu. The Create
New Network window will appear.
2 Provide a Name and optional Network Description.
3 If you wish to designate a unique administrator for the Network, check
Create user account for network administrator.
Provide login credentials and a default email for this administrator.
4 Click OK to complete.
5 To associate players with a network, drag them from the Connections tab
of the Network pane into the given network or subnetwork.
6 A warning will appear; click OK.
Delete Network
To delete a Network, right-click on the Network and select Delete Network.
Click Yes on the warning that appears.
NOTE: The following cannot be deleted through the Remote Manager:
• The PDS Server
• Networks with subnetworks
• Networks with players associated (including greyed-out moved or disconnected
players)
Delete subnetworks and move or delete all players before deleting a network.
Polycom, Inc. 41
Page 52

Polycom Digital Signage Administrator Guide Network and Groups Pane
Manage Users
1 Right click on a Server, Network, or subnetwork in the Networks and
Groups Pane. Select Manage Users from the context menu.
2 The Manage Accounts window will appear.
3 To delete an account, right-click on the username and select Delete
Account.
4 Click Add Account to create a new account, or double-click on an existing
account to edit the properties.
NOTE: The properties of the default Agent for each network cannot be changed,
although they can be viewed. A new Agent can be created if you wish to change the
Agent properties.
5 The Create New Account window will appear.
6 Choose whether the account will be a Player Agent, Network
Administrator, or a Content Manager.
— The Player Agent is the link between Players and the Server. It enables
network status and health monitoring.
42 Polycom, Inc.
Page 53

Network and Groups Pane Using the Remote Manager
— The Network Administrator oversees all configuration on a given
network via the Remote Manager, as well as all content oversight
abilities.
— The Content Manager has content update privileges on a given
network via the Web Controller; the Content Manager can log into but
make no changes in the Remote Manager.
7 Provide an email address and login credentials.
8 Click OK.
Download Agent Setup
Select Download Agent Setup if you wish to download the Agent for a
particular network. Agent downloads should not be necessary in the default
configuration of the PDS Server. Please consult Non-Standard Installations on
page 159.
Broadcast Message
Administrators can broadcast a message to all Remote Manager users. To
directly communicate with one user, see Manager List below.
Polycom, Inc. 43
Page 54

Polycom Digital Signage Administrator Guide Network Pane
Network Pane
The Network pane shows different properties of the Players that are in the
network or group selected in the Networks & Groups pane.
Manager List
A list of managers appears below the Player list in the Network Pane. Details
about managers currently online are visible here.
44 Polycom, Inc.
Page 55

Network Pane Using the Remote Manager
Double-clicking a manager’s username launches a chat pop-up:
Connections
The Connections tab shows a table with one row for each Player. The table
columns show the following information for each Player:
— Name
— Online status
— IP address
— Network
— Date and time it came online
— System ID
— Number of dropped connections
— Player (agent) version number
Polycom, Inc. 45
Page 56

Polycom Digital Signage Administrator Guide Network Pane
— Date and time the Player was last online (for offline Players)
Note:
— The name in the network column indicates the network to which the
Player belongs, which is useful when you have selected a network or
group that contains sub-networks or subgroups.
— Players that are currently offline will be shown as dimmed, i.e., the
text of their table row will be a light gray color, and you will not be
able to perform most operations on them.
— You can sort the table entries by clicking any of the column headings.
PDS Remote Manager will initially sort the table by Player name.
To bring up the PDS Remote Player Management Console, double-click the
Player's row in the table.
Player Status
Like the Connections tab, the Player Status tab presents a table of the Players
in the selected network, but with different columns of data to show status
information for the PDS Player software and the computer.
The columns in the table show the following information for each Player:
— Name
— PDS Player status
— Self-healing setting
— Currently running playlist
— Current event number within the current playlist
— Windows page file size
— Virtual memory used by the CG (Player graphics application)
— Virtual memory used by the PDS Player application
— Total disk usage on the system
— Master volume level for the audio output
— Time stamp (in Player local time) of the last status information sent to
PDS Server
— Time stamp (in Player local time) of the last Player "heartbeat" seen by
the agent
46 Polycom, Inc.
Page 57

Network Pane Using the Remote Manager
— Time stamp (in Player local time) of the last screenshot sent to PDS
Server
— The full Windows file path of the currently running playlist
Please note that:
— Players that are currently offline will be shown as dimmed, i.e., the
text of their table row will be a light gray color, and you will not be
able to perform most operations on them.
— You can sort the table entries by clicking any of the column headings.
PDS Remote Manager will initially sort the table by Player name.
To bring up the Remote Player Management Console, double-click the Player's
row in the table.
Screenshots
The Screenshots tab displays still images of each Player's output as rendered
by the graphics card on the system. The screenshots are updated at a regular
interval (based on the Auto-Refresh setting in the toolbar), so watching the
images in the screenshots provides a quick and effective way to check the
output from the Players in the network.
Each screenshot is captioned, with the name of the Player and network shown
immediately above the screenshot image.
You can adjust the size of the screenshot images shown in this view using the
zoom slider immediately below the screenshot viewing area.
Polycom, Inc. 47
Page 58

Polycom Digital Signage Administrator Guide Network Pane
You can select the monitor whose image is used for the screenshots by
selecting from the pop-up menu immediately below the screenshot viewing
area. You can select PDS Output Screen (this is the default option), System
Primary Screen, or System Secondary Screen. (Note that if you select System
Secondary Screen, Remote Manager will show a blank blue screen for all
Players that have a single-monitor configuration.)
To bring up the Remote Player Management Console, double-click the Player's
screenshot image.
System Info
Like the Connections and Player Status tabs, the System Info tab presents a
table of the Players in the selected network, but with different columns of data
to show detailed system status information for the computer.
The columns in the table show the following information for each Player:
— Computer name (as configured in the Windows "System Properties"
control panel)
— Time zone (as configured in the Windows "Date and Time" control
panel
— Player name
— PDS Server version number
— Days remaining in the PDS Player license (for temporary licenses)
— PDS Player Product ID (for licensing)
— Data Parser version (if PDS Data Parser is installed)
— Days remaining in the Data Parser license
— Heartbeat Server version number
— Package Handler version number
— Operating system version (see note below)
— Operating system "uptime" (i.e., time since the last system reboot)
NOTE: The Windows version number is shown as reported by Windows, and the
format of this version number does not correspond exactly to the marketing names
for Window versions. For example, Windows Vista is reported in the table as
"Microsoft Windows NT 6.0.6001 Service Pack 1."
48 Polycom, Inc.
Page 59

Network Pane Using the Remote Manager
— Players that are currently offline will be shown as dimmed, i.e., the
text of their table row will be a light gray color, and you will not be
able to perform most operations on them.
— You can sort the table entries by clicking any of the column headings.
The PDS Remote Manager will initially sort the table by Player name.
Network Packages
Network packages can be observed from the Network Packages tab. To send
network packages, open the Web Controller or use the Publish Content tool in
the Remote Manager.
Polycom, Inc. 49
Page 60

Polycom Digital Signage Administrator Guide Remote Player Management Console
Remote Player Management Console
Double-clicking a Player in the Network pane (double-clicking the Player row
in a tabular view, or double-clicking the Player's thumbnail image in an image
view) will bring up the PDS Remote Player Management Console window.
This window presents more detailed status information on the Player and
provides tools for managing and controlling the Player.
The Remote Player Management Console window consists of four parts:
• the menu bar and tool bar, which include the "Tools" menu and the
buttons used for Player operations;
• the performance meter pane, which includes LED-style graphs to show
the current levels for page file size, CPU usage, audio level, and disk
usage;
• the screenshots pane, which includes a tab and display area to show the
screenshots for each of the system's display outputs; and
• the status detail pane, with tabs to show different detail elements of the
systems status (this pane is discussed in more detail below).
50 Polycom, Inc.
Page 61

Remote Player Management Console Using the Remote Manager
Tools Menu
The Tools menu contains the following options:
— File Browser: Select this option to bring up a File Manager view,
browsing the Player's file system, in a separate window. The File
Manager is described in detail below.
—Close: Select this option to close the Remote Player Management
Console window.
Note that you can work in the main Polycom Digital Signage Remote
Manager Window and in the Remote Player Management Console at
the same time, and you may also have multiple Management Console
windows open at once. However, keep in mind that each open
Management Console window receives a refreshed set of screenshots
every five seconds, so each open window will consume additional
network bandwidth.
Tool Bar
The tool bar contains a number of buttons for performing management tasks
on the Player:
Start Process
The "Start Process" button allows you to start a new process on the Player.
Click the button to bring up the Start Process dialog:
— In the File Name field, enter the full path (on the Player) of the
program to run.
Polycom, Inc. 51
Page 62

Polycom Digital Signage Administrator Guide Remote Player Management Console
— In the Arguments field, enter the command-line parameters, if any.
— In the Working Directory field, enter the full path of the directory (on
the Player) that will be the working directory for the new process.
— To cancel and return to the Remote Player Management Console, click
Cancel.
— To schedule the process on multiple Players, click Start On… You will
be brought to a new dialog with a tree view of the Player network.
Select a Player to run this process by checking the check box next to
that Player's name.
— To start the process on the current Player only, click Start.
File Manager
Click File Manager… to bring up a File Manager view, browsing the Player's
file system, in a separate window.
The File Manager is described in detail in the section below.
Reboot
Click Reboot to reboot the Player immediately. (Note that this will reboot the
entire system. This is the same as selecting Shut Down... > Restart from the
Start menu in Windows.)
Set License
Click Set License to bring up a menu listing the components on the Player that
can be licensed. Once you select a component, Remote Manager will display a
dialog box with that component's product ID and a field for you to enter the
component's license key.
52 Polycom, Inc.
Page 63

Remote Player Management Console Using the Remote Manager
Monitoring Settings
The Monitoring Settings dialog box allows you to configure different settings
for the Player Agent:
• Enable Self-Healing allows the agent to take corrective action should a
Player experience a problem playing out content.
• Load last played playlist… to have the PDS Player automatically load the
previously running playlist any time it is started.
• In Player Startup, you can optionally enter the name of a playlist to be
loaded by the Player when it starts up.
• Check Enable Audio Monitoring to allow the audio output and levels to
be sent to the Server by the Player. If this is not checked, no audio
information or levels will be checked or sent, and no audio alarms will be
triggered, even if the Player is playing out audio.
• Use the Video Monitoring selection to choose the display output that
should be monitored by the Agent-this should be the display receiving the
output from the Player (usually the System Secondary Screen).
• The settings under Alarm Conditions allow you to control how quickly
the Player Agent will send a notification to the Server when encountering
the following potential problems:
— Missing video: This alarm condition occurs when the agent is not able
to get any video output from the Player to provide a screenshot. This
usually indicates a problem with the Player.
Polycom, Inc. 53
Page 64

Polycom Digital Signage Administrator Guide Remote Player Management Console
— Missing audio: This alarm condition occurs when the agent is not able
to obtain any audio output from the Player. This usually indicates a
problem with the Player. (Note that Enable Audio Monitoring must
be checked for this condition to trigger an alarm.)
— Missing heartbeat: The Player regularly updates a timestamp file (the
"heartbeat") that is checked by the Agent. This alarm condition occurs
when the heartbeat has not been updated by the Player in the specified
interval. This usually indicates a problem with the Player; however,
for very graphics-intensive templates or on lower-end Player systems,
you may need to lengthen this interval to eliminate false alarms
caused by the Player simply being overloaded.
• Click OK to apply your changes and close the dialog box.
• Click Cancel to discard your changes.
• Click Apply to apply your changes but leave the dialog box open.
• Click Apply To… to apply your changes to multiple Player systems.
Clicking Apply To… will bring up a new dialog with a tree view of the
Player network. Select Players to receive these changes by checking the
check box next to each Player's name.
Edit Config
This is used for advanced trouble-shooting. Please do not modify these
settings without direction from Polycom Support.
Restart Polycom Player
Click this if you wish to restart Player(s) in your network. If the Player does
not have Load previous playlist selected, you will have to manually load a
playlist using the Playlist Load functionality found in the toolbar. Alternately
you could publish a playlist to the Player(s) using the Publish Content
functionality, found in the main application window.
Playlist
This feature scans available playlists on the Player hard disk and conveniently
lets you select one to load.
Command
Choose one of the commands that appears in the drop-down list to perform
common tasks, such as clearing the screens. Please see Appendix A: Player
Commands on page 167 for a list of commands.
54 Polycom, Inc.
Page 65

Remote Player Management Console Using the Remote Manager
Status Detail Panel
The Status Detail panel of the Remote Player Management Console provides
granular and up-to-the-moment status information regarding the Player. The
Status Detail panel also provides remote process management for the Player
appliance.
The Status Detail panel consists of four tabs: Player Status, Running
Processes, Windows Services, and File Manager.
Player Status
The Player Status panel provides a summary of the individual Players’
performance and present status.
Polycom, Inc. 55
Page 66

Polycom Digital Signage Administrator Guide Remote Player Management Console
Running Processes
The Running Processes tab functions as a process manager for the remote
Player.
• To stop a process running on the PDS Player, right-click on the process
and click Kill Process.
56 Polycom, Inc.
Page 67

Remote Player Management Console Using the Remote Manager
Windows Services
The Windows Services tab displays the Windows services on the selected PDS
Player. As with the Running Processes tab, users can remotely start and stop
these services when necessary.
• To stop a running Windows service, right-click on the service and click
Stop.
• To start a Windows service, right-click on the service and click Start.
Polycom, Inc. 57
Page 68

Polycom Digital Signage Administrator Guide Remote Player Management Console
File Manager
The File Manager allows direct management of the files on the PDS Player.
Using the File Manager, administrators can navigate through the files stored
on the PDS Player.
• If you wish to alter or edit a folder, right-click on the folder. A pop-up
appears:
— Copy Path to Clipboard: Copies the path of the folder as text.
— Rename/Move To: Allows users to rename or move the folder.
— Delete: Deletes the file.
— Create Package: Saves the folder as a PDS Package for distribution.
58 Polycom, Inc.
Page 69

Remote Player Management Console Using the Remote Manager
• Right-clicking on a file will launch the following pop-up:
— View Tail: Launches a text editor which displays the last 50 KB to 5
MB of data contained in a file.
—Edit File: Launches a text editor with which users can edit files.
— Copy Path to Clipboard: Copies the path of the folder as text.
— Compare...: Allows users to compare files across multiple Players.
This tool is useful for ensuring that packages have published correctly.
After running the comparison, the following window appears:
— Download...: Allows users to download files from a Player to the
computer running Remote Manager.
— Copy To...: Allows users to copy the file to another location on the
PDS Player.
— Rename/Move To: Allows users to rename or move the file.
— Delete: Deletes the file.
Polycom, Inc. 59
Page 70

Polycom Digital Signage Administrator Guide Remote Player Management Console
— Execute...: Executes a specific file. Please note that this function allows
users to browse for files to run, rather than using the Start Process item
in the Remote Player Management Console Tool Bar.
— Load...: Directly loads PDS Playlists and Templates in the PDS Player.
60 Polycom, Inc.
Page 71

Using the Web Controller
This chapter outlines the use of the Polycom Web Controller in content
managment procedures. It contains the following sections:
• About the PDS Web Controller
• Installing the Web Controller
• Opening the Web Controller
4
• Web Controller Interface Guide
• Control Panel
• Playlist Editor
• Crawling Ticker
• Slide Show Tickers
• Video Slide Content
• Message Board/Webcast
• Alerts
• Settings
About the PDS Web Controller
The Polycom PDS Web Controller gives administrators remote control over
the content and settings of individual Polycom PDS Players. In addition to its
powerful central content management interface, the Polycom PDS Web
Controller provides professionally-designed and fully customizable
templates, automated news and data feeds, and direct Player oversight.
Polycom, Inc. 61
Page 72

Polycom Digital Signage Administrator Guide Installing the Web Controller
Installing the Web Controller
Web Controller is supported on Windows XP, Windows Vista (32 bit), and
Windows 7 (32 bit). Windows Vista and Windows 7 require the additional
pre-installation steps outlined below.
Pre-Installation Procedures on Windows Vista and Windows 7
1 Open the Start menu. Type MSconfig in the Search field and click enter.
The System Configuration window will open.
2 Go to the Tools tab.
3 Select the option Disable UAC under the “Tool Name” column.
4 Click Launch.
5 Restart the computer.
6 Perform the installation steps detailed below.
Installation
1 Find the Polycom Digital Signage Web Controller installer in the
C:\software directory on the Polycom Digital Signage Server.
2 Distribute this file to your computer.
3 Double click on the PDS Web Controller setup .exe file. The PDS Web
Controller setup screen appears. Click Next.
62 Polycom, Inc.
Page 73

Installing the Web Controller Using the Web Controller
4 Designate a destination for the file. The default directory, C:\Program
Files\Polycom\PDS Web Controller
, is recommended. Click Next.
5 Choose a folder to appear in the Start Menu. Click Next.
Polycom, Inc. 63
Page 74

Polycom Digital Signage Administrator Guide Opening the Web Controller
6 A review screen will appear. Click Install.
7 Double click on the PDS Web Controller desktop icon to begin.
Opening the Web Controller
When you first open the Polycom Digital Signage Web Controller application,
you will be prompted to enter your login credentials:
The default server name is PDSSERVER. The default credentials for Content
Managers are ContentAdmin/Polycom123.
64 Polycom, Inc.
Page 75

Opening the Web Controller Using the Web Controller
Please note that you should not need to edit the TCP Port when using the
default PDS Server configuration.
Licensing the Web Controller
The Web Controller must be licensed prior to use. To license the Web
Controller:
1 Navigate to File > License.
2 The License dialog will appear.
a In the dialog, click the Request a License Key button.
b Enter the PDS Serial Number. The PDS Serial Number, provided by
your sales representative in your fulfillment email, is unique per
customer and comprehensive across the Polycom Digital Signage
solution. Do not discard this number.
3 Click Request License Key to request the license key, which will
automatically populate the license key field in the initial dialog.
4 Click OK.
Polycom, Inc. 65
Page 76

Polycom Digital Signage Administrator Guide Web Controller Interface Guide
Web Controller Interface Guide
After login and licensing, the Web Controller landing page appears.
66 Polycom, Inc.
Page 77

Web Controller Interface Guide Using the Web Controller
Main Panel
All content management and Player configuration tools reside in the Main
Panel of the Web Control.
Each tab is documented individually throughout the rest of the chapter.
Polycom, Inc. 67
Page 78

Polycom Digital Signage Administrator Guide Web Controller Interface Guide
Player Monitor Panel
The Player Monitor Panel of the Web Controller user interface displays
screenshots of all connected Players on the given network of the Polycom
Digital Signage Server. Use the Zoom tool to change the level of resolution of
the display.
To change monitor settings:
1 Right-click on the chosen PDS Player. Click Full Screen Monitor....
68 Polycom, Inc.
Page 79

Web Controller Interface Guide Using the Web Controller
2 The Full Screen Monitor pop-up will appear.
3 To change the Monitor view, open the Screen drop-down on the far left.
Choose whether to view the PDS Output Screen, System Primary Screen,
or System Secondary Screen.
For more information about using multiple screens with the PDS Player,
please consult Configuring PDS Player Video Settings on page 6.
4 To change the monitor’s update frequency, open the Update Interval
drop-down and select a new timeframe.
Events Panel
The Events Panel provides feedback for PDS Web Controller users during the
publication process. The events detailed include content updates, errors, and
Player status changes. Changes made in the Web Controller may not take
effect until the package has completed the download and processing of a
package; this panel allows you to monitor the states of these processes.
Polycom, Inc. 69
Page 80

Polycom Digital Signage Administrator Guide Web Controller Interface Guide
Changing the Layout
To change the layout of the above panels, navigate to View and choose
Horizontal Layout or Vertical Layout. The Vertical Layout, selected by
default, places the Monitor Panel to the right of the Main Panel; the Horizontal
Layout places it below the Main Panel.
A user can also freely change the look and feel by dragging and resizing the
panes within the Web Controller.
Style
The style selection menu allows users to choose a different visual style for the
Web Controller.
70 Polycom, Inc.
Page 81

Control Panel Using the Web Controller
Control Panel
The Control Panel provides a set of direct controls over the Players in the
associated network. The Control Panel is the starting point for content
management on Players. Greater detail is provided on the subsequent tabs in
the PDS Web Controller, but the Control Panel gives immediate access to
overarching controls.
Player Controls
Polycom, Inc. 71
Page 82

Polycom Digital Signage Administrator Guide Control Panel
The Player Controls section allows immediate changes to be made to the
Player. Unlike text edits or playlist changes elsewhere in the Web Controller,
one click on each of these options will update Players targeted in the selection
wizard:
• Clear Screen: resets the Player and clears the Player screen.
• Next Event: Advances to the next event in the playlist.
• Previous Event: Returns to the previous event in the playlist.
•First Event: Returns to the first event in the playlist.
•Restart: Shuts down the Player and restarts it. This tool can be used to
perform a full reset of the application.
•Stop: Shuts down the Player.
•Disable Video: Shuts down video card output, bringing the Player into
standby mode. Please note that the Player will cease output when this is
chosen.
• Enable Video: Resumes video card output on the Player.
•Volume:
— Change the Audio Volume. 100 is the default; 0 will mute the output.
— Click Set Volume.
•Load Playlist: This option loads the playlist selected from the dropdown
menu. Click Refresh to restart the playlist.
72 Polycom, Inc.
Page 83

Control Panel Using the Web Controller
Selection Wizard
After selecting one of the above options, the Player selection window will
appear.
Offline Players will display a darkened screen; online Players will show a blue
screen.
Click OK.
Note: In order for the changes made in the PDS Web Controller to take effect, all
affected Players must be online and running the PDS Player application. Updates
made offline will not take effect automatically.
Editing the Announcement and Emergency Crawls
Polycom, Inc. 73
Page 84

Polycom Digital Signage Administrator Guide Control Panel
The Announcement and Emergency Crawls can be edited, started, and
stopped from the Control Panel. These crawls will not change or stop the
playlist in progress but will instead run at the top of the screen. To publish a
crawl to a PDS Player:
1 To change an announcement, edit the crawl text field.
2 Click Start Crawl. The Player selection window will appear. Choose the
target Player or Players for your announcement. Click OK.
3 The Announcement Crawl should appear on the Player shortly.
74 Polycom, Inc.
Page 85

Control Panel Using the Web Controller
Please note that the Emergency Crawl will appear in red:
4 To stop the crawl, click Stop Crawl in the Web Controller. The Player
Selection screen will appear again; indicate which Player you wish to
target and click OK.
Polycom, Inc. 75
Page 86

Polycom Digital Signage Administrator Guide Playlist Editor
Playlist Editor
The Playlist Editor tab in the Web Controller provides controls over playlists
displayed in the PDS Player.
To create, edit, or play Playlists via the Playlist Editor:
1 Select a Playlist from the Available Playlists drop-down range.
76 Polycom, Inc.
Page 87

Playlist Editor Using the Web Controller
a To retrieve a specific Playlist from a player for editing, click Retrieve
from Player. The Player Selection window will appear; choose a
player and a playlist and click OK.
b To create a new playlist, click New. The Save As dialog appears. Enter
a name and click OK.
Alternatively, click Save As at the bottom of the Editor.
Polycom, Inc. 77
Page 88

Polycom Digital Signage Administrator Guide Playlist Editor
2 The Playlist will then appear.
3 To add a template to the playlist:
a Choose a template from the Available Templates drop-down menu.
b Choose the duration in seconds for which the template will run.
c Choose whether the item will run in the foreground (appropriate only
for crawling tickers) or in the background.
d Click Add Template.
4 To change the configuration of an existing template, click on a
Description, Duration, Layer, or Parameter field to launch an editor.
5 To move a template within a playlist, use the up and down arrows within
the editor. The order of the template will determine when the template
plays on the playlist.
6 To load a specific template within a playlist, click the Load link.
78 Polycom, Inc.
Page 89

Playlist Editor Using the Web Controller
7 To remove a single template, click the Remove link beside the template
inside the Playlist. To remove all templates from the Playlist, click Clear
All. To delete the Playlist altogether, click Delete Current Playlist.
8 When all configuration changes have been made, click Save to save the
Playlist within the Web Controller.
9 Click Distribute to send the Playlist to the selected target Players.
10 Click Load on Player(s) to load the Playlist on the selected target Players.
Adding Content through the Playlist Editor
Content Directory
Prior to making changes to PDS Player content by means of the PDS Web
Controller, content managers should create a central directory for all video,
text, and PowerPoint files intended for distribution to PDS Players. These
directories must reside on the C: drive of the computer running the Web
Controller.
For situations in which a single content manager is responsible for all content
distributed on a network, Polycom recommends creating the directory
C:\Content.
For implementations in which multiple content managers oversee the same
network, we recommend creating the directory C:\[ContentManagerName].
If properly configured on the computer running the Web Controller, this
directory will automatically be created on the target players during the Playlist
publication process.
NOTE: Data files that supply information for the various Trivia, News, and Weather
templates must reside in the C:\XPresenterContent\Data directory. The processes
for updating these files are outlined in subsequent sections below.
Polycom, Inc. 79
Page 90

Polycom Digital Signage Administrator Guide Playlist Editor
Default Playlist
The PDS Player and PDS Web Controller ship with a preconfigured default
playlist:
The following templates constitute the default playlist:
• Lower Crawl: the crawl that plays throughout the playlist. Can be edited
in the Crawling Ticker tab in the Web Controller. To remove the crawl
from the PDS Player output, delete this template from the playlist.
• Entertainment News: a default data feed that displays entertainment
news from a pre-defined feed. This feed updates regularly and populates
the template with headlines, stories (usually one or two sentences), and
images if possible.
•Trivia: a template that displays trivia questions and answers generated by
a data file.
• Weather 3Day: displays local weather for the next three days.
• Event Calendar PowerPoint: Displays a user-designated PowerPoint.
This PowerPoint can be retrieved, edited, replaced, and distributed (as ppt
or as a jpg archive) via the Slide Show Tickers tab in the Web Controller.
• Video 4x3: Displays a user-designated standard ratio video. This template
is editable in the Video Slide Content tab of the Web Controller.
80 Polycom, Inc.
Page 91

Playlist Editor Using the Web Controller
• Sports Headlines: a default data feed that displays sports news from a
pre-defined feed. This feed updates regularly and populates the template
with headlines, stories (usually one or two sentences), and images if
possible.
• Video 16x9: Displays a user-designated widescreen video. This template
is editable in the Video Slide Content tab of the Web Controller.
• Product Catalog PowerPoint: Displays a user-designated PowerPoint
presentation. This PowerPoint can be retrieved, edited, replaced, and
distributed (as ppt or as a jpg archive) via the Slide Show Tickers tab in the
Web Controller.
NOTE: The Default Playlist includes preconfigured text, video, and PowerPoint
presentation content. However, these elements are intended to be user-edited. For
information on adding and editing content in templates, please see below.
Templates
The PDS Web Controller includes a library of default templates that can be
added to a playlist from the Available Templates drop-down. The
information and possible parameter changes for each of these additional
templates follows.
AddOn L Bar Streaming Video
The AddOn L Bar Streaming Video template displays a streaming video or
URL, a fixed message, and a text ticker.
NOTE: Websites are not resized automatically. Some sites may be restricted on
player output given the resolution.
1 Click on the Params link beside "AddOn L Bar Streaming Video."
Polycom, Inc. 81
Page 92

Polycom Digital Signage Administrator Guide Playlist Editor
2 The Template Parameters screen will appear.
3 To add a live video stream or website display, enter the URL in the text
field under VideoStreamSource.
4 To add a static message:
a Click the browse (...) button under Message_Title.
b In the dialog that appears, choose the text file with the message title.
c Click Open.
d Next, click the browse (...) button under Message_Body.
e In the dialog that appears, choose the text file that contains the
message body.
5 To add a message ticker:
a Click the browse (...) button under Message_Ticker.
b Select a text file. The Message Ticker displays two lines of text at a
time; ensure that your text file is edited properly.
c Click Open.
6 Click OK when all changes have been completed.
82 Polycom, Inc.
Page 93

Playlist Editor Using the Web Controller
AddOn PowerPoint Schedule:
Displays a PowerPoint slide of your choosing; this template is intended to
display a calendar or schedule created in PowerPoint. To add your own
schedule template:
1 Click on the Params link beside "AddOn PPT Schedule."
2 The Template Parameters screen will appear.
3 Click on ‘...,’ the browse button. This will bring up your list of available
PowerPoint templates for selection.
Click on the PP_Ticker_Schedule.ppt file. Right-click on this file and
select Open.
Polycom, Inc. 83
Page 94

Polycom Digital Signage Administrator Guide Playlist Editor
4 PowerPoint will launch. You will then have the below PowerPoint slide
available for changes and population of your required data.
5 From here you can adjust the default information, including location
names, time intervals, meeting names, etc., using the PowerPoint
application.
To change the style of this PowerPoint schedule:
a Click Select in the PowerPoint Editing panel in the Home tab. Select
Selection Pane from the drop-down menu that appears.
84 Polycom, Inc.
Page 95

Playlist Editor Using the Web Controller
b Scroll to the bottom of the Selection Pane. Toggle layer visibility to
match styles. The options outlined in dashed red dictate table style;
the options outlined in solid blue dictate background style.
6 Once you have made your changes, save the PowerPoint slide and click
Open in the selection dialog.
7 Click OK to complete template editing.
AddOn Video Clip, PowerPoint, Message
The AddOn Video Clip, PowerPoint, Message template displays a 4x3 video
file, PowerPoint ticker, and text file. To configure an AddOn Video Clip,
PowerPoint, Message template:
Polycom, Inc. 85
Page 96

Polycom Digital Signage Administrator Guide Playlist Editor
1 Click Params. The Template Parameters screen will appear.
2 To add a video:
a Click the browse (...) button under ClipFilename.
b Choose a video file in the dialog that appears.
c Click Open.
3 To add a PowerPoint ticker:
a Click the browse (...) button under PPT_Ticker.
b Choose a PowerPoint file in the dialog that appears.
c Click Open.
d You will be prompted to create a PowerPoint archive. Click Yes.
4 To edit the message text:
a Click the browse (...) button under Message_Text.
b Select a text file in the dialog that appears.
c Click Open.
5 Click OK.
86 Polycom, Inc.
Page 97

Playlist Editor Using the Web Controller
AddOn Video Fullscreen
Displays a full-screen video. To add a video:
1 Click on the Params link. The template dialog window will appear.
2 Click the browse (...) button. Choose a video file from your content
directory and click Open.
3 Click OK.
AddOn VideoStream
Displays a live video stream; if a non-video URL is designated, the template
will display that URL. To add a video stream:
Polycom, Inc. 87
Page 98

Polycom Digital Signage Administrator Guide Playlist Editor
1 Click on the Params link. The template dialog window will appear.
2 Enter in the source URL for the website you would like to reference.
Click OK. Once changes are made, save and distribute to the players.
Alert Fullscreen
Displays an alert screen. See Alerts below.
Data Ticker Fullscreen
Displays a data-driven news feed. To add:
88 Polycom, Inc.
Page 99

Playlist Editor Using the Web Controller
1 Click on the Params link. The template dialog window will appear.
a Click the Add File or ... button beside the Datasource field. Locate the
.xdsrc file on your computer and click Open.
NOTE: Please consult the “Using the Data Parser” on page 147 for more
information on configuring .xdsrc files.
b Remove all pathway and file type information from the chosen file.
The Datasource field should contain only the file name of the .xdsrc
file, without the file extension.
In our example,
C:\PolycomContent\Data\PolycomFeed_PolycomFeed.xdsrc
becomes
PolycomFeed_PolycomFeed in the Datasource field.
c Provide a title and category for the Template.
2 Click OK.
Lobby Crawl
Displays the crawling ticker. Once the ticker has been begun it will play
throughout the Playlist. See Crawling Ticker below.
PowerPoint Ticker LBar
Displays a PowerPoint ticker. For more information, consult Slide Show
Tickers below.
Polycom, Inc. 89
Page 100

Polycom Digital Signage Administrator Guide Playlist Editor
Message Board
Displays the Message Board. For more information, consult Message
Board/Webcast below.
Trivia
Displays a Trivia sequence. To edit the Trivia questions and answers:
1 Click on the Params link. The Template Parameters window will appear.
2 The NumQuestions field allows users to define the number of questions
displayed on this template from the source Excel spreadsheet.
The Title is the name that will be displayed on the template.
The DataFilename is the source Excel spreadsheet which will be called for
this application. The syntax of the file must be "lib_Trivia.xls".
3 To customize the questions, open the C:\XPresenterContent\Data folder
on your computer. Double-click on the lib_Trivia.xls file.
90 Polycom, Inc.
 Loading...