

Page 1

USER GUIDE 2.0 | May 2019 | 3725-85853-001A
Polycom® G7500
Page 2

Copyright© 2019, Polycom, Inc. All rights reserved. No part of this document may be reproduced,
translated into another language or format, or transmitted in any form or by any means, electronic or
mechanical, for any purpose, without the express written permission of Polycom, Inc.
6001 America Center Drive
San Jose, CA 95002
USA
Trademarks Polycom®, the Polycom logo and the names and marks associated with Polycom products
are trademarks and/or service marks of Polycom, Inc. and are registered and/or common law marks in the
United States and various other countries.
All other trademarks are property of their respective owners. No portion hereof may be reproduced or
transmitted in any form or by any means, for any purpose other than the recipient's personal use, without
the express written permission of Polycom.
End User License Agreement By installing, copying, or otherwise using this product, you acknowledge
that you have read, understand and agree to be bound by the terms and conditions of the End User
License Agreement for this product. The EULA for this product is available on the Polycom Support page
for the product.
Patent Information The accompanying product may be protected by one or more U.S. and foreign
patents and/or pending patent applications held by Polycom, Inc.
Open Source Software Used in this Product This product may contain open source software. You may
receive the open source software from Polycom up to three (3) years after the distribution date of the
applicable product or software at a charge not greater than the cost to Polycom of shipping or distributing
the software to you. To receive software information, as well as the open source software code used in
this product, contact Polycom by email at OpenSourceVideo@polycom.com (for video products) or
OpenSourceVoice@polycom.com (for voice products).
Disclaimer While Polycom uses reasonable efforts to include accurate and up-to-date information in this
document, Polycom makes no warranties or representations as to its accuracy. Polycom assumes no
liability or responsibility for any typographical or other errors or omissions in the content of this document.
Limitation of Liability Polycom and/or its respective suppliers make no representations about the
suitability of the information contained in this document for any purpose. Information is provided "as is"
without warranty of any kind and is subject to change without notice. The entire risk arising out of its use
remains with the recipient. In no event shall Polycom and/or its respective suppliers be liable for any
direct, consequential, incidental, special, punitive or other damages whatsoever (including without
limitation, damages for loss of business profits, business interruption, or loss of business information),
even if Polycom has been advised of the possibility of such damages.
Customer Feedback We are striving to improve our documentation quality and we appreciate your
feedback. Email your opinions and comments to DocumentationFeedback@polycom.com.
Polycom Support Visit the Polycom Support Center for End User License Agreements, software
downloads, product documents, product licenses, troubleshooting tips, service requests, and more.
Page 3

Contents
Before You Begin................................................................................................4
Get Help.............................................................................................................................. 4
The Polycom Community......................................................................................... 4
Polycom and Partner Resources..............................................................................4
Documentation Feedback........................................................................................ 4
Product Overview...............................................................................................5
General Features and Capabilities......................................................................................5
Screen Reference............................................................................................................... 5
Getting Started................................................................................................... 8
Home Screen Quick Reference.......................................................................................... 8
LED Status Indicators for the G7500 System..................................................................... 9
LED Status Indicators for the Polycom® Microphone Adapter..................................9
LED Status Indicators for IP Microphones............................................................. 10
Using a Remote Control.................................................................................. 12
Wake the System.............................................................................................................. 12
Remote Control Button Reference.................................................................................... 12
Pair Your Remote Control................................................................................................. 14
Using a Touch Monitor.....................................................................................15
Configure a Touch Monitor................................................................................................15
Wake Your Touch Monitor................................................................................................. 15
Placing Calls..................................................................................................... 16
Place a Call Using the Onscreen Keyboard......................................................................16
Place a Conference Call................................................................................................... 17
Place an Audio Call...........................................................................................................17
Answer a Call.................................................................................................................... 17
Ignore a Call......................................................................................................................17
Adjust Volume................................................................................................................... 18
Mute Your Local Microphones...........................................................................................18
Unmute Your Local Microphones...................................................................................... 18
Mute Video........................................................................................................................ 18
Unmute Video....................................................................................................................19
Polycom, Inc. 1
Page 4

Hang Up a Call..................................................................................................................19
Calling Contacts............................................................................................... 20
Manage Contacts.............................................................................................................. 20
Call a Contact....................................................................................................................20
Call a Frequent Contact.................................................................................................... 20
Call a Recent Contact....................................................................................................... 21
Calling Favorite Contacts................................................................................ 22
Favorite a Contact.............................................................................................................22
Unfavorite a Contact......................................................................................................... 22
Call a Favorite Contact......................................................................................................22
Joining Meetings from the Calendar.............................................................. 23
Viewing Meeting Cards..................................................................................................... 23
Place a Call from a Meeting Card..................................................................................... 23
Join an Overbooked Meeting............................................................................................ 24
Manually Dial to Join a Meeting........................................................................................ 24
Contents
Customizing Calls for Your Site......................................................................25
Change Participant Layouts.............................................................................................. 25
Sharing Content from a Computer or Device................................................ 26
View Content Help Tips.....................................................................................................26
Polycom Content App....................................................................................................... 26
Share Content Casted from AirPlay or Miracast............................................................... 27
Share Content Using an HDMI Connection...................................................................... 27
Sharing Content on a Blackboard or Whiteboard......................................... 28
Annotating on a Blackboard or Whiteboard...................................................................... 28
Access the Help Screen......................................................................................... 28
Add a Blackboard or Whiteboard........................................................................... 28
Take a Snapshot.....................................................................................................29
Delete a Snapshot or Content................................................................................ 29
End a Content Session..................................................................................................... 29
Hang Up a Call that includes Content............................................................................... 29
Cameras............................................................................................................ 31
Polycom, Inc. 2
Page 5

Adjust a Camera............................................................................................................... 31
Turn Your Camera Off.......................................................................................................32
Turn Your Camera On.......................................................................................................32
Turn Camera Tracking On.................................................................................................32
Turn Camera Tracking Off.................................................................................................32
Camera Presets................................................................................................ 33
Select a Preset..................................................................................................................33
Save a Preset....................................................................................................................33
Delete a Preset................................................................................................................. 34
System Settings............................................................................................... 35
Status Settings Reference................................................................................................ 35
Diagnostic Settings Reference..........................................................................................36
Perform a Monitor Test........................................................................................... 37
Perform a Speaker Test..........................................................................................37
Test Audio Meter Levels......................................................................................... 38
Contents
Accessibility Features..................................................................................... 39
Features for Hearing-Impaired Users................................................................................39
Features for Vision-Impaired and Blind Users.................................................................. 39
Features for Mobility-Impaired Users................................................................................ 40
Polycom, Inc. 3
Page 6

Before You Begin
Topics:
▪ Get Help
The Polycom G7500 User Guide contains overview information, procedures, and references you can use
to perform tasks with the following Polycom® G7500 system products:
▪ Polycom® G7500 system (Model: P011)
▪ Polycom® IP Table Microphone (Model: P013)
▪ Polycom® IP Ceiling Microphone (Model: P014)
Get Help
For information about installing, configuring, using, and administering Polycom products, refer to product
documentation on Polycom Support.
The Polycom Community
The Polycom Community gives you access to the latest developer and support information. Participate in
discussion forums to share ideas and solve problems with your colleagues. To register with the Polycom
Community, simply create a Polycom online account. When logged in, you can access Polycom support
personnel and participate in developer and support forums to find the latest information on hardware,
software, and partner solutions topics.
Polycom and Partner Resources
In addition to this guide, the following documentation further describes Polycom endpoints and
peripherals used in video conferencing. The Release Notes, in particular, might include known issues or
limitations related to interoperability with Polycom endpoints.
For more information, refer to the Polycom Documentation Library.
▪ Polycom® G7500 Release Notes
▪ Polycom® G7500 Administrator Guide
Documentation Feedback
We welcome your feedback to improve the quality of Polycom documentation.
You can email Documentation Feedback for any queries or suggestions related to this documentation.
Polycom, Inc. 4
Page 7

Product Overview
Topics:
▪ General Features and Capabilities
▪ Screen Reference
The Polycom® G7500 system is an all-in-one video conferencing and content-sharing solution.
General Features and Capabilities
The system provides the following features and capabilities:
▪ Placing and joining video calls
▪ Sharing video content
▪ Creating favorites list
▪ Collaborating with electronic whiteboarding
▪ Viewing and joining scheduled calendar meetings
▪ Managing contacts, call lists, and directories
Screen Reference
The following tables provide screen layouts for the G7500 home screen and content screen.
Note: Some elements of your screen may be different depending on the system configuration.
Polycom, Inc. 5
Page 8
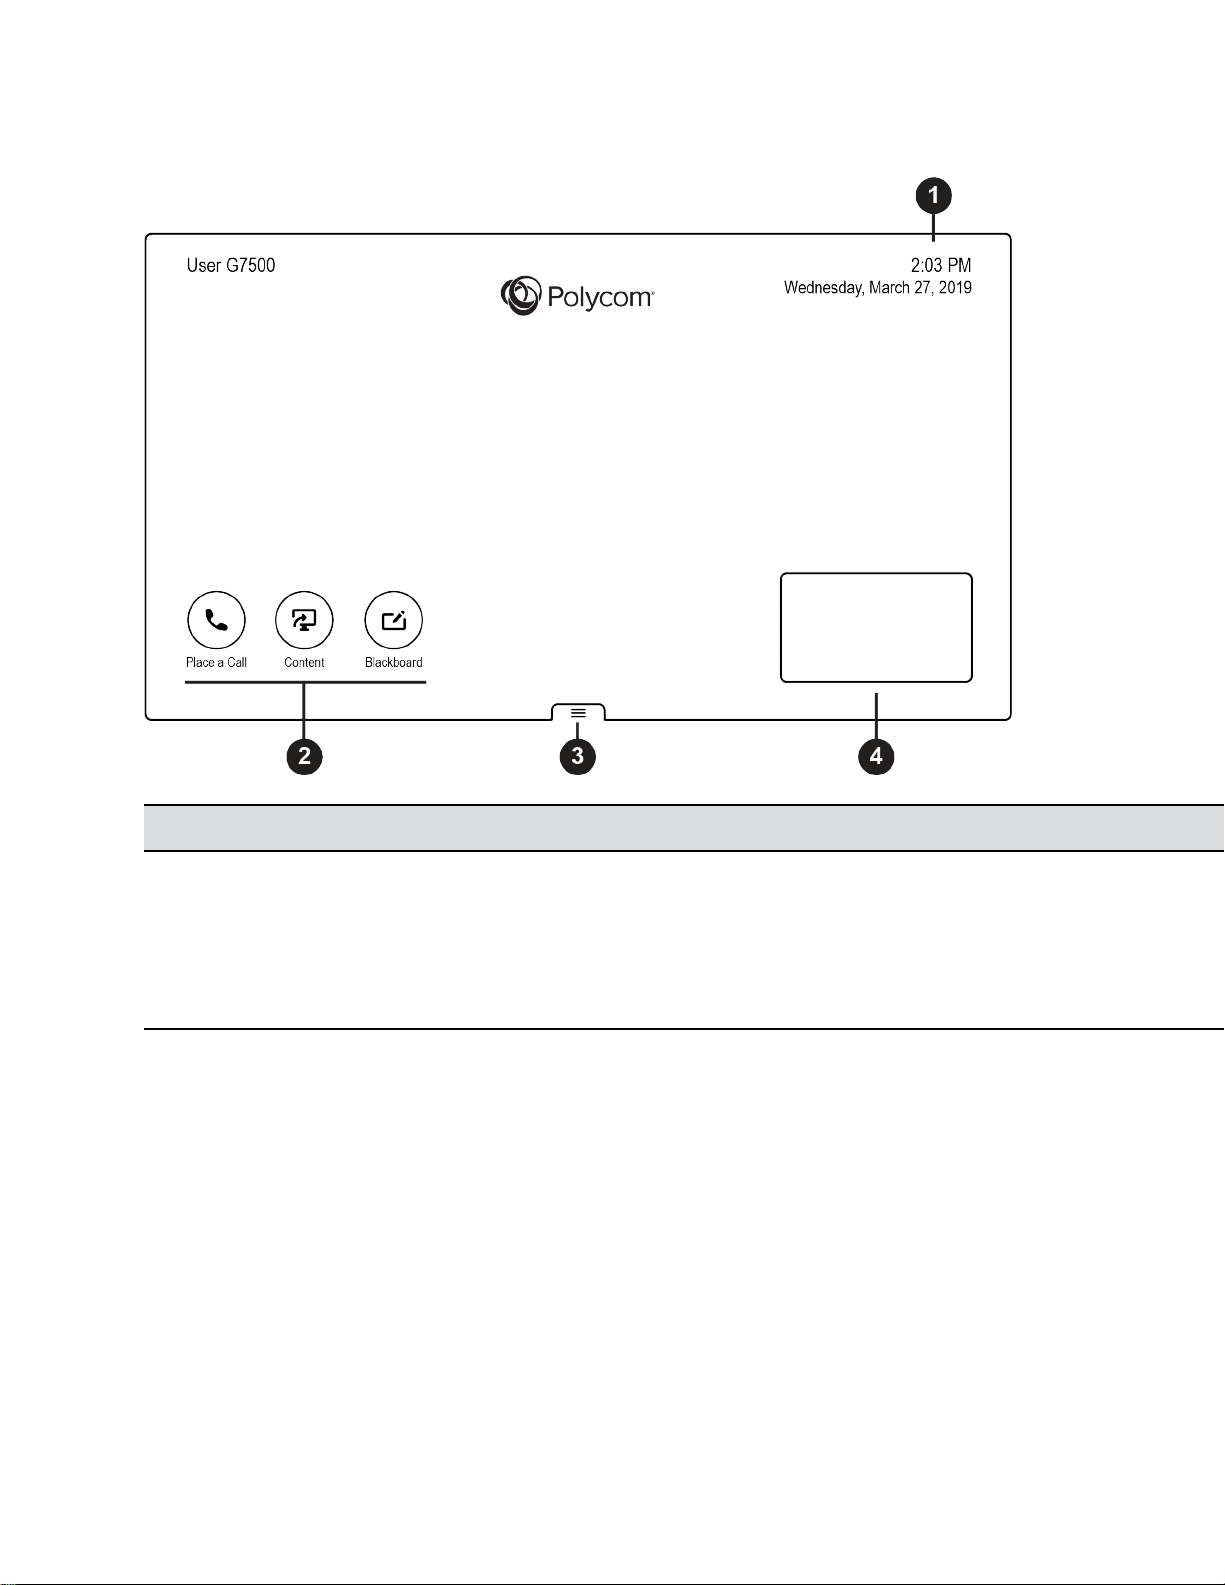
Home Screen
Product Overview
Number Description
1 System information bar, shows system information such as date/time and system name.
2 Task buttons, opens screens for placing calls, sharing content, or creating a blackboard.
3 Menu, opens navigation menus to access features.
4 Local camera view.
Polycom, Inc. 6
Page 9
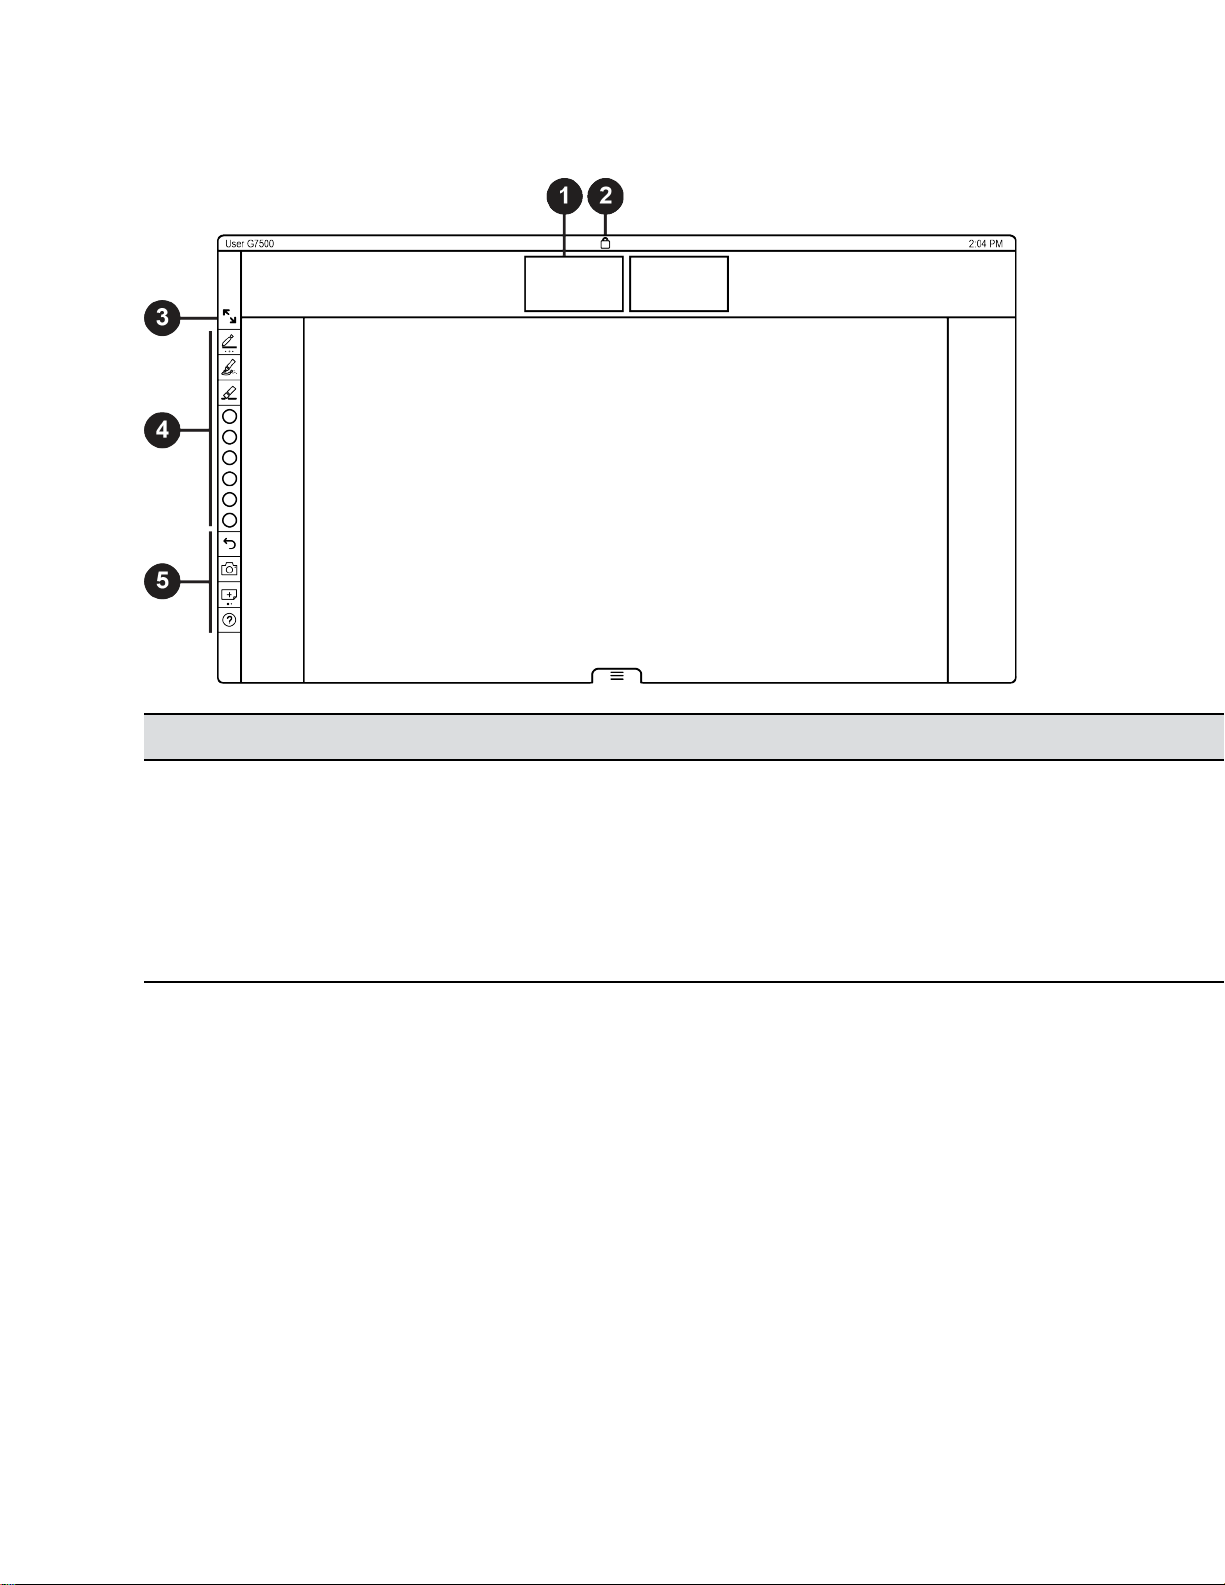
Content Screen
Product Overview
Number Description
1 System information bar, shows system information such as system name and time.
2 Camera views of call participants.
3 Opens presentation mode (full screen).
4 Content toolbar, provides tools to annotate and work with content.
5 Content management functions.
Polycom, Inc. 7
Page 10
Getting Started
Topics:
▪ Home Screen Quick Reference
▪ LED Status Indicators for the G7500 System
Home Screen Quick Reference
The home screen is the first screen you encounter on the system’s monitor. From this screen, you have
quick access to many of the functions.
Some of the following interactive and read-only elements might not display on your system.
Home Screen Elements
Name Description
Name Descriptive name determined by the system administrator. Used
when you want to connect to a system.
Security Code Displayed after you attempt a source connection. Use the four-digit
code to set up wireless connections through AirPlay, Miracast, or
Polycom Content App.
IP Address IP address, SIP, H.323, and secondary network configured for your
system.
Current time Local time zone.
Current date Local time zone date.
Warning Notification that the system has detected one or more problems that
might prevent it from fully functioning.
Calendar or Favorites cards Either of these card types display so that you can view your
calendar or favorites.
Place a Call Opens a call screen where you can dial a call. Or you can select a
card to dial numbers, access favorites, or view your calendar.
Content When content is available, the system displays a list of available
content. Otherwise, opens a help screen that describes how to set
up content sharing using HDMI, the Polycom Content App, or an
AirPlay or Miracast-certified device.
Blackboard Creates a new blackboard, where you can share annotations or
drawings.
Polycom, Inc. 8
Page 11
Getting Started
Name Description
Menu Opens new menu selections for calling, sharing content, camera
control, and more.
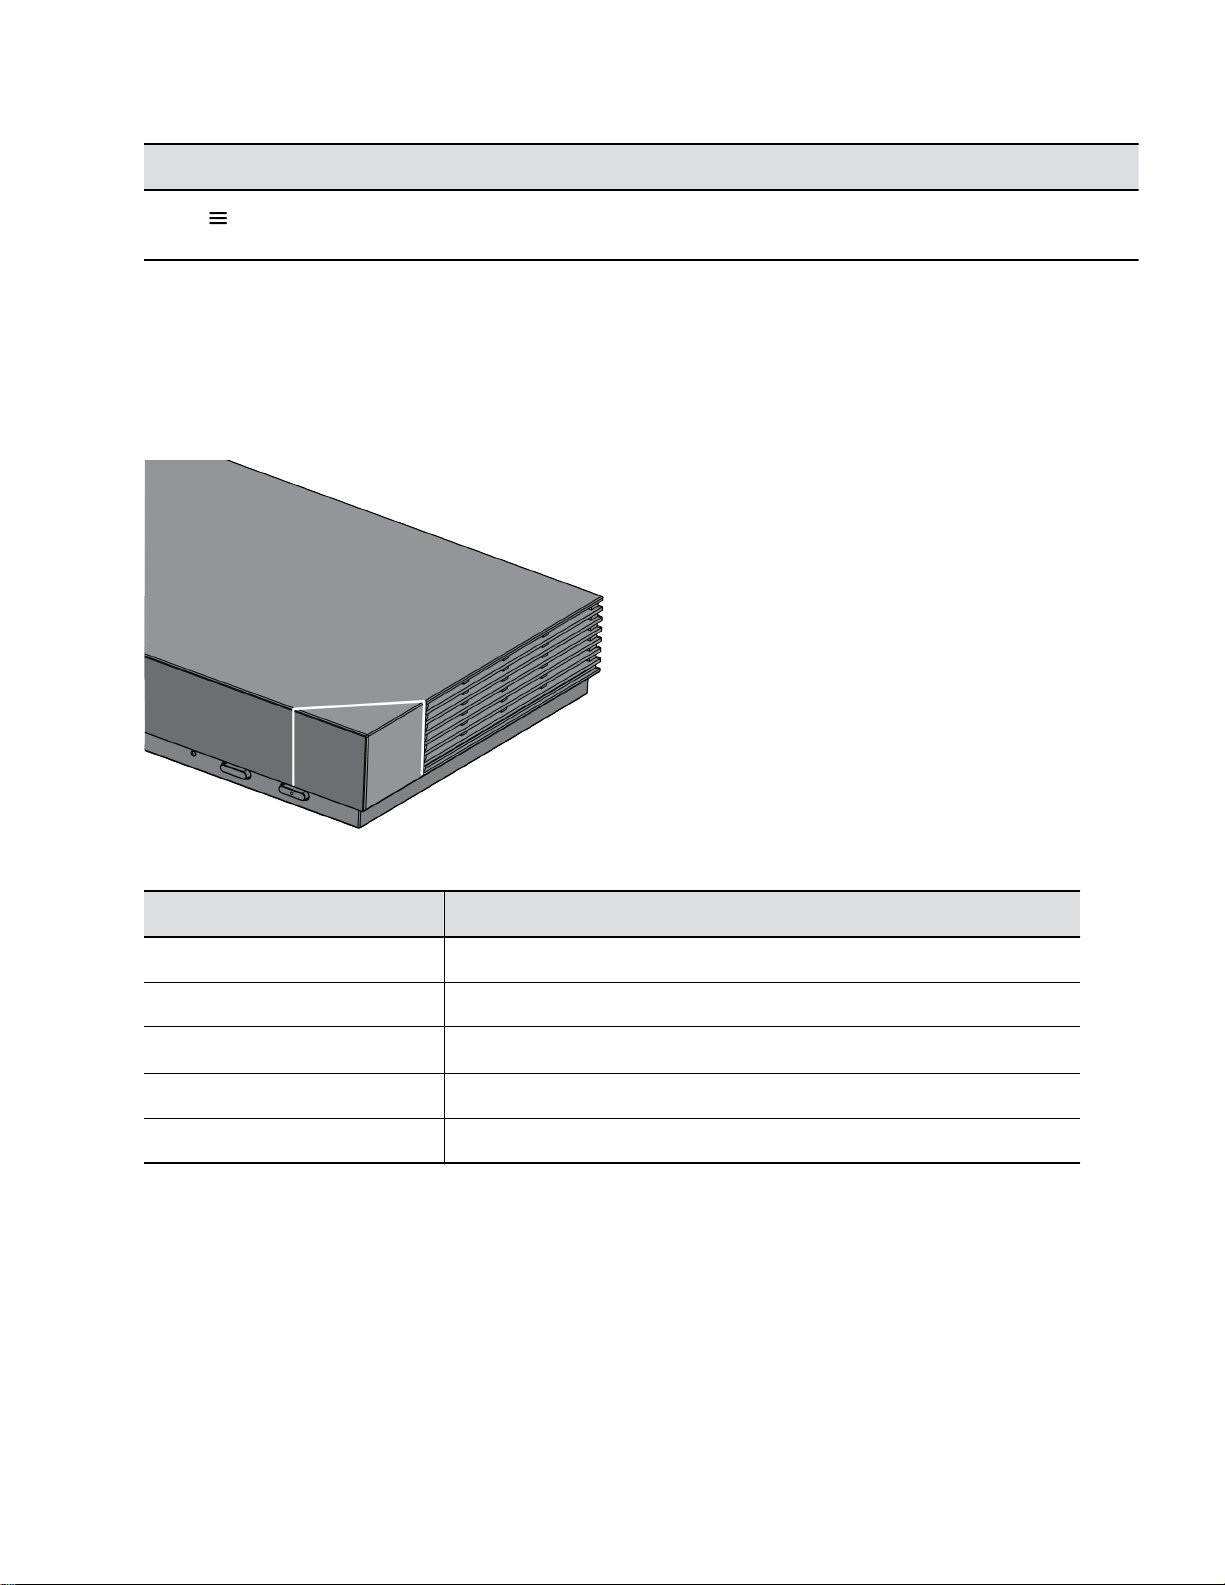
LED Status Indicators for the G7500 System
There’s an LED on the front right corner of the codec to help you understand the state of your G7500
system.
Figure 1: G7500 LED Status Indicator Location
G7500 System LED Status Indicators
Indicator Status
Blinking white Powering on or off
Solid white Working normally
Blinking amber Update in progress
Solid amber Sleeping
Blinking red Error preventing normal operation
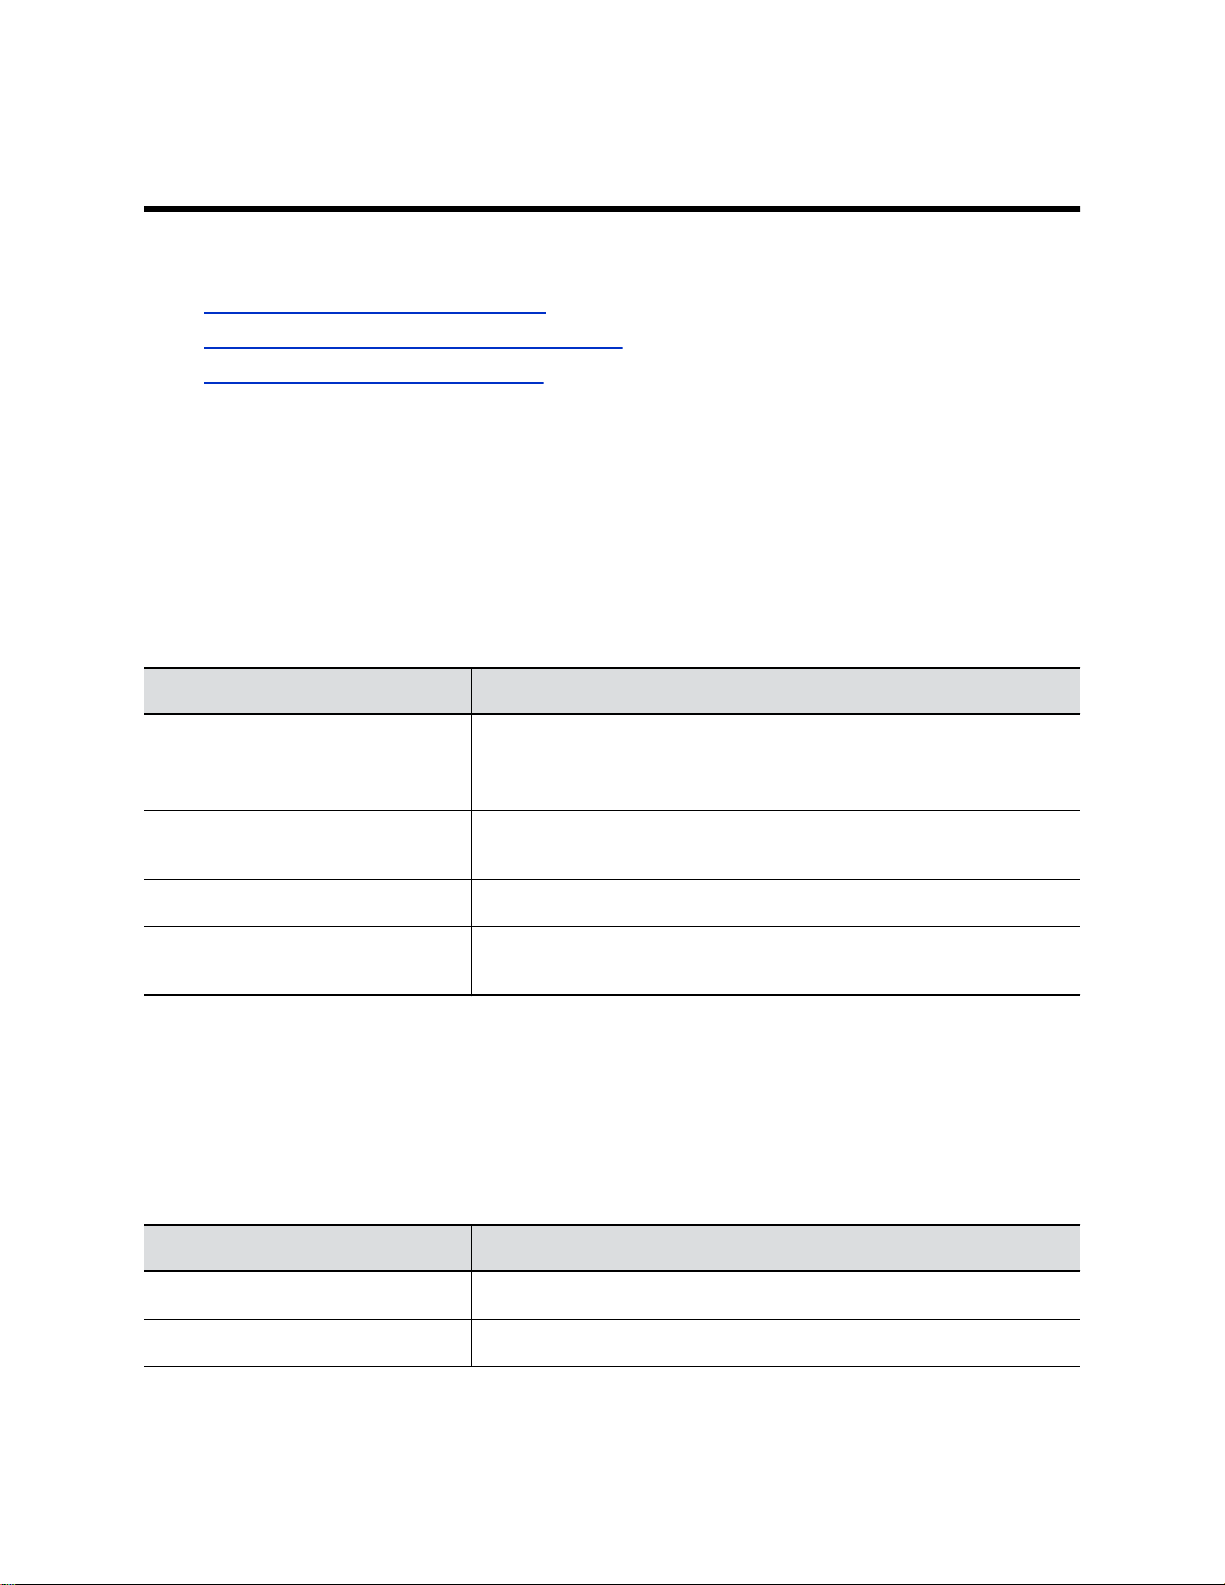
LED Status Indicators for the Polycom® Microphone Adapter
There’s an LED to help you understand the state of your microphone adapter.
Polycom, Inc. 9
Page 12
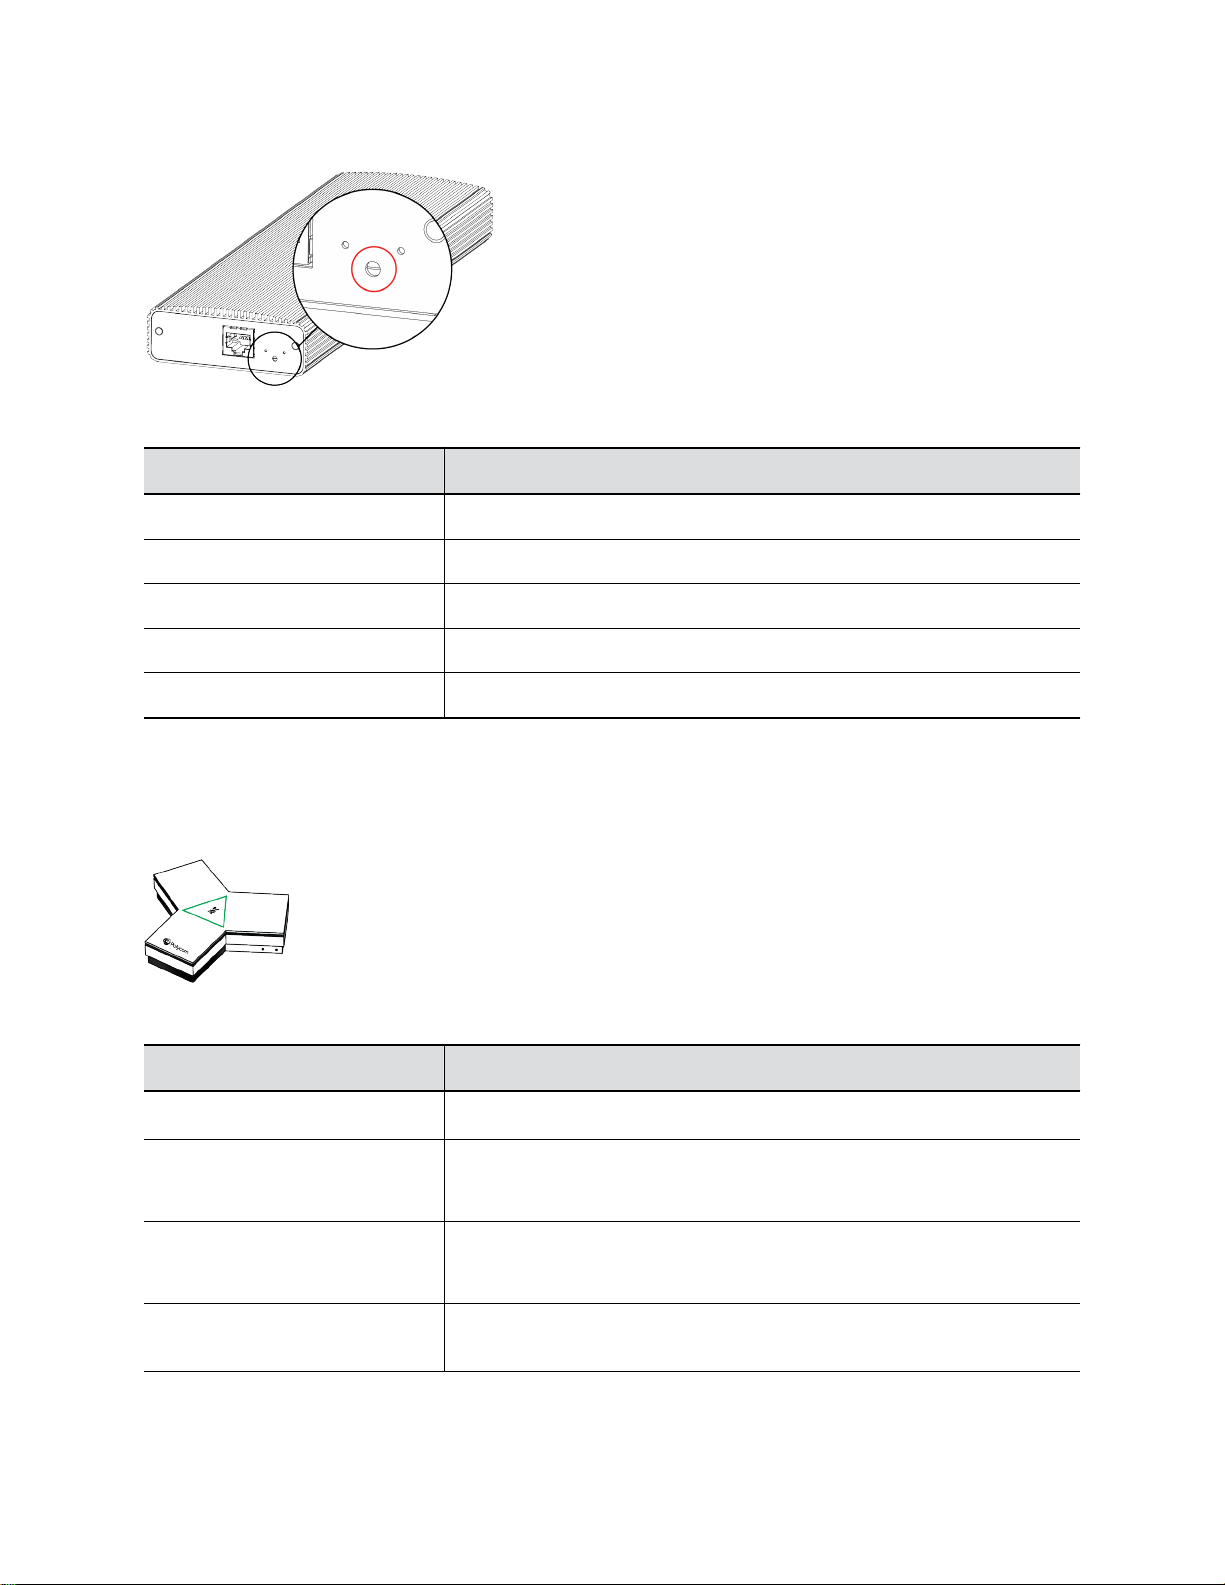
Figure 2: Microphone Adapter LED Status Indicator Location
Microphone Adapter LED Status Indicators
Indicator Status
Blinking white Powering on
Solid white On
Blinking blue Ready to pair
Getting Started
Solid blue Paired successfully
Blinking green and blue Update in progress
LED Status Indicators for IP Microphones
There’s an LED on the IP table and ceiling microphones to help you understand the state of each device.
Figure 3: Polycom IP Table Microphone LED Status Indicator Location
IP Microphone LED Status Indicators
Indicator Status
Solid then blinking white Powering on
Solid red Muted microphone
To avoid distraction, the ceiling microphone doesn't display red when muted.
Solid green In a call
To avoid distraction, the ceiling microphone doesn't display green in a call.
Alternating blinking and solid
amber
Polycom, Inc. 10
Update in progress
Page 13

Indicator Status
Blinking amber Factory reset in progress
Blinking blue Ready to pair
Solid blue Paired successfully
Getting Started
Polycom, Inc. 11
Page 14

Using a Remote Control
Topics:
▪ Wake the System
▪ Remote Control Button Reference
▪ Pair Your Remote Control
The Polycom® Bluetooth Remote Control enables you to interact with a G7500 system. This interaction
includes placing calls, adjusting the volume, controlling a camera, navigating screens, and more.G7500
Wake the System
After a period of no activity, the system enters sleep mode (if configured by your administrator).
Procedure
» Do one of the following.
▪ Press any button on the remote control.
▪ Pick up the remote control.
▪ Press the power button on the front of the system.
▪ If you’re using a touch monitor, tap the screen.
Remote Control Button Reference
The following table shows the G7500 system remote control and descriptions for each button.
Many remote control buttons have dual functions depending on what screen your cursor is in.
Note: If some of the buttons don’t work as documented, your administrator has turned off the
functionality.
Polycom, Inc. 12
Page 15

Buttons Number Description
1 Voice Assistant microphone: Feature planned for future use.
2 Voice Assistant : Feature planned for future use.
3 Volume or Zoom: Adjust volume up and down. Or in camera
mode, zoom the camera in or out.
4 Layout: Opens the layout screen, where you can change how
two or more participants display on the screen in a call.
5 Present Content: On the home screen, displays the content
help screen. Or in a content session, opens the content tray and
allows you to select one piece of content.
6 Directional: Navigate the screen. Or in camera mode, controls
the camera. You can tilt it up or down, or pan left or right.
7 Select: Select an item, such as a button, menu item, or a list
choice.
Using a Remote Control
8 Back or Exit: Navigates back to the previous screen. Or in
camera mode, exits camera control.
9 Menu: Opens navigation menus to access features.
10 Mute: Mutes your local audio. Or long press to pair the remote
control with your system.
11 Keypad: Press number keys to dial a call. Or press the keys to
select presets in a call. You can select presets in camera mode
or outside of camera mode. If configured, press a number to
generate DTMF (touch tones).
12 Asterisk or Period: Generates a period if the cursor is in a
numeric field. To enter a string to dial, double press to toggle
from a numeric to text entry. Generates an asterisk if the cursor
is in a text field. Or generates dual-tone multi-frequency DTMF
tones. Press this button followed by DTMF keys to send (if
configured by the system administrator).
13 Pound or Hash: Generates a pound/hash if the cursor is in a
numeric field. To enter a string to dial, double press to toggle
from a numeric to text entry. Generates an asterisk if the cursor
is in a text field. Or generates dual-tone multi-frequency (DTMF)
touch tones. Press this button followed by DTMF keys to send.
14 Call: Opens the Place a Call screen (outside of a content
session).
15 Hang up or End session: Hangs up a call or ends a content
session.
Polycom, Inc. 13
Page 16

Using a Remote Control
Pair Your Remote Control
Out of the box, your remote control is paired with the G7500 system, so no setup is required. To use a
different remote control, you must pair it with the system.
Procedure
1. Press the Bluetooth button on the front of the system.
A pairing screen displays.
2. With your remote control close to the monitor, long press the red Mute button for at least seven
seconds.
3. Follow the instructions on the pairing screen.
The screen displays either a successful or unsuccessful pairing notification.
Note: If pairing is unsuccessful, remove the batteries from the remote control and insert them
again in about five seconds. Move your remote control closer to the system than other
remote controls and try to pair again.
4. To end the pairing process, select Skip Pairing.
Polycom, Inc. 14
Page 17

Using a Touch Monitor
Topics:
▪ Configure a Touch Monitor
▪ Wake Your Touch Monitor
If you have a touch monitor, you can tap, touch, and swipe items to interact with the G7500 system.
Configure a Touch Monitor
In a dual-monitor setup, you must configure any touch monitors to work with your G7500 system.
Note: Single touch monitor setups require no configuration.
Procedure
1. Do one of the following:
▪ In a call: Select Menu > More > Settings > Diagnostics.
▪ Out of a call: Select Menu > Settings > Diagnostics.
2. Open the Touch Configuration menu.
3. On each screen, tap Hand .
4. Tap Finish Configuration.
Wake Your Touch Monitor
After a period of time, your system might go to sleep. You can wake it at any time.
▪ Tap the screen.
Note: If your monitor doesn’t wake after you tap it, you might need to configure it. Refer to your monitor
documentation for configuration details.
Polycom, Inc. 15
Page 18

Placing Calls
Topics:
▪ Place a Call Using the Onscreen Keyboard
▪ Place a Conference Call
▪ Place an Audio Call
▪ Answer a Call
▪ Ignore a Call
▪ Adjust Volume
▪ Mute Your Local Microphones
▪ Unmute Your Local Microphones
▪ Mute Video
▪ Unmute Video
▪ Hang Up a Call
You can place calls using the following methods.
▪ Call using the dialpad
▪ Join a meeting from the Calendar
▪ Call a contact
▪ Select a frequently-used number
▪ Select a recent contact
▪ Call a favorite
Place a Call Using the Onscreen Keyboard
When placing a call, you can enter the contact name using the onscreen keyboard.
The onscreen keyboard appears in many of the screens on your system.
Procedure
1. To enter letters, select the onscreen keyboard .
To return to the keypad to enter numbers, select Back .
2. Enter the letters for your contact.
For dialing format examples, refer to the following:
▪ IPv4 address: 192.0.2.0
▪ Host name: room.company.com
▪ SIP address: user@domain.com
▪ H.323 or SIP extension: 2555
▪ ISDN or phone number: 9782992285
Polycom, Inc. 16
Page 19

Placing Calls
3. To dial the call, select Call .
Place a Conference Call
To start a conference call, place the first call, then add the other site.
Ensure that your system is registered with a conference calling service.
Procedure
1. Call the first contact.
2. After the call connects, place another call.
Three sites are now on the conference call.
Place an Audio Call
You can place an audio call to an audio contact or place an audio call to a conference that includes video
and audio calls.
Note: As an alternative to placing an audio call, you can make a video call and turn off your camera.
Procedure
1. On the Home screen, select Place a Call.
2. On the Keypad screen, move the slider to Audio .
3. Enter a number on the keypad or select Keyboard to enter letters.
4. Select Call.
Answer a Call
You can choose to answer an incoming call or ignore it. If your administrator has configured your system
to answer calls automatically, this option is not available.
Procedure
» In an incoming call notification, select Answer.
Ignore a Call
You can choose to ignore a call. If your administrator has configured your system to answer calls
automatically, this option is not available.
Procedure
» In an incoming call notification, select Ignore.
Polycom, Inc. 17
Page 20

Placing Calls
Adjust Volume
You can adjust the volume before or during a call.
Procedure
1. Select Menu .
2. Select Volume.
3. Do one of the following.
▪ Use the volume slider on a touch screen.
▪ Press + or - buttons on the remote control.
▪ Press the left or right navigation buttons on the remote control (when the volume control is
displayed to adjust volume).
Mute Your Local Microphones
To prevent distractions for the speaker and meeting participants, you can mute your local microphones.
Procedure
1. Select Menu .
2. Do one of the following. You can mute your audio both in or out of a call.
▪ On your remote control or touch screen, select Mute .
▪ Select Menu > Volume.
A notification displays that your local microphones are muted.
Unmute Your Local Microphones
When your audio is muted and you’re ready to speak in a call, unmute your local microphones.
Procedure
1. Select Menu .
2. Select Unmute .
Mute Video
Turn off your camera so that other sites in a call can’t see you.
Procedure
1. Select Menu .
2. Select Camera.
3. Select Camera Off.
Polycom, Inc. 18
Page 21

Placing Calls
Unmute Video
Turn your camera on so that call participants can see you.
Procedure
1. Select Menu .
2. Select Camera.
3. Select Camera On.
Hang Up a Call
Hang up your call to end the current meeting. If you have content such as blackboards, whiteboards, or
snapshots, the system asks if you want to keep them.
Procedure
» In a call, do one of the following:
▪ Select Hang Up on your remote control.
▪ Select Menu and Hang Up.
Polycom, Inc. 19
Page 22

Calling Contacts
Topics:
▪ Manage Contacts
▪ Call a Contact
▪ Call a Frequent Contact
▪ Call a Recent Contact
Manage Contacts
You can add contacts individually or in bulk in the G7500 system web interface.
You need local administrator access for this feature.
Procedure
1. On the Dashboard or Place a Call page, select Contacts.
2. Select More and choose one of the following:
▪ New Contact: Create a single contact.
▪ Import: Upload contacts in bulk using an XML file (can’t exceed 3 MB).
▪ Export: Download local contacts in an XML file (doesn’t include contacts available through a
directory server).
Call a Contact
To quickly dial a contact, you can perform a search and select a contact card from the results.
These cards are displayed for frequent contacts, directory contacts, favorites, and local contacts.
Procedure
1. From the home screen, select Place a Call.
2. Select the Contacts tab.
3. In the search field, use the onscreen keyboard to type characters or numbers.
4. Select Search.
5. Select a contact card to view contact details.
6. Select Call.
Call a Frequent Contact
As you place calls, the system learns your frequently-used contacts and displays them in a list.
Procedure
1. Select Place a Call.
Polycom, Inc. 20
Page 23

2. Select a contact card from the Frequent list.
The call automatically dials.
Related Tasks
Call a Recent Contact on page 21
Call a Recent Contact
You can quickly call a recent contact from a list organized by most to least recent.
Procedure
1. Select Place a Call.
2. Select Recent.
3. Scroll through the list of recent contacts, sorted by date.
4. Select a recent contact.
The call automatically dials.
Related Tasks
Call a Frequent Contact on page 20
Calling Contacts
Polycom, Inc. 21
Page 24

Calling Favorite Contacts
Topics:
▪ Favorite a Contact
▪ Unfavorite a Contact
▪ Call a Favorite Contact
To quickly access a short list of contacts you call most often, create favorites. Select a favorite card and
the call dials automatically.
Favorite a Contact
Create favorites to display contacts that you call the most often.
Favorite cards display on the Favorites or Contacts screens, or might also display on your home screen
(depending upon system configuration).
Procedure
1. From the home screen, select Place a Call.
2. Select Contacts.
3. Select a contact card, then select Favorite.
The contact now displays a star icon, indicating it’s a favorite.
Unfavorite a Contact
Unfavorite a contact to remove the contact from your favorites list.
Procedure
1. From the home screen, select Place a Call.
2. In the Favorites list, select a contact.
3. Select Unfavorite.
The favorite [star icon] is removed from the contact card.
Call a Favorite Contact
To quickly call a contact, you select a favorite card.
Procedure
» Do one of the following.
▪ Select a favorite from the home screen.
▪ Go to the Place a Call > Favorites screen and select a favorite card.
The call automatically dials.
Polycom, Inc. 22
Page 25

Joining Meetings from the Calendar
Topics:
▪ Viewing Meeting Cards
▪ Place a Call from a Meeting Card
▪ Join an Overbooked Meeting
▪ Manually Dial to Join a Meeting
To join a meeting from the calendar, you can select meeting cards without dialing a number. You can also
manually dial into meetings using a keypad.
If no meetings are scheduled for the current week, a “No Meetings” message is displayed. If no meetings
are currently scheduled until later in the day or the week, a “Free until [time/day] message is displayed.
Viewing Meeting Cards
You can view meeting cards that show your calendar event details, and can use the cards to dial into
meetings. If your administrator has not configured calendaring for your system, the cards do not display.
On the Home screen, meeting cards display the meeting time, subject, and organizer. To view future
meetings, select a card and scroll to the right.
Select Info to view the following details.
▪ Meeting Subject
▪ Time and duration of meeting
▪ Location
▪ Description
▪ Other details might display, depending upon your calendar service.
Note: Private meetings are labeled Private Meeting. Except for the time, meeting details are hidden.
Place a Call from a Meeting Card
You can select a meeting card for options to join to a meeting. If the meeting organizer added calling
information to the calendar event, and if your administrator configured calendaring, automatic dialing is
supported.
All-day meetings display as the first meeting card.
Select a card for focus to display the contact’s SIP, email, telephone, and mobile phone details.
When a meeting is ongoing, the card displays In Session.
Procedure
» Do one of the following.
Polycom, Inc. 23
Page 26

Joining Meetings from the Calendar
▪ On a current meeting card, select Join.
▪ If the meeting card doesn’t include calling information, select the ... button to display a
dialpad. Dial the number to enter the meeting.
Related Tasks
Place a Video Call Using the Keypad
Join a Password-Protected Meeting
Join an Overbooked Meeting
If two or more meetings are scheduled at the same time, the time is shown as overbooked.
On the home screen, overbooked meetings display as Overbooked cards.
Procedure
1. Select an overbooked meeting card.
2. Select Info to display overbooked meetings.
3. Select Join to connect to one of the overbooked meetings.
Manually Dial to Join a Meeting
If your administrator did not configure calendaring for your system, you can dial into meetings using a
keypad on the Place a Call screen.
Procedure
1. From the home screen, select Place a Call .
A keypad displays.
2. Use the keypad to enter the meeting room number or address.
Your call joins the meeting.
Related Tasks
Join a Password-Protected Meeting
Polycom, Inc. 24
Page 27

Customizing Calls for Your Site
Topics:
▪ Change Participant Layouts
You might want to change some of the default options available in a call or out of a call.
Change Participant Layouts
During a call with two or more participants, you can change from the current layout to another layout
better suited for the meeting. The layout frames include the near site and far sites.
If you are sharing content on a single monitor, content displays in one of the frames.
Procedure
1. In a call, select Menu .
2. Select Layouts .
3. Select from one of the following layouts.
▪ Equal: All participants are the same size.
▪ Gallery: Participants display at the top of the screen and the speaker displays in the main
frame.
▪ Fullscreen: The active speaker is full screen.
Polycom, Inc. 25
Page 28

Sharing Content from a Computer or Device
Topics:
▪ View Content Help Tips
▪ Polycom Content App
▪ Share Content Casted from AirPlay or Miracast
▪ Share Content Using an HDMI Connection
You can share content from a computer, or use wireless applications to stream content from other
devices.
The following methods for sharing content are supported:
▪ AirPlay or Miracast-certified device
▪ Polycom® Content App, which wirelessly connects to the G7500 system.
▪ Computer or device directly connected to the system through HDMI
Note: Before you share content, take precautions to protect your privacy. For example, disable your
device's screen lock feature before you share your screen with meeting participants.
View Content Help Tips
Content help tips provide information on how to stream content using HDMI, Miracast, AirPlay, or the
Polycom Content App.
Note: If you’re already connected to a source for sharing content, the help tips don’t display.
Procedure
1. On the home screen, select Content .
A help screen opens.
2. Review the tips for your source type.
3. To go back to the previous screen, select Back .
Polycom Content App
The Polycom Content App allows you to share content from a computer connected to a G7500 system
over an IP network.
For information on using this application, refer to the Polycom Content App User Guide on Polycom
Support.
Polycom, Inc. 26
Page 29

Sharing Content from a Computer or Device
Share Content Casted from AirPlay or Miracast
You can share content from your Airplay or Miracast-certified device and display it on the system.
Procedure
1. Navigate to AirPlay or Miracast on your device.
2. From the list of available devices, select the name of your G7500 system.
3. Begin casting from your AirPlay or Miracast device. For casting information for your device, refer
to the product documentation.
4. If prompted, enter the security code shown on the home screen.
Your content displays on the system screen.
Share Content Using an HDMI Connection
You can share content through an HDMI connection from your device to the system. This method doesn’t
require you to connect using a wireless service.
Procedure
» Connect an HDMI cable from your device to the system’s HDMI port.
Your content displays on the screen.
Polycom, Inc. 27
Page 30

Sharing Content on a Blackboard or Whiteboard
Topics:
▪ Annotating on a Blackboard or Whiteboard
▪ End a Content Session
▪ Hang Up a Call that includes Content
You can annotate on a blackboard or whiteboard, or stream content using various protocols.
Annotating on a Blackboard or Whiteboard
Blackboards and whiteboards provide blank canvases to write on so you can share your ideas and
collaborate with others.
Access the Help Screen
For help annotating on your blackboard or whiteboard, you can access information on how to use the
annotation icons and touch gestures.
Procedure
1. On the home screen, select Blackboard
2. On the toolbar, select Help .
The help screen opens.
3. To close the screen, tap the screen or press Back on your remote control.
.
Add a Blackboard or Whiteboard
You can create a blackboard or whiteboard at any time.
Note: If the active board has no annotations, you cannot add a new board.
Procedure
1. Do one of the following.
▪ Out of a call: On the home screen, select Blackboard .
▪ In a call: Select Menu > Content > Blackboard .
You can now annotate on the blackboard.
2. Do one of the following to add another board.
▪ To add a blackboard: In the toolbar, select Blackboard .
▪ To add a whiteboard: In the toolbar, long press Blackboard and select Whiteboard .
Polycom, Inc. 28
Page 31

Sharing Content on a Blackboard or Whiteboard
Note: The default board type is whatever type you last selected.
Take a Snapshot
You can take a picture of your current content. Then you can annotate on the snapshot or download it
using the Polycom® Content App.
A limited number of snapshots are available. A prompt notifies you when you have reached the snapshot
limit.
Procedure
» When you have a board or content on the screen, select Snapshot .
The content is captured and displayed as Snapshot-1. Additional snapshots are named with
successive numbers.
Delete a Snapshot or Content
You can delete snapshots or content that you no longer need.
Procedure
1. Select a snapshot or content that’s visible in the content area (not in the content tray).
2. Select the red x.
3. Select Delete.
The snapshot or content is deleted.
End a Content Session
If you close all content, you stop showing content.
Procedure
1. During a content session, select Menu .
2. Tap End Session, or on your remote control, press Hang up .
Note: A message displays a warning that if you end your session, content is removed in a few
seconds.
3. To keep content, select Continue Session, or to end content, select End Session.
Hang Up a Call that includes Content
If your call includes content, you can hang up your call and end the content session, or end your call and
keep content.
Procedure
1. In a call with content, select Menu .
2. Select Hang Up.
Polycom, Inc. 29
Page 32

Sharing Content on a Blackboard or Whiteboard
The call ends and you are asked if you want to keep content.
3. Select Yes, Keep Content or No, End Session.
If you keep content, the content session continues.
4. When ready to stop content, select Menu > End Session > End Session.
Polycom, Inc. 30
Page 33

Cameras
Topics:
▪ Adjust a Camera
▪ Turn Your Camera Off
▪ Turn Your Camera On
▪ Turn Camera Tracking On
▪ Turn Camera Tracking Off
You can use cameras in a variety of ways.
Some tasks, depending upon the camera type, include the following:
▪ Select a camera to control at your site or at a remote site.
▪ Zoom in, zoom out, pan, or tilt the camera.
▪ Turn tracking on or off.
▪ Turn your camera on or off.
▪ Select, save, and delete presets. Use the presets to move a camera.
Note: If camera tracking is on, camera control and preset features are unavailable. Turn tracking off to
access them.
Near: The camera at your site.
Far: The camera at another site in a call.
Adjust a Camera
To enhance the view of meeting participants, you can make adjustments to a camera.
Procedure
1. Select Menu .
2. Select Camera .
3. Select Control .
4. Optional: In a call, you can select Switch to move the camera from Near to Far.
If there’s a controllable far camera available, you can select it. After you select a camera, pan, tilt,
and zoom controls display (if available).
5. Press or tap + to zoom in or - to zoom out. Press or tap the arrows to tilt up or down, or to pan left
or right.
6. To exit the control screen, select Back.
Polycom, Inc. 31
Page 34

Turn Your Camera Off
You can turn your camera off to hide your local video.
Procedure
1. Select Menu .
2. Select Camera .
3. Select Off .
Turn Your Camera On
You can turn your camera on to show local video.
Procedure
1. Select Menu .
2. Select Camera .
3. Select On .
Cameras
Turn Camera Tracking On
Cameras with tracking automatically focus on the current speaker, removing the need to manually adjust
the camera.
Note: If you mute your local microphone, camera tracking is not completely turned off. Group framing is
still tracked, but speaker tracking is disabled.
Procedure
1. Select Menu .
2. Select Camera .
3. Select Tracking On.
Turn Camera Tracking Off
To stop automatically tracking the speaker during a call, turn off camera tracking.
Procedure
1. Select Menu .
2. Select Camera .
3. Select Tracking Off.
Polycom, Inc. 32
Page 35

Camera Presets
Topics:
▪ Select a Preset
▪ Save a Preset
▪ Delete a Preset
Camera presets are stored camera positions that allow you to quickly point a camera at pre-defined
locations in a room. Near camera presets are stored in the camera and are available in and out of the
call. Far camera presets only exist in a call. You can select, save, and delete presets.
If your camera supports pan, tilt, and zoom, you can create up to 10 preset camera positions.
In a call, you can use presets created at a far site to control the their camera, if enabled by the
administrator.
Note: If camera tracking is on, camera control and preset features are unavailable. Turn tracking off to
access them.
Select a Preset
Using previously created camera presets, you can quickly move the camera to a desired position in a call.
Procedure
1. Select Menu .
2. Select Camera .
3. Select Presets .
4. Do one of the following.
▪ On the preset you want, select the image.
▪ Long press the image and choose Select.
▪ Press a number on your remote control to select a preset.
The camera view moves to the preset position.
Save a Preset
Save the current camera position as a preset for later use. You can use saved presets to change the near
camera position in or out of a call. Far camera saved presets are available only in a call.
Procedure
1. Select Menu .
2. Select Camera .
3. Select Presets .
Polycom, Inc. 33
Page 36

4. Adjust the camera to your desired position.
5. Long press the preset image.
6. Select Save.
The preset is saved and displays as a new preset in the control panel.
Delete a Preset
You can delete a camera preset that you no longer need.
Procedure
1. Select Menu .
2. Select Camera .
3. Select Presets .
4. Long touch the preset image you want to delete.
5. Select Delete.
The preset is removed from the control panel. After you restart the G7500, the former preset
position changes to Add a Preset.
Camera Presets
Polycom, Inc. 34
Page 37

System Settings
Topics:
▪ Status Settings Reference
▪ Diagnostic Settings Reference
Two types of system settings are available. Status settings include read-only system information about
connections. Diagnostic settings allow you to perform tests to determine if changes are required to
improve performance.
Status Settings Reference
System status settings provide important information on connections to devices, services, and servers.
Certain settings display a Lock on your system. This indicates that the setting is limited to system
administrators.
▪ In a call: Menu > More > Settings > Status.
▪ Out of a call: Menu > Settings > Status.
Status Settings
Setting Description
Active Alerts Displays the status of any device or service with an
error status. If any alerts exist, an alert displays
next to the system time.
Call Control Displays status of the Auto-Answer Point-to-Point
Video setting.
LAN Properties Displays the connection status of the IP network.
Servers
Peripheral Devices Lists the connection status of peripheral devices.
▪ Displays the Gatekeeper and SIP Registrar Server
status.
▪ Displays the active Global Directory Server, LDAP
Server, or Microsoft Server status.
▪ If enabled, displays the Provisioning Service or the
Calendaring Service status.
Polycom, Inc. 35
Page 38

System Settings
Diagnostic Settings Reference
Diagnostics are tools to test your system’s performance. The diagnostic tool locations vary depending on
whether you are in or out of a call as described below.
Certain settings display a lock on your system. This indicates that the setting is limited to system
administrators.
Do one of the following:
▪ In a call: Go to Menu > More > Settings > Diagnostics
▪ Out of a call: Go to Menu > Settings > Diagnostics
Diagnostic Settings
Setting Description
Near End Loop Available only out of a call. Tests the internal audio
encoders and decoders, external microphones and
speakers, internal video encoders and decoders, audio
hardware, external microphones, speakers, cameras,
and monitors. Monitor 1 displays the video and plays
the audio sent to the far site in a call.
Ping Tests whether the system can connect with a far-site IP
address that you specify. Ping returns abbreviated
Internet Control Message Protocol results. If you’ve
configured the far site for H.323, it returns H.323
information. It returns SIP information only if you’ve
configured the far site for SIP. If the test is successful,
the system displays a message.
Trace Route Tests the routing path between the local system and
the IP address you enter. If the test is successful, the
system lists the hops between the system and the IP
address.
Color Bars Tests the color settings of your monitor for optimum
picture quality. If the color bars generated during the
test aren’t clear, or the colors don’t look correct, adjust
the monitor settings.
Speaker Test A 473 Hz audio tone indicates whether the local audio
connections are correct. If you run this test during a
call, the far site hears the tone. You can test the left or
right speaker. If Start Both is displayed, you can also
test both speakers at the same time.
Polycom, Inc. 36
Page 39

System Settings
Setting Description
Audio Meter Identifies the left and right audio channels on the
system. Audio meters indicate the audio strength of
your microphones, far-site audio, and any device
connected to the audio ports. To avoid or to fix audio
distortion, configure this setting in the local or web
system interface.
Reset System Resets all configurations to factory defaults, and
requires a system restart. You have options to keep
installed certificates, directory entries, system logs, and
call detail reports.
Touch Configuration Displays if the system has one or more touch monitors
that require configuration. Touch Configuration opens a
wizard so you can configure your touch displays.
Call Statistics Available in a call only. Displays information to help you
troubleshoot system issues or problems experienced
by call participants.
Perform a Monitor Test
To check if you’ve properly adjusted your monitors, you can perform a color bar test.
Procedure
1. Do one of the following:
▪ In a call: > More > Settings > Diagnostics > Color Bars.
▪ Out of a call: > Settings > Diagnostics > Color Bars.
2. Select Start.
Perform a Speaker Test
This diagnostic test checks the speaker connections and volume level.
After you start the test at the near site, you hear a tone. If your system is in a call, the far site also hears
the tone.
Procedure
1. Do one of the following:
▪ In a call: Go to Menu
▪ Out of a call: Menu > Settings > Diagnostics > Speaker Test
2. Select Speaker Test.
3. To begin the test, select Start Left, Start Both, or Start Right.
Note that Start Both, which allows you to test both speakers at the same time, might not display.
> More > Settings > Diagnostics > Speaker Test
Polycom, Inc. 37
Page 40

Test Audio Meter Levels
To monitor the real-time audio signal your G7500 system, you can use audio meter levels.
Procedure
1. Do one of the following:
▪ In a call: Select Menu > More > Settings > Diagnostics.
▪ Out of a call: Select Menu > Settings > Diagnostics.
2. Select Audio Meter.
3. To test the audio, do one of the following:
▪ To check the microphones for the near-site, speak into the microphones.
▪ To check far-site audio, ask a participant at the far-site to speak, or call a phone in the far-
site room to hear it ring.
4. For normal speech and program material, set the audio signal levels so that you see peaks
between +3 dB and +7 dB.
Note: Occasional peaks of +12 dB to +16 dB with loud transient noises are acceptable. If you
see +20 on the audio meter, the audio signal is 0 dBFS and the audio might be distorted.
A meter reading of +20 dB corresponds to 0 dBFS in the room system audio.
System Settings
Polycom, Inc. 38
Page 41
Accessibility Features
Topics:
▪ Features for Hearing-Impaired Users
▪ Features for Vision-Impaired and Blind Users
▪ Features for Mobility-Impaired Users
Polycom products include a number of features to accommodate hearing-, vision-, mobility-, or
cognitively-impaired users.
Features for Hearing-Impaired Users
There are features that allow those with hearing impairments to use the G7500 system.
If needed, contact your administrator to enable the following features.
Features for Hearing-Impaired Users
Accessibility Feature Description
Visual notifications Status and icon indicators let you know when you have incoming,
outgoing, active, or held calls. Indicators also alert you of the device’s
status and when features are enabled.
Status indicator lights The system and its microphones use LEDs to indicate some statuses,
including if your microphones are muted.
Adjustable call volume While in a call, you can raise or lower the volume of the device.
Adjustable sound effects volume You can choose and adjust the volume of a variety of ringtones and user
alert tones.
Features for Vision-Impaired and Blind Users
Some features allow those with visual impairments to use the G7500 system.
If needed, contact your administrator to enable the following features.
Features for Vision-Impaired and Blind Users
Accessibility Feature Description
Auto-answering You can enable the system to auto-answer calls.
Mute auto-answered calls You can configure the system to mute auto-answered calls.
Polycom, Inc. 39
Page 42

Accessibility Features
Accessibility Feature Description
Microphone mute An audible alert plays when you mute or unmute the microphones.
Ringtones An audible tone plays for incoming calls.
Join and leave tones An audible tone plays when someone joins or leaves a conference call.
User alert tones An audible tone plays when the system displays an alert.
Embossed buttons The remote control has embossed push buttons for performing common
tasks with the system, such as dialing a number.
Features for Mobility-Impaired Users
There are features that allow those with mobility impairments to use the G7500 system.
If needed, contact your administrator to enable the following features.
Features for Mobility-Impaired Users
Accessibility Feature Description
Remote control The Bluetooth remote control allows you to control the system and to
perform tasks, such as to make calls, start a sharing session, and
configure some settings.
Auto-answering You can enable the system to auto-answer calls.
Calling from a personal device With administrator credentials, you can wirelessly access the system
web interface from your own device to make calls and manage contacts
and favorites.
Touch-capable monitor support If you have a touch-capable monitor connected to the system, you can
select, swipe, and press the screen to perform functions and activate
features.
Polycom, Inc. 40
 Loading...