

Polycom RealPresence Group Series, RealPresence Group 500, RealPresence Group 300, RealPresence Group 310, RealPresence Group 700 User Manual
Page 1

USER GUIDE
5.1.0 | February 2016| 3725-63715-008A
Polycom RealPresence Group
Series
Page 2

Copyright© 2016, Polycom®. All rights reserved. No part of this document may be reproduced, translated into another
language or format, or transmitted in any form or by any means, electronic or mechanical, for any purpose, without the
express written permission of Polycom, Inc.
6001 America Center Drive
San Jose, CA 95002
USA
Trademarks Polycom
trademarks and/or service marks of Polycom, Inc. and are registered and/or common law marks in the United States
and various other countries.
All other trademarks are property of their respective owners. No portion hereof may be reproduced or transmitted in any
form or by any means, for any purpose other than the recipient's personal use, without the express written permission
of Polycom.
®
, the Polycom logo and the names and marks associated with Polycom products are
Disclaimer While Polycom uses reasonable efforts to include accurate and up-to-date information in this document,
Polycom makes no warranties or representations as to its accuracy. Polycom assumes no liability or responsibility for
any typographical or other errors or omissions in the content of this document.
Limitation of Liability Polycom and/or its respective suppliers make no representations about the suitability of the
information contained in this document for any purpose. Information is provided "as is" without warranty of any kind and
is subject to change without notice. The entire risk arising out of its use remains with the recipient. In no event shall
Polycom and/or its respective suppliers be liable for any direct, consequential, incidental, special, punitive or other
damages whatsoever (including without limitation, damages for loss of business profits, business interruption, or loss of
business information), even if Polycom has been advised of the possibility of such damages.
End User License Agreement By installing, copying, or otherwise using this product, you acknowledge that you
have read, understand and agree to be bound by the terms and conditions of the End User License Agreement for this
product. The EULA for this product is available on the Polycom Support page for the product.
Patent Information The accompanying product may be protected by one or more U.S. and foreign patents and/or
pending patent applications held by Polycom, Inc.
Open Source Software Used in this Product This product may contain open source software. You may receive
the open source software from Polycom up to three (3) years after the distribution date of the applicable product or
software at a charge not greater than the cost to Polycom of shipping or distributing the software to you. To receive
software information, as well as the open source software code used in this product, contact Polycom by email at
[email protected].
Customer Feedback We are striving to improve our documentation quality and we appreciate your feedback. Email
your opinions and comments to [email protected].
Polycom Support Visit the Polycom Support Center for End User License Agreements, software downloads,
product documents, product licenses, troubleshooting tips, service requests, and more.
ii
Page 3

Contents
Before You Begin . . . . . . . . . . . . . . . . . . . . . . . . . . . . . . . . . . . . . . . . . . . . . . . . . . . .1
Audience, Purpose, and Required Skills . . . . . . . . . . . . . . . . . . . . . . . . . . . . . . . . . . . . . . . . . . .1
Get Help . . . . . . . . . . . . . . . . . . . . . . . . . . . . . . . . . . . . . . . . . . . . . . . . . . . . . . . . . . . . . . . . . . .1
Polycom Partner and Solution Resources . . . . . . . . . . . . . . . . . . . . . . . . . . . . . . . . . . . . . .1
The Polycom Community . . . . . . . . . . . . . . . . . . . . . . . . . . . . . . . . . . . . . . . . . . . . . . . . . . .2
Getting Started with Polycom RealPresence Group Series . . . . . . . . . . . . . . . . . .3
RealPresence Group System Power . . . . . . . . . . . . . . . . . . . . . . . . . . . . . . . . . . . . . . . . . . . . . .3
Power On the RealPresence Group System . . . . . . . . . . . . . . . . . . . . . . . . . . . . . . . . . . . . .3
System Health Check . . . . . . . . . . . . . . . . . . . . . . . . . . . . . . . . . . . . . . . . . . . . . . . . . . . . . .4
Power Off a RealPresence Group System . . . . . . . . . . . . . . . . . . . . . . . . . . . . . . . . . . . . . .4
Using a Polycom RealPresence Group Series Remote Control . . . . . . . . . . . . . . .5
Remote Control Buttons and Descriptions . . . . . . . . . . . . . . . . . . . . . . . . . . . . . . . . . . . . . . . . .6
Recharge the Remote Control Battery . . . . . . . . . . . . . . . . . . . . . . . . . . . . . . . . . . . . . . . . . . . .7
Wake a RealPresence Group System . . . . . . . . . . . . . . . . . . . . . . . . . . . . . . . . . . . . . . . . . . . . .7
Contacts . . . . . . . . . . . . . . . . . . . . . . . . . . . . . . . . . . . . . . . . . . . . . . . . . . . . . . . . . . . . . . . . . . .7
Contact Presence States . . . . . . . . . . . . . . . . . . . . . . . . . . . . . . . . . . . . . . . . . . . . . . . . . . .8
Browse the Global Directory . . . . . . . . . . . . . . . . . . . . . . . . . . . . . . . . . . . . . . . . . . . . . . . . .8
Search for Directory Contacts . . . . . . . . . . . . . . . . . . . . . . . . . . . . . . . . . . . . . . . . . . . . . . . .8
Calling . . . . . . . . . . . . . . . . . . . . . . . . . . . . . . . . . . . . . . . . . . . . . . . . . . . . . . . . . . . . . . . . . . . . .9
Call by Entering a Name or Number . . . . . . . . . . . . . . . . . . . . . . . . . . . . . . . . . . . . . . . . . . .9
Call from the Contacts Screen . . . . . . . . . . . . . . . . . . . . . . . . . . . . . . . . . . . . . . . . . . . . . .10
Call from the Recent Calls List . . . . . . . . . . . . . . . . . . . . . . . . . . . . . . . . . . . . . . . . . . . . . .10
Call a Speed Dial Entry . . . . . . . . . . . . . . . . . . . . . . . . . . . . . . . . . . . . . . . . . . . . . . . . . . . .10
Answer a Call . . . . . . . . . . . . . . . . . . . . . . . . . . . . . . . . . . . . . . . . . . . . . . . . . . . . . . . . . . .10
Ignore a Call . . . . . . . . . . . . . . . . . . . . . . . . . . . . . . . . . . . . . . . . . . . . . . . . . . . . . . . . . . . .11
Hold a Call . . . . . . . . . . . . . . . . . . . . . . . . . . . . . . . . . . . . . . . . . . . . . . . . . . . . . . . . . . . . . .11
Hold a Call and Answer a Call . . . . . . . . . . . . . . . . . . . . . . . . . . . . . . . . . . . . . . . . . . . . . .11
Hold a Call and Place a Call . . . . . . . . . . . . . . . . . . . . . . . . . . . . . . . . . . . . . . . . . . . . . . . .11
Switch Between Point-to-Point Calls . . . . . . . . . . . . . . . . . . . . . . . . . . . . . . . . . . . . . . . . . .11
Resume a Call . . . . . . . . . . . . . . . . . . . . . . . . . . . . . . . . . . . . . . . . . . . . . . . . . . . . . . . . . . .11
Polycom, Inc. iii
Page 4

Contents
Hang Up All Calls and Answer a Call . . . . . . . . . . . . . . . . . . . . . . . . . . . . . . . . . . . . . . . . .12
End a Call . . . . . . . . . . . . . . . . . . . . . . . . . . . . . . . . . . . . . . . . . . . . . . . . . . . . . . . . . . . . . .12
Multipoint Conference Calls . . . . . . . . . . . . . . . . . . . . . . . . . . . . . . . . . . . . . . . . . . . . . . . .12
Place a Multipoint Call by Adding Participants . . . . . . . . . . . . . . . . . . . . . . . . . . . . . . .12
Place a Call While a Multipoint Call is on Hold . . . . . . . . . . . . . . . . . . . . . . . . . . . . . . .12
Incoming Call Handling of Multipoint Conference Calls . . . . . . . . . . . . . . . . . . . . . . . .12
Hold and Answer a Call in a Conference . . . . . . . . . . . . . . . . . . . . . . . . . . . . . . . . . . .13
Switch Between Calls in a Multipoint Call . . . . . . . . . . . . . . . . . . . . . . . . . . . . . . . . . . .13
Resume a Held Call in a Multipoint Call . . . . . . . . . . . . . . . . . . . . . . . . . . . . . . . . . . . .13
Hang Up an Individual Call in a Multipoint Call . . . . . . . . . . . . . . . . . . . . . . . . . . . . . . .13
Hang Up a Held Call and Add a Call . . . . . . . . . . . . . . . . . . . . . . . . . . . . . . . . . . . . . .13
Hang Up All Calls . . . . . . . . . . . . . . . . . . . . . . . . . . . . . . . . . . . . . . . . . . . . . . . . . . . . .14
Passwords for Multipoint Calls . . . . . . . . . . . . . . . . . . . . . . . . . . . . . . . . . . . . . . . . . . .14
Set Up a Meeting Password . . . . . . . . . . . . . . . . . . . . . . . . . . . . . . . . . . . . . . . . . . . . .14
Enter a Meeting Password . . . . . . . . . . . . . . . . . . . . . . . . . . . . . . . . . . . . . . . . . . . . . .14
Microsoft Meetings . . . . . . . . . . . . . . . . . . . . . . . . . . . . . . . . . . . . . . . . . . . . . . . . . . . . . . .15
View Scheduled Meetings with the Remote . . . . . . . . . . . . . . . . . . . . . . . . . . . . . . . . .15
Join a Scheduled Meeting from the Home Screen . . . . . . . . . . . . . . . . . . . . . . . . . . . .15
Join a Scheduled Meeting from the Calendar . . . . . . . . . . . . . . . . . . . . . . . . . . . . . . .15
Content . . . . . . . . . . . . . . . . . . . . . . . . . . . . . . . . . . . . . . . . . . . . . . . . . . . . . . . . . . . . . . . . . . .15
Content Connections of RealPresence Group Systems . . . . . . . . . . . . . . . . . . . . . . . . . . .16
Show Content from a Computer Connected to RealPresence Group System . . . . . . . . . .18
Polycom People+Content IP . . . . . . . . . . . . . . . . . . . . . . . . . . . . . . . . . . . . . . . . . . . . . . . .18
Download and Install People+Content IP . . . . . . . . . . . . . . . . . . . . . . . . . . . . . . . . . . .19
Share Content with People+Content IP . . . . . . . . . . . . . . . . . . . . . . . . . . . . . . . . . . . .19
Stop Sharing Content with People+Content IP . . . . . . . . . . . . . . . . . . . . . . . . . . . . . . .19
Microsoft Content Management . . . . . . . . . . . . . . . . . . . . . . . . . . . . . . . . . . . . . . . . . . . . .19
Scroll and Zoom Microsoft Content . . . . . . . . . . . . . . . . . . . . . . . . . . . . . . . . . . . . . . .19
Control Microsoft Content . . . . . . . . . . . . . . . . . . . . . . . . . . . . . . . . . . . . . . . . . . . . . . .20
Return Control of Microsoft Content . . . . . . . . . . . . . . . . . . . . . . . . . . . . . . . . . . . . . . .20
Recording Calls . . . . . . . . . . . . . . . . . . . . . . . . . . . . . . . . . . . . . . . . . . . . . . . . . . . . . . . . . . . . .20
Manage Recordings with Polycom RealPresence Media Suite . . . . . . . . . . . . . . . . . . . . .20
RealPresence Media Suite Connection Methods . . . . . . . . . . . . . . . . . . . . . . . . . . . . .21
RealPresence Media Suite Touch Tones . . . . . . . . . . . . . . . . . . . . . . . . . . . . . . . . . . .21
Record on RealPresence Media Suite . . . . . . . . . . . . . . . . . . . . . . . . . . . . . . . . . . . . .22
Stop Recording on RealPresence Media Suite . . . . . . . . . . . . . . . . . . . . . . . . . . . . . .22
Play Back a Recording . . . . . . . . . . . . . . . . . . . . . . . . . . . . . . . . . . . . . . . . . . . . . . . . .22
Use the Remote Control to Manage the RealPresence Media Suite . . . . . . . . . . . . . .23
Record Calls on a DVD or DVR . . . . . . . . . . . . . . . . . . . . . . . . . . . . . . . . . . . . . . . . . . . . .23
Record Calls with a Laptop or Tablet . . . . . . . . . . . . . . . . . . . . . . . . . . . . . . . . . . . . . . . . .23
Polycom, Inc. iv
Page 5

Contents
Settings . . . . . . . . . . . . . . . . . . . . . . . . . . . . . . . . . . . . . . . . . . . . . . . . . . . . . . . . . . . . . . . . . . .23
Video Adjustments . . . . . . . . . . . . . . . . . . . . . . . . . . . . . . . . . . . . . . . . . . . . . . . . . . . . . . .24
Switch Between Full-Screen Video and the Home Screen . . . . . . . . . . . . . . . . . . . . . .24
Configure Automatic Self View Control . . . . . . . . . . . . . . . . . . . . . . . . . . . . . . . . . . . . .24
Adjust for Room Lighting . . . . . . . . . . . . . . . . . . . . . . . . . . . . . . . . . . . . . . . . . . . . . . .24
Stop Video . . . . . . . . . . . . . . . . . . . . . . . . . . . . . . . . . . . . . . . . . . . . . . . . . . . . . . . . . .25
Start Video . . . . . . . . . . . . . . . . . . . . . . . . . . . . . . . . . . . . . . . . . . . . . . . . . . . . . . . . . .25
Turn Self View On . . . . . . . . . . . . . . . . . . . . . . . . . . . . . . . . . . . . . . . . . . . . . . . . . . . .25
Turn Self View Off . . . . . . . . . . . . . . . . . . . . . . . . . . . . . . . . . . . . . . . . . . . . . . . . . . . .25
Allow Video Display on the Web . . . . . . . . . . . . . . . . . . . . . . . . . . . . . . . . . . . . . . . . . .25
Multipoint Viewing Modes . . . . . . . . . . . . . . . . . . . . . . . . . . . . . . . . . . . . . . . . . . . . . . .26
Set the Multipoint Viewing Mode . . . . . . . . . . . . . . . . . . . . . . . . . . . . . . . . . . . . . .26
Multipoint Viewing Layouts . . . . . . . . . . . . . . . . . . . . . . . . . . . . . . . . . . . . . . . . . . .26
Change Multipoint Viewing Layout . . . . . . . . . . . . . . . . . . . . . . . . . . . . . . . . . . . . .27
Audio Adjustments . . . . . . . . . . . . . . . . . . . . . . . . . . . . . . . . . . . . . . . . . . . . . . . . . . . . . . .27
Adjust the Volume . . . . . . . . . . . . . . . . . . . . . . . . . . . . . . . . . . . . . . . . . . . . . . . . . . . .27
Mute the Microphone . . . . . . . . . . . . . . . . . . . . . . . . . . . . . . . . . . . . . . . . . . . . . . . . . .27
Unmute the Microphone . . . . . . . . . . . . . . . . . . . . . . . . . . . . . . . . . . . . . . . . . . . . . . . .27
Cameras . . . . . . . . . . . . . . . . . . . . . . . . . . . . . . . . . . . . . . . . . . . . . . . . . . . . . . . . . . . . . . .28
Select Cameras . . . . . . . . . . . . . . . . . . . . . . . . . . . . . . . . . . . . . . . . . . . . . . . . . . . . . .28
Adjust Cameras . . . . . . . . . . . . . . . . . . . . . . . . . . . . . . . . . . . . . . . . . . . . . . . . . . . . . .28
Switch Between Cameras . . . . . . . . . . . . . . . . . . . . . . . . . . . . . . . . . . . . . . . . . . . . . .28
Allow the Far-End System to Control Your Camera . . . . . . . . . . . . . . . . . . . . . . . . . . .28
Disable EagleEye Director Tracking in a Call . . . . . . . . . . . . . . . . . . . . . . . . . . . . . . . .29
Enable EagleEye Director Tracking in a Call . . . . . . . . . . . . . . . . . . . . . . . . . . . . . . . .29
Camera Presets . . . . . . . . . . . . . . . . . . . . . . . . . . . . . . . . . . . . . . . . . . . . . . . . . . . . . .29
View Stored Camera Presets . . . . . . . . . . . . . . . . . . . . . . . . . . . . . . . . . . . . . . . . .30
Store a Camera Preset . . . . . . . . . . . . . . . . . . . . . . . . . . . . . . . . . . . . . . . . . . . . .30
Move the Camera to a Stored Preset . . . . . . . . . . . . . . . . . . . . . . . . . . . . . . . . . . .31
Call Answering Settings . . . . . . . . . . . . . . . . . . . . . . . . . . . . . . . . . . . . . . . . . . . . . . . . . . .31
Temporarily Refuse Calls . . . . . . . . . . . . . . . . . . . . . . . . . . . . . . . . . . . . . . . . . . . . . . .31
Enable Answering Video Calls Automatically . . . . . . . . . . . . . . . . . . . . . . . . . . . . . . . .31
Mute Automatically Answered Video Calls . . . . . . . . . . . . . . . . . . . . . . . . . . . . . . . . . .31
Encryption and Security . . . . . . . . . . . . . . . . . . . . . . . . . . . . . . . . . . . . . . . . . . . . . . . . . . .32
Verify Encryption Check Code . . . . . . . . . . . . . . . . . . . . . . . . . . . . . . . . . . . . . . . . . . .32
Change the Call Security Level . . . . . . . . . . . . . . . . . . . . . . . . . . . . . . . . . . . . . . . . . .33
Troubleshooting . . . . . . . . . . . . . . . . . . . . . . . . . . . . . . . . . . . . . . . . . . . . . . . . . . . . . . . . . . . . .33
Make a Test Call . . . . . . . . . . . . . . . . . . . . . . . . . . . . . . . . . . . . . . . . . . . . . . . . . . . . . . . . .33
System Information . . . . . . . . . . . . . . . . . . . . . . . . . . . . . . . . . . . . . . . . . . . . . . . . . . . . . . .34
Locate the System Serial Number . . . . . . . . . . . . . . . . . . . . . . . . . . . . . . . . . . . . . . . .34
Polycom, Inc. v
Page 6

Contents
View Self Test Warnings . . . . . . . . . . . . . . . . . . . . . . . . . . . . . . . . . . . . . . . . . . . . . . .34
Locate the Software Version . . . . . . . . . . . . . . . . . . . . . . . . . . . . . . . . . . . . . . . . . . . .34
Locate Active Alert Messages . . . . . . . . . . . . . . . . . . . . . . . . . . . . . . . . . . . . . . . . . . .34
Locate the IP Address and H.323 Extension Settings . . . . . . . . . . . . . . . . . . . . . . . . .35
Locate the LAN Status . . . . . . . . . . . . . . . . . . . . . . . . . . . . . . . . . . . . . . . . . . . . . . . . .35
Locate Diagnostics . . . . . . . . . . . . . . . . . . . . . . . . . . . . . . . . . . . . . . . . . . . . . . . . . . . .35
Regulatory Notices . . . . . . . . . . . . . . . . . . . . . . . . . . . . . . . . . . . . . . . . . . . . . . . . . . . . . . .35
Using the Touch User Interface . . . . . . . . . . . . . . . . . . . . . . . . . . . . . . . . . . . . . . . .36
Wake the System . . . . . . . . . . . . . . . . . . . . . . . . . . . . . . . . . . . . . . . . . . . . . . . . . . . . . . . . . . .36
Contacts . . . . . . . . . . . . . . . . . . . . . . . . . . . . . . . . . . . . . . . . . . . . . . . . . . . . . . . . . . . . . . . . . .36
Contacts . . . . . . . . . . . . . . . . . . . . . . . . . . . . . . . . . . . . . . . . . . . . . . . . . . . . . . . . . . . . . . . . . .37
Contact Presence States . . . . . . . . . . . . . . . . . . . . . . . . . . . . . . . . . . . . . . . . . . . . . . . . . .37
Browse the Global Directory . . . . . . . . . . . . . . . . . . . . . . . . . . . . . . . . . . . . . . . . . . . . . . . .37
Search for Directory Contacts . . . . . . . . . . . . . . . . . . . . . . . . . . . . . . . . . . . . . . . . . . . . . . .37
Calling . . . . . . . . . . . . . . . . . . . . . . . . . . . . . . . . . . . . . . . . . . . . . . . . . . . . . . . . . . . . . . . . . . . .38
Call by Entering a Name or Number . . . . . . . . . . . . . . . . . . . . . . . . . . . . . . . . . . . . . . . . . .38
Call from the Contacts Screen . . . . . . . . . . . . . . . . . . . . . . . . . . . . . . . . . . . . . . . . . . . . . .38
Call from the Recent Calls List . . . . . . . . . . . . . . . . . . . . . . . . . . . . . . . . . . . . . . . . . . . . . .39
Call a Speed Dial Entry . . . . . . . . . . . . . . . . . . . . . . . . . . . . . . . . . . . . . . . . . . . . . . . . . . . .39
Answer a Call . . . . . . . . . . . . . . . . . . . . . . . . . . . . . . . . . . . . . . . . . . . . . . . . . . . . . . . . . . .39
Answer a Call during a Call . . . . . . . . . . . . . . . . . . . . . . . . . . . . . . . . . . . . . . . . . . . . . . . . .39
Ignore a Call . . . . . . . . . . . . . . . . . . . . . . . . . . . . . . . . . . . . . . . . . . . . . . . . . . . . . . . . . . . .39
Hold a Call . . . . . . . . . . . . . . . . . . . . . . . . . . . . . . . . . . . . . . . . . . . . . . . . . . . . . . . . . . . . . .39
Hold a Call and Place a Call . . . . . . . . . . . . . . . . . . . . . . . . . . . . . . . . . . . . . . . . . . . . . . . .40
Hold a Call and Answer a Call . . . . . . . . . . . . . . . . . . . . . . . . . . . . . . . . . . . . . . . . . . . . . .40
Resume a Call . . . . . . . . . . . . . . . . . . . . . . . . . . . . . . . . . . . . . . . . . . . . . . . . . . . . . . . . . . .40
Switch Between Calls . . . . . . . . . . . . . . . . . . . . . . . . . . . . . . . . . . . . . . . . . . . . . . . . . . . . .40
Hang Up a Call and Answer a Call . . . . . . . . . . . . . . . . . . . . . . . . . . . . . . . . . . . . . . . . . . .40
End a Call . . . . . . . . . . . . . . . . . . . . . . . . . . . . . . . . . . . . . . . . . . . . . . . . . . . . . . . . . . . . . .40
Multipoint Conference Calls . . . . . . . . . . . . . . . . . . . . . . . . . . . . . . . . . . . . . . . . . . . . . . . .41
Place a Multipoint Call . . . . . . . . . . . . . . . . . . . . . . . . . . . . . . . . . . . . . . . . . . . . . . . . .41
Place a Call during a Multipoint Call . . . . . . . . . . . . . . . . . . . . . . . . . . . . . . . . . . . . . . .41
Incoming Call Handling of Multipoint Conference Calls . . . . . . . . . . . . . . . . . . . . . . . .41
Answer an Incoming Call during a Multipoint Call . . . . . . . . . . . . . . . . . . . . . . . . . . . .42
Add an Incoming Call to a Multipoint Call . . . . . . . . . . . . . . . . . . . . . . . . . . . . . . . . . . .42
Hold a Multipoint Conference Call . . . . . . . . . . . . . . . . . . . . . . . . . . . . . . . . . . . . . . . .42
Leave a Multipoint Call . . . . . . . . . . . . . . . . . . . . . . . . . . . . . . . . . . . . . . . . . . . . . . . . .42
Hang Up an Individual Call in a Multipoint Call . . . . . . . . . . . . . . . . . . . . . . . . . . . . . . .42
Hang Up All Calls . . . . . . . . . . . . . . . . . . . . . . . . . . . . . . . . . . . . . . . . . . . . . . . . . . . . .42
Polycom, Inc. vi
Page 7

Contents
Passwords for Multipoint Calls . . . . . . . . . . . . . . . . . . . . . . . . . . . . . . . . . . . . . . . . . . .42
Enter a Meeting Password . . . . . . . . . . . . . . . . . . . . . . . . . . . . . . . . . . . . . . . . . . .43
Set a Meeting Password . . . . . . . . . . . . . . . . . . . . . . . . . . . . . . . . . . . . . . . . . . . .43
Microsoft Meetings . . . . . . . . . . . . . . . . . . . . . . . . . . . . . . . . . . . . . . . . . . . . . . . . . . . .43
Join Meetings from the Calendar . . . . . . . . . . . . . . . . . . . . . . . . . . . . . . . . . . . . . .43
View Meeting Details . . . . . . . . . . . . . . . . . . . . . . . . . . . . . . . . . . . . . . . . . . . . . . .44
Microsoft Conference Calls . . . . . . . . . . . . . . . . . . . . . . . . . . . . . . . . . . . . . . . . . . . . .44
Initiate a Microsoft Conference . . . . . . . . . . . . . . . . . . . . . . . . . . . . . . . . . . . . . . .44
Add Participants to a Microsoft Conference Call . . . . . . . . . . . . . . . . . . . . . . . . . .44
Content . . . . . . . . . . . . . . . . . . . . . . . . . . . . . . . . . . . . . . . . . . . . . . . . . . . . . . . . . . . . . . . . . . .44
Polycom People+Content IP . . . . . . . . . . . . . . . . . . . . . . . . . . . . . . . . . . . . . . . . . . . . . . . .45
Download and Install People+Content IP . . . . . . . . . . . . . . . . . . . . . . . . . . . . . . . . . . .45
Share Content with People+Content IP . . . . . . . . . . . . . . . . . . . . . . . . . . . . . . . . . . . .45
Stop Sharing Content with People+Content IP . . . . . . . . . . . . . . . . . . . . . . . . . . . . . . .45
VisualBoard . . . . . . . . . . . . . . . . . . . . . . . . . . . . . . . . . . . . . . . . . . . . . . . . . . . . . . . . . . . . .46
Access VisualBoard When Not in a Call . . . . . . . . . . . . . . . . . . . . . . . . . . . . . . . . . . . .46
Access VisualBoard in a Call . . . . . . . . . . . . . . . . . . . . . . . . . . . . . . . . . . . . . . . . . . . .46
Create a New Whiteboard or Blackboard . . . . . . . . . . . . . . . . . . . . . . . . . . . . . . . . . . .46
Annotate Content with VisualBoard . . . . . . . . . . . . . . . . . . . . . . . . . . . . . . . . . . . . . . .46
Undo Annotations . . . . . . . . . . . . . . . . . . . . . . . . . . . . . . . . . . . . . . . . . . . . . . . . . . . . .46
Erase Annotations . . . . . . . . . . . . . . . . . . . . . . . . . . . . . . . . . . . . . . . . . . . . . . . . . . . .46
Exit VisualBoard . . . . . . . . . . . . . . . . . . . . . . . . . . . . . . . . . . . . . . . . . . . . . . . . . . . . . .47
Sharing Content from a Laptop or Tablet . . . . . . . . . . . . . . . . . . . . . . . . . . . . . . . . . . . . . .47
Content Source Resolutions and Refresh Rates . . . . . . . . . . . . . . . . . . . . . . . . . . . . .47
Share Content from a Laptop or Tablet . . . . . . . . . . . . . . . . . . . . . . . . . . . . . . . . . . . .47
Stop Content from a Laptop or Tablet . . . . . . . . . . . . . . . . . . . . . . . . . . . . . . . . . . . . .48
Show Content from USB Flash Drive . . . . . . . . . . . . . . . . . . . . . . . . . . . . . . . . . . . . . . . . .48
Stop Content from a USB Flash Drive . . . . . . . . . . . . . . . . . . . . . . . . . . . . . . . . . . . . . . . .48
Scroll and Zoom Microsoft Content . . . . . . . . . . . . . . . . . . . . . . . . . . . . . . . . . . . . . . . . . . .48
Control Microsoft Content . . . . . . . . . . . . . . . . . . . . . . . . . . . . . . . . . . . . . . . . . . . . . . . . . .49
Return Control of Microsoft Content . . . . . . . . . . . . . . . . . . . . . . . . . . . . . . . . . . . . . . . . . .49
Recording Calls . . . . . . . . . . . . . . . . . . . . . . . . . . . . . . . . . . . . . . . . . . . . . . . . . . . . . . . . . . . . .49
Manage Recordings with Polycom RealPresence Media Suite . . . . . . . . . . . . . . . . . . . . .49
RealPresence Media Suite Connection Methods . . . . . . . . . . . . . . . . . . . . . . . . . . . . . . . .50
RealPresence Media Suite Touch Tones . . . . . . . . . . . . . . . . . . . . . . . . . . . . . . . . . . .50
Record Calls with RealPresence Media Suite . . . . . . . . . . . . . . . . . . . . . . . . . . . . . . .51
Stop Recording . . . . . . . . . . . . . . . . . . . . . . . . . . . . . . . . . . . . . . . . . . . . . . . . . . . . . . .51
Playback a Recording . . . . . . . . . . . . . . . . . . . . . . . . . . . . . . . . . . . . . . . . . . . . . . . . . .51
Record Calls with a Laptop or Tablet . . . . . . . . . . . . . . . . . . . . . . . . . . . . . . . . . . . . . . . . .52
Record Calls on a DVD or DVR . . . . . . . . . . . . . . . . . . . . . . . . . . . . . . . . . . . . . . . . . . . . .52
Polycom, Inc. vii
Page 8

Contents
Settings . . . . . . . . . . . . . . . . . . . . . . . . . . . . . . . . . . . . . . . . . . . . . . . . . . . . . . . . . . . . . . . . . . .52
Adjust for Room Lighting . . . . . . . . . . . . . . . . . . . . . . . . . . . . . . . . . . . . . . . . . . . . . . . . . . .53
Call Settings . . . . . . . . . . . . . . . . . . . . . . . . . . . . . . . . . . . . . . . . . . . . . . . . . . . . . . . . . . . .53
Temporarily Refuse Calls . . . . . . . . . . . . . . . . . . . . . . . . . . . . . . . . . . . . . . . . . . . . . . .53
Answering Video Calls Automatically . . . . . . . . . . . . . . . . . . . . . . . . . . . . . . . . . . . . . .53
Configure Automatic Self View Control . . . . . . . . . . . . . . . . . . . . . . . . . . . . . . . . . . . . .53
Video Adjustments . . . . . . . . . . . . . . . . . . . . . . . . . . . . . . . . . . . . . . . . . . . . . . . . . . . . . . .54
Change the Video Layout . . . . . . . . . . . . . . . . . . . . . . . . . . . . . . . . . . . . . . . . . . . . . . .54
Allow Video Display on the Web . . . . . . . . . . . . . . . . . . . . . . . . . . . . . . . . . . . . . . . . . .54
Turn Off Self View . . . . . . . . . . . . . . . . . . . . . . . . . . . . . . . . . . . . . . . . . . . . . . . . . . . .54
Start Sending Video . . . . . . . . . . . . . . . . . . . . . . . . . . . . . . . . . . . . . . . . . . . . . . . . . . .55
Turn On Self View . . . . . . . . . . . . . . . . . . . . . . . . . . . . . . . . . . . . . . . . . . . . . . . . . . . .55
Stop Sending Video . . . . . . . . . . . . . . . . . . . . . . . . . . . . . . . . . . . . . . . . . . . . . . . . . . .55
Switch Between Full Screen Video and the Home Screen . . . . . . . . . . . . . . . . . . . . . .55
Multipoint Viewing Modes . . . . . . . . . . . . . . . . . . . . . . . . . . . . . . . . . . . . . . . . . . . . . . .56
Set the Multipoint Viewing Mode . . . . . . . . . . . . . . . . . . . . . . . . . . . . . . . . . . . . . .56
Camera Presets . . . . . . . . . . . . . . . . . . . . . . . . . . . . . . . . . . . . . . . . . . . . . . . . . . . . . . . . .56
View Stored Presets . . . . . . . . . . . . . . . . . . . . . . . . . . . . . . . . . . . . . . . . . . . . . . . . . . .57
Select a Stored Preset . . . . . . . . . . . . . . . . . . . . . . . . . . . . . . . . . . . . . . . . . . . . . . . . .57
Store a Camera Preset . . . . . . . . . . . . . . . . . . . . . . . . . . . . . . . . . . . . . . . . . . . . . . . . .57
Audio Adjustments . . . . . . . . . . . . . . . . . . . . . . . . . . . . . . . . . . . . . . . . . . . . . . . . . . . . . . .57
Adjust the Volume . . . . . . . . . . . . . . . . . . . . . . . . . . . . . . . . . . . . . . . . . . . . . . . . . . . .58
Mute Automatically-Answered Calls . . . . . . . . . . . . . . . . . . . . . . . . . . . . . . . . . . . . . . .58
Mute the Microphone . . . . . . . . . . . . . . . . . . . . . . . . . . . . . . . . . . . . . . . . . . . . . . . . . .58
Unmute the Microphone . . . . . . . . . . . . . . . . . . . . . . . . . . . . . . . . . . . . . . . . . . . . . . . .58
Encryption and Security . . . . . . . . . . . . . . . . . . . . . . . . . . . . . . . . . . . . . . . . . . . . . . . . . . .59
Verify Encryption Check Code . . . . . . . . . . . . . . . . . . . . . . . . . . . . . . . . . . . . . . . . . . .59
Change the Call Security Level . . . . . . . . . . . . . . . . . . . . . . . . . . . . . . . . . . . . . . . . . .60
Troubleshooting . . . . . . . . . . . . . . . . . . . . . . . . . . . . . . . . . . . . . . . . . . . . . . . . . . . . . . . . . . . . .60
Make a Test Call . . . . . . . . . . . . . . . . . . . . . . . . . . . . . . . . . . . . . . . . . . . . . . . . . . . . . . . . .60
System Information . . . . . . . . . . . . . . . . . . . . . . . . . . . . . . . . . . . . . . . . . . . . . . . . . . . . . . .60
Locate the IP Address and H.323 Extension Settings . . . . . . . . . . . . . . . . . . . . . . . . .61
Locate Diagnostics Information . . . . . . . . . . . . . . . . . . . . . . . . . . . . . . . . . . . . . . . . . .61
View System Health Check Warnings . . . . . . . . . . . . . . . . . . . . . . . . . . . . . . . . . . . . .61
Locate the System Serial Number . . . . . . . . . . . . . . . . . . . . . . . . . . . . . . . . . . . . . . . .61
Locate the Software Version . . . . . . . . . . . . . . . . . . . . . . . . . . . . . . . . . . . . . . . . . . . .61
Locate Active Alert Messages . . . . . . . . . . . . . . . . . . . . . . . . . . . . . . . . . . . . . . . . . . .61
Locate the LAN Status . . . . . . . . . . . . . . . . . . . . . . . . . . . . . . . . . . . . . . . . . . . . . . . . .61
Polycom, Inc. viii
Page 9

Contents
Using a Polycom RealPresence Touch Device . . . . . . . . . . . . . . . . . . . . . . . . . . .62
Power On the RealPresence Touch . . . . . . . . . . . . . . . . . . . . . . . . . . . . . . . . . . . . . . . . . . . . .62
Wake a RealPresence Group System . . . . . . . . . . . . . . . . . . . . . . . . . . . . . . . . . . . . . . . . . . . .63
Pair a Previously Paired RealPresence Touch and RealPresence Group System . . . . . . . . . .63
Calling . . . . . . . . . . . . . . . . . . . . . . . . . . . . . . . . . . . . . . . . . . . . . . . . . . . . . . . . . . . . . . . . . . . .63
Call Using Contacts . . . . . . . . . . . . . . . . . . . . . . . . . . . . . . . . . . . . . . . . . . . . . . . . . . . . . . .63
Call by Entering a Name or Number . . . . . . . . . . . . . . . . . . . . . . . . . . . . . . . . . . . . . . . . . .63
Call Using Recent Calls . . . . . . . . . . . . . . . . . . . . . . . . . . . . . . . . . . . . . . . . . . . . . . . . . . .64
Call Using Speed Dial . . . . . . . . . . . . . . . . . . . . . . . . . . . . . . . . . . . . . . . . . . . . . . . . . . . . .64
Search for Directory Contacts to Call . . . . . . . . . . . . . . . . . . . . . . . . . . . . . . . . . . . . . . . . .64
Answer a Call . . . . . . . . . . . . . . . . . . . . . . . . . . . . . . . . . . . . . . . . . . . . . . . . . . . . . . . . . . .64
Decline a Call . . . . . . . . . . . . . . . . . . . . . . . . . . . . . . . . . . . . . . . . . . . . . . . . . . . . . . . . . . .64
Hold a Call . . . . . . . . . . . . . . . . . . . . . . . . . . . . . . . . . . . . . . . . . . . . . . . . . . . . . . . . . . . . . .65
Hold a Call and Answer a Call . . . . . . . . . . . . . . . . . . . . . . . . . . . . . . . . . . . . . . . . . . . . . .65
Hold a Call and Place a Call . . . . . . . . . . . . . . . . . . . . . . . . . . . . . . . . . . . . . . . . . . . . . . . .65
Switch Between Calls . . . . . . . . . . . . . . . . . . . . . . . . . . . . . . . . . . . . . . . . . . . . . . . . . . . . .65
Resume a Call . . . . . . . . . . . . . . . . . . . . . . . . . . . . . . . . . . . . . . . . . . . . . . . . . . . . . . . . . . .65
End a Call . . . . . . . . . . . . . . . . . . . . . . . . . . . . . . . . . . . . . . . . . . . . . . . . . . . . . . . . . . . . . .65
Multipoint Conference Calls . . . . . . . . . . . . . . . . . . . . . . . . . . . . . . . . . . . . . . . . . . . . . . . .66
Place a Multipoint Call from Recent Calls . . . . . . . . . . . . . . . . . . . . . . . . . . . . . . . . . . .66
Place a Multipoint Call from Contacts . . . . . . . . . . . . . . . . . . . . . . . . . . . . . . . . . . . . . .66
Place a Multipoint Call by Adding Participants . . . . . . . . . . . . . . . . . . . . . . . . . . . . . . .66
Incoming Call Handling of Multipoint Conference Calls . . . . . . . . . . . . . . . . . . . . . . . .67
Answer a Call in a Multipoint Conference . . . . . . . . . . . . . . . . . . . . . . . . . . . . . . . . . . .67
Hang Up an Individual Call in a Multipoint Call . . . . . . . . . . . . . . . . . . . . . . . . . . . . . . .67
Hang Up All Calls . . . . . . . . . . . . . . . . . . . . . . . . . . . . . . . . . . . . . . . . . . . . . . . . . . . . .67
Switch Between Calls in a Multipoint Call . . . . . . . . . . . . . . . . . . . . . . . . . . . . . . . . . . .68
Microsoft Meetings . . . . . . . . . . . . . . . . . . . . . . . . . . . . . . . . . . . . . . . . . . . . . . . . . . . . . . .68
Set Up a Meeting Password . . . . . . . . . . . . . . . . . . . . . . . . . . . . . . . . . . . . . . . . . . . . .68
View Scheduled Meetings on the Calendar . . . . . . . . . . . . . . . . . . . . . . . . . . . . . . . . .68
Join a Scheduled Meeting on the Calendar . . . . . . . . . . . . . . . . . . . . . . . . . . . . . . . . .69
Join a Meeting in an Overbooked Time Slot on the Calendar . . . . . . . . . . . . . . . . . . .69
Content . . . . . . . . . . . . . . . . . . . . . . . . . . . . . . . . . . . . . . . . . . . . . . . . . . . . . . . . . . . . . . . . . . .69
Content Connections of RealPresence Group Systems . . . . . . . . . . . . . . . . . . . . . . . . . . .70
Show Content from a Connected Computer . . . . . . . . . . . . . . . . . . . . . . . . . . . . . . . . . . . .71
Stop Sharing Content From a Connected Computer . . . . . . . . . . . . . . . . . . . . . . . . . . . . .72
Share Content Using VisualBoard . . . . . . . . . . . . . . . . . . . . . . . . . . . . . . . . . . . . . . . . . . .72
Stop Sharing Content From VisualBoard . . . . . . . . . . . . . . . . . . . . . . . . . . . . . . . . . . . . . .72
Settings . . . . . . . . . . . . . . . . . . . . . . . . . . . . . . . . . . . . . . . . . . . . . . . . . . . . . . . . . . . . . . . . . . .72
Audio Adjustments . . . . . . . . . . . . . . . . . . . . . . . . . . . . . . . . . . . . . . . . . . . . . . . . . . . . . . .72
Polycom, Inc. ix
Page 10

Contents
Mute the Microphone . . . . . . . . . . . . . . . . . . . . . . . . . . . . . . . . . . . . . . . . . . . . . . . . . .73
Unmute the Microphone . . . . . . . . . . . . . . . . . . . . . . . . . . . . . . . . . . . . . . . . . . . . . . . .73
Adjust the Call Volume . . . . . . . . . . . . . . . . . . . . . . . . . . . . . . . . . . . . . . . . . . . . . . . . .73
Generate Touch Tones . . . . . . . . . . . . . . . . . . . . . . . . . . . . . . . . . . . . . . . . . . . . . . . . .73
Video Adjustments . . . . . . . . . . . . . . . . . . . . . . . . . . . . . . . . . . . . . . . . . . . . . . . . . . . . . . .73
Change Monitor Layouts on the RealPresence Touch . . . . . . . . . . . . . . . . . . . . . . . . .73
Control the Brightness . . . . . . . . . . . . . . . . . . . . . . . . . . . . . . . . . . . . . . . . . . . . . . . . .74
Allow Video Display on the Web . . . . . . . . . . . . . . . . . . . . . . . . . . . . . . . . . . . . . . . . . .74
Turn Off Video Display on the Web . . . . . . . . . . . . . . . . . . . . . . . . . . . . . . . . . . . . . . .74
Cameras . . . . . . . . . . . . . . . . . . . . . . . . . . . . . . . . . . . . . . . . . . . . . . . . . . . . . . . . . . . . . . .74
Select and Adjust a Camera . . . . . . . . . . . . . . . . . . . . . . . . . . . . . . . . . . . . . . . . . . . . .74
Turn On Camera Tracking . . . . . . . . . . . . . . . . . . . . . . . . . . . . . . . . . . . . . . . . . . . . . .75
Turn Camera Tracking Off . . . . . . . . . . . . . . . . . . . . . . . . . . . . . . . . . . . . . . . . . . . . . .75
Turn On Far End Control of Camera . . . . . . . . . . . . . . . . . . . . . . . . . . . . . . . . . . . . . .75
Turn Off Far End Control of Camera . . . . . . . . . . . . . . . . . . . . . . . . . . . . . . . . . . . . . .75
Start Video . . . . . . . . . . . . . . . . . . . . . . . . . . . . . . . . . . . . . . . . . . . . . . . . . . . . . . . . . .75
Stop Video . . . . . . . . . . . . . . . . . . . . . . . . . . . . . . . . . . . . . . . . . . . . . . . . . . . . . . . . . .76
View Camera Presets . . . . . . . . . . . . . . . . . . . . . . . . . . . . . . . . . . . . . . . . . . . . . . . . . .76
Store a Camera Preset . . . . . . . . . . . . . . . . . . . . . . . . . . . . . . . . . . . . . . . . . . . . . . . . .76
Select a Stored Preset . . . . . . . . . . . . . . . . . . . . . . . . . . . . . . . . . . . . . . . . . . . . . . . . .76
Troubleshooting . . . . . . . . . . . . . . . . . . . . . . . . . . . . . . . . . . . . . . . . . . . . . . . . . . . . . . . . . . . . .76
Make a Test Call . . . . . . . . . . . . . . . . . . . . . . . . . . . . . . . . . . . . . . . . . . . . . . . . . . . . . . . . .76
View Device Details for a RealPresence Touch . . . . . . . . . . . . . . . . . . . . . . . . . . . . . . . . .77
View System Details and Connection Status for a Room System . . . . . . . . . . . . . . . . . . .77
Locate Company Contact Information . . . . . . . . . . . . . . . . . . . . . . . . . . . . . . . . . . . . . . . . .77
View Call Statistics . . . . . . . . . . . . . . . . . . . . . . . . . . . . . . . . . . . . . . . . . . . . . . . . . . . . . . .78
Using a Polycom Touch Control Device . . . . . . . . . . . . . . . . . . . . . . . . . . . . . . . . .79
Power On the Polycom Touch Control . . . . . . . . . . . . . . . . . . . . . . . . . . . . . . . . . . . . . . . . . . .79
Wake the RealPresence Group System . . . . . . . . . . . . . . . . . . . . . . . . . . . . . . . . . . . . . . . . . .79
Pair a Polycom Touch Control with a RealPresence Group System . . . . . . . . . . . . . . . . . . . . .79
Using the Polycom Touch Control as a Virtual Remote Control . . . . . . . . . . . . . . . . . . . . . . . .80
Disconnect a Polycom Touch Control from a RealPresence Group System . . . . . . . . . . . . . . .80
Calling . . . . . . . . . . . . . . . . . . . . . . . . . . . . . . . . . . . . . . . . . . . . . . . . . . . . . . . . . . . . . . . . . . . .81
Call by Entering a Name or Number . . . . . . . . . . . . . . . . . . . . . . . . . . . . . . . . . . . . . . . . . .81
Call from the Contacts Screen . . . . . . . . . . . . . . . . . . . . . . . . . . . . . . . . . . . . . . . . . . . . . .81
Call from the Recent Calls List . . . . . . . . . . . . . . . . . . . . . . . . . . . . . . . . . . . . . . . . . . . . . .82
Answer a Call . . . . . . . . . . . . . . . . . . . . . . . . . . . . . . . . . . . . . . . . . . . . . . . . . . . . . . . . . . .82
Ignore a Call . . . . . . . . . . . . . . . . . . . . . . . . . . . . . . . . . . . . . . . . . . . . . . . . . . . . . . . . . . . .82
Hold a Call . . . . . . . . . . . . . . . . . . . . . . . . . . . . . . . . . . . . . . . . . . . . . . . . . . . . . . . . . . . . . .82
Polycom, Inc. x
Page 11

Contents
Hold a Call and Answer a Call . . . . . . . . . . . . . . . . . . . . . . . . . . . . . . . . . . . . . . . . . . . . . .82
Hold a Call and Place a Call . . . . . . . . . . . . . . . . . . . . . . . . . . . . . . . . . . . . . . . . . . . . . . . .82
Switch Between Calls . . . . . . . . . . . . . . . . . . . . . . . . . . . . . . . . . . . . . . . . . . . . . . . . . . . . .83
Resume a Call . . . . . . . . . . . . . . . . . . . . . . . . . . . . . . . . . . . . . . . . . . . . . . . . . . . . . . . . . . .83
End a Call . . . . . . . . . . . . . . . . . . . . . . . . . . . . . . . . . . . . . . . . . . . . . . . . . . . . . . . . . . . . . .83
Multipoint Conference Calls . . . . . . . . . . . . . . . . . . . . . . . . . . . . . . . . . . . . . . . . . . . . . . . .83
Place a Multipoint Call by Adding Participants . . . . . . . . . . . . . . . . . . . . . . . . . . . . . . .83
Hold and Answer a Call in a Conference . . . . . . . . . . . . . . . . . . . . . . . . . . . . . . . . . . .84
Place a Call While a Multipoint Call is on Hold . . . . . . . . . . . . . . . . . . . . . . . . . . . . . . .84
Resume a Held Call in a Multipoint Call . . . . . . . . . . . . . . . . . . . . . . . . . . . . . . . . . . . .84
Hang Up an Individual Call in a Multipoint Call . . . . . . . . . . . . . . . . . . . . . . . . . . . . . . .84
Hang Up All Calls . . . . . . . . . . . . . . . . . . . . . . . . . . . . . . . . . . . . . . . . . . . . . . . . . . . . .84
Set Up a Meeting Password . . . . . . . . . . . . . . . . . . . . . . . . . . . . . . . . . . . . . . . . . . . . .84
Enter a Meeting Password . . . . . . . . . . . . . . . . . . . . . . . . . . . . . . . . . . . . . . . . . . . . . .84
Microsoft Meetings . . . . . . . . . . . . . . . . . . . . . . . . . . . . . . . . . . . . . . . . . . . . . . . . . . . . . . .85
View Scheduled Meetings on the Calendar . . . . . . . . . . . . . . . . . . . . . . . . . . . . . . . . .85
Contact Presence States on the Polycom Touch Control . . . . . . . . . . . . . . . . . . . . . . .85
Content . . . . . . . . . . . . . . . . . . . . . . . . . . . . . . . . . . . . . . . . . . . . . . . . . . . . . . . . . . . . . . . . . . .85
Content Connections of RealPresence Group Systems . . . . . . . . . . . . . . . . . . . . . . . . . . .86
Share Content from a Connected Comput er . . . . . . . . . . . . . . . . . . . . . . . . . . . . . . . . . . . .88
Stop Sharing Content from a Connected Computer . . . . . . . . . . . . . . . . . . . . . . . . . . . . . .88
Download and Install People+Content IP . . . . . . . . . . . . . . . . . . . . . . . . . . . . . . . . . . . . . .89
Share Content with People+Content IP . . . . . . . . . . . . . . . . . . . . . . . . . . . . . . . . . . . . . . .89
Stop Sharing Content with People+Content IP . . . . . . . . . . . . . . . . . . . . . . . . . . . . . . . . . .89
Share Content from a USB Drive . . . . . . . . . . . . . . . . . . . . . . . . . . . . . . . . . . . . . . . . . . . .89
Annotate Content on a USB Drive with Polycom Touch Control . . . . . . . . . . . . . . . . . . . . .91
Recording Calls . . . . . . . . . . . . . . . . . . . . . . . . . . . . . . . . . . . . . . . . . . . . . . . . . . . . . . . . . . . . .91
Record and Stream with the RealPresence Media Suite . . . . . . . . . . . . . . . . . . . . . . . . . .91
Settings . . . . . . . . . . . . . . . . . . . . . . . . . . . . . . . . . . . . . . . . . . . . . . . . . . . . . . . . . . . . . . . . . . .92
Audio Adjustments . . . . . . . . . . . . . . . . . . . . . . . . . . . . . . . . . . . . . . . . . . . . . . . . . . . . . . .92
Adjust the Volume . . . . . . . . . . . . . . . . . . . . . . . . . . . . . . . . . . . . . . . . . . . . . . . . . . . .92
Mute the Microphone . . . . . . . . . . . . . . . . . . . . . . . . . . . . . . . . . . . . . . . . . . . . . . . . . .92
Adjust the Polycom Touch Control Ring Tone and Alert Volume . . . . . . . . . . . . . . . . .93
Video Adjustments . . . . . . . . . . . . . . . . . . . . . . . . . . . . . . . . . . . . . . . . . . . . . . . . . . . . . . .93
Adjust for Room Lighting . . . . . . . . . . . . . . . . . . . . . . . . . . . . . . . . . . . . . . . . . . . . . . .93
Allow Video Display on the Web . . . . . . . . . . . . . . . . . . . . . . . . . . . . . . . . . . . . . . . . . .94
Call Answering Settings . . . . . . . . . . . . . . . . . . . . . . . . . . . . . . . . . . . . . . . . . . . . . . . . . . .94
Enable Answering Video Calls Automatically . . . . . . . . . . . . . . . . . . . . . . . . . . . . . . . .94
Mute Automatically Answered Video Calls . . . . . . . . . . . . . . . . . . . . . . . . . . . . . . . . . .94
Temporarily Refuse Calls . . . . . . . . . . . . . . . . . . . . . . . . . . . . . . . . . . . . . . . . . . . . . . .95
Polycom, Inc. xi
Page 12

Contents
Cameras . . . . . . . . . . . . . . . . . . . . . . . . . . . . . . . . . . . . . . . . . . . . . . . . . . . . . . . . . . . . . . .95
Select a Camera . . . . . . . . . . . . . . . . . . . . . . . . . . . . . . . . . . . . . . . . . . . . . . . . . . . . . .95
Adjust Cameras . . . . . . . . . . . . . . . . . . . . . . . . . . . . . . . . . . . . . . . . . . . . . . . . . . . . . .95
Allow the Far-End System to Control Your Camera . . . . . . . . . . . . . . . . . . . . . . . . . . .96
Enable EagleEye Director Tracking in a Call . . . . . . . . . . . . . . . . . . . . . . . . . . . . . . . .96
Disable EagleEye Director Tracking in a Call . . . . . . . . . . . . . . . . . . . . . . . . . . . . . . . .96
Camera Presets . . . . . . . . . . . . . . . . . . . . . . . . . . . . . . . . . . . . . . . . . . . . . . . . . . . . . .97
View Stored Camera Presets . . . . . . . . . . . . . . . . . . . . . . . . . . . . . . . . . . . . . . . . .97
Store a Camera Preset . . . . . . . . . . . . . . . . . . . . . . . . . . . . . . . . . . . . . . . . . . . . .97
Move the Camera to a Stored Preset . . . . . . . . . . . . . . . . . . . . . . . . . . . . . . . . . . .98
Using a Polycom SoundStation IP 7000 Conference Phone . . . . . . . . . . . . . . . .99
Answer a Call with a Connected SoundStation IP . . . . . . . . . . . . . . . . . . . . . . . . . . . . . . . . . . .99
Place a Call with a Connected SoundStation IP . . . . . . . . . . . . . . . . . . . . . . . . . . . . . . . . . . . .99
Place a Multipoint Call with a Connected SoundStation IP . . . . . . . . . . . . . . . . . . . . . . . . . . .100
Control Volume with a Connected SoundStation IP . . . . . . . . . . . . . . . . . . . . . . . . . . . . . . . .100
Mute the Microphone . . . . . . . . . . . . . . . . . . . . . . . . . . . . . . . . . . . . . . . . . . . . . . . . . . . . . . . .100
End a Call with a Connected SoundStation IP . . . . . . . . . . . . . . . . . . . . . . . . . . . . . . . . . . . .100
Display Content with a Connected SoundStation IP . . . . . . . . . . . . . . . . . . . . . . . . . . . . . . . .101
Polycom, Inc. xii
Page 13

Before You Begin
This guide is for users who need to operate Polycom® RealPresence® Group systems.
Please read the Polycom RealPresence Group Series docu ment ation before yo u operate the system . The
following related documents for RealPresence Group Serie s systems are availab le fr om Polyco m Supp or t:
● Polycom RealPresence Group Series Software, Options, and Accessories Installation Guide which
describes how to install Polycom RealPresence Group systems and accessories
● Setup sheets for your hardware
● Release notes
● Polycom RealPresence Group Series Regulatory Notices, which describes safety an d leg a l
considerations for using RealPresence Group Series systems
Polycom recommends that you record the serial number and option key of your Polycom RealPresence
Group Series system here for future reference. The serial number for the system is printed on the unit.
System Serial Number: ____________________________________________
Option Key: ____________________________________________________
Audience, Purpose, and Required Skills
The primary audience for this guide are users who want to perform basic to intermediate tasks using the
RealPresence Group Series system with or without a Polycom touch device.
These tasks include using the remote controls, making video confere nce calls to o ne or severa l endpoints,
adjusting cameras and audio, showing content, recording calls, and more.
Get Help
For more information about installing, configuring, and administering Polycom products, refer to
Documents and Downloads at Polycom Support.
Polycom Partner and Solution Resources
To find all Polycom partner solutions, see Strategic Global Partner Solutions.
Polycom Implementation and Maintenance services provide support for Polycom solution compo nents only .
Additional services for supported third-party Unified Communications (UC) environments integrated with
Polycom solutions are available from Polycom Global Services and its certified Partners. These additional
Polycom, Inc. 1
Page 14

Before You Begin
services help customers successfully design, deploy, optimize and manage Polycom visual
communications within their UC environments.
Professional Services for Microsoft Integration is mandatory for Microsoft Office Communications Server,
Microsoft Lync Server 2013, or Skype fo r Business Server 2015 integrations. For additional infor mation and
details please refer to http://www.polycom.com/services/professional_services/index.html or contact your
local Polycom representative.
The Polycom Community
The Polycom Community gives you access to the latest developer and support information.
Participate in discussion forums to share ideas and solve problems with your colleagues. To register with
the Polycom Community, simply create a Polycom online account. When logged in, you can access
Polycom support personnel and participate in developer and support forums to find the latest info rmation on
hardware, software, and partner solutions topics.
Polycom, Inc. 2
Page 15

Getting Started with Polycom
TASK
RealPresence Group Series
This guide includes information about Polycom RealPresence Group Series systems and the various
controllers you can use to drive the systems.
It includes information that helps you whether you're just starting to lear n about video conferenci ng or if you
just need a quick refresher . It also includes step-by-step instructions for everyday video conferencing tasks.
All RealPresence Group Series systems, except the 700 systems, support 1080p60 performance for people
or for content at one time. RealPresence Group 700 systems suppo rt 1080p60 performance for people an d
content at the same time.
For detailed information on the available systems and bundles, as well as the most recent feature
descriptions, refer to the Polycom RealPresence Group Series Release Notes available at
support.polycom.com.
Note: RealPresence Group systems and Polycom touch devices can be configured to show only those
options used in your organization. There fore, this guide might cover options that you cannot access on your
system. To find out more about these options, speak to your administrator.
RealPresence Group System Power
Powering your system on and off is a simp le pro cedu re , bu t it is important to perfor m the ta sks in a certain
order.
Make sure that the system is powered off before you connect wired devices to it. After you have connected
the related equipment that you intend to use, connect the power cable and power on the RealPresence
Group system.
It is important to note that RealPresence Group Series systems do not have what you might think of as a
power button—they have a power proximity sensor. Inste ad of pressing an actual button that moves, touch
the sensor (or near the sensor) that indicates power on the front of the system.
Power On the RealPresence Group System
After charging your remote control or attaching accessories, you ne ed to power on the RealPresence Group
Series system.
• On RealPresence Group 300, 310, 500, and 700 systems, touch and hold the power sensor on
the front of the system.
Because the power sensor is touch sensitive, you can place your finger on or close to the sensor . The
Polycom splash screen displays within several seconds.
Polycom, Inc. 3
Page 16

Getting Started with Polycom RealPresence Group Series
TASK
System Health Check
After being powered on, the system automatically performs a system health check. This process is known
as a power on self test (POST).
The status of the POST sequence is shown using the LED indicator light on the fron t of the device, or in the
text field display on the front of the system. For more information about what the colors of the indicator lights
mean, contact your administrator.
All test results are logged in the system memory . When the test sequence completes with no severe errors,
the system starts normally.
Power Off a RealPresence Group System
If you need to change out certain connected peripherals, you might need to power off the RealPresence
Group system.
1 Touch the power sensor on the front of the system.
The indicator light changes color and blinks, which means that the system is shutting down.
2 Release the power sensor when the indicator light changes color.
Polycom, Inc. 4
Page 17

Using a Polycom RealPresence Group Series Remote Control
The infrared RealPresence Group Series remote control allows you to operate a RealPresence Group
Series system.
This includes placing calls, adjusting the volume, zooming the camera, navigating screens, and more.
RealPresence Group Series systems and EagleEye cameras have infrared receive rs. You can control your
RealPresence Group Series system by pointing the remote control toward a RealPresence Group Series
system or a connected EagleEye camera.
Y ou might need a special cable to connect an SDI camera to the system to receive infrared signals from the
remote control. For more information about the cable, contact Polycom support.
This section includes the following topics:
● “Remote Control Buttons and Descriptions” on page 6
● “Contacts” on page 7
● “Calling” on page 9
● “Content” on page 15
● “Recording Calls” on page 20
● “Settings” on page 23
● “Troubleshooting” on page 33
Polycom, Inc. 5
Page 18
Using a Polycom RealPresence Group Series Remote Control
Remote Control Buttons and Descriptions
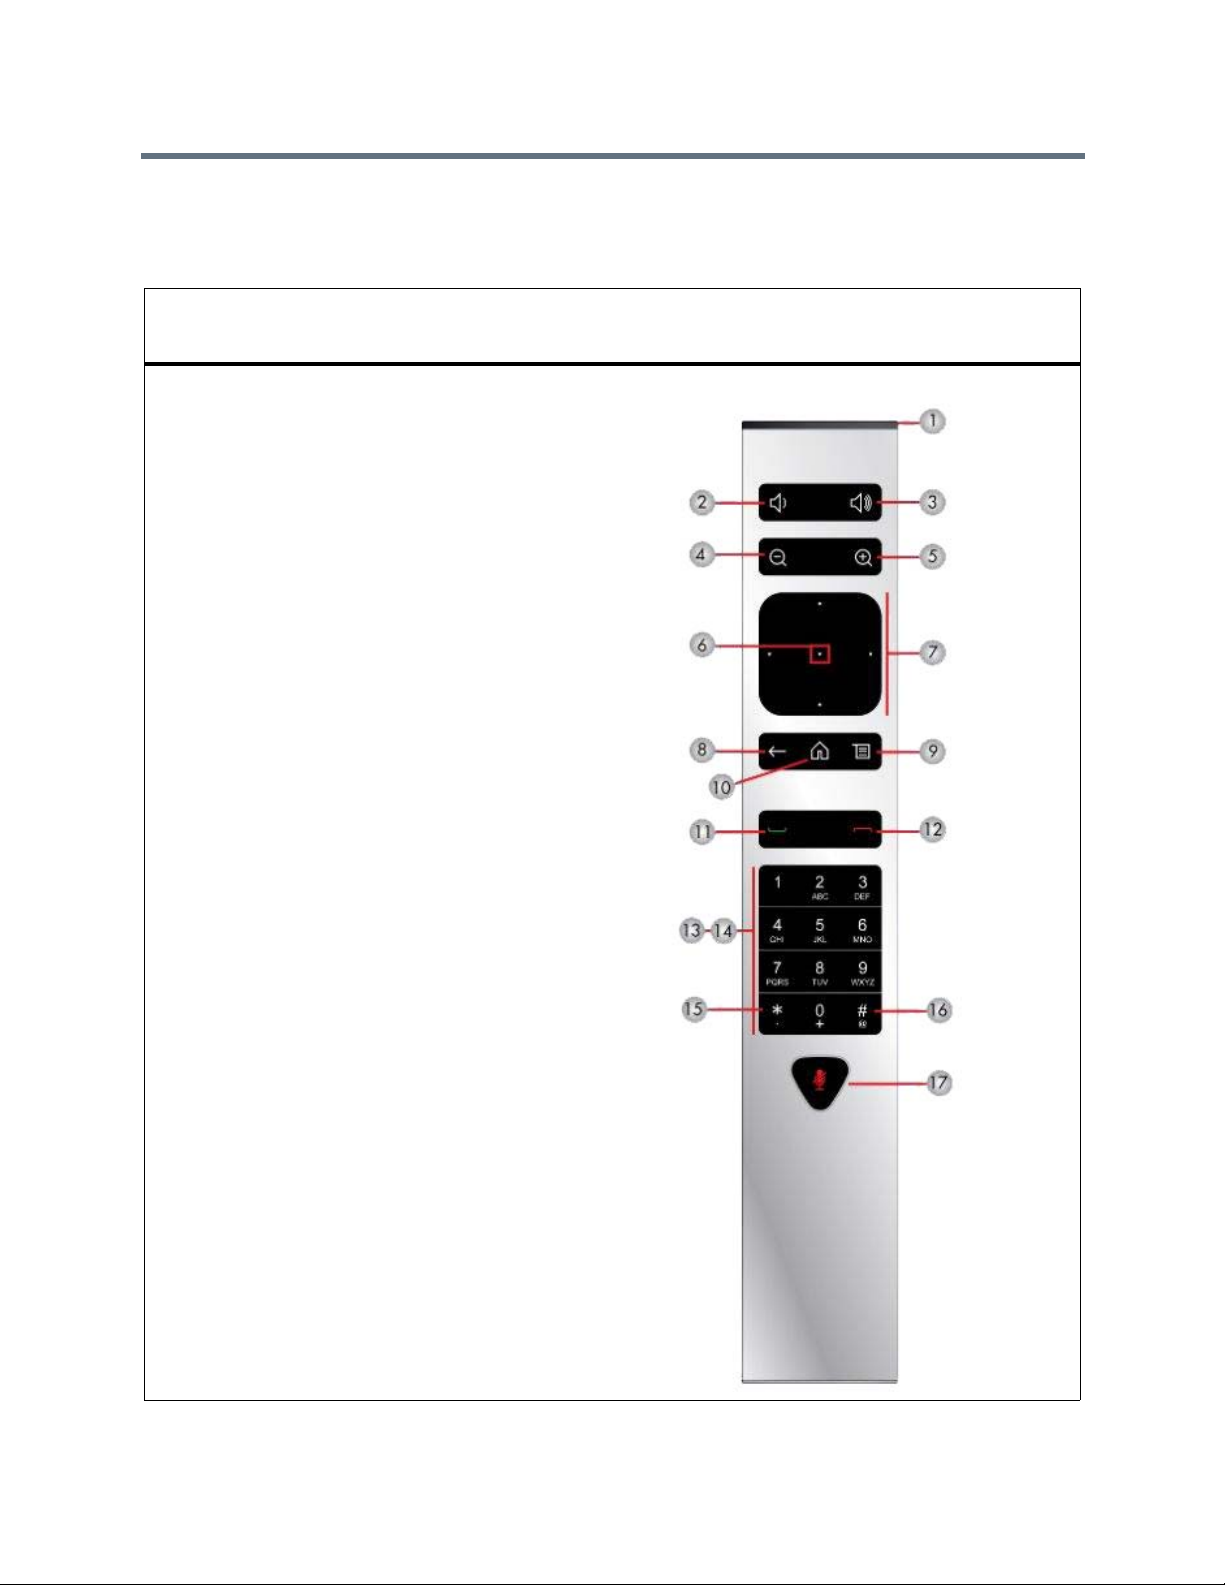
Descriptions of the remote control parts are shown next.
Remote Control Button Descriptions Parts of the Remote Control
Number Description
1 LED IR emitter
2 Decrease speaker volume.
3 Increase speaker volume.
4 Zoom camera out.
5 Zoom camera in.
6 Press center Select button to select highlighted
menu item.
7 Navigate through menu items using the Up,
Down, Left, and Right buttons; pan/tilt the
camera.
8 Delete letters or numbers or go back to a
previous screen.
9 Display the Menu screen.
10 Return to the Home screen.
11 Place, answer call.
12 End, reject call.
13 Enter letters or numbers.
14 In camera control mode, move the camera to a
stored preset or press and hold a number to
store a preset.
15 • Generates an asterisk if the cursor is in a text
16 Generates dual-tone multi-frequency (DTMF)
17 Mute or unmute a microphone.
field.
• Generates a period if the cursor is in a
numeric field.
touch tones. Press #, followed by DTMF keys to
send.
Polycom, Inc. 6
Page 19
Using a Polycom RealPresence Group Series Remote Control
TASK
Recharge the Remote Control Battery
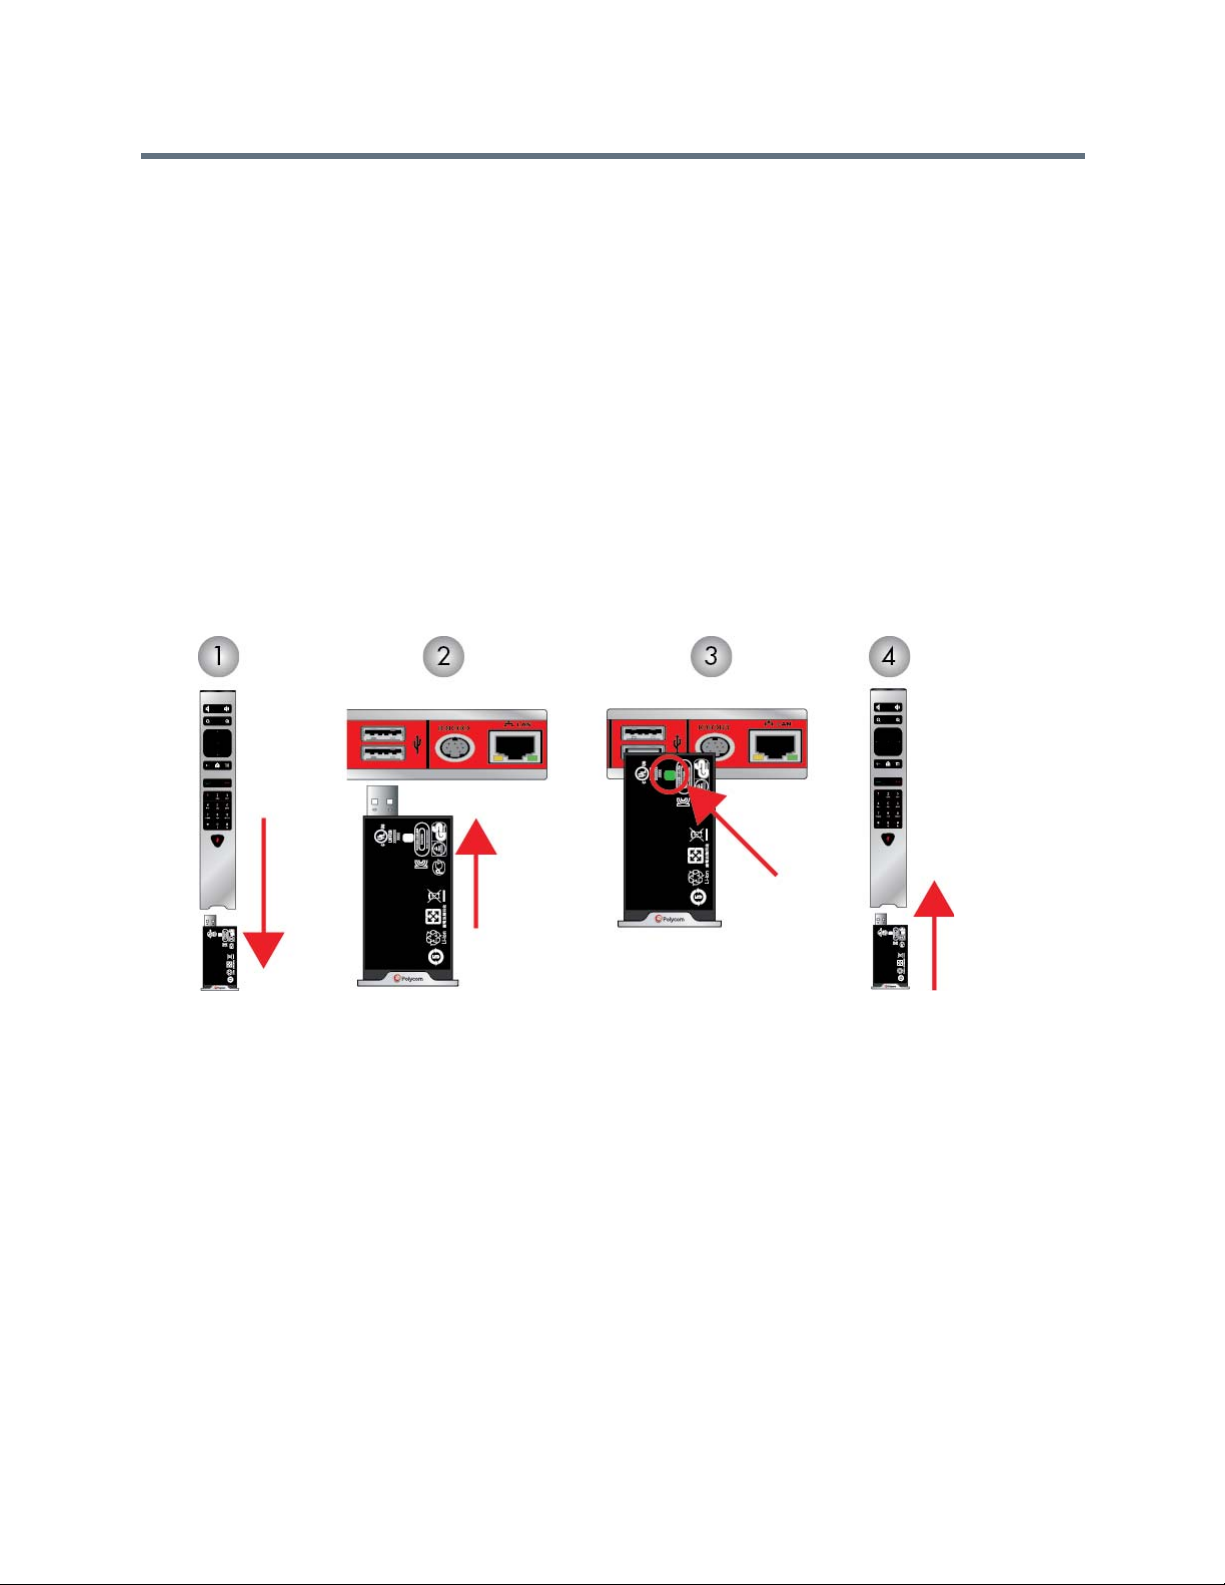
Your system setup sheet shows how to charge the battery in the remote control the first time.
When the remote control battery power is at 10% or less, a notification displays on the RealPresence Group
system Home screen.
Use a USB 2.0 port to charge the remote battery . The RealPresence Group 300, 310, and 500 systems have
two USB 2.0 ports on the back of each system, while the 700 system has one USB 2.0 por t on th e fr ont of
the system and two USB 3.0 ports on the back of the system.
1 Pull the battery out of the end of the remote control.
2 Insert the USB plug of th e ba ttery into a USB 2.0 port such as the one on your system.
3 Wait until the status light on the battery turns green before removing it from the port.
Recharging the battery might take from 20 minutes to multiple hours.
4 Insert the char ge d ba tt er y into the rem o te control.
Figure 1: Recharge the Battery: RealPresence Group 300, 310, 500 and 700 Systems
Wake a RealPresence Group System
After a certain amount of time with no activity, the RealPresence Group system goes into sleep mode.
» Press any button on the remote control, or just pick up the remote to wake up the system.
Contacts
The directory on your system stores contact information that you can use to quickly call contacts. Any
contacts that you add to the directory are acce ssib le to everyone at your site who uses the system. Users
at other sites cannot access the contacts on your system.
Polycom, Inc. 7
Page 20
Using a Polycom RealPresence Group Series Remote Control
TASK
When a contact is listed in the directory of your system, the system displays the name on the screen when
receiving an incoming call. If a contact that is not listed in the directory calls, the dialing information for th at
contact displays, and you can choose to save the information in the directory when the call ends.
Your system supports up to 2,000 contacts, or an unlimited number of contacts when the system is
registered with Microsoft L ync Server 2013 o r Skype for Business Server 2015. If your system is registered
with one of the supported Microsoft servers, you can search the directory, view a list of contacts, view
contact presence states, and call contacts from the directory.
For more information about this and other Microsoft and Polycom interoperability considerations, refer to
the Polycom Unified Communications for Microsoft Environments Deployment Guide.
Contact Presence States
If your system is automatically provisioned and registered to a global directory server, your directory might
include default LDAP group members and up to 200 global contacts stored by the presence service.
Polycom systems registered to Microsoft Lync 2013 or Skype for Business Server 2015 in an integrated
environment use the following colors to indicate presence states.
Color Presence
Green Available
Red Busy or Do Not Disturb
Black Offline or Unknown
Yellow Away
Browse the Global Directory
If your system is registered with a Global Directory Server , you can search for i nformation about other active
sites that are registered with the same Global Directory Server.
These entries are stored on the Global Directory Server, and you cannot edit them.
The global directory contains address book entries downloaded from an enabled global directory server.
You can select the global directory to view a list of all global directory entries, scroll through the global
directory, and select contacts in the global directory to call. The global directory displays on the
RealPresence Group system as a default Favorites group, Global Entry.
1 On your remote control, press , then select .
2 Scroll through th e direc to ry en tr ie s to locate the desired contact.
Search for Directory Contacts
If you want to call someone who is not in your Favorites or Contacts list, you might need to perfor m a di rectory search.
Note: Start your search with the last name first. Do not begin a search with a first name.
Polycom, Inc. 8
Page 21

Using a Polycom RealPresence Group Series Remote Control
TASK
TASK
1 With your remote control, press , then select .
2 To enter a name in the search field, do one of the following:
Enter the name using the onscreen keyboard.
Use the text-entry method commonly used with cell phones to select letters directly on your
remote control.
3 Select Search to search for an entry in the directory.
Calling
There are several ways to initiate calls on the system. You can place a call by entering your contact’s name
or number, by choosing a contact in the directory, or by calling a speed dial or recent contact.
You can perform all of the functions that are available when making conventional calls, plus you can make
multipoint conference calls.
Call by Entering a Name or Number
You can place a call several different ways.
One easy way to place a call is to enter a specific name or number using a touch device or the remote
control.
An alternate way of entering data is by attaching a standard English USB keyboard to one of the system's
USB ports. When a USB keyboard is connected to a RealPresence Group system, you can enter only
numbers with the remote control on the local interface Keypad or Contacts screens.
To enter letters, unplug the keyboard from the USB port, then select the Keyboard button now displayed
on your system screen.
Note: The Keyboard button do es not display on your system screen if a USB keyboard is plugged into the
system USB port. After you unplug the USB keyboard from the system's port, the Keyboard button displays.
Keep in mind that, depending on the capabilities of your system and the system you are calling, the dialing
information could look like one of these examples:
● 10.11.12.13 (IPv4 address—include the dots)
● 2555 (E.164 extension for H.323 or SIP)
● stereo.polycom.com (host name )
● (SIP)
1 Press on the remote control.
Polycom, Inc. 9
Page 22

Using a Polycom RealPresence Group Series Remote Control
TASK
TASK
TASK
2 In the dialing field, en te r th e dialing info rm a tio n as fo llow s:
Numbers: To enter numbers, select each number on the keypad with the remote control or enter
numbers.
Letters: To enter letters, select Keyboard. Then use your remote control to select each letter on the
onscreen keyboard. Or you can use the text-e ntry method commonly used with cell phones to select
letters directly on your remote control.
Backspace: To backspace, press .
3 Enter any additional information needed for the call.
The available settings depend on the type of call and your system's configuration.
4 Press to place the call.
Call from the Contacts Screen
If your system administrator has added directory and contacts, you can view your favorites and search for
contacts registered to the same Global Directory Server.
1 Using your remote control, select and navigate to on your system screen.
2 Highlight an entry in the Contacts list, and press .
Call from the Recent Calls List
You can quickly choose a number to call from a list of the sites you have called recently.
The Recent Calls screen provides details of all incoming and outgoing calls, including the time of the calls.
1 Press and on the local interface, select .
2 Highlight the entry you want to call.
3 Press .
Call a Speed Dial Entry
If your system administrator enabled Speed Dial, you can use your remote to quickly call a contact in your
directory.
1 At the top of the Home screen, select the Speed Dial tab and select a Speed Dial entry to call.
2 To place the call, select Call or to use your remote control, select .
Answer a Call
The way a RealPresence Group system handles incoming calls depends on how the system is configured.
It either answers the call automatically, rejects the call automatically, or prompts you to answer the call
manually.
Polycom, Inc. 10
Page 23

Using a Polycom RealPresence Group Series Remote Control
TASK
TASK
If the Polycom RealPresence Group system is not configured to answer incoming calls autom atically, you
are prompted to answer manually.
» Using your remote control, select Answer or press .
Ignore a Call
If the Polycom RealPresence Group system does not answer incoming calls automatically, you are
prompted to answer manually.
» Using your remote control, select Ignore or press .
Hold a Call
In a point-to-point call, you can place a call on hold, and then answer an incoming call, make an outgoing
call, or switch between two calls.
After you complete a call, you can resume the call you had on hold.
1 Press Home on the remote control, then select Active Call > Hold.
When a call is on hold, On hold appears on the RealPresence Group system screen for 5 secon ds.
After 5 seconds, the hold icon appears and remains on the screen until all calls disconnect or are
resumed.
Hold a Call and Answer a Call
At times, you might need to place a call on hold and answer an incoming call.
» Use your remote control to select Hold + Answer.
Hold a Call and Place a Call
To make an individual outgoing call while you are on a call, you must place the active call on hold.
» Press on the remote control.
Place the call using your preferred meth o d.
Switch Between Point-to-Point Calls
When you have a call on hold, you can switch between the held and active call.
1 Press Home.
2 Select Manage > Switch To.
Resume a Call
When you no longer want to keep a call on hold, you can resume the held call.
» Use your remote control to press , thenselect Hold.
Polycom, Inc. 11
Page 24

Using a Polycom RealPresence Group Series Remote Control
TASK
Hang Up All Calls and Answer a Call
When Auto Answer Point-to-Point Video is set to No, you can add an incoming call to the conference.
» Select Hang Up + Answer to hang up all active and held calls and establish a point-to-point call with
the incoming call.
End a Call
When your call is complete, hang up the call.
» On the remote control, press .
Multipoint Conference Calls
Conference, or multipoint, calls involve at least three different endpoints.
During a multipoint call, multiple sites can see and hear each other. You can also share content in a
multipoint call, just as you can in a point-to-point call.
All systems can participate in multipoint calls. To host multipoint calls, your administrator must install the
multipoint video option key . You can host multipoint calls using a video conferencing system with multipoint
capabilities, or you can use a bridge, such as the RealPresence
®
Collaboration Server 800s.
Note: You cannot host multipoint video calls on RealPresence Group 300 and 310 systems.
How you place a multipoint call depends on whether you're using a RealPresence Group syste m or brid ge
with multipoint capabilities. The number of sites allowed in the call is determined by the capabilities of the
system or bridge hosting the call.
Place a Multipoint Call by Adding Participants
To start a new multipoint call, you need to start with the first participant or site and then add others.
1 Call the first site.
2 After the call connects, press on the remote control to open the dialing keypad.
3 Place a call to the next site.
4 Repeat the above steps until all sites are connected.
Place a Call While a Multipoint Call is on Hold
You can hold a conference call in order to make a new call.
» Press and then on the remote control.
Place the call using your preferred meth o d.
Incoming Call Handling of Multipoint Conference Calls
When the system is in a call, regardless of whether the system has multipoint capability, incoming calls are
handled in one of three ways.
Polycom, Inc. 12
Page 25

Using a Polycom RealPresence Group Series Remote Control
TASK
TASK
TASK
● Automatically answered: The incoming call is automatically added to the conference call. No
notification appears.
● Manually answered: You can select Ignore, Hold+Answer, or Hang up+Answer.
● Declined: The system declines incoming calls. No notification appe ars, but th e de clin ed syste m
receives a notification.
Hold and Answer a Call in a Conference
While in a multipoint call, you can hold the main call and answer an incoming call.
1 Use your remote control to select Hold + Answer to hold the current call and answer the incoming
call.
Note: Depending on the call type, you might be able to put an individual participant in the meeting
on hold and resume in a multipoint conference.
Switch Between Calls in a Multipoint Call
When you have a call on hold, you can switch between the held and active calls.
» Use your remote control to press .
This allows you to determine which call to make active.
Resume a Held Call in a Multipoint Call
When there is no active call, but there is a call on hold, you can resume the held call.
1 If you have a single call on hold with no active call, to resume the call on hold, press .
2 Select Resume Call.
Hang Up an Individual Call in a Multipoint Call
In a multipoint call, you can hang up calls individually.
1 Using your remote control, press .
2 Navigate to the call you want to end.
3 Select Hang Up.
Hang Up a Held Call and Add a Call
Depending on how your administrator configured your system, you might be able to add an inco ming call to
a conference.
» Select Hang Up + Answer to hang up the call that has been on hold the longest.
The incoming call is added to the conference.
Polycom, Inc. 13
Page 26

Using a Polycom RealPresence Group Series Remote Control
TASK
TASK
TASK
Hang Up All Calls
When you are in a conference call, you can hang up one call at a time or hang up all calls at once.
1 Using your remote control, press .
2 Select Leave Conference.
Passwords for Multipoint Calls
You might be required to enter a meeting password to join a multipoint call.
In addition, you can require that far-end systems enter a meeting password to prevent unauthorized
participants from joining multipoint calls hosted by your RealPresence Group system.
Keep the following points in mind regarding meeting passwords:
● Do not set a meeting password if multipoint calls include audio-o nly endpoints. Audio-on ly endpoints
are unable to participate in password-protected calls.
● Microsoft Office Communicator clients are unable to join password-protected multipoint calls.
● SIP endpoints are unable to dial in to password-protected multipoint calls.
Set Up a Meeting Password
You can set up a meeting password to ensure only authorized participants can join the meeting.
1 From the Home scre en , pr es s .
2 Navigate to More > Settings > User Settings > Meetings.
3 Enter the password in the Meeting Password field in one of these ways:
Press the remote control number buttons, us ing the text -e nt ry me th o d com m o nly us ed wit h cell
phones.
Use the on-screen keypad to enter the password.
4 Press to save your change and return to the Home screen.
Enter a Meeting Password
Before you can join a multipoint call, you might be prompte d to en te r a me e tin g password.
1 If a prompt appears on the screen, use the remote control or on-screen keypad to enter the password.
2 If you hear an audio prompt, use the remote control to generate DTMF tones. Press the # key on
your remote control and a message displays “Touch tones enabled.” Then, use the number keys to
enter numbers.
Polycom, Inc. 14
Page 27

Using a Polycom RealPresence Group Series Remote Control
TASK
TASK
Microsoft Meetings
If your system is deployed in a Lync Server 2013 or Skype for Business 2015 environment, you can place
and participate in multipoint calls that are hosted by Microsoft audio and video servers.
RealPresence Group systems can connect to Microsoft Exchange Server 2013 and retrieve calendar
information associated with a Microsoft Outlook or Microsoft Office 365 account. If the Home screen does
not display calendar information, the system is not registered with the Microsoft Exchan ge Server. Contact
your administrator to register the system.
Note: Endpoints using Microsoft Office 365 accounts must be SIP-re gistered to Microsoft Lync 2013 or
Skype for Business Server 2015 in order to join calendar meetings.
View Scheduled Meetings with the Remote
If your RealPresence Group system is configured to connect to the Microsoft Exchange Server, you can
view scheduled meetings on the Home screen.
To view more information about a meeting on the calendar, select the meeting. Depending on the your
system is configured, private meeting details might not be visible.
» In the local interface, access the Home screen.
Scheduled meetings are listed for the current day and for the next 6 days.
Join a Scheduled Meeting from the Home Screen
You can join a scheduled meeting from the Home screen.
1 With your remote, select a meeting on the Home screen.
2 Select Join to call into the meeting.
Join a Scheduled Meeting from the Calendar
You can join a scheduled meeting from the calendar.
1 Press .
2 Select Calendar.
3 Navigate to the meeting you want to join, and then click Join.
Content
Y ou can show content in video calls a few dif ferent ways. To show people and content at the same time, the
RealPresence Group systems must be configured for content. Besides showing content, you can also
receive and work with Microsoft content when a user initiates a content-sharing request.
You can show the content from the following to the far-end systems:
Polycom, Inc. 15
Page 28

Using a Polycom RealPresence Group Series Remote Control
● Any information stored on a computer connected directly to a RealPresence Group system or a
Polycom touch device
● A DVD or DVR player connected directly to a Polycom system
● Content from the Polycom People+Content™ IP application (installed on a compu ter and connected
to the Polycom RealPresence Group system)
● VisualBoard
This section describes how to share content using a connected computer or People+Content IP. For
instructions on using VisualBoard, refer to the VisualBoard Technology Application User Guide.
If you attempt to display copyright-protected content on the local interface, such as from a DVD or DVR, the
following message is shown on the RealPresence Group system: “This content is protected and cannot be
displayed or shared.” This message appears in a call and out of a call.
Y o u can show one conten t source and one people vide o source at a time, and yo u can switch to a dif ferent
type of content or people video source if you need to. Participants at other sites can also show content or
people video sources. Content shown is from one site at a time ; another site sharing co ntent overrides a ny
content being shared.
When you are showing content, a message appears on your main monitor. Whether you also see the
content on your monitor depends on how your system is configured.
Note: To show content on a RealPresence Group 300 system, you must use the People+Content IP application.
Content Connections of RealPresence Group Systems
Before you prepare to show content, make sure the computer is powered on and connected to the
RealPresence Group system. You can connect a computer to the HDMI or VGA video input.
Note: Your administrator can enable 3.5mm audio input mixing with HDMI or VGA content inpu t on RealPresence Group systems during active calls. If this feature is not enabled, 3.5 mm audio input is heard by
both the near-end and far-end conference site participants during active calls. For more information about
3.5mm audio input, contact your administrator.
Polycom, Inc. 16
Page 29
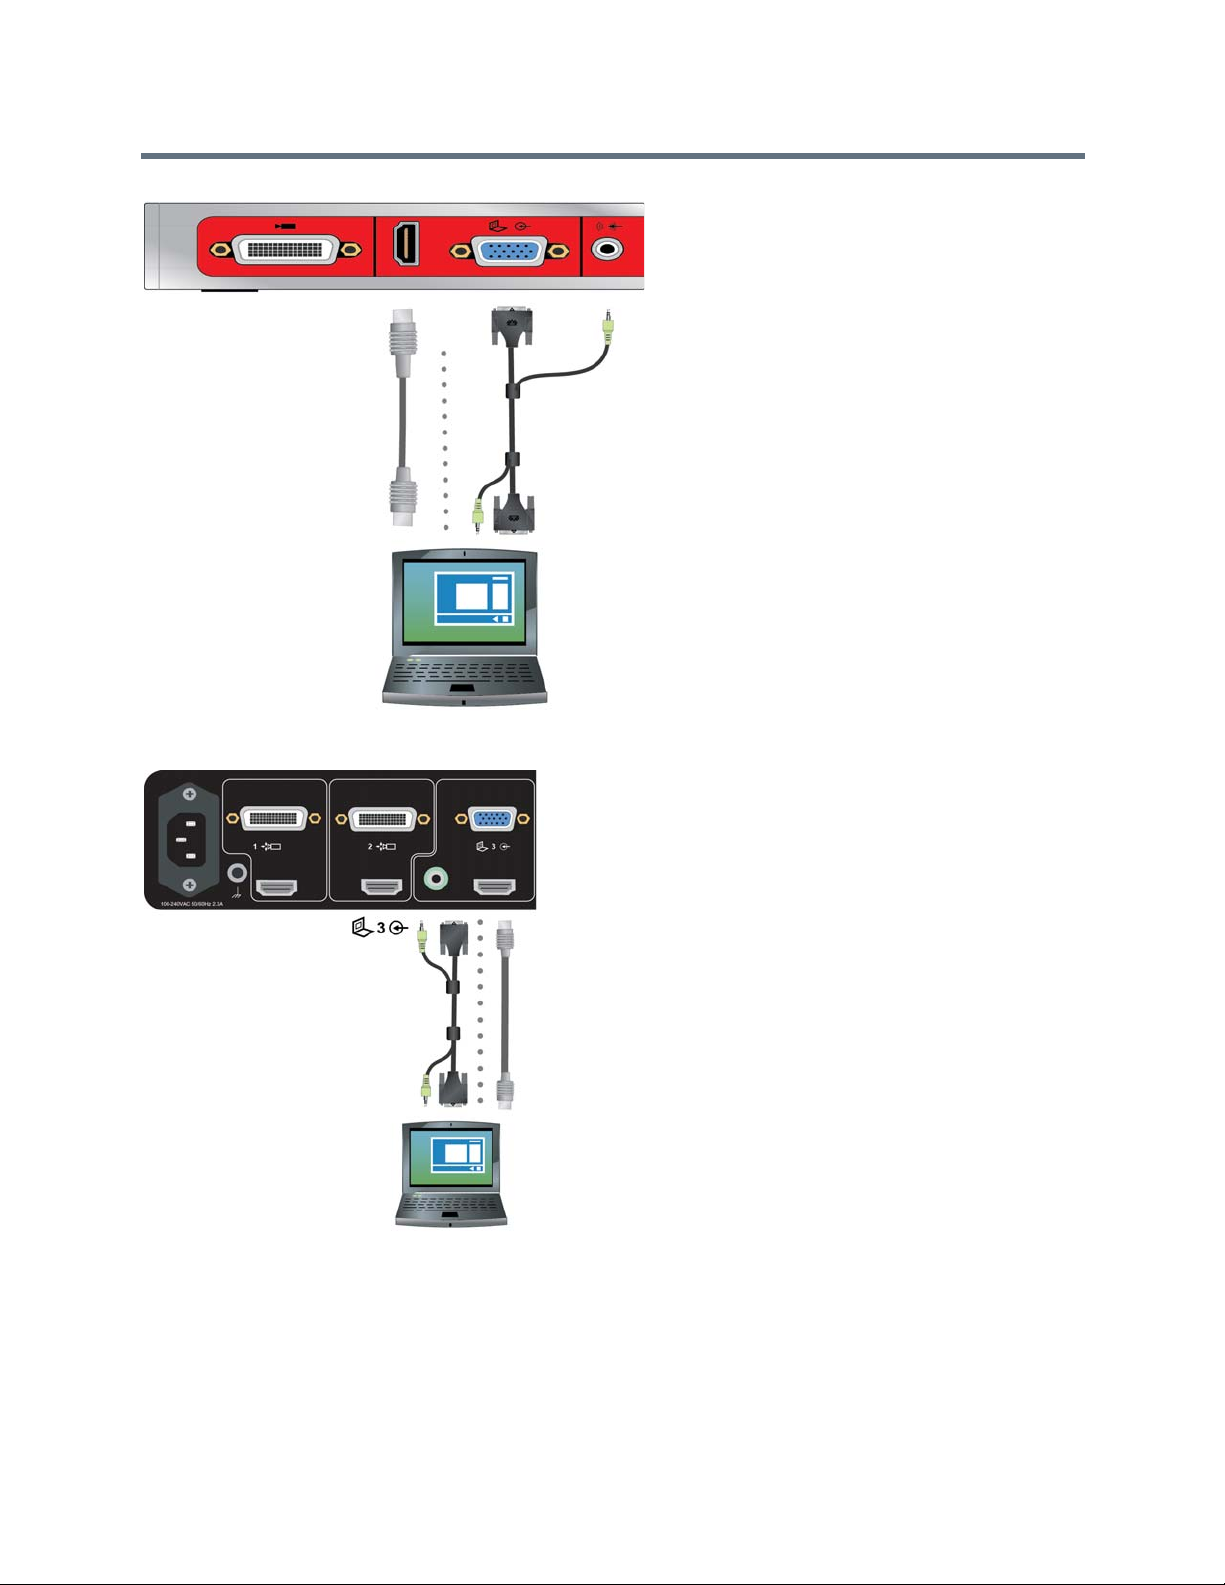
Using a Polycom RealPresence Group Series Remote Control
Figure 2: Connections for RealPresence Group 310 and 500 systems
Figure 3: Connections for a RealPresence Group 700 system
Polycom, Inc. 17
Page 30
Using a Polycom RealPresence Group Series Remote Control
Show Content from a Computer Connected to RealPresence Group System
Before you show content, check that the computer video output is configured to use one of these supported
resolutions and refresh rates.
For best video quality, use refresh rates of 60 Hz or less.
Resolution Refresh rates (Hz)
800 x 600 56, 60, 72, 75, 85
1024 x 768 60, 70, 75, 85
1280 x 720 50, 60
1280 x 768 60
1280 x 1024 60, 75
1600 x 1200 60
1680 x 1050 60
1920 x 1080 60
1920 x 1200 60
Note: The way you set the resolution and refresh rate differs, depending on the type of operating system
you have. Check your computer's manual or help topics for the appropriate steps.
To start showing content from a source connected to a RealPresence Group system:
» Using your remote control, select and then select your content source from the list.
While in a call, you can press > Select on your remote to turn on and off the last used content
source.
Polycom People+Content IP
The People+Content IP application allows you to send content from a computer that is not connected
directly to the RealPresence Group system or Polycom touch devices.
Keep the following points in mind about People+Content IP:
● People+Content IP provides video-only content. No audio is shared.
● People+Content IP supports any computer desktop resolution with color set to 16-bit or higher.
● Your computer resolution can be set to anything, but People+Content IP scales the image to
1024x768 or 1280x720.
Note: For a computer connected directly to the RealPresence Group system, Polycom recommends
using the Send Computer button or Content button instead of People+Content IP.
Polycom, Inc. 18
Page 31

Using a Polycom RealPresence Group Series Remote Control
TASK
TASK
TASK
Download and Install People+Content IP
You need to download and install the People+Content IP application on a computer before you can use it
to show content.
1 On a computer, go to the Polycom People+Content IP page.
2 Under Resources, download the People+Content IP software for Mac or PC.
3 Extract the contents of the .zip file and launch the installer. Follow the instructions in the installation
wizard.
Share Content with People+Content IP
After you download and install People+Content IP, you are ready to share content.
1 On your computer, launch the application.
2 Enter the IP address or host name of the RealPresence Group system and the meeting password, if
one is set.
You can find your IP address by pressing the on the remote control.
3 Click Connect.
4 Open the content you want to show, and click .
Stop Sharing Content with People+Content IP
When you are done showing content, shut down People+Content IP.
» Click in the People+Content IP application.
Microsoft Content Management
Your system can receive content from Microsoft Lync 2013 and Skype for Business 2015 remote desktop
(RDP) clients in active calls.
The Microsoft clients must initiate the content sharing request.
Be aware that you cannot share content, including con tent sha red th ough Pe op le+Co ntent IP and through
VisualBoard, while actively receiving content from Microsoft clients.
Scroll and Zoom Microsoft Content
When a Microsoft Lync 2013 or Skype for Business 2015 client shares content with your system in an active
call, and when a USB mouse is connected to your system, you can scroll and zoom in order to see all the
shared content.
1 Connect a USB mouse to your system.
2 Move the mous e to scr oll an d zoom .
Polycom, Inc. 19
Page 32

Using a Polycom RealPresence Group Series Remote Control
TASK
TASK
Control Microsoft Content
Microsoft clients must select the specific system to give control to. After a system receives and takes control
of content from the client, the system can open and use shared applications, programs, and files on the
system with the client using a connected USB mouse and keyboard.
Note: Any normal Microsoft feature restrictions apply. For more info rm a tio n, re fe r to th e Mic ro so ft do cu mentation. Password enabled applications, programs, or files remain password enabled when using this
feature.
1 Connect a USB mouse to the system.
2 If you want to use shared applications, programs, and files that require keyboard functions, connect
a USB keyboard to the system.
3 On the local interface, select the Control Remote checkbox. The system now controls the content
received from the Microsoft client.
Return Control of Microsoft Content
You can return control of Microsoft content at any time.
1 Connect a mouse to the system.
2 On the local interface, clear the Control Remote checkbox. The Microsoft client now controls the
shared content. You can still scroll and zoom to see all the shared content.
Recording Calls
Depending on how your system is configured, you can record calls in one or more ways. RealPresence
Group 700 systems allow you to record calls using monitor 3.
If you have a different RealPresence Group system, you can record calls using Polycom RealPresence
Media Suite.
Manage Recordings with Polycom RealPresence Media Suite
Polycom® RealPresence® Media Suite is an enterprise recording, streaming, and video content
management solution. This solution offers you a self-ser vice portal for recording calls on a room system, or
for turning a room system into a web-cast studio.
RealPresence Media Suite integrates with room systems using the following methods:
● Dial RealPresence Media Suite directly: You can dial into RealPresence Media Suite using the
suite’s IP address, H.323 extension, or SIP URL. When you use this method, the system uses the
default recording settings defined by a RealPresence Media Suite administrator.
Polycom, Inc. 20
Page 33

Using a Polycom RealPresence Group Series Remote Control
● Dial a RealPresence Media Suite Video Recording Room (VRR): A VRR is a virtual Capture
Server with a specific recording profile that is defined by a RealPresence Media Suite administrator.
Before recording a call using this method, you n eed the VRR number and th e IP a ddress, H.323 ID,
or SIP address of the RealPresence Media Suite.
Note: Y ou have immediate access to play a recording back as long as the Media Suite TVUI remains
open. After that, you must access th e RealPresence Media Suite portal to access the recording in the
list of archives where recordings are saved.
Contact your administrator for details on accessing the RealPresence Media Suite User Portal.
RealPresence Media Suite Connection Methods
The following connection methods are supported for dialing RealPresence Media Suite.
Media Suite
T ype Connection Method Example
Media Suite
system
VRR For H.323 calls:
If the room system is not registered to the gatekeeper
or to a SIP server, dial the RealPresence Media Suite
IP address.
If the room system is registered to the gatekeeper, dial
the RealPresence Media Suite E.164 extension for
H.323.
If the room system is registered to a SIP server, dial the
RealPresence Media Suite SIP address.
[RealPresence Media Suite IP]##[VRR number]
or
[RealPresence Media Suite E.164 prefix][VRR number]
For SIP calls:
[VRR number]@[RealPresence Media Suite IP]
or
[SIP peer prefix][VRR number]
RealPresence Media Suite Touch Tones
10.11.12.13
1234
CS123
If the RealPresence Media Suite IP
is 11 .12.13.14 and the VRR number
is 4096, dial 11.12.13.14##4096.
If the RealPresence Media Suite
E.164 prefix is 8888 and the VRR
number is 4096, dial 88884096.
If the RealPresence Media Suite IP
is 11 .12.13.14 and the VRR number
is 4096, dial [email protected].
If the SIP peer prefix of the
RealPresence Media Suite is 8888
and the VRR number is 4096, dial
88884096.
Y ou can use e nter touch tones with the touch interface, a to uch device, or remote control to manage the call
recording.
The supported touch tone codes for activating the button controls on the TVUI are listed in this table.
Polycom, Inc. 21
Page 34

Using a Polycom RealPresence Group Series Remote Control
TASK
TVUI State Operation Touch Tone Code
Menu display state Pause recording *1
Start a recording
Resume a paused recording
Stop a recording *3
Playback a recording *5
Video playback state Pause the video *1
Start the video
Resume a paused video
Stop a playback and return to the main menu *3
Reverse a video *4
Fast forward a video *6
*2
*2
Record on RealPresence Media Suite
When you establish a connection to RealPresence Media Suite, the TV User Interface (TVUI) displays in a
call window. Unless the administrator for the RealPresence Media Suite has disabled the Start Recording
Immediately setting, the recording starts immediately after the TVUI opens. Y ou can use the remote contr ol,
the touch interface, or a supported touch device to dial into and control the recording.
1 To dial the Media Suite, press on your remote and enter the IP, H.323, or SIP address of the
Media Suite. The TVUI displays in the call window.
2 If the recording does not start immediately, press *2 on the remote control to start the recording.
3 When you are done recording, press *3 on the remote control.
4 To playback the recording, press *5 on the remote control.
Stop Recording on RealPresence Media Suite
Before ending a call, make sure to stop recording.
» When you are done recording, press *3 on the remote control.
Play Back a Recording
Y o u have immediate access to play back a recording as long as the Media Suite TVUI con tinues to display
and the call has not ended. After this time, you can access the r ecording in the RealPr esence Me dia Suite
portal in the recording archive.
1 To play back a recording, press *5 on the remote control.
Polycom, Inc. 22
Page 35

Using a Polycom RealPresence Group Series Remote Control
TASK
TASK
TASK
Use the Remote Control to Manage the RealPresence Media Suite
1 Point the remote control toward the RealPresence Group system.
2 Using the remote control, press the appropriate selection button (Left, Up, or Right) that
corresponds to the far end control shown on the TVUI (Record Start/Stop, Confirm/Pause, or Play)
that you want to activate.
Record Calls on a DVD or DVR
On a RealPresence Group 700 system, you can record a call on monitor 3.
Y ou can either record the speaker and content or re cord the speaker only. Y our administrator must configure
the settings for this feature.
1 Power off your RealPresence Group 700 system.
2 Attach a VGA cable from the VGA video output on your RealPresence Group system to the VGA
input on your DVD or DVR device.
3 Power on your RealPresence Group system.
4 On the DVD or DVR device, use the record function to record the call.
The layout option for the recorded video is the layout that yo ur administrator configured for Monitor 3.
Record Calls with a Laptop or Tablet
On a RealPresence Group 700 system, you can record a call on monitor 3.
Y ou can either record the speaker and content or re cord the speaker only. Y our administrator must configure
the settings for this feature.
1 Power off your RealPresence Group 700 system.
2 Attach an HDMI cable from the HDMI video output on your RealPresence Group system to the
HDMI input on your laptop or tablet.
3 Power on your RealPresence Group system.
4 On the laptop or tablet, use a recording application to record the call.
The layout option for the recorded video is the layout that yo ur administrator configured for Monitor 3.
Settings
Before or during calls, you can adjust audio and video settings, including adjusting th e volu me, muting the
microphone, turning off the camera, and changing the video layout.
Depending on how the system is set up by your administrator, you can customize administration and user
settings on the system, including the language, time zone, LAN settings, and security settings. If you have
any questions about changing these settings, contact your administrator for assistance.
Polycom, Inc. 23
Page 36
Using a Polycom RealPresence Group Series Remote Control
TASK
TASK
TASK
Video Adjustments
Besides managing audio and call settings, you can also manage the video and certain user inte rface
settings.
Switch Between Full-Screen Video and the Home Screen
When your call connects, the system automatically shows video on the whole screen.
Y ou can switch ba ck to the Home screen during a call if , for example, you need to adjust a user setting and
your system is configured to allow you to do so.
1 Press on the remote control to go to the Home screen.
2 Press on the remote control to see the full screen.
Configure Automatic Self View Control
If your administrator has allowed you access to set Automatic Self View Control, you can configure this
setting so that other users can display or hide the Self View window.
1 From the Home scre en , pr es s .
2 Do one of the following:
When in a call, navigate to More > Settings > User Settings > Camera.
When not in a call, navigate to Settings> User Settings > Camera.
3 Select the Automatic Self View Control checkbox.
Adjust for Room Lighting
If your system administrator has allowed access to user settings, you can use the backlight control to adjust
the brightness of the video that the main camera sends to the RealPresence Group system.
Use backlight compensation in situations where the subject appears darker than the backg round. Enabling
this setting helps to darken a bright background, which can impact the tracking performance of th e Polycom
EagleEye Director.
Note: Because backlight controls adjust the main built-in camera, these controls do not make content
displayed from a computer appear brighter.
1 From the Home scre en , pr es s .
2 Do one of the following:
When in a call, navigate to More > Settings > User Settings > Camera.
When not in a call, navigate to Settings> User Settings > Camera.
Polycom, Inc. 24
Page 37
Using a Polycom RealPresence Group Series Remote Control
TASK
3 Select Backlight Compensation.
Stop Video
Sometimes, you want to stop sharing your video whether in or out of a call.
Stopping your video allows you to stop sending your near-end camera-encoded video while still remaining
connected to the conference. When your video is stopped, th e far end does not see video transmission fr om
you.
» Press , then select Camera Off.
Note: In Microsoft Lync 2013 or Skype for Business 2015 environments when your video is stopped,
video transmissions ceases and no Self View displa ys. When yo ur video is stopped in other envir onments, a video pause image is sent to the far end.
Regardless of environment, stopping your video does not affect the sending or receiving of content.
Start Video
If your near-end site video is currently not displayed, you can choose to display your video to others in a
conference call.
» Press , then select Camera On.
Turn Self View On
Self View shows you the video stream that your contacts see when they are in a call with you. If automatic
self view is not enabled, you can turn Self View on when you want to see your video stream.
» On the remote control, press then select Self View On.
Turn Self View Off
Self View shows you the video stream that your contacts see when they are in a call with you. If automatic
self view is not enabled, you can turn Self View off when you do not want to see your video stream.
» On the remote control, press then select Self View Off.
Allow Video Display on the Web
If your system administrator has allowed access to user settings, you can choose whether to allow viewing
of the room where the system is located or video of calls in which the system participates.
Caution: The default setting is to not allow video display on the web. Be sure to verify whether your system
administrator wants the setting to be changed.
1 Navigate to Settings > User Settings > Meetings.
2 Select Allow Video Display on Web.
Polycom, Inc. 25
Page 38

Using a Polycom RealPresence Group Series Remote Control
TASK
Multipoint Viewing Modes
The multipoint viewing mode configured on the host system is the one used in the call for all endpoints in
the call.
The default mode is Discussion, however, your administrator might have configured one of the other
modes for your system.
The following table describes the available multipoint viewing modes when a system is hosting the
multipoint call.
Setting Description
Video images from multiple sites can be automatically combined on one monitor in a display known as continuous
presence.
Auto The view switches between continuous presence and full screen, depending
on the interaction between the sites.
If multiple sites are talking at the same time, continuous presence is used. If
one site speaks uninterrupted for at least 15 seconds, that site appears in full
screen on the monitor.
Discussion Multiple sites are displayed in continuous presence. The current speaker's
image is highlighted.
Presentation The speaker sees continuous presence while the other sites see the speaker
in full screen on the monitor.
Full Screen The site that is speaking is shown in full screen to all other sites. The current
speaker sees the previous speaker.
Set the Multipoint Viewing Mode
You might want to change your multipoint viewing mode from the default.
1 From the Home scre en , pr es s .
2 Navigate to More > Settings >User Settings > Meetings.
3 Select a viewing mode from the Multipoint Mode list.
Multipoint Viewing Layouts
What you see during a multipoint call can vary depending on how the RealPresence Group system is configured, the number of sites participating, the numb er of monitors you are using, and whether content is
shared.
The multipoint viewing layout configured on the host system is the one used in the call for all endpoints in
the call.
When you use two monitors of equal size, you can have eight-way multipoint calling, depending on your
system configuration. When you share content, one monitor is used for content and one for people. The
configuration varies depending on whether your administrator has enabled Self View and how many peo ple
are participating. When you do not share content, the configuration for both monitors is spread over both
monitors.
To find out more about multipoint layouts, talk to the administrator of your RealPresence Group system.
Polycom, Inc. 26
Page 39

Using a Polycom RealPresence Group Series Remote Control
TASK
Note: If you are not in an RealPresence® Collaboration Server (RMX®) system call, your only layout option
is Browse.
Change Multipoint Viewing Layout
You can change the multipoint viewing layout by browsing through the availa ble options in the local interface.
1 While in a call, press , then select Layout.
2 Select Near Video or Far Video.
3 Cycle throug h th e av aila ble layouts for the call to decide which layout you prefer.
The available layouts vary depending upon certain factors, such as how many particip ants are in the
call or the content status.
Audio Adjustments
You can control several audio settings on the system, including adjusting the volume and muting the
microphone.
Adjust the Volume
You can raise or lower the volume of the meeting.
Changing the volume affects only the sound you hear at your site.
» Using the remote control, press and hold or to increase or decrease the near-end volume.
Mute the Microphone
You can mute the microphone if you do not want the far end to hear conversations at your site.
Keep the following in mind regarding muting:
● Muting the microphone does not mute a udio coming from any device conne cted to the content audio
inputs.
● The red mute indicator on the front of the Polycom EagleEye View camera is lit when the system is
muted or when a Polycom microphone is connected and muted.
● The microphone might mute when the system automatically answers an incoming call and if the
system is configured to mute auto answered calls.
» Press on the remote control.
If a Polycom tabletop microphone array is connected to your system, you can mute the call by
touching on the microphone.
The indicators on the microphone are red when your audio is muted. This near-end icon also
appears on the monitor display.
Unmute the Microphone
You can resume your microphone audio after muting it in order to speak in a call.
» If muted, press on the remote control or on the table microphone to unmute.
Polycom, Inc. 27
Page 40
Using a Polycom RealPresence Group Series Remote Control
TASK
TASK
TASK
Cameras
You can adjust available cameras in several ways.
Select Cameras
You can use the remote control to select and adjust the main camera or other nea r-end or far-end video
sources.
You might be able to adjust other auxiliary cameras that support pan, tilt, and zoom movement. You can
adjust a far-end camera only in a call and only if the far end allows it.
1 Navigate to Camera > Select Camera.
2 Then select Near Cameras for near-end control or Far Cameras for far-end control.
Adjust Cameras
After you select a camera, you can make some adjustments to enhance the view.
Note: Before you can adjust the EagleEye Director camera, you must turn camera tracking off.
To adjust a Polycom EagleEye III, Polycom EagleEye IV, Polycom EagleEye Acoustic, or
Polycom EagleEye Director using the remote control:
1 Select either a near-end or far-end video source to control.
During a multipoint call being hosted by a system in the call, you can adjust a camera only at the far
end that has a current speaker.
2 Press the navigation buttons on the remote control to move the camera up, down, left, or right.
3 On the remote control, press to zoom out or to zoom in.
Switch Between Cameras
You can switch to controlling the far-end camera or the near-end camera in a call.
1 Press .
2 Select Camera, then select Near Camera or Far Camera.
Allow the Far-End System to Control Your Camera
If your system administrator has allowed access to user settings, you can let the far-end system control your
camera.
If their systems support presets, far-end participants can also set and use presets for your camera.
Polycom, Inc. 28
Page 41
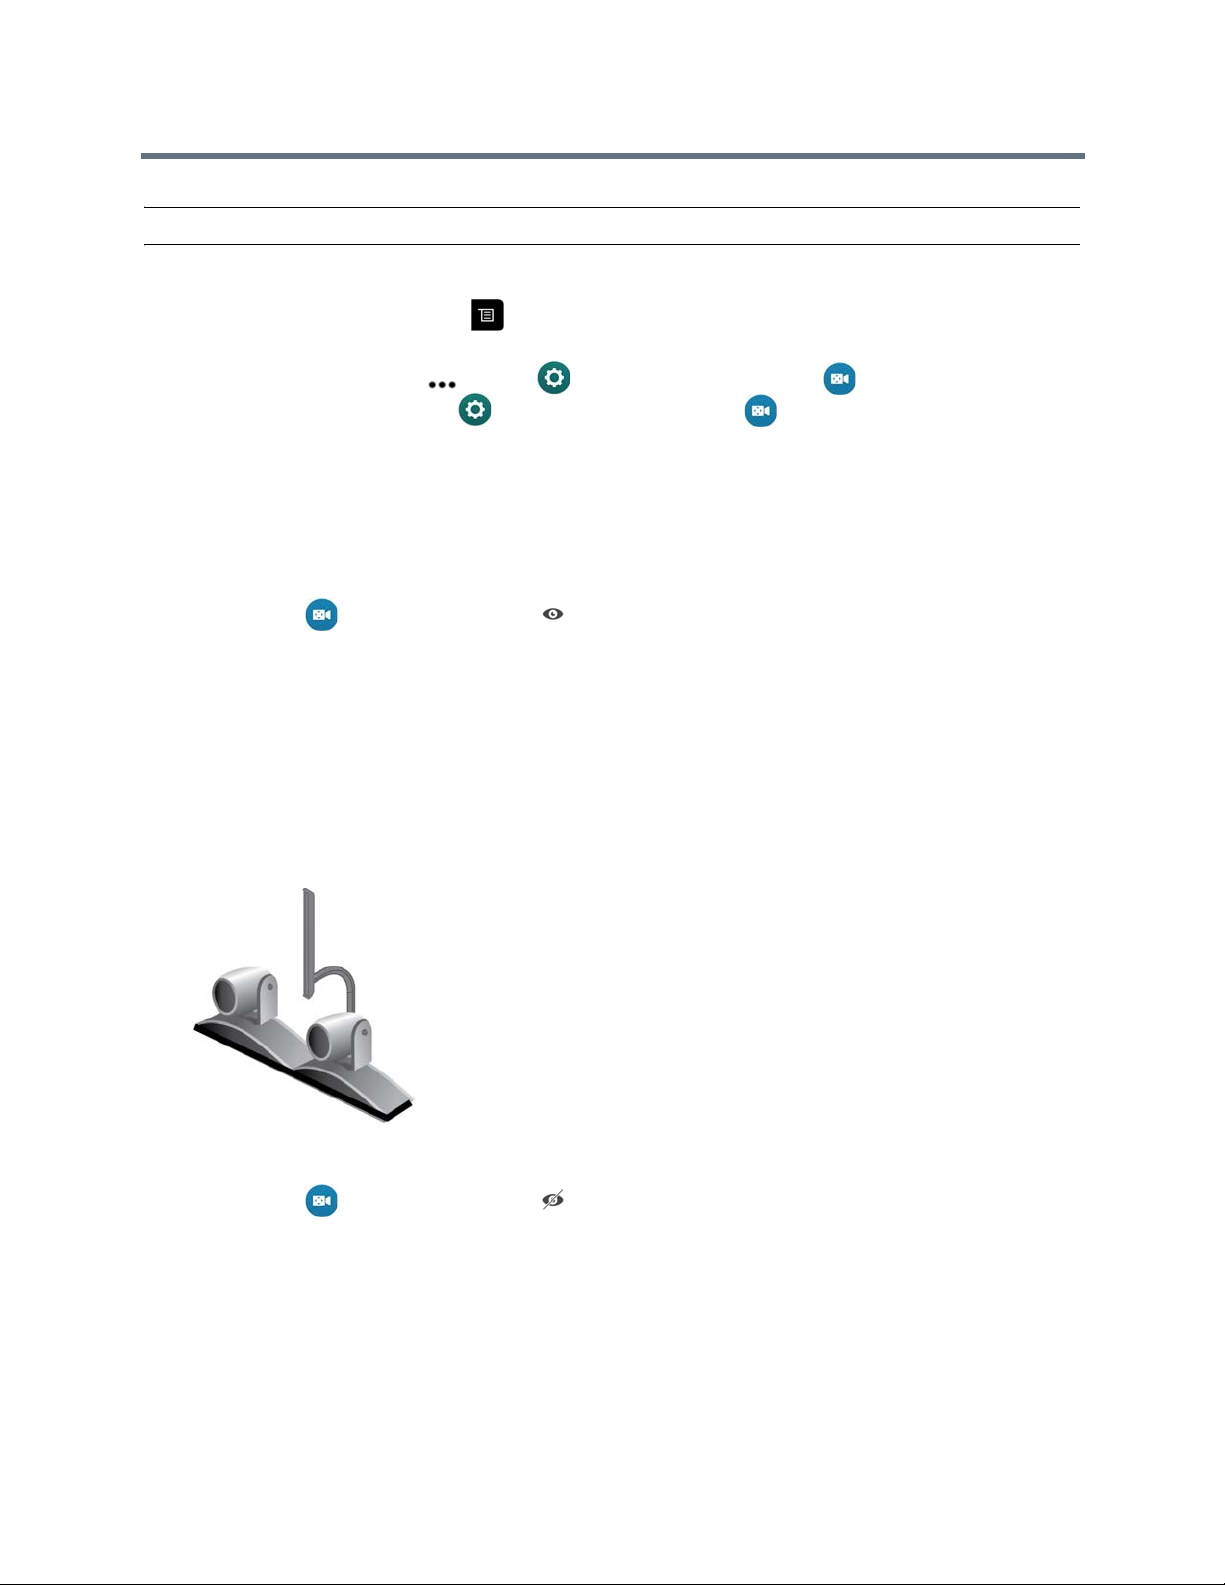
Using a Polycom RealPresence Group Series Remote Control
TASK
Note: Changing this setting takes effect immediately, even if a call is in progress.
1 From the Home scre en , pr es s .
2 Do one of the following:
While in a call, select More > Settings > User Settings > Camera.
While not in a call, select Settings > User Settings > Camera.
3 Select Allow Other Participants in a Call to Control Your Camera.
Disable EagleEye Director Tracking in a Call
While in a call, you might want to disable EagleEye Director tracking.
When you stop camera tracking through the menu, the Mute and Unmute buttons do not affect tracking.
» Navigate to Cameras, and select Tracking On/Tracking Off to toggle tracking off.
After you disable tracking in this way, the Mute and Unmute functions on the microp hone and remote
control no longer affect tracking.
Enable EagleEye Director Tracking in a Call
If EagleEye Director tracking is enabled, the camera follo ws th e pe rs on or peop le who ar e sp ea kin g.
This tracking action, also called automatic camera positioning, can be manually started or stopped.
You must start camera tracking using the menu before the Mute and Unmute buttons will again affect
tracking. After the call is complete, EagleEye Director returns to its default setting.
Figure 4: EagleEye Director
» Navigate to Cameras, and select Tracking On/Tracking Off to toggle tracking on.
Camera Presets
Camera presets are stored camera positions that you can create before or during a call.
The system uses preset 0 as the default camera position for all preset camera positions. This default
camera position is zoomed out, panned straight ahead with horizontal tilt.
Presets allow you to do the following:
Polycom, Inc. 29
Page 42

Using a Polycom RealPresence Group Series Remote Control
TASK
● Quickly point a camera at pre-defined locations in a room.
● Select a video source such as a document camera or an auxiliary camera.
If your system camera supports pan, tilt, and zoom movement, you can create up to 10 preset camera
positions for the near-end camera. Each preset stores the following information:
● Camera number
● Camera zoom level
● Direction the camera points
These presets remain in effect until you change them.
If far-end camera control is allowed, you can create 10 presets for the far-end camera. These presets are
saved only for the duration of the call. You might also be able to use presets that were created at the far end
to control the far-end camera.
Keep the following camera control information in mind when using Self View:
● When in a call, selecting near camera control pans and zoo ms the local camera without changing the
layout.
● When out of a call, selecting camera control changes the Self View to full screen.
● Incoming calls override the full-screen Self View layout.
View Stored Camera Presets
You need to be familiar with the stored camera presets to get the most out of your system.
» Navigate to Cameras > Presets.
Icons for presets 0-9 are shown on the screen. A snapshot above the number means that a preset
has been assigned to that number. An empty box means that no preset has been assigned to that
number.
Store a Camera Preset
You cannot delete a preset. Instead, overwrite an existing preset with a new camera position.
1 If you are in a call, press .
On the local interface, navigate to Cameras > Presets.
2 Select Near or Far camera.
3 If you selected a camera that supports electronic pan, tilt, and zoom, you can adjust the camera's
position using your remote control:
Press or to zoom the camera out or in.
Press the directional buttons to move the camera up, down, left, or right.
4 To store a preset position, press and hold a number from 0 to 9 for five seconds.
Any existing preset stored at the number you entered is replaced.
Polycom, Inc. 30
Page 43

Using a Polycom RealPresence Group Series Remote Control
TASK
TASK
TASK
Move the Camera to a Stored Preset
After you have your presets stored, move the camera to one of the stored presets.
1 If you are in a call, press Select on the remote control to switch between a near-end site (Your
Camera) or far-end site (Their Camera) camera.
2 Press a number on the remote control.
Call Answering Settings
To change the way calls are answered, you might want to change the default settings of your system.
Temporarily Refuse Calls
If your system administrator has allowed you access, you can automatically refuse incoming calls when you
do not want to be disturbed.
Callers get a message that the call was rejected, and you receive no notification about incoming calls. You
can, however, make outgoing calls.
1 Navigate to Settings > User Settings > Meetings.
2 Set Auto Answer Point-to-Point Video or Auto Answer Multipoint Video to Do Not Disturb.
Enable Answering Video Calls Automatically
If your system administrator has allowed access to user settings, you can specify whether to answer video
calls automatically or to have the system announce incoming video calls and wait for you to answer manually.
Caution: Automatically answering calls is convenient, but it can create security issue s. An un ex pe ct ed
caller could interrupt a meeting in progre ss or look at equipment and notes left in an empty room.
1 Navigate to Settings > User Settings > Meetings.
2 Set Auto Answer Point-to-Point Video or Auto Answer Multipoint Video to Yes.
Mute Automatically Answered Video Calls
If your system administrator has allowed access to user settings, you can choose wh ether to mute the audio
when automatically answered video calls connect.
This prevents callers from overhearing conversations or meetings.
Note: If you enable automatic muting during a call, the audio for the current meeting is not affected.
Polycom, Inc. 31
Page 44
Using a Polycom RealPresence Group Series Remote Control
TASK
TASK
1 Navigate to Settings > User Settings > Meetings.
2 Select Mute Auto Answer Calls.
After a call connects, press on the remote control when you're re ady to unmute the microphones.
When a call is muted, this icon displays on your monitor.
Encryption and Security
If encryption is enabled on the system, a locked padlock appears on the monitor screen when a call
is encrypted.
If a call is not encrypted, an open padlock appears on the monitor screen.
● If you are in a point-to-point call or a multipoint call hosted by another system, the padlock icon
displays the state of your individual connection.
● If you are hosting a multipoint call, the padlock icon displays the combined state of all connections:
encrypted if all connections in the call are encrypted, unencrypted if one or more connections in the
call are not encrypted.
In one call, some connections might be encrypted while others are not. However, the padlock icon might not
accurately indicate whether the call is encrypted if the call is cascaded or includes an audi o-only endp oint.
If encryption is required on your system, the far end must support encryption or the call will not be
completed.
Note: To avoid security risks, Polycom recommends that all participants communicate the state of their
padlock icons verbally at the beginning of a call.
Verify Encryption Check Code
T o provide extra security for encr ypted H.323 calls, the RealPresence Group system provides an encryption
check code. Participants in a call can use this check code to verify that their call is not being intercepted by
a third party. This mechanism is most useful for point-to-point calling.
The check code is a 16-digit hexadecimal number that is calculated so that the number is the same at both
sites in the call. The numbers are identical if, and only if, the calculation uses data exclusively from the two
sites in the call, with no data being intercepted and modified by a thir d par ty. Note that in externally-hosted
multipoint calls, check code numbers do not match any other numbers in the call.
Polycom recommends verifying check codes at each site to protect against third-party eavesdropping on
H.323 point-to-point calls.
1 Place an encrypted H.323 point-to-point call.
2 Press on your remote control, then navigate to > Settings > System Information >
Call Statistics.
3 On the Call screen, select View Call Statistics.
4 At Call Encryption, locate the 16-digit check code as in the following example:
ABC-123/ab-1234 /1a2b34c99009d66e
Polycom, Inc. 32
Page 45

Using a Polycom RealPresence Group Series Remote Control
TASK
5 Verbally verify that the check code is the same at both sites.
6 Do one of the following:
If the codes match, the call is secure. Proceed with the call.
If the codes do not match, the call might be compromised. Hang up the call and contact your
system administrator.
Change the Call Security Level
When enabled by your administrator, visual security classification works for SIP calls in a BroadSoft environment.
This feature helps participants remain conscious of the maximum level of classified information that can be
safely exchanged in a conversation. After a call begins, the Visual Security Classification indication of the
call displays on all endpoint monitors in the call. During a call, you can override the security classification
and assign a lower security classification level.
While you can change the security level, you cannot raise the it higher than the default setting.
1 In the local interface, navigate to Call > Security.
2 From the Security Classification list, select the desired security level.
3 Click Continue to confirm your selection. After the security classification is raised or lowered, a
message displays for five seconds to all video participants. The change is only applicable to the
current call.
Troubleshooting
Y our administrator is availa ble to assist you when you encoun ter difficul ties. If you are having any problems
making a call, try the following troubleshooting tips first.
Make a Test Call
To troubleshoot any issues making video calls, call a Polycom video site to test your setup.
A list of worldwide test numbers is available at www.polycom.com/videotest.
When placing test calls, try these ideas:
● Make sure the number you dialed is correct, then try the call again. For e xample , you migh t nee d to
dial 9 for an outside line or include a long distance access or country code.
● To find out if the problem exists in your system, ask the person you were trying to reach to call you
instead.
● Find out if the system you are calling is powered on and is functioning properly.
● If you can make calls but not receive them, make sure that your system is configured with the correct
number.
If you are not able to make test calls successfully and you have verified that the equipment is installed and
set up correctly, contact your administrator for further assistance.
Polycom, Inc. 33
Page 46
Using a Polycom RealPresence Group Series Remote Control
TASK
TASK
TASK
TASK
System Information
Note that your administrator might ask you for the system serial number, software version, any active alert
messages, and other information .
Locate the System Serial Number
Y ou can view the system serial number , which is 14 digits, on the local interface of the RealPresence Group
system. The serial number is also available on the back of the system.
1 From the Home scre en , pr es s .
2 Navigate to Settings > System Information.
3 Select Information.
View Self Test Warnings
If any warnings occur during the test sequence, use the remote control to view them after the system starts.
1 From the Home scre en , pr es s .
2 Navigate to Settings > System Information > Status > Active Alerts.
For more details, use the remote control to select More Information. If a severe error occurs during
startup, the system does not power on. Contact Polycom your administrator.
Locate the Software Version
You can view the software version on the local interface of the RealPresence Group system.
1 From the Home scre en , pr es s .
2 Navigate to Settings > System Information.
3 Select Inf ormation.
Locate Active Alert Messages
You can view the active alert messages on the local interface of the RealPresence Group system.
1 From the Home scre en , pr es s .
2 Navigate to Settings > System Information.
3 Select Status.
Polycom, Inc. 34
Page 47
Using a Polycom RealPresence Group Series Remote Control
TASK
TASK
TASK
Locate the IP Address and H.323 Extension Settings
You can view IP Address and H.323 extension settings on the local interface of the RealPresence Group
system.
1 From the Home scre en , pr es s .
2 Navigate to Settings > System Information.
3 Select Information.
Locate the LAN Status
You can view the LAN status on the local interface of the RealPresence Group system.
1 From the Home scre en , pr es s .
2 Navigate to Settings > System Information.
3 Select Status > LAN.
Locate Diagnostics
You can view diagnostics on the local interface of the RealPresence Group system.
1 From the Home scre en , pr es s .
2 Navigate to Settings > System Information.
3 Select Diagnostics.
Regulatory Notices
Regulatory notices describe safety and legal considerations for using the following Polycom RealPr esence
Group systems:
● Polycom RealPresence Group 300 System (Model: Group 300; Type: P001)
● Polycom RealPresence Group 310 System (Model: Group 310; Type: P001)
● Polycom RealPresence Group 500 System (Model: Group 500; Type: P001)
● Polycom RealPresence Group 700 System (Model: Group 700; Type: P002)
For more regulatory information, refer to Polycom RealPresence Group Series Regulatory Notices at
support.polycom.com.
Caution: If you have an EagleEye Acoustic camera, be sure to use it only with UL-approved Information
Technology Equipment (ITE) or similarly approved equipment.
Polycom, Inc. 35
Page 48

Using the Touch User Interface
RealPresence Group systems now have touch user interface capability when connected to touch-capable
monitors. This interface works with both your RealPresence Grou p series remote control and by touch. You
can use the touch interface to control the RealPresence Group system, the VisualBoard application, or to
manage Microsoft Lync or Skype for Business remote desktop content.
Your administrator sets up the touch-capable monitors for use.
This section includes the following topics:
● “Contacts” on page 36
● “Contacts” on page 37
● “Calling” on page 38
● “Content” on page 45
● “Recording Calls” on page 49
● “Settings” on page 52
● “Troubleshooting” on page 60
Wake the System
After a period of time, the system goes into Power Saving mode and the monitor goes to sleep. You can
wake the system at any time.
» Tap the touch screen to wake the system.
Contacts
The directory on your system stores contact information that you can use to quickly call contacts. Any
contacts that you add to the directory are acce ssib le to everyone at your site who uses the system. Users
at other sites cannot access the contacts on your system.
When a contact is listed in the directory of your system, the system displays the name on the screen when
receiving an incoming call. If a contact that is not listed in the directory calls, the dialing information for th at
contact displays, and you can choose to save the information in the directory when the call ends.
Your system supports up to 2,000 contacts, or an unlimited number of contacts when the system is
registered with Microsoft L ync Server 2013 o r Skype for Business Server 2015. If your system is registered
Polycom, Inc. 36
Page 49

Using the Touch User Interface
TASK
with one of the supported Microsoft servers, you can search the directory, view a list of contacts, view
contact presence states, and call contacts from the directory.
For more information about this and other Microsoft and Polycom interoperability considerations, refer to
the Polycom Unified Communications for Microsoft Environments Deployment Guide.
Contacts
The directory on your system stores contact information that you can use to quickly call contacts. Any
contacts that you add to the directory are acce ssib le to everyone at your site who uses the system. Users
at other sites cannot access the contacts on your system.
When a contact is listed in the directory of your system, the system displays the name on the screen when
receiving an incoming call. If a contact that is not listed in the directory calls, the dialing information for th at
contact displays, and you can choose to save the information in the directory when the call ends.
Your system supports up to 2,000 contacts, or an unlimited number of contacts when the system is
registered with Microsoft L ync Server 2013 o r Skype for Business Server 2015. If your system is registered
with one of the supported Microsoft servers, you can search the directory, view a list of contacts, view
contact presence states, and call contacts from the directory.
For more information about this and other Microsoft and Polycom interoperability considerations, refer to
the Polycom Unified Communications for Microsoft Environments Deployment Guide.
Contact Presence States
If your system is automatically provisioned and registered to a global directory server, your directory might
include default LDAP group members and up to 200 global contacts stored by the presence service.
Polycom systems registered to Microsoft Lync 2013 or Skype for Business Server 2015 in an integrated
environment use the following colors to indicate presence states.
Color Presence
Green Available
Red Busy or Do Not Disturb
Black Offline or Unknown
Yellow Away
Browse the Global Directory
1 Tap Place a Call > Contacts.
2 Select the directory you want to browse.
3 Scroll through th e direc to ry en tr ie s to locate the desired contact.
Polycom, Inc. 37
Page 50

Using the Touch User Interface
TASK
TASK
TASK
Search for Directory Contacts
If you want to call someone who is not in your Favorites or Contacts list, you can perform a directory sear ch
using the contact’s last name.
1 Tap Place a Call, then Contacts.
2 Select the directory you want to search.
3 Tap the onscreen keyboard and enter the name of the contact.
4 Tap Search.
Calling
You can place calls to contacts, join meetings, initiate a multipoint call, and adjust aud io and video settings
during a call.
Y o u can place a call by entering your contact's name or number or by choosing a contact in the directory, a
contact stored as a speed dial, or a recent contact. You can also add a call to a call and hold a call while
you place another call.
Call by Entering a Name or Number
When you place a call, you can enter a contact's name or number using the onscreen keyboard.
Depending on the capabilities of the solution and the system you are calling, the dialing information you
enter could be similar to one of the following examples:
● IPv4 address: 10.11.12.13
● E.164 extension for H.323 or SIP: 2555
● Host name: stereo.polycom.com
● SIP address: [email protected]
1 On the Home screen, tap Place a Call. The Place a Call screen displays with the onscreen
numeric keyboard.
2 Enter your contact's information using the onscreen numeric keyboard, or tap the Onscreen
Keyboard and enter your contact's information.
3 Tap .
Call from the Contacts Screen
If your system administrator has added directory and contacts, you can view your favorites and search for
contacts registered to the same Global Directory Server.
1 Tap Place a Call > Contacts.
Polycom, Inc. 38
Page 51

Using the Touch User Interface
TASK
TASK
2 Do one of the following:
Select a contact from the list of contacts.
Tap a group and select a contact.
Using the onscreen keyboard, enter your contact's name and tap your contact in the search
results.
3 Tap Call.
Call from the Recent Calls List
You can quickly choose a number to call from the Recent Calls list. The Recent Calls list includes the most
recent incoming and outgoing calls.
1 Tap Place a Call and tap Recent.
2 Tap a recent outgoing or incoming call.
Call a Speed Dial Entry
Your administrator can save a list of contacts as speed dials, which enables you to quickly call and start a
meeting with a contact.
1 Tap Place a Call and tap Speed Dial.
A list of contacts added as speed dials is displayed.
2 Tap a speed dial contact.
Answer a Call
If the system is not set to answer calls automatically, you can choose to answer or ignore an incoming call.
» Tap Answer.
Answer a Call during a Call
When you receive an incoming call during a point-to-point call , you can choose to place the curren t call on
hold or hang up the current call and answer the incoming call.
» Do one of the following:
Tap Hold + Answer.
Tap Hang Up + Answer.
Ignore a Call
If you do not want to answer an incoming call when you are in a call or not in a call, you can choose to ignor e
the incoming call.
Polycom, Inc. 39
Page 52
Using the Touch User Interface
TASK
TASK
TASK
» Tap Ignore.
Hold a Call
You can place a point-to-point call on hold, and then answer an incoming call, make an outgoing call, or
switch between two calls.
» Tap to open the Quick Access menu then tap More > Hold.
Hold a Call and Place a Call
You can place your current call on hold and place a call to another contact.
1 Tap to open the Quick Access menu, then tap More > Hold.
2 Tap to open the Quick Access menu, then tap More > Place a Call.
3 Enter a contact's number or select a contact from Contacts, Speed Dial, or Recent.
Hold a Call and Answer a Call
If you receive an incoming call during an active call, you can hold and ans wer. The previous call is placed
on hold and incoming call is active.
» From the incoming call options, select Hold + Answer.
Resume a Call
When you no longer want to keep a call on hold, you can resume the held call.
1 Tap to open the Quick Access menu.
2 Tap More > Resume.
Switch Between Calls
When you have a call on hold, you can switch between the held and active calls.
1 Tap to open the Quick Access menu.
2 TapSwitch.
Hang Up a Call and Answer a Call
When Auto Answer Point-to-Point Video is set to No, you can end an active call and answer an incoming
call. Held calls will remain on hold until resumed.
» From the incoming call options, select Hang Up + Answer.
Polycom, Inc. 40
Page 53

Using the Touch User Interface
TASK
TASK
End a Call
You can end a call using the RealPresence Touch.
» To end a call, tap Hang Up.
Multipoint Conference Calls
Conference, or multipoint, calls involve at least three different endpoints.
During a multipoint call, multiple sites can see and hear each other. You can also share content in a
multipoint call, just as you can in a point-to-point call.
All systems can participate in multipoint calls. To host multipoint calls, your administrator must install the
multipoint video option key . You can host multipoint calls using a video conferencing system with multipoint
capabilities, or you can use a bridge, such as the RealPresence
Note: You cannot host multipoint video calls on RealPresence Group 300 and 310 systems.
How you place a multipoint call depends on whether you're using a RealPresence Group syste m or brid ge
with multipoint capabilities. The number of sites allowed in the call is determined by the capabilities of the
system or bridge hosting the call.
®
Collaboration Server 800s.
Place a Multipoint Call
To start a new multipoint call, you need to start with the first participant or site and add other participants
after each participant answers the call.
1 Call the first site.
2 After the call connects, tap to open the Quick Access menu then tap More > Add a Call.
3 On the Place a Call screen, enter your contacts number, tap and enter your contact's name, or
select a contact from Contacts, Speed Dial, or Recent.
4 Repeat the above steps until all sites are connected.
Place a Call during a Multipoint Call
If you need to, you can hold the multipoint call and place a new call.
1 Tap to open the Quick Access menu then tap More > Hold.
2 Tap More > Place a Call and place the call using your preferred method.
Incoming Call Handling of Multipoint Conference Calls
When the system is in a call, regardless of whether the system has multipoint capability, incoming calls are
handled in one of three ways.
● Automatically answered: The incoming call is automatically added to the conference call. No
notification appears.
Polycom, Inc. 41
Page 54

Using the Touch User Interface
TASK
TASK
TASK
● Manually answered: You can select Ignore, Hold+Answer, or Hang up+Answer.
● Declined: The system declines incoming calls. No notification appe ars, but th e de clin ed syste m
receives a notification.
Answer an Incoming Call during a Multipoint Call
While in a multipoint conference call, you can choose to hold the conference call and answer an incoming
call.
» Tap Hold + Answer to hold the current call and answ er the incom in g ca ll.
Add an Incoming Call to a Multipoint Call
When you receive an incoming call, you can add the call to the active multipoint call.
» When you receive an incoming call, tap Add to Call on the incoming call notification.
Hold a Multipoint Conference Call
You can place a multipoint conference call on hold to answer an incoming call or place a call to another
contact. You cannot hold an individual participant in a mu ltipoint conference.
» Tap to open the Quick Access menu then tap More > Hold.
Leave a Multipoint Call
You can choose to leave a multipoint call without ending the call for all participants.
1 Tap to open the Quick Access menu then tap Hang Up.
2 On the Active Call screen, tap Leave Conference.
Hang Up an Individual Call in a Multipoint Call
In a multipoint call, you can hang up calls individually.
1 Tap to open the Quick Access menu then tap Hang Up.
2 On the Active Call screen, tap Hang Up for the call that you want to hang up.
Hang Up All Calls
In a multipoint conference call, you can hang up all of the calls at once.
1 Tap to open the Quick Access menu then tap Hang Up.
2 On the Active Call screen, tap Hang Up at the top of the screen above the list of individual calls.
Polycom, Inc. 42
Page 55

Using the Touch User Interface
TASK
TASK
Passwords for Multipoint Calls
You might be required to enter a meeting password to join a multipoint call.
In addition, you can require that far-end systems enter a meeting password to prevent unauthorized
participants from joining multipoint calls hosted by your RealPresence Group system.
Keep the following points in mind regarding meeting passwords:
● Do not set a meeting password if multipoint calls include audio-o nly endpoints. Audio-on ly endpoints
are unable to participate in password-protected calls.
● Microsoft Office Communicator clients are unable to join password-protected multipoint calls.
● SIP endpoints are unable to dial in to password-protected multipoint calls.
Enter a Meeting Password
If a meeting password is set, you are prompted to enter a meeting password before you can join the
multipoint call.
1 Tap to open the Quick Access menu then tap More > Touch Tones.
2 Enter the meeting password using the onscreen keypad.
Set a Meeting Password
You can set up a meeting password for a multipoint call to control who is allowed to enter the call.
1 On the Home screen, tap to open the Quick Access menu, tap More > Settings then tap
User Settings.
2 On the User Settings screen, tap Meetings.
3 On the Meetings screen, tap Meting Password and enter a password to be used for all meetings.
Microsoft Meetings
If your system is deployed in a Lync Server 2013 or Skype for Business 2015 environment, you can place
and participate in multipoint calls that are hosted by Microsoft audio and video servers.
RealPresence Group systems can connect to Microsoft Exchange Server 2013 and retrieve calendar
information associated with a Microsoft Outlook or Microsoft Office 365 account. If the Home screen does
not display calendar information, the system is not registered with the Microsoft Exchan ge Server. Contact
your administrator to register the system.
Note: Endpoints using Microsoft Office 365 accounts must be SIP-re gistered to Microsoft Lync 2013 or
Skype for Business Server 2015 in order to join calendar meetings.
Polycom, Inc. 43
Page 56

Using the Touch User Interface
TASK
TASK
TASK
Join Meetings from the Calendar
When the is configured to connect to Microsoft Exchange Server, you can view and join meetings you
scheduled with the solution on the Home screen and on the Calendar. You can join a meeting from the
Calendar on the Home screen or in the Place a Call screen.
» Do one of the following:
On the Home screen, tap a meeting displayed at the top of the screen and tap Join.
Tap Join in the Meeting Reminder that displays before the start of a meeting.
On the Home screen, tap Place a Call > Calendar and tap Join for the upcoming meeting.
Tap Place a Call > Calendar, tap a meeting, and enter the meeting number.
View Meeting Details
You can view the details for all upcoming meetings scheduled with the room system on the Calendar.
1 Tap Place a Call > Calendar.
2 Select an upcoming meeting.
The details for the meeting displays with the location, organizer and participants, and all the number s
you can use to join the meeting.
Microsoft Conference Calls
If your system is deployed in a Lync Server 2013 or Skype for Business 2015 environment, you can place
and participate in multipoint calls that are hosted by Microsoft audio and video servers.
Initiate a Microsoft Conference
Y ou can initiate a conference and add par ticipants to the conference. After the call is underway , you can add
additional participants to the call.
1 From the Call screen, tap to open the Quick Access menu then tap Conference.
2 Create a list of participants from Contacts, Speed Dials, and Recent contacts you want to add to the
call.
3 To initiate the conference call, tap Join when your list of participants is complete.
Add Participants to a Microsoft Conference Call
Y ou can add additional participants to a conference call without putting other participants on hold, although
you might experience a brief audio or vid eo pause. You can add participants to the call using the keypad or
select participants from the Contacts, Speed Dials, or Recent contacts.
1 From the Call screen, tap to open the Quick Access menu then tap More > Add Partici-
pant.
2 Enter a number to call, or choose a contact from Recent, Speed Dial, or Contacts.
Polycom, Inc. 44
Page 57

Using the Touch User Interface
TASK
TASK
Content
Y o u can show one conten t source and one people vide o source at a time, and yo u can switch to a dif ferent
type of content or people video source if you need to. Participants at other sites can also show content or
people video sources. If a contact starts sharing conten t, that content overrides any content currently being
shared.
When you are sharing content, a message displays on the monitors. You can show the following types of
content to far-end systems you are in a call with any of the following:
● Content sent using the Polycom
● Content annotated in the VisualBoard application
● Any information stored on a computer or USB flash drive connected directly to the system
● Content sent using the SmartPairing feature in Polycom
Mobile applications. For information on using SmartPairing, r efer to the RealPr esence Desktop an d
RealPresence Mobile documentation at support.polycom.com.
You can also receive and annotate content from a Lync or Skype for Business client.
®
People+Content™ IP application (installed on a computer)
®
RealPresence® Desktop or RealPresence®
Polycom People+Content IP
The People+Content IP application enables you to send content from a computer that is not connected
directly to the system using the system's IP address.
Keep the following points in mind about People+Content IP:
● People+Content IP provides video-only content; no audio is shared.
● People+Content IP supports any computer desktop resolution with color set to 16 bits or higher.
● People+Content IP scales the content image to 1024x768 or 1280x720 regardless of your computer's
resolution settings.
Download and Install People+Content IP
You need to download and install the People+Content IP application on a computer before you can use it
to show content.
1 On a computer, go to the Polycom People+Content IP page.
2 Under Resources, download the People+Content IP software for Mac or PC.
3 Extract the contents of the .zip file and launch the installer. Follow the instructions in the installation
wizard.
Share Content with People+Content IP
After you download and install People+Content IP, you are ready to share content.
1 On your computer, launch the application.
Polycom, Inc. 45
Page 58

Using the Touch User Interface
2 Enter the IP address or host name of the RealPresence Group system and the meeting password, if
one is set.
You can find your IP address by pressing the on the remote control.
3 Click Connect.
4 Open the content you want to show, and click .
Stop Sharing Content with People+Content IP
When you are done showing content, shut down People+Content IP.
» Click in the People+Content IP application.
VisualBoard
The VisualBoard application enables you to show and annotate content in real time on the using the
touchscreen monitors. You can use the VisualBoard application in a call and out of a call. When using a
touchscreen monitor, you can annotate content using your finger, a stylus, or a connected USB mouse.
Refer to the Polycom VisualBoard Technology Application User Guide for more information on using the
VisualBoard application.
Access VisualBoard When Not in a Call
When you are not in a call, you can access the VisualBoard ap plication to show and annotate content. When
you open the VisualBoard application, a blackboard disp la ys by defa u l t.
» Tap Content > VisualBoard.
Access VisualBoard in a Call
You can show annotate content during a call using the VisualBoard application. When you open the
VisualBoard application, a blackboard displa ys by default.
» Tap to open the Quick Access menu then tap Content > VisualBoard.
Create a New Whiteboard or Blackboard
When you need to create a new whiteboard or blackboard, the previous board is saved automatically if a
USB is connected to the system.
» Tap or .
Annotate Content with VisualBoard
When you can use the VisualBoard application to annotate content displayed in the meeting.
» Do one of the following:
Use the Arrow Pointer to point to sections of the displayed content.
Select the color and thickness of a line to write or draw on the content.
Polycom, Inc. 46
Page 59
Using the Touch User Interface
Undo Annotations
You can undo a previous annotation or undo all annotatio ns at one time.
» Do one of the following:
Tap to undo the last annotation made.
Tap and hold to undo all annotations made.
Erase Annotations
You can erase a previous annotation or erase all annot ations at one time. When you erase an annotation,
you cannot undo the deletion.
» Do one of the following:
Tap to undo the last annotation made.
Tap and hold to undo all annotations made.
Exit VisualBoard
When you are done using the VisualBoard application, exit the application.
» Tap .
Sharing Content from a Laptop or Tablet
Before you prepare to show content, make sure the laptop or tablet is powered on and connected to the
system. You can connect a computer using the HDMI or VGA video input.
Content Source Resolutions and Refresh Rates
Before you show content, check that the laptop or tablet video output is configured to use one of these
supported resolutions and refresh rate s.
For best video quality, use refresh rates of 60 Hz or less.
Resolution Refresh rates (Hz)
800 x 600 56, 60, 72, 75, 85
1024 x 768 60, 70, 75, 85
1280 x 720 50, 60
1280 x 768 60
1280 x 1024 60, 75
1600 x 1200 60
1680 x 1050 60
1920 x 1080 60
1920 x 1200 60
Polycom, Inc. 47
Page 60
Using the Touch User Interface
TASK
TASK
TASK
Note: The way you set the resolution and refresh rate differs, depending on the type of operating system
you have. Check your computer manual or help topics for the appropriate steps.
Share Content from a Laptop or Tablet
After you connect a laptop or a tablet to the system using the HDML or VGA video input, you can share
content from it.
1 Tap to open the Quick Access menu.
2 Tap Content, and tap the content source to start showing content.
Note: Audio from the content input is muted unless the content input is selected as a video source.
If both digital and analog inputs are connected, only the digital content is sent. To send analog
content, disconnect both digital and analog inputs, wait 15 seconds, then connect only the analog
input.
Stop Content from a Laptop or Tablet
When you done showing content, make sure to stop sharing content before disconnecting the computer.
» Tap to open the Quick Access menu then tap Content, and tap Stop Content.
Show Content from USB Flash Drive
Y ou can connect a USB flash drive to the and show content from slideshow, PDF or image files on the flash
drive.
If another participant is showing content using People+Content IP to show content, that content must be
stopped before you can show content from a USB drive.
1 Connect the USB device to the USB port on the base of the solution.
2 Tap to open the Quick Access menu, tap Content, and tap the content source to start
showing content.
3 Navigate to the file that you want and select the file.
Stop Content from a USB Flash Drive
When you done showing content, make sure to stop sharing content before disconnecting the USB drive.
1 Tap to open the Quick Access menu.
2 Tap Content, and tap Stop Content.
Polycom, Inc. 48
Page 61

Using the Touch User Interface
TASK
TASK
TASK
Scroll and Zoom Microsoft Content
When a Microsoft Lync 2013 or Skype for Business 2015 client shares content with your system in an active
call, and when a USB mouse is connected to your system, you can scroll and zoom in order to see all the
shared content.
1 Connect a USB mouse to your system.
2 Move the mous e to scr oll an d zoom .
Control Microsoft Content
Microsoft clients must select the specific system to give control to. After a system receives and takes control
of content from the client, the system can open and use shared applications, programs, and files on the
system with the client using a connected USB mouse and keyboard.
Note: Any normal Microsoft feature restrictions apply. For more info rm a tio n, re fe r to th e Mic ro so ft do cu mentation. Password enabled applications, programs, or files remain password enabled when using this
feature.
1 Connect a USB mouse to the system.
2 If you want to use shared applications, programs, and files that require keyboard functions, connect
a USB keyboard to the system.
3 On the local interface, select the Control Remote checkbox. The system now controls the content
received from the Microsoft client.
Return Control of Microsoft Content
You can return control of Microsoft content at any time.
1 Connect a mouse to the system.
2 On the local interface, clear the Control Remote checkbox. The Microsoft client now controls the
shared content. You can still scroll and zoom to see all the shared content.
Recording Calls
Depending on how your system is configured, you can record calls in one or more ways. RealPresence
Group 700 systems allow you to record calls using monitor 3.
If you have a different RealPresence Group system, you can record calls using Polycom RealPresence
Media Suite.
Polycom, Inc. 49
Page 62

Using the Touch User Interface
Manage Recordings with Polycom RealPresence Media Suite
Polycom® RealPresence® Media Suite is an enterprise recording, streaming, and video content
management solution. This solution offers you a self-ser vice portal for recording calls on a room system, or
for turning a room system into a web-cast studio.
RealPresence Media Suite integrates with room systems using the following methods:
● Dial RealPresence Media Suite directly: You can dial into RealPresence Media Suite using the
suite’s IP address, H.323 extension, or SIP URL. When you use this method, the system uses the
default recording settings defined by a RealPresence Media Suite administrator.
● Dial a RealPresence Media Suite Video Recording Room (VRR): A VRR is a virtual Capture
Server with a specific recording profile that is defined by a RealPresence Media Suite administrator.
Before recording a call using this method, you n eed the VRR number and th e IP a ddress, H.323 ID,
or SIP address of the RealPresence Media Suite.
Note: Y ou have immediate access to play a recording back as long as the Media Suite TVUI remains
open. After that, you must access th e RealPresence Media Suite portal to access the recording in the
list of archives where recordings are saved.
Contact your administrator for details on accessing the RealPresence Media Suite User Portal.
RealPresence Media Suite Connection Methods
The following connection methods are supported for dialing RealPresence Media Suite.
Media Suite
T ype Connection Method Example
Media Suite
system
VRR For H.323 calls:
If the room system is not registered to the gatekeeper
or to a SIP server, dial the RealPresence Media Suite
IP address.
If the room system is registered to the gatekeeper, dial
the RealPresence Media Suite E.164 extension for
H.323.
If the room system is registered to a SIP server, dial the
RealPresence Media Suite SIP address.
[RealPresence Media Suite IP]##[VRR number]
or
[RealPresence Media Suite E.164 prefix][VRR number]
For SIP calls:
[VRR number]@[RealPresence Media Suite IP]
or
[SIP peer prefix][VRR number]
10.11.12.13
1234
CS123
If the RealPresence Media Suite IP
is 11 .12.13.14 and the VRR number
is 4096, dial 11.12.13.14##4096.
If the RealPresence Media Suite
E.164 prefix is 8888 and the VRR
number is 4096, dial 88884096.
If the RealPresence Media Suite IP
is 11 .12.13.14 and the VRR number
is 4096, dial [email protected].
If the SIP peer prefix of the
RealPresence Media Suite is 8888
and the VRR number is 4096, dial
88884096.
Polycom, Inc. 50
Page 63

Using the Touch User Interface
TASK
RealPresence Media Suite Touch Tones
Y ou can use e nter touch tones with the touch interface, a to uch device, or remote control to manage the call
recording.
The supported touch tone codes for activating the button controls on the TVUI are listed in this table.
TVUI State Operation Touch Tone Code
Menu display state Pause recording *1
Start a recording
Resume a paused recording
Stop a recording *3
Playback a recording *5
Video playback state Pause the video *1
Start the video
Resume a paused video
Stop a playback and return to the main menu *3
Reverse a video *4
Fast forward a video *6
*2
*2
Record Calls with RealPresence Media Suite
When you establish a connection to a RealPresence Media Suite, the recording starts and the TVUI displays
in a call window. Unless the administrator for the RealPresence Media Suite has disabled the Start
Recording Immediately option, the recording starts immediately after the TVUI displays.
You can use either the touch monitors or the remote control to dial into RealPresence Media Suite and
activate the TVUI.
1 Enter the IP, H.323, or SIP address of the Media Suite.
The TVUI displays in the call window.
2 If the recording does not start immediately, do one of the following to start recording:
Press *2 on the remote control.
Tap to open the Quick Access menu then tap More > Touch Tones and enter *2 on
the onscreen dial pad.
Stop Recording
Before ending a call, make sure to stop the recording.
» Do one of the following:
Press *3 on the remote control.
Tap to open the Quick Access menu, tap More > Touch Tones, and enter *3 on the
onscreen dial pad.
Polycom, Inc. 51
Page 64

Using the Touch User Interface
TASK
TASK
Playback a Recording
You have immediate access to playback a recording as long as the Media Manager TVUI continues to
display and the call hasn't ended. After this time, you can access th e recording in the RealPresence Me dia
Suite portal in a list of archives where recordings are saved. Contact your administrator for information on
accessing the portal.
» Tap to open the Quick Access menu tap More > Touch Tones, and enter *5 on the
onscreen dial pad.
Record Calls with a Laptop or Tablet
On a RealPresence Group 700 system, you can record a call on monitor 3.
Y ou can either record the speaker and content or re cord the speaker only. Y our administrator must configure
the settings for this feature.
1 Power off your RealPresence Group 700 system.
2 Attach an HDMI cable from the HDMI video output on your RealPresence Group system to the
HDMI input on your laptop or tablet.
3 Power on your RealPresence Group system.
4 On the laptop or tablet, use a recording application to record the call.
The layout option for the recorded video is the layout that yo ur administrator configured for Monitor 3.
Record Calls on a DVD or DVR
On a RealPresence Group 700 system, you can record a call on monitor 3.
Y ou can either record the speaker and content or re cord the speaker only. Y our administrator must configure
the settings for this feature.
1 Power off your RealPresence Group 700 system.
2 Attach a VGA cable from the VGA video output on your RealPresence Group system to the VGA
input on your DVD or DVR device.
3 Power on your RealPresence Group system.
4 On the DVD or DVR device, use the record function to record the call.
The layout option for the recorded video is the layout that yo ur administrator configured for Monitor 3.
Settings
Before or during calls, you can adjust audio and video settings, including adjusting th e volu me, muting the
microphone, turning off the camera, and changing the video layout.
Polycom, Inc. 52
Page 65
Using the Touch User Interface
TASK
TASK
TASK
Depending on how the system is set up by your administrator, you can customize administration and user
settings on the system, including the language, time zone, LAN settings, and security settings. If you have
any questions about changing these settings, contact your administrator for assistance.
Adjust for Room Lighting
If your administrator allows access to User Settings, you can adjust the brightness of the video using
Backlight Compensation. Use Backlight Compensation in situations where the subject displays darker than
the background or to darken a bright ba ckground in rooms with high brightness levels. This feature does not
affect the way content is displayed.
1 From the Home screen, tap to open the Quick Access menu, tap More > Settings > User
Settings > Camera.
2 Tap the Backlight Compensation check box.
Call Settings
If your administrator allows access to User Settings, you can choose the way calls are answered or
declined.
Temporarily Refuse Calls
If your administrator allows access to User Settings, you can automatically refuse incoming calls when you
do not want to be disturbed. Callers get a message that the call was rejected, and you receive no notification
about incoming calls. You can still make outgoing calls.
1 Tap to open the Quick Access menu, tap More > Settings then tap User Settings >
Meetings.
2 Set Auto Answer Point-to-Point Video or Auto Answer Multipoint Video to Do Not Disturb.
Answering Video Calls Automatically
If your administrator allows access to User Settings, you can specify whether to answer video calls
automatically or to have the system announce incoming video calls and wait for you to answer manually.
Note: Automatically answering calls is convenient, but it can create security issues. An unexpected caller
could interrupt a meeting in progress or look at equipment and notes left in an empty room.
1 Tap to open the Quick Access menu, tap More > Settings then tap User Settings >
Meetings.
2 Set Auto Answer Point-to-Point Video or Auto Answer Multipoint Video to Yes.
Polycom, Inc. 53
Page 66
Using the Touch User Interface
TASK
TASK
TASK
Configure Automatic Self View Control
If your administrator has allowed you access to set Automatic Self View Control, you can configure this
setting so that other users can display or hide the Self View window.
1 From the Home sc re en, tap to open the Quick Access menu.
2 Do one of the following:
When in a call, tap More > Settings > User Settings > Cameras.
When not in a call, tap Settings > User Settings > Cameras.
3 Select the Automatic Self View checkbox.
Video Adjustments
Besides managing audio and call settings, you can also manage the video and certain user inte rface
settings.
Change the Video Layout
What you see during a multipoint call can vary depending on how the system is set up, th e number of sites
in the call, the number of monitors you are using, and whether content is shared. The multipoint monitor
layout configured on the host system is the one used in the call.
You can change the layout of how video, self view, and content display during a multipoi nt call. The layout
options vary depending on how many participants are in the call and whether content or Self V iew is on.
1 In a call, tap to open the Quick Access menu.
2 To change the near-end layout, tap More > P IP Layout. To change the far-end layout, tap
More > Participant Layout.
3 Select one of the available layouts.
Allow Video Display on the Web
If your administrator allows access to User Settings, you can choose whether to allow others to view the
room where the solution is located or the video stream from calls in which the solution participates.
Note: The default setting is to not allow video display on the web. Be sure to verify whether your system
administrator wants the setting to be changed.
1 Tap to open the Quick Access menu, tap More > Settings then tap User Settings >
Meetings.
2 Tap Allow Video Display on Web.
Polycom, Inc. 54
Page 67
Using the Touch User Interface
TASK
TASK
TASK
Turn Off Self View
Self View shows you the video stream that your contacts see when they are in a call with you. If automatic
self view is not enabled, you can turn off Self View when you do not want to view your video stream.
1 Tap to open the Quick Access menu.
2 Tap Self View Off
Start Sending Video
If your near-end site video is currently not displayed, you can choose to display your video to others in a
conference call.
» Tap to open the Quick Access menu then tap Camera On.
Turn On Self View
Self View shows you the video stream that your contacts see when they are in a call with you. If automatic
self view is not enabled, you can turn Self View on to view the same video stream the far end sees.
1 Tap to open the Quick Access menu.
2 Tap Self View On.
Stop Sending Video
Whether you are in a call or before a call begins, you can tu rn your camera off to stop sending video. Turning
off the camera enables you to stop sending your video stream to contacts while r emaining connected to the
call.
Note: When you stop your video in a Lync environment, video transmission ceases and no Self View
displays. When you stop your video in a non-Ly nc environment, a video pau se im age is se nt to the far en d.
» Tap to open the Quick Access menu then tap Camera Off.
When you stop the video, a video pause icon is displayed.
Switch Between Full Screen Video and the Home Screen
When your call connects, the system automatically shows video in full screen view. You can switch back to
the Home screen during a call if, for example, you need to adjust a user setting and your system is
configured to allow you to do so.
1 Press the Home key on the remote control to go to the Home screen.
2 Press the Back key on the remote control to see the full screen.
Polycom, Inc. 55
Page 68

Using the Touch User Interface
TASK
Multipoint Viewing Modes
The multipoint viewing mode configured on the host system is the one used in the call for all endpoints in
the call.
The default mode is Discussion, however, your administrator might have configured one of the other
modes for your system.
The following table describes the available multipoint viewing modes when a system is hosting the
multipoint call.
Setting Description
Video images from multiple sites can be automatically combined on one monitor in a display known as continuous
presence.
Auto The view switches between continuous presence and full screen, depending
on the interaction between the sites.
If multiple sites are talking at the same time, continuous presence is used. If
one site speaks uninterrupted for at least 15 seconds, that site appears in full
screen on the monitor.
Discussion Multiple sites are displayed in continuous presence. The current speaker's
image is highlighted.
Presentation The speaker sees continuous presence while the other sites see the speaker
in full screen on the monitor.
Full Screen The site that is speaking is shown in full screen to all other sites. The current
speaker sees the previous speaker.
Set the Multipoint Viewing Mode
You might want to change your multipoint viewing mode from the default.
1 Tap to open the Quick Access menu, tap More > Settings then tap User Settings >
Meetings.
2 Select a viewing mode from the Multipoint Mode list.
Camera Presets
Camera presets are stored camera positions that you can create before or during a call.
The system uses preset 0 as the default camera position for all preset camera positions. This default
camera position is zoomed out, panned straight ahead with horizontal tilt.
Presets allow you to do the following:
● Quickly point a camera at pre-defined locations in a room.
● Select a video source such as a document camera or an auxiliary camera.
If your system camera supports pan, tilt, and zoom movement, you can create up to 10 preset camera
positions for the near-end camera. Each preset stores the following information:
● Camera number
Polycom, Inc. 56
Page 69

Using the Touch User Interface
TASK
TASK
TASK
● Camera zoom level
● Direction the camera points
These presets remain in effect until you change them.
If far-end camera control is allowed, you can create 10 presets for the far-end camera. These presets are
saved only for the duration of the call. You might also be able to use presets that were created at the far end
to control the far-end camera.
Keep the following camera control information in mind when using Self View:
● When in a call, selecting near camera control pans and zoo ms the local camera without changing the
layout.
● When out of a call, selecting camera control changes the Self View to full screen.
● Incoming calls override the full-screen Self View layout.
View Stored Presets
When you store a preset, a snapshot of the are a where the camera is pointing is sa ved. You can view snapshots of previously stored presets at any time.
1 Tap to open the Quick Access menu.
2 Tap Presets,
Select a Stored Preset
Using previously stored presets, you can quickly move the position of the camera.
1 Tap to open the Quick Access menu.
2 Tap Presets and select a preset.
Store a Camera Preset
Camera presets are stored on the system until you replace the preset with a new snapshot.
1 Tap Camera >Camera Control, and select the desired camera.
2 Position the camera to take the snapshot.
3 Tap to open the Quick Access menu, then tap Presets. Tap and hold a preset for one second.
After five seconds, a snap shot is taken and set for the camera preset.
Audio Adjustments
You can control several audio settings on the system, including adjusting the volume and muting the
microphone.
Polycom, Inc. 57
Page 70

Using the Touch User Interface
TASK
TASK
TASK
TASK
Adjust the Volume
You can raise or lower the volume while in a call. Changing the volume affects the level of sound you hear
on your system.
1 Tap to open the Quick Access menu then tap Volume.
2 Place your finger on the Volume slider and move your finger to the left to lower the volume and to
the right to raise the volume.
Mute Automatically-Answered Calls
Y ou ca n choose to mute the microphones when a video call is answered automatically. The status indicator
at the base of the solution glows red when the microphones are muted then progressively dim.
1 Tap to open the Quick Access menu, tap More > Settings then tap User Settings >
Meetings.
2 Tap Mute Auto Answer Calls.
3 After the call connects, tap Unmute when you're ready to unmute the microphones.
When a call is muted, the muted microphone icon displays.
Mute the Microphone
Y ou can mute th e microphone at anytime to mute your audio when you do not want the far -site to hear your
conversation. The status indicator at the base of the solution glows red when the microphones are muted
then progressively dims.
Keep the following in mine regarding muting:
● Muting the microphone does not mute a udio coming from any device conne cted to the content audio
inputs.
● The LED indicators at the base of the system are red when the system is muted.
● The microphone might mute when the system automatically answers an incoming call and if the
system is configured to mute auto answered calls.
1 Tap to open the Quick Access menu.
2 Tap Mute.
Unmute the Microphone
You can resume your microphone audio after muting it in order to be heard in a call.
1 Tap to open the Quick Access menu.
» Tap Unmute to resume audio.
Polycom, Inc. 58
Page 71

Using the Touch User Interface
TASK
Encryption and Security
If encryption is enabled on the system, a locked padlock appears on the monitor screen when a call
is encrypted.
If a call is not encrypted, an open padlock appears on the monitor screen.
● If you are in a point-to-point call or a multipoint call hosted by another system, the padlock icon
displays the state of your individual connection.
● If you are hosting a multipoint call, the padlock icon displays the combined state of all connections:
encrypted if all connections in the call are encrypted, unencrypted if one or more connections in the
call are not encrypted.
In one call, some connections might be encrypted while others are not. However, the padlock icon might not
accurately indicate whether the call is encrypted if the call is cascaded or includes an audi o-only endp oint.
If encryption is required on your system, the far end must support encryption or the call will not be
completed.
Note: To avoid security risks, Polycom recommends that all participants communicate the state of their
padlock icons verbally at the beginning of a call.
Verify Encryption Check Code
To provide extra security for encrypted H.323 calls, the RealPresence Centro solution provides an
encryption check code. Participants in a call can use this check code to verify that their call is not being
intercepted by a third party. This mechanism is most useful for point-to-point calling.The check code is a
16-digit hexadecimal number that is calculated so that the number is the same at both sites in the call. The
numbers are identical if, and only if, the calculation uses data exclusively from the two sites in the call, with
no data being intercepted and modified by a third party . Note that in externally-hosted multipoint calls, check
code numbers do not match any other numbers in the call.Polycom recommends verifying check codes at
each site to protect against third-party eavesdropping on H.323 point-to-point calls.
1 Place an encrypted H.323 point-to-point call.
2 T ap to open the Quick Access menu, tap More > Settings then tap System Information
> Call Statistics.
3 On the Call Statistics screen, tap View Call Statistics.
4 For Call Encryption, locate the 16-digit check code as in the follo win g exam p le:
ABC-123/ab-1234 /
1a2b34c99009d66e
5 Verbally verify that the check code is the same at both sites.
6 Do one of the following:
If the codes match, the call is secure. Proceed with the call.
If the codes do not match, the call might be compromised. Hang up the call and contact your
system administrator.
Polycom, Inc. 59
Page 72

Using the Touch User Interface
TASK
Change the Call Security Level
When enabled by your administrator, visual security classification works for SIP calls in a BroadSoft
environment. This feature helps participants remain conscious of the maximum level of classified
information they can safely exchange in a conversation. After a call begins, the Visual Security Classification
indication of the call displays on all endpoint monitors in the call. During a call, you can override the security
classification and assign a lower security classification level.While you can change the security level, you
cannot raise it higher than the default setting.
1 Tap to open the Quick Access menu, tap More > Settings then tap Administration
Settings > Security.
2 From the Security Classification list, select the desired security level.
3 Click Continue to confirm your selection.
After the security classification is raised or lowered, a message displays for five seconds to all video
participants. The change is only applicable to the current call.
Troubleshooting
Y our administrator is availa ble to assist you when you encoun ter difficul ties. If you are having any problems
making a call, try the following troubleshooting tips first.
Make a Test Call
To troubleshoot any issues making video calls, call a Polycom video site to test your setup.
A list of worldwide test numbers is available at www.polycom.com/videotest.
When placing test calls, try these ideas:
● Make sure the number you dialed is correct, then try the call again. For e xample , you migh t nee d to
dial 9 for an outside line or include a long distance access or country code.
● To find out if the problem exists in your system, ask the person you were trying to reach to call you
instead.
● Find out if the system you are calling is powered on and is functioning properly.
● If you can make calls but not receive them, make sure that your system is configured with the correct
number.
If you are not able to make test calls successfully and you have verified that the equipment is installed and
set up correctly, contact your administrator for further assistance.
System Information
Note that your administrator might ask you for the system serial number, software version, any active alert
messages, and other information .
Polycom, Inc. 60
Page 73

Using the Touch User Interface
TASK
Locate the IP Address and H.323 Extension Settings
You can view IP Address and H.323 extension settings on the local interface.
» Tap to open the Quick Access menu, then tap Settings > System Information > Information >
Network.
Locate Diagnostics Information
You can view diagnostics information of the system.
» Tap to open the Quick Access menu, then tap More > Settings > System Information > Diag-
nostics.
View System Health Check Warnings
If any warnings occur during the system health check, you can view them after the system starts.
1 Tap to open the Quick Access menu then tap Settings > System Information > Status > Active
Alerts.
2 For more details, select More Information.
Locate the System Serial Number
You can view the system's 14-digit serial number on the local interface of the .
» Tap to open the Quick Access menu, then tap Settings > System Information > Information >
System Detail.
Locate the Software Version
You can view the software version on the local interface.
» Tap to open the Quick Access menu then tap Settings > System Infor mation > Inform ation >
System Detail.
Locate Active Alert Messages
You can view the active alert messages on the local interface.
» T ap to open the Quick Access menu, then tap Settings > System Information > Status > Act ive
Alerts for messages generated by your system.
Locate the LAN Status
You can view the LAN status on the local interface.
» Tap to open the Quick Access menu, then tap Settings >System Information >Status > LAN.
Polycom, Inc. 61
Page 74
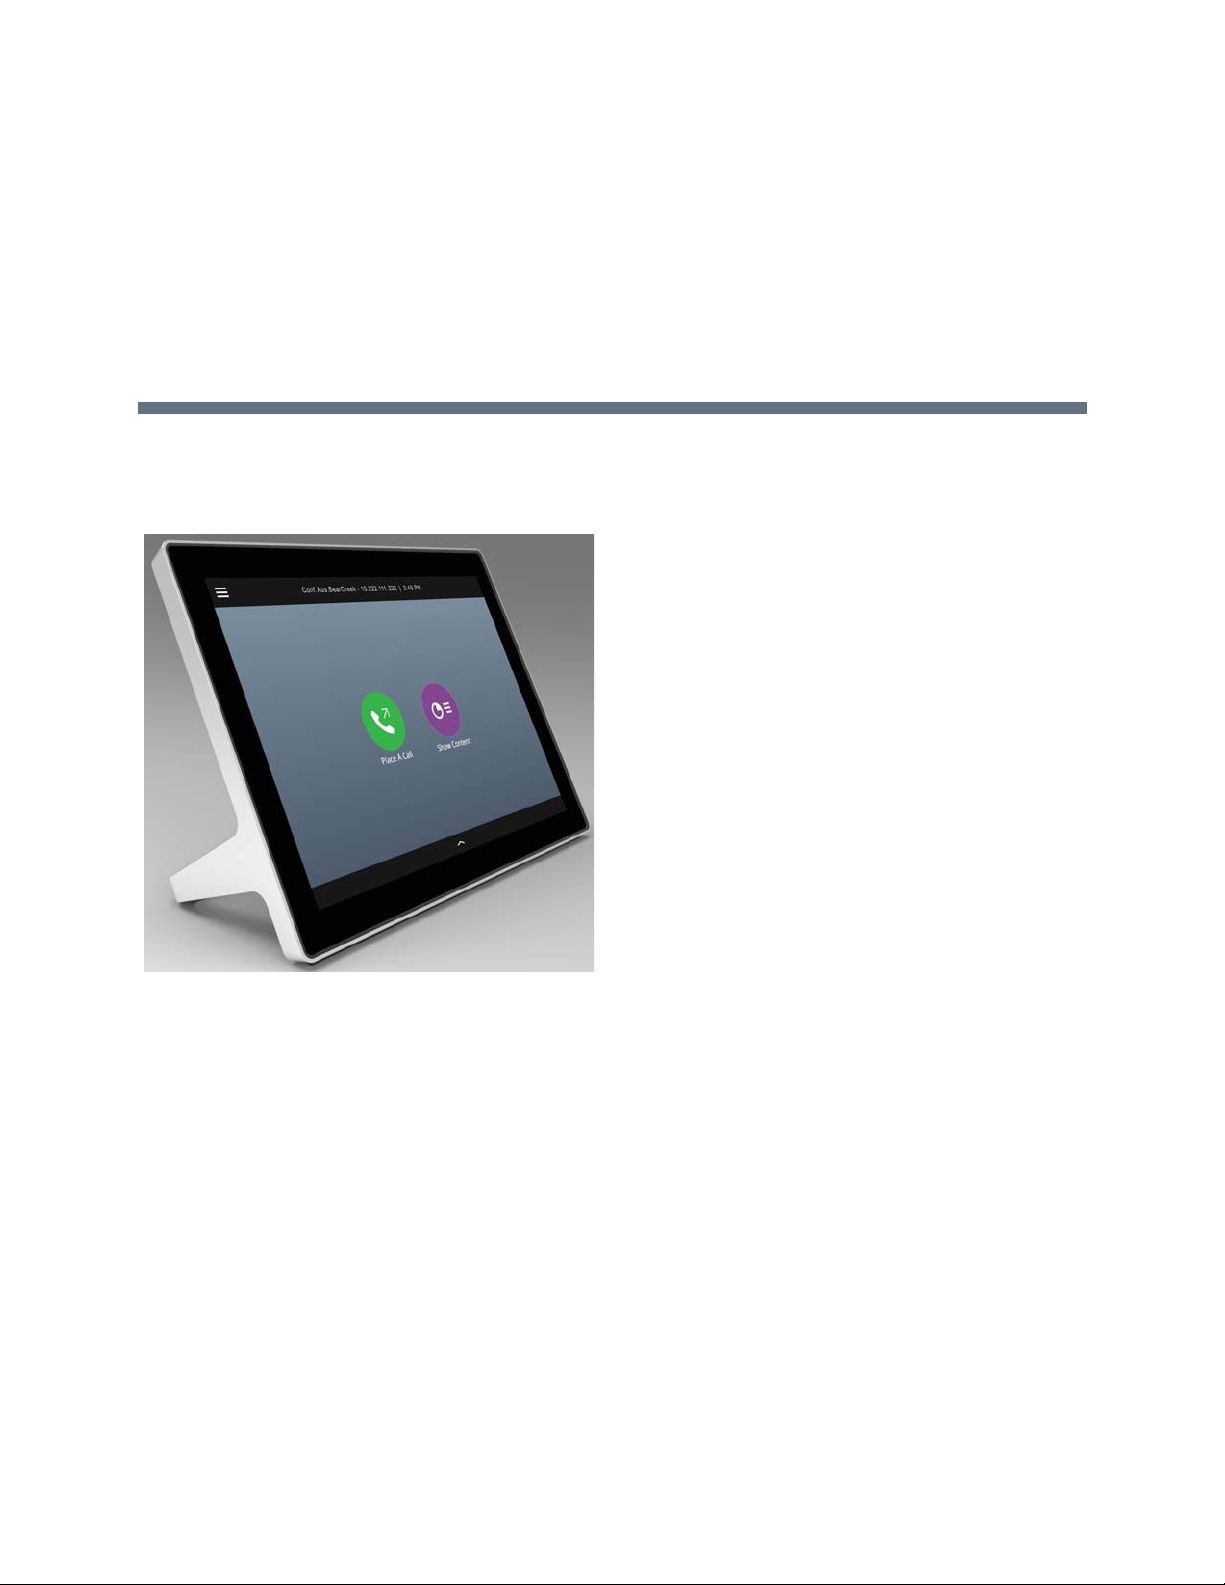
Using a Polycom RealPresence Touch Device
The new Polycom® RealPresence Touch™ graphical interface solution is a highly-intuitive touch control
device that enables you to quickly and easily initiate video conferences.
Besides all of the expected call controls, RealPresence Touch offers a USB port for content input and the
ability to activate the VisualBoard application.
For more information about usingRealPresence Touch for basic tasks, refer to the Polycom RealPresence
Group Series Quick Tips. Your administrator configures and pairs the RealPresence Touch. For assistance
with pairing or other administration tasks, contact your administrator.
This section includes the following topics:
● “Calling” on page 63
● “Content” on page 69
● “Settings” on page 72
● “Troubleshooting” on page 76
Polycom, Inc. 62
Page 75

Using a Polycom RealPresence Touch Device
TASK
TASK
Power On the RealPresence Touch
If you want to use a RealPresence Touch with your RealPresence Group system, you must first power it on.
For detailed instructions, refer to the Polycom RealPresence Touch Control Setup Sheet.
» Connect the Ethernet cable to the RealPresence Touch. The splash screen displays first, and then
the Home screen displays.
Wake a RealPresence Group System
If the RealPresence T ouch has been idle for two minutes or longer, you can easily wake both the de vice and
the RealPresence Group system.
» Tap the RealPresence Touch screen .
Pair a Previously Paired RealPresence Touch and RealPresence Group System
If your connection to a paired RealPresence Group system is lost, you need to pair that system again.
1 After the system is unpaired, you might see a "Searching" message. Tap Cancel.
2 On the Recently Paired tab, tap the RealPresence Group system that you want to pair.
The pairing connection begins, and the Home screen displays when the pairing is successful.
Note: If you unpair from the RealPresence Group system, any current calls on the system are still
active. To hang up the calls, pair to the room system and select , then Participants > ,
and Remove or Remove All.
Calling
There are several ways to initiate calls on the system. You can place a call by entering your contact’s name
or number, by choosing a contact in the directory, or by calling a speed dial or recent contact.
You can perform all of the functions that are available when making conventional calls, plus you can make
multipoint conference calls.
Call Using Contacts
You can select an existing contact from a list and dial the participant.
1 On the Home screen, tap Place a Call, and then tap Contacts.
2 Tap a contact in the contact list.
3 To dial the contact, tap . The dials the contact.
Polycom, Inc. 63
Page 76

Using a Polycom RealPresence Touch Device
TASK
TASK
TASK
TASK
Call by Entering a Name or Number
You can place a direct call by entering the name or number using the RealPr esence Touch.
1 From the Home screen, tap Place a Call.
2 On the Place a Call screen, enter the number or name to call in the input fie ld. To use a keyboard to
enter letters or numbers, tap .
3 T o dial the call, tap .
Call Using Recent Calls
You can select a recent call from a list and dial the participant.
1 On the Home screen, tap Place a Call, and then tap Recent.
2 Specify whether you want to see all calls, recently placed calls, or received calls.
3 Tap a contact in the list. The RealPresence Touch dials the recent contact.
Call Using Speed Dial
If your administrator has enabled Speed Dial and a dded contacts, you can call contacts from the Speed Dial
screen.
1 On the Home screen, tap Place a Call, and then tap Speed Dial.
2 Tap a contact on the Speed Dial screen. The paired RealPresence Group system dials the contact.
Search for Directory Contacts to Call
If you want to call someone who is not in your Contacts list, you can perform a directory search.
1 On any screen, tap Menu, then Place a Call.
2 Tap the Contacts tab.
3 Tap , then enter a name to search.
4 If no records are found, tap Continue Search on the Server.
5 Tap the contact name you want to call in the list.
6 To dial the contact, tap .
Answer a Call
You can choose to answer an incoming call using the RealPresence Touch.
If your administrator has configured your room system to automatically answer point-to-point calls, no actio n
is required.
Polycom, Inc. 64
Page 77

Using a Polycom RealPresence Touch Device
TASK
TASK
TASK
» Touch Answer to answer an incoming call.
Decline a Call
You can choose to decline an incoming call using the RealPresence Touch.
If your administrator has configured your room system to automatically answer point-to-point calls, no action
is required.
» Touch Decline to decline an incoming call.
Hold a Call
While in a call, you might need to hold an active call.
1 On any screen, tap the Control Bar at the bottom of the RealPresence Touch screen to view the
control icons.
2 Tap Hold.
Hold a Call and Answer a Call
While in a point-to-point call, you might need to place the active call on hold and answer an incoming call.
» Tap Hold+Answer.
Hold a Call and Place a Call
You can place a call on hold, and then you dial a new call.
1 Touch Hold to place a participant on hold.
2 Touch Place a Call. Place the call using your preferred meth o d.
Switch Between Calls
You can easily switch between two calls using the RealPresence Touch.
1 When one call is on hold and one call is active, to resume the call on hold, from the Home screen,
tap Manage Calls.
2 Tap Resume to resume the call on hold.
Resume a Call
When you no longer want to have a call on hold, you can resume the call.
● On the Manage Conference screen, under Participants, tap the call you want to resume, then tap
Resume.
● On any other screen, tap Menu, tap Manage Conference, and then tap Resume.
Polycom, Inc. 65
Page 78
Using a Polycom RealPresence Touch Device
TASK
TASK
End a Call
You can end a call using the RealPresence Touch.
» To end a call, tap Hang Up.
Multipoint Conference Calls
Conference, or multipoint, calls involve at least three different endpoints.
During a multipoint call, multiple sites can see and hear each other. You can also share content in a
multipoint call, just as you can in a point-to-point call.
All systems can participate in multipoint calls. To host multipoint calls, your administrator must install the
multipoint video option key . You can host multipoint calls using a video conferencing system with multipoint
capabilities, or you can use a bridge, such as the RealPresence
Note: You cannot host multipoint video calls on RealPresence Group 300 and 310 systems.
How you place a multipoint call depends on whether you're using a RealPresence Group syste m or brid ge
with multipoint capabilities. The number of sites allowed in the call is determined by the capabilities of the
system or bridge hosting the call.
®
Collaboration Server 800s.
Place a Multipoint Call from Recent Calls
You can use the Recent Calls list to include participants in a multipoint conference call.
1 On the Home screen, tap Place a Call.
2 Under Add Participants > Recent Calls, tap a recent contact in the list. The contact now has a
check mark.
3 Repeat the above step until you have selected all of the recent contacts to add to the conference.
4 Tap . The system dials all of the selected contacts.
Place a Multipoint Call from Contacts
You can call contacts to include them as participants in a multipoint conference call.
1 On the Home screen, tap Place a Call, and then tap Contacts.
2 Tap a contact in the contact list.
3 Continue to add the rest of the contacts to the conference list.
4 To dial all of the contacts in the list, tap .
The paired room system dials all of the selected contacts.
Polycom, Inc. 66
Page 79

Using a Polycom RealPresence Touch Device
TASK
TASK
Place a Multipoint Call by Adding Participants
You can add participants to a multipoint conference call.
1 Using your preferred dialing method, call the first site.
2 To dial the next site, do one of the following:
If you are on the monitor layout screen, after the first call connects, tap Add.
On any screen, tap , then tap Back to Call. After the first call connects, tap , then tap Add.
3 Dial the site using your preferred dialing method.
4 Repeat the above steps until all meeting participants have been dialed.
Incoming Call Handling of Multipoint Conference Calls
When the system is in a call, regardless of whether the system has multipoint capability, incoming calls are
handled in one of three ways.
● Automatically answered: The incoming call is automatically added to the conference call. No
notification appears.
● Manually answered: You can select Ignore, Hold+Answer, or Hang up+Answer.
● Declined: The system declines incoming calls. No notification appe ars, but th e de clin ed syste m
receives a notification.
Answer a Call in a Multipoint Conference
While in a multipoint conference call, as a conference host, you can answer an incoming call.
» If an incoming call comes in during in a conference call, do one of the following:
Tap Hold + Answer to hold all of the conference participants and answer the incoming call.
Tap Hang Up and Answer to hang up all of the conference participants and answer th e incoming
call.
Tap Add to Call to allow the incoming call to join the ong oin g co nf er en ce .
Note: If you are a participant in a multipoint conference, you can put your call on hold and the conference
continues. If you are a Microsoft conference participant, you can also put your call on hold and the conference will continue.
Hang Up an Individual Call in a Multipoint Call
You can hang up an individual call in a conference.
1 On the Manage Calls screen, under Participants, select the participant that you wa nt to hang up, tap
, and then tap Remove.
2 From any othe r scr ee n, tap Menu, then Active Call, then in the Participants list, select the call
you want to hang up and tap Remove.
Polycom, Inc. 67
Page 80

Using a Polycom RealPresence Touch Device
TASK
TASK
Hang Up All Calls
You can hang up all calls in a multipoint conference.
» From the Manage Conference screen, ta p Hang Up.
From any other screen, tap Menu, tap Active Call, and then Hang Up.
A Meeting Ended message displays.
Switch Between Calls in a Multipoint Call
Y ou can switch between calls in a multipoint call on the RealPresence Touch. When one call is on hold and
one is active, a Manage Calls button displays on the Monitor Layout screen. Use this button to switch
between calls.
1 Touch Manage Calls to display the Manage Conference screen.
2 Tap the participant that you want to switch to.
Microsoft Meetings
If your system is deployed in a Lync Server 2013 or Skype for Business 2015 environment, you can place
and participate in multipoint calls that are hosted by Microsoft audio and video servers.
RealPresence Group systems can connect to Microsoft Exchange Server 2013 and retrieve calendar
information associated with a Microsoft Outlook or Microsoft Office 365 account. If the Home screen does
not display calendar information, the system is not registered with the Microsoft Exchan ge Server. Contact
your administrator to register the system.
Note: Endpoints using Microsoft Office 365 accounts must be SIP-re gistered to Microsoft Lync 2013 or
Skype for Business Server 2015 in order to join calendar meetings.
Set Up a Meeting Password
You can configure a meeting password to require that far-end systems enter a meeting password; this
prevents unauthorized participants from joining multipoint calls hosted by the paired RealPresence Group
system. Do not set a meeting password if multipoint calls include audio-only endpoints, because audio-only
endpoints cannot participate in password-protected calls. SIP endpoints are unable to dial in to password-protected multipoint calls.
1 On any screen, tap Menu, Settings, then User Settings.
2 Scroll down to Meeting Password.
3 Enter your meeting password, then enter it again to confirm the password.
4 Tap Done, then Save.
5 On the upper left of the screen, tap Done again to exit the screen.
After the password is confirmed, you are returned to the Home screen.
Polycom, Inc. 68
Page 81

Using a Polycom RealPresence Touch Device
TASK
TASK
View Scheduled Meetings on the Calendar
You can view meetings on your calendar on the .
» Go to the Home screen.
At the top of the Home screen, scheduled meetings are listed for the cur rent day and for up to 5 days.
If several meetings occur on the current day, only current day meetings are displayed.
Join a Scheduled Meeting on the Calendar
You might want to join a meeting from your calendar on the RealPresence Touch Home screen.
1 On the Home screen, find the meeting you want to join.
2 Touch Join to call into the meeting.
Join a Meeting in an Overbooked Time Slot on the Calendar
After you select a meeting time on the RealPresence T ouch Calendar that is labeled Overbooked, you must
select a meeting from the list to join.
1 On the Home screen, select an Overbooked time slot on the calendar.
2 Decide which meeting you want to join and tap Join to call into the meeting.
Content
Y ou can show content in video calls a few dif ferent ways. To show people and content at the same time, the
RealPresence Group systems must be configured for content. Besides showing content, you can also
receive and work with Microsoft content when a user initiates a content-sharing request.
You can show the content from the following to the far-end systems:
● Any information stored on a computer connected directly to a RealPresence Group system or a
Polycom touch device
● A DVD or DVR player connected directly to a Polycom system
● Content from the Polycom People+Content™ IP application (installed on a compu ter and connected
to the Polycom RealPresence Group system)
● VisualBoard
This section describes how to share content using a connected computer or People+Content IP. For
instructions on using VisualBoard, refer to the VisualBoard Technology Application User Guide.
If you attempt to display copyright-protected content on the local interface, such as from a DVD or DVR, the
following message is shown on the RealPresence Group system: “This content is protected and cannot be
displayed or shared.” This message appears in a call and out of a call.
Y o u can show one conten t source and one people vide o source at a time, and yo u can switch to a dif ferent
type of content or people video source if you need to. Participants at other sites can also show content or
people video sources. Content shown is from one site at a time ; another site sharing co ntent overrides a ny
content being shared.
Polycom, Inc. 69
Page 82
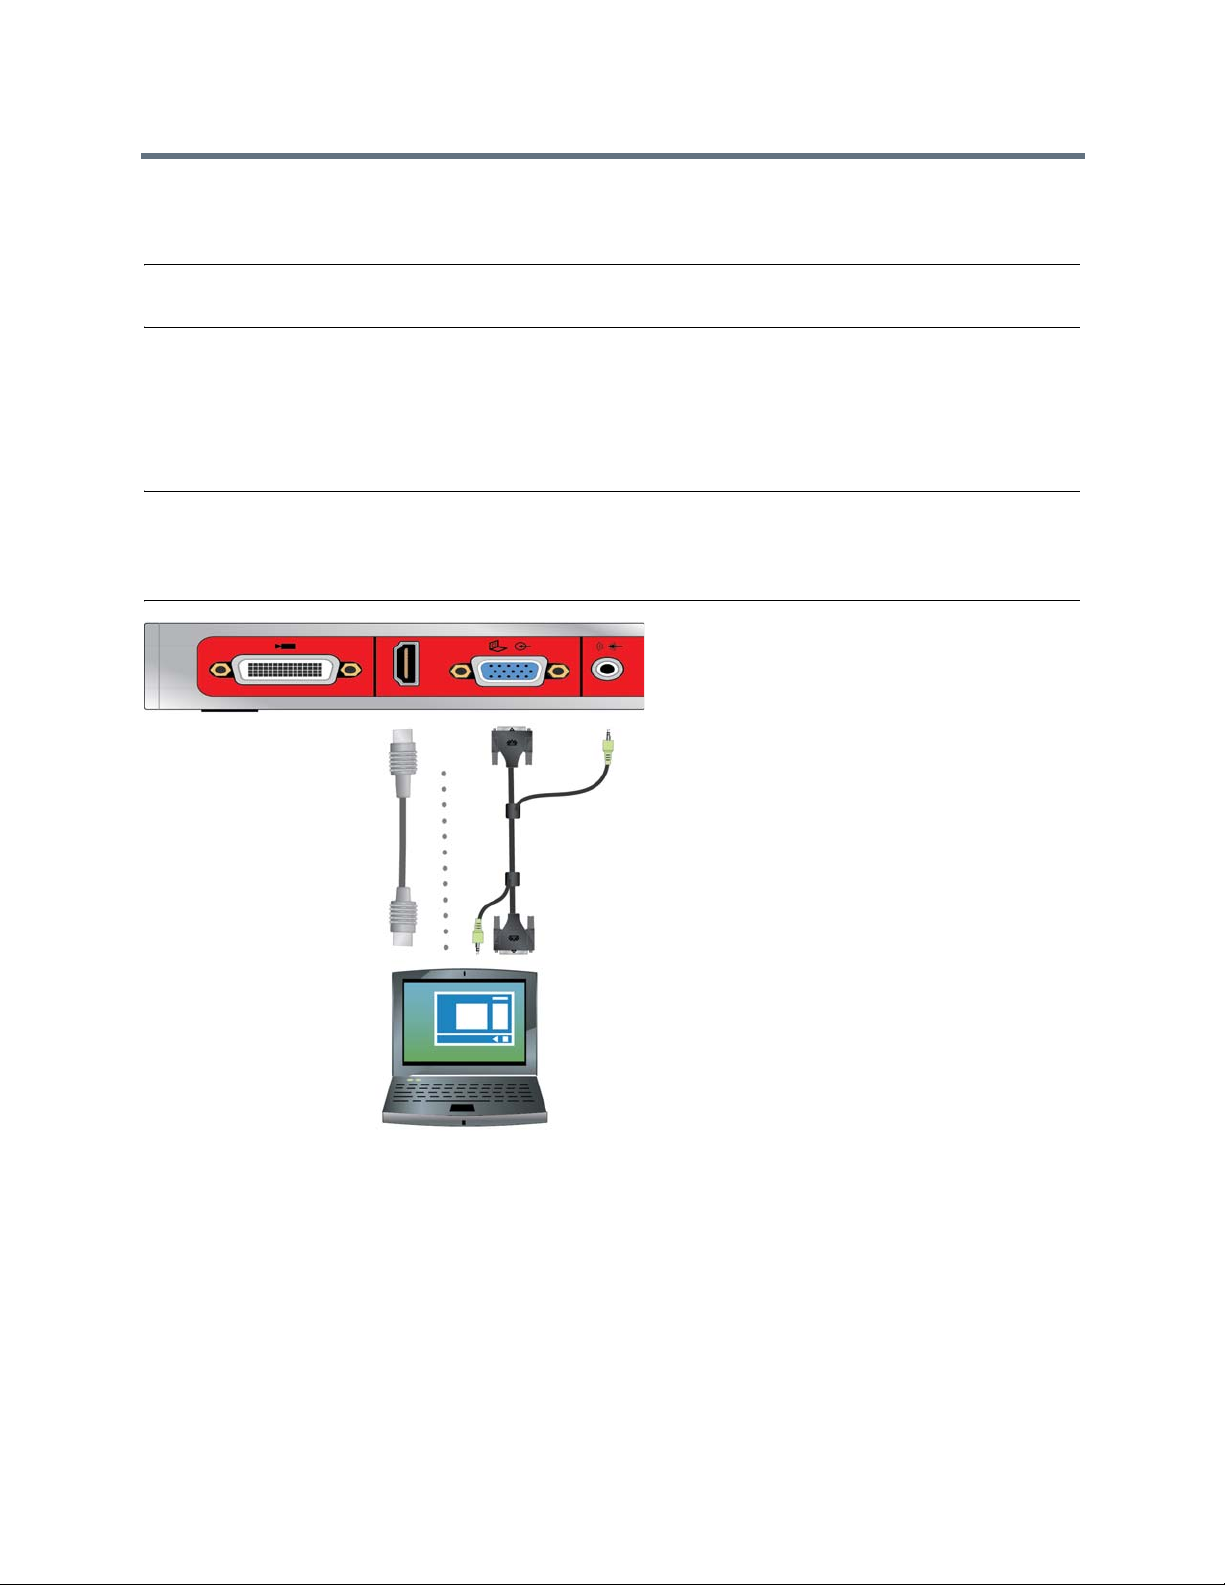
Using a Polycom RealPresence Touch Device
When you are showing content, a message appears on your main monitor. Whether you also see the
content on your monitor depends on how your system is configured.
Note: To show content on a RealPresence Group 300 system, you must use the People+Content IP application.
Content Connections of RealPresence Group Systems
Before you prepare to show content, make sure the computer is powered on and connected to the
RealPresence Group system. You can connect a computer to the HDMI or VGA video input.
Note: Your administrator can enable 3.5mm audio input mixing with HDMI or VGA content inpu t on RealPresence Group systems during active calls. If this feature is not enabled, 3.5 mm audio input is heard by
both the near-end and far-end conference site participants during active calls. For more information about
3.5mm audio input, contact your administrator.
Figure 1: Connections for RealPresence Group 310 and 500 systems
Polycom, Inc. 70
Page 83
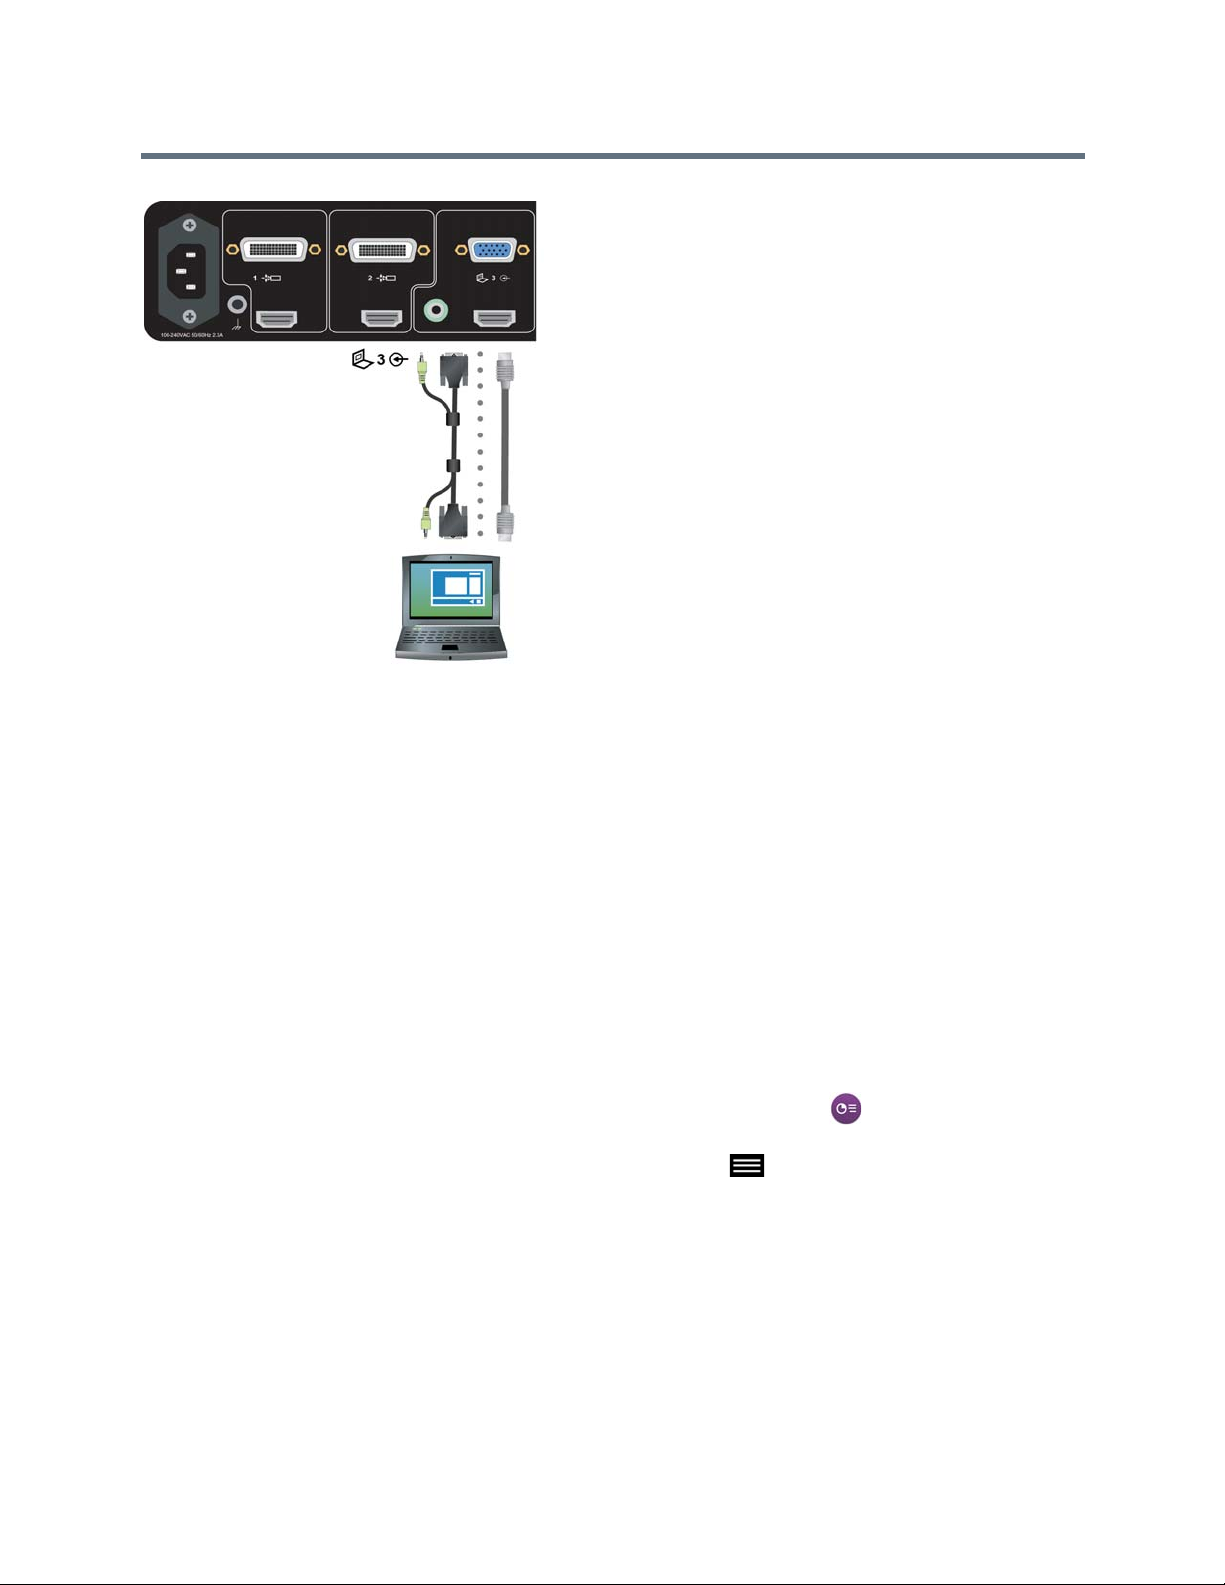
Using a Polycom RealPresence Touch Device
TASK
Figure 2: Connections for a RealPresence Group 700 system
Show Content from a Connected Computer
After you connect a USB cable from your computer to the RealPresence Touch, you can share content from
the computer to the RealPresence Group system monitor display.
The computer does not need a LAN connection for this feature, because content information is sent over
the USB cable connected to the RealPresence Touch. Windows and Macintosh computers are supported.
Content audio is not supported.
1 Connect a compatible USB cable from the RealPresence Touch to your computer.
2 After the USB cable is connec te d, the Peo p le+ Con t ent (PPCIP) application is available on one of
your computer drives, such as E or F.
3 Open the People+ContentIP.exe file to start the application.
4 When you are ready to begin showing content, do one of the following:
Out of a Call: On the RealPresence Touch, from the Home screen, tap Show Content. Then
under People+Content IP, tap Show Content.
In a Call: On the RealPresence Touch, from any screen, tap Menu, Active Call, Content. Then
under People+Content IP, tap Show Content.
Content on your computer is now displaying on the connected room system monitor.
Polycom, Inc. 71
Page 84

Using a Polycom RealPresence Touch Device
TASK
Stop Sharing Content From a Connected Computer
After sharing content from a connected computer , you can choose to stop showing content on the RealPre sence Touch.
» On the RealPresence Touch, under People+Content IP, tap Stop Content.
The content from the connected computer is no longer showing.
Share Content Using VisualBoard
To show content, you can use the RealPresence Touch to launch the VisualBoard application on the paired
room system.
The content displays on the room system monitor, where you can make annotations on the content.
1 To show content using the VisualBoard application, do one of the following:
In a Call: On the RealPresence Touch, from any screen, tap Menu, Active Call, and then
Content.
Out of a Call: On the RealPresence Touch, from the Home screen, tap Show Content.
2 Under VisualBoard, tap Show Content.
The VisualBoard application displays on the paired room system monitor. For information on using
the VisualBoard application to annotate content, refer to Polycom
Application with Polycom
®
RealPresence® Group Series User Guide.
®
VisualBoard™ Technology
Stop Sharing Content From VisualBoard
After sharing content from VisualBoard, you can choose to stop showing content.
» On the RealPresence Touch, under VisualBoard, tap Stop Content.
The content from VisualBoard is no longer showing.
Settings
Before or during calls, you can adjust audio and video settings, including adjusting th e volu me, muting the
microphone, turning off the camera, and changing the video layout.
Depending on how the system is set up by your administrator, you can customize administration and user
settings on the system, including the language, time zone, LAN settings, and security settings. If you have
any questions about changing these settings, contact your administrator for assistance.
Audio Adjustments
You can control several audio settings on the system, including adjusting the volume and muting the
microphone.
Polycom, Inc. 72
Page 85

Using a Polycom RealPresence Touch Device
TASK
TASK
TASK
TASK
TASK
Mute the Microphone
You can mute your microphone and listen to the far-end call audio using the RealPresence Touch.
1 From the Home screen, tap the Control bar at the bottom of the RealPresence Touch screen.
The Control Bar icons display.
2 Tap Mute to mute the microphone.
Unmute the Microphone
You can resume your microphone audio after muting it on the RealPresence Touch.
1 From the Home screen, tap the Control bar at the bottom of the RealPresence Touch screen.
The Control Bar icons display.
2 Tap Unmute.
Adjust the Call Volume
You can control the call volume using the RealPresence Touch.
1 From the Home screen, tap the Control bar.
2 Tap Volume.
Generate Touch Tones
In some environments, you need to use touch tones. You can generate (DTMF) touch tones in a call easily.
1 In a call, tap .
2 Tap Touch Tones.
Video Adjustments
Besides managing audio and call settings, you can also manage the video and certain user inte rface
settings.
Change Monitor Layouts on the RealPresence Touch
You can change monitor layouts during a call.
1 On any screen, tap Menu, then Active Call.
2 Tap Monitor 1, Monitor 2, or Monitor 3.
3 To adjust the near-end layout, tap the PIP Layout tab, or to adjust the far-end layout, tap the
Participant Layout tab.
Polycom, Inc. 73
Page 86

Using a Polycom RealPresence Touch Device
TASK
TASK
TASK
TASK
4 Select a layout from the available choices. Any layout changes are made immediately.
Note: If you are not in a RealPresence
option is PIP Layout. The Participant Layout screen is not available.
®
Collaboration Server (RMX®) system call, your only layout screen
Control the Brightness
You can control the brightness of your screen using the RealPresence Touch.
1 From the Home screen, tap Menu.
2 Tap Settings and then User Settings.
3 Auto Adjust is on by default. To turn Auto Adjust off, touch and drag the slider .
4 After Auto Adjust is turned off, you can manually touch and drag the Brightness slider to the left for
lower brightness, and to the right for higher brightness.
Allow Video Display on the Web
If your administrator has enabled users access to user settings, you can turn on video display on the web.
Note that if this setting is turned on, an administrator can view the video images from meetings using the
RealPresence Group system web interface.
1 Tap User Settings.
2 Under Meetings, ensure that Allow Video Display on Web is turned on.
Turn Off Video Display on the Web
If your administrator has enabled users access to user settings, you can turn off video display o n the web.
Note that if this setting is turned on, an administrator can view the video images from meetings using the
RealPresence Group system web interface.
1 Tap User Settings.
2 Under Meetings, ensure that Allow Video Display on Web is turned off.
Cameras
You can adjust available cameras in several ways.
Select and Adjust a Camera
You might need to select and adjust a near-end or far-end camera using the RealPresence Touch.
1 On any screen, tap the Control bar and select Camera.
2 If you are in a call, you can tap more than one camera, either Near or Far; if you are not in a call,
only the Near local camera is available.
Polycom, Inc. 74
Page 87

Using a Polycom RealPresence Touch Device
TASK
TASK
TASK
TASK
TASK
3 On the Camera Control screen, tap the arrow buttons to pan the camera u p, down, left, or right. Tap
the plus sign to zoom the camera in; tap the minus sign to zoom the camera out.
4 To close the Camera Control screen, tap the X icon.
Turn On Camera Tracking
You can turn EagleEye Director camera tracking on using the RealPresence Touch.
1 In a video call, tap Camera.
2 Under Camera Tracking, touch and drag to On.
Turn Camera Tracking Off
You can turn EagleEye Director camera tracking off using the RealPresence Touch.
1 In a video call, tap Camera.
2 Under Camera Tracking, touch and drag to Off.
Turn On Far End Control of Camera
Y ou m ight need to allow users to control th e Far End Camera Contro l (FECC). FECC specifies whether the
far site can pan, tilt, or zoom the local camera. When this option is selected, a user at the far site can control
the framing and angle of the camera for the best view of the near site.
1 From any screen, tap Menu, then tap User Settings and scroll to Camera.
2 Ensure that the Far Control of Near Camera button is turned on.
Turn Off Far End Control of Camera
Y ou might need to turn of f user control of the Far End Camera Control (FECC). FECC specifies whether the
far site can pan, tilt, or zoom the local camera. When this option is turned off, a user at the far site cannot
control the framing and angle of the camera for the best view of the near site.
1 From any screen, tap Menu, then tap Settings and scroll to Camera.
2 Ensure that the Control of Near Camera button is turned off.
Start Video
You can choose to display your video to others in or out of a call from the RealPresence Touch.
1 From the Home screen, tap the Control bar at the bottom of the RealPresence Touch screen.
The Control Bar icons display.
2 Tap Camera Off to start your video.
Polycom, Inc. 75
Page 88
Using a Polycom RealPresence Touch Device
TASK
TASK
TASK
TASK
Stop Video
You can stop sharing your video whether in or out of a call from the RealPresence Touch.
1 From the Home screen, tap the Control bar at the bottom of the RealPresence Touch screen.
The Control Bar icons display.
2 Tap Camera On to stop your video.
View Camera Presets
Y ou can view stored camera positions on the RealPres ence Touch. Icons for preset positions 0-9 are shown
on the screen. The default position is 0.
1 On any screen, tap the Control bar and select Camera.
2 Tap the Presets tab. The available preset positions display on the RealPresence Touch screen.
Store a Camera Preset
You can store a custom camera position on the RealPresence Touch.
1 On any screen, tap the Control bar and select Camera.
2 Tap Presets.
3 Select a position numbered 0 to 9 by touching and holding one of the presets. The new position
displays immediately. You can optionally enter a label.
4 To close the Presets screen, then tap the X icon.
Select a Stored Preset
Using previously stored presets, you can quickly move the position of the camera.
1 Tap to open the Quick Access menu.
2 Tap Presets and select a preset.
Troubleshooting
Y our administrator is availa ble to assist you when you encoun ter difficul ties. If you are having any problems
making a call, try the following troubleshooting tips first.
Make a Test Call
To troubleshoot any issues making video calls, call a Polycom video site to test your setup.
A list of worldwide test numbers is available at www.polycom.com/videotest.
When placing test calls, try these ideas:
Polycom, Inc. 76
Page 89

Using a Polycom RealPresence Touch Device
TASK
TASK
● Make sure the number you dialed is correct, then try the call again. For e xample , you migh t nee d to
dial 9 for an outside line or include a long distance access or country code.
● To find out if the problem exists in your system, ask the person you were trying to reach to call you
instead.
● Find out if the system you are calling is powered on and is functioning properly.
● If you can make calls but not receive them, make sure that your system is configured with the correct
number.
If you are not able to make test calls successfully and you have verified that the equipment is installed and
set up correctly, contact your administrator for further assistance.
View Device Details for a RealPresence Touch
Y ou might need to view certain device deta ils to perform troubleshooting tests to provide information for your
administrator.
1 On any screen, tap Menu and then Settings.
The System Information screen displays.
2 Under Device Connection Status, tap the RealPresence Touch device name.
Device details are listed for your RealPresence Touch device.
View System Details and Connection Status for a Room System
At times, you need to view certain system details to perform troubl eshooting tests to provide information for
your administrator.
1 On any screen, tap Menu and then Settings.
2 Under Device Connection Status, tap the room system that you want information on.
System details and connection status information is listed for the connected room system.
Locate Company Contact Information
If your administrator has configured the RealPresence Touch device to include your company’s contact
information, you can access it on the device
» From any screen, tap Menu and select Help. The Contact Information screen displays; it
includes a Help Desk phone number, your administrator’s name, and other helpful contact information.
Polycom, Inc. 77
Page 90

Using a Polycom RealPresence Touch Device
TASK
View Call Statistics
During a call, you can view certain call statistics, such as bitrates, compression formats, and packet loss on
the RealPresence Touch.
1 During a call, on any scree n, tap Call Statistics (located at the top left of your screen). Call
statistics for each stream in the current call are now displayed.
2 To view statistics for another call participant, switch to that participant and tap Call Statistics
again.
3 To view more information about a specific stream, navigate to the desired stream and tap .
Polycom, Inc. 78
Page 91

Using a Polycom Touch Control Device
TASK
Polycom Touch Control has a touch screen that allows you to control a RealPresence Group system. You
can use the Polycom Touch Control to place calls, adjust the volume, control the camera, show content, and
select options.
This section includes the following topics:
● “Using the Polycom Touch Control as a Virtual Remote Control” on page 80
● “Calling” on page 81
● “Content” on page 86
● “Recording Calls” on page 91
● “Settings” on page 92
Power On the Polycom Touch Control
If you want to use a Polycom Touch Control with your RealPresence Group system, you must first power it
on.
» To power on the Polycom Touch Control, connect the LAN cable to the underside of the device.
The Home button is lit when the device is powered on.
Wake the RealPresence Group System
The Polycom Touch Control device goes to sleep after 2 minutes of inactivity.
» To wake the Polycom Touch Control, touch the screen. This, in turn, wakes the paired RealPresence
Group system.
Pair a Polycom Touch Control with a RealPresence Group System
Before you make a call using the Polycom Touch Control, you must pair the Polycom Touch Control with a
RealPresence Group system.
After the devices are successfully paired, the remote control no longer has control of the system.
1 Do one of the following:
Polycom, Inc. 79
Page 92
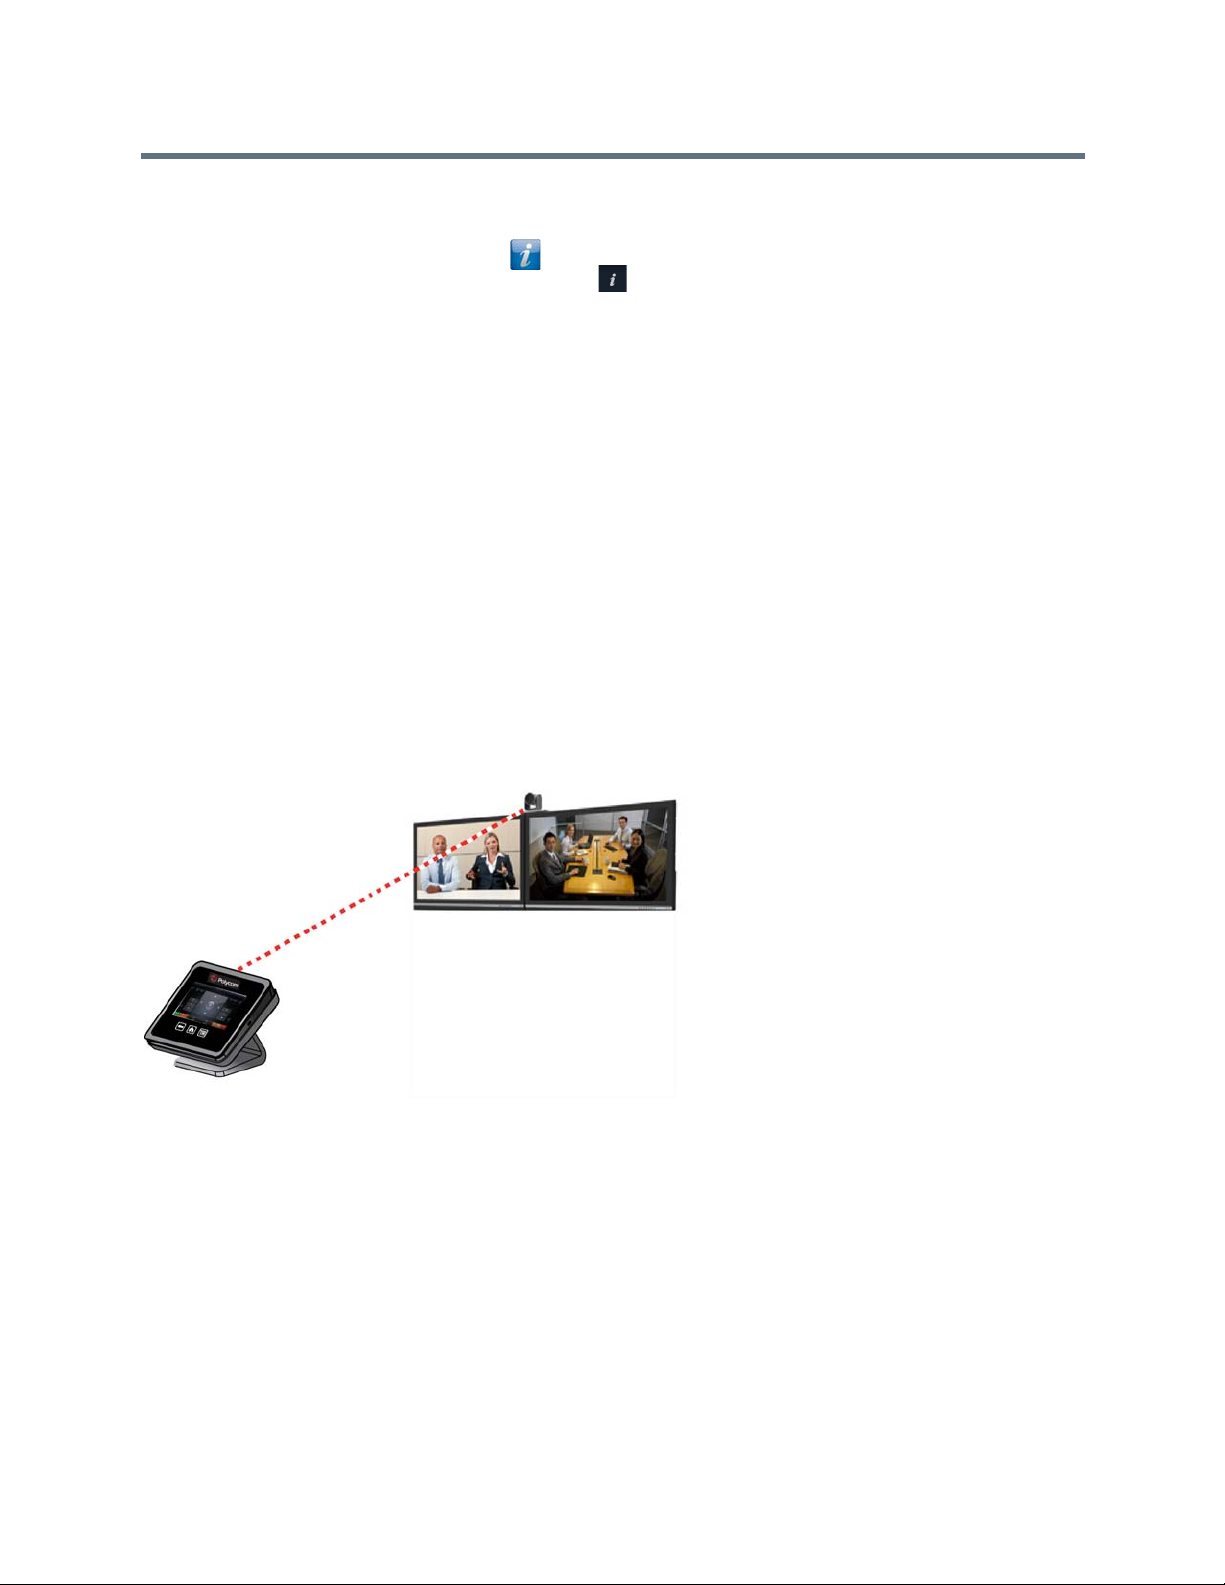
Using a Polycom Touch Control Device
After you power on the Polycom Touch Control, a Connect to Device screen is displayed. Enter
the IP address for the RealPresence Group system. Touch Connect.
From your Home screen, touch and then touch the RealPresence Group Series system tab.
Under Device Connection status, to uch . Touch View Pairing Settings. Enter the admin ID
and password for your Polycom T ouch Control. Enter the RealPresence Group system IP
address.
2 Enter the ID and password of the RealPresence Group system.
3 Touch Next.
The pairing connection begins, and a message displays when the connection is successful.
Using the Polycom Touch Control as a Virtual Remote Control
During normal operation, the Polycom Touch Control uses an IP connection to communicate with the RealPresence Group system.
If this connection is lost for more than 2 minutes, you might see error messages on the RealPresence Gr oup
system monitor and the Polycom Touch Control screen.
After you are disconnected, you can use a virtual remote control on the Polycom Touch Control to access
the RealPresence Group system until the connection is restored. The virtual remote control sends IR signals
across the room, so make sure the back of the Polycom Touch Control is facing the RealPresence Grou p
system camera.
Figure 1: Virtual Remote Control
When the IP connection is restored, the virtual remote control is no longer available.
Polycom, Inc. 80
Page 93

Using a Polycom Touch Control Device
TASK
TASK
Disconnect a Polycom Touch Control from a RealPresence Group System
The connection pairing with the Polycom Touch Control persists until you either disconnect or power off the
RealPresence Group system.
1 On the Home screen, touch then touch the RealPresence Group Series System tab.
2 Under Device Connection Status, touch .
3 Touch View Pairing Settings.
4 Touch Forget This Device.
The IP Address field is now blank.
Calling
There are several ways to initiate calls on the system. You can place a call by entering your contact’s name
or number, by choosing a contact in the directory, or by calling a speed dial or recent contact.
You can perform all of the functions that are available when making conventional calls, plus you can make
multipoint conference calls.
Call by Entering a Name or Number
You can place a call several different ways.
One easy way to place a call is to enter a specific name or number using a touch device or the remote
control.
Keep in mind that, depending on the capabilities of your system and the system you are calling, the dialing
information could look like one of these examples:
● 10.11.12.13 (IPv4 address—include the dots)
● 2555 (E.164 extension for H.323 or SIP)
● stereo.polycom.com (host name )
● (SIP)
1 From the Home scre en , to uc h .
2 In the dialing field, en te r th e dia ling inform a tio n.
3 Enter any additional information needed for the call.
The available settings depend on the type of call and your system's configuration.
4 Touch to place the call.
Polycom, Inc. 81
Page 94

Using a Polycom Touch Control Device
TASK
TASK
Call from the Contacts Screen
If your system administrator has added directory and contacts, you can view your favorites and search for
contacts registered to the same Global Directory Server.
1 From the Home scre en , to uc h > Favorites.
2 Touch an entry to place the call.
To see more details about an entry in Favorites, touch next to the entry.
Call from the Recent Calls List
You can quickly choose a number to call from a list of the sites you have called recently.
The Recent Calls screen provides details of all incoming and outgoing calls, including the time of the calls.
1 From the Home screen, touch and then touch Recent Calls.
2 Touch an entry to place the call.
You can filter the list by touching All, Placed, or Received.
Answer a Call
The way a handles incoming calls depends on how it is configured.
It either answers the call automatically, rejects the call automatically, or prompts you to answer the call
manually.
If the RealPresence Group systemdoes not answer incoming calls automatically, you are prompted to
answer manually.
» Touch Answer when a call comes in.
Ignore a Call
If the RealPresence Group system does not answer incoming calls automatically, you are prompted to
answer or ignore it manually.
» Touch Ignore when a call comes in.
Hold a Call
In a point-to-point call, you can place a call on hold, and then answer an incoming call, make an outgoing
call, or switch between two calls.
After you complete a call, you can resume the call you had on hold.
» On the Polycom Touch Control, touch Hold.
When a call is on hold, On Hold appears on the RealPresence Group system screen fo r 5 se co nds.
Polycom, Inc. 82
Page 95

Using a Polycom Touch Control Device
TASK
Hold a Call and Answer a Call
At times, you might need to place a call on hold and answer an incoming call.
» Touch Hold + Answer.
Hold a Call and Place a Call
To make an individual outgoing call while you are on a call, you must place the active call on hold.
» Touch Place a Call.
Place the call using your preferred meth o d.
Switch Between Calls
When you have a call on hold, you can switch between the held and active call.
» On the Call screen, touch Manage > Active > Switch To.
Resume a Call
When you no longer want to keep a call on hold, you can resume the held call.
1 Touch Resume Call.
Note: If the far-end site puts you on hold, a message displays for 5 seconds that you have been
placed on hold.
End a Call
When your call is complete, hang up the call.
» From the Call screen, touch Hang Up.
Multipoint Conference Calls
Conference, or multipoint, calls involve at least three different endpoints.
During a multipoint call, multiple sites can see and hear each other. You can also share content in a
multipoint call, just as you can in a point-to-point call.
All systems can participate in multipoint calls. To host multipoint calls, your administrator must install the
multipoint video option key . You can host multipoint calls using a video conferencing system with multipoint
capabilities, or you can use a bridge, such as the RealPresence
Note: You cannot host multipoint video calls on RealPresence Group 300 and 310 systems.
How you place a multipoint call depends on whether you're using a RealPresence Group syste m or brid ge
with multipoint capabilities. The number of sites allowed in the call is determined by the capabilities of the
system or bridge hosting the call.
®
Collaboration Server 800s.
Polycom, Inc. 83
Page 96

Using a Polycom Touch Control Device
TASK
TASK
Place a Multipoint Call by Adding Participants
To start a new multipoint call, you need to start with the first participant or site and then add others.
1 Call the first site.
2 After the call connects, touch Add Participant from the Call screen.
3 Place a call to the next site.
4 Repeat the above steps until all sites are connected.
Hold and Answer a Call in a Conference
While in a multipoint call, you might need to hold the main call and answer an incoming call.
» Touch Hold + Answer to hold the current call and answer the incoming call.
Note: In a multipoint conference, you cannot put an individual participant in the meeting on hold and
then resume that call.
Place a Call While a Multipoint Call is on Hold
You might find yourself needing to hold the conference call in order to make a new call.
» Touch Place a Call.
Place the call using your preferred meth o d.
Resume a Held Call in a Multipoint Call
When there is no active call, but there is a call on hold, you can resume the held call.
» Touch Resume Call.
Hang Up an Individual Call in a Multipoint Call
In a multipoint call, you can hang up on calls individually.
» On the Active Call screen, select the call that you want to hang up and touch Hang Up.
Hang Up All Calls
When you are in a conference call, you can hang up one call at a time or hang up all calls at once.
» At the top of the Active Call screen above the list of individual calls, touch Leave Conference.
Set Up a Meeting Password
You can set up a meeting password to ensure only the desired participants can join a call.
1 From the Home scre en , to uc h .
2 Touch the RealPresence Group Series System tab.
3 Enter the password in the Meeting Password field by using the on-screen keypad.
Polycom, Inc. 84
Page 97

Using a Polycom Touch Control Device
TASK
Enter a Meeting Password
Before you can join a multipoint call, you might be prompte d to en te r a me e tin g password.
• If a prompt appears on the screen, use the on-screen keypad to enter the password.
• If you need to generate touch tones (DTMF tones) with the Polycom Touch Control, touch Keypad
from the Call screen.
Then use the keypad number buttons.
Microsoft Meetings
If your system is deployed in a Lync Server 2013 or Skype for Business 2015 environment, you can place
and participate in multipoint calls that are hosted by Microsoft audio and video servers.
RealPresence Group systems can connect to Microsoft Exchange Server 2013 and retrieve calendar
information associated with a Microsoft Outlook or Microsoft Office 365 account. If the Home screen does
not display calendar information, the system is not registered with the Microsoft Exchan ge Server. Contact
your administrator to register the system.
Note: Endpoints using Microsoft Office 365 accounts must be SIP-re gistered to Microsoft Lync 2013 or
Skype for Business Server 2015 in order to join calendar meetings.
View Scheduled Meetings on the Calendar
If your RealPresence Group system is configured to connect to the Microsoft Exchange Server, you can
view scheduled meetings on the Home screen.
To view more information about a meeting on the calendar, select the meeting. Depending on the your
system is configured, private meeting details might not be visible.
» On the Home screen, touch Calendar or the date and time display at the top of th e scr ee n.
Scheduled meetings are listed for the current day and for the next 6 days.
Contact Presence States on the Polycom Touch Control
If your RealPresence Group system is registered to Microsoft® Lync™ Server 2013 or Skype for Business
Server 2015, you can see the following presence icons next to your contacts. Polycom systems registered
to Microsoft Lync 2013 or Skype for Business Server 2015 in an integrated environment use the following
colors to indicate presence states.
Color Presence
Green Available
Red Busy or Do Not Disturb
Black Offline or Unknown
Yellow Away
Polycom, Inc. 85
Page 98

Using a Polycom Touch Control Device
Content
Y ou can show content in video calls a few dif ferent ways. To show people and content at the same time, the
RealPresence Group systems must be configured for content. Besides showing content, you can also
receive and work with Microsoft content when a user initiates a content-sharing request.
You can show the content from the following to the far-end systems:
● Any information stored on a computer connected directly to a RealPresence Group system or a
Polycom touch device
● A DVD or DVR player connected directly to a Polycom system
● Content from the Polycom People+Content™ IP application (installed on a compu ter and connected
to the Polycom RealPresence Group system)
● VisualBoard
This section describes how to share content using a connected computer or People+Content IP. For
instructions on using VisualBoard, refer to the VisualBoard Technology Application User Guide.
If you attempt to display copyright-protected content on the local interface, such as from a DVD or DVR, the
following message is shown on the RealPresence Group system: “This content is protected and cannot be
displayed or shared.” This message appears in a call and out of a call.
Y o u can show one conten t source and one people vide o source at a time, and yo u can switch to a dif ferent
type of content or people video source if you need to. Participants at other sites can also show content or
people video sources. Content shown is from one site at a time ; another site sharing co ntent overrides a ny
content being shared.
When you are showing content, a message appears on your main monitor. Whether you also see the
content on your monitor depends on how your system is configured.
Note: To show content on a RealPresence Group 300 system, you must use the People+Content IP application.
Content Connections of RealPresence Group Systems
Before you prepare to show content, make sure the computer is powered on and connected to the
RealPresence Group system. You can connect a computer to the HDMI or VGA video input.
Note: Your administrator can enable 3.5mm audio input mixing with HDMI or VGA content inpu t on RealPresence Group systems during active calls. If this feature is not enabled, 3.5 mm audio input is heard by
both the near-end and far-end conference site participants during active calls. For more information about
3.5mm audio input, contact your administrator.
Polycom, Inc. 86
Page 99
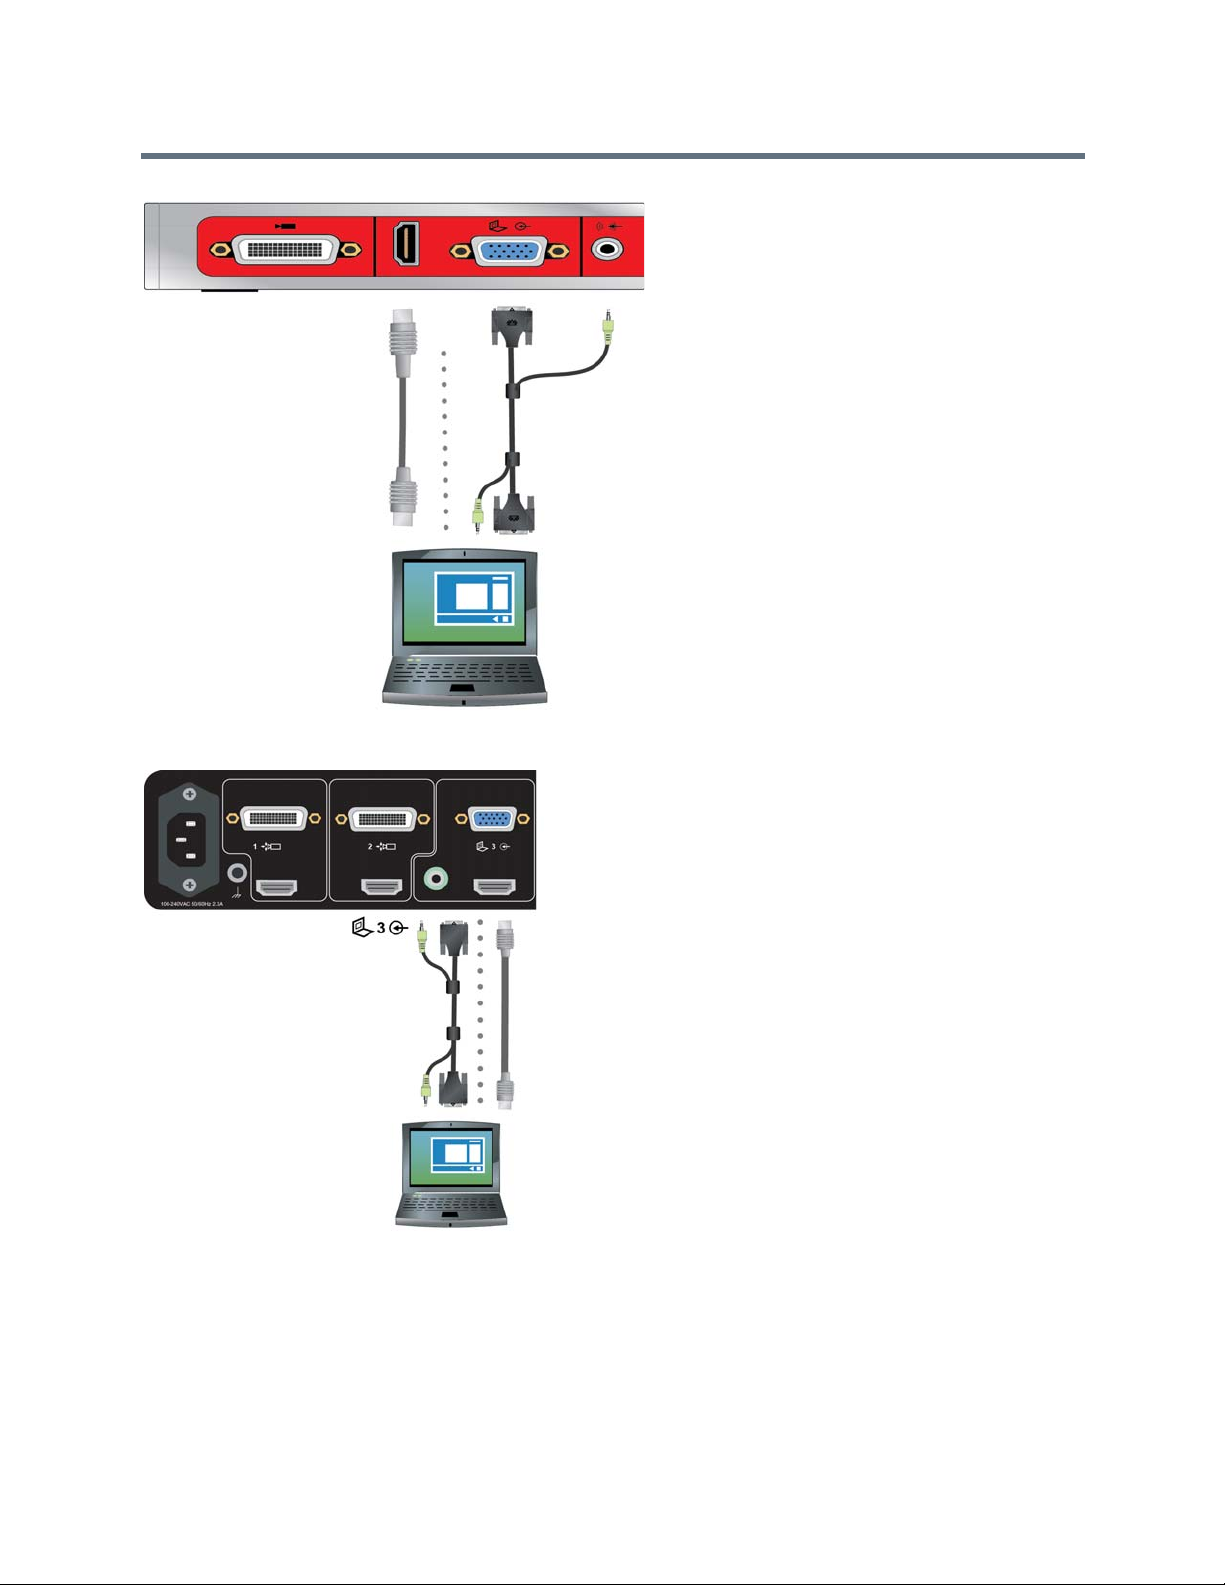
Using a Polycom Touch Control Device
Figure 2: Connections for RealPresence Group 310 and 500 systems
Figure 3: Connections for a RealPresence Group 700 system
Polycom, Inc. 87
Page 100

Using a Polycom Touch Control Device
TASK
TASK
Share Content from a Connected Computer
Before you show content, check that the computer video output is configured to use one of these supported
resolutions and refresh rates.
For best video quality, use refresh rates of 60 Hz or less.
Resolution Refresh rates (Hz)
800 x 600 56, 60, 72, 75, 85
1024 x 768 60, 70, 75, 85
1280 x 720 50, 60
1280 x 768 60
1280 x 1024 60, 75
1600 x 1200 60
1680 x 1050 60
1920 x 1080 60
1920 x 1200 60
Note: The way you set the resolution and refresh rate differs, depending on the type of operating system
you have. Check your computer manual or help topics for the appropriate steps.
1 From the Home scre en or Call screen, touch Show Content.
2 Touch the video source to start showing content.
Keep the following in mind points:
Audio from the content input is muted unless the content input is selected as a video source.
T o send analog content, disconnect both digital and analog inputs, wait 15 second s, then connect
only the analog input.
If both digital and analog inputs are connected, only the digital content is sent.
Stop Sharing Content from a Connected Computer
You can use the Touch Control to stop showing the content you are sharing from a computer connected to
a RealPresence Group system.
1 From the Content screen of the Touch Control, touch the computer source to stop showing it.
2 Using your remote control, select > Hide and the name of your content source, such as Hide
Laptop.
Polycom, Inc. 88
 Loading...