

SSppeecciiaall AAlllleerrggyy
6
5
B
B1
A
A1
C D
E
F
H
J
I
O
G
21
22
23
24
25
26
20
16
3
4
1
4
2
9
8
7
27
18b
19
18
17
18
18a
19a
10
12
13
14
15
11
O1
O2
O3
N
L
M
5-A
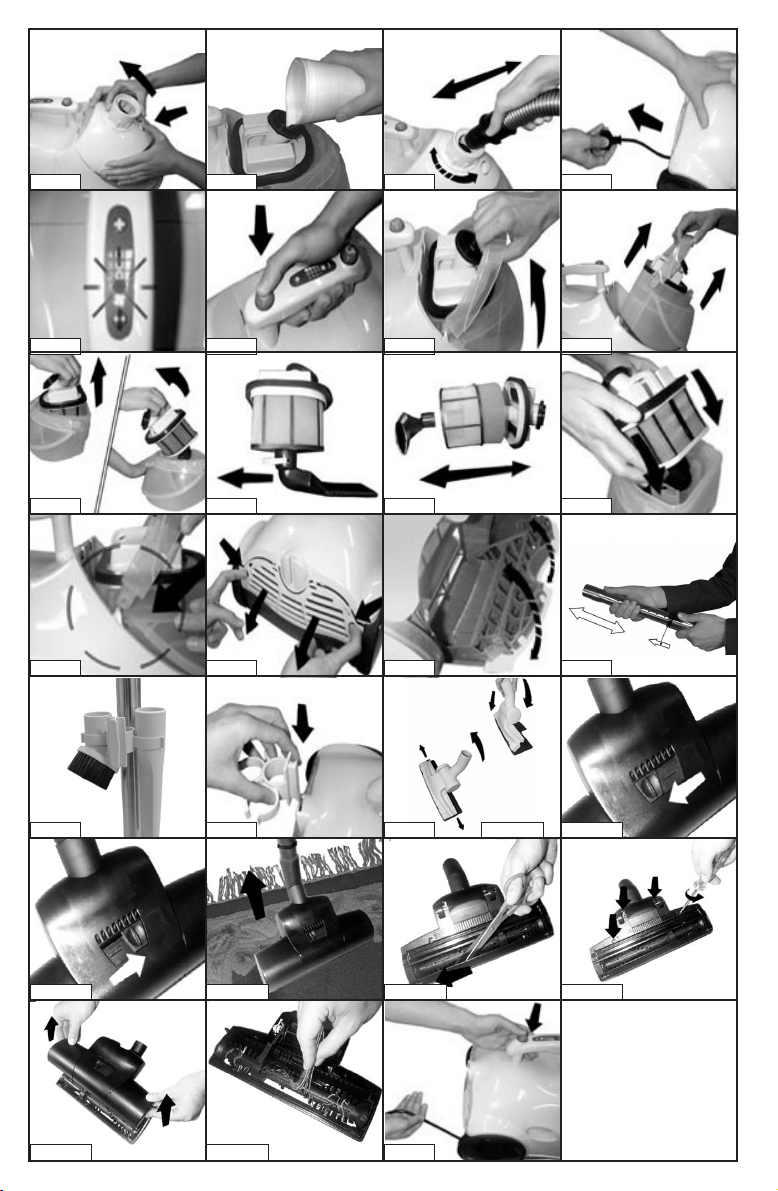
Fig. 1 Fig. 2 Fig. 3 Fig. 4
Fig. 5 Fig. 6 Fig. 7 Fig. 8
Fig. 9 Fig. 10 Fig. 11 Fig. 12
Fig. 19a
Fig. 13 Fig. 14 Fig. 15 Fig. 16
Fig. 17 Fig. 18 Fig. 19 Fig. 20a
Fig. 20b Fig. 20c Fig. 20d Fig. 20e
Fig. 20f Fig. 20g Fig. 21
6
5
B
B1
A
A1
C D
E
F
H
J
I
O
G
21
22
23
24
25
26
20
16
3
4
1
4
2
9
8
7
27
18b
19
18
17
18
18a
19a
10
12
13
14
15
11
O1
O2
O3
N
L
M
5-A

LECOLOGICO SPECIAL ALLERGY
Certificate
of Quality
D
u
s
t
r
e
t
a
i
n
i
n
g
S
L
G
-
C
h
e
m
n
i
t
z
/
G
e
r
m
a
n
y
Dear Customer,
Thank you for choosing Polti thus showing your trust in our company.
By choosing Lecologico Special Allergy, you show your interest in the health of your family, because
Lecologico Special Allergy Polti is a friend of the environment but an enemy of dust, pollen, dust
mites and their associated allergens.
Thanks to its EcoActive-Filter, Lecologico Special Allergy holds dirt in the water which, once dirty,
can be poured away, preventing dust and micro-organisms from spreading again everywhere. Moreover, EcoActive-Filter sets you free from dusty bags and all the problems associated with dust bags.
After use, Lecologico Special Allergy can be stored away perfectly clean.
Using Lecologico Special Allergy Polti, you will finally be breathing clean air! Its 6-stage filtering system with its Hepa filter traps the smallest particles and gives you clean discharged air.
Lecologico Special Allergy is able to suck up dry dirt, even of big size, so as to solve also small domestic problems; and with the Turbo-Brush tool it is easy to remove hairs from any surface, especially carpets and upholstery.
The complete tool kit addresses all types of cleaning problems, solving them without effort or waste
of time.
Before using Lecologico Special Allergy, please read carefully the instructions book, and then keep
it in a safe place for future reference, or for anyone else who may use your appliance.
What is the Eco-Active Filter?
The EcoActive-Filter is the revolutionary green heart of Lecologico Special Allergy, as it bases its efficiency on the natural purifying force of just water. The water flow in the special filter and its bubbling are the factors which trap dirt, avoiding any harmful contact with dust as well as preventing the
dust from recycling into your environment.
What is the HEPA Filter (HIGH EFFICIENCY PARTICULATE AIR FILTER)?
Lecologico Special Allergy is provided with a special, powerful HEPA filter, previously used only in
professional applications requiring the utmost hygiene. This filter retains the finest dust, pollen, dust
mites and other micro organisms.
CREDITS
Lecologico Special Allergy filtration efficiency
has been awarded the Quality Certificate by
the prestigious German laboratory SLG.
Moreover, the British Allergy Foundation
has given its “Seal of Approval” to Lecologico
Special Allergy, as an effective device in dust mites removal.
This unit conforms with EC-directives 89/336 as amended by 93/68 (EMC) and 73/23 as amended by 93/68 (low voltage).

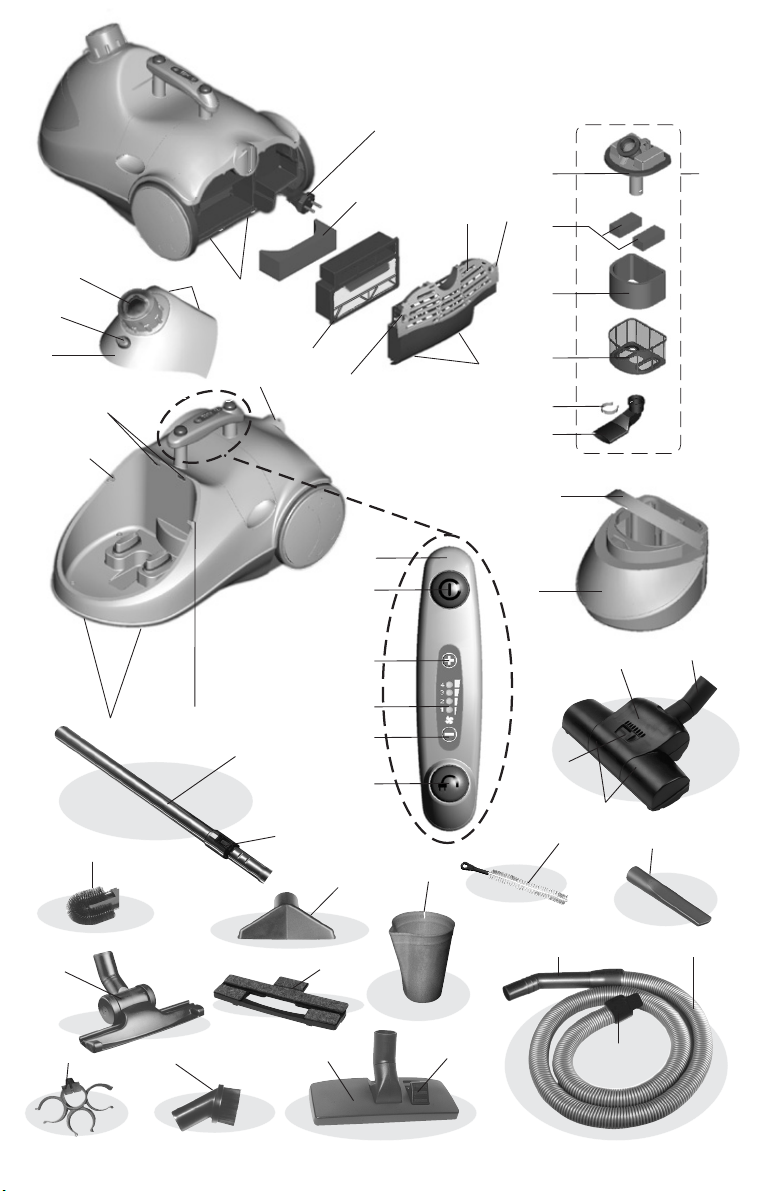
LECOLOGICO SPECIAL ALLERGY
KEY
1) Pivoting wheels
2) Upper cover locking pins
3) Upper cover locking holes
4) Container locking pin
5) “EcoActive-Filter” water container
6) Water container handle
7) Upper cover
8) Upper cover opening button
9) Tube junction
10) Carrying handle
11) Mains ON/OFF switch
12) + button (suction power increase)
13) Suction power indicator lights
14) - button (suction power decrease)
15) Cable winder button
16) Accessories holder place
17) Air outlet filter grill
18) Opening levers for air outlet filter grill
18a) Locking pins for air outlet filter grill
18b) Locking holes for air outlet filter grill
19) Hepa filter
19a) Back sponge filter
20) “EcoActive-Filter” water filter group
21) Filter cage cover
22) Square sponge filters
23) Shaped sponge filter
24) Filter body with micropore sponge
25) Elbow tube locking ring
26) Elbow tube
27) Supply cable plug
ACCESSORIES
A) Telescopic tube
A1) Telescopic tube spring button
B) Universal brush
B1) Brush selector
C) Flexible tube handle
D) Flexible tube
E) Tube
F) Multipurpose nozzle
G) Lance for cleaning corners
H) Small brush
I) Accessories holder
J) Jug for filling the container
L) Radiator brush
M) Joker brush
N) Parquet accessory
O) Turbo brush
5-A) Water tank cleaning brush
Polti S.p.A. reserves the right to change equipment
or accessory specification without prior notice.
PPPPRRRREEEECCCCAAAAUUUUTTTTIIIIOOOONNNNSS
• Read these instructions for use carefully before
using the Lecologico.
• Before connecting the Lecologico, make sure
that the mains voltage is the same as the voltage indicated on the data label of the appliance
and that the power outlet is connected to earth.
• Never touch the appliance with wet hands or
feet with the cable plugged into the mains.
• Never dip the appliance in water or other liquids.
• Never leave the appliance unattended with the
cable plugged into the mains.
• Never let children use it, nor people who are not
familiar with how the Lecologico works.
• If the Lecologico is left unused, always discon-
nect it from the mains.
• Never attempt to take the appliance to pieces in
SS
the event of failure or improper operation. Consult the nearest Authorised Assistance Centre.
• The wiring system to which the appliance is
connected must always comply with the laws in
force.
• In order to avoid prejudicing the safety of the appliance, use only original spare parts and accessories approved by the manufacturer.
• Do not use the appliance if the power cable or
other important parts are damaged.
• Do not vacuum up liquids.
• Do not use the appliance to suck up acids or
solvents, as these might cause serious damage
to the appliance, and above all do not suck in explosive dust or liquids, as these could cause explosions on coming into contact with the inside
components of the appliance.
• Use of the appliance in places where there is a
danger of explosions is prohibited.
• Do not suck up burning or incandescent objects
such as embers, ash or other material in which
combustion is taking place.

LECOLOGICO SPECIAL ALLERGY
• Do not leave the appliance exposed to wind or
rain.
• Do not use electric extension leads that are not
authorized by the manufacturer, as they may
cause damage or fire.
• In case of an accidental fall of the appliance, it is
necessary to have it checked by an authorized
service centre as the internal safety features
may have been affected.
CCCCOOOORRRRRRRREEEECCCCTTTT UUUUSSSSEEEE OOOOFFFF TTTTHHHHEEEE PPPPRRRROOOODDDDUUUUCCCCTT
This appliance is intended for use as an aspirator
for solids according to the descriptions and instructions in this manual. It is recommended to read
these instructions carefully and to store them for future use.
PPPPRRRREEEEPPPPAAAARRRRAAAATTTTIIIIOOOONNNNSSSS FFFFOOOORRRR UUUUSSSSEE
• Push the upper cover opening button (8) which
is on the upper cover (7)
• Lift the upper cover turning it upwards as indicated in fig. 1.
• Fill the “EcoActive-Filter” water container (5)
using the jug supplied (J), carefully respecting
the exact amount of water indicated on it (fig. 2)
(400 ml).
For correct operation, it is VERY IMPORTANT that the amount of water is the one
indicated by the jug capacity, neither lower
nor higher.
• Put the upper cover (7) back, taking care that
the two pins (2) on the cover (7) engage with the
two holes (3) on the appliance, pushing the button (8) again.
• Insert the tube (E) into the junction (9) turning it
clockwise until it connects (fig. 3).
BBBBIIIIOOOOEEEECCCCOOOOLLLLOOOOGGGGIIIICCCCOO
We recommend use of Bioecologico, an anti-bacterial agent scented with natural anti-allergenic substances. Add regularly to the water you use to fill
Lecologico Special Allergy water container (5) to
prevent proliferation of bacteria and micro-organisms and inhibit allergens. As well as providing a
sanitising action, Biecologico also eliminates
odours from collected dust in the water.
Use: add 5 ml each time you fill the water container.
Bioecologico is sold by appliance dealers or by mail
order from the authorised Polti Service Centres.
Bioecologico is available in the “neutral” unscented
version supplied with Lecologico Special Allergy, or
in mountain pine or citrus.
OO
TT
EE
OOOOPPPPEEEERRRRAAAATTTTIIIIOOOONN
• Unwind the cable until it is COMPLETELY outside
its storage compartment by pulling the plug
(27) towards you (fig. 4).
• Connect the plug to the mains.
• Position 1 of the indicators lights (13) will start
to flash. Your appliance is now in a “stand-by”
position (fig. 5).
• Push the mains On/Off switch (11) (fig.6), Lecologico Special Allergy will start to operate at minimum speed, the first stage of the indicator lights will change from flashing to constant. The
mains On/Off switch (11) can be pushed with
your foot without bending down.
• The power levels are four. We suggest use at
the minimum level for curtains, at the mediumlow for couches, armchairs and pillows, medium-high for carpets, and high for floors and
hard surfaces (ceramic, marble etc.).
•To increase the speed, push the + button (12),
each press on the button + (12) will increase
the motor power by one level.
•Increase by one level is indicated by the illumination of one further stage of the indicator lights.
• By pushing the - button (14), at each press the
motor power will decrease and one stage will
switch off.
•To take the appliance back to the “stand-by” position, push the mains On/Off switch (11), the
first stage of the indicator lights (13) will start to
flash again.
•To start vacuum cleaning again, push the mains
On/Off switch (11) again.
• When water is very dirty or when the moisture
sensor blocks the suction, it is necessary to prepare the appliance as described in paragraphs
“haw to empty and clean the water tank” and
“drying cycle”
HHHHOOOOWWWW TTTTOOOO EEEEMMMMPPPPTTTTYYYY AAAANNNNDDDD CCCCLLLLEEEEAAAANNNN TTTTHHHHEE
WWWWAAAATTTTEEEERRRR TTTTAAAANNNNKK
• Switch off the appliance at the mains switch
(11) and disconnect the power supply cable
from the mains.
• Disconnect the tube from the junction by turning
it inversely with rispect to paragraphs "preparations for use" (fig.3).
• Push the opening button (8) on the upper cover (7).
• Lift the cover (7) by turning it upwards as indicated in fig. 1.
• Lift the container handle (6) by taking it to the
height of the tube hole as in fig. 7.
•Take out the container (5) by pulling it out of the
appliance (fig. 8)
NN
EE
KK

LECOLOGICO SPECIAL ALLERGY
• Pull the water filter cage (20) upwards and then
pull it out (fig. 9).
• Empty the container (5) and rinse it.
• Unhook the elbow tube locking ring (25) by pul-
ling it outwards (fig. 10).
• Pull the elbow tube (26) from the filter body (24)
until it slips off (fig. 11).
• Divide all the components as described in the
key and then rinse them under running water (If
the sponge filters are worn out replace them
with original Polti spare parts).
•To help with the water bucket (5) a cleaning brush is included (5-A), which can be used to clean
the tubes joint and the internal parts and the accessories.
NOTE: do not use the brush to clean the appliance externally
• Before putting the sponge filters (22-23) back,
wring them by using a cloth so as to completely
dry them.
• Reassemble the water filter group (20) by repeating the operation in reverse.
NOTE: before reassembling the water filter,
make sure that all the parts have been properly
dried.
• Put the filter group (20) back into the container
(5) so as to insert the elbow tube (26) between
the two projections of the container (fig. 12).
• Gently push the water container handle (6) until
the two slots on the handle fit with the two pins
(4) on the appliance (fig. 13).
• Before storing the appliance or before using it
again, make a drying cycle as described in the
“Drying cycle” paragraph.
•We advise you to clean the appliance after each use.
DDDDRRRRYYYYIIIINNNNGGGG CCCCYYYYCCCCLLLLEE
Warning: always make the drying cycle with an
empty tank.
The drying cycle eliminates possible water particles present in the filters and in the suction tubes of
the container (5). The purpose of this process is to
avoid interventions of the humidity sensor, which interrupts the operation of the appliance.
The humidity sensor acts to protect the Hepa filter,
preventing humidity particles from reaching it,
which may damage its functioning.
• Move the two air outlet filter grill opening levers
(18) simultaneously by pushing them inwards
(fig. 14) so as to allow the air outlet filter grill
(17) to unhook.
• Remove the Hepa filter (19) as described in the
“Cleaning or replacing the Hepa filter” paragraph.
EE
• Remove the back sponge filter (19a).
• Connect the supply cable plug (27) to the
mains.
• The first stage of the luminous indicator light
(13) will start to flash.
•To reactivate the appliance, keep the mains
On/Off switch (11) pushed until the machine reaches the maximum speed.
• The appliance will keep on working until the humidity sensor no longer feels the presence of
water in the circuit.
• When the sensor no longer feels water in the circuits of the appliance, it will automatically go to
the stand-by position and the luminous indicator
(13) will start to flash.
• Put the Hepa filter (19) and the air outlet filter
grill (17) operating inversely.
• If you want to use the appliance again, fill the
water container (5) as indicated in the “Preparation” paragraph, otherwise store the appliance
with the container (5) empty.
MMMMOOOOIIIISSSSTTTTUUUURRRREEEE SSSSEEEENNNNSSSSOOOORRRR OOOOPPPPEEEERRRRAAAATTTTIIIINNNNGG
• If the sensor measures some humidity, the machine will stop and the 4 lights on the luminous
indicator (13) will start to flash alternately first
to last and viceversa.
•To reactivate the appliance, keep the mains
On/Off switch (11) pushed until the machine reaches the maximum speed.
• The appliance will keep on working until the humidity sensor no longer feels the presence of
water in the circuit.
• When the sensor no longer feels water in the circuits of the appliance, it will automatically go to
the stand-by position and the luminous indicator
(13) will start to flash.
• Reassemble the Hepa filter (19) and the air outlet filter grill (17), inserting first the two pins
(18a) into the locking holes (18b) (fig. 15).
Warning: always do the drying cycle with an
empty tank.
UUUUSSSSIIIINNNNGGGG TTTTOOOOOOOOLLLLSS
Tools may be connected directly to the flexible tube
(D) or to the telescopic tube (A).
Using the telescopic tube (A)
The tube is about 60 cm long when closed, 1 m
when extended to its greatest length. To increase
or decrease length, press the catch positioned as
shown in fig. 16 and extend or reduce length as desired.
SS
GG

LECOLOGICO SPECIAL ALLERGY
Using the universal brush (B)
Connect the brush to the telescopic tube. If you
move the selector on the brush (B1) and press with
a foot, you can change the suctioning surface without bending down. The position with bristles extended is recommended for all non-carpeted
floors. The position without bristles is recommended for carpets.
Multipurpose nozzle (F)
The multipurpose nozzle is recommended for
cleaning upholstery surfaces such as the joints of
sofas, armchairs, mattresses, car upholstery, etc.
Lance for cleaning corners/skirting boards
(G) – radiator brush (L)
The lance (G) is recommended for thorough vacuum cleaning of hard-to-reach spots such as skirting
boards and folds in sofas, armchairs, upholstered
furniture and car upholstery. Apply the radiator
brush (L) to the tip of the lance (G) to clean inside
radiator elements and remove accumulated dust.
Soft brush (H)
The soft brush has soft bristles for dusting delicate
surfaces such as picture frames, books, etc.
Using the tool holder (I) and tool holder
housing (16)
The tool holder may be used to fasten tools onto
the body of the appliance or the handle.
Installation on the handle: Hook one of the tool
holder rings to the handle. Insert the tools you
want to keep handy in the rings (fig. 17).
Replacing on the appliance body: Slide the tool
holder guide into the groove on the back of the appliance as shown in figure 18, proceeding to anchor the tools as described above.
You can perform the same operation to replace the
universal brush (B) with the telescopic tube (A) at-
tached to it.
Use of Joker brush (M) and of parquet tool (N)
Joker brush makes it possible to suck up all kinds
of solid dirt and fits to all kinds of surfaces. Place
Joker brush (M) on the parquet tool (N) as shown
in Fig. 19. Apply the tool to the brush, following the
arrow indication, so as to join and fasten them. To
unfasten the parquet tool from Joker brush, pull
outwards the two levers mounted on the frame
sides and lift up the brush (fig. 19a).
Turbo Brush (O)
The turbo brush is designed for perfect cleaning of
carpets with a maximum pile length up to 15 mm.
The rotating brush effortlessly picks up threads,
hair, animal hair and other particles which are normally particularly difficult to vacuum up. The turbo
brush may be used on hard surfaces too.
On the front of the turbo brush you can see a slide
for adjustment to every type of carpet: for low pile
carpets or hard floors, move the cursor to the left
(O2) (fig. 20a), for long pile carpets move it to the
right (fig. 20b). Move the turbo brush slowly forward and backward over the carpet, on fringes or
near corners move it in the direction of the arrow
(fig. 20c).
Cleaning
It may happen that the turbo brush decreases its
rotation speed while in use, becoming less effective. This may be caused by clogged hairs and
threads around the brush or because the turbine
becomes blocked. If this happens, then proceed
with the following cleaning operation:
Cleaning the rotating brush: insert the points of
a pair of scissors into the brush roller slots (fig.
20d). Move the scissors to catch the threads or
hairs, then cut them and remove them manually or
using a small-sized pair of pliers.
Cleaning the turbine: unscrew the four screws
(O3) on the bottom side (fig. 20e). Turn the turbo
brush over and remove the cover (fig. 20f). Clean
the turbine and the other parts (fig. 20g). Reassemble the parts repeating this operation in reverse order. Make sure that the two sections fit together properly.
AAAAUUUUTTTTOOOOMMMMAAAATTTTIIIICCCC CCCCAAAABBBBLLLLEEEE WWWWIIIINNNNDDDDEEEERR
Before putting the vacuum cleaner away, rewind
the power cable by pressing the button (2), as
shown in fig.21, being careful to accompany it during rewinding.
RR

LECOLOGICO SPECIAL ALLERGY
BLACK
OR
BLUE
RED
OR
BROWN
L
E
N
F
U
S
E
GGGGEEEENNNNEEEERRRRAAAALLLL MMMMAAAAIIIINNNNTTTTEEEENNNNAAAANNNNCCCCEE
Before maintenance, make sure that the supply cable is not connected to the mains.
Cleaning or replacing the HEPA filter
• Move the two air outlet filter grill opening levers
(18) at the same time by pulling them towards
the inside so as to allow the air outlet filter grill
(17) to unhook (fig. 14).
• Remove the HEPA filter (19) from its location,
tap it and, if necessary, replace it with an original Polti spare part.
• Reassemble the Hepa filter (19) and the air outlet filter grill (17), inserting first the two pins
18a into the locking holes 18b (fig. 15).
NOTE: the filter lasts about 100 hours (about 6
months) in normal domestic use. If the suction
power noticeably decreases, replace the filter
even before the 100 hours.
AAAATTTTTTTTEEEENNNNTTTTIIIIOOOONN
• This appliance is built according to current regulations for recycling.
• Do not throw away the packing materials used
to protect the appliance during transportation,
but take them to relevant collecting centres.
• Filters are sold in authorised assistance centres
and in all major appliance shops.
NN
EE
EEEELLLLEEEECCCCTTTTRRRRIIIICCCCAAAALLLLSSSSAAAAFFFFEEEETTTTYY
No earth required.
Ensure the mains voltage suits your appliance.
Fitting the mains plug important
The wires in the mains lead are coloured in
accordance with the following code:
• Blue: Neutral
•Brown: Live
The wire which is coloured BLUE must be
connected to the Terminal which is marked with the
letter “N” or coloured BLACK.
The wire which is coloured BROWN must be
connected to the Terminal which is marked with the
letter “L” or coloured RED.
It is important that the outer sheath is clamped
correctly into the 3-pin plug.
If in doubt consult your local Service Dealer or
qualified electrician before the machine is used.
A 13 AMP FUSE MUST BE FITTED TO THE MAINS
PLUG.
YY
• Use only original Polti spare parts.
Polti declines liability for any damage or accident derived from any use of LECOLOGICO
SPECIAL ALLERGY which is not in conformity
with the instructions contained in this booklet.

LECOLOGICO SPECIAL ALLERGY
TTTTRRRROOOOUUUUBBBBLLLLEEEESSSSHHHHOOOOOOOOTTTTIIIINNNNGG
TROUBLE CAUSA SOLUTION
The suction switches off and
the 4 indicator lights flash
alternately.
The suction switches off during
use and the 4 indicator lights
flash simultaneously.
The suction hose or the elbow
tube are obstructed.
The suction power is too high
for the type of surface.
Intervention of the humidity
sensor because the filters
and tubes are not dry enough.
Intervention of the humidity
sensor because of too
much water in the container.
Intervention of the humidity
sensor for accidental
anomalous movement of
the appliance during use.
GG
Take out any obstructions in
the tubes.
Keep the mains On/Off switch
pushed until the 4 indicator
lights go back to constant light
from flashing, taking the suction power to the speed previously set.
Operate as described in
the “Drying cycle” paragraph.
Empty the container and
operate as described in the
“Drying cycle” paragraph. Fill
the container again by using
the jug supplied.
The drying cycle lasts more
than 3 minutes.
The humidity sensor does not
work correctly.
Contact the nearest Polti
Authorised Centre
 Loading...