


Especial Parquet
R
EEEENNNNGGGGLLLLIIIISSSSHH
HH
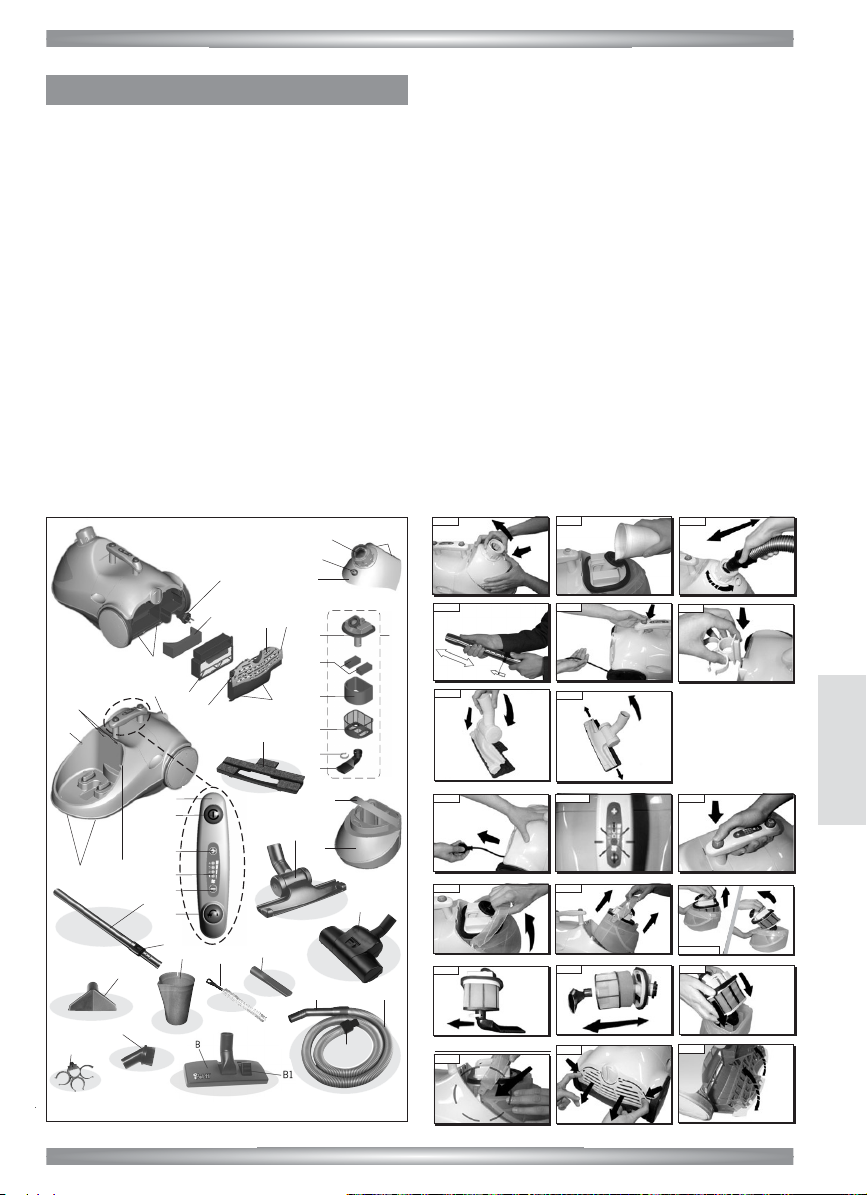
1) Pivoting wheels
2) Upper cover locking pins
3) Upper cover locking holes
4) Container locking pin
5) "EcoActive-Filter" water container
6) Water container handle
7) Upper cover
8) Upper cover opening button
9) Tube junction
10) Carrying handle
11) Mains ON/OFF switch
12) + button (suction power increase)
13) Suction power indicator lights
14) - button (suction power decrease)
15) Cable winder button
16) Accessories holder place
17) Air outlet filter grill
18) Opening levers for air outlet filter grill
18a) Locking pins for air outlet filter grill
18b) Locking holes for air outlet filter grill
19) Hepa filter
19a) Back sponge filter
20) "EcoActive-Filter" water filter group
21) Filter cage cover
22) Square sponge filters
2
EE
EE
NN
NN
GG
GG
LL
LL
II
II
SS
SS
HH
HH
LECOLOGICO ESPECIAL PARQUET
23) Shaped sponge filter
24) Filter body with micropore sponge
25) Elbow tube locking ring
26) Elbow tube
27) Supply cable plug
ACCESSORIES
A) Telescopic tube
A1) Telescopic tube spring button
B) Universal brush
B1) Brush selector
C) Flexible tube handle
D) Flexible tube
E) Tube
F) Multipurpose nozzle
G) Lance for cleaning corners
H) Small brush
I) Accessories holder
J) Jug for filling the container
L) Turbo brush (optional)
M) Joker brush
N) Parquet accessory
5-A) Water tank cleaning brush
Polti S.p.A. reserves the right to change equipment or accessory
specification without prior notice.
6
5
27
18b
19
18
17
18
18a
2
9
8
7
16
3
4
1
4
10
11
12
13
14
15
A
A1
C D
E
F
H
J
I
L
G
21
22
23
24
25
26
20
19a
B
B1
M
N
5-A
SSAALLEE((BB)
)
(
NN)
)
Fig. 6a
SSAALLEE((BB)
)
NN)
)
Fig. 6b
Fig. 9
Fig. 8
Fig. 7
Fig. 11
Fig. 12/13
Fig. 14
Fig. 15
Fig. 16
Fig. 17
Fig. 10
A
Fig. 18
Fig. 19
OOTTTTO
O
Fig. 4
OOTTTTO
O
Fig. 5
OOTTTTO
O
Fig. 3
OOTTTTO
O
Fig. 2
OOTTTTO
O
Fig. 1
Fig. 6

CCCCOOOORRRRRRRREEEECCCCTTTTUUUUSSSSEEEEOOOOFFFFTTTTHHHHEEEEPPPPRRRROOOODDDDUUUUCCCCTT
TT
This appliance is intended for use as an aspirator for solids according to the descriptions and instructions in this manual. It is
recommended to read these instructions carefully and to store
them for future use.
PPPPRRRREEEEPPPPAAAARRRRAAAATTTTIIIIOOOONNNNSSSSFFFFOOOORRRRUUUUSSSSEE
EE
• Push the upper cover opening button (8) which is on the up-
per cover (7)
• Lift the upper cover turning it upwards as indicated in fig. 1.
• Fill the "EcoActive-Filter" water container (5) by using the jug
supplied (J), carefully respecting the exact amount of water
indicated on it (fig. 2) (400 ml). For correct operation, it is
important that the amount of water is the one contemplated in the jug capacity, neither lower nor higher.
• Put the upper cover (7) back taking care that the two pins (2)
on the cover (7) engage with the two holes (3) on the appliance, pushing the button (8) again.
• Insert the tube (E) into the junction (9) turning it clockwise un-
til it connects (fig. 3).
UUUUSSSSEEEE OOOOFFFFTTTTHHHHEEEETTTTEEEELLLLEEEESSSSCCCCOOOOPPPPIIIICCCC TTTTUUUUBBBBEEEE ((((AAAA))
))
The tube is about 500 mm long when closed and about 1000
mm. at its maximum extension. To make it longer or shorter,
move the locking button (A1) as shown in fig. 4.
AAAAUUUUTTTTOOOOMMMMAAAATTTTIIIICCCC CCCCAAAABBBBLLLLEEEEWWWWIIIINNNNDDDDEEEERR
RR
Before storing the vacuum cleaner, rewind the power supply cable by pushing the button (15) as indicated in fig. 5.
The cable winder button (15) can be pushed with your foot without having to bend down.
UUUUSSSSEEEEOOOOFFFFTTTTHHHHEEEEAAAACCCCCCCCEEEESSSSSSSSOOOORRRRIIIIEEEESSSSHHHHOOOOLLLLDDDDEEEERRRR((((IIII))
))
The accessories holder (I) allows you to fix the accessories on
the body of the appliance or on the handle.
Installation on the handle: insert one of the rings of the accessories holder on the handle. Insert in the rings the accessories
you want to keep at hand.
Installation in the accessories holder on the appliance body:
make the groove of the accessories holder run into the guide on
the back of the appliance, as shown in fig. 6, fixing the accessories as described above.
UUUUSSSSEEEEOOOOFFFFTTTTHHHHEEEE UUUUNNNNIIIIVVVVEEEERRRRSSSSAAAALLLLBBBBRRRRUUUUSSSSHHHH((((BBBB))
))
Insert the brush. If you move the selector (B1) placed on the
brush by pressing with your foot, you can change the suction surface without bending down. The position with the bristles exposed is recommended for all floors. The position without bristles
is recommended for carpets and rugs.
JJJJOOOOKKKKEEEERRRRBBBBRRRRUUUUSSSSHHHH ((((MMMM))
))
With the Joker brush it is possible to remove all types of solid or
liquid dirt, and it will work on any type of surface.
PPPPAAAARRRRQQQQUUUUEEEETTTTAAAACCCCCCCCEEEESSSSSSSSOOOORRRRYYYY ((((NNNN))
))
This accessory is for use solely with the Joker brush. Put the
Joker brush into place on the parquet accessory as illustrated in
Figure 6a. Apply the brush to the accessory as indicated by the
arrow so that the two pieces fit onto each other and then hook
them together. To unhook the parquet accessory from the Joker
brush pull the two levers on the sides of the fitting outwards and
then lift the brush off. (Figure 6b).
3
EE
EE
NN
NN
GG
GG
LL
LL
II
II
SS
SS
HH
HH
LECOLOGICO ESPECIAL PARQUET
OOOOPPPPEEEERRRRAAAATTTTIIIIOOOONN
NN
• Unwind the cable until it is completely outside its storage
compartment by pulling the plug (27) towards you (fig. 7).
• Connect the plug to the mains.
• Position 1 of the indicators lights (13) will start to flash. Your
appliance is now in a "stand-by" position (fig. 8).
• Push the mains On/Off switch (11) (fig.9), LECOLOGICO will
start to operate at minimum speed, the first stage of the indicator lights will change from flashing to constant. The mains
On/Off switch (11) can be pushed with your foot without
bending down.
• The power levels are four. We suggest use at the minimum
level for curtains, at the medium- low for couches, armchairs
and pillows, medium-high for carpets and high for floors and
hard surfaces (ceramic, marble etc.).
•To increase the speed, push the + button (12), each press
on the button + (12) will increase the motor power by one
level.
• The increase by one level is indicated by the illumination of
one further stage of the indicator lights.
• By pushing the - button (14), at each press the motor power
will decrease and one stage will switch off.
•To take the appliance back to the "stand-by" position, push
the mains On/Off switch (11), the first stage of the indicator
lights (13) will start to flash again.
•To start vacuum cleaning again, push the mains On/Off
switch (11) again.
““““BBBBIIIIOOOOEEEECCCCOOOOLLLLOOOOGGGGIIIICCCCOOOO””
””
"Bioecologico" is available for sanitising while using the suction
function. It is a scented antibacterial product with natural-based
anti-allergenic substances. If it is added regularly to the water
used to fill the water container (5) of the L’ecologico, it will prevent the proliferation of bacteria and micro-organisms and inhibit
the action of allergens. In addition to ensuring a sanitising action,
"Biecologico" will eliminate smells due to the presence of dust in
the water, leaving a pleasant smell of cleanness in the room.
Use: Normally add 5 ml each time you fill the water-based filter.
Bioecologico is sold in household appliance shops or direct from
our authorised Assistance Centres.
HHHHOOOOWWWW TTTTOOOO EEEEMMMMPPPPTTTTYYYY AAAANNNNDDDDCCCCLLLLEEEEAAAANN
NN
TTTTHHHHEEEEWWWWAAAATTTTEEEERRRR TTTTAAAANNNNKK
KK
•Switch off the appliance at the mains switch (11) and disconnect the power supply cable from the mains.
• Disconnect the tube from the junction by turning it anticlockwise.
• Push the opening button (8) on the upper cover (7).
• Lift the cover (7) by turning it upwards as indicated in fig. 1.
• Lift the container handle (6) by taking it to the height of the
tube hole as in fig. 10.
•Take out the container (5) by pulling it out of the appliance
(fig. 11)
• Pull the water filter cage (20) upwards and then pull it out
(fig. 12-13).
• Empty the container (5) and rinse it.
• Unhook the elbow tube locking ring (25) by pulling it outwards (fig. 14).
• Pull the elbow tube (26) from the filter body (24) until it slips
off (fig. 15).
• Divide all the components as described in the key and then
rinse them under running water (if the sponge filter is damaged, replace it by contacting a Polti Authorized Service Centre)
• Before putting the sponge filters (22-23) back, wring them
by using a cloth so as to dry them perfectly.
• Reassemble the water filter group (20) by repeating the operation in reverse.

NOTE: before reassembling the water filter, make sure that
all the parts have been properly dried.
• Put the filter group (20) back into the container (5) so as to
insert the elbow tube (26) between the two projections of the
container (fig. 16).
• Gently push the water container handle (6) until the two slots
on the handle fit with the two pins (4) on the appliance (fig.
17).
• Before storing the appliance or before using it again, make a
drying cycle as described in the "Drying cycle" paragraph.
DDDDRRRRYYYYIIIINNNNGGGG CCCCYYYYCCCCLLLLEE
EE
Warning: make the drying cycle with the empty tank.
The drying cycle eliminates possible water particles present in
the filters and in the suction tubes of the container (5). The purpose of this process is to avoid interventions of the humidity sensor, which interrupts the operation of the appliance.
The humidity sensor acts in protection of the Hepa filter preventing humidity particles from reaching it, damaging its function.
• Move the two air outlet filter grill opening levers (18) at the
same time by pushing them towards the inside (fig. 18) so as
to allow the air outlet filter grill (17) to unhook.
• Remove the Hepa filter (19) as described in the "Cleaning or
replacing the Hepa filter" paragraph.
• Remove the back sponge filter (19a).
• Connect the supply cable plug (27) to the mains.
• The first stage of the luminous indicator light (13) will start to
flash.
•To reactivate the appliance, keep the mains On/Off switch
(11) pushed until the machine reaches the maximum speed
• The appliance will keep on working until the humidity sensor
feels the presence of water in the circuit.
• When the sensor no longer feels water in the circuits of the
appliance, it will automatically go to the stand-by position and
the luminous indicator (13) will start to flash.
• Put the Hepa filter (19) and the air outlet filter grill (17) back.
• If you want to use the appliance again, fill the water container
(5) as indicated in the "Preparation" paragraph, otherwise
store the appliance with the container (5) empty.
• If the sensor measures some humidity, the machine will stop
and the 4 lights on the luminous indicator (13) will start to
flash alternately first to last and viceversa.
•To reactivate the appliance, keep the mains On/Off switch
(11) pushed until the machine reaches the maximum speed.
• The appliance will keep on working until the humidity sensor
feels the presence of water in the circuit.
• When the sensor no longer feels water in the circuits of the
appliance, it will automatically go to the stand-by position and
the luminous indicator (13) will start to flash.
• Reassemble the Hepa filter (19) and the air outlet filter grill
(17), inserting first the two pins (18a) into the locking holes
(18b) (fig. 19).
Warning: make the drying cycle with the empty tank.
GGGGEEEENNNNEEEERRRRAAAALLLL MMMMAAAAIIIINNNNTTTTEEEENNNNAAAANNNNCCCCEE
EE
Before maintenance, make sure that the supply cable is not connected to the mains.
CCCClllleeeeaaaannnniiiinnnngggg tttthhhheeee ““““EEEEccccooooAAAAccccttttiiiivvvveeee----FFFFiiiilllltttteeeerrrr”””” wwwwaaaatttteeeerrrr ffffiiiilllltttteeeerrrr ccccaaaaggggee
ee
((((22220000)))) aaaannnndddd ssssppppoooonnnnggggeeee ffffiiiilllltttteeeerrrrssss ((((22222222 ---- 22223333))))..
..
We recommend that you clean after every use.
• Switch off the appliance by the mains On/Off switch (11).
Disconnect the power supply cable from the mains.
• Push the upper cover opening button (8) .
• Lift the cover (7) by turning it upwards as in fig. 1.
• Lift the container handle (6) by taking it to the height of the
tube hole as indicated in fig. 10.
• Remove the container (5) by pulling it out of the appliance
(fig. 11).
• Pull upwards the water filter group (20) and then pull it out
(fig. 12 - 13).
• Empty the water container (5) and rinse it.
• Unhook the elbow tube locking ring (25) by pulling it towards
the outside (fig. 14).
• Pull the elbow tube (26) from the microspore sponge filter
body (24) until it slips off (fig. 15).
• Divide all the components as described in the key and then
rinse them under running water (if the sponge filter is damaged, replace it contacting a Polti Authorized Service Centre).
• Before putting the sponge filters (22-23) back, wring them
by using a cloth so as to dry them perfectly.
• Reassemble the water filter group (20).
NOTE: before reassembling the water filter, make sure that
all parts have been properly dried.
• Put the filter group (20) back into the container (5) so as to
insert the elbow tube (26) between the two projections of the
container (fig. 16).
CCCClllleeeeaaaannnniiiinnnngggg oooorrrr rrrreeeeppppllllaaaacccciiiinnnngggg tttthhhheeee HHHHEEEEPPPPAAAA ffffiiiilllltttteeeerr
rr
• Move the two air outlet filter grill opening levers (18) at the
same time by pulling them towards the inside so as to allow
the air outlet filter grill (17) to unhook (fig. 18).
• Remove the HEPA filter (19) from its location, tap it and, if
necessary, replace it with an original Polti spare part.
• Reassemble the Hepa filter (19) and the air outlet filter grill
(17), inserting first the two pins 18a into the locking holes
18b (fig. 19).
NOTE: the filter lasts about 100 hours (about 6 months) in
normal domestic use. If the suction power noticeably
decreases, replace the filter even before the 100
hours.
TTTTRRRROOOOUUUUBBBBLLLLEEEESSSSHHHHOOOOOOOOTTTTIIIINNNNGG
GG
PPPPRRRREEEECCCCAAAAUUUUTTTTIIIIOOOONNNNSS
SS
¡Attention! Do not use the appliance without reading the instructions.
• Never store the appliance with the container full of water
• Never store the appliance vertically
• When the appliance is without the water container (5), pay attention that liquids and solid objects do not go inside
• In case of damage or malfunction, do not attempt to disassemble the appliance but contact the nearest Polti Authorised Service Centre.
• The mains the appliance is connected to must conform with
regulations
• Do not allow children to use the machine or any others who
may not know how to operate it .
Trouble
The suction switches off and
the 4 indicator lights flash
alternately.
The suction switches off during
use and the 4 indicator lights
flash simultaneously.
The drying cycle lasts more
than 3 minutes.
Cause
The suction hose or the elbow
tube are obstructed.
The suction power is too high
for the type of surface.
Intervention of the humidity
sensor because the filters
and tubes are not dry enough.
Intervention of the humidity
sensor because of too
much water in the container.
Intervention of the humidity
sensor for accidental
anomalous movement of
the appliance during use.
The humidity sensor does not
work correctly.
Solution
Take out any obstructions in
the tubes.
Keep the mains On/Off switch
pushed until the 4 indicator
lights go back to constant light
from flashing, taking the suction power to the speed previously set.
Operate as described in
the "Drying cycle" paragraph.
Empty the container and
operate as described in the
"Drying cycle" paragraph. Fill
the container again by using
the jug supplied.
Empty the container and
proceed as described
in the"Drying cycle" paragraph.
Contact the nearest Polti
Authorised Centre
4
EE
EE
NN
NN
GG
GG
LL
LL
II
II
SS
SS
HH
HH
LECOLOGICO ESPECIAL PARQUET

•In order not to compromise the safety of the appliance, only
use original spare parts and accessories, approved by the
manufacturer.
• Do not use the appliance if the supply cable or other important parts of the unit are damaged
• Do not touch the plug with wet hands
• Do not suck up acids or solvents, which may cause serious
damage to the appliance and especially do not suck up explosive powders or liquids, which may cause explosions if
they come in contact with the internal parts of the appliance.
•You must not use the appliance in environments where there
is danger of explosion
• Do not suck up objects in flames or glowing, such as embers, ash and other materials while burning.
• Should there be a liquid or foam leak during aspiration, immediately switch off the appliance and contact the nearest
Polti Authorised Service Centre.
• Polti declines liability for any damage or accident
derived from any use of LECOLOGICO which is not in
conformity with the instructions contained in this
booklet.
EEEELLLLEEEECCCCTTTTRRRRIIIICCCCAAAALLLLSSSSAAAAFFFFEEEETTTTYY
YY
No earth required.
Ensure the mains voltage suits your appliance.
Fitting the mains plug important
The wires in the mains lead are coloured in accordance with the
following code:
• Blue: Neutral
•Brown: Live
The wire which is coloured BLUE must be connected to the
Te rminal which is marked with the letter “N” or coloured BLACK.
The wire which is coloured BROWN must be connected to the
Te rminal which is marked with the letter “L” or coloured RED.
It is important that the outer sheath is clamped correctly into
the 3-pin plug.
If in doubt consuot your local Service Dealer or qualified
electrician before the machine is used.
A 13 AMP FUSE MUST BE FITTED TO THE MAINS PLUG.
BLACK
OR
BLUE
RED
OR
BROWN
L
E
N
F
U
S
E
5
EE
EE
NN
NN
GG
GG
LL
LL
II
II
SS
SS
HH
HH
LECOLOGICO ESPECIAL PARQUET
 Loading...