

Page 1

10.0 Megapixel Digital Camera
t1031
User’s Manual
Questions?
Need Some Help?
This manual should help you
understand your new product.
If you still have questions, call
our help line found on the
insert with this icon:
or visit
www.polaroid.com/support.
DIGITAL QUALITY, POLAROID SIMPLICITY™
Page 2

Table of Contents
1 Preface. .....................................................................................6
• About this Manual ....................................................................6
Federal Communications Commission (FCC) Compliance .............6
Declaration of Conformity ......................................................7
Trademark Recognition ...........................................................7
• Safety and Handling Precautions ...............................................7
Camera Information ..............................................................7
Battery Information ...............................................................8
2 Introduction ................................................................................9
• System Requirements ..............................................................9
• Main Features .......................................................................10
• Package Contents .................................................................11
• Camera Views .......................................................................12
• Camera Buttons .....................................................................14
• Navigation Control .................................................................14
• Notifications .......................................................................... 15
LED Indicators ..................................................................... 16
Operation Sound..................................................................17
• Camera Memory .....................................................................17
Internal memory ..................................................................17
External storage.................................................... ..............17
3 Getting Started .........................................................................18
• Attaching the Wrist Strap ....................................................... 18
• Inserting the Battery.. ............................................................. 18
• Inserting an SD/SDHC Memory Card .. ...................................... 19
• Charging the Battery ..............................................................20
• Turning the Power On and Off . ...............................................21
• Initial Settings .......................................................................21
Setting the Language ...........................................................21
Setting the Date & Time ............ .......................................21
• Modes ..................................................................................23
Switching between Record mode and Playback Mode ..............23
2
Polaroid t1031 Digital Camera User Guide
www.polaroid.com
Page 3

4 Using the LCD Monitor ...............................................................24
• LCD Monitor Layout ...............................................................24
Record Mode Screen Layout ..................................................24
Playback Mode Screen Layout ............................................... 26
Changing the LCD Monitor Display ........................................29
5 Recording Photos, Videos and Voices ..........................................31
• Taking Photos section . ........................................................... 31
• Using the Stabilizer .................................................................32
• Setting the Zoom Control ....................................................... 32
• Using Flash ...........................................................................33
• Using Macro ........................................................................ 34
• Using the Function Menu .......................................................35
My Mode ........................................................................... 35
Resolution ..........................................................................36
Quality ............................................................................... 36
EV Compensation ............................................................... 37
White Balance ...................................................................37
ISO ................................................................................... 38
Metering .............................................................................38
Color Mode ........................................................................ 39
• Using the Record Menu .......................................................... 40
Record Menu ......................................................................40
Setting the Scene Mode ......................................................41
Selecting the Smile Detection Mode ......................................44
Selecting the Blink Detection Mode ........................................ 44
Selecting the Photo Stitch Mode ...........................................44
Setting the Drive Mode ........................................................45
Setting the AEB ..................................................................46
Setting the AF Area ............................................................ 47
Setting the AF Lamp ........................................................... 47
Setting Sharpness ...............................................................48
Setting Saturation ..............................................................48
Setting Contrast ................................................................. 49
Setting the Digital Zoom ...................................................... 49
Setting the Date Stamp ....................................................... 50
Setting Auto Review ........................................................... 51
• Recording Movies ................................................................... 52
Polaroid t1031 Digital Camera User Guide
www.polaroid.com
3
Page 4

Setting the Movie Size ........................................................52
YouTube Mode ..................................................................53
• Recording Voices. ...................................................................... 54
6 Playback ..................................................................................55
• Viewing in Single Navigation ....................................................55
• Viewing thumbnails ............................................................... 56
• Zooming images .................................................................... 57
• Playing Movies ......................................................................57
To capture screenshot image from a movie clip ......................58
• Playing Voice Recording ..........................................................58
• Playing Voice Memo .............................................................. 59
• Deleting an Image/Video/Audio ...............................................59
Using the Delete Button ......................................................59
• Playback Menu .. ....................................................................60
Slideshow ..........................................................................61
Delete ................................................................................ 62
Protect .............................................................................64
Red Eye Correction .............................................................66
Voice Memo .......................................................................67
Photo Edit .........................................................................68
D-Lighting .........................................................................69
Rotate ............................................................................... 70
Trim ...................................................................................71
Resize ................................................................................ 72
Startup Image ....................................................................73
DPOF ................................................................................. 73
PictBridge ...........................................................................75
7 Using the Setup Menu ...............................................................76
• Setting Sounds .....................................................................77
• Setting Power Save ................................................................ 78
• Setting Date & Time .............................................................. 78
• Setting Language ..................................................................79
• Setting File Numbering ............................................................ 79
• Setting TV Out .......................................................................79
• Setting LCD Brightness ..........................................................80
• Setting Memory Kit ...............................................................80
4
Polaroid t1031 Digital Camera User Guide
www.polaroid.com
Page 5

• Reset All .............................................................................. 80
8 Installing the Software onto a Computer ......................................81
• Software Included with Your Camera ........................................ 81
• Installing the Software ............................................................82
• Uninstalling Polaroid t1031 Camera Driver ................................ 83
• Fast and Easy YouTube™ Upload .............................................83
9 Making Connections ..................................................................84
• Connecting the Camera to a TV ..............................................84
• Connecting the Camera a PC ..................................................85
• Connecting the Camera to a Printer .........................................85
10 Appendix ................................................................................86
• About Folder and File Names ..................................................86
Folder Structure ...................................................................86
File Naming .........................................................................87
11 Troubleshooting ......................................................................88
12 Getting Help ...........................................................................89
• Polaroid Online Services .......................................................... 89
• ArcSoft Software Help ............................................................ 89
13 Specifications .........................................................................90
Polaroid t1031 Digital Camera User Guide
www.polaroid.com
5
Page 6

1 Preface
• About this Manual
This manual is designed to assist you in using your new digital camera.
Allinformation presented is as accurate as possible but is subject to
change without notice.
Copyright
This manual contains proprietary information protected by copyright. All
rights are reserved. No part of this manual may be reproduced by any
mechanical, electronic or other means, in any form, without prior written
permission of the manufacturer.
© Copyright 2008
Federal Communications Commission (FCC) Compliance
This equipment has been tested and found to comply with the limits for
a Class B digital device, pursuant to Part 15 of the FCC Rules. These
limits are designed to provide reasonable protection against harmful
interference in a residential installation. This equipment generates, uses,
and can radiate radio frequency energy and, if not installed and used in
accordance with the instructions, may cause harmful interference to radio
communications. However, there is no guarantee that interference will
not occur in a particular installation. If this equipment does cause harmful
interference to radio or television reception, which can be determined by
turning the equipment off and on, the user is encouraged to try to correct
the interference by one or more of the following measures:
• Reorient or relocate the receiving antenna.
• Increase the distance between the equipment and the receiver.
• Connect the equipment to an outlet on a circuit different from that to
which the receiver is connected.
• Consult the dealer or an experienced radio/TV technician for help.
6
Polaroid t1031 Digital Camera User Guide
www.polaroid.com
Page 7

Warning: A shielded-type power cord is required in order to meet FCC emission
limits and to prevent interference to radio and television reception. Use only
shielded cable to connect I/O devices to this equipment. Any changes or
modifications not expressly approved by the manufacturer may void your
warranty and service agreement.
Declaration of Conformity
This device complies with Part 15 of the FCC rules. Operation is subject
to the following conditions:
• This device may not cause harmful interference.
• This device must accept any interference received, including interference
that may cause undersired operation.
Trademark Recognition
Windows 98/2000/ME/XP are registered trademarks of Microsoft
Corporation in the United States and/or other countries. Windows is an
abbreviated term referring to the Microsoft Windows Operation System.
All other companies or product names are trademarks or registered
trademarks of their respective companies.
• Safety and Handling Precautions
Camera Information
• Do not take apart or attempt to service the camera yourself.
• Do not expose the camera to moisture, or extreme temperatures.
• Allow the camera to warm up when moving from cold to warm
temperatures.
• Do not touch the camera lens.
• Do not expose the lens to direct sunlight for extended periods.
• Do not use abrasive chemicals, cleaning solvents or strong detergents to
clean the product. Wipe the product with a slightly damp soft cloth.
Polaroid t1031 Digital Camera User Guide
www.polaroid.com
7
Page 8

Battery Information
• Turn off the camera before installing or removing the battery.
• Use only the provided batteries or type of battery and charger that
came with your camera. Using other types of battery or charger may
damage the equipment and invalidate the warranty.
• When using Li-ion battery in this product, ensure that they are inserted
correctly. Inserting the battery upside down can cause damage to the
product and possibly cause an explosion.
• When the camera is used for an extended period of time, it is normal
for the camera body to feel warm.
• Download all pictures and remove the battery from the camera if you
are going to store the camera for a long period of time.
Need help with your digital camera?
Call our toll-free customer service number. Look for the insert with this icon:
Or visit www.polaroid.com.
8
Polaroid t1031 Digital Camera User Guide
www.polaroid.com
Page 9

2 Introduction
Thank you for selecting the new Polaroid t1031 digital camera for your
imaging needs. Incorporated with Polaroid’s sophisticated technology,
your exquisitely compact camera will offer a powerful range of high-end,
easy-to-use functions. It will allow you to capture those special occasions
with life-like clarity and beautiful color renditions. This manual provides
step-by-step instructions on how to use your camera, and is intended for
your reference only.
• System Requirements
In order to get the most out of your camera, your computer must meet the
following system requirements:
For Windows:
• Windows 98SE/2000/XP/ME/Vista
• Processor: Pentium III 1 GHz
• Memory: 512 MB or above
• HDD space: 500 MB or above
• 16bit color display monitor
• Microsoft DirectX 9.0C
• USB port and CD-ROM drive
• Stereo speakers
For Macintosh
• Power Mac G3 or later
• Mac OS X 10.3 - 10.5
• Memory: 256 MB or above
• HDD space: 500 MB or above
• USB port and CD-ROM drive
• Stereo speakers
Polaroid t1031 Digital Camera User Guide
www.polaroid.com
9
Page 10

• Main Features
• 10 mega pixels resolution
• Up to 3x optical zoom and 5x digital zoom
• 1/2.3 inch CCD image sensor
• 3 inch color LTPS LCD monitor
• 32MB internal flash memory with optional external SD/SDHC card
• Supports up to 4GB of SD card, and up to 8GB of SDHC card
• Sleek metallic finish
• Easy-to-use button interface
• DCF, DPOF, PictBridge compatibility
• Slideshow feature to review your pictures and movies
• A/V output to view your pictures and movies on your TV
• USB port to transfer photos and movies to your PC
Need help with your digital camera?
Call our toll-free customer service number. Look for the insert with this icon:
Or visit www.polaroid.com.
10
Polaroid t1031 Digital Camera User Guide
www.polaroid.com
Page 11
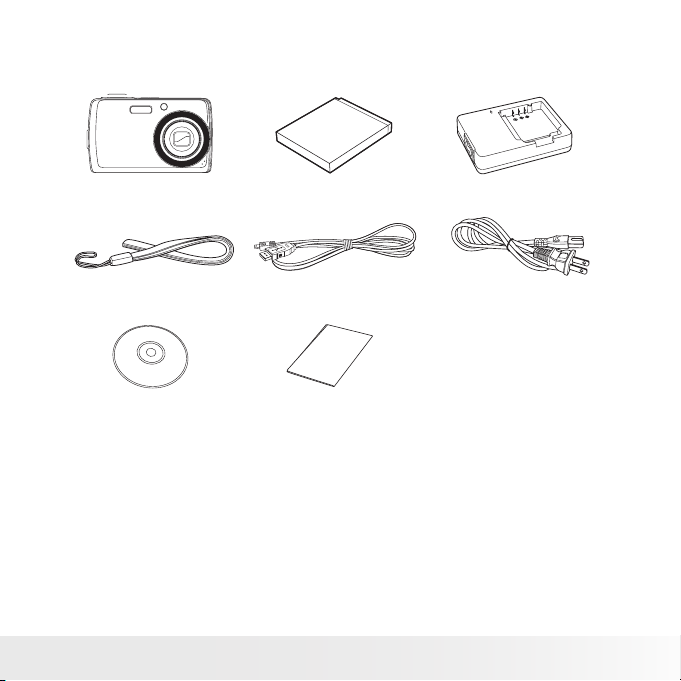
• Package Contents
Please check the contents of your camera package. It should contain:
Z
O
L
O
A
M
C
I
T
L
P
E
N
O
S
X
3
F
6
=
.
6
5
-
.
3
1
.
-
1
3
8
=
.
9
F
m
m
Digital camera Li-ion battery Battery charger
Wrist strap USB cable Power cord
Quic
k
St
G
ar
ui
t
d
e
CD-ROM Quick Start GuideUser Manual (optional)
Camera pouch (optional)AV cable (optional)
Polaroid t1031 Digital Camera User Guide
www.polaroid.com
User
M
an
ual
User Manual
11
Page 12

• Camera Views
Front View
Back View
LCD screen
Menu button
Function / Delete
button
Top View
12
Flash
Self-timer LED /
AF Assist Lamp
Z
O
L
O
A
M
C
I
T
L
P
E
N
O
S
X
3
F
6
=
.
6
5
-
.
3
1
.
-
1
3
8
=
.
9
F
m
m
Zoom Lens
Microphone
Zoom buttons
Play button
SET button /
4-way navigation
control
Stabilizer button Power button
Shutter button
LED indicator
Polaroid t1031 Digital Camera User Guide
www.polaroid.com
Page 13
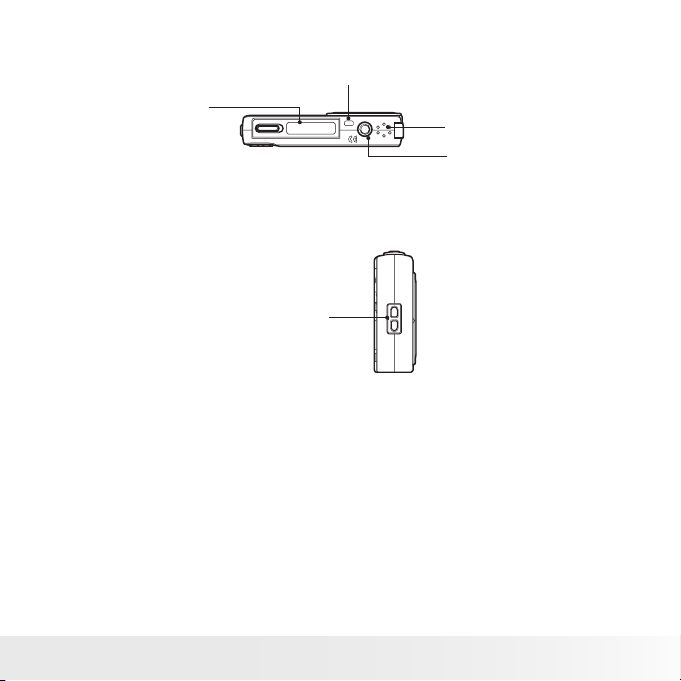
Bottom View
Battery/ SD card
compartment
Left View
USB / TV Out
Speaker
Tripod screw hole
Strap ring
Polaroid t1031 Digital Camera User Guide
www.polaroid.com
13
Page 14

• Camera Buttons
Your camera is equipped with different buttons for ease of use.
Button Description
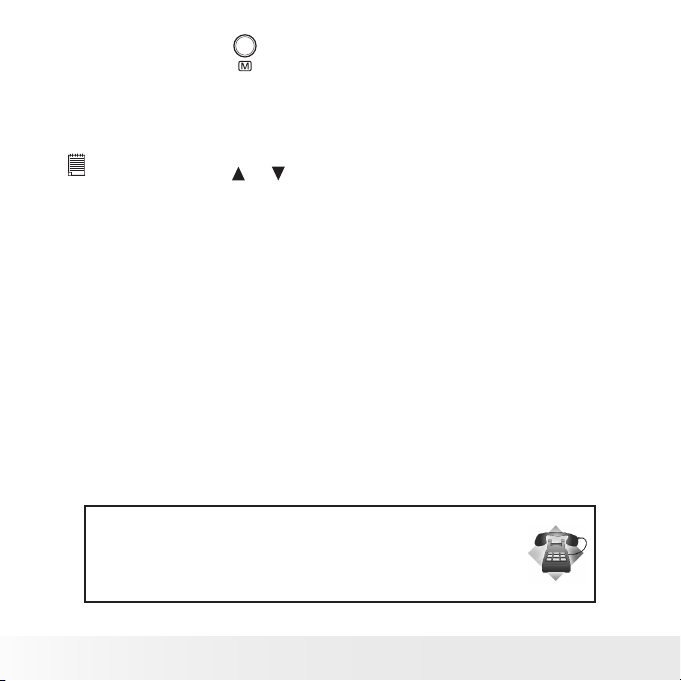
Power Press to turn on/off the power.
Stabilizer
Shutter Press to capture an image or start/stop recording video or audio clip.
Zoom Press the zoom buttons to change zoom focus.
Menu Press to enter or exit the Setup Menu.
Function/
Delete
The stabilizer sets the optiomal ISO value according to light levels to com-
pensate for camera shake.
Press to set stabilizer on/off.
If the camera is turned off, press the play button to turn on camera in
Playback mode.
Play
If the camera is turned on, press to toggle camera to Playback or Record
mode.
In Record mode, press to enter function menu.
In Playback mode, press to delete an image, video or audio clip.
• Navigation Control
The 4-way Navigation Control and the SET button allows you to access
the various menus available from the On Screen Display (OSD). You can
congure a wide range of settings to ensure maximum results from your
photos and videos. Further functions of these buttons are as follows:
UP button
Macro button
SET button
Flash button
Down button
14
Polaroid t1031 Digital Camera User Guide
www.polaroid.com
Page 15

Button Usage
SET
Flash/ Right
Macro/ Left
Up
Down
1. Conrm a selection when using the OSD menus.
2. In Record and Playback mode, press to change LCD screen display to
show OSD icons and guide lines.
1. In Record mode, press to scroll through the ash mode options. (Auto,
Anti Red-eye, Fill, Slow Sync and Off)
2. In Playback mode, press to view the next image, video or audio clip.
3. In Playback Video mode:
• Press to fast forward video playback
• Press again to continue normal playback
4. In Menu, press to enter the submenu or to navigate through the menu
selections.
1. In Record mode, press to turn on/off Macro.
2. In Playback mode, press to view the previous image, video or audio clip.
3. In Playback Video mode:
• Press to retrack video playback
• Press again to continue normal playback
4. In Menu, press to exit a submenu or to navigate through the menu
selections.
1. In Menu, press to navigate through the menu and submenu selections.
2. In Playback Video/ Audio mode, press to Start/Pause video or audio
playback.
1. In Menu, press to navigate through the menu and submenu selections.
2. In Playback Video/ Audio mode, press to Stop video or audio playback
• Notications
Your camera gives feedback to users in two ways:
• LED Indicators
• Operation Sound
Polaroid t1031 Digital Camera User Guide
www.polaroid.com
15
Page 16

Led Indicators
Your camera is equipped with 2 LED indicators:
• Operation Lamp, located on top of your camera. See “Top View” on
page 12 to locate the Operation Lamp, and
• Self-timer Lamp, located in the front of the camera. See “Front View”
on page 12 to locate the Self-timer Lamp.
LED LED Status Camera Status
Operation
Lamp
Self-timer
LED
Off Power Off .
Green (steady)
Green (fast blinking)
Green (slow blinking)
Amber (steady) Power saving (sleep mode).
Amber (very fast blinking)
Amber (fast blinking) Battery low or card error.
Amber (slow blinking)
Off Self-timer off.
Red (fast blinking)
Red (slow blinking)
Power On.
Ready to take pictures / record / playback.
Camera busy or deleting / copying images /
recording / data transfer is in progress.
Playing slideshow or recording voice or
movie.
In Record mode, ash is charging or AF
error.
In Playback mode, self-timer countdown
error.
Error message: card locked, le / folder error,
no memory card, copy / format error.
Self timer countdown is set between 0 to 3
seconds.
Self-timer countdown is set between 3 to
10 seconds.
16
Polaroid t1031 Digital Camera User Guide
www.polaroid.com
Page 17

Operation Sound
Your camera is equipped with a buzzer for operation sound.
Buzzer Camera Status
Two beeps
Three beeps
C o n ti nu o us
beep
Shutter sound The shutter is pressed to record an image.
Denotes the start of an operation like recording and printing. Also beeps
when using menu and set properties.
Denotes low battery and other warning and error message like memory full
and card error.
Beeps every second for countdown if self-timer is set between 3 to 10
seconds. Beeps every half second if self-timer is set between 0 to 3 seconds.
Beep goes off after the countdown.
A startup sound can be set when you power on your camera in the sound
setting menu. See “Setting Sounds” on page 77.
• Camera Memory
Internal memory
Your camera is equipped with 32MB of internal memory. Users can store
images up to 10MB. If there is no memory card inserted in the memory
card slot, all images, videos and audio clips recorded are automatically
stored in the internal memory.
External storage
Your camera supports SD cards of up to 4GB in size. It also supports
SDHC cards with a maximum capacity of 8GB. If there is a storage card
inserted in the memory slot, the camera automatically saves all images,
videos and audio clips in the external storage card. The icon indicates
the camera is using SD card.
Polaroid t1031 Digital Camera User Guide
www.polaroid.com
17
Page 18
3 Getting Started
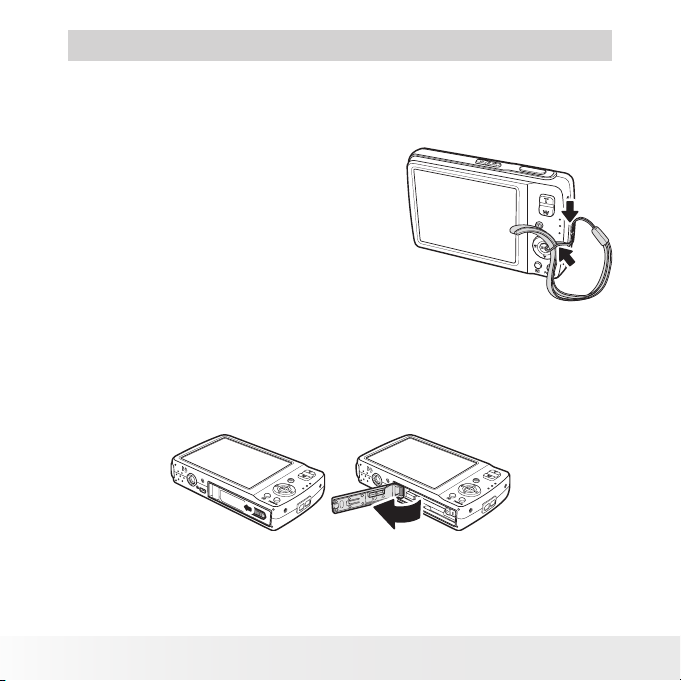
• Attaching the Wrist Strap
Follow these instructions to attach the wrist strap to your camera to
facilitate easy carrying:
1. Insert the short loop of the strap in the
strap eyelet.
2. Thread the larger loop of the strap though
the short loop and pull tight to attach the
strap to the camera.
• Inserting the Battery
Follow these instructions to insert the Li-ion battery into the battery
compartment. Please read “Battery Information” on page 8 before
inserting/removing batteries.
1. Open the battery compartment at the bottom of the camera.
2. Insert the battery into the compartment with the terminal facing inside
the camera and the battery indent next to the compartment door.
18
Polaroid t1031 Digital Camera User Guide
www.polaroid.com
Page 19

3. Close the battery compartment.
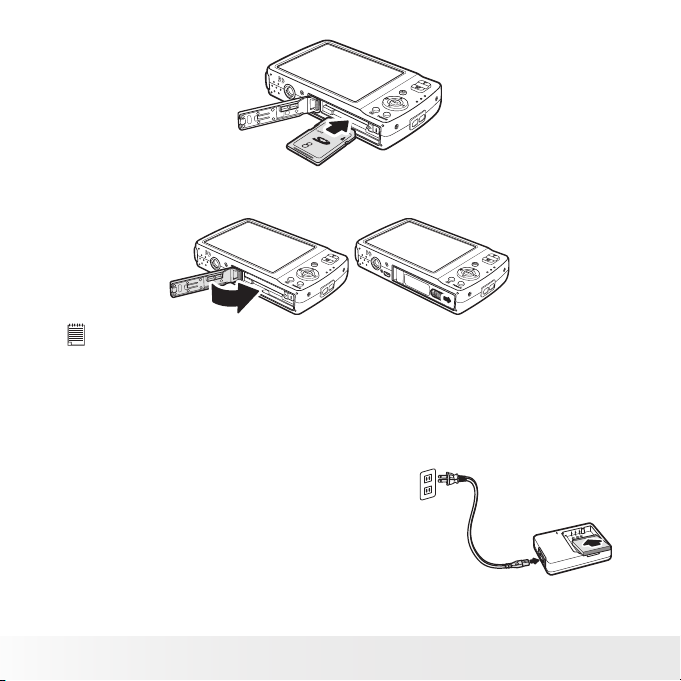
• Inserting an SD/SDHC Memory Card
Expand your camera’s storage by using SD or SDHC memory cards. Your
camera supports SD cards of up to 4GB and SDHC cards of up to 8GB
in size.
Follow these instructions to insert the SD/SDHC card.
1. Make sure the power is off before inserting a SD/SDHC memory card.
2. Open the battery compartment at the bottom of the camera.
3. Insert the SD/SDHC card into the memory card slot with the metallic
part facing the front side of the camera.
4. Push the SD/SDHC card into the memory slot until it clicks into place.
Polaroid t1031 Digital Camera User Guide
www.polaroid.com
19
Page 20
M B
5. Close the battery compartment.
NOTE:
To remove the SD/MMC card, gently push the card until it pops out. Pull out the
the card carefully.
• Charging the Battery
The battery that is included in the package is not charged. You need to
charge the battery before using the camera.
1. Insert the battery into the battery
charger as shown.
2. Connect the power cord to the
battery charger.
3. Plug the power cord to the main
outlet.
The battery charging time is 2 hours.
20
Polaroid t1031 Digital Camera User Guide
www.polaroid.com
Page 21

Battery icon on the LCD monitor indicates the battery level. See “LCD
Monitor Layout” on page 24.
• Turning the Power On and Off section
There are two ways to turn on the camera:
• Press the Power button. The start up image displays briey and the
startup sound plays if enabled. The zoom lens extends and the camera
is turned on in Record mode.
• Press the Play button. The camera is turned on in Playback mode. The
zoom lens is not extended.
To turn off the camera, press the Power button.
See “Modes” on page 23 to know more about Record and Playback
mode.
• Initial Settings
When you turn on your camera for the first time, you will be asked to do
the initial settings of your camera.
When you turn the Power button on, the Language Menu is displayed on
the LCD screen for you to setup the display langauge.
Setting the Language
1. Press , , or to move through the selection
2. Select a language, then press SET to apply.
Setting the Date & Time
1. Press or to move through the selection
2. Press or keys to change the value for the date and time.
3. Press SET to apply.
Polaroid t1031 Digital Camera User Guide
www.polaroid.com
21
Page 22
4. If necessary, press to close the menu.
Now, you are ready to start taking photos and videos.
NOTE:
• Holding down the or changes the values continuously.
• If the batteries are removed for more than 48 hours, the Date & Time will
have to be re-set.
Need help with your digital camera?
Call our toll-free customer service number. Look for the insert with this icon:
Or visit www.polaroid.com.
22
Polaroid t1031 Digital Camera User Guide
www.polaroid.com
Page 23

• Modes
Your camera has two modes:
Record mode
• Set to Record mode to capture images and record videos and audio clips.
• Record mode can be further set to mode options like auto, movie and scene
selection modes. See “Selecting the Record mode options” below.
Playback mode
• Set your camera to Playback mode to view and edit captured images
and playback videos and audio clips. You can also attach voice memo
to images in this mode.
When you turn on your camera using the Power button, the camera is
automatically set to Record mode.
Switching between Record mode and Playback Mode
In Record mode, press the Play button to switch to Playback mode.
In Playback mode, press the Play button to back to Record mode.
Selecting the Record mode options section
Maximize the quality and ease of use of your camera by using the different
mode options. The mode options allow you to capture images with preset
settings according to scene conditions.
1. Set the camera to Record mode.
2. Press button to launch Record Mode.
3. Press to enter Record Mode submenu.
4. Select a mode.
5. Press the SET button to apply selected mode.
NOTE:
• For more information, see “Using the Record Menu” on page 40.
• Use the 4-way navigation control to move through the menu selections.
Polaroid t1031 Digital Camera User Guide
www.polaroid.com
Record Mode
Drive Mode
AEB
AF Area
AF Lamp
Sharpness
OFF
OFF
23
Page 24
4 Using the LCD Monitor
The high resolution 3” LCD monitor shows all important information
regarding camera settings as well as the visual image of your photo or
video. The display on the LCD monitor is called the On Screen Display or
OSD.
• LCD Monitor Layout
The following illustrations show the LCD monitor layout and icon
descriptions.
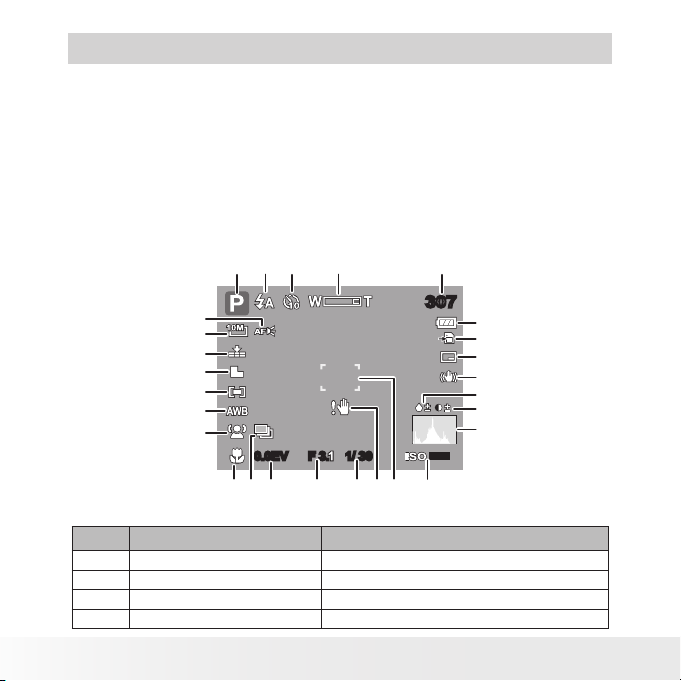
Record Mode Screen Layout
1 2 3 4 5
27
307307
26
25
24
23
22
21
F 3.F 3. / 301/ 300.0EV0.0EV
AUTO
1314151617181920
No. Item Description
1 Record Mode Indicates the current mode.
2 Flash Indicates ash settings.
3 Self-timer / Burst Indicates drive mode settings.
4 Zoom indicator Displays zoom.
24
Polaroid t1031 Digital Camera User Guide
6
7
8
9
10
11
12
www.polaroid.com
Page 25

No. Item Description
5 Shots remaining Indicates the remaining shots available.
6 Battery Indicates battery level.
7 Storage media Indicates current storage media in use.
8 Date stamp Indicates date stamp is enabled.
9 Stabilizer Indicates stabilizer function is enabled.
10 Saturation Displays saturation settings.
11 Contrast Displays contrast settings.
12 Histogram Graphic display of ISO settings.
13 ISO Displays ISO settings.
14 Focus area Use to frame subject to capture.
15 Shake warning Indicates that the camera is shaking.
16 Shutter speed Displays shutter speed settings.
17 Aperture value Displays aperture settings.
18 Exposure Displays exposure settings.
19 AEB Displays AEB settings.
20 Macro Indicates macro is enabled.
21 Face tracking Indicates face tracking is enabled.
22 White balance Displays white balance settings.
23 Metering Displays metering settings.
24 Sharpness Displays sharpness settings.
25 Quality Displays quality settings.
26 Resolution Displays resolution settings.
27 AF lamp Displays AF lamp is enabled.
Polaroid t1031 Digital Camera User Guide
www.polaroid.com
25
Page 26
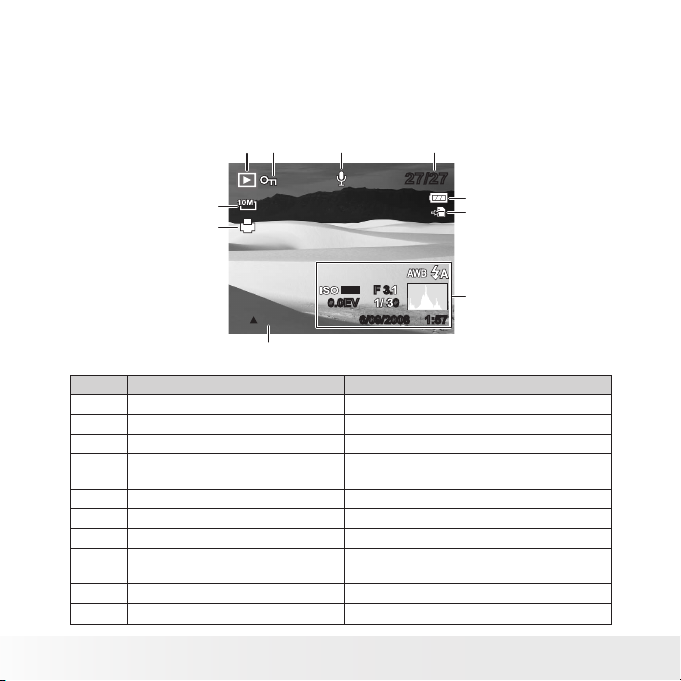
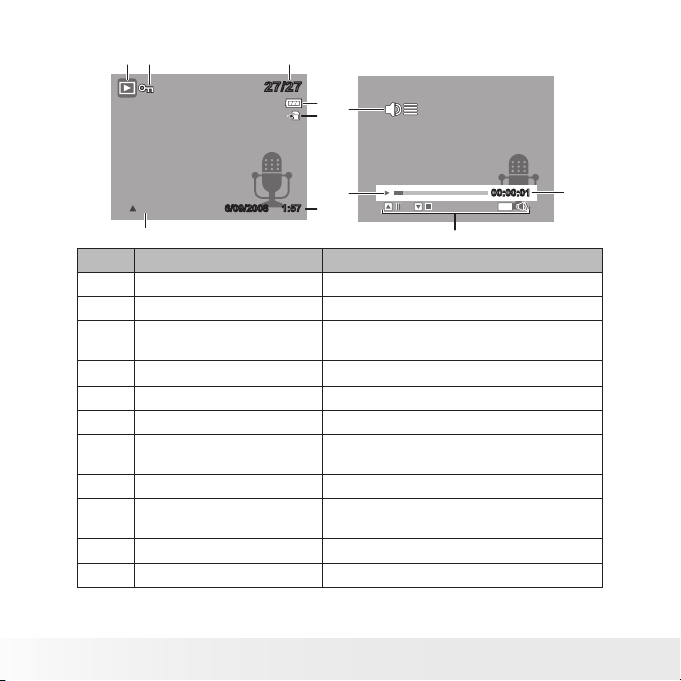
Playback Mode Screen Layout
1 2 3
5
The Playback mode display varies depending on the type of image being
viewed.
Playback mode display of still images:
4
27/2727/27
10
9
AUTO
F 3.F 3.
:PLAY
8
No. Item Ref. Page
1 Playback mode Indicates playback mode.
2. Protect Indicates le is protected.
3 Voice memo Indicates voice memo is attached.
4 File no. / Total no.
5 Battery Indicates battery level.
6 Storage media Indicates used storage memory.
7 Recording information Displays recording information of the le.
8 Button intro
9 DPOF Indicates the le is marked for printing.
10 Resolution Displays the resolution settings.
26
000.0EV0.0EV
6/09/2008 1:576/09/2008 1:57
Indicates the le number over the total
number of les in the storage card.
Indicates the button to press on the camera
to play a movie or audio le.
Polaroid t1031 Digital Camera User Guide
6
7
www.polaroid.com
Page 27
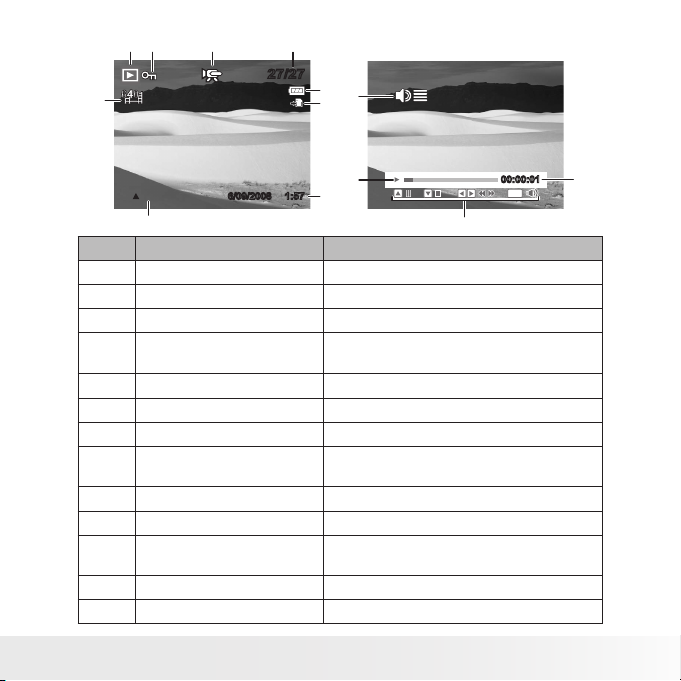
Playback mode of videos:
1 2 3
9
27/2727/27
4
5
13
6
:PLAY
8
No. Item Description
1 Playback mode Indicates playback mode.
2 Protect Indicates the le is protected.
3 Movie clip Indicates the le is a movie.
4 File no. / Total no.
5 Battery Indicates battery level.
6 Storage media Indicates used storage memory.
7 Recording information Displays recording information of the le.
8 Button intro
9 Video size Indicates video size
10 Played time Indicates played time.
11 Key indicator
12 Playing status Displays playing status.
13 Volume Indicates volume settings.
Polaroid t1031 Digital Camera User Guide
www.polaroid.com
6/09/2008 1:576/09/2008 1:57
12
7
Indicates the le number over the total number
of les in the storage card.
Indicates the button to press on the camera to
play a movie or audio le.
Indicates the buttons to press on the camera
to apply the functions.
00:00:0100:00:01
WT
10
27
Page 28
Playback mode of audio clips:
9
8
1 2 3
27/2727/27
4
11
5
10
:PLAY
7
6/09/2008 1:576/09/2008 1:57
6
No. Item Description
1 Playback mode Indicates playback mode.
2 Protect Indicates the le is protected.
3 File no. / Total no.
Indicates the le number over the total number
of les in the storage card.
4 Battery Indicates battery level.
5 Storage media Indicates used storage memory.
6 Recording information Displays recording information of the le.
7 Button intro
Indicates the button to press on the camera to
play a movie or audio le.
8 Played time Indicates played time.
9 Key indicator
Indicates the buttons to press on the camera
to apply the functions.
10 Playing status Displays playing status.
11 Volume Indicates volume settings.
28
Polaroid t1031 Digital Camera User Guide
00:00:0100:00:01
WT
www.polaroid.com
Page 29

• Changing the LCD Monitor Display
The type of information displayed on the LCD screen can be changed
using the SET button.
Press the SET button repeatedly to change the LCD display from one type
to another.
In Record Mode, the LCD display can be changed into any of the
following:
307307
0.0EV0.0EV
307307
AUTO
OSD on Full OSD on
Guide lines on OSD off
NOTE:
• The OSD information may vary depending on the record mode type.
• Use the “Guide lines” to properly set image for capture.
Polaroid t1031 Digital Camera User Guide
www.polaroid.com
29
Page 30

In Playback mode, the LCD display can be changed into any of the following:
27/2727/27
OSD on Full OSD on OSD off
NOTE:
LCD display cannot be changed in the following situations:
• Manual exposure mode
• Recording movie or audio clips
• Playing movie or audio clips
• Playing slideshow
Need help with your digital camera?
Call our toll-free customer service number. Look for the insert with this icon:
Or visit www.polaroid.com.
30
Polaroid t1031 Digital Camera User Guide
www.polaroid.com
Page 31

5 Recording Photos, Videos and Voices
• Taking Photos section
Now that you are familiar with your camera, you are now ready to take
your photos.
Taking photos with your camera is very simple.
1. Turn on the camera by pressing the
Power button.
2. Frame the shot using the focus bracket
on the LCD monitor. See illustration on
the right.
0.0EV0.0E V
3. Half press the Shutter button. The
camera automatically adjusts the
focus and exposure. When the camera
is ready to take the photo, the frame
bracket turns green, the shutter speed
and aperture value are displayed.
4. Fully press the Shutter button to capture
image.
When the shake warning icon appears, hold the camera steadily, with
your arms at your side or use a tripod to stabilize the camera to prevent
blurred images.
307307
AUTO
Polaroid t1031 Digital Camera User Guide
www.polaroid.com
31
Page 32

• Using the Stabilizer
The Stabilizer function prevents
blurred images caused by shaking.
Stabilizer button
This function is only available if
ISO is set to Auto. See “ISO” on
page 38 on how to adjust the ISO
settings.
To activate Stabilizer
307307
Press the Stabilizer button
on top of your camera to
enable/disable stabilizer.
Stabilizer on.
If Stabilizer is enabled, the
stabilizer icon is displayed
on the LCD monitor.
• Setting the Zoom Control
Your camera features up to 3x optical zoom and up to 5x of digital
zoom.
1. Press the Zoom buttons to zoom in or
zoom out an image.
2. The zoom indicator appears on the LCD
onitor.
Zoom buttons
To adjust the zoom:
1. Press the T button to optically zoom in to the maximum until it stops.
2. Release the button.
32
Polaroid t1031 Digital Camera User Guide
Press to zoom in.
Press to zoom out.
www.polaroid.com
Page 33

3. Press the T button again to switch to digital zoom automatically.
Zooming continues.
Optical zoom Digital zoom
x5.0x5.0
307307
x5.0
x5.0
307307
0.0EV0.0EV
AUTO
0.0EV0.0EV
AUTO
NOTE:
• Digital zoom is not activated in recording movies.
• Using Flash
When taking pictures in difficult lighting conditions, use the Flash to get
correct exposure. This function cannot be activated in recording movies
or continuous shooting.
To activate Flash:
• Press the Flash/Right button on your camera
repeatedly until your desired flash mode is
displayed on the LCD monitor.
Polaroid t1031 Digital Camera User Guide
www.polaroid.com
Flash button
33
Page 34

Your camera is equipped with five flash modes:
Auto flash. The flash fires automatically
whenever extra lighting is needed.
Red-eye reduction. The flash fires
twice to reduce the red-eye effect.
Forced on. The flash fires whenever you
press the shutter button regardless of
lighting conditions.
Slow sync. The flash fires with a slow
shutter speed.
Forced off. The flash is turned off.
• Using Macro
Macro mode is designed for close-up
photography.If Macro is enabled, you can
capture the detail and sharpness of a very
close image by fixed focus.
To activate macro:
• Press the Macro/Left button of your camera
to enable/disable macro.
If macro is enabled, the macro icon is
displayed on the LCD monitor.
macro enabled
34
Polaroid t1031 Digital Camera User Guide
Auto flash is enabled.
307307
Macro button
307307
www.polaroid.com
Page 35

• Using the Function Menu
The Function Menu is used to adjust capture settings in Record Mode. It
contains My Mode, Resolution, Quality, EV Compensation, White Balance,
ISO, Metering, and Color Mode.
NOTE:
• Press the FUNC button of your camera to launch the Function Menu.
• Press the FUNC button again to close the menu.
• The Menu bar displays the current
status of your camera settings. Only
the available functions for the settings
are shown as icon on the menu bar.
• The availabe options for each item
on the menu bar are shown in the
Menu options.
Menu bar
• Use the or to move through the
menu selections then press the SET
10M
0.0EV
AWB
ISO
AUTO
Program
N
button to save and apply changes.
Menu options
My Mode
The My Mode function displays the 6
most recent modes used in order. When
you move through the different modes
in the menu options, the items on the
menu bar changes synchronously to the
corresponding available settings.
Polaroid t1031 Digital Camera User Guide
www.polaroid.com
10M
0.0EV
AWB
ISO
AUTO
Program
N
35
Page 36

Resolution
The Resolution function is used to set the
resolution before you capture the image.
Changing the resolution affects the number
of images that can be stored in your
memory card. The higher the resolution,
the more memory space is required.
The table below shows the resolution values for still images.
Icon Pixel Size
10M
3672 x 2748 A2 Size 2595 x 1944 A4 Size
3:2
3672 x 2448 A2 Size 2048 x 1536 4” x 6”
16:9
3672 x 2064 HDTV 1920 x 1080 HDTV
8M
3264 x 2448 A3 Size 640 x 480 E-mail
Print Size
Suggestion
Icon Pixel Size
5M
3M
16:9
VGA
10M
0.0EV
AWB
ISO
AUTO
10M
10M 8M 5M
N
Print Size
Suggestion
Quality
The Quality function lets you adjust the
quality settings of your photos before you
capture them. The quality determines the
amount of compression applied to your
photos. More compression results in a more
detailed image. However, the higher the
quality, the more memory space is required
in your memory card. The available settings
for still images are as follows:
Super fine, Fine, and Normal.
10M
0.0EV
AWB
ISO
AUTO
Fine
N
3:2 16:9
36
Polaroid t1031 Digital Camera User Guide
www.polaroid.com
Page 37

EV Compensation
EV stands for Exposure Value. In difficult
lighting condition, the auto exposure
function of your camera may be misled
into giving the wrong readings. The EV
Compensation function allows you to
adjust the exposure value and correctly
expose your images. Available for still
images only.
10M
0.0EV
AWB
ISO
AUTO
0.0EV
N
• To adjust EV settings, press the or keys to increase/ decrease
the value. As you adjust the settings, the LCD monitor synchronously
displays the image applying the EV settings. Press the SET button to
save and apply changes.
• The available settings are” 0EV(Default), +2.0EV, +1.7EV, +1.3EV,
+1.0EV, +.7EV, +.3EV, -2.0EV, -1.7EV, -1.3EV, -1.0EV, -.7EV, and
-.3EV.
White Balance
The White Balance function allows you to adjust
the camera setting according to the white light
when recording still images and movies.
• As you move through the selection, you
can see the preview on the LCD screen.
10M
0.0EV
AWB
ISO
AUTO
Auto
AWB
N
Polaroid t1031 Digital Camera User Guide
www.polaroid.com
37
Page 38

Icon Item Description
AWB
Auto (Default) The camera automatically adjusts the white balance.
Daylight Ideally used for bright sunny conditions.
Cloudy Ideally used for cloudy conditions.
Tungsten
Ideally used for indoor photos with tungsten or halogen lighting
without a flash.
Flourescent 1 Ideally used for indoor photos with flourescent lighting conditions.
Flourescent 2 Ideally used for indoor photos with flourescent lighting conditions.
Custom Used when light source cannot be specified.
ISO
The ISO function lets you adjust the ISO sensitivity in recording still
images depending on the lighting levels of your surroundings.
• Use a higher ISO setting in dim conditions
and a lower ISO setting in brighter
conditions.
• As you move through the selection, you
can see the preview on the LCD screen.
• Available settings are: Auto, 50, 100,
200, 400, 800, 1600, and 3200.
10M
0.0EV
AWB
ISO
AUTO
800
ISO
ISO
ISO
800
1600
N
3200
Metering
The Metering function lets you select the
area of the subject or frame by which the
camera measures light to record still images or
movies.
• As you move through the selection, you
can see the preview on the LCD screen.
10M
0.0EV
AWB
ISO
AUTO
Multi
N
38
Polaroid t1031 Digital Camera User Guide
www.polaroid.com
Page 39

Icon Item Description
Multi
Center
Spot
The camera measures the exposure readings from multiple
points in the suject area.
The camera measures the average light from the entire frame
but gives more importance to the values near the center.
The camera selects the exposure value based on the center
of your picture.
Color Mode
The Color Mode function lets you record still
images or movies and apply different colors or
tones for a more artistic effect.
• As you move through the selection, you
can see the preview on the LCD screen.
Icon Item Description
Normal The camera records normally.
N
Vivid
V
Sepia Images are captured in sepia tones.
S
B&W Images are captured in black and white.
BW
Vivid Red
R
Vivid Green
G
Vivid Blue
B
The camera captures the image with more contrast and
saturation emphasizing on the bold colors.
Captured image becomes reddish. Ideally used to record
images like flowers and cars to make them more vivid.
Captured image becomes greenish. Ideally used to record
images like mountains and lawns to make them more vivid.
Captured image becomes bluish. Ideally used to record images
like the sky and the ocean, to make them look more vivid.
10M
0.0EV
AWB
ISO
AUTO
Normal
VN S RBW
N
Polaroid t1031 Digital Camera User Guide
www.polaroid.com
39
Page 40

• Using the Record Menu
If you are in Record mode, you can access the Record menu simply
by pressing the MENU button on your camera.
When the menu is displayed, use the 4-way navigation control and
the SET button to move through menu selections and apply your
desired settings. To close the menu anytime, press the menu
button again.
Record Menu
The Record menu allows you to change modes, and setup other capture
settings.To go to Record Menu:
1. Set the camera to Record mode. See
“Switching between Record mode and
Playback Mode” on page 23.
2. Press to launch the Record Menu.
3. Use the or keys to move through
the menu selections.
4. To select an item, press .
5. Change the submenu settings using the
4-way navigation control.
6. Press the SET button to save and apply
settings.
Record Mode
Drive Mode
AEB
AF Area
AF Lamp
Sharpness
OFF
OFF
40
Polaroid t1031 Digital Camera User Guide
www.polaroid.com
Page 41

Setting the Scene Mode
Setting the Scene mode allows you to capture
images with preset settings according to the
scenes or environment.
1. From the Record Menu, press to
select Record Mode.
2. Use the navigation controls to move
through the selection.
3. Press the SET button to save and
apply changes.
The table below shows the available
scene mode settings.
Polaroid t1031 Digital Camera User Guide
www.polaroid.com
Record Mode
Drive Mode
AEB
AF Area
AF Lamp
Sharpness
Select
Auto
OFF
OFF
OK
41
Page 42

Icon Item Description
Auto
Program
Aperture Priority
Shutter Priority
Manual Exposure
Portrait The camera blurs the background to focus on the subject.
Landscape This feature is used to emphasize wide scenic views.
Sunset
Backlight
Smile Capture
Kids This feature is used to capture still images of moving kids.
Night Scene
Fireworks
Snow This feature is used for beach and snow scenes
Sports This feature captures still images in high speed motions.
The simplest way to shoot basic images. Settings are adjusted
automatically.
The camera automatically adjusts suitable shooting settings
like shutter speed and aperture values
The camera automatically adjusts an aperture value to match
the brightness.
The camera automatically adjusts the shutter speed to match
the brightness.
This feature allows the user to adjust shutter speed and
aperture value to correctly expose your images
This feature enhances the red hue for recording sunset
images.
This feature is used to capture the image of a backlight object
by changing the metering.
This feature uses face tracking to auto detect faces to
capture. When faces are detected, it takes six continuous
shots.
This feature is used to capture images with night scenery
background.
This feature slows shutter speed to capture fireworks
explosions.
42
Polaroid t1031 Digital Camera User Guide
www.polaroid.com
Page 43

Icon Item Description
Party This feature is used for wedding or indoor party settings.
Candlelight This feature is used to capture warm candle light effects.
NIght Portrait
Soft Skin
Soft Flowing
Water
Food
Building This feature enhances the edges of captured images.
Text
Auction
Photo Stitch Used for taking panoramic pictures
Blink Detection Used for detecting whether the subjects’ eyes are open
Movie This mode is used to record movie clips.
Voice REC This mode is used to record audio clips.
This feature is used to capture portrait pictures with night or
dark background.
This feature enhances skin tone thus facial skin appears
smooth.
This feature enhances smooth effects like water or silk.
This feature is used to capture food images. The increased
saturation in this mode makes the captured image more
enticing.
This feature enhances the black and white contrast normally
used when capturing text images
Pictures taken in Auction mode are automatically saved under
a specific folder named “_AUCT”. See “Folder Structure” on
page 86 for more information.
After selecting the scene mode, the selected mode, except Voice Rec, will
be added to the forefront in MyMode of Function Menu. See “Using the
Function Menu” on page 35.
Polaroid t1031 Digital Camera User Guide
www.polaroid.com
43
Page 44

Selecting the Smile Detection Mode
This feature is based on “Face Tracking”. When you use smile capture,
you need to set the face tracking feature on rst.
Enter to the scene mode, Use the navigation controls to select “Smile
Capture” item and press SET button to confirm.
Selecting the Blink Detection Mode
NO MORE CLOSED EYES IN YOUR PICTURES.
This feature allows the camera to detect when your subjects’ eyes are
open. The camera will only take the pictures when the subjects’ eyes
are open. If you have taken blinked pictures, there will be a red frame
on the subjects’ faces. When you playback the pictures, there will be an
exclamation mark and a triangle to indicate you have blinked pictures.
Enter to the scene mode, Use the navigation controls to select “Blink
Detect” item and press SET button to confirm.
Selecting the Photo Stitch Mode
This feature is used for shooting scenery. Use Photo Stitch to make your
panoramic pictures or combine different scenes into one picture.
Enter to the scene mode, Use the navigation controls to select “Photo
Stitch ” item and press SET button to confirm.
44
Polaroid t1031 Digital Camera User Guide
www.polaroid.com
Page 45

Setting the Drive Mode
Your camera features a Self-timer and Burst
which can be set in the Drive mode function
in the Record Menu. The Self-timer allows
you to take photos after a pre-defined delay.
While burst lets you take consecutive shots.
This function is only available in recording still
images. The Drive mode setting is automatically
set to off when you turn off the camera.
To set the Drive Mode
1. From the Record Menu, select Drive Mode.
2. Use the or keys to go through the
selection.
3. Press the SET button to save and apply
changes.
The table below shows the available Drive
mode settings.
Need help with your digital camera?
Call our toll-free customer service number. Look for the insert with this icon:
Or visit www.polaroid.com.
Record Mode
Drive Mode
AEB
AF Area
AF Lamp
Sharpness
Record Mode
10
Drive Mode
2
AEB
x
2
AF Area
AF Lamp
OFF
Sharpness
10 sec.
2 sec.
Double
Burst
Off
OFF
OFF
OFF
OFF
Polaroid t1031 Digital Camera User Guide
www.polaroid.com
45
Page 46

Icon Item Description
10 Sec Self-timer
10
2 Sec Self-timer
2
Double Self-timer
x
2
Burst
Off (Default) Captures an image without time delay.
Sets a 10-second delay to capture image after pressing the
shutter button.
Sets a 2-second delay to capture image after pressing the
shutter button.
Performs delay and capture twice:
• Performs a 10-second delay, then captures the image.
• Performs another 2-second delay then cap tures the image
again.
Performs continuous shooting when the shutter button is
pressed. Stops shooting when the shutter button is released.
Setting the AEB
AEB stands for Automatic Exposure Bracketing. This feature captures the
same image with 3 different exposure settings.
• The settings are recorded in the following order: standard exposure,
under exposure, and over exposure.
• Available settings are: [On] and [Off].
To set AEB
1. From the Record menu, select AEB.
2. Use the or keys to go through the
selection.
3. Press the SET button to save and apply
changes.
46
Polaroid t1031 Digital Camera User Guide
Record Mode
Drive Mode
AEB
On
AF Area
OFF
Off
AF Lamp
Sharpness
www.polaroid.com
OFF
OFF
Page 47

Setting the AF Area
AF stands for Automatic Focus. This feature determines the area on which
the camera focuses.
To set AF Area
1. From the Record Menu, select AF Area.
2. Use the or selection.
3. Press the SET button to save and apply
changes. The table below shows the
available AF area settings.
Icon Item Description
Face Tracking
Wide
Center The focus area is fixed on the center
The camera automatically detects the position of a face
and sets the focus.
The camera automatically selects focus area within the
wide frame.
Setting the AF Lamp
The AF Lamp function allows you to record
images even in low light conditions.
If AF Lamp is set to Auto, the AF lamp located
in the front of the camera, see “Front View” on
page 12, emits a red light by half pressing the
shutter button allowing the camera to focus
easily. Available settings are: [Auto] and [Off].
To set AF Lamp
1. From the Record Menu, select AF Lamp.
2. Use the or keys to go through the selection.
3. Press the SET button to save and apply changes.
Polaroid t1031 Digital Camera User Guide
www.polaroid.com
Record Mode
Drive Mode
AEB
AF Area
AF Lamp
Sharpness
Record Mode
Drive Mode
AEB
AF Area
AF Lamp
OFF
Sharpness
Face Tracking
Wide
Center
Auto
Off
OFF
OFF
OFF
OFF
47
Page 48

Setting Sharpness
This function alllows you to enhance or soften finer details of your photos.
To set Sharpness
1. From the Record Menu, select Sharpness.
2. Use the or keys to go through the
selection.
3. Press the SET button to save and apply
changes.
The table below shows the available Sharpness
settings.
Icon Item Description
High Sharpens the image.
Normal Normal sharpness.
Low Softens the image.
Record Mode
Drive Mode
AEB
AF Area
AF Lamp
Sharpness
High
Normal
Low
OFF
OFF
Setting Saturation
The Saturation function lets you adjust the color saturation in your photos.
Use a higher saturation setting for rich colors and a lower saturation
setting for more natural tones.
To set Saturation
1. From the Record Menu, select Saturation.
2. Use the or keys to go through the
selection.
3. Press the SET button to save and apply
changes.
The table below shows the available Saturation
settings.
48
Polaroid t1031 Digital Camera User Guide
Saturation
High
Contrast
Normal
Digital Zoom
Low
Date Stamp
Auto Review
www.polaroid.com
OFF
OFF
Page 49

Icon Item Description
High Enhances saturation.
Normal Normal saturation is applied.
Low Reduces saturation.
Setting Contrast
This function allows you to adjust the contrast of your photos.
To set Contrast
1. From the Record Menu, select Contrast.
2. Use the or keys to go through the
selection.
3. Press the SET button to save and apply
changes.
The table below shows the available Contrast
settings.
Icon Item Description
High Enhances the contrast.
Normal Normal contrast.
Low Reduces the contrast.
Saturation
Contrast
High
Digital Zoom
Normal
Date Stamp
Low
Auto Review
OFF
OFF
Setting the Digital Zoom
This feature controls the digital zoom mode of your camera.
Your camera enlarges an image using the optical zoom first. When the
zoom scale exceeds 5x, the camera uses digital zoom.
Polaroid t1031 Digital Camera User Guide
www.polaroid.com
49
Page 50

1. From the Record Menu, select Digital Zoom.
2. Use the or keys to go through the
selection.
3. Press the SET button to save and apply
changes.
The table below shows the available Digital
Zoom settings.
Icon Item Description
Intellect Zoom Enlarges the image digitally with almost no distortion.
Standard Zoom
Off Uses the optical zoom only.
NOTE:
The maximum Intellect zoom scale varies depending on the image type and resolution.
Enlarges all image sizes up to a maximum of 12x, but the
image quality deteriorates.
Saturation
Contrast
Digital Zoom
Intellect Zoom
Date Stamp
Standard Zoom
Auto Review
OFF
Off
OFF
OFF
Setting the Date Stamp
The Date Stamp function allows you to add the recorded date and time
on your photos.
The recording date and time are based on your camera’s clock settings.
Once date and time are stamped on a photo, they can no longer be edited
or deleted.
Limitations of Date Stamp functions are as follows:
• Available for still images only.
• May slowdown AEB/ continuous shooting when Date Stamp is enabled
in /AEB/ Burst mode.
• If Date Stamp is enabled, digital zoom is automatically turned off.
• In vertical or rotated images, the date and time on your photos still
appear horizontally.
50
Polaroid t1031 Digital Camera User Guide
www.polaroid.com
Page 51

To set Date Stamp
1. From the Record men, select Date Stamp.
2. Use the or keys to go through the
selection.
3. Press the SET button to save and apply
changes.
Available settings are as follows:
• Date
• Date & Time
• Off
Setting Auto Review
The Auto Review function lets you view the
captured image right after shooting it.
If Auto review is On, the camera will display
the captured image for 1 second on the LCD
monitor.
Available settings are: On, Off.
To set Auto Review
1. From the Record menu, select Auto
Review.
2. Use the or keys to go through the
selection.
3. Press the SET button to save and apply
changes.
Polaroid t1031 Digital Camera User Guide
www.polaroid.com
Saturation
Contrast
Digital Zoom
Date Stamp
Auto Review
Saturation
Contrast
Digital Zoom
Date
Date Stamp
Date & Time
Auto Review
OFF
Off
Saturation
Contrast
Digital Zoom
Date Stamp
Auto Review
Saturation
Contrast
Digital Zoom
Date Stamp
ON
On
Auto Review
OFF
Off
OFF
OFF
OFF
OFF
OFF
OFF
OFF
OFF
51
Page 52

• Recording Movies
1. From the Record mode menu, select Movie.
2. Focus your camera on the subject that you
want to take.
3. Press the Shutter button to start recording.
4. Use the control to zoom in and zoom out
Record Mode
Drive Mode
AEB
AF Area
AF Lamp
Sharpness
an image.
5. To pause recording, press the key.
6. To continue recording, press the key
again.
7. To stop recording, press the Shutter
button.
NOTE:
• Sound cannot be recorded while pressing the control.
• Digital zoom is not available in movie recording.
• The camera will automatically stop recording when the memory capacity is
full.
Setting the Movie Size
The Movie Size function icon appears only in
Movie Mode. Use this function to adjust the
resolution and quality of movie clips.
The table below shows the available size and
corresponding image quality settings.
52
Polaroid t1031 Digital Camera User Guide
640
AWB
640 320
16:9
N
www.polaroid.com
OFF
OFF
OFF
00:00:0200:00:02
Page 53

Icon Frame Size Image Quality
3672 x 2064 HDTV
640 X 480 High Quality
320 x 240 (Default) Normal
640 x 480 For YouTube
To set other movie mode settings, please refer to “Using the Function
Menu” on page 35.
YouTube Mode
The YouTube Mode allows you to record movies with predefined video
settings for easy upload to the YouTube website.
YouTube supports two file upload standards:
• Single File Uploader. The maximum movie file size is up to 100 MB.
• YouTube Uploader. The maximum movie file size is up to 1 GB.
Most uploaded movie length ranges within 5 minutes, although you can
upload a maximum movie length of 10 minutes.
Therefore when you record using the YouTube mode, the following
standards are followed:
• Recorded movies are set to YouTube standard resolution of 640 X 480.
• Recording automatically stops when the file reaches 100 MB.
Recorded movies in the YouTube mode are stored following the DCF rule,
however movies are saved in a specific folder named “_UTUBE”. For more
details, please refer to “Folder Structure” on page 86.
• To record a YouTube movie, select from the Movie Size function.
Available recording time for a YouTube movie is up to 10 minutes.
Polaroid t1031 Digital Camera User Guide
www.polaroid.com
53
Page 54

• Recording Voices
1. From the Record mode menu, select Voice.
The Voice Recording screen layout is dis-
played on the LCD monitor.
2. Press the Shutter button to start recording.
3. Press the Shutter button again to stop
recording.
NOTE:
Voice recording will automatically stop when the maximum memory capacity
is full.
Need help with your digital camera?
Call our toll-free customer service number. Look for the insert with this icon:
Or visit www.polaroid.com.
00:00:0200:00:02
54
Polaroid t1031 Digital Camera User Guide
www.polaroid.com
Page 55

6 Playback
View images, videos and audio clips through your camera’s Playback
mode.
• Viewing in Single Navigation
The Single navigation mode displays the images one by one on the LCD
monitor. To view images/videos/audio clips, follow the steps below.
1. Press the Play button to set or turn on the camera to Playback
mode.
2. The LCD monitor displays an image. To understand the icons and other
information on the screen, please see “Playback Mode Screen Layout”
on page 26.
Still Image Movie Audio Clip
27/2727/27
27/2727/27
27/2727/27
:PLAY
6/09/2008 1:576/09/2008 1:57
:PLAY
6/09/2008 1:576/09/2008 1:57
3. Use the or keys to view next/previous image/video/audio.
4. To play a movie or audio clip, press the key. See “Playing Movies” on
page 57 and “Playing Voice Recording” on page 58 for more details.
Polaroid t1031 Digital Camera User Guide
55
www.polaroid.com
Page 56

• Viewing thumbnails
1. Press the W button to view 9-image thumbnails.
2. Use the navigation buttons to move through the items.
3. Press the SET button to select the image and view it normally.
Scroll bar. If scroll bars
appear, it indicates that the
screen can be scrolled.
Select
Thumbnail icons
When you view the thumbnails, some images may contain icons. These
icons indicate the type of file or recording.
Icon Type Description
Thumbnail view
Voice Memo Indicates that a voice memo is attached to the image.
Movie
Locked File
Voice Record Indicates a voice recording file.
File Error Indicates an error file.
Indicates a recorded movie. The image displayed is the
first frame of the movie clip
Indicates that the image has been locked. Locked files
cannot be edited or deleted.
56
Polaroid t1031 Digital Camera User Guide
www.polaroid.com
Page 57

• Zooming images
The zoom view function works with still images only.
• In normal view, press the T button
repeatedly until the desired zoom view.
• The 4 arrows on the LCD monitor
indicate that the image is zoomed in.
• You can zoom view an image of up to
12X.
• Press the SET button to close zoom
view.
• Playing Movies
27/2727/27
:PLAY
4. During playback, press the or keys to
fast forward or rewind the movie.
5. During playback, use the to control
volume. Press the T button to increase
volume. Press the W button to decrease
volume.
6. Press the key to pause playback. Press
the key again to resume.
7. Press the key to stop the playback. The
LCD monitor displays the movie frame
image in Single navigation mode.
1. Set the camera to Playback mode.
2. Use the navigation controls to scroll
through the saved images. A movie clip
has a movie icon displayed on screen.
See picture on the left.
3. Press the key to play the movie.
2.0x
00:00:0100:00:01
WT
Polaroid t1031 Digital Camera User Guide
www.polaroid.com
57
Page 58

To capture screenshot image from a movie clip
1. During playback of movie, press the key
to pause playback on your desired movie
frame to capture.
2. Press the Shutter button to capture
screenshot.
3. The camera will automatically stop
playback. The LCD monitor displays the
captured image in Single navigation mode.
NOTE:
This feature does not function when memory card is full or the folder cannot be
created. The icon does not appear on screen either.
SHUTTER
00:00:0500:00:05
WT
• Playing Voice Recording
1. Set the camera to Playback mode.
2. Use the navigation controls to scroll through
the saved images. When viewing a voice
recording file, the LCD monitor displays the
screen layout of Audio clips. See picture on
the right.
3. Press the key to play the voice recording.
4. During playback, use the to control volume. The volume icon
appears on the screen. Press the T button to increase volume. Press
the W button to decrease volume.
5. Press the key to pause playback. Press the key again to resume.
6. Press the key to stop the playback. The LCD monitor displays the
image in Single navigation mode.
00:00:0100:00:01
WT
58
Polaroid t1031 Digital Camera User Guide
www.polaroid.com
Page 59

• Playing Voice Memo
Voice memo is separately recorded and attached to a captured image. See
“Voice Memo” on page 67 on how to record voice memo.
1. Set the camera to Playback mode.
2. Use the navigation controls to scroll through
the saved images. An image file with voice
27/2727/27
memo has a voice memo icon located on
the top center of the LCD monitor. See
picture on the right.
3. Press the key to play the voice
recording.
:PLAY
AUTO
F 3.0F 3.0
1/ 30
1/ 300.0EV0.0EV
6/09/2008 1:576/09/2008 1:57
4. During playback, use the to control volume. Press the T button to
increase volume. Press the W button to decrease volume.
5. Press the key to pause playback. Press the key again to resume.
6. Press the key to stop the playback. The LCD monitor displays the
image in Single navigation mode.
• Deleting an Image/Video/Audio
There are two ways to delete an image/video/audio:
• Using the Delete button, or
• Using Playback Menu Delete settings. See “Delete” on page 62.
Using the Delete Button
Use the Delete button on your camera to delete or mark an image/
video/audio clip for deletion.
1. Set the camera to Playback mode.
2. View images/videos/audio clips in Single navigation mode.
3. Use the or keys to scroll the display.
4. When the desired image/video/audio clip is displayed on the LCD
monitor, press the Delete button.
Polaroid t1031 Digital Camera User Guide
www.polaroid.com
59
Page 60

5. A confirmation selection appears on
screen.
6. Select Delete.
7. Press the SET button to delete.
Delete
Cancel
8. The next image is displayed on the LCD monitor. To delete another file,
use the or to scroll through the images/videos/audio clips. Then,
repeat steps
9. To close the Delete function and go back to viewing in single navigation
mode, select Cancel.
NOTE:
Locked files cannot be deleted at any time. When you try to delete a locked file,
the camera displays “File Locked” message on the LCD monitor.
• Playback Menu
The Playback menu allows you to edit images, records voice memo, and
setup playback settings.
To go to Playback Menu:
1. Set the camera to Playback mode by pressing the Play button.
NOTE:
To exit the Menu at any time, press the Menu button.
2. Press to launch the Playback Menu.
3. Use the or keys to move through the
menu selections.
4. To select a menu, press or the SET
button.
Slide Show
Delete
Protect
Red-eye Correction
Voice Memo
Photo Edit
5. Change the submenu settings using the 4-way navigation control.
6. Press the SET button to save and apply settings.
60
Polaroid t1031 Digital Camera User Guide
www.polaroid.com
Page 61

Slideshow
The Slideshow function allows you to view all stored photos/videos in still
image format in a continuous sequence.
To view slideshow:
1. From the Playback menu, select Slideshow.
The Slideshow menu appears.
2. Set the slideshow settings.
3. Select Start, then press the SET button to
start the slideshow.
4. During slideshow, press the SET button to
pause slideshow.
Interval
Transition
Repeat
Select
Slide Show
Start
Cancel
1 sec.
Horizontal
OK
On
5. Use the or keys to move through the options. Select whether to
Continue or Exit the slideshow.
6. Press the SET button to apply selected option.
To change slideshow settings:
1. From the Slideshow menu, use the or selections.
2. Select Interval setting. Press the or keys to move through the keys
to adjust. Choose among the available interval settings: 1 sec., 3 sec.,
5 sec., and 10 sec.
3. Select Transition setting. Press the or the available transition
settings:
• Horizontal
• Shrink
• Fade
• Vertical
• Random
4. Select Repeat setting. Press the or keys to adjust. Available settings
are: On, Off.
Polaroid t1031 Digital Camera User Guide
www.polaroid.com
61
Page 62

Delete
The Delete function lets you remove unwanted files in the internal memory
or on the memory card.
To delete a photo/video/audio clip:
1. From the Playback menu, select Delete.
2. The Delete submenu is displayed on the
LCD monitor. Select available settings:
• Single. Select one file to delete.
• Multi. Select multiple files to delete at the same time.
• All. Delete all files.
To delete a single file:
1. Select Single in the Delete submenu, the images are displayed on the
LCDmonitor in single navigation mode.
2. Use the or keys to scroll the display.
3. When the desired image/video/audio clip
is displayed on the LCD monitor, select
Delete.
4. Press the SET button to delete.
5. The next image is displayed on the LCD monitor. To delete another
file, use the or to scroll through the images/videos/audio clips.
Repeat steps 3 to 7.
6. To close the Delete function and go back Playback menu, select
Cancel.
Slide Show
Delete
Single
Protect
Multi
Red-eye Correction
All
Voice Memo
Photo Edit
Delete
Cancel
62
Polaroid t1031 Digital Camera User Guide
www.polaroid.com
Page 63

To delete multiple files:
1. Select Multi in the Delete submenu, the images
are displayed in thumbnail view on the LCD
monitor.
2. Use the navigation control to move through the
files.
3. When the desired image/video/audio clip is
highlighted, press the SET button to mark image/
video/audio clip for deletion.
4. Repeat step 3 until all desired images for deletion
are marked.
5. Press the MENU button. A confirmation selection
appears.
6. Select Yes to confirm.
7. Press the SET button to delete marked files.
To delete all files:
1. Select All in the Delete submenu. A confirmation
message appears.
2. Select Delete.
3. Press the SET button to delete all files.
Select Ne xt
Yes
Cancel
delete all files
Delete
Cancel
Polaroid t1031 Digital Camera User Guide
www.polaroid.com
63
Page 64

Protect
The Protect function lets you lock a photo or video to protect it from being
modified or accidentally erased. A protected file has a lock icon when
viewed on Playback mode.
To protect files:
1. From the Playback menu, select Protect.
2. The Protect submenu is displayed on the
LCD monitor. Select available settings:
• Single. Select one file to lock.
• Multi. Select multiple files from the
thumbnail view to lock.
• Lock All. Lock all files
• Unlock All. Unlock all files.
To protect/unprotect a single file:
1. Select Single in the Protect submenu, the images are displayed on the
LCD monitor in single navigation mode.
2. Use the or keys to scroll the display.
3. When the desired file is displayed on the
LCD monitor, select Lock/Unlock.
4. Press the SET button to protect/unprotect
the file and go back to Playback mode.
Slide Show
Delete
Single
Protect
Multi
Red-eye Correction
Lock all
Voice Memo
Unlock all
Photo Edit
Lock
Exit
64
Polaroid t1031 Digital Camera User Guide
www.polaroid.com
Page 65

To protect/unprotect multiple files:
1. Select Multi in the Protect submenu, the
images are displayed in thumbnail view on the
LCD monitor.
2. Use the navigation control to move through
the files.
3. When the desired file is highlighted, press the
SET button to mark/unmark the file clip for
protection.
4. Repeat step 3 until all desired files to protect
are marked.
5. Press the MENU button. A confirmation
selection appears.
Select Ne xt
Yes
Cancel
6. Select Yes.
7. Press the SET button to lock files and go back to Playback mode.
To protect all files:
1. Select Lock all in the Protect submenu. A
confirmation message appears.
2. Select Delete.
Yes
Cancel
lock all files
3. Press the SET button to delete all files.
To unlock all files:
1. Select Unlock all in the Protect submenu. A
confirmation message appears.
2. Select Yes.
Yes
Cancel
unlock all files
3. Press the SET button to unlock all protected files.
Polaroid t1031 Digital Camera User Guide
www.polaroid.com
65
Page 66

Red Eye Correction
The Red Eye Correction function is used to reduce red eye in captured
images. This function is only available for still images. Red eye correction
can be applied to an image several times, but the quality may gradually
deteriorate.
To activate Red Eye Correction:
1. Set the camera to Playback mode.
2. Press the or keys to scroll and select an
image.
3. Press the MENU button to launch the Playback
menu.
4. Select Red Eye Correction.
5. Select Start.
6. Press the SET button to start correction.
Red-eye Correction
7petS6dna5spetS
Red-eye Correction
Slide Show
Delete
Protect
Red-eye Correction
Voice Memo
Photo Edit
Start
Cancel
Overwrite
Save As
Cancel
7. After completing Red eye correction, a menu selection appears. Select
whether to:
• Overwrite. Save and replace the old file with the new one.
• Save As. Save the new file as a new one.
• Cancel. Cancel red eye correction.
8. Press the SET button to save/cancel changes.
66
Polaroid t1031 Digital Camera User Guide
www.polaroid.com
Page 67

Voice Memo
The Voice Memo function allows you to record and attach a voice memo
to a saved image. You can record a maximum of 30 seconds of Voice
memo per image. This function is only available in still images.
To record voice memo:
1 Set the camera to Playback mode.
2. Press the or keys to scroll and select an
image to attach voice memo to.
3. Press the MENU button to launch the Playback
menu.
4. Select Voice Memo.
5. Select Start, then press the SET button to start recording.
Slide Show
Delete
Protect
Red-eye Correction
Voice Memo
Photo Edit
Time left (nseconds)
for recording.
Start
Cancel
3030
6. Select Stop, then press the SET button to stop recording.
NOTE:
When you record voice memo to an image with an existing voice memo, the old
recording is automatically changed to the new one.
Polaroid t1031 Digital Camera User Guide
www.polaroid.com
67
Page 68

Photo Edit
The Photo Edit function lets you edit still images to apply different colors
or tones for a more artistic effect. Edited photos in this function is saved
as a new file.
To activate Photo Edit:
1. Set the camera to Playback mode.
2. Press the or keys to scroll and select an image to edit.
3. Press the MENU button to launch the Playback menu.
4. Select Photo Edit. The Photo Edit submenu appears.
Slide Show
Delete
Protect
Red-eye Correction
Voice Memo
Photo Edit
5. Press the or or keys to scroll and select an option. As you move
through the selection, the preview on the LCD monitor changes
synchronously. The following table shows the available settings.
Icon Item Description
Normal No effect is added to the image.
N
Sepia Image is saved with a sepia tone.
S
BW
Neg.
6. Press the SET button to save the new file.
68
B&W Image is saved in black and white.
Negative
Mosaic Image is saved with mosaic tiles.
Vivid Red Image is saved with reddish tint.
R
Vivid Green Image is saved with greenish tint.
G
Vivid Blue Image is saved with bluish tint.
B
Polaroid t1031 Digital Camera User Guide
PhotoEdit
Normal
VN S RBW
Image appears to be the opposite of
the original image.
www.polaroid.com
Page 69

D-Lighting
The D-Lighting function allows you to manually adjust the exposure to
compensate for inadequate lighting conditions. This function is only
applicable for still images. The edited image is saved as a new file.
To adjust D-Lighting:
1. Set the camera to Playback mode.
2. Press the or keys to scroll and select an
image to adjust lighting.
3. Press the MENU button to launch the Playback
menu.
4. Select D-Lighting. The D-Lighting menu
appears on the screen.
5. Press the or keys to increase/ decrease
the value. As you adjust the settings, the LCD
monitor synchronously displays the image
applying the new settings.
• The available settings are: 0.0, 1.0, 2.0, 3.0, and 4.0.
6. Press the SET button to save and apply changes.
D-Lighting
Rotate
Trim
Resize
Startup Image
DPOF
0.0EV
D-Lighting
Polaroid t1031 Digital Camera User Guide
www.polaroid.com
69
Page 70

Rotate
The Rotate function lets you change the orientation of a saved photo.
This function in only available for still images. Rotated images are saved
as a new file.
To Rotate an image:
1. Set the camera to Playback mode.
2. Press the or keys to scroll and select an image to rotate.
3. Press the MENU button to launch the Playback menu.
4. Select Rotate.
5. Select Yes and press the SET button to rotate image. The preview on
the LCD monitor changes synchronously.
Rotate
Rotate
Yes
Cancel
Normal orientation of
image
Yes
Cancel
Image r otated a t 90º
clockwise.
6. Repeat step 5 until desired orientation is achieved.
7. Select Cancel and press the SET button to close Rotation function.
NOTE:
Each time you press the SET button to rotate image, the image is rotated at
90º clockwise.
70
Polaroid t1031 Digital Camera User Guide
www.polaroid.com
Page 71

Trim
The Trim function allows you to trim an image to another image size. This
function is only available for still images.
To trim an image:
1. Set the camera to Playback mode.
2. Use the or keys to scroll and select
an image to trim.
3. Press the MENU button to launch the
Playback menu.
4. Select Trim. The Trim screen layout is
displayed on the LCD monitor.
5. Use the control to change size.
D-Lighting
Rotate
Trim
Resize
Startup Image
DPOF
Current image size.
Display area.
Shows the approximate
location of the
displayed area.
SET: 5MSET: 5M
Enlarged image.
4-way indicator.
6. Use the navigation controls to move the image.
7. Press the SET button to apply changes. A
menu selection appears.
8. Select whether to:
Overwrite
Save As
Cancel
• Overwrite. Save and replace the old file with the new one.
• Save As. Save the new file as a new one.
• Cancel. Cancel resize.
9. Press the SET button to save/cancel changes.
Polaroid t1031 Digital Camera User Guide
www.polaroid.com
Trim
71
Page 72

Resize
The Resize function allows you to change the image resolution of large
images to smaller ones. This function is only available for still images.
To resize an image:
1. Set the camera to Playback mode.
2. Use the or keys to scroll and select an
image to resize.
3. Press the MENU button to launch the Playback
menu.
4. Select Resize. The Resize submenu is displayed
on the LCD monitor.
5. Select size among: 8M, 5M, 3M, and VGA. Available size settings may
vary depending on original image size. Unavailable settings appear as
gray icons in Resize submenu.
6. After selecting size, a menu selection appears.
Select whether to:
• Overwrite. Save and replace the old file with the
new one.
• Save As. Save the new file as a newone.
• Cancel. Cancel resize.
7. Press the SET button to save/cancel changes.
NOTE:
Resize function is not available for photos with image size set to VGA.
D-Lighting
Rotate
Trim
Resize
Startup Image
DPOF
Overwrite
Save As
Cancel
8M
5M
3M
VGA
72
Polaroid t1031 Digital Camera User Guide
www.polaroid.com
Page 73

Startup Image
The Startup Image function allows you to setup a startup image when you
turn on your camera.
1. Press the MENU button to launch the Playback menu.
2. Select Startup Image. The menu selection appears.
3. Select options:
• System. Use camera default image.
• My Photo. Use the or keys to scroll and
select desired image.
• Off. Disable the startup image.
SYSTEM
My Photo
Off
4. Press the SET button to apply changes.
DPOF
The Digital Print Order Format (DPOF) function allows you to mark image
in your memory card for printing and allows you to specify the number of
copies that you want to print at a later date. When all images to be printed
are marked, take the memory card to a digital printing service, or use a
DPOF compatible printer.
To set DPOF:
1. Press the MENU button to launch the Playback
menu.
2. Select DPOF. The submenu appears. Available
settings are as follows:
Polaroid t1031 Digital Camera User Guide
www.polaroid.com
D-Lighting
Rotate
Trim
Single
Resize
All
Startup Image
Reset
DPOF
73
Page 74

• Single. Select a single image to mark.
• All. Mark all images in the memory card.
• Reset. Reset all DPOF settings to initial default settings.
To set DPOF on a single image:
1. Select Single on the DPOF submenu.
2. Use the or keys to scroll and select
an image to mark for printing.
DPOF
3. Specify number of copies. Use the or
keys to increase/decrease number.
4. Press the Func button to toggle between
turning on/off the date stamp.
5. Press the SET button to save DPOF settings.
To set DPOF on all files:
1. Select All on the DPOF submenu.
2. Specify number of copies. Use the
or number.keys to increase/decrease.
3. Press the Func button to toggle between
turning on/off the date stamp.
4. Press the SET button to save DPOF settings.
74
Polaroid t1031 Digital Camera User Guide
00
00
Copies
Date stamp off
DPOF
0000
Copies
Date stamp off
www.polaroid.com
Page 75

To reset DPOF:
1. Select Reset on the DPOF submenu. A confirmation
message appears.
2. Select Yes.
Yes
Cancel
Reset DPOF?
3. Press the SET button to reset DPOF settings.
NOTE:
You can specify up to 99 copies for DPOF. If you specify 0 copies, the DPOF
setting of that image is automatically disabled.
PictBridge
The PictBridge function allows you to print images captured by your
camera without connecting the camera to a PC. Print images with a
PictBridge compatible printer directly.
To activate PictBridge:
Connect your camera to a PictBridge compatible printer using the USB
cable. See illustration below.
Polaroid t1031 Digital Camera User Guide
www.polaroid.com
75
Page 76

7 Using the Setup Menu
You can access the Setup menu whether you are in Record or Playback
mode. The Setup menu allows you to configure general camera settings.
To go to Setup Menu:
1. Press to launch the Record/ Playback Menu.
2. Use the or keys to change
the menu tab to Setup menu.
3. Use the or keys to move
through the menu selections.
4. To select an item, press .
5. Change the submenu settings using the 4-way navigation control.
6. Press the SET button to save and apply settings.
Need help with your digital camera?
Call our toll-free customer service number. Look for the insert with this icon:
Or visit www.polaroid.com.
Sounds
Power Save
Date & Time
Language
File Numbering
TV Out
1min
NTSC
76
Polaroid t1031 Digital Camera User Guide
www.polaroid.com
Page 77

• Setting Sounds
Use the Sound menu functions to control the sounds produced by the
camera.
1. From the Settings menu, select Sounds.
2. Adjusts sound settings.
3. Press the SET button to apply changes.
Sounds
Startup
Shutter
Operation
Volume
Select OK
Sound1
On
On
Item
Startup
Shutter On, Off
Operation On, Off Enables or disables operation sound.
Volume 0-4 Adjusts volume.
Available
Settings
Sound 1, Sound 2, Sound
3, Off
Description
Selects the startup sound when camera
is turned on.
Enables or disables shutter sound when
shutter button is pressed. Shutter sound
is not available when recording movies
or voice clips.
Polaroid t1031 Digital Camera User Guide
www.polaroid.com
77
Page 78

• Setting Power Save
The Power Save function allows you to set an idle time after which the
camera automatically sets to sleep mode to save power. After a minute of
being in sleep mode, the camera eventually turns off power.
Available settings are: 1 min, 3 min., and 5 min.
This function is not available in the following
instances:
• Recording a movie or audio file
• Playing a slideshow/movie/audio file
• Using the USB connector.
Sounds
Power Save
1 min.
1min
Date & Time
3 min.
3min
Language
5 min.
5min
File Numbering
TV Out
1min
NTSC
• Setting Date & Time
Use the Date & Time function to set the date and time of your camera.
This function is useful in attaching date stamps on captured images.
Your camera uses a 24-hour time format.
1. Press the navigation controls to adjust
date and time value. By holding down
the or , the numeric values changes
continuously.
2. Press the SET button to apply changes.
78
Polaroid t1031 Digital Camera User Guide
Date & Ti me
2008 / 06 / 10 08 : 05
MM/DD/YY
Select OK
www.polaroid.com
Page 79

• Setting Language
The Language menu allows you to choose the
language of the on screen display (OSD) menu.
• Use the navigation control to scroll through the
list and select the desired language.
• Press the SET button to confirm and apply
settings.
Language
English
Deutsch
Français
Español
Italiano
Select OK
Nederlands
Português
Magyar
Polski
• Setting File Numbering
This function allows you to select the method
inwhich to assign file numbers to images. Available
settings are:
• Series. Assigns number to files in sequence
even if the folder is changed .
0001
•
Reset. Starts from 0001 each time the folder
is changed.
Sounds
Power Save
Date & Time
Language
Series
File Numbering
Reset
0001
TV Out
1min
NTSC
To understand folder and file structure of your camera, see page 86 for
details.
• Setting TV Out
Use the TV Out function to adjust video output signal to accomodate
different regional settings.
If TV out is not set correctly, the image may not
display properly on TV.
Available settings are:
NTSC
•
NTSC. Applicable in Japan, USA,
Canada, Taiwan and others.
PA L
•
PAL. Applicable in Europe, Asia (excluding Taiwan), Oceania and
others.
Polaroid t1031 Digital Camera User Guide
www.polaroid.com
Sounds
Power Save
Date & Time
Language
NTSC
NTSC
File Numbering
PAL
PAL
TV Out
1min
NTSC
79
Page 80

• Setting LCD Brightness
Use the LCD Brightness function to control the
LCD brightness. Available settings are:
• Bright. Enhances LCD brightness.
LCD Brightness
Bright
Memory Kit
Normal
Reset All
• Normal. Normal LCD brightness.
• Setting Memory Kit
Use this function to manage contents of the internal memory or memory
card.
Available settings are:
• Format. Select to format currently used
memory.
• Copy to Card. Select to copy all files stored
in the internal memory to the memory card.
NOTE:
• If there is a memory card inserted in the memory slot, the camera automatically
saves all files to the memory card.
• If there is no memory card or the internal memory is empty, the Copy to Card
function is disabled.
LCD Brightness
Memory Kit
Format
Reset All
Copy to card
• Reset All
Use this function to reset to original default
settings.
80
Polaroid t1031 Digital Camera User Guide
Reset all settings?
Yes
Cancel
www.polaroid.com
Page 81

8 Installing the Software onto a Computer
• Software Included with Your Camera
The t1031 software CD contains the following software:
Polaroid Digital Camera Driver
Driver is ready for Windows 98se Users only. Your computer need to be installed
this driver to gain camera’s mass storage function in Windows 98se.
ArcSoft MediaImpression™:
Manages your media for you, and gives you tons of fun and exciting ways
to create and share projects featuring your photo, video, and music files.
Edit, enhance and add creative effects to your photos. Create your own
movies or photo slide shows, complete with soundtrack. Upload your files
easily to YouTube™! Or share them through simple email attachments or
popular photo printing.
ArcSoft Print Creations™:
A family of fun and easy print-project software that brings out the
creativity in you.
Print Creations brings together ArcSoft’s latest printing applications into
one great user experience. Starting from the Print Creations Launch Pad,
you can access any of ArcSoft’s great new printing applications including:
Greeting Card, Photo Calendar, Album Page and more. Projects can be
printed at home or saved as image files for sharing with family and friends
by email or the web.
Each unique print-project software comes packed with a full set of
professionally designed templates and layouts for all occasions and in
all kinds of styles. You can personalize the designs with your own digital
pictures and text.
Polaroid t1031 Digital Camera User Guide
www.polaroid.com
81
Page 82

Adobe® Acrobat® Reader™ .PDF File Reading Software
Adobe® Acrobat® Reader™ lets you view and print Adobe Portable
Document format (PDF) files on all major computer platforms, as well as
fill in and submit Adobe PDF forms online.
NOTE:
• Please access http://www.arcsoft.com/ to learn more about ArcSoft
software.
• ArcSoft MediaImpression & PrintCreations don’t support Windows 98se/Me.
• Installing the Software
For Windows® Users:
NOTE:
• If you don’t know how to install the software, please read the “Read Me” le
on the CD rst.
• Windows 98SE needs to install your digital camera Driver for the Mass
Storage function. After the installation, please restart your computer before
connecting your camera to the computer.
• Windows Me, 2000, XP, and Vista do not need to install the driver. Plug in
the camera to the computer to transfer or edit your photos and video clips.
• For better quality graphics and sound when watching your video clips on
the computer, it is recommended to install DirectX version 9.0 or above. To
download, visit www.microsoft.com
1. Before you begin, close all other software applications open on your
computer.
2. Insert the camera CD into your computer CD-ROM drive.
3. The CD User Interface screen will automatically launch. (If the setup
screen does not appear after loading the CD, you can open Windows
Explorer, double click on the “INSTALL-E.exe” in the CD folder to
start the setup.
4. Click on each software interface button in turn and follow the on-screen
instructions.
PC
82
Polaroid t1031 Digital Camera User Guide
www.polaroid.com
Page 83

For Macintosh Users:
Mac
1. Before you begin, close all other software applications open on your
computer.
2. Insert the CD supplied into the computer CD-ROM Drive.
3. Double click the CD-ROM icon “Polaroid”.
4. Install the software included.
• Uninstalling Polaroid t1031 Camera Driver
For Windows® Users only
1. Open Add/Remove Program Properties in Control Panel and select
“Polaroid Digital Camera” program, then click “Add/Remove” button.
2. The confirmation dialogue box appears, please click “Yes” to confirm
removing the camera driver.
3. The un-installation program runs automatically, please restart your
computer when it is finished.
• Fast and Easy YouTube™ Upload:
1. Install ArcSoft software on included CD-ROM.
2. Download movie files from your digital camera to your computer.
3. Open ArcSoft software and select “Video”.
4. Select the movie file you want to upload and click. Upload to
YouTube” icon.
5. Enter your YouTube account information. If you do not have a
YouTube account, visit http://www.youtube.com to register for a
free account.
Polaroid t1031 Digital Camera User Guide
www.polaroid.com
83
Page 84

9 Making Connections
Audio
Video
You can connect your camera to:
• TV
• Computer
• Printer
• Connecting the Camera to a TV
To connect your camera to a TV:
1. Turn on the camera.
2. Set the TV out to match TV’s video
out format. See “Setting TV Out” on
page 79.
3. Connect the USB/AV 3-in-1 cable to
the USB port on the bottom of your
camera.
4. Connect the other end of the cabele
to the TV’s AV input port.
5. The LCD monitor turns black and all
images and video clips are displayed
on the TV.
NOTE:
• If the operation system for your computer is Windows 98se, please install the
t1031 camera driver from the supplied CD first.
84
Polaroid t1031 Digital Camera User Guide
www.polaroid.com
Page 85

• Connecting the Camera a PC
You can transfer photos, videos and audio files to your PC.
1. Connect the camera to a PC using the USB
cable.
2. Turn on the camera.
3. The PC detects the connection. The camera’s
internal memory and memory card display as
removable drives in the file manager. No image
is displayed on the LCD monitor.
NOTE:
You can also use a card reader to access the memory card contents of your
camera
• Connecting the Camera to a Printer
You can print your photos directly using a PictBridge compatible printer.
1. Turn on your camera.
2. Set PictBridge settings.
3. Connect the camera to the printer using the USB cable.
For more details on how to print photos, see “PictBridge” on page 75.
Polaroid t1031 Digital Camera User Guide
www.polaroid.com
85
Page 86

10 Appendix
• About Folder and File Names
Your camera automatically creates specific directory of folders in the
internal memory memory cards to organize captured images, videos and
audio files.
Folder Structure
Your camera creates three directory names:
• DICAM. All captured images, videos and audio
files are stored in this folder except for files
recorded using the Auction or YouTube mode.
• _AUCT. Captured images using the Auction
mode are saved in this folder.
• UTUBE. Captured videos using the YouTube
mode are saved in this folder.
Folder names begin with a 3-digit number from 100 to 999 and followed
by “DICAM” or “_AUCT” or“_UTUBE”. Each folder holds up to 9999
files. If new files are saved, a new folder named in sequence will be
automatically created.
86
Polaroid t1031 Digital Camera User Guide
www.polaroid.com
Page 87

File Naming
File names begin with “DSCI” and followed by a 4-digit number that
increases in sequence. File numbering starts from 0001 when a new
folder is created.
If the highest folder number is 999 and the highest file number exceeds
9999, the camera will display the warning message “Folder cannot be
created.” When this happens, try one of the following ways:
• Reset the file number. See “Setting File Numbering” on page 79.
• Plug in a new memory card.
NOTE:
Do not change the folder and file names in the memory card using your PC. It
may be unale to playback the data using the camera.
Polaroid t1031 Digital Camera User Guide
www.polaroid.com
87
Page 88

11 Troubleshooting
Problem Cause and/or Action
Camera does not
turn on.
Camera turns off
automatically.
LCD turns blank.
Empty battery icon is
displayed on the LCD,
then the camera turns
off.
LCD screen displays
‘No image’.
LCD screen displays
‘Not available for this
le’.
LCD screen displays
‘Memory full’.
LCD screen displays
‘File locked’
LCD screen displays
‘Card locked’.
LCD screen displays
‘Format error’.
LCD screen displays
‘Copy error’.
No image displays on
the TV screen
The batteries may be exhausted. Charge or replace the
batteries.
Press any button except the Power button to turn on the
camera.
Press any button except the Power button to turn on the
LCD.
Batteries are exhausted, please replace or recharge.
The image le on the memory card. Image le format may not
be supported.
Function is only available for specic le types. File format is
not supported.
Memory card is full. Replace the memory card with a new one
or delete unnecessary images.
This le is locked. Unlock the le. See “Protect” on page 64.
The memory card is protected. Remove the card and slide the
write-protect switch to its unlock position.
The memory card is protected. Remove the card and slide the
write-protect switch to its unlock position.
The memory card is protected. Remove the card and slide the
write-protect switch to its unlock position.
The memory card is full. Replace card or delete unnecessary
les.
Incorrect TV-out type was selected. Set the correct
TV-out type to match your TV system.
88
Polaroid t1031 Digital Camera User Guide
www.polaroid.com
Page 89

12 Getting Help
• Polaroid Online Services
Website: http://www.polaroid.com
• ArcSoft Software Help
For United States For Latin America
ArcSoft HQ Support Centre E-mail:latinsupport@arcsoftsupport.com
(Fremont, CA 94538)
Tel.: 1-510-979-5599
Fax: 1-510-440-7978
E-mail: support@arcsoftsupport.com
Web: http://www.arcsoft.com/en/support/
For Europe For China
ArcSoft Europe Support Centre ArcSoft China Support Centre
(Ireland) (Hangzhou)
Tel.: +353-(0) 61-702087 Tel.: +86-571-88210575
Fax: +353-(0) 61-702001 E-mail: support@arcsoft.com.cn
E-mail: eurosupport@arcsoft.com Web: http://www.arcsoft.com.cn/new/support
For Japan For Taiwan
ArcSoft Japan Support Centre (Tokyo) ArcSoft Taiwan Support Centre (Taiwan)
Tel.: +81-3-5795-1392 Tel.: +886-(0) 2-2506-9355
Fax: +81-3-5795-1397 Fax: +886-(0) 2-2506-8922
E-mail: support@arcsoft.jp E-mail: support@arcsoft.com.tw
Web: http://www.arcsoft.jp Web: www.arcsoft.com.tw
Visit http:// www.arcsoft.com for technical support and frequently asked questions (FAQ’s).
(c)2009 by All rights reserved
“Polaroid” and “Polaroid and Pixel” are trademarks of PLR IP Holdings, LLC. Used under license.
Polaroid t1031 Digital Camera User Guide
www.polaroid.com
89
Page 90

13 Specications
Sensor 10 Mega Pixels CCD, Size: 1/2.3
Lens
LCD Monitor 3.0” color LTPS LCD
Focus Range
Aperture F = 3.1 - 5.6
Shutter
File Format
Resolution
Scene Mode
Sensitivity Auto, 50, 100, 200, 400, 800, 1600, 3200 (3M or lower only)
White Balance.
Exposure Control -2EV to + 2EV (1/3EV steps)
Metering Multi, Spot, Center-weighted
Drive Mode 10 sec, 2 sec, Double, Burst
Flash Auto, Red-eye Reduction, Slow Sync, Forced On, Forced Off
90
Focal Length: f = 6.3 - 18.9 mm,
3X optical zoom, 5x digital zoom
Normal: 0.4m - Innity (All zoom step) Macro: 0.1m - 0.6m (At
wide only)
Auto: 1 - 1/2000 sec
Manual mode: 15 - 1/2000 sec Night: 15 - 1/2000 sec Fireworks:
2 sec
Still Image: EXIF 2.2 compatible format (JPEG
compression)
Video: AVI (MJPEG) Audio: WAV
Image: 10M (3648 X 2736), 3:2 (3648 X 2432), 16:9
(3648 X 2048), 8M (3264 X 2448), 5M (2592 X 1944), 3M
(2048 X 1536), HD 16:9 (1920 x 1080), VGA (640 X 480)
Auto, Program, Aperture Priority, Shutter Priority, Manual
Exposure, Portrait, Landscape, Sunset, Backlight, Smile Detection,
Kids, Night Scene, Fireworks, Snow, Sports, Party, Candlelight,
Night Portrait, Soft Skin, Soft Flowing Water, Food, Building,
Text, Auction, Movie, Voice Rec, Blink Detect, Photo Stitch
Auto, Daylight, Cloudy, Tungsten, Flourescent_1, Flourescent_2,
Custom
Polaroid t1031 Digital Camera User Guide
www.polaroid.com
Page 91

Photo Edit
Storage
TV system NTSC, PAL
Battery Li-ion battery
OperatingTemperature 0º C - 40º C
Operating Humidity 0% - 90%
Microphone Built-in
Speaker Built-in
Dimensions
Weight 130g
Black & White, Sepia, Negative, Mosaic, Vivid Red, Vivid
Green, Vivid Blue
32MB internal memory, 10MB real size for mass storage
SD (max. size 4GB)
SDHC card (max. size 8GB)
Max. 97.6 X 57.5 X 18.9 mm
Normal 95.45 X 56.45 X 18.9 mm
Polaroid t1031 Digital Camera User Guide
www.polaroid.com
91
Page 92

Part No.: UMT1031US004
US 0609
Page 93

 Loading...