

Page 1
Polaroid Smart Alarm
PSMAA10NA
Page 2

Polaroid Smart Alarm
2
Congratulations on buying this alarm system. Installing the alarm
system is easy and quick. Before using the product we recommend
you read the manual rst. There are some parts of the installation
which have to be done in the right order to complete the installation
successfully.
Contents
Overview of the alarm system
In the box
Included accesories
Operating principle of the alarm system
Sensors
Sensor placement
Grouping sensors
Renaming sensors
Test mode alarm system
Record alarm message
Getting started
Inserting SIM card
Turning on the control panel
Network connection (indicator)
Settings inquiry by SMS
Control panel operation
Arming the system
Partially arming the system
Disarming the system with the control panel
Arming/Disarming the system by RFID tag
Record and play back voice message
Page 3

PSMAA10NA
3
Naming RFID tags
Speed dial
Phone dial
Changing the language
Disarming the alarm system by SMS
Arming the system by SMS
Partially arming (home mode) the system by SMS
Two-way talk
Leaving a message by phone call
Phone operation when receiving emergency call
Apple and Android App
Adding an account
Polaroid Smart alarm App overview
Setting up the alarm system with the App
Request alarm system status by SMS
Store emergency telephone numbers
Store emergency SMS numbers
Store SMS number for RFID tags arm/disarm notication
Sore speed dial number
Change RFID tag names
Change sensors name
Change system arm delay time (exit delay time)
Internal siren setting
Change disarm use code
Setting single zone alarm delay time
Store SMS numbers for status alerts
Wireless siren arm/disarm tone
Delete accesories
Page 4

Polaroid Smart Alarm
4
Restore system to default setting
SMS notication of tampering sensors
Arm & Disarm by free phone call
Conect (new) wireless accesories & RFID tags
Connect new wireless sensors
Connect new RFID tags
Connect and delete wireless sirens
Remote control
Remote control overview
Arm
Disarm
Home mode
Mute mode
Emergency call
Connect a new remote control
Per-Immune PIR motion detector
PIR motion detector overview
LED indicator
Inside PIR motion detector
Infrared sensors
Tamper switch
LED On/Off
Rearside PIR motion detector
Test mode
Power saving mode
Connecting wireless PIR motion detector
Installing PIR motion detector
Test mode PIR motion detector
Page 5

PSMAA10NA
5
Page 6

Polaroid Smart Alarm
6
Overview of the Alarm System
In the box
Front View
Rear Side
Page 7
PSMAA10NA
7
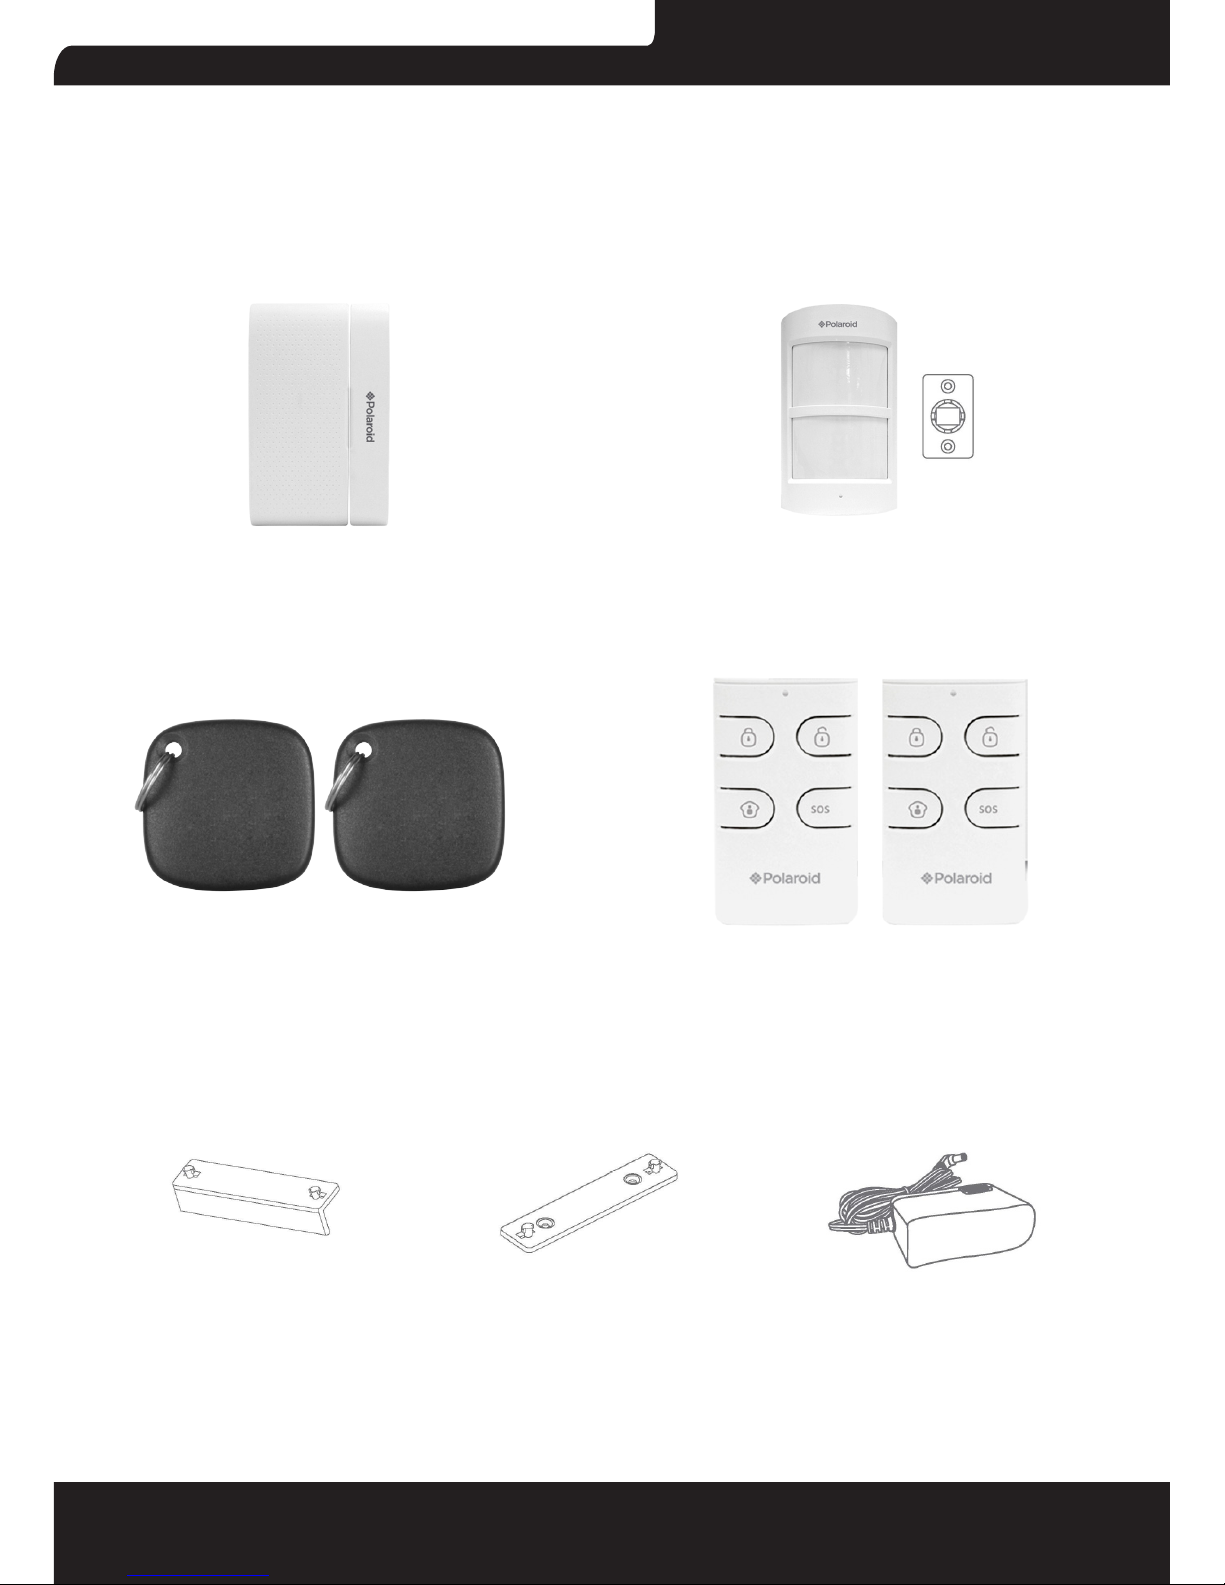
Included accesories
The Alarm System has the following accessories included in the box:
-English manual
-English quick guide
1 x Wireless door/window 1 x Pet-Immune PIR
contact DWC-102 motion detector PIR-910
2 x RFID tags TAG-26 2 x Multifuncional remote
control RC-80
1x Desk stand 1x Wall mount 1x Adapter
Page 8

Polaroid Smart Alarm
8
Operating principle of the alarm system
The alarm system will receive a signal when a sensor has been
triggered. The control panel will sound the internal siren and send
an SMS to all stored phone numbers. When texting is completed it
will then call all stored phone numbers. If a strobe siren has been
added to the system it will also sound and ash for the duration of the
pre-programmed ringing time limit. Once the time limit is reached the
alarm will reset the timer and the system will remain armed in case
there is a further alarm activation.
Note: If the alarm is disarmed before it completes texting and/or
calling stored numbers, this function will stop because the alarm has
been disarmed by an authorised user.
Page 9
PSMAA10NA
9
Sensors
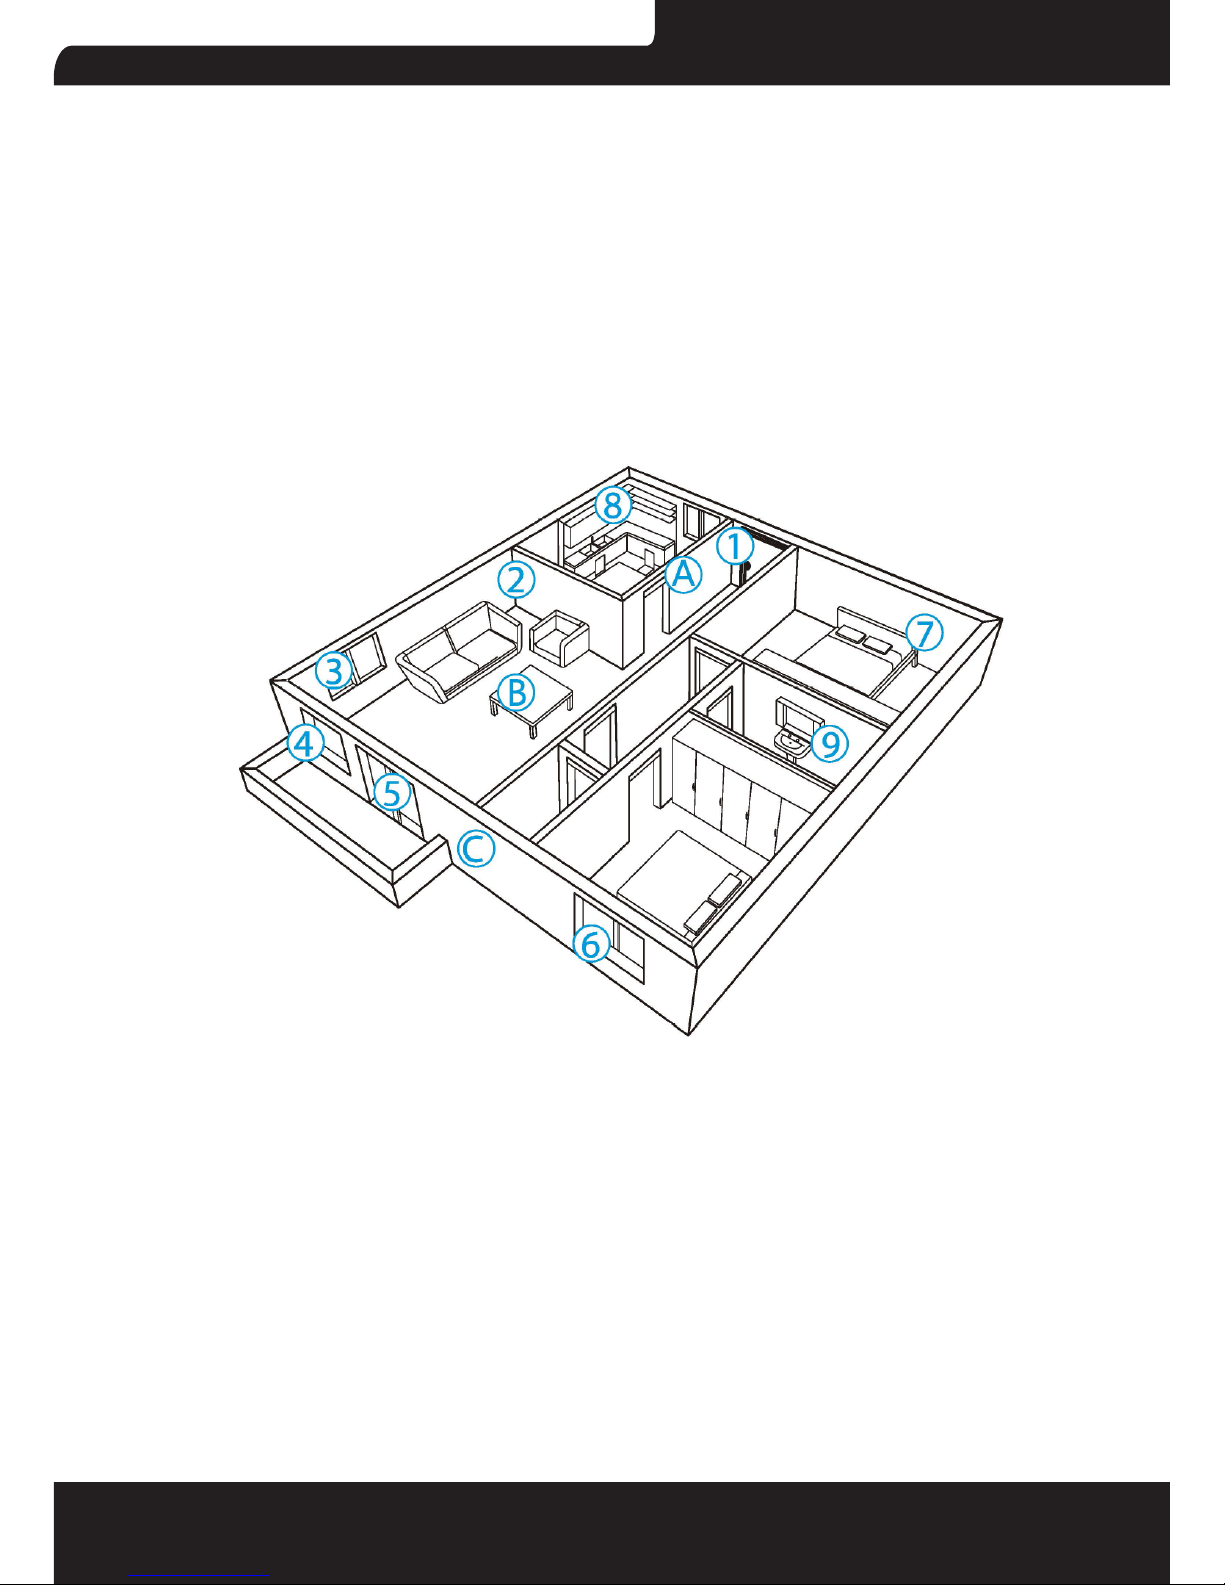
Sensor placement
The alarm system is more effective with well-placed and set sensors.
Determine which areas you want to monitor and with which sensor.
In the picture below are potencial places shown for different types of
sensors from which you can determine what the best placing is for
your space.
Grouping sensors
Each sensor can be placed in a group. Four different groups can be
selected. The home group, normal group, 24-hour group or a single
zone group.
Page 10

Polaroid Smart Alarm
10
IMPORTANT: Determine before installing the alarm system which
group a sensor should be set on.
IMPORTANT: If sensor group has to be changed, the sensor must
reconnect to the control panel.
The gure below shows the four different group settings as can be
found inside the sensors. Move the bridges in the desired conguration
to set up the group in each sensor.
Normal group: The supplied door/window contact(s) by default are
set on the normal group with bridges set on ‘D0”D1’ and ‘D2’. When
the alarm is in Arm or Home mode, all the sensors in the normal
group will be monitored.
Home group: The supplied PIR motion detector(s) by default are set
to the home group with jumpers set on ‘D1’ and ‘D2’. When the alarm
is set to Home mode, all sensors in the home group will be ignored
by the system. Using the home mode means that it is possible to
partially arm the house with the advantage of being able to freely
move about without triggering the alarm. When the alarm is set to
Arm mode, all sensors in home group will be monitored as well as the
other sensors.
Single delay group: One or more sensors can be set to the entry
delay group which means there will be a delay before the alarm will
be triggered. The entry delay group is used for the likes of an entry
door and/or motion sensors that will be triggered on the entry path
to gain access to the home. The default delay setting is 30 seconds
Page 11

PSMAA10NA
11
but this can be changed to between 0-300 seconds. Refer to page
28. When the alarm is set to either ‘Arm or Home’ mode, all sensors
in the entry delay group will be monitored. The Single delay group
also has a door chime feature that can be turned on or off by texting
‘46701’ = On or ‘46700’ = Off. The default is set to off.
24-hour group: The 24-hour group (‘D0,D1 and D3’) is recommended
as default setting for sensors that can detect smoke or gas for
instance. When set to this group the sensor is always active and will
always send a signal to the control panel when triggered, regardless
whether the system is armed or disarmed without delay.
Renaming sensors
The supplied motion detector and door/window contact are by default
paired with the alarm system. Every sensor is called a zone and
every sensor will get it´s own zone number assigned. Their sequence
in naming follows pairing order, for example, the rst sensor is by
default assigned to zone 1 and so on. You can rename the rst 30
zone name ie. Front Door, Hallway PIR, Master Bedroom. etc.
Test mode alarm system
The alarm system can be put in a test mode. This will cause the alarm
to beep three times when it receives a signal from a sensor which is
triggered, instead of ringing the siren.
Disarm (default code:1234) the system, and then press the button
three times in a row on the panel until the system beeps once. After
10 minutes the system will automatically exit the test mode. It is also
possible to exit the test mode by pressing the button.
Page 12

Polaroid Smart Alarm
12
Record alarm message
When the alarm is activarted the control panel will call the set
emergency numbers and play a meesage. This message can be
changed by pressing the button, then type the disarm code
(default 1234), press again the button and nally press the
button. From that point you have 10 seconds to leave a message.
Getting Started
Inserting 3G SIM card
Before inserting the SIM card, please perform the following steps:
1. Make sure the alarm system is power off.
2. IMPORTANT: Remove the (default) code permanently from the
SIM card.
3. Turn off the voice mail function if it is enabled.
4. Insert the SIM card into the SIM card holder from the alarm system
as shown in the illustration below. Slide the SIM card holder open
before putting the SIM card in.
Page 13

PSMAA10NA
13
IMPORTANT: In order to use and set up the alarm system, SMS
texting will be used. The use of SMS texting costs money. Consult
your carrier for the cost.
IMPORTANT: The android and/or Apple App both make use of SMS.
Turning on the control panel
Connect the power adapter to the connector in the back of the system.
Then slide the power switch to ‘On’.
Network connection (indicator)
After switching on the system, the network indicator is steady on.
This indicates that the control panel is searching for a network. When
connected to a network the LED indicator will ash once every second.
Note:
1. The control panel will sounds a long beep once per 15 seconds to
indicate network disconnection, you can disarm the control panel to
stop this sound notication once.
You can also turn on or turn off this function permanently by following
the steps below.
Turn off: Press “7400” + button + button on the control panel
Turn on: Press “7401” + button + button on the control panel
2. Make sure the security code of the SIM card is permanently
deactivated.
Settings inquiry by SMS
The settings of the alarm system can be changed by simply sendind
an SMS with a mobile phone. You can request an entire menu for
Page 14

Polaroid Smart Alarm
14
information on possible SMS commands. The complete menu
consists of three parts which can be requested by sending one, two
or three question marks as can be seen in the pictures below.
Page 15

PSMAA10NA
15
Note: Two text messages will be received
Note: If you can not receive the reply message from the control panel,
please send ‘CSQ’ in a message to the SIM card in the control panel.
It will reply an SMS and shows the signal strength, the number value
is between 1-31. The higher the number value is means a stronger
signal in that location. Find a location with good signal to place the
control panel.
Page 16

Polaroid Smart Alarm
16
Control Panel Operation
Arming the system (‘All groups’)
Press . All the sensors will be activated.
Partially arming the system (‘Home group’)
Press . Sensors which are set to the home group will not be active
when home mode of the panel is activated. All other sensors in other
groups will remain active.
Disarming the system with the control panel
Disarming the system with the control panel can be done by entering
the 4-digit password (default 1234) and press the button. You will
hear one beep and the system will be disarmed. If you hear three
beeps the password is entered incorrectly.
Arming/Disarming the system by RFID tag
Hold the RFID tag close to the RFID reader (circle on the left of the
control panel).
The system will beep as a conrmation it is disarmed.
Swiping the RFID tag twice in 3 seconds will arm the system.
IMPORTANT: The control panel must
be connected to AC to use a RFID tag to
arm or disarm the system.
Record an play back voice message
Press the button for 3 seconds to record a
personal message uo to 10 seconds. If your
message is shorter than 10 seconds, press
Page 17

PSMAA10NA
17
the button to stop recording. The voice
message can be played back by pressing the
circle.
Naming RFID tags
RFID tags can be given a name if someone arms or disarms the
alarm system an SMS message with the name will be sent to the pre-
shorted RFID text number.
IMPORTANT: The administrator can only receive a notication if the
RFID tag has been assigned and an SMS number for RFID tags is
stored. (Settings can be found on page 21 and 23)
Speed dial
When you press , the system will dial the present emergency
number immediately. The call ends when you press again. How to
set the speed dial number can be found on page 22.
Phone dial
You can directly enter a phone number and press the button. The
system dials out and you can make the call via the built-in microphone
and speaker of the alarm system.
When you press again the call is ended.
Page 18

Polaroid Smart Alarm
18
Changing the language
Please change the system language before setting.
English
Send a SMS message with ‘0001’ to the telephone number of the SIM
card in the control panel. The language of the alarm system will be
changed intro English. The control panel will send an SMS message
to conrm the language is set successfully.
Dutch
Send a SMS message with ‘0031’ to the telephone number of the SIM
card in the control panel. The language of the alarm system will be
changed into Dutch. The control panel will send an SMS message to
conrm the language is set successfully.
Note: The language can also be set in the Polaroid Smart Alarm App.
Page 19

PSMAA10NA
19
Disarming the alarm system by SMS
The main menu, which you receive after texting ‘?’, will display the
command for disarming the system (‘0’). If you want to disarm the
system you only have to send a ‘0’ to the number of the SIM card in
the control panel. You will receive a conrmation if it succeeded as
shown in the picture below
Disarming
Arming the system by SMS
If you want to arm the system you only have to send a ‘1’ to the
number of the SIM card in the control panel.
Arming
Partially arming (home mode) the system by SMS
If you want to partially arm the system you only have to send a ‘2’ to
the number of the SIM card in the control panel.
Home Mode (Stay)
Page 20

Polaroid Smart Alarm
20
Two-way talk
Send a text message with number ‘3’ to the telephone number of the
SIM card in the control panel. You will be called back by the system
and will be abel to listen and/or speak.
Leaving a message by phone call
Send a text message with number ‘4’ to the telephone number of the
SIM card in the control panel. You will be called by your sistem. Pick
up the phone, and leave a 10 seconds message. The message can
be played back by pressing the circle.
Phone operation when receiving emergency call
When the alarm system is triggered the control panel will call the
set emergency numbers. The following commands can be used to
cammand the alarm system:
SMS Input
Disarm 0
Arm 1
Turn off siren 6
Turn on siren 9
Two-way talk *
Replay alarm voice message #
Page 21

PSMAA10NA
21
Apple and Android APP
The alarm system can also be operated
with an App. You can download it by searching
the keywords ‘Polaroid Smart Alarm’ in the App
Store or Google Play.
Download and install the App on your smartphone.
IMPORTANT: The android and/or Apple App both make use of SMS
texting.
Adding an account
The alarm system can be operated with the Polaroid Smart Alarm App.
When using the Apple App there will be set up a SMS text message
automatically for even function. Press the ‘send’ button to send the
text message and set the function
you have chosen.
When using an Android smartphone
the App will send a text message in
the background without needing to
conrm sending the message.
Launch the App on your phone and
select ‘Add account’.
Enter a name for the alarm (eg. Alarm home) and enter the mobile
number of the SIM card installed in the alarm system.
Once the account is added it will appear on the home screen of the
app.
IMPORTANT: Always start the SIM car telephone number with the
area code of the country (eg. 0031 for the Netherlands). This will
allows you to operate the alarm system abroad.
Page 22

Polaroid Smart Alarm
22
Polaroid Smart alarm App overview
The illustration below shows the functions of the home screen of the
App. Other tabs will be explained in the following pages.
Setting up the Alarm System with the App
Setting the alarm system can be done by sending text messages but
also by using the App. This chapter will show how this can be done
for all the function.
Request alarm system status by SMS
Send a text message with ‘00’ to the SIM card telephone number in
the control panel.
Page 23

PSMAA10NA
23
In the Polaroid Smart Alarm App press the following button:
Store emergency telephone numbers
Emergency numbers are the telephone numbers which have to be
called when the alarm goes off. To get a list of the current settings,
send ‘5’ to the control panel.
Copy the received SMS message entirely and paste
it into a new text message. Here you can ll in all the
numbers you would like. It´s recommended to start
with your area code of your country. You can specify
multiple phone numbers in the same text message.
When you have nished the entry the message can
be sent.
Right is an example of a list of numbers
lled in the text message.
Page 24

Polaroid Smart Alarm
24
After sending the message it will send back a message from the
control panel to conrm the new settings.
With the Polaroid Smart Alarm App this setting can be done as follows:
IMPORTANT: Only phone numbers stored in the alarm system can
make changes and modify the system.
Store emergency SMS numbers
Emergency SMS numbers are the numbers that should be texted
to when the alarm goes off. When sending a ‘6’ you will receive the
current settings. Copy and edit the text message and send it back.
After sending the message it will send back a message from the
control panel to conrm the new settings.
Page 25

PSMAA10NA
25
Store SMS number for RFID tags
The SMS number for RFID tag is the number which will be used to
send a text message to when a RFID tag is used to arm or disarm
the system.
Copy and edit the received text message and send it bak with the
new telephone number. After sending the message it will send back a
message from the control panel to conrm the new settings.
In the App:
Store speed dial number
In this menu you can assign a phone number that will be stored as
speed dial number. You can speed dial by pressing the button.
Page 26

Polaroid Smart Alarm
26
Copy and edit the received text message and send it back with the
new telephone number. After sending the message there will be send
back a message from the control panel to conrm the new settings.
It is highly recommended to start with your area code or land code.
In the App:
Change RFID tag names
The rst 30 RFID tags can be renamed. Sending a text message with
“801”, “802”, “803” to “830”, you can edit the names linked to each
tag.
Left is the response message of the
alarm system shown when texting ‘801’
to the control panel. Copy the
Page 27

PSMAA10NA
27
message and adjust the names behind the numbers as shown below.
In the App:
Change sensor name
Each sensor is reffered to as a zone. The rst 30 sensors (1-30) can
be changed according to personal reference. Each sensor (zone) has
30 free characters to ll in a new name. The name of the sensors
from zone 31 and higher can´t be adjusted. When sending a text
message with ‘901’, ‘902’, ‘903’ to ‘930’ you will receive a message
back with the zone numer and name.
Page 28

Polaroid Smart Alarm
28
To change the name of the zone you can copy the received text
message and replace ‘Zone 1 alarm’ for a name of your choice
After sending this message you will receive a conrmation of the new
settings being adjusted successfully.
In the App:
Change system arm delay time (exit delay time)
The system can be armed with a time delay. When a delay time is
set you will hear a beep every second as a warning of this delay. The
beep will go faster in the last 15 seconds.
Left is the response message of the
alarm system shown when texting ‘11’
to the control panel. Copy the message
and adjust the time as shown below.
Page 29

PSMAA10NA
29
In the App:
Internal siren setting
Arm/disarm tone, alarm volume and duration of the internal siren can
be adjusted in this menu.
Arm/Disarm tone: The default setting is ON, it can be turned off by
texting ‘24700’ to the control panel or turned on by texting ‘24701’.
Alarm volume and duration:
Left is the response message
of the alarm system shown when
texting ‘12’ to the control panel.
Copy the message and adjust the
volume (‘0, 1 or 2’) of the siren and
the duration of the siren as shown below.
Page 30

Polaroid Smart Alarm
30
In the App:
Change disarm password
Left is the response message of the
alarm system shown when texting
‘13’ to the control panel. Copy the message
and adjust the user code as shown below.
In the App:
Page 31

PSMAA10NA
31
Setting single zone alarm delay time
After setting single zone alarm delay time (Single Delay Group), when
the single zone sensor is trigged, the control panel will beep once per
second insted of alarming
immediately. This allows the user time to disarm the system from the
control panel. If the system is not disarmed within the delay time then
the alarm will be triggered.
Bellow is the response message of the alarm system shown when
texting ‘14’ to the control panel. Copy the message and adjust the
delay time for the single zone group as shown below.
In the App:
Page 32

Polaroid Smart Alarm
32
Store SMS numbers for status alerts
The stored number can receive SMS in case of low battery, power
failure or recovery. You can store the numbers by texting ‘16’ to the
control panel or by App.
Wireless siren arm/disarm tone
If you have a wireless siren with your system you can turn on or off
the arm/disarm tone by texting ‘63701’= On or ‘63700’= Off.
Note: The default setting is off.
Delete accesories
Option1: SMS
You can delete the wireless sensors (door/windows contacts, PIR
detectors) by texting “21” to the SIM card number in the control panel.
You can delete the RFID tags by texting “22” to the SIM card number
in the control panel.
You can delete the remote controls by texting “23” to the SIM card
number in the control panel.
Option 2: App
You can delete the wireless sensors/ RFID tags/ remote controls from
App.
Option 3: Control Panel
You can delete the sensors one by one from control panel. For
example, if you want to delete zone 1 sensor:
1. Enter ‘1234’ (or new disarm password);
2. Press [ ];
Page 33

PSMAA10NA
33
3. Enter ‘01’;
4. Press [ ].
Restore system to default setting
Also called a ‘hard reset’. This should also be performed when
changing the SIM card.
Long pressing tamper switch for 4 seconds and then quick pressing
it 5 times in 3 seconds can also restore the control panel to default
setting, and the control panel will beep twice.
SMS notication of tampering sensors
The stored numbers on page 20 will receive an SMS message when
a tamper alarm condition occurs. The zone name will appear in the
SMS along with the words ‘tamper alarm’. This feature only applies to
sensors with a built-in tamper switch.
Arm & Disarm by free phone call
Arming the alarm system can be done by calling the SIM card
telephone number in the control panel. When you hear the dialling
tone, hang up. You will be called back by the same number. Do not
answer the call. The alarm will be armed.
Disarming the alarm system can be done by calling the SIM card
telephone number. Hold on until the system disconncts by itself. The
alarm system will not call you back and the alarm system will be
disarmed.
IMPORTANT: To arm or disarm the alarm system, make sure voicemail
is disabled on the SIM card of the alarm system.
Page 34

Polaroid Smart Alarm
34
FCC WARNING
This device complies with part 15 of the FCC Rules. Operation is
subject to the following two conditions: (1) this device may not cause
harmful interference, and (2) this device must accept any interference
received, including interference that may cause undesired operation.
Any changes or modications not expressly approved by the party
responsible for compliance
could void the user’s authority to operate the equipment.
NOTE: This equipment has been tested and found to comply with the
limits for a Class B digital device, pursuant to Part 15 of the FCC Rules.
These limits are designed to provide reasonable protection against
harmful interference in a residential installation. This equipment
generates, uses and can radiate radio frequency energy and, if not
installed and used in accordance with the instructions, may cause
harmful interference to radio communications. However, there is no
guarantee that interference will not occur in a particular installation.
If this equipment does cause harmful interference to radio or television
reception,
which can be determined by turning the equipment off and on, the
user is encouraged to try to correct the interference by one or more
of the following measures:
-- Reorient or relocate the receiving antenna.
-- Increase the separation between the equipment and receiver.
-- Connect the equipment into an outlet on a circuit different
from that to which the receiver is connected.
-- Consult the dealer or an experienced radio/TV technician for help.
To maintain compliance with FCC’s RF Exposure guidelines, This
equipment should be installed and operated with minimum distance
between 20cm the radiator your body: Use only the supplied antenna.
FCC ID: 2ADWUPSMAA10NA
Page 35

PSMAA10NA
35
Page 36

Distributed by:
Comercializadora Milenio S.A. de C.V.
© 2016 All Rights Reserved
MADE IN CHINA
TM
Distribuido por: One Diamond Electronics, Inc. 1450 Frazee
Road, Suite 414 San Diego, C.A. 92108
HECHO EN CHINA
Polaroid, Polaroid & Pixel, el Polaroid Classic Border logo y Polaroid Color Spectrum son marcas registradas de PLR IP Holdings,
LLC, utilizada bajo licencia. Todas las demás marcas son propie-
dad de su respectivo propietario, que no tiene patrocinado, avalado ni aprobado este producto. PLR IP, LLC no hace fabricación
de este producto o da la garantía del fabricante o de apoyo.
Polaroid, Polaroid & Pixel, Polaroid Classic Border Logo and Polaroid Color Spectrum are trademarks of PLR IP Holdings, LLC,
used under license. All other trademarks are the property of the
respective owner, who has not sponsored, endorsed or approved
this product.
PLR IP Holdings, LLC does not manufacture this product or pro-
vide any Manufacturer’s Warranty or support.
© 2016 All Rights Reserved
 Loading...