

Page 1

Installation and Quick Reference
ProPalette 7000
ProPalette 8K Series
Page 2
English
Installation
5
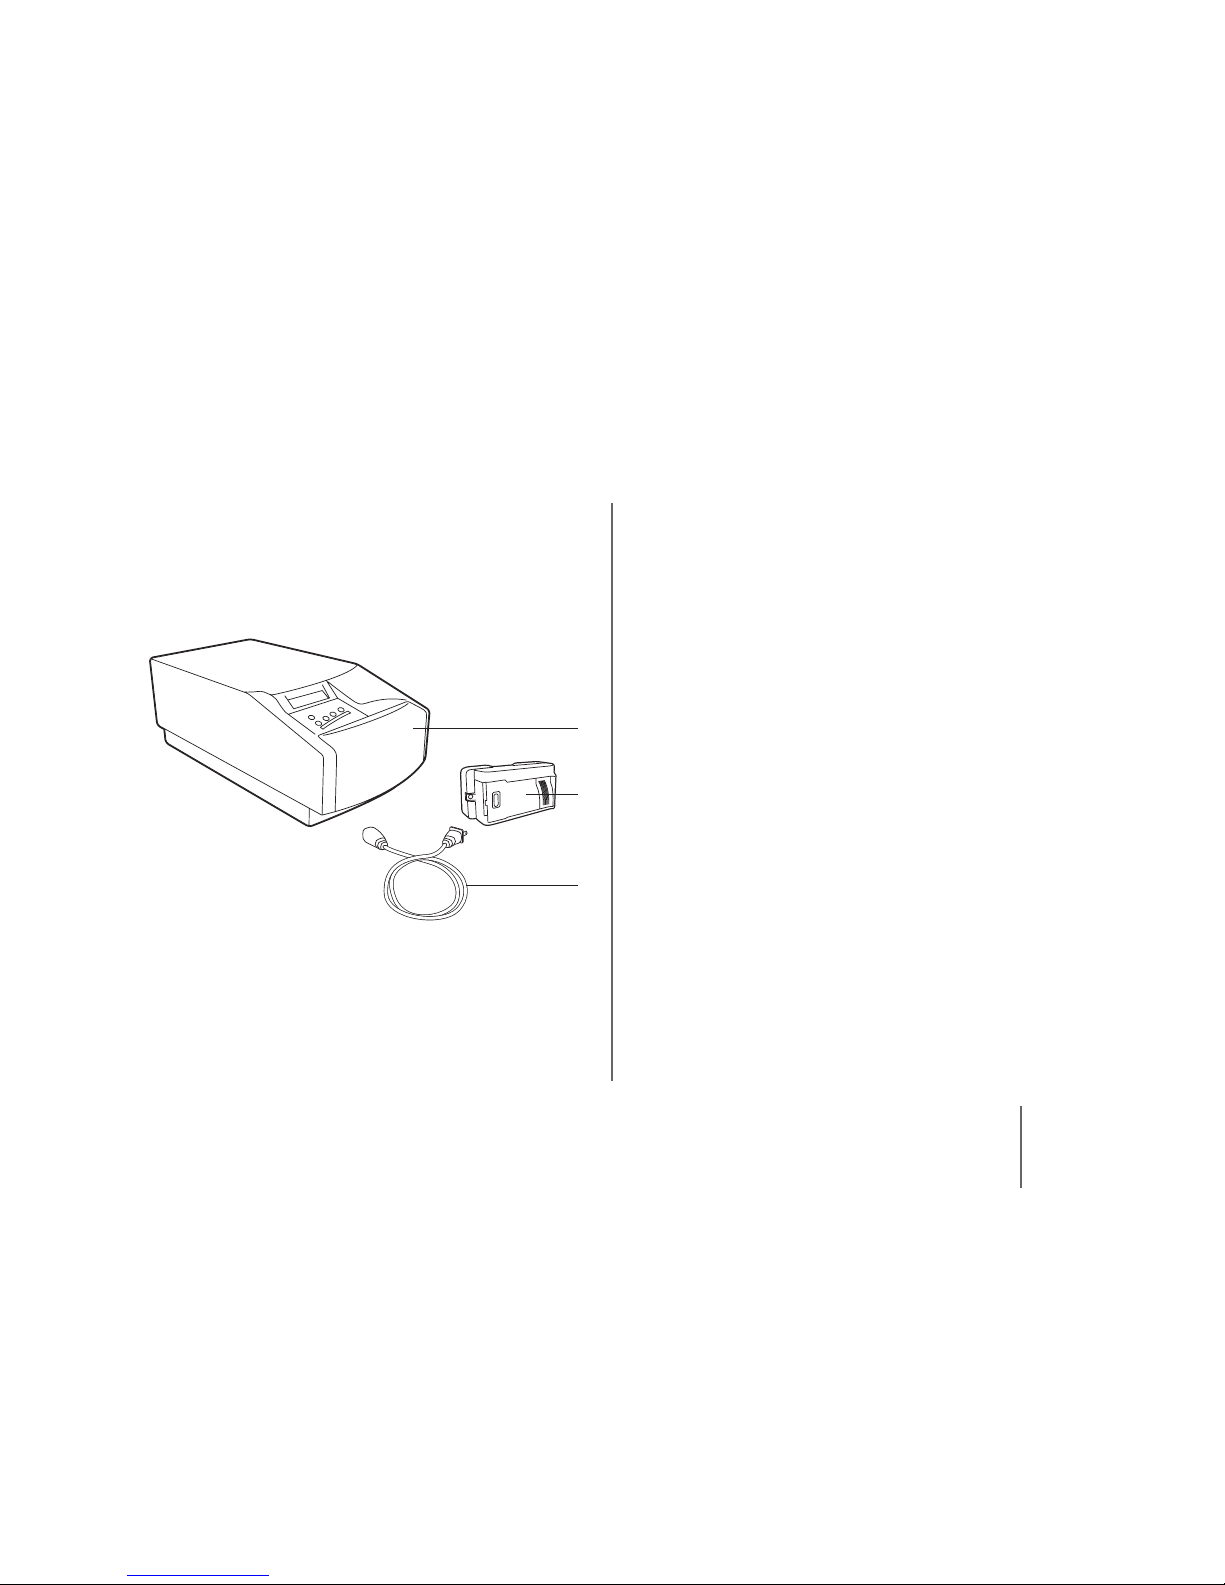
1 Unpack the Box
Make sure you have all the following components. Contact your
dealer if any are missing or damaged.
1
2
3
1
ProPalette film
recorder
2
35 mm camera back
(shipped mounted on the film
recorder)
3
Power cord
Installation and Quick Reference (this document), and registration card (not shown)
ProPalette film recorder software and connecting cables are in a
separate box. Some models include a 4x5 or 6x7 camera back
packed with the film recorder.
Page 3

English
Installation
6
2 Position the Film Recorder
Place the film recorder at a convenient working height on a flat
vibration-free surface. Make sure that all four rubber feet are in
contact with the surface, and that the ventilation holes are not
obstructed. Position the film recorder away from any electromagnetic fields such as computer monitors or electric motors.
Page 4
English
Installation
7
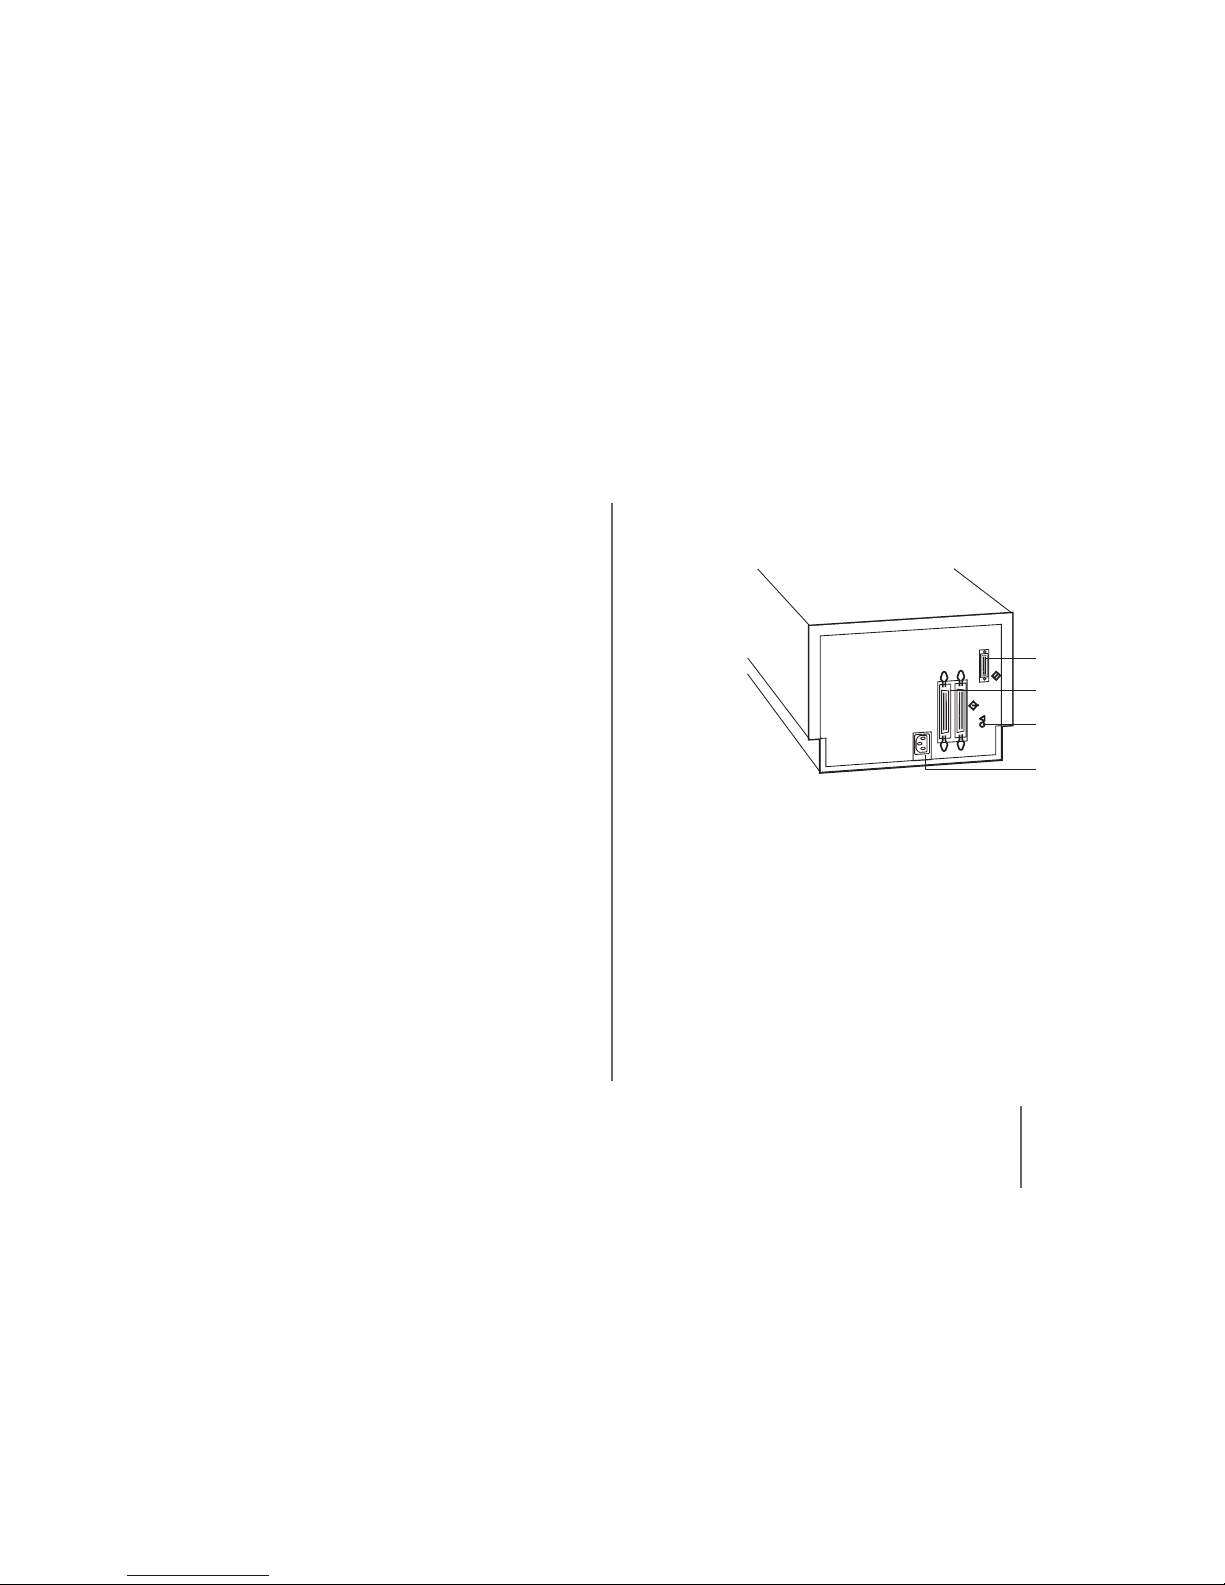
3 Connect the Film Recorder
Connection Types
ProPalette film recorders have a parallel port for connection to a
Windows computer, and a SCSI port for connection to either a
Macintosh computer or to a Windows computer with a SCSI host
adapter installed.
The software kit for Windows systems includes a parallel cable,
but you can connect your system to the SCSI port if you have a
SCSI host adapter installed and a SCSI connection cable (not
included).
If you install a SCSI host adapter, follow the instructions provided
by the adapter manufacturer. Host adapters may not be available
for some iMac computers.
1
Parallel connector
2
SCSI connectors
3
Reset button
4
Power connection
1
2
3
4
Page 5

English
Installation
8
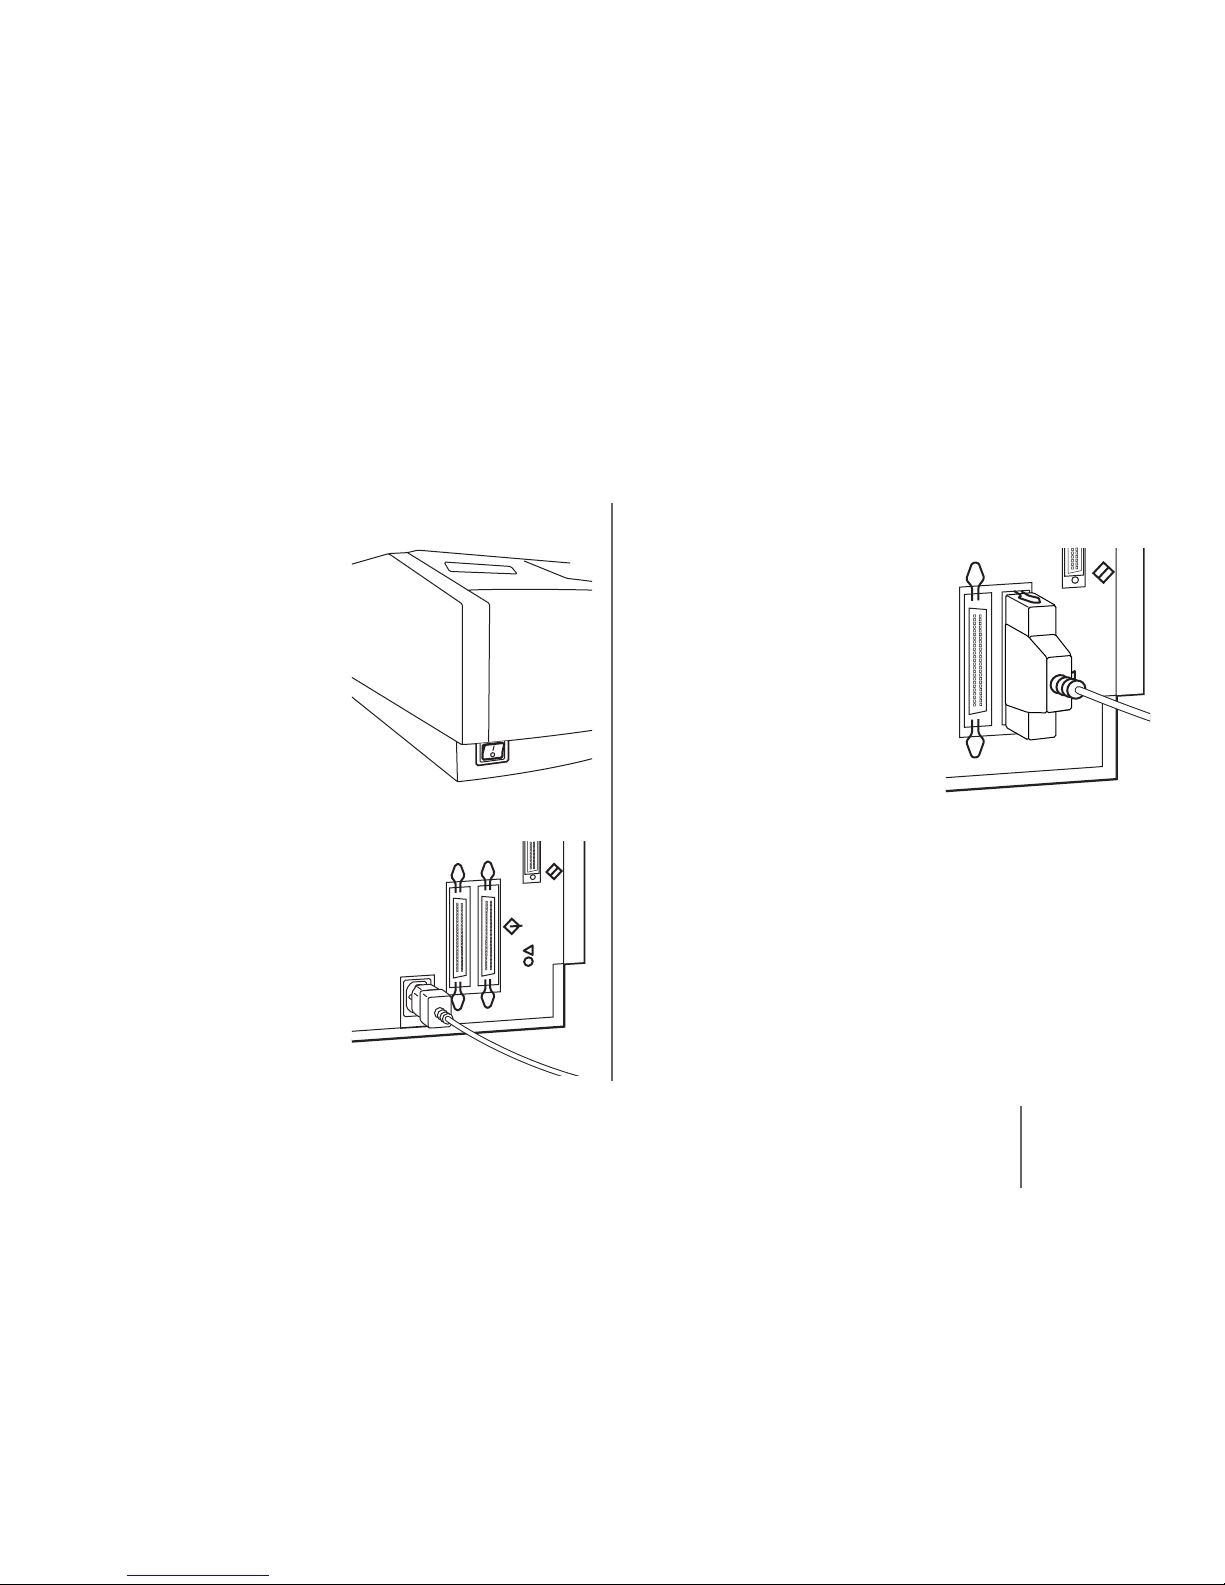
Parallel Connection (PC)
1
Turn off both your PC and
the film recorder.
2
Connect the film recorder
to power.
3
Plug the parallel cable into
the parallel port on the
film recorder and secure
the connection.
4
Plug the parallel cable into the parallel port on your computer and secure the connection.
5
Turn on the film recorder and wait for it to complete initialization (
READY
shows on the display).
Page 6
English
Installation
9
SCSI Connection (PC or Macintosh Computer)
1
Turn off both your computer and the film
recorder.
2
Connect the film recorder
to power.
3
Plug the 50-pin end of the
SCSI cable into the SCSI
port on the rear panel of
the film recorder and
secure the connection.
4
Plug the 25-pin end of the SCSI cable into the SCSI port on
your computer and secure the connection.
5
Turn on the film recorder and wait for it to complete initialization (
READY
shows on the display).
SCSI device chains must be terminated once at each end of the
chain. The host adapter terminates one end. You must terminate
the other end. The next page illustrates three typical connections.
Page 7

English
Installation
10
In this example, the film recorder is the only SCSI device and
must be terminated. This example shows external termination
using a separate terminator (not included). The film recorder
may also be terminated internally, see below. Connect the SCSI
terminator either between the SCSI cable and the film recorder or
to the second SCSI connector on the film recorder rear panel.
In this example, the film recorder is the last device in the SCSI
chain and must be terminated. This example shows external termination using a separate terminator (not included). The film
recorder may also be terminated internally, see below. Connect
the SCSI terminator either between the SCSI cable and the film
recorder or to the second SCSI connector on the film recorder
rear panel.
In this example, the film recorder is in the middle of the SCSI
chain and must not be terminated.
Note
: Do not terminate the film recorder both inter-
nally and externally.
6
If you need to terminate the film recorder internally:
a
Turn off the computer and all other
SCSI devices.
b
Turn on the film recorder and wait for
it to complete initialization (
READY
shows on the display).
c
Press to display the
Change
Setup?
menu on the message panel.
d
Press until
SCSI Terminated?
appears.
Page 8

English
Installation
11
e
Press , then press or to
highlight
Ye s
(terminate) or
No
(turn
off termination).
f
Press , then press twice.
g
Press the Reset button on the back of
the film recorder.
Each device on a SCSI chain must have a unique SCSI ID. The
preset film recorder SCSI ID is 4. If the SCSI ID of any other
device is 4, either change the SCSI ID of that device (consult the
device documentation) or change the SCSI ID of the
film recorder.
7
If you need to change the film recorder SCSI ID:
a
Turn off the computer and all other
SCSI devices.
b
Turn on the film recorder.
c
Press to display the
Change
Setup?
menu on the message panel.
d
Press until
SCSI ID?
appears,
then press to display the current
SCSI ID number.
e
Press to select an unused SCSI ID
number. Note that the SCSI host
adapter is usually ID 0, and most
internal SCSI hard drives are ID 1. An
internal SCSI CD-ROM drive may be
ID 3.
f
Press , then press twice.
g
Press the Reset button on the back of
the film recorder.
Page 9

English
Installation
12
4 Install the Software
1
Turn on your computer.
2
Insert the Polaroid Palette Software CD ROM into the drive.
Windows 95, 98, or NT
a
Wait for the program to start. If it
does not, select
Run
from the Win-
dows Start menu. Click
Browse
and
select POLAROID.EXE on the CDROM, then click
OK
.
b
Follow the instructions on the screen.
Power Macintosh or Power PC
a
Install Apple LaserWriter driver software. Graphx RasterPlus for Macintosh Polaroid Edition software
requires Apple Laserwriter driver 8.6
or later (included on the software
CD). To find out which Apple LaserWriter driver, if any, you have
installed, select the LaserWriter document in the System…Extension
folder. Select File…Get Info.
b
Click on the Palette icon on the CD.
c
Follow the instructions on the menu.
d
After the installation, click Quit to exit
the installer. Graphx RasterPlus for Macintosh Polaroid Edition software runs
automatically.
e
Personalize the software by filling in
the fields on the personalization
screen and click OK .
f
Select your film recorder and click OK .
g
Enter your desktop printer name (not
the film recorder) and click OK .
3
Remove the CD.
Page 10

English
Installation
13
5 Test the Installation
PC
1
Start the PC and Graphx RasterPlus95 software.
2
Select Edit...Queue Properties .
3
Select the recorder you are using from the Device list.
4
Select the port to which the film recorder is connected from
the Connection list (LPT or SCSI port).
5
Click the Options button.
6
Click the Info button.
An information box with film recorder information displays if the
software can communicate with the film recorder.
If the software cannot communicate with the film recorder, an
error message tells you that the recorder is off-line. Make sure
that the film recorder is properly connected, turned on, and that
the correct port is selected on the Device list on the Queue Properties dialog box.
If the film recorder is connected via SCSI, and the computer has
an EIDE controller for the CD, an error message may appear indicating that the recorder is disconnected or off-line after attempting a SCSI connection. To correct this problem, follow these steps:
1
Select Tools...SCSI Explorer .
The system displays a list of host adapters and the SCSI
adapter ID numbers associated with each host adapter.
2
Locate the host adapter ID number associated with
DP2SCSI.
3
Select Edit...Queue Properties...Options .
4
Click the SCSI Adapter # list box and set the value to the host
adapter ID number associated with DP2SCSI.
5
Click the OK button twice.
Page 11

English
Installation
14
Macintosh Computer
After installing and configuring the film recorder software (see
above), check communications between the software and the film
recorder.
1 Start the Macintosh computer and Graphx RasterPlus for
Macintosh Polaroid Edition software.
2 Select [Film Recorder]…Interface to confirm communica-
tion with your film recorder. [Film Recorder] is the name of
the film recorder selected during installation.
For More Information
Information on using the film recorder, including using the software and loading film backs, can be found in the on-line documentation installed with the software.
To view the on-line documentation from Graphx RasterPlus95
software (PC), select Help…Polaroid Online Manuals.
To access the online documentation from Graphx RasterPlus for
Macintosh Polaroid Edition software, select Balloon
Help
…Polaroid Online Manuals.
You can also view the on-line manuals from your hard disk. Open
the PAL_MAIN.PDF file. For the Macintosh computer, the file is
in the Online Manuals folder within the RasterPlus® Polaroid
folder. For the PC, the file is in the Program file\Graphx\
RasterPlus95\OnlineManuals folder.
Page 12

English
Quick Reference
15
menu on the
menu system to
menu.
Select
Selects a menu or submenu device-setup or
device-activation item. Marks the selected
item with an asterisk (*).
A device-setup item (for example,
SCSI
Terminated?
) sets a film recorder
attribute.
A device-activation item (for example,
Rewind Film
) causes the film recorder to
perform an action.
Key What It Does
Page 13

English
Quick Reference
16
3
Insert the film cassette at
an angle into the chamber.
Push the cassette in fully,
so that the film lies flat
against the track.
Note
: Do not touch the
shutter when loading the
film.
4
Pull the end of the film
gently to the right until the
end reaches 1/2" (13 mm)
past the white triangle at
the lower right.
If you pull the end of the
film too far, remove the
cassette, turn the black
knob at the top of the cassette to wind the end back in, and
reinsert the cassette into the chamber.
Page 14

English
Quick Reference
17
Loading
Page 15

English
Quick Reference
18
3
Note the pressure plate
dial setting.
If the black arrow is pointing to the type of film (120
or 220 length) you are
loading, proceed to step 5.
If the black arrow is not
pointing to the correct film
type:
a
Hold the camera insert
in your left hand. Do
not set it down on a flat
surface.
Note
: Do not touch the pressure plate on the
back of the camera insert.
b
Push in the pressure plate dial and turn it clockwise until
the arrow points to the film you are loading (as printed on
the film package).
120
220
P
OFF ON LR BC NI-Cd
120
220
P
OFF ON LR BC NI-Cd
Page 16

English
Quick Reference
19
OFF
ON
LR BC NI-Cd
P
6
Turn the film roll so that
the film feeds toward the
back of the camera insert.
7
Swing out the left spool
retainer. Insert the film
roll. Swing in the left
spool retainer.
OFF
ON
LR BC NI-Cd
P
OFF
ON
LR BC NI-Cd
P
Page 17

English
Quick Reference
20
OFF
ON
LR BC NI-Cd
P
10
Open the camera back.
Check that the top and
bottom latches are fully
open.
Seat the camera insert
tightly onto the camera
back.
11
While holding the camera
insert onto the camera
back, close the film door.
Hold the door shut while
pushing the top latch
down and the bottom latch
up.
If the door does not shut and latch easily, reseat the camera
insert onto the camera back.
OFF
ON
LR BC NI-Cd
P
Page 18

English
Quick Reference
21
12 Check the control lever
positions on the top of the
camera back. If the control levers do not point to
the white squares, turn the
levers until they point to
the white squares.
13 Turn the camera back
OFF/ON switch to ON.
OFF
ON
LR BC NI-C
14 Press the START button
on top of the camera back
to advance the film to the
first exposure.
15 Pull out the dark slide
before exposure.
Page 19

English
Quick Reference
22
Loading 4x5 Film
1 Verify that the 4x5 camera
back is attached, and turn
the film recorder on.
2 In a darkroom, load the
4x5 film holder with film.
Orient the film with the
notch positioned as
shown.
Note: Some 4x5 films are
available in Readyload
packages. When used with
the Polaroid 545i or the Kodak Readyload packet film holder,
you can load the film holder outside of a darkroom.
3 Pull open the outer section of
the camera back enough, but
no more than 2" (51 mm), to
slide the film holder in.
Note: Do not pull the outer
section too far. This can
cause the camera back to pop
out of the springs and
require Service Center repair.
Insert the 4x5 film holder into the camera back
from the right.
Note: To avoid light leaks, make sure that the left side of the
film holder lies snugly against the left side of the outer section
of the camera back.
Page 20

English
Quick Reference
23
4 Wait for the message panel to display a message directing you
to pull out the dark slide.
5 Pull out the dark slide
before exposure.
Remember to reinsert the
dark slide after exposure.
6 Push any button on the keypad to confirm dark slide
removal.
© Copyright Polaroid Corporation, 1999. All rights reserved.
“Polaroid” and “ProPalette” are trademarks of Polaroid
Corporation, Cambridge, MA, U.S.A. All other product names may be
trademarks of their respective owners.
PW-20900Q-0
Page 21

 Loading...