

Page 1

ProCam Camera
1
Page 2

2
This product is listed by Underwriters’
Laboratories, Inc. As a condition of listing,
UL requires that basic safety information be
provided.
IMPORTANT
SAFEGUARDS
AS WITH ANY BA TTERY-OPERA TED
EQUIPMENT, OBSERVE THESE BASIC
SAFETY PRECAUTIONS:
1 .FOLLOW ALL INSTRUCTIONS.
2.CLOSELY SUPERVISE UNIT WHEN IT IS
BEING USED BY OR NEAR CHILDREN.
3.ALWAYS USE BATTERIES RECOMMENDED.
4.DO NOT USE UNIT IF IT HAS BEEN
DROPPED OR DAMAGED - UNTIL IT HAS
BEEN EXAMINED AT AN AUTHORIZED
POLAROID SERVICE CENTER.
5.TO AVOID ELECTRICAL SHOCK HAZARDS,
DO NOT DISASSEMBLE UNIT. SERVICE OR
REPAIR WORK MUST BE DONE ONLY BY
AN AUTHORIZED POLAROID SERVICE
CENTER. INCORRECT REASSEMBLY CAN
CAUSE ELECTRICAL SHOCK WHEN UNIT IS
USED AGAIN. DO NOT IMMERSE IN
WATER OR OTHER FLUIDS.
PLEASE KEEP THESE
INSTRUCTIONS
Page 3

Table of contents
5
Camera features
8
Opening and closing the camera
9
Loading the film
9
Cleaning the rollers
10
Removing an empty film pack
10
Framing the subject
11
Taking the picture
12
Lighten/Darken control
13
Autofocus system
14
Automatic flash system
15
Date display buttons
18
ProCam Close-up Lens
18
Attaching the lens
20
Troubleshooting
23
Full Lifetime warranty
24
Camera, film specifications
3
Page 4
4
1
Page 5

Camera features
5
The Polaroid ProCam is a rugged,
portable, folding camera designed
to meet the needs of business
users for documentation,
verification and identification. It
has a wide angle lens and can
focus on subjects as close as 18
inches (46cm) to meet a wide
range of photographic
requirements. With an
easy-to-attach close-up lens, you
can photograph subjects as close
as 12 inches (30cm). The ProCam
features a durable strap for
comfortable one-handed
operation. If you choose, the
camera can imprint the date or
time in your photographs. Other
features include a sonar autofocus
system and a built-in electronic
flash, both of which can be
overridden or cancelled as
needed, and a tripod socket.
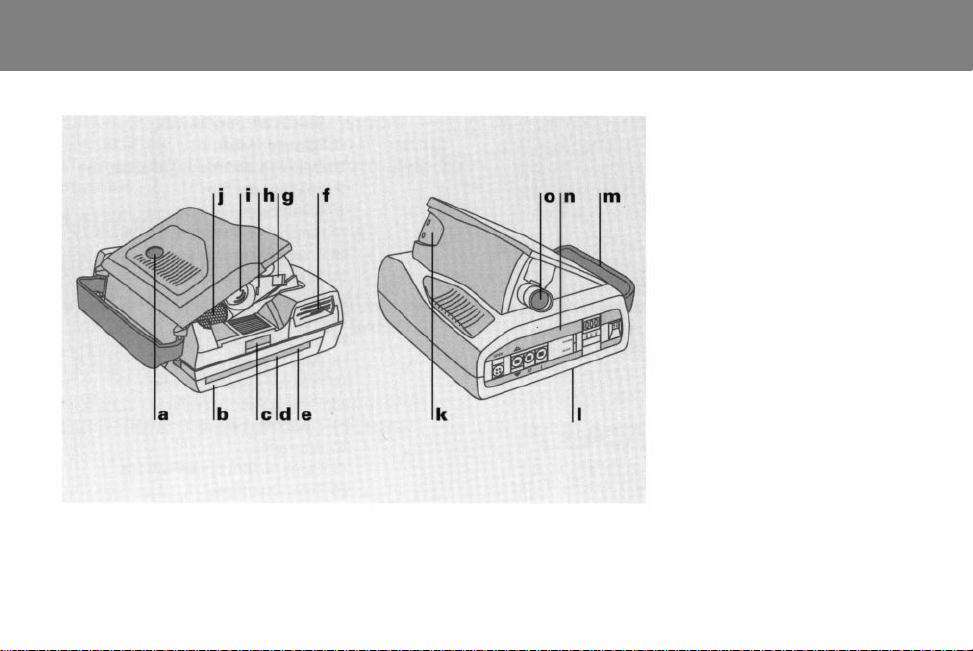
The camera
a
Shutter button
b
Film door (Serial number inside)
c
Film door release
d
Film exit slot
e
Film shade (protects the picture from
light as it exits the camera)
f
Automatic electronic flash
g
Viewfinder
h
Close-up Lens positioning tab
i
Four-element, wide-angle glass lens
j
Sonar rangefinder (sends out sound
waves to measure the distance to your
subject)
k
Close-up Lens locking tab cut-out
l
Tripod socket (underneath the
camera)
m
Hand strap
n
Control panel
o
Viewfinder
(picture 1)
Page 6
6
2
Page 7

7
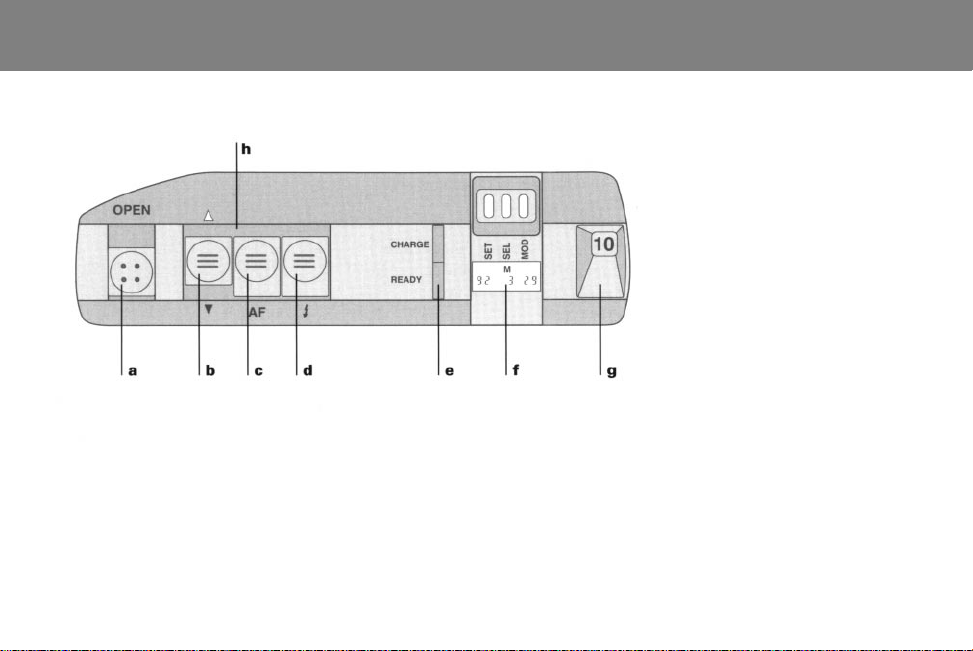
The control panel
a
Release latch: Slide it up to open
the camera.
b
Exposure control: Set it to normal
for most pictures. Slide the button up to lighten or down to
darken a picture.
c
Sonar autofocus override: Slide
the switch up to turn off the autofocus system (i.e., for pictures
through glass). Focus range
when Autofocus is off: infinity.
d
Automatic flash: Slide it up to
turn the flash off (when taking
pictures of highly reflective surfaces or through glass).
(picture 2)
e
Flash indicators: Red light means
the flash is charging; green light
means the flash is ready to fire
and you can take a picture.
f
Date display buttons:
MOD (mode) button toggles
through five display modes; Japanese date, day-time, off, U.S.
date and European date.
SEL (select) button selects the
year, month, day (or hour,
minute)
SET (set) button sets the desired
date (or time).
g
Picture counter: Counts down to
show how many pictures are left
in the film pack.
h
Red field: (not visible in picture)
indicates adjustments on control
panel are not on automatic/
normal settings (i.e., lighten/
darken on darken, autofocus off,
flash off).
Page 8

8
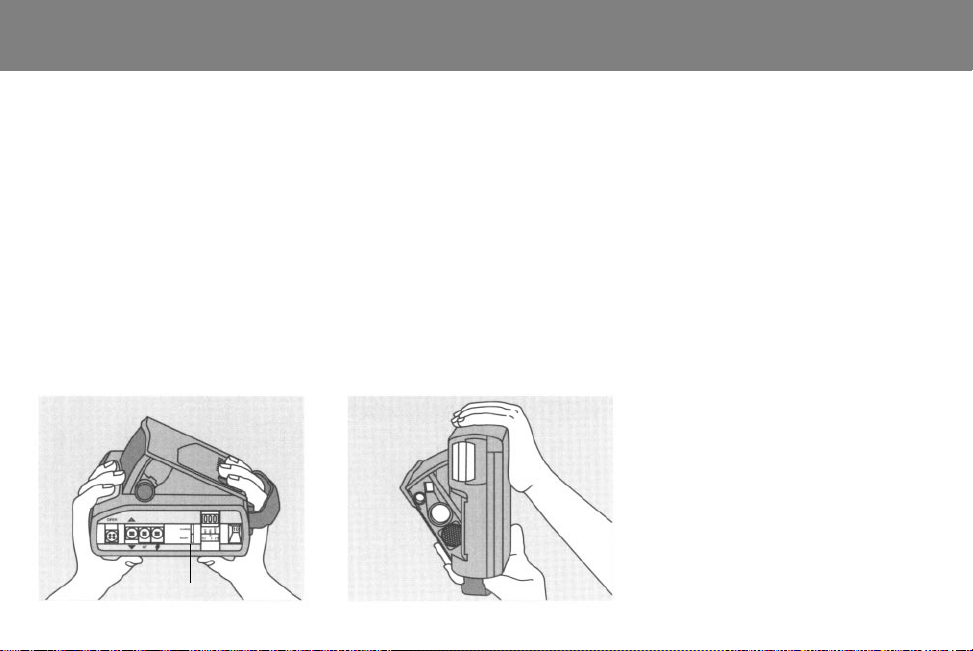
Opening and closing the camera
To open the camera
Slide your right hand through the
hand strap and hold the camera
as you would a pair of binoculars
(picture 3). Slide the OPEN switch
on the back of the camera’s
up
control panel. The camera will
open automatically.
To close the camera
When you have finished using the
camera, close it to protect the
lens. Hold the camera as shown
(picture 4). Press down on the top
of the camera until it locks in the
closed position.
34
Page 9

Loading the film Cleaning the rollers
9
Use Polaroid
The film pack contains a
mercury-free battery.
Spectra/lmage
Polaroid films cannot be used
with this camera.
When the camera is open,
push the film door release button
in the front of the camera. The
film door will open.
Hold the film
pack by its edges only
and slide it all the way into the
camera. Close the film door and a
film.
Other
(picture 5)
cardboard cover protecting the
film will eject automatically.
Dirty rollers can prohibit your
camera from operating correctly
and can cause a repeated spot or
bar pattern in the picture.
As part of the regular maintenance of your camera, check
that the rollers (picture 6) are
clean each time you load a fresh
pack of film. The developer rollers
are located inside the film door. If
56
there is film in the camera, open the
door in dim light and clean the
rollers.
While turning rollers, clean them
with a lint-free cloth, dampened
with water, if necessary.
Page 10

10
Removing an empty film pack Framing the subject
Remove the empty film pack
when loading a new
pack into the camera.
When the film pack is
empty, the picture
counter on the control
panel sets to zero and
you will hear three chimes when the
camera is open and when the shutter button is pressed.
Push the film door release button on the front of the camera. Pull
the colored tab to remove the
film pack.
The wide-angle lens of the
ProCam allows you a wider field
of view to capture more in your
photograph. The lens also allows
you to photograph subjects from
18 inches (46cm) to infinity. The
flash is designed to be used for
every picture -
indoors.
indoors:
outdoors and
For best results, your
subject should be from 18 inches
to 18 feet (46cm to 5.5m) away
and near a light-colored
background.
Outdoors:
Your subject should be
at least 18 inches (46cm) away.
Keep the sun behind you or to
your side.
Page 11
Taking the picture
11
Slide your right hand through the
hand strap and hold the camera
as you would a pair of binoculars
(picture 7). Rest your index finger
on the shutter button. Look
through the viewfinder to frame
your subject. Press the shutter
button then release while holding
the camera steady until all motor
sound stops and the picture has
ejected. The film will not eject out
of the camera as long as your
finger is on the shutter button.
There may be situations when you
may want to use this feature
such as extremely windy
conditions.
If the green flash-ready light
Note:
is not on, touch the shutter
(a)
button lightly to restore it, then
take the picture. The picture will
eject automatically.
For horizontal pictures, hold
the camera as shown in picture 7.
For vertical pictures, position the
78
a
camera with the flash on top as
shown in picture 8 to get the best
results.
When taking pictures of
Note:
people or objects, you may want
to hold the camera as in picture 8
to reduce the shadow effect on
the side of the image.
Page 12
12
Lighten/Darken control
Use the exposure control when
you want to
retake
a picture to
make it lighter or darker.
When retaking a picture to
make it
lighter:
all the way up.
Slide the control
When retaking a picture to make it
Slide the control
darker:
way down.
all the
After you have finished taking the
picture, do not forget to return the
control to the
center position.
Page 13
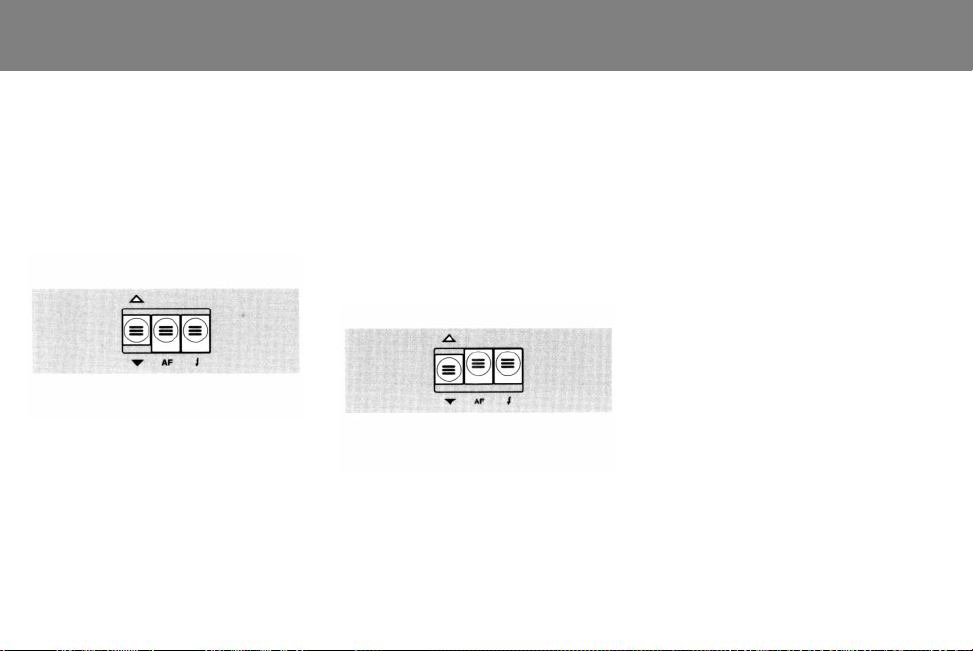
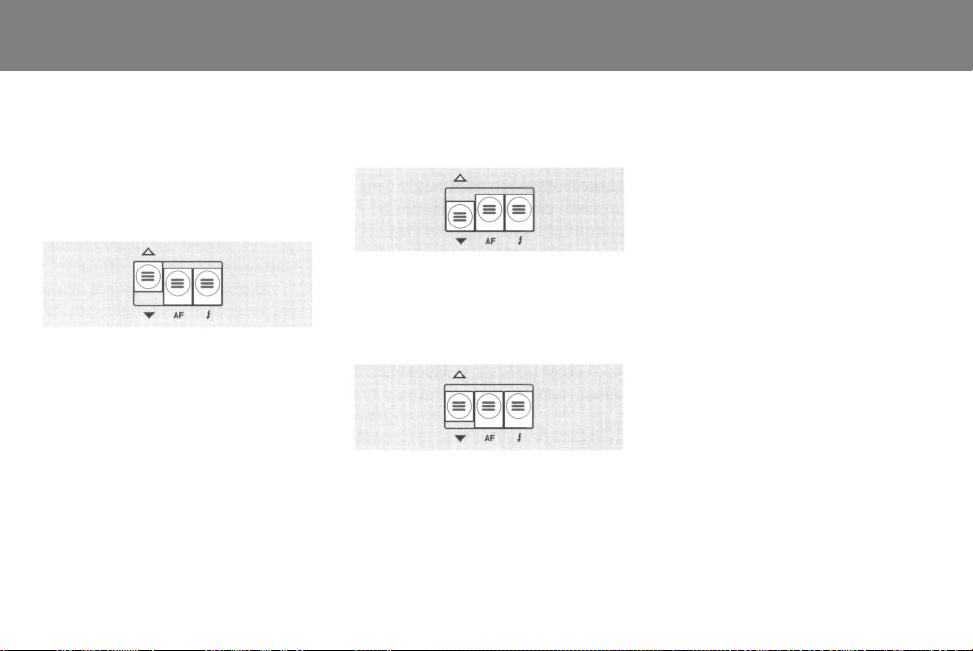
Autofocus system
13
The ProCam has a computerized
sonar autofocus system which
uses sound waves to measure
accurately the distance to your
subject and set the lens. Check
that the AF switch on the control
panel is set on the following:
Photographing a distant scene
through glass
To avoid focusing on the glass
and getting a flash reflection, turn
the autofocus and
off
systems
up
by sliding both switches
. The red field on the control
flash
panel (indicating controls are not
on automatic) will then be visible
at the base of the two switches.
When you turn off the autofocus
system, the lens sets for distant
scenes of 15 feet (4.6m) to infinity.
To ensure a successful picture, be
sure to:
take the picture from at least 15
•
feet (4.6m) away,
take the picture in daylight, hold
•
the camera steady or mount
it on a tripod to avoid a blurry
•
picture.
Page 14

14
Automatic flash system
Every time you take a picture,
indoors or outdoors, your camera
blends light from the scene with
just enough flash to provide the
right lighting for the best possible
picture. Wait for the flash charge/
ready light on the control panel to
be READY (green) before taking a
flash picture.
Flash ON position:
There may be situations (i.e. highly
reflective subjects, taking pictures
through glass) where you may wish
to turn off the flash.
You may do so by sliding the
automatic flash button up on the
control panel.
Flash
Flash range:
OFF
position:
18 feet (5.5m)
Page 15

Date display buttons
15
The date display buttons (picture
9) on the control panel allow you
the option to imprint a date and/
or time (1 .8mm high) in the upper
left-hand corner of your photographs. The date display buttons
are used to set the display to Japanese, U.S. or European date
mode, day-hour mode or off
mode.
To set a date:
1
Press MOD (mode) repeatedly
until the desired date mode is 1
displayed (Japanese, U.S. or European). The MOD (mode) button
toggles through the following
options: Japanese date, day-hour,
off, U.S. date and European date.
An M will be visible in the date
display to indicate which digit is
the month.
2
Press SEL (select) to select the
year, month or day (see blinking
digit).
3
Press SET repeatedly (or hold button) until the desired digit is displayed. Repeat steps 2 and 3 until
the desired year, month and day
are all set.
4
Press SEL (select) a fourth time to
lock in the date.
Setting the time (in day-hourminute model)
1
Press the MOD (mode) button
until the day, hour and minute
mode is displayed. The first set of
digits visible in the display is the
day of the month, followed by the
time in hours and minutes in
European (or U.S. military) time
(ex. 13:00 = 1:00 p.m.).
2
Press SEL (select) and the hours
will blink. Press SET (set) to toggle
through the hours. Press SEL
(select) again to lock-in the hour
and the minutes will blink.
3
Press SET (set) to toggle through
the minutes. Press SEL (select)
again to lock in the minutes. (The
colon will be blinking).
4
Press SEL (select) a fourth time to
lock in the desired time (starting at
the hours and minutes displayed
and zero seconds).
Page 16

16
9
Shutting off the date display
option
Press the MOD (mode) button until
a series of dashes appears in the
display. When these are visible in
the display, a date will not appear
on your photograph.
Date display battery
There is a lithium battery in the
camera that provides back-up
power to the camera’s date
display module. It has a
life expectancy of approximately
five years.
If the LCD appears dim when the
camera is in the closed position,
your date display battery needs
replacement. Contact the nearest
Polaroid office listed in this
instruction book.
Page 17

10
17
Page 18

18
ProCam Close-up Lens Attaching the lens
a
Lens
b
Lower tab
c
Positioning slot
d
Prong
e
Locking tab
f
Viewfinder window
g
Lens guard
The ProCam Close-up Lens (picture I0) allows you to take photographs 10-14 inches (25 to 36cm)
from your subject and provides a
magnification of approximately
0.4X. It can be easily attached to
your camera and can remain on
when the camera is closed.
Open the camera and face the
camera lens toward you. Hold the
1
Orient the Close-up Lens onto the
front of the camera as shown in
the illustration with the word
“Polaroid” facing out.
2
Position the lens
era lens, first seating the lower
tab behind the lens guard
3
Make sure the positioning tab on
the camera fits into the position-
ing slot
4
Push the Close-up Lens securely
against the camera.
5
Press the upper right corner of the
Close-up Lens so the prong
fits into the camera.
6
Snap the locking tab
cut-out area on the side of the
camera.
camera securely. Hold the Closeup Lens by the locking tab on the
side of the lens. Do not touch the
lenses, as fingerprints will blur
your photograph.
(c)
Taking a close-up picture
To measure the appropriate distance of 10-14 inches (25 to 36cm)
from your subject, stretch the shoul-
(a)
over the cam-
der strap taut and place the metal
rivet on the strap at the subject.
(g)
.
.
Frame your subject in the viewfinder, drop the strap,
distance
Note:
, and shoot.
Remember to remove the
maintain the
Close-up Lens when you have
completed taking your close-up
photographs. The Lens, however,
may remain on the camera when
(d)
closing it.
(e)
into the
Page 19

19
Indoors, place your subject near a
background, allowing the automatic
electronic flash to light up the scene.
For pictures of highly reflective surfaces, shoot at an angle to avoid a
flash reflection. Or, for best results,
turn the flash off. When the flash is
off, hold the camera steady or use a
tripod.
For multiple pictures of the same
subject, you may want to use a tripod to avoid reframing each picture.
Hold the camera steady until the
picture has ejected from the camera.
When framing your picture,
move in close to fill the frame with
the subject for best results.
Start with the lighten/darken
control on the normal position.
Some subjects may require an
adjustment.
It is important to avoid touching
the lenses. Should you need to
remove dust or fingerprints, breathe
on the lens and wipe it gently with a
clean, soft facial tissue.
silicone-treated eyeglass tissues.
Do not use
If you are having a picture-tak-
Note:
ing problem, check to be sure your
camera is in the fully automatic
mode with the switches in a row so
that the red field is not visible.
Retake your picture. If this does not
correct the problem, review this section or call us at the nearest Polaroid
Service Center. See page 25.
Page 20

20
Troubleshooting
Blurry picture
Cause
•
When subject is not centered in
the picture, the sound waves pass
by the subject and measure the
distance to the background. This
causes the subject to be unsharp
because the lens focuses on the
background.
Solution
•
Center subject in the picture.
Cause
•
Object in foreground prevented
sound waves from measuring correctly. Lens focuses on object,
causing unclear and possibly dark
subject.
Solution
•
The sound waves travel to the central part of the scene. Be sure there
aren’t any objects in front of your
subject.
Cause
•
Camera movement can cause
the picture to be blurry. When a
picture is taken in low light (at
dusk, in the shade, etc.), the shutter can stay open for as long as 2.8
seconds.
Solution
•
Hold camera steady as you take a
picture, or place the camera on a
tripod.
Page 21

21
Background too dark
Cause
•
Background too far from subject
or beyond flash range.
Solution
•
Be sure the exposure control is in
the center position; place subject
near a background and keep both
within the 18 in. to 18 feet (46cm
to 5.5m).
Repeated spots or bar pattern
Cause
•
Rollers inside the film door need
to be cleaned.
Solution
•
Clean rollers as described (see
page 9).
Subject too dark
Cause
•
The camera’s photocell measured
the bright window light, causing
the subject to be too dark.
Solution
•
Reposition subject away from the
bright background.
Page 22

22
Cause
•
When a bright source of light
(such as lamplight) is in the central
part of the scene and in front of
the subject, the camera’ s photocell
will measure the bright light, causing the subject to be too dark.
Solution
•
Move the source of light to one
side of your subject so it is not in
the central part of the scene.
Picture too blue or too red/yellow as possible.
Cause
•A blue tint
may result when pictures are taken at temperatures
below 55°F (13°C).
•A red
or
yellow tint
may result
when pictures are taken at temperatures above 95°F (35°C).
Solution
•
Keep camera and film away from
excesses of temperatures (hood of
a car, glove compartment or
trunk).
The film
For best results, take pictures
when the temperature is between
55°F (13%) and 95°F (35%). Below
55°F (13°C), place developing pictures in a warm pocket. Above
95°F (35C), keep the film as cool as
possible. Store below 75°F (24°C);
do not freeze.
The picture
During the first 60 seconds of development, handle the picture gently
and hold it by the wide, white border. Keep the developing picture
away from hot surfaces like the
hood of a car.
the pictures.
Do not fan or bend
The lens
Avoid touching the lens. To remove
dust or fingerprints, breathe on the
lens and wipe it gently with a lens
tissue or a clean, soft facial tissue.
Do not use silicone-treated eyeglass tissues.
Page 23

Full Lifetime warranty
23
U.S.A.
If this camera proves to be defective,
we will, at your option, either
replace it or repair it without charge
for as long as you own the camera
(original owners only).
ranty options.
To obtain warranty
See Y our war -
service, please call Polaroid at the
toll-free number listed or write to the
Polaroid Resource Center, 784
Memorial Drive, Cambridge, Massachusetts 02139-4688. This warranty
does not cover damage caused by
accident, misuse, or tampering with
the camera, and a charge will be
made for such repairs.
This warranty gives you specific
rights, and you may also have other
rights which vary from state to state.
This warranty excludes all consequential damages. Some states do
not allow the exclusion of consequential damages so the foregoing
exclusion may not apply to you.
Your warranty options:
Replacement:
You can choose to
receive a replacement camera at no
charge. If the failure occurs within 90
days of the purchase date, you can
return the camera to any participating Polaroid dealer and you will
receive a new ProCam camera. If the
failure occurs after that period, call
Polaroid at the toll-free number
listed and we will ship you a refurbished camera of equal or better
value. Replacement will be made 3-5
business days from the receipt of
your camera. When you call, we will
also tell you how you can get even
faster service.
You can choose to have
Repair:
your camera repaired by calling the
number listed for the address of the
nearest authorized Polaroid repair
location. Please allow 3 to 5 weeks
from the receipt of your camera for
the repair. The repaired camera will
be returned to you along with a
reimbursement of your postage
cost. This warranty applies to new
ProCam cameras purchased in retail
stores in the U.S.A. Please keep your
dated sales receipt or proof of the
purchase date to confirm coverage.
Business Image Guarantee
We are so sure you will be happy
with your pictures that we guarantee
complete satisfaction for one year.
If you are not pleased with any
picture you take, use Polaroid
Image Guarantee coupons to
receive free replacement film.
This offer is limited to 10 packs of
replacement film. To receive your
book of coupons, simply fill out
and return the Registration card.
U.S. offer only
Page 24

24
Camera, film specifications
Aperture/shutter system
Apertures: from f/10 to f/45.
Shutter speeds: from 1/245 to 2.8
seconds.
Camera size/weight
Length: 6.48 in. (16.5cm).
Width: 6.36 in. (16.2cm).
Height: 2.84 in. (7.21cm) closed, 4.63
in. (11.8cm) opened.
Weight: 2.2 lb. (1.0kg), without a film
pack.
Close-up lens
Close-up capability: 10-14 in. (25 to
36cm).
Date display buttons
Date and/or time imprint 1.8mm
high in picture.
Film advance
Automatic film advance; motorized
picture ejection.
Film
Polaroid Spectra or Image color film
only. Starts developing in seconds.
Ten pictures per pack.
Film size
Outer border: 4 x 4.06 in.
(10.1 x 10.3cm).
Image area: 3.60 x 2.90 in.
(9.1 x 7.2cm).
Lens
Wide-angle lens focus capability:
18 in. (46cm) to infinity.
Power source
Six-volt battery in each film pack
powers camera functions. Date display module powered by its own
battery with expected life span of
five years with warranty replacement by Polaroid Service Center.
Programmed flash
Built-in flash designed to be used
indoors and outdoors. Recharge
time: from 1 to 2.8 seconds. Flash
duration: from 1/3000 to 1/20,000 of
a second, Indoor flash range: from
18 in. to 18 feet (46cm to 5.5m).
Sonar autofocus system
Computerized autofocus system
uses sound waves to measure accurately the distance to your subject
and set the lens.
Speed
Film Speed: IS0 600/29°.
Viewfinder
95% viewing (no parallax) at18 feet
(5.5m).
Viewfinder magnification: .45x (subjects appear half lifesize).
Page 25

Polaroid Service Center
25
For more information
and help
Picture problems are often due to
incorrect use of the camera. if you
need further help, and before you
return the camera for repair, please
see your dealer or contact the nearest Polaroid office listed in this
instruction book.
If you write, please explain the
nature of the problem and, if possible, enclose sample pictures.
U.S.A.
Polaroid Corporation
784 Memorial Drive
Cambridge, MA 02139
Tel.: Toll free 800-343-5000
from anywhere in the U.S.A.
(For hearing impaired users, call:
1-800-448-6708.) Our representatives can be reached every weekday
from 8 a.m. to 8 p.m., Eastern Time.
Page 26

26
This device complies with Part 15
of the FCC rules. Operation is subject to the following two conditions:
• This device may not cause harm-
ful interference.
• This device must accept any inter-
ference received, including inter-
ference that may cause undesired
operation.
Note: This
equipment has been
tested and found to comply with
the limits for a class B digital device,
in accordance with Part 15 of the
FCC rules. These limits are designed
to provide reasonable protection
against harmful interference to radio
communications in a residential
installation. This equipment generates, uses and can radiate radio frequency energy. If not installed and
used in accordance with the instructions, it may cause harmful interference to radio or television reception
(determined by whether interference exists when the equipment is
in use).
You should correct the interference by one or both of these
methods:
• reorient or relocate the receiving
antenna of the radio or television
set
• increase the separation between
the equipment and the receiver
This digital apparatus does
not exceed the Class B limits for
radio noise emissions from digital
apparatus set out in the Radio
lnterference Regulations of the
Canadian Department of Communications.
 Loading...