

Page 1

Polaview SuperPortable 10
Page 2

FCC Statement
Warning: This equipment generates, uses and can radiate
radio frequency energy and, if not installed and used in
accordance with the instruction manual, may cause interference to radio communications. It has been tested and found
to comply with limits for a Class “A” computing device pursuant to Subpart B of Part 15 of the FCC Rules, which are
designed to provide reasonable protection against such
interference when operated in a commercial environment.
Operation of this equipment in a residential area is likely to
cause interference in which case the user, at his own
expense, will be required to take whatever measures may be
necessary to correct the interference.
Warning: Changes or modifications to this unit not expressly
approved by Polaroid could void the user’s authority to
operate the equipment.
Canadian Notice
This digital apparatus does not exceed the Class A limits for
radio noise emissions from digital apparatus set out in the
Radio Interference Regulations of the Canadian Department
of Communications.
Le présent appareil numérique n’émet pas de bruits
radioélectriques dépassant les limites applicables aux
appareils numériques de la classe A prescrites dans le
Règlement sur le brouillage radioélectrique edicté par le
ministère des Communications du Canada.
European Notice
Warning: This is a Class A product. In a domestic environ-
ment this product may cause radio interference in which
case the user may be required to take adequate measures.
The “CE” mark certifies that this product satisfies the
requirements of the EU (European Union) regarding safety,
public health, environment and consumer protection. (“CE”
is the abbreviation of Conformité Européenne.) This product
is in conformity with the following directives: 73/23/EEC, low
voltage directive; 89/33/EEC, EMC directive; 93/68/EEC, “CE”
marking directive.
© Copyright 1996 Polaroid Corporation. All rights reserved.
Specifications are subject to change without notice.
Page 3

1 Introduction
What’s in the box? 3
Important safety instructions 5
2 Detailed setup
Your Polaview SuperPortable 10 Projector 9
Getting started 9
Connecting the projector 19
Turning on the projector and lamp 16
3 Using the projector
Using your Polaview SuperPortable 10 LCD Projector 19
Control-panel keys 20
The remote control 23
Menu-mode on-screen controls 24
Illuminated indicators 27
Table of contents
Page 4

ii
Table of contents
4 Maintenance
Transporting and storing the projector 29
Cleaning the lens 30
Replacing the lamp 31
Replacing the fuse 34
Changing the remote-control battery 35
5 Troubleshooting
Troubleshooting guide 39
Where to get help 43
Polaroid Offices and Service Centers 44
One Year Warranty 46
Appendix A:
Specifications 49
Appendix B:
Parts 51
Appendix C:
Abbreviations 53
Index
55
Page 5

The Polaroid Polaview projector family consists of portable,
color data and video LCD desktop projectors that make sharing data and presenting information as easy as connecting
your computer to your monitor.
The Polaview SuperPortable 10 LCD Projector is a full-color
compact LCD projection system ideal for displaying a computerized multi-media presentation. The built-in amplifier
and speakers let you play sound from a portable CD player
or to the auxiliary output of a stereo system. The projector
also lets you display video output from a VCR or LaserDisc
player.
The Polaview
SuperPortable 10
LCD Projector
in operation
1 Introduction
Polaroid
Polaview
Projectors
Polaroid
Polaview
Projectors
Page 6

The projector has a monitor-interface connector that lets you
view your computer video simultaneously on both the small
and large screens.
You can connect the projector to any IBM or IBM compatible
computer equipped with a VGA video output. You can also
connect it to any Apple Macintosh computer that is equipped
with a standard Macintosh video output.
The projector uses advanced thin-film-transistor liquid crystal
display (TFT LCD) technology and is capable of displaying up
to 16,194,277 colors. The fast response time of the TFT LCD
lets the projector display sharp, clear, fast-moving images.
The liquid crystal display is a matrix of 921,600 pixels
arranged in 480 rows and 640 columns. Each pixel is a single
thin-film transistor that actively controls the brightness of the
light that passes through the pixel.
When you turn on the projector, you also turn on the built-in
fans that prevent the projector from overheating.
The control panel and on-screen controls let you change the
video source or make adjustments to the projected color
image and sound.
2 Introduction
Page 7
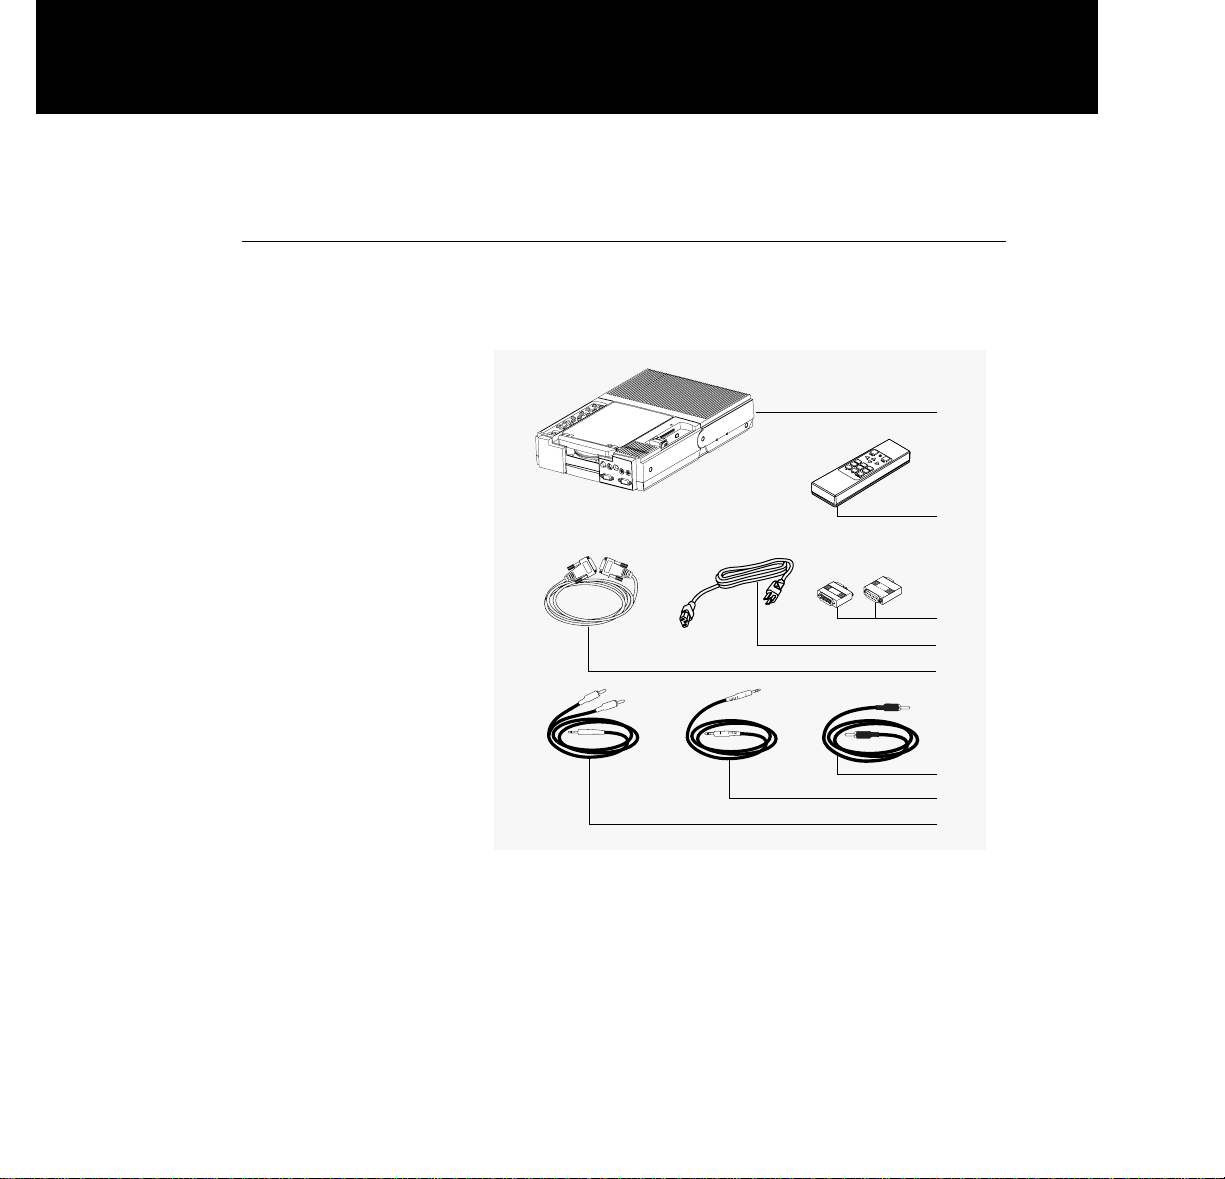
What’s in the box?
After you open the box and remove the projector and accessories, make sure you have all of the items shown below.
Items included
with the Polaview
SuperPortable 10
LCD Projector
a Polaview SuperPortable 10 LCD Projector
b RC-8 remote control
c Macintosh computer and monitor adapters
d Power cord (110V units only)
e VGA 9 ft. computer cable
f
PC video cable
g 3.5mm stereo audio cable
h Dual RCA audio cable
Introduction 3
a
b
c
d
e
f
g
h
Page 8
Also included but
• This user’s guide
not shown
• Quick reference guide
• Soft carrying case
• Product-registration card
Replacement parts
If you need replacement parts for your projector, contact
Polaroid or an authorized dealer. Do not attempt to use
unauthorized replacement parts as they may increase the
risk of fire, electric shock, or other hazards. See
Appendix B,
Parts,
for a complete list of replacement parts, accessories,
and the appropriate order numbers.
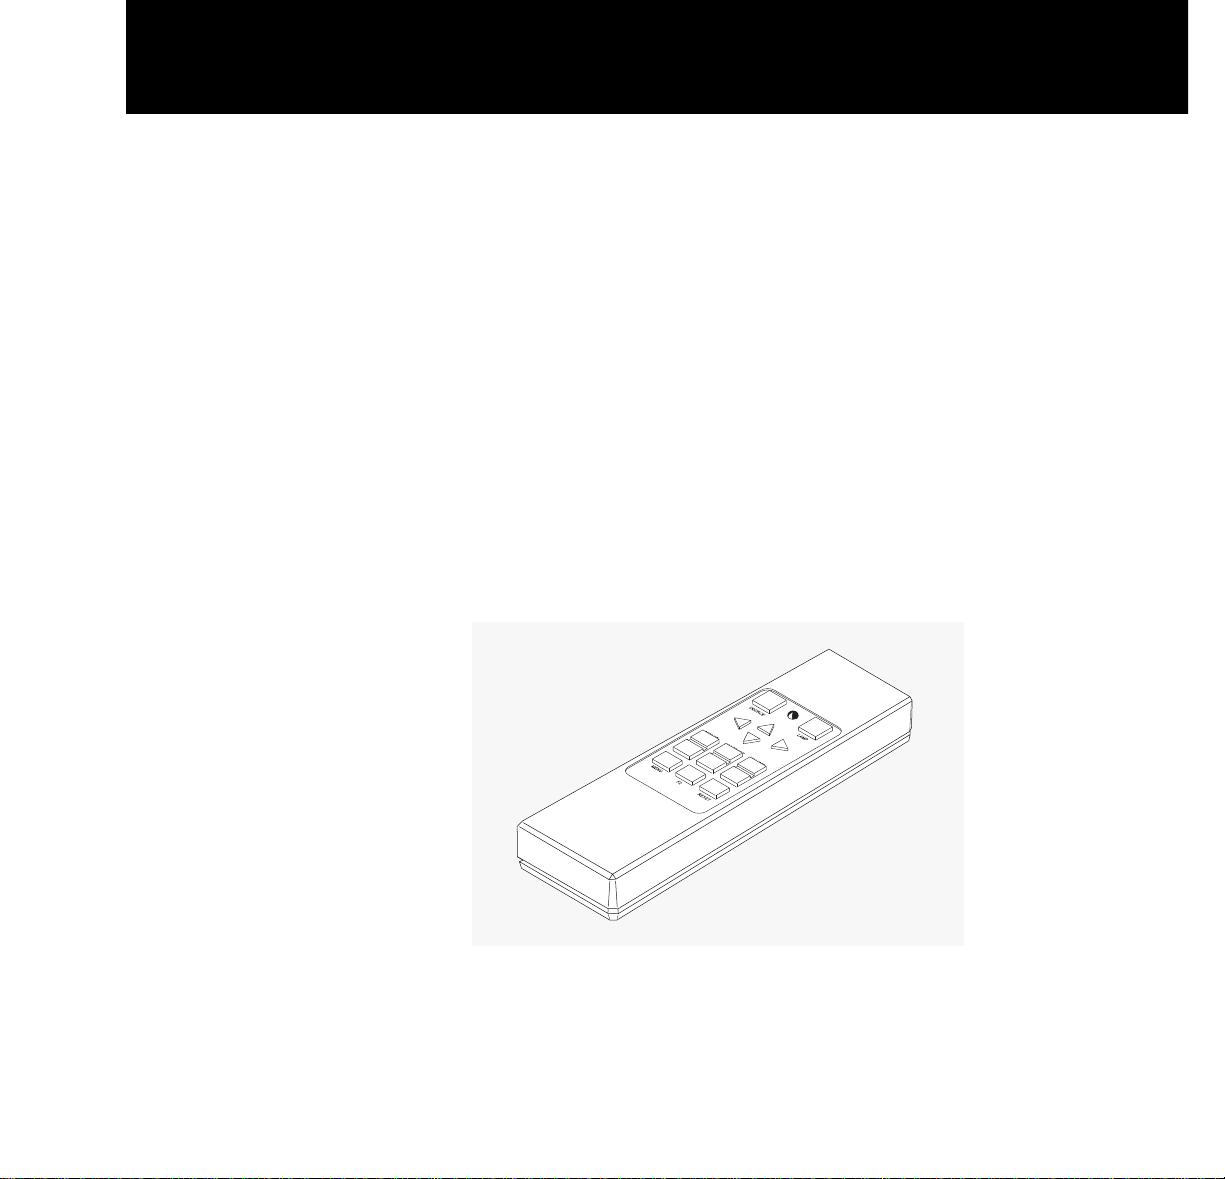
The remote control
The RC-8 remote control is specifically designed for use with
the SuperPortable 10 projector. It provides remote control of
all the projector control-panel and on-screen functions. For
detailed information about key functions, see Chapter 3,
Using the projector
.
The RC-8
remote control
4 Introduction
Page 9

Important safety instructions
Cleaning
Unplug the product from the wall outlet before cleaning any
exterior surface. Follow the cleaning instructions in this
manual. See Chapter 4,
Maintenance.
Water and spillage
Do not use the projector near water. Avoid using the projector in an area where liquids can spill or where objects can
fall onto it and come into contact with dangerous voltage
points, possibly resulting in fire or electric shock.
Ventilation
The projector housing has vents to ensure reliable operation
and prevention of overheating. When you operate the projector, do not cover or block these vents in any way.
Power cord
Place the power-supply cord where no one can step on it or
trip over it. Do not place objects on the power cord that can
pinch or cut into the cord. Pay particular attention to powercord connection points at wall outlets, convenience receptacles, and the projector input jack. If you must leave the projector unused or unattended for a period of time, shut the
unit off and unplug the power cord from the wall outlet. This
eliminates the risk of damage to the projector that can result
from power surges and lightning storms.
Warning: Before you attempt to replace the projector lamp,
to avoid the risk of electrical shock, unplug the power cord
first from the AC wall outlet then from the projector AC
power-input jack.
Overloading power
Do not overload wall outlets, extension cords, or integral
convenience receptacles as this can result in the risk of fire
or electric shock.
Introduction 5
Page 10

Service
Whenever you open or remove the projector covers, you
expose yourself to dangerous voltage. Do not attempt to
service the product beyond what is described in Chapter 4,
Maintenance
, of this user’s guide. Contact qualified service
personnel for any other servicing. See the list of Polaroid
Service Centers in Chapter 5,
Troubleshooting.
Should the projector sustain damage, unplug the power
cord from the wall outlet immediately. Contact qualified service personnel when the following situations occur:
• Damage to the power cord or plug
• Damage resulting from an object falling onto the projector
or from a liquid spilling into the projector
• Damage from exposure to water, moisture, rain
• Damage resulting from dropping the projector
• Irregular, inconsistent, or poor performance
6 Introduction
Page 11

2 Detailed setup
Your Polaview SuperPortable 10 LCD Projector
This chapter is a detailed description of the setup for your
Polaview SuperPortable 10 LCD Projector.
Unpack the projector and identify the package contents.
Check to be sure you have all the items listed in
What’s in
the box?
in Chapter 1,
Introduction.
Contact your Polaroid
dealer if anything is missing or damaged.
Note: The 550093-002 and 550093-003 adapters are for use
with Macintosh multisync monitors. (Polaview part numbers 550093-000 and 550093-001 are for use with non-multisync Macintosh monitors.) To obtain the 550093-002 and
550093-003 adapters, contact Polaroid.
Page 12
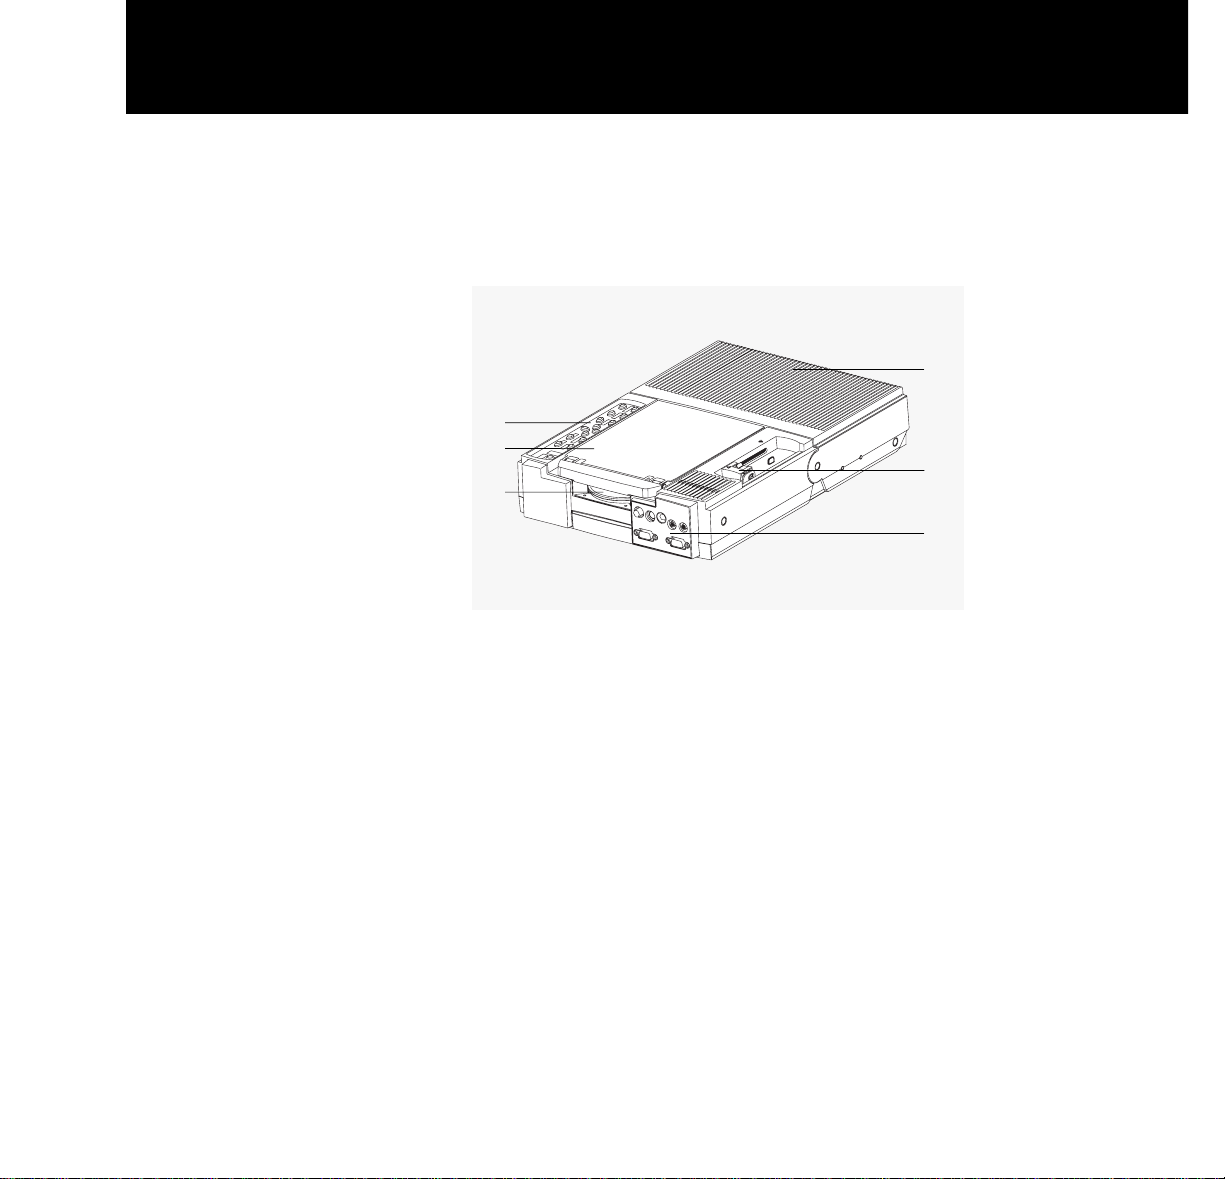
Before you begin, take a moment to identify the parts of the
projector.
The Polaview
SuperPortable
10 LCD Projector,
shown closed
a Control panel
b Mirror
c Projection lens
d Rear vents
e Projector locking mechanism
f Connector panel
8 Detailed setup
f
e
d
a
c
b
Page 13

Getting started
1 Place the projector on a solid, flat surface.
2 Turn off all equipment.
3 Release the projector locking mechanism (
a) and slide it in
the direction of the arrow (
b) in the illustration below.
Opening the projector
4 Raise the mirror (c) and, at the same time, rotate it (d) as
shown in the illustration above.
Note: When you raise the mirror, be careful not to stick your
fingers under it so as to avoid getting fingerprints on the
glass surface.
Detailed setup 9
c
d
b
a
Page 14
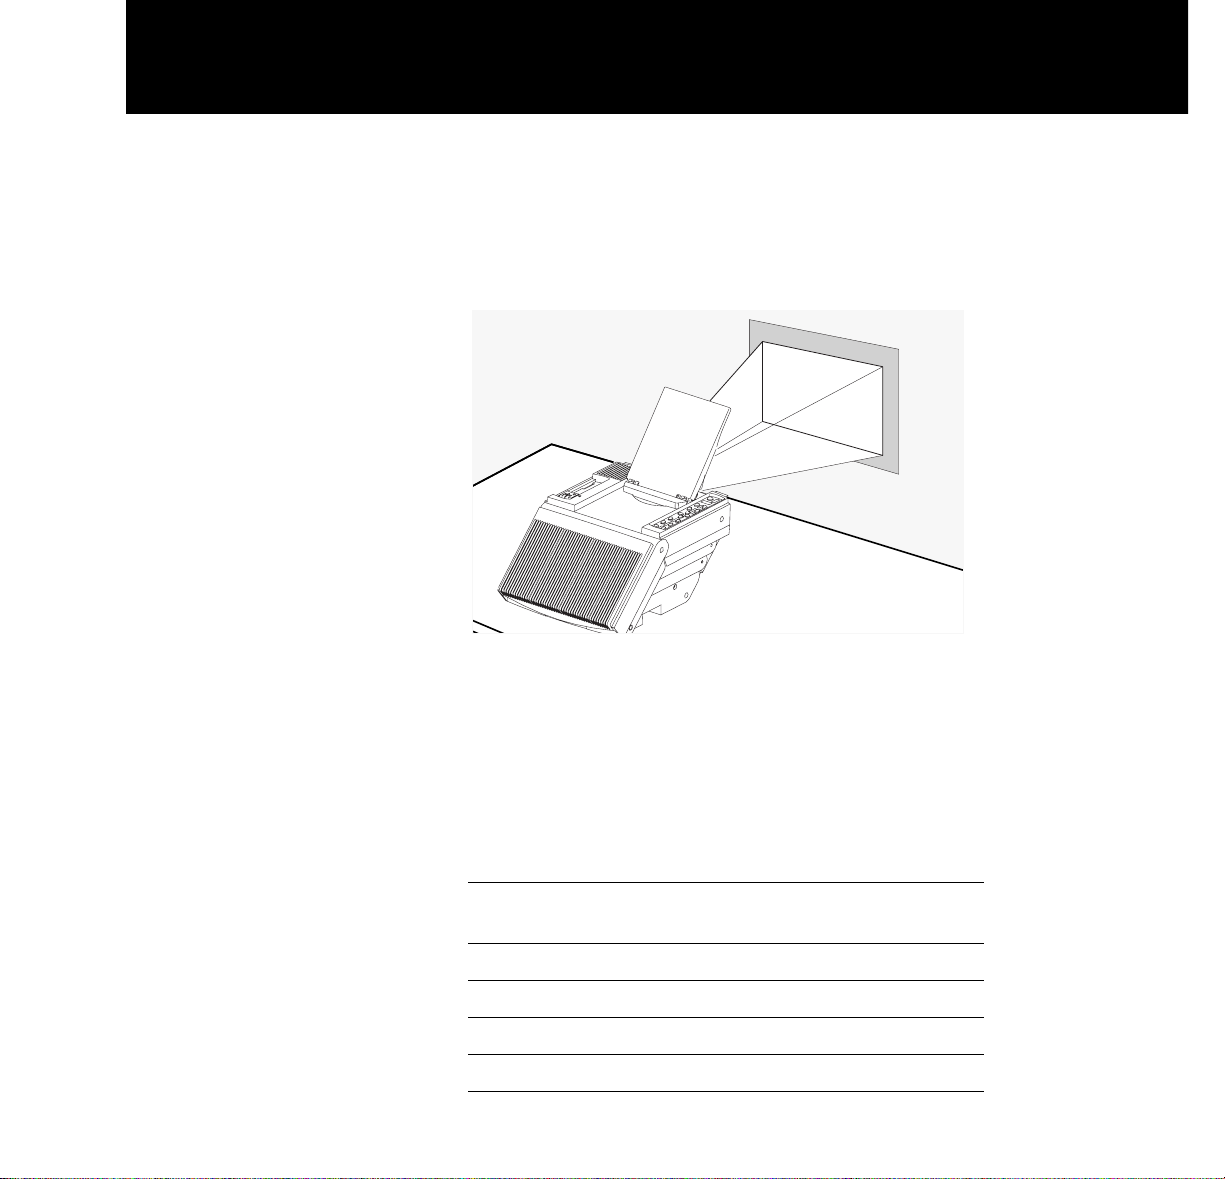
10 Detailed setup
When fully raised, the mirror should tilt upward at a approximately a 45 degree angle from the top of the projector, as
shown below.
Positioning the
projector in front
of the projection
screen
Note: Ensure that nothing is blocking the projector vents.
The projector takes in cool air through vents on both sides. It
expels hot air from vents at the rear of the projector.
Image size
The size of the projected image depends on the distance
between the projector and the projection screen. The following table shows the projected image size, measured diagonally, based on this distance.
Distance between
projector and screen Image width Image height
4 ft/1.2 m 4.2 ft/1.3 m 3.1 ft/0.9 m
5 ft/1.5 m 5.1 ft/1.6 m 3.9 ft/1.2 m
6 ft/1.8 m 6.2 ft/1.9 m 4.7 ft/1.4 m
7 ft/2.1 m 7.2 ft/2.2 m 5.4 ft/1.6 m
Page 15

Connecting the projector
You must connect the projector to a video source, and to an
AC wall outlet. In addition, you can also connect the projector to a computer monitor, an audio source, an additional
(composite or S-VHS) video source, and an external amplified stereo speaker system.
The connector panel
Port Connects to Cable
VIDEO Connects the projector to a PC video
LaserDisc or a VCR to bring cable
video from these sources
into the projector
S-VHS Connects the projector to S-video
an S-video source to bring cable
video into the projector
Detailed setup 11
Page 16

12 Detailed setup
Port Connects to Cable
AUDIO IN Connects to a VCR or Stereo or dual
LaserDisc to bring stereo RCA audio
audio into the projector cable
AUDIO OUT Connects to external Audio
speakers or an external cable
sound system to send
stereo audio out
COMPUTER Connects to the computer VGA
to bring computer video computer
into the projector cable
MONITOR Connects a PC or Macintosh Existing
monitor to the projector for monitor
simultaneous display cable
Page 17

Basic setup
For basic setup, follow these steps:
1 Plug the projector into an AC wall outlet (the POWER button
on the projector control panel starts to glow).
2 The projector has built-in speakers that can amplify audio
input. Connect a stereo or mono audio source, such as the
auxiliary output of an amplifier, CD player, tape player, VCR
or LaserDisc to the AUDIO IN jack. Use either the
3.5mm
stereo audio cable
or the dual RCA audio cable.
3 If you wish, connect an external amplified, mono or stereo
speaker system to the AUDIO OUT jack on the projector.
Note: When you plug a cable into the AUDIO OUT jack, you
disable the built-in speakers of the projector.
4 You can connect a video source such as a VCR or LaserDisc
player to the VIDEO jack on the projector. Use the PC video
cable. If your video system has S-VHS capabilities, use the
cable supplied with your video system to connect it to the
S-VHS jack on the projector.
Detailed setup 13
Page 18
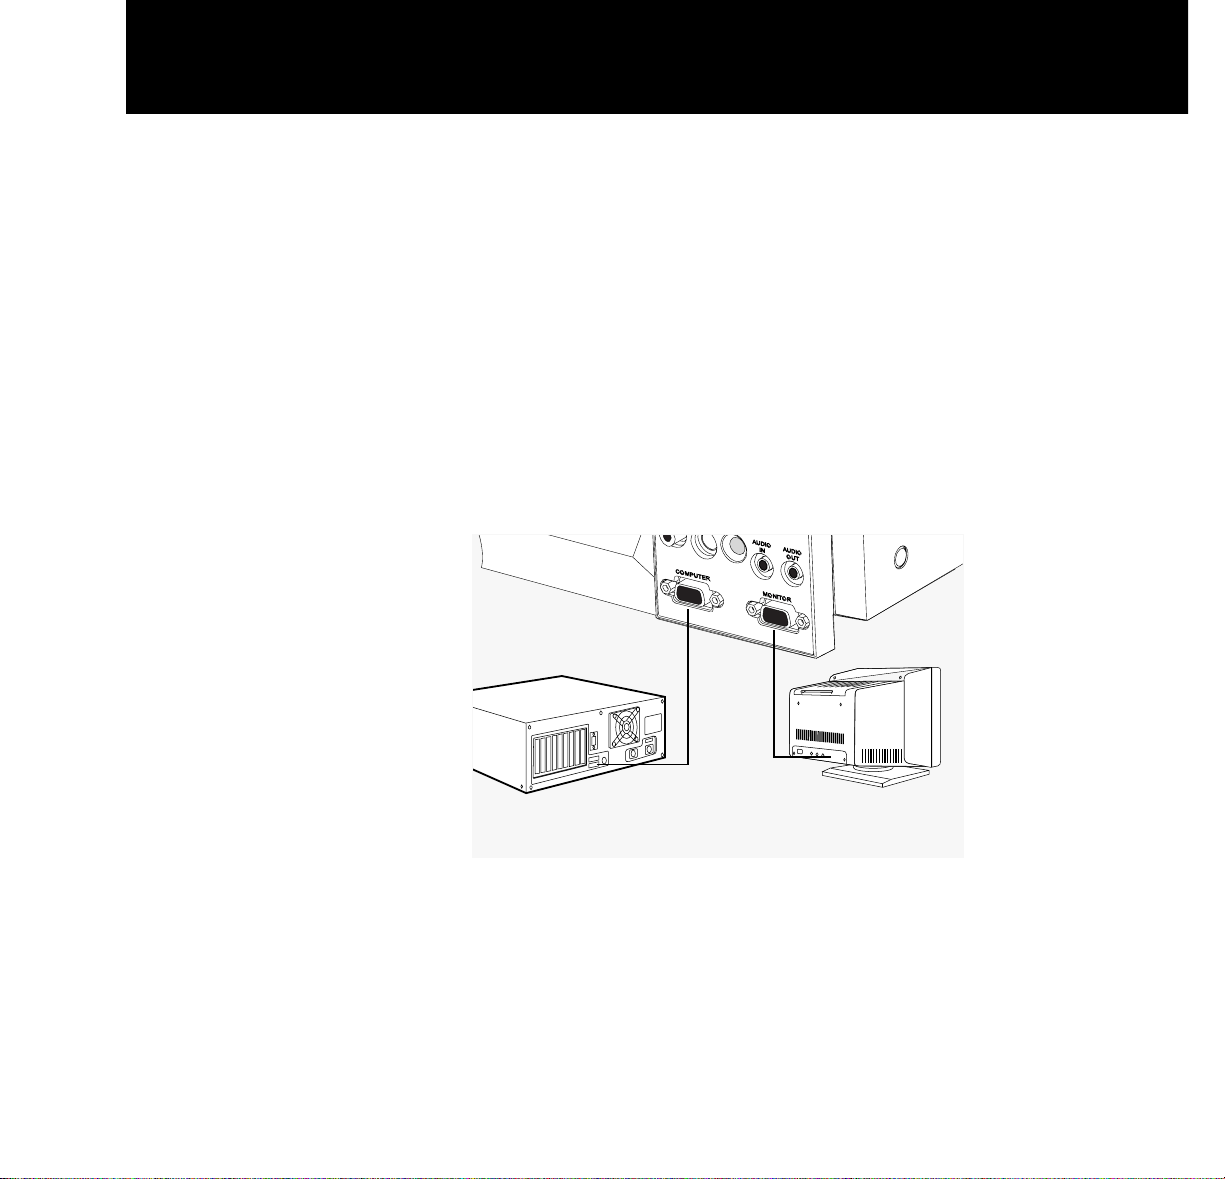
Connecting the
If you are using an IBM VGA computer, connect the
projector to a PC
computer to the projector by following these steps:
1 Unplug the monitor cable from the computer.
2 Plug one end of the supplied VGA computer cable into the
video port of the computer.
3 Plug the other end of the VGA computer cable into the pro-
jector COMPUTER jack.
4 To use your computer monitor simultaneously with your
projector, plug the computer monitor cable into the projector MONITOR jack.
PC connections
14 Detailed setup
Monitor
IBM compatible PC
Page 19

Connecting the
If you are using a Macintosh computer, connect the
projector to a
computer to the projector by following these steps:
Macintosh
1 Unplug the monitor cable from the computer.
2 Plug the adapter labeled either 550093-0 or 550093-2 into
the monitor port of the computer.
3 Plug one end of the supplied VGA computer cable into the
adapter on the computer.
4 Plug the other end of the VGA computer cable into the pro-
jector COMPUTER jack.
e To use your computer monitor simultaneously with your
projector, select the adapter labeled either 550093-1 or
550093-3. Plug the adapter into the projector MONITOR jack;
plug the computer monitor cable into the adapter.
Note: Use the 550093-2 and 550093-3 adapters with a 12-
inch Macintosh monitor, or a 15-inch Multisync monitor.
These adapters are available as accessories. Contact your
Polaroid dealer for information on ordering them.
Macintosh
connections
Detailed setup 15
Macintosh computer
and monitor
Adapter
550093-001 or
550093-003
Adapter
550093-000 or
550093-002
Page 20

Turning on the projector and lamp
Be sure that the projector is in the open position and that
you have lifted and rotated the mirror to its proper position,
as described in the previous chapter. Then follow these
steps:
1 Press POWER on the control panel to turn on the projector.
The control panel lights up and the projector lamp lights.
(When you turn on the projector, the projector lamp lights
automatically.) Initially the projection screen is blue. After
initialization, the Polaroid logo appears.
Warning: To prevent burning yourself when you are operat-
ing the projector, avoid touching the lamp-access door and
the surrounding area. The lamp-access door is on the bottom of the projector.
2 Turn on your computer. As you do so, the Polaroid logo dis-
appears from the projection screen, and the computer
screen image appears in its place.
Caution: The cooling fans protect the projector from heat
generated by the projector lamp. Make sure never to block
the air intake and exhaust vents. These vents are located on
the top and on both sides of the projector.
3 Adjust the room lighting for optimum screen viewing.
4 Adjust the mirror angle to attain the best screen image.
If you wish, you can press the POWER button to turn off the
projector and lamp until the start of your presentation.
16 Detailed setup
Page 21

5 Adjust the screen focus by rotating the lens, as shown in the
illustration below.
Focusing the projector
Note: If you let ten seconds elapse before before you unplug
the projector from the AC wall outlet, the projector saves all
control-panel and on-screen control settings.
6 For image phase adjustment, display a colorful image on the
computer screen and select the on-screen FOCUS control.
Note that it is easier to adjust the projector settings when it
displays a colorful image.
7 Turn on your audio source (CD player, amplifier, auxiliary
audio output, etc.).
8 Press VOLUME on the control panel to adjust the volume of
the speakers built into the projector.
Note: If you have an external powered speaker system
plugged into the AUDIO OUT jack, turn it on and adjust the
volume of that external system. (VOLUME controls the
sound level at the AUDIO OUT jack.)
Detailed setup 17
Page 22

9 Turn on and play the connected VCR, LaserDisc player, etc.
10 Press SOURCE on the projector control panel to select one
of the video inputs.
11 To enhance or adjust the projected image, refer to the
Con-
trol-panel keys
and
Menu-mode on-screen controls
sections
later in this chapter.
Note: After you adjust the settings, wait ten seconds for the
projector to save the changes. The next time you turn on the
your projector, it defaults to the new settings.
12 When you finish your presentation, press POWER to turn off
the projector and lamp.
13 Let the projector cool down and wait for the fans to stop
before you unplug the projector from the AC wall outlet.
Note: If you want to use your computer and monitor without
disconnecting them from the projector, be sure that the projector remains plugged into an AC wall outlet. The MONITOR jack on the projector requires power to operate the
computer monitor. You do not need to turn on the projector
to use the MONITOR jack.
18 Detailed setup
Page 23

Using your Polaview SuperPortable 10 LCD Projector
After you follow the steps described in Chapter 2,
Detailed
setup,
you are ready to begin using your Polaview Super-
Portable 10 LCD Projector.
The Polaview SuperPortable 10 LCD Projector is designed
with ease of use and simplicity in mind. With the remote
control or the control panel, most of the common functions
are right at your fingertips. To execute most of the functions
you need during your presentation, just press the appropriate key on the remote control or the control panel.
This chapter describes keys on the remote control and control panel and their functions. It also describes how to use
the Menu-mode on-screen controls.
3 Using the projector
Page 24

Control-panel keys
The projector control panel lets you adjust your projected
image and enhance the appearance of your presentation.
The function of each control-panel key is described below.
The control panel
Key-panel controls
Note: All controls have on-screen graphics to indicate their
relative value or selection setting.
BRIGHTNESS
Press the “+” key of the BRIGHTNESS control to increase
the overall image brightness. Press the “–” key of the
BRIGHTNESS control to decrease the overall image brightness. When you reach either adjustment limit, the on-screen
indicator stops moving.
CONTRAST
Press the “+” key of the CONTRAST control to make the
color image more vivid. Press the “–” key of the CONTRAST
control to provide greater definition to the color image in
areas that have subtle shading. When you reach either
adjustment limit, the on-screen indicator stops moving.
VOLUME
Press the “+” key of the VOLUME control to increase the
sound volume from the built-in speakers to or increase the
sound level at the AUDIO OUT jack. Press the “–” key of the
VOLUME control to decrease the sound volume from the
built-in speakers, or to decrease the sound level at the
AUDIO OUT jack. When you reach either adjustment limit,
the on-screen indicator stops moving.
20 Using the projector
Page 25

Alignment
Press ÿ (left), ÷ (right), ▲ (up), or ▼ (down) to move the
image to the desired position. There is no adjustment limit
for the alignment function; the image continues to move
and begins to wrap around onto the opposite side of the
display.
Note: The alignment controls function only when the pro-
jector is not in Menu mode.
MENU
This key controls the display of the on-screen controls
menu. If you display an on-screen controls menu item,
pressing this key makes the display disappear (on-screen
displays normally disappear after five seconds). To enter
Menu mode to gain access to the on-screen controls, press
and release MENU/RESET, then press either the ▲or ▼key
to scroll through the menu until you display the desired
Menu mode on-screen control. When the projector is in
Menu mode, only the Menu-mode on-screen controls function.
(RESET)
To reset the projector image to the original factory settings,
press and hold MENU/RESET until the on-screen display
indicates READY TO RESET (hold the key down approximately five seconds). When you release the key, you reset
the projector and clear all image enhancements you have
made, restoring the factory settings as the default settings.
(If you release MENU/RESET
before
you display READY TO
RESET, you cannot restore the factory settings.)
SOURCE
Press SOURCE to select video input from COMPUTER,
VIDEO, or S-VHS jacks. If you connect only one video source
to the projector, the projection screen goes blank momentarily, then returns, displaying from the connected video
source.
Using the projector 21
Page 26

F1, F2
You can program the F1 and F2 keys as shortcut keys to
any Menu-mode on-screen controls that you want to use
regularly, eliminating the need to to go through the onscreen menus. To program the F1 or F2 key, first select the
desired Menu-mode on-screen control. Then press F1 or F2,
and the F1 on-screen graphic appears. Press F1 or F2 a second time to program the key for the selected Menu-mode
on-screen control. The F1 or F2 key now selects the Menumode on-screen control automatically. If you do not press
F1 or F2 a second time within five seconds, the F1 and F2
programs remain unchanged.
REPLACE LAMP
The REPLACE LAMP indicator lights when the LAMP
HOURS value reaches zero. Use the LAMP HOURS onscreen control to reset the value. After you reset the value,
the REPLACE LAMP indicator goes out.
POWER
Press POWER to turn the projector and lamp on. Press it
again to turn the projector and lamp off.
22 Using the projector
Page 27

The remote control
Use the RC-8 remote control to change all the control panel
and on-screen control functions. Whenever you press a
remote-control key, the LED on the remote control blinks
rapidly. The remote-control keys share the same functions
as the corresponding keys on the projector control panel.
To use the remote control, point it at the front of the projector and press a key, or bounce the infrared (IR) signal off the
projection screen.
Note: When the operating distance between the projector
and remote control becomes too short for your purposes,
install a fresh battery as described in the
Changing the
remote-control battery
section in Chapter 4,
Maintenance
.
The RC-8 remote
control
a SOURCE f F2
b LED indicator g RESET
c Arrow keys (alignment) h LAMP (REPLACE LAMP)
d BRIGHT (BRIGHTNESS) i CONTRAST
e MENU j VOLUME
Using the projector 23
a
e
f
g
c
b
d
h
i
j
Page 28

Menu-mode on-screen controls
The Menu-mode on-screen controls let you adjust the projected image and enhance the appearance of your presentation. The function of each on-screen control is described
below.
INVERSE
To use the INVERSE function, press and release MENU,
then press either the ▲or ▼ key to scroll through the menu
until you display INVERSE. Press either the
ÿ or ÷ key to
switch between positive and negative images. A graphic
appears on the screen to indicate the current INVERSE setting.
WIDTH
To use the WIDTH function, press and release MENU, then
press either the ▲or ▼ key to scroll through the menu until
you display WIDTH. Press the
÷ key to increase the width of
the image. Press the
ÿ key to reduce the width of the image.
A graphic appears on the screen to indicate the current relative value of the WIDTH setting. WIDTH may affect the
FOCUS control; refer to the
Troubleshooting guide
in Chap-
ter 5 for more information.
FOCUS
To use the FOCUS function, press and release MENU, then
press either the ▲or ▼ key to scroll through the menu until
you display FOCUS. Press either the
ÿ or ÷ key to select
from 8 possible image-phase-adjustment settings. A graphic
appears on screen to indicate the current FOCUS setting.
The WIDTH control may affect FOCUS; refer to the
Trou-
bleshooting guide
in Chapter 5 for more information.
MIRROR
To use the MIRROR function, press and release MENU, then
press either the ▲or ▼ key to scroll through the menu until
you display MIRROR. Press either the
ÿ or ÷ key to switch
from the standard to the mirror (reverse) image. A graphic
appears on screen to indicate the current MIRROR setting.
24 Using the projector
Page 29

PALETTE
To use the PALETTE function, press and release MENU,
then press either the ▲or ▼ key to scroll through the menu
until you display PALETTE. Press either the
ÿ or ÷ key to
switch from one of two color modes: 8-color or 16,194,277color. A graphic appears on screen to indicate the current
PALETTE setting.
TINT
To use the TINT function, press and release MENU, then
press either the ▲or ▼ key to scroll through the menu until
you display TINT. Press the
÷ key to increase the red in the
color image. Press the
ÿ key to increase the green in the
color image. A graphic appears on screen to indicate the
current relative value of the TINT setting.
TONE
To use the TONE function, press and release MENU, then
press either the ▲or ▼ key to scroll through the menu until
you display TONE. Press the
÷ key to increase the high
tones of the speaker output. Press the
ÿ key to decrease the
high tones of the speaker output. A graphic appears on
screen to indicate the current relative value of the TONE setting.
LAMP HOURS
To use the LAMP HOURS function, press and release
MENU, then press either the ▲or ▼ key to scroll through
the menu until you display LAMP HOURS. A graphic
appears on screen to indicate the current relative LAMP
HOURS value. The LAMP HOURS value is based upon an
expected average lamp life. As you use the projector, the
lamp-hour value decreases incrementally toward 0. When
the lamp-hour value reaches 0, the REPLACE LAMP indicator lights. Press either the
ÿ or ÷ key to reset the LAMP
HOURS value to its maximum value and to extinguish the
REPLACE LAMP indicator.
Language
To use the language function, press and release MENU,
then press either the ▲or ▼ key to scroll through the menu
until you display ENGLISH, FRENCH, GERMAN, or SPANISH. Press either the
ÿ or ÷ key to choose one of the four
languages. The current language selected appears on the
screen.
Using the projector 25
Page 30

TV COMPRESS
To use the TV COMPRESS function, press and release
MENU, then press either the ▲or ▼ key to scroll through
the menu until you display TV COMPRESS. Press the
ÿ or ÷
key to switch between standard and compressed screen
images. A graphic appears on screen to indicate the current
TV COMPRESS setting. You can only adjust this control
when you are viewing a PAL or SECAM TV video image.
TV SHARPNESS
To use the TV SHARPNESS function, press and release
MENU, then press either the ▲or ▼ key to scroll through
the menu until you display TV SHARPNESS. Press the
ÿ or
÷ key to select from the 8 image-sharpness settings. A
graphic appears on screen to indicate the current TV
SHARPNESS setting. You can only adjust this control when
you are viewing a TV video image.
TV COLOR
To use the TV COLOR function, press and release MENU,
then press either the ▲or ▼ key to scroll through the menu
until you display TV COLOR. Press the
÷ key to increase the
amount of color in the image. Press the
ÿ key to decrease
the amount of color in the image. A graphic appears on
screen to indicate the relative value of the current TV
COLOR setting. You can only adjust this control when you
are viewing a TV video image.
26 Using the projector
Page 31

Illuminated indicators
POWER
The POWER key glows red when you plug the projector
power cord into an AC wall outlet. After the red light is on,
use the POWER key on the control panel to turn on the projector and lamp.
Control panel
An illuminated control-panel indicates that the projector is
in operation; the projector lamp should also be on.
REPLACE LAMP
When illuminated, REPLACE LAMP indicates that the LAMP
HOURS value is zero. Refer to LAMP HOURS in the
Menu-
mode on-screen control
section of this chapter or to
Lamp
replacement
in Chapter 4,
Maintenance.
Using the projector 27
Page 32

Transporting and storing the projector
To prepare your projector for transport, follow these steps:
1 Press POWER to turn off the projector and lamp. (The fans
continue to run for approximately three minutes.)
2 When the fans stop turning and the projector is cool, unplug
the power cord.
3 Close the projector down to its storage position and engage
the locking mechanism.
4 Rotate and close the mirror to its storage position.
Note: Store and transport the projector at temperatures
between 0° and 140°F (-17° to 60°C). Avoid leaving it in an
automobile during seasonal temperature extremes as automobile interior temperatures can exceed 160°F (70°C) in
summer and drop below -20°F (-29°C) in winter. If you
should expose the projector to extremely hot, cold or humid
conditions, allow it to stand at room temperature for 30 minutes before you attempt to use it.
4 Maintenance
Page 33

Cleaning the lens
1 Lift and rotate the mirror as you would to prepare the pro-
jector for use.
2 Gently wipe the exposed lens surface with a clean, lint-free
tissue (slightly moistened with lens cleaner if necessary).
Never pour lens cleaner or other solvents on the lens elements.
Caution: Never use silicone-impregnated eyeglass tissues
on the coated projection lens.
30 Maintenance
Page 34

Replacing the lamp
Warning: Before you attempt to replace the projector lamp,
to avoid the risk of electrical shock, unplug the power cord
first from the AC wall outlet then from the projector AC
power-input jack.
1 Press POWER to turn off the projector and lamp. (The fans
continue to run for approximately three minutes.)
Warning: To avoid the risk of burning yourself, let the lamp
access door and projector lamp cool down before you
attempt to replace the lamp.
2 When the fans stop turning and the projector is cool, unplug
the power cord from the AC wall outlet.
3 Be sure to close the mirror, then close the projector down to
its storage position.
4 Turn the projector over and lay it on a flat, stable surface.
Note: Typically, lamps have an average operating life of
approximately 30 hours. When illuminated, REPLACE LAMP
indicates that the projector lamp has reached this average
lamp operating life, and lamp failure may soon occur. You
may choose to replace the lamp or reset the LAMP HOURS
using the Menu-mode on-screen control, or you may
choose to continue using your projector until the lamp actually fails.
Maintenance 31
Page 35

5 Loosen the two lamp-access-door screws shown below.
(These are captive screws; do not try to separate them from
the lamp-access door.)
Replacing the lamp
6 Lift out the lamp/spare lamp-holder assembly.
7 Turn over the lamp-holder assembly and place it on a stable
surface.
32 Maintenance
Lamp-access-door
screws
WARNING: HOT
Allow unit to cool before
replacing lamp. Avoid
touching bulb or inside
of reflector.
Replace with FXL Lamp.
Page 36

8 Press the retainer spring and pull the active lamp out of the
lamp holder (see the illustration below).
9 Slide the spare lamp out of the lamp-holder assembly, as
shown in the illustration above, to remove it from its storage location. Insert it into the lamp holder.
Note: Replace the spare lamp as soon as possible.
10 Reinstall the lamp-holder assembly.
11 Tighten the two lamp-access-door screws.
Maintenance 33
Spring
retainer clip
Active lamp
Spare lamp
Page 37

Replacing the fuse
Locate the fuse holder just below the AC power-input jack
(shown in the illustration below). Use a small flat-blade
screwdriver to remove the fuse holder.
Note: If you want to remove the fuse holder, you must open
the projector to its raised position. If the projector is already
open, unplug the power cord from the wall outlet and from
the projector before you attempt to remove the fuse holder.
Replace the fuses only with the type and rating shown on
the label. If the projector repeatedly blows fuses, return it for
servicing.
34 Maintenance
AC power
input jack
Fuse
holder
USE ONLY WITH 250V FUSE
Page 38

Changing the remote-control battery
The remote control requires one 9V alkaline battery. Apart
from the first time you use the remote control, you should
install a new battery in the remote control when:
•
The LED on the remote control no longer lights when you press
the keys. This is an sign that the battery is dead.
• The operating distance between the projector and the remote
control becomes too short to meet your needs. This is an sign
of a weak battery.
To install the battery, follow these steps:
1 Turn the remote control upside down. Slide the battery
cover back and lift it out, as shown below.
Removing the
battery cover
Maintenance 35
OPEN
Page 39

2 Place a new battery in the battery compartment, as shown
below.
Loading the
new battery
36 Maintenance
Page 40

3 Align the tabs on the battery cover with the slots in the back
of the remote-control case (as illustrated below). Then close
the cover.
Closing the battery
cover
Maintenance 37
OPEN
Page 41

4 Test the operation of the remote control by pressing any
remote-control key. When the battery is properly installed,
the LED indicator should blink rapidly.
The LED indicator
38 Maintenance
STANDBY
FOCUS
BRIGHT
CONTRAST
VOLUME
SOURCE
MODE
MENU
LED indicator
Page 42

Troubleshooting guide
Symptom Cause Solution
Polaroid logo Unit working properly, Connect video source
displayed on projector but no video source
connected
No image projected Projector not turned on Turn on projector
from projector
Projector not connected Plug cord into outlet
to AC wall outlet
AC wall outlet defective Contact electrician;
do not attempt repair
Computer or video Check cable connections
cable not secured
No video signal from Check power and connections
computer or video source
Incompatible video signal Check that computer video
from computer source is compatible with
projector; see
Appendix A,
Specifications;
contact Polaroid
to verify compatible sources
Projector lamp burned out Replace lamp
Weak video signal or
poor VCR tracking
5 Troubleshooting
Page 43

Symptom Cause Solution
No image on Computer or monitor Check cable connections
computer monitor video cable not secured
Monitor power off or Turn on monitor; check
disconnected connections
Projector not connected Plug cord into outlet
to AC wall outlet
No video signal from Check power and connections
computer
Poor color or no color Color controls require Adjust BRIGHTNESS, TINT,
adjustment and CONTRAST controls
Wrong INVERSE mode Change INVERSE setting
Signal from computer Use appropriate video source
is monochrome
Computer video cable Check cable connections
not secured
Select a different color mode
using the PALETTE function
Adjust room lighting
Flickering or Image out of focus Use the FOCUS control;
unstable image there are 8 possible settings
Computer video cable Check cable connections
not secured
Incompatible video signal Check that computer video
from computer source is compatible with
projector; see
Appendix A,
Specifications;
contact Polaroid
to verify compatible sources
Adjust the WIDTH control
40 Troubleshooting
Page 44

Troubleshooting 41
Symptom Cause Solution
Split image or Image alignment needed Use up-down and
partial image left-right arrow keys
Incompatible video signal Check that computer video
from computer source is compatible with
projector; see
Appendix A,
Specifications;
contact Polaroid
to verify compatible sources
Reset projector to factory
default settings
POWER button not Projector not connected Plug cord into outlet
illuminated on to AC wall outlet
control panel
Defective AC wall outlet Contact electrician;
do not attempt repair
No audio from No audio source Connect audio source
built-in speakers connected
Projector not turned on Turn on projector
Projector not connected Connect projector to wall
to AC wall outlet outlet
AC wall outlet defective Contact electrician
do not attempt repair
Audio source turned off Turn on audio source
Audio source not Replace with appropriate
connected to cable
appropriate video input
Audio source and audio Use appropriate connections
output cables are reversed
VOLUME control Adjust VOLUME
set too low
External amplified speaker Disconnect external system
system connected to
AUDIO OUT jack
Page 45

Symptom Cause Solution
Bright spots Inactive pixel may appear
on projected image as bright spot on screen;
it does not affect picture
quality or life expectancy
of projector; projector may
contain maximum of
50 inactive pixels
Image contains one or WIDTH out of alignment Use the Menu-mode on-screen
more vertical bars controls to adjust WIDTH; after
eliminating vertical bars, use
FOCUS to sharpen image;
when you adjust WIDTH, if left
arrow adjustment causes
number of bars to increase,
use right arrow adjustment to
eliminate bars; if right arrow
adjustment causes number of
bars to increase, use left arrow
adjustment to eliminate bars
Blurred image Image out of focus Rotate lens to adjust
screen focus
Adjust FOCUS control;
if only portions of image are
out of focus and FOCUS
adjustment causes
out-of-focus portions to move,
refer to solution described in
vertical bars problem;
displaying a cross-hatch
pattern aids in resolving any
focus-adjustment problems
42 Troubleshooting
Page 46

Symptom Cause Solution
No image on Incorrect Macintosh Use 550093-002 and
Macintosh monitor computer and monitor 550093-003 adapters with
adapters 15-in. Macintosh multisync
monitor or with 12-in.
Macintosh monitor; use
550093-000 and 550093-001
adapters with non-multisync
Macintosh monitors
No screen image with PowerBook must be Turn off the PowerBook,
Macintosh PowerBook turned on
after
projector then turn it on again;
is connected be sure to enable Monitor
Mirroring on the PowerBook
control screen
Inexplicable or Before calling for technical
unresolved problem assistance press RESET
to restore factory default
settings, then use control
panel and Menu-mode on-
screen controls to restore
image enhancements
Where to get help
If at any time you need help:
1 Check the
Troubleshooting guide
.
2 Call your dealer’s technical support line and explain your
problem.
3 Call Polaroid Corporation (see pages 44 and 45).
Troubleshooting 43
Page 47

44 Troubleshooting
Polaroid Offices and Service Centers
Australia
Polaroid Australia Pty. Ltd.
13–15 Lyonpark Road
P.O. Box 163
North Ryde, N.S.W. 2113
Tel.: (02) 9 950 7000
Fax: (02) 887 2209
Belgique/België
Polaroid (Belgium) N.V.–S.A.
Rue Colonel Bourg 111
Kolonel Bourgstraat 111
1140 Bruxelles–1140 Brussel
Tel.: 32 2 702 86 20
Fax: 32 2 726 92 99
Toll free: 32 78 155 905
Brasil
Polaroid do Brasil Ltda.
Av. Paulista, 1776–11º andar
Cerqueira Cesar
São Paulo–Capital
01310-921
Tel.: 55.11.285.6411
Fax: 55.11.283.2625
288.6521
287.5393
Canada
Polaroid Canada Inc.
350 Carlingview Drive
Etobicke, Ontario M9W 5G6
Toll free: 1-800-268-6970
Danmark
Polaroid a.s.
Blokken 75
3460 Birkerød
Tlf.: 42 81 75 00
Fax: 42 81 70 26
Deutschland
Polaroid GMBH
Sprendlinger Landstrasse 109
63069 Offenbach
Tel.: 069 8404 1
Fax: 069 8404 204
España
Polaroid (España), S.A
Calle Orense, 16
2
a
planta
28020 Madrid
Tno: 34-1-597.02.52
Fax: 34-1-597.27.82
France
Polaroid (France) S.A.
B.P. 7
78996 Elancourt Cédex
Tel.: (1) 30 68 38 38
Fax: (1) 30 68 38 39
Hong Kong
Polaroid (Far East) Ltd.
32/F Windsor House
311 Gloucester Road
Causeway Bay
Tel.: (852) 2894 0333
Fax: (852) 2895 1382
Italia
Polaroid (Italia) S.p.A.
Via Piave 11
21051 Arcisate (Varese)
Tel.: 0332-470031
Fax: 0332-478249
Japan
Nippon Polaroid
Kabushiki Kaisha
Mori Building No. 30
Toranomon 3-2-2
Minato-ku
Tokyo 105
Tel.: 81-3-3438-8811
Fax: 81-3-3433-3537
México
Polaroid de México S.A. de C.V.
Paseo de la Reforma 195
Piso 17
C.P. 06500 México, D.F.
Tel.: 703-1111
Fax: 566-0505
Del interior al 91 (800) 70-727
Ventas 91 (800) 70-747
Nederland
Polaroid Nederland B.V.
Zonnebaan 45
3606 CH Maarssen
PO Box 1219
3600 BE Maarssen
Tel.: 31-30-2-410-420
Fax: 31-30-2-411-969
Reparaties:
Polaroid (Europe) B.V.
Hoge Bothofstraat 45
7511 ZA Enschede
Tel.: 31-53-4-865-400
Page 48

Troubleshooting 45
New Zealand
Polaroid New Zealand Ltd.
Camera Services
24-26 Anzac Avenue
Auckland
Tel.: (09) 377 3773
Norge
Polaroid (Norge) A/S
Industriveien 8B, 1473 Skårer
Postboks 80, 1471 Skårer
Tlf: 67 90 47 10
Fax: 67 90 51 73
Österreich
Polaroid Ges.m.b.H.
Eitnergasse 5A
1231 Wien
Tel.: 869 86 27
Fax: 869 81 00
Portugal
Polaroid (España) S.A.
Sucursal em Portugal
Edificio Monumental
Avenida Praia da Vitória, 71-A 4º B
1050 Lisboa
Tel.: (01) 316.10. 52
Puerto Rico
Polaroid Caribbean Corporation
Centro de Seguros
Ave. Ponce de León 701
Miramar, Santurce 00907
Tel.: (809) 725-6240
Fax: (809) 725-5462
Schweiz/Suisse/Svizzera
Polaroid AG
Hardturmstrasse 133
8037 Zürich
Tel.: (01) 277.72.72
Suomi
Polaroid Oy
Sinikalliontie 10
02630 Espoo
Puh: 90-502 35 33
Fax: 90-502 35 50
Sverige
Polaroid AB
Ekholmsvägen 34
Box 204
127 24 Skärholmen
Tel.: 08-710 08 50
Fax: 08-740 73 68
U.K.
Polaroid (U.K.) Ltd. &
Polaroid Export Operations
Wheathampstead House
Codicote Road
Wheathampstead
Hertfordshire AL4 8SF
U.K.
Tel: (44) 1582 632000
Freefone: 0800 010119
U.S.A.
Polaroid Corporation
Technical Assistance
Tel.: Toll free 1-800-432-5355
Call for the nearest Polaroid
location
Page 49

46 Troubleshooting
One Year Warranty
Polaroid Corporation warrants your Polaview Projector
equipment against defects in manufacture for a period of
one year from the date of purchase. To verify the warranty
period, you should keep the sales slip or other proof of the
purchase date.
Should this product, or any component or accessory
included with it, become defective at any time during the
warranty period, Polaroid Corporation will, at its discretion,
either replace or repair this item, without charge, provided
the product is returned to a designated servicing location
(prepaid and insured). To ship the unit, pack the carrying
case in the original carton or equivalent, with plenty of
padding.
This Limited Warranty does not apply to product damage
resulting from accident, incorrect installation, unauthorized
modification, misuse or abuse.
U.S.A. and Canada
Before you return your equipment for repair, please call
Polaroid Electronic Imaging Technical Support from within
the U.S.A. at 1-800-432-5355, Monday through Friday, 8 a.m.
to 8 p.m., Eastern Time. In Canada, call 1-800-268-6970.
We can help you determine what is at fault, and advise you
on how and where to get service in the quickest and most
convenient way.
THIS WARRANTY EXCLUDES ALL INCIDENTAL AND
CONSEQUENTIAL DAMAGES. ALL EXPRESSED OR
IMPLIED LIABILITY FOR THIS EQUIPMENT INCLUDING
BUT NOT LIMITED TO THE IMPLIED WARRANTY OF
MERCHANTABILITY AND FITNESS FOR A PARTICULAR
PURPOSE ARE LIMITED IN DURATION TO THE ONE-YEAR
WARRANTY PERIOD.
SOME STATES DO NOT ALLOW THE EXCLUSION OR
LIMITATION OF INCIDENTAL OR CONSEQUENTIAL
DAMAGES OR THE DURATION OF IMPLIED WARRANTIES
Page 50

SO THE ABOVE LIMITATIONS MAY NOT APPLY TO YOU.
THIS WARRANTY GIVES YOU SPECIFIC LEGAL RIGHTS,
AND YOU MAY ALSO HAVE OTHER RIGHTS WHICH MAY
VARY FROM STATE TO STATE.
Outside the U.S.A.
THIS WARRANTY EXCLUDES ALL INCIDENTAL AND
and Canada
CONSEQUENTIAL DAMAGES AND DOES NOT AFFECT
YOUR STATUTORY RIGHTS.
Note: No user-serviceable parts inside, with the exception
of the lamp which can be replaced as described in this manual. Attempts to modify mechanical or electronic parts
inside will void your warranty, and may be hazardous.
Troubleshooting 47
Page 51

Color
8-color mode: 2 shades per color,
8 total colors
16M-color mode: 253 shades per color,
16,194,277 total colors
Display technology
Active matrix TFT
Resolution
640 x 480
Contrast ratio
60:1 minimum
100:1 typical
LCD panel
6.4 in. (diagonal measure)
Pixel response time
tr = 30 msec typical
tf = 50 msec typical
Computer video compatibility
Red, Green, Blue signal input/output
(0 to 1.0V at 75 ohms impedance)
Vertical sync frequency: 50 - 72 Hz
Horizontal sync frequency: 31 - 40 kHz
Appendix A: Specifications
Page 52

Composite video compatibility
NTSC, PAL or SECAM composite video
S-VHS video compatibility
NTSC, PAL or SECAM video with
separate chrominance and luminance
Optical lens
140 mm focal length
f3.7
4-element Dogmar lens
Projection lamp
410 watt FXL lamp
Input power
450 watts
Dimensions
2.9 in. (H) x 16 in. (L) x 10.3 in. (W)
(74 mm x 406 mm x 262 mm)
Weight
9.8 lbs (4.4 kg)
Computer interface
HD-15 D-subminiature interface
connector
Computer compatibility
IBM and IBM compatibles with VGA
(640 x 480)
Macintosh computers with external video
(640 x 480 mode)
800 x 600 mode supported by showing a
640 x 480 window of the larger image
Recommended storage temperature
0° to 140°F (-17° to 60°C)
Recommended operating temperature
32° to 95°F (0° to 35°C)
Recommended relative humidity
95% (non-condensing) at 104°F (40°C)
50 Appendix A
Page 53

Polaview model Part no.
Polaview SuperPortable 10 LCD Projector 622187
Replacement product Part no.
RC-8 infrared remote control 623405
Soft carrying case 590300-000
FXL 410 lamp 44925P13
PC video cable 58381-003
AC-1, 3.5mm stereo audio cable 550025-000
AC-2, dual RCA audio cable 550025-001
Macintosh computer adapter 550093-000
Macintosh monitor adapter 550093-001
CVL-V, VGA 9 ft. (2.74m) computer cable 550009-003
Power cord (U.S.) 550006-101
Optional accessory Part no.
Macintosh computer adapter 550093-002
Macintosh monitor adapter 550093-003
Power cord (Europe) 550024-000
Power cord (United Kingdom) 550024-004
Power cord without wall plug 550024-011
You can order replacement parts and accessories
through your local dealer or by contacting Polaroid
(see pages 44 and 45).
Appendix B: Parts
Page 54

Abbreviations
AUX Auxiliary
B/W Black and white
CCIR Comite Consultatif International
des Radio Communications
CD Compact disk
CW Clockwise
CCW Counter-clockwise
DOS Disk operating system
EP Extended play (same as SLP)
FCC Federal Communications Commission
LCD Liquid crystal display
LED Light emitting diode
LP Long play
ME-SECAM Middle East SECAM
NTSC National Television System Committee
PAL Phase alternation by line
Appendix C: Abbreviations
Page 55

RAM Random access memory
ROM Read only memory
SECAM Sequentiel Couleur A Memoire
SLP Super long play (same as EP)
SP Standard play
S-VHS super VHS
TFT Thin film transistor
VAC Volts-alternating current
VCR Video cassette recorder
VDC Volts-direct current
VGA Video graphics adapter
VHS Video home system
54 Appendix C
Page 56

A
Abbreviations, 53–54
Accessories, 4, 51
Adapter, 3, 4, 8, 15
Alignment, 21, 23, 41, 42
Arrow keys, 21, 23, 24, 25, 26,
41, 42
Audio, 13, 17, 41
AUDIO IN, 12, 13
AUDIO OUT, 12, 13, 17, 41
B
Battery, 23, 35–38
battery replacement, 35–38
BRIGHT, 23
BRIGHTNESS, 20, 40
C
Cables, 3, 11–12
Cleaning, 5
Color, 2, 25, 26, 40, 49
Compatibility, 2, 49–50
Computer, see
Compatibility
or
Connections
COMPUTER, 12, 14, 15, 21
Connections, 11–15, 39, 40
Audio, 13
Macintosh, 15
PC, 14
S-video, 13
Video, 13
Connector panel, 8, 11, 20
AUDIO IN, 12, 13
AUDIO OUT, 12, 13, 17, 41
COMPUTER, 12, 14, 15, 21
MONITOR, 12, 15, 14, 18
S-VHS, 11, 13, 21
VIDEO, 11, 13, 21
CONTRAST, 20, 23, 40
Control panel, 2, 8, 16, 19,
20–22, 27
Control-panel keys, 20–22
Alignment, 21, 23, 41, 42
BRIGHTNESS, 20, 40
CONTRAST, 20, 23, 40
F1, 22
F2, 22, 23
MENU, 21, 23, 24–26
POWER, 13, 16, 22, 27, 31, 42
REPLACE LAMP, 22, 27, 31
RESET, 21, 23, 43
SOURCE, 18, 21, 23
VOLUME, 17, 20, 23, 41
Index
Page 57

D
Default settings, 17, 18, 21, 41
E
ENGLISH, 25
F
F1, 22
F2, 22, 23
Fans, 29, 40
Features, 1–2
Focus, 17, 24, 40, 42
FOCUS, 17, 24, 40, 42
FRENCH, 25
Fuse holder, 34
Fuse replacement, 34
G
GERMAN, 25
I
Indicators
Control panel, 27
LED, 23, 35, 38
POWER, 27
REPLACE LAMP, 27
Image size, 10
INVERSE, 24, 40
L
Lamp, 16, 25, 31–33, 50
Lamp access, 16
Lamp-access door, 16, 32
Lamp holder, 32–33
LAMP HOURS, 25, 31
Lamp replacement, 5, 31–33
Language, 25
LCD, 2
LED indicator, 23, 35, 38
Lens, 8, 17, 30, 42, 50
Locking, 8, 9, 29
M
Mac connection, 15
MENU, 21, 23. 24–26
Menu-mode on-screen controls,
17, 18, 19, 22, 24–26
FOCUS, 17, 24, 40, 42
INVERSE, 24, 40
LAMP HOURS
Language
MIRROR, 24
PALETTE, 25, 40
TINT, 25, 40
TONE, 25
TV COLOR, 26
TV COMPRESS, 26
TV SHARPNESS, 26
WIDTH, 24, 40, 42
Mirror, 8, 9, 16, 29, 30, 31
MIRROR, 24
MONITOR, 12, 15, 14, 18
56 Index
Page 58

O
Opening, 9
Operating temperature, 29, 50
P
PALETTE, 25, 40
Parts, 3–4, 8, 51
PC connection, 14
Pixel, 2, 42, 49
Polaroid Offices and Service
Centers, 44–45
Polaview 10 SuperPortable
LCD Projector
connections, 11–15, 39, 40
maintenance, 29–38
opening, 9
safety, 5-6
specifications, 49–50
storage, 29
transporting, 29
troubleshooting, 39–48
turning off, 18
turning on, 16
warranty, 46–47
POWER, 13, 16, 22, 27, 31, 42
Power cord, 3, 5, 13, 31, 34
PowerBook, 43
Projection lens, 8, 17, 30, 42, 50
Projector locking mechanism,
8, 9, 29
R
Relative humidity, 50
Remote control, 4, 19, 23, 35–38
battery, 23, 35–38
battery replacement, 35–38
keys, 23
Arrow keys, 21, 23, 24, 25,
26, 41, 42
BRIGHT, 23
CONTRAST, 20, 23, 40
F2, 22, 23
LAMP, 22, 23, 27, 31
LED indicator, 23, 35, 38
MENU, 21, 23. 24–26
RESET, 21, 23, 43
SOURCE, 18, 21, 23
VOLUME, 17, 20, 23, 41
REPLACE LAMP, 22, 27, 31
Replacement parts, 4, 51
RESET, 21, 23, 43
S
Safety, 5–6
Service, 6, 43–45
Setup, 7–18
SOURCE, 18, 21, 23
SPANISH, 25
Spare lamp, 33
Speakers, 13, 17, 41
Specifications, 49–50
Storage, 29
Storage temperature, 29, 50
S-VHS, 11, 13, 21
Index 57
Page 59

T
TFT LCD, 2
TINT, 25, 40
TONE, 25
Transporting, 29
Troubleshooting, 39–48
Turning off, 18
Turning on, 16
TV COLOR, 26
TV COMPRESS, 26
TV SHARPNESS, 26
V
Vents, 5, 8, 10, 16
Video, 1, 2, 11, 13, 18, 21, 39,
40, 41
VIDEO, 11, 13, 21
VOLUME, 17, 20, 23, 41
W
Warranty, 46–47
WIDTH, 24, 40, 42
58 Index
Page 60

“Polaroid” and “Polaview” are trademarks of Polaroid Corporation, Cambridge, MA, U.S.A. Other trademarks may be the
property of their respective owners.
PXW8557 10/96 Printed in U.S.A. 1F2430
 Loading...