

Page 1

Polaroid
PolaColor Insight Software
User’s Guide for Power Macintosh and
Windows applications
© Copyright Polaroid Corporation 1999.
“Polaroid”, “SprintScan”, “PolaColor” and “IQA” are trademarks of
Polaroid Corporation, Cambridge, MA, U.S.A.
All other product names may be the
trademarks of their respective owners.
All rights reserved.
Ver 3 1/18/99
Page 2

Table of Contents
1 Introduction 7
Features 8
Compatible scanners 8
What you can scan 8
Output file choices 8
Preview scan 9
Final scan 10
Saving scan settings 10
System requirements 11
Power Macintosh systems 11
PC systems 11
How to use this manual 12
Scanner connection and setup instructions 13
Getting assistance 13
2 Quick start 14
Typical PolaColor Insight software workflow 14
Typical scanning steps 14
2
Page 3

3 PolaColor Insight basics 16
Navigating in the PolaColor Insight window 16
Menus 19
File menu 20
Edit menu 21
View menu 21
Scanner menu 22
Scripting menu 22
Help menu 22
Apple menu 23
Context menus 24
Macintosh context menus 24
PC context menus 25
Toolbar buttons 25
Status Bar 26
Help Features 26
4 Getting started 27
Starting the PolaColor Insight program 27
Choosing a scanner 28
Naming a job 29
3
Page 4

4 Getting started (continued)
Saving and using job settings 30
Choosing settings for first-time use 30
Creating new default job settings 31
Exporting current job settings for later use 31
Importing job settings 32
Changing preferences 33
5 Previewing your scan 35
Preview overview 35
Choosing film and monitor profiles 36
Doing a preview scan 36
Flipping the picture 37
Rotating the picture 37
Cropping the preview 38
6 Correcting and enhancing the image 41
Correction overview 41
Using split view 42
Zooming and panning 43
Zooming in 44
Zooming out 44
Panning 44
Automatically adjusting lightness 45
4
Page 5

6 Correcting and enhancing the image (continued)
Manually adjusting lightness 45
Enhancing detail in light and dark areas 46
Manually adjusting contrast 47
Automatically removing color cast 47
Removing color cast with the gray eyedropper 48
Manually adjusting color balance 50
Adjusting color saturation 51
Converting a color image to black-and-white 52
Defining a whitepoint or blackpoint 52
Defining the whitepoint 53
Defining the blackpoint 54
Adjusting highlights, midtones or shadows with tone
curves 54
About tone curves 55
Adjusting the tone curves 56
Adjusting sharpness 57
Reducing dust spots 58
7 Performing the final scan 59
Final scan overview 59
Final scan tips 60
Choosing an image resolution 60
5
Page 6

7 Performing the final scan (continued)
Choosing scanning quality 61
Choosing units of measure 62
Scaling the image 62
Cropping the final scan 63
Using fixed size output 64
Doing the final scan 64
Ejecting the film carrier 65
8 Scanning and printing tips 66
Scanning tips 66
Choosing the correct film and display profiles 66
Adjusting lightness first 67
Trying all color cast removal tools 67
Scanning black and white slides 67
Printing tip 68
Batch scanning (Macintosh only) 68
Setting up for batch scanning 68
Performing a batch scan 69
Using the Photoshop plug-in (Macintosh only) 70
Troubleshooting SCSI problems 70
Software license agreement 71
6
Page 7

1 Introduction
PolaColor Insight is a simple software program designed for use with all Polaroid
SprintScan 35, 45 and 4000 film scanner models. With PolaColor Insight software,
you scan a positive or negative transparency (color slide, color negative, black-andwhite slide, black-and-white negative). Then you preview, enhance, and save your
acquired picture. The automatic and custom picture correction tools are easy to learn
even if you have no image editing or color processing experience.
After you process a picture with PolaColor Insight software, you can work with the
image file using a photo editor like Adobe Photoshop, or a desktop publishing or
graphic design tool. You can place pictures in documents, newsletters, and reports for
home and office activities. You also can create image files with sharp and accurate
colors for display on a monitor as a screen-saver or a presentation, or as a component
of a page on the World Wide Web.
PolaColor Insight software uses Polaroid’s Image Quality Assured (IQA) technology
to produce consistently superior results. IQA applies correction factors for matching
the color characteristics of your monitor, and it also analyzes and adjusts each picture
for optimum brightness and highlight and shadow detail. In addition, PolaColor
Insight can improve the overall color tint of your picture.
7
Page 8

Features
PolaColor Insight software provides a range of features for basic and advanced scanning tasks.
Compatible scanners
Polaroid PolaColor Insight software is compatible with all Polaroid SprintScan 35, 45
and 4000 film scanner models.
What you can scan
PolaColor Insight software scans the following image media:
• Color slides
• Color negatives
• Black-and-white negatives
• Black-and-white slides (positives)
Output file choices
With PolaColor Insight software, you can save your images in these file formats:
PolaColor Insight
for Macintosh
• TIFF
• PSD
• JPEG
In any of these formats, you can save images as full 24-bit color depth or 8-bit grayscale.
PolaColor Insight
for Windows
• TIFF
• BMP
8
Page 9

Preview scan
The preview crop box function provides great flexibility for preview scans. You can
work with the entire original image, or choose any rectangular portion of the original
image for previewing and processing.
You can also flip the picture side-to-side to create a mirror effect for any orientation
and rotate the image to any 90 degree compass point.
Each automatic image adjustment tool turns on or off with a single click. You can correct the exposure, enhance the detail in shadows and highlights, and remove an overall
tint, or color cast, from the picture.
The manual image adjustment tools enable you to control the extent of the lightness,
contrast, saturation, color cast removal, sharpening and dust reduction. You can create
custom effects and also convert an image to grayscale. You can use the manual adjustment tools in place of the automatic tools or in combination with them.
The split view feature lets you make dynamic updates to the image and see the before
and after effects as you apply changes. You can zoom and pan the image to make
enhancements with greater precision.
9
Page 10

Final scan
The scan crop box lets you select an area of interest from the corrected image for the
final scan. You can enlarge or reduce the image to almost any percentage of its original size or you can have PolaColor Insight software automatically scale a selected
area to height and width dimensions you specify.
Depending on your requirements, you can prepare the image for low , medium, or high
quality printing on your printer. To prepare the image for on-screen viewing, you can
specify the size of the image in pixels.
Saving scan settings
As a convenience, you can save the settings from a scanning job and use them again
for a new job using the same original or others like it. You can also experiment with
different graphics effect, sizes, and resolutions and create and save variations of an
image file from the same original.
10
Page 11

System requirements
Power Macintosh systems
• A Power Macintosh family computer or compatible, with a PowerPC processor and
16 megabytes (MB) of RAM (32 MB recommended).
• Apple system software version 7.5.3 or later.
• Appearance Manager software version 1.0.2 or later.
• A video adapter and monitor capable of displaying thousands of colors, minimum.
24-bit color (16.7 million colors) is recommended for optimal display of scanned pictures.
PolaColor Insight software runs on systems with adapters and monitors with
Note:
less color capability, but pictures displayed on the monitor may not be satisfactory.
PC systems
• An IBM PC or compatible, with at least a 66-MHz Pentium-class processor and 24
megabytes (MB) of RAM (32 MB recommended).
• Microsoft Windows 95, Windows NT (version 4 or later), or Windows 98 operating
system.
• An ASPI-compliant SCSI adapter with the appropriate Windows 95 or Windows NT
drivers.
• A video adapter and monitor capable of displaying 24-bit color (16.7 million colors)
is recommended for optimal display of scanned pictures.
PolaColor Insight software runs on systems with adapters and monitors with
Note:
less color capability, but pictures displayed on the monitor may not be satisfactory.
11
Page 12

How to use this manual
This user's guide provides instructions for using PolaColor Insight on a Power Macintosh computer or an IBM PC (or compatible). You can view the manual and navigate
through it on your computer screen using Adobe Acrobat Reader, or you can use
Acrobat Reader to print a copy for guidance while you are running the PolaColor
Insight program.
This guide contains the following chapters:
1 Introduction Overview of features and capabilities of PolaColor Insight software,
system requirements, instructions for obtaining technical support, and other general
information.
2 Quick start Brief instructions in outline form for experienced scanner-users.
3 PolaColor Insight basics Introductory information about PolaColor Insight naviga-
tion, menus, controls and on-line help features.
4 Getting started Instructions for starting PolaColor Insight and setting up a scanning
job.
5 Pre viewing y our scan Instructions for performing a preview scan, then orienting and
cropping the preview scan for further processing.
6 Correct ing and enhancing the image Procedures for adjusting and optimizing
image tone, color, sharpness and other characteristics.
7 Performing the final scan Steps for performing the final scan to save your enhanced
12
Page 13

picture as an image file for viewing, printing or importing into other applications.
8 Scanning and printing tips Information that will help you obtain the best results
with PolaColor Insight software.
Scanner connection and setup instructions
For instructions on connecting the SprintScan scanner to your computer and performing other hardware setup and maintenance tasks, refer to the appropriate SprintScan
hardware manual on your SprintScan installation CD.
Getting assistance
For customer support from within the U.S.A., call 1-800-432-5355, Monday through
Friday , 8 a.m. to 8 p.m.(Eastern time), or fax to: 781-386-9688. You can also write to
Polaroid National Technical Support Operations, 201 Burlington Rd. 1-2A, Bedford,
MA, 01730.
In Canada, call 1-800-268-6970., or fax to: 416-675-3228. You can also write to
Polaroid Canada, 350 Carlingview Dr., Toronto, Ontario M9W 5G6.
For the latest product information, updates and bulletins, access the Polaroid World
Wide Web site at http://www.polaroid.com. You can also submit technical questions
via electronic mail by clicking Customer Support on the Polaroid Web page.
13
Page 14

2 Quick start
Typical PolaColor Insight software workflow
Using PolaColor Insight to scan and enhance images usually includes these operations:
Starting and setting up the PolaColor Insight program.
1
Performing a preview scan.
2
Correcting and enhancing the image.
3
Performing the final scan.
4
See the following section for a more detailed outline of scanning steps.
Typical scanning steps
This section provides a typical sequence for scanning with the PolaColor Insight program. On some jobs, you may not perform every step listed here.
Start and set up the PolaColor Insight program:
1
Start the PolaColor Insight program (page 27).
a
Choose a scanner, if needed (page 28).
b
Name the current job (page 29).
c
14
Page 15

Choose program preferences (page 33).
d
Perform a preview scan:
2
Choose your film and monitor profiles (page 36).
a
Preview the image (page 36).
b
Rotate, flip or crop the preview image (page 37).
c
Correct and enhance the image (page 41).
3
Perform the final scan:
4
Determine the final scanning resolution and quality (page 60).
a
Set the output size, scaling and cropping (page 62).
b
Perform the final scan to create an output file (page 64).
c
15
Page 16
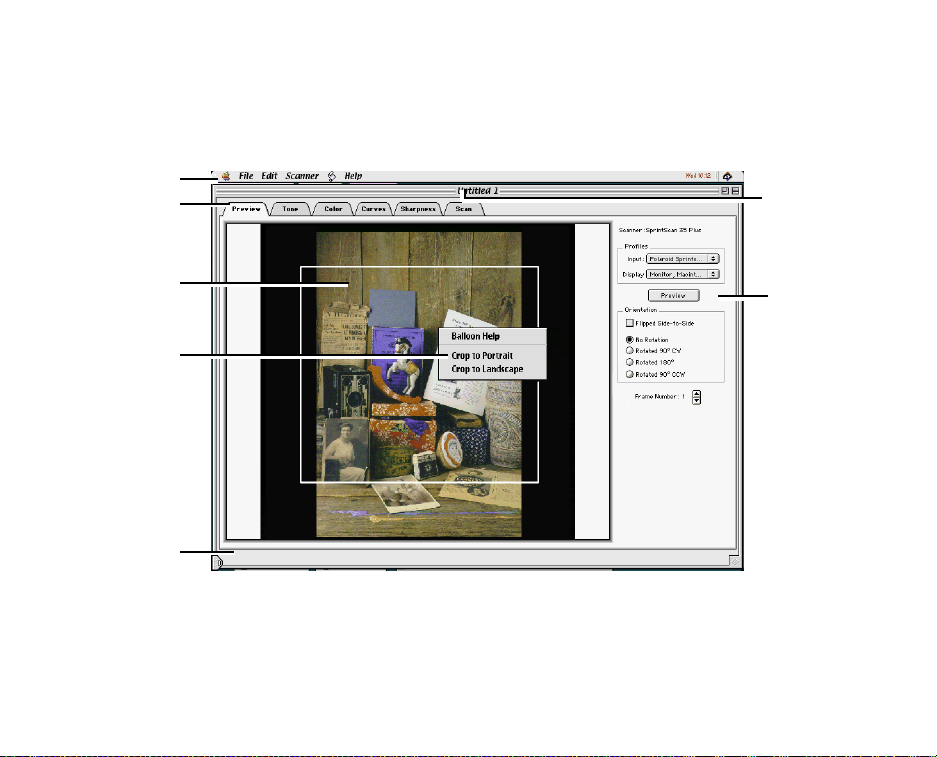
3 PolaColor Insight basics
Navigating in the PolaColor Insight window
Macintosh window
a
c
g
d
e
f
Note: Descriptions of these window components begin on page 17.
h
16
Page 17
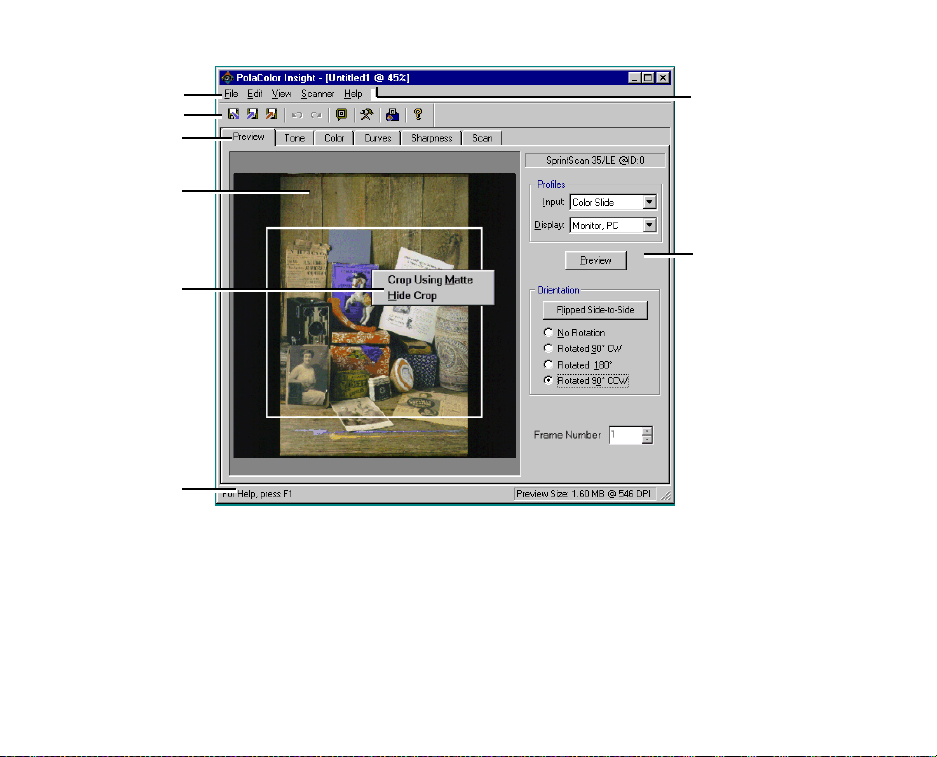
PC window
a
b
c
d
e
f
Menus The PolaColor Insight menu bar includes menus for choosing commands and
a
functions: File, Edit, View (PC only), Scanner, Scripting (Macintosh only), and Help.
See Menus on page 19 for more detailed information.
Toolbar (PC systems only) The toolbar contains shortcut buttons that correspond to
b
menu options for the most frequently used tasks. To see a description of any shortcut
button, point to the button with the mouse.
g
h
17
Page 18

Tabs Six tabs display these PolaColor Insight software panels:
c
Preview For capturing and orienting a preview image before proceeding to the
other panels for enhancement and final scanning.
Tone For adjusting image brightness and contrast.
Color For adjusting the color qualities of the image.
Curves For defining a whitepoint or blackpoint, or for adjusting highlights, mid-
tones or shadows with tone curves.
Sharpness For enhancing sharpness and reducing dust spots and small specks.
Scan For choosing resolution, size and other attributes of the final image, and for
initiating the final scan.
Image display area The image display area is the portion of the panel where the
d
scanned image appears during preview, enhancement, and final scanning operations.
Context menus Context menus provide a con v enient way to access some commands.
e
See Context menus on page 24 for more information.
Status bar The status bar at the bottom of the window displays information about the
f
current activity on each panel.
Title bar The title bar at the top of the window displays the default job name (Unti-
g
tled n) each time you start a new job. The job name is refreshed on the window when
18
Page 19

Menus
you name or rename the job with the Name Job command. It also shows the viewing
scale factor for each image window.
Command area The command area on the right-hand side is used to enter specific
h
instructions for preview, correction, and scanning operations.
The PolaColor Insight menu bar includes these menus:
File For naming jobs and importing and exporting settings.
Edit For canceling actions, resetting controls and changing program preferences.
View For controlling viewing options (PC systems only).
Scanner For selecting the active scanner. Also for ejecting the film carrier from the
SprintScan 4000 scanner.
Scripting For initiating command sequences scripted with AppleScript (Macintosh
systems only).
Help For displaying on-line help, choosing help options, and (on PC systems only)
displaying information about SCSI connections and your version of PolaColor Insight
software. (This menu may be labeled with a question mark on some Macintosh systems.)
Apple menu For displaying information about SCSI connections and your versions
of PolaColor Insight software and scanner firmware (Macintosh systems only).
See the following sections for more detailed information about each menu.
19
Page 20

File menu
Name Job Displays a dialog box to let you specify an optional name for the current
job. This name will be the default file name prefix when you create a TIFF, JPEG or
PSD image output file (Macintosh), or a .TIF or .BMP image output file (PC).
Import Settings Opens a previously saved settings file and applies predetermined
attributes to the current scan job.
Export Settings Saves the attributes of the current scan job in the currently open settings file.
Export Settings As (PC systems only) Saves the attributes for the current scan job as
a new settings file.
Export Settings As Default (PC systems only) Saves the attributes for the current
scan job as the default settings file. These settings will be take effect whenever you
start the PolaColor Insight program.
Recently Used Files (PC systems only) Implements the settings from the BSF file
selected from the list. (The list contains the four most recently saved settings files.)
Note: This list is not visible until you export settings files.
Quit (Macintosh) or Exit (PC) Quits or exits from the PolaColor Insight application
and returns to the desktop.
20
Page 21

Edit menu
Undo Cancels the previous image correction command.
Redo Restores the image correction cancelled by the previous undo command.
Cut, Copy, Paste, Clear, Select All (Macintosh systems only) For editing text in
fields on the Scan panel.
Reset All Image Correction Tools Sets all image correction tools to their neutral
positions.
Save Settings As Default (Macintosh systems only) Saves the attributes for the cur-
rent scan job as the default settings file. These settings will be take effect whenever
you start the PolaColor Insight program.
Preferences Displays a dialog box for adjusting preview resolution, choosing initial
image correction settings, enabling messages, and choosing other program settings.
View menu
The View menu appears on PC systems only.
Toolbar Shows or hides the toolbar.
Status Bar Shows or hides the status bar.
Menu Buttons Shows or hides the buttons to the left of some menu items.
21
Page 22

Scanner menu
Current Scanner List Shows a list of all SCSI scanners connected to the computer,
with the currently active scanner indicated by a checkmark.
Show All Scanners (PC systems only) Displays the names of any connected and
powered-on SprintScan scanners. Click the scanner's name to select it.
Update Film Carrier (Available for SprintScan 4000 scanner only.) Resets the
Frame Number box to the current frame after the film carrier has been changed.
Eject Film (A v ailable for SprintScan 4000 scanner only.) Ejects the film carrier from
the scanner.
Scripting menu
The scripting menu appears on Macintosh systems only.
Open Scripts Folder Opens the Scripts folder for adding or deleting command-
sequence scripts created with AppleScript.
Script list List of available command scripts. Several scripts are provided with Pola-
Color Insight, and you can use AppleScript to create others.
Help menu
The Help menu appears on all PC systems and on Macintosh systems using MacOS
8.0 or later. (On Macintosh systems with older operating systems, this menu is labeled
with a question mark.)
About Balloon Help (Macintosh systems only) Displays the Balloon Help version
information.
22
Page 23

Show Balloons (Macintosh systems only) Hides or shows context-sensitive help.
PolaColor Insight Help (Macintosh systems only) Launches the Adobe Acrobat
Reader and displays the PolaColor Insight User's Guide.
View SCSI Bus (PC systems only; on Apple menu for Macintosh) Displays informa-
tion about SCSI devices connected to the system.
Help Topics (PC systems only) Displays a list of on-line help topics, along with a
help index tab and a tab for finding help topics with word searches.
Tip of the Day (PC systems only) Displays a helpful tip for using the PolaColor
Insight program.
About PolaColor Insight (PC systems only) Displays information about the soft-
ware and component version numbers, and physical memory and disk space availability.
Apple menu
The Apple menu appears on Macintosh systems only.
About PolaColor Insight Displays information about the PolaColor Insight program
and scanner firmware version numbers.
View SCSI Bus Displays information about SCSI devices connected to the system.
23
Page 24

Context menus
As a convenience, PolaColor Insight software provides context menus on most Macintosh systems and on PC systems for selected commands.
Macintosh context menus
To view a context menu on a Macintosh system, hold down the control key and click
the image display area.
Preview panel context menu During previewing procedures, you can turn contextsensitive (balloon) help on and off, crop to a preset portrait rectangle or crop to a preset landscape rectangle.
Tone, Color, Curves and Sharpness panel context menu During correction procedures, you can:
• Enable or disable balloon help
• Zoom in and out
• Select or deselect the gray eyedropper tool (Color panel only)
• Show or hide the splitter bar
• Reset all tools on the current tab to their neutral positions
Scan panel context menu During scanning procedures, you can enable or disable
balloon help and set the crop rectangle to the full image area.
24
Page 25

PC context menus
To view a context menu on a PC, right-click the image display area.
Preview panel and Scan panel context menu During previewing and scanning pro-
cedures, you can toggle between a matte frame or a marquee for cropping. You can
also toggle between showing or hiding either the matte or the marquee.
Tone, Color, Curves and Sharpness panel context menu During correction procedures, you can:
• Perform zoom operations.
• Select or deselect the gray eyedropper tool (Color panel only).
• Show or hide the splitter bar.
• Reset tools on the current panel to their defaults.
Toolbar buttons
The PolaColor Insight program toolbar (on PCs only) contains shortcut buttons that
correspond to the menu options for frequently used tasks. When you pause the cursor
over a toolbar icon, a tool tip shows the name and purpose of the icon.
You can hide or display the toolbar by clicking Toolbar on the View menu. You can
change the look of the toolbar using the Appearance tab of the Preferences box
(accessible from the Edit menu).
25
Page 26

Status Bar
The status bar at the bottom of every panel displays prompts and informational messages to give you visual cues as you work.
If you are running PolaColor Insight on a PC, you can hide or display the status bar
messages through the Appearance tab of the Preferences box (accessible from the
Edit menu).
Help Features
PolaColor insight provides a full range of help features to guide you at every step. Online help is always just a keystroke away. Depending on your current activity, you can:
• Click PolaColor Insight Help (Macintosh) or Help Topics (PC) on the Help menu.
• On Macintosh systems, click Balloon Help on the Help menu and point to an item to
see its description.
• On PC systems, right-click an item and then click the What's This? button that pops
up.
• On PC systems, click an item and then press the F1 key.
26
Page 27

4 Getting started
Starting the PolaColor Insight program
Turn on the scanner. Then turn on the computer.
1
The scanner self-calibrates and is ready when both the yellow and green lights are
steady. For best results, allow the scanner to warm up for five minutes before scanning.
On Macintosh systems, launch PolaColor Insight by double-clicking the PolaColor
2
Insight icon.
On PC systems, start the PolaColor Insight program as follows:
Click the Windows Start button.
a
Point to Programs.
b
Point to the Polaroid PolaColor Insight group.
c
Click PolaColor Insight.
d
27
Page 28

Choosing a scanner
The Scanner menu lets you choose a particular SprintScan scanner model if you have
more than one scanner attached to your computer and powered on.
To choose a scanner:
On Macintosh system, click the Scanner menu.
1
On PC systems, click Show All Scanners on the Scanner menu to display the names
of all connected and powered-on SprintScan scanners.
Click a scanner model name to select it.
2
The scanner name in the upper right corner of the Preview panel is automatically
refreshed. Your selection becomes the new default scanner for the PolaColor Insight
program.
If necessary, you can reinitialize the scanner by selecting it from the Scanner
Tip:
menu.
28
Page 29

Naming a job
Each time you start the PolaColor Insight program, an untitled job window appears.
Use the Name Job function to name or rename the current job. This helps you keep
track of your activities.
If you are performing a series of scan jobs, the Name Job function is a convenient way
for you to begin a new scan job without exiting the PolaColor Insight program.
The job name will be the default file name prefix when you create an image output
file. For example, if you create a job Travel1, this prefix will appear as the default file
name when you save the image as a TIFF, PSD or JPEG file (Macintosh), or as a .TIF
or .BMP file (PC). You could also use the job name as the prefix when you save a job
settings file.
To name or rename a job:
Choose Name Job from the File menu.
1
The Name/Rename Active job dialog box appears.
Enter the job name and click OK.
2
The new or changed name appears on the PolaColor Insight title bar.
29
Page 30

Saving and using job settings
The PolaColor Insight program settings are similar to word processing style sheets. A
settings file contains the following attributes applied to a scan job:
• Preview and scan crop box sizes
• IQA enhancements and corrections
• Input and display profiles
For each scan job, you can define unique image attributes or use an existing job settings file.
Choosing settings for first-time use
The first time that you use PolaColor Insight software, basic program default settings
are applied. You can override the defaults and specify settings for the new job as you
perform preview, correction, and scanning operations.
• You can save the new settings as the default job settings. (On PC systems, the default
job settings file is always named DEFAULT .BSF and is always stored in the PolaColor Insight folder.)
• You can export the current settings as a job settings file for later use. You can specify
a filename and location of your choice.
Note: If you change any job settings during a work session and do not save the job
settings file, the PolaColor Insight program prompts you to save the changed settings
before you exit the program.
30
Page 31

Creating new default job settings
To create a default settings file on Macintosh systems, click Save Settings As Default
on the Edit menu. On PC systems, click Export Settings As Default on the File menu.
The PolaColor Insight program automatically saves the settings.
The latest saved default settings are applied each time you begin a PolaColor Insight
program session. You can preserve the original settings, or define and save new
default job settings.
Exporting current job settings for later use
You can export the settings from a scanning job and save them as a custom job settings file.
To export job settings:
On Macintosh systems, click Export Settings on the File menu. On PC systems, click
1
Export Settings As on the File menu.
The PolaColor Insight program displays the Export Job Settings dialog box.
Specify a file name and destination. Enter a file name for the job settings (on PC sys-
2
tems, the software appends the file extension .BSF) and choose a location.
Click Save to create the new settings file.
3
Note for PC systems: After you export the current job settings to a file, you can click
the Export Settings button to save changes to this job settings file as you work.
31
Page 32

Importing job settings
For each new scan job, you can override the default job settings and import a saved
job settings file (created with Export Settings). This saves time when you are working
with the same original or a similar image.
To import job settings:
Click the Preview tab.
1
Click Import Settings on the File menu. The PolaColor Insight program displays the
2
Import Job Settings dialog box.
Select a job settings file from the list.
3
Click Open to apply the selected job settings file to the current job.
4
Note for PC systems: You can also choose a file from the most recently used settings
files on the File menu.
32
Page 33

Changing preferences
PolaColor Insight software enables you to change these viewing and program preferences:
Preview scan resolution Change the resolution of the preview scan.
Initial image-correction tool settings Choose the settings of the image correction
tools for each preview scan.
Reminder message display status Display or hide warnings and reminder messages.
Automat ic Web-savvy f ile name extension status (Macintosh systems only) Enable
or disable automatic addition of the .JPG extension to files saved in the JPEG format
and the .TIF extension to files saved in the TIFF format, allowing the format to be recognized by Web-browser applications.
Image-editing application selection (Macintosh systems only) Choose a default
image-editing application (such as Adobe Photoshop) to be launched by PolaColor
Insight when you save a scanned image. (For PC systems, you can choose a default
application while saving the image. See Doing the final scan on page 64 for more
information.)
Toolbar, progress dialog box, splitter bar appearance (PC systems only) Choose a
Windows-standard or a flat toolbar, hide or display a progress dialog box during
lengthy operations, and change the width of the bar separating the before and after
panels when split screen is enabled.
33
Page 34

To change the preferences:
Click Preferences on the Edit menu.
1
On PC systems only, click the tab containing the preference you want to change.
2
Make any necessary changes in the Preferences dialog box.
3
For information about a setting on Macintosh systems, click Balloon Help on the
Tip:
Help menu and point to the item in the Preferences box. On PC systems, right-click
on an item.
On PC systems, click Apply to view the effect of any changes you made.
4
Click OK to save the changed Preferences.
5
Note: If you change the preview scan resolution while a preview image is displayed,
you must scan the image again.
34
Page 35

5 Previewing your scan
Preview overview
The Preview panel is used to acquire an image and perform a pre view scan. A default
preview crop box appears when you open a new job.
From the Preview panel, you can perform any of the following procedures:
• Specify the film profile for the slide or negative you want to scan and the monitor you
are using to view the preview image.
• Scan a preview image.
• Flip the preview image side-to-side to create a mirror effect for any orientation.
• Rotate the preview image to any 90-degree compass point.
• Adjust the crop box to choose any rectangular portion of the original image for pre-
viewing and processing.
Refer to the following sections for more detailed instructions on any of these proce-
dures.
35
Page 36

Choosing film and monitor profiles
On the Preview panel, be sure to select the input profile matching the slides or negatives you are scanning. Variations in films and processing make this especially important for color negatives.
For each job, you should also specify the monitor you are using to view the preview
image. PolaColor Insight software automatically matches the image colors for the
best display on your monitor.
To choose the film and monitor profiles:
Choose a slide or negative from the Input list on the Preview panel. If your negative
1
film type is not listed, choose the generic "Color Negative." If you are scanning a
black-and-white slide (positive), select "Color Slide."
Choose a monitor family from the Display list.
2
Doing a preview scan
Insert your slide, negative or filmstrip into the scanner according to your scanner
1
hardware instructions.
If your scanner model lets you select a frame from a filmstrip or slide carrier , a Frame
2
Number box is visible. Type or select the number of the frame you want to previewscan.
Click the Preview b utton to perform the pre view scan. While the scanner is w orking, it
3
may pause for a few moments to calibrate.
36
Page 37

The preview image appears on the Preview panel display area.
Note: The preview scanning speed and resolution depend on how PolaColor Insight
software preferences are defined. For more information about changing preferences,
see page 33.
Flipping the picture
Flip the picture to restore the correct orientation as needed. For example, flip a picture
that contains reverse mirror image text.
To flip the picture, click the Flipped Side-to-Side box (Macintosh) or button (PC).
The PolaColor Insight program automatically flips the image.
The image remains flipped until you click the Flipped Side-to-Side box or button
again.
Rotating the picture
You can rotate a picture to any 90-degree compass point. Use the rotation options to
convert an image from landscape to portrait orientation, or vice versa. You also can
correct the orientation if a transparency or negative was not mounted properly.
If you need to perform both flip and rotation, perform the flip first.
Tip:
To rotate the picture, click a button to choose the rotation point. The rotation choices
are relative to the image as it would be oriented if preview-scanned with No Rotation
selected.
37
Page 38

Cropping the preview
The preview crop box (a) is a flexible tool that is displayed as a white marquee on the
Preview panel display area. Use it to select the full field view of the image or any rectangular portion for previewing and IQA processing.
a
The part of the image that appears within the preview crop box is called the area of
interest. The area of interest appears in the Tone, Color, Curves, Sharpness and Scan
panels. In the Scan panel, you can crop further for the final scanned image if necessary.
38
Page 39

The preview crop box is often used to select the entire image and ensure that the picture edges are straight. This is a particular consideration when you are working with
filmstrips that may have ragged or blurred borders.
Note: It is important to crop out a black or white border from an image for best IQA
image correction. PolaColor Insight software makes image adjustments on the Tone,
Color, Curves and Sharpness panels based on the selected area of interest in the preview crop. If your picture shows a light floral arrangement with a dark background,
for example, IQA correction produces a different result if you preview-crop only the
flowers instead of the entire scene.
You can also use the preview crop box for many practical or artistic effects:
• To choose one figure from a group pose.
• To choose the best part of the image (dramatic lighting or colors, action, facial expres-
sion, etc.).
• To eliminate dead or distracting picture space.
• To create new image proportions if you changed the orientation of your original.
Preview cropping is a free-form process. Move, resize, or redraw the preview crop
box according to instructions below to select the area of interest that you want to
appear on the Tone, Color, Sharpness and Scan panels and in the final, scanned image.
To resize the preview crop box: Click any preview crop box border. The pointer
changes to a two-headed arrow shape. Drag a corner or a border outward to stretch the
crop box, or inward to shrink the crop box.
39
Page 40

To move the preview crop box: Click inside the preview crop box. The pointer
changes to a four-way arrow shape. Drag the preview crop box to move it.
To draw a new preview crop box: Click outside the current preview crop box and
drag to draw a new box.
40
Page 41

6 Correcting and enhancing the image
Correction overview
The Tone, Color, Curves and Sharpness panels are used to perform color correction
and image enhancements on the preview image.
From these panels, you can perform any of the following procedures. (See the later
sections of this chapter for more detailed instructions.)
• Use the split view feature to see the before and after effects as you apply changes.
• Zoom and pan the image to make enhancements with greater precision.
• Automatically lighten or darken the entire picture.
• Manually lighten or darken the entire picture.
• Automatically enhance detail in light and dark areas ("dodge and burn").
• Manually adjust contrast.
• Automatically remove a color cast to correct an overall tint.
• Manually remove a color cast with the gray eyedropper.
• Manually adjust color balance.
• Manually reduce or increase the color saturation.
• Convert a color image to black and white (grayscale).
• Define a whitepoint or blackpoint and adjust the entire image accordingly.
41
Page 42

• Adjust highlights, midtones or shadows with tone curves.
• Improve the sharpness of the image.
• Automatically reduce the number of dust spots or other specks.
Using split view
The split view feature lets you compare the before and after effects each time you
apply changes. The original view appears in the left hand area of the split image. The
corrected view in the right hand area is dynamically updated each time you apply
changes.
You can also move, stretch, and angle the splitter bar (a) to divide the horizontal view.
a
42
Page 43

Note: If split view is off, corrections are applied to the entire viewing area.
To use split view:
Display the splitter bar by clicking the Split View check box on the Tone, Color,
1
Curves or Sharpness panel.
On Macintosh systems, hold the Control key and click on the image to display a
Tip:
context menu for turning split view on and off. On PC systems, right-click on the
image to display a context menu.
Adjust the splitter bar placement by dragging either splitter bar handle to position the
2
ends of the bar at any point on the horizontal display borders. You can also click on
the splitter bar itself and drag it right or left.
Zooming and panning
The initial preview image is displayed on the Preview panel at a size the best fits the
current job window. But when you view the preview image on the Tone, Color,
Curves or Sharpness panel (either full or split view), you can enlarge or reduce the
image within the display area.
You can display the image at these zoom factors:
• 25% • 100%
• 50% • 200%
Greater magnifications may be possible on some computers.
43
Page 44

Zooming in
To zoom in, double-click the image on the Tone, Color, Curves or Sharpness panel.
You can double-click several times to zoom up to the maximum magnification for
your computer's available memory.
The maximum zoom display is a viewing aid for making fine image adjustments with
the eyedropper tools (on the Color and Curves panels) or for examining fine detail in
the image.
For best results when zooming to high magnifications, set the preview scan reso-
Tip:
lution to More Resolution by clicking Preferences on the Edit menu.
Zooming out
Hold down the Option key (Macintosh) or the Ctrl key (PC) and double-click the
image on the Tone, Color, Curves or Sharpness panel. Double-click several times to
zoom out to the minimum zoom factor of 25%.
On Macintosh systems, hold the Control key and click on the image to display a
Tip:
context menu for zooming out or sizing the image to fit the viewing window. On PC
systems, right-click on the image to display a context menu.
Panning
If the zoomed-in image is larger than the display area, you can pan the picture (shift
your view right or left, up or down) by dragging it.
44
Page 45

Automatically adjusting lightness
The PolaColor Insight auto exposure feature automatically improves the overall lighting of a picture. If an image is too dark (underexposed), auto exposure brightens the
image. If an image is too bright (overexposed), auto exposure darkens it.
To use auto exposure:
Click the Tone tab.
1
Click the Auto Exposure button. IQA analyzes the preview image and adjusts the
2
lightness.
Note: If you do not want to keep this change, click Undo Auto Exposure on the Edit
menu.
Manually adjusting lightness
A correctly exposed image has good detail in the highlights and shadows. When highlights are correct, they are bright but still show detail. When shadows are correct, the y
are dark but still show detail. The lightness tool enables you to make precise adjustments if the image is too light or too dark.
To lighten or darken the entire image:
Click the Tone tab.
1
Adjust the Lightness slider . If the image is too dark, increase lightness by moving the
2
slider to the right. If it is too light, decrease lightness by moving the slider to the left.
45
Page 46

The Lightness slider has a range of -100 to 100. The default is 0, the center of the
slider.
If you do not want to keep this change, click Undo Lightness Adjustment on the Edit
menu.
Try another lightness value as needed. Continue to adjust the slider and view the
3
changes.
Tip for PC systems: Move the slider in small increments by clicking it once, then
pressing the left or right arrow key on the keyboard.
Enhancing detail in light and dark areas
The Dodge & Burn tool automatically adjusts the contrast within the brightest (highlight) colors and the darkest (shadow) colors to make detail in these areas more visible.
To use dodge and burn:
Click the Tone tab.
1
Click the Dodge & Burn button. IQA analyzes the preview image and enhances the
2
highlights and shadows.
Note: If you do not want to keep this change, click the Dodge & Burn button again or
click Undo Dodge & Burn on the Edit menu.
46
Page 47

Manually adjusting contrast
Contrast is the relative difference between adjacent light and dark areas of a picture.
To adjust contrast:
Click the Tone tab.
1
Adjust the Contrast slider by dragging it left or right.
2
If you do not want to keep the change, click Undo Contrast Adjustment on the Edit
menu.
Automatically removing color cast
Some images might look too blue, too yellow, etc. These color casts are common
when you scan color negatives because of variations in film and processing. Cast
removal eliminates an ov erall color tint from an image.
Each automatic cast removal option uses a different method for correcting a color
cast:
• Pastel Cast Removal Determines what should be the neutral gray by calculating the
average of the lighter colored (pastel) pixels.
• Gray Cast Removal Determines what should be the neutral gray by calculating the
average of all pixels in the image.
• Bright Cast Removal Determines what should be the neutral gray by measuring the
brightest pixel in the image.
47
Page 48

To remove a color cast automatically:
Click the Color tab.
1
Click one of the cast removal options above. IQA analyzes the preview image and
2
performs the correction.
If you do not want to keep this change, click Undo on the Edit menu.
Try another cast removal option if necessary. (Click Undo on the Edit menu if you
3
want to cancel the change.)
Note: Instead of using an automatic cast removal tool, you can remove color cast
manually with the gray eyedropper tool (next section) or by manually adjusting color
balance (page 50).
Removing color cast with the gray eyedropper
An image with a color cast looks as if you are viewing it through a colored filter. All
parts of the image, including neutral areas like gray and white, are colored.
The gray eyedropper enables you to neutralize the color cast by choosing the particular color in the image that should be neutral gray. That color is converted to neutral
gray and all other colors in the picture are shifted accordingly.
To remove a color cast with the gray eyedropper:
Click the Color tab.
1
48
Page 49

Double-click the image to zoom in. This helps you select an image color with greater
2
precision.
Click the eyedropper button.
3
Point to a color in the picture that should be gray, such as a metallic object, concrete,
4
gray brick, or a shadow falling on a white object. The red, green, blue (RGB) color
triplet values and the color patch indicate the color under the cursor. Click the desired
color to choose it.
If you do not want to keep this change, click Undo Eyedropper Cast Removal on the
Edit menu.
Repeat step 4 to select a new gray point and view the effect as needed.
5
When you are finished, deselect the eyedropper tool by clicking the eyedropper but-
6
ton.
On Macintosh systems, hold the Control key and click on the image to display a
Tip:
context menu for selecting and deselecting the gray eyedropper tool. On PC systems,
right-click on the image to display a context menu.
Note: Instead of using the eyedropper for cast removal, you can remove color cast
automatically as described on page 47. You can also remove a color cast by manually
adjusting color balance as described in the following section.
49
Page 50

Manually adjusting color balance
If necessary, you can manually adjust the color balance of the entire picture by moving the indicator (a) on the Color panel color wheel. If the picture has an overall blue
tint, for example, you can shift the color balance toward yellow to remove it.
a
To adjust color balance:
Click the Color tab.
1
Adjust the color balance by dragging the color wheel indicator to a new location. If
2
the image is too blue, for example, move the indicator a way from blue and to ward yellow.
You can move the indicator in small increments by clicking one of the color arrows at
the edge of the wheel.
The x and y coordinates of the color wheel indicator appear above the color
Tip:
wheel for reference.
If you do not want to keep the change, click Undo Color Wheel Cast Removal on the
Edit menu.
50
Page 51

Adjusting color saturation
Color saturation is the intensity, or purity of a color. Saturated colors are bright and
eye-catching. Unsaturated colors are gray, muted, or washed-out looking. The saturation tool enables you to make precise adjustments if the image is too faded or too
strongly colored.
To adjust saturation:
Click the Color tab.
1
Adjust the Saturation slider. If the image is undersaturated, increase the color inten-
2
sity by moving the slider to the right. If oversaturated, decrease the color intensity by
moving the slider to the left.
The Saturation slider has a range of -100 to 100. The default is 0, the center of the
slider.
Tip: Too much saturation may produce colors that look unnatural. A saturation setting of -100 (extreme left position) creates a black-and-white (grayscale) image,
which is stored as an 8-bit grayscale image when the image is scanned.
If you do not want to keep this change, click Undo Saturation Adjustment on the Edit
menu.
Try another Saturation value as needed.
3
Tip for PC systems:
pressing the left or right arrow key on the keyboard.
Move the slider in small increments by clicking it once, then
51
Page 52

Converting a color image to black-and-white
You can use PolaColor Insight to save a color image as a black and white (grayscale)
image.
To convert a color image to black and white:
Click the Color tab.
1
Drag the Saturation slider to the extreme left position.
2
"B&W" appears above the slider in place of a numerical value.
If you do not want to keep a change, click Undo Saturation Adjustment on the Edit
menu.
Defining a whitepoint or blackpoint
PolaColor Insight provides tools for automatically or manually identifying points in
the image that should be pure white (whitepoint) or pure black (blackpoint). After this
point is identified, the software adjusts the tone of the entire image to make the point
pure white or pure black.
Defining a whitepoint is useful for:
• Brightening highlights that have a “muddy” look.
• Increasing overall image contrast.
• Removing a color cast from highlights.
52
Page 53

Defining a blackpoint is useful for:
• Darkening shadows.
• Increasing overall image contrast.
• Removing a color cast from the shadows.
Defining the whitepoint
To define the whitepoint:
Click the Curves tab.
1
T o def ine the whitepoint automatically , click the Auto Highlight button. To define the
2
whitepoint manually, click the white eyedropper button and then click a bright highlight or another point in the image that should be pure white.
The effect of the change becomes visible in the image and in the tone curve in the
lower-right of the panel. (See “About tone curves” on page 55 for more information.)
To reset the whitepoint to its original setting: On Macintosh systems, hold the Control key and click the image. On PC systems, right-click the image. Then click Reset
Curves Tools on the context menu.
53
Page 54

Defining the blackpoint
To define the blackpoint:
Click the Curves tab.
1
To define the blackpoint automatically, click the Auto Shadow button. To define the
2
blackpoint manually, click the black eyedropper button and then click a deep shadow
or another point in the image that should be pure black.
The effect of the change becomes visible in the image and in the tone curve in the
lower-right of the panel. (See “About tone curves” on page 55 for more information.)
To reset the blackpoint to its original setting: On Macintosh systems, hold the Control key and click the image. On PC systems, right-click the image. Then click Reset
Curves Tools on the context menu.
Adjusting highlights, midtones or shadows with tone curves
The tone curves in PolaColor Insight let you selectively adjust the brightness v alues of
the highlights, shadows or the tones between them. You can also independently adjust
the red, green, or blue values individually.
Adjusting the tone curves is useful for:
• Correcting brightness of the middle tones without losing detail in the highlights and
shadows.
• Changing the brightness of the highlight or shadow areas without changing the mid-
tones.
54
Page 55

• Adjusting the color balance in the highlight, shadow or midtone areas without affect-
ing color balance in other areas.
About tone curves
A tone curve is a graph representing the tone corrections applied to an image. The
horizontal (x) axis represents the current pixel brightness values of the image, and the
vertical (y) axis represents the corrected values.
The left-hand curve below has no effect on the image. For example, a pixel with a
brightness value of 128 on the horizontal axis remains 128 on the vertical (corrected)
axis.
The right-hand curve brightens the middle tones. All pixels with a value of 128 in the
original image, for example, are changed to a value of 192 in the corrected image.
However, the darkest (0) and the lightest (255) pixels remain unchanged.
55
Page 56

Adjusting the tone curves
Note: If you are also defining a white or blackpoint as described in the previous section, define the points before adjusting the tone curves. (Defining a white or blackpoint resets the tone curves.)
To adjust the tone curves:
Choose the curve to be changed — Red, Green, Blue, or Master (all three colors) —
1
from the drop-down Channel list.
Create a moveable point on the curve by pointing to the curv e and clicking the mouse.
2
If necessary, drag the new point to reposition it.
The effect of the curve change becomes visible in the image when you release the
mouse button.
To remove a point from the curve: Drag the point to another point on the curve
(Macintosh) or hold the Control key and click the point (PC).
Repeat step 2 as needed to obtain the curve shape and image effect you need. (Up to
3
20 points can be created.)
To change the curve for a different channel, start again at step 1.
4
To reset the curve to neutral (and also return and white or blackpoint values to their
original settings): On Macintosh systems, hold the Control key and click the image.
On PC systems, right-click the image. Then click Reset Curves Tools on the context
menu.
56
Page 57

Adjusting sharpness
PolaColor Insight lets you increase the apparent sharpness of the image.
Note: The degree of sharpening effect depends on the resolution of the final scan and
may not be displayed accurately in the preview image.
To adjust sharpness:
Click the Sharpness tab.
1
Drag the sliders to achieve the effect you want:
2
Amount Changes the degree of sharpening. A higher value produces a greater effect.
Radius Changes the number of pixels ev aluated at one time. A higher v alue produces
a more pronounced effect.
Threshold Changes the amount a pixel's value must change to trigger the effect.
Note: If the Amount slider is set to 0 (extreme left), the Radius and Threshold sliders
are disabled.
Tip for PC systems: Move a slider in small increments by clicking it once, then
pressing the left or right arrow key on the keyboard.
If you do not want to keep a change, click Undo on the Edit menu.
57
Page 58

Reducing dust spots
If your picture contains dust spots or other "noise," you can have PolaColor Insight
analyze the image and reduce the number of spots automatically.
Note: The degree of dust reduction depends to some extent on the resolution of the
final scan and may not be displayed accurately in the preview image.
To reduce dust spots or other specks:
Click the Sharpness tab.
1
Click the Normal or the Maximum dust reduction button.
2
If you do not want to keep a change, click Undo on the Edit menu.
58
Page 59

7 Performing the final scan
Final scan overview
The Scan panel enables you to specify the final scanning output settings for your corrected image. You can perform a final scan with a more refined crop and save the
image file for use in another application.
From the Scan panel, you can perform any of the following procedures. (Refer to the
later sections in this chapter for more detailed instructions.)
• Choose the scanning resolution units in LPI (lines per inch) or DPI (dots per inch).
• If the scanning resolution units are LPI, choose low , medium, or high quality printing.
• Specify a scaling factor for the output file.
• Choose a unit of measurement for the final image in inches, centimeters, points, picas,
or pixels.
• Move or resize the scan crop box to choose the final scanning area.
• Use the Fixed Size option to define the height and width of the output image.
• Scan the image, save the output f ile in TIFF, JPEG or PSD format (Macintosh), or in a
.TIF or .BMP format (PC), and start an image editing application to open the saved
image file.
59
Page 60

Final scan tips
• All the PolaColor Insight software scan output options are flexible but interdepen-
dent. For example, when you select a fixed image size, the Scale To box is disabled.
(Its value changes to maintain the fixed size you specify if you resize the crop box.)
Warning messages help guide your actions if you attempt to enter an invalid choice.
• The scanner readout below the image shows you the actual scan area size and scanner
resolution. The Scan panel also displays the projected image size below the Scan button. As you change any scan values, this information is updated accordingly.
• When you scan images to be used in applications such as word processors and desk-
top publishing programs, enlarge or reduce the images to their final size in the PolaColor Insight program before saving them.
• Greatly reducing or enlarging an image after you scan and save it with the PolaColor
Insight program may degrade its quality.
Choosing an image resolution
In the Resolution box on the Scan panel, type a resolution for the output image file.
Specify the units in LPI (lines per inch) or DPI (dots per inch).
If you intend to display the picture on a monitor, choose a typical monitor resolution
such as 72 DPI.
If you intend to use the image in a Web page, the resolution setting does not matter.
For those images, change the units of measure to Pixels (see page 62), and scale the
60
Page 61

image to achieve the height and width you need as described in Scaling the image on
page 62.
For images that are going to be used for printing press material, you can use the LPI
setting to determine the resolution of the scan. First enter the Lines Per Inch (LPI) that
will be used. Typical values for LPI are 100 (newspaper), 133 (magazine), 150 (high
quality printing). This is information you can get from your printer.
If you use the LPI setting, you can specify low, medium, or high quality as described
in the next section for further defining the scanning resolution.
Choosing scanning quality
Choose a quality type from the Quality drop-down list as needed. The Quality list is
available only for LPI resolution.
High takes the LPI value and multiplies it by 2 to get the scanning resolutio n in DPI.
This is a common algorithm in the printing industry to determine resolution for the
highest quality printing. For example, an image set at 150 LPI at high quality will be
scanned at 300 DPI.
Medium takes the LPI value and multiplies it by 1.5 to get the scanning resolution.
This algorithm is considered industry standard for printing most material. For example, an image set at 150 LPI at medium quality will be scanned at 225 DPI.
Low takes the LPI value and scans it at that value in DPI. This is useful for For Position Only (FPO) scans used only for rough drafts in page layout documents. For
example, an image set at 150 LPI at Low Quality will be scanned at 150 DPI.
61
Page 62

Choosing units of measure
PolaColor insight supports a complete range of units of measure. To change the units
of measurement, select the Units drop-down list to choose inches, centimeters, points,
picas, or pixels. Your choice of units may depend on your final output. For example,
pixels is the unit most often used for screen displays.
The Width and Height fields are automatically adjusted to sho w the dimensions in the
new units of measure.
Note: The scanner readout always appears in either inches or centimeters. If you
choose points, picas or pixels as a unit of measure in PolaColor Insight, the scanner
readout will be in inches or centimeters as determined by your operating system.
Scaling the image
The scale factor determines the size of the output image. Enter a value in the Scale T o
field to make automatic image size adjustments. For example, specifying a scale factor of 200% means that a one-inch area on the slide or negative will produce a two
inch picture when printed.
The scale factor and the image Width and Height fields are interrelated. When you
change the Scale To percentage, the image Width and Height fields are updated
accordingly if Fixed Size is not enabled.
The Scale To box is disabled when you create a fixed size image. The values in it
change to maintain the fixed size you specify if you resize the crop box.
62
Page 63

Cropping the final scan
The scan crop box is a flexible tool that is displayed as a white marquee on the Scan
panel display area. Use it to select the final area of interest. When you adjust the scan
crop box, the values in the Wi dth and Height f ields are automatically updated if Fixed
Size is disabled. (If Fixed Size is enabled, the Scale To adjusts automatically and the
aspect ratio of the crop box stays constant.)
Note: When you check Fixed Size, the aspect ratio of the scan crop box remains fixed
as you resize it. If you resize the crop box when Fixed Size is checked, the Scale To
value changes automatically to maintain the values in the Width and Height boxes.
Tip for PC systems: For a better representation of the final image, right-click the
image and click Crop Using Matte.
Scan cropping is a free-form process. Move, resize, or redraw the scan crop box as
described below to select the area to be saved in the scanned image file.
To resize the scan crop box: Point to any crop box border. The pointer changes to a
two-headed arrow shape. Drag a corner or a border outward to stretch the crop box, or
inward to shrink the crop box. (If you selected the Fixed Size checkbox, the crop box
maintains its height-to-width ratio as you resize it.)
To move the scan crop box: Point to any location inside the crop box. The pointer
changes to a four-way arrow shape. Drag the crop box to move it.
To draw a new scan crop box: On Macintosh systems, hold the Option key, click
outside the current crop box and drag to create a new crop box. On PC systems, click
outside the current preview crop box and drag to draw a new box.
63
Page 64

Tip for PC systems: Point to the image area and click the right mouse button to dis-
play a menu for substituting a matte frame for the scan crop box.
Using fixed size output
Check the Fixed Size option when you want to def ine a specif ic image size. F or e xample, you may want to create a screen saver image that is exactly 1024 x 768 pixels.
When you use the fixed size feature, the PolaColor Insight program automatically
changes the Scale To value as you adjust the crop box to achieve the image size you
specify.
Doing the final scan
When the output specifications are complete, click the Scan button to create the image
output file. If you want, you can have the PolaColor Insight program immediately
start an image-editing application and display the scanned image in it.
To scan and save the image:
Click the Scan button to scan the image and display the Save Image File As box.
1
Enter a file name or leave the default name (the active scan job name) in the File
2
Name box.
Choose TIFF, PSD or JPEG (Macintosh), or .TIF or .BMP (PC) as an image file for-
3
mat.
64
Page 65

Choose a drive and a folder for the file.
4
On PC systems, you can type an image editing program path and file name in the
5
Application box. (Click Browse to select the file name instead of typing it in the box.)
Note: On Macintosh systems, you choose an image-editing application through the
Preferences choice on the Edit menu. (See Changing prefer ences on page 33 for more
information.)
If you want the image-editing application to start and display the scanned image as
6
soon as you click Save in step 7, click the checkbox next to "Launch application with
this file."
Click Save. This scans the image, creates an image file, and opens an image-editing
7
application (if you selected this option in step 6).
Ejecting the film carrier
If you are using PolaColor Insight software with the Polaroid SprintScan 4000 scanner, eject the film carrier from the scanner by clicking Eject Film on the Scanner
menu.
65
Page 66

8 Scanning and printing tips
While PolaColor Insight software is easy to use, a few tips can help you get high quality results immediately.
Scanning tips
The following tips can help you obtain optimum results with PolaColor Insight.
Note: These tips are especially important if you are scanning color negativ es, because
of variations in films and processing.
Choosing the correct film and display profiles
Before you click the Preview button on the Preview panel, be sure to select the Input
profile matching the slides or negatives you are scanning. Variations in films make
this step especially important for color negatives. If your negative film type is not
listed in the Input box, choose the generic "Color Negative" input profile.
If you are scanning a black-and-white slide (a positive), select the "Color Slide" profile.
Also be sure to select the Display profile for your monitor. This helps assure that your
monitor accurately displays the preview image and any corrections you make.
66
Page 67

Adjusting lightness first
When adjusting the image, correct the lightness using the Auto Exposure button or the
Lightness slider on the Tone panel before making any other changes.
First, click Auto Exposure and view the results. If lightness requires further adjustment, move the Lightness slider left or right as needed.
Trying all color cast removal tools
After making exposure adjustments, remove any color cast (entire image is too blue,
too yellow, etc.) if necessary. Experiment first with the three automatic cast removal
tools on the Color panel (Pastel, Gray, Bright) by choosing them one at a time. For
more information about automatic cast removal, see page 47.
If the automatic cast removal tools do not produce satisfactory results, use the gray
eyedropper as described on page 48.
If the gray eyedropper does not give the results you want, manually adjust the color
balance as described on page 50.
Scanning black and white slides
Scanning black and white slides (positives) is similar to scanning color slides. For
black and white slides, choose the "Color Slide" input profile on the Preview panel
before performing the preview scan and then perform any image orientation changes.
Click the Color tab and move the Saturation slider to the ex treme left to create a grayscale image file format. Then use the correction tools on the Tone and Sharpness
panel as necessary.
67
Page 68

Finally, click the Scan tab and make your output, resolution and image size choices.
When the image is set up as you want it, click the Scan button to save it.
Printing tip
Be sure that your printer driver color-matching function is turned on when you print
pictures captured and enhanced with PolaColor Insight. Also be sure to follow any
other recommendations in your printer documentation.
Batch scanning (Macintosh only)
When running on a Macintosh system, PolaColor Insight software can automatically
execute multiple scans to capture several different areas of the image, with different
correction and scanning settings for each area.
This feature is useful for capturing four images inserted in the 35mm slide carrier and
scanned with a SprintScan 45 4x5 scanner. On 35mm scanners, it can also capture
multiple areas of 35mm slides or the same area multiple times with different settings
for each scan.
Setting up for batch scanning
To set up a batch scan:
Create a folder to hold all the scan settings for this batch.
1
Preview-scan, preview-crop, and correct the first area using the Preview, Tone, Color,
2
Curves and Sharpness panels.
68
Page 69

On the Scan panel, final-crop and make any necessary changes to the final-scan set-
3
tings. (Do not scan at this time.)
Export the job settings file (page 31) to the folder you created in step 1.
4
Repeat steps 2, 3 and 4 as necessary to export a job settings file for each area to be
5
scanned in the batch. Be sure to store all the job settings files in the same folder created in step 1.
Performing a batch scan
To perform a batch scan:
If you have not already done so, set up the batch scan as described in the pre vious sec-
1
tion.
Click Run Batch Folder on the Scripting menu.
2
When prompted, specify the batching folder (the folder containing the job settings
3
files for the batch) and the destination folder for the scanned images.
Click OK to scan and save the images.
4
69
Page 70

Using the Photoshop plug-in (Macintosh only)
If you have a Macintosh system, you can work with the PolaColor Insight program as
an Adobe Photoshop plug-in.
With the plug-in installed, you start PolaColor Insight from within an image-processing application compatible with plug-in modules. (Select Import from the application’s File menu, then select PolaColor Insight.) After you use PolaColor Insight to
preview the image, enhance it, and scan it, the image appears in your image-processing application for further manipulation.
To install the PolaColor Insight plug-in, double-click the Plug-In Installer in the PolaColor Insight folder and follow the instructions. (You must specify the import/export
plug-ins folder during installation.)
Troubleshooting SCSI problems
The PolaColor Insight program communicates with your SprintScan scanner through
a SCSI (Small Computer Systems Interface) connection.
If you suspect communication problems with your scanner, you can display the SCSI
bus status from within PolaColor Insight to help isolate the cause. Click View SCSI
Bus on the Apple menu (Macintosh) or the Help menu (PC).
If necessary, see your scanner hardware manual for more information about connecting SCSI devices to your computer.
70
Page 71

Software license agreement
Polaroid End User License Agreement
IMPORTANT: THIS IS A LEGAL AGREEMENT. BY INSTALLING THIS SOFTWARE, YOU ACCEPT ALL THE TERMS AND CONDITIONS OF THIS AGREEMENT.
This Polaroid Corporation ("Polaroid") End User License Agreement ("Agreement")
is provided with the "Polaroid PolaColor Insight Version 3" software product and
related documentation (collectively, "Software"). The term Software also shall
include any upgrades, enhancements or updates of the Software. Please read this
Agreement carefully because at the end you will be asked to accept the terms and conditions of this Agreement and continue the installation process or , if you do not wish
to accept these terms and conditions, to decline, in which case the installation process
will be aborted and you will not be able to use the Software. If you decline to accept
the terms and conditions of this Agreement, thereafter you may restart the installation
and accept the terms and conditions or return the Software to the place you obtained it
for a full refund.
1. Grant of License. Polaroid grants to you the right to use one copy of the accompanying Polaroid Software on a single terminal connected to a single computer (i.e.,
with a single CPU). You may not network the Software or otherwise use it on more
than one computer or computer terminal at the same time.
2. Copyright. The Software is owned by Polaroid or its suppliers and is protected by
United States Copyright Laws and International Treaty provisions. Therefore, you
71
Page 72

must treat the Software like any other copyrighted material (e.g., a book or musical
recording) except that you may either (a) make one copy of the Software solely for
backup or archival purposes, or (b) transfer the Software to a single hard disk provided you keep the original solely for backup or archival purposes. You may not copy
the written materials accompanying the software.
3. Other Restrictions. You agree not to modify, adapt, translate, reverse engineer,
decompile, disassemble or otherwise attempt to discover the source code of the Software. You may not rent or lease the Software, but you may transfer the Software on a
permanent basis provided you retain no copies and the recipient agrees to the terms of
this Agreement. If Software is an update, any transfer must include the update and all
prior versions.
4. Limited Warranty . Polaroid warrants that the Software media will be free of
defects in materials and workmanship for a period of 90 days from the date of purchase. Polaroid's entire liability and your exclusive remedy shall be, at Polaroid's
option, either (a) return of the price paid or (b) repair or replacement of the Software
that does not meet Polaroid's Limited Warranty and which is returned to Polaroid with
a copy of your sales receipt. This limited Warranty is void if failure of the Software
has resulted from accident, abuse, or misapplication. Any replacement Software will
be warranted for the remainder of the original warranty period or 30 days, whichever
is longer.
5. No Other Warranties. POLAROID MAKES NO OTHER WARRANTIES
WITH RESPECT TO THE SOFTWARE, EITHER EXPRESS OR IMPLIED,
INCLUDING BUT NOT LIMITED TO IMPLIED WARRANTIES OF MERCHANTABILITY AND FITNESS FOR A PARTICULAR PURPOSE. Some states
72
Page 73

and countries do not allow the exclusion of implied warranties, so the above exclusions may not apply to you.
6. Limitation of Liability. IN NO EVENT SHALL POLAROID OR ITS SUPPLIERS BE LIABLE FOR ANY CONSEQUENTIAL OR INCIDENTAL DAMAGES
(INCLUDING, WITHOUT LIMITATION, DA MAGES FOR LOSS OF BUSINESS
PROFITS, BUSINESS INTERRUPTION, LOSS OF BUSINESS INFORMATION,
OR OTHER PECUNIARY LOSS) ARISING OUT OF THE USE OR INABILITY
TO USE THIS POLAROID PRODUCT, EVEN IF POLAROID HAS BEEN
ADVISED OF THE POSSIBILITY OF SUCH DAMAGES. Some states and countries do not allow the exclusion or limitation of liability for consequential or incidental damages, so above limitations may not apply to you.
7. U.S. Government Restricted Rights. The Software are provided with
RESTRICTED RIGHTS. Use, duplication, or disclosure by the United States Government is subject to restrictions as set forth in subparagraph (c)(1)(ii) of the rights in
Technical Data and Computer Software clause at DFAR 52.227-7013, or such other
applicable government or agency regulations providing equivalent protection. Contractor/Manufacturer is Polaroid Corporation, 549 Technology Square, Cambridge,
Massachusetts 02139.
8. Governing Law and General Pro visions. This Agreement is governed b y the laws
of the Commonwealth of Massachusetts, USA, excluding its conflicts of law rules,
and the laws of the United States of America. If any part of this Agreement is found
void and unenforceable, it will not affect the validity of the balance of the Agreement,
which shall remain valid and enforceable according to its terms. You agree that the
Software will not be shipped, transferred or exported into any country or used in any
73
Page 74

manner prohibited by the United States Export Administration Act or any other export
laws, restrictions or regulations. This Agreement shall automatically terminate upon
failure by you to comply with its terms. This Agreement may only be modified in
writing signed by an authorized officer of Polaroid.
Your Acceptance of the Foregoing Agreement Will Be Indicated During Installation.
74
 Loading...