

Page 1

42” Plasma EDTV withATSC Tuner
PLA-4237
20060306
Page 2

TableofContents
Polaroid. Add a little color to your life.
Since1937,America has turnedtoPolaroid for theirphotographyneeds. Today,familieslook to Polaroidforconsumer electronicsthatdefine the
digitalage:plasmaandLCDTVs,portableandstandardDVDplayers,digitalcameras.Andwhileourselectionhaschanged,you'llstillreceive the
samefriendly,helpfulservice thatmadePolaroid anAmerican icon.Congratulationson your newPolaroid Plasma TVpurchase. Toensure your
newPlasmaTVprovidesyouwithyearsofenjoyment,pleasereadthisguidecarefully.
Table of Contents
Important Information .......................................................................................................................................................1
Important Safety Precautions...........................................................................................................................................2
Setup................................................................................................................................................................................5
Identification of Controls...................................................................................................................................................8
Connections....................................................................................................................................................................11
Basic Operations............................................................................................................................................................17
Memorizing the Channels...............................................................................................................................................18
Channel Selection..........................................................................................................................................................20
Setting Picture................................................................................................................................................................21
Setting Sound................................................................................................................................................................22
TimeSetandSleepTimer.............................................................................................................................................23
Viewing Closed Captions...............................................................................................................................................24
Setting Parental Control 5
Screen Setup for VGA(PC) Mode/Component Mode ....................................................................................................28
Troubleshooting.............................................................................................................................................................29
Care and Maintenance...................................................................................................................................................30
Specifications.................................................................................................................................................................31
.................................................................................................................................................2
Programming the Universal Remote Control.................................................................................................................32
Page 3
Important Information
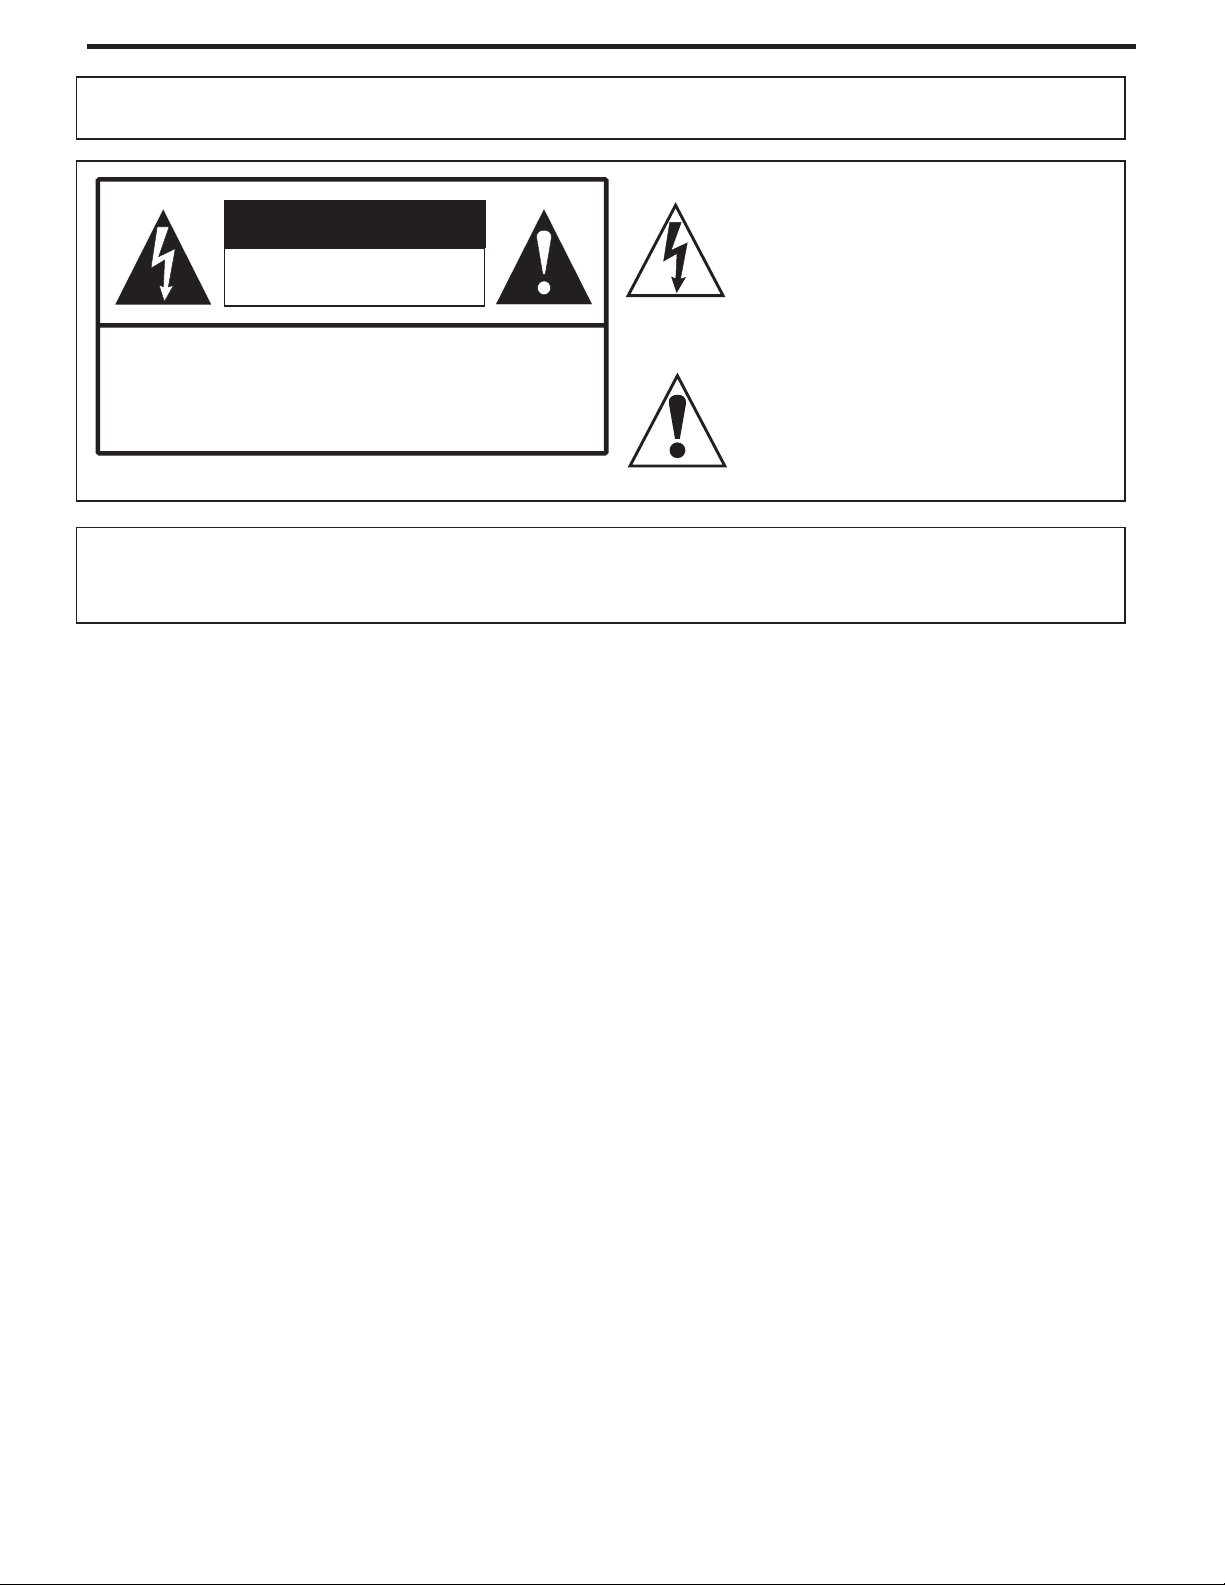
WARNING:
CAUTION-To reduce the risk of electric shock, do not perform any
Thisproductutilizestin-leadsolder,andfluorescentlampcontainingasmallamountofmercury.Disposalofthesematerialsmayberegulateddue
toenvironmental considerations. Fordisposalorrecycling information,please contactyourlocal authorities ortheElectronicIndustriesAlliance:
www.eia.org
TO REDUCE THE RISK OF FIRE OR ELECTRIC SHOCK, DO NOT EXPOSE THIS APPARATUS TO RAIN OR
MOISTURE.
The lightning flash with arrowhead symbol,
CAUTION
RISK OF ELECTRIC SHOCK
DO NOT OPEN
servicing other than that contained in the operating
instructionsunlessyouarequalifiedtodoso.
within an equilateral triangle is intended to
alert the user to the presence of uninsulated
dangerous voltage within the product's
enclosure that may be of sufficient magnitude to
constituteariskofelectricshocktopersons
The exclamation point within an equilateral
triangle is intended to alert the user to the
presence of important operating and
maintenance (servicing) instructions in the
literatureaccompanyingtheappliance.
.
FCC STATEMENT
FCC Notice
PDP TV: ACLASS B digital device
ThisequipmenthasbeentestedandfoundtocomplywiththelimitsforaClassBdigitaldevice,pursuanttopart15oftheFCCRules.These
limits are designed to provide reasonable protection against harmful interference when the equipment is operated in a commercial
environment.
Thisequipment generates,uses, andcanradiate radiofrequency energyand,if notinstalled andusedin accordancewith theinstruction
manual, may cause harmful interference to radio communications. Operation of this equipment in a residential area is likely to cause
harmfulinterferenceinwhichcasetheuserwillberequiredtocorrecttheinterferenceathisownexpense.
FCC CAUTION:
Pursuant to 47CFR, Part 15.21 of the FCC rules, any changes or modifications to this monitor not expressly approved by the
manufacturercouldcauseharmfulinterferenceandwouldvoidtheuser'sauthoritytooperatethisdevice.
WARNING:This isa CLASS Bproduct.In adomesticenvironment this productmay cause radiointerference in
whichcasetheusermayberequiredtotakeadequatemeasurestocounterinterference.
1
Page 4
Important Safety Precautions
Electrical energy can performmany usefulfunctions, but it can alsocause personalinjuries and property damage ifimproperly handled.
This product has been engineered and manufactured with the highest priority on safety. But IMPROPER USE CAN RESULT IN
POTENTIAL ELECTRICAL SHOCK OR FIRE HAZARD. In order to prevent potential danger,please observe the following instructions
wheninstalling,operatingandcleaningtheproduct.ToensureyoursafetyandprolongtheservicelifeofyourPDPTVproduct,pleaseread
thefollowingprecautionscarefullybeforeusingtheproduct.
1.Readtheseinstructions---Alloperatinginstructionsmustbereadandunderstoodbeforetheproductisoperated.
2.Keeptheseinstructions---Thesesafetyandoperatinginstructionsmustbekeptinasafeplaceforfuturereference.
3.Heedallwarnings---Allwarningsontheproductandintheinstructionsmustbeobservedclosely.
4.Followallinstructions---Alloperatinginstructionsmustbefollowed.
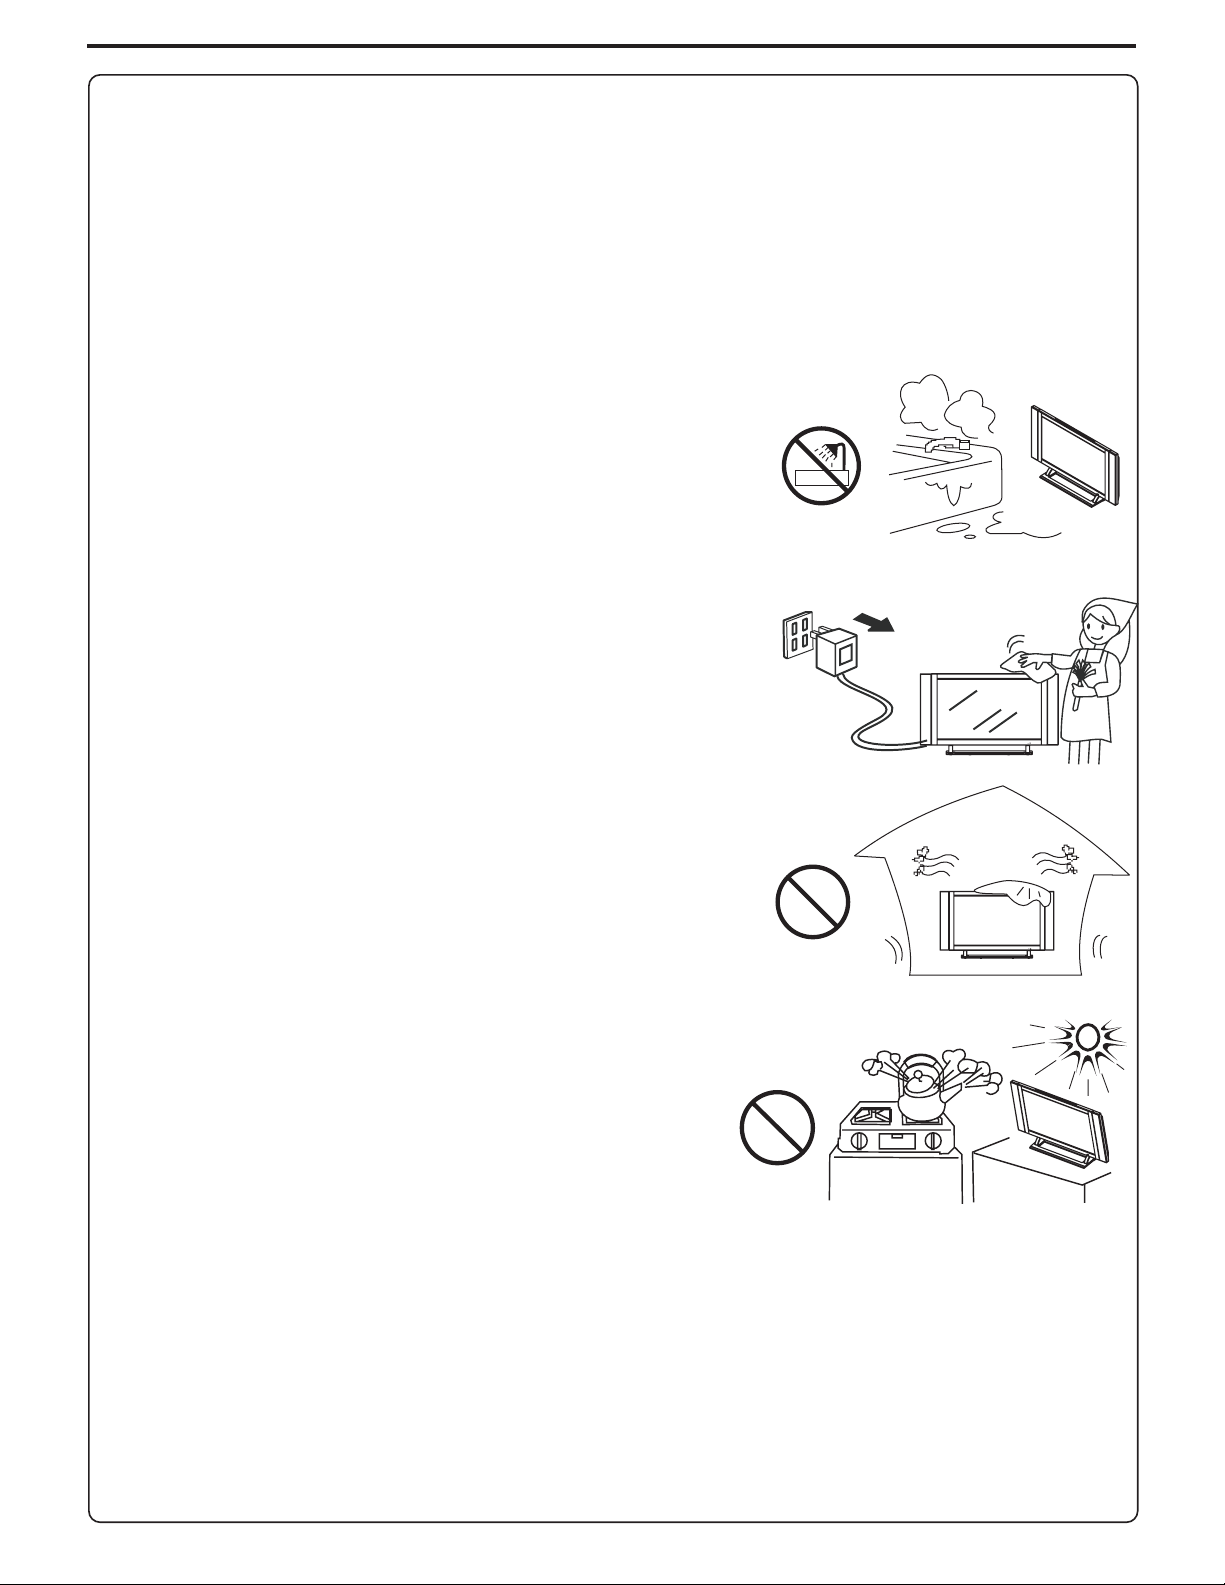
5. Do not use this apparatus near water---for example, near a bathtub, washbowl,
kitchensink,orlaundrytub,inawetbasement,ornearaswimmingpool,andthelike.
Do not use immediately after moving from a low temperature to high temperature
environment, as this causes condensation, which may result in fire, electric shock, or
otherhazards.
6. Clean onlywith drycloth---Unplug thisproductfrom thewall outletbefore cleaning.
Donotuseliquidcleanersoraerosolcleaners.Useadampclothforcleaning.
7. Ventilation---Do not block any ventilation openings. Install in accordance with the
manufacturerinstructions. The ventsand otheropeningsin thecabinetare designedfor
ventilation.Do notcover orblock thesevents andopenings since insufficientventilation
cancauseoverheatingand/or shortenthe life ofthe product.Do notplace theproduct on
abed, sofa, rug or othersimilar surface,since theycan blockventilation openings.This
product is not designed for built-in installation;do not place the productin an enclosed
place such as a bookcase or rack, unless proper ventilation is provided or the
manufacturer’sinstructionsarefollowed.
8.Heatsources---Donot installnear anyheat sourcessuchasradiators, heatregisters,
stoves,orotherapparatus(includingamplifiers)thatproduceheat.
9.Groundingor Polarization---Do notdefeat thesafetypurposeof thepolarizedorgrounding-type plug.Apolarizedplughas twoblades
with onewider than the other.A groundingtype plug hastwo blades and athird grounding prong.The wide blade or the third prongare
providedforyoursafety.Iftheprovidedplugdoesnotfitintoyouroutlet,consultanelectricianforreplacementoftheobsoleteoutlet.
10.Powercord protection---Protect thepowercordfrom beingwalkedonor pinchedparticularlyat plugs, conveniencereceptacles,and
thepointwheretheyexitfromtheapparatus.
11.Attachments---Onlyuse attachments/accessories specified by the manufacturer.Do not use attachments not recommended bythe
manufacturer.Useofimproperattachmentscanresultinaccidents.
2
Page 5
Important Safety Precautions (continued)
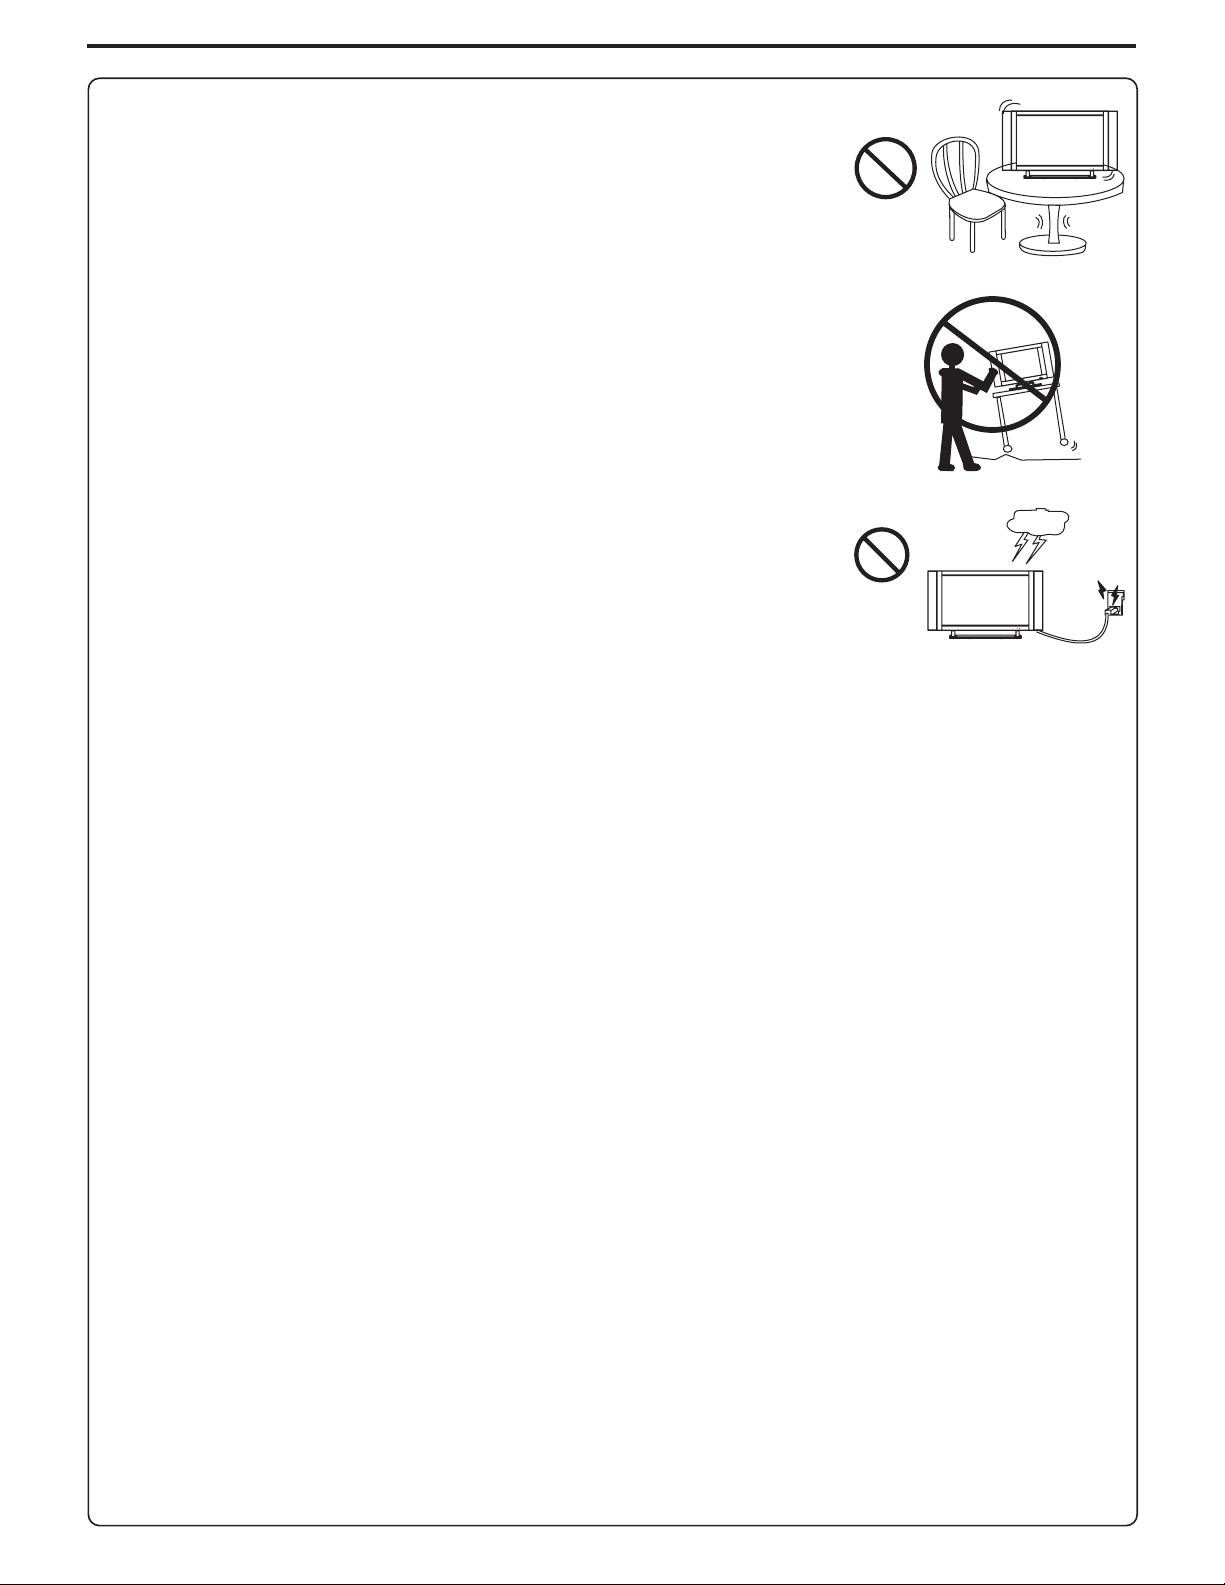
12.Stand---Useonlywiththecart,stand,tripod,bracket, or tablespecifiedbythe manufacturer,or
sold with the apparatus. Do not place the product on an unstable trolley, stand, tripod or table.
Placingtheproducton anunstable basecan causethe productto fall,resultinginseriouspersonal
injuriesas wellas damagetothe product.When mountingtheproduct ona wall,besure tofollow
the manufacturer’s instructions. Use only the mounting hardware recommended by the
manufacturer.
13. Move carefully---When a cart is used, use caution when moving the cart/apparatus
combinationtoavoidinjuryfromtip-over.Suddenstops,excessiveforceandunevenfloorsurfaces
cancausetheproducttofallfromthetrolley.
14.Lightning---Unplug thisapparatus duringlightningstorms orwhen unusedforlong periodsof
time.
For added protection for this television equipment during a lightning storm, or when it is left
unattended andunused forlong periods oftime, unplugit from thewall outlet and disconnect the
antenna.Thiswillpreventdamagetotheequipmentduetolightningandpower-linesurges.
15.Servicing---Referallservicingtoqualifiedservicepersonnel.Servicing is requiredwhentheapparatushas been damagedinanyway,
suchas power-supplycord orplug isdamaged, liquidhas beenspilled orobjects have falleninto theapparatus, theapparatus hasbeen
exposedtorainormoisture,doesnotoperatenormally,orhasbeendropped.
16. Replacement parts---In case the product needs replacement parts, make sure that the service person uses
replacement parts specified by the manufacturer, or those with the same characteristics and performance as the
originalparts.Useofunauthorizedpartscanresultinfire,electricshockand/orotherdanger.
17.Overloading---Donotoverloadwalloutlets,extensioncords,orconveniencereceptaclesonotherequipmentasthiscanresultinarisk
offireorelectricshock.
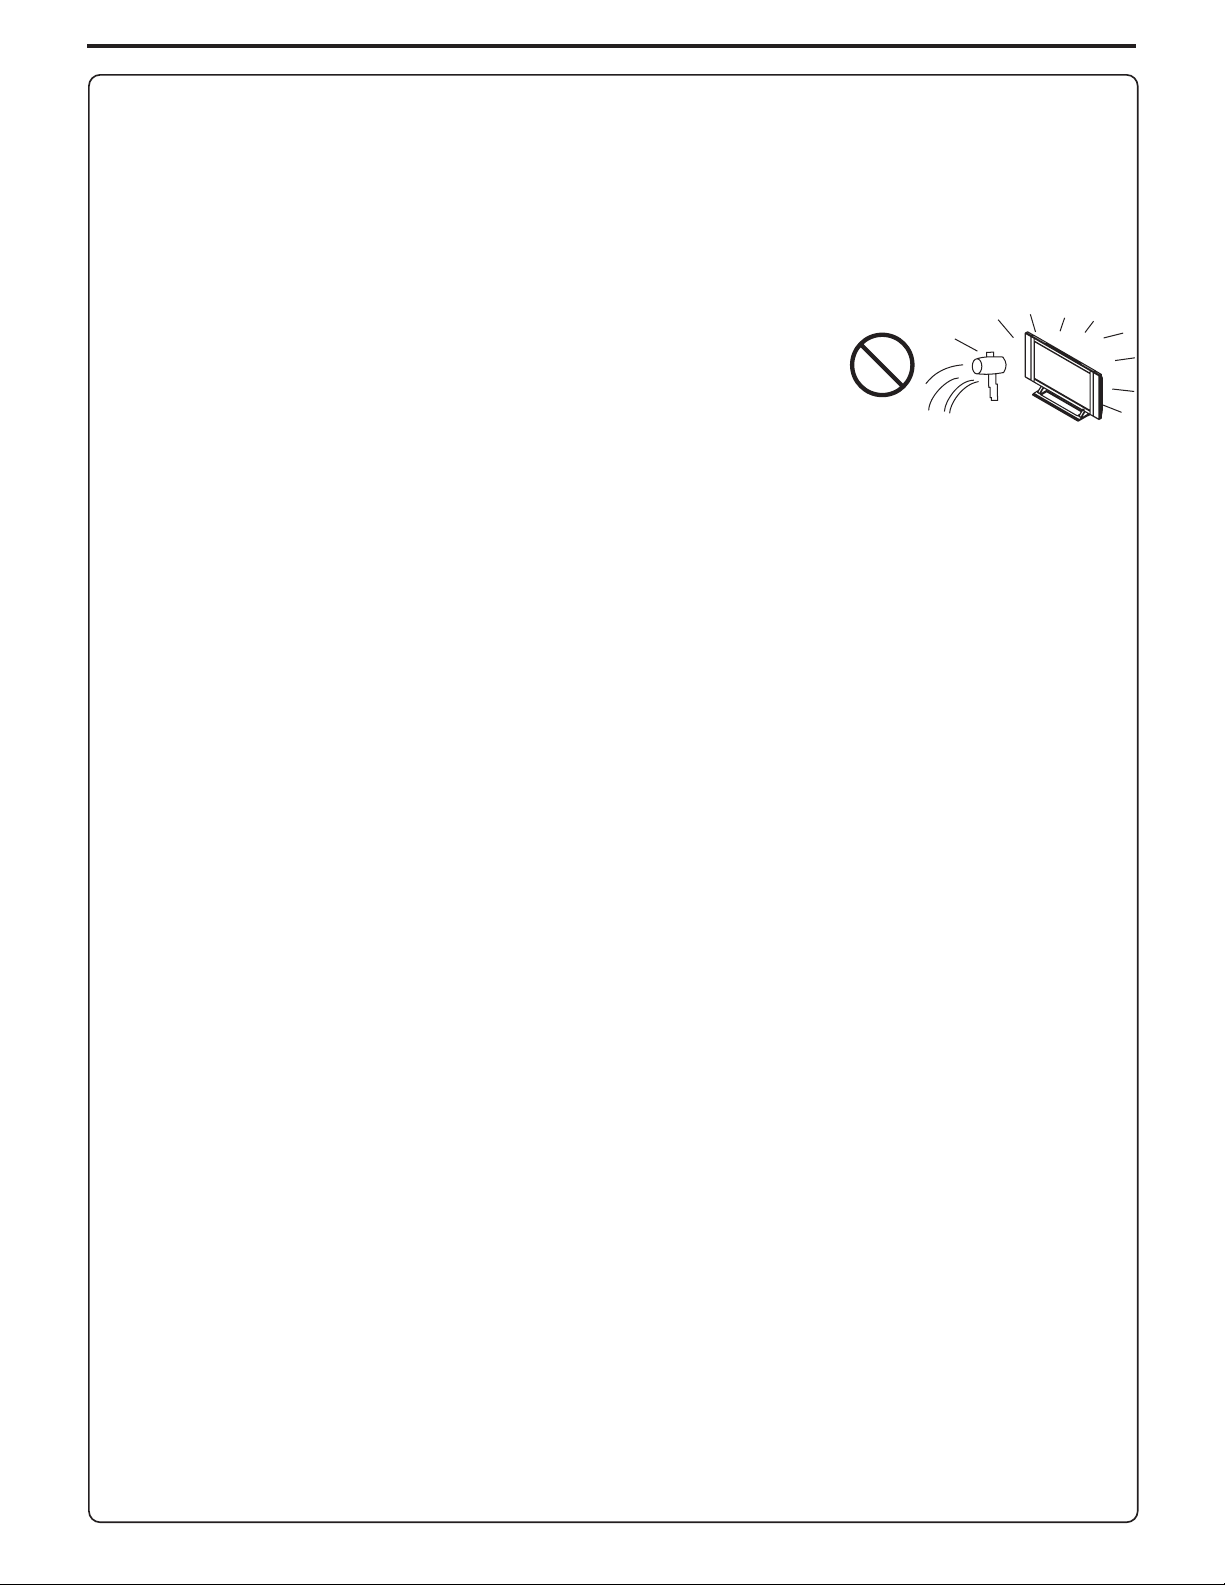
18.Enteringofobjectsand liquids---Neverinsert anobjectinto theproductthrough ventsoropenings. Highvoltageflows intheproduct,
andinsertinganobjectcancauseelectricshockand/orshortinternalparts.Forthesamereason,donotspillwaterorliquidontheproduct.
19.Damagerequiringservice---Ifanyofthefollowingconditionsoccurs,unplugthepowercordfromtheACoutlet,andrequestaqualified
servicepersontoperformrepairs.
a.Whenthepowercordorplugisdamaged.
b.Whenaliquidisspilledontheproductorwhenobjectshavefallenintotheproduct.
c.Whentheproducthasbeenexposedtorainorwater.
d.Whentheproductdoesnotoperateproperlyasdescribedintheoperatinginstructions.
Do nottouch the controls otherthan those described inthe operating instructions. Improperadjustment of controls notdescribed in the
instructionscancausedamage,whichoftenrequiresextensiveadjustmentworkbyaqualifiedtechnician.
e.Iftheproducthasbeendroppedorthecabinethasbeendamagedinanyway.
f.Whentheproductdisplaysanabnormalconditionor exhibits adistinctchangein performance.Anynoticeableabnormalityintheproduct
indicatesthattheproductneedsservicing.
20.Safety checks---Upon completion of service or repair work, request the service technician to perform safety
checkstoensurethattheproductisinproperoperatingcondition.
21.Wall or ceiling mounting---When mounting the product on a wall or ceiling, be sure to install the product according to the method
recommendedbythemanufacturer.Thisisasafetyfeature.
3
Page 6
Important Safety Precautions (continued)
22.Powersource---Thisproductisintendedtobesuppliedbyalistedpowersupplyindicatedonthemarkinglabel.Ifyouarenotsureofthe
type of power supply to your home,consult your product dealer orlocal power company.For added protection forthis product during a
lightning storm,or when itis left unattendedand unused forlong periods oftime, unplug itfrom the walloutlet and disconnectthe cable
system.This will preventdamage totheproduct duetolightning andpowerline surges.Whenthe unithas to beused withanotherpower
supplyvoltage, thepowercable mustbe changed. Consultyour productdealer.The socketoutlet shouldbeinstalled neartheequipment
andeasilyaccessible.Useonlythepowercorddesignatedbyour dealer toensuresafetyandEMC. When connectingotherproductssuch
asVCRsandpersonalcomputers,youshouldturnoffthepoweroftheunitforprotectionagainstelectricshock.
23.Panelprotection---ThePDPpanelusedinthisproductismadeofglass.Therefore,itcanbreak
when the product is dropped or impacted upon by other objects. Be careful not to be injured by
brokenglasspiecesincasethePDPpanelbreaks.
24.Pixel defect---The PDP panel is a very high technology product, giving you finely detailed pictures. Occasionally, a few non-active
pixelsmayappearonthescreenasafixedpointofblue,greenorred.Pleasenotethatthisdoesnotaffecttheperformanceofyourproduct.
4
Page 7
Setup
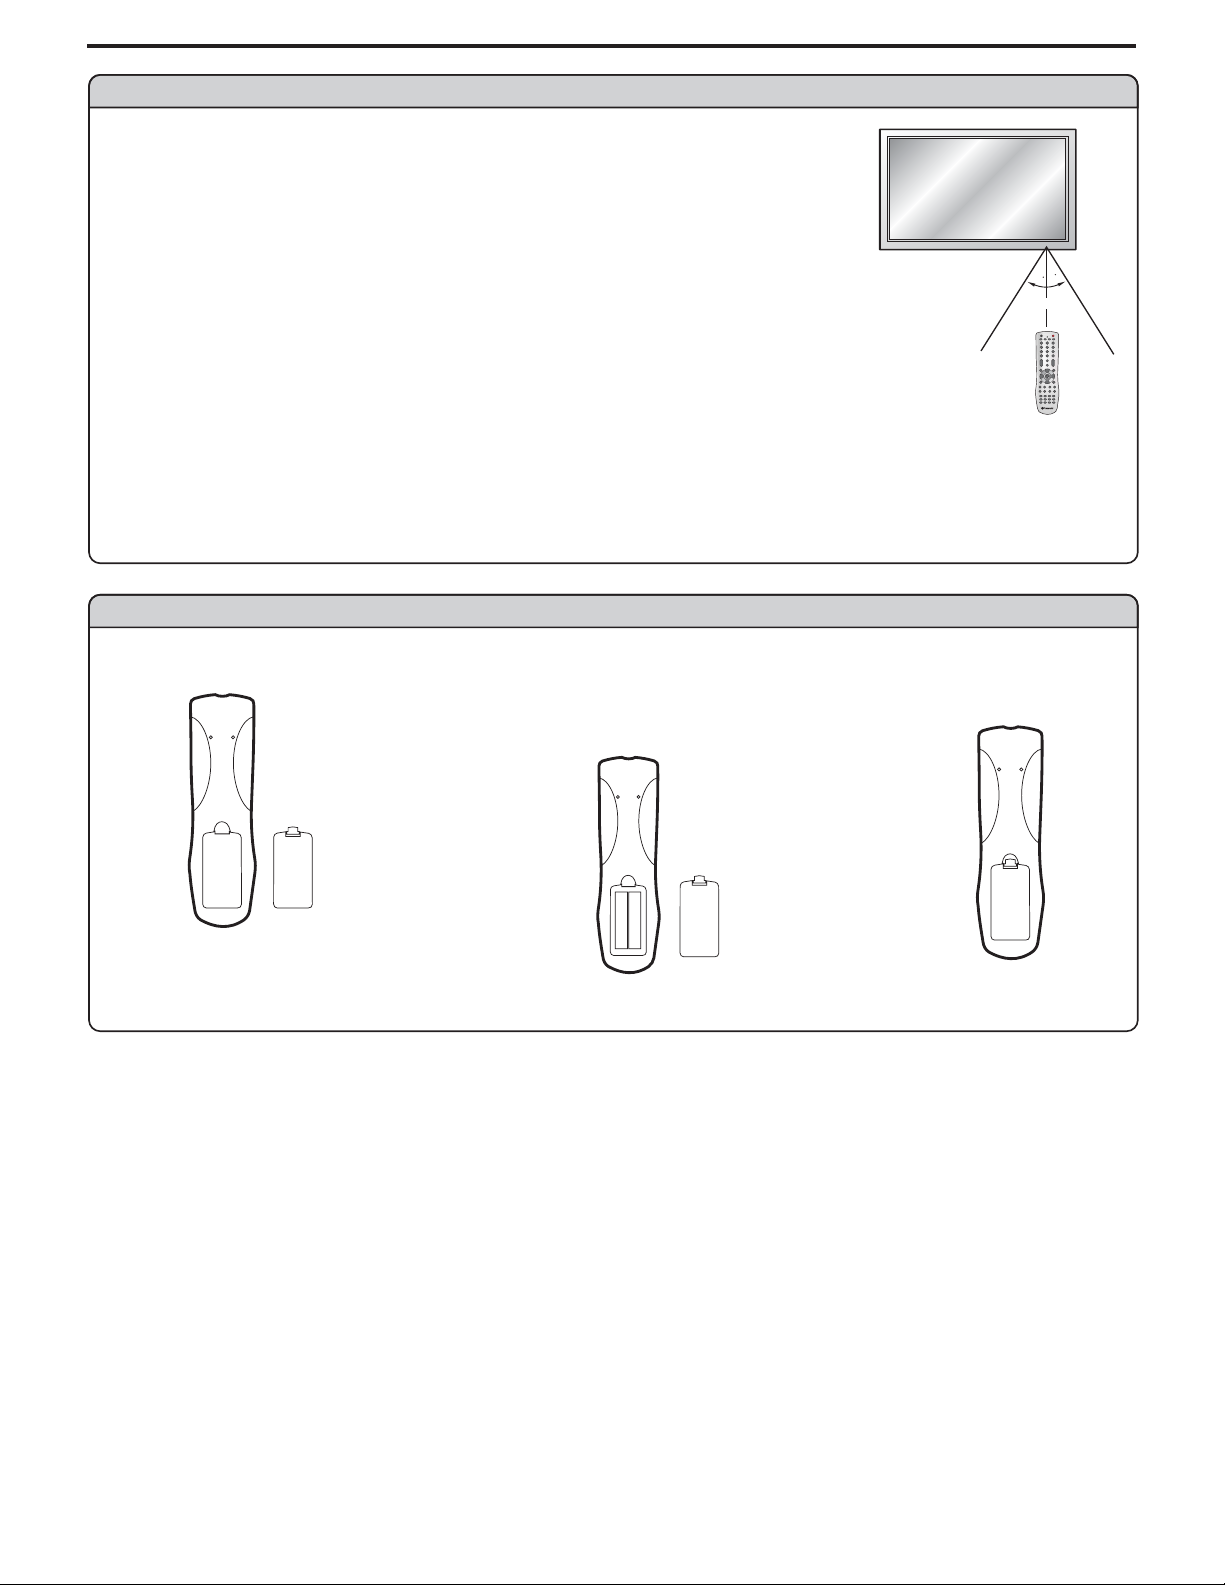
Using the Remote Control
<Usetheremotecontrolbypointingittowardstheremotesensorwindowoftheset.Objectsbetween
theremotecontrolandsensorwindowmaypreventproperoperation.
Note: This illustration is for reference only. The remote sensor may be in different locations on
different models.
30
30
5m
Cautions regardinguse of remote control
<Donotexpose theremote controltoshock.In addition,donotexpose theremote controltoliquids,
anddonotplaceinanareawithhighhumidity.
<Donotinstallorplacetheremotecontrolunderdirectsunlight.Theheatmaycausedeformationoftheunit.
<Theremotecontrolmaynotworkproperlyiftheremotesensorwindowofthemainunitisunderdirectsunlightorstronglighting.Insucha
case,changetheangleofthelightingorPDPTVset,oroperatetheremotecontrolclosertotheremotesensorwindow.
Batteries for the Remote Control
Openthebatterycover.
1
Precaution onbattery use
Improperuseofbatteriescanresultinaleakageofchemicalsand/orexplosion.Besuretofollowtheinstructionsbelow.
<
Placebatterieswiththeirterminalscorrespondingtothe(+)and(–)indications.
Differenttypesofbatterieshavedifferentcharacteristics.Donotmixbatteriesofdifferenttypes.
<
Do not mix oldand newbatteries. Mixingold and newbatteries canshorten thelife of new batteries and/orcause oldbatteries toleak
<
chemicals.
Removebatteriesas soonas theyarenon-operable.Chemicals thatleak frombatteriescancause arash. Ifchemicalleakageis found,
<
wipewithacloth.
Thebatteriessuppliedwiththeproductmayhaveashorterlifeexpectancyduetostorageconditions.
<
Iftheremotecontrolisnotusedforanextendedperiodoftime,removethebatteriesfromtheremotecontrol.
<
Inserttwosize-AAbatteries.
2
<(Place the batteries with their terminals
correspondingto the(+) and(–) indications
inthebatterycompartment.)
+
-
+
-
Replacethecover.
3
5
Page 8
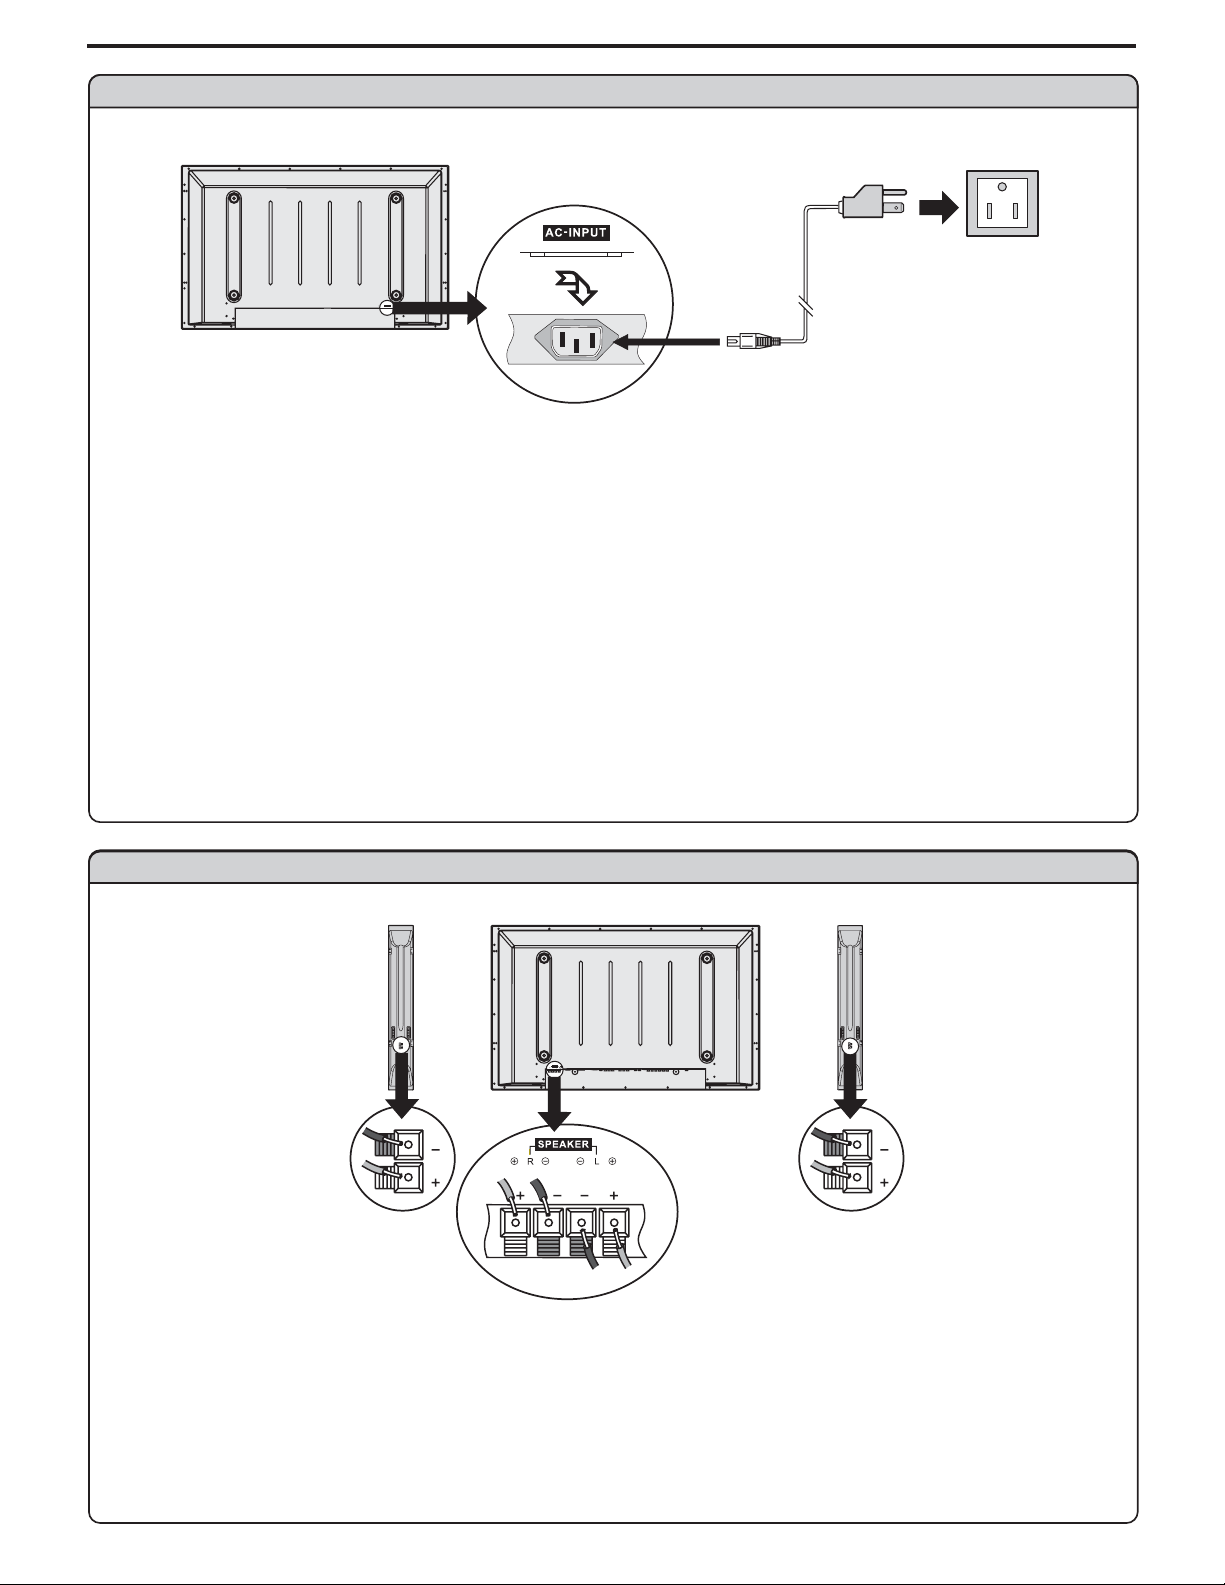
Setup
Power connection
AC cord
AC-INPUT
1.ConnectingthefemaleplugtotheACsocketontheunit.
2.Connectingthemaleplugtothewalloutletasillustrated.
Note:
<
This product shouldbe operated only fromthe type of powersource indicated on themarking label.
<
Always unplug theAC cordfrom power outletwhen not using fora long period oftime.
Household
power outlet
Plug into AC outlet.
Speaker connection
SPEAKER
L
R
(Black)
(Red)
Connect the speaker audio cable to
the external speaker output jack on
Right
speaker
Left
speaker
Note:
1 Unplug the plasma display and all connected components before connecting the speakers
. .
2 The illustration maybe differentdepending onmodel.
.
theunit matchingthe "+"and "-"ends
ofthecablewithcolor.
(Black)
(Red)
6
Page 9
Setup
COMPONENTINPUT1
S/PDIF
SPEAKER
L
R
COMPONENTINPUT2
LRAUDIO
LRAUDIO
AC-INPUT
7
Page 10
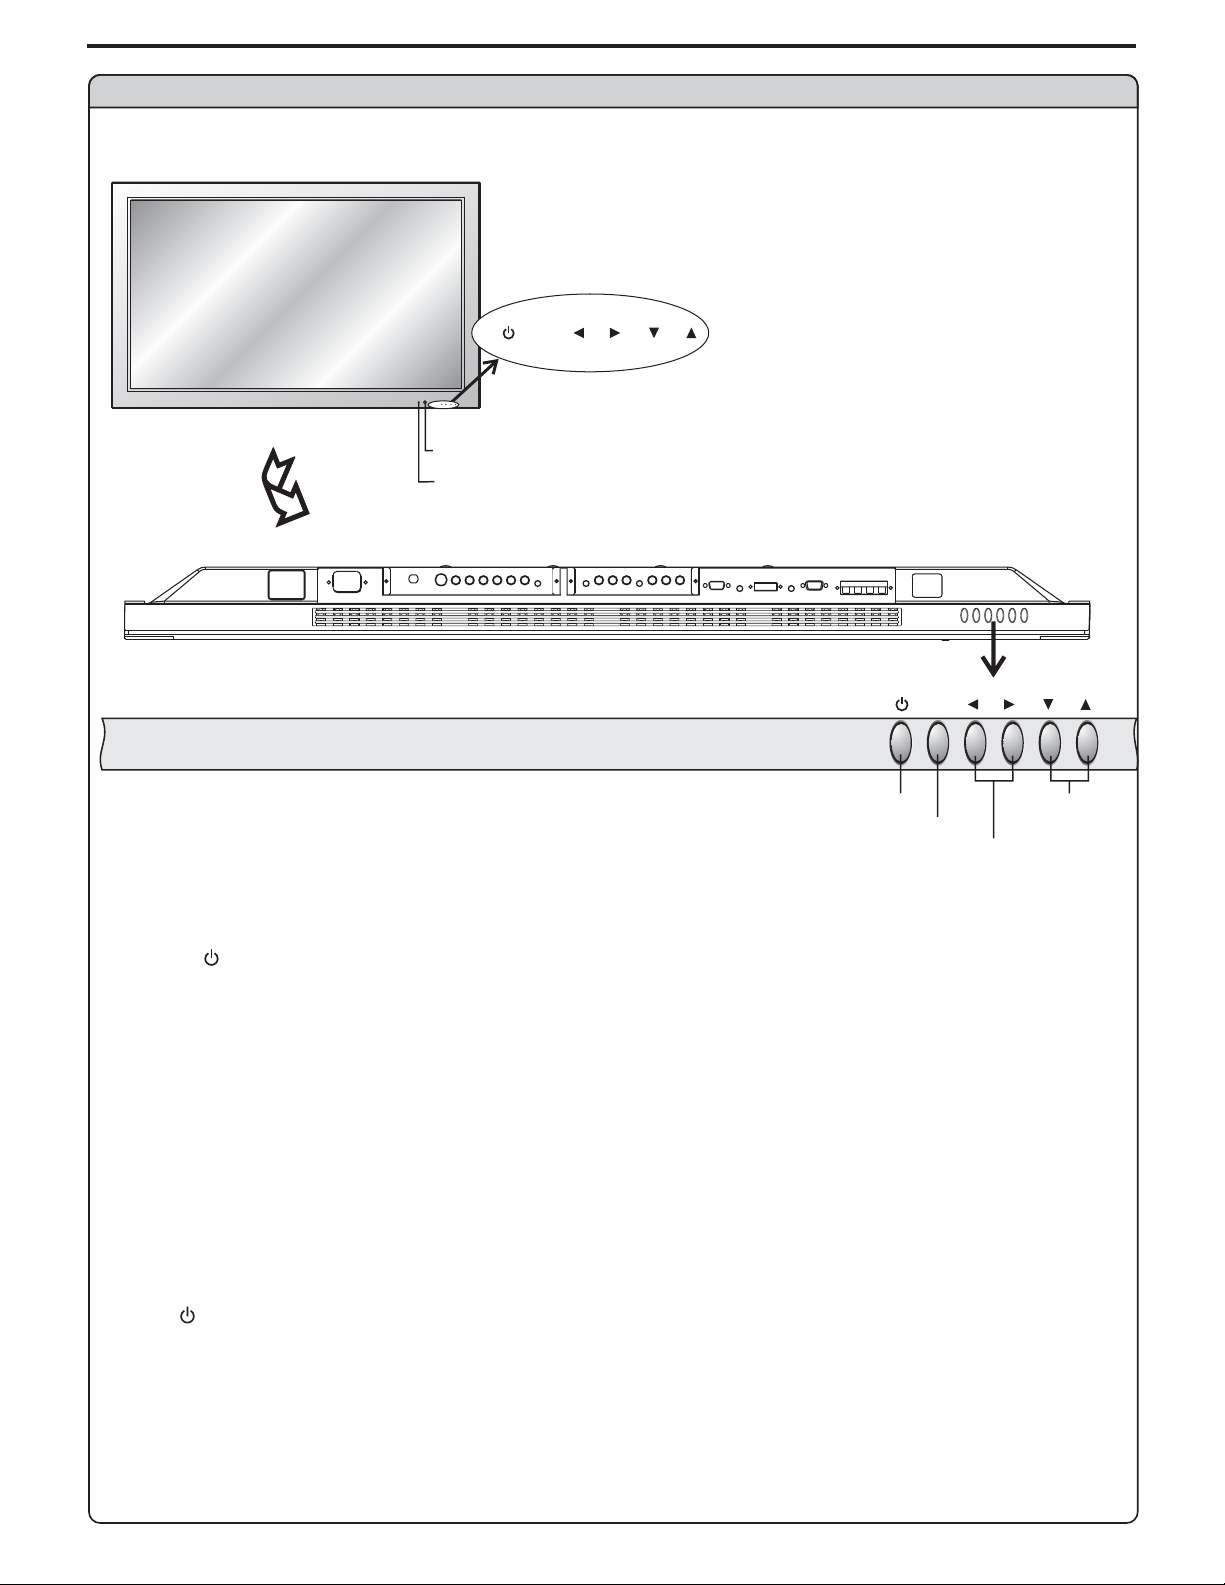
Main unit (front view)
Identification of Controls
MENU
MENU
SOURCE
VOL
CH
REMOTE SENSOR
POWER INDICATOR
VOL
CH
BOTTOM VIEW
POWER ON/STANDBY
VOLUME DOWN/UP
1. POWER
Press thisbutton to turnthe unit ON from STANDBYmode. Press itagain to turnthe set backto STANDBY.
2. MENU
Press thisbutton to accessthe MENU main page.
3. Volume /
Press theVOL or VOL button todirectly increase ordecrease the sound volume level.
34
43
In OSDMenu, press thesebuttons to adjust the value or settingof each item
4. Channel /
56
Channel Downor up.
In OSDMenu, press thesebuttons to choose the OSD items.
MENU
MENU
VOL
CH
CHANNEL
DOWN/UP
Note:
POWER VOL / / MENU, , and on the main unit have the same functions as the corresponding buttons on the remote
34 56CH
control.
This operation manualprovides a description basedon operating functions withthe remote control.
8
Page 11
Main unit (rear view)
Identification of Controls (continued)
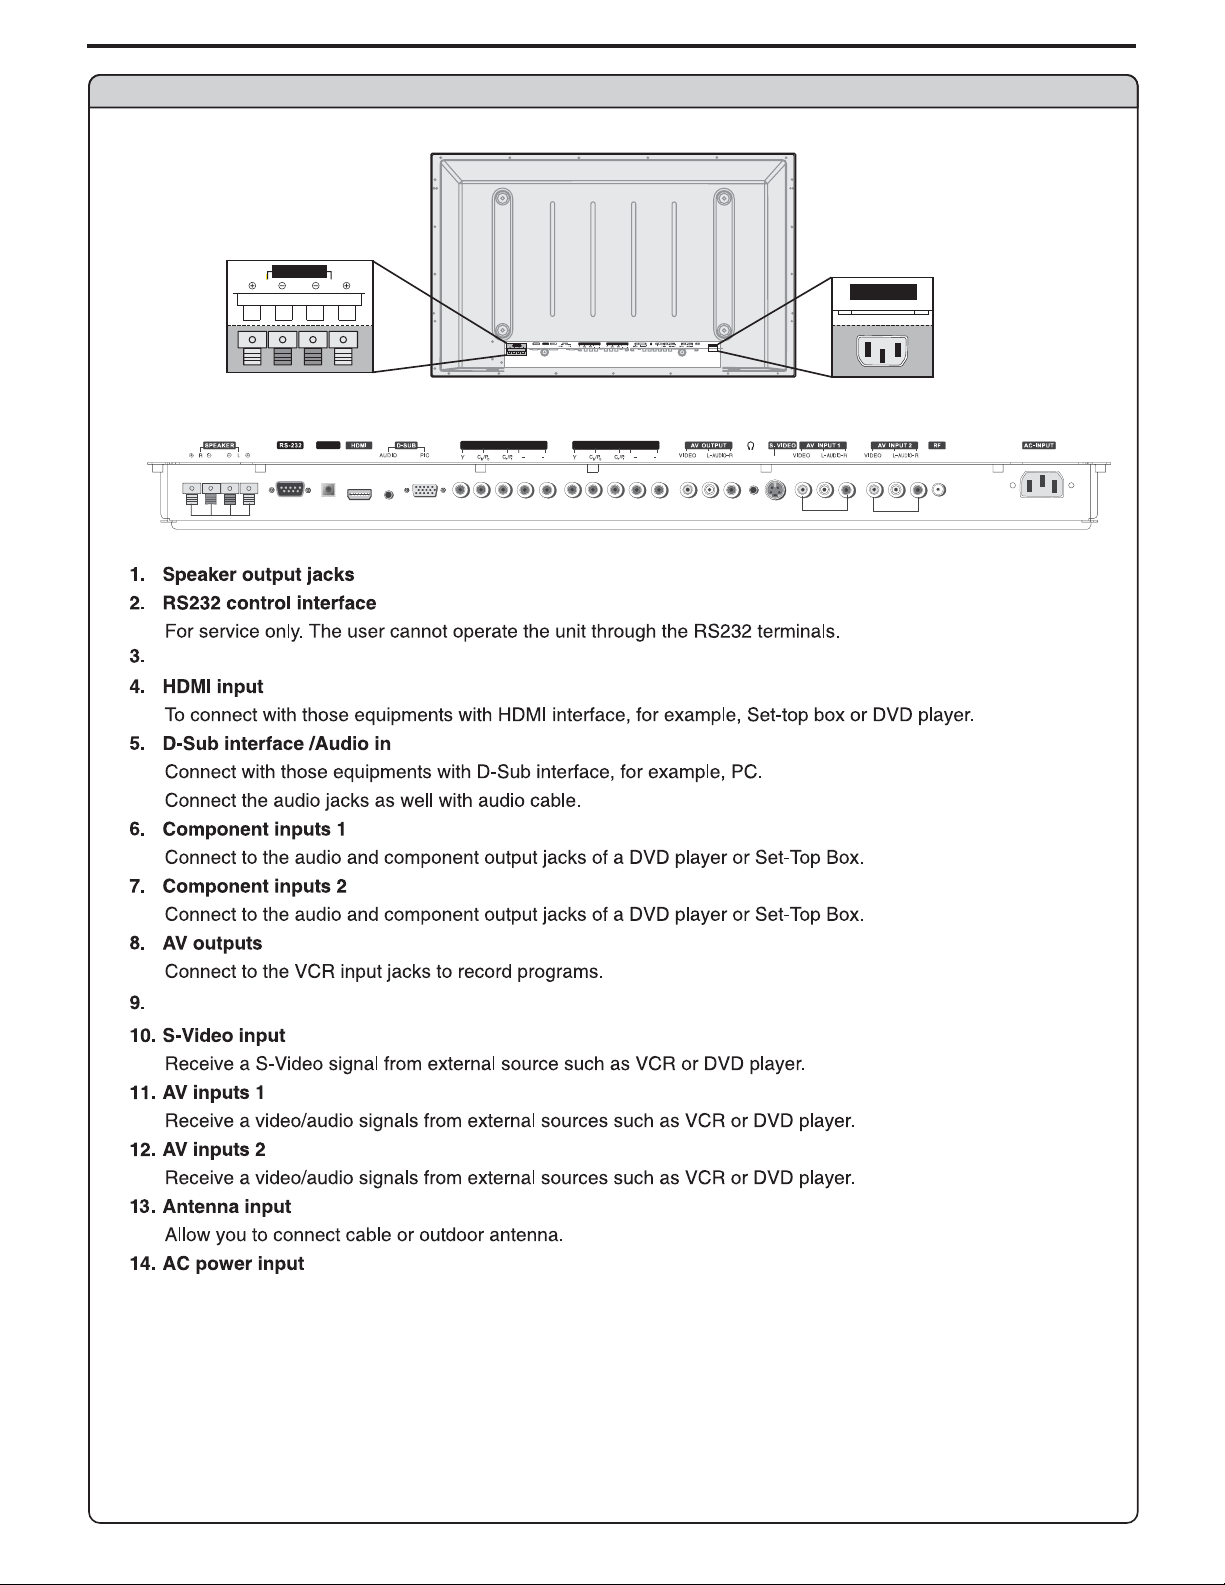
Speaker outputjacks
SPEAKER
S/PDIF
L
COMPONENTINPUT1
S/PDIF
SPEAKER
R
COMPONENT INPUT1
L
AUDIO
LR
LRAUDIO
COMPONENT INPUT2
R
S/PDIF digital audio out terminal optical()
AC power
input socket
AC-INPUT
COMPONENTINPUT2
LRAUDIO
AUDIO
AC-INPUT
LR
Earphone jack
9
Page 12
Identification of Controls
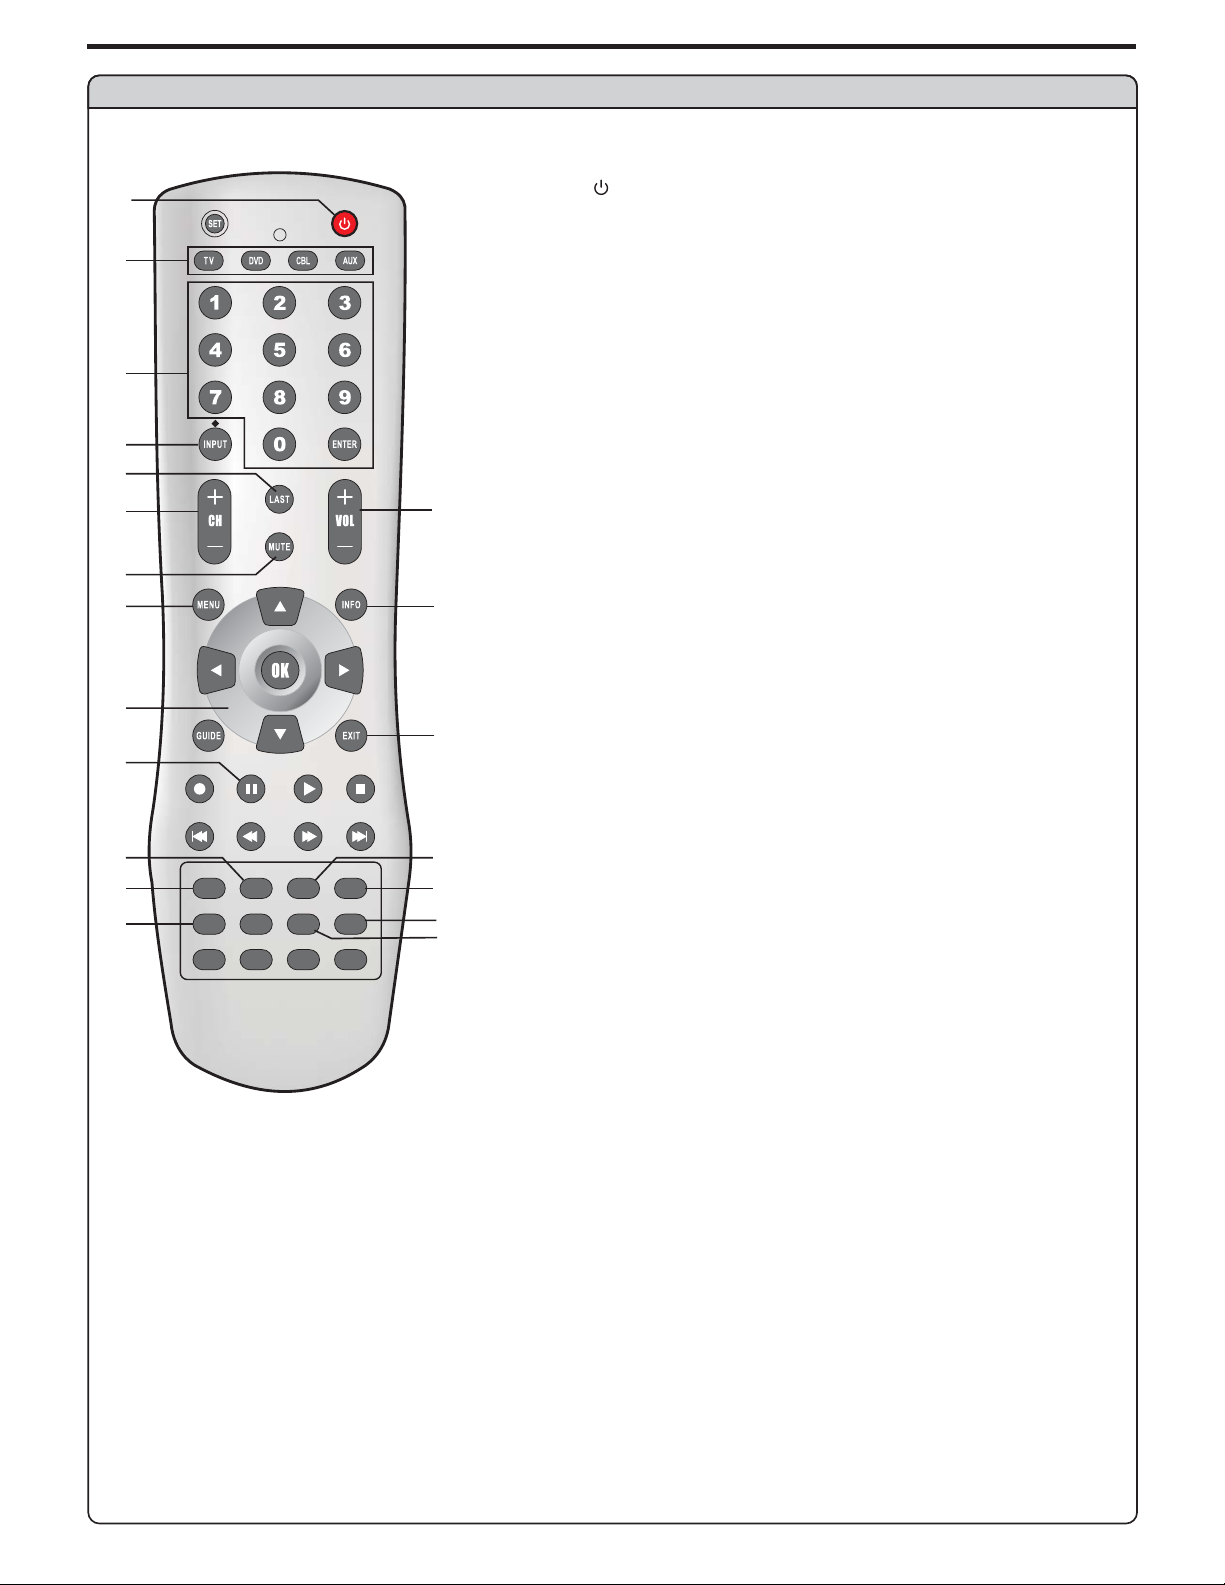
Remote Control
1
2
3
4
5
6
8
9
11
13
14
15 17
18
DISPLAY
ASPECT CAPTION SLEEP
STEREO SRS
PIP
SIZE TV/PC PIP INPUT
SOUND MODE
PICTURE MODE
10
.
1 POWER
Turnthe unit onor off
.
2 Toselectadditionalproductstobecontrolledwithremotecontrol
Note:This remotecontrol isanuniversal remotecontrol. Ifyour
remote control does not work correctly when you operate the
unit,pleasetrytopressTVbutton.
.
3 Directchannel selector/number buttons
Usethesenumberbuttonstoselectchannelorinputpassword.
4. INPUT/
To quicklyselect input source
DOT :
7
such as2-1,2-2, etc.
5. LAST
To quicklyreturn to theprevious channel
6. CH+/-
To selectchannels upward ordownward
7. VOL+
Used toadjust volume.
.
8 MUTE
Sound mute
12
.
9 MENU
To accessthe Menu mainpage
10. INFO
To displaychannel status orsignal information
11.Menu navigation button:
16
19
20
12. EXIT
Used toexit the menu
13. STILL
To freezecurrent picture
14.ASPECT
To selectscreen aspect ratio
15. DISPLAY
To displaychannel status orsignal information
16. CAPTION
To selectclosed caption mode
17. SLEEP
To setSleep timer
18. STEREO
To selectSTEREO, SAP orMONO
19. PICTUREMODE
To selectthe picture mode
20. SOUNDMODE
To selectthe sound mode
l
used toenter a programnumber for multiple program channels
()l
/-
5634
: Tomove upward ordownward in menu operation;
56
: Tomove left orright in menu operation;
34
To adjustselected menu itemin menu operation;
OK button
: Toconfirm or togglebetween the settingsof the selected
menu item.
10
Page 13
Connections
Cautions before connecting
Carefullychecktheterminalsforpositionandtypebeforemakinganyconnections.
Theillustrationoftheexternalequipmentmaybedifferentdependingonyourmodel.
Looseconnectorscanresultinimageorcolorproblems.Makesurethatallconnectorsaresecurelyinsertedintotheirterminals.
Refertotheusermanualoftheexternaldeviceaswell.
Whenconnectinganexternaldevice,turnthepoweroffonthepaneltoavoidanyissues.
Connect an Audio Processor or Hi Fi Digital Audio-( )
For a full Home Theater sound experience you connect your,-
Fi or Audio processor to the S PDIF Optical terminal on the
Optical cable
OR
S PDIF OUT
/
Optical
()
Audio Processor
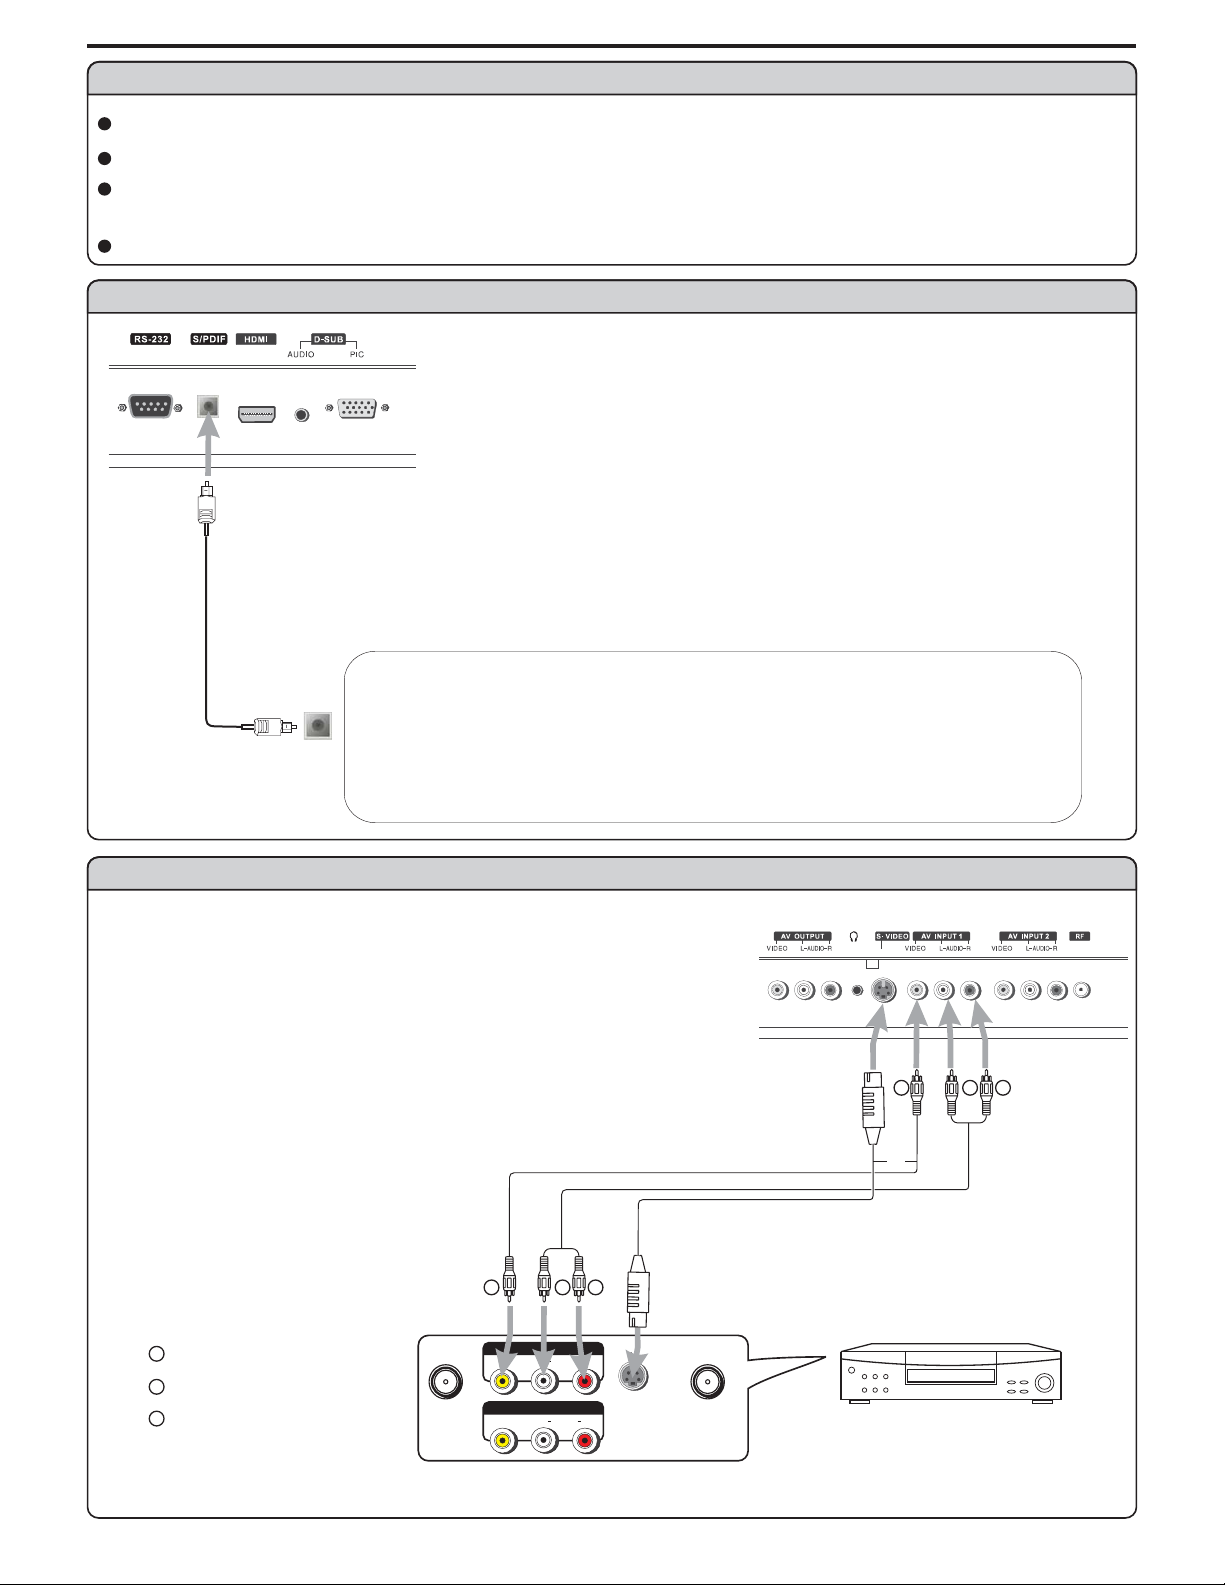
Connect a VCR
How to connect:
ConnecttheAudio/Video cables betweentheAudio(L/R)/Videojacks onthe unitand
VCR.
Note: For bettervideo, you canuse the S-video terminalif your source supportsit.
must Hi
/( )
HIFi System
To play VCR
1. Turn on yourPDP TV, press button onthe remote controlto select or
S Video
--)
if using S VIDEO terminal .
2. Turn on yourVCR , inserta videotape andpress the Play button.
Y
Yellow (VIDEO)
W
White (AUDIO L)
R
Red (AUDIO R )
INPUT Composite1
R
S-VIDEO
S-video
cable
ANT INANT OUT
Video
cable
Y
VIDEO
VIDEO
AV O UT
AV I N
Audio
cable
W
AUDIO
AUDIO
RL
RL
Rear ofthe VCR
(
11
W
Y
or
R
VCR
Page 14
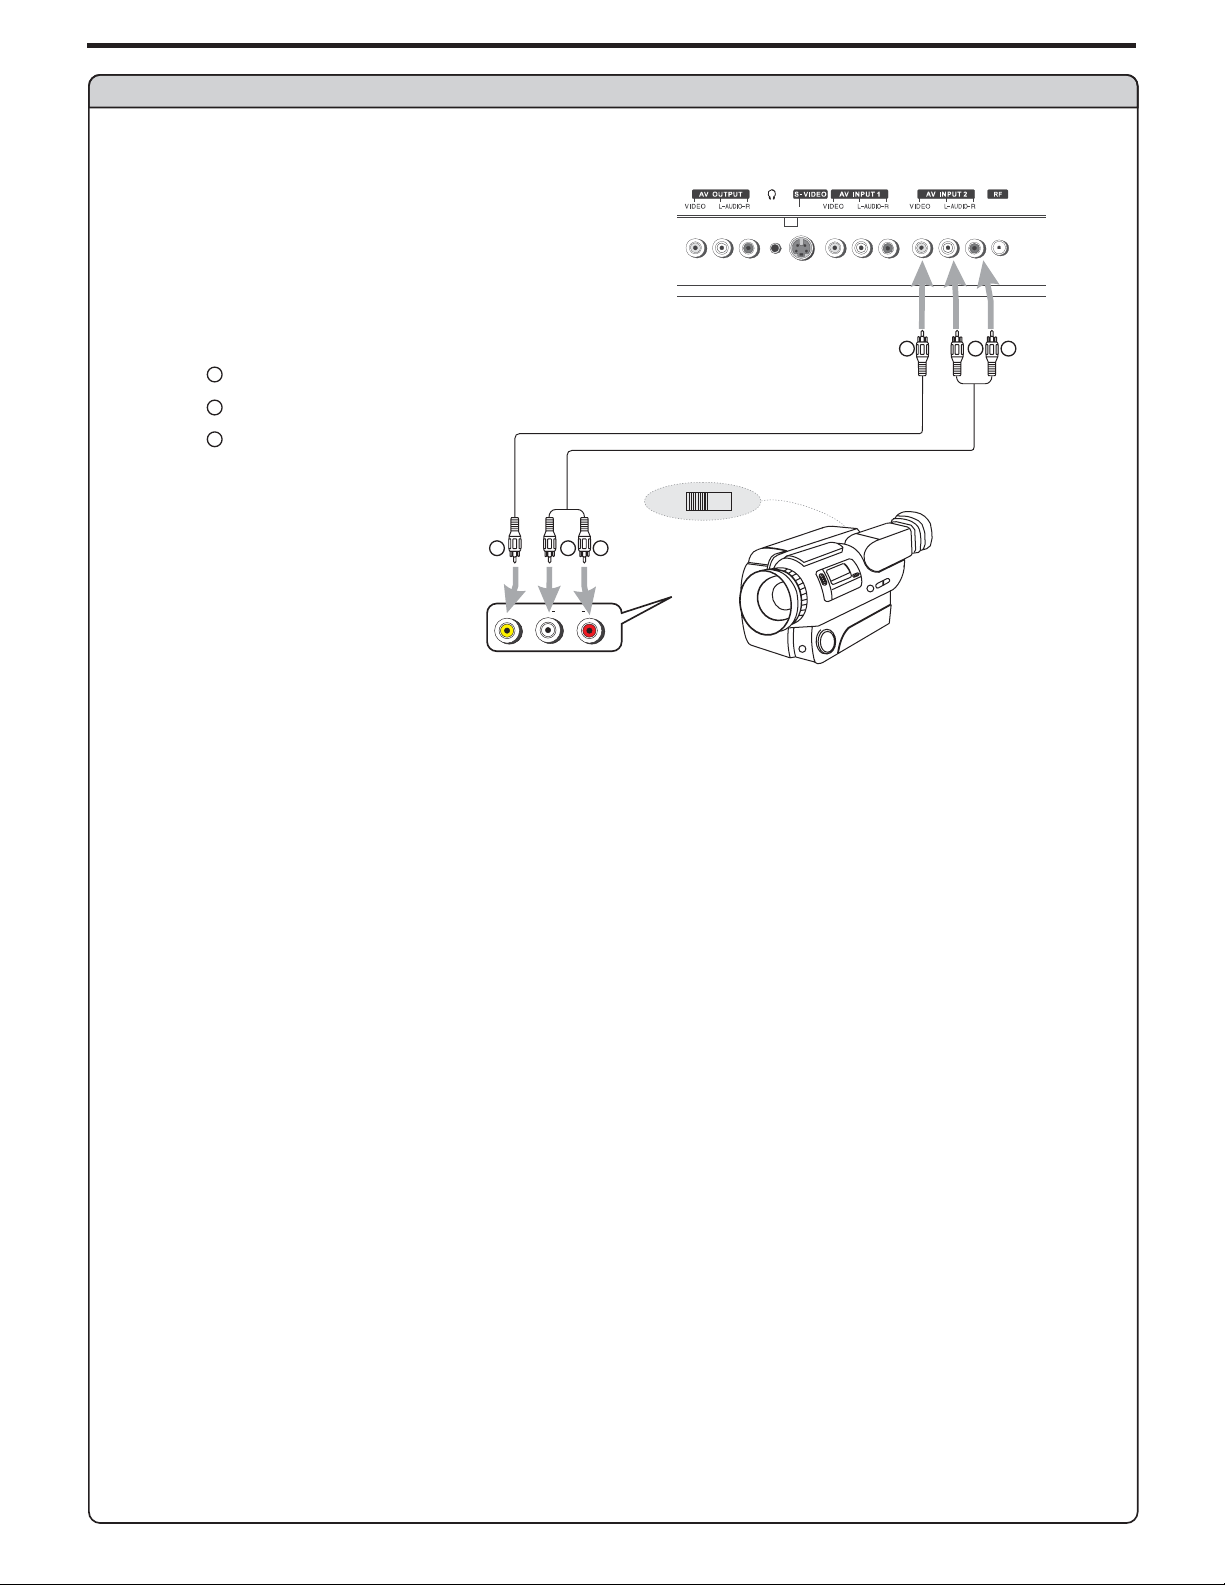
Connect a Camcorder
Y
Yellow (VIDEO)
W
White (AUDIO L)
R
Red (AUDIO R )
Connections (continued)
Video
cable
Audio
cable
OUT
W
Y
IN
R
Y
W
AUDIO
R
RLVIDEO
How to connect:
Connect theAudio/Videocables between theAudio (L/R)/Videojacks on theunit and camcorder.
To playback Camcorder
1. Turn on yourPDP TV, press button onthe remote controlto select .
2. Turn on yourVCR , inserta videotape andpress the Play button.
3. Turn on yourcamcorder and setit to outputmode. (For details, referto your camcorderuser manual.)
4. Insertthe tape intothe camcorder and press Play button.
Note:
The operations of thecamcorder maybe different andis dependant on your model.
Please read theuser manual of yourcamcorder to confirm operation.
INPUT Composite 2
12
Page 15
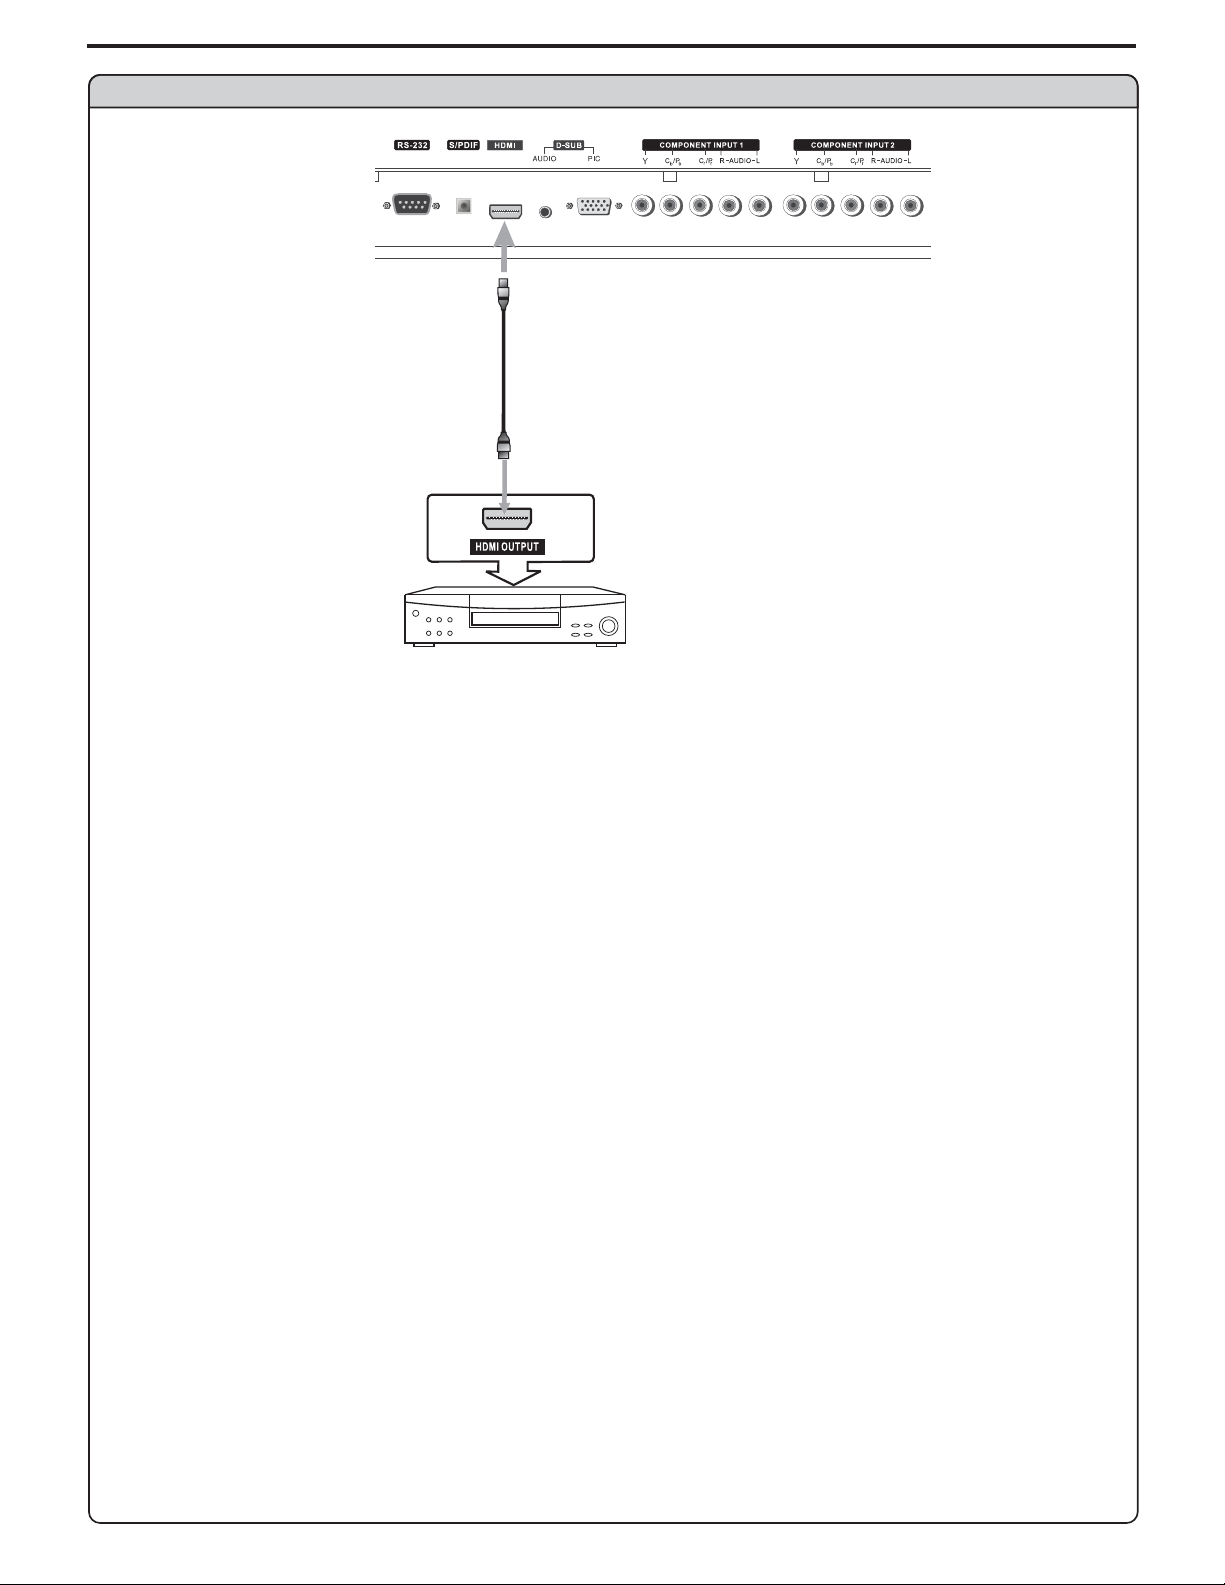
Connect a DVD player
Connections (continued)
HDMI cable
DVD player with
HDMI interface
How to connect a DVD Player using HDMI Connection:
Connect theHDMI cable betweenthe HDMI interface on the unit andHDMI output onthe DVD player.
To play DVD
1. Turn on yourPDP TV, press button onthe remote controlto select .INPUT HDMI
2. Turn on your DVD player,insert aDVD disc andpress the Playbutton.
Note:
If the external device has DVI output only use a DVI to HDMI adapter cable to connect to
the HDMI terminal Connect the audio cable to the AUDIO IN terminal of D SUB on the TV
.-
,
13
Page 16

Connect a DTV receiver
W
white (audio L)
R
red (audio R, P /C )
Green (Y)
G
B
Blue (P /C )
rbr
b
Connections (continued)
RG B
R
Video
cable
W
Audio
cable
R GB
P
P
r
b
AV O UT
AUDIO
RLVIDEO
R
Y
S-VIDEO
W
AUDIOCOMPONENT
AUDIO
LR
DVI
ANT
Rear ofthe DTV receiver
How to connect:
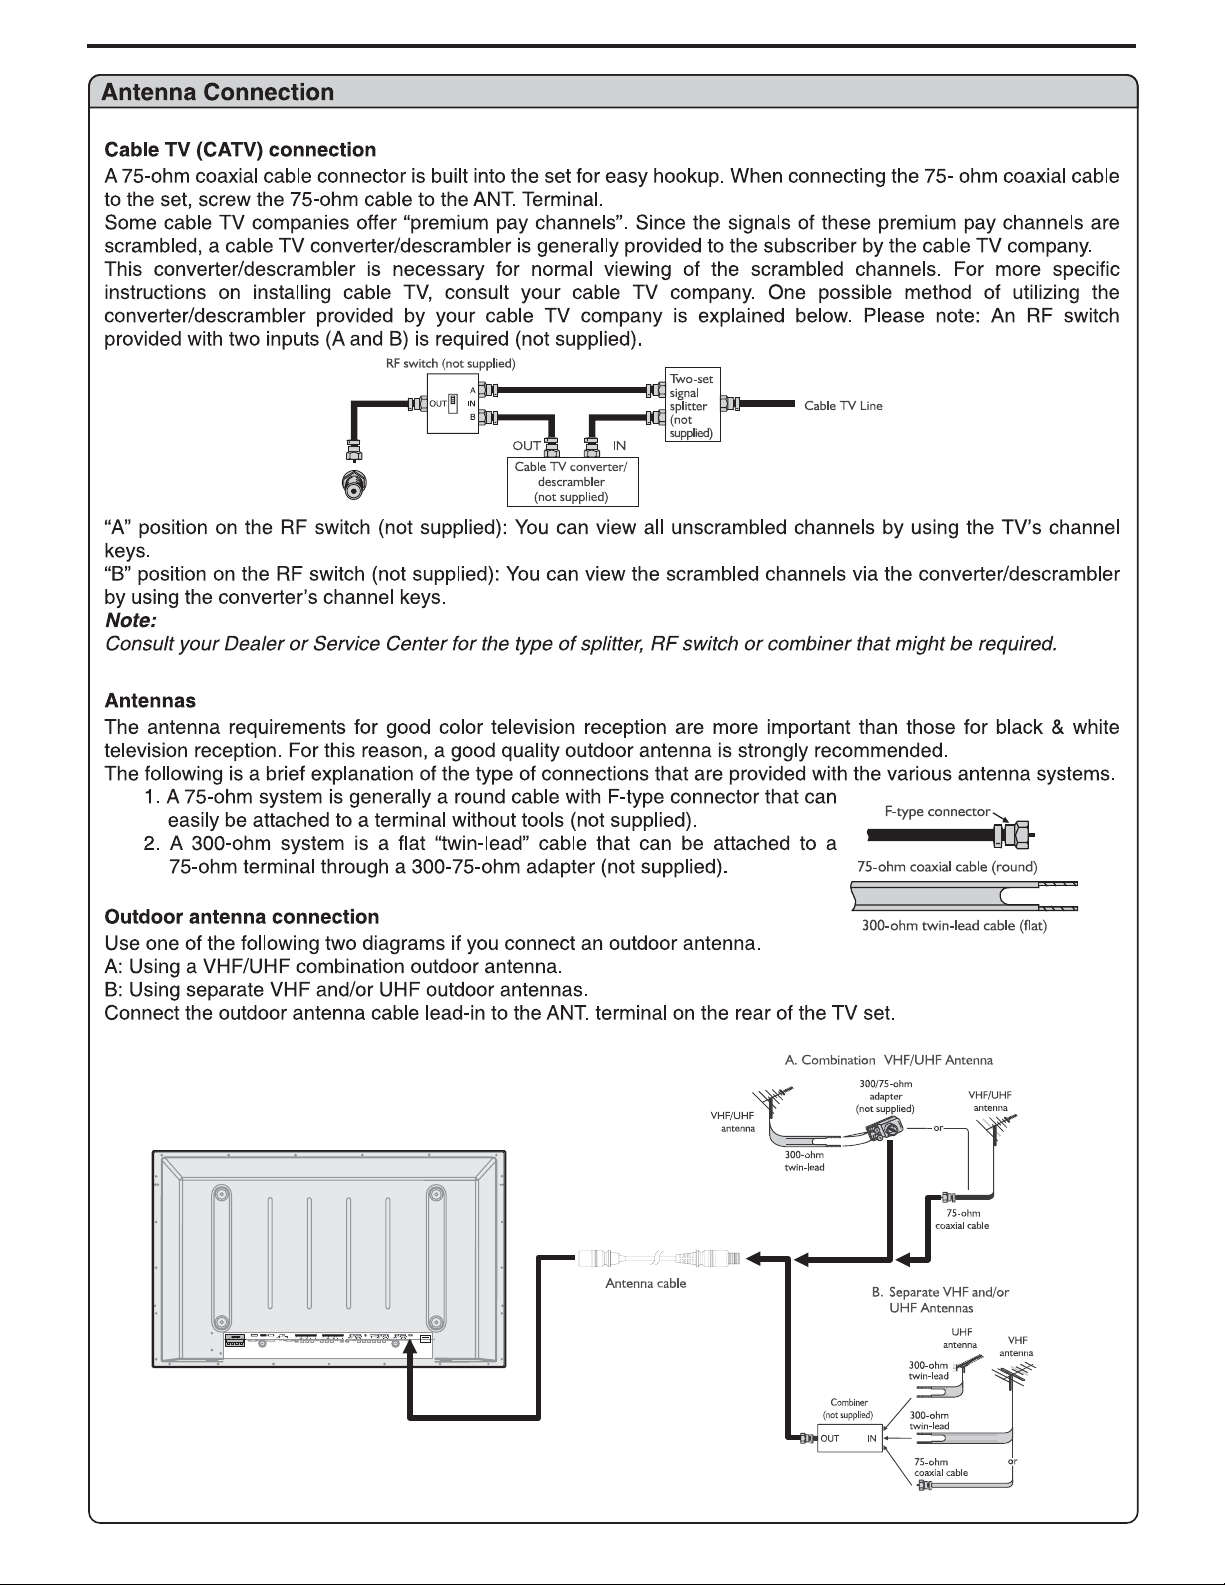
Connect thecable or antennato the antenna input jack on theDTV receiver.
Connect theVideo cable betweenthe Y, Pb, Prinput jacks on the unit andY,Pb, Pr outputjacks on theDTV receiver .
Connect theAudio cablebetween theAUDIO inputjack on theunit andAUDIO output jackson the DTV receiver.
To Watch DTV
1. Turn on yourPDP TV, press button onthe remote controlto select .
Turnon your DTVreceiver.
2.
INPUT Component1
14
Page 17

Connect a PC
Connections (continued)
D-sub
cable
Audio
cable
How to connect:
Connect aD-sub cable betweenthe D-sub jack on the PC andthe D-sub inputjack on theunit.
Connect anAudio cablebetween theAUDIO output on the PC andAUDIO input jack onthe unit.
To Watch the PC screen
1. Turn on your PDP TV , press button on the remote control
2. Turn on your PC and check for PC system requirements.
3. Adjust the PC screen.
INPUT to select .VGA
15
Page 18

Connections (continued)
Connect a VCR (for recording) or external amplifier
Y
Yellow (VIDEO)
W
White (AUDIO L)
R
Red (AUDIO R )
W
Y
R
Video
cable
Audio
cable
Audio
cable
R
W
W
Y
R
To Audio inputs
ExternalAmplifier
AV O UT
AUDIO
AV I N
AUDIO
Rear ofthe VCR
S-VIDEO
RLVIDEO
RLVIDEO
ANT INANT OUT
How to connect:
Connect theAudio/Videocables between theAudio (L/R)/Videojacks on theunit and VCR.
- or -
Connect theAudio cablesbetween theAudio (L/R) jackson the unitand external amplifier.
To record program
1. Turn on yourPDP TV, select a programyou wish torecord.
2. Turn on yourVCR, insert avideotape for recording.
3. Pressthe Record buttonto begin recording.
VCR for recording
To enjoy high-quality sound through an external amplifier
Note:
The operations of the amplifier may be different depending on model. Please read the user manual of your amplifier to confirm proper
operation.
TheAV output terminals outputaudio/video signal inputted fromAntenna inputorAV inputs.
16
Page 19

Basic Operations
Turning the Unit On and Off
Turning On
Insert the power cord into thewall outlet.
Press the button on the remote control, theunit will be turnedon and you willbe ready to useits features.Power
Turning Off
With the power on, press the button on the remote controlto turn off.Power
Note: PowerYoucan also use the button on the control panel on the main unit.
Viewing the Menus and Displays
This unit has a simple, easy-to-use menu system that appears on the screen.This system makes it convenient and
fast to use features on theunit. The unit also lets youdisplay the status ofmany of your TV features.
Menu navigation
With the power on, press the button to display the main menu.MENU
1
Press button to select menu page.56or
2
Press or button to enter the menu page.OK 4
3
Within the menu, use to navigate or adjust.
4
Press or button to confirm, enter sub-menuor toggle the settingsof the selected menu item.
Press button to return to the previous level menu.
5
Press button to exit the main menu and return to your program.
OK
MENU
EXIT
4
,,
563 4
or
Note: to clearly introduce the menu operations , this operation manual provides a description based on operation
with the remote control.
Displaying Status Information
Press the button on the remote control, the unit will display current status information such as channel
number or signal source, etc.
On-screen Menus Language Selection
Press MENU.
1
Press to select menu, press or to access the
2
submenu.
Press to select ress to
3
select your desired language.
Press button to return to TV viewing.EXIT
4
Selecting Input Source Signal
Navigate to the menu and highlight .Feature Source
1
Press or toOK 4 select your desired input source.
2
Note: INPUTYou may directly press button on the remote control to
select input source.
INFO
Video
Feature OK56 4or
OK or56 4or item, pMenu Language
Audio
Setup
Feature
Video
Audio
Setup
Feature
Source
Time Set
Sleep Timer
Parental Control
Closed Caption Options
CC when Mute
Menu Language
To Move
OK Exit
Source
Time Set
Sleep Timer
Parental Control
Closed Caption Options
CC when Mute
Menu Language
To Move
OK Exit
To Select
To Select
TV
Off
Off
English
To Exit
TV
Off
Off
English
To Exit
TV--------SelectTVsignal.
Composite1-------Select signalfrom AV INPUT1 terminals.
Composite2-------SelectsignalfromAVINPUT2 terminals.
Component1------SelectsignalfromCOMPONENTINPUT1terminals.
Component2------SelectsignalfromCOMPONENTINPUT2terminals.
17
VGA-------SelectsignalfromD-SUBinputinterface.
HDMI-------SelectsignalfromHDMIinputinterface.
S-Video-------SelectsignalfromS-VIDEOinput terminal.
Page 20

Memorizing the Channels
This unit can automatically find allchannels available through antennaor cable inputs, andstore them in memory.
Be sure to select the source before operationNote TV
:.
Selecting the Tuning Band
Before your TV can memorize the available channels, you must specify the type of signal source that is connected
to the unit. (i.e., an antennaor cable system)
Press to display the menu main page.MENU
1
Press repeatedly to select menu.56or Setup
2
Press or to access the submenu.OK 4
3
Press to select .56or itemTuning Band
4
Press or to select the Tuning Band.OK 4
5
Air, Cable, Cable HRC, Cable IRC Cable Autoand can be selected.
¨ If using antenna, select Air;
? /
If using cable, select one of Cable/Cable HRC/Cable IRC Cable Auto according to your local area’s
cable system For further band information contact your
cable service provider
..(,
Normally please select Cable Auto
.)
Video
Audio
Setup
Feature
Tuning Band
DTV Signal
Auto Ch Search
Manual Ch Set
Channel Labels
To Move
Air
OK Exit
To Select
To Exit
Auto Channel Search
Navigate to the sub-menu and highlight .Setup Auto Ch Search
1
Press or to beginthe auto channel search.
2
The unit will automatically search for all available TV/DTV (if
OK
4
using antenna), CATV/CADTV (if using cable)program.
Note: EXITif you want to stop theauto-search, press button.
Manual Channel Set
Video
Audio
Setup
Feature
Autoprogram Menu
NTSC Channel 12
Channels Found
Progress (%)
Tuning Band
DTV Signal
Auto Ch Search
Manual Ch Set
Channel Labels
To Move
OK Exit
7
Air
To Select
To Exit
Found
3
After setting channels into memory, you can add or delete channels
from the default channel list asfollows:
Navigate to the sub-menu and highlight .Setup Manual Ch Set
1
Press or to open sub-menu.OK Manual Channel Set Menu4
2
Use navigation buttons ( ) to navigate and select, use
3
button to add (the added channel will have a mark) or delete
OK
the channel. (If you want to toggle between NTSC and ATSC,
se navigation buttons to highlight it,and then use to toggle
u.)
563 4or
,,
OK
Video
Audio
Setup
Feature
Tuning Band
DTV Signal
Auto Ch Search
Manual Ch Set
Channel Labels
To Move
OK Exit
Air
To Select
To Exit
Press button to exit.EXIT
4
Now when you use CH+/- buttons to cycle among the channels,
the deleted channels can not beselected.
Note:
l
For DTV program, you can only delete the programs from the
list, you can not add it.
You can make use of to know
l
Manual Channel Set Menu
whether an ATSC channel exists as a sub channel.
18
Use OK button to toggle between
NTSC and ATSC after highlighted.
Manual Channel Set Menu
31
41
51
33
32
43
42
53
52
To Move
35
34
45
44
55
54
OK Exit
36
46
56
To Select
NTSCTuning Band
38
37
48
47
58
57
To Exit
40
39
50
49
60
59
Page 21

Memorizing the Channels (continued)
DTV Signal Strength
You can make use of DTV signal strength monitor to check how strong
your DTV signal is and whether you need to adjust your antenna or
digital cable input. The higher the signal strength, the less likely you
are to experience picture degradation.
Navigate to the sub-menu and highlight .Setup DTV Signal
1
Press or to view the on-screen signal strength monitor to
2
see the quality of the signalbeing received.
OK 4
Channel Label Setup
If required you can give a name to the programs
Note
broadcasting station the TV displays a short name for a DTV
channel even if you didn t setup a label for the channel
Navigate to the sub-menu and highlight .Setup Channel Labels
1
Press or to openOK Channel Labels Menu.4
2
,.
if a channel label is provided on the signal from the
:
,
'.
Video
Audio
Setup
Feature
No Signal
Video
Audio
Setup
Feature
Tuning Band
DTV Signal
Auto Ch Search
Manual Ch Set
Channel Labels
OK Exit
To Move
Weak Normal
Tuning Band
DTV Signal
Auto Ch Search
Manual Ch Set
Channel Labels
To Move
To Select
OK Exit
To Select
Air
To Exit
Good
96
Air
To Exit
Within the menu, use to move the
3
56
U toggle between NTSC and ATSC, or select
se to
/
channel number, or
You may use button to return to theprevious level menu.
To quit press button,.EXIT
4
OK
34
/.
select character.
highlight or cursor
Channel Labels Menu
NTSC
To Move
Ch005
OK Exit
To Change
----
To Exit
19
Page 22

Channel Selection
Information about USA channel numbering
?
ATSC PSIP channel has two part channelnumber:
— Major channelnumber FrequencyÞ
— Minor channelnumber Sub channelon frequency
In USA, the major channel number is same for both analog and digital frequencies. (It is equal to the NTSC
?
channel number for existing broadcasters.)
In USA, a minor channel numberof zero is usedfor a broadcaster’s analog channel.
?
Channel Numbering Example
?
Original NTSC Channels for Des Moines:
— 5, 8,11, 13, 17
?
Possible NTSC + ATSC Channels for Des Moines:
— 5-0, 8-0, 11-0, 13-0, 17-0 (channel numbers for existing analog channels, all on original NTSC analog
frequencies)
— 5-1, 5-2, 8-1, 8-2,8-3,8-4, 13-1 (channel numbersfor digital channelson three new digitalfrequencies)
Þ
Channel Selection
Using the Channel up/down buttons (CH or CH )+-
Press the or to cycle among available channels found.CH+ CH-
Using the direct select buttons (0-9 and dot buttons)
Press the and the to go directly to a channel.
For example, if you want toselect channel 8-3, just key in ‘8’, ‘ ’, ‘3’ on the remote control.
Note:
=
When you use the number buttons, you can directly select any channel within the channel range .
=
In some situations virtual channel numbers have no correspondence to physical frequencies.
Using the LAST button
Press this button to switch between the current channel and the lastviewed channel.
number buttons (0-9) dot button ( )l
l
20
Page 23

Setting Picture
Customizing the Picture
Press to display the menu main page.MENU
1
Press repeatedly to select menu.56or Video
2
Press or to access the submenu.OK 4
3
Within the menu, use to navigate
4
Press OK or button to confirm, enter sub-menu or toggle
4
the settings of the selected menuitem.
Press button to exit.EXIT
5
Option
Picture Mode
Contrast
Brightness
Color
563 4
or or adjust.
,,
Function Choice/remarks
Selects a desired picture mode.
Adjusts image contrast.
Adjusts screen brightness for easier
viewing of dark picture such as night
scenes and black hair.
Adjusts color saturation.
To Select
User
Wide
To Exit
Video
Audio
Setup
Feature
Picture Mode
Contrast
Brightness
Color
Sharpness
Aspect Ratio
Advanced Video Menu
To Move
50
50
50
0
OK Exit
Notes:
The OSD illustration shown above is Video
menu in RF(TV)mode.
The menu items may be different when the
unit works in different mode
.
User/Nature/Soft/Bright
Note PICTUREMODE:youmaydirectlypress button
ontheremotecontroltoselect.
4:
stronger
3
: weaker
4:
lighter
3
: darker
4:
stronger
3
: weaker
Sharpness
Adjusts image sharpness and displays a
sharp image.
4:
3
: softer
sharper
Wide/Cinema/Normal/Zoom
Aspect Ratio
Noise Reduction--Spatial
Noise Reduction--Speckle
Noise Reduction--Temporal
Tint
Selects screen aspect ratio.
Reduces noise in the picture
commonly called snow,.
Adjusts tint for image.
Note ASPECT: you maydirectly press buttonon the
remotecontroltoselect.
On/Off
4:
greenish
3
: purplish
Selects one of three automatic color
Color
Temperature
Advanced Video Menu
3D Y C/
adjustments Sets to warm to enhance
hotter colors such as red or set to cool to
see less intense colors with more blue
Selects 3D comb filter on/off, normally
please select On.
.
,
Cool/Warm/Normal
.
On/Off
To still the picture
Press the button to hold on the image on the screen the video sources are still operating Press
the button again to reactivate the image
STILL
.
().
Note:
For the sake of protecting the screen please do NOT still a picture for a long time,.
21
Page 24

Setting Sound
Adjusting the Volume
Using the volume buttons (VOL+ and VOL-)
Press the or to or the volume.VOL + VOL- increase decrease
Using the Mute
At any time, you can temporarilycut off the sound using theMUTE button.
Press the button and thesound cuts off.MUTE
1
To turn muteoff, press the button againMUTE .
2
Customizing the sound
Press to display the menu main page.MENU
1
Press repeatedly to select menu.56or Audio
2
Press or to access the submenu.OK 4
3
Within the menu, use to navigate
4
Press or button to confirm, enter sub-menu or toggle
OK
4
the settings of the selected menu item.
Press button to exit.EXIT
5
Option
Sound Mode
Bass
Treble
563 4
or or adjust.
,,
Function
Selects sound mode.
Adjusts Bass (low sounds)
Adjusts Treble (high sounds).
To Select
User
RAW
Mono
To Exit
Video
Audio
Setup
Feature
Sound Mode
Bass
Treble
Balance
Earphone Vol
Digital Audio Output
MTS
To Move
30
30
30
30
OK Exit
(The above menu is shown as an example.
It is in TV mode and the signal is analog)
Choice/Range/Remarks
User/News/Music/Movie
Note SOUND MODE: you may directly press
buttonontheremotecontroltoselect.
4:
stronger
3
: weaker
4:
stronger
3
: weaker
4
:
Balance
Adjusts volume balance (left and right volumes).
Higher volume from right speaker.
Higher volume from left speaker.
:
3
4:
Earphone Vol
Digital Audio
Output
Adjusts earphone volume.
Selects audio output mode from SPDIF.
AC-3 in AC-3 out
RAW
:
PCM in PCM out
AC-3 in PCM out
PCM:
PCM in PCM out
3
The choice may be different in
MTS
(In analog
signal only)
Audio Language
(In digital
signal only)
Selects MTS (multi-channel TV sound) mode:
Mono, Stereo and SAP (Second Audio
Program).
Other languages may be available if a digital
signal is provided by the broadcastingstation.
different situation
Note: you may directly press
button on the remote control to select.
The choice may be different in
different situation
Notes:.the menu items may be different when the unit works in different mode
22
stronger
: weaker
RAW/PCM
STEREO
Page 25

Time Set and Sleep Timer
Auto Clock Setup
- The time is set automatically from a digital channel signal.
- The digital channel signal includes information for the current time provided by the broadcasting station.
- Set the clock manually, if the current time is set incorrectly by the auto clock function.
Press to display the menu main page.MENU
1
Press repeatedly to select menu ress or to
2
access the submenu.
Highlight item pTime Set , 4
3
Highlight and then use or to select .Time Set Mode OK Auto
4
Highlight and then use or to select your viewing
5
area time zone:
Mountain
Press button to return to TV viewing or press button
6
to return to the previous menu.
Time Zone OK
.
EXIT MENU
menu ress or to access theOK Time
4
4
Pacific, Alaska, Hawaii, Eastern, Central,
OK56 4or pFeature ,
Video
Audio
Setup
Feature
Time Set Menu
Time Set Mode
Time Zone
Year
Date
Time
Source
Time Set
Sleep Timer
Parental Control
Closed Caption Options
CC when Mute
Menu Language
To Move
OK Exit
To Change
To Move
To Select
TV
Off
Off
English
To Exit
Auto
Pacific
2004
Aug 22
12:00 AM
To ExitOK Exit
Manual Clock Setup
- If current time setting is wrong, reset the clock manually.
Navigate to the sub-menu, highlight
1
then use or to selectOK Manual
56
Press
2
selected,
Press button to return to TV viewing or press button to
3
return to the previous menu.
or to select either the Year, Date, or Time option. Once
EXIT MENU
Feature Time Set Mode
4
use or / to set theyear, date, andtime options.OK
34
.
and
Note:,.if you power off the TV set the clock will be reset
Sleep timer
Sleep timer lets you select the amount of time before your TV turns itself
off automatically.
Navigate to the sub-menu, highlight
use or to select the amount of timeOK
select .
Off
Note: you may directly press button on the remote control to
set sleep timer.
Feature Sleep Timer
4
. To turn off sleep timer,
SLEEP
and then
Time Set Menu
Time Set Mode
Time Zone
Year
Date
Time
To Change
Video
Audio
Setup
Feature
To Move
Source
Time Set
Sleep Timer
Parental Control
Closed Caption Options
CC when Mute
Menu Language
To Move
OK Exit
To Select
Manual
Pacific
2004
Aug 22
12:00 AM
To ExitOK Exit
TV
Off
Off
English
To Exit
23
Page 26

Viewing Closed Captions
The unit decodes and displays the closed captions that are broadcast with certain TV shows. These captions are
usually subtitles for the hearing impaired or foreign language translations. All VCRs record the closed caption signal
from television programs, so home-recorded video tapes also provide closed captions. Most prerecorded
commercial video tapes provide closed captions as well. Check for the closed caption symbol in your television
schedule and on the tape’s packaging: .
Note:
The Caption featuredoes not work withComponent, VGA,HDMI.
Not all theprograms and videos willoffer closed captioning.Please look for the symbol to ensurethat captions will beshown.
Analog Broadcasting System Captions
- Select a caption mode fordisplaying captioning information ifprovided on a program.
-Analog caption displays informationon the screen usuallythe program’s dialog.
Press CAPTION
button on the remote control to select caption mode: CC1, CC2, CC3, CC4, TEXT1,TEXT2, TEXT3
orTEXT4.
To turn off closed captioning, press repeatedly to select .
CAPTION Off
The Closed Caption broadcasts can be viewed in two modes: CAPTION and TEXT. For each mode, four channels
are available.
The [CAPTION] mode shows subscripts of dialogues and commentaries of TV dramas and news programs while
allowing a clear view of thepicture.
The [TEXT] mode displays various information over the picture (such as TV program schedule, weather forecast,
etc.) that is independent of theTV programs.
Digital Broadcasting System Captions
- You mayuse button on the remote control toselect caption mode.CAPTION
® You can customize the digital closed captions that
appear on your screen.
Navigate to the sub-menu, highlight
1
Options 4
Caption
Highlight and then use or to selectStyle OK Custom.4
2
Press to select your desired item and then use or to
3
customize the Size, Font, etc. to your preference. A preview
sample menu
and then use
sub-menu.
56 4or
is provided at the bottom of the screen for you to see
the effect.
¨
Size
: Set the size the wordswill appear in.
¨
Font
: Select a typeface for thewords.
¨
Text Color
¨
Text Opacity
¨
Background Color
¨
Background Opacity
¨
Edge Effect
¨
Edge Color
Feature Closed Caption
OK Digital Closed
or to open the
,OK
: Choose a color for thetext.
: Specify the opacity for thetext color.
: Select a background color.
: Select the opacity for thebackground color.
: Select an edge effect.
: Select a color for theedges.
Video
Audio
Setup
Feature
Digital Closed Caption
Style
Size
Font
Text Color
Text Opacity
Background Color
Background Opacity
Edge Effect
Edge Color
Source
Time Set
Sleep Timer
Parental Control
Closed Caption Options
CC when Mute
Menu Language
To Move
OK Exit
CLOSED CAPTION SAMPLE
To Move
To Select
TV
Off
Off
English
To Select
Custom
Normal
Default
White
Solid
Black
Solid
None
Red
To ExitOK Exit
To Exit
Setting CC When Mute
Navigate to the sub-menu, highlightFeature CC whenMute.
1
Press 4or to select or .
2
When is selected, the unit will automatically display closed
caption when you mute the sound.
OK On Off
On
24
Video
Audio
Setup
Feature
Source
Time Set
Sleep Timer
Parental Control
Closed Caption Options
CC when Mute
Menu Language
To Move
OK Exit
To Select
TV
Off
On
English
To Exit
Page 27

Setting Parental Control
Parental Control
This function allows TV programs to be restricted and TV usage to be controlled based on FCC data. It prevents
children from watching violent or sexualscenes that may beharmful.
Restriction of TV programs includes two ratings that contain information about the program: the MPAA rating and
the TV Parental Guidelines. The MPAA rating is restricted by age. TV Parental Guidelines are restricted by age
and content.
Since a TV program may use either the MPAA rating or the TV Guidelines, both should be adjusted for complete
control.
[1] Movie Rating (MPAA)
Rating
age
based
G
PG
PG-13
R
NC-17
X
NONE
GENERALAUDIENCES. Allages admitted.
PARENTAL GUIDANCESUGGESTED. Some material may notbe suitablefor children.
PARENTAL STRONGLYCAUTIONED. Some materialmay beinappropriate for children under 13.
RESTRICTED. Under 17 requiresaccompanying parent or adult guardian.
NO ONE 17AND UNDERADMITTED.
X Rating is anolder rating that is unifiedwith NC-17 but may beencoded in the data ofolder movies.
NOT RATED.
Note:
The Movie rating is only age-based.
Example 1:
“PG-13” in the age-based rating is blocked, this will automatically block
the higher ratings “R”, “NC-17”, “X” also.
Example 2:
“R” in the age-based rating is blocked, this will automatically block the
higher rating “NC-17”, “X” also.
Parental Control Set Menu
MPAA TV RATING
NONE NONE
G TV-Y
PG TV-Y7
PG-13 TV-G
R TV-PG
NC-17 TV-14
X TV-MA
To Move
Parental Control Set Menu
MPAA TV RATING
NONE NONE
G TV-Y
PG TV-Y7
PG-13 TV-G
R TV-PG
NC-17 TV-14
X TV-MA
To Move
ALL FV
To Select
ALL FV
To Select
L
S
VD
To ExitOK Exit
L
S
VD
To ExitOK Exit
25
Page 28

[2] TV Rating
Setting Parental Control(continued)
Rating
content based
S
LD
FVV
TV-Y(All children)
TV-Y7(Direct toOlder Children)
age
based
TV-G(GeneralAudience)
TV-PG(Parental GuidanceSuggested)
TV-14(Parents StronglyCautioned)
TV-MA(Mature AudienceOnly)
Content Rating can be set but this Rating isnot
normally broadcast by TV Station.
Content Rating can be set.
Sexually Suggestive Dialog
D:
V:
Violence
S:
Sexual Situation
L:
Adult Language
FV:
Fantasy Violence
Note:
Age-based ratings can be modified by the content-based ratings but only in the combinations indicated by an in
the table above.
Choosing lower age-based rating blocks the higher age-based ratings regardless of content ratings settings.
Example 1:
Parental Control Set Menu
When TV-Y in the age-based rating is set to BLOCK, this will
automatically block the higher rating: TV-Y7.
MPAA TV RATING
NONE NONE
G TV-Y
PG TV-Y7
PG-13 TV-G
R TV-PG
NC-17 TV-14
X TV-MA
To Move
ALL FV
To Select
L
S
VD
To ExitOK Exit
Example 2:
When TV-G in the age-based rating is set to BLOCK, this will
automatically block the higher ratings: TV-PG,TV-14,TV-MA.
Parental Control Set Menu
MPAA TV RATING
NONE NONE
G TV-Y
PG TV-Y7
PG-13 TV-G
R TV-PG
NC-17 TV-14
X TV-MA
To Move
ALL FV
To Select
L
S
VD
To ExitOK Exit
26
Page 29

Setting Parental Control(continued)
Password Setup
To use the Parental Control function, you first need to set your
password.
Navigate to the sub-menu, highlight
1
and then use
Highlight and then use or to access.Password Change OK 4
2
Input old password (4-digit, the preset password is 0000), then
3
input a new password and then confirm again. Now your new
Feature Parental Control
OK Parental Control Menuor to access .
4
password has been created successfully..Be sure to write
down your password and retain it for future use
MPAA Rating Setup
Video
Audio
Setup
Feature
Parental Control Menu
Password Change
Parental Control Set
Source
Time Set
Sleep Timer
Parental Control
Closed Caption Options
CC when Mute
Menu Language
To Move
To Move
To Select
Enter Old Password
Enter New Password
Confirm New Password
TV
Off
Off
English
OK Exit
To Select
To ExitOK Exit
To Exit
Navigate to the sub-menu, highlight and
1
then use
Highlight and then use or to access.Parental Control Set OK 4
2
Input your password correctly to access.Parental Control Set
3
Menu
Within the menu use to navigate use to block
4
or unblock the rating
OK Parental Control Menuor to access .
Feature Parental Control
4
,,
,, OK563 4or
.
When “PG-13” in the age-based rating is blocked, this will
automatically block the higher ratings “R”, “NC-17”, “X” also.
TV Rating Setup
Navigate to the sub-menu, highlight and
1
then use
Highlight and then use or to access.Parental Control Set OK 4
2
Input your password correctly to access.Parental Control Set
3
Menu
Within the menu use to navigate use to block
4
or unblock the rating
OK Parental Control Menuor to access .
Feature Parental Control
4
,,
,, OK563 4or
.
Parental Control Menu
Password Change
Parental Control Set
To Move
To Select
Enter Password
Parental Control Set Menu
MPAA TV RATING
NONE NONE
GTV-Y
PG TV-Y7
PG-13 TV-G
R TV-PG
NC-17 TV-14
XTV-MA
To Move
ALL FV
To Select
To ExitOK Exit
L
S
VD
To ExitOK Exit
When TV-Y in the age-based rating is set to BLOCK, this will automatically blockthe higher rating: TV-Y7.
When TV-G in the age-based rating is set to BLOCK, this will automatically block the higher ratings: TV-PG,TV14,TV-MA.
27
Page 30

Screen Setup for VGA PC Mode Component Mode() /
- Be sure to select the correct source (VGA or Component) before operation.
Customizing the picture
Navigate to the sub-menuVideo .
1
Within the menu, use to
2
navigate
Press or button to confirm
or adjust.
OK ,
enter sub-menu
563 4
4
or toggle the
,,
settings of the selected menu item.
Press button to exit.EXIT
3
Option
Picture Mode
Contrast
Selects a desired picture mode.
Adjusts image contrast.
Adjusts screen brightness for easier
Brightness
viewing of dark picture such as night
scenes and black hair.
Color
Sharpness
Adjusts color saturation.
Adjusts image sharpness and displays a
sharp image.
Picture Mode
Contrast
Video
or
Feature
Brightness
Color
Audio
Sharpness
Aspect Ratio
Setup
Advanced Video Menu
VGA Set
50
50
50
0
To Move
User
Wide
OK Exit
To Select
To Exit
Feature
Picture Mode
Contrast
Video
Brightness
Color
Audio
Sharpness
Aspect Ratio
Setup
Advanced Video Menu
Component Set
50
50
50
0
To Move
User
Wide
OK Exit
To Select
To Exit
()Video menu in modeVGA ()Video menu in modeComponent
Function Choice/remarks
User/Nature/Soft/Bright
Note PICTURE
: you may directly press
MODE
buttonontheremotecontroltoselect.
4: stronger
3: weaker
4: lighter
3: darker
4: stronger
3: weaker
4: sharper
3: softer
Aspect Ratio
Noise Reduction--Spatial
Selects screen aspect ratio.
Reduces noise in the picture
Noise Reduction--Speckle
Noise Reduction--Temporal
Tint
commonly called snow,.
Adjusts tint for image.
Selects one of three automatic color
Color
Temperature
adjustments Sets to warm to enhance
hotter colors such as red or set to cool
to see less intense colors with more blue
Advanced Video Menu
3D Y C/
Selects 3D comb filter on/off, normally
please select On.
Adjusts the horizontal position of the
H-Pos
for PC mode
()
for Component mode
()
V-Pos
Clock
image.
Adjusts the vertical position of the image.
Adjusts the sample frequency.
Wide/Cinema/Normal/Zoom
Note ASPECT:you maydirectly press button
ontheremotecontroltoselect.
On/Off
4:
greenish
3
: purplish
.
,
Cool/Warm/Normal
.
On/Off
4: rightward
3: leftward
4: upward
3 downward:
VGA Set
Component Set
Phase
Setting
Improves the focussing of stable image.
Selects and activates Preset to reset the adjusted values to original factory
values.
28
Page 31

Troubleshooting
Before calling for repair service, check the following items for possible remedies to an encountered
symptom.
Symptoms
No power
No picture
Good picturebut no sound
Good soundbut poor color
Poor picture
Horizontal dottedline
Remote operationfails.
Check item
=
Checkthatthe ACpowercordispluggedintothemainssocket.
=
Unplug the power cord, wait for 60 seconds. Then re-insert plug into the mains
socketandturnontheunitagain.
=
Check videoconnections at therear of the unit to see ifit is properlyconnected to
the unit.
=
Adjust thecontrast and brightnesssettings.
=
Select acorrect input.
=
Is anon-compatible signal beinginput?
=
Increase theVOLUME.
=
Check thatthe unit isnot muted.
=
Adjust thecontrast, color andbrightness settings.
=
Sometimes, poor picture quality occurs when an activated S-VHS camera or
camcorderisconnectedwhileanotheractivatedperipheralisconnected.Inthiscase,
switchoffoneoftheperipherals.
=
Checkwhethertheroomistoobright.
=
This maybe caused byelectrical interference (e.g. hairdryer, nearby neon lights,
etc.).
=
Turnoff the equipment.
=
This remotecontrol is auniversal remote control. If the remote controldoes not
work correctlywhen operating themonitor, trypressing the TVbutton.
=
Check whetherthe batteries areworking. Replace if necessary.
=
Clean theremote control sensorlens on the unit.
=
Do notuse the remotecontrol under strong or fluorescent lighting.
=
The batteriesshould be insertedwith polarity (+, -) aligned.
Snowy pictureand noise
No stableor not
=
Check theA/V connections.
=
Check ifyou have selectedthe correct VGAmode inyour PC.
synchronized VGApicture
No outputfrom one
=
Adjust Balancein the SOUNDmenu.
of thespeakers
=
Control buttonsdo not work.
Unplugthepowercord,waitforafewseconds.Thenre-plugthepowercordandturn
ontheunitagain.
+ Donotuseinhotandcoldrooms(locations)
•Whentheunitisusedinrooms(locations)withlowtemperature,thepicturemayleavetrailsorappearslightlydelayed.Thisisnot
amalfunction,andtheunitwillrecoverwhenthetemperaturereturnstonormal.
•Donotleavetheunitinahotorcoldlocation.Also,donotleavetheunitinalocationexposedtodirectsunlightornearaheater,as
thismaycausethecabinettodeformandthePDPpaneltomalfunction.
(Storagetemperature: 0°Cto+50°C Working temperature:5°Cto+40°C)
Note:
If your problem is not solved, turn your unit off and then on again.
Never attempt to repair a PDP TV yourself.
29
Page 32

Plasma Display panel
Troubleshooting / Care and Maintenance
Symptoms
Somepartsofthescreendonotlightup.
After-imagesappear
Snapping sounds may be heard from the
displayunit.
The plasma display panel is manufactured using an extremely high level of precision
technology, however, sometimes some parts of the screen may be missing picture
elementsorhaveluminousspots.Thisisnotamalfunction.
Donot allowa stillpicture to bedisplayed for an extended period, as this can cause a
permanentafter-imagetoremainonthePlasmaDisplay.
Examples of still pictures include logos, video games, computer images, teletext and
imagesdisplayedin4:3mode.
Note:
Thepermanentafter-imageon the PlasmaDisplay resultingfrom fixedimage use isnot
anoperatingdefect.
Thisproductisnotdesignedtodisplayfixedimagesforextendedperiodsoftime.
This sound is produced when the cabinet expands or contracts due to variations in
temperatureandisnotamalfunction.
Check item
Cleaning and Maintenance
The front of the display panel has been specially treated. Wipe the panel surface gently using only a
cleaningclothorasoft,lint-freecloth.
R
Ifthesurfaceisparticularlydirty,soakasoft,lint-freeclothinaweakdetergentsolutionandthenwringtheclothto
removeexcessliquid.Usethisclothtowipethesurfaceofthedisplaypanel,thenwipeitevenlywithadrycloth,of
thesametype,untilthesurfaceisdry.
R
Donotscratchorhitthesurfaceofthepanelwithfingernailsorotherhardobjects.Furthermore,avoidcontactwith
volatile substances such as insect sprays, solvents and thinner, otherwise the quality of the surface may be
adverselyaffected.
Ifthecabinetbecomesdirty,wipeitwithasoft,drycloth.
R
Ifthecabinetisparticularlydirty,soaktheclothinaweakdetergentsolutionandthenwring theclothdry.Usethis
clothtowipethecabinet,andthenwipeitdrywithadrycloth.
R
DonotallowanydetergenttocomeintodirectcontactwiththesurfaceofthePlasmaDisplay.
R
Ifwaterdropletsgetinsidetheunit,operatingproblemsmayresult.
R
Avoidcontactwithvolatilesubstancessuch as insect sprays, solvents and thinner,otherwisethequalityof the
cabinetsurfacemaybeadverselyaffectedorthecoatingmaypeeloff.Furthermore,donotleaveitforlongperiods
incontactwitharticlesmadefromrubberorPVC.
30
Page 33

Specifications
86 lb()
C
CADTV
1 125~
TV system:
Unit Dimensions (WxHxD) (inch) 49x 28.8 x 11.3
1 135~
DTV
269~
1247
1050
777
645
733
(: )Unit mm
79
110
287
31
Page 34

Programming your Remote Control
Introduction
Your remote lets you control four devices with one easy-to-use, compact unit. After installing batteries, you can program the remote to
control your Universal TV, VCR or DVD, Cable or Satellite Receivers, Amplifier or Tuner, and Auxiliary devices. To do so, follow the
instructions in “Programming a Device”. For best results, please read and follow all the remaining instructions. Keep this guide for future
reference.
A Quick Look at Programming a Device
To control VCR or DVD, Cable or Satellite Receivers, Amplifier or Tuner, and Auxiliary devices, follow these steps. Before proceeding, find
the codes for the devices you want to program in “Manufacturer's Codes” in pages 35-47 and write them down or highlight them.
To program a DVD Player, TV/DVD Combo, TV/VCR/DVD Combo, portable DVD player, or mobile DVD player, use the key.
NOTE: DVD
1. Turn on the device (for example, DVD player) and, if needed, load media (for example, a DVD).
2. Press a device key ( or ).
3. Press and hold until the red LED blinks twice; then release.
4. Enter the first five-digit code for your device. The LED blinks once as each digit is entered. If the code is correct, the LED blinks
twice.
If the LED does not blink twice, repeat steps 2 to 4 and try entering the code again.
NOTE:
?
5. Aim the remote at the device and press . The device should turn off. If it does not, repeat steps 35, trying each code for
your brand until you find one that works. If you cannot find a code that works, see “Searching for Your Code”.
6. Repeat steps 15 for the other devices you want to control. For future reference, write down each working device code below:
AUX
CBL
CD
DVD
SAT
TNR
VCR
7. Press set to save and exit
VCR/DVD, CBL/ SAT, AUX
SET
Power
Code:
Code:
Code:
Code:
Code:
Code:
Code:
Searching for your Code
If your device does not respond to the remote after trying all codes listed for your brand, or if your brand is not listed, try searching for your
code:
1. Press a device key once.
2. Press and hold until the red LED blinks twice; then release.
3. Enter , then the device group number (0= Cable, 1= TV, 2= VCR, 3= Audio). The LED blinks twice.
4. Aim the remote at the device and press . The remote sends IR codes from its library to the selected device, starting with
5. If the device does not respond, press . The remote will try the next code. Continue until the device responds.
6. To search for other device codes, repeat steps 1 to 5.
7. Press to save and exit.
9-9-1
the most popular code first. If the device responds, go to step 7.
NOTE: CH-
?
SET
SET
Power
CH+
Press to try the previous code.
Checking the Codes
If you have set up the remote using the procedure in “Searching for Your Code”, you may need to find out which four-digit code is operating
your equipment.
For example, to find out which code is assigned to your TV:
1. Press once.
2. Press and hold until the red LED blinks twice; then release.
3. Enter . The LED blinks twice.
4. To view the code for the first digit, press . Count the LED blinks (for example, three blinks = 3), and write down the number in the
5. Repeat step 4 for the four remaining digits, using for the second digit, for the third digit, for the fourth digit, and for the fifth
6. To check for other device codes, repeat steps 15, substituting the device key for .
TV
9-9-0
appropriate code listing in step 8 under “Programming a Device”.
NOTE: 0
?
digit.
SET
1
If a code digit is , the LED does not blink.
234 5
TV
32
Page 35

Changing Volume Lock
The remote comes preset to allow independent volume control of each selected device (Global Volume Unlock). However, you may
change the Volume Lock setting to Global Volume Lock so that one device's volume will control volume in all other modes. After that, you
can perform Individual Volume Unlock on a selected device to set its volume control for independent operation or Global Volume Unlock to
remove all volume locking.
Locking Volume Control to One Mode (Global Volume Lock)
1. Press and hold until the red LED blinks twice; then release.
2. Enter and then press the mode key for the device you want to control volume (for example, ). The LED blinks twice.
9-9-3 TV
Now when you press , , or , the selected device (for example, ) will control the volume regardless of the
current mode.
SET
VOL+ VOL- Mute TV
Unlocking All Volume Control (Restoring Global Unlock)
1. Press and hold until the red LED blinks twice; then release.
2. Enter and then press . The LED blinks four times.
Volume is now independently controlled for all programmed devices.
9-9-3 VOL+
SET
Unlocking a Single Device's Volume Control
1. Press a device key ( or ).
2. Press and hold until the red LED blinks twice; then release.
3. Enter and then press . The LED blinks four times.
Volume is now independently controlled for the selected devices.
9-9-3 VOL-
TV, VCR/DVD, CBL/ SAT, AUX
SET
Troubleshooting
PROBLEM:
SOLUTION:
PROBLEM:
SOLUTION:
PROBLEM:
SOLUTION:
PROBLEM:
SOLUTION:
LED does not blink when you press a key.
Replace battery with one new 3.3 V 2032 Lithium battery.
LED blinks when you press a key, but device does not respond.
Make sure the remote is aimed at your device and is not more than 15 feet away.
LED blinks one long blink.
An entry error has occurred (for example, wrong key). Try entry sequence again.
Remote does not control devices or commands are not working properly.
Try all listed codes for the device. Make sure the device operates with an infrared remote control.
PROBLEM: CH+ CH- LAST
SOLUTION:
PROBLEM:
SOLUTION:
PROBLEM:
SOLUTION: Enter Enter
channel number.
, , and do not work for your RCA TV.
Due to RCA design from 1983 to 1987, only the original remote control will operate these functions.
No volume on a device.
See “Changing Volume Lock”.
Channels do not change properly.
If the original remote control required you to press to change channels, press on this remote after entering the
33
Page 36

MANUFACTURER'S CODES
Set Codes for Audio Amplifiers
Bose 30674
GE 30078
JVC 30331
Marantz 30321
Nakamichi 30321
NEC 30264
Optimus 30395
Realistic 30395
Sansui 30321
Shure 30264
Sony 30689
Soundesign 30078
Victor 30331
Wards 30078
Yamaha 30354, 30133
Set Codes for Audio Amp/Tuners
ADC 30531
Aiwa 31405, 31243, 30121
Anam 31609, 31074
Audiotronic 31189
Bose 31229
Capetronic 30531
Carver 31189
Coby 31263
Denon 31360, 31142, 30904
Fonmix 31360
Glory Horse 31263
Harman/Kardon 30110
Hitachi 31273
Inkel 30027
Integra 30135
JBL 30110
JVC 30074, 31263
Kenwood 31313, 31570, 30027
KLH 31428
Magnavox 31189, 31269, 30531
Marantz 31189, 31269, 30039
MCS 30039
Onkyo 30842, 30135
Optimus 31023, 30670, 30531, 31074
Panasonic 31518, 30039
Philips 31189, 31269
Pioneer 31023, 30150, 30014, 30630, 30531
Proscan 31254
Qisheng 31609
Quasar 30039
RadioShack 31263
RCA 31023, 31609, 31254, 30531, 31074
Sharper Image 31263
Silsonic 30176
Sony 31258, 31759
Soundesign 30670
Stereophonics 31023
Sunfire 31313
Teac 31074, 31267
Technics 31308, 31518, 30039
Thorens 31189
Victor 30074
Wards 30014
Yamaha 30176, 31276, 31176
34
Page 37

Set Codes for Cable Converters
ABC 00003, 00008, 00014
Americast 00899
Bell & Howell 00014
Bell South 00899
Clearmaster 00883
ClearMax 00883
Coolmax 00883
Daeryung 01877, 00877, 00477, 00008
Digi 00637
Director 00476
Dumont 00637
Gehua 00476
General Instrument 00476, 00810, 00276, 00003, 00014
GoldStar 00144
Hamlin 00009, 00273
Hitachi 00014
Jerrold 00476, 00810, 00276, 00003, 00012, 00014
KNC 00008
LG 00144
Memorex 00000
Motorola 00476, 00810, 00276, 01254, 01376
MultiVision 00012
Pace 01877, 00237
Panasonic 00000, 00008, 00107
Panther 00637
Paragon 00000
Philips 00317, 01305
Pioneer 01877, 00877, 00144, 00533
Pulsar 00000
Quasar 00000
RadioShack 00883
Regal 00279, 00273
Runco 00000
Samsung 00000, 00144
Scientific Atlanta 01877, 00877, 00477, 00008
Sony 01006
Starcom 00003, 00014
Supercable 00276
Supermax 00883
Tocom 00012
Torx 00003
Toshiba 00000
Trans PX 00276
Tristar 00883
TS 00003
V2 00883
Viewmaster 00883
Vision 00883
Vortex View 00883
Zenith 00000, 00525, 00899
Set Codes for CD Players
Aiwa 30157
Burmester 30420
California Audio Labs 30029
Carver 30157, 30179
Denon 30873
DKK 30000
DMX Electronics 30157
Dynamic Bass 30179
Fisher 30179
Garrard 30420
Genexxa 30032
Harman/Kardon 30157, 30173
35
Page 38

Set Codes for Cable Converters
ABC 00003, 00008, 00014
Americast 00899
Bell & Howell 00014
Bell South 00899
Clearmaster 00883
ClearMax 00883
Coolmax 00883
Daeryung 01877, 00877, 00477, 00008
Digi 00637
Director 00476
Dumont 00637
Gehua 00476
General Instrument 00476, 00810, 00276, 00003, 00014
GoldStar 00144
Hamlin 00009, 00273
Hitachi 00014
Jerrold 00476, 00810, 00276, 00003, 00012, 00014
KNC 00008
LG 00144
Memorex 00000
Motorola 00476, 00810, 00276, 01254, 01376
MultiVision 00012
Pace 01877, 00237
Panasonic 00000, 00008, 00107
Panther 00637
Paragon 00000
Philips 00317, 01305
Pioneer 01877, 00877, 00144, 00533
Pulsar 00000
Quasar 00000
RadioShack 00883
Regal 00279, 00273
Runco 00000
Samsung 00000, 00144
Scientific Atlanta 01877, 00877, 00477, 00008
Sony 01006
Starcom 00003, 00014
Supercable 00276
Supermax 00883
Tocom 00012
Torx 00003
Toshiba 00000
Trans PX 00276
Tristar 00883
TS 00003
V2 00883
Viewmaster 00883
Vision 00883
Vortex View 00883
Zenith 00000, 00525, 00899
Set Codes for CD Players
Aiwa 30157
Burmester 30420
California Audio Labs 30029
Carver 30157, 30179
Denon 30873
DKK 30000
DMX Electronics 30157
Dynamic Bass 30179
Fisher 30179
Garrard 30420
Genexxa 30032
Harman/Kardon 30157, 30173
36
Page 39

Hitachi 30032
Integra 30101
JVC 30072
Kenwood 30826, 30626, 30028, 30037, 30036, 30190
Krell 30157
Linn 30157
Magnavox 30157
Marantz 30626, 30029, 30157
MCS 30029
Miro 30000
Mission 30157
MTC 30420
NSM 30157
Onkyo 30868, 30101
Optimus 31063, 30000, 30032, 30037, 30420, 30179, 31075, 30145
Panasonic 30029
Parasound 30420
Philips 30626, 30157
Pioneer 31063, 31062, 30032
Polk Audio 30157
Proton 30157
QED 30157
Quad 30157
Quasar 30029
RadioShack 31075
RCA 31062, 30032, 30420, 30179, 30053
Realistic 30420, 30179
Rotel 30157, 30420
SAE 30157
Sansui 30157
Sanyo 30179
SAST 30157
Sharp 30861, 30037
Silsonic 30888, 30036
Sonic Frontiers 30157
Sony 30490, 30000, 30100
Soundesign 30145
TAG McLaren 30157
Tascam 30420
Teac 30420
Technics 30029
Victor 30072
Wards 30157, 30053
Yamaha 30888, 30036
Zonda 30157
Set Codes for DVD Players
Aiwa 20641, 21912
Akai 20770
Allegro 20869
Apex Digital 20672, 20717, 20797, 21061, 20796, 21056, 21937, 20794, 21020, 21915
Blaupunkt 20717
Blue Parade 20571
Broksonic 20695
Changhong 20627, 21061
CineVision 20869
Coby 21086
Curtis Mathes 21087
CyberHome 21024, 21023, 21129, 20816, 21117
Daewoo 20833, 21172, 20869
Denon 20490
DVD2000 20521
Emerson 20591, 20675
37
Page 40

Enterprise 20591
Fisher 21919
Funai 20675
Gateway 21158, 21073
GE 20522, 20717
Go Video 20744, 20833, 21099, 20783, 21075, 20869, 21730
Greenhill 20717
Harman/Kardon 20582, 20702
Hitachi 20573, 20664, 21919
Hiteker 20672
Initial 20717
Integra 20627, 21924
JBL 20702
JVC 20558, 20623, 20867
Kenwood 20490, 20534
KLH 20717, 21020, 21149
Koss 20651, 21980
Lasonic 20798
LG 20591, 20869, 20801
Liquid Video 21980
Lite-On 21158, 21058
Loewe 20511
Magnavox 20503, 20539, 21976, 21914, 20675
Marantz 20539
Memorex 20695
Microsoft 20522
Mintek 20717
Mitsubishi 21521, 20521
Nesa 20717
Norcent 21003
Onkyo 20503, 20627, 21924, 20792
Oritron 20651, 21980
Panasonic 20490, 21762, 21990
Philips 20503, 20539, 20646, 21914
Pioneer 20525, 20571
Polaroid 21086, 21061
Polk Audio 20539
Portland 20770
Proscan 20522
Qwestar 20651
RCA 20522, 20571, 20717, 20822
Rio 20869
Rotel 20623
Sampo 20752, 20698
Samsung 20490, 20573, 21932, 21075, 20820
Sansui 20695
Sanyo 20695
Sharp 20630, 20752
Sharper Image 21117
Sherwood 20770
Shinco 20717
Shinsonic 20533
Sonic Blue 20869, 21099
Sony 20533, 20864, 21033, 21904, 21903
SVA 20717
Sylvania 20675
Symphonic 20675
Teac 20717, 21984, 20809
Technics 20490
Theta Digital 20571
Toshiba 20503, 20695
Urban Concepts 20503
Xbox 20522
Yamaha 20490, 20539, 20545
Zenith 20503, 20591, 20869
38
Page 41

Set Codes for Satellite Receivers
AlphaStar 00772
Chaparral 00216
Crossdigital 01109
DirecTV 00392, 00566, 00639, 01142, 00247, 00749, 01749, 00724, 00819, 01856, 01076, 01109, 00099, 01392,
Dish Network System 01005, 00775, 01505
Dishpro 01005, 00775, 01505
Echostar 01005, 00775, 01505
Expressvu 00775
GE 00566
General Instrument 00869
GOI 00775
Goodmans 01246
Hisense 01535
Hitachi 00819, 00222, 01250
HTS 00775
Hughes Network Systems 01142, 00749, 01749, 01442
I-Lo 01535
JVC 00775
LG 01414, 01226
Magnavox 00724, 00722
Memorex 00724
Mitsubishi 00749
Motorola 00869
NEC 01270
Next Level 00869
Panasonic 00247, 00701
Paysat 00724
Philips 01142, 00749, 01749, 00724, 01076, 00722, 00099, 01442
Proscan 00392, 00566
Proton 01535
RadioShack 00869
RCA 00392, 00566, 00855, 00143, 01392
Samsung 01276, 01109, 01108
Sanyo 01219
SKY 00856
Sony 00639, 01640
Star Choice 00869
Tivo 01142, 01442
Toshiba 00749, 01749, 00790, 01285
UltimateTV 01640, 01392
Uniden 00724, 00722
US Digital 01535
USDTV 01535
Voom 00869
Zenith 00856, 01856
01640, 01442, 01414, 01108
Set Codes for TVs
Addison 10092
Admiral 10093, 10463
Advent 10761, 10842
Aiko 10092
Aiwa 11914
Akai 10812, 10702, 10030, 10672, 11903
Albatron 10700, 10843
America Action 10180
Anam 10250, 10180, 10700
Anam National 10250, 10650
Anhua 10051
AOC 10451, 10093, 10180, 10060, 10030, 10178, 10092
Apex Digital 10748, 10765, 10879, 10767, 11943
Audiovox 10451, 10180, 10875, 10092, 10623
39
Page 42

Baile 10661
Beijing 10812, 10661
Bell & Howell 10154
BenQ 11032
Bradford 10180
Broksonic 10236, 10463, 11911, 11938, 11905, 11935, 11929
Cailing 10748
Candle 10030
Carnivale 10030
Carver 10054
Celebrity 10000
Celera 10765
Changcheng 10051, 10661
Changhong 10156, 10765, 11156, 10767
Ching Tai 10092
Chun Yun 10000, 10180, 10700, 10092, 10843
Chung Hsin 10180, 10053
Cinema 10672
Citizen 10180
Commercial Solutions 11447, 10047
Conrowa 10156, 10145, 11156
Contec 10180
Craig 10180
Crosley 10054
Crown 10180
Curtis Mathes 10047, 10054, 10154, 10451, 10093, 10060, 10702, 10030, 10145, 10166
CXC 10180
Daewoo 10154, 10451, 10180, 10030, 10178, 10672, 11928, 10092, 10661, 11909, 10623, 10700
Dayu 10661
Dell 11080
Denon 10145
Dumont 10017
Durabrand 10463, 10180, 10178, 10171, 11034
Electroband 10000
Emerson 10154, 10236, 10463, 10180, 10178, 10171, 11944, 11909, 11929, 11905, 11928, 10623, 11911
Envision 10030
Ether 10030
Firstar 10236
Fisher 10154
Fortress 10093
Fujitsu 10809, 10853
Funai 10180, 10171, 11904
Furi 10145
Futuretech 10180
Gateway 11756, 11755
GE 11447, 10047, 11454, 10051, 10451, 10180, 10030, 10178, 11917, 10092, 11907, 11922
Gibralter 10017, 10030
GoldStar 10154, 10030, 10178, 11926
Grunpy 10180
Haier 11034
Hallmark 10178
Hankook 10180, 10030, 10178
Harley Davidson 11904
Harman/Kardon 10054
Harvard 10180
Havermy 10093
Helios 10865
Hello Kitty 10451
Hisense 10156, 10748, 10145, 11156
Hitachi 10156, 10030, 10178, 11145, 10145, 10092, 11904, 11156
Hongmei 10093
Huafa 10145
Huari 10145
Huodateji 10051
Imperial Crown 10661
40
Page 43

Infinity 10054
Inteq 10017
JBL 10054
JCB 10000
Jean 10156, 10051, 10236, 10092
Jensen 10761
Jiahua 10051
Jinfeng 10051
Jinxing 10054, 10156, 10145
JVC 10053, 11923, 11253
Kangli 10661
KEC 10180
Kenwood 10030
KLH 10765, 10767
Kolin 10180, 10150, 10053
KTV 10180, 10030
Kunlun 10051, 10661
LG 10060, 10030, 10178, 10856, 10700, 10025
Lloyd's 11904
LXI 10047, 10054, 10154, 10156, 10178
Magnasonic 11928, 11913
Magnavox 11454, 10054, 10030, 10706, 11931, 11254, 11913, 11904, 11944
Magnin 11907
Marantz 10054, 10030, 10704
Matsushita 10250, 10650
Maxent 11755
Megapower 10700
Megatron 10178, 10145
Memorex 10154, 10463, 10150, 10178, 11911, 11926, 11924, 11920, 11927
MGA 10150, 10030, 10178, 11907
Midland 10047, 10017, 10051
Mitsubishi 10154, 10250, 10093, 10236, 10180, 11250, 10150, 10030, 10178, 11917, 10836
Monivision 10843, 10700
Motorola 10093
MTC 10060, 10030
Mudan 10051
Multitech 10180
NAD 10156, 10178, 10866
National 10051
NEC 10154, 10156, 10051, 10053, 10030, 10178, 11704
Newave 10093, 10178, 10092
Nikko 10030, 10178, 10092
Norcent 10748, 10824
NTC 10092
Onwa 10180
Optimus 10154, 10250, 10166, 10650, 11927, 11924, 11913
Optonica 10093
Orion 10236, 10463, 11929, 11911, 11905
Panasonic 10054, 10250, 10051, 10650, 11941, 11927, 11924
Panda 10051, 10706
Penney 10047, 10156, 10051, 10060, 10030, 10178, 11926, 11907
Philco 10054, 10180, 10030, 10178
Philips 11454, 10054, 10000, 10051, 10030, 10178, 10092, 10690
Pilot 10030
Pioneer 10166, 10866, 10679
Portland 10092
Prima 10761
Princeton 10700
Prism 10051
Proscan 11447, 10047, 11922
Proton 10030, 10178
Pulsar 10017
Qingdao 10051
Quasar 10250, 10051, 11924, 10650
RadioShack 10047, 10154, 10180, 10030, 10178, 11920, 11904
41
Page 44

RCA 11447, 10047, 11454, 10000, 10030, 10178, 11547, 11922,11917, 10092, 11907, 11948, 10090, 10679
Realistic 10154, 10180, 10030, 10178
Rowa 10748
Runco 10017, 10030
Sampo 10154, 10093, 10030, 10178, 10171, 10700, 10650, 11755, 10092
Samsung 10154, 10156, 10060, 10812, 10702, 10030, 10178, 11060, 10814, 10092, 11903, 10090, 10766
Sansui 10463, 11904, 11935, 11929, 11911
Sanyo 10154, 10156, 10180, 10145, 11907
Sanyuan 10093
Scotch 10178
Scott 10236, 10180, 10178
Sears 10047, 10054, 10154, 10156, 10178, 10171, 11926, 11904
Shaofeng 10145
Sharp 10093, 10030, 10650, 11917
Shen Ying 10092
Shencai 10145
Sheng Chia 10093, 10236
Skygiant 10180
Skyworth 10748
Sony 11100, 10000, 10650, 11925, 11904
Soundesign 10180, 10178
Sowa 10156, 10051, 10060, 10178, 10092
Squareview 10171
SSS 10180
Starlite 10180
Studio Experience 10843
Supreme 10000
SVA 10748, 10865
Sylvania 10054, 10030, 10171, 11944, 11931
Symphonic 10180, 10171, 11913, 11904
Synco 10000, 10451, 10093, 10060, 10178, 10092
Tacico 10178, 10092
Tandy 10093
Tashiko 10092, 10650
Tatung 10054, 10154, 10156, 10051, 10060, 11156, 11756, 11254
Technics 10250, 10051
Techwood 10051
Teco 10051, 10093, 10178, 10092
Teknika 10054, 10180, 10150, 10060, 10092
Telefunken 10702
Tera 10030
Thomas 11904
Tiane 10093
TMK 10178
TNCi 10017
Tobo 10748
Toshiba 10154, 10156, 10060, 10145, 11945, 11704, 11936, 11156,11935, 10650, 11918
Tuntex 10030, 10092
TVS 10463
V Inc. 11756, 10885, 10864
Vector Research 10030
Victor 10250, 10053, 10650
Vidikron 10054
Vidtech 10178
Viewsonic 11755, 10885, 10864
Wards 10054, 10030, 10178, 10866, 11156
Warumaia 10661
Waycon 10156
White Westinghouse 10463, 11909, 10623
Yamaha 10030
Yapshe 10250
Zenith 10017, 10463, 10178, 11904, 11929, 11911, 11909, 10092
42
Page 45

Set Codes for VCRs
ABS 21972
Admiral 20048, 20209
Aiko 20278
Aiwa 20037, 20479
Alienware 21972
America Action 20278
American High 20035
Amoisonic 20479
Anam 20162, 20037, 20240, 20278
Anam National 20162
Asha 20240
Audiovox 20037, 20278
Beaumark 20240
Bell & Howell 20104
Broksonic 20184, 20121, 20209, 20002, 20479
Calix 20037
Canon 20035
Carver 20081
CCE 20072, 20278
Changhong 20048, 20081
Citizen 20037, 20278
Colt 20072
Craig 20037, 20047, 20240, 20072
Curtis Mathes 20060, 20035, 20162
Cybernex 20240
CyberPower 21972
Daewoo 20045, 20104, 20278
Dell 21972
Denon 20042
DirecTV 20739
Durabrand 20039, 20038
Electrohome 20037
Electrophonic 20037
Emerex 20032
Emerson 20035, 20037, 20184, 20240, 20045, 20121, 20043, 20209, 20002, 20278, 20479
Fisher 20047, 20104
Fuji 20035, 20033
Fujitsu 20045
Gateway 21972
GE 20060, 20035, 20240
General 20045
Go Video 20432
GoldStar 20037, 20209, 20038, 20225
Haojie 20240
Harman/Kardon 20081, 20038
Harwood 20072
Hewlett Packard 21972
HI-Q 20047
Hitachi 20037, 20042, 20055
Howard Computers 21972
HP 21972
Hughes Network Systems 20042, 20739
iBUYPOWER 21972
JVC 20045, 20067
KEC 20037, 20278
Kenwood 20067, 20038
KLH 20072
Kodak 20035, 20037
Kolin 20043
LG 20037, 20045, 20042, 20209, 20038
Logik 20072
LXI 20037
Magnavox 20035, 20039, 20081
Magnin 20240
Marantz 20035, 20081
Marta 20037
43
Page 46

Matsushita 20035, 20162
Media Center PC 21972
MEI 20035
Memorex 20035, 20162, 20037, 20048, 20039, 20047, 20240, 20104, 20209, 20479
MGA 20240, 20043
MGN Technology 20240
Microsoft 21972
Mind 21972
Minolta 20042
Mitsubishi 20067, 20043
Motorola 20035, 20048
MTC 20240
Multitech 20072
NEC 20035, 20037, 20048, 20104, 20067, 20038
Newave 20037
Nikko 20037
Noblex 20240
Northgate 21972
Olympus 20035
Optimus 21062, 20162, 20037, 20048, 20104, 20432
Orion 20184, 20209, 20002, 20479
Panasonic 21062, 20035, 20162, 20616, 20225
Penney 20035, 20037, 20240, 20042, 20038
Pentax 20042
Philco 20035, 20479
Philips 20035, 20081, 20739, 20618
Pilot 20037
Pioneer 20042, 20067
Polk Audio 20081
Profitronic 20240
Proscan 20060
Protec 20072
Pulsar 20039
Qisheng 20060
Quasar 20035, 20162
Radix 20037
Randex 20037
RCA 20060, 20035, 20240, 20042, 20880
Realistic 20035, 20037, 20048, 20047, 20104
ReplayTV 20616
Runco 20039
Sampo 20037, 20048
Samsung 20240, 20045, 20432
Sanky 20048, 20039
Sansui 20067, 20209, 20479
Sanyo 20047, 20240, 20104
Scott 20184, 20045, 20121, 20043
Sears 20035, 20037, 20047, 20042, 20104
Sharp 20048, 20209
Shintom 20072
Shogun 20240
Singer 20072
Sonic Blue 20616
Sony 20035, 20032, 20033, 20636, 21972
STS 20042
Sylvania 20035, 20081, 20043
Systemax 21972
Tagar Systems 21972
Tashiko 20037
Tatung 20045, 20067
Technics 20035, 20162
Teco 20035, 20037, 20048, 20038
Teknika 20035, 20037
Tivo 20636, 20618, 21503, 20739
TMK 20240
Toshiba 20045, 20042, 20067, 20043, 21503, 21008, 21972
44
Page 47

Totevision 20037, 20240
Touch 21972
Unitech 20240
Vector 20045
Vector Research 20038
Victor 20067
Video Concepts 20045
Videomagic 20037
Videosonic 20240
Viewsonic 21972
Wards 20060, 20035, 20048, 20047, 20081, 20240, 20042, 20072
White Westinghouse 20209, 20072
XR-1000 20035, 20072
Yamaha 20038
Zenith 20039, 20033, 20209, 20479
ZT Group 21972
CARE
? Keep the remote dry. If it gets wet, wipe it dry immediately.
? Use and store the unit only in normal temperature environments.
? Handle the remote gently and carefully. Don't drop it.
? Wipe the remote with a damp cloth to keep it looking like new.
"Polaroid" and “Polaroid and Pixel” are trademarks of Polaroid Corporation, Waltham, MA, USA.
For service, support and warranty information, visit orwww.pwwservice.com
in the US or Canada call 1-866-396-6322.
45
Page 48

PRINTED ON
RECYCLED PAPER
 Loading...