

Page 1
Introduction
Your Polaroid flash is designed to give today’s digital photographer a new level of control and creativity. Thanks to its sophisticated technology it will seamlessly integrate with the latest
digital cameras as well as many older ones. This means you’ll be able to “focus” on creativity, secure in the knowledge that your Polaroid flash has the features and flexibility to “make
light” of even the most demanding of situations and environments.
To make sure you get the most out of your flash, please take a few moments to familiarize yourself with its operation by reading this manual.
…And thank you for trusting the Polaroid brand for your pictures!
USER GUIDE FOR
POLAROID PL126-PZ FLASH UNIT
E) USING YOUR POLAROID FLASH
1 SHOOTING IN AUTO MODE
Because your flash is designed for seamless fully automatic integration with your Canon, Nikon,
Sony, Olympus, Panasonic, or Pentax digital camera, taking great flash photos is easy as turning on your
flash, waiting for the ready light, setting your camera to the appropriate flash mode and taking your
pictures. Thanks to its advanced technology, your camera will automatically be controlling key flash
features like sync speed (which varies by model), and Through The Lens (TTL) functions including,
Auto-focus (AF), Red-Eye reduction and light output—much like it would for a built-in flash.
After your picture has been taken, the "AUTO/OK" symbol will illuminate to confirm correct exposure.
F) SPECIAL FEATURES—Designed To Help You Get The Most Out Of Your Polaroid Flash!
1 AUTO-FOCUS "AF" ASSIST
Designed to assist your camera’s auto focus system in low light situations by projecting a beam of
red light onto your subject.
To activate this handy feature, press lightly on your camera’s shutter release.
2 BUILT-IN ZOOM
Your Polaroid flash is equipped with a unique zoom feature which enables
you to “Zoom” the flash in conjunction with the focal length setting of your
zoom lens.
Using this feature is as simple as pulling the zoom ‘lens’ on the flash forward
to one of the 4 preset click stops (28mm,35mm, 50mm, 85mm) that best
corresponds to your lens setting.
3 BOUNCE, SWIVEL & EFFECT LENSES
Your Polaroid flash offers numerous built-in features to creatively enhance your pictures as well as
eliminate the sometimes harsh unflattering lighting created by “Head-On” flash photographs
A) Bounce Flash: To bounce the flash, simply tilt the head from its
“normal” 90° angle to any of the preset increments up to 180°.
For best results bounce should be used in areas with lightly colored
ceilings of normal height
B) Swivel Flash: The ability to rotate the flash clockwise or counter
clockwise makes it Ideal for creating dramatic effects and highlights
C) Reflection and Diffusion Lenses: These indispensable parts of any
pro’s arsenal are designed to easily mount over the flash head
whenever you need to create or enhance a mood
4 SLEEP MODE
To conserve power and extend battery life your Polaroid flash is designed to automatically go into
“Sleep” mode 3 minutes after the last time it was fired or powered “On”. While in sleep mode, the
READY lamp will be off. To take it out of “Sleep” mode simply press either the TEST button or
the camera shutter. Despite the fact “Sleep” mode will conserve power, always turn off your flash
when you’re done using it.
5 FRONT AND REAR CURTAIN SYNCHRONIZATION
While your Polaroid flash supports front and rear curtain synchronization, this is usually controlled
through your camera. When Rear Curtain Sync is selected, the flash fires right before the camera’s
rear curtain closes, when used in conjunction with a slow shutter speed the result is streaming light
trails behind the subject. Before selecting Front or Rear Mode please check your camera’s manual
GETTING STARTED
A) LOADING THE BATTERIES
1 Make sure the power switch is at the "OFF" position
2 Slide the battery compartment cover forward so it swings open
3 Insert batteries following the "+/-" markings inside the compartment
(for best results, use fully charged batteries or fresh alkaline batteries,
mixing old and new batteries may affect operation)
4 Close the compartment cover and slide it back so it locks in place
B) MOUNTING YOUR POLAROID FLASH ON YOUR CAMERA
1A FOR SONY CAMERAS, hold the flash so the back is facing you, then
press the locking button on the bottom of flash’s mounting shoe and
slide it forward into your camera’s accessory shoe (while holding down
the button), once it’s in place, release the locking button to lock the flash
into the accessory shoe
1B FOR CANON, NIKON, &PENTAX CAMERAS, loosen the knurled
locking by ring simply turning it to the right until you can easily slide the
flash forward into the camera’s accessory shoe
1C FOR OLYMPUS & PANASONIC CAMERAS, insert the mounting foot of the flash into
camera accessory shoe and press "LOCK" to lock the flash in place
2 After the flash is properly positioned in the camera’s accessory shoe, tighten the locking ring by
turning it to the left until it no longer turns easily and the flash feels firmly mounted.
3 Slide the power switch to the “ON” position
C) TESTING YOUR POLAROID FLASH
As with any high performance technology product, it’s always a smart idea to
make sure your Polaroid flash is in optimal working order before using it. To do so,
follow these three simple steps:
1 Turn on the unit by sliding the power switch to the “ON” position
2 Wait about 3 to 5 seconds for the Ready light (located to the left
of On/Off switch) to illuminate. Once it does, it means your flash is
ready for use.
3 Press the Test button to fire the flash and confirm your flash is ready for use.
CONGRATULATIONS, You’re Now Ready To Begin Shooting!
NOTE: When you turn on your flash you should hear a high pitched ‘whistling’ sound for about 3 to 5
seconds. This is the sound of the flash charging and no cause for concern.
D) REMOVING YOUR POLAROID FLASH FROM YOUR CAMERA
1 Slide the power switch on the flash to the “OFF” position
2A FOR SONY CAMERAS:
With the front of the flash away from you press and hold down the lock button on the flash’s
mounting shoe while gently pulling the flash towards you until it’s out of the camera’s
accessory shoe
2B FOR CANON, NIKON, & PENTAX CAMERAS:
With the front of the flash facing away from you, carefully turn the knurled locking ring to the
right so it becomes loose
2C FOR OLYMPUS & PANASONIC CAMERAS:
Press both sides of the Lock/Release button towards the directions as indicated then pull the
flash off backward
3 Once you can no longer easily turn the locking ring, remove the flash from your camera’s
accessory shoe by carefully sliding it towards you
NOTE: Always make sure that your flash is off before you insert or remove it from your camera
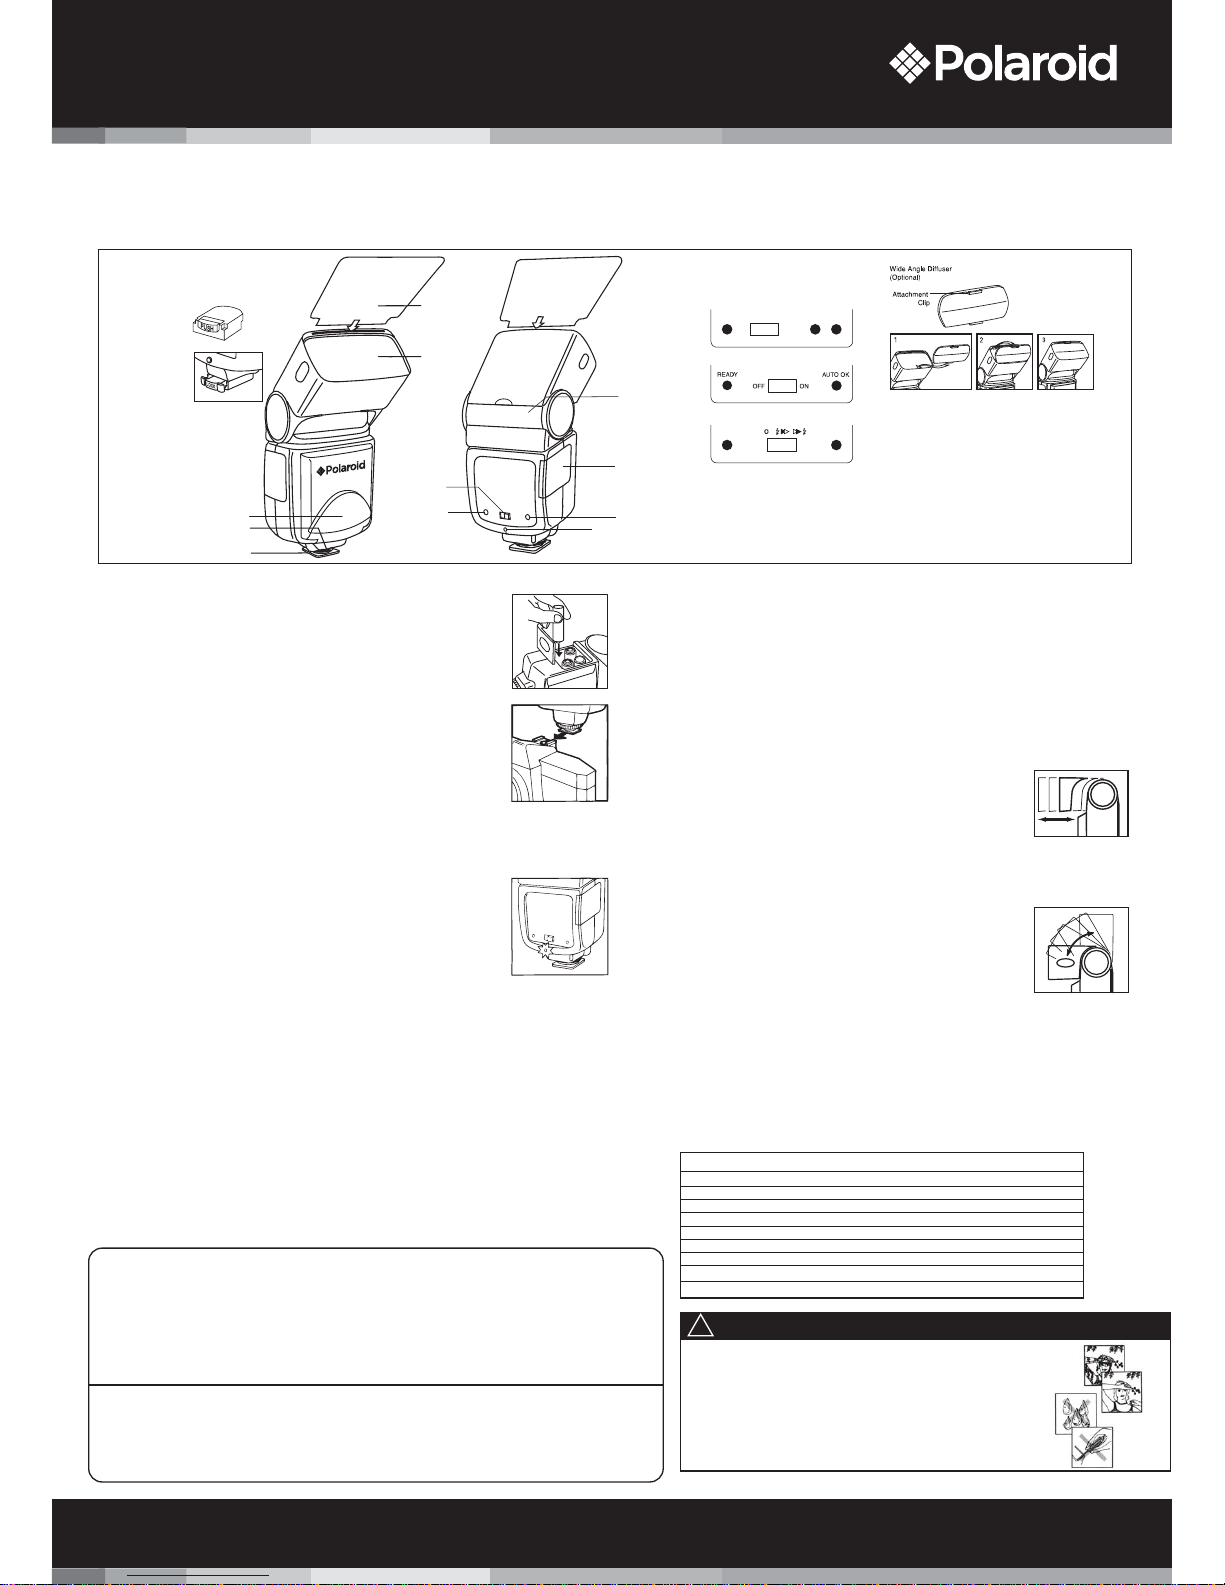
GETTING TO KNOW YOUR
POLAROID FLASH
Specifications*
Guide Number (ISO 100):
Flash Head:
Bounce Angle:
Swivel Angle:
Power Source:
Recycling Time:
Dimensions:
Net Weight:
42(m) at 85mm position
28-35-50-85mm
0°, 45°, 60°, 75°, 90°
Right 0° - 90°; Left 0° -180°
Four 1.5V AA size batteries (R6, LR6)
0.5-8 sec.
Approx. 72 (W) x 102 (D) x 130 (H) mm
Approx. 260g (w/o batteries)
*Specifications are subject to change without further notice.
• The flash unit is not designed to work with camcorders
• Misfiring will sometimes occur when the power switch is turned on and off repeatedly . If it happens, power off the
flash unit for a few seconds before switching it on again. The flash unit should then work as normal
• Do not leave or store the flash unit in temperatures exceeding 40°C. This might adversely affect the internal structure
or performance of the flash unit. Particularly, do not leave the flash unit in the automobiles during summer.
• Remove the batteries if you do not intend to use the flash unit for a long period of time.
• The flash unit is not water-resistant. Rain and humid weather may cause irreparable damages to the flash.
• The flash unit is composed of very sophisticated electronic parts’. Therefore it should be protected against shocks,
falls or other improper handling.
• The flash unit contains a high voltage condenser. Do not try to open the housing or repair the flash yourself
• As is the case will all high quality technology products, do not clean the surface or internal areas with any liquids,
oil-based solutions, detergents or strong solvents as these solvents may damage to the flash and void your warranty
!
Type SA
Mounting Foot
Type OP
Mounting Foot
Type PE
AUTO OKREADY
READY OFF ON ETTL OK
Type C
Type N, OP, S
Difference in the position of
indicators and switch at the rear
of C, N, OP, PE & S flash
Bounce Angle
Indication
Battery
Compartment
Cover
ON/OFF Switch
Ready Lamp
Auto OK Light
Test Button
Reflecting Plate
(Optional)
Zoom Head
Auto Focus Lens
Lock Ring
Mounting Foot
WHAT TO DO WHEN SERVICE IS NEEDED
STEP 1. Package the product and supplied accessories. To prevent damage in shipping be sure to add enough padding and to use a USPS (or similar) shipping package.
STEP 2. In addition to the unit please include proof of purchase (e.g. a dated sales receipt) and a detailed description of the problem or malfunction. If possible please include a
photo which shows how the flash causes the problem.
STEP 3. Inlude your return address and telephone number (daytime).
STEP 4. MAIL TO
C&A Licensing, LLC, 2 Bergen Turnpike, Ridgefield Park, NJ 07660
When service is complete, the product will be returned to you shipping prepaid. In the event the product is deemed to not be faulty or the defect/malfunction is a result of wear
and tear, C&A may levy a handling charge for the return of the product. This warranty gives you specific legal rights. You may also have other rights which vary from country and State
to State thereof. For more information visit www.polaroid.com.
IN NO EVENT WILL C&A, ITS MANUFACTURERS, DISTRIBUTORS OR PLR IP HOLDINGS, LLC BE LIABLE FOR ANY INCIDENTAL,
DIRECT, INDIRECT, SPECIAL, PUNITIVE OR CONSEQUENTIAL DAMAGES (SUCH AS, BUT NOT LIMITED TO, DAMAGES FOR LOSS
OF PROFITS, BUSINESS, SAVINGS, DATA OR RECORDS) RELATED TO THIS PRODUCT. EXCEPT AS STATED HEREIN, NO OTHER
WARRANTIES SHALL APPLY.
Limited One Year Warranty
C&A Licensing, LLC (”C&A”) warrants this product to be free of defects in material and workmanship for a period of one year from the date of purchase. During such period,
C&A will repair or replace the product at no charge for parts or labor.
TIME PERIOD OF THIS WARRANTY: The time period of this warranty starts from the date of the original purchase and expires on the first anniversary date of purchase.
WHAT IS NOT COVERED BY THIS WARRANTY: No express or implied warranty is made for any defects in this product which result from accident, abuse, misuse, failure to
operate the product in accordance with relevant instructions, neglect, immersion in or exposure to chemicals or liquids, extremes of climate, fungus, excessive wear and tear, cosmetic
damage and defects resulting from other extraneous causes such as unauthorized disassembly, repair or modification.This warranty shall not extend to any incidental or
consequential damages arising from the purchase, use or inability to use this product even if C&A has been advised of such damages.The laws of some countries and some
States thereof do not allow the limitation of incidental or consequential damages, so the above limitation or exclusion may not apply to you.
Polaroid and Polaroid & Pixel are trademarks of PLR IP Holdings, LLC, used under license. All other trademarks are the property of the respective owner, who has not sponsored,
endorsed or approved this product. PLR IP Holdings, LLC does not manufacture this product or provide any Manufacturer's Warranty or support.
For warranty information and technical support please call 1-800-226-6534 or visit www.polaroid.com
©2010 All Rights Reserved
Distributed by: C&A Licensing, LLC, 2 Bergen Turnpike, Ridgefield Park, NJ 07660
 Loading...