

Page 1
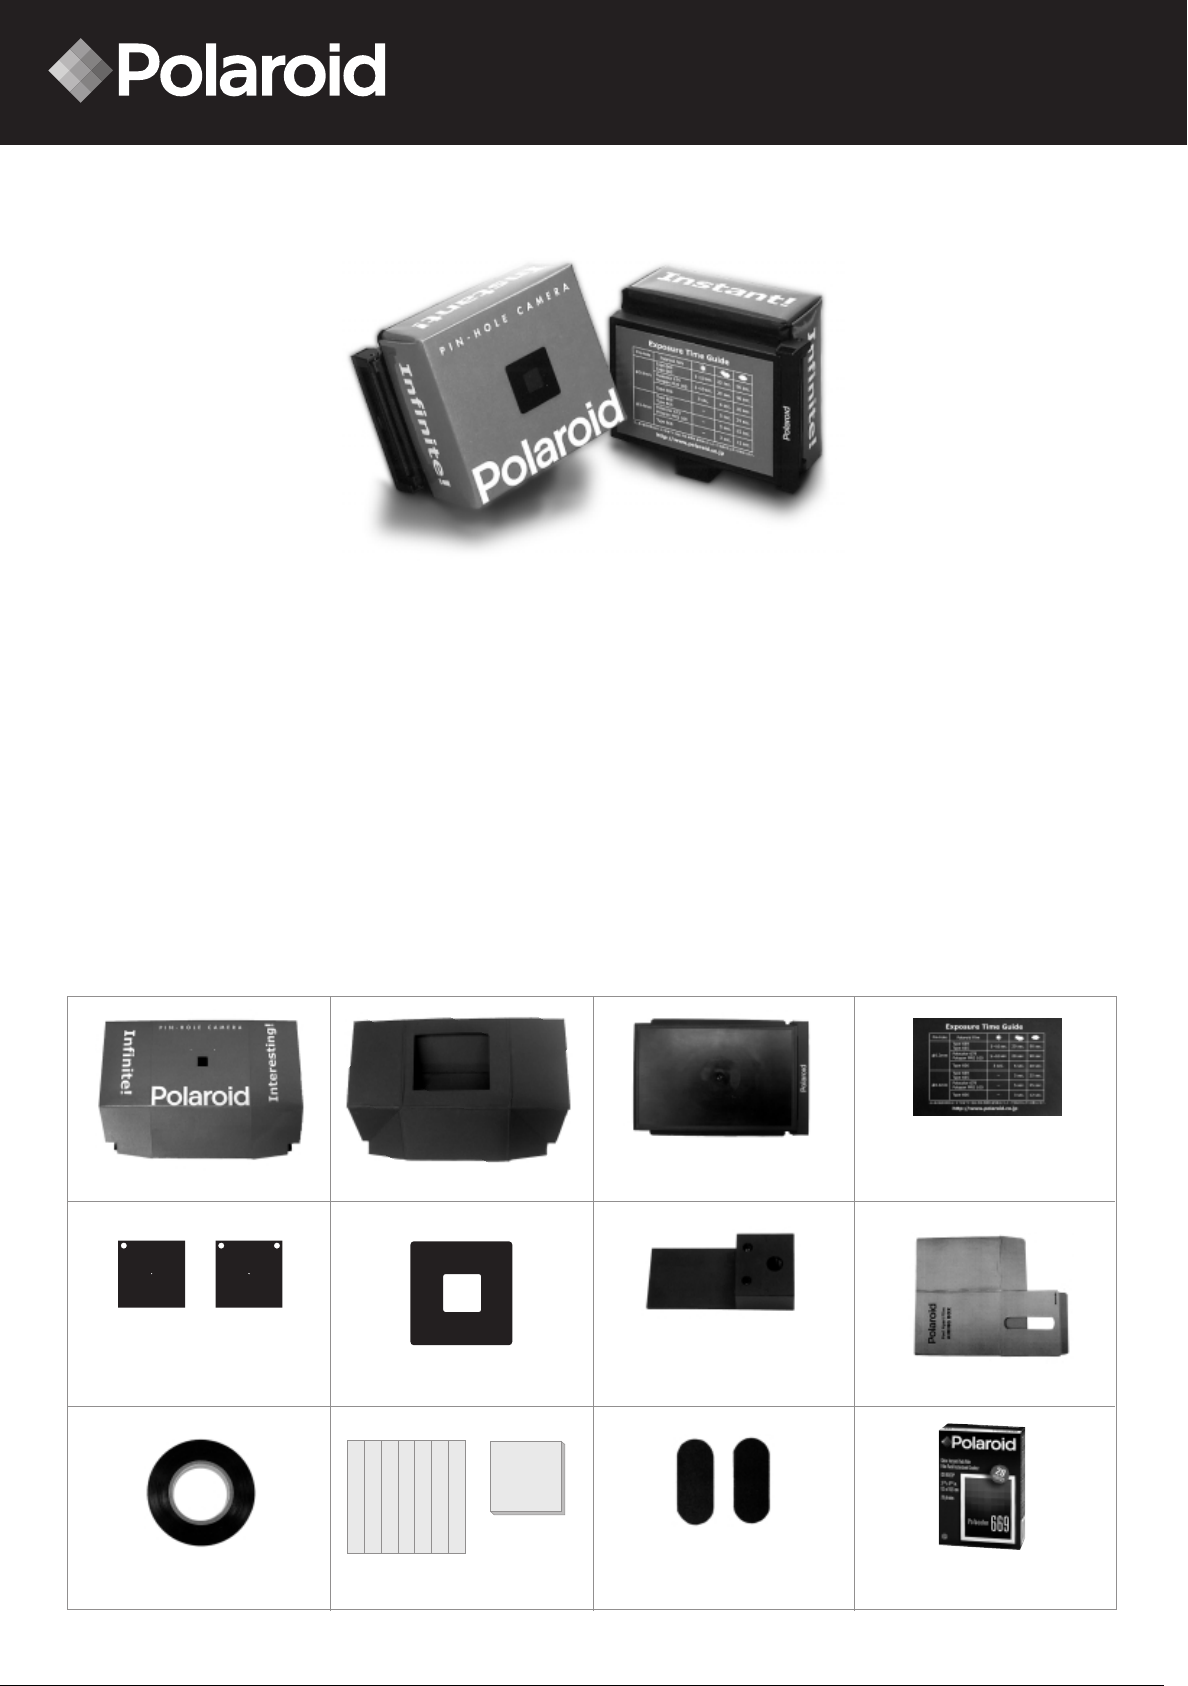
Kit Components
Polaroid Pinhole Photo Kit
User's Guide
The pinhole kit is designed for everyone who enjoys making
their own pinhole camera and appreciates the instant, high quality
prints produced by Polaroid peel-apart films. It combines the unique
results of pinhole camera photography with Polaroid's power to
create images instantly, results you can not obtain with conventional
35 mm photography.
Please read this guide carefully. It contains important instructions for
set up and operation. Save it for future reference.
This is not a disposable camera. Continue to use it with Polaroid's
high quality peel-apart films so you can continue to create images
instantly.
Outer Box
0.3 mm 0.4 mm
Pinhole plates
Double-sided
Shield tape Framing bar
tape
Inner Box Film holder for Polaroid film Exposure time guide sticker
Pinhole frame Tripod adapter Airing box
Double-sided
sponge tape
Polaroid Peel-apart film
(Type 669)
Page 2
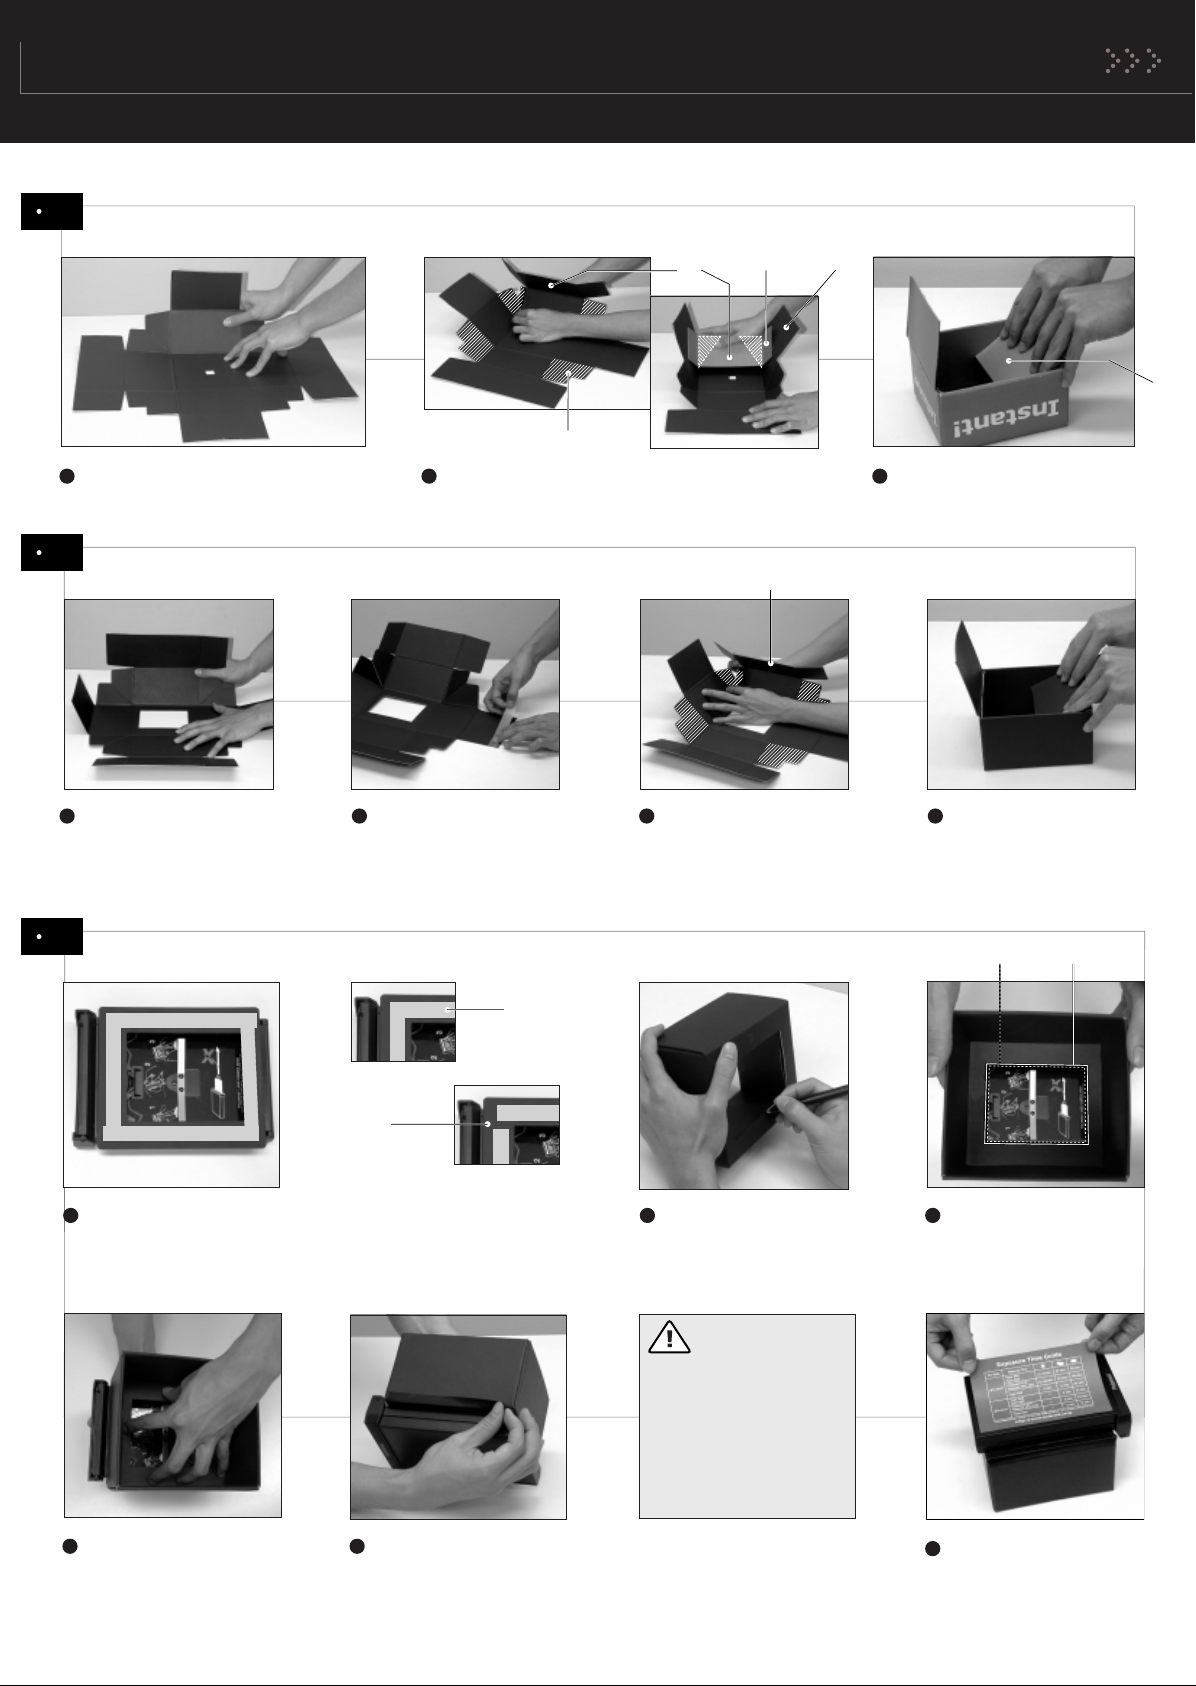
Create the Pinhole Camera
1 Create the outer box
b
c
a
b
a
c
a
b
a
ac
diagonal area
1 2 3
Fold inward on all the creases. Fold in the diagonal areas under flap b. Fold in the c flaps over the
a flaps.
2 Create the inner box
b
a
ba
c
1 2
Fold inward on all the
creases.
Cut the double-sided
tape to an equal length
and stick on the edge
of the c flaps.
3
Fold in the diagonal
areas under the b
flaps as done in step
2 above.
4
Fold in the c flaps over
the a flaps.
c
3 Setup the camera back
Bad
1
Cut the double-sided tape to an equal length and stick
on the plate. To prevent light from seeping into the box
and exposing the film, the tape edges should be flush
with each other.
Good
2
Paint the frame of the
inner body box opening
with a black marker pen.
Prevent light
seeping into the
camera box by using
generous amounts of
black shield tape. If you
run out of shield tape
you may use black
electrical tape as a
substitute.
film holder inner box
3
Place the inner box
above the film holder.
Center the openings.
4
Press the inner box and
film holder together as
shown above.
5
To prevent light seeping
into the box, apply the
shield tape around the
film holder.
6
Place the inner box
above the film holder.
Center the openings.
Page 3
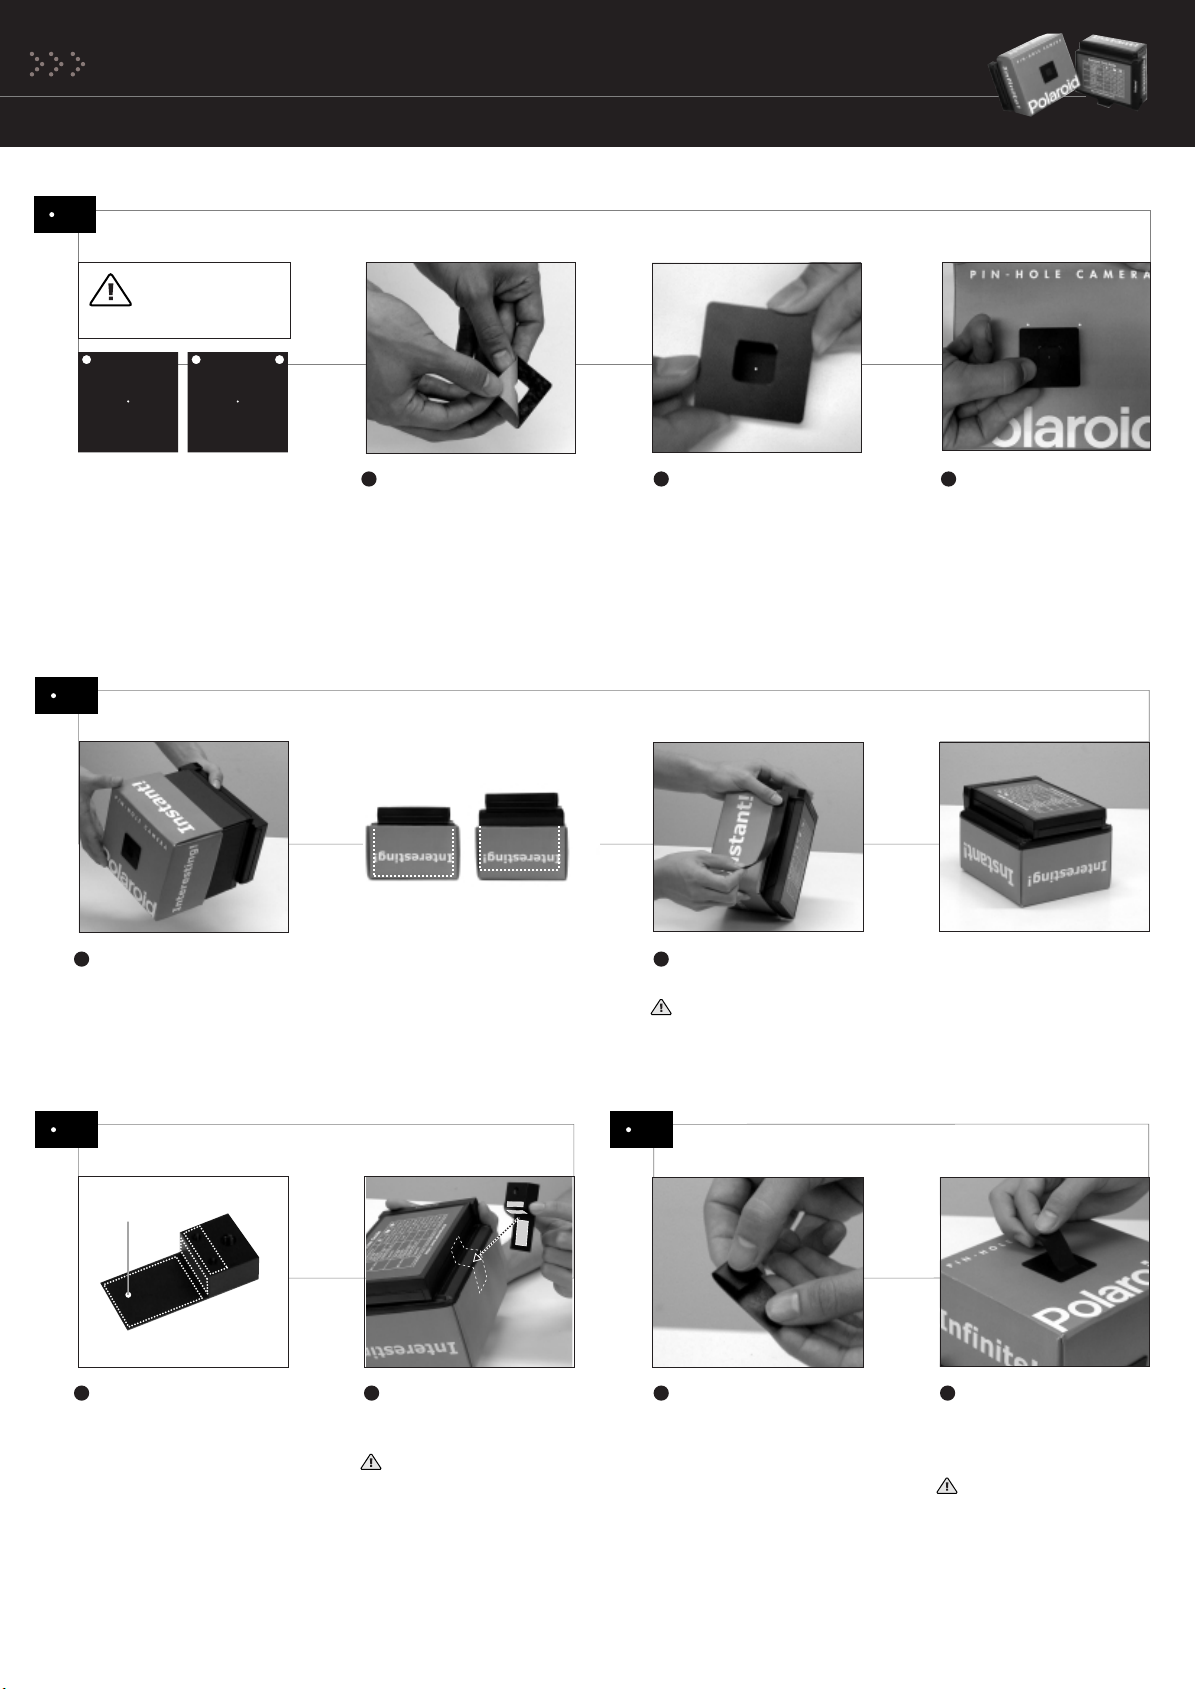
4 Create the pinhole plate
Caution: Pinhole
plates are sharp.
aba
Handle with care.
0.3 mm 0.4 mm
To decide which pinhole
plate to use, see "Pinhole
plates" in the
better pictures
for more details.
Guide to
section
1 2 3
Peel the light brown
paper from the backside
of the frame.
5 Create the camera box
Good Bad
1 2
Insert the inner box slowly but completely into the
outer box. Use extra care when inserting so as not to
damage the sides of the box. For best results, the inner
box must be inserted completely.
Center the frame over
the pinhole and stick
together.
For best results, make
sure your pinhole is in
the center of the frame.
To prevent light seeping into the box, apply the shield
tape around the edges.
Position the frame over
the two white dots on
the face of the outer
body box.
Make sure your pinhole
is centered, then press
down. Use shield tape
to prevent light leakage.
Prevent light seeping into the camera box by using
generous amounts of black shield tape. If you run out
of shield tape you may use black electrical tape as a
substitute.
6 Attach the tripod adapter
a
1
Stick sponge tape on
area outlined on
adapter.
2
Attached the tripod
adapter at the center
of the box.
The tripod adapter is
important. Even if you
will not use a tripod,
the tripod adapter is
necessary for placing
the camera on flat
surfaces, like a table
or a stand.
7 Create a shutter release
1 2
Cut the shield tape
about 2 inches (5 cm)
and fold back about
1/2 inch (1 cm).
Stick the tape below
the pinhole. The tape
works like a shutter
on a regular camera.
Before you load the
film, make sure the
pinhole is covered by
the tape.
Page 4

Taking a pinhole photo
1 Load film
Polaroid pinhole kit uses Polaroid peel-apart films for professional use.
Follow the process when you load the film.
1 2 3 4
Confirm the pinhole is
covered by the shutter
release tape.
Hold the top and bottom
of film holder latch, and
turn it into outside.
Open the film holder
cover.
Load film with safety
cover facing you.
Do not hold the
camera body
when pulling out the
safety cover or film.
Hold the film holder.
5
Check the leader tab
number. The leader tab
number is the frame
number.
6
Confirm the safety
cover extends out of the
film holder. Close the
cover.
7
Close the film holder
latch. Pull the safety
cover out in a straight
line in one motion.
2 Take photo
Since exposure time is quite long for a pinhole photo, use a tripod or place
the camera on a flat surface to ensure your subject will be in focus.
1 2 3 4
Set the camera on the
tripod or put it on the
flat table and face to
subject.
Look at the subject from
behind the camera. Use
the width of the camera
front to frame your
picture.
Put the framing bars on
each side of the camera
to help you aim. See
more details in "Attach
the framing bars" in
Tips for better pictures
section.
Peel the shutter tape
away from the pinhole
to take your photo.
Use the "Exposure
time guide" for help
on exposure time. The
final image will differ
based on temperature,
weather, period of
time and subject.
Purchase additional
Polaroid peel-apart film
at your nearest dealer.
After exposure, cover
the pinhole with shield
tape.
Page 5

3 Develop film
a
b
1 2
After taking photo, pull out the leader tab (a) out in a straight line in one even motion. The
pull tab (b) will appear. Check that rest of the leader tabs remain inside the film holder.
When you pull the leader tab, hold the film holder tightly using your hand. If you hold the
body and pull the tab, the camera or film might get damage. DO NOT cover the film exit
with your finger like picture above.
Pull the pull tab out in
a straight line in one
even motion.
3
Put the film on the flat surface and measure the
development time. Since the development time varies
by the film type and temperature, please follow the film
tip sheet.
Do not touch or scrub the developing film. It may result
in a distorted or incomplete image.
4 Dry the photo
Dry the pictures. Just after peeled, Polaroid peel-apart film is still wet on the
image surface. Put the frame either on the flat table or inside airing box to dry it.
1
Assemble airing box as
shown.
2
Slide the photo into the
holders.
3
When developed time is reached, peel the frame apart
from the pull tab in one even motion. Do not stop part
of the way.
Caution: Polaroid peel-apart film uses caustic paste.
Please read the film tip sheet carefully for handling. See
caution statement below.
Fold the negative as shown above and discard of
appropriately. Film negative is harmful to the environment.
Bring a trash bag with you if taking photos outdoors.
Film storage: Store unopened film in a cool, dry place. Refrigerate
film whenever possible; do not freeze it. For best results, film should
be at room temperature (70–80°F/ 21–27°C) at time of use.
Limited Warranty: Polaroid will replace any film that is defective in
manufacture, labeling or packaging, provided representative samples
are returned to your dealer or to the nearest Polaroid office. This
warranty does not apply to outdated film and excludes all consequential
damages except in jurisdictions not allowing such exclusions or
limitations. This does not affect your statutory rights.
Caution: This process uses a caustic paste. Avoid contacting skin, eyes
or mouth with the paste and keep it away from children and animals.
If you get some paste on your skin, wipe it off immediately and wash
with water to avoid an alkali burn. If eye or mouth contact occurs,
quickly wash the area with plenty of water and see a doctor. Keep
discarded materials away from children, animals, clothing and furniture.
Page 6

Troubleshooting
Picture is almost or perfectly black.
Cause and Solution: The exposure time is not long enough or the pinhole is being blocked.
Picture is perfectly white
Cause and Solution: Too much exposure was given to the film or the film holder was
opened, thereby exposing the film.
Subject is too bright or has a flare of light
Cause and Solution: This is caused by exposing too long in a bright place. Check to
see if there are not any other light leaks around the camera.
Repeated white spots on the print
Cause and Solution: Spread Rollers inside the Film Holder need to be cleaned (refer
to the section of cleaning the rollers).
Wavy or bar pattern on the image
Cause and Solution: When you pull the film through the rollers, pull with a straight even
motion. Do not stop part way.
Blurry picture
Cause and Solution: Ensure that the pin hole camera is stable when making the picture.
Incomplete coverage
Cause and Solution: When you pull the film through the rollers, pull with a straight even
motion. Do not stop part way.
1 Clean the film roller
1
Open the film
door.
Place your thumb
2
on the edge of
roller unit and turn
the unit up and
take out the roller.
3
Clean the roller
with a lent free
cloth dampened
with water.
Return roller
4
unit into the film
holder.
5
Check the film
exit debris.
Remove paper or
dried reagent
from the film exit.
6
Close the film
holder cover.
Page 7

Tips for better pictures
A Pinhole plate features
This kit contains two pinhole plates. One is 0.3 mm wide. The other
is 0.4 mm. Each will give you different results.
0.3 mm –Standard
This size is recommended for general use.
Take sharp pictures using this plate.
Because of the characteristics of instant
film, cloudy weather conditions will effect
the picture's color balance under long
exposure times. (Bluish prints)
0.4 mm – Short Exposure
To avoid color shifts, use the 0.4 mm
pinhole plate which has a shorter
exposure time.
B Use the framing bars
For best results,
use shield tape
to cover edges of the
pinhole frame whenever
you change pinholes
plates
Change pinholes at the same time when changing film.
If you change pinholes with film in the camera, the first
frame of film will be exposed. Pull out the exposed
frame before taking more pictures.
The framing bars helps you aim and frame your photograph.
The framing bars
will only show
you the width of your
picture. It will not
indicate the height.
1 3
Tape or glue the framing bars on the sides of the camera. View your picture width between the framing bars.
C Using filters
You can take a unique color tone picture with the
character of this film. Change color balance using Light
Balancing Filter to finish something new to one. Please
choose the color and density of the Light Balancing
Filter based on the condition and purpose of taking a
picture. Cellophane paper gives you an interesting effect.
1
Cut the filter in a 3
centimeter square and
stick on the pinhole
frame with shield tape.
Apply filters at the same time when changing film.
If you apply filters with film in the camera, the first
frame of film will be exposed. Pull out the exposed
frame before taking more pictures.
2
Place the shutter tape
over it.
DO NOT touch the filter.
When you use the light balancing filter, exposure time
may be longer than "Exposure Time Guide".
Because of the characteristics of instant film, cloudy
weather conditions will effect the picture's color balance
under long exposure times. (Bluish prints)
Page 8

Precautions
Observe the following precautions when you use the Polaroid Pinhole Photo Kit
Confirm before taking a picture
Before loading film or taking picture, you should make sure:
1. The camera body, film holder and pinhole are tightly connected.
2. The shutter tape is covering the pinhole.
Keep the camera dry
The camera body is made of paper and can be easily damaged by water.
Water may also cause the film holder to have mechanical problems.
Do not hold the camera body
The camera body is made of paper and can be easily damaged.
Hold the Polaroid Pinhole Camera by the film holder.
Travel
To avoid damage, place camera into a hard case when traveling.
Storage
Do not leave your camera in the sun for prolonged periods. Do not leave
it in your car in the summer or in front of a heater.
Long-term non usage
Clean the roller of the film holder and keep in a dry place.
1-800-225-1618
www.polaroid.com
© 2001 Polaroid Corporation, Cambridge, MA 02139, U.S.A., owner of the
trademarks “Polaroid and pixel design”. All other product names may be the
property of their respective owners. All rights reserved. Printed in Japan.
0537-2-1-0 11/01
 Loading...