

Page 1
PDC 700
Digital Camera
Abridged User Guide
This is a reformatted, edited version of the help file included on the PhotoMAX
Image Maker software CD.
Page 2
Questions?
Visit our Help site at:
www.polaroid.com
Or call us at our
Help line: 1-800-897-0356
This sheet contains
information that is not
found in the enclosed
Quickstart Guide
in the software
Online Help.
or
This PDC 700 camera
has a USB cable for
faster downloads!
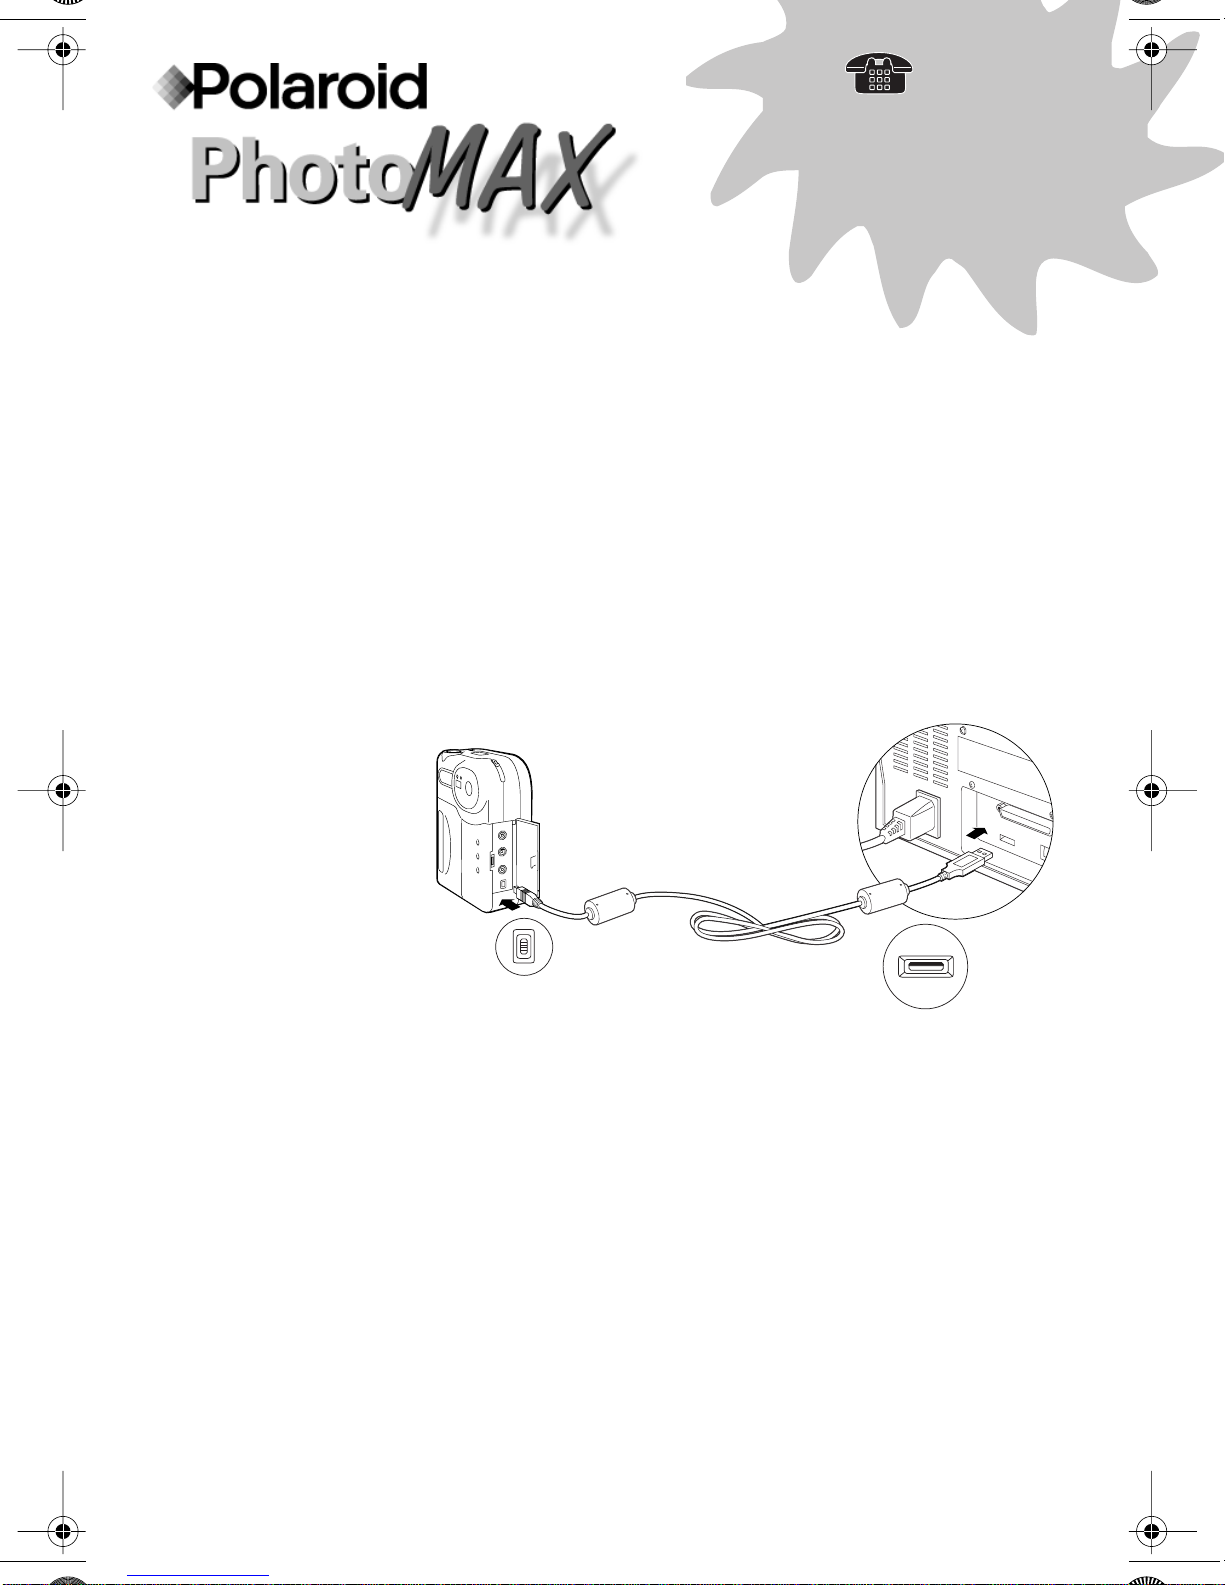
If you own a Windows 98 PC, you can connect this PhotoMAX
PDC 700 camera to the computer’s high-speed USB port . . .
and download images even faster!
1.
Turn off the camera.
2.
Connect the USB cable to the USB port on your computer
(a)
and then to the camera (b)
, as shown.
b
NOTE:
Windows 98 computer to make the connection.
3.
Connect the AC power adapter to the AC power connection
on the camera, as described in the enclosed documentation.
4.
Plug the AC adapter into a grounded electrical outlet.
5.
Turn on the camera.
6.
Use the Polaroid PhotoMAX Image Maker Version 2.41
Software included in this kit to establish the download
connection, as described in the enclosed documentation.
NOTE:
you can download images over the USB connection.
Copyright 2000 Polaroid Corporation, Cambridge, MA 02139, U.S.A., owner of
the registered trademarks “Polaroid” and “Polaroid PhotoMAX”. “MAX the Bird
(and feather design)” Copyright 1998 Polaroid Corporation. All other product
names may be the property of their respective owners. All rights reserved.
Printed in the U.S.A.
You do not need to turn off a
You must install the Version 2.41 software before
PU-21546T-0 5/00
a
Page 3

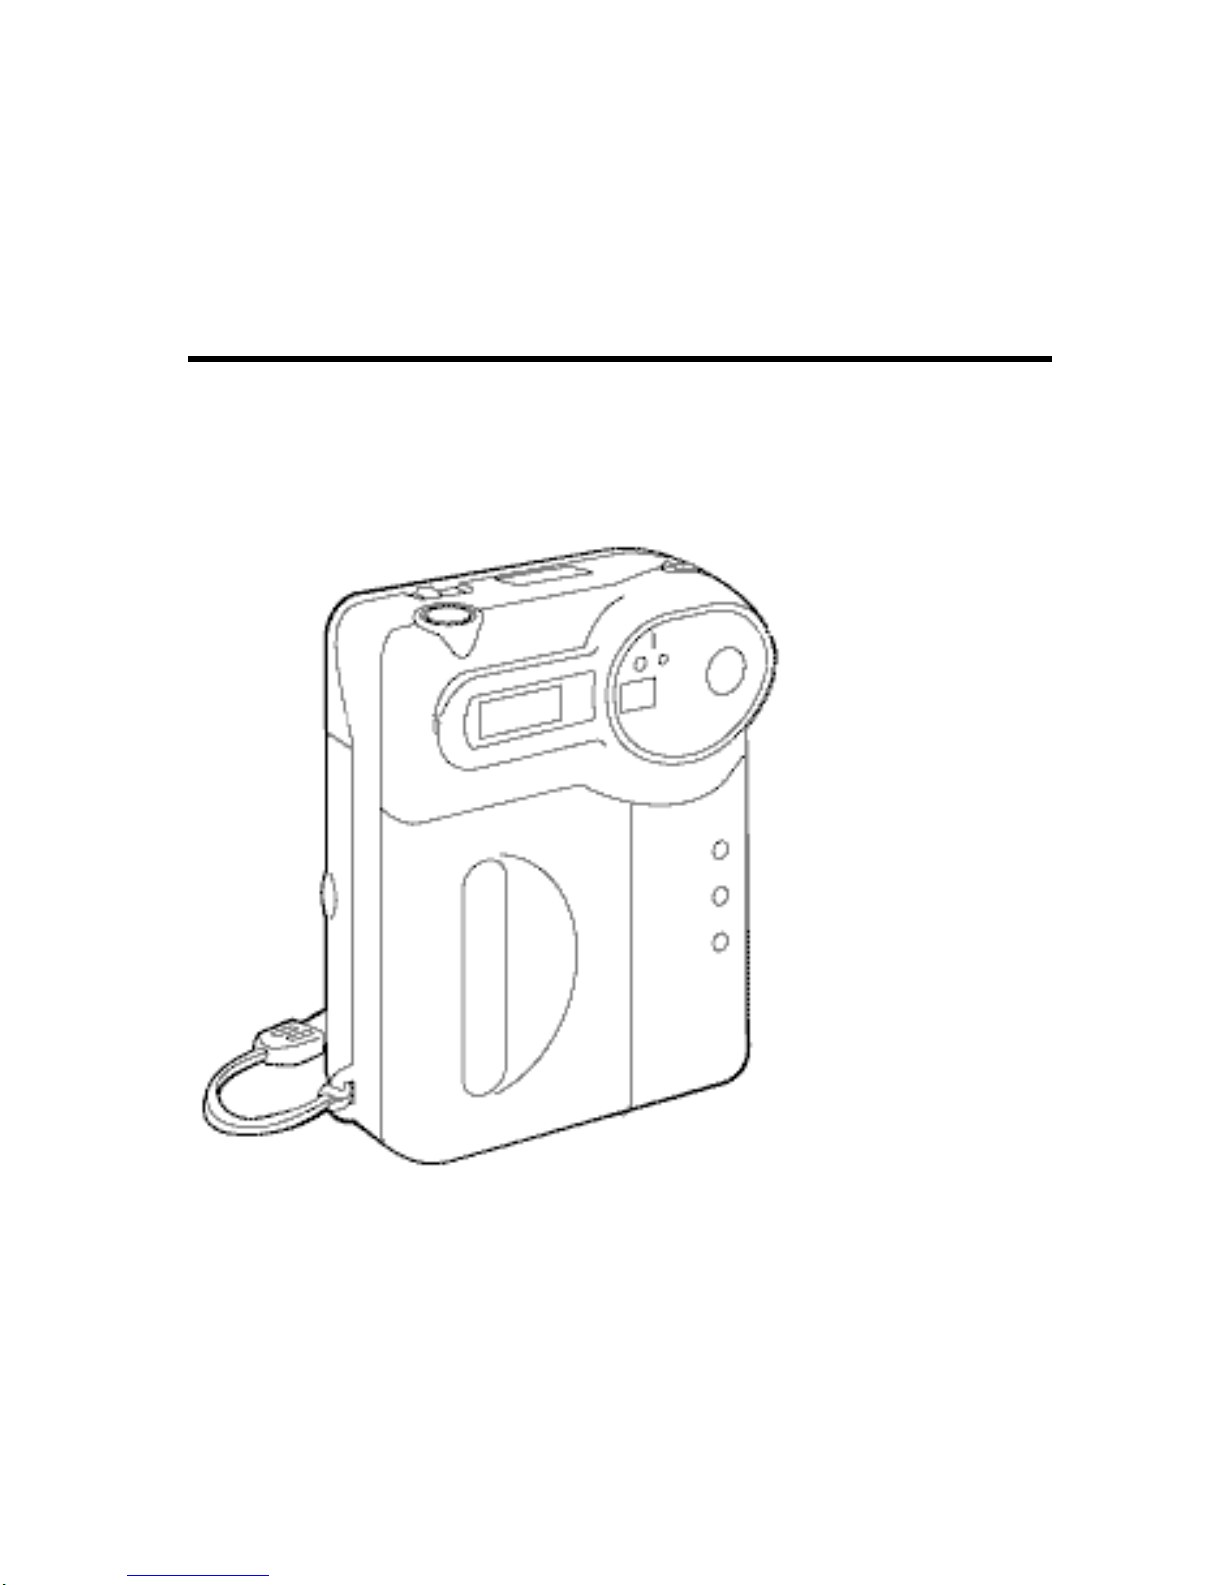
The Polaroid PhotoMAX PDC 700
Digital Camera Creative Kit
Your Polaroid PhotoMAX PDC 700 Digital Camera Creative Kit contains everything you
need to take digital pictures and transfer them to your computer where you can edit them,
send them over the Internet, print them, and store them.
The Polaroid PDC 700 Digital Camera and the Polaroid Image Maker Software and the
PhotoMAX Pro software are easy to use, and are designed to work together to produce
high-quality results. Use your imagination. Have fun!
a Polaroid PDC 700 Digital Camera
b Four AA batteries
c Camera-to-computer cable (RS-232C serial cable)
d Camera case
e Wrist strap
f Camera-to-TV cable (video cable)
g Polaroid PhotoMAX Image Maker Software CD-ROM
h AC power adapter
i AC power adapter cord
j Polaroid PhotoMAX PDC 700 QuickStart Card
Please fill out and mail in your registration card!
2
Page 4
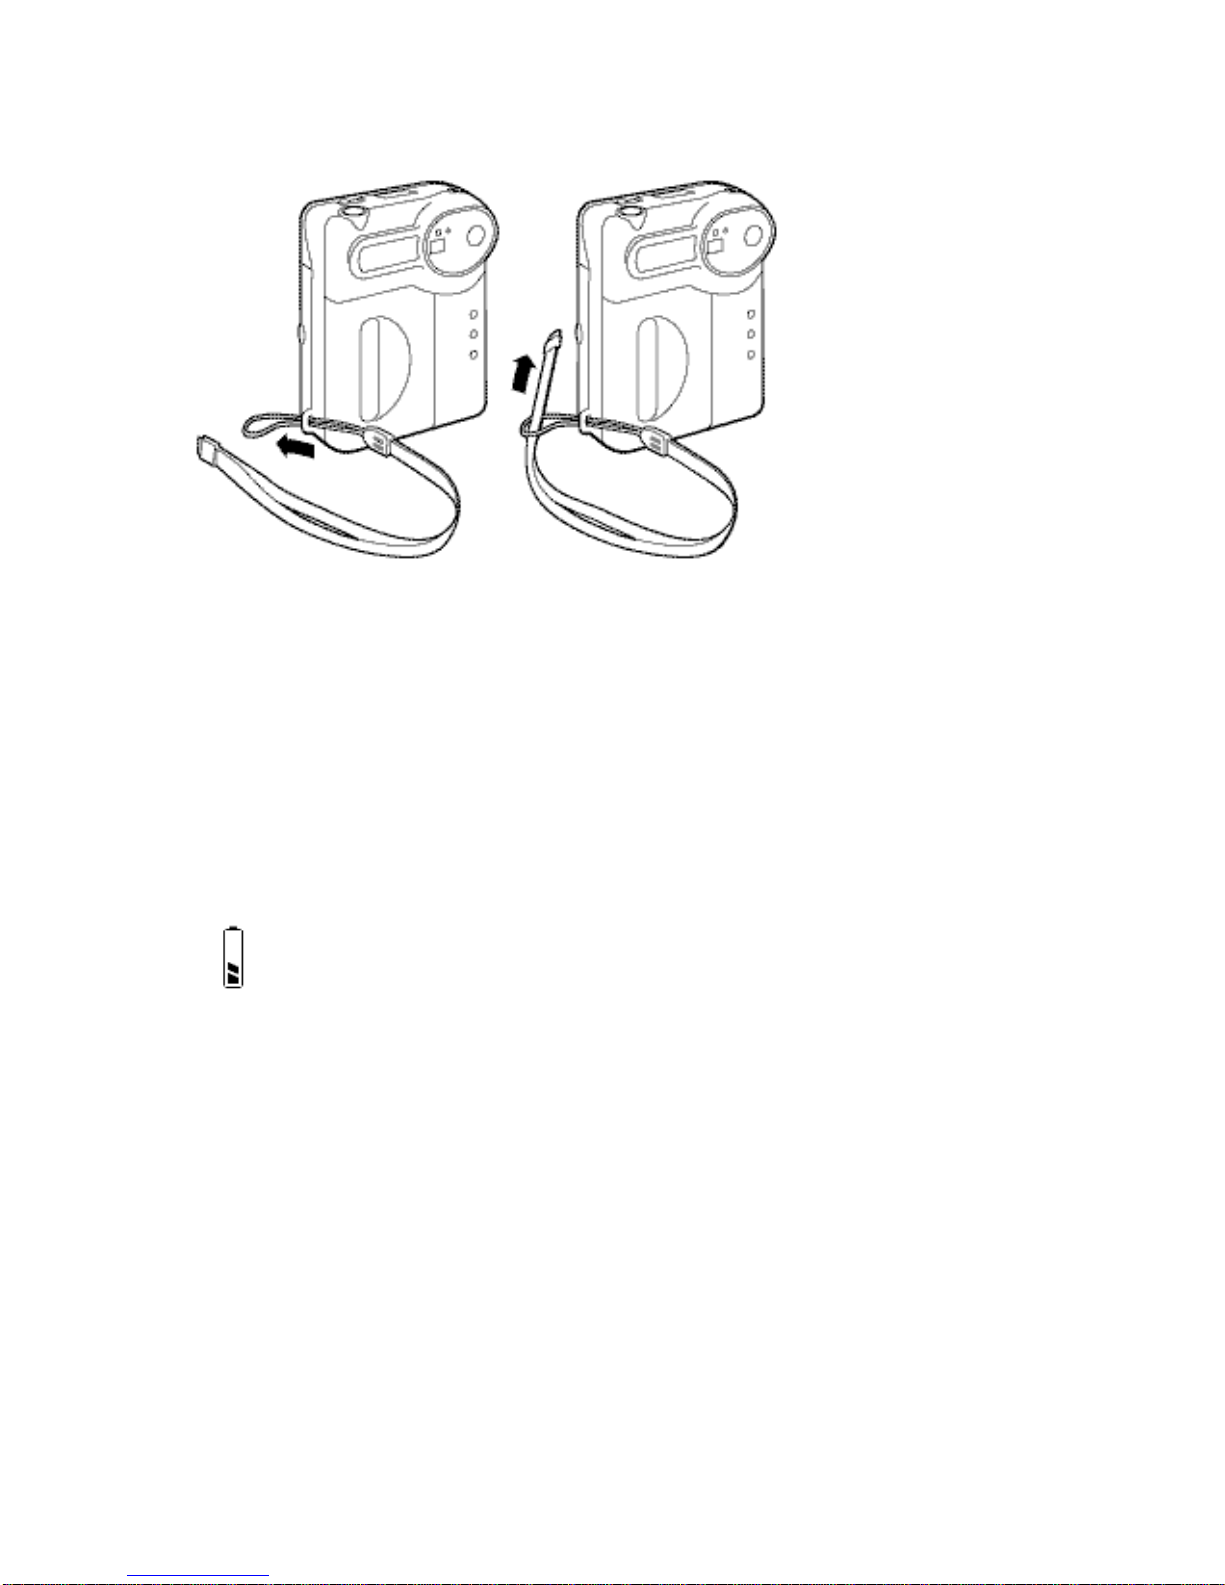
Attaching the wrist strap
Power Supply
You can operate the Polaroid PDC 700 digital camera on battery power or with the AC
adapter. Use the AC adapter whenever possible to extend the life of your batteries. It is a
good idea to keep a set of extra batteries handy, especially on a trip when it may not be
possible to find replacement batteries easily.
If the camera is not connected to the computer and you are not using the AC adapter, the
camera goes into power-save mode.
The camera displays a low battery icon on the LCD display
when the battery power is weak. When you see this icon, replace
the batteries with a new set as soon as possible.
When battery power is low you can continue to use the camera
without the flash for a short period of time. You cannot turn on
the camera when the batteries are dead.
Loading batteries
1. Open the battery compartment on the bottom of the camera by pushing the button in
the direction indicated by the arrow.
3
Page 5
2. Load 4 AA-size batteries into the compartment.
Make sure the + and - terminals are oriented correctly in the compartment, or the
camera will not function. Do not mix old and new batteries, batteries of different
types (for example, Alkaline and Lithium), or batteries from different manufacturers.
3. Close the battery compartment cover. Make sure it is closed securely.
Caution: If you are not going to be using your camera for an extended length of time or
if the batteries are dead, remove the batteries to prevent leaks or corrosion. Camera
damage caused by misuse of batteries is not covered under the terms of the One
Year Limited Warranty.
Some tips for extending the life of your batteries:
• Use the optical viewfinder to take pictures. Prolonged use of the LCD display
shortens the life of the batteries.
• Use the AC adapter to review images on the LCD.
• Use the AC adapter to review images on your TV.
4
Page 6

Connecting the AC adapter
Using the Optional Memory Card
Images are stored in the 4 MB flash memory in the Polaroid PDC 700 Digital Camera.
The images you take with your camera also can be stored on a removable memory card.
The memory card is an optional ATA-compatible memory device that gives your camera
additional memory. With additional memory you can store more images or images of
higher quality. CompactFlash card maximum size: 48MB.
You need an external device to transfer images from the memory card to your computer.
You also can transfer images from the memory card to a Laptop computer using the
PCMCIA slot.
When you use a memory card, the images are stored on the card and not in the flash
memory in the camera.
Note: If an unformatted memory card is installed in the camera when you turn on the
camera, the card is formatted automatically. You also can manually format the memory
card.
5
Page 7

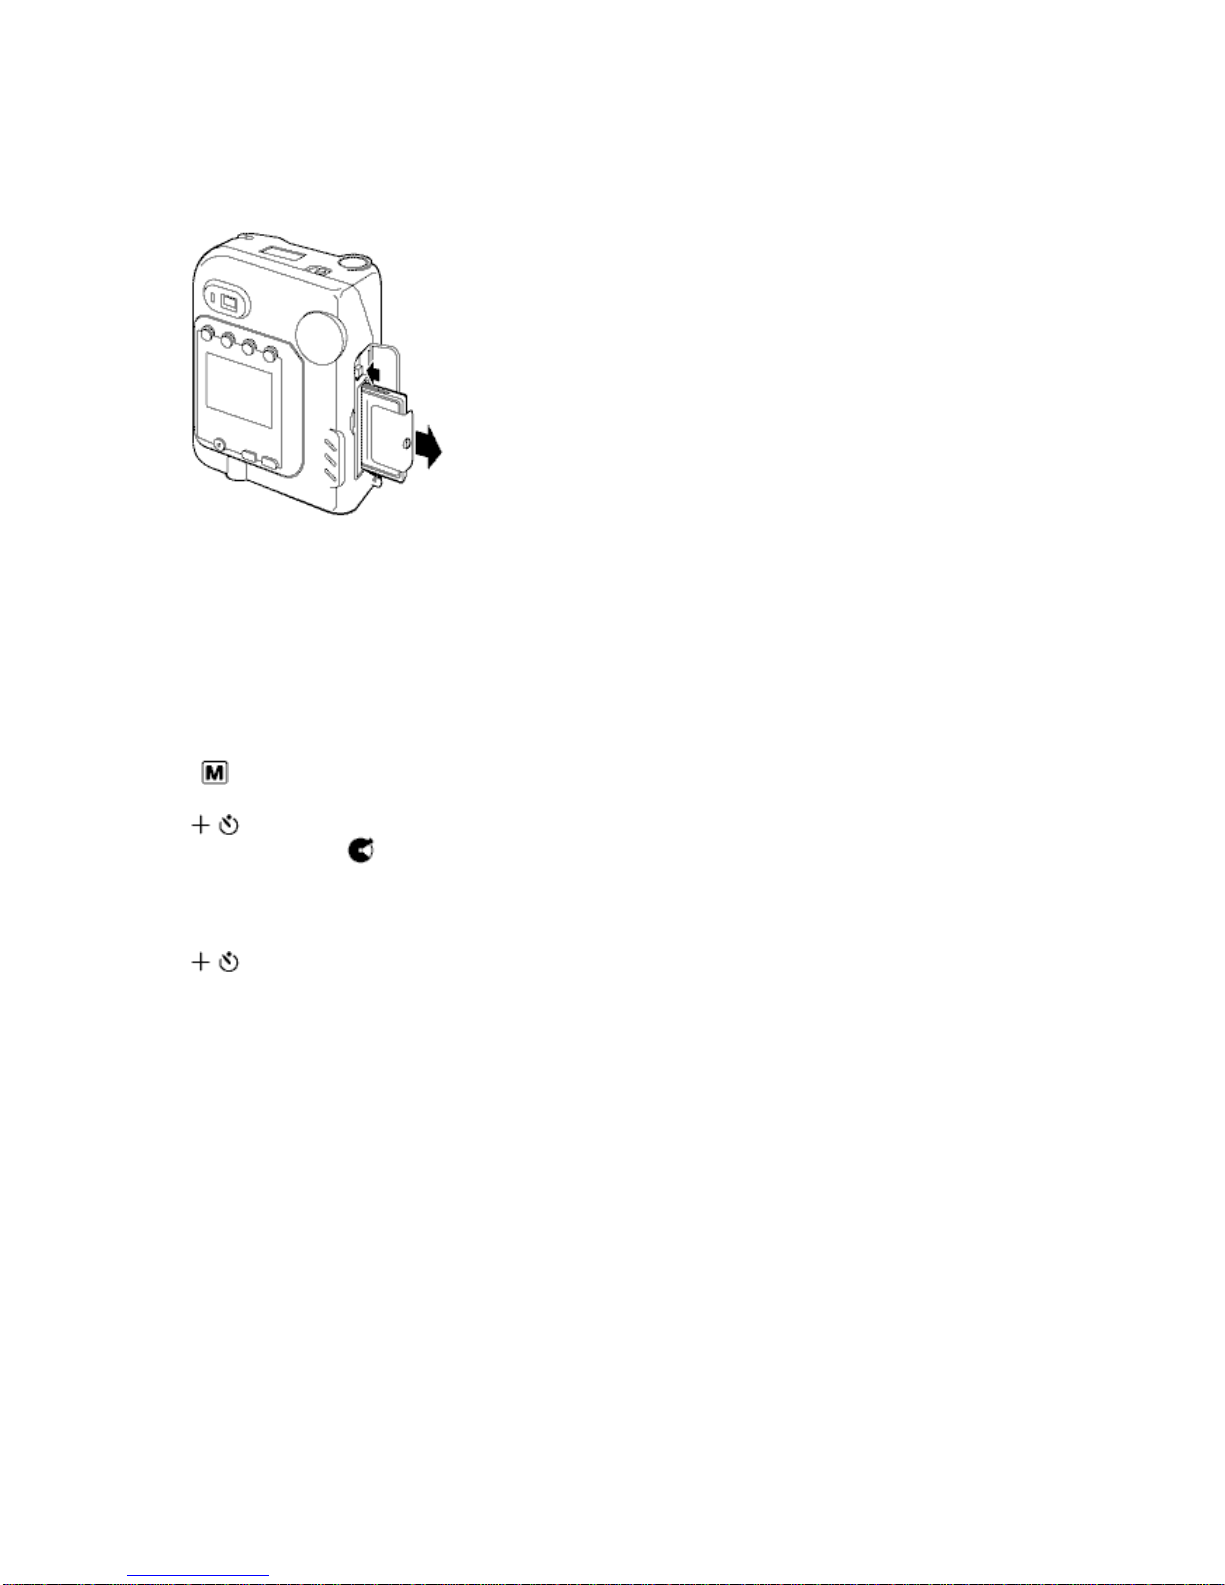
To insert the memory card:
1. Turn off the camera.
2. Open the memory compartment.
3. Insert the memory card into the slot.
Make sure the card is pushed firmly into the slot.
Note: The camera prompts you to format the memory card if it is not formatted. The
camera displays the format menu on the LCD display.
6
Page 8
To remove the memory card
1. Press the button next to the card and pull the card out from the slot.
2. Close the memory compartment door.
Formatting the flash memory and a memory card
1. Turn on the camera.
2. Press the Menu Mode button.
3. Press the Next/Self-timer button to move the cursor to the Format Memory
icon .
4. Press the shutter button to display the Format screen.
5. Press the Next/Self-timer button to format the flash memory and the
memory card. Press the Previous/Flash button to cancel the operation.
Warning: Once you format the flash memory or a memory card, all images are erased
and cannot be retrieved - they are gone forever! Before you format the flash memory
or a memory card, transfer the images to your computer.
7
Page 9

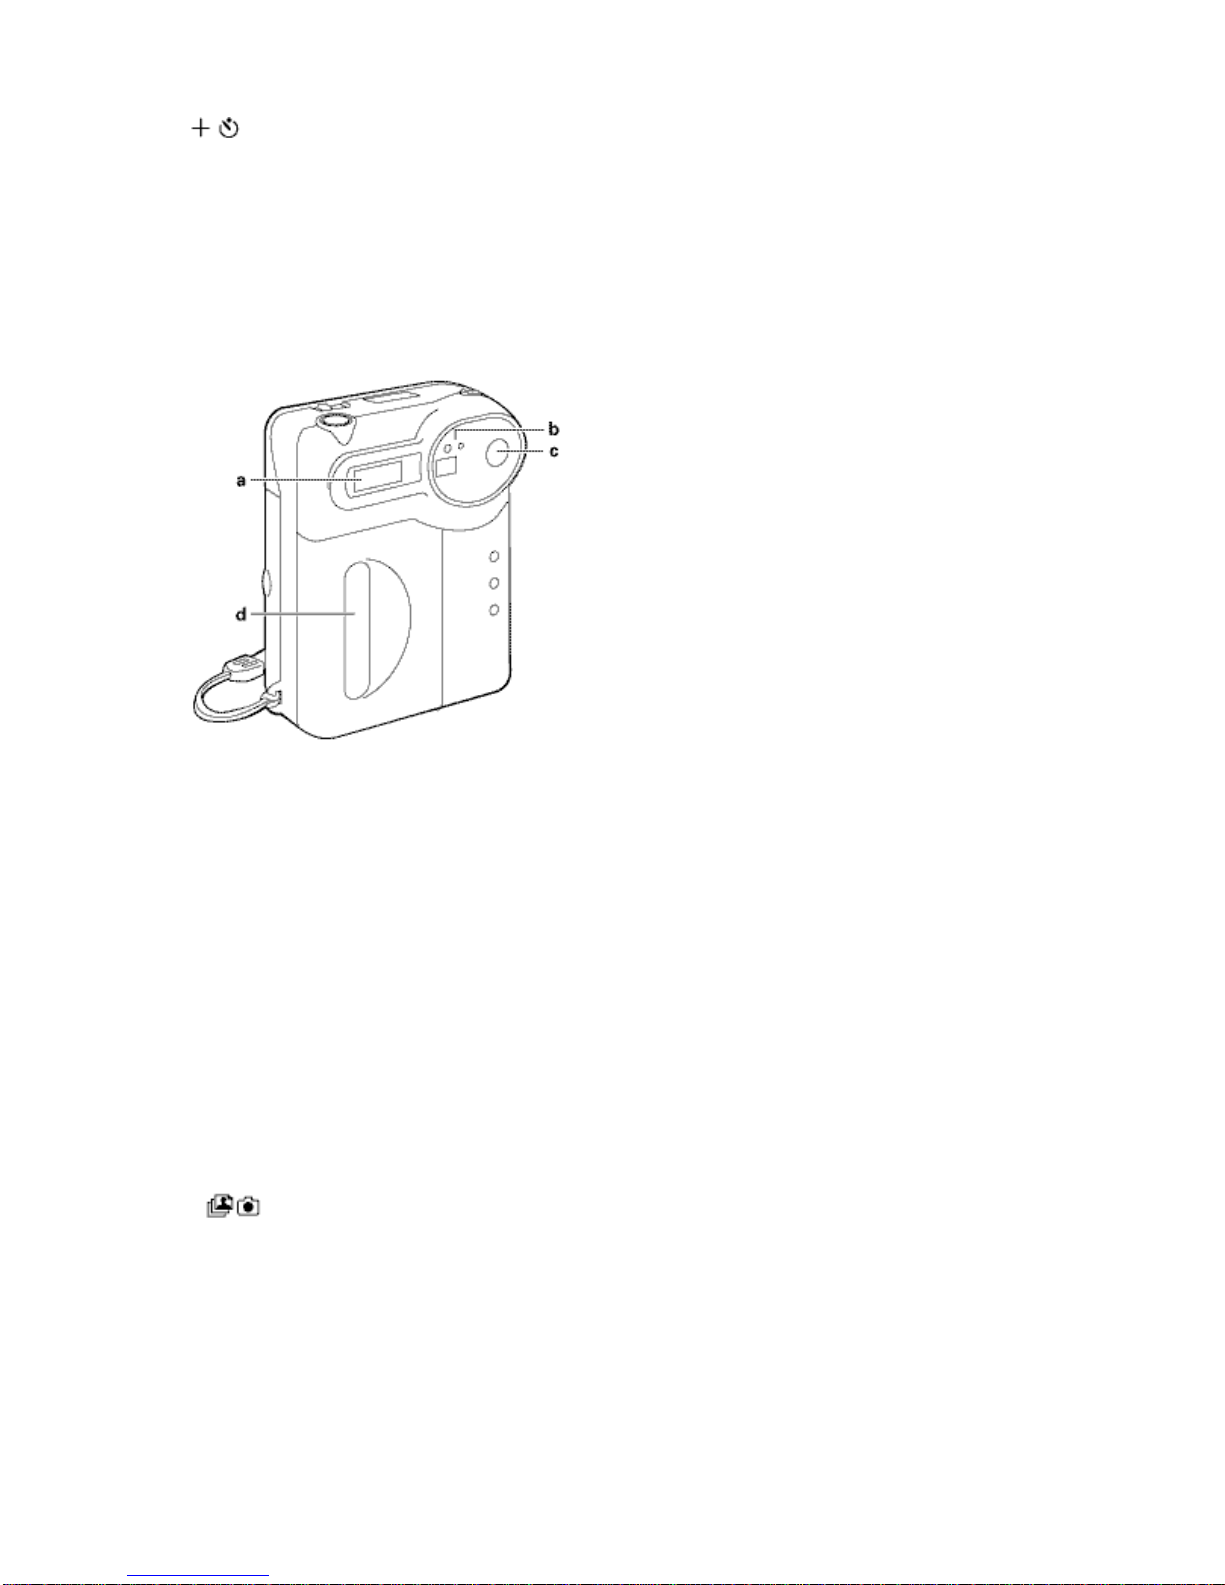
Using the Camera
To turn on the power to the camera:
1. If you have the optional memory card, insert it now.
2. Slide the power switch (c) on the top of the camera to the right.
3. The default camera settings appear on the Status panel (a):
a Battery status
b Flash setting
c Number of images that can be taken (Record mode) and the current picture index
(Playback mode)
d Resolution setting on the top of the camera.
To set the time and date:
1. Turn on the camera.
2. Press the Menu Mode button.
3. Press the Next/Self-timer button to move the cursor to the Set Time-Date
icon .
4. Press the shutter button (b) to display the Set Time screen
.
5. Press the Next/Self-timer button to move the cursor to each setting that you
want to change. Press the shutter button to toggle through the settings.
8
Page 10
6. Press the Next/Self-timer button to move the cursor to the OK icon.
7. Press the shutter button to save the time and date settings and to close the Set
Time screen.
Taking a Picture with Your PDC 700 Digital Camera
You can take pictures using the optical viewfinder (c) or using the LCD display. Use the
optical viewfinder for faster processing and flash recycle time and to optimize battery
life. Use the LCD display to optimize framing your image when you are using the macro
lens to take close-ups of objects. You can select your flash (a) settings, and even put
yourself in the picture with the self-timer (b).
To take a picture:
1. Turn on the camera.
The camera is in Record mode by default when you turn it on.
2. Press the Play/Record button if the camera is not in Record mode.
3. Slide the lens setting button to one of the following settings:
9
Page 11
Icon For Subjects…
Macro lens
8 to 18 in. from the camera
Normal lens
18 in. to infinity from the camera
4. Press the Erase/SFN button on the back of the camera to set the resolution to one of
the following options:
Icon Description
640 x 480 resolution
Superfine mode = 36 pictures (1/8 compression ratio)
Fine mode = 68 pictures (1/15 compression ratio)
Normal mode = 90 pictures (1/20 compression ratio)
1024 x 768 resolution
Superfine mode = 12 pictures (1/8 compression ratio)
Fine mode = 25 pictures (1/15 compression ratio)
Normal mode = 50 pictures (1/20 compression ratio)
5. Press the Previous/Flash button to set the flash to one of the following options:
Icon Flash Setting
• The flash fires automatically.
• The autoexposure sensor determines when lighting conditions require
additional light.
• This is the default camera setting.
• The flash fires for every picture.
• Use fill flash when there is a light behind the subjects to fill in and soften
strong shadows.
• Use on cloudy days.
• The flash does not fire.
• Use in places where flash is prohibited or may be distracting, or when
shooting toward a reflective background, such as a window or a mirror.
6. Take a picture:
10
Page 12

If you want to… Then…
Use the optical viewfinder
Use the LCD display
7. Once you have composed your picture, press the shutter button.
A preview of your picture and the Delete Now? message appears on the LCD
display. Press the Erase/SFN button if you do not want to save this image.
The green LED next to the optical viewfinder blinks. When the LED stops blinking,
you can take another picture.
Tips for Taking Great Pictures
a. Look through the optical viewfinder on the back of the
camera.
b. Frame the image.
a. Press the LCD display button on the back of the
camera to turn on the LCD display.
b. Point the camera at your subject and frame the image.
• Keep the sun behind you or at your side. Avoid having the sun directly overhead.
• Use the fill flash setting if there is a light behind your subject.
• In low light level conditions, use a tripod to avoid camera movement during
exposure.
• Avoid extreme temperatures (below 13°C (55°F) or above 35°C (95°F)), which can
affect battery performance.
• Keep the subject within the flash range (18 in. to 10 ft. (0.45m to 3m)).
• Avoid shooting toward reflective objects to avoid hot spots in your pictures. You can
use the fill flash setting if you cannot avoid shooting toward reflective objects.
•• Periodically clean the lens, the LED area on the front of the camera, and the LCD
display on the back of the camera with a soft, lint-free cloth. Do not use cleaning
solutions or chemically-treated tissues.
11
Page 13

Using the PDC 700 Digital Camera Controls
Use the LCD display and function buttons on the back of the camera to set the camera
controls:
a Multiple Display/EV* button
b Erase/SFN* button
c Menu Mode button
d Play*/Record mode button
e LCD display
f Next/Self-timer* button
g Previous/Flash* button
h LCD display
*Power on defaults.
12
Page 14

Changing flash options
You can select two different flash modes, or disable the flash. Press the Previous/Flash
button on the back of the camera until you see one of the icons in the following
table on the Status panel:
• The flash fires automatically when the autoexposure sensor
determines that lighting conditions require additional light.
• This is the default flash setting.
• The flash fires for every picture.
• Use fill flash when there is a light behind the subjects to fill in
and soften strong shadows.
• Use on cloudy days.
• The flash does not fire.
• Use in places where flash is prohibited or may be distracting, or
when shooting toward a reflective background, such as a
window or a mirror.
Note: The camera remains in the flash mode you select until you choose another flash
mode.
If you are taking flash pictures and your subjects are 1.5 to 3 feet from the camera, your
picture might be overexposed. You may need to compensate for this by changing the
Exposure Value (EV). You can take the picture and preview the exposure on the LCD
display. If you think the picture is overexposed, you can delete the image, change the EV
(-0.5 or -1.0 EV), and retake the picture.
Changing the EV compensation value
The Exposure Value (EV) system defines the f-stop and shutter speed as one number.
The camera chooses the appropriate EV automatically. However, you can use the EV
system to compensate for the exposure value manually.
The exposure value range is -2EV to +2EV in increments of 0.5. Increasing the EV
compensation value results in a picture that is more exposed (brighter). Decreasing the
EV compensation value results in a picture that is less exposed (darker).
You can use the LCD display to preview your subject to determine if there is enough
light. Take your picture and look at the preview on the LCD display. If your image is
overexposed or underexposed, change the EV.
Note: The EV compensation value is reset to the default value (+0.0) when you turn off
the camera.
13
Page 15

To change the EV compensation value:
1. Turn on the camera.
2. Press the Multiple Display/EV button.
The Expo. Val. screen appears.
3. Press the shutter button to change the exposure value in 0.5 increments.
4. Press the Next/Self-timer button to move the cursor to the OK icon and
press the shutter button to save the exposure value setting and exit this
screen.
Press the Next/Self-timer button to move the cursor to the exit icon and
press the shutter button to exit this screen without saving any changes.
Setting XGA or VGA resolution
Use this option to set the image resolution to XGA or VGA.
640 x 480 resolution
The number of pictures you can store in the 4 MB flash memory:
Superfine mode = 22 pictures
Fine mode = 45 pictures
Normal mode = 90 pictures
1024 x 768 resolution
The number of pictures you can store in the 4 MB flash memory:
Superfine mode = 12 pictures
Fine mode = 25 pictures
Normal mode = 50 pictures
Note: Use the resolution setting (VGA or XGA) with the Image Quality setting to obtain
higher or lower quality images, depending on your needs. The higher the resolution and
the lower the compression, the higher the image quality. However, higher quality images
have larger file sizes and fewer of them can be stored in the memory of the camera.
14
Page 16

To set the resolution:
1. Turn on the camera.
2. Press the Menu Mode button.
To move the cursor, press the Previous/Flash or Next/Self-timer buttons.
3. Press the shutter button to toggle between VGA and XGA mode.
4. Press the Menu Mode button to exit.
Setting the Image Quality mode
Use this setting to change the amount an image is compressed. The higher the resolution
and the lower the compression, the higher the image quality. However, higher quality
images have larger file sizes and fewer of them can be stored in the memory of the
camera. Also, the large images take up more space on your hard drive when you transfer
them to your computer.
Note: Use the Image Quality setting with the resolution setting (VGA or XGA) to obtain
higher or lower quality images. You can set the IQ mode to one of the following modes:
Quality Description
S Super Fine
Low compression
F Fine
Medium Compression
This is the default setting.
N Normal
High compression
To change the Image Quality setting:
1. Turn on the camera.
2. Press the Erase/SFN button.
The setting is displayed on the Status panel. Also, the number of images
you can take changes based on the Image Quality setting and resolution
that you select. This number is displayed on the Status panel.
15
Page 17

Setting the Auto White Balance
Different light sources produce light of different colors. This option takes the lighting
conditions into account and produces the highest color fidelity possible.
Select one of the following modes:
Auto White
Balance
Use this setting to allow the camera to adjust for the lighting
automatically. This is the recommended setting for most picture taking
environments and is the default camera setting.
Sunshine Can use this setting if you are taking pictures outdoors in bright
sunlight.
Shade Can use this setting if you are taking pictures outdoors and there is
shade.
Lamp Can use this setting if you are taking pictures indoors with lighting from
a lamp with incandescent light bulbs.
Note: You must turn off the flash when you use this setting. If there is
not adequate light, change the +EV setting and use a tripod.
Fluorescent Use this setting if taking pictures indoors with lighting from a
fluorescent light bulb.
Note: This setting is reset to the default setting (Auto White Balance) when you turn off
the camera.
To set the Auto White Balance:
1. Turn on the camera.
2. Press the Menu Mode button.
The cursor appears on the first icon.
3. Press the Next/Self-timer button to move the cursor to the Auto White
Balance icon .
4. Press the shutter button to toggle between the different settings (see the
previous table).
5. Press the Menu Mode button to exit.
16
Page 18
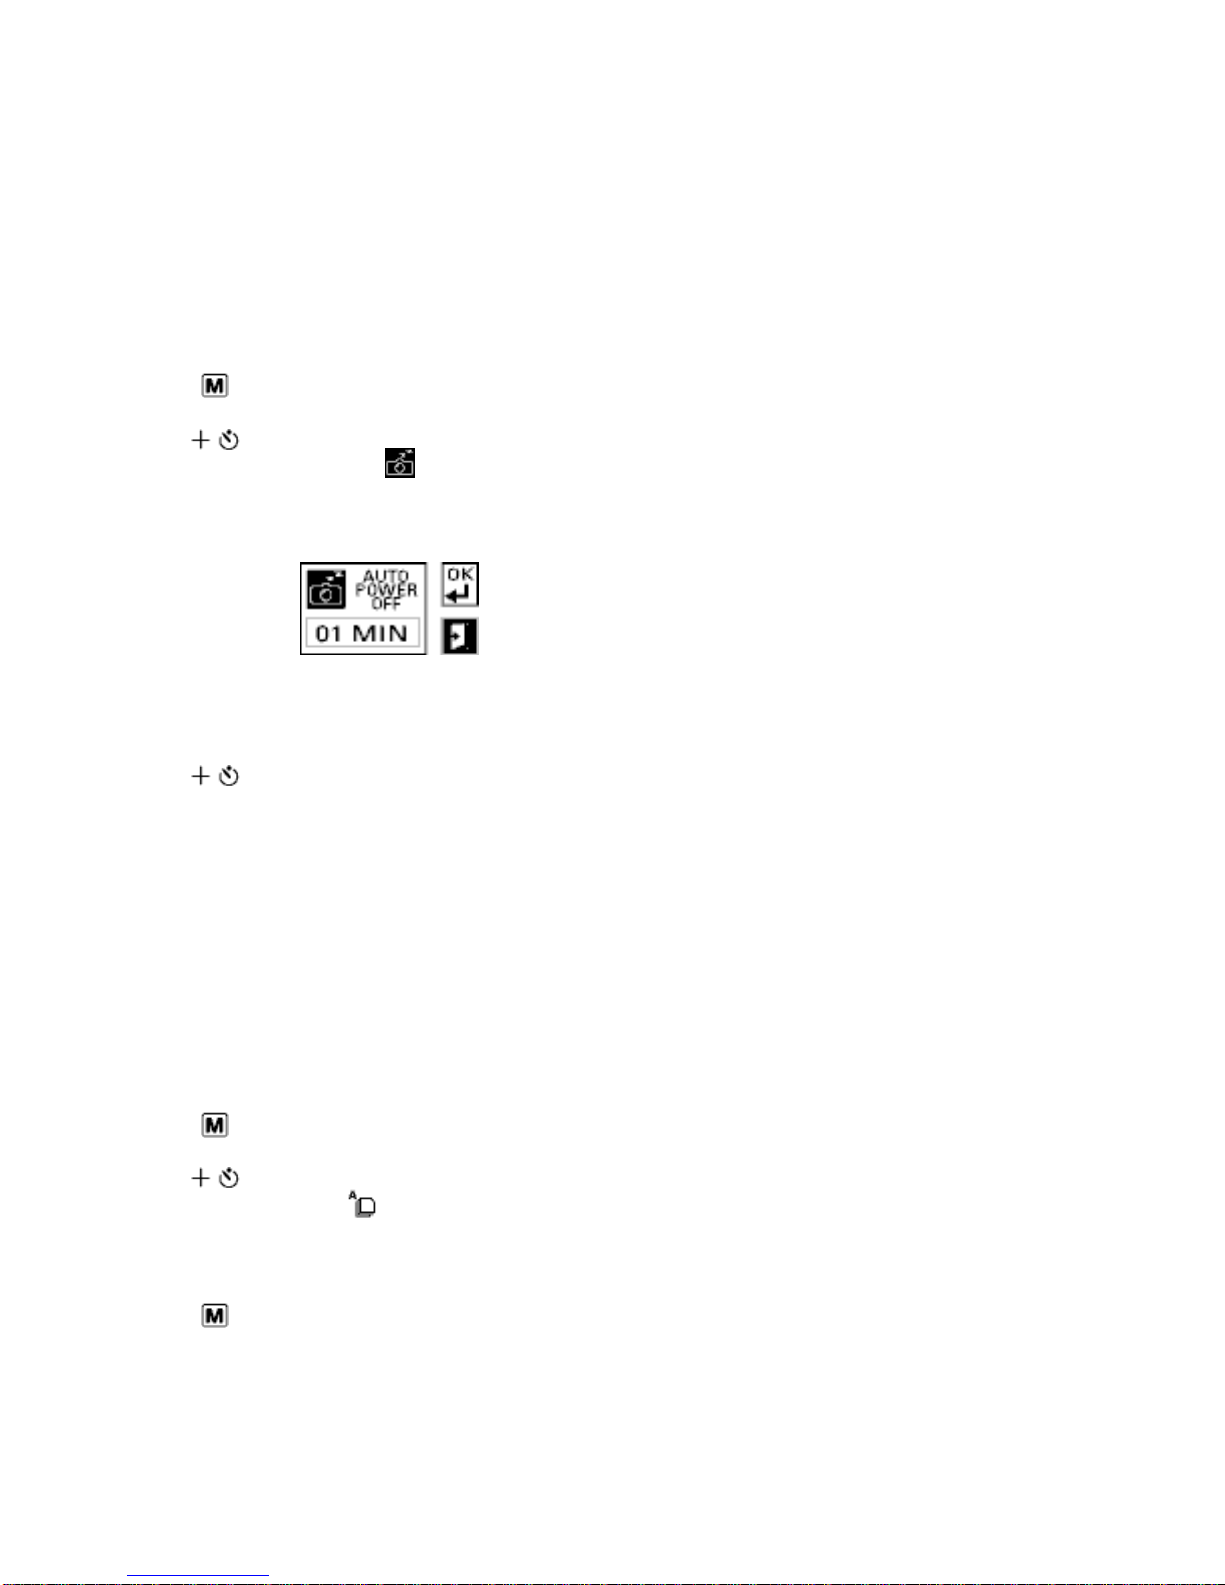
Setting the Auto Power Off time
Use this option to set the number of minutes before the camera power is shut off
automatically. This option saves battery life.
To set the Auto Power Off time:
1. Turn on the camera.
2. Press the Menu Mode button.
3. Press the Next/Self-timer button to move the cursor to the Set Auto Power
Off icon .
4. Press the shutter button to display the Auto Power Off screen.
5. Press the shutter button to change the number of minutes (up to 99 minutes).
Press the Next/Self-timer button to move the cursor to the second digit.
6. Press the Next/Self-timer button to move the cursor to the OK icon.
7. Press the shutter button to save the setting and to close the Auto Power Off
screen.
Setting playback mode
Use this option to set the playback mode to Manual or Auto. In Manual mode, you need
to use the Next/Self-timer and Previous/Flash buttons to scroll through the images. In
Auto mode, the camera displays each image in memory automatically.
1. Turn on the camera.
2. Press the Menu Mode button.
3. Press the Next/Self-timer button to move the cursor to the Set Auto Play
icon .
4. Press the shutter button to toggle between the settings.
5. Press the Menu Mode button to exit.
17
Page 19

Displaying information on the LCD display
Mode Displays. . .
Record Date
Icon if connected to the AC adapter
Self-timer icon if the timer is set
Play Time and date
Number of the image in memory
Image quality
Flash setting
Resolution
Play mode icon
To display information on the LCD display:
1. Turn on the camera.
2. Press the Menu Mode button.
The cursor appears on the first icon.
3. Press the Next/Self-timer button to move cursor to the Information icon .
4. Press the shutter button to toggle between the settings.
5. Press the Menu Mode button to exit.
Adjusting the LCD display brightness
Turn the LCD dial (a) on the bottom of the camera with your fingernail or a small coin to
adjust the brightness of the LCD display. Turn the dial to the right to darken the display
and to the left to lighten it.
18
Page 20

Using the self-timer
Use this feature to include yourself in your picture.
To use the self-timer:
1. Place the camera on a tripod or other steady support.
2. Turn on the camera.
Set the resolution, flash, and distance settings, if needed.
3. Compose your picture in the viewfinder. Plan where you will appear in the
picture.
4. Press the Next/Self-timer button.
The red LED on the front of the camera is lit.
5. Press the shutter button to activate the self-timer.
You have 10 seconds to get into the picture. The red LED on the front of the
camera next to the viewfinder blinks as the self-timer counts down.
Managing Stored Pictures
Viewing Pictures
View images on the LCD display one image at a time or as thumbnails (nine at a time).
1. Turn on the camera.
2. View images:
To view. . . Do the following. . .
One image at a time a. Select the playback mode.
b. Press the Play/Record mode button.
c. Press the Play/Record mode button
again to return to Record mode.
19
Page 21

Thumbnail images
a. Press the Play/Record mode button.
Note: You cannot view thumbnail images in
Auto Play mode.
b. Press the Multiple Display/EV button.
c. Press the Next/Self-time r or the
Previous/Flash buttons to scroll through
the images if there are more than nine images
stored in memory.
d. Press the Play/Record button to return
to Record mode.
Copying images to the memory card
This frees up flash memory so you can take more pictures.
To copy images:
1. Turn on the camera.
2. Press the Menu Mode button.
The cursor appears on the first icon.
3. Press the Next/Self-timer button to move the cursor to the Copy Film to
Card icon.
4. Press the shutter button.
One of the following messages appears on the LCD display:
• None Moved - no images were moved because the memory card is full or
is not installed in the camera.
• Partially Moved - some of the images were moved. There is no more
space on the card.
• Totally Moved - all the images were moved successfully.
20
Page 22

Erasing Images
You can erase selected images or erase all images from memory.
Erasing selected images:
1. Turn on the camera.
2. Press the Play/Record Mode button.
3. Do one of the following:
• Press the Next/Self-time r button to find the image that you want to
erase.
• Press the Multiple Display/EV button if you want to view the images
as thumbnails. Press the Next/Self-timer or Previous/Flash button to
select the image that you want to erase. Press the Multiple
Display/EV button to view the selected image.
4. Press the Erase/SFN button to display the Erase screen.
5. Press the Next/Self-timer button to erase the image from the camera
memory or the memory card.
Press the Previous/Flash button to close the Erase screen without erasing
any images.
Warning: Once you erase an image, it cannot be retrieved - it is gone forever!
Before you erase any images, transfer the images to your computer. If you have a
memory card, copy the images to the card and remove the card from the camera.
Erasing all images from memory
1. Turn on the camera.
2. Press the Menu Mode button.
The cursor appears on the first icon.
3. Press the Next/Self-timer button to move the cursor to the Erase All icon.
21
Page 23

4. Press the shutter button to display the Erase All screen.
5. Press the Next/Self-timer button to erase all the images in the camera
memory.
Press the Previous/Flash button to close the Erase All screen without erasing
any images.
Warning: Once you erase an image, it cannot be retrieved - it is gone forever!
Before you erase any images, transfer the images to your computer. If you have a
memory card, copy the images to the card and remove the card from the camera.
Displaying Images on a TV (NTSC only)
View the images stored in your camera on any TV equipped with a video input terminal.
1. Turn off the TV and turn off the camera.
2. Plug one end of the video cable into the video input connector on the TV.
3. Open the side compartment on your camera and the plug the other end of the video
cable into the VIDEO OUT connector.
4. Turn on the TV and set the channel used for video input.
For more information about using your TV for video input, refer to the manufacturer's
manual for your TV.
5. Turn on the camera.
The camera is in Record mode.
6. Press the Play/Record Mode button to enter Play mode. Use the Next/Self-
timer and Previous/Flash buttons to review the images one at a time.
Press the Multiple Display/EV button to view the images as thumbnails.
22
Page 24

Using Polaroid PhotoMAX Image Maker Software
Minimum System Requirements:
• IBM Compatible computer with a mouse
• Microsoft Windows 95 or Windows 98
• 16 MB of RAM (32 MB recommended)
• 90 MB available hard drive space
• Hi-Color display adapter (True Color recommended)
• 16-bit display card (24-bit display card recommended)
• Color monitor
• 2X or faster CD-ROM drive
• Sound card (recommended)
It is recommended that you set your display to 24-bit color (True Color) or 16-bit color
(High Color). True color provides millions of colors and gives a more realistic
representation of your images.
Getting Started
Before you begin to discover the fun and exciting features of using your Polaroid
PhotoMAX Image Maker Software, do the following:
1. Create digital images of your favorite things.
You can use a digital camera image, Web image, photo CD image, or scanned image
with your PhotoMAX Image Maker Software.
2. Turn off your computer.
3. Connect one end of the serial cable to the back of the computer and connect the other
end of the cable to the digital port on the digital camera.
4. Turn on the camera, then turn on the power to your computer. Use the AC adapter
whenever possible to extend the life of your batteries. A No Space message appears
on the LCD display when there is no more room in the flash memory or on the
memory card.
23
Page 25

5. Double-click the PhotoMAX icon on your desktop and you are ready to begin.
Note: If you are using PhotoMAX Pro to transfer pictures, you need to select PDC
700 Camera from the Select Source dialog box (select File>Acquire >Select
Source), and then select File>Acquire .
6. Click and do one of the following:
If you want to… Then…
Open an image file that is located on
your hard drive, diskette drive, or photo
CD
a. Click .
The Open dialog box
appears.
b. Select the location of your
image.
c. Select the image you want to
edit.
Open an image that was saved in an
album
d. Click Open.
The image appears in the
image tray.
a. Click .
The album manager window
appears.
b. Select the album from the
Album list.
c. Double-click the image you
want to edit.
The image appears in the
image tray.
24
Page 26

Transfer images from your PDC 700
Digital Camera
a. Click .
The album manager window
appears.
b. Click
The download from camera
window appears and displays
thumbnails of the images
stored in your camera.
c. Click the images that you
want to transfer to your
computer and click OK.
Click Select All to transfer
all the images.
When the transfer is
complete, you are returned to
the album manager window.
Acquire your image from a digital
camera or scanner
d. Double-click the image
that you want to edit. It
appears in the image tray.
a. Click .
The album manager window
appears.
b. Click .
c. Select the device from the
Sources: list (for example,
select PhotoMAX Photo
Scanner, or select PDC 640).
Follow instructions. The
interface that appears
depends on the device you
selected.
25
Page 27

Managing Pictures
How do I… Solution
Make colors darker or
lighter?
1. Click .
2. Drag the slider to the left to make colors
darker. Drag the slider to the right to
make colors lighter.
3. Click the Brightness button when the
preview looks like the right colors.
Note: You can click undo if you do not
like the way your image looks.
Select more than one
area?
Enlarge the image in
the image tray?
Print multiple copies
of my picture on one
page?
Hold down the Shift key on your keyboard
as you make your selections.
1. Select .
2. Select Fill Display.
Note: This does not change the actual
size of the file that is saved on the hard
drive. It only enlarges the image in the
image tray to make it easier to make
changes to the image. Use the Resize
tool to enlarge the image.
1. Click .
2. Click .
The PhotoPrinter application opens
26
Page 28

Add a border to my
image?
1. Click .
2. Click the Select tool and select an area
around the outside of your image (for
example, select an area ¼ inch from the
edge).
3. Click Select Inverse.
4. Click Retouch Photo.
5. Click the Gradient Fill tool.
6. Select a beginning and ending color.
7. Move the mouse into the selected area.
8. Press the left mouse button and drag the
mouse within the selected area.
9. Release the mouse button to create the
gradient fill.
Use the Clone tool to
add a third eye to my
friend's picture?
1. Open the image of your friend.
2. Click .
3. Click the Clone tool.
Tip: If this tool does not seem to work,
make sure that no part of your image is
selected. Also, make sure your brush
size is large enough.
4. Click the right mouse button on your
friend’s eye. A plus sign (+), alternately
flashing black and white, marks the
exact area to be cloned.
5. Place the clone tool over the area where
you want the new eye to appear. Press
the left mouse button and drag the Clone
tool without releasing it until you have
cloned the new eye!
27
Page 29

Creating an Album
Click to create a photo album of your images. You can create new
albums or add to existing albums. The album manager window lets you transfer images
directly from a TWAIN device or from a FlashPath Floppy Disk Adapter.
1. Click .
2. Click .
The album manager window appears.
3. Click to create a new album or click the down arrow to select an
existing album from the list.
A default album (sample.abm) that contains some sample images is installed with the
Polaroid PhotoMAX Image Maker Software in the PhotoMAX Albums folder. You
can add your pictures to the sample album or create a new album.
4. Click to add an image to the album.
28
Page 30

5. To transfer images from a TWAIN device:
Click To . . .
Transfer images from the PDC 700 Digital Camera directly to an
album.
Get an image directly from any digital camera or scanner.
Transfer images from a SmartMedia memory card using the
FlashPath Floppy Disk Adapter.
6. Click to print thumbnails to your printer.
The Print Thumbnails dialog box appears. You can print all or selected thumbnails
and can print the file name of each thumbnail. Click Setup to change printer settings.
7. Click to sort the images in your album.
8. Click to delete the selected image from your album.
Note: You are not deleting the image from your hard drive, you are just removing
the image from the album.
9. Double-click the image that you want to edit or click to close the
album manager window.
29
Page 31

Tools
Edit photo tools:
• Crop Image - changes your image so that only the selected area remains
• Copy Area - copies the selected area of your image to the Clipboard. You then can
paste the copied area to another section of your image
• Paste - pastes the contents of the Clipboard into your image. You also can paste into
another application (for example, a word-processing application)
• Discard Selection - removes the selection outline from the image
• Rotate 90° - turns the selected part of the image counterclockwise 90-degrees
• Fill Display - enlarges the image in the image tray
• Select All - selects the entire image
• Select Inverse - selects the opposite of what is currently selected
• Flip Horizontal - reverses entire image (or pa rt of the image)on a horizontal axis
• Flip Vertical - reverses entire image (or selected part of the image) on a vertical axis.
Image tray toolbar tools:
• Select - selects a rectangular area on your image
• Select None - removes the selection box from all parts of the image that are
currently selected
• Zoom in - increases the displaye d portion of your image (the actual size of
the image does not change although the image looks bigger)
• Zoom out - decreases the displayed portion of your image (the actual size of
the image does not change, although the image looks smaller)
• Grabber – enables you to work on different parts of the image in the image
tray (this tool works only when you zoom in or zoom out the image)
• Freehand Rotate - rotates the selected part of the image
• Add Text - adds text in different fonts, colors, and sizes to your picture
30
Page 32

Retouch photo tool palette:
• Ellipse Select - selects an area of your image
• Freehand Select - selects an area by outlining it (like tracing with a pencil)
• Move Image - moves the mask (shape of the selected area, or selection box)
and the part of the image within the mask to another part of your image
• Magic Wand - selects connected areas of your image that are the same color
• Resize - increases or decreases the size of your selection
• Bucket Fill - adds color to connected areas of the same color
• Paintbrush - adds color, as if you are painting with a paintbrush
• Pen - adds color as if you are writing with a pen
• Airbrush - adds the active color as if you are spray painting with an airbrush;
the edges of the stroke are more diffused than those created with the Paintbrush tool
• Clone - copies an area of the image and uses it to paint elsewhere on image
• Eraser - erases color or part of the image that you moved to another
area; use the Select tool to select the part of the image that you want to erase
• Eyedropper - selects and changes your active color by picking a color
directly from your image
• Smudge - blends neighboring colors together by smudging the edges of color;
select the Brush Palette tool button to change the size and shape of the brush
• Wet Brush - imitates the effect of a watercolor brush
• Gradient Fill - fills a selected area with a blend or gradation of colors
31
Page 33

Special Effects tool palette:
32
Page 34

To apply an effect:
1. Scroll with the up and down arrows to display the effect you want in the special
effects tool palette:
2. Adjust the intensity to the desired level. View the result in the preview window.
3. Click the desired effect button to apply the effect to your image. The image tray now
shows the result of the special effect on your image.
To undo an effect:
1. Click undo if you do not want to keep an effect you have just applied.
Note: The undo tool undoes up to the last 10 actions.
2. Click redo to reapply the effect that you undid in step 1.
Using the Function Keys for Editing
Function Key Opens
F2 The Image Size window, which lets you change
the size of your image. You can maintain the
aspect ratio (if you change the height, the width
changes in proportion and vice versa).
F3 The Brightness and Contrast window, which lets
you adjust the tonal range of the image. You can
change the brightness and contrast for all RGB
values or for each value individually.
F4 The Hue and Saturation window, which lets you
change the hue (wavelength of light reflected
from or transmitted through an object) or the
saturation (the strength or purity of the color).
Saturation represents the amount of gray in
proportion to the hue.
F5 The Tone Adjustment window, which lets you
adjust the highlights, midtones, and shadows.
You also can let the PhotoMAX Image Maker
Software make the adjustment for you
automatically.
33
Page 35

Saving Your Image
Click on the function button bar to save the image as the following:
To save an image as a screen saver:
Click .
Your file is saved automatically.
Note: You cannot use a GIF-formatted file to create a screen saver. Save your file in
a different file format (for example, as a BMP).
To save an image as wallpaper:
Click .
Your file is saved automatically and appears on your desktop.
To save an image to a file:
To… Then…
Save the image with the
same file name and in
the same file format
Save the file with a
different name or in a
different file format
Click .
a. Click .
b. Select the folder on your hard
drive where you want to save the
image.
c. Type in a name for your new
image, if needed.
d. Choose the file format for your
saved image (BMP, TIFF, PCX,
GIF, TGA, JPG, EPS, or FPX).
Tip: If you want to use your
image on a Web page, save it as a
GIF or JPG file format.
e. Click OK.
34
Page 36

Printing Your Image
Click on the function button bar to print the image to an ink jet or laser
printer after you have created and saved your image. You can print your image directly to
a printer or use the PhotoPrinter software to print multiple images on a page.
Note: If you are using the Polaroid PhotoMAX Photo Printer to print your images, refer
to “Printing Images Using the PhotoMAX Photo Printer” below.
To print an image:
1. Click .
2. Click to open the Print dialog box.
3. Enter a description (limit of 45 alphanumeric characters and spaces) of your image in
the Description field.
The description appears below your printed image. If you do not want to print a
description of the image, leave this space blank.
4. Enter the number of copies you want to print in the Copies field.
5. Select your image and drag it to where you want it to appear on the page. You can
select Hori-centered to center your image on the page horizontally, or select Vert-
centered to center your image vertically.
6. Drag the Output slider to set the size of your printed image.
Note: The larger the image, the lower the resolution and quality of the printed image.
7. Click Print.
Your image prints to the device specified as your default printer.
35
Page 37

Printing Images Using the PhotoMAX Photo Printer
You can print your digital images directly to the PhotoMAX Photo Printer, or to another
ink jet or laser printer connected to your computer.
• Click the instant prints button to print to
the PhotoMAX Photo Printer.
This is the easiest way to print to your
PhotoMAX Photo Printer.
• Click the Print It! button to print to the
Photo Printer or to print to another printer.
To print an image using instant prints:
1. Open the image that you want to print.
2. Click instant prints.
Your image is sized and adjusted to fit properly on an instant photo automatically.
You do not have to make adjustments to any printer settings when using this option.
The picture ejects from the Photo Printer automatically.
The picture is dry as soon as it is ejected and can be handled immediately. However,
for the first few minutes, do not shake or bend the picture. Allow several minutes to
develop fully saturated colors. Handle the picture only by the edges.
To print an image using Print It!:
1. Open the image that you want to print.
2. Click .
3. Click to open the Print dialog box.
4. Click Printer Setup to open the Print Setup dialog box.
a. Select Polaroid Photo Printer Parallel from the Name: list if needed. To print to
a different printer, select that printer name from the Name: list.
b. Select Portrait or Landscape .
36
Page 38

c. Select Properties to open the Polaroid Photo Printer Parallel Properties window.
You may need to change the film type, enable or disable preview mode, enable or
disable IQA Technology, change the number of copies, or change the intensity of
the image.
d. Click OK.
5. Enter a description (limit of 45 alphanumeric characters and spaces) of your image in
the Description field.
The description appears below your printed image. If you do not want to print a
description of the image, leave this space blank. The description does not print on
your image if the image fills the entire image area on the film.
6. Enter the number of copies you want to print in the Copies field.
7. Select your image and drag it to where you want it to appear on the picture. You can
select Hori-centered to center your image horizontally, or select Vert-centered to
center your image vertically.
8. Drag the Output slider to set the size of your printed image.
Note: For the best results, set the dpi to 160. The larger the image, the lower the
resolution and quality of the printed image.
9. Click Print.
If Using Preview is selected on the Graphics tab on the Polaroid Photo Printer Parallel
Properties window, a preview of your image appears (go to step 10):
37
Page 39

If Using Preview is not selected, the image prints directly to the Photo Printer.
10.Click the printer icon on the preview window.
The green LED on the printer blinks while the picture is processing. The picture
ejects from the Photo Printer when it is done processing.
The picture is dry as soon as it is ejected and can be handled immediately. However,
for the first few minutes, do not shake or bend the picture. Allow several minutes to
develop fully saturated colors. Handle the picture only by the edges.
Using the PhotoPrinter Software
Use the PhotoPrinter software to print multiple copies of the same image on the same
page. You can print different sizes of the same image on the same page.
1. Click .
2. Click .
3. Select one of the layout options at the bottom of the window. Use the left and right
arrows to display more layout options.
4. Select the number of copies.
5. Click Printer Setup if you need to change printer settings.
6. Click Print.
7. Click the close button in the upper-right corner of the window to close the
PhotoPrinter software.
38
Page 40

Using the Internet Options (Note: As of 1/2001 WebCannon! is not supported.)
Click on the function button bar for exciting ways to share your images
with friends, family, and everyone else on the World Wide Web. You can send your
image in postcard-style multimedia greetings with Multimedia Email. Or create and post
your own custom Web site, complete with your images with WebCannon!.
Creating a Web Site
WebCannon! lets you create your own Web site with a variety of easy-to-use templates.
Tip: To get help, select Intro on the WebCannon! main window or press the right mouse
button to display an options menu. Select Help from the options menu.
To create a Web site:
1. Click New to create a new Web site.
2. Choose the category (Personal, Forms, Slideshow, Business) and a style for the page
you want to create and click OK. Click the Previous and the Next buttons to display
different types of pages for the style you selected.
Note the hints at the top of the window.
39
Page 41

3. Enter the name of your new Web site and click OK. Limit the name to eight
alphanumeric characters.
4. Move the cursor over an element or any blank space on the window and press the
right mouse button to display an options menu.
Note: Edit options vary depending on where you place your cursor.
5. Select an option from the menu. Other dialog boxes or windows may open depending
on which option you choose.
6. Press the right mouse button on the background and select Done from the menu to
close and save your Web page.
7. Click Quit to close WebCannon!.
Sending Multimedia E-mail
Multimedia Email lets you make entertaining multimedia postcards for any special
occasion, holiday, or other event. E-mail them to friends and family for a lasting
memory!
Note: You must have an account with an Internet service provider to send e-mail.
Note: We recommend leaving your PhotoMAX CD-ROM in the drive for complete
audio help and access to a collection of backgrounds, voices, and videos. Your computer
must be on-line to send e-mail.
To make a Multimedia E-mail postcard:
1. Choose a background
40
Page 42

Click Background to display the supplied backgrounds. Select a category of backgrounds
and then double-click the background that you want to use.
2. Add an image
Click Include Image if you want to include an image on your postcard.
Select an image file from the list. If you had an image in the PhotoMAX image tray, it
appears on your postcard by default. You can use this image, or select a different image.
Click Image to display the image tools. You can select an image, crop your image, or
acquire your image from a TWAIN-compliant device (for example, your PhotoMAX
Photo Scanner).
Click Crop if you want to select part of the image.
Click Acquire to get your image from a digital camera or scanner. Select the device from
the Sources: list.
Click Help to display more information about the task.
Click Done to return to the main window options.
41
Page 43

3. Add text
Click Text to display the text tools. Click Include Text to include a message on your
postcard.
You can include a text file that you created with another word processing program or
click New to create text.
Select a text file from the list. Click Edit to make changes to an existing text file.
42
Page 44

4. Add audio
Click Audio to display the audio tools. This is the control panel for the audio file. You
can play, stop, rewind, and fast forward the audio file.
You can include a prerecorded audio file (.wav or .mid) or record a new file. You also
can click the red button to record your own audio file.
Click Include Audio to include an audio file (.wav or .mid) with your postcard.
Select an audio file (.wav or .mid) from the list.
The status of the audio file (Stopped, Playing, or Recording) displays in this box.
43
Page 45

5. Add video
Click Video to display the video tools This is the control panel for the video file. You
can play, stop, rewind, and fast forward the movie clip.
Click Include Video to include a movie clip (.avi) with your postcard.
You can include a prerecorded video file (.avi).
Select a video file (.avi) from the list.
6. Preview your postcard
Click Preview to display your postcard. You can view the front and the back of the
postcard.
7. Click Ship-It to send your postcard.
You can send your Multimedia Email postcard by e-mail, save it to a diskette or to
your hard drive, or post it as your own Web page.
Note: If the PhotoMAX Image Maker Software cannot locate your e-mail program to
send your postcard, it alerts you and provides instructions about how to send your
postcard as an attachment.
44
Page 46

Using the Creative Gallery
Click on the function button bar for fun and creative ways to use your
images. You can turn your favorite images into your wildest fantasies with PhotoFantasy
by combining your image with a fantasy background. For example, you can put your face
on an angel or a sports figure.
Or use your image to create your own stickers and ID badges, greeting cards and
envelopes, and T-shirts with Sticker Store. Sticker Store lets you choose from a wide
selection of templates. You can add jazzy text with special effects.
Making a PhotoFantasy
Use your favorite image and combine it with one of the many fantasy backgrounds that
are supplied with the PhotoFantasy software. For example, you can add your face to the
Statue of Liberty.
To make a PhotoFantasy:
45
Page 47

1. Click Creative Gallery.
Make sure the CD is installed in the CD-ROM drive.
2. Click the PhotoFantasy button.
3. Select a Fantasy
4. Select a Photo
When you open PhotoFantasy, the image in the image tray becomes the default image
for Selected Photo.
5. Create a Fantasy
Adjust your image to fit the background with the PhotoFantasy tool palette.
6. Save your image to your hard drive or a diskette, or print your image.
To get help in PhotoFantasy, move the cursor over the field for which you want help and
press the right mouse button. A help message appears.
Using Sticker Store
Sticker Store Deluxe lets you add your own images to greeting cards and envelopes,
stickers and ID badges, and T-shirts. You also can use templates and graphics that are
included with Sticker Store Deluxe.
Tip: To get help, select Help Topics from the Sticker Store Help menu. Select Tutorials
from the Help Topics window to learn more about how to create cards, stickers, T-shirts,
and envelopes.
To use Sticker Store:
1. Click Creative Gallery.
2. Click the Sticker Store Deluxe button.
46
Page 48

3. Click the Project tab.
Select the type of project that you want to create (for example, cards and envelopes,
stickers, or T-shirt designs) and follow the prompts.
If you are making a card, you are asked where you want to place the image (front,
back, or inside the card). If you are making a sticker, the image appears automatically
in the first sticker location. If you are making at T-shirt, the image is placed on the Tshirt automatically.
47
Page 49

4. Click the Design tab.
Select from one of the many different designs. You can add your image to any of the
supplied designs.
48
Page 50

5. Click the Graphics tab.
You can import your own images from your hard drive, or acquire your images from
the PDC 300 or PDC 640 Digital Camera, or the PhotoMAX Photo Scanner. You also
can use any of the many images that are included with Sticker Store.
49
Page 51

6. Click the Text tab.
You can add text in different fonts and sizes to your project.
50
Page 52

7. Click the Effects tab.
Click Enable Text Effects to add special effects to the selected text. You can add
color and shadows and bend your text around your image.
8. Print your project.
51
Page 53

PDC 700 Digital Camera Troubleshooting
Problem Solution
The Polaroid PhotoMAX Image
Maker Software does not see the
camera
No power
• Make sure you turn on the camera
and then your turn on your
computer.
• Close the PhotoMAX Image
Maker Software, turn on the
camera, and then open the
software again.
• Connect the PDC 700 Digital
Camera serial cable to the RS232C serial port on the back of the
computer and connect the other
end of the cable to the serial cable
port on the camera.
• Make sure the AC power adapter
is connected to the power socket
on the camera and to an outlet.
• Make sure the cables are attached
firmly to the camera and to the
back of the computer.
• Slide the power button to the right.
• Position the + and - terminals
correctly in the battery
compartment.
• Replace the batteries.
• Use the recommended AC adapter.
Low Battery indicator on the
Status panel
Replace the batteries.
52
Page 54

Cannot take a picture
Flash does not work
• Wait until the green LED next
to the optical viewfinder stops
blinking.
• If you have taken the
maximum number of images,
transfer the images to your
computer and delete the
images from memory.
• Make sure the memory card is
inserted correctly in the
memory compartment.
• If the camera is connected to
your computer, use the
software controls to take a
picture, or disconnect the
camera from the computer.
• Check the flash mode icon on
the Status panel. Cycle through
the flash options to turn on the
flash if it was disabled.
No signal on the TV monitor while
the camera is on
• Wait until the green LED next
to the optical viewfinder stops
blinking.
• Replace the batteries.
Use the specified cable to connect the
camera and the TV monitor.
53
Page 55

The PDC 700 Digital Camera
works but other TWAIN devices
(for example, a scanner) do not
work after you installed the
PhotoMAX Image Maker
Software
If your Polaroid PhotoMAX PDC 700
Digital Camera is working properly
and you are having difficulty with
other TWAIN devices (for example, a
scanner), do the following:
1. Use the Windows Explorer to
search for the following files in
your Windows and
Windows\System folders:
• TWAIN.DLL
• TWAIN_32.DLL
• TWUNK_16.EXE
• TWUNK_32.EXE
If you have copies of these files in
both folders, look at the dates on
each of the files.
Note: If you do not see these files
in the Windows Explorer, you may
have DLL files hidden. Select
View>Options from the Windows
Explorer menu. Select Show all
files.
2. If the copies of these files in the
Windows\System folder are older
that the copies of the files in the
Windows folder, rename the files
in the Windows\System folder or
move them to a temporary
directory.
3. Try your TWAIN device again. If
this solves the problem, then you
can remove the files that you
renamed or moved.
4. If the problems persist, call for
assistance.
54
Page 56

Contacting Polaroid
You can call Polaroid toll-free within the U.S.A. at 1-800-897-0356, 7 days a week, 8
A.M. to 8 P.M. Eastern Standard Time. When calling with a technical question, ask for an
Electronic Imaging or a Digital Imaging Specialist.
Please identify the Polaroid product and its serial number (if applicable). If possible, have
your system running the software when you call.
We offer a variety of Customer Support Services. Call us for details and applicable fees.
Outside the U.S.A., contact the Polaroid office nearest you.
Internet Support
Technical support is available via the Internet. Visit our Web site at:
www.polaroid.com
PDC 700 Digital Camera Precautions,
Specifications, and Warranty Information
Camera precautions
• Do not open the camera case or attempt your own repairs. High-voltage internal
components create the risk of electrical shock when exposed. Return your digital
camera to your authorized Polaroid service provider for all maintenance and repairs.
• Keep the camera away from water and other liquids because moisture creates the
danger of fire and electrical shock. Make sure not to get the camera wet if you are
using it in the rain, at the seashore, or any other location where there is the possibility
of exposure to liquids.
• Turn off the power to the camera and unplug the AC adapter immediately if water or
any other liquids get into the camera. Using the camera under these conditions creates
the danger of electrical shock or fire.
• Do not open the battery compartment or unplug the AC adapter when the green LCD
light on the back of the camera is flashing. If the camera loses power while
processing a new image, the new image cannot be stored and can cause corruption of
other stored images.
• Do not touch the LCD screen.
• Keep memory cards away from heat, moisture, static electricity, and magnetic fields.
• Do not expose the lens to direct sunlight for long periods of time.
• Do not expose the camera to excessive heat or excessive cold. Do not leave the
camera in an automobile where it can be exposed to extremes in temperature (below
13°C (55°F) or above 35°C (95°F)).
55
Page 57

Battery precautions
• Only use AA alkaline, NiMH, NiCad, or lithium batteries with this camera.
• Never mix old and new batteries, different types of batteries (for example, Alkaline
and Lithium), or batteries from different manufacturers.
• Do not expose batteries to direct heat or dispose of them by burning. Dispose of
batteries according to local laws and regulations.
• Remove batteries from the camera if you are not going to use the camera for extended
periods of time.
• Remove dead batteries from the camera. Dead batteries are susceptible to leakage,
which can cause significant damage to your camera.
Note: Camera damage caused by misuse of batteries is not covered under the One
Year Limited Warranty.
Camera specifications
Optics
• Optical Viewfinder and LCD Display: 1.8 inch LCD Monitor
• Lens aperture: F 3.5
• Lens focal range: 33.75 mm equivalent 135 mm camera
• Electronic shutter: 1/30 sec to 1/10,000sec
• 1034 x 779 CCD image sensor
• Speed: ISO 160 equivalent
• Flash: range is 18 in. to 10 ft. (0.45m to 3m) (normal)
Images
• Compression: JPEG
• Color: 24-bit (millions of colors)
• XGA (1024 x 768) and VGA (640 x 480) resolution modes
• XGA optical resolution directly from memory card (998x760)
• Superfine Image Quality mode
− XGA mode: 12 images/4 MB camera memory 1/8 Compression Ratio
− VGA mode: 22 images
• Fine Image Quality mode
− XGA mode: 25 images/4 MB camera memory 1/15 Compression Ratio
− VGA mode: 45 images
• Normal Image Quality mode
56
Page 58

− XGA mode: 50 images/4 MB camera memory 1/20 Compression Ratio
− VGA mode: 90 images
Storage, Interfaces, and Power
• Built-in memory: 4 MB flash memory
• Removable Memory: CompactFlash Memory Card (optional - Maximum size 48MB)
• Serial interface: RS-232C
• Four AA batteries (compatible with alkaline, NiMH, NiCAD, Lithium)
• Video output: NTSC
• AC adapter: input voltage range: 7V to 9V
User Controls and Other Features
• Autofocus
• Records date and time
• Auto formatting of removable memory (SSFDC)
• Tripod mountable
• Flash modes: Auto, Flash fill-in, and Flash off
• Self-timer: 10 sec delay
• Focus Range (2 modes)
− Macro (super close-up): 8 to 18 in.
− Normal: 18 in. to infinity
Physical
• Dimension: 45mm (D) x 84.5mm (w) x 106.5mm (h)
• Weight: 250g
Operating Environment
• Temperature: 0 ~ +40°C (32 to 104° F)
• Relative humidity: 20% - 95% (noncondensing)
57
Page 59

Warranty information
One Year Limited Warranty
Polaroid will, at our option, repair or replace any unit found defective in manufacture
within the warranty period. The warrant period is determined by the date of purchase.
Keep the receipt as proof of purchase. Otherwise, the warranty period is determined by
the date of manufacture. This warranty does not apply to damage caused by accident,
misuse or tampering, and excludes all consequential damages except in jurisdictions
not allowing such exclusions or limitations .
Caution
This unit is battery operated. Supervise children when camera is operated by them or
used in their presence. To avoid electrical shock, do not expose or immerse in water or
other fluids, disassemble, or operate if dropped or damaged. Contact a Polaroid Service
Center for repair information.
FCC notice
This equipment has been tested and found to comply with the limits for a Class B digital device, pursuant
to part 15 of the FCC Rules. These limits are designed to provide reasonable protection against harmful
interference in commercial installation. This equipment generates, uses and can radiate radio frequency
energy and if not installed and used in accordance with the instructions, may cause harmful interference to
radio communications. However, there is no guarantee that interference will not occur in a particular
installation. If this equipment does cause harmful interference to radio or television reception, detectable by
turning the equipment in question off and on, the user is encouraged to try to correct the interference by one
or more of the following measures: Reorient or relocate the receiving antenna; Increase the distance
between the equipment and the receiver; Connect the equipment to an outlet on a different circuit than that
which the receiver is connected to; Or consult the dealer or an experienced radio/TV technician for help.
Copyright Notice
Copyright 1999 Polaroid Corporation, Cambridge, MA 02139, U.S.A., owner of the
trademarks "Polaroid", "Polaroid PhotoMAX", "IQA Design", "PDC", "OneStep",
"Extreme", "Spectra", and "Polaroid Image". "MAX the Bird" Copyright 1998 Polaroid
Corporation. All other product names may be the property of their respective owners. All
rights reserved.
58
 Loading...