

Page 1
PDC 3350 US UM .indd 2/18/03, 10:56 AM1
Page 2
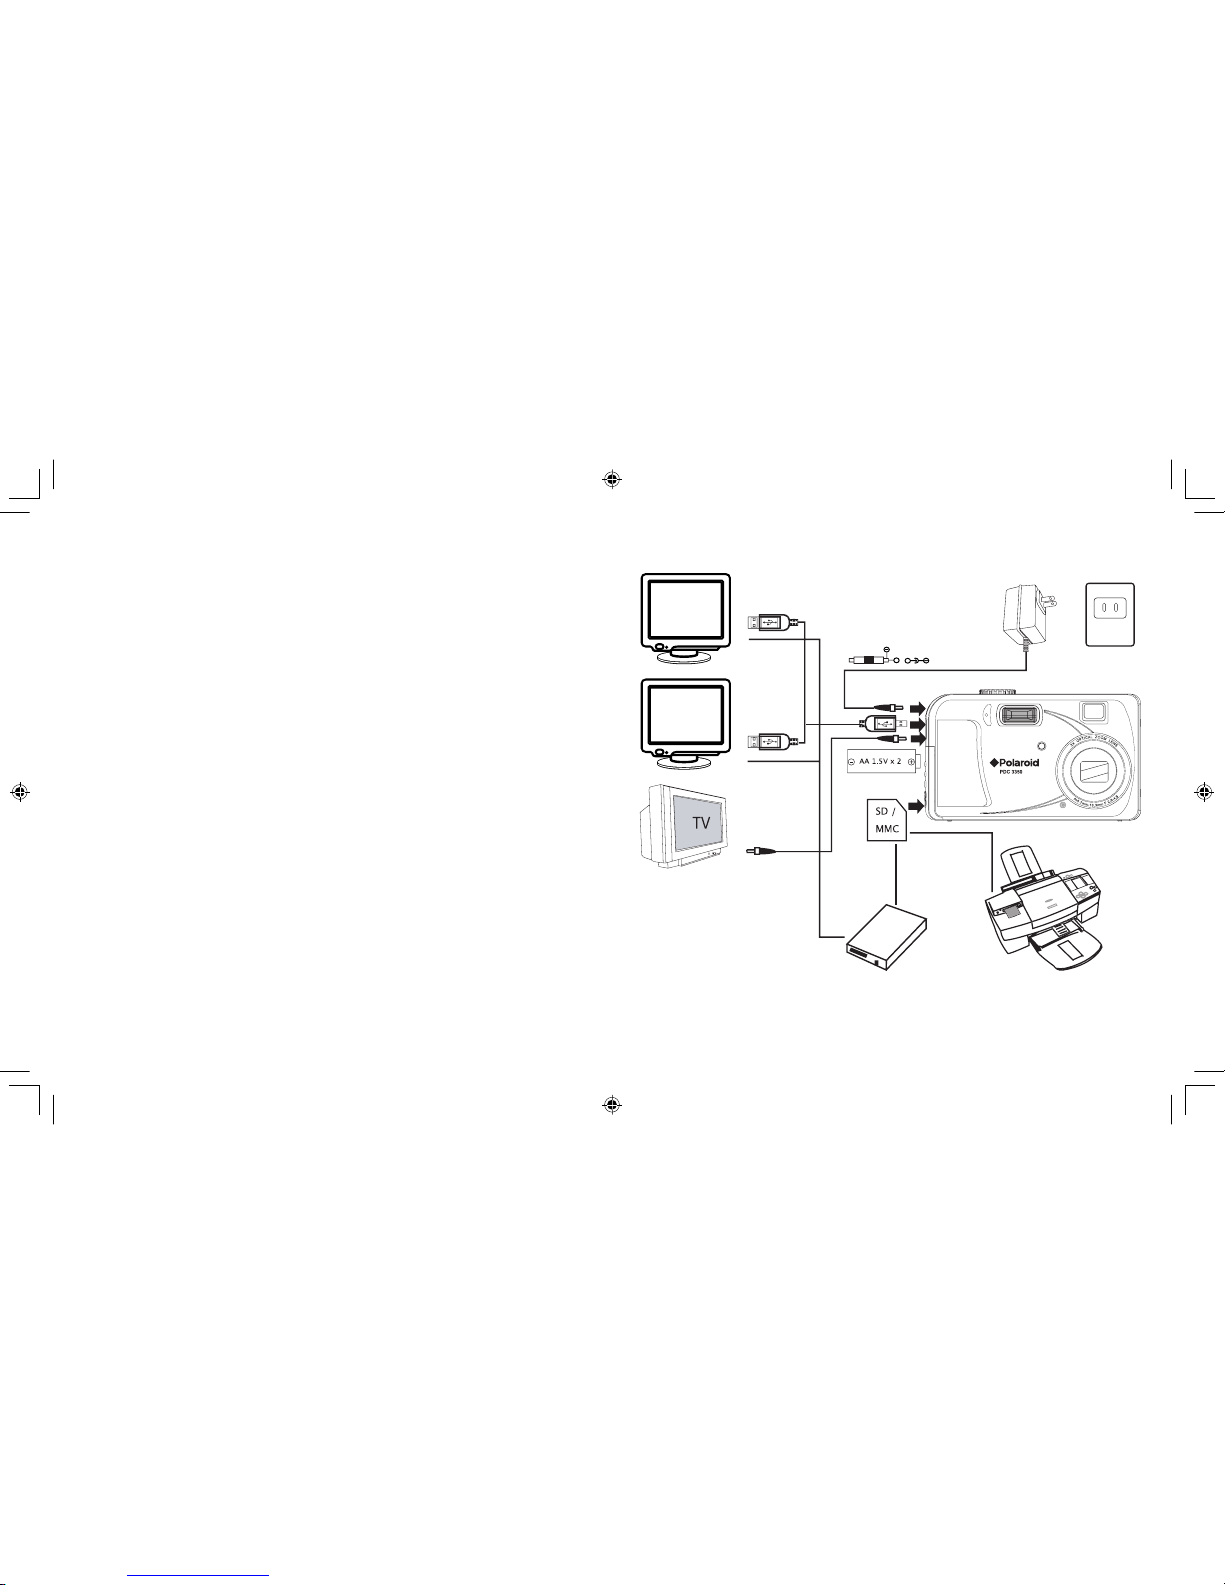
+
+
PC
MAC
TV
DPOF
AC Adaptor
(not included)
USB por t
USB por t
batteries
SD Card
Reader
DC 3V, 1.5A
AC120V
60Hz
PDC 3350 US UM .indd 2/18/03, 10:56 AM2-3
Page 3

Polar oid Phot oMAX
PDC 33 50
Digit al Came ra User G uide
www.polar oid- digit al.com
5
Polar oid Phot oMAX
PDC 33 50
Digit al Came ra User G uide
www.polar oid- digit al.com
Product Overview
Self-timer LED
2.
Flash
3.
Microphone
4.
Zoom Lens
5.
Exposure sensor
6.
View nder
5
4
2
3
6
Operation LED
2.
View nder
3.
Up/Flash button
4.
Left/Self-timer button
5.
Down/ Previous shot button
6.
Right/Macro button
7.
LCD screen
8.
Zoom out ( Wide Angle)
/Thumbnail button
9.
Zoom in (Telephoto) button
Display button
Menu button
OK button
Hand strap holder
2
3
6
5
USB Por t/Video Out/ DC Jack
2.
Battery/SD and card door
Power button
2.
Shutter button
3.
Mode selector
2
3
PDC 3350 US UM .indd 2/18/03, 10:56 AM4-5
Page 4

6
Polar oid Phot oMAX
PDC 33 50
Digit al Came ra User G uide
www.polar oid- digit al.com
Polar oid Phot oMAX
PDC 33 50
Digit al Came ra User G uide
www.polar oid- digit al.com
Table of Contents
8
Camera Package Contents
8
Attaching the Hand Strap
9
Battery Guidelines
9
Installing the Batteries
Turning the Camera On and Off and Setting the Date and Time
How to Navigate Menus
Connecting AC Adaptor (not included)
2 Camera Setting
Checking Camera Status
Camera Mode
Low Battery
•
Setting the Current Date and Time
Auto Power Save Settings
Setting the Beep Sound On/ Off
Setting LCD Con rm On/Off
File No. Reset Settings
Setting Display Language
Setting the Focus indicator On /Off
Resetting to Default Settings
Switching the Information Display/LCD Screen Off
3 Taking and Managing the Pictures
20
Taking a Picture
20
Taking Macro Pictures
21
Set Flash Mode
Setting Self-Timer
23
Zoom Feature
24
Setting the Picture Resolution and Compression
25
Setting Exposure Compensation
27
Setting White Balance
28
Changing the ISO Speed
29
Setting the Slow Shutter Mode
30
4 Recording Video Clips
31
Recording Video Clips
31
5 Playback
32
Playback Picture(s)
32
Playing the Video Clip
34
Protect the Picture(s) or Video Clip(s) Against Deletion
34
Deleting One Picture or Video Clip
35
Deleting All Pictures and Video Clips
36
View Pictures and Video clips on a T V
37
6 Using the SD Card
38
Using the SD (Secure Digital) Card
38
DPOF ( Digital Print Order Format)
43
P.I.M. (PRINT Image Matching)
7 Installing the Software onto a Computer
45
Installing the Software
45
•
Software Included with Your Camera
46
•
Computer System Requirements
47
8 Transferring Pictures to Your Computer
48
•
Before You Transfer Pictures
48
Connecting to Your Computer
48
Transferring Pictures/ Video Clips
49
9 Troubleshooting Problems
50
•
Troubleshooting
50
53
•
Polaroid-digital Online Services
53
Customer Support
53
ArcSoft Software Help
53
54
Technical Speci cations
54
Capacity of SD Card
57
Uninstalling Polaroid
PDC 3350
driver
58
Camera Default Settings
59
•
Using Your Batteries
60
•
Tips, Your Safety & Maintenance
60
Regulatory Information
61
Distributed by
62
PDC 3350 US UM .indd 2/18/03, 10:56 AM6-7
Page 5
8
Polar oid Phot oMAX
PDC 33 50
Digit al Came ra User G uide
www.polar oid- digit al.com
9
Polar oid Phot oMAX
PDC 33 50
Digit al Came ra User G uide
www.polar oid- digit al.com
The
PDC 3 350
camera provides you easy-to-use features. It can never
be any easier and enjoyable. Go ahead and enjoy your operation. Here
are a few examples of what you can do with your camera.
Enjoy point & shoot operation. Take digital pictures in your
preferable detail, like size, white balance and sharpness.
Store pictures, video clips to the internal memory or a SD
card.
Playback pictures and video clips on LCD screen, TV or a
computer.
Send the pictures and video clips over the Internet to family
and friends.
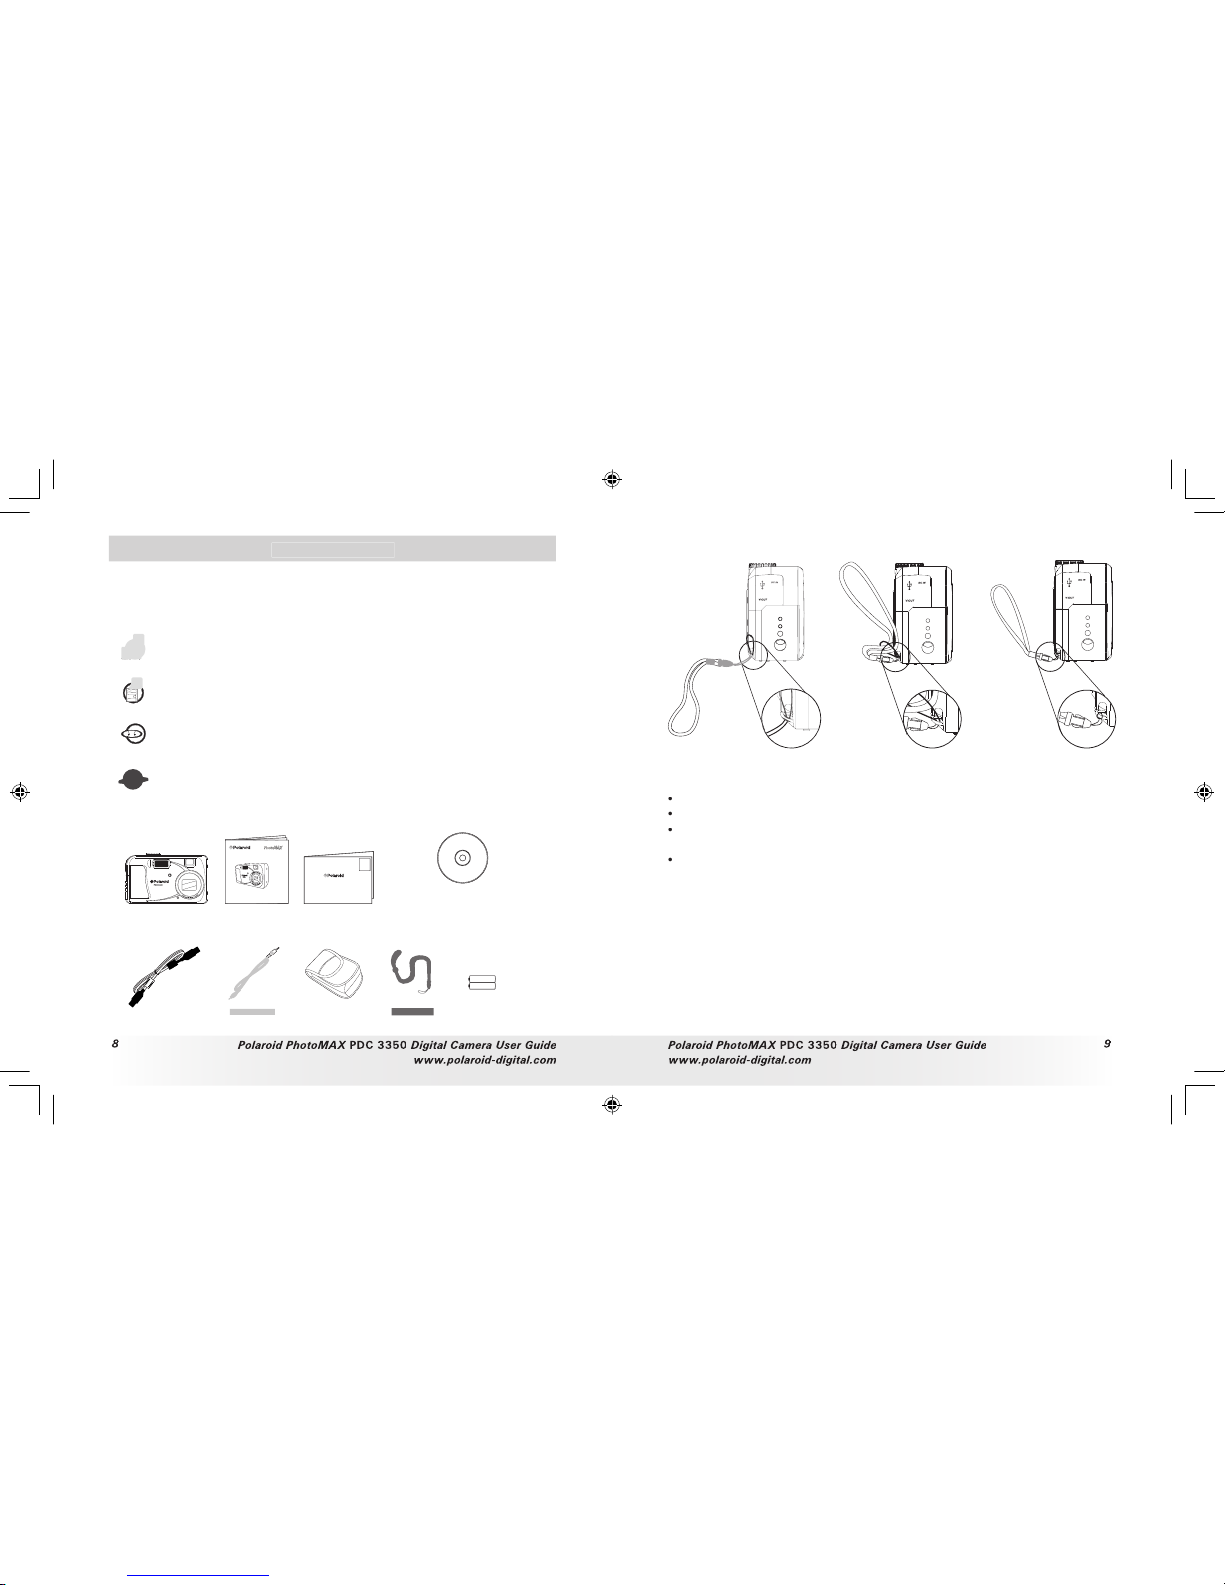
• Camera Package Contents
PDC 3350
USB Cable
2 x AA
Batteries
Warranty Card
Digital Imaging Product s
201 Burlington Road
Bedford, MA 01730-1434
Pouch
3
X
O
P
T
I
C
A
L
Z
O
O
M
L
E
N
S
User’s Manual
PDC 3350
Digital Camera
User Guide
www.polaroid-digital.com
PDC 3350
CD-ROM includes
Polaroid
PDC 3350
Camera Driver (PC
& Mac)
Arcsoft® PhotoImpression™ 4.0 (PC & Mac),
Adobe® Acrobat® Reader (PC & Mac).
• Attaching the Hand Strap
• Batter y Guidelines
Never use manganese batteries.
Battery life differs greatly by manufacturers.
Battery life is greatly affected by how much you use the ash, LCD screen
and other functions, and how long you leave the power turned on.
To prolong battery life, use the Flash button to turn off the ash
whenever you are not using it.
PDC 3350 US UM .indd 2/18/03, 10:57 AM8-9
Page 6

Polar oid Phot oMAX
PDC 33 50
Digit al Came ra User G uide
www.polar oid- digit al.com
Polar oid Phot oMAX
PDC 33 50
Digit al Came ra User G uide
www.polar oid- digit al.com
• Installing the Batteries
2 x AA batteries are supplied with the product.
Open the camera battery door by pushing it outwards as illustrated.
Inser t the batteries as shown, ensuring you follow the +/- signs
correctly.
3.
Close the battery door by pressing it downwards and then slide it
towards the camera to lock.
+
-
+
-
You can use both 2 X AA batteries and an AC adaptor (DC 3V, 1.5A,
center positive (not included) ) to supply power for the camera. We
highly recommend the user to use 1800mAh NiMH rechargeable or
Lithium AA batteries.
• Turning the Camera On and Off and Setting the Date and Time
Press and hold the Power button until the
green LED is ashing. It takes about three
seconds to turn on the camera. The zoom
lens will extend when you turn on the
camera under Auto/Manual/Video mode.
Press the Power button again to turn off
the camera, the zoom lens will retract.
Power button
The rst time the camera is turned on, it will directly enter the interface
for setting the Current Date and Time. Please refer to
Set the current date
and time
on page 14 for further detail.
• How to Navigate Menus
Use the 4-way control to select on-screen menu items. Press
and
to scroll up and down through menus. Press
and
to scroll left
and right.
• Connecting the AC Adaptor (not included)
Turn off the camera before connecting or
disconnecting the Adaptor. Connect the
adaptor as shown to power the camera
from a household power outlet. The camera
automatically switches over to AC adaptor
powered operation when AC adaptor is
connected.
IMP ORTANT!
Only use DC 3V output adaptor (S ee page 56).
We recommend the user to use AC adaptor to power the ca mera whenever
connected to a computer.
PDC 3350 US UM .indd 2/18/03, 10:57 AM10-11
Page 7
Polar oid Phot oMAX
PDC 33 50
Digit al Came ra User G uide
www.polar oid- digit al.com
Polar oid Phot oMAX
PDC 33 50
Digit al Came ra User G uide
www.polar oid- digit al.com
2 Camera Setting
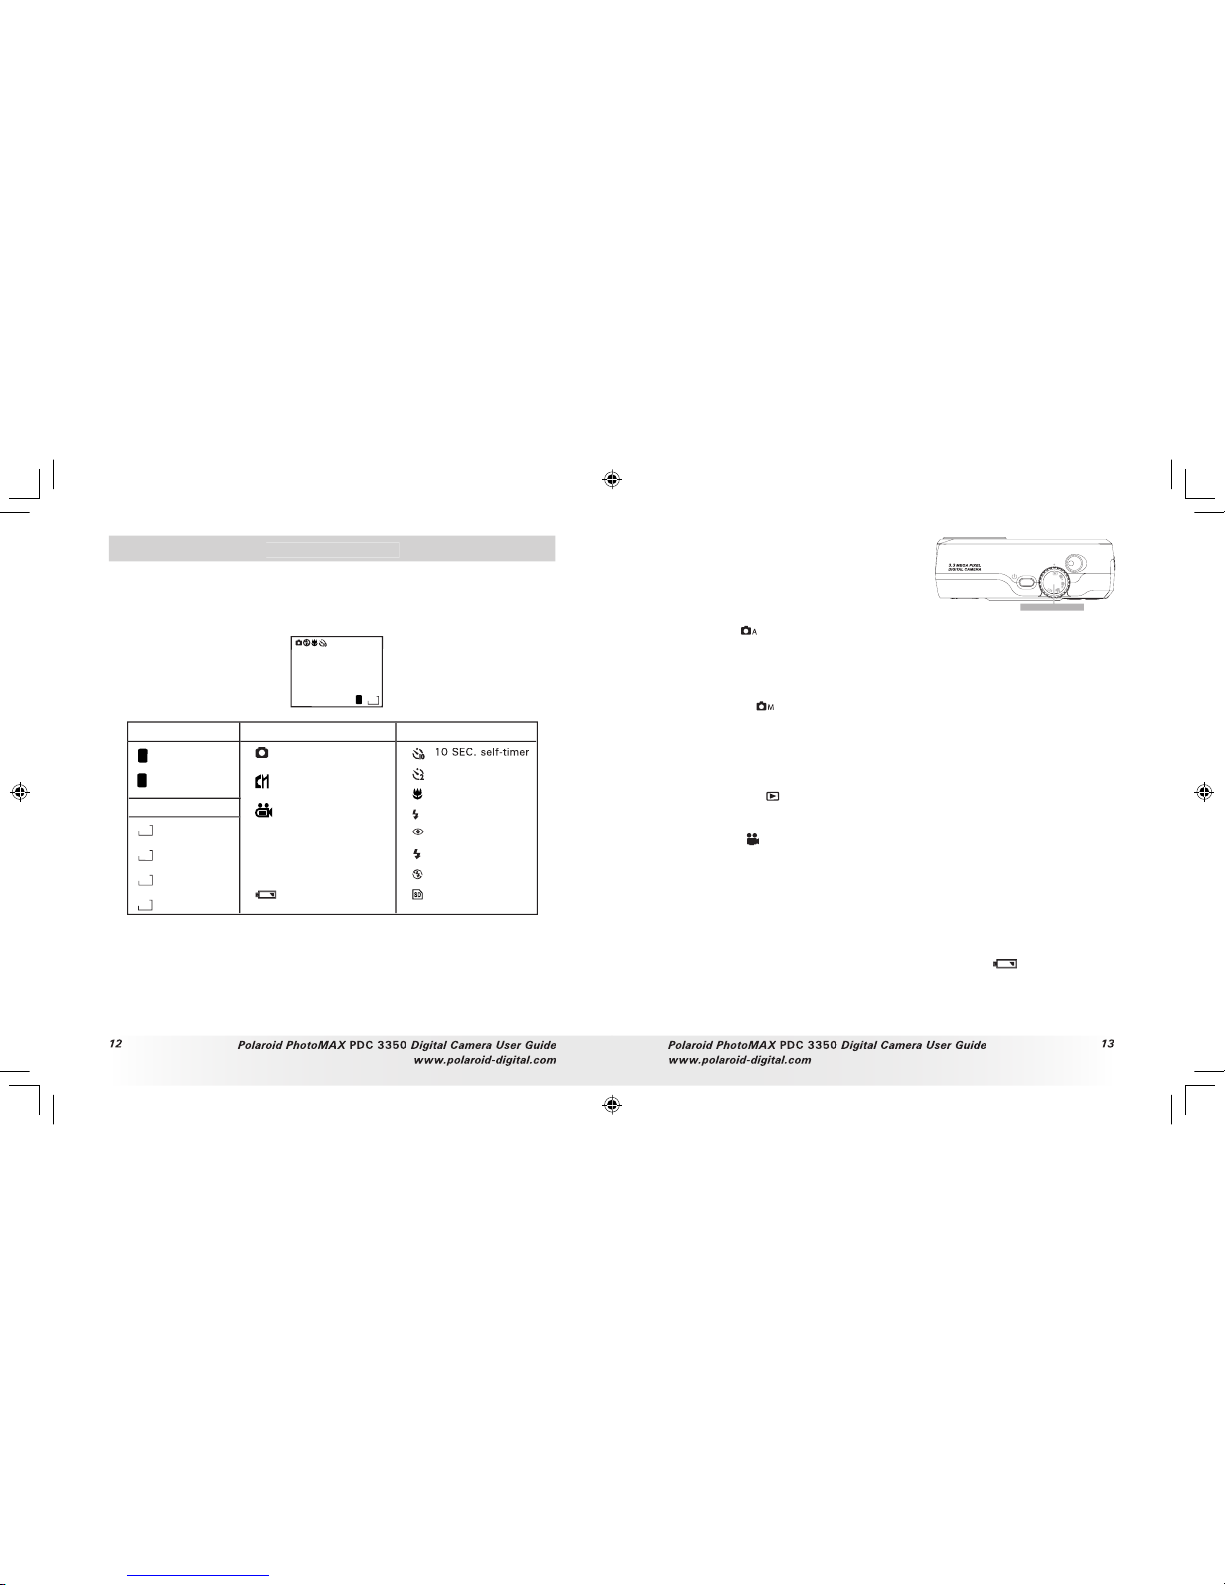
• Checking Camera Status
Turn on the camera, view the camera LCD screen to check which
camera settings are active. If the feature icon is not displayed, it means
that particular feature is not activated.
10
F
2
048
Picture Quality
Camera Status
Other Features
Fine
Normal
Resolution
F
N
2048 X 1536
2
0
4
8
1
6
0
0
1
0
2
4
640 X 480
6
4
0
2 SEC. self-timer
Macro Mode
A
Auto Flash
Red eye
Flash On
Flash Off
Auto Record mode
Low Battery
Number of pictures can
be taken
10
Manual Record
mode
Video mode
0:35
The length of video clip
can be recorded
SD card Inserted
• Camera Mode
The camera has ve working modes.
You can select any mode by turning the
Mode selector located on the top of the
camera.
Auto mode
Under this mode, the camera will automatically judge the environment
conditions for you. It will set the Exposure and White balance
automatically according to the shooting environment.
Manual mode
Under this mode, you can set the Exposure and White balance based
on different environment condition before taking pictures.
Further detail
refer to
Setting Exposure Compe nsation
on page 27 and
Setting White
Balance
on page 28.
Playback mode
Playback or delete pictures/video clips from the camera.
Video mode
Using this mode to record video clips.
SET mode
SET
Under this mode, you can access the Set-up menu to change the camera
settings to customize your camera.
• Low Battery
When battery power is low, the red bat tery icon
appears and a
warning “BATTERY LOW” will show on the LCD screen. Batteries need
to be replaced or the camera will soon automatically turn off.
PDC 3350 US UM .indd 2/18/03, 10:57 AM12-13
Page 8
Polar oid Phot oMAX
PDC 33 50
Digit al Came ra User G uide
www.polar oid- digit al.com
Polar oid Phot oMAX
PDC 33 50
Digit al Came ra User G uide
www.polar oid- digit al.com
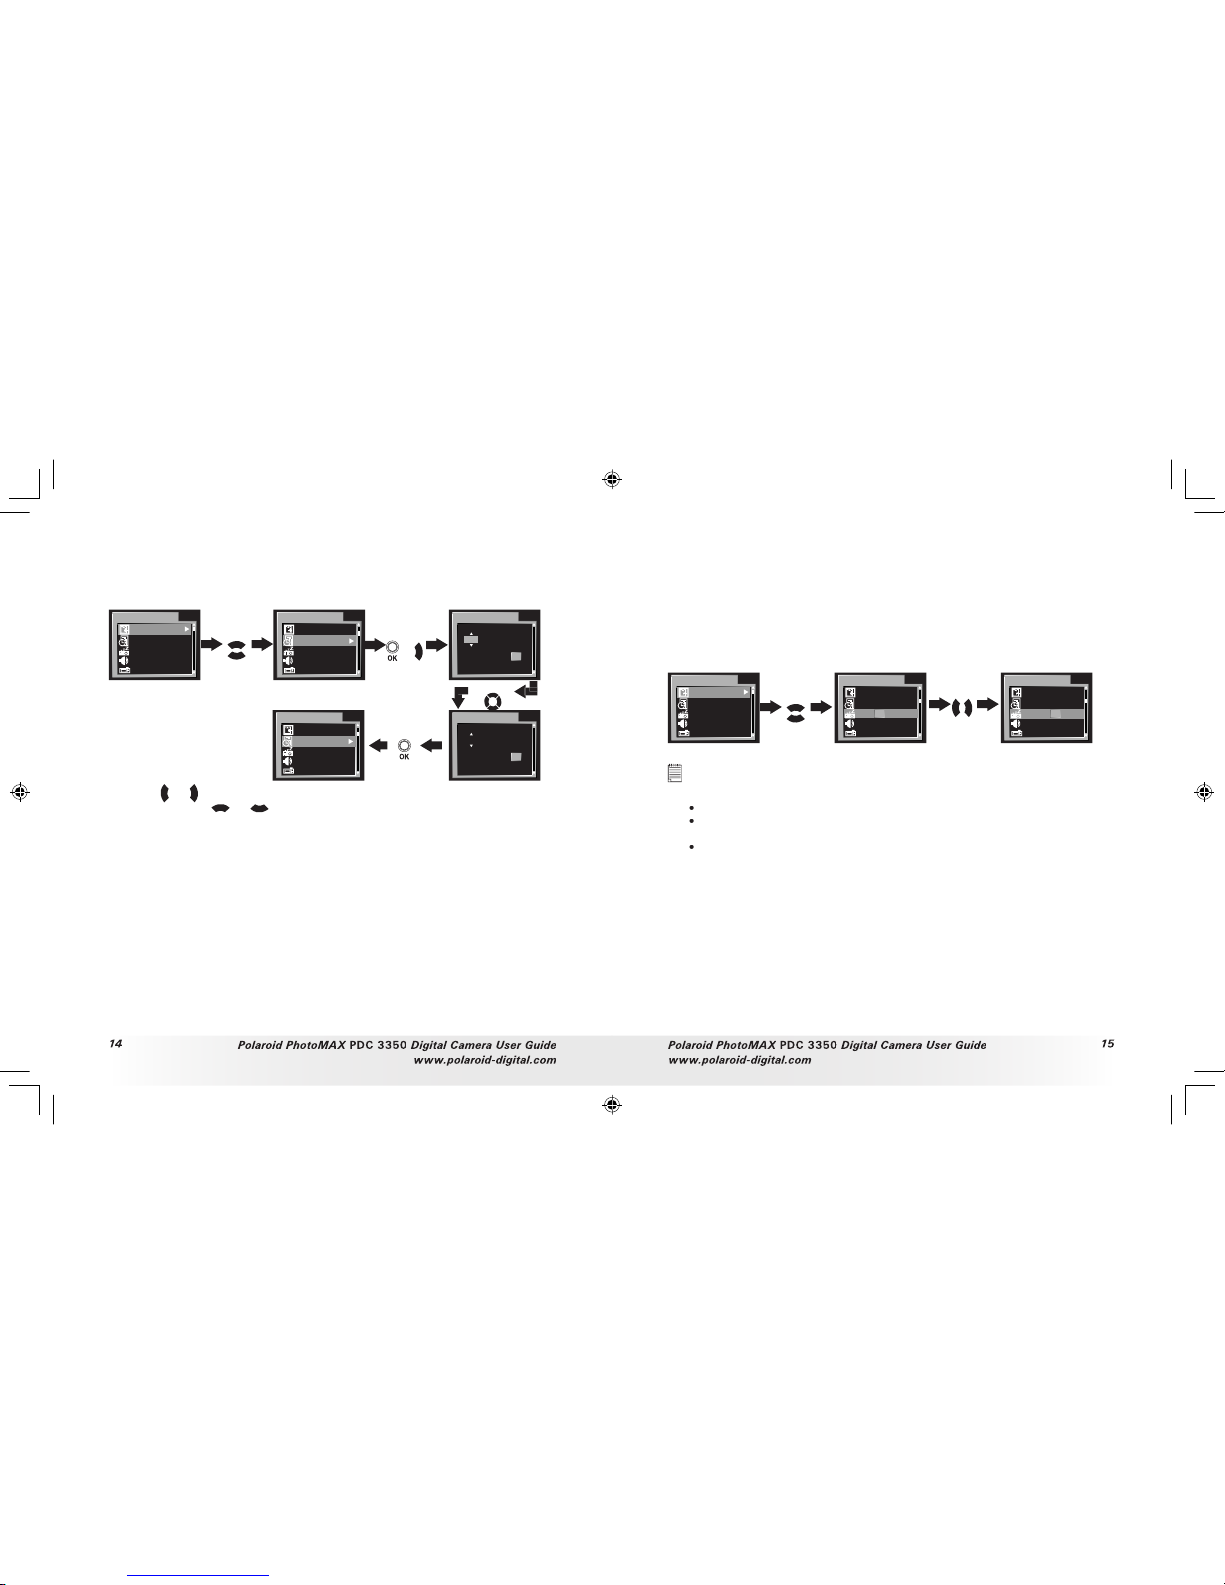
• Setting the Current Date and Time
The date and time menu will appear the rst time the camera is turned
on or if the battery is removed for more than 2 minutes.
Turn on the camera and set the Mode selector to SET.
DATE/TIME
15.1MB
'0 3. 0 1. 01 . ..
3 MIN.
ON
ON
DATE/TIME
Y/ M/ D
OK
20 03 . 01 . 01 . 12:0 0
Press
FORMAT
15 .1 M B
'0 2. 1 2. 30 . ..
3 MIN.
ON
ON
DATE/TIME
Y/ M/ D
OK
20 02 . 12 . 12 . 12:0 0
Press
or
DATE/TIME
15.1MB
'0 2. 1 2. 30 . ..
3 MIN.
ON
ON
Press
Press
Use the
or
buttons to select a eld, such as year, month, day, hour,
minute. Use the
or
buttons to adjust the value in the eld. Press
the OK but ton after all elds are set.
• Auto Power Save Settings
The camera performs the following power save operations to conserve
battery power.
The camera is designed to switch off automatically
to save battery life after one/three/ ve minute(s) of
inactivity. Default setting is three minutes.
Off:
The power save function is not activated.
You can change the Power save setting according to the following steps:
Turn on the camera and set the Mode selector to SET.
FORMAT
15 .1 M B
'0 2. 1 2. 30 . ..
3 MIN.
ON
ON
Press
Press
AUTO POWER OFF
15.1MB
'0 3. 0 1. 01 . ..
1 3 5 OF F
ON
ON
AUTO POWER OFF
15.1MB
'0 3. 0 1. 01 . ..
1 3 5 OF F
ON
ON
NOTE :
Auto power off is automati cally disabl ed under any one of the foll owing
conditions.
While a slides how is play ing.
While the camera’s USB port i s connected to a compu ter or other external
devices, or while the camera is being cont rolled by an external dev ice.
While the AC adaptor is connected to the camera.
PDC 3350 US UM .indd 2/18/03, 10:58 AM14-15
Page 9
Polar oid Phot oMAX
PDC 33 50
Digit al Came ra User G uide
www.polar oid- digit al.com
Polar oid Phot oMAX
PDC 33 50
Digit al Came ra User G uide
www.polar oid- digit al.com
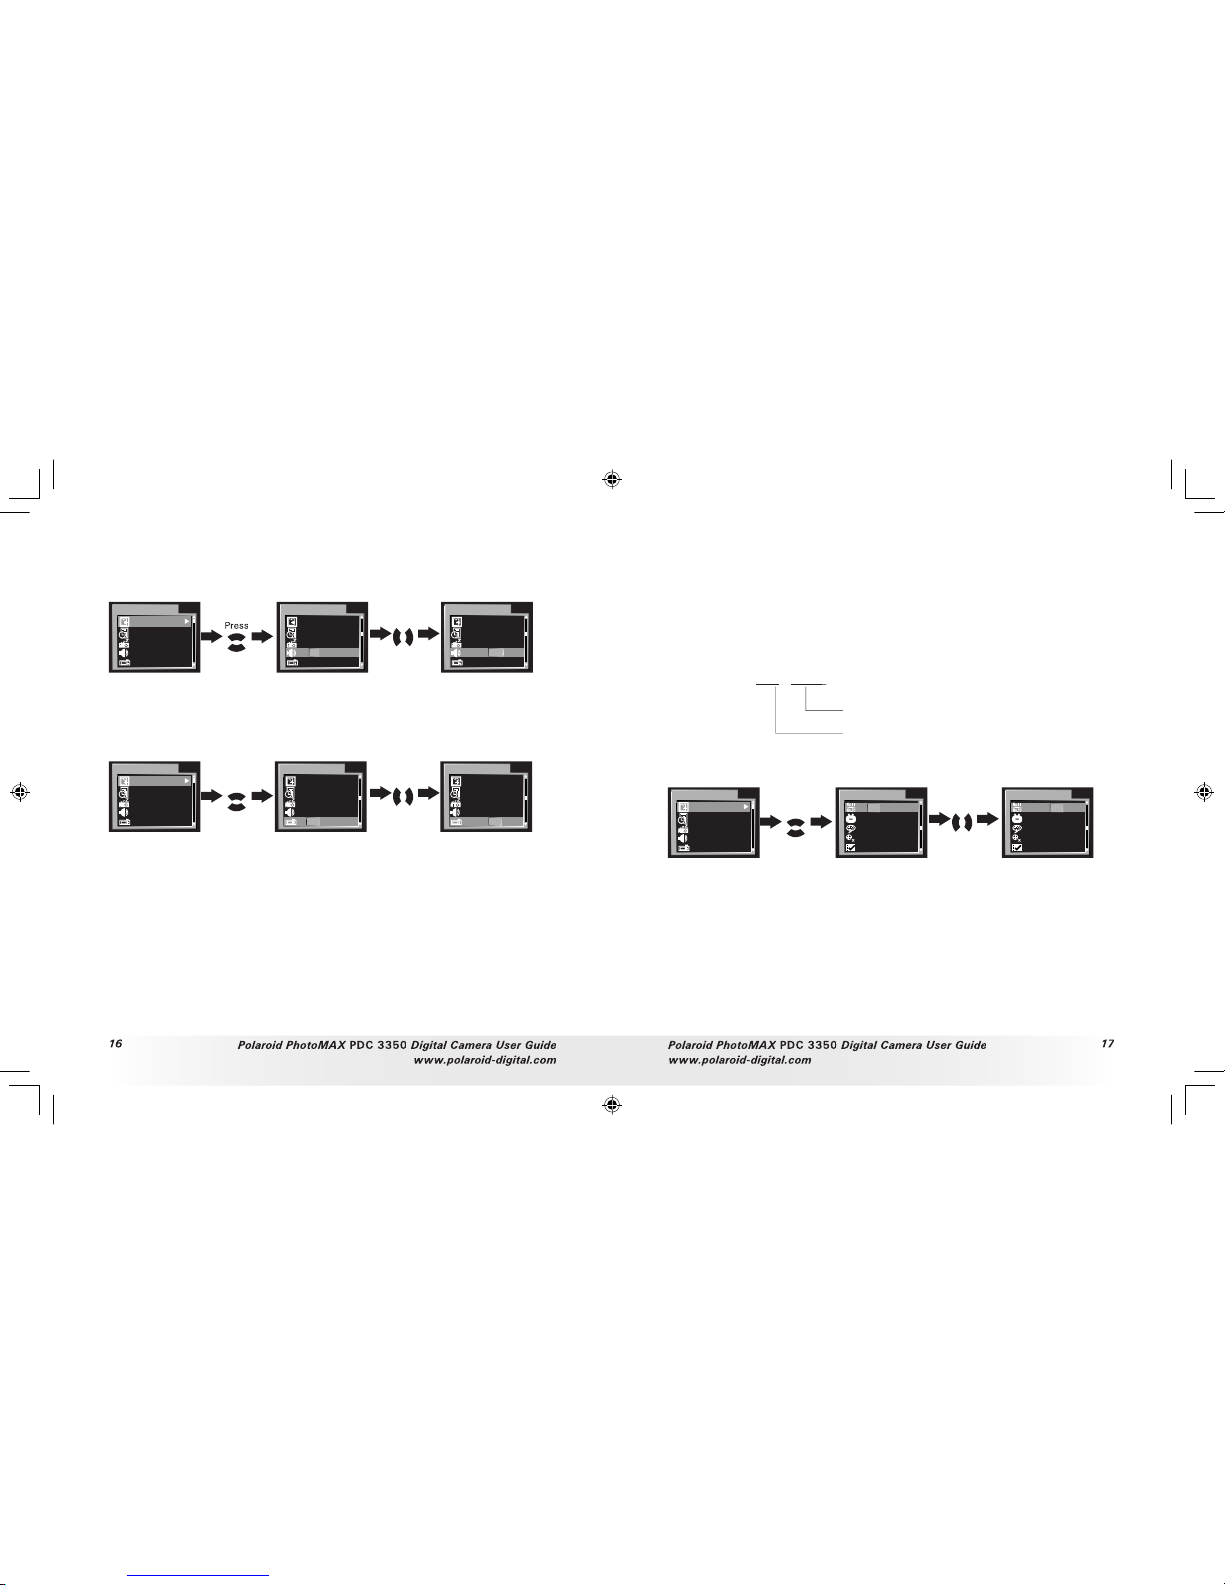
• Setting the Beep Sound On/Off
You can turn the Beep sound on and off in SET mode. When the Beep
sound is turned on, the camera will beep when you press the buttons.
Turn on the camera and set the Mode selector to SET.
FORMAT
15 .1 M B
'0 2. 1 2. 30 . ..
5 MIN.
ON
ON
BEEF
15.1MB
'0 3. 0 1. 01 . ..
5 MIN.
ON O FF
ON
BEEF
15.1MB
'0 3. 0 1. 01 . ..
5 MIN.
ON O FF
ON
Press
Press
• Setting LCD Con rm On/Off
This setting enables you to view the picture on the LCD screen right
after it is taken.
Turn on the camera and set the Mode selector to SET.
FORMAT
15 .1 M B
'0 2. 1 2. 30 . ..
5 MIN.
ON
ON
Press
Press
LCD CONFIRM
15.1MB
'0 3. 0 1. 01 . ..
5 MIN.
OF F
ON O FF
LCD CONFIRM
15.1MB
'0 3. 0 1. 01 . ..
5 MIN.
OF F
ON O FF
• File No. Reset Settings
The camera automatically created a directory of folders in its internal
memory or on a memory card to store pictures/video clips. Each folder
can hold up to 999 pictures. If a picture is taken when the current folder
contains a picture le numbered 0999. Your camera will create a new
folder by adding one to the current folder number. In the new folder,
the picture le numbering starts over from 0001. ( For example, if the
current folder is “100 P3350”, the new folder will be “101P3350”). The
maximum folder number is 999.
For example: 10 0 - 0 0 11
Number of pictures taken and
stored in 100P3350 folder
Folder number (e.g.100P3350)
You can set the File no. Reset to On or Off according to the following steps:
Turn on the camera and set the Mode selector to SET.
FORMAT
15 .1 M B
'0 2. 1 2. 30 . ..
3 MIN.
ON
ON
Press
Press
FILE NO. RESET
ON O FF
NT SC
EN GL I SH
ON
FILE NO. RESET
ON O FF
NT SC
EN GL I SH
ON
ON:
When this option is selected, if the memor y card is format ted or a
new card is inserted in the camera, the picture le number starts
from 00 01.
OFF:
When this option is selected, if the memory card is formatted or
a new card is inserted in the camera, the picture le number will
continue from the last number used.
PDC 3350 US UM .indd 2/18/03, 10:58 AM16-17
Page 10
Polar oid Phot oMAX
PDC 33 50
Digit al Came ra User G uide
www.polar oid- digit al.com
Polar oid Phot oMAX
PDC 33 50
Digit al Came ra User G uide
www.polar oid- digit al.com
• Setting Display Language
Under this setting, you can select the language you prefer for the LCD
screen.
Turn on the camera and set the Mode selector to SET.
FORMAT
15 .1 M B
'0 2. 1 2. 30 . ..
3 MIN.
ON
ON
Press
Press
LANGUAGE
UI T
PAL
DU TC H
AA N
LANGUAGE
OF F
PAL
EN GL I SH
ON
• Setting the Focus Indicator On/Off
Focus indicator helps you to gain a bet ter focus while you are capturing
a picture.
Turn on the camera and set the Mode selector to SET.
FORMAT
15 .1 M B
'0 2. 1 2. 30 . ..
3 MIN.
ON
ON
Press
Press
FOCUS INDICATOR
OF F
PAL
EN GL I SH
ON O FF
FOCUS INDICATOR
OF F
PAL
EN GL I SH
ON O FF
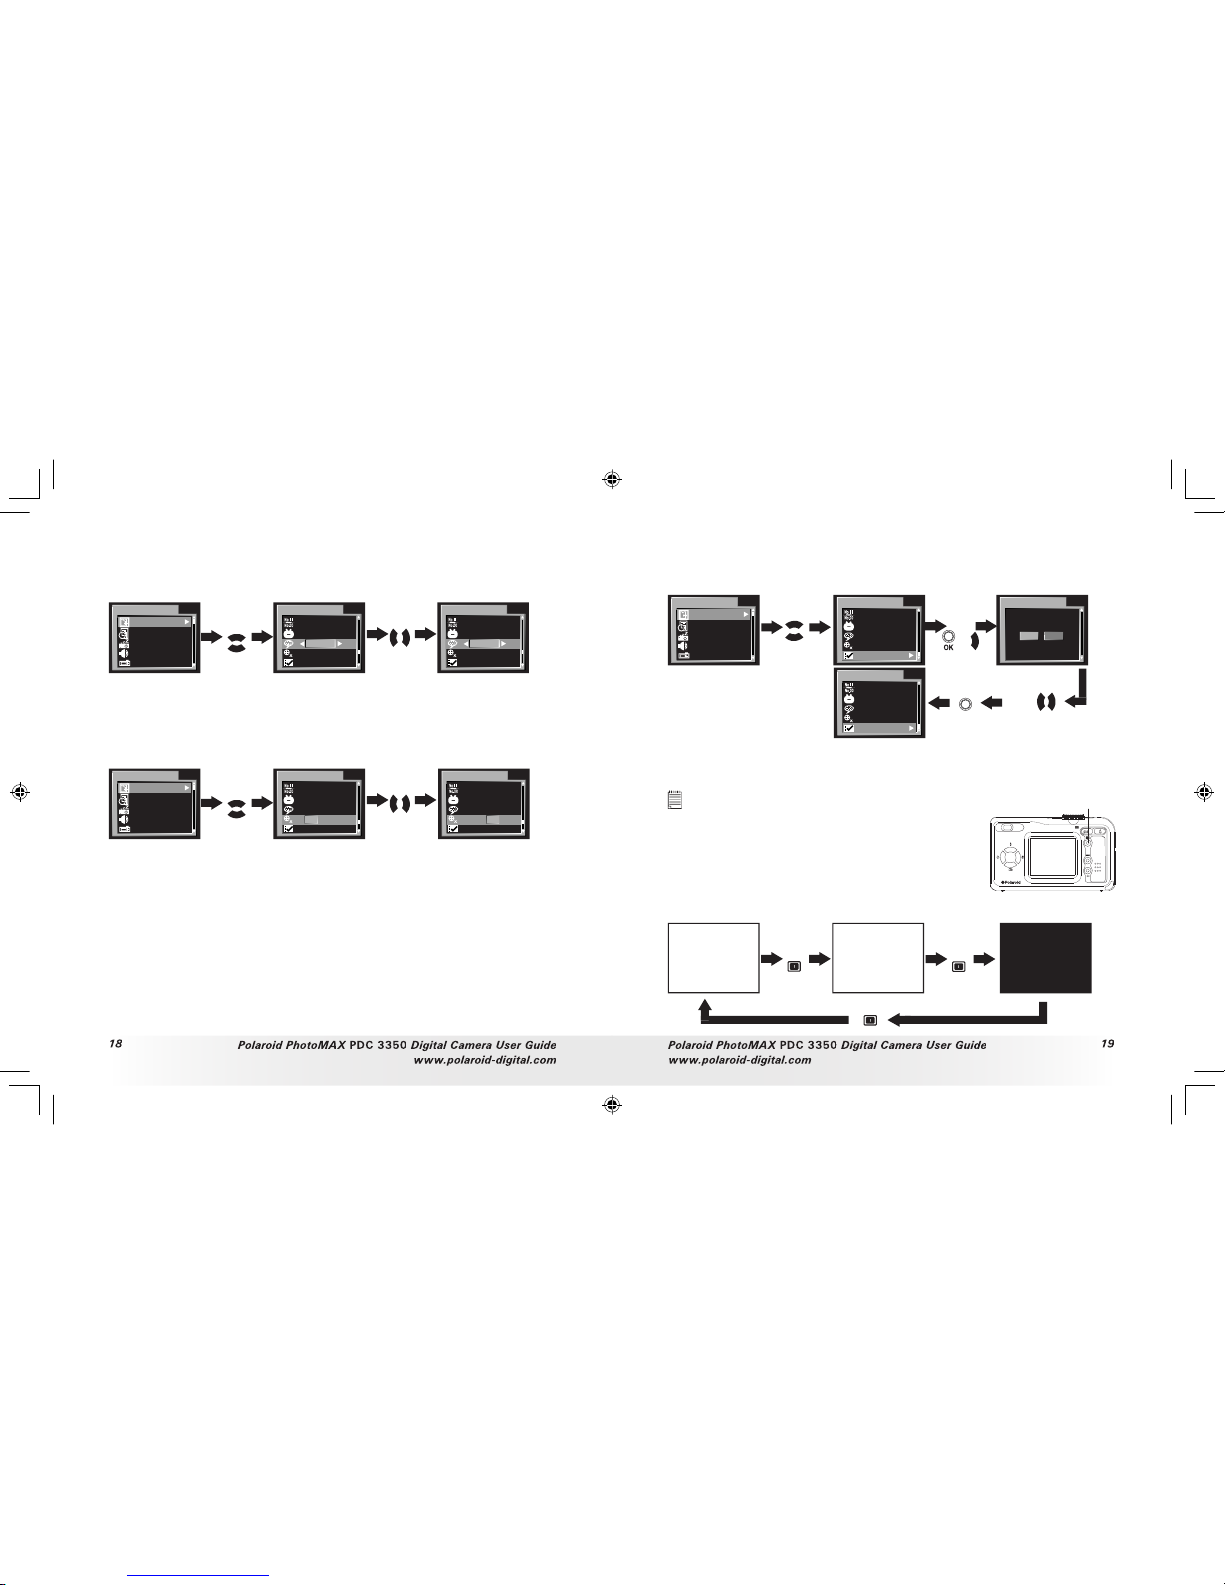
• Resetting to Default Settings
You can easily change all the settings you made back to the camera
default settings by the following steps.
Turn on the camera, set the Mode selector to SET.
FORMAT
15 .1 M B
'0 2. 1 2. 30 . ..
3 MIN.
ON
ON
Press
or
Press
DEFAULT SETTING
OF F
PAL
EN GL I SH
OF F
DEFAULT SETTING
DEFAULT SETTING?
NO
YES
DEFAULT SETTING
ON
NT SC
EN GL I SH
ON
Press
Press
ME NU
Please refer to the
Appendix
on page 54 for detail camera default settings.
• Switching the Information Display/LCD Screen Off
NOTE :
This fea ture is ava ilabl e in Video, Auto and Manual mode.
To turn the information display off, just simply
press the Display button, press it again will turn
off the LCD screen. Press the Display button
one more time will turn on the information
display and the LCD screen.
Display button
LCD screen on,
Information display on
LCD screen on, Information
display off
LCD screen off,
information display off
Press
Press
Press
10
ISO 200
EV +0.3
F
2048
PDC 3350 US UM .indd 2/18/03, 10:58 AM18-19
Page 11

20
20
Polar oid Phot oMAX
PDC 33 50
Digit al Came ra User G uide
www.polar oid- digit al.com
Polar oid Phot oMAX
PDC 33 50
Digit al Came ra User G uide
www.polar oid- digit al.com
3 Taking and Managing the Pictures
Before you take pictures, please read this note rst:
IMP ORTANT!
Never remove batteries, disconn ect the AC adap tor from the camera, or
unplug the adaptor while a picture is being save d. Doing so will prevent th e
curren t pictu re being saved and may corrupt other pictures already stored on
the camera’s internal memory or on a memor y card.
Shutter button
• Taking a Picture
Set the Mode selector to Manual or Auto.
2.
Turn on the camera.
3.
Frame your subject using the LCD screen.
4.
Press the Shutter button half way and align the
Focus indicator (if it is set to “ON”) on the subject
you want to capture. When the focus is locked,
the auto focus mark turns green and the operation
LED will light up.
10
F
2048
Focus indicator
The icon
will only appear when the shutter speed is slower than
Operation LED lights up with red color means taking picture with
ash.
Operation LED lights up with green color means taking picture
without ash.
When auto focus is locked onto a subject, the cross hairs turn green,
otherwise, the cross hairs turn red.
5.
Press Shutter button completely down to take a picture. Hold the
camera steady. A beep will sound when the picture has been taken.
6.
If the LCD Con rm is set to “ON”, the picture just taken will be shown
on the LCD for a while.
The Operation LED will ash which indicates the camera is processing
the picture. You can take the next picture when the Operation LED
stops ashing. You can review the picture you just took by pressing
Down button, press it again to continue your operation.
IMP ORTANT!
We highly re comme nd the user to take pic ture af ter fram ing mark has turned
green.
Outdoor Pictures without the Flash
Take pictures at approximately 6.4 inches (16CM) to in nity.
Avoid intense sunlight that may cause sun spots in pictures.
Always make sure that the sun or other light source is in front of the
subject.
• Taking Macro Picture
Press Right/Macro button to record
subject within 8 to 24 inches ( 0.2 to
0.6m) at the telephoto and between 4
to 24 inches (0.1 to 0.6m) wide angle
setting.
Right/macro button
PDC 3350 US UM .indd 2/18/03, 10:58 AM20-21
Page 12

Polar oid Phot oMAX
PDC 33 50
Digit al Came ra User G uide
www.polar oid- digit al.com
23
Polar oid Phot oMAX
PDC 33 50
Digit al Came ra User G uide
www.polar oid- digit al.com
• Set Flash Mode
Turn on the camera, set the Mode selector to Auto or Manual. Press the
Flash button to cycle through the ash settings and select the one you
need. When you rst press the Flash button, the LCD screen will turn
black and the Operation LED will blink in red which indicates the ash
is charging. When charging is complete, the icon (according to the ash
setting you selected) will appear on the LCD screen. You can now take
pictures using the Flash mode you selected. The ash will recharge after
each ash picture.
Flash Range:
Wide: 2.6 ~ 10 feet (0.8 ~ 3 meters )
Telephoto: 2.6 ~ 6.7 feet (0.8 ~ 2 meters )
The camera has four ash modes (default setting is Off). Different ash
setting applied to different situation:
Flash Mode on, the ash res for every picture. Use this
setting in high- contrast situations to provide ll-light or use it
indoors in low light.
Flash Mode off, the ash does not re. Use this setting
for outdoor pictures or where ash is prohibited or may
be distracting. Also use when shooting toward a re ective
surface, such as a window or mirror. If you do not have enough
light when using this setting, your pictures will be too dark.
A
Auto Flash Mode, the ash res automatically as needed. Use
this setting to take most pictures.
Red eye, Use this setting to avoid red glare in your subject’s
eyes. The camera res a brief, pre ash ash before the regular
ash.
NOTE :
Flash modes are not available in Video mode.
Never touch or block the ash or the exposure sensor with your ngers. Doing
so can soil these components and interfere with the correct ash operation.
• Setting Self-timer
Your camera is designed with a self timer function which will allow you
to take pictures with the 2 or 10 seconds built-in timer. Please place the
camera on at surface or use a tripod for the Self-timer function.
Set Mode selector to Auto or Manual.
Turn on the camera.
3.
Press the Self-timer button to cycle through the self-timer setting.
No icon
Self-timer is off.
2 SEC. Self-timer indicates a countdown of two
seconds.
seconds.
The icon
or
will appear on the LCD screen when it is selected.
5.
Press the Shutter button to take a picture. The camera starts
countdown. When
is selected, the Self-timer LED (on the front of
the camera) will blink 8 times before the picture is taken. When
is
selected, the Self-timer LED blinks slowly for 4 times, then quicker
for 8 times and very quick for another 8 times before the picture is
taken.
6.
Another beep ( if beep is turned on) will sound when the picture is
taken.
PDC 3350 US UM .indd 2/18/03, 10:58 AM22-23
Page 13

Polar oid Phot oMAX
PDC 33 50
Digit al Came ra User G uide
www.polar oid- digit al.com
25
Polar oid Phot oMAX
PDC 33 50
Digit al Came ra User G uide
www.polar oid- digit al.com
• Zoom Feature
Set Mode selector to Auto, Manual or Video.
Turn on the camera.
3.
Press Zoom in (Telephoto) /Zoom out (wide) button to zoom in/out
the subject. While you press the Zoom in ( Telephoto) /out (wide)
buttons, a bar will be shown on the LCD screen as illustrated. The red
square in the bar indicates the zoom status. “T” stands for “Tele” and
The bar disappears from LCD screen. Now you can take pictures or
record video clips. The zoom setting will remain af ter taking pictures
or recording video clips, if you want to take the normal size picture or
video clip, please use Zoom out button to move the red square to the
bottom of the bar.
There are two types of zoom in this
camera :
digital zoom and optical zoom
Area A is optical zoom, when the red
square moves within this area the lens will
zoom up or zoom down while you press
the Zoom in/out button.
Area B is digital zoom, when the red bar
moves up to this area, the lens will not
zoom while you press the Zoom in/out
button.
1
0
F
2
0
4
8
Area B
Area A
Red Square
For digital zoom feature, the view nder
may not re ect the actual image taken.
We recommend the user to use LCD
screen to monitor the zoom feature.
NOTE :
You may notice a decrease in imag e quali ty when using the digit al zoom.
• Setting the Picture Resolution and Compression
Picture resolution refers to the number of pixels in a digital picture.
Picture quality depends on the JPEG le compression that the camera
applies when the picture is taken. Higher resolution and less compression
make better quality which occupies more memory space. Smaller size
pictures and normal quality are easier to email while larger size and ne
quality are bet ter for printing.
Resolution setting
Set the Mode selector to Manual and turn on the camera.
10
F
2048
10
F
2048
RESOLUTION
2048X1536
1600X1200
1024X768
640X480
IS O
111
F
640
Press
ME NU
Press
Press
Compression setting:
Set the Mode selector to Manual and turn on the camera.
RESOLUTION
2048X1536
1600X1200
1024X768
640X480
IS O
Press
Press
ME NU
111
F
640
COMPRESSION
FINE
NORMAL
IS O
222
N
640
Press
Press
PDC 3350 US UM .indd 2/18/03, 10:58 AM24-25
Page 14

26
26
Polar oid Phot oMAX
PDC 33 50
Digit al Came ra User G uide
www.polar oid- digit al.com
Polar oid Phot oMAX
PDC 33 50
Digit al Came ra User G uide
www.polar oid- digit al.com
• Setting Exposure Compensation
You can adjust the exposure compensation value (EV) within the range
of -2EV to +2EV in order to compensate for current lighting conditions.
This setting can be used to obtain better result when shooting with
backlighting, indirect indoor lighting, a dark background, etc.
Set the Mode selector to Manual and turn on the camera.
Press
Press
ME NU
Press
10
F
2048
EXP
[+/-]
+0 .3
IS O
10
F
2048
EV +0.3
RESOLUTION
2048X1536
1600X1200
1024X768
640X480
IS O
Press
NOTE :
A higher EV value is best used for light-colored subjects and backlit subjects. A
lower EV value is best for dark-colored subjects and for shooting outdoors on a
clear day.
When shooting un der very dark or very bright conditions, you may not
be able to obtain satisfac tory results even after per formi ng exposure
compensation.
You can also set picture resolution and compression in Auto mode.
Set the Mode selector to Auto and turn on the camera.
10
F
2048
205
N
640
Press
ME NU
QUA LI TY /S IZ E
FINE
NORMAL
FINE
NORMAL
NORMAL
NORMAL
2048X1536
2048X1536
1600X1200
1600X1200
1024X768
640X480
Press
Press
Here are the approximate numbers of pictures you can expect the
camera to hold at each setting based on the 16MB internal memory.
You can expand the memory with SD card, please refer to
Capacity of SD
Card
on page 57 for further de
tail.
Resolution: 2048 X 1536
Fine: Approx. 11 pictures
Normal: Approx. 22 pictures
Resolution: 1600 X 1200
Fine: Approx. 18 pictures
Normal: Approx. 37 pictures
Resolution: 1024 X 768
Fine: Approx. 45 pictures
Normal: Approx. 90 pictures
Resolution: 640 X 480
Fine: Approx. 112 pictures
Normal: Approx. 225 pictures
NOTE :
Scene complexity affects a picture’s le size. For example, a picture of
trees in autumn has a larger le size than a picture of bl ue sky at the same
resolu tion and qua lity setting. Therefore, the number of pictures you can
store on the camera internal memory or a memory card may vary. The numbe r
of pictu res on the LCD screen is for reference only.
PDC 3350 US UM .indd 2/18/03, 10:58 AM26-27
Page 15

28
28
Polar oid Phot oMAX
PDC 33 50
Digit al Came ra User G uide
www.polar oid- digit al.com
29
Polar oid Phot oMAX
PDC 33 50
Digit al Came ra User G uide
www.polar oid- digit al.com
• Setting White Balance
Selecting the right type of white balance can help to make the colors of a
subject appear more natural under the type of lighting that is available.
Set the Mode selector to Manual and turn on the camera.
Press
Press
Press
ME NU
Press
10
F
2048
RESOLUTION
2048X1536
1600X1200
1024X768
640X480
IS O
WHITE BALANCE
CL OU DY
IS O
10
F
2048
You can also set White balance in Video mode by the follow steps:
Set the Mode selector to Video and turn on the camera.
WHITE BALANCE
AUTO
DAY LIGHT
CLOUDY
TUNGSTEN
FLUORESCENT
BLACK WHITE
0:35
0:35
Press
ME NU
Press
When shooting under these conditions:
Select this setting
Normal conditions (Camera adjusts white balance
automatically.)
Outdoor daylight
Cloudy
Indoors, illuminated by light bulbs
Indoors, illuminated by uorescent lighting
Converts images to black and white
AUTO
• Changing the ISO Speed
This function enables you to change the camera’s sensitivity to light
by selecting different ISO values. ISO is a measure of how quickly
your camera reacts to light. The higher the ISO value, the less the
light needed to make an exposure, allowing the same exposure to be
achieved with higher shutter speeds or smaller apertures. In a digital
camera, higher ISO value allows higher shutter speed, at the expense of
mottled or grain appearing in the nal picture.
You can change the ISO value according to the following steps:
Set the Mode selector to Manual and turn on the camera.
10
F
2048
ISO 200
Press
Press
ME NU
Press
10
F
2048
RESOLUTION
2048X1536
1600X1200
1024X768
640X480
IS O
Press
In the same lighting condition, the higher ISO value is,
the faster the shutter speed will be.
Auto:
The camera’s sensitivity is automatically changed by
different lighting value or subject brightness.
The ISO value appears on the LCD screen when ISO setting is
activated.
PDC 3350 US UM .indd 2/18/03, 10:59 AM28-29
Page 16

30
Polar oid Phot oMAX
PDC 33 50
Digit al Came ra User G uide
www.polar oid- digit al.com
31
Polar oid Phot oMAX
PDC 33 50
Digit al Came ra User G uide
www.polar oid- digit al.com
• Setting the Slow Shutter Mode
This function enables you to control how long the shutter stays open.
The slow shutter mode can be used to photograph bright subjects such
as reworks in a dark place. There are four options in Slow Shutter
mode: 1 second, 2 seconds, 4 seconds and 8 seconds.
Set the Mode selector to Manual and turn on the camera.
101S
F
2048
Press
Press
Press
ME NU
10
F
2048
RESOLUTION
2048X1536
1600X1200
1024X768
640X480
IS O
Press
The shutter speed 1S/2S/4S/8S will appear on the LCD screen when
selected.
To avoid blurr y pictures, place the camera on a at, steady surface or
use a tripod. We recommend the user to use a tripod to keep the camera
steady for Slow Shutter Mode.
4 Recording Video Clips
• Recording Video Clips
Set the Mode selector to Video mode and turn on the camera.
0:31
0:04
0:35
Press
Shutter
button to
start
Press
Shutter
button to
stop
In Video mode, you can record video clips with audio feature, the
resolution is set to 320x240 pixels automatically. The Operation LED
(green) and the green spot on the LCD screen ash while recording and
video length (in seconds) appears on LCD screen. Please note that there
is no digital zoom function in Video mode.
You can record video clips for up to approximately 1 minute by using
the internal memory. Using the SD (Secure Digital) card will increase the
video recording time.
PDC 3350 US UM .indd 2/18/03, 10:59 AM30-31
Page 17

32
32
Polar oid Phot oMAX
PDC 33 50
Digit al Came ra User G uide
www.polar oid- digit al.com
33
Polar oid Phot oMAX
PDC 33 50
Digit al Came ra User G uide
www.polar oid- digit al.com
5 Playback
• Playback Picture(s)
Reviewing the pictures
Set the Mode selector to Playback.
Turn on the camera.
3.
Press Left/ Right button to view the pictures taken.
Zooming the displayed picture
When viewing a picture in Playback mode, you can zoom the picture you
selected up to X8.0 by using the Zoom in/ Zoom out button.
Reviewing the pictures in Thumbnail
You can view up to 9 pictures at a time on the LCD screen by using the
Thumbnail function.
Set the Mode selector to Playback mode.
Turn on the camera.
3.
Press Zoom out but ton, the thumbnail pictures will be shown on the
LCD screen and the latest reviewed picture will be highlighted.
Running a slide show
The Slide Show function enables you to view all the pictures stored in
the camera one by one on the LCD screen.
Set the Mode selector to Playback mode and turn on the camera.
ERASE ONE
Press
Press
ME NU
Press
SLIDE SHOW
100-0015
S
100-0001
S
The slide show will automatically run from the rst picture taken after
you press the OK button. Every pictures will display about 3 seconds.
You can press Left/ Right button to skip backward or forward. Press OK
button again to pause and press Menu button to stop the slide show.
The slide show will keep running as long as there is power supply.
We
recommend the user to use AC power for long time slide show.
PDC 3350 US UM .indd 2/18/03, 10:59 AM32-33
Page 18

34
Polar oid Phot oMAX
PDC 33 50
Digit al Came ra User G uide
www.polar oid- digit al.com
35
Polar oid Phot oMAX
PDC 33 50
Digit al Came ra User G uide
www.polar oid- digit al.com
• Playing the Video Clip
Set the Mode selector to Playback mode.
Turn on the camera.
3.
Use Left/Right button to select the video clip you
want to play.
Press OK button to start playing video clip. Press it
again to pause.
5.
Press Menu but ton to stop.
100-0015
The
icon is shown on LCD screen when video clip is selected.
• Protect the Picture(s) or Video Clip(s) Against Deletion
Set the Mode selector to Playback mode and turn on the camera.
ERASE ONE
Press
Press
ME NU
Press
PROTECT
Press
to set
Press
again to
cancel
100-0015
100-0015
100-0015
Press
to select a
picture/video clip to protect
Press Menu button to exit. You can use Left/Right button to select the
next picture/video clip during the above operation. Icon
appears on
the information display when you review the protection status of the
protected picture/video clip.
• Deleting One Picture or Video Clip
Set the Mode selector to Playback mode and turn on the camera.
Press
to select “Yes”
ERASE ONE
ERASE
NO YES
100-0015
Press
to enter erase
mode
Press
ME NU
Press
Press
You can use Left/ Right button to select the next picture during the
above operation. Please note that protected les cannot be deleted.
PDC 3350 US UM .indd 2/18/03, 10:59 AM34-35
Page 19

36
Polar oid Phot oMAX
PDC 33 50
Digit al Came ra User G uide
www.polar oid- digit al.com
37
Polar oid Phot oMAX
PDC 33 50
Digit al Came ra User G uide
www.polar oid- digit al.com
• Deleting All Pictures and Video Clips
Please note that protected les cannot be deleted. Set the Mode
selector to Playback mode and turn on the camera.
ERASE ALL
Press
ERASE ALL
ERASE ALL IMAGES?
NO
YES
Press
ERASE ONE
Press
Press
ME NU
NO IM AGE
OR
Press
to select “Yes”
• View pictures and Video clips on a TV
Setting the Video Output System
The video output signal can be switched (NTSC or PAL) to accommodate
different signal systems. For example: NTSC for U.S.A., Canada,
Taiwan, Japan, etc. and PAL for Europe, Asia (excluding Taiwan), etc.
You can change the video output system according to the following
steps:
Turn on the camera, set the Mode selector to SET.
FORMAT
15 .1 M B
'0 2. 1 2. 30 . ..
3 MIN.
ON
ON
Press
Press
VIDEO SYSTEM
OF F
PAL N TS C
EN GL I SH
ON
VIDEO SYSTEM
OF F
PAL N TS C
EN GL I SH
ON
Connecting to a T V
When the camera is connected to a TV, the LCD screen is not active and
the TV screen now performs as the LCD screen.
Connect the camera to a TV via the video cable (supplied) as
illustrated.
2.
Set the T V to “Video” mode.
3.
When the mode selector is
set to Auto/ Manual, you can
preview the picture you want
to take on the TV screen.
4.
When the mode selector is
set to Playback, you can
review all the pictures stored
in the camera on the TV.
3
X
O
P
T
I
C
A
L
Z
O
O
M
L
E
N
S
Video cable
PDC 3350 US UM .indd 2/18/03, 10:59 AM36-37
Page 20

38
38
Polar oid Phot oMAX
PDC 33 50
Digit al Came ra User G uide
www.polar oid- digit al.com
39
Polar oid Phot oMAX
PDC 33 50
Digit al Came ra User G uide
www.polar oid- digit al.com
6 Using the SD Card
• Using the SD (Secure Digital) card
Your camera comes with approximately 16MB of built-in ash memor y
for storing pictures/video clips. You can expand the memory using a
commercially available SD card. The camera senses whether a memory
card is inserted, and automatically saves pictures accordingly. Note that
you cannot save pictures to built-in ash memory while a memory card
is installed in the camera.
IMP ORTANT!
Make sure you turn off the camera before inserting or removing a memory card.
Be sure to orient the ca rd correctly wh en inserting it. Never try to force a
memor y card in to the slo t when you feel resistance.
SD memory cards have a write protect switc h, which you can use to protect
against accidental delet ion of pi cture data. “Whenever you wan t to record,
format or delete item in th e SD Card, you must d isabl e write protecti on.”
Inser ting th e SD
Card
Turn off the camera and open the battery door as illustrated. Inser t the
SD card ensuring the card is inserted correctly as illustrated. Close the
SD card door.
Make sure that the terminal of the memor y card is facing
the front of the camera.
Notche d corne r
of SD card
Removing the SD Card
To remove the SD card, turn off your camera , open the SD card door,
gently push the SD card inwards and then release it. The SD card will
eject out from the SD card door as illustrated.
IMP ORTANT!
Never insert any oth er objec ts besides a SD memory card into the camera’s
card slot. Doin g so creates the risk of damaging the c amera a nd card s lot.
Make sure that the terminal of the memory car d is facin g towards th e front
of the camera.
Shoul d water or any foreign objects ever get into the card slot, immediately
turn off the camera, remove the batteri es or disconnect the AC adaptor, and
contac t your dealer or nearest service provi der.
PDC 3350 US UM .indd 2/18/03, 10:59 AM38-39
Page 21

40
40
Polar oid Phot oMAX
PDC 33 50
Digit al Came ra User G uide
www.polar oid- digit al.com
Polar oid Phot oMAX
PDC 33 50
Digit al Came ra User G uide
www.polar oid- digit al.com
To Format a Memo ry Card
Format ting a memory card deletes all data already stored on it.
Set the Mode selector to SET mode. Turn on the camera.
Press
to select “Yes”
FORMAT
15 .1 M B
'0 2. 1 2. 30 . ..
3 MIN.
ON
ON
FORMAT
15.3MB
'0 2. 1 2. 30 . ..
3 MIN.
ON
ON
Press
or
FORM AT...
Press
FORMAT
FORMAT IN-MEM?
NO
YES
IMP ORTANT!
You can format a memory card on the camera or
on a computer. However forma tting a memory
card on a co mpute r takes much longer.
Note that data deleted by a format operation
cannot be recove red. Make sure you d o not have
any useful data currentl y stored on a memory card
before you format i t.
Formatting a memory card des troys all the pictures, even thos e are
protected.
Copy Inte rnal Memory pictures to a Memory Card.
Turn off your camera and insert a SD (Secure Digital) Card into the Card
Slot.
Set the Mode selector to Playback mode and turn on the camera.
ONE
A selected picture in internal memory will be copied to a memory card.
ALL
All pictures in internal memory will be copied to a memory card.
COPY?
NO YES
100-0015
COPY TO CARD
COPY TO CARD
ONE ALL
WAIT . . .
Press
Press
ME NU
Press
Press
button
to select “YES” and
press
to con rm
Press
ONE
COPYING . . .
COPY TO CARD
Press Menu button to exit to normal Playback mode. Please note that you
cannot copy picture(s) from memory card to internal memory.
PDC 3350 US UM .indd 2/18/03, 11:00 AM40-41
Page 22

Polar oid Phot oMAX
PDC 33 50
Digit al Came ra User G uide
www.polar oid- digit al.com
43
Polar oid Phot oMAX
PDC 33 50
Digit al Came ra User G uide
www.polar oid- digit al.com
Memor y Card Precautions
Use only an SD memory card or a MultiMediaCard with this camera.
Proper operation is not guaranteed when any other type of card is used.
2.
Electrostatic charge, electrical noise, and other phenomena can cause
data corruption or even loss. Always make sure that you always back up
important data on other media (MO disc, computer hard drive, etc.).
3.
If a memory card starts to behave abnormally, you can restore normal
operation by reformatting it. However, we recommend that you always
take along more than one memory card whenever using the camera far
away from the home or of ce.
4.
We recommend that you format a memory card before using it for the
rst time after purchasing it, or whenever the card you are using seems
to be the cause of abnormal pictures. Remember to format a memory
card if it was used in another digital camera or other devices.
To Print Selected Picture
Set the Mode selector to Playback mode.
PRINT SETTING
PRINT SETTING
SETTING MODE:
RESETSET
ERASE ONE
Press
Press
ME NU
Press
Press
Press
Press OK button to deselect a selected picture. You can select “Reset”
to deselect all selected pictures in above operations. Press Menu button
to exit and return to normal playback mode.
NOTE :
You cannot se lect video clips.
• DPOF ( Digital Print Order Format)
The letters ”DPOF” stand for “Digital Print Order Format”, which is a
format for recording on a memory card or other medium which digital
camera images should be printed and how many copies of the image
should be printed. Then you can print on a DPOF- compatible printer or
at a professional print service from the memory card in accordance with
the le name and number of copies settings recorded on the card.
With this camera, you should always select images by viewing them on
the LCD screen. Do not specify images by le name without viewing the
le contents.
IMP ORTANT!
DPOF print settings can be con gured for images on a memory card only, not
for images in the camera’s built-in memory. To con gure DPOF print settings for
images in the camera memory, you need to copy the images to a memory card
rst.
PDC 3350 US UM .indd 2/18/03, 11:00 AM42-43
Page 23

Polar oid Phot oMAX
PDC 33 50
Digit al Came ra User G uide
www.polar oid- digit al.com
45
Polar oid Phot oMAX
PDC 33 50
Digit al Came ra User G uide
www.polar oid- digit al.com
• P.I.M. (PRINT Image Matching)
This camera supports PR INT Image Matching. Images recorded with it
include information about the mode setting, camera setup, etc. When
you print an image on a printer that supports PRINT Image Matching,
the printer reads this data and adjusts the printed image accordingly,
so your image comes out just the way you intended when you recorded
them. See the documentation that came with your printer for full details
about PRINT Image Matching.
Now your digital camera and your printer can speak the same language.
PRINT Image Matching technology ensures that PRINT Image Matching-
enabled digital cameras and printers work together perfectly to produce
the best possible prints. Through this innovative technology, the printer
is able to instantly identify the print speci c information for each image
captured, to provide superior color, quality and detail in every print.
For more detailed information, please go to the PRINT Image Matching
website ht tp://www.printimagematching.com.
7 Installing the Software onto a Computer
• Installing the software
For Wind ows® Users :
PC
IMP ORTANT!
Please backup all the necessary data before any driver/sof tware installation.
The CD-ROM is tested and recommended to use under English Windows
OS.
IMP ORTANT! ( For W indows® 9 8SE )
Windows® 98SE needs to ins tall the
PDC 3350
Driver for Mass Storage
function. You must i nstal l this driver before plug ging in the came ra.
IMP ORTANT! ( For W indows® M E, 20 00, XP)
Directly pl ug-in the camera to transfe r and play the pictures and video clips.
There is no need to install the cam era driver.
Before you begin, close all other software
applications open on your computer.
2.
Inser t the CD supplied into the computer
CD-ROM Drive.
3.
The CD User Interface Screen will
automatically launch.
4.
With the mouse, click on each software
interface button in turn and follow the on
screen instructions.
Open & Clo se
NOTE :
If the setup screen doesn’t appear after loading the CD, then you can manually
start it by double -clicking the “My Computer” Icon on your desktop, then double -
clicking the icon for the CD -ROM drive. When the CD- ROM window opens,
double-click the “INSTALL-E.EXE” icon.
PDC 3350 US UM .indd 2/18/03, 11:00 AM44-45
Page 24

46
Polar oid Phot oMAX
PDC 33 50
Digit al Came ra User G uide
www.polar oid- digit al.com
Polar oid Phot oMAX
PDC 33 50
Digit al Came ra User G uide
www.polar oid- digit al.com
For Mac intosh® Use rs:
MAC
Before you begin, close all other software applications opened on
your computer.
2.
Inser t the CD supplied into the computer CD- ROM Drive.
3.
Double click the CD-ROM icon “Digital Camera”.
4.
Install the software included.
• Software Included with Your Camera
DC 3350
Driver
Plug & Play removable disk
Easy to use, just plug the camera to a computer and use it as a removable
disk. Use the Arcsoft® software suite to edit and print the Pictures.
ArcSof t Photo Impression™ 4.0
Pictu re Editi ng Softwa re
ArcSoft PhotoImpression™ is an easy to use digital video and image-
editing program. This program enables users to upload still image and
movie clips store in your camera. You could also edit and retouch your
photos, then add special effects or place them in cards, calendars,
frames and fantasy templates. ArcSoft PhotoImpression™ also includes
a wide variety of printing options.
Adobe® Acrobat® Reader
.PDF F ile Re ading S oftware
Adobe® Acrobat® Reader lets you view and print Adobe Portable
Document format (PDF) les on all major computer platforms, as well as
ll in and submit Adobe PDF forms online.
• Computer System Requirements
For acceptable picture transfer and editing performance, we recommend
the following minimum requirements;
For Wind ows® Users
PC
Compatible with Microsoft® Windows® 98SE, Me, 2000 or XP
Pentium® II 333 MHz or equivalent processor
64MB R AM (128MB recommended)
USB Por t
200M B free disk space
Color monitor with high color (16-bit) graphic capability or higher
CD-ROM drive
Standard mouse and keyboard
Stereo speakers
For Mac intosh® Use rs
MAC
PowerPC ® Processor
Mac™ OS Version 9.0, 9.1 or X
USB Por t
64MB R AM (128MB recommended)
Color monitor with high color (16-bit) graphic capability or higher
CD-ROM drive
Standard mouse and keyboard
Stereo speakers
PDC 3350 US UM .indd 2/18/03, 11:00 AM46-47
Page 25

48
Polar oid Phot oMAX
PDC 33 50
Digit al Came ra User G uide
www.polar oid- digit al.com
49
Polar oid Phot oMAX
PDC 33 50
Digit al Came ra User G uide
www.polar oid- digit al.com
8 Transferring Pictures and Video Clips to a Computer
• Before you transfer pictures
IMP ORTANT!
Before you tra nsfer you r pi cture s m ake s ure you have installed th e Po laroid
PDC 335 0 Camer a Driver fr om the CD. Ple ase refer to I nstal ling th e Softwa re
onto a Com puter o n page 45.
• Connecting to Your Computer
Connecting with the USB Cable.
Turn the camera Off.
2.
Plug the labelled end
of the USB cable into the socket marked
on your computer.
3.
Plug the other end of the USB cable into the port on your camera.
4.
Turn on the camera and an interface “New Hardware Found” will
show on the computer desktop.
5.
A removable disk drive wil be installed onto your computer
automatically.
• Transferring Pictures/Video Clips
For Wind ows® Users
PC
NOTE :
You can trans fer pictures /video clips in any mode.
Turn on the camera
Connect the camera to a computer via the USB cable.
3.
Double click on “My Computer” on your PC desktop and you will see
a “Removable Disk” drive.
Double click “Removable Disk” -> double click “DCIM”-> double
click any directory folder under “DCIM”.
5.
All the pictures, video clips are in the directory folder. Highlight the
pictures and video clips and drag them to a folder of your choice. You
can also create sub folders to group them or use the Arcsoft software
to edit and manage the pictures or video clips.
For Mac intosh® Use rs
MAC
NOTE :
For MAC us er, direct ly plug -in th e camera, no need to install the dr iver.
Turn on the camera
Set the camera to Playback mode.
3.
Connect the camera to MAC via the USB cable, the systems will
automatically recognize the MASS STORAGE drive. (System
will automatically create a Mass Storage named “INTERNAL”/
NOTE :
This Dr ive name will vary from dif ferent versio n of MAC OS sys tem.
Double click the folder “INTERNAL”/“EX TERNAL” to enter sub-folder
5.
Double click the folder “DCIM” and then any subfolder inside.
6.
You can copy the pictures and video clips from this directory folder
and paste to the hard disk.
PDC 3350 US UM .indd 2/18/03, 11:00 AM48-49
Page 26

50
50
Polar oid Phot oMAX
PDC 33 50
Digit al Came ra User G uide
www.polar oid- digit al.com
51
Polar oid Phot oMAX
PDC 33 50
Digit al Came ra User G uide
www.polar oid- digit al.com
9 Troubleshooting Problems
• Troubleshooting
The troubleshooting guide is designed to help you. If problems
continue, please contact your local customer suppor t hot line. See your
registration card for help line contact details.
For Wind ows® Users :
PC
Symptom
Proble m
Solutio n
I receive an error message
when I am installing
“Polaroid
PDC 3350
Camera
Driver”.
“Polaroid
PDC 3350
Camera
Driver” does not load.
Shut down all other applications and attempt
to reinstall the driver.
Check to see if the USB controller in your
BIOS if it is activated. If this does not work
contact your national customer support
representative, refer to the instruction manual
included with your PC.
I cannot upload images to my
computer.
Connection failure.
Check all cable connections are secured.
I cannot run the “Polaroid
PDC 3350
Camera Driver”.
Con ict with another camera
driver or capture device.
If you have another camera installed on your
computer, remove it and it’s driver completely
from your system to avoid con icting with it.
I see the following error
message during driver
installation. “An error
occurred during the
move data process: -115
Component:\WIN98\ICO File
Group: 98ICO File: C:”
Polaroid
PDC 3350
driver installs
second time.
Please remove the existing
PDC 3350
driver
rst and install again.
Camera Driver is not installed.
You need to install the camera driver for
Windows 98SE systems.
Images do not show on TV.
Video cable is not connected
correctly.
Wrong system selection
Images do not display in
color.
Make sure the video cable is connected to the
TV “Video In” socket.
Change to NTSC for USA.
My CD Installation wizard
does not work.
The auto installation le is
switched off or The CD-ROM is
disconnected.
Go to the computer desktop. Right click
on “My Computer”. Click “Properties”.
Select “Device Manager”. Double click on
“CD_ROM”, double click on “CD-R (normally
the manufacturer’s name. Click on “Settings”.
Ensure both “Auto insert noti cation” and the
“disconnect” are ticked. If you change the
settings the computer will ask you to restart
your PC. Click “Yes”.
For Wind ows® and Maci ntosh® Use rs:
PC
MAC
I cannot activate my Digital
Camera by pressing the Power
switch.
Insuf cient battery power or
batteries are missing.
Replace batteries.
Symptom
Proble m
Solutio n
I cannot upload images to the
computer.
Connection failure.
Check all cable connections are
secured.
Camera does not turn on.
Batteries are not oriented correctly
Or
Batteries are dead
Or
Wrong AC adaptor type being used.
Orient batteries correctly
Or
Replace batteries
Or
Make sure you use a correct adaptor.
Camera suddenly powers off.
Auto Power Function activated
Or
Batteries are dead.
Turn the camera on
Or
Replace batteries.
Image is not recorded when the
shutter button is pressed.
Camera is turned off
Or
Flash unit is charging
Or
Memory is full.
Turn the camera on
Or
Wait until ash unit charging nishes
Or
Delete images you no longer need, or use
another memory card.
Camera powers off during self-
timer countdown.
Batteries are dead.
Replace batteries.
LCD screen image is out of
focus.
Macro Mode being used for scenery
or portraits
Or
Normal Mode being used for macro
images.
Set the Normal/Macro selector to Normal
for scenery and portraits
Or
Set the Normal/Macro selector to Macro
for macro images.
Recorded pictures are not
saved in memory.
Camera powers off before the save
operation is complete
Or
Removing the memory card before
the save operation is complete.
If the battery indicator is on the LCD
screen, replace batteries with a full set
of new ones as soon as possible
Or
Do not remove the memory card before
the save operation is complete.
PDC 3350 US UM .indd 2/18/03, 11:00 AM50-51
Page 27

52
52
Polar oid Phot oMAX
PDC 33 50
Digit al Came ra User G uide
www.polar oid- digit al.com
53
Polar oid Phot oMAX
PDC 33 50
Digit al Came ra User G uide
www.polar oid- digit al.com
Symptom
Problem
Solution
Sunlight or light from another source
is shining directly into the lens during
recording.
Position the camera so sunlight does not
shine directly onto the lens.
Color of the playback pictures is
different from the picture on the
LCD screen during recording.
Pictures are not displayed.
A memory card with non-DCF
pictures recorded with another
camera is loaded in the camera.
This camera cannot display non-DCF
pictures recorded onto a memory card
used by another digital camera.
I cannot erase pictures.
All the pictures in memory are
protected.
Unprotected the pictures you want
to delete.
LCD screen does not appear
on the screen of the connected
television.
There is a problem with the camera-
TV connection
Or
TV setup is wrong
Or
Video system is incompatible.
Use the supplied video cable to connect
the camera to the TV
Or
Consult the documentation of the TV
and put it in its video mode
Or
Select the proper video output system.
Please also refer to the he lp les & User Guides that accompany the enclos ed
applications.
For furthe r informati on and support, pl ease visit our website: http://polaroid-
digital.com
• Polaroid-digital Online Services
Website: http://www.polaroid-digital.com
• Polaroid-digital Online Services
• Polaroid-digital Online Services
• Customer Suppor t
Questions? Need Help?
Call us at 1-888-235-0808
Monday thru Friday, 10 am - 7 pm EST and
Sat 10 am - 4 pm EST
Or visit us at
http://
www.polaroid-digital.com
• ArcSoft Software Help
For Nor th Amer ica
• ArcSoft Software Help
• ArcSoft Software Help
For South & Central America
ArcSof t HQ Support Center
Tel: 1-510-979+5520
(Fremont California, CA)
Fax: 1-510- 44 0-1270
Tel: 1-80 0-762-8657
E-mail:latlns uppor t@a rcsof t.com
(toll free numb er)
Fax: 1-510- 44 0-1270
E-mail: support@arc soft.com
For China
For Japan
ArcSof t China Suppo rt Cen ter (B eiji ng)
ArcSoft Japan Support Center (Tokyo)
Tel: 8610-6849 -1368
Tel: +81-03- 3834 -5256
Fax: 8610-68 49-1367
Fax: +81-03-5816-4730
E-mail: chi na@ arcsoft.com
Web: http://www.mds2000.co.jp/
arcsof t
E-mail: jap an@ arcsoft.com a nd
support@ mds20 00.com
For Oceania
For Europe/ Middle Eas t/
ArcSof t Australian S upport Center
Africa & Rest of the World
For Europe/ Middle Eas t/
For Europe/ Middle Eas t/
(Baulkham Hills, N ew South Wales)
ArcSof t Europe Support Ce nter
Tel: 61 (2) 9899- 5888
(Ire land )
Fax: 61 (2 ) 9899 -5728
Tel: +353- (0 ) 61-702087
E-mail:
support@ suppo rtgro up.com. au
Fax: +353-( 0) 61-702001
E-mail: europe@arcs oft.co m
Visit
http://
www.arcsoft.com for technical support and frequently asked
questions (FAQ’s).
http://
http://
www.arcsoft.com for technical support and frequently asked
www.arcsoft.com for technical support and frequently asked
PDC 3350 US UM .indd 2/18/03, 11:00 AM52-53
Page 28

54
Polar oid Phot oMAX
PDC 33 50
Digit al Came ra User G uide
www.polar oid- digit al.com
55
Polar oid Phot oMAX
PDC 33 50
Digit al Came ra User G uide
www.polar oid- digit al.com
• Technical Speci cations
Internal Memory: Approx. 16MB NAND FLASH
External Memory: support SD card memory card up to 128MB ( not
included)
Still Image Resolution:
Resolution:
2048 X 1536
Fine: Approx. 11 pictures
Normal: Approx. 22 pictures
Resolution:
Fine: Approx. 18 pictures
Normal: Approx. 37 pictures
Resolution:
Fine: Approx. 45 pictures
Normal: Approx. 90 pictures
Resolution:
640 X 480
Fine: Approx. 112 pictures
Normal: Approx. 225 pictures
Still Image Quality:
Fine - 5X compression rate
Normal - 10X compression rate
Video Resolution: 320 x 240 pixels
Self Timer:
2 or 10 seconds with Beep sound
Video Clip:
Unlimited when connected to the computer via USB
Limited when using the internal memory: @ 320 X 240 pixels,
internal memor y)
Using SD card
8 M - Approx. 20 sec.
32 M - Approx. 98 sec.
64 M - Approx. 202 sec.
Playback Mode: Single/9 Thumbnail pictures
File Format:
Still Image - Still: EXIF 2.1 compatible format (JPEG compression )
DCF compatible. Support DPOF, PIM
Video Clip - AVI format
Image Deletion
Single image; all images in memory (with image protection);
Format
Lens Module
Element: 5 Glass
Focal Length: 5.69 ~ 16.29 mm
F No.: 2.66 ~ 4.92
Sensor
Sony 3.34 Mega Pixel CCD
Size: 1/2.7 inch
Digital Zoom
Capture Mode: up to 2X continuous
Playback Mode: up to 8X, scollable
Optical Zoom
Preview mode: up to 3X, continuous
Focusing
Auto focus with macro mode
Focus Range
Normal focus:18 inches to ∞ (45cm to ∞)
Macro focus - Telephoto: 8 ~ 24 inches (0.2 ~ 0.6 meter)
Wide: 4 ~ 24 inches ( 0.1 ~ 0.6 meter)
(The focusing range is the distance from the lens surface to the
subject)
Built-in Flash
Flash Modes -AUTO, OFF, ON, Red- eye reduction
Flash Range - Wide: 2.6 ~ 10 feet ( 0.8 ~ 3 meters)
Telephoto: 2.6 ~ 6.7 feet (0.8 ~ 2 meters )
PDC 3350 US UM .indd 2/18/03, 11:00 AM54-55
Page 29

56
56
Polar oid Phot oMAX
PDC 33 50
Digit al Came ra User G uide
www.polar oid- digit al.com
57
Polar oid Phot oMAX
PDC 33 50
Digit al Came ra User G uide
www.polar oid- digit al.com
Low Battery indicator
3 levels, Full, Low and Exhausted
Weight
Approximately 160g excluding batteries
External Connector: USB, SD card slot, Video Out (NTSC/ PAL)
Auto Power Off: 1/3/5 minutes in Capture/Playback mode with
battery power in
LCD Screen
Input/Output Terminal
USB port (Mini-B port), AC adaptor connector, Video Out (NTSC/PAL)
Power Supply
3.3 V, center positive, 1.5A Adaptor (not included)
2 x AA Batteries (included )
Operating System:
For Windows® Users: Microsoft® Windows® 98SE, ME, 2000 or XP
For Macintosh® Users: Mac® OS Version 9.0, 9.1 or X.
• Capacity of SD Card
8M
32M
64M
SD
Normal q ualit y
pictur es can be ta ken
pictur es can be ta ken
Fine quality p icture s
can be taken
2048 X 153 6
2048 X 153 6
2048 X 153 6
2048 X 153 6
2048 X 153 6
640 X 4 80
640 X 4 80
640 X 4 80
640 X 4 80
640 X 4 80
5
8
21
46
53
36
43
87
218
23
46
38
93
233
466
49
96
80
384
480
961
325
390
780
975
NOTE :
Scene complexity affects a picture’s le size. For example, a picture of
trees in autumn has a larger le size than a picture of bl ue sky at the same
resolu tion and qua lity setting. Therefore, the number of pictures you can
store on a card may var y.
PDC 3350 US UM .indd 2/18/03, 11:00 AM56-57
Page 30

58
58
Polar oid Phot oMAX
PDC 33 50
Digit al Came ra User G uide
www.polar oid- digit al.com
59
Polar oid Phot oMAX
PDC 33 50
Digit al Came ra User G uide
www.polar oid- digit al.com
Uninstalling Polaroid PDC 3350 driver
For Wind ows® 98SE Us ers:
PC
NOTE :
The following driver unins tall procedure is for Windows 98SE users only
because only W indows 98SE needs to ins tall the
PDC 33 50
driver.
Open Add /Removable Program Proper ties in Control Panel and select
Polaroid
PDC 3350
program, then click Add/ Remove .
The following dialog box appears, click Yes to con rm removing the
camera driver.
3.
The un-installation program runs automatically, please restart your
computer when it is nished.
Ok, the driver un-installation is completed.
• Camera Default Settings
Working M ode Descr iptio ns Defau lt
Playba ck Mode Information Display ON
Auto Mod e 2048x1536/N ormal
Flash Off
Display Image and Information
Manual Mode 2048x1536
Normal
Force Off
0.0
AUTO
AUTO
Display Image and Information
AUTO
Video M ode
Display Image and Information
SET Mo de ON
YMD
ON
3 Min.
ON
NTSC
Resolution /Qu ality
Flash
Preview Display
Size
Quality
Flash
Expos ure Compensa tion
White B alance
ISO Speed
Preview Display Mode
White B alance
Preview Disp Mo de
Beep
Date Style
Focus Indicator
Auto Power O ff
LCD Con rm
TV Out
Language ENGL ISH
PDC 3350 US UM .indd 2/18/03, 11:00 AM58-59
Page 31

60
Polar oid Phot oMAX
PDC 33 50
Digit al Came ra User G uide
www.polar oid- digit al.com
61
Polar oid Phot oMAX
PDC 33 50
Digit al Came ra User G uide
www.polar oid- digit al.com
• Using your batteries
WARNI NGS!
Batteries should be replaced by an adult.
Do not mix different types of batteries or new and used batteries.
Use recommended or equivalent type of batteries only.
Inser t the bat teries with the correct polarity.
Remove exhausted batteries from the camera immediately.
Do not short the supply terminals.
Do not mix alkaline, standard (carbon-zinc), or rechargeable (nickel-
cadmium) batteries.
Do not dispose the batteries in re.
Remove batteries from the camera when not in use.
These instructions should be retained for future reference.
Batteries life varies depends on the camera usage.
• Tips, Your Safety & Maintenance
Your Camera should only be operated within the following environmental
conditions;
41 - 104º Fahrenheit; 5 - 40º Celsius
20% - 85% relative humidity, non condensing
Battery life or image quality may be affected outside these conditions.
AC Adaptor
The AC Adaptor carries voltage which can be dangerous if live par ts are
exposed.
We recommend that you regularly examine the AC adaptor for any
breakage. NEVER try to repair or open the AC adaptor.
Camera Cautio ns
NEVER immerse any part of the Camera or its accessories into any uid
or liquid.
ALWAYS disconnect the Camera from your PC or TV before cleaning it.
ALWAYS remove dust or stains with a soft cloth dampened with water
or neutral detergent.
NEVER place hot items on the surface of the Camera.
NEVER attempt to open or disassemble Camera as this will affect any
warranty claim.
• Regulatory Information
FCC Notice
This device complies with Part 15 of FCC Rules. Operation is subject
to the following two conditions: (1) This device may not cause harmful
interference, and (2) This device must accept any interference received,
including interference that may cause undesired operation.
Warning: Changes or modi cations to this unit not expressly approved
by the party responsible for compliance could void the user’s authority
to operate the equipment.
NOTE: This equipment has been tested and found to comply with the
limits for Class B digital device, pursuant to Part 15 of the FCC Rules.
These limits are designed to provide reasonable protection against
harmful interference in a residential installation. This equipment
generates, uses and can radiate radio frequency energy and, if not
installed and used in accordance with the instructions, may cause
harmful interference to radio communications.
PDC 3350 US UM .indd 2/18/03, 11:00 AM60-61
Page 32

62
62
Polar oid Phot oMAX
PDC 33 50
Digit al Came ra User G uide
www.polar oid- digit al.com
However, there is no guarantee that interference will not occur in a
particular installation. If this equipment does cause harmful interference
to radio or television reception, which can be determined by turning
the equipment off and on, the user is encouraged to try to correct the
interference by one or more of the following measures:
Reorient or relocate the receiving antenna.
Increase the separation between the equipment and receiver.
Connect the equipment into an outlet on a circuit different from that
to which the receiver is needed.
Consult the dealer or an experienced radio/TV technician for help.
Shielded cable must be used with this unit to ensure compliance with
the Class B FCC limits.
Under the environment with electrostatic discharge, the product may
malfunction and require user to reset the product.
• Distributed by
SPECTRA MERCHANDISING INTERNATIONAL, INC.
Chicago Industry Tech Park
4230 North Normandy Avenue
Chicago, Illinois 60634, USA
E-mail Address : spectra@interaccess.com
US 0103
Part No.: OM837571 R1
Printed in China
PDC 3350 US UM .indd 2/18/03, 11:00 AM62-63
 Loading...