

Page 1

Page 2

Contents
Inhalt
Table des matières
1 - - - - - English
27 - - - - Français
53 - - - - Deutsch
Page 3
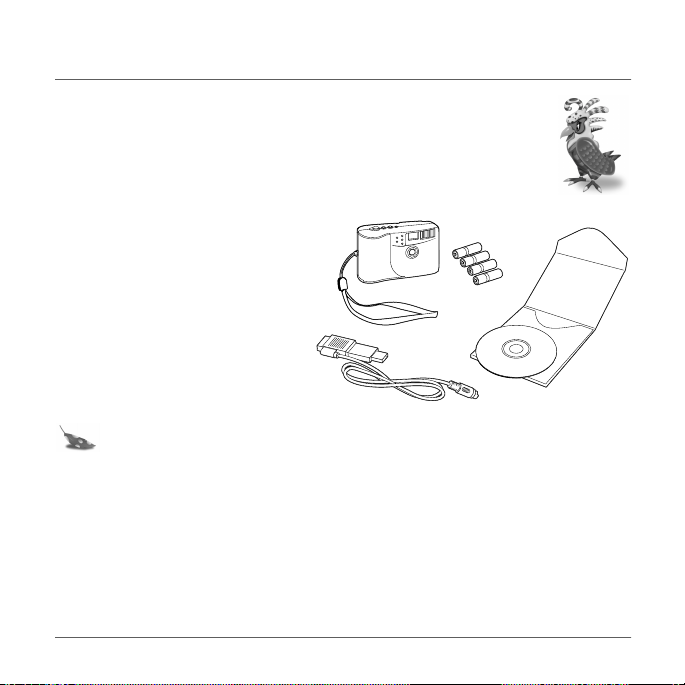
Welcome to Polaroid Fun
Your Polaroid Fun Flash 640 SE Digital Camera kit contains everything you need to
take digital photos, save them to your computer, and manipulate them. Using the
software in your kit, you can correct, edit, and play with your digital photos. You can
also use Polaroid PhotoImpression 2000 Software with other TWAIN-compliant
digital cameras and scanners.
Your kit contains the following:
• Polaroid Fun Flash 640 SE Digital
Camera
• Wrist strap
• Four AAA batteries
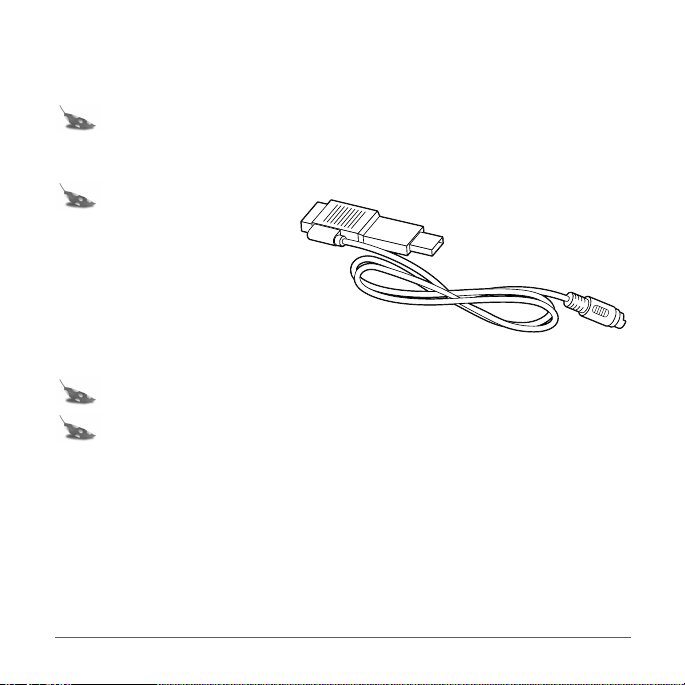
• Camera-to-computer cable (RS-232C
serial and USB connector)
• Polaroid PhotoImpression 2000
Software
• Quickstart Guide
Note: Your computer needs an RS-232C serial port or a high-speed USB port to use your
digital camera.
English
Questions?
Contact Polaroid Corporation at
www.polaroiddigitalEU.com
1
Page 4
English
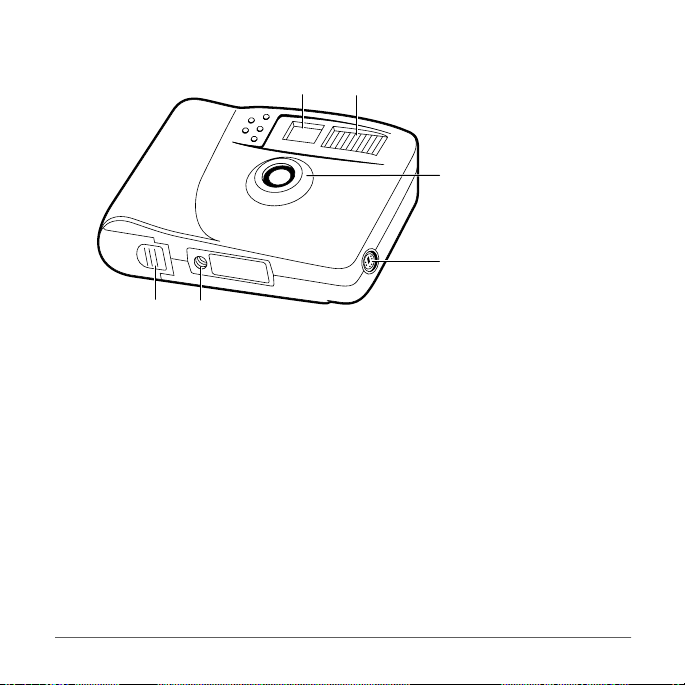
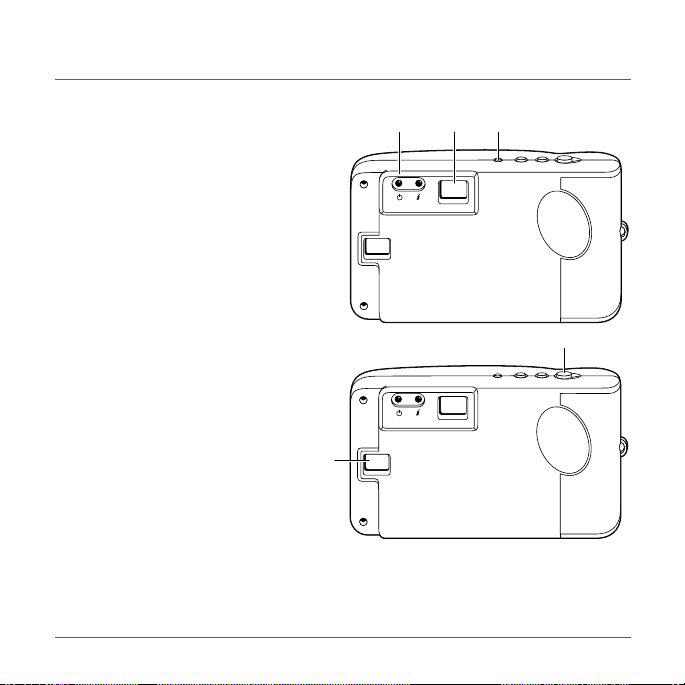
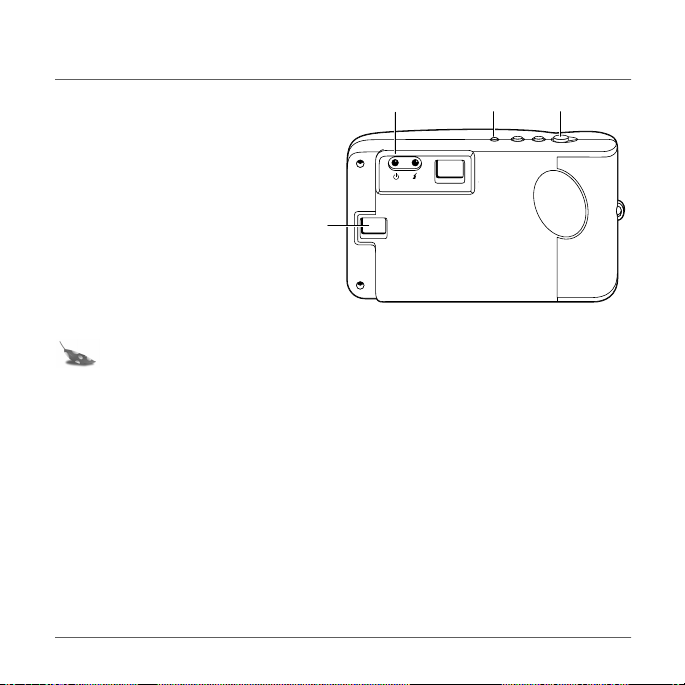
Camera features
ef
a. Viewfinder
b. Flash unit
c. Lens
d. Serial/USB cable connector port
e. Tripod mount
f. Battery compartment
ab
c
d
2 Questions?
Contact Polaroid Corporation at
www.polaroiddigitalEU.com
Page 5
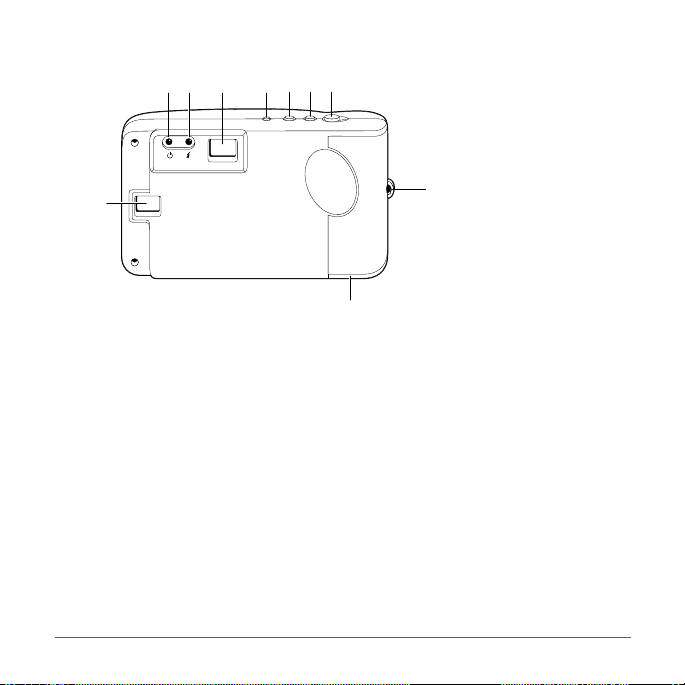
ih
jklmn
English
g
g. LCD status display
h. Power/status indicator light
i. Flash indicator light
j. Viewfinder
k. Power button
l. Flash button
m.Self-timer button
n. Shutter button
o. Wrist strap slot
p. Battery compartment
Questions?
Contact Polaroid Corporation at
o
p
www.polaroiddigitalEU.com
3
Page 6
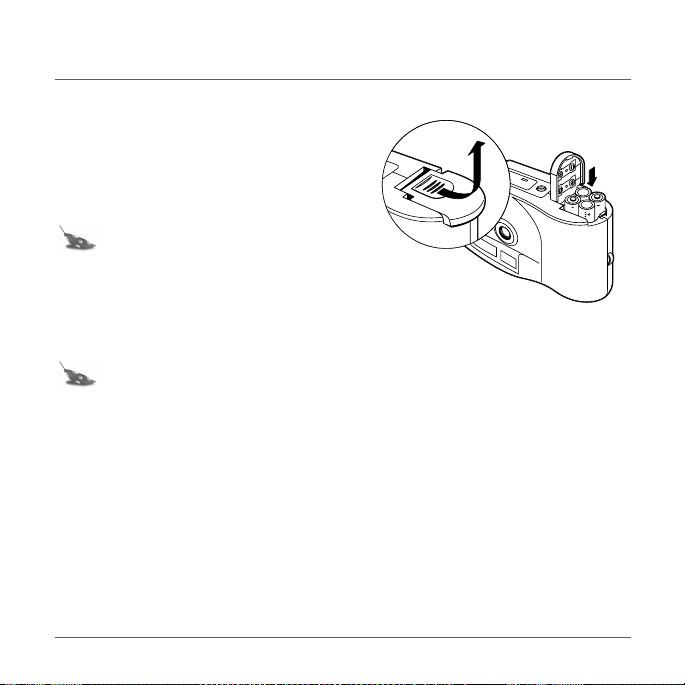
English
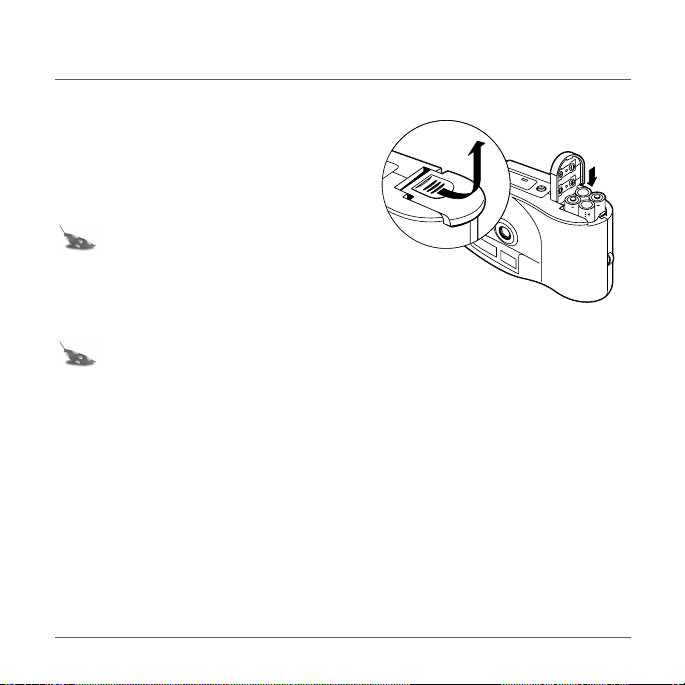
Inserting batteries
Your kit includes four AAA batteries.
1. Open the battery door.
2. Insert four AAA batteries. Make sure that the
battery terminals (+ and -) are properly
positioned.
3. Close the battery door.
Note: Replace the batteries when the
power/status indicator light blinks,
the LCD status display shows the
battery-low message (bL), or the
LCD status display does not turn on.
Note: Replace all four batteries at the same time. Do not mix old and new batteries,
batteries of different types, or batteries from different manufacturers. High-capacity
super-alkaline batteries provide longer battery life in digital cameras.
4 Questions?
Contact Polaroid Corporation at
www.polaroiddigitalEU.com
Page 7
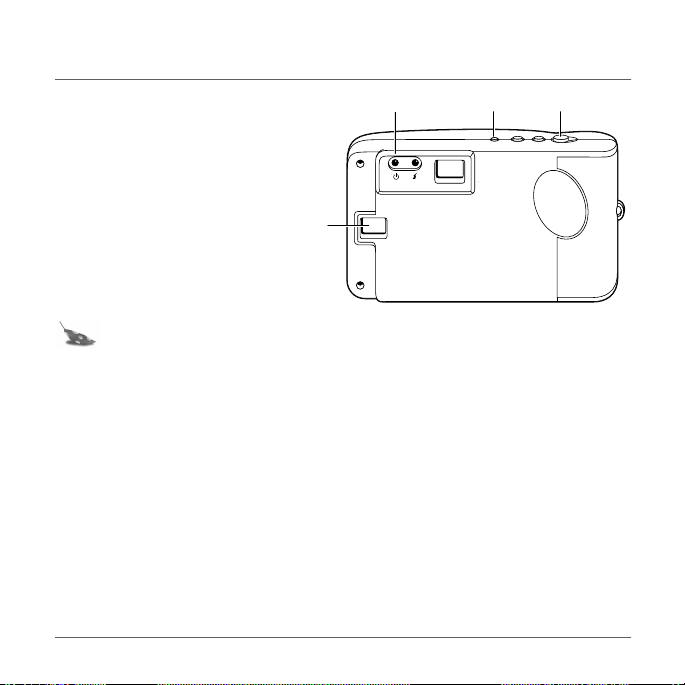
Taking photos
1. Turn on the camera (a). The green power/
status light (b) on the back of the camera
is lit.
If the green power/status light is not lit,
check to make sure the batteries are
properly loaded and do not need replacing.
2. Frame your subject(s) in the viewfinder (c).
English
abc
3. Hold the camera steady; press and hold
the shutter button (d) until the camera
beeps. The camera increases the picture
counter in the LCD status display (e) by
one.
Questions?
Contact Polaroid Corporation at
d
e
www.polaroiddigitalEU.com
5
Page 8
English
Using sleep mode
To save battery power, your digital camera
automatically shuts off after 45 seconds of
inactivity. In this sleep mode, the LCD status
display (a) turns off, the power/status
indicator light (b) displays green, and the
camera beeps every ten seconds.
Press the power button (d) once to bring
the camera out of sleep mode. The LCD
status display (a) turns on; the power/
status indicator light (b) displays green.
Press the shutter button (c) to take a photo.
Note: The power shuts off after three minutes in sleep mode, the LCD displays the system-
shutdown message (Sd), and the camera beeps. Push the power button (d) to
restore power.
6 Questions?
Contact Polaroid Corporation at
a
b
www.polaroiddigitalEU.com
cd
Page 9
English
Using the picture counter
The picture counter is found on the LCD status display. The camera comes with 2 MB of internal
memory, which typically stores 30 photos (640 x 480 pixel resolution). The number of photos that the
camera actually stores depends on the complexity of the photos.
1. Turn on the camera (a).
2. Press the shutter button (b).
The camera beeps and increases the
picture counter in the LCD status
display (c) by one.
When memory is full, the LCD status
display shows the memory-full
message (FL).
Note: The camera does not have
removable memory. When
memory is full, transfer photos into your computer and then erase them from the
camera memory. See page 12 to transfer photos to your computer.
c
ab
Questions?
Contact Polaroid Corporation at
www.polaroiddigitalEU.com
7
Page 10

English
Using the flash
When you turn on your digital camera, it is in the No Flash (nF) mode. You can change the
flash setting at any time.
Note: If the batteries are very weak when you turn on the camera, the flash does not
charge.
The camera indicates when you may need to use the flash by displaying the Low Lighting message
(LL) in the LCD status display. There are three flash settings:
LCD icon Flash setting
nF No Flash (flash off)
• The flash does not fire.
• Use when shooting toward a reflective background, such as a
window or a mirror.
AF Autoflash
• The flash fires automatically when needed.
• The autoexposure sensor in the camera determines when the
flash is necessary.
FF Force Flash
The flash fires for every photo.
8 Questions?
Contact Polaroid Corporation at
www.polaroiddigitalEU.com
Page 11

Changing the flash setting
1. Turn on the camera (a); it is in No
abcd
Flash (nF) mode.
2. Press the flash setting button (c) to
change the setting. The LCD status
display (b) shows the new setting.
3. If you turn on the Autoflash (AF) or
Force Flash (FF) setting, the flash
charges for a few seconds. The flash
indicator (d) lights yellow when the flash
is charged and ready to take a photo.
If the flash takes longer than 25 seconds
to charge, the Battery Low icon (bL) appears on the LCD status display and the flash stops
charging. You need to replace the camera batteries to use the flash (see page 4 to replace
batteries).
Note: If the camera detects the Battery Low condition when you turn it on, the flash does
not charge.
Note: If the camera is not used within 45 seconds after the flash is fully charged (or 45
seconds after the Battery Low icon appears), the camera enters sleep mode.
English
Questions?
Contact Polaroid Corporation at
www.polaroiddigitalEU.com
9
Page 12

English
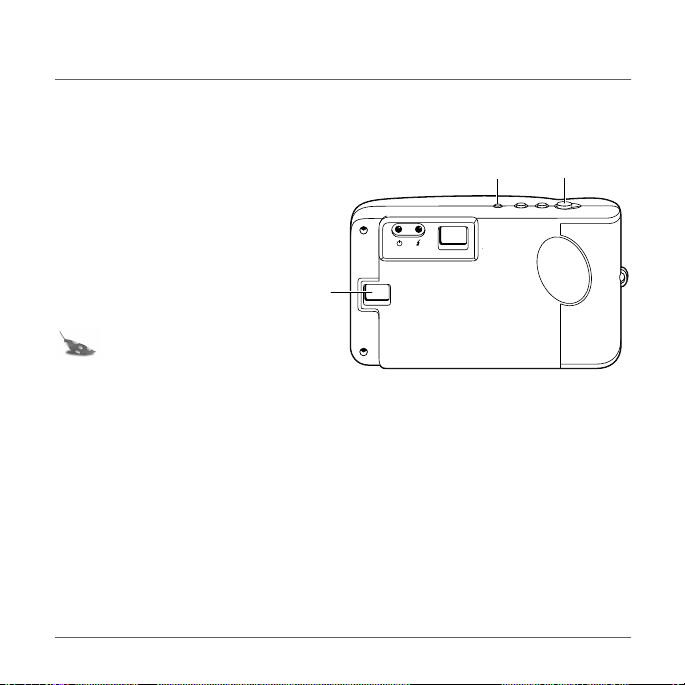
Using the self-timer
1. Turn on the camera (a).
2. Set the camera into position to take a photo.
3. Look through the viewfinder (b) to
compose the photo.
4. Press the self-timer button (c). The camera
beeps for 15 seconds, the beep speeds up
and then stops just before the camera takes
the photo.
Note: You do not need to press the
shutter button to take a selftimed photo.
abc
10 Questions?
Contact Polaroid Corporation at
www.polaroiddigitalEU.com
Page 13

English
Deleting photos
You must delete photos from your camera or transfer photos to your computer when the camera’s
memory is full. The memory is full when the picture counter does not increase after you take a photo
(usually after you take 30 photos).
See page 12 to learn how to transfer photos to your computer and page 17 to learn how to delete
photos from the camera using the PhotoImpression 2000 software.
Questions?
Contact Polaroid Corporation at
www.polaroiddigitalEU.com
11
Page 14

English
Transferring photos to your computer
To transfer your digital photos to your computer, first install the Polaroid PhotoImpression 2000
Software included in your kit.
This software includes many fun and interesting features:
• One-click fix technology that instantly improves any digital image.
• A wide selection of digital special effects such as melting and swirling.
• PhotoFantasy, which lets you put someone’s image inside one of the many supplied digital
fantasies.
Minimum system requirements
Before installing the software, make sure that your computer meets these requirements:
• PC with Pentium class processor
• Microsoft Windows 95, Windows 98, or Windows Me
• 32 MB of RAM
• 178 MB available hard drive space
• SVGA monitor with 800 x 600 resolution or greater
• Available RS232-C COMM (serial) port (on computers running Windows 95, Windows 98, or
Windows Me) or a high-speed USB port (on computers running Windows 98 or Windows Me)
• 2x or faster CD-ROM drive
• Mouse
Note: If you have any questions about the system capabilities of your computer, read the
documentation that came with the computer or contact the computer manufacturer.
12 Questions?
Contact Polaroid Corporation at
www.polaroiddigitalEU.com
Page 15
Installing PhotoImpression 2000 Software
1. Insert the PhotoImpression CD-ROM in your CD-ROM drive.
If the installation program does not start automatically:
a. Select Run from the Windows Start menu.
b. Click Browse to locate your CD-ROM drive.
c. Select Setup.exe from the CD-ROM.
d. Click Open.
e. Click OK.
2. Follow the instructions on your computer screen.
3. Click Finish to complete software installation.
Note: Read the ReadMe file for any important last minute information about your
software. You can access the ReadMe file by clicking the Start menu, then
selecting Programs\Polaroid\ReadMe.
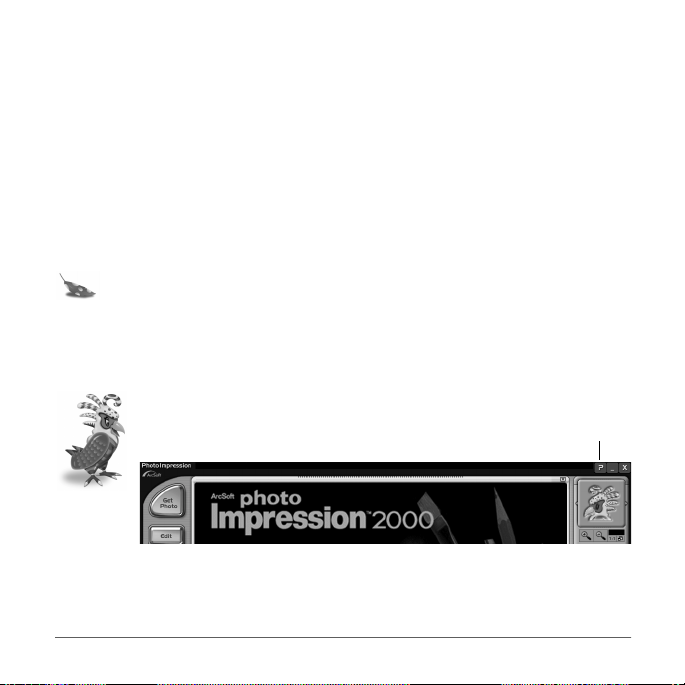
Using PhotoImpression 2000 software
For information about using Polaroid PhotoImpression 2000 Software, click on the ?
button to open the online Help.
English
? button
Questions?
Contact Polaroid Corporation at
www.polaroiddigitalEU.com
13
Page 16
English
Connecting the digital camera to your computer
1. Turn off the camera, computer, and any peripheral devices.
Note: You do not need to turn off a Windows 98 or Windows Me computer to connect the
camera to its USB port.
2. Locate the serial/USB connector cable from your kit.
Note: The serial/USB
connector cable is
actually two different
cables in one, with one
end split into two
connectors. This allows
you to choose to
connect the camera to
your computer using either a USB port or the serial port.
Note: Transferring photos with a USB port is much faster than doing so with a serial port.
Note: If your computer does not have a USB port, it is necessary to connect the camera to
the serial port.
14 Questions?
Contact Polaroid Corporation at
www.polaroiddigitalEU.com
Page 17
English
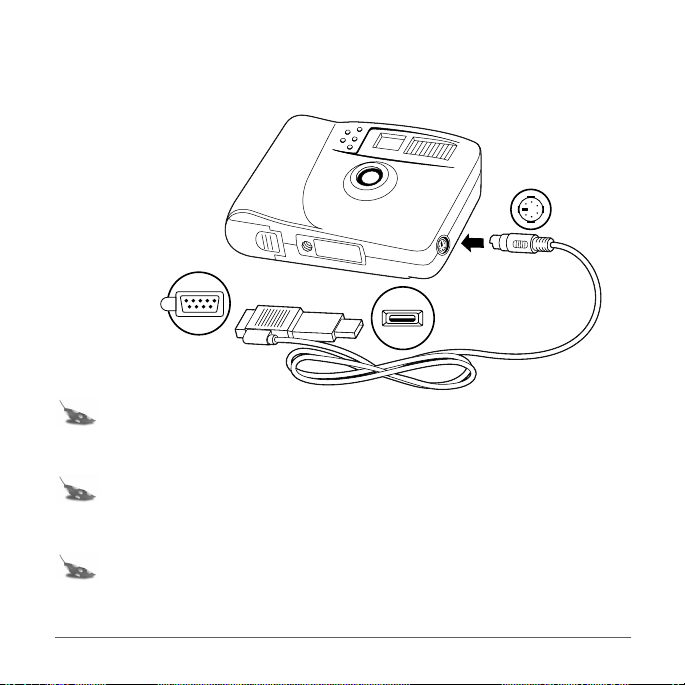
3. Connect the serial head of the cable (a) to the serial port on your Windows 95, Windows 98, or
Windows Me computer. Or connect the USB head of the cable (b) to the USB port on your
Windows 98 or Windows Me computer.
c
a
Note: If the connection between the USB head and the computer USB port is not tight, the
USB head may eventually pull out of the port. Check that the USB head is fully
plugged in every time you transfer photos.
Note: To get help finding the serial or USB port on your computer, read the instruction
manual that came with your computer or contact the computer manufacturer.
4. Connect the other end of the cable to the camera (c).
Note: When inserting the plug into the camera, the arrow on the plug should face the
camera front. Insert the plug straight into the port and do not turn or twist the plug.
Questions?
Contact Polaroid Corporation at
b
www.polaroiddigitalEU.com
15
Page 18

English
5. Turn on the camera.
6. Turn on the computer.
Note: The computer can remain on when you plug the serial/USB connector cable into the
computer’s USB port.
7. From the Start menu, select Programs\Polaroid\PhotoImpression 2000.
The software launches.
16 Questions?
Contact Polaroid Corporation at
www.polaroiddigitalEU.com
Page 19
Transferring photos to your computer
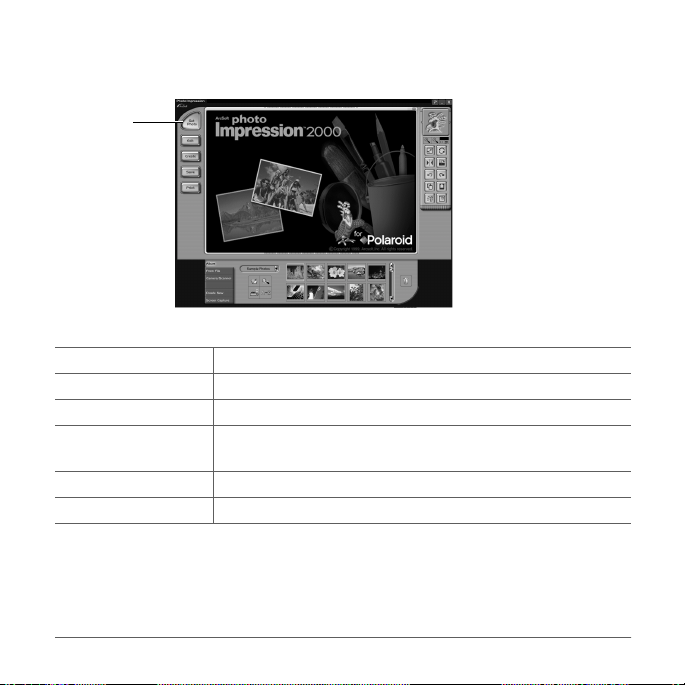
1. Click Get Photo.
Get
Photo
The Get Photo button lets you select an image from a variety of sources:
Selection: Click on it to:
Album Open an image file from a PhotoImpression 2000 album
From File Open a recently used image or any image file on your computer
Camera/Scanner Transfer a photo from your camera, scanner, or other TWAIN-
compatible device
Create New Create a new image file
Screen Capture Grab an entire computer screen or active window
English
Questions?
Contact Polaroid Corporation at
www.polaroiddigitalEU.com
17
Page 20
English
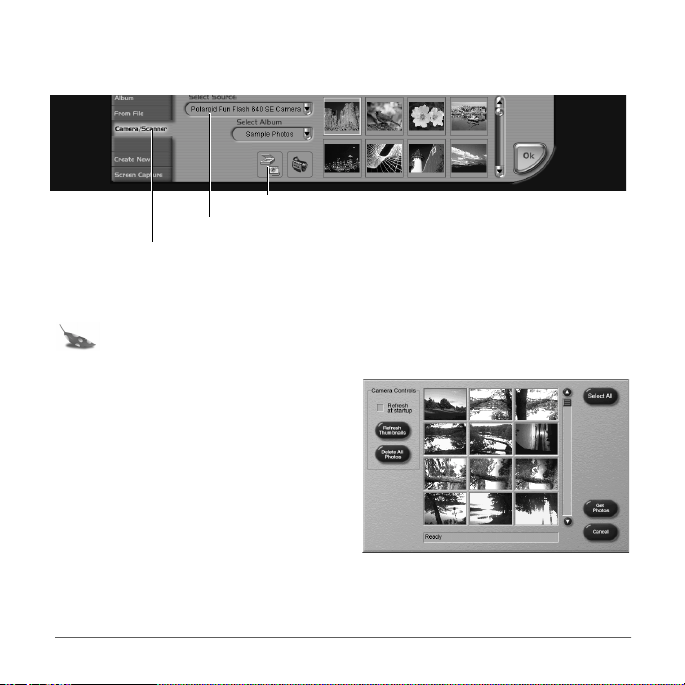
2. Click Camera/Scanner.
The Select Source list appears.
Acquire button
Select Source list
Camera/Scanner button
3. Select Polaroid Fun Flash 640 SE Camera.
4. Choose the destination album for your photos from the Select Album list.
Note: To create a new album, select [New] and use the album named New Album1
or enter a different album name.
5. Click the Acquire button.
The digital camera TWAIN software window
opens. TWAIN software is used to transfer,
delete, and save photos from your camera.
6. Click Refresh Thumbnails to display
your photos in the TWAIN window.
7. Click on a photo thumbnail to select it for
transfer to your computer.
To transfer more that one photo, press
Control (Ctrl) on your keyboard while you click on each thumbnail image.
To transfer all of the photos from the camera, click Select All.
18 Questions?
Contact Polaroid Corporation at
www.polaroiddigitalEU.com
Page 21

8. Click Get Photos. The selected photos appear in the active photo album.
Note: Click Delete All Photos to erase all photos from the camera.
Note: It’s a good idea to erase photos from your camera after downloading them to your
computer. This will free up some space for taking more photos!
9. Double-click on an image to open it in the image tray.
English
Questions?
Contact Polaroid Corporation at
www.polaroiddigitalEU.com
19
Page 22
English
Changing images
You can add effects, retouch colors, cut and paste selections between images, and more with your
PhotoImpression 2000 Software.
Opening an image
To play with an image, first use your software to open it from an Album.
1. Double-click on an Album thumbnail image to display it in the image tray.
Image
Tr ay
20 Questions?
Contact Polaroid Corporation at
www.polaroiddigitalEU.com
Page 23

English
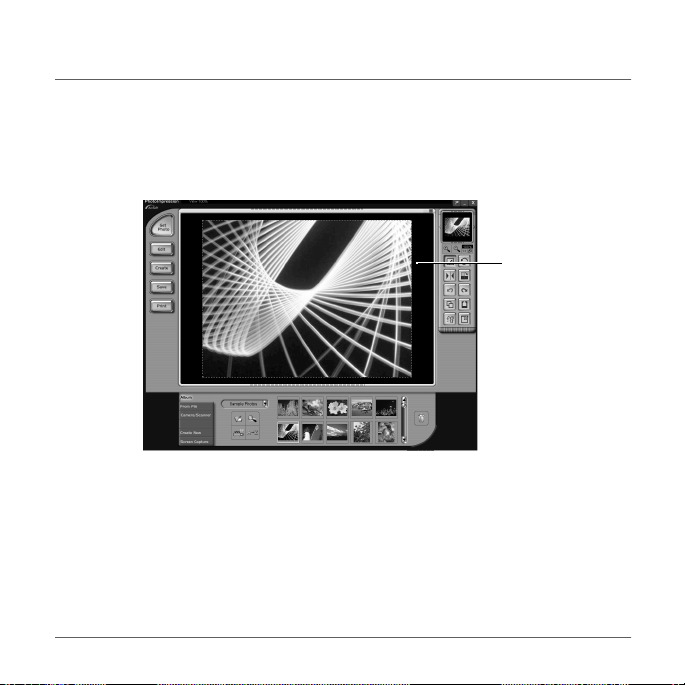
Applying effects
You can apply many different special effects to part or all of an image. For example, try making your
image look like an oil painting!
1. Double-click on a photo album thumbnail to open an image in the image tray.
2. Click Edit.
3. Click Effects.
4. Click the down arrow on the tool palette or drag the vertical slider until you see the “painting”
effect thumbnail. (It is the first thumbnail in the fourth row of effects.)
5. Click the painting effect thumbnail to show its effect on the image.
6. Drag the Intensity slider to the left to decrease the intensity of the effect or to the right to
increase the intensity of the effect.
7. Click Apply to implement the effect.
Click the undo button if you change your mind.
Questions?
Contact Polaroid Corporation at
www.polaroiddigitalEU.com
21
Page 24

English
Cropping images
Use the Crop tool to cut out part of an image.
1. Double-click on a photo album thumbnail to open an image in the image tray.
2. With the image displayed, click Edit.
3. Click Select & Crop.
4. Select the desired cropping tool.
5. Click and drag the mouse pointer to define the desired crop area.
6. Move the cursor into the selected area; click and drag it to move the crop boundary, if desired.
7. Drag the Soft Edge slider to the left to sharpen the boundary of the selected area or to the
right to soften the boundary.
8. Select Apply to All Layers to crop the same area in all layers of the image.
9. Click the Crop button.
The cropped image appears in the image tray.
Click the undo button if you change your mind.
22 Questions?
Contact Polaroid Corporation at
www.polaroiddigitalEU.com
Page 25

English
Saving images
To save the image that is on the image tray to your computer, click on the image and click the Save
button. There are several ways to save the image to your computer:
• Click Save to save the file with the same file name and in the same file format.
• Click Save As to save the file with a different file name or in a different file format.
Note: If you select JPG, a slider appears to set the amount of image compression. A higher
setting saves the file with less compression and higher image quality. A lower
setting saves the file with more compression and a lower image quality. Files with
more compression take up less hard disk space.
• Click Email to save the file as an email attachment.
Note: Your email system (with MAPI support) should open so that you can attach the image
file to a new message. If your email system does not open, consult its manual or
technical support for information about MAPI support.
• Click Visit Polaroid Digital to go to the Polaroid digital imaging Web site.
Questions?
Contact Polaroid Corporation at
www.polaroiddigitalEU.com
23
Page 26

English
Camera Precautions
Follow these guidelines when using your Polaroid Fun Flash 640 SE Digital Camera:
• Do not open the camera case or attempt your own repairs. High-voltage internal components
create the risk of electrical shock.
• Supervise children when the camera is used by them or in their presence.
• Do not expose the camera to, or immerse it in, water or other liquids. Turn off the camera and
remove the batteries if the camera is exposed to fluids. Using the camera under these conditions
creates the risk of electrical shock or fire.
• Do not open the battery compartment when the camera power is on.
• Do not operate the camera if it is dropped or damaged.
24 Questions?
Contact Polaroid Corporation at
www.polaroiddigitalEU.com
Page 27

English
Product Limited Warranties
One Year Limited Warranty
Polaroid Fun Flash 640 SE Digital Camera
Polaroid will, at our option, repair or replace any unit found defective in manufacture within the warranty period.
The warranty period is determined by the date of purchase. Keep the receipt as proof of purchase. Otherwise, the
warranty period is determined by the date of manufacture.
This warranty does not apply to damages caused by accident, misuse, or
tampering, and excludes all consequential damages except in jurisdictions
not allowing such exclusions or limitations.
Ninety Day Limited Warranty
Polaroid PhotoImpression 2000 Software
Polaroid warrants that the software media will be free of defects in materials and workmanship for a period of 90
days from the date of purchase. Polaroid's entire liability and your exclusive remedy shall be to repair or replace
the software that does not meet Polaroid's Limited Warranty and is returned to Polaroid with a copy of your sales
receipt. This Limited Warranty is void if failure of the software has resulted from accident, abuse, or
misapplication. Any replacement software will be warranted for the remainder of the original warranty period or
30 days, whichever is longer.
Polaroid makes no other warranties with respect to the software, either
express or implied, including but not limited to implied warranties of
merchantability and fitness for a particular purpose.
Questions?
Contact Polaroid Corporation at
www.polaroiddigitalEU.com
25
Page 28

English
Product Compliance
This product conforms to the following EC standards:
Safety
Low Voltage Directive 73/23/EEC
EN60950
EMC
EMC Directive 89/336/EEC
EN55022, Class B
EN50082-1
Questions?
Contact Polaroid Corporation on the Web at
www.polaroiddigitalEU.com
Or call the Polaroid Digital Product Support Center Monday through Friday during normal
business hours at:
France: 0130683888
•
Switzerland (French): 01 277 7276
•
Switzerland (German): 01 277 7277
•
Switzerland (Italian): 01 277 7278
•
United Kingdom: 01582 632021
•
Germany: 069/ 8404-999
•
Warranty, phone-support, and repair services are regional and may not be available for a particular product outside
the country where it was purchased.
Thank you for purchasing this Polaroid Digital Product. For more information on our other imaging products, visit
the Web site
www.polaroid.com
© 2000 Polaroid Corporation, Cambridge MA 02139 USA, owner of the trademarks "Polaroid", "Max
the Bird & Design" and "Feather Design." All other product names may be the property of their
respective owners. All rights reserved.
.
.
26 Questions?
Contact Polaroid Corporation at
www.polaroiddigitalEU.com
Page 29

Polaroid Fun
Le kit de votre appareil photo numérique Polaroid Flash 640 SE vous permet de
prendre des photos numériques, de les sauvegarder sur votre ordinateur et de les
manipuler. A l'aide du logiciel inclus, vous pouvez corriger, modifier et jouer avec vos
photos numériques comme vous le souhaitez. Vous pouvez utiliser le logiciel Polaroid
PhotoImpression 2000 avec d'autres appareils photos et scanners compatibles
TWAIN.
Votre kit contient les éléments suivants :
• un appareil photo numérique Polaroid
Fun Flash 640 SE,
• une dragonne,
• quatre piles AAA,
• un câble de connexion à l'ordinateur
série RS-232C/USB,
• un logiciel Polaroid PhotoImpression
2000,
• un guide de démarrage rapide.
Remarque : Votre ordinateur doit être équipé d'un port série RS-232C ou d'un port USB
grande vitesse pour pouvoir utiliser votre appareil photo numérique.
Français
Des Questions?
www.polaroiddigitalEU.com
Contactez Polaroid Corporation à l'adresse suivante :
27
Page 30

Français
Eléments de l'appareil photo
ef
a. Viseur
b. Flash
c. Objectif
d. Port pour câble série/USB
e. Ecrou de pied
f. Compartiment à piles
ab
c
d
28 Des Questions?
www.polaroiddigitalEU.com
Contactez Polaroid Corporation à l'adresse suivante :
Page 31

ih
jklmn
Français
g
g. Ecran à cristaux liquides
h. Témoin d'alimentation
i. Témoin du flash
j. Viseur
k. Bouton d'alimentation
l. Bouton de flash
m.Bouton du retardateur
n. Déclencheur
o. Point de fixation de la dragonne
p. Compartiment à piles
Des Questions?
www.polaroiddigitalEU.com
Contactez Polaroid Corporation à l'adresse suivante :
o
p
29
Page 32

Français
Insertion des piles
Votre kit comprend quatre piles AAA.
1. Ouvrez le compartiment à piles.
2. Insérez quatre piles AAA. Assurez-vous que les
bornes des piles (+ et -) sont correctement
positionnées.
3. Fermez le compartiment à piles.
Remarque : Remplacez les piles lorsque
le témoin d'alimentation
clignote, l'écran à cristaux
liquides affiche le message
indiquant que les piles sont
faibles (bL) ou lorsque l'écran à cristaux liquides ne s'allume pas.
Remarque : Remplacez les quatre piles en même temps. N'utilisez pas de piles usagées
avec des piles neuves, ni de piles de types ou de fabricants différents. Les
piles super alcalines haute énergie ont une durée de vie plus longue dans les
appareils photo numériques.
30 Des Questions?
www.polaroiddigitalEU.com
Contactez Polaroid Corporation à l'adresse suivante :
Page 33

Prise de vue
1. Allumez l'appareil photo (a). Le témoin vert
d'alimentation (b) au dos de l'appareil
s'allume.
Si le témoin vert d'alimentation ne s'allume
pas, vérifiez que les piles sont
correctement insérées ou qu'elles n'ont pas
besoin d'être remplacées.
2. Cadrez le sujet dans le viseur (c).
Français
abc
3. Tenez fermement l'appareil photo, puis
appuyez sur le déclencheur et
maintenez-le enfoncé (d) jusqu'à ce
que l'appareil émette un bip sonore. Le
nombre de photos affiché par le
compteur de vues sur l'écran à cristaux
liquides d'état passe au chiffre
supérieur (e).
Des Questions?
www.polaroiddigitalEU.com
Contactez Polaroid Corporation à l'adresse suivante :
d
e
31
Page 34
Français
Utilisation du mode veille
Pour économiser les piles, votre appareil
photo numérique s'éteint automatiquement
après 45 secondes de non-utilisation. En
veille, l'écran à cristaux liquides (a)
s'éteint, le témoin d'alimentation (b) est
allumé et l'appareil émet un bip sonore
toutes les dix secondes.
Appuyez une fois sur le bouton
d'alimentation (d) pour réactiver l'appareil
photo. L'écran à cristaux liquides (a)
s'allume ainsi que le témoin
d'alimentation (b). Appuyez sur le déclencheur (c) pour prendre une photo.
Remarque : L'appareil s'éteint après trois minutes de veille, l'écran à cristaux liquides
affiche le message indiquant que l'appareil va s'éteindre (Sd) et l'appareil
photo émet un bip sonore. Appuyez sur le bouton d'alimentation (d) pour
rallumer l'appareil.
32 Des Questions?
www.polaroiddigitalEU.com
a
b
Contactez Polaroid Corporation à l'adresse suivante :
cd
Page 35

Français
Utilisation du compteur de vues
Le compteur de vues se trouve sur l'écran à cristaux liquides. L'appareil photo est équipé d'une
mémoire interne de 2 Mo ce qui permet généralement de stocker 30 photos (avec une résolution de
640 x 480 pixels). Le nombre de photos que l'appareil peut réellement stocker dépend de la
complexité des photos.
1. Allumez l'appareil photo (a).
2. Appuyez sur le déclencheur (b).
L'appareil photo émet un bip sonore et
le nombre de photos affiché par le
compteur de vues sur l'écran à cristaux
liquides passe au chiffre supérieur (c).
Lorsque la mémoire est pleine, l'écran
à cristaux liquides d'état affiche le
message indiquant que la mémoire est
pleine (FL).
Remarque : L'appareil photo n'est pas équipé de carte mémoire amovible. Lorsque la
mémoire est pleine, transférez les photos vers votre ordinateur puis
supprimez-les de la mémoire de l'appareil. Reportez-vous à la page 38 pour le
transfert de photos vers votre ordinateur.
c
ab
Des Questions?
www.polaroiddigitalEU.com
Contactez Polaroid Corporation à l'adresse suivante :
33
Page 36

Français
Utilisation du flash
Lorsque vous allumez votre appareil photo numérique, il est en mode Sans flash (nF). Vous
pouvez modifier le mode du flash à tout moment.
Remarque : Si les piles sont très faibles lorsque vous allumez votre appareil, le flash ne se
charge pas.
L'appareil photo vous signale quand utiliser le flash en affichant le message indiquant que
l'éclairage est insuffisant (LL) sur l'écran à cristaux liquides. Vous disposez de trois modes pour le
flash :
Icône LCD Mode
nF Sans flash (flash éteint)
• Le flash ne se déclenche pas.
• A utiliser lorsque l'arrière-plan est réfléchissant (une fenêtre ou
un miroir, par exemple).
AF Auto
• Le flash se déclenche automatiquement si nécessaire.
• Le capteur d'exposition automatique de l'appareil photo
détermine si le flash est nécessaire.
FF Flash forcé
Le flash se déclenche pour chaque photo.
34 Des Questions?
www.polaroiddigitalEU.com
Contactez Polaroid Corporation à l'adresse suivante :
Page 37

Modification du réglage du flash
1. Allumez l'appareil photo (a). Il est en
abcd
mode Sans flash (nF).
2. Appuyez sur le bouton de flash (c) pour
modifier le réglage. L'écran à cristaux
liquides (b) indique le nouveau réglage.
3. Si vous activez le mode Auto (AF) ou
le mode Flash forcé (FF), le flash
se charge pendant quelques secondes. Le
témoin du flash (d) devient jaune lorsque
le flash est chargé et prêt à fonctionner.
Si le flash met plus de 25 secondes à se
charger, l'icône indiquant que les piles sont faibles (bL) apparaît sur l'écran à cristaux liquides
et le flash ne se charge plus. Vous devez changer les piles de l'appareil photo pour utiliser le
flash (reportez-vous à la page 30 pour remplacer les piles).
Français
Remarque : Si l'appareil photo détecte que les piles sont faibles lorsque vous l'allumez, le
flash ne se chargera pas.
Remarque : Si vous n'utilisez pas l'appareil photo dans les 45 secondes qui suivent le
chargement complet du flash (ou dans les 45 secondes qui suivent l'apparition
de l'icône indiquant que les piles sont faibles), l'appareil se mettra en veille.
Des Questions?
www.polaroiddigitalEU.com
Contactez Polaroid Corporation à l'adresse suivante :
35
Page 38

Français
Utilisation du retardateur
1. Allumez l'appareil photo (a).
2. Positionnez l'appareil pour prendre une photo.
3. Cadrez votre photo à l'aide du viseur (b).
4. Appuyez ensuite sur le retardateur (c).
L'appareil photo émet des bips sonores de
plus en plus rapprochés pendant 15
secondes et s'arrête juste avant que la
photo ne soit prise.
Remarque : Vous n'avez pas besoin
d'appuyer sur le
déclencheur pour prendre
une photo à l'aide du
retardateur.
abc
36 Des Questions?
www.polaroiddigitalEU.com
Contactez Polaroid Corporation à l'adresse suivante :
Page 39

Français
Suppression de photos
Vous devez effacer des photos de votre appareil ou les transférer vers votre ordinateur lorsque la
mémoire de l'appareil photo est pleine. La mémoire est pleine lorsque le numéro affiché par le
compteur de vues ne change plus quand vous prenez une photo (généralement après 30 photos).
Reportez-vous à la page 38 pour connaître la procédure de transfert des photos vers votre
ordinateur. Reportez-vous également à la page 43 pour connaître la procédure de suppression de
photos de votre appareil à l'aide du logiciel PhotoImpression 2000.
Des Questions?
www.polaroiddigitalEU.com
Contactez Polaroid Corporation à l'adresse suivante :
37
Page 40

Français
Transfert de photos vers votre ordinateur
Pour transférer vos photos numériques vers votre ordinateur, installez d'abord le logiciel Polaroid
PhotoImpression 2000 inclus dans votre kit.
Ce logiciel offre de multiples fonctions des plus pratiques aux plus amusantes :
• Amélioration instantanée de vos photos d'un simple clic de souris.
• Large sélection d'effets spéciaux numériques, tels que les outils de manipulation d'images.
• PhotoFantasy, qui vous permet d'appliquer des effets numériques à la photo d'une personne.
Configuration minimale requise
Avant d'installer le logiciel, assurez-vous que votre ordinateur dispose des éléments suivants :
• un PC équipé d'un processeur Pentium,
• Microsoft Windows 95, Windows 98 ou Windows Me,
• 32 Mo de RAM,
• 178 Mo d'espace disque dur disponible,
• un moniteur SVGA avec une résolution 800 x 600 ou supérieure,
• un port (série) RS232-C COMM disponible (sur les ordinateurs utilisant Windows 95, Windows 98
ou Windows Me) ou un port USB à grande vitesse (sur les ordinateurs utilisant Windows 98 ou
Windows Me),
• un lecteur de CD-ROM 2x minimum,
• une souris.
Remarque : Pour obtenir de plus amples informations sur la configuration de votre
ordinateur, reportez-vous à la documentation fournie avec celui-ci ou
contactez le fabricant.
38 Des Questions?
www.polaroiddigitalEU.com
Contactez Polaroid Corporation à l'adresse suivante :
Page 41

Installation de PhotoImpression 2000
1. Insérez le CD-ROM PhotoImpression dans votre lecteur de CD-ROM.
Si le programme d'installation ne démarre pas automatiquement :
a. Sélectionnez Exécuter dans le menu Démarrer de Windows.
b. Cliquez sur Parcourir pour rechercher le lecteur de CD-ROM.
c. Sélectionnez Setup.exe à partir du CD-ROM.
d. Cliquez sur Ouvrir.
e. Cliquez sur OK.
2. Suivez les instructions qui s'affichent à l'écran.
3. Cliquez sur Terminer pour terminer l'installation du logiciel.
Remarque : Veuillez lire le fichier ReadMe pour prendre connaissance des dernières
informations sur le logiciel. Vous pouvez accéder au fichier ReadMe en
cliquant sur le menu Démarrer, puis
Programmes\Polaroid\ReadMe.
Utilisation du logiciel PhotoImpression 2000
Pour de plus amples informations sur l'utilisation du logiciel Polaroid
PhotoImpression 2000, cliquez sur le bouton ? pour afficher l'aide en ligne.
Français
Bouton ?
Des Questions?
www.polaroiddigitalEU.com
Contactez Polaroid Corporation à l'adresse suivante :
39
Page 42

Français
Connexion de votre appareil photo numérique à votre ordinateur
1. Eteignez l'appareil photo, l'ordinateur, ainsi que tous les périphériques.
Remarque : Il n'est pas nécessaire d'éteindre votre ordinateur si celui-ci fonctionne sous
Windows 98 ou Windows Me pour brancher l'appareil sur le port USB.
2. Repérez le câble série/USB dans votre kit.
Remarque : Le câble série/
USB est composé
de deux câbles
différents, avec
une extrémité
divisée en deux
connecteurs.
Vous pouvez ainsi
choisir de brancher l'appareil photo sur votre ordinateur en utilisant soit le
port USB soit le port série.
Remarque : Le transfert de photos via le port USB est beaucoup plus rapide que via le port
série.
Remarque : Si votre ordinateur n'est pas équipé d'un port USB, vous devez brancher
l'appareil photo sur le port série.
40 Des Questions?
www.polaroiddigitalEU.com
Contactez Polaroid Corporation à l'adresse suivante :
Page 43

3. Branchez l'extrémité série du câble (a) sur le port série de votre ordinateur équipé de
Windows 95, Windows 98 ou Windows Me. Branchez l'extrémité USB du câble (b) sur le port
USB de votre ordinateur équipé de Windows 98 ou Windows Me.
c
Français
a
Remarque : Si la connexion entre l'extrémité USB et le port USB de l'ordinateur n'est pas
sécurisée, l'extrémité USB peut se débrancher. Assurez-vous que l'extrémité
USB est branchée correctement à chaque fois que vous transférez des photos.
Remarque : Si vous ne trouvez pas le port série ou le port USB sur votre ordinateur,
consultez la documentation fournie avec celui-ci ou contactez le fabricant.
Des Questions?
www.polaroiddigitalEU.com
Contactez Polaroid Corporation à l'adresse suivante :
b
41
Page 44

Français
4. Branchez l'autre extrémité du câble sur l'appareil (c).
Remarque : Lorsque vous insérez la fiche dans l'appareil, assurez-vous que la flèche qui
figure sur la fiche est bien tournée vers l'avant de l'appareil. Insérez la fiche
dans le port sans la tourner ni la tordre.
5. Allumez l'appareil photo.
6. Mettez l'ordinateur sous tension.
Remarque : L'ordinateur peut être allumé lorsque vous branchez le câble série/USB sur le
port USB de l'ordinateur.
7. Dans le menu Démarrer, sélectionnez
Programmes\Polaroid\PhotoImpression 2000 pour lancer le logiciel.
42 Des Questions?
www.polaroiddigitalEU.com
Contactez Polaroid Corporation à l'adresse suivante :
Page 45

Transfert de photos vers votre ordinateur
1. Cliquez sur Importer une photo.
Importer
une
photo
Le bouton Importer une photo vous permet de sélectionner une image à partir de
plusieurs sources :
Sélection : Action :
Album Ouvre un fichier image à partir d'un album PhotoImpression 2000.
A partir du
fichier
Caméra/
Scanneur
Créer un
Ouvre une image récemment utilisée ou un fichier image sur votre
ordinateur.
Transfère une photo à partir de votre appareil photo, d'un scanner ou
de tout autre périphérique compatible TWAIN.
Crée un nouveau fichier image.
nouveau fichier
Capture d'écran Copie un écran entier ou une fenêtre active.
Français
Des Questions?
www.polaroiddigitalEU.com
Contactez Polaroid Corporation à l'adresse suivante :
43
Page 46

Français
2. Cliquez sur Caméra/Scanneur.
La liste Sélectionner la source s'affiche.
Bouton Acquérir
Liste Sélectionner la source
Bouton Caméra/Scanneur
3. Sélectionnez Polaroid Fun Flash 640 SE Camera.
4. Choisissez l'album cible de vos photos dans la liste Sélectionner un album.
Remarque : Pour créer un nouvel album, sélectionnez [Nouveau] et utilisez l'album
Nouvel album1 ou entrez un nom d'album différent.
5. Cliquez sur le bouton Acquérir.
La fenêtre TWAIN de votre appareil photo
numérique s'affiche. Le logiciel TWAIN vous
permet de transférer, de supprimer et
d'enregistrer des photos à partir de votre
appareil photo.
6. Cliquez sur Rafraîchir pour afficher vos
photos dans la fenêtre TWAIN.
44 Des Questions?
www.polaroiddigitalEU.com
Contactez Polaroid Corporation à l'adresse suivante :
Page 47

Français
7. Cliquez sur la miniature d'une photo afin de la sélectionner pour la transférer vers votre
ordinateur.
Pour transférer plusieurs photos, maintenez la touche Contrôle [Ctrl] du clavier enfoncée et
cliquez sur les miniatures souhaitées.
Pour transférez toutes les photos depuis l'appareil, cliquez sur Tout sélectionner.
8. Cliquez sur Acquérir les photos. Les photos sélectionnées s'affichent dans l'album
photos actif.
Remarque : Cliquez sur Effacer toutes les photos pour supprimer toutes les
photos de l'appareil photo.
Remarque : Nous vous conseillons de supprimer les photos de votre appareil photo après
les avoir téléchargées sur votre ordinateur. Ceci permet de libérer de l'espace
dans votre appareil photo afin de prendre plus de photos !
9. Cliquez deux fois sur une image pour l'ouvrir dans le répertoire d'images.
Des Questions?
www.polaroiddigitalEU.com
Contactez Polaroid Corporation à l'adresse suivante :
45
Page 48

Français
Modification des images
PhotoImpression 2000 vous permet d'ajouter des effets, de retoucher les couleurs, de copier-coller
des sélections d'une image à l'autre, etc.
Ouverture d'une image
Pour pouvoir manipuler une image, utilisez d'abord votre logiciel pour l'ouvrir à partir d'un album.
1. Cliquez deux fois sur la miniature dans l'album pour afficher l'image dans le répertoire d'images.
Répertoire
d'images
46 Des Questions?
www.polaroiddigitalEU.com
Contactez Polaroid Corporation à l'adresse suivante :
Page 49

Français
Application d'effets
Vous pouvez appliquer de nombreux effets spéciaux à une partie ou à l'ensemble d'une image.
Par exemple, vous pouvez essayer de faire une toile de votre photo !
1. Cliquez deux fois sur la miniature dans l'album photos pour ouvrir une image dans le répertoire
d'images.
2. Cliquez sur Edition.
3. Cliquez sur Effets.
4. Cliquez sur la flèche vers le bas dans l'outil palette ou déplacez le curseur vertical jusqu'à ce que
la miniature d'effet « toile » s'affiche. (Il s'agit de la première miniature sur la quatrième ligne
d'effets.)
5. Cliquez sur la miniature d'effet «toile» pour visualiser l'effet sur l'image.
6. Déplacez le curseur Intensité vers la gauche pour diminuer l'intensité de l'effet ou vers la
droite pour l'augmenter.
7. Cliquez sur Appliquer pour appliquer l'effet.
Cliquez sur le bouton d'annulation pour annuler l'opération.
Des Questions?
www.polaroiddigitalEU.com
Contactez Polaroid Corporation à l'adresse suivante :
47
Page 50

Français
Recadrage des images
Utilisez l'outil de recadrage pour couper une partie de l'image.
1. Cliquez deux fois sur la miniature dans l'album photos pour ouvrir une image dans le répertoire
d'images.
2. Lorsque l'image est affichée, cliquez sur Edition.
3. Cliquez sur Sélection et recadrage.
4. Sélectionnez l'outil de recadrage approprié.
5. Cliquez sur le bouton de la souris et déplacez le pointeur de manière à définir la zone de
recadrage.
6. Si vous le souhaitez, vous pouvez déplacer le curseur dans la zone sélectionnée, cliquer sur
celle-ci, puis modifier comme vous le souhaitez la limite de la zone de recadrage.
7. Déplacez le curseur Bord doux vers la gauche pour accentuer la limite de la zone
sélectionnée ou vers la droite pour l'atténuer.
8. Sélectionnez Appliquer à tous les calques pour recadrer la même zone dans tous
les calques de l'image.
9. Cliquez sur le bouton Recadrage.
L'image recadrée s'affiche dans le répertoire d'images.
Cliquez sur le bouton d'annulation pour annuler l'opération.
48 Des Questions?
www.polaroiddigitalEU.com
Contactez Polaroid Corporation à l'adresse suivante :
Page 51

Français
Sauvegarde des images
Pour sauvegarder l'image affichée dans le répertoire d'images de votre ordinateur, sélectionnez
l'image, puis cliquez sur le bouton Enregistrer. Vous disposez de plusieurs possibilités pour
sauvegarder l'image sur votre ordinateur :
• Cliquez sur Enregistrer pour enregistrer le fichier sous le même nom et au même format.
• Cliquez sur Enregistrer sous pour enregistrer le fichier sous un nom différent ou un autre
format.
Remarque : Si vous sélectionnez JPG, un curseur apparaît pour vous permettre de définir
le taux de compression des images. Un réglage élevé permet de sauvegarder
le fichier avec moins de compression et une qualité d'image supérieure. Un
réglage moins élevé permet de sauvegarder le fichier avec plus de
compression et une qualité d'image inférieure. Les fichiers sauvegardés avec
• Cliquez sur Courrier électronique pour sauvegarder le fichier comme pièce jointe.
Remarque : Votre application de courrier électronique (avec prise en charge MAPI) doit
• Cliquez sur Visitez Polaroid Digital pour accéder au site Web d'imagerie numérique de
Polaroid.
un taux de compression élevé occupent moins d'espace sur le disque dur.
être ouverte pour que vous puissiez attacher le fichier image à un nouveau
message. Si votre application de courrier électronique n'est pas ouverte,
reportez-vous au manuel fourni avec celle-ci ou contactez l'assistance
technique pour obtenir de plus amples informations sur la prise en charge
MAPI.
Des Questions?
www.polaroiddigitalEU.com
Contactez Polaroid Corporation à l'adresse suivante :
49
Page 52

Français
Précautions d'emploi
Suivez les indications ci-dessous lorsque vous utilisez votre appareil photo numérique Polaroid Fun
Flash 640 SE :
• N'ouvrez pas le boîtier de l'appareil et n'essayez pas d'effectuer des réparations. Les composants
internes à haute tension présentent des risques d'électrocution.
• Surveillez les enfants lorsqu'ils utilisent l'appareil photo ou lorsque celui-ci est utilisé en leur
présence.
• Veillez à ne pas mettre l'appareil en contact avec l'eau ou d'autres liquides. Si l'appareil est
mouillé, éteignez-le, puis retirez les piles. L'utilisation de l'appareil photo dans ces conditions
présente des risques d’électrocution ou d’incendie.
• N'ouvrez pas le compartiment à piles lorsque l'appareil est allumé.
• N'utilisez pas l'appareil s'il a subi un choc ou s'il a été abîmé.
50 Des Questions?
www.polaroiddigitalEU.com
Contactez Polaroid Corporation à l'adresse suivante :
Page 53

Français
Garanties limitées du produit
Garantie limitée à un an
Appareil photo numérique Polaroid Fun Flash 640 SE
Polaroid devra, à sa discrétion, réparer ou remplacer toute partie présentant un défaut de fabrication pendant la
durée de la garantie. La période de garantie est déterminée par la date d'achat. Conservez le ticket comme preuve
de l'achat. Si vous ne l'avez pas conservé, la période de garantie est déterminée par la date de fabrication.
Cette garantie ne s'applique pas aux dommages causés par accident, par une
utilisation non conforme ou une altération du produit. Elle exclut tous les
dommages indirects, excepté dans certaines juridictions qui interdisent ces
exclusions ou limitations de garantie.
Garantie limitée à 90 jours
Logiciel Polaroid PhotoImpression 2000
Polaroid garantit que le logiciel est exempt de vices de matière ou de main-d'oeuvre, pendant une période de 90
jours à partir de la date d'achat. Polaroid est entièrement responsable de la réparation ou du remplacement de tout
logiciel ne correspondant pas aux termes de la garantie limitée. Vous devez retourner le logiciel défectueux à
Polaroid accompagné d'une copie de votre preuve d'achat. Cette garantie limitée est frappée de nullité si le
dysfonctionnement du logiciel est dû à un accident, à un emploi abusif ou à une mauvaise utilisation de celui-ci.
Tout logiciel fourni dans le cadre d'un remplacement sera garanti pendant le reste de la période de garantie
originale ou soumis à une période de garantie de 30 jours (la période de garantie la plus longue sera appliquée).
Polaroid n'applique aucune autre garantie relative au logiciel, expresse ou
implicite, y compris mais sans limitation les garanties implicites concernant
la commercialisation et l'adéquation à un usage particulier.
Des Questions?
www.polaroiddigitalEU.com
Contactez Polaroid Corporation à l'adresse suivante :
51
Page 54

Français
Conformité du produit
Ce produit est conforme aux normes de la communauté européenne :
Sécurité
Directive sur les basses tensions 73/23/CEE
EN60950
CEM
Directive 89/336/CEE CEM
EN55022, classe B
EN50082-1
Des questions ?
Interrogez Polaroid Corporation sur le Web à l'adresse suivante :
www.polaroiddigitalEU.com
Vous pouvez également appeler le centre d'assistance Polaroid pour les produits numériques, du
lundi au vendredi aux heures de bureau normales. Veuillez composer les numéros suivants :
France : 0130683888
•
Suisse (romande) : 01 277 7276
•
Suisse (allemande) : 01 277 7277
•
Suisse (italienne) : 01 277 7278
•
Royaume-Uni : 01582 632021
•
Allemagne : 069/ 8404-999
•
La garantie, l'assistance téléphonique et les services assurant la réparation des produits sont régionaux et peuvent
ne pas être disponibles pour un produit spécifique hors du pays d'achat.
Merci d'avoir acheté ce produit numérique Polaroid. Pour de plus amples informations sur nos autres produits
d'imagerie, consultez notre site Web à l'adresse suivante :
© 2000 Polaroid Corporation, Cambridge MA 02139 Etats-Unis, propriétaire des marques commerciales
« Polaroid », « Max the Bird & Design » et « Feather Design ». Tous les autres noms de produits mentionnés sont la
propriété de leurs détenteurs respectifs. Tous droits réservés.
.
www.polaroid.com
.
52 Des Questions?
www.polaroiddigitalEU.com
Contactez Polaroid Corporation à l'adresse suivante :
Page 55

Willkommen bei Polaroid Fun
Ihr Polaroid Flash 640 SE Digitalkamera-Paket enthält alles, was Sie für die
Aufnahme von digitalen Fotos, deren Speicherung und Bearbeitung benötigen.
Mit Hilfe der in Ihrem Paket enthaltenen Software können Sie Ihre digitalen Fotos
korrigieren, bearbeiten und mit ihnen experimentieren. Sie können außerdem
Polaroid PhotoImpression 2000-Software mit anderen TWAIN-kompatiblen
Digitalkameras und Scannern verwenden.
In Ihrem Paket ist folgendes enthalten:
• Polaroid Fun Flash 640 SE-Digitalkamera
• Handschlaufe
• Vier AAA-Batterien
• Kamera/Computerkabel (serieller
RS-232C-Anschluß und USB-Anschluß)
• Polaroid PhotoImpression
2000-Software
• Anleitung zum Schnelleinstieg
Hinweis: Ihr Computer muß über einen seriellen RS-232C-Anschluß oder einen
Hochgeschwindigkeits-USB-Anschluß verfügen, damit Sie die Digitalkamera
verwenden können.
Deutsch
Noch Fragen?
www.polaroiddigitalEU.com in Verbindung
Bitte kontaktieren Sie die Polaroid Corporation unter
53
Page 56

Deutsch
Kamerafunktionen
ef
a. Sucher
b. Blitz
c. Linse
d. Anschluß für serielles/USB-Kabel
e. Stativgewinde
f. Batterieklappe
ab
c
d
54 Noch Fragen?
www.polaroiddigitalEU.com in Verbindung
Bitte kontaktieren Sie die Polaroid Corporation unter
Page 57

ih
jklmn
Deutsch
g
p
g. LCD-Statusanzeige
h. Strom-/Statusanzeige
i. Blitzanzeige
j. Sucher
k. Ein/Ausschalttaste
l. Blitztaste
m.Selbstauslöser
n. Auslöser
o. Handschlaufenbefestigung
p. Batterieklappe
Noch Fragen?
www.polaroiddigitalEU.com in Verbindung
Bitte kontaktieren Sie die Polaroid Corporation unter
o
55
Page 58
Deutsch
Einlegen von Batterien
Im Lieferumfang sind vier AAA-Batterien enthalten.
1. Öffnen Sie die Batterieklappe.
2. Legen Sie vier AAA-Batterien ein. Stellen Sie
sicher, daß die Batteriepole (+ und -) richtig
ausgerichtet sind.
3. Schließen Sie die Batterieklappe.
Hinweis: Tauschen Sie die Batterien aus,
wenn die Strom-/Statusanzeige
blinkt, in der LCD-Statusanzeige
niedriger Batterieladezustand
angezeigt wird (bL) oder wenn
die LCD-Statusanzeige nicht eingeschaltet wird.
Hinweis: Tauschen Sie alle vier Batterien auf einmal aus. Verwenden Sie keine alten und
neuen Batterien zusammen, keine Batterien unterschiedlichen Typs und keine
Batterien von unterschiedlichen Herstellern. Super-Alkali-Batterien hoher
Kapazität stellen eine längere Lebensdauer der Batterien in Digitalkameras
bereit.
56 Noch Fragen?
www.polaroiddigitalEU.com in Verbindung
Bitte kontaktieren Sie die Polaroid Corporation unter
Page 59

Aufnehmen von Fotos
1. Schalten Sie die Kamera ein (a). Die grüne
Strom-/Statusanzeige (b) an der Rückseite
der Kamera leuchtet.
Wenn die grüne Strom-/Statusanzeige
nicht leuchtet, überprüfen Sie, ob die
Batterien ordnungsgemäß eingelegt sind
und nicht ausgetauscht werden müssen.
2. Richten Sie den Sucher auf das
aufzunehmende Motiv (c).
Deutsch
abc
3. Halten Sie die Kamera ruhig, drücken
Sie den Auslöser (d), und halten Sie ihn
gedrückt, bis die Kamera einen Piepton
ausgibt. Die Anzeige des Bildzählers in
der LCD-Statusanzeige (e) wird um Eins
erhöht.
e
Noch Fragen?
www.polaroiddigitalEU.com in Verbindung
Bitte kontaktieren Sie die Polaroid Corporation unter
d
57
Page 60

Deutsch
Verwenden des Abschaltmodus
Um Batterieleistung einzusparen, schaltet
sich Ihre Digitalkamera nach 45 Sekunden
Inaktivität aus. In diesem Abschaltmodus
wird die LCD-Statusanzeige (a)
ausgeschaltet, die Strom-/Statusanzeige
(b) leuchtet grün, und die Kamera gibt in
Abständen von zehn Sekunden Pieptöne
aus.
Drücken Sie die Ein-/Ausschalttaste (d)
einmal, um den Abschaltmodus zu
deaktivieren. Die LCD-Statusanzeige (a)
wird eingeschaltet, die Strom-/Statusanzeige (b) leuchtet grün. Drücken Sie den Auslöser (c), um
ein Foto aufzunehmen.
Hinweis: Die Stromzufuhr wird nach drei Minuten im Abschaltmodus unterbrochen, in der
LCD-Anzeige wird die Meldung angezeigt, daß das System heruntergefahren
wird (Sd), und die Kamera gibt einen Piepton aus. Drücken Sie die Ein-/
Ausschalttaste (d), um die Stromzufuhr wieder aufzunehmen.
58 Noch Fragen?
www.polaroiddigitalEU.com in Verbindung
a
b
Bitte kontaktieren Sie die Polaroid Corporation unter
cd
Page 61

Deutsch
Verwenden des Bildzählers
Der Bildzähler befindet sich in der LCD-Statusanzeige. Die Kamera ist mit 2 MB internem Speicher
ausgestattet, in dem normalerweise 30 Fotos (Auflösung 640 x 480 Pixel) gespeichert werden
können. Die Anzahl der Fotos, die in der Kamera tatsächlich gespeichert wird, ist von der
Komplexität der Fotos abhängig.
1. Schalten Sie die Kamera ein (a).
2. Drücken Sie den Auslöser (b).
Die Kamera gibt einen Piepton aus, und
die Anzeige des Bildzählers in der LCDStatusanzeige (c) wird um Eins erhöht.
Wenn der Speicher voll ist, wird in der
LCD-Statusanzeige die Meldung
angezeigt, daß der Speicher voll ist
(FL).
Hinweis: Die Kamera verfügt über keinen herausnehmbaren Speicher. Wenn der Speicher
voll ist, übertragen Sie Fotos auf Ihren Computer, und löschen Sie sie dann aus
dem Kameraspeicher. Informationen zum Übertragen von Fotos auf Ihren
Computer finden Sie auf Seite 64.
c
ab
Noch Fragen?
www.polaroiddigitalEU.com in Verbindung
Bitte kontaktieren Sie die Polaroid Corporation unter
59
Page 62

Deutsch
Verwenden des Blitzes
Nach dem Einschalten der Kamera befindet sich diese in der Einstellung Blitz aus (nF). Sie
können diese Blitzeinstellung jederzeit ändern.
Hinweis: Wenn die Batterien beim Einschalten der Kamera sehr schwach sind, wird der
Blitz nicht geladen.
Die Kamera gibt an, wann Sie den Blitz möglicherweise verwenden sollten. Hierzu wird die Meldung
für zu geringe Helligkeit (LL) (Low Lighting) in der LCD-Statusanzeige angezeigt. Es gibt drei
Blitzeinstellungen:
LCD-Symbol Blitzeinstellung
nF Blitz aus
• Der Blitz ist nicht aktiviert.
• Verwenden Sie diese Einstellung, wenn Sie Bilder vor einem
reflektierenden Hintergrund aufnehmen, wie beispielsweise
einem Fenster oder einem Spiegel.
AF Autoblitz
• Der Blitz funktioniert bei Bedarf automatisch.
• Der Autobelichtungs-Sensor in der Kamera bestimmt, wann der
Blitz benötigt wird.
FF Blitz ein
Der Blitz ist für jede Aufnahme aktiviert.
60 Noch Fragen?
www.polaroiddigitalEU.com in Verbindung
Bitte kontaktieren Sie die Polaroid Corporation unter
Page 63

Ändern der Blitzeinstellungen
1. Schalten Sie die Kamera ein (a). Sie
abcd
befindet sich im Modus Blitz aus
(nF)
2. Drücken Sie die Blitztaste (c), um die
Einstellung zu ändern. In der LCDStatusanzeige (b) wird die neue
Einstellung angezeigt.
3. Wenn Sie die Einstellung Autoblitz
(AF) oder Blitz ein (FF) aktivieren,
wird der Blitz einige Sekunden lang
geladen. Die Blitzanzeige (d) leuchtet
gelb, wenn der Blitz geladen ist und Sie ein Foto aufnehmen können.
Wenn der Blitz nach 25 Sekunden noch nicht geladen ist, wird das Symbol für niedrigen
Batterieladezustand (bL) in der LCD-Statusanzeige angezeigt, und der Blitz wird nicht weiter
geladen. Sie müssen die Kamerabatterien austauschen, um den Blitz verwenden zu können
(Anweisungen zum Austauschen der Batterien finden Sie auf Seite 56).
Hinweis: Wenn die Batterien beim Einschalten der Kamera sehr schwach sind, wird der
Blitz nicht geladen.
Deutsch
Hinweis: Wenn die Kamera 45 Sekunden nach dem vollständigen Laden des Blitzes nicht
verwendet wird (oder 45 Sekunden, nachdem das Symbol für niedrigen
Batterieladezustand eingeblendet wird), wird der Abschaltmodus der Kamera
aktiviert.
Noch Fragen?
www.polaroiddigitalEU.com in Verbindung
Bitte kontaktieren Sie die Polaroid Corporation unter
61
Page 64

Deutsch
Verwenden des Selbstauslösers
1. Schalten Sie die Kamera ein (a).
2. Richten Sie die Kamera für die Aufnahme eines Fotos aus.
3. Suchen Sie Ihr Motiv durch den Sucher (b).
4. Drücken Sie den Selbstauslöser (c). Die
Kamera gibt 15 Sekunden lang Pieptöne
aus, die Abständen zwischen den Pieptönen
werden kürzer und hören unmittelbar vor
dem Auslösen auf.
Hinweis: Es empfiehlt sich die
Verwendung eines
Kamerastativs.
abc
Hinweis: Sie müssen den Auslöser nicht drücken, um ein Foto mit Selbstauslöser
62 Noch Fragen?
aufzunehmen.
www.polaroiddigitalEU.com in Verbindung
Bitte kontaktieren Sie die Polaroid Corporation unter
Page 65

Deutsch
Löschen von Fotos
Sie müssen Fotos entweder aus Ihrer Kamera löschen oder auf Ihren Computer übertragen, wenn
der Kameraspeicher voll ist. Der Speicher ist voll, wenn sich der Bildzähler nach der Aufnahme eines
Fotos nicht erhöht (normalerweise nach der Aufnahme von ca. 30 Fotos).
Weitere Informationen zum Übertragen von Fotos auf Ihren Computer finden Sie auf Seite 64 sowie
Anweisungen zum Löschen von Fotos aus der Kamera mit Hilfe der PhotoImpression 2000-Software
auf Seite 69.
Noch Fragen?
www.polaroiddigitalEU.com in Verbindung
Bitte kontaktieren Sie die Polaroid Corporation unter
63
Page 66

Deutsch
Übertragen von Fotos auf Ihren Computer
Zum Übertragen von digitalen Fotos auf Ihren Computer installieren Sie zunächst die in Ihrem Paket
enthaltene Polaroid PhotoImpression 2000-Software.
Diese Software enthält viele unterhaltsame und interessante Funktionen:
• Verbesserung jedes digitalen Fotos umgehend durch einen Mausklick.
• Eine große Auswahl an digitalen Spezialeffekten, wie Verschmelzungen und Drehungen.
• PhotoFantasy, womit Sie das Bild einer Person vor einem der zahlreichen und phantasievollen zur
Verfügung stehenden digitalen Hintergründe plazieren können.
Mindestsystemanforderungen
Stellen Sie vor dem Installieren der Software sicher, daß Ihr Computer die folgenden Anforderungen
erfüllt:
• PC mit einem Pentium-Prozessor
• Microsoft Windows 95, Windows 98 oder Windows ME
• 32 MB RAM-Speicher
• 178 MB verfügbarer Festplattenspeicher
• SVGA-Monitor mit der Auflösung 800 x 600 oder höher
• Freier RS232-C COMM-Anschluß (seriell) (bei Computern mit Windows 95, Windows 98 oder
Windows ME) oder einem Hochgeschwindigkeits-USB-Anschluß (bei Computern mit Windows 98
oder Windows ME)
• 2x oder schnelleres CD-ROM-Laufwerk
• Maus
Hinweis: Wenn Sie Fragen zu den Systemkapazitäten Ihres Computers haben, lesen Sie
die dazugehörigen Handbücher, oder wenden Sie sich an den Hersteller des
Computers.
64 Noch Fragen?
www.polaroiddigitalEU.com in Verbindung
Bitte kontaktieren Sie die Polaroid Corporation unter
Page 67

Installieren der PhotoImpression 2000-Software
1. Legen Sie die PhotoImpression-CD-ROM in Ihr CD-ROM-Laufwerk ein.
Wenn das Installationsprogramm nicht automatisch ausgeführt wird, gehen Sie folgendermaßen
vor:
a. Wählen Sie im Windows-Startmenü die Option Ausführen.
b. Klicken Sie auf Durchsuchen, um Ihr CD-ROM-Laufwerk auszuwählen.
c. Wählen Sie Setup.exe von der CD-ROM.
d. Klicken Sie auf Öffnen.
e. Klicken Sie auf OK.
2. Befolgen Sie die Anweisungen auf Ihrem Computerbildschirm.
3. Klicken Sie auf Fertig, um die Softwareinstallation zu beenden.
Deutsch
Hinweis: Lesen Sie die Datei ReadMe, um wichtige letzte Informationen zu Ihrer
Software zu erhalten. Sie können auf die ReadMe-Datei zugreifen, indem
Sie auf das Start menü klicken und anschließend
Programme\Polaroid\ReadMe wählen.
Verwenden der PhotoImpression 2000-Software
Für Informationen zur Verwendung der Polaroid PhotoImpression 2000-Software
klicken Sie auf die Schaltfläche ?, um die Online-Hilfe zu öffnen.
Noch Fragen?
www.polaroiddigitalEU.com in Verbindung
Bitte kontaktieren Sie die Polaroid Corporation unter
?-Schaltfläche
65
Page 68

Deutsch
Anschließen der Digitalkamera an Ihren Computer
1. Schalten Sie die Kamera, den Computer und alle Peripheriegeräte aus.
Hinweis: Einen Computer mit dem Betriebssystem Windows 98 oder Windows ME
müssen Sie nicht ausschalten, um die Kamera an den USB-Anschluß
anzuschließen.
2. Suchen Sie das serielle/USB-Anschlußkabel im Lieferumfang.
Hinweis: Das serielle/USB-
Anschlußkabel ist
ein Kabel, das aus
zwei verschiedenen
Kabeln besteht,
wobei ein Ende in
zwei Stecker
aufgeteilt ist.
Dadurch können Sie die Kamera wahlweise an einen USB-Anschluß oder an den
seriellen Anschluß anschließen.
Hinweis: Die Übertragung von Fotos über einen USB-Anschluß ist erheblich schneller als
die Übertragung über einen seriellen Anschluß.
Hinweis: Wenn Ihr Computer über keinen USB-Anschluß verfügt, muß die Kamera an den
seriellen Anschluß angeschlossen werden.
66 Noch Fragen?
www.polaroiddigitalEU.com in Verbindung
Bitte kontaktieren Sie die Polaroid Corporation unter
Page 69

Deutsch
3. Schließen Sie den seriellen Stecker des Kabels (a) an den seriellen Anschluß Ihres Computers
mit Windows 95, Windows 98 oder Windows ME an. Schließen Sie den USB-Stecker des Kabels
(b) an den USB-Anschluß Ihres Computers mit Windows 98 oder Windows ME an.
c
a
Hinweis: Sitzt der USB-Stecker nicht fest im USB-Anschluß des Computers, rutscht der
Hinweis: Für Hilfestellungen zum Suchen des seriellen oder des USB-Anschlusses am
4. Schließen Sie das andere Ende des Kabels an die Kamera (c) an.
Hinweis: Beim Einstecken des Steckers in die Kamera muß der Pfeil auf dem Stecker zur
Noch Fragen?
www.polaroiddigitalEU.com in Verbindung
USB-Stecker möglicherweise aus dem Anschluß heraus. Prüfen Sie vor jeder
Übertragung von Fotos, daß der USB-Stecker richtig eingesteckt ist.
Computer lesen Sie das Handbuch mit den Anweisungen, das im Lieferumfang
Ihres Computers enthalten war, oder wenden sich an den Computerhersteller.
Vorderseite der Kamera weisen. Schieben Sie den Stecker gerade in den
Anschluß, und drehen oder verwinden Sie den Stecker dabei nicht.
Bitte kontaktieren Sie die Polaroid Corporation unter
b
67
Page 70

Deutsch
5. Schalten Sie die Kamera ein.
6. Schalten Sie den Computer ein.
Hinweis: Der Computer kann während des Anschlusses des seriellen/USB-
Anschlußkabels an den USB-Anschluß des Computers eingeschaltet bleiben.
7. Wählen Sie im Start menü die Option Programme\Polaroid\PhotoImpression
2000.
Die Software wird gestartet.
68 Noch Fragen?
www.polaroiddigitalEU.com in Verbindung
Bitte kontaktieren Sie die Polaroid Corporation unter
Page 71

Übertragen von Fotos auf Ihren Computer
1. Klicken Sie auf Foto importieren.
Foto
importieren
Mit der Schaltfläche Foto importieren können Sie ein Foto aus einer Reihe von Quellen
auswählen:
Quelle: Klicken Sie darauf, um folgendes zu tun:
Album Öffnen einer Bilddatei aus einem PhotoImpression 2000-Album
Von Datei Öffnen eines kürzlich verwendeten Bildes oder einer beliebigen
Bilddatei auf Ihrem Computer
Kamera/Scanner Übertragen eines Fotos aus Ihrer Kamera, Ihrem Scanner oder
anderen TWAIN-kompatiblen Geräten
Neu erstellen Erstellen einer neuen Bilddatei
Bildschirmaufze-
ichnung
Erfassen eines gesamten Computerbildschirms oder eines aktiven
Fensters
Deutsch
Noch Fragen?
www.polaroiddigitalEU.com in Verbindung
Bitte kontaktieren Sie die Polaroid Corporation unter
69
Page 72

Deutsch
2. Klicken Sie auf Kamera/Scanner.
Die Liste Quelle auswählen wird angezeigt.
Liste zum Auswählen der Quelle
Schaltfläche zum Erfassen
Kamera/Scanner-Schaltfläche
3. Wählen Sie Polaroid Fun Flash 640 SE Camera.
4. Wählen Sie das gewünschte Zielalbum für Ihre Fotos aus der Liste Album auswählen.
Hinweis: Zum Erstellen eines neuen Albums wählen Sie [Neu] und verwenden das
Album namens Neues Album1 oder geben einen anderen Albumnamen
ein.
5. Klicken Sie auf die Schaltfläche Erfassen.
Das Fenster für die Digitalkamera-TWAINSoftware wird geöffnet. TWAIN-Software wird
zum Übertragen, Löschen und Speichern von
Fotos aus Ihrer Kamera verwendet.
6. Klicken Sie auf Piktogramme
aktualisieren, um Ihre Fotos im TWAIN-
Fenster anzuzeigen.
70 Noch Fragen?
www.polaroiddigitalEU.com in Verbindung
Bitte kontaktieren Sie die Polaroid Corporation unter
Page 73

Deutsch
7. Klicken Sie auf eine Foto-Miniaturansicht, um eines für die Übertragung auf Ihren Computer
auszuwählen.
Um mehrere Fotos zu übertragen, drücken Sie Steuerung (Strg) auf Ihrer Tastatur,
während Sie auf die einzelnen Foto-Miniaturansichten klicken.
Um alle Fotos aus der Kamera zu übertragen, klicken Sie auf Alles markieren.
8. Klicken Sie auf Foto importieren. Die ausgewählten Fotos werden im aktiven Fotoalbum
angezeigt.
Hinweis: Klicken Sie auf Alle Fotos löschen, um alle Fotos aus der Kamera zu
entfernen.
Hinweis: Es empfiehlt sich, Fotos nach dem Herunterladen auf den Computer aus der
Kamera zu löschen. Hiermit wird Kapazität für die Aufnahme weiterer Fotos
freigesetzt!
9. Doppelklicken Sie auf ein Bild, um dieses in der Bildergalerie zu öffnen.
Noch Fragen?
www.polaroiddigitalEU.com in Verbindung
Bitte kontaktieren Sie die Polaroid Corporation unter
71
Page 74

Deutsch
Ändern von Bildern
Sie können Bildern mit Ihrer PhotoImpression 2000-Software Effekte hinzufügen, Farben
retuschieren, Ausschnitte aus Bildern ausschneiden und in anderen einfügen, und vieles mehr.
Öffnen von Bildern
Öffnen Sie zum Experimentieren mit einem Bild dieses zunächst aus einem Album.
1. Doppelklicken Sie auf eine Fotoalbum-Miniaturansichtbild, um dieses in der Bildergalerie zu
öffnen.
Bildergalerie
72 Noch Fragen?
www.polaroiddigitalEU.com in Verbindung
Bitte kontaktieren Sie die Polaroid Corporation unter
Page 75

Deutsch
Anwenden von Effekten
Sie können zahlreiche unterschiedliche Spezialeffekte zu Ausschnitten oder ganzen Bildern
hinzufügen. Versuchen Sie zum Beispiel, Ihr Bild wie ein Ölgemälde aussehen zu lassen!
1. Doppelklicken Sie auf eine Fotoalbum-Miniaturansicht, um ein Bild in der Bildergalerie zu öffnen.
2. Klicken Sie auf Bearbeiten.
3. Klicken Sie auf Effekte.
4. Klicken Sie in der Werkzeugpalette auf den Pfeil nach unten, oder verschieben Sie den vertikalen
Schieberegler, bis Sie die Miniaturansicht für den Effekt „painting“ sehen. (Dies ist die erste
Miniaturansicht in der vierten Zeile der Effekte.)
5. Klicken Sie auf die Miniaturansicht für den Effekt painting, um seine Wirkung auf das Bild
anzuzeigen.
6. Verschieben Sie den Intensitätsregler nach links, um die Intensität des Effekts zu verringern,
beziehungsweise nach rechts, um die Intensität zu erhöhen.
7. Klicken Sie auf Anwenden, um den Effekt zu implementieren.
Klicken Sie auf die Schaltfläche zum Rückgängigmachen , wenn Sie sich anders
entscheiden.
Noch Fragen?
www.polaroiddigitalEU.com in Verbindung
Bitte kontaktieren Sie die Polaroid Corporation unter
73
Page 76

Deutsch
Zuschneiden von Bildern
Verwenden Sie das Werkzeug zum Zuschneiden, um einen Teil des Bildes herauszuschneiden.
1. Doppelklicken Sie auf eine Fotoalbum-Miniaturansicht, um ein Bild in der Bildergalerie zu öffnen.
2. Wenn das Bild angezeigt wird, klicken Sie auf Bearbeiten.
3. Klicken Sie auf Auswahl & Ausschneiden.
4. Wählen Sie das gewünschte Werkzeug zum Zuschneiden.
5. Klicken Sie mit der Maustaste, und halten Sie diese gedrückt, während Sie den Mauszeiger
verschieben, um den gewünschten Ausschnittsbereich zu bestimmen.
6. Plazieren Sie den Mauszeiger im ausgewählten Bereich, klicken Sie darauf und ziehen Sie daran,
um den Ausschnittsbereich gegebenenfalls zu verschieben.
7. Verschieben Sie den Regler für abgerundete Ecken nach links, um den Rand des ausgewählten
Bereichs zu verschärfen, beziehungsweise nach rechts, um den Rand zu verwischen.
8. Wählen Sie Auf alle Lagen anwenden, um denselben Bereich in allen Lagen des
Bildes auszuschneiden.
9. Klicken auf die Schaltfläche Zuschneiden.
Das beschnittene Bild wird in der Bildergalerie angezeigt.
Klicken Sie auf die Schaltfläche zum Rückgängigmachen , wenn Sie sich anders
entscheiden.
74 Noch Fragen?
www.polaroiddigitalEU.com in Verbindung
Bitte kontaktieren Sie die Polaroid Corporation unter
Page 77

Deutsch
Speichern von Bildern
Um das Bild, das sich in der Bildergalerie befindet, auf Ihrem Computer zu speichern, klicken Sie auf
das Bild und anschließend auf die Schaltfläche Speichern. Sie haben mehrere Möglichkeiten,
das Bild auf Ihrem Computer zu speichern:
• Klicken Sie auf Speichern, um die Datei unter demselben Dateinamen und in demselben
Dateiformat zu speichern.
• Klicken Sie auf Speichern unter, um die Datei unter einem anderen Dateinamen oder in
einem anderen Dateiformat zu speichern.
Hinweis: Wenn Sie JPG auswählen, wird ein Schieberegler zum Festlegen der
Bildkomprimierung angezeigt. Durch eine höhere Einstellung wird die Datei mit
geringerer Komprimierung und höherer Bildqualität gespeichert. Durch eine
niedrigere Einstellung wird die Datei mit höherer Komprimierung und niedrigerer
Bildqualität gespeichert. Dateien mit höherer Komprimierung belegen weniger
Festplattenspeicher.
• Klicken Sie auf Email, um die Datei als E-Mail-Anhang zu speichern.
Hinweis: Ihr E-Mail-System (mit MAPI-Unterstützung) sollte geöffnet werden, so daß Sie
die Bilddatei an eine neue Nachricht anhängen können. Wenn Ihr E-Mail-System
nicht geöffnet wird, finden Sie Informationen zur MAPI-Unterstützung im
dazugehörigen Handbuch oder beim technischen Kundendienst.
• Klicken Sie auf Besuchen Sie die Polaroid Digital, um zur digitalen
Bildbearbeitungs-Website von Polaroid zu gelangen.
Noch Fragen?
www.polaroiddigitalEU.com in Verbindung
Bitte kontaktieren Sie die Polaroid Corporation unter
75
Page 78

Deutsch
Sicherheitshinweise zur Kamera
Befolgen Sie die folgenden Richtlinien bei der Verwendung Ihrer Polaroid Fun Flash 640 SE-
Digitalkamera:
• Öffnen Sie nicht das Kameragehäuse und versuchen Sie nicht, eigenmächtig Reparaturen
vorzunehmen. Interne Komponenten mit hoher Spannung können einen elektrischen Schlag
verursachen.
• Lassen Sie Kinder nicht unbeaufsichtigt, wenn die Kinder oder Sie selbst die Kamera verwenden.
• Achten Sie darauf, daß die Kamera nicht naß wird, und tauchen Sie sie nicht in Wasser oder
andere Flüssigkeiten. Schalten Sie die Kamera aus und entfernen Sie die Batterien, wenn die
Kamera Flüssigkeit ausgesetzt ist. Das Benutzen der Kamera unter diesen Bedingungen kann
einen elektrischen Schlag oder Feuer zur Folge haben.
• Öffnen Sie nicht die Batterieklappe, wenn die Kamera eingeschaltet ist.
• Benutzen Sie die Kamera nicht, wenn sie heruntergefallen oder beschädigt ist.
76 Noch Fragen?
www.polaroiddigitalEU.com in Verbindung
Bitte kontaktieren Sie die Polaroid Corporation unter
Page 79

Deutsch
Beschränkte Produktgarantie
Ein Jahr beschränkte Garantie
Polaroid Fun Flash 640 SE-Digitalkamera
Innerhalb der Gewährleistungsfrist repariert und ersetzt Polaroid nach eigenem Ermessen jede Kamera, die einen
Herstellungsfehler aufweist. Die Gewährleistungsfrist beginnt am Tag des Kaufs. Bewahren Sie die Quittung als
Nachweis für den Kauf auf. Andernfalls beginnt die Gewährleistungsfrist am Tag der Herstellung.
Ausgeschlossen von der Gewährleistung sind durch Unfall, falschen Gebrauch
oder Veränderungen an der Kamera verursachte Schäden sowie sämtliche
Folgeschäden. Dies gilt nicht für Länder, die den Ausschluß solcher
Gewährleistungen oder solche Einschränkungen nicht zulassen.
Neunzigtägige beschränkte Garantie
Polaroid PhotoImpression 2000-Software
Polaroid garantiert für einen Zeitraum von 90 Tagen ab Erwerb, daß die Softwaremedien keine Material- oder
Herstellungsfehler aufweisen. Die gesamte Haftung von Polaroid und Ihr alleiniger Anspruch bestehen in der
Reparatur oder dem Ersatz der Software, die der beschränkten Garantie von Polaroid nicht genügt und die
zusammen mit einer Kopie Ihrer Quittung an Polaroid zurückgegeben wird. Diese beschränkte Garantie gilt nicht,
wenn der Ausfall der Software auf einen Unfall, auf Mißbrauch oder auf fehlerhafte Anwendung zurückzuführen
ist. Für eine Ersatz-Software übernimmt Polaroid nur für den Rest der ursprünglichen Garantiefrist oder für 30 Tage
eine Garantie, wobei der längere Zeitraum maßgebend ist.
Polaroid übernimmt keine weitere Garantie bezüglich der Software, weder
ausdrücklich noch stillschweigend, einschließlich, aber nicht beschränkt auf
implizierte Garantien für Marktgängigkeit und die Eignung für einen
bestimmten Zweck.
Noch Fragen?
www.polaroiddigitalEU.com in Verbindung
Bitte kontaktieren Sie die Polaroid Corporation unter
77
Page 80

Deutsch
Produktkompatibilität
Dieses Produkt entspricht den folgenden EC-Richtlinien:
Sicherheit
Richtlinie für niedrige Spannung 73/23/EEC
EN60950
EMC
89/336/EEC EMC Richtlinie
EN55022, Klasse B
EN50082-1
Noch Fragen?
Setzen Sie sich mit der Polaroid Corporation im Internet unter
www.polaroiddigitalEU.com in Verbindung
Oder rufen Sie das Polaroid-Kundendienstzentrum für Digitalprodukte von Montag bis Freitag
während normaler Bürozeiten an:
Frankreich: 0130683888
•
Schweiz (Französisch): 01 277 7276
•
Schweiz (Deutsch): 01 277 7277
•
Schweiz (Italienisch): 01 277 7278
•
Großbritannien: 01582 632021
•
Deutschland: 069/ 8404-999
•
Garantieleistungen, telefonischer Kundendienst und Reparaturdienste sind regional bedingt und stehen
möglicherweise nicht für ein bestimmtes Produkt außerhalb des Landes, in dem es gekauft wurde, zur Verfügung.
Wir danken Ihnen für den Erwerb dieses digitalen Polaroid-Produkts. Weitere Informationen zu unseren anderen
Bildbearbeitungsprodukten finden Sie auf unserer Website unter
© 2000 Polaroid Corporation, Cambridge MA 02139 USA, Rechtsinhaber der Warenzeichen „Polaroid“, „Max the
Bird & Design“ und „Feather Design“. Alle anderen Produktnamen sind gegebenenfalls Eigentum ihrer jeweiligen
Rechtsinhaber. Alle Rechte vorbehalten.
.
www.polaroid.com
.
PE-21717F-0
78 Noch Fragen?
www.polaroiddigitalEU.com in Verbindung
Bitte kontaktieren Sie die Polaroid Corporation unter
 Loading...