

Page 1

5.0 Megapixel HD Digital Camcoder
DVC-00725F
User’s Manual
Questions?
Need Some Help?
This manual should help you
understand your new product.
If you still have questions, call
our help line found on the
insert with this icon:
or visit
www.polaroid.com/support.
DIGITAL QUALITY, POLAROID SIMPLICITY™
Page 2
2
Polaroid DVC-00725F Digital Camera User Guide
www.polaroid.com
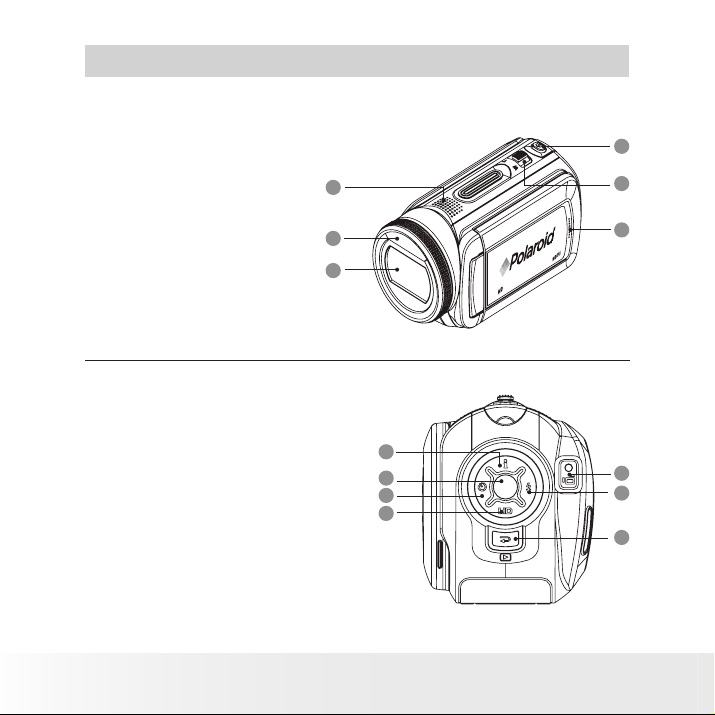
Product Overview
1. Speaker
2. Flash
Lens
3.
Camera Shutter Button
4.
Tele / Wide Button
5.
6. Microp
hone
7. Up / Lighting Button
8. OK / Menu Button
9. Self Timer / Left Button
10. HD / Down
11. Record Button
12. Flash / Right Button
13. Playback
Button
button
1
2
3
7
8
9
10
4
5
6
11
12
13
Page 3
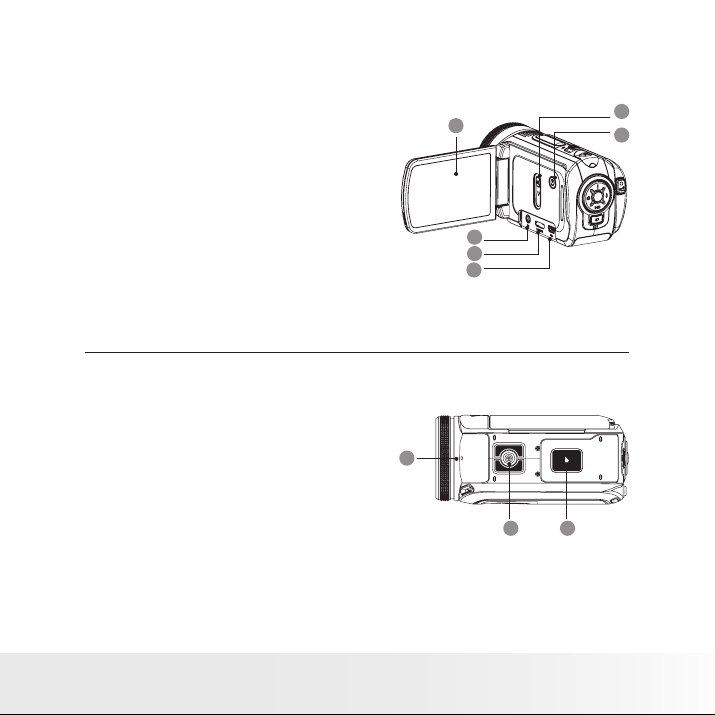
3
Polaroid DVC-00725F Digital Camera User Guide
www.polaroid.com
14. LCD Panel
15. TV Port
16. HDMI Port
Mini USB / Battery Charging Port
17.
Ports Slide Cover
18.
19. Power Button
20. Self-timer LED
Tripod mount
21.
22. Battery / SD card door
14
15
16
17
20
18
19
2221
Page 4

4
Polaroid DVC-00725F Digital Camera User Guide
www.polaroid.com
Table of Contents
Product Overview ......................................................................2~3
Table of Contents ...........................................................................4
1 Getting Started. .......................................................................... 7
• Package Contents ....................................................................8
• Checking the Battery Level ........................................................9
• Installing and Removing the Battery ............................................9
• Using Your Battery ................................................................. 10
• Turning the Camera On and Getting Started ...............................11
• Turning the Camera Off ...........................................................11
2 Record Mode ............................................................................ 12
• Button Function ....................................................................12
• LCD Display Information ..........................................................13
• Recording Videos ...................................................................15
• Photo Recording ..................................................................... 15
• Using the Intelligent Lighting Function .......................................16
• Using the Zoom Function .......................................................16
• Setup Options in the Record Menu ..........................................17
• Setup Operations in the Record Mode ...................................... 17
• Video Mode Settings.. ............................................................18
• Video Resolution.. .............................................................................................. 18
• Macro Mode Setting.. .........................................................................................
• Exposure Settings.. ............................................................................................
• Sharpness Settings.. ..........................................................................................
• White Balance Settings.. .....................................................................................
• Stabilization Setting.. .........................................................................................
• Night Mode Feature.. .........................................................................................
• Still Capture Settings.. ............................................................25
• Photo Resolution.. .............................................................................................25
• Macro Mode Setting.. .........................................................................................
• Exposure Settings.. ............................................................................................
• Two in One (Photo Record Mode Only).. ...............................................................
• Photo Frame (Photo Record Mode Only)..
• Flash (Photo Record Mode Only).. ........................................................................
..............................................................29
19
20
21
22
23
24
26
27
28
30
Page 5

5
Polaroid DVC-00725F Digital Camera User Guide
www.polaroid.com
• Selftimer (Photo Record Mode Only).. ...................................................................31
• Sharpness Setting.. ............................................................................................
• White Balance Settings.. .....................................................................................
• Multi-snap (Photo Record Mode Only).. .................................................................
• Backlight (Photo Record Mode Only). ...................................................................
• Date-Printing (Photo Record Mode Only).. .............................................................
32
33
34
35
36
• Motion Detection ..................................................................37
• Effect Setting. .......................................................................38
• Setting Menu .........................................................................39
• Sound.. ............................................................................................................40
• Time Setting.. ...................................................................................................
• Format Memory (when there is no SD card in the camera).. ....................................
• Format Card (when there is an SD Card in the camera). ..........................................
• TV System..
• Language.. ........................................................................................................
• Information.. .....................................................................................................
• Default Setting.. ................................................................................................
......................................................................................................42
40
41
41
42
43
43
3 Playback Mode ..........................................................................44
• Button Function .....................................................................44
• LCD Display Information ..........................................................45
• Video Playback.. ....................................................................46
• Deleting Videos.. ...............................................................................................47
• Thumbnail Function.. ..........................................................................................
• Locking Videos. .................................................................................................
• Repeating Videos.. .............................................................................................
48
48
49
• Photo Playback ...................................................................... 50
• Deleting Photos.. ...............................................................................................51
• Thumbnail Function.. ..........................................................................................
• Locking Photos. .................................................................................................
• Make a Slide Show.. ..........................................................................................
52
52
53
4 Transferring & Viewing Video onto a PC .......................................54
• Transferring Photos or Videos to a Computer. ............................54
• Viewing a Video on a PC .........................................................54
• Sharing A Video .....................................................................54
Page 6

6
Polaroid DVC-00725F Digital Camera User Guide
www.polaroid.com
5 View Photos and Videos on a TV ................................................55
• Connecting to a High-Definition TV. ..........................................55
• Connecting to a non-high-definition 16:9 (Wide) or 4:3 TV ..........56
6 Video File Cinverter ...................................................................57
• Media Converter .....................................................................57
7 Using the SD (Secure Digital) Card ..............................................60
• Using the SD Card .................................................................. 60
8 Burning the Recorded Clip into DVD .............................................63
9 Uploading Video Files to YouTube .............................................. 65
• ArcSoft MediaImpression ........................................................65
10 Installing Bundled Software ......................................................69
• Installing Video Codec to View Videos Correctly on PC ...............69
• Installing Bundled ArcSoft Software ..........................................69
11 Getting Help ...........................................................................70
• Polaroid Online Services ..........................................................70
• ArcSoft Software Help ............................................................70
12 Appendix ................................................................................71
• Technical specifications ..........................................................71
• Default Settings ..................................................................... 72
• System Requirements ............................................................. 73
• Troubleshooting ..................................................................... 74
• Tips, Your Safety & Maintenance ............................................. 76
• Regulatory Information ............................................................ 76
Page 7

7
Polaroid DVC-00725F Digital Camera User Guide
www.polaroid.com
1 Getting Started
Thank you for purchasing your new Polaroid DVC-00725F high definition
HD Digital Camcoder. This camera with a 5.0 Megapixel sensor can
take high definition videos and high quality still images up to 11.0 Mega
pixels.
Outstanding features that your DVC-00725F HD Digital Camcoder has:
• A high quality glass lens system for well exposed sharp pictures from
0.5m to infinity including a 5X optical zoom mode and 4X digital zoom
mode
• Built-in flash with three modes (Auto, Red-eye reduction and Off)
• Automatic white balance and exposure compensation to suit lighting
conditions
• Large 2.7 inch LCD screen for easier image preview and review.
Need help with your digital camera?
Call our toll-free customer service number. Look for the insert with this icon:
Or visit www.polaroid.com.
Page 8
8
Polaroid DVC-00725F Digital Camera User Guide
www.polaroid.com
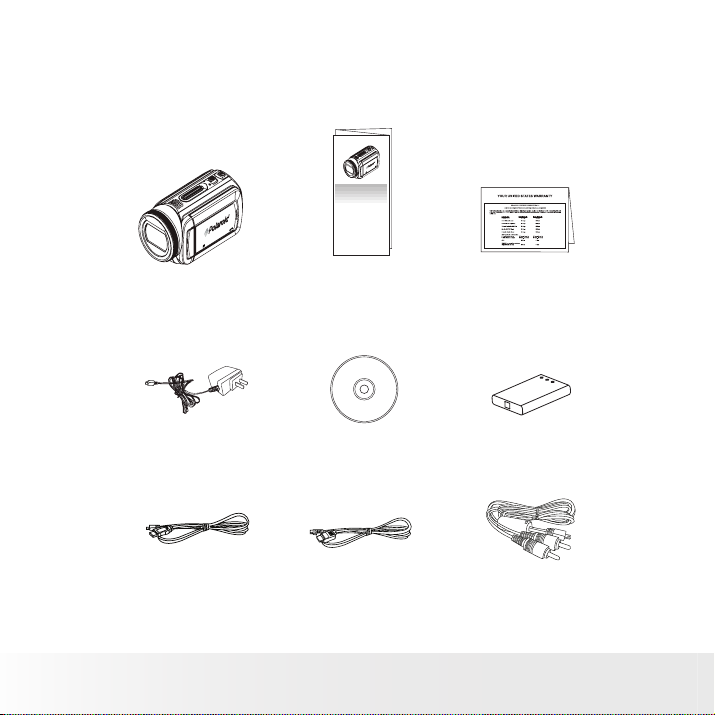
• Package Contents
Quick Start Guide
Guide de Démarrage rapide
Schnellanleitung
Guida Rapida
Guía Rápida de Inicio
Guia de Início Rápido
XX XXXX
Part no.: XXXXXXXXX
Printed in China
DVC-00725F Warranty Card
AC Adapter
HD Digital Camcoder
USB Cable
Quick Start Guide
Software CD-ROM
HDMI Cable
NP60 Battery
AV Cable
Page 9
9
Polaroid DVC-00725F Digital Camera User Guide
www.polaroid.com
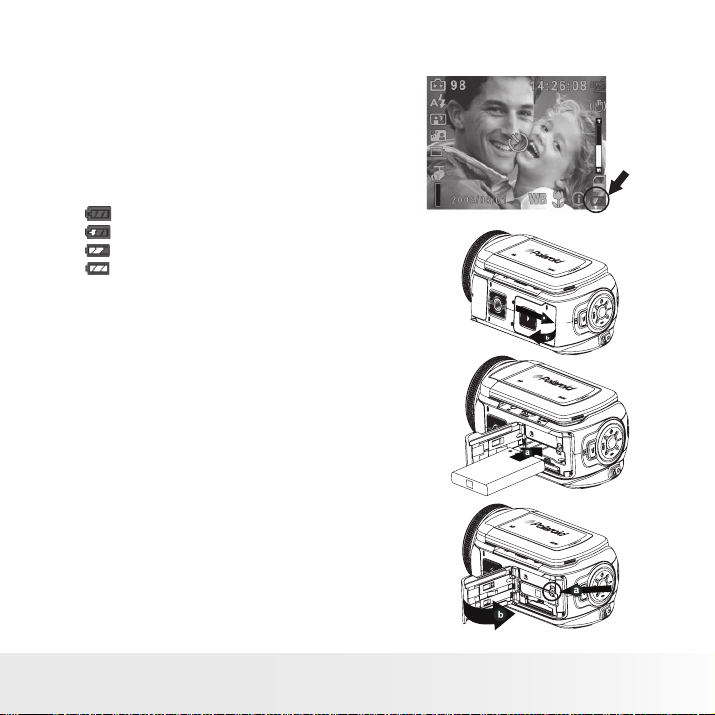
• Checking the Battery Level
Check the battery power level before
taking videos or photos.
1. Turn on the camera.
2. Check the battery power level that
appears on the LCD screen.
Battery power is full.
Battery power is adequate.
Battery power is low.
Battery power is exhausted. Please
recharge the battery.
• Installing and Removing the Battery
1. Open the camera’s battery/SD card
door by pushing it outwards as
illustrated.
2. Insert the battery as shown.
3. Close the battery/SD card door by
pressing it downwards then slide it
back to lock.
4. To remove the battery, slide the
battery lock and the batteries will eject
out of the battery compartment.
5. Pull the battery out with your finger.
Page 10

10
Polaroid DVC-00725F Digital Camera User Guide
www.polaroid.com
• Using Your Battery
Our laboratory testing has shown that our digital camera models comply
with industry standard battery consumption levels (Camera & Imaging
Products Association commonly known as CIPA).
All digital cameras are high drain products. For the best performance and
prolonged battery life, we recommend the use of a high capacity battery
designed for such applications. (The lithium ion battery included with your
camera is a high capacity battery).
Here are some helpful hints to extend battery life considerably by limiting
the following activities:
• Reviewing photos on the LCD Screen
• Excessive use of the flash
• Remove the battery from your camera when not in use to prevent
battery leakage.
WARNING!
• The battery should be replaced by an adult.
• Use recommended or equivalent type of batteries only.
• Insert the batteries in the correct orientation.
• Remove the exhausted battery from the camera immediately.
• Do not short the supply terminals.
• Please dispose of the battery properly.
These instructions should be retained for future reference.
Page 11
11
Polaroid DVC-00725F Digital Camera User Guide
www.polaroid.com
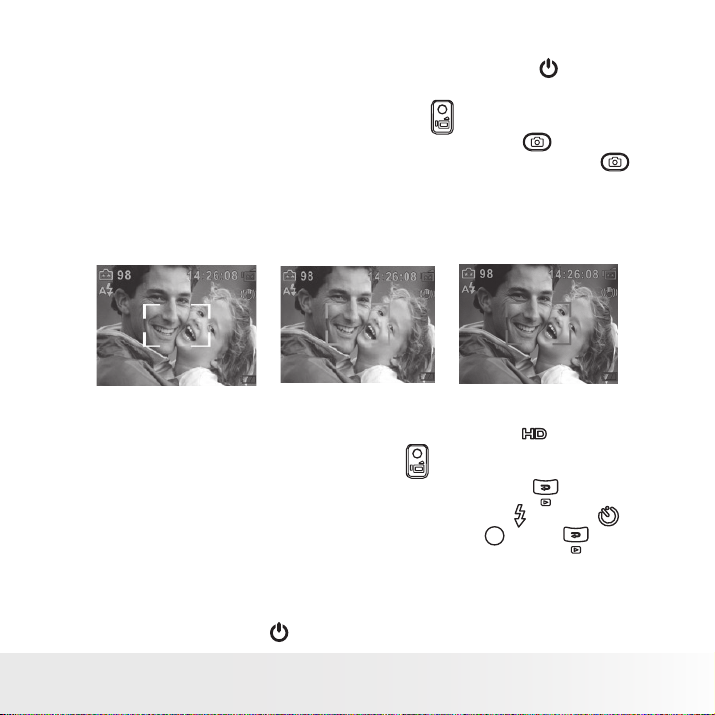
• Turning the Camera On and Getting Started
1. To turn on the camera: Flip out the LCD panel or press the (POWER)
button for one second. When the camera is turned on, the green LED
will light up.
2. To take a video: press the Record button ( ).
3. To take a picture: press the Camera Shutter button ( ) halfway
down till the focusing frame turns from white to green. Press the
fully down to take pictures. (Should you see the focus frame turn red
that indicates that your subject is not in focus. Remove your finger
from the Camera Shutter button, frame your subject and press the
Camera Shutter button until the focus frame turns green and press all
the way down to take your picture)
Focusing Frame: White Focusing Frame: Green Focusing Frame: Red
4. To take video in HD resolution, press the Down button ( ) to switch
to HD mode. Press the Record button ( ).
5. To view stored videos or pictures, press Playback button ( ) once to
switch to to the Videos or Photos screen. Use the right ( ) or left ( )
button to make your choice and press the OK button ( ). Press again
to return to Record mode.
• Turning the Camera Off
1. To turn off the camera: Return the LCD Panel back to its original
position or press the (POWER) button for one second.
Page 12
12
Polaroid DVC-00725F Digital Camera User Guide
www.polaroid.com
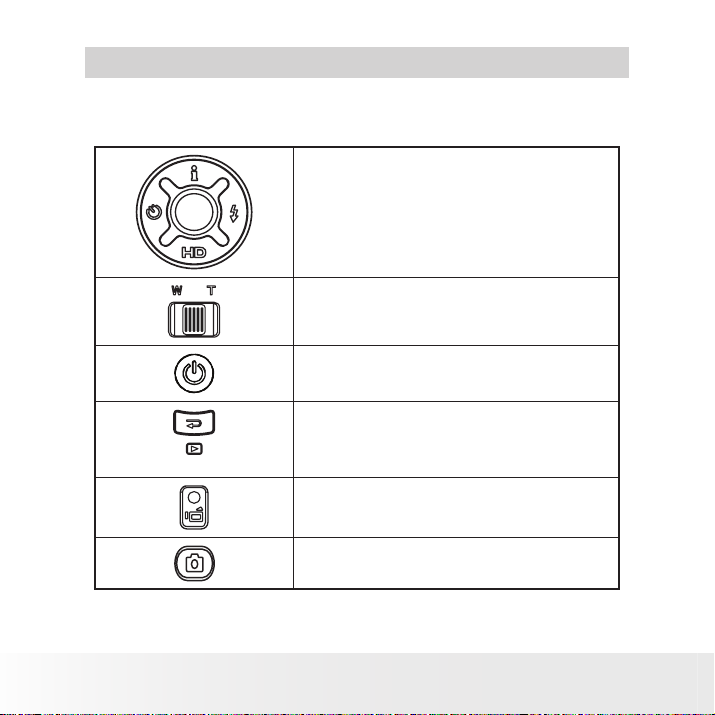
• Button Functions
2 Record Mode
Right Button: Auto Flash/Red Eye Reduction/
OFF
Left Button: Self timer ON/OFF
Up Button: Intelligent Lighting ON/OFF
Down Button: HD Recording Mode
OK/Enter Button: Setup Menu On
Tele Button : Zoom In
Wide Button : Zoom out
Power Button: Hold down for one second to
turn the camera on or off.
Playback Button functions:
1. Switch between Record and Playback Mode.
2. Exit a Menu
3. Return to the previous page.
Record Button:
1. Start to take Video.
2. To stop recording, press it again.
Camera Shutter Button: Press to take Photo.
Page 13
13
Polaroid DVC-00725F Digital Camera User Guide
www.polaroid.com
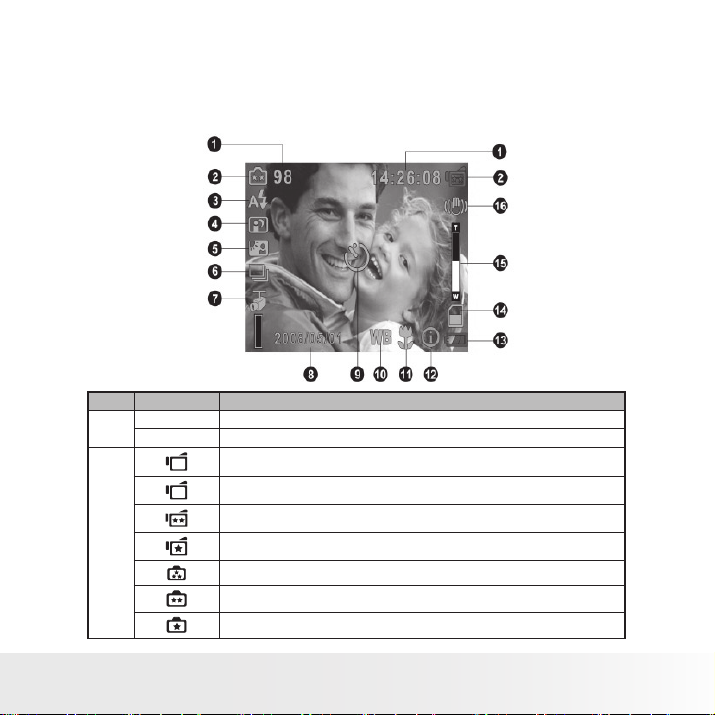
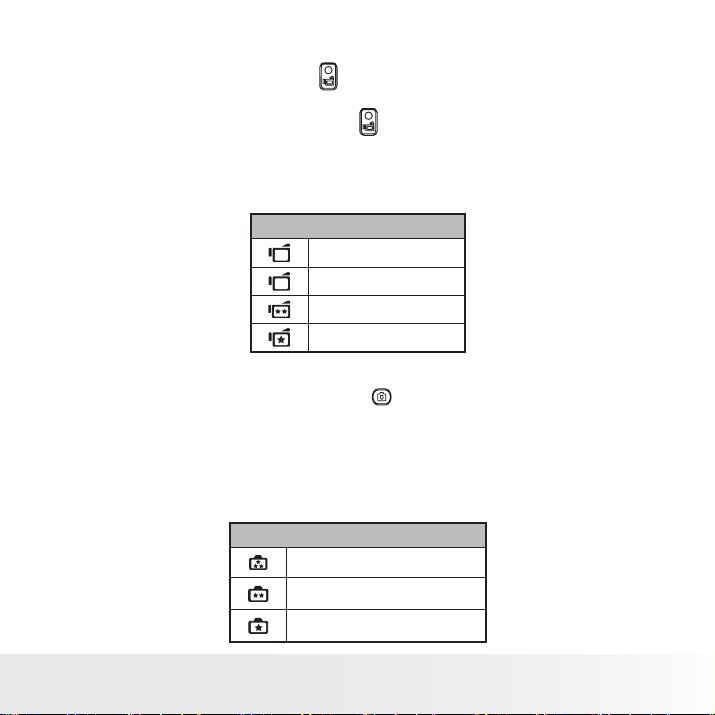
• LCD Display Information
The illustration below shows what may be displayed when videos and
photos are recorded:
NOTE: Icons may not be displayed if their settings are in the default
mode.
No. Icon Description
1
2
98 Remaining number of images that can be taken at current resolution
14:26:08 Remaining video recording time at the current resolution
HD
HD
D1
D1
VGA
QVGA
High
Standard
Low
Page 14
14
Polaroid DVC-00725F Digital Camera User Guide
www.polaroid.com
Auto Flash
3
4 Night Mode
5 Backlight Mode
6 Brust Mode (5 continuous pictures. The ash is disabled).
7 Motion Detection
8 2008/05/01 Date/Time: YYYY/MM/DD HH: MM
9 Self timer
10 White Balance
11 Macro
12 Intelligent Lighting On
13
14 SD Card inserted
15 20X zoom(5X optical zoom and 4X digital zoom)
16 Motion Stabilization
Red Eye Reduction
Flash Off
Battery: full power
Battery: adequate power
Battery: low power
Battery: power empty
Page 15
15
Polaroid DVC-00725F Digital Camera User Guide
www.polaroid.com
• Recording Videos
1 Press the Record Button ( ) to start recording. When a Video is
recording, a time indicator will display on the LCD display. To stop
recording, press Record Button ( ) again.
2 Press Playback Button to view the recorded Video.
3 Four resolution recording settings are available. You may change the
resolution setting in the Setup menu. (For more information refer to
page 18).
Video Quality
HD
D1
HD(1280X720)
D1(720X480)
VGA(640X480)
QVGA(320X240)
• Photo Recording
1 Press the Camera Shutter Button ( ) halfway down till the focusing
frame turns from white to green. Press the Camera Shutter Button all
the way down to take a photo.
2 Press the Playback Button to view the Photo.
3 Three resolution settings are available. You may change the resolution
setting in the Setup menu. (For more information refer to page 25).
Image Quality
High:11 Mega Pixels
Standard:5 Mega Pixels
Low:2 Mega Pixels
Page 16

16
Polaroid DVC-00725F Digital Camera User Guide
www.polaroid.com
• Using the Intelligent Lighting Function
The camera has the ability to allow you to extend the brightness of objects
that are dark or in shadows.
To use Intelligent Lighting Button:
1. When recording videos or taking pictures, press Intelligent Lighting ( )
Button to extend the dynamic range for backlit and high contrast scenes
so that the objects will be brighter and clearer.
2. Press Intelligent Lighting ( ) Button again to exit.
• Using the Zoom Function
The zoom function magnifies images, when recording videos or taking
pictures.
1. To zoom in/out, press the Tele/Wide Button.
2. It can be set from 1x to 20x(5x optical zoom and 4x digital zoom).
Need help with your digital camera?
Call our toll-free customer service number. Look for the insert with this icon:
Or visit www.polaroid.com.
Page 17
17
Polaroid DVC-00725F Digital Camera User Guide
www.polaroid.com
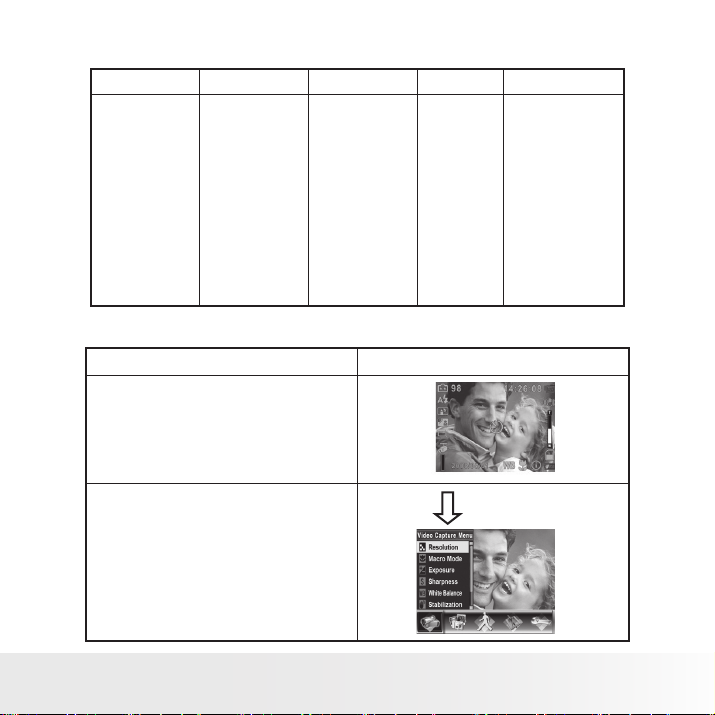
• Setup Options in the Record Menu
Video Mode Still Capture Motion Detect Effect Setting
• Resolution
• Macro Mode
• Exposure
• Sharpness
• White Balance
• Stabilization
• Night Mode
• Exit
• Resolution
• Macro Mode
• Exposure
• Two in One
• Photo Frame
• Flash
• Selftimer
• Sharpness
• White Balance
• Multi-snap
• Backlight
• Date Printing
• Night Mode
• Exit
• On
• Off
• Normal
• B/W
• Classic
• Negative
• Exit
• Sound
• Time Setting
• Format Memory
• TV System
• Language
• Information
• Default Setting
• Exit
• Setup Functions in the Record Mode
Operation Display Screen
1. Press the OK Button when in Video/Photo
Record Mode.
2. Use Right/Left Buttons to move between
the menu options, which are Video
Capture Menu, Still Capture Menu, Motion
Detect, Effect, and Setting. The submenu
will pop up when moving from one option
to another.
3. Press the OK Button to confirm the option
you select.
OK Button
Page 18
18
Polaroid DVC-00725F Digital Camera User Guide
www.polaroid.com
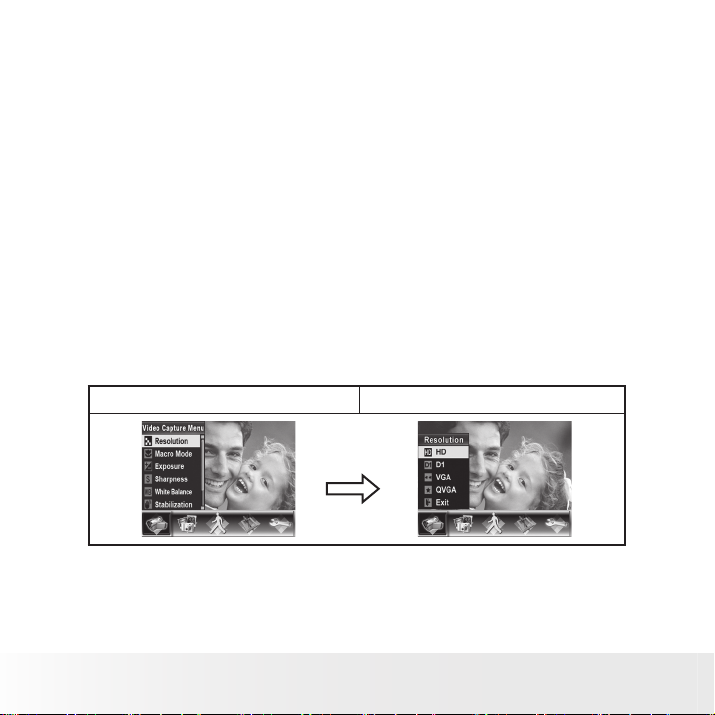
• Video Mode Settings
This menu includes camera and other advanced settings. You can use
Right/Left Buttons to move between options and press the OK Button to
confirm the settings.
Video Resolution
To change the Video Resolution:
1. In Video/Photo Record Mode, press the OK Button to switch to the
record setup menu screen.
2. Use Right/Left Buttons to select Video Capture Menu. The Video Mode
submenu will pop up on the screen.
3. Use Up/Down Buttons to select Resolution, then press the OK Button
to switch to the Resolution submenu.
4. Use Up/Down Buttons to move between the four settings.
5. Press OK Button to confirm your setting and exit.
Record Menu Setup Screen Video Resolution Option
OK Button
Page 19
19
Polaroid DVC-00725F Digital Camera User Guide
www.polaroid.com
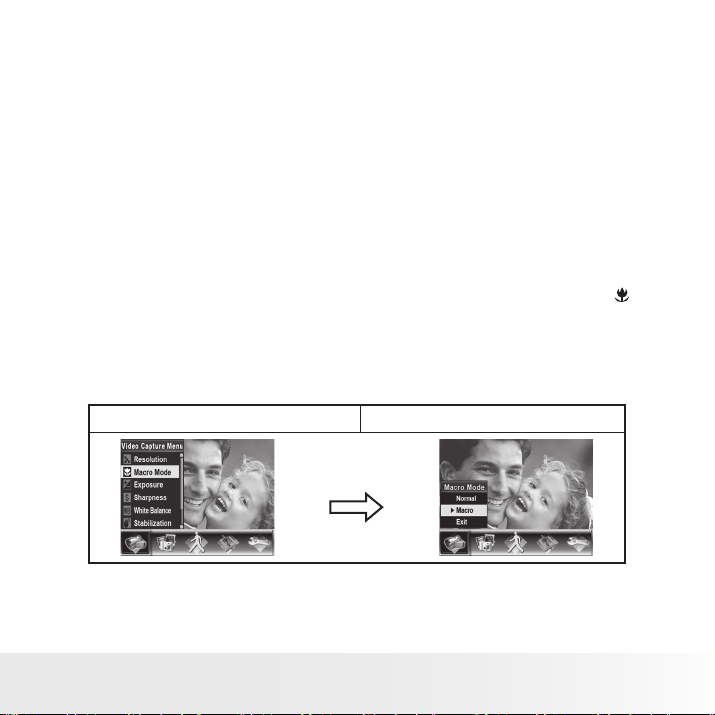
Macro Mode Setting
When your camera is set to Macro, you can take close-up images of
objects from a distance of 1cm to 30cm (0.39 inches ~ 11.8 inches).
To enable Macro Mode:
1. In Video/Photo Record Mode, press the OK Button to switch to the
record setup menu screen.
2. Use the Right/Left Buttons to select Video Capture Menu. The submenu
of the Video Mode will pop up on the screen.
3. Use the Up/Down Buttons to select Macro Mode, then press the OK
Button to switch to the Macro Mode submenu.
4. Use the Up/Down Buttons to move between two settings.
5. Press the OK Button to confirm the setting and exit. (You will see
on the lower right corner of the LCD display.)
6. To switch back to the default value, select ‘Normal’ in the Macro
Mode submenu.
Record Menu Setup Screen Macro Mode Option
OK Button
Page 20
20
Polaroid DVC-00725F Digital Camera User Guide
www.polaroid.com
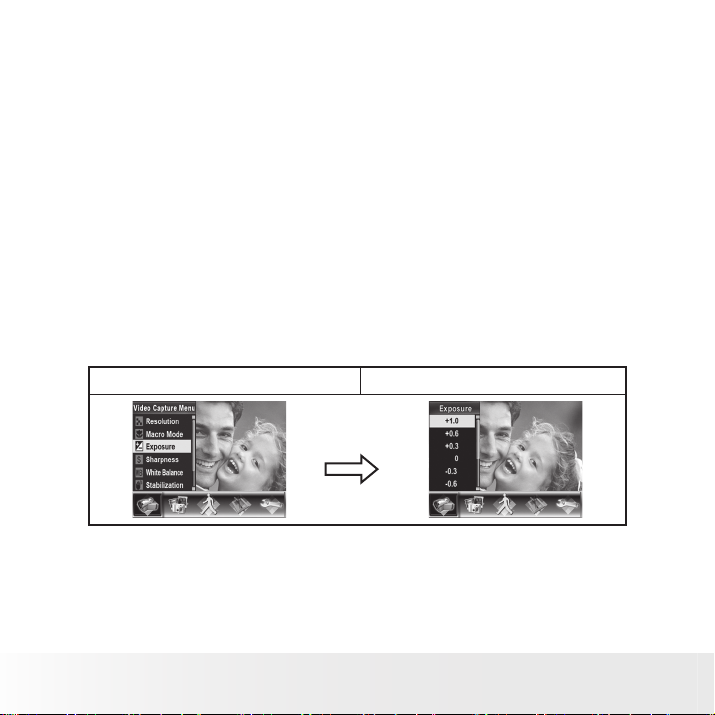
Exposure Settings
The camera adjusts image exposure automatically. In certain circumstances
you may wish to adjust the exposure compensation setting.
To change the Exposure setting:
1. In the Video/Photo Record Mode, press the OK Button to switch to the
record setup menu screen.
2. Use the Right/Left Buttons to select the Video Capture Mode. The
submenu of Video Mode will pop up on the screen.
3. Use the Up/Down Buttons to move to the Exposure Option. Press the
OK Button and the Exposure Submenu will pop up on the screen.
4. Use the Up/Down Buttons to choose the preferred EV value. When
selected the change is immediate.
5. Press the OK Button to confirm the setting and exit.
Record Menu Setup Screen Exposure Option
OK Button
Page 21
21
Polaroid DVC-00725F Digital Camera User Guide
www.polaroid.com
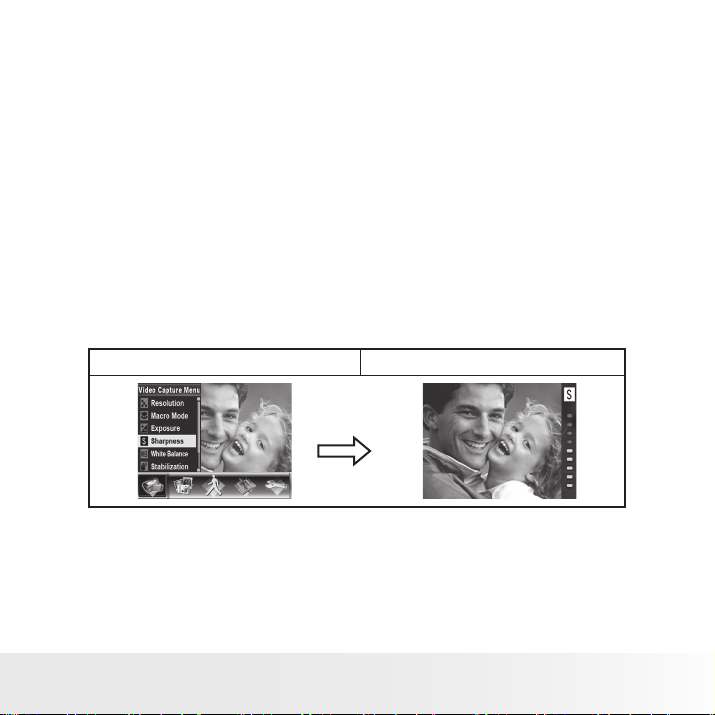
Sharpness Settings
You can soften and/or sharpen images to achieve different effects.
To change sharpness setting:
1. In the Video/Photo Record Mode, press the OK Button to switch to the
record setup menu screen.
2. Use the Right/Left Buttons to select the Video Capture Menu. The
submenu of the Video Mode will pop up on the screen.
3. Use the Up/Down Buttons to select the Sharpness setting then press
the OK Button to switch to the Sharpness submenu.
4. Use Up/Down Buttons to move between the nine levels. When selected
the change is immediate.
5. Press OK Button to confirm the setting and exit.
Record Menu Setup Screen Sharpness Option
OK Button
Page 22
22
Polaroid DVC-00725F Digital Camera User Guide
www.polaroid.com
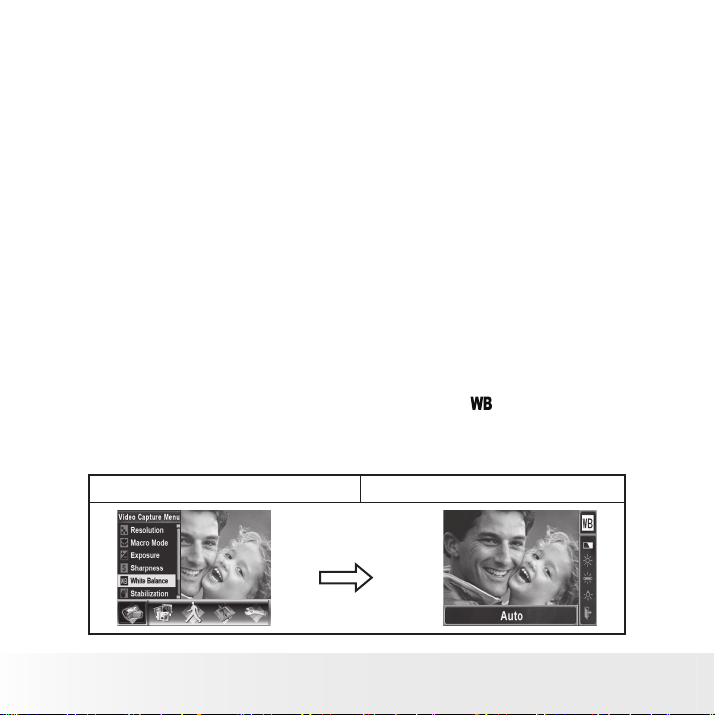
White Balance Settings
The camera adjusts the color balance of images automatically. Four
manual white balance settings are available:
• AUTO: The camera automatically adjusts white balance.
• Daylight: Use this setting for outdoor brightly lit scenes.
• Fluorescent: Use this setting indoors with fluorescent lighting.
• Tungsten: Use this setting indoors with tungsten/incandescent
lighting.
To change the White Balance Setting:
1. In the Video/Photo Record Mode, press the OK Button to switch to the
record setup menu screen.
2. Use the Right/Left Buttons to select Video Capture Menu. The Video
Mode submenu will pop up on the screen.
3. Use the Up/Down Buttons to select the White Balance setting then
press the OK Button to switch to the White Balance submenu.
4. Use the Up/Down Buttons to move between the four settings. When
selected the change is immediate. (You will see on the lower right
corner of the LCD display.)
5. Press the OK Button to confirm the setting and exit.
Record Menu Setup Screen White Balance Option
OK Button
Page 23

23
Polaroid DVC-00725F Digital Camera User Guide
www.polaroid.com
Stabilization Setting
To enable the Stabilization feature:
1. In the Video/Photo Record Mode, press the OK Button to switch to the
record setup menu screen.
2. Use the Right/Left Buttons to select the Video Capture Menu. The
submenu of the Video Capture Menu. will pop up on the screen.
3. Use the Up/Down Buttons to select the Stabilization setting then press
the OK Button to switch to Stabilization submenu.
4. Use the Up/Down Buttons to choose between ON or OFF. (You will
see on the upper right corner of the LCD display.)
5. Press the OK Button to confirm the setting and exit.
Record Menu Setup Screen Stabilization Option
OK Button
NOTE:
• The captured screen will be smaller when stabilization is enabled.
• Digital Zoom is disabled when stabilization is activated.
Page 24
24
Polaroid DVC-00725F Digital Camera User Guide
www.polaroid.com
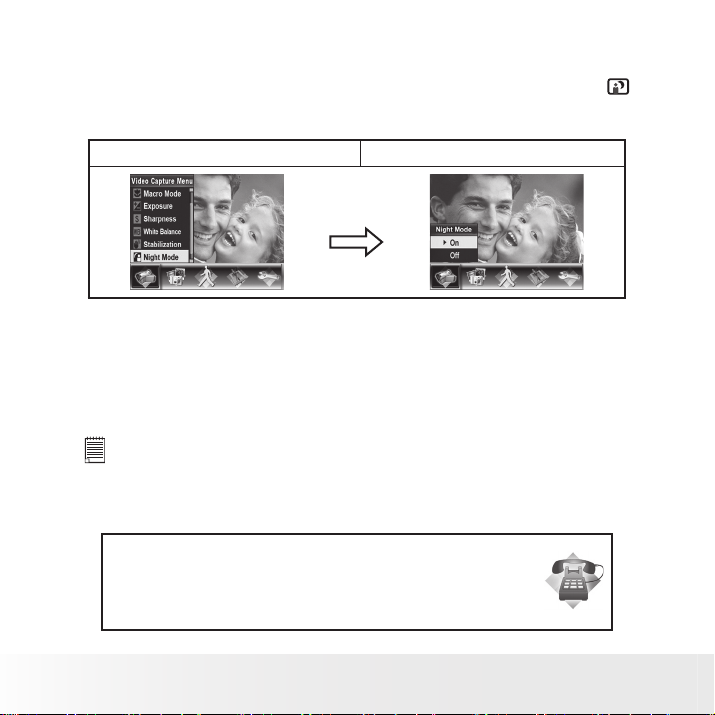
Night Mode Feature
Use Night Mode for night scenes or low light conditions. (You will see
on the upper left corner of the LCD display.)
Record Menu Setup Screen Night Mode Option
OK Button
NOTE:
To avoid blurry pictures, place the camera on a flat, steady surface,
or use a tripod.
Need help with your digital camera?
Call our toll-free customer service number. Look for the insert with this icon:
Or visit www.polaroid.com.
Page 25

25
Polaroid DVC-00725F Digital Camera User Guide
www.polaroid.com
• Still Capture Settings
Photo Resolution
To change the picture resolution:
1. In Video/Photo Record Mode, press the OK Button to switch to the
record setup menu screen.
2. Use Right/Left Buttons to select the Still Capture Menu. The submenu
of the Still Capture Menu will pop up on the screen.
3. Use the Up/Down Buttons to select the Resolution Setting then press
the OK Button to switch to the Resolution submenu.
4. Use the Up/Down Buttons to move between the three settings. (You
will see on the upper left corner of the LCD display.)
5. Press the OK Button to confirm the setting and exit.
Display Screen Image Resolution Option
OK Button
Page 26

26
Polaroid DVC-00725F Digital Camera User Guide
www.polaroid.com
Macro Mode Setting
With the Macro Mode enabled, you could take close-up images of objects
from a distance of 1cm to 30cm (0.39 inches~11.8 inches).
To enable the Macro Mode:
1. In the Video/Photo Record Mode, press the OK Button to switch to the
record setup menu screen.
2. Use the Right/Left Buttons to select the Still Capture Menu. The
submenu of the Still Capture Menu will pop up on the screen.
3. Use the Up/Down Buttons to select the Macro Mode then press the
OK Button to switch to the Macro Mode submenu.
4. Use the Up/Down Buttons to move between the two settings.
5. Press the OK Button to confirm the setting and exit. (You will see
on the lower right corner of the LCD display.)
6. To switch back to the default value, select ‘Normal’ in the Macro
Mode submenu.
Display Screen Macro Mode Option
OK Button
Page 27

27
Polaroid DVC-00725F Digital Camera User Guide
www.polaroid.com
Exposure Settings
The camera adjusts image exposure automatically. In certain circumstances
you may wish to adjust the exposure compensation setting.
To change Exposure setting:
1. In the Video/Photo Record Mode, press the OK Button to switch to the
record setup menu screen.
2. Use the Right/Left Buttons to select the Still Capture Menu. The
submenu of the Still Capture Menu will pop up on the screen.
3. Use the Up/Down Buttons to move to the Exposure Option. Press the
OK Button and then Exposure Submenu will pop up on the screen.
4. Use Up/Down Buttons to choose preferred EV value. When selected
the change is immediate.
5. Press the OK Button to confirm the setting and exit.
Record Menu Setup Screen Exposure Option
OK Button
Page 28

28
Polaroid DVC-00725F Digital Camera User Guide
www.polaroid.com
Two in One (Photo Record Mode Only)
With camera set to Two in One mode, you can combine two snapshots
into one Photo.
To enable Two in One:
1. In the Video/Photo Record Mode, press the OK Button to switch to the
record setup menu screen.
2. Use the Right/Left Buttons to select the Still Capture Menu. The
submenu of the Still Capture Menu will pop up on the screen.
3. Use the Up/Down Buttons to select the Two in One feature then press
the OK Button to switch to the Two in One submenu.
4. Use the Up/Down Buttons to choose either ON or OFF.
5. Press the OK Button to confirm the setting and exit.
Record Menu Setup Screen Two in One Option
OK Button
1. Press Camera Shutter Button to
take first photo on the left side
of the LCD display.
2. Align the subject on the right
side of the LCD display and
press the Camera Shutter
Button to take second Photo.
3. Press the Playback Button to
view the Two in One Photo.
Page 29

29
Polaroid DVC-00725F Digital Camera User Guide
www.polaroid.com
Photo Frame (Photo Record Mode Only)
Your camera features a popular electronic photo frame feature. You can
take your pictures with a preferred electronic photo frame.
To enable Photo Frame Feature:
1. In the Still Capture menu, use the Up/Down Buttons to select the
Photo Frame option, then press the OK Button to switch to the Photo
Frame submenu.
2. Use the Up/Down Buttons to locate your preferred photo frame then
select the Set option and Press the OK Button to confirm the setting
and exit.
Record Menu Setup Screen Photo Frame option
OK Button
Page 30

30
Polaroid DVC-00725F Digital Camera User Guide
www.polaroid.com
Flash (Photo Record Mode Only)
This camera has three flash settings. You can change the flash setting by
either the hot key (Right Button) or using the Option Setting.
• Auto Flash ( ) The flash fires automatically according to
lighting conditions. Use this setting for most
photographic scenes.
• Red Eye Reduction( ) The pre-flash will fire to reduce the red-eye
effect.
• Flash off ( ) The flash will not fire under any circumstances.
Use this mode when taking images in a place
where flash photography is prohibited, or when
the subject is far away (beyond 10 feet).
To change the Flash setting:
1. When in the Still Capture menu, use Up/Down Buttons to select
the Flash Option, then press the OK Button to switch to the Flash
submenu.
2. Use the Up/Down Buttons to move between the three settings.
3. Press the OK Button to confirm the setting and exit.
NOTE:
The flash will be disabled automatically when battery power is low.( )
Record Menu Setup Screen Flash option
OK Button
Page 31

31
Polaroid DVC-00725F Digital Camera User Guide
www.polaroid.com
Selftimer (Photo Record Mode Only)
The selftimer allows you to take pictures with a ten-second time delay.
The Self-timer LED on the front of the camera will also blink. The speed of
blinking will increase just before the Photo is taken.
To enable the Selftimer:
1. When in the Still Capture menu, use the Up/Down Buttons to select
the Selftimer, then press the OK Button to switch to the Selftimer
submenu.
2. Use the Up/Down Buttons to choose between On or Off.
3. Press the OK Button to confirm the setting and exit.
Record Menu Setup Screen Selftimer option
OK Button
Page 32

32
Polaroid DVC-00725F Digital Camera User Guide
www.polaroid.com
Sharpness Setting
You can soften and sharpen images to achieve different effects.
To change sharpness setting:
1. When in the Still Capture Menu, use the Up/Down Buttons to select
the Sharpness Option, then press the OK Button to switch to the
Sharpness submenu.
2. Use the Up/Down Buttons to move between the nine levels. When
selected the change is immediate.
3. Press the OK Button to confirm the setting and exit.
Record Menu Setup Screen Sharpness option
OK Button
Page 33

33
Polaroid DVC-00725F Digital Camera User Guide
www.polaroid.com
White Balance Settings
The camera adjusts the color balance of images automatically. Four
manual white balance settings are available:
• AUTO: The camera automatically adjusts white balance.
• Daylight: Use this setting for outdoor brightly lit scenes.
• Fluorescent: Use this setting indoors with fluorescent lighting.
• Tungsten: Use this setting indoors with tungsten/incandescent
lighting.
To change White Balance Setting:
1. When in the Still Capture Mode, use the Up/Down Buttons to select
the White Balance option, then press the OK Button to switch to the
White Balance submenu.
2. Use the Up/Down Buttons to move between the four settings. When
selected the change is immediate.
3. Press the OK Button to confirm the setting and exit. (You will see
on the lower right corner of the LCD display.)
Record Menu Setup Screen White Balance option
OK Button
Page 34

34
Polaroid DVC-00725F Digital Camera User Guide
www.polaroid.com
Multi-snap (Photo Record Mode Only)
With the camera set to Multi-snap Mode, you can take five continuous
pictures (the flash is disabled).
To enable Multi-snap:
1. When in the Still Capture Mode, use the Up/Down Buttons to select
the Multi-snap, then press OK Button to switch to the Multi-snap
submenu.
2. Use the Up/Down Buttons to choose between On or Off.
3. Press the OK Button to confirm the setting and exit. (You will see
on the upper left corner of the LCD display.)
Record Menu Setup Screen Multi-snap option
OK Button
Need help with your digital camera?
Call our toll-free customer service number. Look for the insert with this icon:
Or visit www.polaroid.com.
Page 35

35
Polaroid DVC-00725F Digital Camera User Guide
www.polaroid.com
Backlight (Photo Record Mode Only)
With the camera set to the backlight Mode, you can take shots when
bright light is behind the subject.
To enable the Backlight Feature:
1. When in the Still Capture Menu, use the Up/Down Buttons to select
the Backlight feature, then press the OK Button to switch to the
Backlight submenu.
2. Use the Up/Down Buttons to choose between On or Off.
3. Press the OK Button to confirm the setting and exit. (You will see
on the upper left corner of the LCD display.)
Record Menu Setup Screen Backlight option
OK Button
Page 36

36
Polaroid DVC-00725F Digital Camera User Guide
www.polaroid.com
Date Printing (Photo Record Mode Only)
To enable the Date Printing Feature:
1. When in the Still Capture Menu, use the Up/Down Buttons to select
the Date Printing feature, then press the OK Button to switch to the
Date Printing submenu.
2. Use the Up/Down Buttons to choose between On or Off.
3. Press the OK Button to confirm the setting and exit. (You will see the
date on the lower left corner of the LCD display.)
Record Menu Setup Screen Date Printing option
OK Button
NOTE:
Date would be shown on the Photo once date printing is enabled.
Night Mode
Use Night Mode for night scenes or low light conditions.
Record Menu Setup Screen Night Mode option
OK Button
NOTE:
To avoid blurry pictures, place the camera on a flat, steady surface, or use a tripod.
Page 37

37
Polaroid DVC-00725F Digital Camera User Guide
www.polaroid.com
• Motion Detection
Motion Detection feature allows you to record a moving object. Turn the
motion detection on, the camera will start to record video automatically if
it detects motion and will stop recording if it does not detect motion.
To enable the Motion Detection Feature:
1. In the Video/Photo Record Mode, press the OK Button to switch to
record menu setup screen.
2. Use the Right/Left Buttons to move to the Motion Detect Option. The
submenu of Motion Detect will pop up on the screen.
3. Use the Up/Down Buttons to choose between ON or OFF.
4. Press the OK Button to confirm the setting and exit. (You will see
on the lower left corner of the LCD display.)
Record Menu Setup Screen
Page 38

38
Polaroid DVC-00725F Digital Camera User Guide
www.polaroid.com
• Effect Setting
This setting allows control over the color tones and moods of a picture
or video. The effects can be Normal, B/W(Black/White), Classic and
Negative.
To change the Effect setting:
1. In the Video/Photo Record Mode, press the OK Button to switch to the
record menu setup screen.
2. Use the Right/Left Buttons to move to the Effect Option. The submenu
of the Effect will pop up on the screen.
3. Use the Up/Down Buttons to move between the four settings. When
selected the change is in effect immediately.
4. Press the OK Button to confirm the setting and exit.
Record Menu Setup Screen
Page 39

39
Polaroid DVC-00725F Digital Camera User Guide
www.polaroid.com
• Setting Menu
The Setting submenu contains options for configuring your camera set
up.
To change advanced settings:
1. In the Video/Photo Record Mode, press the OK Button to switch to the
record menu setup screen.
2. Use the Right/Left Buttons to move to the Setting option, then the
Setting Submenu will pop up on the screen.
3 Use the Up/Down Buttons to move between settings.
Record Menu Setup Screen Setting Option
• Sound (operation sound)
• Time setting
• Format Memory or Card
• TV System
• Language
• Information
• Default Setting
NOTE:
• Please refer to Format Memory/Card on page 41.
Page 40

40
Polaroid DVC-00725F Digital Camera User Guide
www.polaroid.com
Sound
Enable or disable the sound by using the Up/Down buttons then press the
OK Button to confirm the setting.
Record Menu Setup Screen Sound option
OK Button
Time Setting
• Move between Date, Time, Set and Exit by using the Left/Right
buttons.
• Adjust the date and time by using the Up/Down Buttons, then select
the Set to confirm each change.
• Select Exit to leave the Time Setting without any change.
Record Menu Setup Screen Sound option
OK Button
NOTE:
If the battery is removed from the camera for an extended period of time or the battery is
depleted, you may need to reset the date and time.
Page 41

41
Polaroid DVC-00725F Digital Camera User Guide
www.polaroid.com
Format Memory (when there is no SD Card in the camera)
Record Menu Setup Screen Format Memory option
OK Button
Format Card (when there is an SD Card in the camera)
Record Menu Setup Screen Format Card option
OK Button
NOTE:
• All the data will be erased when the SD card is formatted. Make sure all the
data is copied to a PC before formatting the SD card.
Page 42

42
Polaroid DVC-00725F Digital Camera User Guide
www.polaroid.com
TV System
Select the appropriate TV standard for your area – NTSC or PAL
Selecting the wrong TV system setting may cause viewing problems.
NTSC: USA, Canada, Japan, South Korea and Taiwan etc.
PAL: UK, Europe, China, Australia, Singapore and Hong Kong etc.
Record Menu Setup Screen TV System option
OK Button
Language
Use this option to select the language of user interface you want.
Record Menu Setup Screen
Page 43

43
Polaroid DVC-00725F Digital Camera User Guide
www.polaroid.com
Information
On: Show the indicator(s) on the LCD screen.
Off: Do not show the indicator(s) on the LCD screen.
Record Menu Setup Screen Information option
OK Button
Default Setting
To restore the default factory setting, select this option.
Record Menu Setup Screen Default Setting option
OK Button
Page 44

44
Polaroid DVC-00725F Digital Camera User Guide
www.polaroid.com
3 Playback Mode
Press the Playback Button to switch from the Record Mode to the Playback
Mode.
The Playback Mode is for viewing and managing videos and photos on the
built-in memory or on an optional memory card.
Operation Display Screen
Press Playback Button ( ) to switch from
Record Mode to Playback Mode Main Menu.
• There are 2 options in the Playback Mode,
Videos and Photos.
• Direction Buttons can be used to select the
specific option.
• Press OK Button to view videos or photos.
• Button Function
The Direction Buttons have the following functions in Video and Photo
Playback Modes.
Right Button: Go to the next Video/Photo.
Left Button: Go to the previous Video/Photo.
OK/Enter Button: Enter to Video or Photo option menu.
Tele Button : Zoom In (only Photo Mode)
Wide Button : Zoom out (only Photo Mode)
Playback Button functions:
1. Switch between Record and Playback modes
2. Return to the previous page.
Record Button:
Start playing the recorded Video.
Page 45

45
Polaroid DVC-00725F Digital Camera User Guide
www.polaroid.com
• LCD Dispaly Information
Indicators on the LCD screen while in Playback Mode:
No. Icon Description
1 5/10 Current Number/ Total number of Video or Photo.
2 Magnication Indicator.
3 Indicate the screen is in Playback Mode
HD
D1
4
5 Indicate the selected Video/Photo is locked.
HD
D1
VGA
QVGA
High
Standard
Low
Page 46

46
Polaroid DVC-00725F Digital Camera User Guide
www.polaroid.com
• Video Playback
Operation Display Screen
1. Press Playback Button to select
Playback Mode. Use Direction Buttons
to select the Video option.
2. Press OK Button to go to Video Playback
Mode.
3. Use Right/Left Buttons to go to the next
or last Video.
4. Press Record Button to play and press it
again to pause.
5. While playing Video, press Right/Left
Buttons to fast forward/backward, then
release the button to stop.
6. Use Up/Down Buttons to adjust
volume.
7. Press OK Button to go to the Video
option menu.
8. Use Right/Left Buttons to select six
options, Delete, Thumbnail, Lock,
Repeat One, Repeat All, or Exit.
Page 47

47
Polaroid DVC-00725F Digital Camera User Guide
www.polaroid.com
Deleting Videos
Operation Display Screen
1. Use Right/Left Buttons to select the
Delete option ( )
2. Press OK Button to go to the Delete
menu.
3. Use Right/Left Buttons to select the
Video.
4. Use Up Button to delete all videos and
Down Button to delete single Video.
5. Before a Video is deleted, a confirmation
screen will appear; choosing “Yes” will
execute the operation and “No” to
cancel the operation.
6. Press OK Button to exit.
NOTE:
• If a memory card is inserted, you can delete only those videos stored on the
card.
• Videos on a written-protected memory card cannot be deleted.
• The delete function will only erase unlocked videos. Locked videos must be
unlocked before being deleted.
Page 48

48
Polaroid DVC-00725F Digital Camera User Guide
www.polaroid.com
Thumbnail Function
Operation Display Screen
1. Use Right/Left Buttons to select the Thumbnail
option ( )
2. Press OK Button to view nine thumbnail videos.
3. To play a Video, use Right/Left Buttons to select
the Video and press OK Button to view.
Locking Videos
A single video or all videos can be locked. This function can prevent the
videos from being deleted accidentally.
Operation Display Screen
1. Use Right/Left Buttons to select the Lock option
( )
2. Press OK Button to go to the Lock menu.
3. Use Right/Left Buttons to select the Video.
4. Use Up Button to lock/unlock all videos and
Down Button to lock/unlock single Video.
5. Before a Video is locked/unlocked, a confirmation
screen will appear; choosing “Yes” will execute
the operation, “No” will cancel the operation.
6. Press OK Button to exit.
Page 49

49
Polaroid DVC-00725F Digital Camera User Guide
www.polaroid.com
Repeating Videos
This function automatically repeats playing a single Video or all videos in
order.
Operation Display Screen
1. Use Right/Left Buttons to select the
Repeat One option ( ) or Repeat All
option ( )
2. Press OK Button to start repeating,
press it again to stop.
Need help with your digital camera?
Call our toll-free customer service number. Look for the insert with this icon:
Or visit www.polaroid.com.
Page 50

50
Polaroid DVC-00725F Digital Camera User Guide
www.polaroid.com
• Photo Playback
Operation Display Screen
1. Press Playback Button to select
Playback Mode. Use Right/Left Buttons
to select the Photos option.
2. Press the OK Button to go to Photo
Playback Mode.
3. Use the Right/Left Buttons to go to the
next or last Photo.
4. While the Photo is selected, use Tele/
Wide Buttons to magnify.
5. To navigate the magnified Photo,
use Direction Buttons to navigate
the magnified Photo. Press Playback
Button again to exit navigation mode.
6. Press OK Button to go to the Photo
option menu.
7. Use Right/Left Buttons to select five
options, Delete, Thumbnail, Lock,
Slideshow, or Exit.
Page 51

51
Polaroid DVC-00725F Digital Camera User Guide
www.polaroid.com
Deleting Photos
Operation Display Screen
1. Use Right/Left Buttons to select the
Delete option ( )
2. Press OK Button to go to the Delete
menu.
3. Use Right/Left Buttons to select the
Photo.
4. Use Up Button to delete all pictures and
Down Button to delete single Photo.
5. Before a Photo is deleted, a confirmation
screen will appear; choosing “Yes” will
execute the operation and “No” to
cancel the operation.
6. Press OK Button to exit.
NOTE:
• If a memory card is inserted, you can delete only those pictures stored on
the card.
• Pictures on a written-protected memory card cannot be deleted.
• The delete function will only erase unlocked pictures. Locked pictures must
be unlocked before being deleted.
Page 52

52
Polaroid DVC-00725F Digital Camera User Guide
www.polaroid.com
Thumbnail Function
Operation Display Screen
1. Use Right/Left Buttons to select the Thumbnail
option ( )
2. While selecting the Thumbnail option, press the OK
Button to view nine thumbnail pictures.
3. To view a Photo, use the Direction Buttons to select
the Photo.
4. Press the OK Button to view the selected Photo.
Locking Photos
A single picture or all pictures can be locked. This function can prevent
the pictures from being deleted accidentally.
Operation Display Screen
1. Use Right/Left Buttons to select the Lock option
( )
2. Press the OK Button to go to the Lock menu.
3. Use the Right/Left Buttons to select the Photo.
4. Use the Up Button to lock/unlock all pictures and
the Down Button to lock/unlock single Photo.
5. Before a Photo is locked/unlocked, a confirmation
screen will appear; choosing “Yes” will execute
the operation, “No” will cancel the operation.
6. Press the OK Button to exit.
Page 53

53
Polaroid DVC-00725F Digital Camera User Guide
www.polaroid.com
Make a Slide Show
This function automatically repeats all pictures in order.
Operation Display Screen
1. Use Right/Left Buttons to select the
Slideshow option ( )
2. Press the OK Button to start the slide
show; press it again to stop.
Need help with your digital camera?
Call our toll-free customer service number. Look for the insert with this icon:
Or visit www.polaroid.com.
Page 54

54
Polaroid DVC-00725F Digital Camera User Guide
www.polaroid.com
4 Transferring & Viewing Video onto a PC
• Transferring Photos or Videos to a Computer
You can transfer pictures or videos stored on your camera to a computer
and send them in emails to friends or post them on websites.
To do this you should:
1. Connect the computer and camera with the provided mini USB 2.0
cable. The LED will light up and blink.
2. After the LED stops blinking, videos can be found on your computer
at “My Computer\Removable Disk\DCIM\200MOVIE”, while Photo(s)
can be found on your computer at “My Computer\Removable Disk\
DCIM\100PHOTO”
3. In these folders, you can read, delete, move, or copy any Video/Photo
you want.
4. Use the bundled ArcSoft application software to edit the videos or
pictures.
• Viewing a Video on a PC
When playing a Video for the first time, the correct Video Codec should
be installed in PC. To do this:
1. Insert the CD-ROM into the computer’s CD-ROM drive. Click “Install
Video Codec” and follow the on-screen instructions to complete the
installation.
2. Start the video player such as Windows Media Player to view AVI
Videos.
• Sharing A Video
You can share the recorded videos with your friends via internet or CD.
Make sure the correct Video Codec is installed on your friends’ PC. Video
Codec is available in the provided CD.
Page 55

55
Polaroid DVC-00725F Digital Camera User Guide
www.polaroid.com
5 Viewing Photos and Videos on a TV
• Connecting to a High-Denition TV
1. Connect HDMI cable to a HD TV.
2. Set video input source of a TV to “ HDMI” option.
3. The steps for viewing stored pictures and Video on a TV are exactly
the same as for viewing them on the LCD display.
NOTE:
The camera can not capture videos or photos when it is connected to
a high-definition TV. The LCD Panel does not work when the camera
is connected to a high-definitionTV.
Need help with your digital camera?
Call our toll-free customer service number. Look for the insert with this icon:
Or visit www.polaroid.com.
Page 56

56
Polaroid DVC-00725F Digital Camera User Guide
www.polaroid.com
• Connecting to a non-high-denition 16:9 (Wide) or 4:3 TV
1. Connect one end of the AV cable to your camera’s AV Out port.
2. Connect the other end of the cable to a TV.
3. The steps for viewing stored photos and Video on a TV are exactly the
same as for viewing them on the LCD display.
NOTE:
The LCD display does not work when the camera is connected to a
TV.
Page 57

57
Polaroid DVC-00725F Digital Camera User Guide
www.polaroid.com
6 Video File Converter
Bundled software CD contains ArcSoft MediaConverter that features
video file converter to convert multiple video formats into compatible
format with your camera. In this way, you can convert various video files
formats and playback your favorite videos on your camera.
• Media Converter
To convert a video file:
1. Install the ArcSoft MediaConverter onto your PC ( Refer to section
10).
2. Click [ Start ] -->[ (All) Programs ] --> [ ArcSoft MediaConverter ] -->
[ MediaConverter] .
3. MediaConverter main Screen will appear on your desktop.
4. Click [Add File] .
Preview Window
Page 58

58
Polaroid DVC-00725F Digital Camera User Guide
www.polaroid.com
5. Select the Video file you want to convert.
6. You can preview your media files before converting. To preview media
files, use the following control functions.
• Click to start previewing.
• Click
to stop previewing.
Make sure your media files can be previewed before converting.
Page 59

59
Polaroid DVC-00725F Digital Camera User Guide
www.polaroid.com
7. Click on [ Start ] to begin converting files.
Preview Window
8. The Task Report window will pop up after the task is completed.
9. Before transferring the converted file to your camera, rename the
converted file to “ CLIPXXXX.avi”. (XXXX should be a four figures,eg
0001 to 9999)
10. Connect your camera to PC and copy the converted video to “My
Computer\Removable Disk\ DCIM\200MOVIE” in your camera.
11. After transferring the converted video to the camera, press Playback
Button to enjoy your favorite Video.
Page 60

60
Polaroid DVC-00725F Digital Camera User Guide
www.polaroid.com
7 Using the SD (Secure Digital) Card
• Using the SD Card
Your camera comes with built-in flash memory for storing photos and
video clips. You can expand the memory by using a Polaroid SD card (sold
separately) (up to 4GB). The camera senses whether a memory card is
inserted, and automatically saves photos and video clips accordingly. Note
that you cannot save photos or video clips to the built-in flash memory
while a memory card is installed in the camera.
Memory card precautions:
1. Use only a compatible SD memory card with this camera preferably a
Polaroid SD card.
2. Electrostatic charge, electrical noise, and other phenomena can cause
data corruption or even loss. Always make sure that you always back
up important data on other media (MO disc, computer hard drive,
etc.).
3. If a memory card starts to behave abnormally, you can restore normal
operation by formatting it. However, we recommend that you always
take along with more than one memory card whenever using the
camera far away from your home or office.
4. We recommend that you format a memory card when using it for the
first time, or whenever the card you are using seems to be the cause
of abnormal pictures. Remember to format a memory card if it was
used in another digital camera or other devices.
Need help with your digital camera?
Call our toll-free customer service number. Look for the insert with this icon:
Or visit www.polaroid.com.
Page 61

61
Polaroid DVC-00725F Digital Camera User Guide
www.polaroid.com
IMPORTANT!
• Make sure you turn off the camera before inserting or removing a memory
card.
• Be sure to orient the card correctly when inserting it. Never try to force a
memory card into the slot when you feel resistance.
• SD memory cards have a write protection switch that you can use to
protect les from accidental deletion. However, you must remove the write
protection whenever you want to record new les onto it, format it, or delete
its les.
• Files contained in the SD card recorded by other cameras may conict with
the DVC-00725F camera, and valuable data in your existing SD card may
be distorted or lost when the card is inserted in the DVC-00725F camera.
We strongly recommend the user to use a new or formatted Polaroid (not
included) SD card for the DVC-00725F camera. The manufacturer is not
liable for losing or corrupting any valuable data or les in your SD card due
to improper operation.
Need help with your digital camera?
Call our toll-free customer service number. Look for the insert with this icon:
Or visit www.polaroid.com.
Page 62

62
Polaroid DVC-00725F Digital Camera User Guide
www.polaroid.com
Inserting the SD card
1. Turn off the camera.
2. Open the camera’s battery/SD card door by
pushing it outwards as illustrated.
3. Insert the SD card and ensure the card is
inserted the correct position as illustrated.
4. Close the camera’s battery/SD card door by
pressing it downwards and slide it back to
lock.
Removing the SD card
To remove the SD card, turn off your camera and open the camera’s
battery/SD card door. Gently push the SD card inwards and then release
it. The SD card will eject out of the SD card slot.
IMPORTANT!
• Never insert any other object into the camera’s SD card slot. Doing so results
in the risk of damage to the camera and card.
• Should water or any foreign objects ever get into the card slot, immediately
turn off the camera, remove the battery or disconnect the AC adapter, and
contact your dealer or the nearest service provider.
• Never remove a card from the camera while the camera is powered on.
Doing so can cause the Photo or video recording operation to fail, and even
damage the memory card.
Page 63

63
Polaroid DVC-00725F Digital Camera User Guide
www.polaroid.com
8 Burning the Recorded Clip into DVD
Bundled software CD contains ArcSoft MediaImpression also features
burning the video clip into DVD. You can preserve your precious videos
on DVD to share with family and friends.
To create a DVD:
1. Install the ArcSoft MediaImpression onto your PC (Refer to Section
10).
2. Click [ Start ]-->[ (All) Programs ]-->[ ArcSoft MediaImpression ]
3. ArcSoft MediaImpression main Screen will appear on your desktop.
4. Click [ Make Video ].
Page 64

64
Polaroid DVC-00725F Digital Camera User Guide
www.polaroid.com
5. The operation screen will appear:
• Select the folder that contains the file(s) you want to use.
• Select the file(s)
• Click button to put the file(s) into slide
• Click [Burn to Disc]
2
2
1
1
3
3
4
4
6. Click [ Start ] to start DVD burning.
Page 65

65
Polaroid DVC-00725F Digital Camera User Guide
www.polaroid.com
9 Uploading Video Files to YouTube
The bundled software CD contains ArcSoft MediaImpression which
features uploading the recorded videos to YouTube. It will help you to
share them with your family and friends on the YouTube website.
• ArcSoft MediaImpression
To upload video files to YouTube:
1. Install the ArcSoft MediaImpression onto your PC (Refer to Section
10).
2. Click [Start]-->[ (All) Programs ]-->[ ArcSoft MediaImpression ]
3. ArcSoft MediaImpression main Screen will appear on your desktop.
4. Click [ Video] Option.
Page 66

66
Polaroid DVC-00725F Digital Camera User Guide
www.polaroid.com
5. Select the video file you want to upload and click [ Upload to YouTube]
option at the bottom menu.
6. If this is your first time using of this function, please follow the
instruction on YouTube Setting Panel.
Page 67

67
Polaroid DVC-00725F Digital Camera User Guide
www.polaroid.com
7. Go to http://www.youtube.com/login, then Log onto your YouTube
account.
(If you do not have a YouTube account, sign up here first.)
8. After you log onto your YouTube account, Click [ Get Authorization ]
button below.
Page 68

68
Polaroid DVC-00725F Digital Camera User Guide
www.polaroid.com
Click [Allow] Button shown on YouTube website.
9. Click [Save] Button to upload the video.
Page 69

69
Polaroid DVC-00725F Digital Camera User Guide
www.polaroid.com
10 Installing Bundled Software
• Installing Video Codec to view videos correctly on PC
Before connecting this camera to a computer for the first time, you should
install the correct Video Codec on the computer in order to view videos on
PC. The Video Codec is on the CD-ROM disc provided in the package.
To install Video Codec:
1. Insert the CD-ROM into the computer’s CD-ROM drive. The autorun
screen will appear.
2. Click “Install Video Codec”. Follow the on-screen instructions to
complete the installation. Depending on your operating system, you
may have to restart your computer after installing it.
• Installing Bundled ArcSoft Software
The CD-ROM supplied with this camera contains the other 2 pieces of
software.
• ArcSoft MediaConverter can convert multiple video formats into
compatible format with your camera.
• ArcSoft MediaImpression is a user-friendly application that helps you
managing your media for you, and gives you funny and exciting ways
to create and share projects featuring your photo and video files. Support the feature of uploading videos easily to YouTube.
The detailed information can be found in online help of all the bundled
software.
To install the bundled software:
1. Insert the CD-ROM into your computer’s CD-ROM drive. The autorun
screen appears.
2. Select the piece(s) of software you want to install from the list, then
click Install Application Software. Follow the on-screen instructions to
complete the installation.
Page 70

70
Polaroid DVC-00725F Digital Camera User Guide
www.polaroid.com
11 Getting Help
• Polaroid Online Services
Website: http://www.polaroid.com
• ArcSoft Software Help
For United States For Latin America
ArcSoft HQ Support Centre E-mail:latinsupport@arcsoftsupport.com
(Fremont, CA 94538)
Tel.: 1-510-979-5599
Fax: 1-510-440-7978
E-mail: support@arcsoftsupport.com
Web: http://www.arcsoft.com/en/support/
For Europe For China
ArcSoft Europe Support Centre ArcSoft China Support Centre
(Ireland) (Hangzhou)
Tel.: +353-(0) 61-702087 Tel.: +86-571-88210575
Fax: +353-(0) 61-702001 E-mail: support@arcsoft.com.cn
E-mail: eurosupport@arcsoft.com
For Japan For Taiwan
ArcSoft Japan Support Centre (Tokyo) ArcSoft Taiwan Support Centre (Taiwan)
Tel.: +81-3-5795-1392 Tel.: +886-(0) 2-2506-9355
Fax: +81-3-5795-1397 Fax: +886-(0) 2-2506-8922
E-mail: support@arcsoft.jp E-mail: support@arcsoft.com.tw
Web: http://www.arcsoft.jp Web: www.arcsoft.com.tw
Visit http:// www.arcsoft.com for technical support and frequently asked questions (FAQ’s).
®2008 by All rights reserved
“Polaroid” and “Polaroid and Pixel” are trademarks of Polaroid Corporation, USA.
Web: http://www.arcsoft.com.cn/new/support
Page 71

71
Polaroid DVC-00725F Digital Camera User Guide
www.polaroid.com
12 Appendix
• Technical specications
Sensor • Sensor: 5.0 MP CMOS
Lens • Focal Length: 6.8~34 mm
LCD Screen 2.7” LCD
Exposure Control -/+1.0 EV in 1/3 step
Image Resolution High: 3744X2808 Standard: 2592X1944
Video Resolution HD: 1280X720 30fps D1: 720X480 30fps
Shutter Electrical shutter
Optical Zoom 5X
White Balance Auto / Manual (Daylight / Fluorescent / Tungsten)
Storage • Internal Memory: 64MB Nand Flash
Self-timer Approx. 10 seconds
File Format • Still Image: JPEG
Flash (for still) Auto / Red Eye Reduction / Off
Flash Range 3m (9.9 ft)
Image Play Single / Thumbnails / Slideshow
TV Out Digital : HDMI
Power Supply NP60 Lithium-ion Rechargeable Battery
Dimension • Size: (W) 117 mm x (D) 56 mm x (H) 65 mm
PC Interface Mini USB2.0
• Normal focus: 1cm ~ infinite
• Macro focus:1cm ~ 30cm
• F No.:3.5~3.7
Low:1600X1200
VGA: 640X480 30fps QVGA: 320X240 30fps
• External Memory: Supports SD/MMC card
• Video Clip: AVI (H.264)
Analog: Composite Video (NTSC/PAL Selectable)
• Weight:
Approximately 314g (without battery); 340(with battery)
Page 72

72
Polaroid DVC-00725F Digital Camera User Guide
www.polaroid.com
• Default Settings
The following table indicates the camera’s default settings as well as the
functionality of the feature. Either it is always on or only functions one
time.
NOTE:
The “One Time” setting is valid once (either Video or Photo capture)
or until the power goes off.
Setting Functionality Default Factory Setting
Resolution Always HD for Video Standard for Photos
Stabilization Always Off
Flash Always Off
Date Printing Always Off
Night Mode Always Off
Sound Always On
TV System Always NTSC
Language Always English
Volume Always Level 8
Macro One Time
Exposure One Time 0EV
Sharpness One Time Level 5
White Balance One Time Auto
Two in One One Time Off
Photo Frame One Time Off
Self timer One Time Off
Page 73

73
Polaroid DVC-00725F Digital Camera User Guide
www.polaroid.com
Multi-snap One Time Off
Backlight Mode One Time Off
Motion Detect One Time Off
Effect One Time Normal
Format Memory /
Format Card
Information One Time On
Intelligent Lighting One Time Off
NOTE:
The default language for the LCD screen may vary with the different shipment
destinations.
One Time Off
• System requirements
• Microsoft Windows 2000/XP/Vista
• Intel Pentium III 800MHz or above
• 256 MB RAM
• CD-ROM Drive
• 700 MB free HDD space
• Available USB port
• 16-bit Color Display
NOTE:
The LCD screen is manufactured using extremely high-precision
technology. However, some tiny black and/or bright dots (white, red,
blue or green) may appear on the LCD screen. These dots are a normal
result of the manufacturing process, and do not affect the recording.
Page 74

74
Polaroid DVC-00725F Digital Camera User Guide
www.polaroid.com
13 Troubleshooting
• Troubleshooting
1.If the LCD image is not clear when shooting, how can the focus be
adjusted?
Make sure the subject is within the focus range; Normal mode is at least
30 cm (11.8 inches) away from the lens.
In the Macro mode, the subject needs to be between 1 to 30 cm (0.39 to
11.8 inches) away.
Make sure the camera is not in the Marco mode if your subject is within
the normal focus range. If it is on, you will see the Macro [ ] on the
lower right side of the LCD display. If your subject is at least 30cm (11.8
inches) away and the camera is set to Macro, the subject will look out of
focus on the LCD display.
2.The flash is not working.
The camera is in Macro Mode.
The battery power is low.
3.When recording, the digital zoom does not function.
If the “Stabilization” function is activated when recording videos, the
“Tele/Wide” button for digital zooming will be disabled.
4.The files on the memory card do not display smoothly when the LCD
shows the “!” or “funnel” marking.
The “!” means the file format is not supported and the “funnel” marking
indicates the file is not read smoothly. Delete these files and the others
can then be played normally. It is recommended that you first format the
memory card before using it and avoid placing files with different formats
in the same folder.
Page 75

75
Polaroid DVC-00725F Digital Camera User Guide
www.polaroid.com
5.Why is camera Flash not active when taking pictures?
Make sure that the focus range is NOT set in the Macro mode; the flash
is disable in this mode. Scroll through Photo modes and set Flash to Auto.
In Auto mode camera flash fires ONLY when necessary (in dark setting
as example).
6.Why do some of my indoor pictures look blurry and dark?
In these photo capture conditions, the camera’s shutter time is much
longer, therefore you may need to turn on the flash and/or use a tripod.
You will hear the shutter sound when the photo is taken.
7.How do I charge battery?
Your computer will not charge battery when connected. ONLY the supplied AC charger can be used. Your camera must be turned OFF; the blinking led indicates charging, when the light is green charging is complete.
Need help with your digital camera?
Call our toll-free customer service number. Look for the insert with this icon:
Or visit www.polaroid.com.
Page 76

76
Polaroid DVC-00725F Digital Camera User Guide
www.polaroid.com
• Tips, Your Safety & Maintenance
Your Camera should only be operated within the following environment.
• 32 - 95º Fahrenheit; 5 - 35º Celsius
• 20% - 80% relative humidity, non condensing
The battery life and image quality may be impaired when the camera is
operated beyond these conditions.
Camera Cautions
• NEVER immerse any part of the camera or its accessories into any fluid
or liquid.
• ALWAYS disconnect the camera from your PC or TV before cleaning
it.
• ALWAYS remove dust or stains on the camera with a soft cloth
dampened with water or neutral detergent.
• NEVER place hot items on the surface of the camera.
• NEVER attempt to open or disassemble the camera because such
doing will violate any warranty claim.
• Regulatory Information
FCC Notice
This device complies with Part 15 of FCC Rules. Operation is subject
to the following two conditions: (1) This device may not cause harmful
interference, and (2) This device must accept any interference received,
including interference that may cause undesired operation.
Warning: Changes or modifications to this unit not expressly approved
by the party responsible for compliance could void the user’s authority to
operate the equipment.
Page 77

77
Polaroid DVC-00725F Digital Camera User Guide
www.polaroid.com
NOTE: This equipment has been tested and found to comply with the
limits for Class B digital device, pursuant to Part 15 of the FCC Rules.
These limits are designed to provide reasonable protection against harmful
interference in a residential installation. This equipment generates, uses
and can radiate radio frequency energy and, if not installed and used in
accordance with the instructions, may cause harmful interference to radio
communications.
However, there is no guarantee that interference will not occur in a
particular installation. If this equipment does cause harmful interference
to radio or television reception, which can be determined by turning
the equipment off and on, the user is encouraged to try to correct the
interference by one or more of the following measures:
• Reorient or relocate the receiving antenna.
• Increase the separation between the equipment and receiver.
• Connect the equipment into an outlet on a circuit different from that
to which the receiver is needed.
• Consult the dealer or an experienced radio/TV technician for help.
Shielded cable must be used with this unit to ensure compliance with the
Class B FCC limits.
Under the environment with electrostatic discharge, the product may
malfunction and require user to reset the product.
Page 78

This manu al should help you understa nd your new p roduct. If you have questio ns, call our customer serv ice help numbe r.
Questions? Need some help?
Look for the insert wit h this icon:
or visit www.polaroid.c om.
Part No.: OMDVC-00725FUS001
US 1008
 Loading...