

Page 1

DVD Recorder with 160GB Hard Disc Drive
DRA-01601A
User’s Manual
20070406
Questions? Need some help?
This manual should help you understand your new product.
If you still have questions, call our toll-free customer service number at 1-866-286-5168.
Page 2

Safety Instructions
To ensure proper use of this product, please read this user’s manual carefully and save for future
reference. This manual provides information regarding the use and maintenance of your DVD
recorder.
About the symbol
If the “” symbol appears on your TV display during operation, the function you are trying to use is
not available.
Danger symbol: The lightening fl ash with arrowhead symbol within an equilateral triangle is
intended to alert the user to the presence of dangerous voltage in the unit.
Warning symbol: The exclamation point within an equilateral triangle is intended to alert the
user to the presence of important operation and maintenance (servicing) instructions.
WARNING:
To prevent fi re or electric shock, do not expose the unit to rain or moisture. Never attempt to open
the cabinet; dangerous high voltages are presented in the unit. Refer servicing to qualifi ed service
personnel when necessary.
MAINTENANCE NOTICE:
Do not put the unit: near strong magnetic fi elds, somewhere exposed direct sunlight or near heat
•
radiation equipment (such as a heater), on top of other heat radiation objects, in a place with
bad ventilation and dirt, somewhere subject to vibration and instability, or somewhere exposed to
moisture or rain. The unit should be installed in a smooth and dry place with good ventilation.
When the unit is moved from a cold place to a warm one, the laser head may get dewed and
•
the unit may not work normally. In this case, keep the power on for an hour or two (with no disc
loaded) before playing normally.
Clean the surface of the unit with neutral detergent. Do not use organic solvents such as alcohol
•
or gasoline. Never polish the unit with sand paper.
If the unit is not to be used for a long time, disconnect the power plug from the wall outlet.
•
For optimum performance, do not place heavy objects on the unit.
•
AUTION:
C
The unit employs a laser system. To prevent direct exposure to the laser radiation, do not attempt
•
to open the cabinet. Visible laser may radiate when the cabinet is opened or the interlocks are
defeated.
Do not stare at laser beams.
•
To ensure the proper use of the unit, read this manual carefully.
•
Keep this manual for future reference. If the unit requires servicing, please contact the seller or
•
service center.
M
OISTURE CONDENSATION:
Never operate this unit immediately after removing it from a cold location to a worm location. Do
not operate for at least three hours. If you use the unit in such a situation, it may damage the DVD
recorder.
2
Page 3

Table of Contents
Safety Information 2
Identifi cation of Controls 4
Remote Control 6
System Connections 8
System Setup 14
Source List 22
Recording 22
Copying from HDD to DVD 24
Playback 24
Editing 25
File Manager 28
USB and SD 29
YesDVD® 30
Troubleshooting 33
Technical Specifi cations 34
Glossary of Terms 35
Page 4

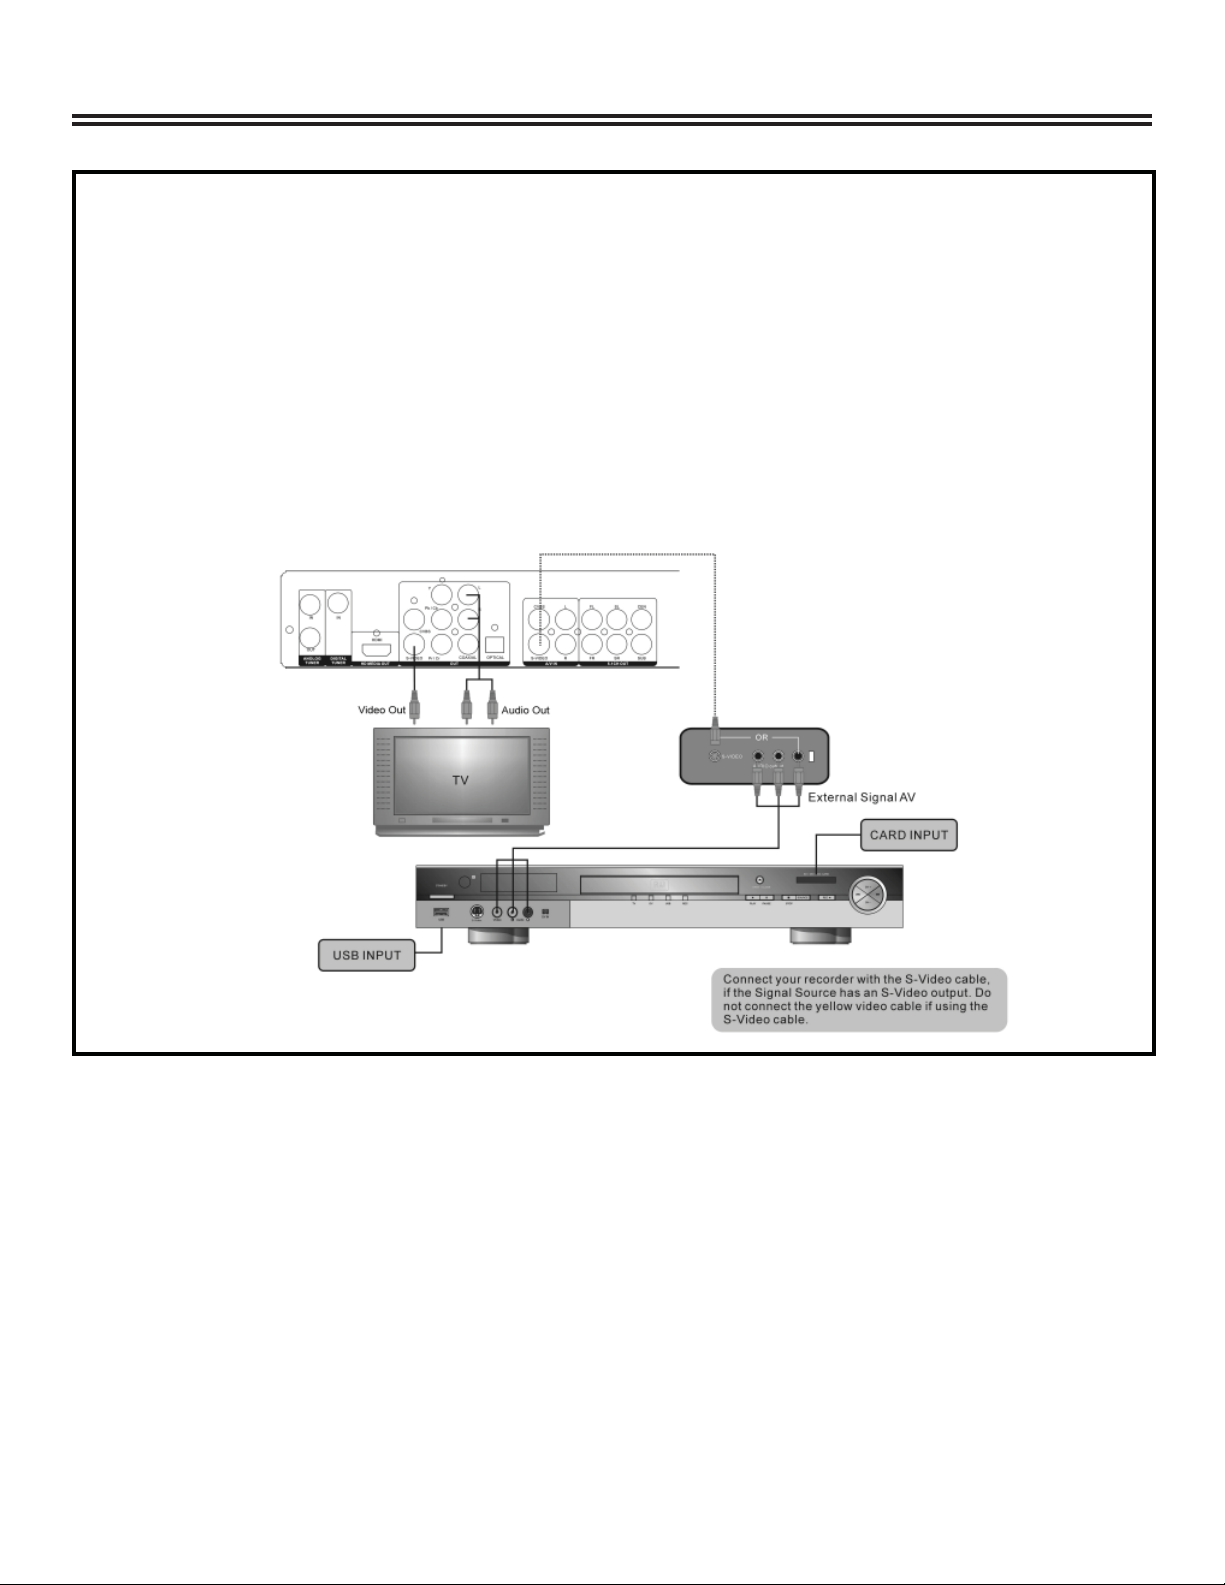
Identifi cation of Controls
F
RONT PANEL
USB port
1.
S-video input
2.
AV input
3.
DV input
4.
TV LED
5.
DV LED: lights when digital video camcorder is inserted
6.
USB LED: lights when USB stick is inserted
7.
REC LED: lights when recording
8.
PLAY button
9.
PAUSE button
10.
STOP button
11.
SOURCE button: press to select the video input source
12.
REC button: press to record
13.
PREVIOUS button
14.
CH- button: press to decrease channels
15.
NEXT button: press to move to the next DVD chapter
16.
STANDBY button
17.
Remote control sensor
18.
DISPLAY button: press to access the time shift screen
19.
Disc tray
20.
OPEN/CLOSE button: press to open or close the disc tray
21.
SD card slot
22.
CH+ button: press to increase channels
23.
4
Page 5

Identifi cation of Controls
R
EAR PANEL
Analog Tuner - RF Signal Output: Connect to your TV’s RF input
1.
HD Media Output: Provides a high-quality interface for digital audio and video using one cable
2.
S-video Output: Connect to your TV’s S-video input
3.
Component Video Output: Connect to your TV’s component input
4.
Digital Audio Coaxial Output: Using a coaxial digital audio type cable, connect to your home
5.
theatre system’s coaxial input
Digital Audio Optical Output: Using a coaxial optical type cable, connect to your home theatre
6.
system’s coaxial input
S-video Input: Connect your S-video cable from your other A/V equipment to the S-video input
7.
Analog Audio Input (Right/Left Channels): Connect from your other A/V equipment to the
8.
analog audio input
5.1 CH Audio Output (Home Theatre System): These outputs connect to your home theatre
9.
system’s amplifi er speaker inputs
Fan
10.
AC Power 110-240V 50/60Hz
11.
Analog Tuner - RF Signal Input: Connect to an external antenna or cable line without using a
12.
cable box
Digital Tuner Input: Connect to an external (digital TV) antenna
13.
Composite Video Output: Connect to your TV’s composite video input
14.
Analog Audio Output (Right/Left Channel): Connect to your TV’s analog audio input
15.
Composite Video Input: Connect from your other A/V equipment to composite video input
16.
5
Page 6

Remote Control
POWER button: turns unit on and off
1.
REC button: press to record
2.
CH+ button: press to increase channels
3.
PAUSE button: press to pause playback
4.
CH- button: press to decrease channels
5.
UP arrow
6.
LEFT arrow, 10 second replay
7.
ENTER button: press to select
8.
SETUP button: press to enter setup menu
9.
button: press to go fast backward
10.
button: press to go fast forward
11.
MUTE button: press to cancel sound
12.
TITLE button: press to access DVD title menu
13.
ADD/CLEAR button: press to highlight video segments
14.
when copying
I/P button: press to change video display (interlaced or
15.
progressive video)
AUDIO button: press to view current OSD language
16.
SUBTITLE button: press to display DVD playback language
17.
on the screen
TIMER button: press to set a timer recording
18.
EDIT button: press to enter the edit mode
19.
DVD button: press to select DVD record or playback
20.
HDD button: press to select HDD record or playback
21.
OPEN/CLOSE button: press to open or close the disc tray
22.
Number pads
23.
VOL+ button: press to increase volume
24.
STOP button
25.
VOL- button: press to decrease volume
26.
PLAY button
27.
RIGHT arrow, 30 second skip
28.
DOWN arrow
29.
SOURCE button: press to select the video input source
30.
NEXT button: press to move to the next DVD chapter
31.
PREVIOUS button: press to move to the previous DVD chapter
32.
RETURN button: press to exit an OSD screen, also brings you back to the previous channel you were
33.
viewing in the television function
MENU button: press to access the menu screen
34.
DISPLAY button: press to access the time shift screen
35.
ZOOM button: press to increase the on-screen image
36.
TIME SHIFT button: press to access the time shift function
37.
ANGLE button: in DVD playback, if the disc has the function, press to change angle views
38.
A-TV button: press to select analog television
39.
DISC OPER button: press to access recorded program for editing (DVD only)
40.
D-TV button: press to select digital television
41.
FILE button: press to access the fi le manager
42.
6
Page 7

Remote Control
To install batteries and use remote control:
Notes:
Do not drop the remote control or leave it in places with high humidity.
•
Do not leave the IR remote sensor exposed to direct sunlight or bright light.
•
Do not mix old and new batteries should they need replacing.
•
Do not use rechargeable batteries.
•
Remote range = 16 feet.
•
7
Page 8
System Connections
Before making any connections, ensure all units are off and unplugged from the power source.
•
You may need to review your TV’s user’s manual to refresh yourself with your TV’s inputs and
•
output.
Refer to the Rear Panel diagram for numbered explanations of the back panel
•
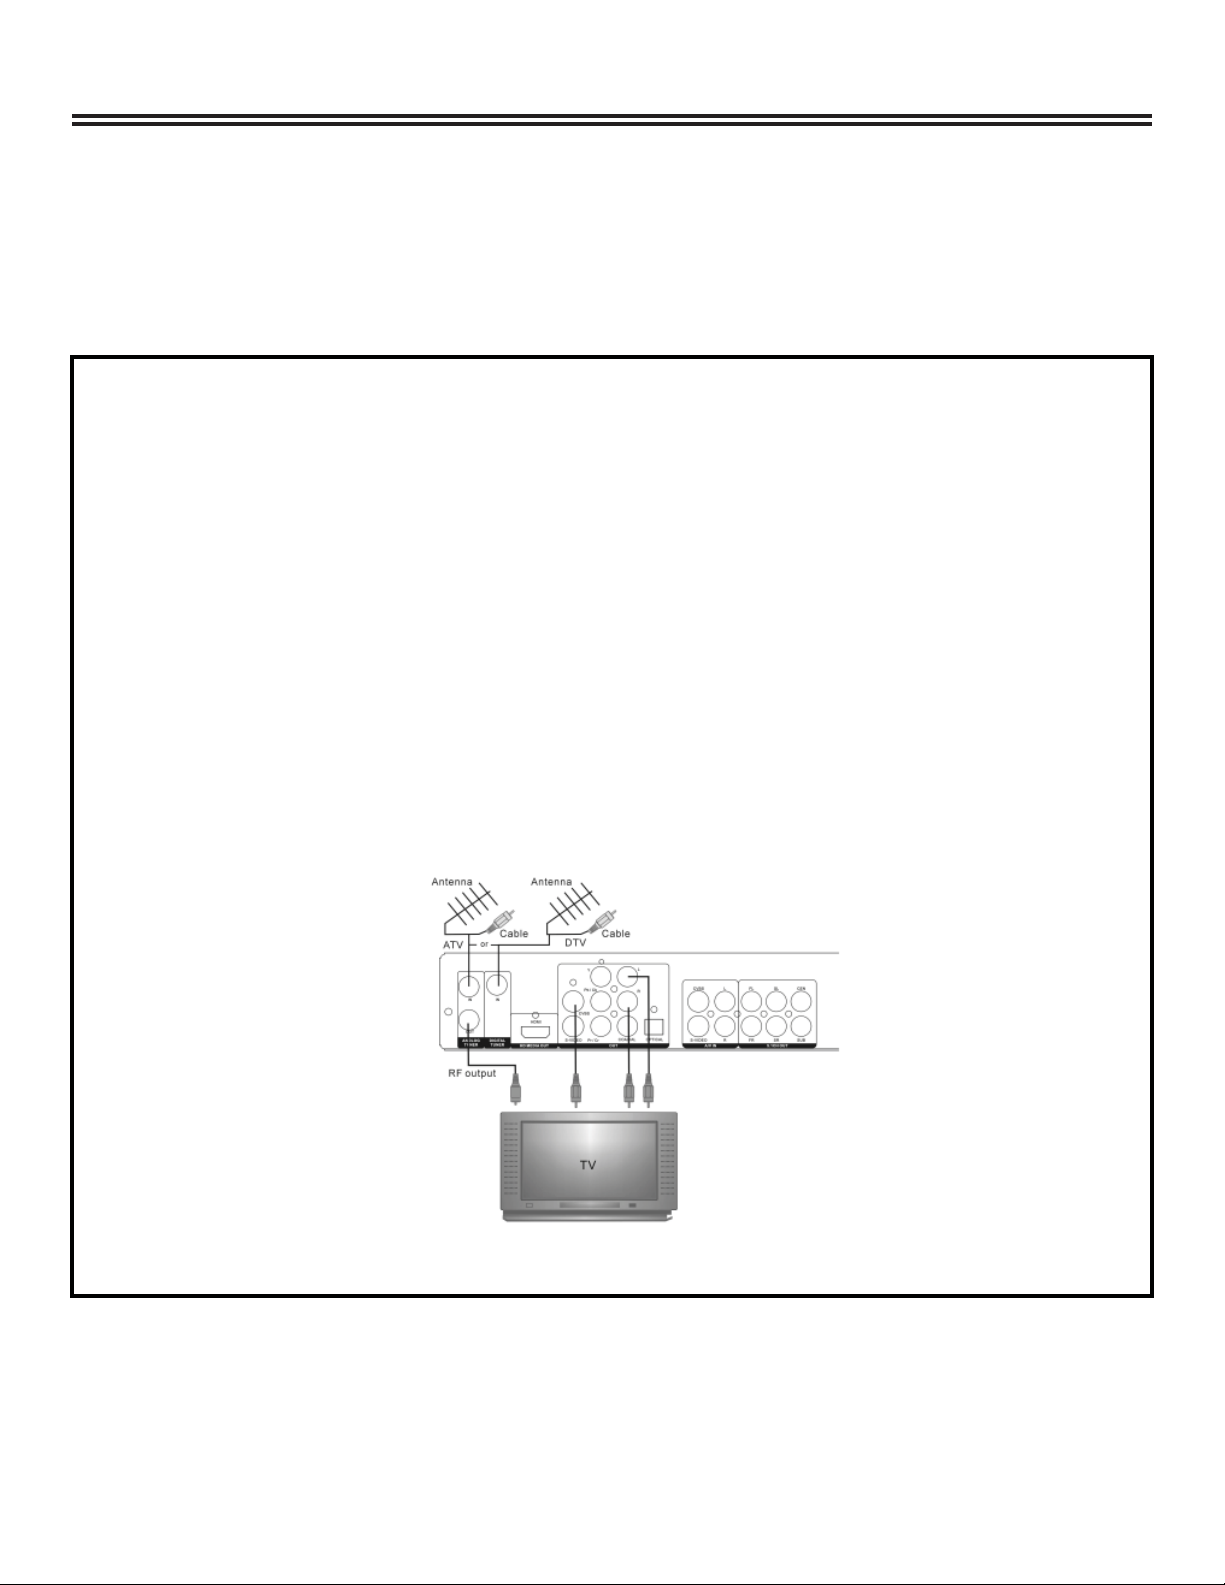
CONNECTING A DIGITAL SIGNAL FROM AN ANTENNA:
Using the RF connection from your antenna, connect the cable to the digital tuner input on the
•
back panel of your DVD Recorder (#13).
CONNECTING AN ANALOG SIGNAL FROM CABLE (WITHOUT USING A CABLE BOX):
If you want to scan basic cable TV channels, you must bypass the cable box. See “ATV Auto
•
Scan Channel” in the “Setup” section of this user’s manual for instructions on how to scan
channels.
Using the RF connection from your wall outlet, connect the cable to the analog tuner input (#12)
•
on the back panel of your DVD Recorder.
CONNECTING AN ANALOG SIGNAL FROM DVD RECORDER TO TV:
Using the RF input connection from your TV, connect the cable to the RF Signal Output (#1) on
•
the back panel of your DVD Recorder.
8
Page 9
System Connections
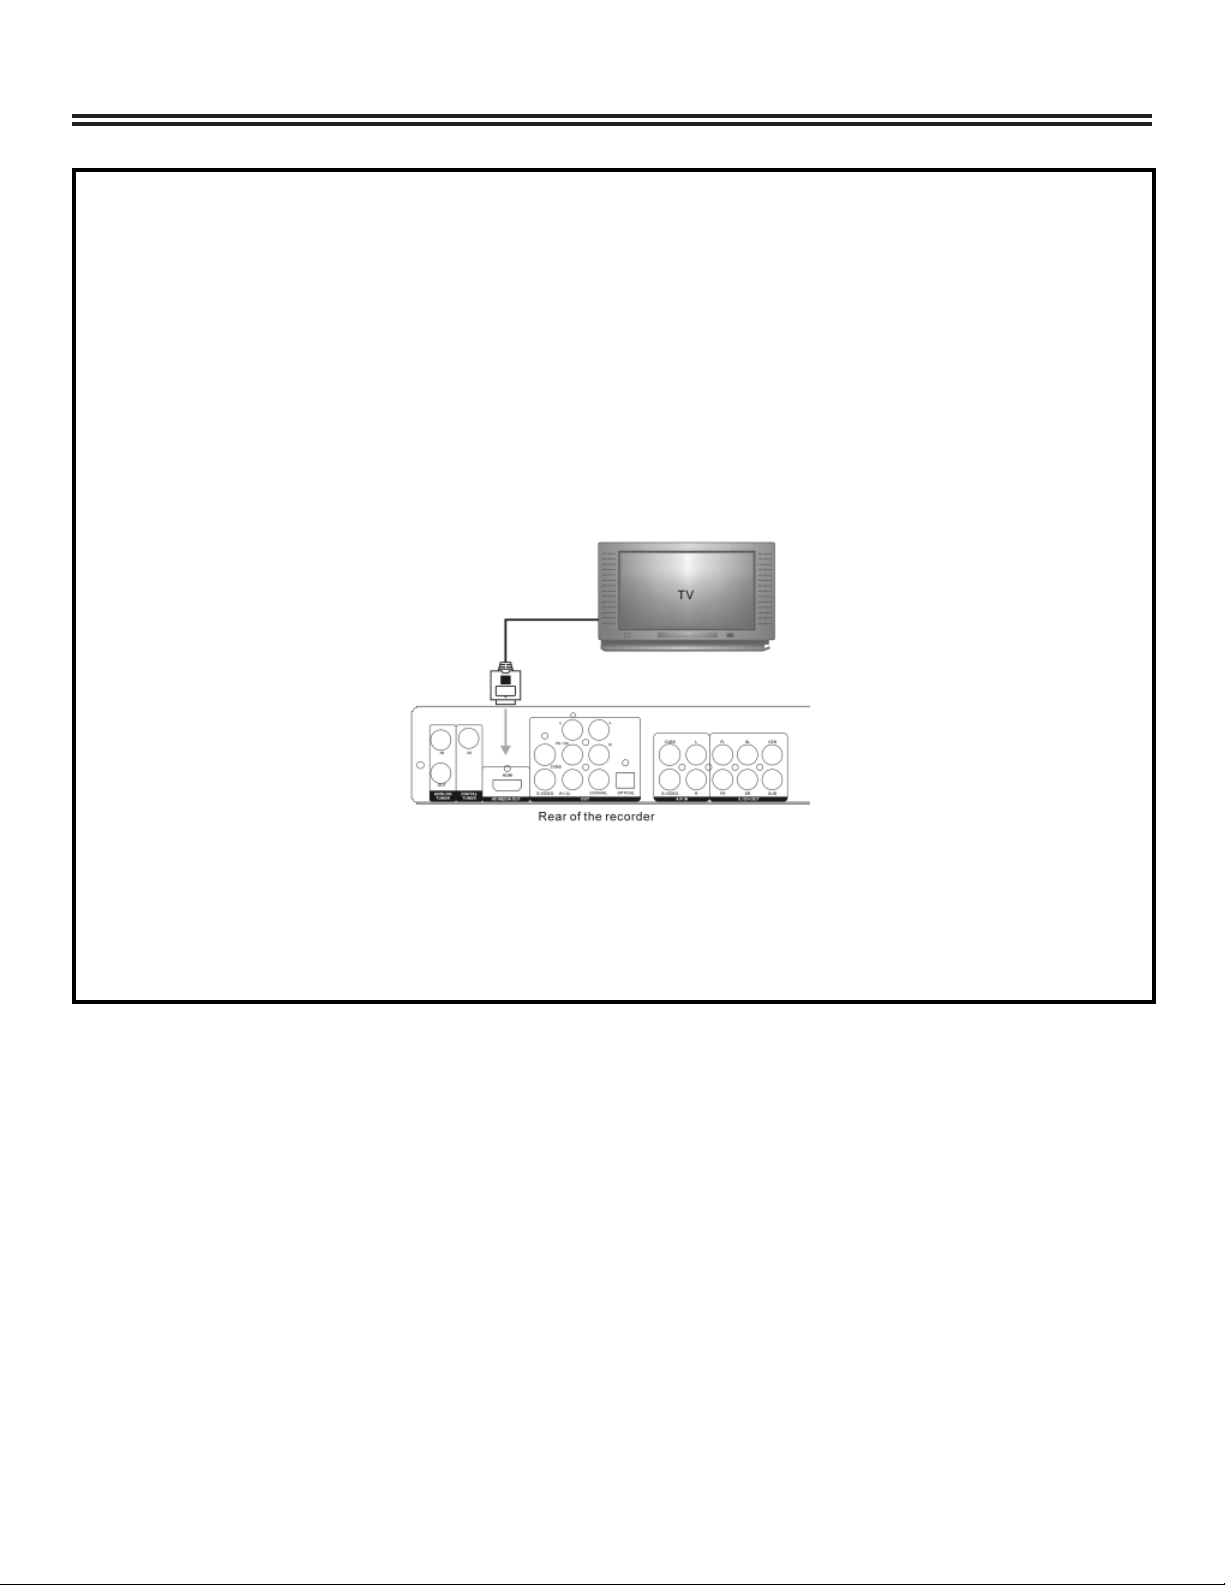
CONNECTING TO AN HDMI SIGNAL:
HDMI has the capability to support standard, enhanced, or high-defi nition video, plus standard
to multi-channel surround sound audio. HDMI features include uncompressed digital video, one
connection (instead of several), and communication between the AV source and AV device such as
digital television.
Using an HDMI cable (not included), connect the HDMI cable from the TV to the HD Media
•
Output (#2) on the rear panel of your DVD Recorder.
When using the HDMI connection, you may need to change the resolution (480p, 480i) in your
•
DVD Recorder’s setup menu.
HDMI, the HDMI logo, and High-Defi nition Multimedia Interface are trademarks or registered
trademarks of HDMI licensing LLC.
9
Page 10
System Connections
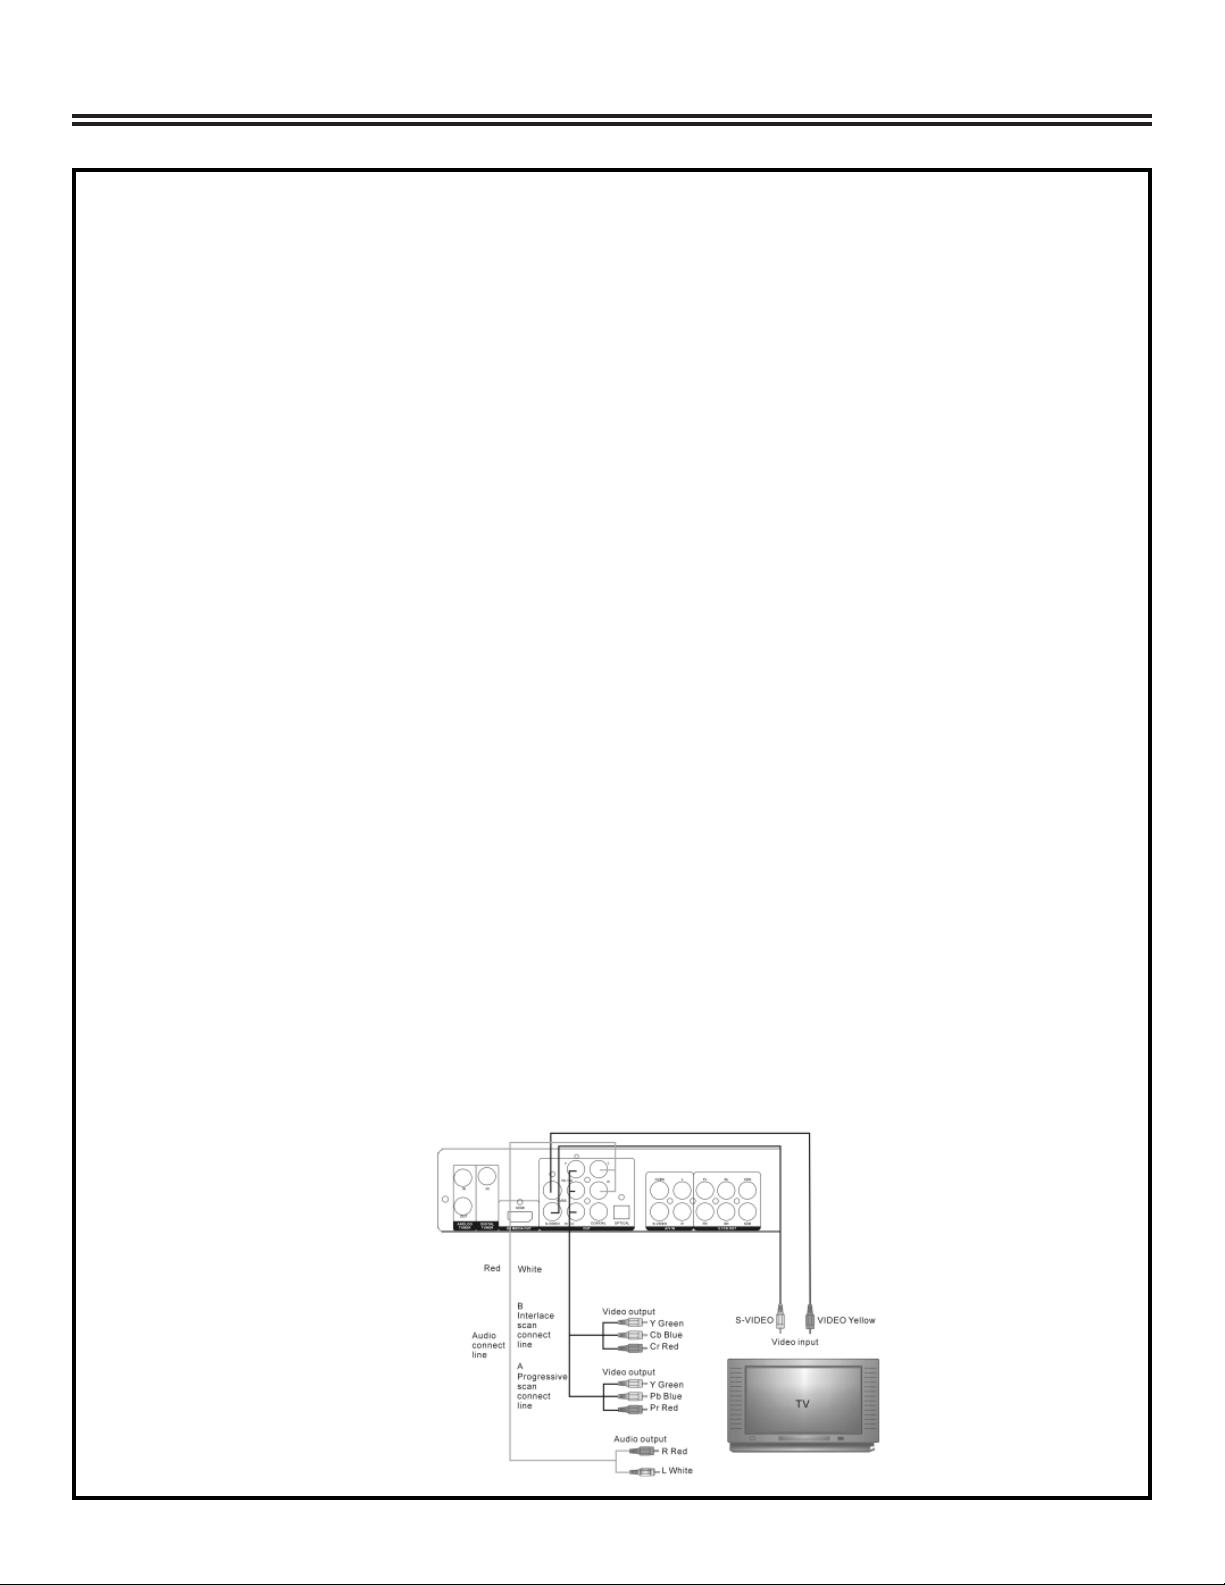
CONNECTING VIDEO OUTPUT TO YOUR TV:
There are three different types of video output you can choose to connect to your TV: S-video,
component (Y Pb Pr), and composite (CVBS). (See S-video section on the next page for S-video
connection steps.)
COMPOSITE VIDEO:
Insert the yellow video cable (included) into the yellow composite video output labeled CVBS
•
(#14) on the rear panel of your DVD Recorder.
Connect the other end of the yellow video cable to the corresponding input on your TV.
•
COMPONENT VIDEO:
Insert the red, green, and blue cables (not included) into the red, green, and blue component
•
video labeled Y Pb Pr (#4) on the rear panel of your DVD Recorder.
Connect the other ends to the corresponding inputs on your TV.
•
CONNECTING ANALOG AUDIO OUTPUT TO YOUR TV:
Insert the red and white audio cables into the red and white analog audio output (#15) on the
•
rear panel of your DVD Recorder.
Connect the other ends of the red and white audio cables to the corresponding inputs on your
•
TV.
CONNECTING ANALOG AUDIO INPUT TO YOUR DVD RECORDER:
Using the red and white audio cables coming from your AV equipment (ie. set-top box, cable
•
box, satellite box, VCR, etc), connect the other ends of the cables to the analog audio input (#8)
on the rear panel of your DVD Recorder.
CONNECTING VIDEO INPUT TO YOUR DVD RECORDER:
Using the yellow video cable coming from your AV equipment (ie. set-top box, cable box,
•
satellite box, VCR, etc), connect the other end of the yellow video cable to the composite
(CVBS) video input (#16) on the rear panel of your DVD Recorder.
10
Page 11
System Connections
S-VIDEO:
S-
VIDEO OUTPUT:
Insert the S-video cable (not included) into the S-video output (#3) on the rear panel of your
•
DVD Recorder.
Connect the other end of the S-video cable to the corresponding input on your TV.
•
S-VIDEO INPUT:
Using the S-video cable coming from your AV equipment (ie. set-top box, cable box, satellite
•
box, VCR, etc), connect the other end of the S-video cable to the S-video input (#7) on the rear
panel of your DVD Recorder.
Note: do not connect the yellow composite video cable if you are using the S-video input.
•
11
Page 12
System Connections
CONNECTING AUDIO OUTPUT TO YOUR TV:
COAXIAL (DIGITAL):
Insert the coaxial cable into the digital audio coaxial output (#5) on the rear panel of your DVD
•
Recorder.
Connect the other end of the coaxial cable to the corresponding inputs on either your TV or
•
home theatre system.
OPTICAL (DIGITAL):
Insert the optical cable into the digital audio optical output (#6) on the read panel of your DVD
•
Recorder.
Connect the other end of the optical cable to the corresponding inputs on either your TV or
•
home theatre system.
Care should be taken when handing the optical cable.
•
CONNECTING AUDIO FROM THE DVD RECORDER TO YOUR HOME THEATRE SYSTEM:
There are three different ways to connect your DVD Recorder audio to your home theatre system:
coaxial digital audio, optical digital audio, and 5.1 CH audio. (See 5.1 CH Audio section on next
page for 5.1 CH Audio connection steps)
COAXIAL (DIGITAL):
Insert the coaxial cable into the digital audio coaxial output (#5) on the read panel of your DVD
•
Recorder.
Connect the other end of the coaxial cable to the corresponding inputs on either your home
•
theatre system.
OPTICAL (DIGITAL):
Insert the optical cable into the digital audio optical output (#6) on the read panel of your DVD
•
Recorder.
Connect the other end of the optical cable to the corresponding inputs on either your home
•
theatre system.
Care should be taken when handing the optical cable.
•
12
Page 13

System Connections
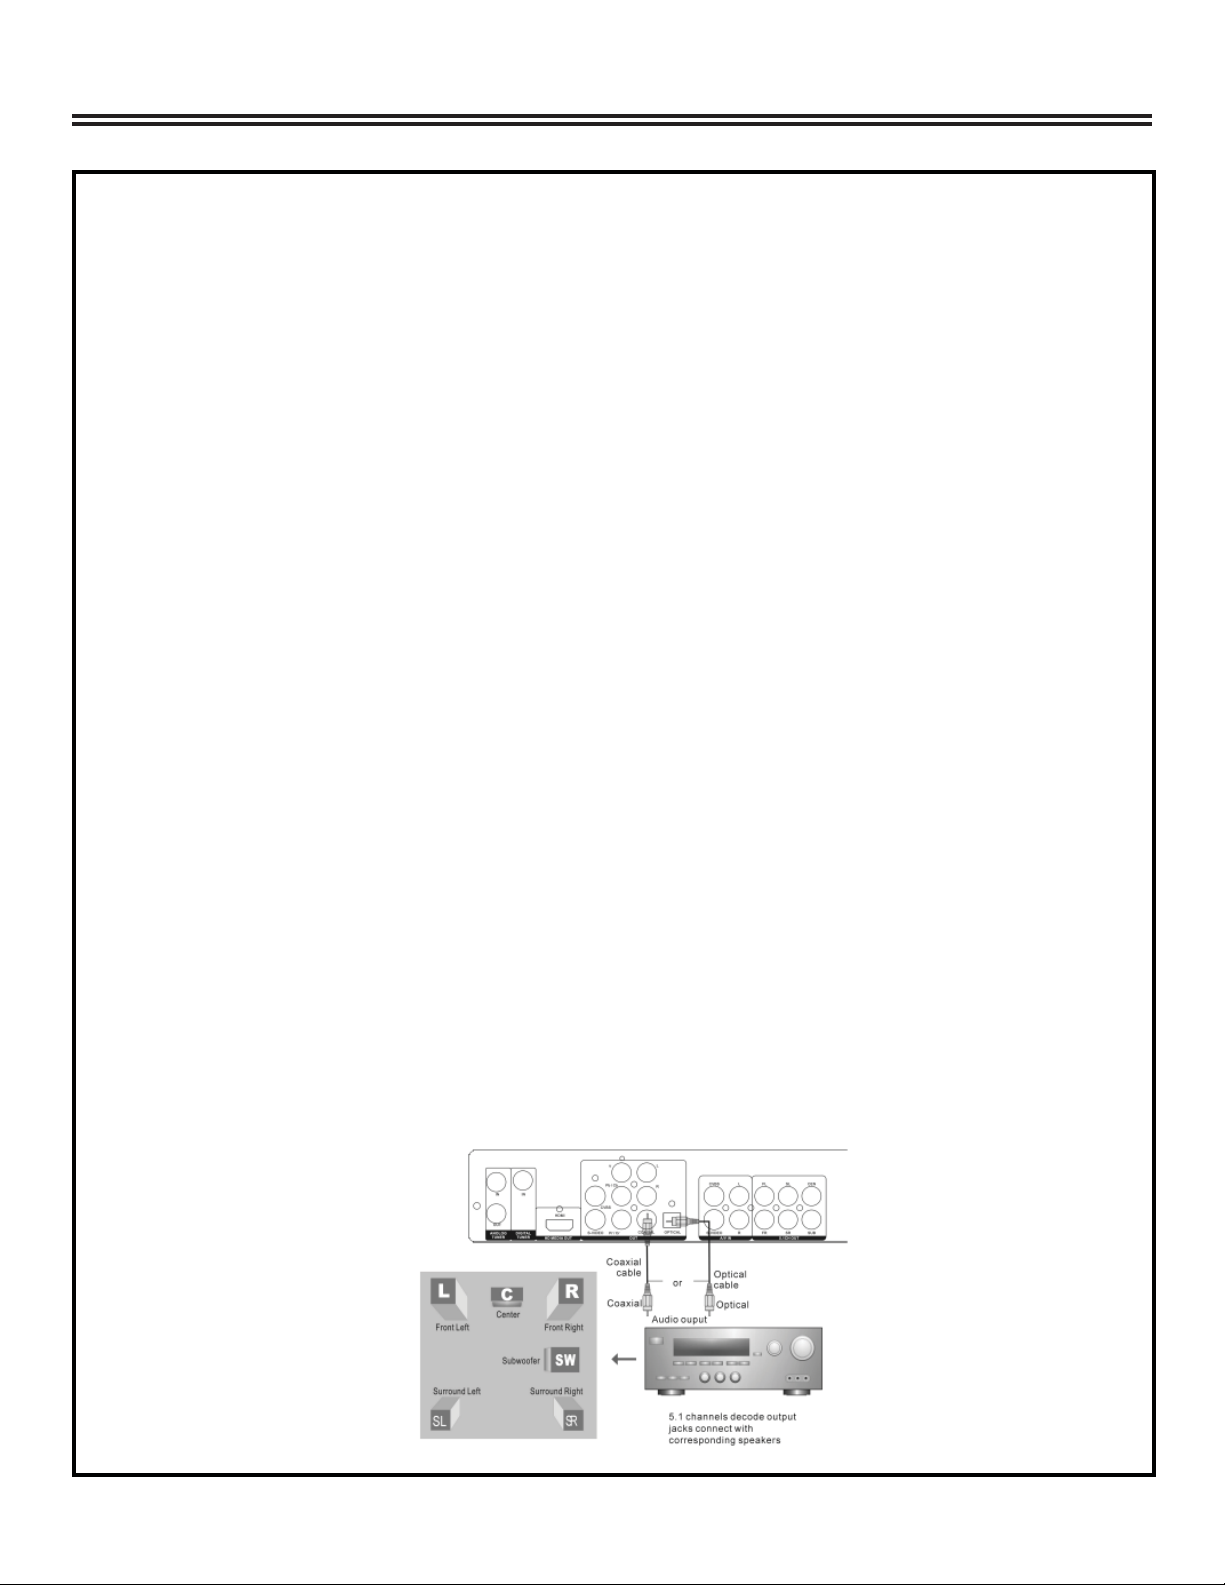
5.1 CH AUDIO
There are six outputs from the DVD Recorder that connect to your home theatre system: FL (front
left), FR (front right), SL (surround left), SR (surround right), Center, and Subwoofer.
Connect the RCA outputs from the DVD Recorder to the corresponding inputs on your home
•
theatre system.
Note: the subwoofer connection needs to be made with a coaxial cable (not included).
•
13
Page 14

System Setup
GENERAL SETTINGS:
A TV AUTO SCAN CHANNEL (ANALOG TV):
Press SETUP.
1.
Press right arrow key to highlight ATV Auto Scan Channel.
2.
Press ENTER to select. A dialog box will appear.
3.
Press OK to accept, cancel to go back.
4.
If you press OK, another dialog box will appear.
5.
Press the up arrow key and then ENTER.
6.
Select either Air or Cable, depending on your tuner input
7.
source. Press ENTER to make your selection.
Once selected, press the down arrow key to highlight “continue”
8.
and ENTER to accept. This will start the channel scanning
process.
To cancel, press ENTER to stop.
9.
To exit setup, press SETUP.
10.
DTV A
1.
2.
3.
4.
5.
6.
7.
8.
9.
10.
TV D
1.
2.
3.
4.
5.
UTO SCAN CHANNEL (DIGITAL TV):
Press SETUP.
Press right arrow key and then down arrow to highlight DTV
Auto Scan Channel.
Press ENTER to select. A dialog box will appear.
Press OK to accept, cancel to go back.
If you press OK, another dialog box will appear.
Press the up arrow key and then ENTER.
Select either Antenna or Cable, depending on your tuner input
source. Press ENTER to make your selection.
Once selected, press the down arrow key to highlight “continue”
and ENTER to accept. This will start the channel scanning
process.
To cancel, press ENTER to stop.
To exit setup, press SETUP.
ISPLAY:
Press SETUP.
Press right arrow key and then down arrow to highlight TV
Display.
Press ENTER to select. This selects the aspect ratio for the
DVD recorder for playback. Note: you may need to modify
the aspect ratio on your TV. Please consult your TV’s user’s
manual.
Use the down arrow to select the desired aspect ratio and
ENTER to select.
4:3 LB = black side bars
a.
4:3 PS = black top, bottom, and sides
b.
16:9 WS = black top and bottom bars
c.
To exit setup, press SETUP.
14
Page 15

System Setup
GENERAL SETTINGS, CONTINUED
RESET TO FACTORY DEFAULTS:
Press SETUP.
1.
Press right arrow key and then down arrow to highlight Reset to
2.
Factory Defaults. This will clear all changes you have made to
the DVD recorder settings.
Press ENTER. A dialog box will appear.
3.
Press “ok” to reset factory defaults, “cancel” to go back.
4.
To exit setup, press SETUP.
5.
AUDIO/VIDEO:
TV TYPE:
Press SETUP.
1.
Press down arrow to select the Video/Audio menu.
2.
Press right arrow to highlight TV Type.
3.
Press ENTER. This will change the DVD recorder picture
4.
resolution.
Use the down arrow to select the desired picture resolution and
5.
ENTER to select.
480P = better resolution
a.
480I = good resolution
b.
To exit setup, press SETUP.
6.
NALOG AUDIO OUTPUT:
A
Press SETUP.
1.
Press down arrow to select the Video/Audio menu.
2.
Press right arrow key and then down arrow to highlight Analog
3.
Audio Output.
Press ENTER. This will change the audio output to your TV.
4.
Use the down arrow to select the desired audio output and
5.
ENTER to select.
2 CH = good audio, standard red and white cables
a.
5.1 CH = better audio, specifi cally for home theatre
b.
To exit setup, press SETUP.
6.
SPDIF O
1.
2.
3.
4.
5.
6.
UTPUT (SONY PHILLIPS DIGITAL INTERFACE FORMAT):
Press SETUP.
Press down arrow to select the Video/Audio menu.
Press right arrow key and then down arrow to highlight SPDIF
Output.
Press ENTER.
Use the down arrow to select the desired SPDIF output and
ENTER to select.
RAW = for 2 CH analog audio
a.
LPCM = for 5.1 CH analog audio
b.
To exit setup, press SETUP.
15
Page 16

System Setup
AUDIO/VIDEO, CONTINUED
LPCM OUTPUT (LINEAR PULSE CODE MODULATION):
Press SETUP.
1.
Press down arrow to select the Video/Audio menu.
2.
Press right arrow key and then down arrow to highlight LPCM
3.
Output.
Press ENTER.
4.
Use the down arrow to select the desired LPCM output and
5.
ENTER to select.
48K = good sampling resolution
a.
96K = better sampling resolution
b.
To exit setup, press SETUP.
6.
LANGUAGE:
SYSTEM LANGUAGE:
Press SETUP.
1.
Press down arrow to select the Language menu.
2.
Press right arrow key to highlight System Language.
3.
Press ENTER.
4.
Use the down arrow to select the desired language and
5.
ENTER to select. The default is English.
To exit setup, press SETUP.
6.
UDIO LANGUAGE:
A
Press SETUP.
1.
Press down arrow to select the Language menu.
2.
Press right arrow key and then down arrow to highlight Audio
3.
Language.
Press ENTER.
4.
Use the down arrow to select the desired language and
5.
ENTER to select. The default is Original.
To exit setup, press SETUP.
6.
UBTITLE LANGUAGE:
S
Press SETUP.
1.
Press down arrow to select the Language menu.
2.
Press right arrow key and then down arrow to highlight Subtitle
3.
Language.
Press ENTER.
4.
Use the down arrow to select the desired language and
5.
ENTER to select. The default is Original.
To exit setup, press SETUP.
6.
D
ISC MENU LANGUAGE:
Press SETUP.
1.
Press down arrow to select the Language menu.
2.
Press right arrow key and then down arrow to highlight Disc
3.
Menu Language.
Press ENTER.
4.
Use the down arrow to select the desired language and
5.
ENTER to select. The default is Original.
To exit setup, press SETUP.
6.
16
Page 17

System Setup
ATV/DTV:
CLOSED CAPTION:
Press SETUP.
1.
Press down arrow to select the ATV/DTV menu.
2.
Press right arrow key to highlight ATV Closed Caption.
3.
Press ENTER.
4.
Use the down arrow to select “on” or “off” and ENTER to
5.
select. The default is “off”.
To exit setup, press SETUP.
6.
MODIFY CHANNEL
Press SETUP.
1.
Press down arrow to select the ATV/DTV menu.
2.
Press right arrow to highlight ATV Modify Channel.
3.
Press ENTER.
4.
Press down arrow to “Fine Tuning”. Use light and right arrows
5.
to adjust.
Press down arrow to select “skip”. Press ENTER. Select “yes”
6.
or “no”. Press ENTER.
To exit setup, press SETUP.
7.
DTV C
1.
2.
3.
4.
5.
LOSED CAPTION:
Press SETUP.
Press down arrow to select the ATV/DTV menu.
Press right arrow key and then down arrow to highlight DTV
Closed Caption.
Press ENTER. A dialog box will appear. This is the closed
captioning display menu.
CC Display: press the right or left arrow to turn the closed
a.
captioning on or off. The default is off.
608CC Type: press the right or left arrow to select the
b.
desired text display. The default is C1.
708CC Type: press the right or left arrow to select the
c.
desired font and text side. The default is Service 1.
CC Mode: use the right or left arrow to select “broadcast”
d.
or “customer”. The default is “broadcast”.
CC Customer: If you changed the CC Mode to “customer”
e.
you will see another dialog box with many text display
choices. Use the up and down arrows to select the desired
option to change, and the right and left arrows to make
such changes.
To exit setup, press SETUP.
17
Page 18

System Setup
ATV/DVT, CONTINUED
DTV CHANNEL SETUP:
Press SETUP.
1.
Press down arrow to select the ATV/DTV menu.
2.
Press right arrow key and then down arrow to highlight DTV
3.
Channel Setup.
Press ENTER. A dialog box will appear.
4.
Channel: press the right or left arrow to change the
a.
channel.
Skip: press the right of left arrow to turn the skip channel
b.
function on or off
Favorite list: press the right arrow key to enable. Use
c.
the right or left arrows to select and program your favorite
channels. You can store up to fi ve favorite channels.
To exit setup, press SETUP.
5.
DTV P
1.
2.
3.
4.
5.
V-chip Setting
6.
ARENTAL CONTROL:
Press SETUP.
Press down arrow to select the ATV/DTV menu.
Press right arrow key and then down arrow to highlight DTV
Parental Control.
Press ENTER. A dialog box will appear.
Enter the password 3-3-0-8 using the number pads and select
“ok”.
USA TV Content Ratings = use the right arrow to block or
a.
view certain TV ratings
Canada English Ratings = use the right arrow to block or
b.
view certain TV ratings
Canada French Ratings = use the right arrow to block or
c.
view certain TV ratings
To exit setup, press SETUP.
Block Enable:
Use the down arrow to hightlight and press the right and left
•
arrow to turn on or off.
RECORDING:
AUTO CHAPTER MARKER:
Press SETUP.
1.
Press down arrow to select the Recording menu.
2.
Press right arrow key to highlight Auto Chapter Marker.
3.
Press ENTER.
4.
Use the down arrow to select the desired length of time
5.
between auto chaptering and ENTER to select. The default is
“5 min”.
To exit setup, press SETUP.
6.
Note: If YesDVD is set to “on”, YesDVD will make chapter markers
at natural scene breaks.
18
Page 19

System Setup
RECORDING, CONTINUED
RECORD QUALITY:
Press SETUP.
1.
Press down arrow to select the Recording menu.
2.
Press right arrow key and then down arrow to highlight Record
3.
Quality.
Press ENTER.
4.
Use the down arrow to select the desired recording quality and
5.
press ENTER to select. The default is “SP”.
HQ = High quality
a.
SP = Standard play
b.
SP+ = Standard play plus
c.
LP = Long play
d.
EP = Extended play
e.
SLP = Super long play
f.
To exit setup, press SETUP.
6.
ESDVD:
Y
Press SETUP.
1.
Press down arrow to select the Recording menu.
2.
Press right arrow key and then down arrow to highlight
3.
YesDVD.
Press ENTER. A dialog box will appear.
4.
YesDVD: Use the down arrow to select “on” or “off” and
a.
ENTER to select. The default is “on”.
Music Video: Use the down arrow to select “on” or “off” and
b.
ENTER to select. The default is “on”.
About YesDVD: press ENTER for more information about
c.
the feature.
About YesDVD BoosterPack: press ENTER for more
d.
information about the feature.
To exit setup, press SETUP.
5.
HARD/OPTICAL DISK:
TIMESHIFT BUFFER LENGTH:
Press SETUP.
1.
Press down arrow to select the Hard/Optical Disk menu.
2.
Press right arrow key to highlight TimeShift Buffer Length.
3.
Press ENTER.
4.
Use the down arrow to select the desired length of time to
5.
record and ENTER to select. The default is “60 minutes”.
To exit setup, press SETUP.
6.
19
Page 20

System Setup
HARD/OPTICAL DISK, CONTINUED
HARD DISK INFO:
Press SETUP.
1.
Press down arrow to select the Hard/Optical Disk menu.
2.
Press right arrow key and then down arrow to highlight Hard
3.
Disk Info.
Press ENTER. An informational dialog box will appear.
4.
To exit, press ENTER.
5.
To exit setup, press SETUP.
6.
ORMAT HARD DISK:
F
Press SETUP.
1.
Press down arrow to select the Hard/Optical Disk menu.
2.
Press right arrow key and then down arrow to highlight Format
3.
Hard Disk.
Press ENTER. A dialog box will appear.
4.
Select “ok” and press ENTER to format the hard disk, “cancel”
5.
to go back.
To exit setup, press SETUP.
6.
E
RASE OPTICAL DISK:
Press SETUP.
1.
Press down arrow to select the Hard/Optical Disk menu.
2.
Press right arrow key and then down arrow to highlight Erase
3.
Optical Disk.
Press ENTER. A dialog box will appear.
4.
Select “ok” and press ENTER to format the optical disk,
5.
“cancel” to go back.
To exit setup, press SETUP.
6.
DATE/TIME:
Note: Should you lose power or unplug the unit for more than 15 minutes, you must reset the date and time.
D
AYLIGHT SAVING:
Press SETUP.
1.
Press down arrow to select the Date-Time Setting menu.
2.
Press right arrow key and then down arrow to highlight Daylight
3.
Saving.
Press ENTER.
4.
Use the down arrow to select “on” or “off” and ENTER to
5.
select. The default is “off”.
To exit setup, press SETUP.
6.
20
Page 21

System Setup
DATE/TIME, CONTINUED
TIME ZONE:
Press SETUP.
1.
Press down arrow to select the Date-Time Setting menu.
2.
Press right arrow key and then down arrow to highlight Time
3.
Zone.
Press ENTER.
4.
Use the down arrow to select the desired time zone and
5.
ENTER to select. The default is “Samo”.
To exit setup, press SETUP.
6.
ATE (MM/DD/YYYY):
D
Press SETUP.
1.
Press down arrow to select the Date-Time Setting menu.
2.
Press right arrow key and then down arrow to highlight Date
3.
(mm/dd/yyyy).
Press ENTER.
4.
Use the up and down arrows to select the desired month and
5.
the right arrow to select.
Use the up and down arrows to select the desired date and the
6.
right arrow to select.
Use the up and down arrows to select the desired year and
7.
press ENTER.
To exit setup, press SETUP.
8.
IME (HH:MM):
T
Press SETUP.
1.
Press down arrow to select the Date-Time Setting menu.
2.
Press right arrow key and then down arrow to highlight Time
3.
(hh:mm).
Press ENTER.
4.
Use the up and down arrows to select “AM” or “PM” and the
5.
right arrow to select.
Use the up and down arrows to select the desired hour and the
6.
right arrow to select.
Use the up and down arrows to select the desired minutes and
7.
press ENTER.
To exit setup, press SETUP.
8.
21
Page 22

Source List
There are two ways to select the source.
Repeatedly press SOURCE. This will toggle you through
1.
all the video inputs.
Press and hold SOURCE for two seconds and release. A
2.
dialog box will appear. Use the down arrow to select the
desired source and ENTER to select.
Note: If you want to access the USB or SD card, press FILE.
Recording
Before recording, endure the timeshift buffer is off by pressing TIMESHIFT on the remote. To confi rm
timeshift is off, press DISPLAY. The system state should indicate “stop”.
RECORDING TO THE HDD USING THE REC BUTTON:
Select the source for the recording.
1.
Press REC. A dialog box will appear.
2.
Using the right or left arrow, select HDD. This will immediately start recording your current source
3.
input. While recording, the unit will not let you change channels or sources.
To stop recording, press STOP.
4.
RECORD TO A DVD USING THE REC BUTTON:
Select the source for the recording.
1.
Press REC. A dialog box will appear.
2.
Using the right or left arrow, select DVD. This will immediately start recording your current source
3.
input. While recording, the unit will not let you change channels or sources.
To stop recording, press STOP. The unit will ask if you want to create a Yes DVD. If yes, see the
4.
YesDVD section in this manual.
22
Page 23

Recording
TIMER RECORDING:
Press timer button on the remote control.
1.
Press ENTER. A dialog box will appear.
2.
Source: press ENTER. Use right arrow then up and down arrows to select the input source or
a.
DTV scanned channel.
Record To: press ENTER. Use right arrow then up and down arrows to select to record to the
b.
HDD or DVD
Quality: press ENTER. Use right arrow then up and down arrows to select the recording quality
c.
Mode: press ENTER. Use right arrow then up and down arrows to select recording
d.
occurrence(s)
Date: press ENTER. Use right arrow and then up and down arrows to set the start date
e.
Start: press ENTER. Use right arrow and then up and down arrows to set the start time
f.
End: press ENTER. Use right arrow and then up and down arrows to set the stop time
g.
Title: use right arrow and then up and down arrows to change letters and name the recording
h.
(up to eight letters)
DVT Channel: press ENTER. Use right arrow then up and down arrows to set the recording
i.
channel
Select OK when complete. If you are watching another program when the timer recording is
3.
preparing to record, three minutes before the start recording time, a dialog box will appear.
This allows you to cancel the timed recording. If you do not cancel the recording, the unit will
automatically record the program and change to the timer record programmed channel. You
will not be able to change channels while the unit is recording. To see the progress of the timer
recording, press DISPLAY.
To stop a timer recording while the unit is recording, press STOP.
4.
To cancel a timer recording, highlight the programmed recording and press ADD/CLEAR.
5.
TIME SHIFT RECORDING:
Don’t miss a scene from a live broadcast. If you have to step away from watching a live broadcast,
follow these steps:
Press TIMESHIFT, then PAUSE. This will start recording the current channel and pause the live
1.
TV.
When you are ready to resume watching your program, press PLAY.
2.
To return to live TV (and bypass your recording), press TIMESHIFT.
3.
23
Page 24

Copying from HDD to DVD
COPYING FROM HDD TO DVD:
Press HDD. A dialog box will appear.
1.
Using the up and down arrows, select the segment you want to copy.
2.
Press ADD/CLEAR.
3.
Continue these steps to select any other material you want to copy.
4.
When all desired material is selected, press HDD. This will transfer your material from HDD to
5.
DVD. (You will see an icon on the screen showing the percentage of transfer.) Note: please be
patient as the material copies; this may take some time.
Playback
PLAYBACK FROM HDD:
Press HDD. A dialog box will appear.
1.
Using the up and down arrows, select the recorded segment you would like to watch and press
2.
ENTER. A preview screen will appear.
Press ENTER again to start watching.
3.
PLAYBACK FROM DVD:
Press DVD. Preview screens will appear.
1.
Using the up and down arrows, select the recorded segment you would like to watch and press
2.
ENTER.
OPEN/CLOSE Opens or closes the disc tray
PAUSE /
SKIP &
SCAN &
ZOOM During playback, press to enlarge the video image (1x - 2x - 4x - normal)
TITLE If the current DVD has a title menu, press to view. If not, pressing TITLE will
MENU Press to see the menu screen
SUBTITLE During playback, press SUBTITLE, then the right and left arrows to select the
AUDIO During DVD playback, press repeatedly to hear a different audio language
During playback, press PAUSE to pause playback; press repeatedly to go either
forward or backward frame-by-frame using the right and left arrows
During playback, press to go to the next chapter or title or to return to the
beginning of the current chapter or title.
During playback, press to select the scan forward or backward speed; when
playback is paused, press repeatedly to play in slow motion.
show the disc menu.
desired subtitle language.
or track; during HDD playback, press AUDIO, then the right and left arrows
repeatedly to hear a different audio channel.
24
Page 25

Editing
EDIT FROM DVD:
Press DVD. Preview screens will appear.
1.
Using the up and down arrows, select the recorded segment you would like to edit and press
2.
right arrow key. Use the up and down arrow key to select the edit you would to make:
Play title: this will playback you video clip
a.
Edit title: use the down arrow key and press ENTER. Another dialog box will appear while
b.
playing back your video clip. Your selections are:
Title
i.
Chapter
ii.
Play
iii.
Chapter Marker: press the right arrow and your selections are Insert Marker, Delete Marker
iv.
and Delete All Markers. Inserting a marker adds chapters to your title. This allows you to
skip/advance through your video clip.
Hide Chapter: as you create markers this function allows you to block chapters during
v.
playback. By pressing ENTER during playback of a Chapter you can Hide or Unhide
Chapters.
Index Picture: This function allows you to change the initial image for the video clip.
vi.
Pressing the ENTER button while viewing the video clip set the index picture.
Split Title: This function allows you to split the current chapter into two titles. Press ENTER
vii.
at the point you are watching your video clip.
T-Elapsed: this shows you how long the video clip is.
viii.
Rename Title: Using the down arrow button ENTER to select this option. It allows you to
e.
rename your chapter title. A dialog box will appear with a keyboard. You need to use the
arrow keys and the ENTER button to make changes.
Erase title: Use the down arrow and press ENTER. A dialog box will appear that will allow
f.
you to delete the current video clip. YES to confi rm deletion, NO to cancel.
Overwrite title: Use the arrow button and press ENTER. You will go to the last input source.
g.
Press the REC button. A dialog box will appear. Recoding to DVD will record over the
existing video clip space on the DVD.
Overwrite disk: Use the arrow button and press ENTER. You will go to the last input source.
h.
Press the REC button. A dialog box will appear. Recoding to DVD will record over the entire
DVD disk.
Append title: Use the arrow button and press ENTER. You will go to the last input source.
i.
Press the REC button. A dialog box will appear. Recording to DVD will add to the current
video clip.
Copy: Use the arrow button and press ENTER. This will copy the current video clip to the
j.
HDD.
25
Page 26

Editing
Before making any edits to your recorded programs, you must unprotect the recording. Please refer
to step 2-i below.
EDIT FROM HDD:
Press HDD. A dialog box will appear.
1.
Using the up and down arrows, select the recorded segment you would like to edit and press right
2.
arrow key. Use the up and down arrow key to select the edit you would to make:
Play
a.
Delete: press ENTER. A dialog box will appear. Select “yes” to confi rm, “no” to exit.
b.
Split: press ENTER. A dialog box will appear. The program will begin to play. When you
c.
are ready to split the program, press ENTER. Select “ok” to confi rm you want to split the
recording, “cancel” to exit. You can also use the DVD functions buttons (fast-forward, play,
pause, stop, etc.) to fi nd the point at which you would like to split.
Segment: press ENTER. The program will begin to play. When you are ready to remove a
d.
segment press ENTER. To stop deleting the segment, press ENTER again. You can also use
the DVD functions buttons (fast-forward, play, pause, stop, etc.) to segment. To restore the
deleted segment, press ADD/CLEAR while the segment is playing back.
Combine: press ENTER. Press ENTER again to confi rm, RETURN to cancel.
e.
Change index picture: press ENTER. The program will begin to play. When you fi nd a screen
f.
you want as the index picture, press ENTER. A dialog box will appear. Select “ok” to confi rm,
“cancel” to continue viewing.
Rename: press ENTER. A keyboard will appear. Use the arrows and ENTER to select the
g.
letters to rename your title. Select “ok” to accept, “exit” to cancel.
Lock: press ENTER. This locks the title and no edits can be made. To unlock, press right
h.
arrow and scroll down to “unlock”. Using the number pads, enter the password 3-3-0-8. Press
ENTER again. The title is now unlocked.
Unprotect: press ENTER.
i.
To copy from HDD to DVD, using the up and down arrows, select the recorded segment you would
•
like to edit. Press ADD/CLEAR to make the transfer and follow the on-screen directions. Copying
will take some time; please be patient. After the copying is complete, you will have the option to
create a YesDVD.
SORTING: To view the title list in different orders, press EDIT until the recorded programs are in
•
the desired order.
26
Page 27

Editing
ADDITIONAL EDITING FEATURES:
Press DVD. Preview screens will appear.
1.
Press the up arrow, then the right arrow. A dialog box will appear.
2.
Using the up and down arrows, select the edit you want to make and press ENTER:
3.
Play
a.
Rename disc: a keyboard will appear. Use the arrow buttons to rename the entire disc
b.
Erase optical disc: a dialog box will appear. Select “yes” to erase, “no” to cancel. (only for
c.
DVD+/-RW discs)
Record a new title: this brings you to the last input source used. Press REC button and using
d.
the right or left arrow, select the source to which you would like to record (HDD or DVD). Press
STOP to stop recording. You will be asked if you want create a YesDVD. To create a YesDVD,
select “yes, create YesDVD disc”, select “no” to continue recording other material.
Overwrite disc: this will prepare your disc to record over what you already have on the disc.
e.
Press REC button and using the left arrow, select DVD. Note: this will erase and record over
already-recorded material (only for DVD+/-RW discs)
YesDVD fi nalize: this will automatically fi nalize the disc
f.
Lock disc: this will automatically lock the disc so no further edits can be made. To unlock,
g.
press left arrow, then right arrow, and then the up and down arrows to select “unlock disc” and
press ENTER. (only for DVD+/-RW discs)
Copy all: this will automatically copy the DVD material to the HDD. Notes: this will only copy
h.
video segments you have recorded. This will NOT copy full-length DVD feature movies.
27
Page 28

File Manager
USB/SD:
Press FILE. The fi le manager will appear. Select the correct card label and press ENTER.
1.
Using the up and down arrows, select the fi le you would like to access.
2.
Press right arrow to do one of the following:
3.
Copy: using up and down arrows, select “Copy” and press ENTER. Highlight the directory you
1.
want to copy to and press the right arrow. Highlight “Do copy” to confi rm.
Delete (inactive)
2.
Rename (inactive)
3.
Move (inactive)
4.
Create dir: using the up and down arrows, select “Create dir” and press ENTER. Using the
5.
arrows, type a directory name and “OK” when done.
Select all: using the up and down arrows, select “Select all” and press ENTER. This will select
6.
all items.
Unselect all: using the up and down arrows, select “Unselect all” and press ENTER. This will
7.
uncheck all items.
Add to favorite
8.
Show favorite list
9.
HDD:
Press FILE. The fi le manager will appear. Select “HDD” and press ENTER.
1.
Using the up and down arrows, select the fi le you would like to access.
2.
Press right arrow to do one of the following:
3.
Copy: using up and down arrows, select “Copy” and press ENTER. Highlight the directory you
a.
want to copy to and press the right arrow. Highlight “Do copy” to confi rm.
Delete: using the up and down arrows, select “Delete” and press ENTER. A dialog box will
b.
appear. Select “yes” to delete, “no” to cancel.
Rename: using the up and down arrows, select “Rename” and press ENTER. A keyboard will
c.
appear. Using the arrows, type a name and “OK” when done.
Move: using the up and down arrows, select “Move” and press ENTER. Select the desired
d.
directory and press ENTER.
Create dir: using the up and down arrows, select “Create dir” and press ENTER. Using the
e.
arrows, type a directory name and “OK” when done.
Select all: using the up and down arrows, select “Select all” and press ENTER. This will select
f.
all items.
Unselect all: using the up and down arrows, select “Unselect all” and press ENTER. This will
g.
uncheck all items.
Add to favorite
1.
Show favorite list
2.
28
Page 29

USB and SD
VIEWING MATERIAL FROM YOUR USB/SD:
Insert USB/SD into the appropriate slot on the DVD recorder.
1.
Press FILE. A dialog box will appear.
2.
Using the up and down arrows, the device you want to access and press ENTER. You will see a
3.
list of materials from your card.
Using the up and down arrows, select the item you want to view and press ENTER to view. Press
4.
ENTER again to return to the File Manager.
COPY MATERIAL FROM YOUR USB/SD TO HDD:
Insert USB/SD into the appropriate slot on the DVD recorder.
1.
Press FILE. A dialog box will appear.
2.
Using the up and down arrows, highlight the material you want to copy.
3.
Press right arrow and a dialog box will appear.
4.
Highlight “copy” and press ENTER.
5.
Using the up and down arrows, select the directory you wish to move the material to.
6.
Press right arrow. Highlight “Do Copy” and press ENTER.
7.
29
Page 30

YesDVD
WHAT IS YesDVD
®
®
:
YesDVD is software included in your DVD Recorder that makes it easy to transfer your video content
to the DVD Recorder’s hard disc drive or DVDs with professional features.
YesDVD will automatically:
Analyze your video and set chapter points at natural scene breaks
•
Build chapter menu screens with pictures representing chapter points for easy scene selection
•
Produce 3 one-minute music video highlights using the clearest scenes from your video (not
•
available for hard disc drive recordings)
Create a DVD case coversheet to be printed from your computer. The DVD case coversheet
•
includes pictures from your video and can be printed for a standard DVD case or a standard
jewel case (not available for hard disc drive recordings)
HOW TO SET UP YesDVD:
With your remote control, press the SETUP button to enter the setup menu.
1.
Use the remote control arrow buttons to highlight the YesDVD option and select “Set”. Insure
2.
YesDVD is set to “On”.
HOW TO CREATE A YesDVD DISC:
Place a blank DVD+R/RW or DVD-R/RW disc in the DVD tray.
1.
Select input signal source. Press the REC button to start recording. Select to record to DVD.
2.
You may stop the recording by press the STOP button on the remote control. A dialog box will
3.
appear asking if you would like to create a YesDVD disc. Select “Yes, create disc” to start disc
creation. If you want to record more titles to the disc before creating the YesDVD disc, select
“no” until you are fi nished or when the disc has reached maximum capacity. You can also create
the YesDVD disc in the disc title menu by choosing the “YesDVD Finalize” option.
Sit back and watch while your DVD Recorder makes the YesDVD for you.
4.
Notes:
Once you have created a YesDVD disc, you can no longer add footage to your disc.
•
The television color system (TV type) of input signal source must be consistent with the DVD
•
Recorder or the YesDVD cannot be created.
If your DVD Recording is longer than fi ve minutes, video music highlights will be created from
•
your footage (direct to DVD recordings only).
If you preform editing functions (ie. overwrite title, hide chapter, etc.) to the recordings on the
•
optical disc, the disc cannot be fi nalized as a YesDVD disc.
30
Page 31

YesDVD
YESDVD ON YOUR HARD DISC DRIVE:
YesDVD can record video footage to the hard drive of your DVD Recorder. YesDVD software sets
chapter points at natural scene breaks so that you can easily jump directly to the segments you want
to watch.
IEWING YOUR YESDVD RECORDINGS ON HDD:
V
After recording, you can view the list of your recordings by pressing HDD on the remote control.
Select the recording you would like to view. If the recording is a YesDVD recording, the YesDVD logo
will appear in the preview picture.
When you select a YesDVD recording, a YesDVD chapter menu will appear. Use the remote control’s
arrow buttons to navigate through the chapters. You will notice that when you highlight a chapter
picture, that chapter picture will be replaced with a short video preview of that chapter. The chapter
pictures also show time stamps to guide you through the recording.
When you are viewing the recording, you can use the NEXT or PREV chapter buttons on the remote
control to jump to chapters. And, you can press the right arrow button to kips 30 seconds forward or
the left arrow button to replay 10 seconds backwards.
®
Notes:
Smart skip points which are at natural scene break points are set in the time shift mode’s time shirt
•
buffer, you can use the NEXT or PREV chapter buttons on the remote control to navigate through
the chapters.
If you preform editing functions (ie. split, segment, combine) to YesDVD recordings on the hard
•
drive, the YesDVD features will be lost.
DUB HDD RECORDINGS TO DVD:
Use this feature to archive hard disc drive recordings onto DVD+R/RW or DVD-R/RW discs. If the
recording contained YesDVD chapter menus, those menus will be saved to the DVD. The case
coversheet fi les are also saved to the disc.
Insert black DVD+R/RW or DVD-R/RW into DVD tray.
1.
Go to the HDD title list.
2.
For each recording you would like to include on the DVD disc, use the remote control’s arrow
3.
buttons to select the recording and press the ADD/CLEAR button.
Press the HDD button to begin dubbing.
4.
Notes:
When you dub a YesDVD recording from HDD to DVD, the YesDVD chapter menus on the DVD
•
will not include chapter time stamps and chapter video previews.
The HDD recording cannot be played back until dubbing is fi nished.
•
You cannot dub more recordings to the YesDVD disc.
•
31
Page 32

YesDVD
PRINT THE CASE COVERSHEET:
1.
Remove the YesDVD disc from the DVD Recorder.
2.
Insert the YesDVD disc into your computer’s DVD-ROM tray.
3.
A window will appear with printing instructions. Choose a coversheet for a standard DVD case or
a standard jewel case. Select the size of coversheet you would like and print the coversheet.
4.
Use scissors to cut the case coversheet out of your printer page.
5.
Insert your DVD case coversheet into the standard 5” x 7” (13.5cm x 19cm) DVD case or fold the
jewel case coversheet in half and insert into standard 4.75” x 4.75” (12.5cm x 12.5cm) jewel case.
BOOSTERPACK UPGRADES:
You can upgrade to high-quality AC3 music fi les for the music video highlights by installing YesDVD’s
BoosterPack into your DVD Recorder. BoosterPack fi les are available for download from YesDVD’s
website. All you need is a computer with a CD/DVD burner and a blank CD-ROM of DVD
®
±R/RW
disc.
To obtain the BoosterPack fi le, go to http://www.yesvideo.com/boosterpack and download
1.
the YesDVDBoosterPack.dat fi le.
After downloading YesDVDBoosterPack.dat to your computer, use your computer’s CD/
2.
DVD burning software to write the fi le onto a CD-ROM or DVD.
Insert the disc containing the BoosterPack fi le into your DVD Recorder. A dialog box will
3.
appear asking if you would like to continue with the BoosterPack installation. Select OK.
After you see the dialog box with the message that BoosterPack has been upgraded
4.
successfully, remove the CD or DVD from your DVD Recorder.
Notes:
When you install BoosterPack fi les from a CD, each feature included in that BoosterPack
•
fi le overwrites features from previously installed BoosterPack fi les.
Erasing the hard disc removed previously-installed BoosterPack features. You must re-
•
install BoosterPack in order to reset the features.
32
Page 33

Troubleshooting Guide
Before contacting service personnel, please check possible problems and solutions below:
SYMPTOM POSSIBLE CAUSE REMEDY
No power Power supply disconnected
No sound Incorrect input connection
No picture Incorrect signal connection
No color Wrong TV system selection
Disc cannot be played No disc in drive
Remote control malfunction Remote control not directed at
Sudden malfunction Bad disc quality
Picture dividing Selected system is incompatible
External signals cannot be recorded Incorrect system connection
1.
Bad connection between power
2.
plug and receptacle
Power of receptacle switched off
3.
1.
Disc is deformed or dirty
2.
System is in mute status
3.
1.
Incorrect TV status
2.
TV system out mode is
3.
Progressive, but your TV system
is Interlace mode
1.
Improper color adjustment
2.
Incorrect video output
3.
1.
Disc placed incorrectly
2.
Moisture condensed in unit
3.
Not in playing status
4.
Wrong disc format
5.
Disc dirty
6.
1.
sensor
Receiving distance is more than 8
2.
meters
Low voltage in remote control
3.
batteries
Outside obstacle between unit and
4.
remote control
1.
Button was pressed mistakenly
2.
Outside static
3.
1. Set up correct system1.
with disc
1.
No disc or re-recordable disc
2.
Disc has been fi nished
3.
No free disc space
4.
1.
2.
3.
1.
2.
3.
1.
2.
3.
1.
2.
3.
1.
2.
3.
4.
5.
6.
1.
2.
3.
4.
1.
2.
3.
1.
2.
3.
4.
Connect to power supply
Plug again or replace receptacle
with new one
Switch on receptacle
Connect inputs properly
Clean of fi x disc
Press “MUTE” button
Connect the inputs correctly
Re-adjust TV/A V status
Press PS/IS to angle or mode
Set up system by pressing
“SYSTEM” button on remote control
Readjust color
Check for correct video output
settings
Insert disc
Put disc on disc tray properly with
label side up
Leave unit on for about an hour
(without disc) before using again
Press “PLAY” button to switch
playing status
Please with supported disc format
Clean disc with soft cloth from
center to edge
Direct remote control at sensor
Reduce receiving distance
Replace batteries
Remove obstacle
Wait 5-10 seconds, playback will be
restored
Turn off and restart unit
Shut off for 1-2 minutes and restart
unit
Connect properly
Insert recordable disc
Change disc
Change disc
No monitor signal Input source not prepared
Timer recording cannot be done Disc does not meet requirements
Recording aborted halfway There is no free disc space
1.
Incorrect video output system
2.
Actual input source not consistent
3.
with selected
1.
Wrong time setting
2.
Input source does not work
3.
properly during recording time
System power failure
4.
1.
Bad disc quality
2.
33
Prepare input source
1.
Switch video output system
2.
Select proper input source
3.
Replace with new disc
1.
Set up time again
2.
Ensure input source works correctly
3.
during recording time
Set system to standby
4.
Replace with blank disc
1.
Replace with high quality disc
2.
Page 34

Technical Specifi cations
TECHNICAL SPECIFICATIONS*
Supported disc formats DVD, DVD+R/RW, DVD-R/RW, SVCD, VCD, JPEG, MPEG4
Supported recordable disc
functions
Recording format DVD, MPEG-II
Recording quality HQ (Perfect Quality), SP (Standard Play), SP+, LP (Extended Play), EP (Long
Input Composite video input (front and rear)
Output Composite video output
Input RF features System: NTSC
Video features
DVD+R/RW, DVD-R/RW
Play), SLP (Super Long Play)
S-video input (Y+C)
DV input (1394)
RF input
Analog audio input
S-video output (Y+C)
Component video output
Analog 5.1 channel audio output
Digital audio coaxial output
Digital audio optical output
Impendance: 75 imbalance coaxial cable
Output Composite video
System: NTSC/PAL
Video label: 1.00.2Vp-p 75
S-video
Y output level: 1.0 Vp-p 75
C output level: 0.3 Vp-p 75
Video horizontal resolution: 500 lines
Y S/N 65dB
Input Composite video
System: NTSC/PAL
Video level: 1.00.2Vp-p 75
S-video
Y input level: 1.0Vp-p 75
C input level: 0.3 Vp-p 75
Audio specifi cations
General specifi cations HDD: 80GB
Working humidity Relative humidity: 15-75% (without water condensation)
Output Audio level: 1.0~2.0Vrms (10k ohm load)
Frequency response: 4Hz~44KHz (2dB)
S/N ratio: 90dB
Audio distortion + noise: -65dB (1KHz)
Input Audio level: 2.0 Vrms (10ohm load)
Power supply: AC110-240V~50/60Hz
Power consumption: 40W
Standby power consumption: 3W
Size: 430mm x 48mm x 308mm
Net weight: 4.6kg
Gross weight: 5.3kg
* Product specifi cations are subject to change without notice
34
Page 35

Glossary of Terms
TERM DEFINITION
Chapter Chapter refers to the subtitle of each title of division on the
DVD image or music. Normally, one title contains several
chapters. Each chapter has its own unique number so it can
be searched easily.
Compatibility (Finalize) Compatibility (Finalize) means to process the information
stored in the disc to make it compatible with other DVD
players. Without this process, the disc can only be played on
this unit. This function is relevant to DVD+R discs only.
DVD+R disc DVD+R discs are also called Write-once DVD Discs. It can be
recorded for only one time. The recorded disc can be played
on other DVD players after being closed.
DVD+RW disc DVD+RW discs are also called DVD+Rewritabe discs. You
can record onto this disc multiple times.
Erasing the disc Erasing the disc means removing information stored on the
optical disc or hard disc.
Multiple angles function Some DVDs record different images of one view taken from
different angles of a screen. The user can view such angles by
pressing the “angle” key.
Multiple languages function Some DVDs record sound ins several languages. The different
languages can be released according to the corresponding
function menu.
Multiple subtitle function Some DVDs record the picture description in multiple
languages. Press the “SUBTITLE” key while watching, and the
recorded subtitle languages will appear.
Preparation for recording Formal preparation for recording includes examining the type
of the disc and the recording format, doing necessary optical
adaptation and pre-writing the content area.
Progressive and Interlace Progressive means a frame picture can be scanned to one
fi eld. Interlace means a frame picture can be scanned to
two fi elds. This unit provides both progressive and interlace
modes.
Recording quality and length For DVD±R/RW discs with the capacity of 4.7GB, HDD disc
with capacity of 80GB, there are 6 different recording qualities
in accordance with the compressing program.
SLP: Good image quality; 6 hours of recording
EP: Good image quality; 4 hours of recording
LP: Better image quality; 3 hours of recording
SP+: Good image quality; 2.5 hours of recording
SP: Better image quality; 2 hours of recording
HQ: Best image quality; 1 hour of recording
35
Page 36

Glossary of Terms
TERM DEFINITION
Region code In order to protect intellectual property, the relevant
organization has divided the world into 6 regions. Each region
can only use DVD players and DVD discs with certain region
codes. The six regions are:
1 Canada, USA and its possessions
2 Japan, Europe, South Africa, Middle East (including Egypt)
3 Southeast Asia, East Asia (including Hong Kong)
4 Australia, New Zealand, Central America, Mexico, South
America, Caribbean Sea
5 Former USSR region, India, Africa (including South Korea
and Mongolia)
6 Mainland China
Title The images and music in the DVD disc are divided into
several parts. The biggest unit for each part is the title. Each
title corresponds with a serial number to that it can be easily
searched
Track Music or images on CDs, DVDs, or VCDs is divided into
several areas. Each area is a track. Each track has it own
unique number so it can be searched easily.
For service, support and warranty information, visit www.polaroid.com.
“Polaroid” and “Polaroid and Pixel” are trademarks of Polaroid Corporation, Waltham, MA, USA.
36
 Loading...