

Page 1
Page 2

Contents
English 1
Deutsch 19
Español 38
Français 57
Italiano 75
i
Page 3

Polaroid ColorShot Parallel User’s Guide
English
System Requirements
• A PC-compatible computer with a parallel port.
• Microsoft Windows 95 (or later) operating system.
• 16MB RAM (minimum); 32MB RAM (recommended).
• 50MB free hard disk space (minimum).
• A VGA 800 x 600 color monitor, 256 colors minimum, 16-bit
recommended (see
Troubleshooting
• A CD-ROM drive, 2x speed (minimum); 4x or faster
(recommended).
Install the Polaroid ColorShot Hardware and Software
This section includes instructions for installing the Polaroid ColorShot
printer using Microsoft’s plug and play feature.
If you are familiar with Microsoft’s Add a Printer program, you have
the option of installing the ColorShot printer using this method. Refer
to
Add a Printer
in the
Recommended Monitor Setting
section for advice on setting your monitor).
Troubleshooting
section of this manual.
in the
Before You Install the ColorShot
Hardware and Software
Note:
If you know your CD-R OM drive letter, skip this section and
go to
Install the Polaroid ColorShot Hardware.
your CD-ROM drive letter, complete these steps before y ou begin
the installation.
1. Turn on your computer.
2. Insert the Polaroid ColorShot CD into the CD-ROM drive.
Note:
Leave the ColorShot CD in the drive until the installation is
complete.
3. Double-click the My Computer icon on the desktop, and note the
drive letter of the CD-ROM drive.
Revised 8/17/98 English • 1
If you do not know
Page 4
Polaroid ColorShot Parallel User’s Guide
4. Turn off your computer.
Note:
If you have more than one printer and only one parallel port
on your computer, you can purchase a manual or automatic
electronic switching device that allows you to connect both
printers through the same parallel port. For more information,
refer to
Electronic Switching Devices
in the
Troubleshooting
section of this manual.
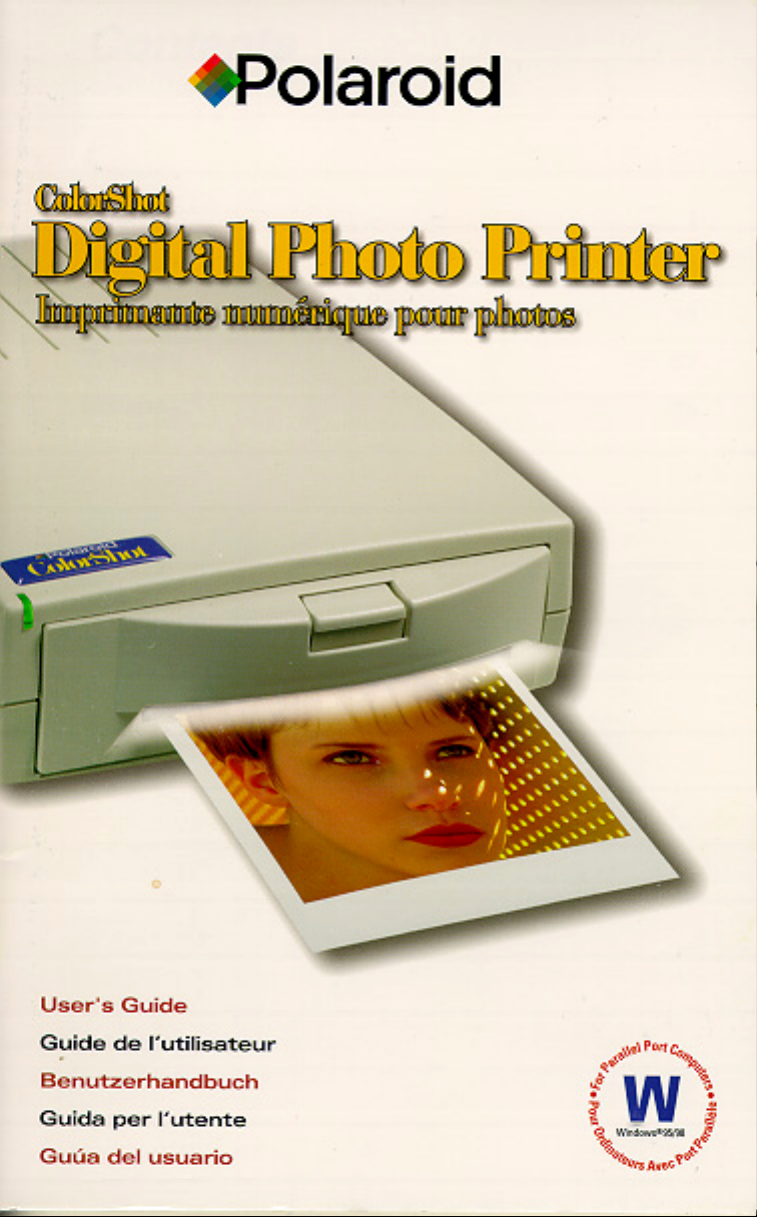
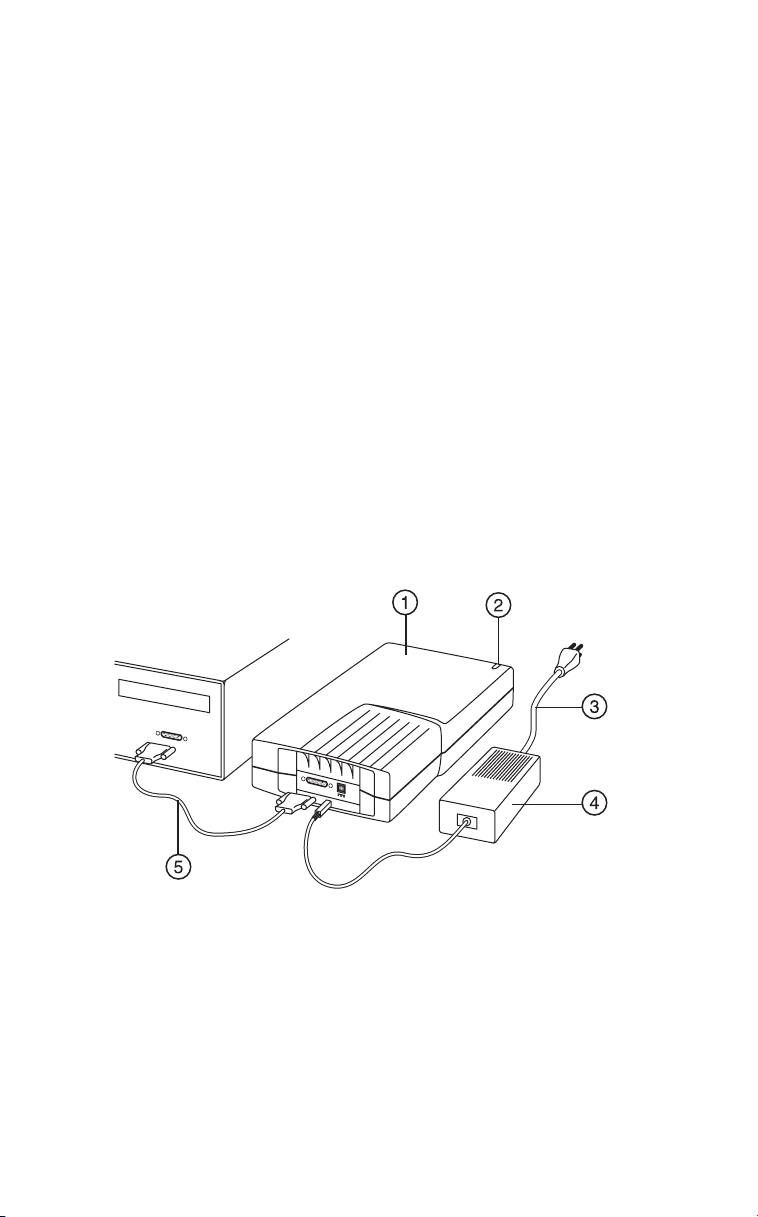
Install the Polaroid ColorShot Hardware
1. Printer
2. Power indicator light
3. Printer power cord
4. AC adapter
5. Printer interface cable
1. Place the ColorShot Parallel printer horizontally, on a flat surface
near your computer.
Note:
Do not position the printer vertically.
2. Make sure your computer is turned off.
3. Connect the printer power cord (3) to the AC adapter (4).
4. Connect the AC adapter (4) to the receptacle on the printer.
2 • English Revised 8/17/98
Page 5

Polaroid ColorShot Parallel User’s Guide
5. Connect the power cord (3) to a grounded outlet.
Note:
The printer power is now on. The green power indicator
light (2) on the front of the printer should be on. There is no on/off
switch.
6. Connect the printer interface cable (5) to the parallel port on the
back of your computer.
7. Connect the other end of the printer interface cable to the parallel
receptacle on the back of the printer.
Install the Polaroid ColorShot Software
1. Turn on your computer. The printer is detected as soon as you
power on the system, and the New Hardware Found message
box displays.
Note:
If the New Hardware Found message box is not displayed,
go to
Add a Printer
2. The system searches your floppy disk drive for the print driver
software and displays the Insert Disk message box.
3. Click OK. The Copying Files dialog box opens.
4. In the Copy files from list box, delete the highlighted text and type
the drive letter for your CD-ROM drive (for example, D:\ or E:\).
Note:
If you have not yet inserted the Polaroid ColorShot CD into
the CD drive, insert it now.
5. Click OK to begin the installation. The License Agreement
displays.
6. Click Yes to proceed with the installation.
7. Click Finish when the Setup Complete dialog box displays.
Note:
Be sure to view the Readme file for last-minute information
about the printer and print driver.
in the
Troubleshooting
section of this manual.
Install the Free Image Editing Software (MGI PhotoSuite)
MGI PhotoSuite is an easy-to-use image editing software package
provided with the Polaroid ColorShot printer. Polaroid recommends
that you install it, and then print two test images to get started.
Revised 8/17/98 English • 3
Page 6
Polaroid ColorShot Parallel User’s Guide
Install MGI PhotoSuite
1. Insert the MGI PhotoSuite CD into your CD-ROM drive. The
Installing MGI PhotoSuite window displays.
2. Click the appropriate language button for your installation. The
Welcome window opens.
3. Click Next. The License Agreement displays.
4. Click Yes to continue with the installation.
5. Follow the rest of the installation instructions as applicable to y our
system.
MGI PhotoSuite Online Help
Refer to the MGI PhotoSuite online Help for instructions on operating
the software. To access the Help:
1. Start MGI PhotoSuite. The MGI PhotoSuite Activity Guide
window opens.
2. Select the Help button in the lower right corner of the window.
Note:
You can also access the MGI PhotoSuite Help by selecting
Contents from the Help menu on the MGI PhotoSuite main
window.
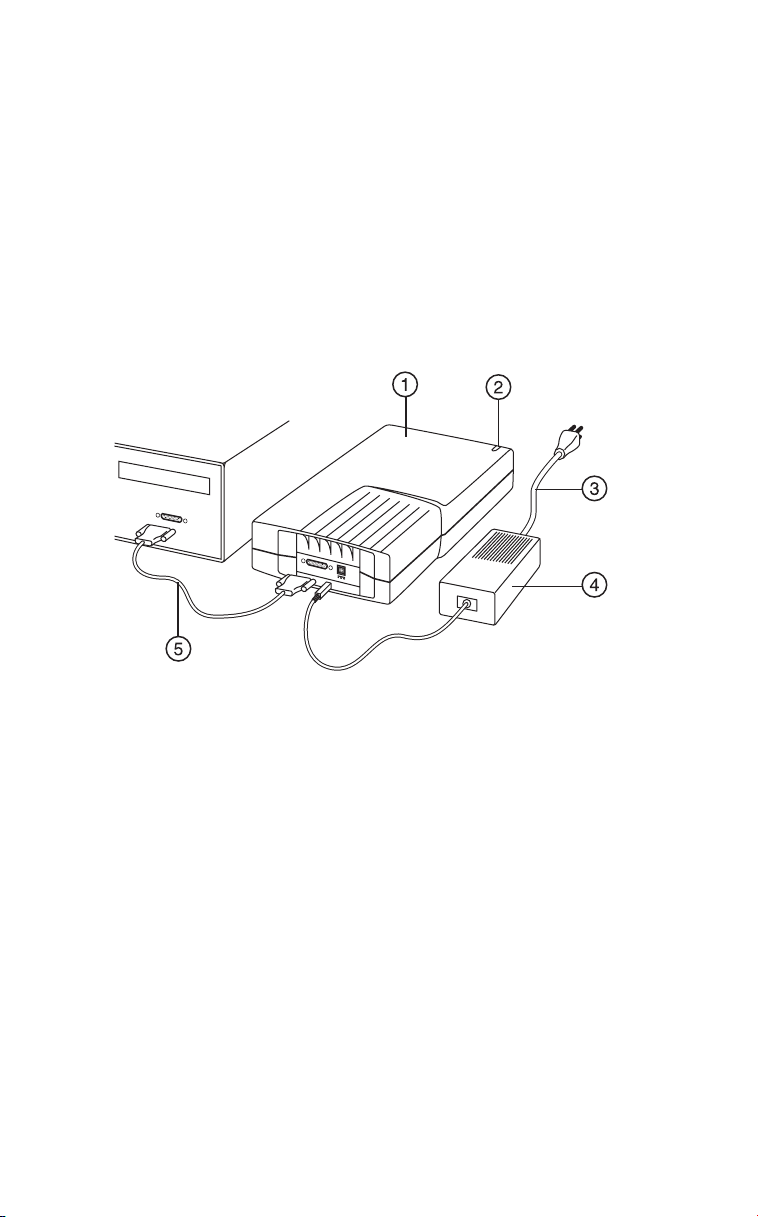
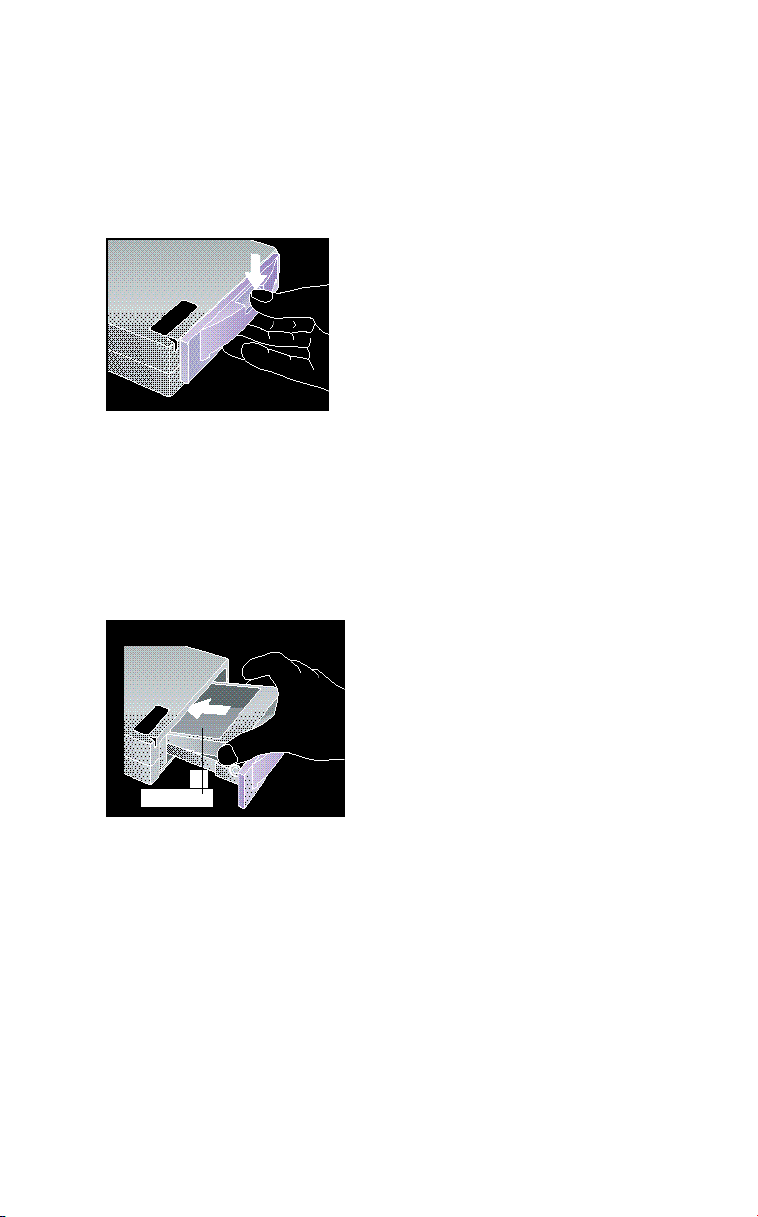
Load Film into the Polaroid ColorShot Printer
1. Press and hold down the door latch.
2. Pull open the film door.
3. Remove the Polaroid ColorShot film from the foil package.
4 • English Revised 8/17/98
Page 7

Polaroid ColorShot Parallel User’s Guide
4. Insert the film into the tray, with the film cover facing up and the
wide plastic border nearest the door.
Note:
The film cover protects the light-sensitive material
beneath it.
Film Cover
5. Slide the film tray in until it latches shut.
Configure the Print Driver
In order to begin using the Polaroid ColorShot printer, you must
configure the Polaroid Colorshot print driver.
1. From the Start menu, select Settings.
2. Click on the Printers folder.
3. Double-click the ColorShot Printer icon inside the folder. The
Polaroid ColorShot status box opens.
4. Select Properties from the Printer menu.
Set Printer Details
1. Click on the Details tab.
2. Select Polaroid Parallel ColorShot as the default printer.
Note:
If you have a paper printer that y ou normally print to, do not
select ColorShot as your default printer
Revised 8/17/98 English • 5
Page 8

Polaroid ColorShot Parallel User’s Guide
Set Printer Graphics
1. Click on the Graphics tab.
2. Select Portrait as the default orientation. You can override this
choice from within your image application when necessary.
Note:
Leave the Intensity level at the center setting. You change
this setting only when you need to compensate for speed
variation in a film pack.
3. In the Copies box, click on the up or down arrows to select the
number of copies to print.
4. Click the Using Preview check box to display a preview of your
image on the screen before printing.
Set Device Options
1. Click on the drop-down arrow next to Film Type. A drop-down list
of film types displays.
2. Select the appropriate film type from the list.
3. Check the IQA Technology box to activate Polaroid’s Image
Quality Assurance enhancement software. IQA is designed to
brighten colors in images that have not been previously
enhanced (general photographic images that hav e been scanned
or that have not had any color correction or image processing
applied).
Note:
Do use IQA Technology for images obtained from the
Internet, or for images that have been color-corrected in an
image-editing application.
Recommended Monitor Settings
Polaroid recommends that you adjust your monitor for the highest
available resolution. To adjust your monitor settings:
1. Click the right mouse button anywhere on your desktop. A menu
displays.
2. Select Properties. The Display Properties dialog box opens.
3. Select the Settings tab.
4. Set the Color palette to 16 bit or higher.
6 • English Revised 8/17/98
Page 9

Polaroid ColorShot Parallel User’s Guide
5. Move the slide control under Display area to the right, to the
highest resolution available; 800 x 600 is recommended.
6. Click OK.
Test the Printer
To learn how to use the Polaroid ColorShot printer, Polaroid
recommends that you print two test images (portrait and landscape)
using MGI PhotoSuite. The test images are located in the Samples
folder in the ColorShot folder on your hard drive.
Print Portrait Test Image
1. Start the MGI PhotoSuite software. The MGI PhotoSuite selection
window opens.
2. Click on Print Your Photos. The Open Image or Album dialog box
displays.
3. Open the Colorshot Samples folder. It is located in the ColorShot
folder on your system’s hard drive.
4. Double-click the image file kids.tif. The MGI PhotoSuite window
opens with the image displayed.
5. Click Printer Setup on the File menu of the MGI PhotoSuite
window.
6. Select Polaroid Parallel ColorShot as the printer.
7. Select Portrait as the Orientation.
8. Click OK.
9. Click the Print Preview icon on the MGI PhotoSuite window tool
bar. The MGI PhotoSuite Preview window opens.
10. Click the Size to Fit button on the tool bar.
11. Click the Printer icon on the tool bar.
12. Click OK. If you have not configured the ColorShot print driver to
display the Preview window, the image begins printing. If you
have configured the print driver as Using Preview, the ColorShot
Preview window opens.
13. Click the Printer icon to begin printing.
If this is your first print of the film pack, the printer ejects the film cover
first. In a few moments, the printer ejects the image kids.tif.
Revised 8/17/98 English • 7
Page 10

Polaroid ColorShot Parallel User’s Guide
Print Landscape Test Image
1. From the MGI PhotoSuite window file menu, select Open.
2. Open the ColorShot Samples folder . It is located in the ColorShot
folder on your system’s hard drive.
3. Double-click the image file flowers.tif.
4. Click Printer Setup on the File menu of the MGI PhotoSuite
window.
5. Select Landscape as the Orientation.
6. Follow steps 8 through 13 from the pre vious section
Image
.
In a few moments, the printer ejects the image flowers.tif.
Print Portrait
Troubleshooting
If the printer is not operating properly, and you cannot resolve the
problem with the information provided in this manual, contact P olaroid
Technical Support, as described in the
this manual.
Technical Support
section of
Add a Printer
If you are familiar with Microsoft’s Add a Printer program, use the
following instructions to install the Polaroid ColorShot printer on your
system.
1. Double-click the My Computer icon on the desktop.
2. Double-click the Printers folder icon.
3. Double-click the Add Printer icon. The Add Printer Wizard opens.
4. Follow the instructions as applicable to your system.
Uninstall the Polaroid ColorShot Software
The Polaroid ColorShot P ar allel printer is a plug and play device. If for
some reason you interrupt the installation process, your registry may
be corrupted and you should uninstall the device before attempting to
install it again.
Caution:
system registry, contact Polaroid Technical Support for help.
8 • English Revised 8/17/98
If you are not familiar with deleting entries from your
Page 11

Polaroid ColorShot Parallel User’s Guide
Delete the ColorShot Printer
1. Double-click the My Computer icon on the desktop.
2. Double-click the Printers folder icon.
3. Click on the ColorShot icon.
4. Select Delete from the File menu.
5. Click Yes to All.
Delete ColorShot Entries From Your Registry
1. Make sure the ColorShot CD is in your CD-ROM drive.
2. From the Start menu, select Programs.
3. Click on Windows Explorer.
4. Click on your CD-ROM drive.
5. In the Contents folder, right-click on Parallel_Recover_PnP.Inf.
6. Choose Install.
This deletes all ColorShot entries from your system’s registry.
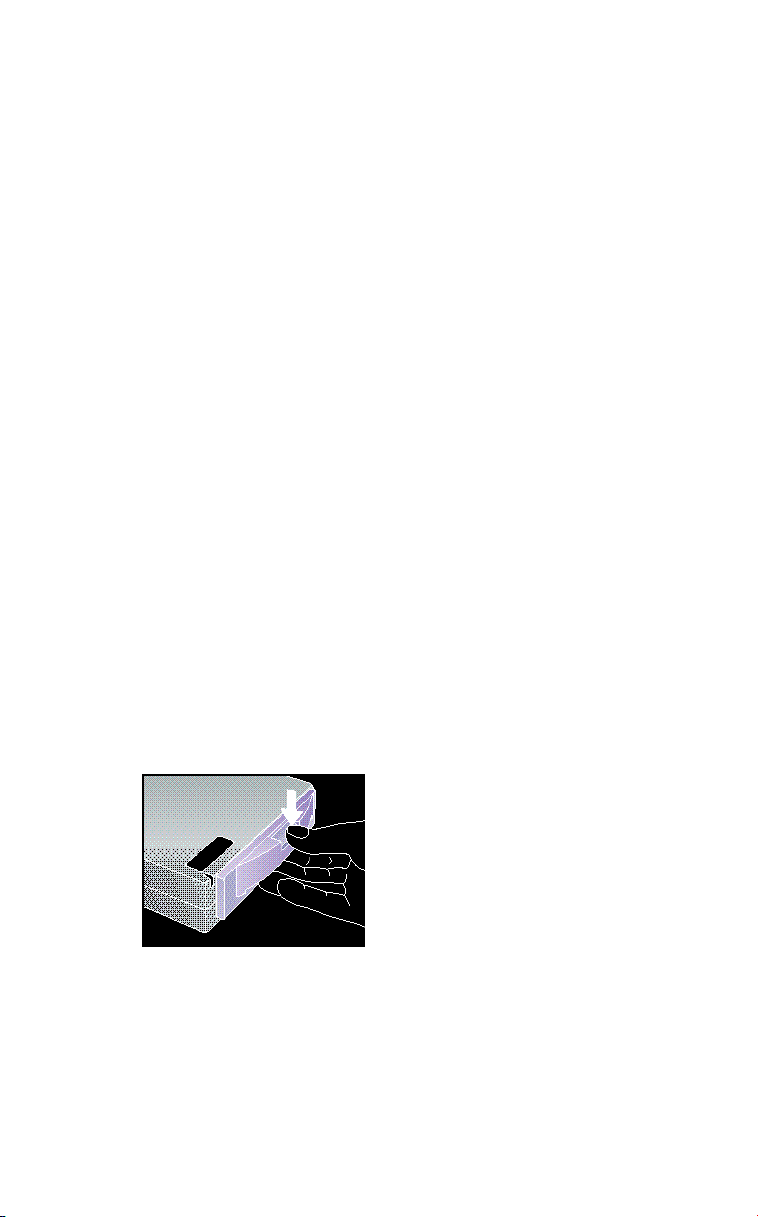
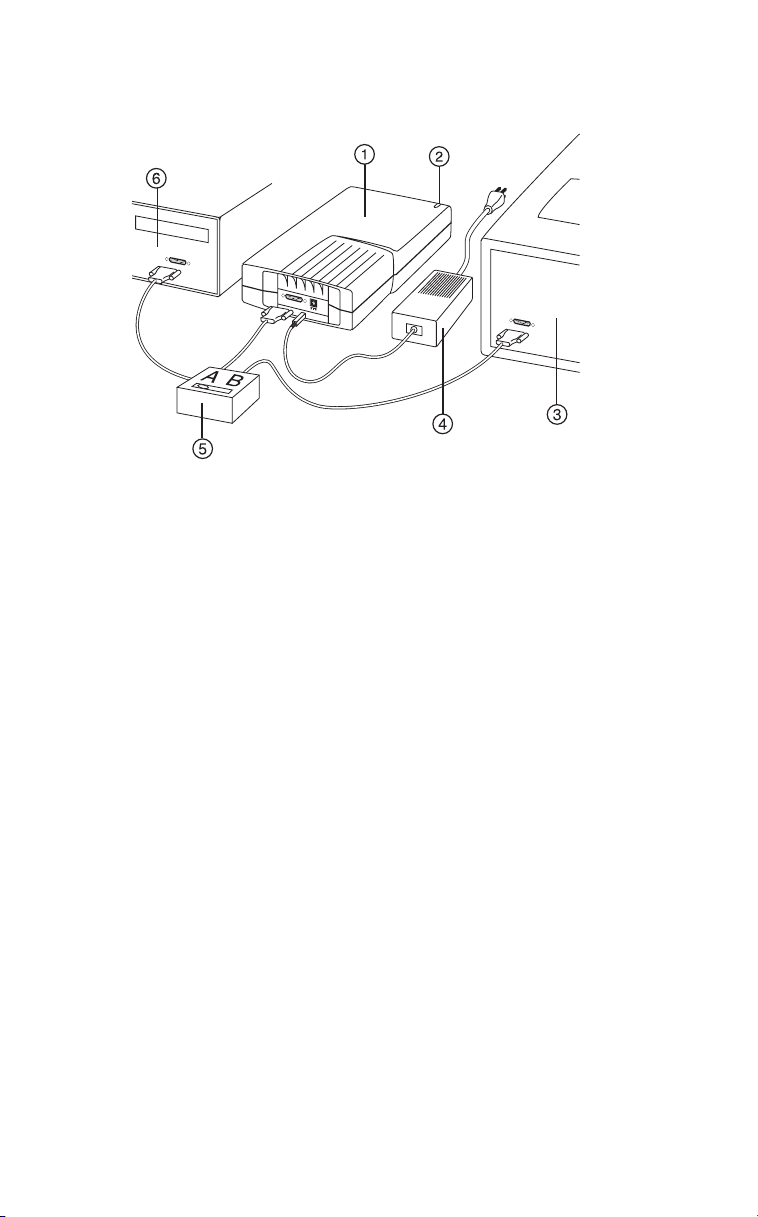
Electronic Switching Devices
If you have more than one printer and only one parallel port on your
computer, you can use a switching device that allows you to connect
both printers through the same port. The following diagram illustrates
how you connect a switching device to your computer and printers.
Contact your dealer or the nearest Polaroid office for information on
available switching devices.
Revised 8/17/98 English • 9
Page 12
Polaroid ColorShot Parallel User’s Guide
1. ColorShot printer
2. Power indicator light
3. Paper printer
4. AC adapter/power cord
5. Switching device
6. Computer parallel port
7. Interface cables
Operating Tips
This subsection provides some tips on printing images with the
Polaroid ColorShot Parallel printer.
Increasing Printer Performance
To optimize the speed and performance of your printer:
• Increase the amount of RAM in your computer.
• Increase the available hard disk space.
• Decrease the size of your image files if possible. The larger the
file, the longer it takes to print.
• Close other applications and documents that are open while you
are trying to print.
10 • English Revised 8/17/98
Page 13

Polaroid ColorShot Parallel User’s Guide
Previewing Before Printing
The format size of the paper is unique to a printer. Polaroid
recommends you preview all prints before printing. The ColorShot
print driver has a Preview window, as well as MGI PhotoSuite.
• There is a delay between selecting the Print function within an
imaging application and seeing the ColorShot Preview window.
The length of delay depends on your computer’s speed and on
the size of the image file you are printing.
• If the ColorShot printer does not print, make sure you have not
minimized the Preview window.
• If you do not see the entire image in the Preview window, make
sure the margins are set to zero in Page Setup on the Preview
window.
Loading a Partially Used Pack
If you load a partially used pack of film keep in mind the following
points:
• The printer assumes a full pack is loaded, and the software gives
you an incorrect picture count. You will have to keep track of the
number of exposures manually.
• The top frame of a partially loaded pack of film acts as a film
cover. It is ejected when you initiate the first print command.
Printing Scanned Photographs
Be sure to scan photographs at the resolution and dimensions of the
output device.
• For the Polaroid ColorShot printer, the resolution is 160 dpi, for
3.625 inches by 3.0 inches.
• In your imaging application, check to make sure the aspect ratio
is maintained when you resize a scanned image; otherwise, the
image will be distorted.
Printing Digital Camera Photographs
If you have a choice of resolutions from a digital camera, select the
best quality, or the resolution that is closest to the ColorShot
resolution of 580 x 480.
Revised 8/17/98 English • 11
Page 14

Polaroid ColorShot Parallel User’s Guide
Image File Size
For the best control over image size:
• Polaroid recommends that y ou resiz e y our image in your imaging
application before printing.
• When given a choice between .bmp, .tif, and .jpg image files,
select .bmp over .tif, and .tif over .jpg. The compression is less in
each case.
• If you must use .jpg, select the least compression or maximum
quality.
• The Polaroid ColorShot printer does not print image files larger
than 18MB.
Using Polaroid ColorShot Hardware and Software
on Systems with Other Printers
In most instances, a standalone or network printer also will be
connected to your computer. You should print a Polaroid ColorShot
image file only when other printers are not printing.
Communication Errors
• If you encounter a Polaroid ColorShot Printer Communication
error, make sure the cables are connected securely to the LPT
port on the back of your computer and the ColorShot printer.
• If you encounter a Communications P ort Not Supported error, the
communications port that you selected is not supported by the
ColorShot printer. You should select a different LPT port for your
printer. You can change the port setting using the Details tab of
the ColorShot Properties dialog box.
• In most instances, selecting the Retry button functions after most
communication errors. However, on some occasions the jobs
may be removed from the print queue.
Out of Memory Error
If you receive an Out of Memory error, the system is out of memory
and cannot print. Close any other applications that you may have
running and try printing again.
12 • English Revised 8/17/98
Page 15

Polaroid ColorShot Parallel User’s Guide
Technical Support
From within the U.S.A., call 1-800-432-5355, Monday through Friday,
8 a.m. to 8 p.m., (Eastern Time) or fax to 1-781-386-9688. You can
also write to Polaroid National Technical Support Operations, 201
Burlington Road, 1-2A Bedford, MA 01730.
In Canada, call 1-800-268-6970 or write to Polaroid Canada, 350
Carlingview Dr., Toronto, Ontario M9W 5G6. Fax: 416-675-3228.
You can also submit technical questions via electronic mail by
connecting to the Polaroid site on the World Wide Web (http://
www.polaroid.com) and clicking Customer Support.
Polaroid Offices and Service Centers
Australia
Polaroid Australia Pty. Ltd.
13-15 Lyonpark Road
P.O. Box 163
North Ryde, NSW 2113
Tel.: (02) 950 7000
Fax: (02) 887 2209
Belgique/België
Polaroid (Belgium) N.V. - S.A.
Rue Colonel Bourg 111
Kolonel Bourgstraat 111
1140 Bruxelles-1140 Brussel
Tel.: 027143102 (Flemish)
027143106 (French)
Brasil
Polaroid do Brasil Ltda.
Av. Paulista, 1776/11º andar
Cerqueira Cesar
São Paulo - Capital
01310-921
Tel.: 55.11.285.6411
Fax: 55.11.283.2625
288.6521
287.5393
Revised 8/17/98 English • 13
Page 16

Polaroid ColorShot Parallel User’s Guide
Danmark
Polaroid a.s.
Blokken 75
3460 Birkerød
Tlf.: 80011887
Deutschland
Polaroid GmbH
Sprendlinger Landstrasse 109
63069 Offenbach
Tel.: 06995096056
España
Polaroid (España), S.A.
Calle Orense 16 - 2ª planta.
28020-Madrid
Tno.: 913778103
France
Polaroid (France) S.A.
B.P. 7
78996-Elancourt Cédex
Tel.: 0141913810
Hong Kong
Polaroid (Far East) Ltd.
32/F Windsor House
311 Gloucester Road
Causeway Bay
Tel.: (852) 2894 0333
Italia
Polaroid (Italia) S.p.A.
Via Piave 11
21051 Arcisate (Varese)
Tel.: 0269633253
14 • English Revised 8/17/98
Page 17

Japan
Nippon Polaroid
Kabushiki Kaisha
Mori Building, No. 30
2-2 Toranomon 3-chome
Minato-ku, Tokyo (105)
Tel.: 81-3-3438-8811
Fax: 81-3-3433-3537
México
Polaroid de México S.A. de C.V.
Paseo de la Reforma 195-Piso 17
C.P. 06500 México, D.F.
Tel.: 703-1111
Fax: 566-0505
Del interior al 91 (800) 70-727
Ventas 91 (800) 70-747
Nederland
Polaroid Nederland B.V.
Zonnebaan 45
3606 CH Maarssen
P.O. Box 1219
3600 BE Maarssen
Tel.: 0204874534
Polaroid ColorShot Parallel User’s Guide
New Zealand
Polaroid New Zealand Ltd.
Camera Services
24-26 Anzac Avenue
Auckland
Tel.: (09) 377 3773
Norge
Polaroid (Norge) A/S
Industriveien 8B, 1473 Skårer
Postboks 80, 1471 Skårer
Tlf.: 80011887
Revised 8/17/98 English • 15
Page 18

Polaroid ColorShot Parallel User’s Guide
Österreich
Polaroid Ges.m.b.H.
Eitnergasse 5A
1231 Wien
Tel.: 06607433
Portugal
Polaroid (España) S.A.
Sucursal em Portugal
Edificio Monumental
Avenue Praia da Vitória 71-A, 4ºB
1050 Lisboa
Tel.: 0505446017
Puerto Rico
Polaroid Caribbean Corporation
Centro de Seguros
Ave. Ponce de León 701,
Miramar, Santurce 00907
Tel.: (809) 725-6240
Fax: (809) 725-5462
Schweiz/Suisse/Svizzera
Polaroid AG
Hardturmstrasse 133
8037 Zürich
Tel.: 018385329 (Deutsch)
018385348 (Français)
018385349 (Italiano)
Suomi
Polaroid Oy
Sinikalliontie 10
02630 Espoo
Puh.: 0800117008
16 • English Revised 8/17/98
Page 19

Sverige
Polaroid AB
Ekholmsvägen 36
Box 204
127 24 Skärholmen
Tel.: 084451231
U.K.
Polaroid (U.K.) Ltd. &
Polaroid Export Operations
Wheathampstead House
Codicote Road
Wheathampstead
Hertfordshire AL4 8SF
Tel.: 0181 308 6508 (U.K.)
(44) 181 308 6593 (Export)
Polaroid ColorShot Parallel User’s Guide
Revised 8/17/98 English • 17
Page 20

Polaroid ColorShot Parallel User’s Guide
Limited Equipment Warranty
Polaroid Corporation warrants y our P olaroid ColorShot printer against
defects in manufacture for a period of one year from the date of
purchase. To verify the warranty period, you should keep the sales
receipt or other proof of purchase date.
Should this product, or any component or accessory included with it,
become defective at any time during the warranty period, Polaroid
Corporation will, at its discretion, either repair or replace this item,
without charge, provided the product is returned prepaid and insured
to a designated servicing location. Please return the product in its
original packaging.
This Limited Warranty does not apply to product damage resulting
from accident, incorrect installation, unauthorized modification,
misuse or abuse.
Warning: Opening the printer housing voids the warranty.
Outside the U.S.A. and Canada, refer to the registration card for local
warranty conditions.
THIS WARRANTY EXCLUDES ALL INCIDENTAL AND
CONSEQUENTIAL DAMAGES AND DOES NOT AFFECT YOUR
STATUTORY RIGHTS.
18 • English Revised 8/17/98
Page 21

Polaroid ColorShot Parallel User’s Guide
Deutsch
Systemanforderungen
• PC-kompatibler Computer mit Parallelanschluß
• Betriebssystem Microsoft Windows 95 (oder höher)
• mind. 16 MB RAM; 32 MB RAM (empfohlen)
• mind. 50 MB freier Festplattenspeicher
• VGA-Farbmonitor (800 x 600), mindestens 256 Farben; 16 Bit
empfohlen (Hinweise zum Einstellen Ihres Monitors finden Sie
unter
Empfohlene Monitor-Einstellung
Fehlerbeseitigung
• CD-ROM-Laufwerk, mind. 2x; 4x oder schneller (empfohlen)
).
Installieren der Polaroid ColorShotHard- und -Software
Dieser Abschnitt enthält Anweisungen zum Installieren des Polaroid
ColorShot-Druckers mit Hilfe der Plug & Play-Funktion von Microsoft.
Wenn Sie mit dem Assistenten für die Druckerinstallation von
Microsoft vertraut sind, können Sie den ColorShot-Drucker damit
installieren. Informationen finden Sie unter
Druckerinstallation
Handbuchs.
im Abschnitt
Fehlerbeseitigung
im Abschnitt
Assistent für die
dieses
Bevor Sie die ColorShotHard- und -Software installieren
Hinweis: Wenn Sie den Laufwerksbuchstaben für Ihr CD-ROM-
Laufwerk kennen, fahren Sie direkt mit
ColorShot-Hardware
nicht bekannt ist, führen Sie vor Beginn der Installation die
folgenden Schritte aus:
1. Schalten Sie Ihren Computer ein.
fort. Wenn Ihnen der Laufwerksbuchstabe
Installieren der Polaroid
Deutsch • 19
Page 22
Polaroid ColorShot Parallel User’s Guide
2. Legen Sie die CD-ROM für Ihren Polaroid ColorShot in das
CD-ROM-Laufwerk ein.
Hinweis: Lassen Sie die ColorShot-CD im Laufwerk, bis die
Installation abgeschlossen ist.
3. Doppelklicken Sie auf das Symbol Arbeitsplatz auf dem
Desktop, und notieren Sie sich den Laufwerksbuchstaben des
CD-ROM-Laufwerks.
4. Schalten Sie Ihren Computer aus.
Hinweis: Wenn Sie mehrere Drucker haben und Ihr Computer
nur über einen Parallelanschluß verfügt, können Sie einen
manuellen oder automatischen elektronischen Umschalter
kaufen, mit dem Sie beide Drucker an denselben
Parallelanschluß anschließen können. Weitere Informationen
finden Sie unter
Elektronische Umschalter
Fehlerbeseitigung
dieses Handbuchs.
im Abschnitt
Installieren der Polaroid ColorShot-Hardware
20 • Deutsch
1. Drucker
2. Netz-LED
3. Netzkabel
4. Netzteil
5. Druckerkabel
Page 23

Polaroid ColorShot Parallel User’s Guide
1. Stellen Sie den ColorShot Parallel-Drucker waagerecht auf eine
ebene Fläche in der Nähe des Computers.
Hinweis: Der Drucker darf nicht hochkant aufgestellt werden.
2. Achten Sie darauf, daß Ihr Computer ausgeschaltet ist.
3. Schließen Sie das Netzkabel (3) an das Netzteil (4) an.
4. Schließen Sie das Netzteil (4) an den entsprechenden Anschluß
am Drucker an.
5. Stecken Sie das Netzkabel (3) in eine geerdete Steckdose.
Hinweis: Am Drucker liegt jetzt Spannung an. Die grüne Netz-
LED (2) an der Vorderseite des Druckers muß leuchten. Einen
separaten Netzschalter gibt es nicht.
6. Schließen Sie das Druckerkabel (5) an den Parallelanschluß auf
der Rückseite des Computers an.
7. Stecken Sie das andere Ende des Druckerkabels in den
Parallelanschluß auf der Rückseite des Druckers.
Installieren der Polaroid ColorShot-Software
1. Schalten Sie Ihren Computer ein. Sobald das System
eingeschaltet wird, wird der Drucker erkannt, und das
Meldungsfeld Neue Hardware-Komponente gefunden wird
angezeigt.
Hinweis: Wenn das Meldungsfeld Neue Hardware-
Komponente gefunden nicht angezeigt wird, lesen Sie unter
Assistent für die Druckerinstallation
Fehlerbeseitigung
2. Das System sucht in Ihrem Diskettenlaufwerk nach der
Druckertreiber-Software und zeigt das Meldungsfeld Diskette
einlegen an.
3. Klicken Sie auf OK. Daraufhin wird das Dialogfeld Dateien
werden kopiert geöffnet.
4. Löschen Sie den markierten Text aus dem Listenfeld Quelle, und
geben Sie dann den Laufwerksbuchstaben Ihres CD-ROMLaufwerks ein (z. B. D:\ oder E:\).
Hinweis: Legen Sie jetzt die Polaroid ColorShot-CD in das
CD-ROM-Laufwerk ein, sofern dies noch nicht geschehen ist.
dieses Handbuchs nach.
im Abschnitt
Deutsch • 21
Page 24

Polaroid ColorShot Parallel User’s Guide
5. Klicken Sie auf OK, um den Installationsvorgang zu starten. Die
Lizenzvereinbarung wird angezeigt.
6. Klicken Sie auf Ja, um die Installation fortzusetzen.
7. Wenn das Dialogfeld Setup beendet angezeigt wird, klicken Sie
auf Fertig stellen.
Hinweis: Lesen Sie unbedingt die Readme-Datei mit den
neuesten Informationen zum Drucker und Druckertreiber.
Installieren der kostenlosen
Bildbearbeitungssoftware (MGI PhotoSuite)
MGI PhotoSuite ist ein einfach zu verwendendes Softwarepaket für
die Bildbearbeitung, das im Lieferumfang des Polaroid ColorShotDruckers enthalten ist. Polaroid empfiehlt, nach der Installation der
Software zunächst zwei Testbilder zu drucken.
Installieren von MGI PhotoSuite
1. Legen Sie die MGI PhotoSuite-CD in das CD-ROM-Laufwerk ein.
Das Installationsfenster von MGI PhotoSuite wird angezeigt.
2. Klicken Sie auf die Schaltfläche zum Auswählen der für die
Installation gewünschten Sprache. Das Begrüßungsfenster wird
angezeigt.
3. Klicken Sie auf Next. Die Lizenzvereinbarung wird angezeigt.
4. Klicken Sie auf Yes, um die Installation fortzusetzen.
5. Befolgen Sie die weiteren Installationsanweisungen, soweit sie
für Ihr System zutreffen.
MGI PhotoSuite-Online-Hilfe
In der MGI PhotoSuite-Online-Hilfe finden Sie Anweisungen für den
Betrieb der Software. So rufen Sie die Hilfe auf:
1. Starten Sie MGI PhotoSuite. Das Fenster MGI PhotoSuite
Activity Guide wird geöffnet.
2. Klicken Sie auf die Schaltfläche Help in der rechten unteren Eck e
des Fensters.
Hinweis: Sie können die MGI PhotoSuite-Hilfe auch aufrufen,
indem Sie im Hauptfenster von MGI PhotoSuite aus dem Menü
Help die Option Contents auswählen.
22 • Deutsch
Page 25
Polaroid ColorShot Parallel User’s Guide
Einlegen des Films in den Polar oid ColorShotDrucker
1. Drücken Sie die Filmladeverriegelung nach unten.
2. Ziehen Sie die Filmlade heraus.
3. Nehmen Sie den Polaroid ColorShot-Film aus der
Folienverpackung.
4. Legen Sie den Film mit dem Filmdeckblatt nach oben und dem
breiten Plastikrand an der Vorderkante der Filmlade ein.
Hinweis: Durch das Filmdeckblatt wird das darunterliegende
lichtempfindliche Material geschützt.
Filmdeckblatt
5. Schieben Sie die Filmlade nach hinten, bis die Verriegelung
einrastet.
Deutsch • 23
Page 26

Polaroid ColorShot Parallel User’s Guide
Konfigurieren des Druckertreibers
Bevor Sie den Polaroid ColorShot-Drucker verwenden können,
müssen Sie den Polaroid Colorshot-Druckertreiber konfigurieren.
1. Wählen Sie aus dem Menü Start die Option Einstellungen.
2. Klicken Sie auf den Ordner Drucker.
3. Doppelklicken Sie auf das Symbol des ColorShot-Druckers
innerhalb des Ordners. Das Polaroid ColorShot-Statusfeld wird
geöffnet.
4. Wählen Sie aus dem Menü Drucker die Option Eigenschaften.
Einstellen der Druckerdetails
1. Klicken Sie auf die Registerkarte Details.
2. Wählen Sie den Polaroid Parallel ColorShot als
Standarddrucker aus.
Hinweis: Wenn Sie normalerweise mit einem Papierdrucker
arbeiten, sollten Sie den ColorShot nicht als Standarddrucker
definieren.
Einstellen der Druckergrafik
1. Klicken Sie auf die Registerkarte Grafik.
2. Wählen Sie Hochformat als Standardausrichtung aus. Diese
Auswahl können Sie gegebenenfalls innerhalb Ihrer
Bildbearbeitungsanwendung überschreiben.
Hinweis: Behalten Sie die Mittelstellung der
Druckdichteeinstellung bei. Diese Einstellung ändern Sie nur,
wenn Sie Empfindlichkeitsschwankungen in einer Filmpackung
ausgleichen müssen.
3. Im Feld Exemplare klicken Sie auf die entsprechende
Pfeilschaltfläche, um die Anzahl der zu druckenden Exemplare
auszuwählen.
4. Zur Anzeige einer Druckvorschau müssen Sie das
Kontrollkästchen Vorschau verwenden aktivieren.
24 • Deutsch
Page 27

Polaroid ColorShot Parallel User’s Guide
Einstellen der Geräteoptionen
1. Klicken Sie auf den Dropdown-Pfeil neben Filmtyp. Ein
Dropdown-Listenfeld der Filmtypen wird angezeigt.
2. Wählen Sie den entsprechenden Filmtyp aus der Liste.
3. Wählen Sie das Feld IQA-Technologie aus, um die IQA-
Software (Image Quality Assurance) von Polaroid zu aktivieren.
IQA dient zum Aufhellen der Farben in zuvor unbearbeiteten
Bildern (allgemeine fotografische Aufnahmen, die eingescannt
wurden oder bei denen keinerlei Farbkorrektur oder
Bildbearbeitung durchgeführt wurde).
Hinweis: Verwenden Sie die IQA-Technologie für Bilder, die aus
dem Internet heruntergeladen wurden oder für Bilder, die einer
Farbkorrektur in einer Bildbearbeitungsanwendung unterzogen
wurden.
Empfohlene Monitoreinstellungen
Stellen Sie am Monitor die höchstmögliche Auflösung ein. So führen
Sie die Monitoreinstellungen aus:
1. Klicken Sie mit der rechten Maustaste auf eine beliebige Stelle
des Desktops. Daraufhin wird ein Menü angezeigt.
2. Wählen Sie Eigenschaften. Daraufhin wird das Dialogfeld
Eigenschaften von Anzeige geöffnet.
3. Wählen Sie die Registerkarte Einstellungen.
4. Stellen Sie in unter Farbpalette 16 Bit oder mehr ein.
5. Stellen Sie mit dem Schieberegler unter Auflösung die
höchstmögliche Auflösung ein (empfehlenswert sind 800 x 600
Pixel).
6. Klicken Sie auf OK.
Druckertest
Polaroid empfiehlt, zwei Testbilder (Hoch- und Querformat) mit Hilfe
von MGI PhotoSuite zu drucken, um den Umgang mit dem Polaroid
ColorShot-Drucker zu erlernen. Die Testbilder befinden sich im
Ordner Samples innerhalb des Ordners ColorShot auf Ihrer
Festplatte.
Deutsch • 25
Page 28

Polaroid ColorShot Parallel User’s Guide
Drucken des Hochformat-Testbilds
1. Starten Sie die MGI PhotoSuite-Software. Das Auswahlfenster
MGI PhotoSuite wird geöffnet.
2. Klicken Sie auf Print Y our Photos. Das Dialogfeld Open Image
or Album wird angezeigt.
3. Öffnen Sie den Ordner Samples. Er befindet sich im Ordner
ColorShot auf der Festplatte Ihres Systems.
4. Doppelklicken Sie auf die Bilddatei kids.tif. Das MGI PhotoSuite-
Fenster wird mit der angezeigten Datei geöffnet.
5. Klicken Sie im Menü File des MGI PhotoSuite-Fensters auf die
Option Printer Setup.
6. Wählen Sie den Polaroid Parallel ColorShot als Drucker aus.
7. Wählen Sie Portrait als Ausrichtung aus.
8. Klicken Sie auf OK.
9. Klicken Sie in der Symbolleiste des MGI PhotoSuite-F ensters auf
das Symbol Print Preview. Das Fenster MGI PhotoSuite
Preview wird geöffnet.
10. Klicken Sie in der Symbolleiste auf die Schaltfläche Size to Fit.
11. Klicken Sie in der Symbolleiste auf das Druckersymbol.
12. Klicken Sie auf OK. Wenn Sie den ColorShot-Druckertreiber nicht
zum Anzeigen des Vorschaufensters konfiguriert haben, wird das
Bild gedruckt. Wenn der Druckertreiber für Using Preview
konfiguriert ist, wird das Fenster ColorShot Preview geöffnet.
13. Klicken Sie auf das Druckersymbol, um den Druckvorgang zu
starten.
Beim ersten Ausdruck mit einer neuen Filmpackung gibt der Drucker
zunächst das Filmdeckblatt aus. Kurze Zeit später wird das Bild
kids.tif ausgegeben.
26 • Deutsch
Page 29

Polaroid ColorShot Parallel User’s Guide
Drucken des Querformat-Testbilds
1. Wählen Sie aus dem Menü File im MGI PhotoSuite-Fenster die
Option Open.
2. Öffnen Sie den Ordner Samples. Er befindet sich im Ordner
ColorShot auf der Festplatte Ihres Systems.
3. Doppelklicken Sie auf die Bilddatei flowers.tif.
4. Klicken Sie im Menü File des MGI PhotoSuite-Fensters auf die
Option Printer Setup.
5. Wählen Sie Landscape als Ausrichtung aus.
6. Führen Sie die Schritte 8 bis 13 aus dem vorangegangenen
Abschnitt,
Kurze Zeit später wird das Bild flowers.tif ausgegeben.
Drucken des Hochformat-Testbilds
, aus.
Fehlerbeseitigung
Wenn der Drucker nicht ordnungsgemäß arbeitet und Sie das
Problem mit den in diesem Handbuch enthaltenen Informationen
nicht lösen können, wenden Sie sich an den technischen
Kundendienst von Polaroid wie im Abschnitt
Kundendienst
dieses Handbuchs angegeben.
Technischer
Assistent für die Druckerinstallation
Wenn Sie mit dem Assistenten für die Druckerinstallation von
Microsoft vertraut sind, installieren Sie den Polaroid ColorShotDrucker anhand folgender Anweisungen auf Ihrem System.
1. Doppelklicken Sie auf dem Desktop auf das Symbol
Arbeitsplatz.
2. Doppelklicken Sie auf das Symbol des Druckerordners.
3. Doppelklicken Sie auf das Symbol Assistent für die
Druckerinstallation. Der Assistent für die Druckerinstallation
wird angezeigt.
4. Befolgen Sie die weiteren Installationsanweisungen, soweit sie
für Ihr System zutreffen.
Deutsch • 27
Page 30

Polaroid ColorShot Parallel User’s Guide
Deinstallieren der Polaroid ColorShot-Software
Der Polaroid ColorShot Parallel-Drucker ist ein Plug & Play-Gerät.
Wenn Sie den Installationsvorgang aus irgendeinem Grund
abbrechen, kann Ihre Registrierung beschädigt werden. In diesem
Fall sollten Sie das Gerät vor einem erneuten Installationsversuch
zunächst vollständig deinstallieren.
Vorsicht: W enn Sie nicht mit dem Löschen von Einträgen aus der
Registrierung vertraut sind, wenden Sie sich an den technischen
Kundendienst von Polaroid.
Löschen des ColorShot-Druckers
1. Doppelklicken Sie auf dem Desktop auf das Symbol
Arbeitsplatz.
2. Doppelklicken Sie auf das Symbol des Druckerordners.
3. Klicken Sie auf das ColorShot-Symbol.
4. Wählen Sie aus dem Menü Datei die Option Löschen.
5. Klicken Sie auf Ja.
Löschen von ColorShot-Einträgen aus Ihrer Registrierung
1. Vergewissern Sie sich, daß sich die ColorShot-CD im CD-ROM-
Laufwerk befindet.
2. Wählen Sie aus dem Menü Start die Option Programme.
3. Klicken Sie auf Windows-Explorer.
4. Klicken Sie auf Ihr CD-ROM-Laufwerk.
5. Klicken Sie im Ordner Contents mit der rechten Maustaste auf
Parallel_Recover_PnP.Inf.
6. Wählen Sie Install.
Dadurch werden die ColorShot-Einträge aus Ihrer
Systemregistrierung gelöscht.
28 • Deutsch
Page 31

Polaroid ColorShot Parallel User’s Guide
Elektronische Umschalter
Wenn Sie mehrere Drucker haben und Ihr Computer nur über einen
Parallelanschluß verfügt, können Sie einen manuellen oder
automatischen elektronischen Umschalter verwenden, mit dem Sie
beide Drucker an denselben Anschluß anschließen können. In der
folgenden Abbildung wird gezeigt, wie Sie einen Umschalter an den
Computer und die Drucker anschließen können.
Wenden Sie sich an Ihren Händler oder an das nächstgelegene
Polaroid-Büro, um Informationen über verfügbare Umschalter zu
erhalten.
1. ColorShot-Drucker
2. Netz-LED
3. Papierdrucker
4. Netzteil/Netzkabel
5. Umschalter
6. Parallelanschluß des Computers
7. Druckerkabel
Tips zum Betrieb
Dieser Abschnitt enthält einige Tips zum Druck en von Bildern mit dem
Polaroid ColorShot Parallel-Drucker.
Deutsch • 29
Page 32

Polaroid ColorShot Parallel User’s Guide
Erhöhung der Druckerleistung
So optimieren Sie die Geschwindigkeit und Leistung Ihres Druckers:
• Vergrößern Sie den Arbeitsspeicher (RAM) Ihres Computers.
• Vergrößern Sie den verfügbaren Festplattenspeicher.
• Verringern Sie wenn möglich die Größe Ihrer Bilddateien. Je
größer die Datei, umso länger dauert der Ausdruck.
• Schließen Sie während des Druckvorgangs andere geöffnete
Anwendungen und Dokumente.
Druckvorschau
Die Formatgröße des Papiers ist für einen Drucker einheitlich.
Polaroid empfiehlt Ihnen, vor dem Drucken grundsätzlich eine
Druckvorschau durchzuführen. Der ColorShot-Druckertreiber hat
genau wie MGI PhotoSuite ein Vorschaufenster.
• Es gibt eine Verzögerung zwischen dem Auswählen der
Druckfunktion innerhalb einer Bildbearbeitungsanwendung und
dem Anzeigen des ColorShot-Vorschaufensters. Die Dauer
dieser Verzögerung ist von der Leistungsfähigkeit Ihres
Computers und der Größe der zu druckenden Bilddatei abhängig.
• Wenn der ColorShot-Drucker nicht druckt, überprüfen Sie , ob Sie
möglicherweise das Vorschaufenster minimiert haben.
• Wenn Sie nicht das ganze Bild im Vorschaufenster sehen,
überprüfen Sie, ob Sie die Ränder im Vorschaufenster unter der
Option Page Setup auf null gesetzt haben.
Einlegen einer teilweise benutzten Packung
Beachten Sie die folgenden Punkte, wenn Sie eine teilweise ben utzte
Filmpackung einlegen:
• Da der Drucker davon ausgeht, daß eine volle Filmpackung
eingelegt wird, zeigt die Software eine falsche Bildanzahl an.
Daher müssen Sie die Anzahl der Belichtungen manuell
verfolgen.
• Das oberste Bild einer teilweise verbrauchten Filmpackung dient
als Filmdeckblatt. Es wird beim ersten Druckbefehl ausgegeben.
30 • Deutsch
Page 33

Polaroid ColorShot Parallel User’s Guide
Drucken von gescannten Fotos
Scannen Sie die Fotos mit der Auflösung und den Abmessungen des
Ausgabegeräts.
• Für den Polaroid ColorShot-Drucker beträgt die Auflösung
160 dpi bei Abmessungen von 9,2 x 7,6 cm.
• Überprüfen Sie in Ihrer Bildbearbeitungsanwendung, ob das
Seitenverhältnis beim Ändern der Größe eines gescannten Bildes
beibehalten wird; andernfalls wird das Bild verzerrt.
Drucken von Fotos von digitalen Kameras
Wenn Sie die Auflösung einer digitalen Kamera einstellen können,
wählen Sie die bestmögliche Qualität oder die Auflösung, die der
ColorShot-Auflösung von 580 x 480 am nächsten kommt.
Bilddateigröße
Beachten Sie folgende Punkte, um die Bilddateigröße am besten
steuern zu können:
• Polaroid empfiehlt, die Bildgröße in Ihrer
Bildbearbeitungsanwendung vor dem Drucken zu verändern.
• Wenn Sie zwischen .bmp-, .tif- und .jpg-Bilddateien wählen
können, verwenden Sie lieber .bmp- als .tif-Dateien und lieber .tifals .jpg-Dateien. Die Komprimierung ist in jedem Fall geringer.
• Wenn Sie .jpg-Dateien verwenden müssen, wählen Sie die
geringste Komprimierung oder die höchste Qualität.
• Der Polaroid ColorShot-Drucker druckt keine Bilddateien, die
größer als 18 MB sind.
Verwenden der Polaroid ColorShot Hard- und -Software auf
Systemen mit anderen Druckern
In den meisten Fällen wird auch ein lokaler oder Netzdrucker an Ihren
Computer angeschlossen. Drucken Sie Polaroid ColorShotBilddateien nur, wenn die anderen Drucker im Ruhezustand sind.
Deutsch • 31
Page 34

Polaroid ColorShot Parallel User’s Guide
Kommunikationsfehler
• Wenn Sie einen Kommunikationsfehler mit dem Polaroid
ColorShot-Drucker feststellen, überprüfen Sie, ob die Kabel fest
an den LPT-Anschluß auf der Rückseite des Computers und des
ColorShot-Druckers angeschlossen sind.
• Wenn Sie in einer Fehlermeldung darauf aufmerksam gemacht
werden, daß der Kommunikationsanschluß nicht unterstützt wird,
wird der ausgewählte Kommunikationsanschluß durch den
ColorShot-Drucker nicht unterstützt. Verwenden Sie in diesem
Fall für Ihren Drucker einen anderen LPT-Anschluß. Die
Anschlußeinstellung können Sie auf der Registerkarte Details im
Dialogfeld Eigenschaften von ColorShot ändern.
• In den meisten Fällen können Sie nach Kommunikationsfehlern
das Problem durch Betätigen der Schaltfläche Retry lösen. In
einigen Fällen können jedoch die Aufträge nicht aus der
Druckerwarteschlange entfernt werden.
Speicherüberlauffehler
Wenn Sie die Meldung erhalten, daß nicht genügend Arbeitsspeicher
vorhanden ist, steht nicht mehr genügend Arbeitsspeicher zum
Drucken zur Verfügung. Schließen Sie gegebenenfalls andere
Anwendungen, und wiederholen Sie den Vorgang.
Technischer Kundendienst
Rufen Sie innerhalb der USA die Nummer 1-800-432-5355, montags
bis freitags von 8 bis 20 Uhr (Eastern Time) an, oder senden Sie ein
Fax an 1-781-386-9688. Sie können auch an folgende Adresse
schreiben: Polaroid National Technical Support Operations, 201
Burlington Road, 1-2A Bedford, MA 01730.
In Kanada rufen Sie 1-800-268-6970 an, oder schreiben Sie an
Polaroid Canada, 350 Carlingview Dr., Toronto, Ontario M9W 5G6.
Fax: 416-675-3228.
Sie können technische Fragen auch per E-Mail übermitteln, indem
Sie eine Verbindung zur Polaroid-Site im World Wide Web (http://
www.polaroid.com) herstellen und auf Customer Support klicken.
32 • Deutsch
Page 35

Polaroid ColorShot Parallel User’s Guide
Polar oid-Niederlassungen und Servicezentren
Australia
Polaroid Australia Pty. Ltd.
13-15 Lyonpark Road
P.O. Box 163
North Ryde, NSW 2113
Tel.: (02) 950 7000
Fax: (02) 887 2209
Belgique/België
Polaroid (Belgium) N.V. - S.A.
Rue Colonel Bourg 111
Kolonel Bourgstraat 111
1140 Bruxelles-1140 Brussel
Tel.: 027143102 (Flemish)
027143106 (French)
Brasil
Polaroid do Brasil Ltda.
Av. Paulista, 1776/11º andar
Cerqueira Cesar
São Paulo - Capital
01310-921
Tel.: 55.11.285.6411
Fax: 55.11.283.2625
288.6521
287.5393
Danmark
Polaroid a.s.
Blokken 75
3460 Birkerød
Tlf.: 80011887
Deutsch • 33
Page 36

Polaroid ColorShot Parallel User’s Guide
Deutschland
Polaroid GmbH
Sprendlinger Landstraße 109
63069 Offenbach
Tel.: 06995096056
España
Polaroid (España), S.A.
Calle Orense 16 - 2ª planta.
28020-Madrid
Tno.: 913778103
France
Polaroid (France) S.A.
B.P. 7
78996-Elancourt Cédex
Tel.: 0141913810
Hong Kong
Polaroid (Far East) Ltd.
32/F Windsor House
311 Gloucester Road
Causeway Bay
Tel.: (852) 2894 0333
Italia
Polaroid (Italia) S.p.A.
Via Piave 11
21051 Arcisate (Varese)
Tel.: 0269633253
Japan
Nippon Polaroid
Kabushiki Kaisha
Mori Building, No. 30
2-2 Toranomon 3-chome
Minato-ku, Tokyo (105)
Tel.: 81-3-3438-8811
Fax: 81-3-3433-3537
34 • Deutsch
Page 37

México
Polaroid de México S.A. de C.V.
Paseo de la Reforma 195-Piso 17
C.P. 06500 México, D.F.
Tel.: 703-1111
Fax: 566-0505
Del interior al 91 (800) 70-727
Ventas 91 (800) 70-747
Nederland
Polaroid Nederland B.V.
Zonnebaan 45
3606 CH Maarssen
P.O. Box 1219
3600 BE Maarssen
Tel.: 0204874534
New Zealand
Polaroid New Zealand Ltd.
Camera Services
24-26 Anzac Avenue
Auckland
Tel.: (09) 377 3773
Polaroid ColorShot Parallel User’s Guide
Norge
Polaroid (Norge) A/S
Industriveien 8B, 1473 Skårer
Postboks 80, 1471 Skårer
Tlf.: 80011887
Österreich
Polaroid Ges.m.b.H.
Eitnergasse 5A
1231 Wien
Tel.: 06607433
Deutsch • 35
Page 38

Polaroid ColorShot Parallel User’s Guide
Portugal
Polaroid (España) S.A.
Sucursal em Portugal
Edificio Monumental
Avenue Praia da Vitória 71-A, 4ºB
1050 Lisboa
Tel.: 0505446017
Puerto Rico
Polaroid Caribbean Corporation
Centro de Seguros
Ave. Ponce de León 701,
Miramar, Santurce 00907
Tel.: (809) 725-6240
Fax: (809) 725-5462
Schweiz/Suisse/Svizzera
Polaroid AG
Hardturmstrasse 133
8037 Zürich
Tel.: 018385329 (Deutsch)
018385348 (Français)
018385349 (Italiano)
Suomi
Polaroid Oy
Sinikalliontie 10
02630 Espoo
Puh.: 0800117008
Sverige
Polaroid AB
Ekholmsvägen 36
Box 204
127 24 Skärholmen
Tel.: 084451231
36 • Deutsch
Page 39

Polaroid ColorShot Parallel User’s Guide
U.K.
Polaroid (U.K.) Ltd. &
Polaroid Export Operations
Wheathampstead House
Codicote Road
Wheathampstead
Hertfordshire AL4 8SF
Tel.: 0181 308 6508 (U.K.)
(44) 181 308 6593 (Export)
Beschränkte Produktgewährleistung
Die Polaroid Corporation gewährt für den Polaroid ColorShot-Druck er
für einen Zeitraum von einem Jahr ab Kaufdatum Garantie bei
herstellungsbedingten Defekten. Zum Nachweis für den
Garantiezeitraum dient der Einkaufsbeleg oder ein anderes mit dem
Kaufdatum versehenes Dokument.
Sollte bei diesem Produkt oder einem der im Lieferumfang
enthaltenen Teile während des Garantiezeitraums ein Defekt
auftreten, wird die Polaroid Corporation das entsprechende Teil nach
eigenem Ermessen ersetzen oder kostenlos reparieren. Dazu muß
das Teil mit Rückporto und Versicherung an ein autorisiertes
Servicezentrum gesendet werden. Bitte schicken Sie das Produkt in
der Originalverpackung zurück.
Diese eingeschränkte Garantie gilt nicht für Schäden am Produkt, die
auf Unfall, falsche Aufstellung, unerlaubte Änderungen am Gerät
oder unsachgemäße Verwendung zurückzuführen sind.
Achtung: Bei Öffnung des Druckergehäuses erlischt die Garantie.
Außerhalb der USA und Kanadas informieren Sie sich auf der
Registrierungskarte über die örtlich geltenden Garantiebedingungen.
DIESE GARANTIE SCHLIESST ALLE ZUFÄLLIGEN UND
FOLGESCHÄDEN AUS UND BEEINTRÄCHTIGT IN KEINER WEISE
DIE GESETZLICH VORGESCHRIEBENEN RECHTE ZUR
GEWÄHRLEISTUNG.
Deutsch • 37
Page 40

Polaroid ColorShot Parallel User’s Guide
Español
Requisitos del sistema
• PC compatible con un puerto paralelo.
• Sistema operativo Microsoft Windows 95 (o posterior).
• 16MB de RAM (mínimo); 32MB de RAM (recomendado).
• 50MB de espacio en el disco duro (mínimo).
• Monitor en color 800 x 600 color, 256 colores como mínimo, se
recomiendan 16 bits (consulte
el monitor
información sobre la configuración de su monitor).
• Unidad de CD-ROM, velocidad 2x (mínimo); 4x o superior
(recomendado).
en la sección
Instalación del hardware y software
de Polaroid ColorShot
Esta sección contiene las instrucciones para instalar la impresora
Polaroid ColorShot mediante la función plug and play de Microsoft.
Si está familiarizado con el programa Agregar impresora de
Microsoft, puede instalar la impresora ColorShot utilizando este
método. Consulte
problemas
de este manual.
Agregar impresora
Configuración recomendada para
Solución de problemas
en la sección
si precisa
Solución de
Antes de instalar el hardware y software de ColorShot
Nota: Si sabe la letra de la unidad de CD-ROM, salte esta
sección y pase a
Si no sabe la letra de la unidad de CD-ROM, realice estos pasos
antes de comenzar la instalación.
1. Encienda el ordenador.
2. Inserte el CD Polaroid ColorShot en la unidad de CD-ROM.
Nota: Deje el CD ColorShot en la unidad hasta que la instalación
haya terminado.
Instalación del hardware de Polaroid ColorShot.
Español • 38
Page 41

Polaroid ColorShot Parallel User’s Guide
3. Haga doble clic en el icono Mi PC del escritorio y anote la letra de
unidad de la unidad de CD-ROM.
4. Apague el ordenador.
Nota: Si tiene más de una impresora y un solo puerto paralelo en
el ordenador, puede adquirir un dispositivo electrónico de
conmutación manual o automático que le permita conectar
ambas impresoras en el mismo puerto paralelo. Para más
información, consulte
en la sección
Solución de problemas
Dispositivos electrónicos de conmutación
de este manual.
Instalación del hardware de Polaroid ColorShot
1. Impresora
2. Indicador de encendido
3. Cable de alimentación de la impresora
4. Adaptador de CA
5. Cable de interfaz de la impresora
1. Coloque la impresora ColorShot Parallel horizontalmente sobre
una superficie plana cerca del ordenador.
Nota: No coloque la impresora en sentido vertical.
2. Asegúrese de que el ordenador está apagado.
Español • 39
Page 42

Polaroid ColorShot Parallel User’s Guide
3. Conecte el cable de alimentación de la impresora (3) al
adaptador de CA (4).
4. Conecte el adaptador de CA (4) en el receptáculo de la
impresora.
5. Conecte el cable de alimentación (3) a una toma a tierra.
Nota: En estos momentos la energía está siendo suministrada a
la impresora. El indicador de encendido de color verde (2),
situado en la parte frontal de la impresora, debe estar encendido.
No existe ningún interruptor de encendido y apagado.
6. Conecte el cable de interfaz de la impresora (5) al puerto
paralelo, situado en la parte posterior del ordenador.
7. Conecte el otro extremo del cable de interfaz de la impresora en
el receptáculo paralelo de la parte posterior de la impresora.
Instalación del software de Polaroid ColorShot
1. Encienda el ordenador. La impresora se detecta tan pronto como
se enciende el sistema y aparece el cuadro de mensaje Nuevo
hardware encontrado.
Nota: Si el cuadro de mensaje Nuevo hardware encontrado no
aparece, vaya a
problemas
2. El sistema busca el controlador de impresión en la unidad de
disco y muestra el cuadro de mensaje Insertar disco.
3. Haga clic en Aceptar. Se abre el cuadro de diálogo Copiando
archivos.
4. En la lista Copiar archivos de, elimine el texto resaltado e
introduzca la letra correspondiente a la unidad de CD ROM (por
ejemplo, D:\ o E:\).
Nota: Si todavía no ha insertado el CD Polaroid ColorShot en la
unidad de CD, insértelo ahora.
5. Haga clic en Aceptar para iniciar la instalación. Aparecerá en
pantalla el Acuerdo de licencia.
6. Haga clic en Sí para continuar con la instalación.
Agregar impresora
de este manual.
en la sección
Solución de
40 • Español
Page 43

Polaroid ColorShot Parallel User’s Guide
7. Haga clic en Finalizar cuando se muestre el cuadro de diálogo
Instalación completada.
Nota: Lea el archiv o Readme para conocer inf ormación de última
hora sobre la impresora y el controlador de impresión.
Instalación del software de edición de
imágenes (MGI PhotoSuite)
MGI PhotoSuite es un paquete de software de edición de imágenes
fácil de usar suministrado con la impresora Polaroid ColorShot.
Polaroid recomienda instalarlo y, a continuación, imprimir dos
imágenes de prueba para comenzar.
Instalación de MGI PhotoSuite
1. Inserte el CD MGI PhotoSuite en la unidad de CD-ROM. Aparece
la ventana de instalación de MGI PhotoSuite.
2. Haga clic en el botón del idioma adecuado para la instalación. Se
abre la ventana de bienvenida.
3. Haga clic en el botón Siguiente. Aparecerá en pantalla el
Acuerdo de licencia.
4. Haga clic en Sí para continuar con la instalación.
5. Siga el resto de las instrucciones de instalación para su sistema.
Ayuda en pantalla de MGI PhotoSuite
Consulte la ayuda en pantalla de MGI PhotoSuite para las
instrucciones sobre el funcionamiento del software. P ara acceder a la
Ayuda:
1. Inicie MGI PhotoSuite. Se abre la ventana MGI PhotoSuite
Activity Guide (Guía de actividades de MGI PhotoSuite).
2. Haga clic en el botón Ayuda, situado en la esquina inferior
derecha de la ventana.
Nota: También puede acceder a la ayuda de MGI PhotoSuite
seleccionando Contenido en el menú Ayuda de la ventana
principal de MGI PhotoSuite.
Español • 41
Page 44

Polaroid ColorShot Parallel User’s Guide
Carga de película en la impresora Polaroid
ColorShot
1. Mantenga pulsada la pestaña de cierre de la puerta.
2. Tire de la puerta de la película para abrirla.
3. Extraiga la película Polaroid ColorShot de su envoltorio.
4. Inserte la película en la bandeja; la cubierta de la película debe
quedar hacia arriba y el borde de plástico ancho en la parte más
próxima a la puerta.
Nota: La cubierta de la película protege el material sensible a la
luz que contiene.
Cubierta de la película
5. Deslice la bandeja de la película hasta que encaje en la posición
correcta.
Configuración del controlador de impresión
Para poder utilizar la impresora Polaroid ColorShot, debe configurar
el controlador de impresión de Polaroid Colorshot.
1. En el menú Inicio, seleccione Configuración.
2. Haga clic en la carpeta Impresoras.
42 • Español
Page 45

Polaroid ColorShot Parallel User’s Guide
3. Haga doble clic en el icono ColorShot Printer, que se encuentra
en el interior de la carpeta. A continuación aparecerá la cuadro
de estado Polaroid ColorShot.
4. Seleccione Propiedades en el menú Impresora.
Definición de los detalles de la impresora
1. Haga clic en la ficha Detalles.
2. Seleccione Polaroid Parallel ColorShot como la impresora
predeterminada.
Nota: Si dispone de una impresora en papel par a los tr abajos de
impresión normales, no seleccione ColorShot como la impresora
predeterminada.
Definición de los gráficos de la impresora
1. Haga clic en la ficha Gráficos.
2. Seleccione Vertical como la orientación predeterminada. En caso
necesario, puede anular esta opción desde la aplicación de
imágenes.
Nota: Deje el nivel Intensidad en la configuración intermedia.
Esta configuración sólo se cambia si es necesario compensar la
variación de velocidad en un paquete de película.
3. En el cuadro Copias, haga clic en las flechas arriba o abajo para
seleccionar el número de copias a imprimir.
4. Haga clic en la casilla de verificación Utilizar Presentación
preliminar para ver en pantalla una presentación preliminar de la
imagen antes de imprimirla.
Definición de las opciones de dispositivo
1. Haga clic en la flecha de lista desplegable junto a Tipo de
película. Aparece una lista desplegable de los tipos de película.
2. Seleccione en la lista el tipo de película adecuado.
3. Active la casilla Tecnología IQA (garantía de calidad de imagen)
para activar el software de mejora de imágenes de Polaroid. IQA
ha sido diseñado para producir colores más vivos en imágenes
que no han sido mejoradas previamente (imágenes fotográficas
Español • 43
Page 46

Polaroid ColorShot Parallel User’s Guide
que hayan sido exploradas o a las que no se les haya aplicado
correcciones de color o no hayan sido procesadas).
Nota: Utilice la Tecnología IQA para imágenes obtenidas de
Internet o a las que se les haya aplicado correcciones de color en
una aplicación de edición de imágenes.
Configuraciones recomendadas para el
monitor
Polaroid le recomienda que ajuste el monitor a la resolución más alta
disponible. Para ajustar las configuraciones del monitor:
1. Haga clic con el botón derecho del ratón en el escritorio. Aparece
un menú.
2. Seleccione Propiedades. Se abre el cuadro de diálogo
Propiedades de Pantalla.
3. A continuación, seleccione la ficha Configuración.
4. Defina la opción Paleta de colores como 16 bits o más.
5. Mueva el control deslizante del panel Área de presentación hacia
la derecha, hasta situarlo en la resolución más alta posible (se
recomienda 800 x 600).
6. Haga clic en Aceptar.
Prueba de la impresora
Para saber cómo utilizar la impresora Polaroid ColorShot, Polaroid le
recomienda imprimir dos imágenes de prueba (vertical y horizontal)
utilizando MGI PhotoSuite. Las imágenes de prueba se encuentran
en la carpeta Samples, que a su vez se encuentra en la carpeta
ColorShot de su disco duro.
Impresión de una imagen de prueba vertical
1. Inicie MGI PhotoSuite. Se abre la ventana de selección de
MGI PhotoSuite.
2. Haga clic en Print Your Photos (Imprima sus fotos). Aparece el
cuadro de diálogo Open Image o Album (Abrir imagen o álbum).
3. Abra la carpeta Samples de Colorshot. Se encuentra en la
carpeta ColorShot del disco duro del sistema.
44 • Español
Page 47

Polaroid ColorShot Parallel User’s Guide
4. Haga doble clic en el archivo de imagen kids.tif. La ventana de
MGI PhotoSuite se abre y muestra la imagen.
5. Haga clic en Especificar impresora en el menú Archivo de la
ventana de MGI PhotoSuite.
6. Seleccione Polaroid Parallel ColorShot como la impresora.
7. Seleccione Vertical como la orientación.
8. Haga clic en Aceptar.
9. Haga clic en el icono Presentación preliminar de la barra de
herramientas de la ventana de MGI PhotoSuite. Se abre la
ventana de presentación preliminar de MGI PhotoSuite.
10. Haga clic en el botón Size to Fit de la barra de herramientas.
11. Haga clic en el icono de la impresora de la barra de
herramientas.
12. Haga clic en Aceptar. Si no ha configurado el controlador de
impresión de ColorShot para que muestre la ventana de
presentación preliminar, la imagen comienza a imprimirse. En
caso de haberlo configurado como Utilizar Presentación
preliminar, se abre la ventana de presentación preliminar de
ColorShot.
13. Haga clic en el icono de la impresora para comenzar a imprimir.
Si se trata de la primera impresión del paquete de película, la
impresora expulsará la cubierta de la película en primer lugar. La
impresora generará la imagen kids.tif en unos momentos.
Impresión de una imagen de prueba horizontal
1. En el menú archivo de la ventana de MGI PhotoSuite, seleccione
Abrir.
2. Abra la carpeta Samples de ColorShot. Se encuentra en la
carpeta ColorShot del disco duro del sistema.
3. Haga doble clic en el archivo de imagen flowers.tif.
4. Haga clic en Especificar impresora en el menú Archivo de la
ventana de MGI PhotoSuite.
5. Seleccione Horizontal como la orientación.
6. Siga los pasos del 8 al 13 de la sección anterior
una imagen de prueba vertical
La impresora generará la imagen flowers.tif en unos momentos.
.
Impresión de
Español • 45
Page 48

Polaroid ColorShot Parallel User’s Guide
Solución de problemas
Si la impresora no funciona correctamente y no puede resolver el
problema mediante la información proporcionada en este manual,
póngase en contacto con el Servicio técnico de Polaroid, como se
describe en la sección
Agregar impresora
Si está familiarizado con el programa Agregar impresora de
Microsoft, utilice las instrucciones siguientes para instalar la
impresora Polaroid ColorShot en su sistema.
1. Haga doble clic en el icono Mi PC del escritorio.
2. Haga doble clic en la carpeta Impresoras.
3. Haga doble clic en el icono Agregar impresora. Aparecerá el
Asistente para agregar impresora.
4. Siga las instrucciones de instalación para su sistema.
Desinstalación del software de Polaroid ColorShot
La impresora Polaroid ColorShot Parallel es un dispositivo plug and
play. Si por algún motivo se interrumpe el proceso de instalación,
podría corromperse el registro y será necesario desinstalar el
dispositivo antes de volver a intentar instalarlo.
Advertencia: Si no está familiarizado con la eliminación de
entradas del registro del sistema, póngase en contacto con el
Servicio técnico de Polaroid para obtener ayuda.
Servicio técnico
de este manual.
Eliminar la impresora ColorShot
1. Haga doble clic en el icono Mi PC del escritorio.
2. Haga doble clic en la carpeta Impresoras.
3. Haga clic en el icono ColorShot.
4. Seleccione Eliminar en el menú Archivo.
5. Haga clic en Sí a todo.
46 • Español
Page 49

Polaroid ColorShot Parallel User’s Guide
Eliminar entradas de ColorShot del registro
1. Asegúrese de que el CD ColorShot está en la unidad de
CD-ROM.
2. En el menú Inicio, seleccione Programas.
3. Haga clic en Explorador de Windows.
4. Haga clic en la unidad de CD-ROM.
5. En la carpeta Contents, haga clic con el botón derecho del ratón
en Parallel_Recover_PnP.Inf.
6. Elija Instalar.
Con esto se eliminan todas las entradas de ColorShot del registro del
sistema.
Dispositivos electrónicos de conmutación
Si tiene más de una impresora y un solo puerto paralelo en el
ordenador, puede utilizar un dispositivo de conmutación que le
permita conectar ambas impresoras en el mismo puerto. El siguiente
diagrama muestra cómo conectar un dispositivo de conmutación al
ordenador y a las impresoras.
Póngase en contacto con su distribuidor u oficina de Polaroid más
cercana para obtener información sobre los dispositivos de
conmutación disponibles.
Español • 47
Page 50

Polaroid ColorShot Parallel User’s Guide
1. Impresora ColorShot
2. Indicador de encendido
3. Impresora en papel
4. Adaptador de CA/cable de alimentación
5. Dispositivo de conmutación
6. Puerto paralelo del ordenador
7. Cables de interfaz
Consejos sobre el funcionamiento
Esta subsección contiene algunos consejos sobre la impresión de
imágenes con Polaroid ColorShot Parallel.
Aumento del rendimiento de la impresora
Para optimizar la velocidad y el rendimiento de la impresora:
• Aumente la memoria RAM de su ordenador.
• Incremente el espacio en disco duro disponible.
• Reduzca el tamaño de los archivos de imagen, si es posible.
Cuanto mayor sea el tamaño del archivo, más tiempo tarda en
imprimirse.
• Cierre los documentos y aplicaciones que estén abiertos
mientras se está realizando la impresión.
48 • Español
Page 51

Polaroid ColorShot Parallel User’s Guide
Presentación preliminar antes de imprimir
El tamaño del formato del papel es único para una impresora.
Polaroid le recomienda que realice una presentación preliminar de
todas las páginas antes de imprimirlas. El controlador de impresión
de ColorShot tiene una ventana de presentación preliminar , así como
MGI PhotoSuite.
• Hay una demora entre la selección de la función de impresión
desde una aplicación de imágenes y la visualización de la
ventana de presentación preliminar de ColorShot. La duración de
la demora depende de la velocidad del ordenador y del tamaño
del archivo de imagen a imprimir.
• Si la impresora ColorShot no imprime, asegúrese de no haber
minimizado la ventana de presentación preliminar.
• Si no puede ver la imagen completa en la ventana de
presentación preliminar, asegúrese de que los márgenes están
definidos en cero en Configurar página de la ventana de
presentación preliminar.
Carga de paquetes utilizados parcialmente
Si carga un paquete de película utilizado parcialmente, tenga en
cuenta lo siguiente:
• La impresora asume que se ha cargado un paquete nuevo y el
software ofrece un número de imágenes incorrecto. Deberá
realizar un seguimiento manual del número de exposiciones.
• El marco superior de un paquete de película parcialmente
cargado actúa como cubierta de película. Así, será expulsado al
iniciar el primer comando de impresión.
Impresión de fotografías exploradas
Asegúrese de explorar las fotografías con la resolución y las
dimensiones del dispositivo de salida.
• Para la impresora Polaroid ColorShot, la resolución es de
160 ppp, para 3,625 por 3,0 pulgadas.
• En su aplicación de formación de imágenes, asegúrese de
mantener la relación de aspecto al cambiar el tamaño de una
imagen explorada; en caso contrario, la imagen se distorsionará.
Español • 49
Page 52

Polaroid ColorShot Parallel User’s Guide
Impresión de fotografías tomadas con cámara digital
Si puede elegir la resolución desde la cámara digital, seleccione la
mejor calidad o la más cercana a la resolución de 580 x 480 de
ColorShot.
Tamaño del archivo de imagen
Para obtener el mejor control sobre el tamaño de la imagen:
• Polaroid le recomienda que cambie el tamaño de la imagen en la
aplicación de formación de imágenes antes de imprimir.
• Si puede elegir entre archivos de imagen .bmp, .tif y .jpg,
seleccione .bmp antes que .tif, y .tif antes que .jpg. La
compresión es menor en cada caso.
• Si tiene que utilizar .jpg, seleccione la compresión menor o la
máxima calidad.
• La impresora Polaroid ColorShot no imprime archiv os de imagen
mayores que 18MB.
Uso del hardware y software de Polaroid ColorShot en sistemas
con otras impresoras
En la mayoría de los casos, también habrá conectada una impresor a
autónoma o en red al ordenador. Imprima un archivo de imagen en la
impresora Polaroid ColorShot sólo cuando ninguna otra esté
imprimiendo.
Errores de comunicación
• Si se encuentra con un error de comunicación de la impresora
Polaroid ColorShot, asegúrese de que todos los cables estén
correctamente conectados al puerto LPT del ordenador y a la
impresora ColorShot.
• Si se encuentra con un error del tipo "Puerto de comunicaciones
no soportado", el puerto de comunicaciones seleccionado no
está soportado por la impresora ColorShot. Seleccione un puerto
LPT diferente para la impresora. Puede cambiar la configuración
del puerto mediante la ficha Detalles del cuadro de diálogo
Propiedades de Polaroid ColorShot.
50 • Español
Page 53

Polaroid ColorShot Parallel User’s Guide
• En la mayoría de los casos, seleccionar el botón Reintentar
funciona tras la mayoría de los errores de comunicación. Sin
embargo, en ocasiones la tareas pueden eliminarse de la cola de
impresión.
Error de memoria agotada
Si recibe un error del tipo "Memoria agotada", indica que el sistema
se ha quedado sin memoria y no puede imprimir. Cierre cualquier
otra aplicación en ejecución y vuelva a intentar imprimir.
Servicio técnico
En EE.UU., llame al 1-800-432-5355, de lunes a viernes, de 8 a.m. a
8 p.m., (hora del Este) o envíe un fax al 1-781-386-9688. También
puede escribir a Polaroid National Technical Support Operations, 201
Burlington Road, 1-2A Bedford, MA 01730.
En Canadá, llame al 1-800-268-6970 o escriba a Polaroid Canada,
350 Carlingview Dr., Toronto, Ontario M9W 5G6. Fax: 416-675-3228.
También puede enviar su preguntas técnicas mediante correo
electrónico conectándose al sitio Web de Polaroid (http://
www.polaroid.com) y haciendo clic en Customer Support (Servicio
técnico).
Español • 51
Page 54

Polaroid ColorShot Parallel User’s Guide
Oficinas y Centros de servicio de Polaroid
Australia
Polaroid Australia Pty. Ltd.
13-15 Lyonpark Road
P.O. Box 163
North Ryde, NSW 2113
Tel.: (02) 950 7000
Fax: (02) 887 2209
Belgique/België
Polaroid (Belgium) N.V. - S.A.
Rue Colonel Bourg 111
Kolonel Bourgstraat 111
1140 Bruxelles-1140 Brussel
Tel.: 027143102 (flamenco)
027143106 (francés)
Brasil
Polaroid do Brasil Ltda.
Av. Paulista, 1776/11º andar
Cerqueira Cesar
São Paulo - Capital
01310-921
Tel.: 55.11.285.6411
Fax: 55.11.283.2625
288.6521
287.5393
Danmark
Polaroid a.s.
Blokken 75
3460 Birkerød
Tlf.: 80011887
Deutschland
Polaroid GmbH
Sprendlinger Landstrasse 109
63069 Offenbach
Tel.: 06995096056
52 • Español
Page 55

España
Polaroid (España), S.A.
Calle Orense 16 - 2ª planta.
28020-Madrid
Tno.: 913778103
France
Polaroid (France) S.A.
B.P. 7
78996-Elancourt Cédex
Tel.: 0141913810
Hong Kong
Polaroid (Far East) Ltd.
32/F Windsor House
311 Gloucester Road
Causeway Bay
Tel.: (852) 2894 0333
Italia
Polaroid (Italia) S.p.A.
Via Piave 11
21051 Arcisate (Varese)
Tel.: 0269633253
Polaroid ColorShot Parallel User’s Guide
Japan
Nippon Polaroid
Kabushiki Kaisha
Mori Building, No. 30
2-2 Toranomon 3-chome
Minato-ku, Tokyo (105)
Tel.: 81-3-3438-8811
Fax: 81-3-3433-3537
Español • 53
Page 56

Polaroid ColorShot Parallel User’s Guide
México
Polaroid de México S.A. de C.V.
Paseo de la Reforma 195-Piso 17
C.P. 06500 México, D.F.
Tel.: 703-1111
Fax: 566-0505
Del interior al 91 (800) 70-727
Ventas 91 (800) 70-747
Nederland
Polaroid Nederland B.V.
Zonnebaan 45
3606 CH Maarssen
P.O. Box 1219
3600 BE Maarssen
Tel.: 0204874534
New Zealand
Polaroid New Zealand Ltd.
Camera Services
24-26 Anzac Avenue
Auckland
Tel.: (09) 377 3773
Norge
Polaroid (Norge) A/S
Industriveien 8B, 1473 Skårer
Postboks 80, 1471 Skårer
Tlf.: 80011887
Österreich
Polaroid Ges.m.b.H.
Eitnergasse 5A
1231 Wien
Tel.: 06607433
54 • Español
Page 57

Portugal
Polaroid (España) S.A.
Sucursal em Portugal
Edificio Monumental
Avenue Praia da Vitória 71-A, 4ºB
1050 Lisboa
Tel.: 0505446017
Puerto Rico
Polaroid Caribbean Corporation
Centro de Seguros
Ave. Ponce de León 701,
Miramar, Santurce 00907
Tel.: (809) 725-6240
Fax: (809) 725-5462
Schweiz/Suisse/Svizzera
Polaroid AG
Hardturmstrasse 133
8037 Zürich
Tel.: 018385329 (Deutsch)
018385348 (Français)
018385349 (Italiano)
Polaroid ColorShot Parallel User’s Guide
Suomi
Polaroid Oy
Sinikalliontie 10
02630 Espoo
Puh.: 0800117008
Sverige
Polaroid AB
Ekholmsvägen 36
Box 204
127 24 Skärholmen
Tel.: 084451231
Español • 55
Page 58

Polaroid ColorShot Parallel User’s Guide
U.K.
Polaroid (U.K.) Ltd. &
Polaroid Export Operations
Wheathampstead House
Codicote Road
Wheathampstead
Hertfordshire AL4 8SF
Tel.: 0181 308 6508 (U.K.)
(44) 181 308 6593 (Export)
Garantía limitada del equipo
Polaroid Corporation garantiza la impresora Polaroid ColorShot
contra defectos de fabricación por un periodo de un año contado a
partir de la fecha de compra. Para verificar el periodo de garantía, es
necesario aportar el volante de compra o cualquier otro comprobante
de la misma.
Si este producto o cualquiera de sus componentes o accesorios
resultasen defectuosos durante el periodo de garantía, Polaroid
Corporation se reserva el derecho de reparar o reemplazar el
elemento defectuoso, sin cargo, siempre que el cliente devuelva el
producto al lugar de servicio que se designe (a portes pagados y con
el seguro correspondiente). La devolución del producto deberá
hacerse en su embalaje original.
Esta Garantía limitada no será válida cuando los daños del producto
se produzcan como consecuencia de accidente, instalación
incorrecta, uso inapropiado o abuso.
Advertencia: La apertura del embalaje de la impresora invalidará la
presente garantía.
Fuera de EE.UU. y Canadá, consulte la tarjeta de registro para
comprobar las condiciones de garantía locales.
LA GARANTÍA EXCLUYE TODOS LOS DAÑOS INCIDENTALES O
CAUSALES Y NO AFECTA A LOS DERECHOS ESTATUTARIOS
DEL USUARIO.
56 • Español
Page 59

Guide de l’utilisateur de l’imprimante ColorShot Parallel de Polaroid
Français
Configuration minimale
• Ordinateur compatible PC équipé d'un port parallèle.
• Système d'exploitation Microsoft Windows 95 (ou version
ultérieure).
• RAM : 16 Mo (minimum), 32 Mo (recommandé).
• 50 Mo d'espace libre sur le disque (minimum).
• Moniteur couleur VGA 800 x 600, 256 couleurs minimum, 16 bits
recommandés (voir
Dépannage
moniteur).
• Lecteur de CD-ROM 2x (minimum), 4x ou vitesse supérieure
(recommandé).
pour obtenir des conseils sur les réglages de votre
Installation du matériel et du logiciel
ColorShot de Polaroid
Cette section donne des instruction sur l'installation de l'imprimante
ColorShot de Polaroid à l'aide des fonctions « Plug-and-Play » de
Microsoft.
Si vous êtes familiarisé avec le programme d'ajout d'imprimante de
Microsoft, il est possible d'installer l'imprimante ColorShot à l'aide de
cette méthode. Voir
ce manuel.
Réglage du moniteur
Ajout d'imprimante
dans la section
dans la section
Dépannage
de
Avant d'installer le matériel et le logiciel ColorShot
Remarque : Si vous connaissez la lettre correspondant au
lecteur de CD-ROM, passez directement à la section
du matériel ColorShot de Polaroid
effectuez cette procédure avant de commencer l'installation.
1. Mettez l'ordinateur sous tension.
2. Insérez le CD Polaroid ColorShot dans le lecteur de CD-ROM.
Remarque : Laissez le CD de ColorShot dans le lecteur jusqu'à
la fin de l'installation.
. Si vous ne la connaissez pas,
Installation
Français • 57
Page 60

Guide de l’utilisateur de l’imprimante ColorShot Parallel de Polaroid
3. Cliquez deux fois sur l'icône Poste de travail qui se trouve sur le
bureau et notez la lettre qui correspond au lecteur de CD-ROM.
4. Mettez l'ordinateur hors tension.
Remarque : Si vous possédez plusieurs imprimantes et que
votre ordinateur n'est équipé que d'un seul port parallèle,
procurez-vous un boîtier manuel ou automatique de partage
d'imprimantes qui permet de connecter des imprimantes sur le
même port parallèle. Pour de plus amples informations, voir
Boîtiers électroniques de partage d'imprimantes
Dépannage
de ce manuel.
dans la section
Installation du matériel ColorShot de Polaroid
1. Imprimante
2. Témoin d'alimentation lumineux
3. Cordon d'alimentation de l'imprimante
4. Adaptateur C.A.
5. Câble d'interface imprimante
1. Placez l'imprimante ColorShot Parallel horizontalement sur une
surface plate près de votre ordinateur.
Remarque : Ne placez pas l'imprimante à la verticale.
2. Assurez-vous que l'ordinateur est hors tension.
58 • Français
Page 61

Guide de l’utilisateur de l’imprimante ColorShot Parallel de Polaroid
3. Branchez le cordon d'alimentation de l'imprimante (3) sur
l'adaptateur C.A. (4).
4. Branchez l'adaptateur C.A. (4) sur le réceptacle de l'imprimante.
5. Branchez le cordon d'alimentation (3) sur une prise de terre.
Remarque : L'imprimante est sous tension. Le témoin
d'alimentation lumineux vert (2) situé à l'avant de l'imprimante
doit être allumé. L'imprimante ne dispose d'aucun interrupteur.
6. Branchez le câble d'interface imprimante (5) sur le port parallèle
qui se trouve à l'arrière de l'ordinateur.
7. Branchez l'autre extrémité de ce câble sur le réceptacle par allèle
à l'arrière de l'imprimante.
Installation du logiciel ColorShot de Polaroid
1. Mettez l'ordinateur sous tension. L'imprimante est détectée dès
que vous mettez l'ordinateur sous tension et le message
Nouveau périphérique détecté s'affiche.
Remarque : Si le message Nouveau périphérique détecté ne
s'affiche pas, passez à
Dépannage
2. Le système recherche le pilote d'imprimante sur le lecteur de
disquettes et affiche le message Insérer la disquette.
3. Cliquez sur OK. La boîte de dialogue Copie de fichiers s'ouvre.
4. Dans la liste Copier les fichiers à partir de, supprimez le texte
sélectionné, puis tapez la lettre correspondant au lecteur de
CD-ROM (D:\ ou E:\, par exemple).
Remarque : Si vous n'avez pas encore inséré le CD Polaroid
ColorShot dans le lecteur, faites-le maintenant.
5. Cliquez sur OK pour commencer l'installation. L'accord de licence
apparaît.
6. Cliquez sur Oui pour continuer l'installation.
7. Cliquez sur Terminé lorsque la boîte de dialogue Installation
terminée apparaît.
Remarque : Lisez le fichier Readme pour connaître les toutes
dernières informations relatives à l'imprimante et à son pilote.
de ce manuel.
Ajout d'imprimante
dans la section
Français • 59
Page 62

Guide de l’utilisateur de l’imprimante ColorShot Parallel de Polaroid
Installation du logiciel de retouche d'image
gratuit (MGI PhotoSuite)
MGI PhotoSuite est un logiciel de retouche d'image simple d'emploi
fourni avec l'imprimante ColorShot de Polaroid. Nous vous
conseillons de l'installer et d'imprimer les deux images de test pour
commencer.
Installation de MGI PhotoSuite
1. Insérez le CD MGI PhotoSuite dans le lecteur de CD-ROM. La
fenêtre Installing MGI PhotoSuite apparaît.
2. Cliquez sur le bouton correspondant à la langue d'installation.
L'écran Welcome s'affiche.
3. Cliquez sur Next. L'accord de licence apparaît.
4. Cliquez sur Yes pour continuer l'installation.
5. Suivez le reste des instructions qui s'appliquent à votre système.
Aide en ligne de MGI PhotoSuite
Reportez-vous à l'aide en ligne de MGI PhotoSuite pour obtenir des
instructions sur le fonctionnement du logiciel. Procédez comme suit
pour accéder à l'aide :
1. Lancez MGI PhotoSuite. La fenêtre du guide d'activité de
MGI PhotoSuite s'ouvre.
2. Sélectionnez le bouton Help dans l'angle inférieur droit de la
fenêtre.
Remarque : Il est également possible d'accéder à l'aide de
MGI PhotoSuite en sélectionnant la commande Contents du
menu Help qui se trouve dans la fenêtre principale de
MGI PhotoSuite.
Chargement du film dans l'imprimante
ColorShot de Polaroid
1. Maintenez le loquet de la porte enfoncé.
2. Tirez pour ouvrir la porte du film.
60 • Français
Page 63

Guide de l’utilisateur de l’imprimante ColorShot Parallel de Polaroid
3. Retirez le film ColorShot de Polaroid de son emballage.
4. Insérez le film dans le compartiment, protection du film orientée
vers le haut et bordure en plastique vers la porte.
Remarque : La protection a pour but de préserver le film sensible
à la lumière.
Protection du film
5. Faites coulisser le compartiment du film jusqu’à ce qu’il
s’enclenche en position fermée.
Configuration du pilote d'imprimante
Vous devez configurer son pilote ColorShot de Polaroid pour pouvoir
utiliser l'imprimante.
1. Dans le menu Démarrer, sélectionnez Paramètres.
2. Cliquez sur le dossier Imprimantes.
3. Cliquez deux fois sur l'icône de l'imprimante ColorShot. La boîte
de dialogue d'état de l'imprimante Polaroid ColorShot apparaît à
l'écran.
4. Sélectionnez Propriétés dans le menu Imprimante.
Français • 61
Page 64

Guide de l’utilisateur de l’imprimante ColorShot Parallel de Polaroid
Définition des détails de l'imprimante
1. Cliquez sur l'onglet Détails.
2. Sélectionnez l'imprimante ColorShot Parallel de Polaroid comme
imprimante par défaut.
Remarque : Si vous utilisez régulièrement une imprimante
papier, ne sélectionnez pas ColorShot par défaut.
Définition des graphiques de l'imprimante
1. Cliquez sur l'onglet Graphiques.
2. Sélectionnez Portrait comme orientation par défaut. Si
nécessaire, vous pouvez modifier ce paramètre à partir de
l'application de retouche d'image.
Remarque : Laissez le niveau d'intensité en position centrale. Ne
modifiez ce paramètre que lorsque vous devez compenser la
variation de vitesse d'un film.
3. Dans la zone Copies, cliquez sur les flèches haut ou bas pour
sélectionner le nombre de copies à imprimer.
4. Cochez la case Aperçu pour afficher un aperçu de l'image à
l'écran avant l'impression.
Définition des options de périphérique
1. Cliquez sur la flèche de menu déroulant située à côté de Type de
film. La liste déroulante correspondante apparaît.
2. Sélectionnez le type de film approprié dans la liste.
3. Cochez la case Technologie IQA pour activer le logiciel Image
Quality Assurance de Polaroid. Cette technologie est conçue
pour éclaircir les couleurs des images qui n'ont pas été
retouchées (des photos numérisées ou qui n'ont pas encore subi
de correction des couleurs ou de traitement de l'image).
Remarque : Utilisez la technologie IQA avec des images
obtenues à partir d'Internet ou des images dont les couleurs ont
été corrigées dans une application de retouche d'image.
62 • Français
Page 65

Guide de l’utilisateur de l’imprimante ColorShot Parallel de Polaroid
Réglage du moniteur
Nous vous conseillons d'utiliser la résolution la plus haute possible
sur votre moniteur. Procédez comme suit pour régler le moniteur :
1. Cliquez avec le bouton droit de la souris sur un endroit
quelconque du bureau. Un menu apparaît.
2. Sélectionnez la commande Propriétés. La boîte de dialogue
Propriétés d'affichage s'ouvre.
3. Sélectionnez l'onglet Configuration.
4. Réglez la palette des couleurs sur 16 bits ou plus.
5. Déplacez le curseur de la zone Espace du bureau vers la droite
afin d'obtenir la résolution la plus haute possible (800 x 600
recommandé).
6. Cliquez sur OK.
Test de l'imprimante
Pour savoir comment utiliser l'imprimante ColorShot de Polaroid,
nous vous conseillons d'imprimer les deux images de test (portrait et
paysage) à l'aide de MGI PhotoSuite. Ces images se trouvent dans le
répertoire Samples situé dans le dossier ColorShot du disque dur.
Impression de l'image de test Portrait
1. Lancez le logiciel MGI PhotoSuite. La fenêtre de sélection de
MGI PhotoSuite s'ouvre.
2. Cliquez sur Print Your Photos. Selon le cas, la boîte de dialogue
Open Image or Album apparaît.
3. Ouvrez le dossier Samples de ColorShot. Il se trouve dans le
dossier ColorShot situé sur le disque dur de votre système.
4. Cliquez deux fois sur le fichier image kids.tif. Il s'affiche dans la
fenêtre MGI PhotoSuite.
5. Cliquez sur la commande Printer Setup du menu File dans la
fenêtre MGI PhotoSuite.
6. Sélectionnez l'imprimante ColorShot Parallel de Polaroid.
7. Sélectionnez l'orientaion Portrait.
8. Cliquez sur OK.
Français • 63
Page 66

Guide de l’utilisateur de l’imprimante ColorShot Parallel de Polaroid
9. Cliquez sur l'icône Print Preview sur la barre d'outils de MGI
PhotoSuite. La fenêtre d'aperçu de MGI PhotoSuite s'ouvre.
10. Cliquez sur le bouton Size to Fit situé sur la barre d'outils.
11. Cliquez sur l'icône d'imprimante de la barre d'outils.
12. Cliquez sur OK. Si vous n'avez pas configuré le pilote
d'imprimante ColorShot de manière à afficher la fenêtre d'aperçu,
l'image s'imprime. Si vous avez choisi l'option Using Preview
dans le pilote d'imprimante, la fenêtre ColorShot Preview s'ouvre.
13. Cliquez sur l'icône de l'imprimante pour lancer l'impression.
S’il s’agit de la première impression, la protection du film est d’abord
éjectée. En quelques instants, l'image kids.tif s'imprime.
Impression de l'image de test Paysage
1. Cliquez sur la commande Open du menu File dans la fenêtre
MGI PhotoSuite.
2. Ouvrez le dossier Samples de ColorShot. Il se trouve dans le
dossier ColorShot situé sur le disque dur de votre système.
3. Cliquez deux fois sur le fichier image Flowers.tif.
4. Cliquez sur la commande Printer Setup du menu File dans la
fenêtre MGI PhotoSuite.
5. Sélectionnez l'orientation Landscape (Paysage).
6. Suivez les étapes 8 à 13 de la section précédente
l'image de test Portrait
En quelques instants, l'image flowers.tif s'imprime.
.
Impression de
Dépannage
Si l'imprimante ne fonctionne pas correctement et que vous ne
parvenez pas à résoudre le problème en suivant les informations
fournies dans ce manuel, contactez l'assistance technique de
Polaroid comme décrit dans la section
manuel.
64 • Français
Assistance technique
de ce
Page 67

Guide de l’utilisateur de l’imprimante ColorShot Parallel de Polaroid
Ajout d'imprimante
Si vous êtes familiarisé avec le programme d'ajout d'imprimante de
Microsoft, procédez comme suit pour installer l'imprimante ColorShot
de Polaroid sur votre système.
1. Cliquez deux fois sur l'icône Poste de travail située sur le bureau.
2. Cliquez deux fois sur l'icône du dossier Imprimantes.
3. Cliquez deux fois sur l'icône Ajout d'imprimante. L’Assistant ajout
d’imprimante apparaît.
4. Suivez les instructions qui s'appliquent à votre système.
Désinstallation du logiciel ColorShot de Polaroid
L'imprimante ColorShot Parallel de Polaroid est un périphérique
« Plug-and-Play ». Si, pour une r aison quelconque , vous interrompez
l'installation, la Base de registres risque d'être altérée et vous devrez
désinstaller le périphérique avant de pouvoir le réinstaller.
Attention : Si vous ne maîtrisez pas bien la suppression des
entrées de la Base de registres de votre système, demandez de
l'aide à l'assistance technique de Polaroid.
Suppression de l'imprimante ColorShot
1. Cliquez deux fois sur l'icône Poste de travail située sur le bureau.
2. Cliquez deux fois sur l'icône du dossier Imprimantes.
3. Cliquez sur l'icône ColorShot.
4. Sélectionnez la commande Supprimer du menu Fichier.
5. Cliquez sur Tous.
Suppression des entrées relatives à ColorShot dans la Base de
registres
1. Assurez-vous que le CD ColorShot se trouve dans le lecteur de
CD-ROM.
2. Dans le menu Démarrer, sélectionnez Programmes.
3. Cliquez sur Explorateur Windows.
4. Cliquez sur le lecteur de CD-ROM.
5. Dans le dossier Contenu, cliquez avec le bouton droit de la souris
sur Parallel_Recover_PnP.Inf.
Français • 65
Page 68

Guide de l’utilisateur de l’imprimante ColorShot Parallel de Polaroid
6. Choisissez Installer.
Ceci permet de supprimer toutes les entrées de ColorShot dans la
Base de registres.
Boîtiers électroniques de partage d'imprimantes
Si vous possédez plusieurs imprimantes et que votre ordinateur n'est
équipé que d'un seul port parallèle, vous pouvez utiliser un boîtier de
partage d'imprimantes qui permet de connecter des imprimantes sur
le même port. Le schéma suivant illustre la conne xion du boîtier entre
l'ordinateur et les imprimantes.
Contactez votre revendeur ou le centre Polaroid le plus proche pour
obtenir des informations sur les boîtiers de partage d'imprimantes
disponibles.
66 • Français
1. Imprimante ColorShot
2. Témoin d'alimentation lumineux
3. Imprimante papier
4. Adaptateur/cordon d'alimentation C.A.
5. Boîtier de partage d'imprimantes
6. Port parallèle de l'imprimante
7. Câbles d'interface
Page 69

Guide de l’utilisateur de l’imprimante ColorShot Parallel de Polaroid
Conseils d'utilisation
Cette sous-section donne des conseils concernant l'impression des
images avec l'imprimante ColorShot Parallel de Polaroid.
Amélioration des performances de l'imprimante
Pour améliorer la vitesse et les performances de l'imprimante :
• augmentez la quantité de mémoire vive (RAM) de l'ordinateur.
• augmentez l'espace libre du disque dur.
• réduisez la taille des fichiers image si possible. Plus le fichier est
volumineux, plus son impression prend de temps.
• fermez les autres applications et documents ouverts lors de
l'impression.
Aperçu avant impression
Le format de papier est propre à l'imprimante. Nous vous
recommandons d'afficher un aperçu de tous les documents avant de
les imprimer. Le pilote d'imprimante ColorShot est équipé d'une
fenêtre d'aperçu, tout comme MGI PhotoSuite.
• Il peut se passer un peu de temps entre la sélection de la fonction
Imprimer de l'application de retouche d'image et l'affichage de la
fenêtre d'aperçu. Le délai dépend de la vitesse de l'ordinateur et
de la taille du fichier à imprimer.
• Si l'imprimante ColorShot n'imprime pas, vérifiez que vous n'avez
pas réduit la fenêtre d'aperçu.
• Si vous ne voyez pas la totalité de l'image dans la fenêtre
d'aperçu, assurez-vous que les marges sont définies sur zéro
dans la mise en page.
Chargement d'un film partiellement utilisé
Si vous chargez un film partiellement utilisé, n'oubliez pas les points
suivants :
• L'imprimante est conçue de manière à attendre un film neuf et le
logiciel indique un nombre d'images incorrect. Vous devrez
compter vous-même le nombre de poses.
Français • 67
Page 70

Guide de l’utilisateur de l’imprimante ColorShot Parallel de Polaroid
• L'image supérieure d'un film partiellement utilisé se comporte
comme une protection. Elle est éjectée lorsque vous lancez la
première impression.
Impression de photos numérisées
V eillez à numériser des photos av ec une résolution et des dimensions
conformes au périphérique de sortie.
• Pour l'imprimante ColorShot de Polaroid, la résolution est de
160 ppp pour 9,21 x 7,62 cm (3,625 x 3,0 po).
• Dans l'application de retouche d'image, assurez-vous que le
rapport hauteur-largeur est conservé lors du redimensionnement
de l'image numérisée, sans quoi elle sera déformée.
Impression de photos prises avec un appareil photo numérique
Si vous pouvez choisir la résolution de l'appareil photo numérique,
sélectionnez la meilleure qualité ou la résolution qui se rapproche le
plus de la résolution ColorShot, à savoir 580 x 480.
Taille du fichier image
Pour contrôler au mieux la taille de l'image :
• Nous vous recommandons de redimensionner l'image dans
l'application de retouche d'image avant de l'imprimer.
• Lorsque vous avez le choix entre des fichiers .bmp, .tif et .jpg,
sélectionnez .bmp plutôt que .tif et .tif plutôt que .jpg. La
compression est inférieure dans chaque cas.
• Si vous devez absolument utiliser le format .jpg, sélectionnez le
taux de compression le plus bas ou la qualité maximum.
• L'imprimante ColorShot de Polaroid ne peut pas imprimer de
fichiers plus volumineux que 18 Mo.
Utilisation du matériel et du logiciel ColorShot de Polaroid sur
des systèmes équipés d'autres imprimantes
Dans la majorité des cas, une imprimante autonome ou réseau est
connectée à votre ordinateur. Il est conseillé d'imprimer un fichier
image ColorShot de Polaroid uniquement lorsque les autres
imprimantes ne sont pas en cours d'impression.
68 • Français
Page 71

Guide de l’utilisateur de l’imprimante ColorShot Parallel de Polaroid
Erreurs de communication
• Si vous obtenez une erreur de communication avec l'imprimante
ColorShot de Polaroid, assurez-vous que les câbles sont
correctement branchés sur le port LPT à l'arrière de l'ordinateur
et sur l'imprimante ColorShot.
• Si vous obtenez une erreur du type Port de communication non
pris en charge, cela signifie que le port sélectionné n'est pas pris
en charge par l'imprimante ColorShot. Sélectionnez un autre port
LPT pour l'imprimante. Vous pouvez modifier les paramètres de
port dans l'onglet Détails de la boîte de dialogue Propriétés de
ColorShot.
• Dans la majorité des cas, il suffit de cliquer sur le bouton
Réessayer après la plupart des erreurs de communication pour
obtenir à nouveau un fonctionnement normal. Toutefois, dans
certaines occasions, les travaux risquent d'être supprimés de la
file d'attente d'impression.
Erreur de manque de mémoire
Si vous obtenez une erreur Manque de mémoire, le système manque
de mémoire et se trouve dans l'impossibilité de lancer l'impression.
Fermez toute application en cours et réessayez d'imprimer.
Assistance technique
Depuis les Etats-Unis, appelez le 1-800-432-5355, du lundi au
vendredi, de 08h00 à 20h00 (heure de la côte est) ou envoyez une
télécopie au 1-781-386-9688. Vous pouvez également écrire à
Polaroid National Technical Support Operations, 201 Burlington
Road, 1-2A Bedford, MA 01730.
Depuis le Canada, appelez le 1-800-268-6970 ou écrivez à Polaroid
Canada, 350 Carlingview Dr., Toronto, Ontario M9W 5G6. Télécopie :
416-675-3228.
Vous pouvez également poser des questions techniques par
l'intermédiaire du courrier électronique en vous connectant au site
Polaroid sur le World Wide Web (http://www.polaroid.com). Cliquez
sur Customer Support.
Français • 69
Page 72

Guide de l’utilisateur de l’imprimante ColorShot Parallel de Polaroid
Bureaux Polaroid et centres d'assistance
Australie
Polaroid Australia Pty. Ltd.
13-15 Lyonpark Road
P.O. Box 163
North Ryde, NSW 2113
Tél. : (02) 950 7000
Télécopie : (02) 887 2209
Belgique/België
Polaroid (Belgium) N.V. - S.A.
Rue Colonel Bourg 111
Kolonel Bourgstraat 111
1140 Bruxelles-1140 Brussel
Tél. : 027143102 (Flamand)
027143106 (Français)
Brésil
Polaroid do Brasil Ltda.
Av. Paulista, 1776/11º andar
Cerqueira Cesar
São Paulo - Capital
01310-921
Tél. : 55.11.285.6411
Télécopie : 55.11.283.2625
288.6521
287.5393
Danemark
Polaroid a.s.
Blokken 75
3460 Birkerød
Tél. : 80011887
Allemagne
Polaroid GmbH
Sprendlinger Landstrasse 109
63069 Offenbach
Tél. : 06995096056
70 • Français
Page 73

Guide de l’utilisateur de l’imprimante ColorShot Parallel de Polaroid
Espagne
Polaroid (España), S.A.
Calle Orense 16 - 2ª planta.
28020-Madrid
Tél. : 913778103
France
Polaroid (España), S.A.
B.P. 7
78996-Elancourt Cédex
Tél. : 0141913810
Hong Kong
Polaroid (Far East) Ltd.
32/F Windsor House
311 Gloucester Road
Causeway Bay
Tél. : (852) 2894 0333
Italie
Polaroid (Italia) S.p.A.
Via Piave 11
21051 Arcisate (Varese)
Tél. : 0269633253
Japon
Nippon Polaroid
Kabushiki Kaisha
Mori Building, No. 30
2-2 Toranomon 3-chome
Minato-ku, Tokyo (105)
Tél. : 81-3-3438-8811
Télécopie : 81-3-3433-3537
Français • 71
Page 74

Guide de l’utilisateur de l’imprimante ColorShot Parallel de Polaroid
Mexique
Polaroid de México S.A. de C.V.
Paseo de la Reforma 195-Piso 17
C.P. 06500 México, D.F.
Tél. : 703-1111
Télécopie : 566-0505
Del interior al 91 (800) 70-727
Ventas 91 (800) 70-747
Pays-Bas
Polaroid Nederland B.V.
Zonnebaan 45
3606 CH Maarssen
P.O. Box 1219
3600 BE Maarssen
Tél. : 0204874534
Nouvelle-Zélande
Polaroid New Zealand Ltd.
Camera Services
24-26 Anzac Avenue
Auckland
Tél. : (09) 377 3773
Norvège
Polaroid (Norge) A/S
Industriveien 8B, 1473 Skårer
Postboks 80, 1471 Skårer
Tél. : 80011887
Autriche
Polaroid Ges.m.b.H.
Eitnergasse 5A
1231 Wien
Tél. : 06607433
72 • Français
Page 75

Guide de l’utilisateur de l’imprimante ColorShot Parallel de Polaroid
Portugal
Polaroid (España), S.A.
Sucursal em Portugal
Edificio Monumental
Avenue Praia da Vitória 71-A, 4ºB
1050 Lisboa
Tél. : 0505446017
Porto Rico
Polaroid Caribbean Corporation
Centro de Seguros
Ave. Ponce de León 701,
Miramar, Santurce 00907
Tél. : (809) 725-6240
Télécopie : (809) 725-5462
Schweiz/Suisse/Svizzera
Polaroid AG
Hardturmstrasse 133
8037 Zürich
Tél. : 018385329 (allemand)
018385348 (français)
018385349 (italien)
Finlande
Polaroid Oy
Sinikalliontie 10
02630 Espoo
Tél. : 0800117008
Suède
Polaroid AB
Ekholmsvägen 36
Box 204
127 24 Skärholmen
Tél. : 084451231
Français • 73
Page 76

Guide de l’utilisateur de l’imprimante ColorShot Parallel de Polaroid
Royaume-Uni
Polaroid (U.K.) Ltd. &
Polaroid Export Operations
Wheathampstead House
Codicote Road
Wheathampstead
Hertfordshire AL4 8SF
Tél. : 0181 308 6508 (Royaume-Uni)
(44) 181 308 6593 (Export)
Garantie limitée sur l'équipement
Polaroid Corporation garantit que l'imprimante P olaroid ColorShot est
exempte de tout défaut de fabrication pendant une période d'un an à
compter de la date d'achat. Pour vérifier cette période de garantie, il
est conseillé de conserver la facture ou toute autre preuve de la date
d’achat.
Si ce produit, ou l’un de ses composants ou accessoires, était
défectueux pendant la période de garantie, Polaroid Corporation
s’engage, à sa discrétion, à remplacer ou à réparer gratuitement cet
élément, à condition que le produit soit retourné à un service aprèsvente agréé (port payé et assuré), dans son emballage d'origine.
Cette garantie limitée ne s’applique pas aux défauts du produit
résultant d’un accident, d’une installation incorrecte, d’une
modification non autorisée, d’un abus ou d’une mauvaise utilisation.
Attention : L’ouverture du boîtier de l’imprimante annule cette
garantie.
Hors des Etats-Unis et du Canada, reportez-vous à la carte
d'enregistrement pour connaître les conditions de garanties locales.
CETTE GARANTIE EXCLUT TOUS LES DOMMAGES FORTUITS
OU SECONDAIRES ET N’AFFECTE PAS VOS DROITS LEGAUX.
74 • Français
Page 77

Guida per l’utente di Polaroid ColorShot Parallel
Italiano
Requisiti di sistema
• Un computer PC compatibile con porta parallela.
• Sistema operativo Microsoft Windows 95 o successivo.
• 16MB di RAM (minimo); 32MB di RAM (consigliati)
• 50MB di spazio libero su disco (minimo).
• Monitor a colori VGA 800 x 600, con minimo 256 colori, 16 bit
consigliati (per informazioni sull’impostazione del monitor, v edere
Impostazione del monitor consigliata
dei problemi
• Un'unità CD-ROM, velocità 2x (minimo); 4x o superiore
(consigliata)
).
Installazione dell’hardware e del software di
Polaroid ColorShot
In questa sezione vengono fornite le istruzioni per l’installazione della
stampante Polaroid ColorShot tramite la funzione plug and play di
Microsoft.
Se si conosce il programma Microsoft per l’aggiunta di stampanti, è
possibile scegliere di installare la stampante ColorShot utilizzando
tale metodo. Vedere
Risoluzione dei problemi
Aggiunta di una stampante
del manuale.
nella sezione
nella sezione
Risoluzione
Prima di installare l’hardware e il software di
ColorShot
Nota: Se si conosce la lettera dell’unità CD-ROM, tralasciare
questa sezione e passare all’argomento
dell’hardware di Polaroid ColorShot.
dell’unità CD-ROM, effettuare le seguenti operazioni prima di
iniziare l’installazione.
1. Accendere il computer.
2. Inserire il CD-ROM di Polaroid ColorShot nell’apposita unità.
Installazione
Se non si conosce la lettera
Italiano • 75
Page 78

Guida per l’utente di Polaroid ColorShot Parallel
Nota: Non rimuovere il CD ColorShot dall’unità fino al termine
dell’installazione.
3. Fare doppio clic sull’icona Risorse del computer sul desktop e
prendere nota della lettera corrispondente all’unità CD-ROM.
4. Spegnere il computer.
Nota: Se si dispone di più stampanti ma il computer è dotato di
una sola porta parallela, è possibile acquistare un dispositivo
elettronico di commutazione, manuale o automatico, che
consente di collegare le stampanti alla stessa porta parallela. P er
ulteriori informazioni, vedere
commutazione
nella sezione
Dispositivi elettronici di
Risoluzione dei problemi
del
manuale.
Installazione dell’hardware di Polaroid ColorShot
76 • Italiano
1. Stampante
2. Spia di alimentazione
3. Cavo di alimentazione
4. Adattatore CA
5. Cavo di interfaccia della stampante
Page 79

Guida per l’utente di Polaroid ColorShot Parallel
1. Collocare la stampante in posizione orizzontale su una superficie
piana accanto al computer.
Nota: Non posizionare la stampante in senso verticale.
2. Accertarsi che il computer sia spento.
3. Collegare il cavo di alimentazione della stampante (3)
all’adattatore CA (4).
4. Collegare l’adattatore CA (4) all’apposita presa della stampante.
5. Collegare il cavo di alimentazione (3) a una presa con messa
a terra.
Nota: La stampante è accesa. La spia di alimentazione verde (2)
sulla parte frontale della stampante dovrebbe essere accesa. La
stampante non ha interruttore di accensione.
6. Collegare il cavo di interfaccia della stampante (5) alla porta
parallela sul retro del computer.
7. Collegare l’altra estremità del cavo di interfaccia della stampante
alla porta parallela sul retro della stampante.
Installazione del software di Polaroid ColorShot
1. Accendere il computer. La stampante viene rilevata
all’accensione del sistema, quindi viene visualizzata la finestra di
messaggio Nuovo componente hardware individuato.
Nota: Se tale finestra non viene visualizzata, passare
all’argomento
Risoluzione dei problemi
2. Il sistema ricerca il software del driver di stampa nell’unità disco
floppy e visualizza la finestra di messaggio Inserire il disco.
3. Scegliere OK. Viene aperta la finestra di dialogo Copia dei file
in corso.
4. Nell'elenco Copia file da, premere il tasto Canc per eliminare il
testo evidenziato, quindi digitare la lettera dell'unità CD-ROM, ad
esempio D:\ o E:\).
Nota: Se non è stato già inserito, inserire il CD Polaroid
ColorShot nell’apposita unità.
5. Scegliere OK per iniziare l'installazione. Viene visualizzato
l'accordo di licenza.
Aggiunta di una stampante
del manuale.
nella sezione
Italiano • 77
Page 80

Guida per l’utente di Polaroid ColorShot Parallel
6. Fare clic su Sì per continuare l’installazione.
7. Fare clic su Fine quando viene visualizzata la finestra di dialogo
Installazione completata.
Nota: Visualizzare il file Readme che contiene le ultime
informazioni sulla stampante e sul driver di stampa.
Installazione del Free Image Editing Software
(MGI PhotoSuite)
MGI PhotoSuite è un pacchetto software di semplice utilizzo per
l’elaborazione delle immagini fornito con la stampante Polaroid
ColorShot. Polaroid consiglia di installare il pacchetto e di stampare
due immagini di prova.
Installazione di MGI PhotoSuite
1. Inserire il CD di MGI PhotoSuite nell'apposito unità. Viene
visualizzata la finestra relativa all’installazione di MGI PhotoSuite.
2. Fare clic sul pulsante relativo alla lingua desiderata per
l’installazione. Viene aperta una finestra di benvenuto.
3. Scegliere Avanti. Viene visualizzato l'accordo di licenza.
4. Fare clic su Sì per continuare l’installazione.
5. Attenersi alle istruzioni di installazione relative al sistema
utilizzato.
Guida in linea di MGI PhotoSuite
Per istruzioni sul funzionamento del software, consultare la Guida in
linea di MGI PhotoSuite. Per accedere alla Guida:
1. Avviare MGI PhotoSuite. Viene aperta la finestra MGI PhotoSuite
Activity Guide.
2. Selezionare il pulsante Help nell’angolo inferiore destro della
finestra.
Nota: È inoltre possibile accedere alla Guida di MGI PhotoSuite
selezionando Contents nel menu Help della finestra principale di
MGI PhotoSuite.
78 • Italiano
Page 81

Guida per l’utente di Polaroid ColorShot Parallel
Caricamento della pellicola nella stampante
Polaroid ColorShot
1. Tenere premuta la levetta dello sportello.
2. Aprire lo sportello della pellicola.
3. Estrarre la pellicola Polaroid ColorShot dalla confezione.
4. Inserire la pellicola nel vassoio con la protezione della pellicola
rivolta verso l'alto e il bordo in plastica largo verso lo sportello.
Nota: La protezione della pellicola preserva dalla luce il materiale
fotosensibile.
Protezione pellicola
5. Inserire il vassoio pellicola fino a chiuderlo con uno scatto.
Configurazione del driver di stampa
Per poter utilizzare la stampante Polaroid ColorShot, è necessario
configurare il driver di stampa Polaroid ColorShot.
1. Dal menu Avvio, scegliere Impostazioni.
2. Fare clic sulla cartella Stampanti.
Italiano • 79
Page 82

Guida per l’utente di Polaroid ColorShot Parallel
3. Fare doppio clic sull'icona della stampante ColorShot all’interno
della cartella. Viene aperta la finestra di stato di Polaroid
ColorShot.
4. Selezionare Proprietà nel menu Stampante.
Impostazione dei dettagli della stampante
1. Fare clic sulla scheda Dettagli.
2. Selezionare Polaroid Parallel ColorShot come stampante
predefinita.
Nota: Se normalmente si utilizza una stampante su carta, non
selezionare ColorShot come stampante predefinita.
Impostazione della grafica della stampante
1. Fare clic sulla scheda Grafica.
2. Selezionare Verticale come impostazione predefinita. Se
necessario, è possibile ignorare questa selezione
nell’applicazione di elaborazione delle immagini.
Nota: Non modificare l’impostazione del livello di intensità. È
necessario modificare questa impostazione solo per compensare
la differenza di velocità di alcune confezioni di pellicola.
3. Nella casella Copie, fare clic sulle frecce SU e GIÙ per
selezionare il numero di copie che si desidera stampare.
4. Fare clic sulla casella di controllo Uso anteprima per visualizzare
un’anteprima dell’immagine prima di avviare la stampa.
Impostazione delle opzioni
1. Fare clic sulla freccia di selezione posta accanto a Tipo di
pellicola. Viene visualizzato un elenco a discesa dei tipi di
pellicola.
2. Selezionare il tipo appropriato nell’elenco.
3. Selezionare la casella Tecnologia IQA per abilitare il software di
ottimizzazione delle immagini Image Quality Assurance Polaroid.
La tecnologia IQA (Image Quality Assurance) consente di
ottenere colori più brillanti nelle immagini non sottoposte a
processi di ottimizzazione, ovvero immagini f otografiche acquisite
80 • Italiano
Page 83

Guida per l’utente di Polaroid ColorShot Parallel
tramite scanner o non sottoposte ad alcun processo di correzione
del colore e dell’immagine.
Nota: Non utilizzare la tecnologia IQA per immagini trasferite da
Internet o sottoposte a correzione del colore in un’applicazione di
modifica delle immagini.
Impostazione del monitor consigliata
Si consiglia di impostare il monitor sulla massima risoluzione
disponibile. Per regolare le impostazioni del monitor:
1. Fare clic con il pulsante destro del mouse in un punto qualsiasi
del desktop. Viene visualizzato un menu.
2. Selezionare Proprietà. Viene aperta la finestra di dialogo
Proprietà-Schermo.
3. Selezionare la scheda Impostazioni.
4. Impostare Tavolozza dei colori su 16 bit o su un valore superiore.
5. Spostare il cursore nell'area del desktop verso destra, sulla
massima risoluzione disponibile; si consiglia di utilizzare una
risoluzione pari a 800 x 600.
6. Scegliere OK.
Prova della stampante
Per imparare ad usare la stampante Polaroid ColorShot, Polaroid
consiglia di stampare due immagini di prova con orientamento
verticale e orizzontale utilizzando MGI PhotoSuite. Le immagini di
prova si trovano nella cartella Samples, contenuta nella cartella
ColorShot sul disco rigido.
Stampa di un’immagine di prova con orientamento
verticale
1. Avviare il software MGI PhotoSuite. Viene aperta la finestra di
selezione MGI PhotoSuite.
2. Fare clic su Print Your Photos. Viene visualizzata la finestra di
dialogo Open Image o Album.
3. Aprire la cartella Samples ColorShot che si trova nella cartella
ColorShot sul disco rigido.
Italiano • 81
Page 84

Guida per l’utente di Polaroid ColorShot Parallel
4. Fare doppio clic sul file immagine kids.tif. La finestra
MGI PhotoSuite visualizza l’immagine selezionata.
5. Fare clic su Printer Setup nel menu File della finestra
MGI PhotoSuite.
6. Selezionare Polaroid Parallel ColorShot come stampante.
7. Selezionare l’impostazione verticale.
8. Scegliere OK.
9. Fare clic sull’icona Print Preview nella barra degli strumenti della
finestra MGI PhotoSuite. Viene aperta la finestra di anteprima di
stampa MGI PhotoSuite.
10. Fare clic sul pulsante Size to Fit nella barra degli strumenti.
11. Fare clic sull’icona Printer nella barra degli strumenti.
12. Scegliere OK. Se il driver di stampa ColorShot non è stato
configurato per visualizzare la finestra Print Preview, l’immagine
viene stampata. Se il driver di stampa è configurato per Using
Preview, viene aperta la finestra di anteprima ColorShot.
13. Fare clic sull’icona Printer per avviare la stampa.
Se si tratta della prima pellicola della confezione, la stampante
espelle prima la protezione. Dopo alcuni secondi, viene stampata
l’immagine kids.tif.
Stampa di un’immagine di prova con orientamento
orizzontale
1. Selezionare Open nel menu File della finestra MGI PhotoSuite.
2. Aprire la cartella Samples ColorShot che si trova nella cartella
ColorShot sul disco rigido.
3. Fare doppio clic sul file immagine flowers.tif.
4. Fare clic su Printer Setup nel menu File della finestra MGI
PhotoSuite.
5. Selezionare l’impostazione orizzontale.
6. Seguire i passi da 8 a 13 elencati nella sezione precedente
Stampa di un’immagine di prova con orientamento verticale
Dopo alcuni secondi, viene stampata l’immagine flowers.tif.
82 • Italiano
.
Page 85

Guida per l’utente di Polaroid ColorShot Parallel
Risoluzione dei problemi
Se il funzionamento della stampate non è corretto e non è possibile
risolvere i problemi riscontrati seguendo le procedure indicate in
questo manuale, contattare l’assistenza tecnica Polaroid, come
indicato nella sezione
Aggiunta di una stampante
Se si conosce il programma Microsoft per l'aggiunta di stampanti,
effettuare le operazioni seguenti per installare la stampante Polaroid
ColorShot.
1. Fare doppio clic sull'icona Risorse del computer sul desktop.
2. Fare doppio clic sull'icona della cartella Stampanti.
3. Fare doppio clic sull'icona Aggiungi stampante. Viene aperta la
finestra Installazione stampante.
4. Attenersi alle istruzioni relative al sistema utilizzato.
Disinstallazione del software di Polaroid ColorShot
La stampante Polaroid ColorShot è un dispositivo “plug and play”. Se
il processo di installazione viene interrotto, è possibile che il registro
venga danneggiato: disinstallare il dispositivo prima di installarlo
nuovamente.
Attenzione: Se non si conoscono le procedure di eliminazione
delle voci dal registro di sistema, contattare l’assistenza tecnica
Polaroid per ulteriori informazioni.
Assistenza tecnica
del manuale.
Eliminazione della stampante ColorShot
1. Fare doppio clic sull'icona Risorse del computer sul desktop.
2. Fare doppio clic sull'icona della cartella Stampanti.
3. Fare doppio clic sull’icona ColorShot.
4. Selezionare Elimina dal menu File.
5. Fare clic su Sì tutti.
Italiano • 83
Page 86

Guida per l’utente di Polaroid ColorShot Parallel
Eliminazione delle voci ColorShot dal registro
1. Accertarsi che il CD ColorShot sia inserito nell’unità CD-ROM.
2. Dal menu Avvio, scegliere Programmi.
3. Fare clic su Gestione risorse.
4. Fare clic sull’unità CD-ROM.
5. Nella cartella Contents, fare clic con il pulsante destro del mouse
su Parallel_Recover_PnP.Inf.
6. Scegliere Install.
Questa operazione consente di eliminare tutte le voci ColorShot dal
registro di sistema.
Dispositivi elettronici di commutazione
Se si dispone di più stampanti ma il computer è dotato di una sola
porta parallela, è possibile utilizzare un dispositivo di commutazione
che consente di collegare le stampanti alla stessa porta parallela
L’illustrazione seguente mostra la procedura di installazione di un
dispositivo di commutazione sul computer e sulle stampanti.
Per informazioni sui dispositivi di commutazione disponibili,
contattare il rivenditore o l’ufficio Polaroid più vicino.
84 • Italiano
Page 87

Guida per l’utente di Polaroid ColorShot Parallel
1. Stampante ColorShot
2. Spia di alimentazione
3. Stampante su carta
4. Adattatore CA/cavo di alimentazione
5. Dispositivo di commutazione
6. Porta parallela del computer
7. Cavi di interfaccia
Suggerimenti
In questa sottosezione vengono forniti dei suggerimenti per la stampa
di immagini con la stampante Polaroid ColorShot Parallel.
Ottimizzazione delle prestazioni della stampante
Per ottimizzare la velocità e le prestazioni della stampante:
• Aumentare la quantità di RAM nel computer.
• Aumentare lo spazio disponibile sul disco rigido.
• Se possibile, ridurre le dimensioni dei file immagine; la v elocità di
stampa è inversamente proporzionale alle dimensioni del file.
• Chiudere le altre applicazioni e gli altri documenti aperti durante
le operazioni di stampa.
Italiano • 85
Page 88

Guida per l’utente di Polaroid ColorShot Parallel
Uso dell’anteprima prima della stampa
La dimensione della carta è specifica per ciascuna stampante.
Polaroid consiglia di visualizzare in anteprima ciascun file prima della
stampa. Il driv er di stampa ColorShot e MGI PhotoSuite sono dotati di
una finestra di anteprima.
• Si verifica un ritardo tra la selezione della funzione di stampa in
un’applicazione di elaborazione delle immagini e la
visualizzazione della finestra di anteprima ColorShot. La durata
del ritardo dipende dalla velocità del computer e dalla dimensione
del file immagine in corso di stampa.
• Se la stampa non viene eseguita, verificare che la finestra di
anteprima non sia stata ridotta a icona.
• Se l’immagine non viene visualizzata integralmente nella finestra
di anteprima, verificare che i margini siano impostati su zero in
Page Setup nella finestra di anteprima.
Caricamento di una confezione parzialmente usata
Se si carica una confezione di pellicola parzialmente usata, tenere
presente che:
• La stampante considera la confezione come se fosse intera e il
conteggio degli scatti fornito dal software risulta errato. Si
consiglia quindi di prendere nota manualmente del numero di foto
stampate.
• La prima pellicola agisce da protezione e viene espulsa dopo
l’invio del primo comando di stampa.
Stampa di fotografie sottoposte a scansione
Eseguire la scansione delle foto utilizzando la risoluzione e la
dimensione del dispositivo di uscita.
• La stampante Polaroid ColorShot utilizza una risoluzione a
160 dpi, 3,625 pollici per 3 pollici.
• Nell’applicazione di elaborazione delle immagini, verificare che
venga mantenuto il rapporto tra altezza e larghezza quando
un’immagine sottoposta a scansione viene ridimensionata; in
caso contrario, l’immagine risulterà distorta.
86 • Italiano
Page 89

Guida per l’utente di Polaroid ColorShot Parallel
Stampa di fotografie acquisite con una fotocamera digitale
Se è possibile scegliere la risoluzione della fotocamera digitale,
selezionare la qualità più elevata o la risoluzione più vicina a quella
utilizzata da ColorShot, ovvero 580 x 480.
Dimensione dei file immagine
Per regolare nel modo migliore la dimensione dell’immagine:
• Polaroid consiglia di ridimensionare l’immagine nell’applicazione
di elaborazione prima di avviare la stampa.
• Se è possibile scegliere tra file immagine in formato .bmp, .tif e
.jpg, selezionare .bmp piuttosto che .tif e .tif piuttosto che .jpg per
ridurre la compressione del file.
• Se è necessario utilizzare il formato .jpg, selezionare la
compressione minore o la qualità più elevata.
• La stampante Polaroid ColorShot non stampa i file immagine di
dimensioni superiori a 18MB.
Uso dell’hardware e del software di Polaroid ColorShot su
sistemi che utilizzano altre stampanti
Nella maggior parte dei casi, al computer è già collegata una
stampante autonoma o di rete. Stampare un file immagine Polaroid
ColorShot solo quando le altre stampanti sono inattive.
Errori di comunicazione
• Se si verifica un errore di comunicazione, verificare che i cavi
siano collegati saldamente alla porta LPT posta sul retro del
computer e alla stampante ColorShot.
• Se si verifica un errore Porta di comunicazione non supportata,
significa che la porta di comunicazione selezionata non è
supportata dalla stampante ColorShot. Selezionare un’altra porta
LPT della stampante. È possibile modificare l’impostazione della
porta utilizzando la scheda Dettagli della finestra di dialogo
Proprietà ColorShot.
• Nella maggior parte dei casi, il pulsante Riprova consente di
risolvere i problemi di comunicazione. In alcuni casi, tuttavia, è
necessario rimuovere i processi dalla coda di stampa.
Italiano • 87
Page 90

Guida per l’utente di Polaroid ColorShot Parallel
Errore Memoria esaurita
Se si verifica un errore Memoria esaurita, significa che il sistema ha
esaurito la memoria disponibile e non è in grado di stampare.
Chiudere eventuali applicazioni aperte e riprovare a stampare.
Assistenza tecnica
Negli Stati Uniti, chiamare il numero 1-800-432-5355 dal lunedì al
venerdì, dalle 8.00 alle 20.00, ora fuso orientale o inviare un fax al
numero 1-781-386-9688. È inoltre possibile scrivere a Polaroid
National Technical Support Operations, 201 Burlington Road, 1-2A
Bedford, MA 01730.
In Canada, chiamare il numero 1-800-268-6970 o scrivere a P olaroid
Canada, 350 Carlingview Dr., Toronto, Ontario M9W 5G6. Fax: 416675-3228.
È possibile sottoporre domande di carattere tecnico tramite posta
elettronica collegandosi al sito Web Polaroid (http://
www.polaroid.com) e facendo clic su Assistenza clienti.
Uffici e centri di assistenza Polaroid
Australia
Polaroid Australia Pty. Ltd.
13-15 Lyonpark Road
P.O. Box 163
North Ryde, NSW 2113
Tel.: (02) 950 7000
Fax: (02) 887 2209
Belgique/België
Polaroid (Belgium) N.V. - S.A.
Rue Colonel Bourg 111
Kolonel Bourgstraat 111
1140 Bruxelles-1140 Brussel
Tel.: 027143102 (Flemish)
027143106 (French)
88 • Italiano
Page 91

Guida per l’utente di Polaroid ColorShot Parallel
Brasil
Polaroid do Brasil Ltda.
Av. Paulista, 1776/11º andar
Cerqueira Cesar
São Paulo - Capital
01310-921
Tel.: 55.11.285.6411
Fax: 55.11.283.2625
288.6521
287.5393
Danmark
Polaroid a.s.
Blokken 75
3460 Birkerød
Tlf.: 80011887
Deutschland
Polaroid GmbH
Sprendlinger Landstrasse 109
63069 Offenbach
Tel.: 06995096056
España
Polaroid (España), S.A.
Calle Orense 16 - 2ª planta.
28020-Madrid
Tno.: 913778103
France
Polaroid (France) S.A.
B.P. 7
78996-Elancourt Cédex
Tel.: 0141913810
Hong Kong
Polaroid (Far East) Ltd.
32/F Windsor House
311 Gloucester Road
Causeway Bay
Tel.: (852) 2894 0333
Italiano • 89
Page 92

Guida per l’utente di Polaroid ColorShot Parallel
Italia
Polaroid (Italia) S.p.A.
Via Piave 11
21051 Arcisate (Varese)
Tel.: 0269633253
Japan
Nippon Polaroid
Kabushiki Kaisha
Mori Building, No. 30
2-2 Toranomon 3-chome
Minato-ku, Tokyo (105)
Tel.: 81-3-3438-8811
Fax: 81-3-3433-3537
México
Polaroid de México S.A. de C.V.
Paseo de la Reforma 195-Piso 17
C.P. 06500 México, D.F.
Tel.: 703-1111
Fax: 566-0505
Del interior al 91 (800) 70-727
Ventas 91 (800) 70-747
Nederland
Polaroid Nederland B.V.
Zonnebaan 45
3606 CH Maarssen
P.O. Box 1219
3600 BE Maarssen
Tel.: 0204874534
New Zealand
Polaroid New Zealand Ltd.
Camera Services
24-26 Anzac Avenue
Auckland
Tel.: (09) 377 3773
90 • Italiano
Page 93

Guida per l’utente di Polaroid ColorShot Parallel
Norge
Polaroid (Norge) A/S
Industriveien 8B, 1473 Skårer
Postboks 80, 1471 Skårer
Tlf.: 80011887
Österreich
Polaroid Ges.m.b.H.
Eitnergasse 5A
1231 Wien
Tel.: 06607433
Portugal
Polaroid (España) S.A.
Sucursal em Portugal
Edificio Monumental
Avenue Praia da Vitória 71-A, 4ºB
1050 Lisboa
Tel.: 0505446017
Puerto Rico
Polaroid Caribbean Corporation
Centro de Seguros
Ave. Ponce de León 701,
Miramar, Santurce 00907
Tel.: (809) 725-6240
Fax: (809) 725-5462
Schweiz/Suisse/Svizzera
Polaroid AG
Hardturmstrasse 133
8037 Zürich
Tel.: 018385329 (Deutsch)
018385348 (Français)
018385349 (Italiano)
Suomi
Polaroid Oy
Sinikalliontie 10
02630 Espoo
Puh.: 0800117008
Italiano • 91
Page 94

Guida per l’utente di Polaroid ColorShot Parallel
Sverige
Polaroid AB
Ekholmsvägen 36
Box 204
127 24 Skärholmen
Tel.: 084451231
U.K.
Polaroid (U.K.) Ltd. &
Polaroid Export Operations
Wheathampstead House
Codicote Road
Wheathampstead
Hertfordshire AL4 8SF
Tel.: 0181 308 6508 (U.K.)
(44) 181 308 6593 (Export)
Garanzia limitata
La Polaroid Corporation garantisce la stampante Polaroid ColorShot
da difetti di fabbricazione per un periodo di un anno dalla data di
acquisto. P er verificare il periodo di garanzia, conservare lo scontrino
o altra prova della data di acquisto.
Nel caso in cui questo prodotto o qualsiasi componente o accessorio
dello stesso fosse difettoso, la Polaroid Corporation potrà, a sua
discrezione, ripararlo o sostituirlo durante il periodo di garanzia senza
alcun costo per il cliente, a condizione che il prodotto venga restituito
ad un sito di manutenzione predefinito, con trasporto e assicurazione
a carico del cliente. Si prega di restituire il prodotto nella confezione
originale.
Questa garanzia limitata non è valida per danni al prodotto dovuti a
incidenti, installazione errata, modifica non autorizzata, uso erroneo o
improprio.
Avvertenza: L'apertura dell'alloggiamento della stampante annulla la
garanzia.
Al di fuori degli Stati Uniti e del Canada, fare riferimento alla scheda
di registrazione per le condizioni di garanzia applicabili.
QUESTA GARANZIA ESCLUDE TUTTI I DANNI INCIDENTALI E
CONSEQUENZIALI E NON HA EFFETTO SUI DIRITTI DI LEGGE.
92 • Italiano
 Loading...