

Page 1
Page 2

English 3
1 Getting started 4
1.1 System contents 4
1.2 DMP controls (1) 4
1.3 DMP features (illustration 1) 4
1.4 Rear panel (illustration 1) 4
1.5 Un-parking the print head
(illustration 2) 5
1.6 Loading ribbon (illustration 3) 5
1.7 Loading paper (illustration 4) 5
1.8 System menu (illustration 5) 5
2 Taking Pictures 6
2.1 Setting up to take a picture
(illustration 6) 6
2.2 Seating the subject (illustration 6) 6
2.3 Turn ON the DMP 6
2.4 Capturing an image 6
2.5 Making your first print
(illustration 7) 6
2.8 Removing a spent ribbon cartridge
(illustration 8 & 9) 7
3 Optimising your DMP 7
3.1 Non-studio environment 7
2.6 Saving the captured image to
memory 7
2.7 Retrieving a saved image 7
3.2 Studio Environment 8
3.3 One touch colour balance
(illustration 10) 8
3.5 Head size guides 9
3.6 U. S. Immigration & Naturalisation
Service (INS) head size guide 9
3.7 Menu lock function 10
3.8 Store & Reset function 10
5.4 Cleaning the feed roller 13
5.5 DMP precautions 14
6 Additional information 14
6.1 Software applications 14
6.2 Media specification 15
6.3 Safety & EMC Statement 15
7 Digital Mini Portrait warranty
(outside U.S.A.) 15
8 Warranty (U.S.A. only) 16
9 Service 16
9.1 Safety instructions 16
4 Optimising your
surroundings 10
4.1 Onboard flash 10
4.2 Studio Lighting 11
4.3 Exposure correction 11
5 Troubleshooting 12
5.1 System errors 12
5.2 Clearing a Paper jam 13
5.3 Cleaning the Thermal print head 13
Page 3

4 English
1 Getting started
The Digital Mini Portrait (DMP) is an all in
one digital imaging system, which allows
you to quickly and easily take and print
instant photographs to meet a variety of
photo-identification needs. This guide
describes all the features of the DMP. It
takes you from unpacking the boxes to setting up the system and trouble-shooting
any problems you may have.
All bracketed numbers refer to the diagrams in the fold out cover located at the
end of the manual.
1.1 System contents
The system will arrive in one box.
a A Digital Mini Portrait system
b Power supply
c Mains cable
d Grey card
e Box of thermal photo paper and ribbon
f Registration card
g The manual and quick start guide
Carefully unpack the contents of the box.
1.2 DMP controls (1)
a Auto Focus – push once to focus the
image on the view screen.The DMP should
be positioned 0.8 to 1.6 metres away from
the subject for optimum use of the Auto
Focus.
b Zoom function – depressing the button to
the right (T) zooms the lens in to give the
user a close up view. Depressing the button to the left (W) causes the lens to zoom
out giving a wide-angle view to the user.
c Image capture button – press once to take
an image. Press the button again to delete
the previous image and return to live preview mode. Press the button to return to
“live” mode.
d Flash adjust – increases or decreases flash
output. Only active if “on-board flash”
mode (5x) is selected.
e Menu In/Out – pressing the button once
brings the main menu up on the view
screen. Pressing the button while in the
menu options brings the user out of
“menu” mode. It is also used to return
from sub-menus to the main menu.
f Menu navigation buttons – in “menu”
mode the use of these buttons allows the
user to move up and down through the
menu options.
In “live” mode, the down button allows the
user to toggle between different headsize
guides.
In “preview” mode, the down button toggles between different print formats, the
up button toggles between the dark and
light skin tone settings.
g OK – in “menu” mode the OK button
selects the highlighted icon on the screen.
h Print button – once an image has been
taken, pushing the print button starts the
print process. Note that the DMP will not
print while in “live” mode.
Note: if a button does not have a func-
tion in the currently selected mode
("live", "preview" or "menu") then an
error beep will sound for the duration
of the button press.
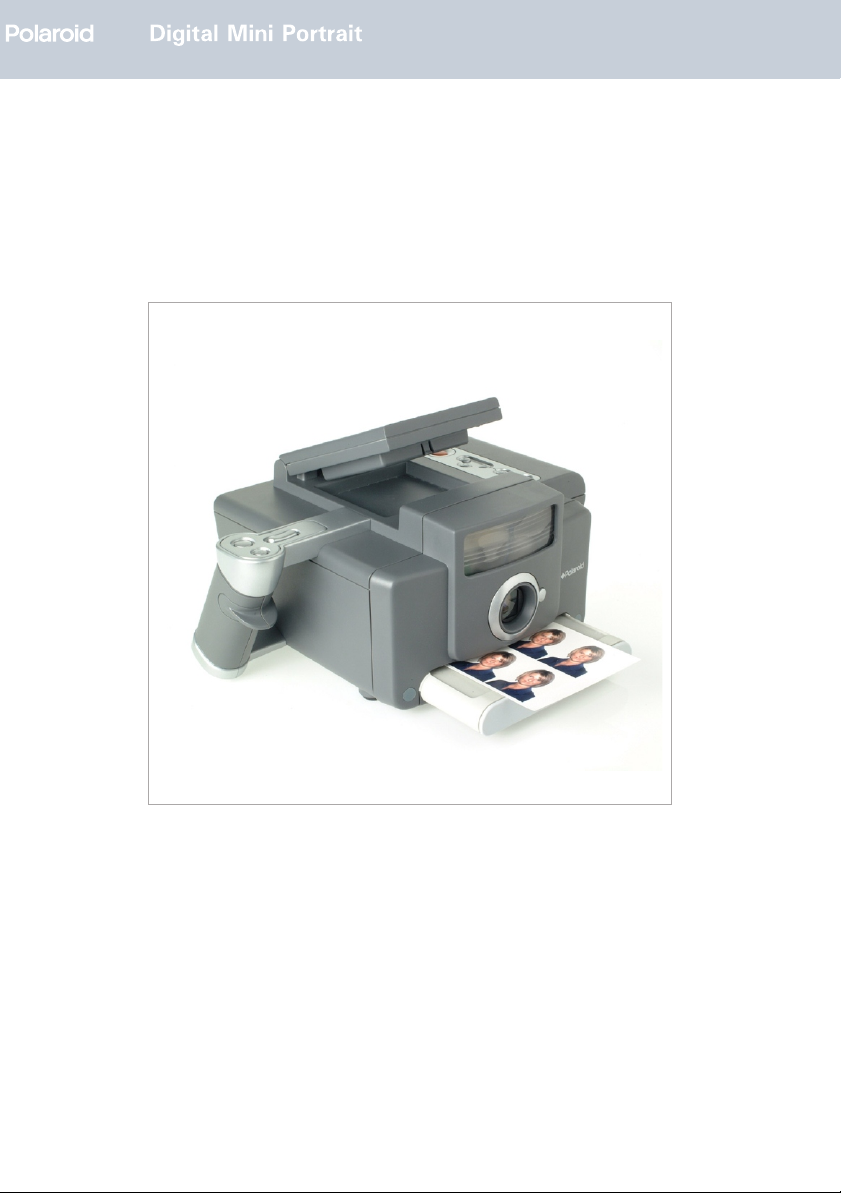
1.3 DMP features (illustration 1)
i LCD preview screen
j Onboard flash
k DMP lens
l Paper exit slot
mPaper tray (Holds up to 25 sheets)
n Ribbon cartridge door
1.4 Rear panel (illustration 1)
o Power button – push the button in to turn
the DMP on. The LCD will illuminate and
display a live image.
p USB connector – connects the DMP to a
PC for use with Polaroid archiving and card
Page 4

English 5
making software. The software is available
from www.Polaroid.com.
q X-sync – connects the DMP to studio light-
ing.
r Power socket – connect the power supply
in here.
1.5 Un-parking the print head (illustration 2)
a Open the box and remove the DMP from all
packaging.
b Read and remove warning label that covers
the Ribbon cartridge door.
c Open the ribbon cartridge door, next con-
nect the power supply and switch on the
DMP. The print head will lift up enabling
the foam insert to be removed. The foam
should be retained in case the DMP has to
be returned for servicing.
d Close the ribbon cartridge door.
NOTE: Store the foam protector and packaging in a safe place for future shipping of
the product. To set the print head to its
travel position first make sure the DMP is
in “live” mode. Then place the foam protector in between the print head and lower
the print head by pressing the menu button
(1e) and the print button (1h) simulta-
neously for 3 seconds. Once the head is
parked do not touch any of the buttons
whilst the DMP is on.
1.6 Loading ribbon (illustration 3)
The DMP uses Polaroid C3000 Thermal
Photo Ribbon. This Photo Ribbon has been
specifically designed for use in the DMP.
a Open the ribbon cartridge door.
b Check that the aperture into the DMP is
clear of obstructions. If the print head is
down, plug in the power and switch ON.
c Remove the cartridge from its wrapping,
avoid contact with the ribbon. Do not place
the ribbon on any surface where it might
pick up debris. Holding the cartridge by its
tab, insert it into the DMP until you hear it
“click” into position. The green latch
should be in the down position.
d Close the ribbon cartridge door.
1.7 Loading paper (illustration 4)
The DMP uses Polaroid C3000 Thermal
Photo paper, which has been specifically
designed for use in the DMP.
a Pull the paper tray out the front of the
DMP.
b Remove one pack (25 sheets) of thermal
paper from its wrapping taking care to only
handle the paper around the edges. Touching the printable surface with your fingers
will cause marks to appear on the finished
print.
c Load the paper into the tray observing that
the paper is in the correct orientation.
d Slide the full paper tray back into the DMP
until it clicks into position.
Note: Remember that when refilling the
paper tray the ribbon cartridge has enough
capacity to print on 50 sheets of paper.
The cartridge should be replaced once both
packs of thermal paper have been
exhausted.
1.8 System menu (illustration 5)
The system menu is accessible via the
DMP preview screen (1i) and menu button
(1e).
a Memory buffer menu
b Skin tone menu
c Picture format menu
d Image colour / B&W menu
e Tool box menu
f Memory buffer 1
g Memory buffer 2
h Memory buffer 3
i Light skin tone
j Medium skin tone
k Dark skin tone
Page 5

6 English
l 1 up picture
m2 up picture
n 4 up picture
o 6 up picture
p colour
q Black & white
r Flash menu
s colour temperature menu
t Head size guide menu
u Sharpening menu
v Red, green, blue set-up menu
wBrightness, contrast, colour saturation
menu
x Manual flash
y Slave flash
z X-sync only
aa One touch colour balance
ab colour temperature (default 5400)
ac Head size guide off
ad European head size guide (4 up)
ae USA / Canada head size guide (2 up)
af USA Immigration and Naturalization ser-
vice head size (4 up)
ag Brazil head size guide (2 up)
2 Taking Pictures
2.1 Setting up to take a picture (illustration
6)
The DMP system can be hand-held or
mounted on a tripod. The tripod socket has
a removable thread converter; if your tripod has a larger fastening screw, remove
the converter.
level with the eyes of the subject. The
DMP should be positioned 1.2 to 1.6
metres away from the subject. When using
the on board flash, position the subject
close to the background, to ensure a light
background and also the smallest possible
shadow behind him or her.
Note: For best results the picture taking
environment should be brightly lit to reduce
the subject’s pupil sizeand show more eye
colour.
2.3 Turn ON the DMP
Push the power switch (1n) until it “clicks”
then release. The DMP powers up, the LCD
comes on and displays a live image.
2.4 Capturing an image
You are now ready to take a picture
a Check your image is correctly framed on
the DMP preview screen. Zoom in or out as
necessary (1b).
b Press the auto focus button (1a).
c Press the image capture button to take an
image (1c).
d If you are dissatisfied with the captured
image on screen, pressing the image cap-
ture button again will return you to “live”
mode (1c).
e Pressing the image capture button once
more will capture another image (1c).
2.5 Making your first print (illustration 7)
a You must have a captured image on the
preview screen in order to print.
b Select a print format by either pushing the
down arrow button (1f) or by going
through the menu (1e).
2.2 Seating the subject (illustration 6)
It is recommended but not essential that a
seat should be provided for the subject.
Avoid chairs with high backs, which may
appear in the picture. The height of the
DMP should be such that the lens is about
Note: If you are using the headsize guide
the print format will be pre-set. You can
override by pushing the down arrow button
when in “preview” mode.
c To print, simply press the print button (1h)
on the left-hand side of the DMP. Printing
Page 6

English 7
d When printing is complete the print is
ejected out the front of the DMP (8).
2.6 Saving the captured image to memory
The system has three image buffers making it possible to save a captured image
and continue to use the system by changing to another buffer for use.
a Enter the main menu by pressing the menu
on/off button (1e). You will see the main
menu displayed on screen.
b Highlight the image buffer icon (5a) using
the arrow buttons (1f), press OK (1g).
c Use the arrow buttons (1f) to highlight an
alternative image buffer for use. Ensure the
thumbnail of the image you want to temporarily store is not highlighted.
d Press the OK button (1g) to select the cho-
sen image buffer and the menu will close
returning you to the full screen image. If the
buffer is empty, the DMP will return to live
mode instead. Any image captured is now
stored on the selected memory buffer
Important: the system does not have the
capability of storing images when power is
switched off. For longer-term storage of
images your DMP can be connected to a
PC via the USB interface to store images.
PC software for archiving is available from
www.polaroid.com.
2.7 Retrieving a saved image
a Enter the main menu by pressing the menu
on/off button (1e). You will see the main
menu displayed on screen.
b Highlight the image buffer icon using the
arrow buttons (1f), press OK (1g).
c Use the arrow buttons (1f) to highlight the
thumbnail of the image you want to
retrieve.
d Press the OK button (1g) to select the cho-
sen memory buffer. The menu will close
and you will see the stored image displayed on screen ready to print.
takes approximately 90 seconds during
which a thumbnail of the print will appear
in the top right of the screen. The egg
timer icon on the screen indicates image
preparation. When the egg timer disap-
pears the user is free to take another
image.
Note: The DMP will only print one image at
a time. If you want to print a series of
images, you will have to wait for the DMP
to finish before commencing the next print.
Remember to change memory buffer again
if you wish to continue to store this image.
Pressing the capture button (1c) at this
stage will mean losing this stored image.
2.8 Removing a spent ribbon cartridge (illus-
tration 8 & 9)
a Open the ribbon cartridge door (1n).
b Remove the empty cartridge by lifting the
green tab (8), the cartridge will spring for-
ward.
c Grasp the cartridge by its tab and pull. The
cartridge should easily slide out (9).
Note: Remember that when replacing the
ribbon cartridge, the thermal paper in the
print tray will also need replacing (see sec-
tion 1.7).
3 Optimising your DMP
Ensure you get the best out of the DMP
product by reading through this section to
see how your system can be better
matched to your particular studio set up
and requirements.
The DMP can be used in a studio or a non-
studio environment.
3.1 Non-studio environment
The DMP comes with a factory set-up suit-
able for use in non-stuio environments with
the on-board strobe. Out of the box the
DMP is ready to point shoot and print,
however fine adjustments can be made to
Page 7

8 English
sharpening (5u), Red, Green & Blue (5v),
Brightness, contrast, & colour saturation
(5w) or strobe output (5x).
3.2 Studio Environment
The DMP can be used with studio lights
through either the x-sync connection (1q,
5z) or by using DMP as a trigger strobe
(5y). The DMP colour temperature has
been preset to 5400K. If you do not know
the colour temperature of your studio lightsyou can use the one push colour balance
(see section 3.3). The colour temperature
menu allows you to optimise the DMP to
match your lighting conditions as follows:
a Enter the main menu by pressing the menu
on/off button (1e). You will see the main
menu displayed on screen.
b Use the arrow buttons (1f) to scroll down
to the Toolbox icon (5e). Press OK (1g).
c Use the arrow buttons (1f) to highlight the
colour temperature icon (5s) and press OK
(1g).
d In the colour temperature menu, use the
arrow buttons (1f) to highlight either the
one touch colour balance icon (5aa) or the
colour temperature icon (5ab) and press
the OK button (1g).
e Selecting the colour temperature icon (5ab)
allows you to select a pre-set colour temperature to suit your particular lighting set
up (if known).
f The procedure for using the one touch
colour balance icon (5aa) is defined below.
3.3 One touch colour balance (illustration 10)
Use the one touch colour balance if you do
not know the colour temperature of your
lighting set up or you are unsatified with
the existing colour balance use the one
touch colour balance for calibration.
Warning, the operation of the one touch
colour balance requires that an image be
captured. This captured image will overwrite the active memory buffer.
a From the colour temperature menu (5s),
select the one touch colour balance icon
(5aa) as described in the previous section.
b A live preview will be displayed with an
overlay consisting of a black rectangle
used to frame the grey card. In the top left:
an icon indicating the currently selected
flash mode (on-board, slave or X-sync).In
the top right & bottom right: two arrows
indicating the effect of moving the green
indicator line (which is only displayed in
capture mode):
Towards the white arrow to lighten the
image
Towards the black arrow to darken the
image
In the bottom middle: an icon representing
the Menu in/out button.
In the bottom left: an icon indicating the
current action taken if the Menu button is
pressed:
If a "Back Arrow" icon is displayed, press-
ing the Menu button cancels the setting of
the colour balance. This is displayed in
live mode.
If a "Tick" icon is displayed, pressing the
menu button selects the calculated colour
balance. This is displayed in capture
mode.
c Position the grey card supplied where your
subject would be seated and zoom the
DMP in to completely fill the rectangle with
the grey card.
d Press the image capture button (1c) and
the captured image will be displayed on
screen. Two black horizontal lines and a sin-
gle green line will be displayed on the right
hand side of the screen. This green line indi-
cates the brightness of the captured image.
The aim is to get the green line to appear in-
between the two black lines. The one touch
icon will now also be displayed in the top cen-
tre of the screen.
e Pressing the image capture button (1c)
again will return to live preview. Whilst in
“live” mode, make any adjustments to the
Page 8

English 9
lighting (to lighten or darken the image as
indicated) or reframe the grey card to fill
the rectangle. Repeat this live/freeze operation until the green line is positioned
between the two black lines.
f Pressing the menu button (1e) while a cap-
tured image is displayed selects the calculated colour balance and returns the user to
the set-up menu.
g Pressing the menu button (1e) while in live
preview cancels the setting of colour balance and returns the user to the colour balance menu.
h Press the menu button (1e) to exit the
menu.
3.4 Skin Tone Settings
To get the best results for customers with
very different skin tones you can select the
optimum skin tone setting for your subject.
The medium skin tone setting (5j) will be
adequate for the majority of subjects.
Choose the light skin tone (5i) for those with
pale features and the dark skin tone (5k) for
those with dark features. To select an alternative skin tone setting, press the menu button (1e) and select the skin tone icon (5b).
The three skin tone settings (5i, j, k) will be
displayed on the screen, highlight one using
the navigation buttons (1f), press OK (1g).
The skin tone can also be set by toggling the
up navigation button (1f) in “preview” mode.
Note: The DMP will default to the medium
skin tone setting after every print.
3.5 Head size guides
To ensure that your photographs meet the
required head size criteria use the head size
guides to accurately frame your subject.
The head size guides can be selected by
either using the down button to scroll
through the settings in live mode or as follows:
a Enter the main menu by pressing the menu
button (1e).
b Use the down arrow button (1f) to high-
light the tool box icon (5e) and press OK
(1g).
c In the tool box menu, use the down arrow
button (1f) to highlight the head size guide
icon (5t) and press OK (1g).
d There are four different head size guides
available. Use the arrow buttons (1f) to
highlight the head size icon you require and
press OK (1g).
e Press the menu button (1e) to return to
“Live” mode.
The dimensions for each head size guide
are as follows:
Head size
guide
EU (4up) 22.5mm 20mm
US / CAN
(2up)
US INS
(4up)
BRA (2up) 40mm 30mm
*Note: In the US / CAN 2up head size
guide, no ear to ear dimension is specified.
3.6 U. S. Immigration & Naturalisation Service (INS) head size guide
To use the INS head size guide, follow the
instructions below:
a Seat the subject facing the DMP
b Activate the INS head size guide on the
preview screen by either toggling the down
arrow button (1f), a US INS icon will be
displayed in the bottom right corner of the
preview screen. Or go into the menu (see
above).
c Zoom in to fill the box ouline with the sub-
jects head (11).
d Get the subject to rotate their whole body
until the bridge of their nose is collinear
with the vertical line of the headsize guide
(12).
Top of head to
chin dimension
30mm(1 3/8
inches)
30mm(1 3/8
inches)
Ear to ear
dimension
*
26mm
Page 9

10 English
Note: Further guidelines are available from
the U. S. Immigration & Naturalisation service, form M-376 (6-92).
3.7 Menu lock function
After set up, your new settings will be
stored when the unit is switched off. In
addition you may wish to disable the toolbox menu (5e) to avoid accidental adjustment of system settings.
a First, ensure the DMP is in “live” mode.
b To activate this function, press and hold
the OK button (1g) and image capture button (1c) simultaneously for 3 seconds on
the DMP. The user will hear a beep if successful.
c Note that the toolbox icon in the main
menu has been removed and is not accessible using the arrow buttons.
d To unlock the set up menu, repeat the but-
ton press sequence described above.
Note: this function will remain effective if
power is removed from the system.
3.8 Store & Reset function
DMP will automatically store the current
settings when you switch it off. To restore
the DMP settings to pre-set factory
defaults first ensure you are in “live”
mode. Then simultaneously press both
navigation arrow buttons (1f) and the capture button (1c) for duration of 2 seconds.
A beep will be heard if the operation is successful
4 Optimising your surroundings
4.1 Onboard flash
The DMP comes with an onboard flash unit
mounted above the lens. The onboard flash
is set as the default option but can be
adjusted by either using the flash adjust
buttons (1h) or via the main menu (see
below).
Step through the following procedure to
ensure the DMP lighting mode applicable to
your studio set-up has been selected.
a Enter the DMP main menu by pressing the
menu on/off button (1e). You will see the
main menu displayed on screen.
b Use the down arrow button (1f) to high-
light the Toolbox icon (5e). Press OK (1g)
to proceed to the next step.
c The flash icon (5r) is the first one displayed
in the column. It indicates the current sta-
tus of the flash set up on the DMP. Press
OK (1g) to select the flash options.
d In the flash set up menu, use the arrow
buttons (1f) to highlight the required icon
and press the OK button (1g). The manual
flash icon (5x) allows the user to adjust the
on-DMP flash output. The flash slave icon
(5y) sets the flash to emit just enough light
to trigger studio lighting, but not sufficient
to illuminate the subject. The X-sync icon
(5z) disables the onboard flash so that the
DMP can be used with full studio lighting
via an x-sync cable.
e Press the menu button (1e) to exit the
menu.
When the unit is switched off the DMP
automatically stores all the chosen set-
tings.
Note: The system can be used with studio
lighting or the on-board flash. For use with
the on board flash the recommended dis-
tance from subject to lens 1.2m (47
inches).
Page 10

English 11
4.2 Studio Lighting
The quality of the shot greatly depends
upon correct lighting. This section details
how you can improve your studio lighting
set-up. The 4 light sources discussed areas
follows:
Main lighting (13): Soft light source using a
flash with an umbrella, soft box or other
reflector, preferably at an angle of 45º to
the axis of shooting and at a distance of
2m from the subject.
Fill-in lighting (14): Weaker and more diffused light than the main light source. Positioned opposite the main light source to
soften harsh facial shadows according to
setting, light intensity and/or distance.
Background lighting (15): Positioned close
to the screen behind the subject to eliminate the shadows cast by the person onto
the background.
Overhead lighting (16) gives depth to the
photograph and produces subtle lighting
effects on hair and shoulders. This source
of lighting should be positioned between
70cm and 1m above the head. (Please
ensure that it is not reflected in the lens.)
Example of a professional lighting set-up
(17): Use all 4 light sources described
above to achieve optimum results:
a Main lighting
b Fill-in lighting
c Background lighting
d Overhead lighting (if necessary with honey-
combed diffusing screen)
c Combined background lighting and, if nec-
essary, overhead lighting.
When using flash lighting, the ideal set up
is with two light sources positioned as
shown. If you are using only one off DMP
lighting source, it should be positioned as
close to the lens as possible to avoid shad-
ows (preferably directly above).
Note: It is particularly important when
using flash lighting, to ensure balanced
lighting of subject and backdrop. If back
lighting is used e.g. to remove a shadow
behind the subject, it should be set to low
power to avoid over-exposing. Saturating
the backdrop may cause an imbalance in
the image.
4.3 Exposure correction
If exposure correction is needed see below
If image is too dark If image is too light
Increase brightness
setting (5w)
or
Move the DMP or
lights closer to the
subject and zoom
out
or
Increase light output
Note: There may be differences between
the preview screen image and the photo
image so you may need to return to this
table after printing a test picture.
Decreasing bright-
ness setting (5w)
or
Move the DMP or
lights away from the
subject and zoom in
or
Decrease light output
Example of a simplified lighting set-up (18):
If space is restricted we recommend the
following solution:
a Main lighting
b Secondary lighting comprising a white
reflective screen
Page 11

12 English
5 Troubleshooting
This checklist should help you correct the
most common problems that you may
encounter with the system. If the problem
persists, unplug your unit and contact your
nearest Polaroid office.
5.1 System errors
If the DMP experiences a problem during
its normal operation an error message icon
will be displayed on the view screen
together with an error code. The error code
will refer the user to the manual for a solution. Separate icons for Paper error, Ribbon
error and Overheat will appear on the
screen due to the frequency of which
these events may occur.
Error code Name Description Checklist
1 Print interrupted
2
Disallowed
combination
Paper alert
Ribbon alert
DMP has been interrupted
during its cycle
Combination of ribbon
and paper is not allowed
Paper not loaded,
not fully inserted,
or jammed
Ribbon cassette not
loaded or ribbon finished
Check the ribbon supply
Check the paper supply
Check to see if there is paper in the
tray.
Check to see if paper is jammed in
the DMP.
Make sure the paper tray is fully
inserted.
Make sure a ribbon is loaded into the
DMP.
Make the ribbon is correctly loaded
into the DMP.
Check to see is sufficient ribbon
remains to produce the print.
The DMP is warming up
or
Wait
6 Miscellaneous Other error
7 Data error
Continuous printing has
caused the DMP to pause
to allow cooling
Over/under run in the
transmission of data
The DMP will resume operations in a
few minutes.
Switch off the DMP then restart.
Page 12

Problems Solution
Is the power cable con-
System will not
power ON
No image on
the screen
The DMP was
unplugged dur-
ing printing
The paper
ejected with no
image printed
The photo
printed with
a hairline
scratch
Auto focus
does not work
nected to the rear?
Have you pushed the ON
Is there power to the sys-
Turn off the power switch
and plug the DMP back in.
Turn on the power wait for
the DMP to initialise.
Remove the paper tray an
open the paper jam doors;
remove any paper from
inside the DMP. Under cer-
tain circumstances the ther-
mal print head may require
cleaning (see below)
Is the photo paper loaded
glossy surface up?
Is the correct paper used?
Clean the thermal print
To reset the Auto focus
press and hold the Auto
focus (1a) for 3 seconds.
Drive the Zoom to the Wide
position using the Zoom-W
button (1b). Press and hold
the Zoom-W button (1b)
once it has reached the
Wide position for 1 second.
Then press Auto Focus
switch?
tem?
head.
Or
(1a).
English 13
5.2 Clearing a Paper jam
a Switch off the DMP and unplug the power
lead
b Pull the paper tray out the front of the
DMP
c Slide the tray top cover off as shown (18).
If the paper is not accessible proceed to
(d), otherwise proceed to (e).
d Turn the DMP upside down and remove
the bottom covers as shown (20).
e Remove the jammed paper.
f Replace the covers and turn the DMP the
correct way up.
5.3 Cleaning the Thermal print head
The print head of the DMP should be cleaned
at least once a year to avoid any excessive
builds up of dirt/debris, or if lines appear on
the print. To clean the print head:
a Ensure the DMP is switched off and unplug
the power lead. Wait for 5 minutes.
b Remove the ribbon cassette from the DMP.
c Turn the DMP upside down and remove
the bottom cover as shown in “Clearing a
Paper Jam” (21).
d Use cotton sticks with an alcohol-based
solvent to clean the brown heating line of
the thermal print head making strokes from
right to left (22).
Note: The cotton sticks should be applied
gently to avoid damaging the print head.
e Replace the cover and turn the DMP the
correct way up.
5.4 Cleaning the feed roller
Note: If an electro-static discharge event
locks the DMP, turn the DMP off and on to
restore it’s normal function.
Handling of the feed roller should be
avoided at all times. Contamination on the
feed roller leaves “tread” marks on finished
prints. If you see “tread” mark patterns on
your prints you should follow the proce-
dure laid out below:
a Ensure the DMP is switched off and unplug
the power lead. Wait for 5 minutes.
Page 13

14 English
b Remove the ribbon cassette from the DMP.
c Turn the DMP upside down and remove
the bottom cover as shown in “Clearing a
Paper Jam” (20).
d Use cotton sticks with an alcohol-based
solvent to clean the roller making firm
strokes from right to left (23).
e Use the cotton stick the push the roller
round to clean the whole surface of the
roller (24).
5.5 DMP precautions
a Do not modify or damage the power cord.
b Do not use DMP if the power plug is not
properly connected.
c Do not place the power cord near heating
applications or expose the power cord to
heat.
d Always connect directly to a wall-mounted
grounding-type power outlet.
e Do not use multiple-socket adapters.
f Turn the DMP off and unplug it from the
power outlet, if liquids or foreign objects
enter DMP.
g If DMP behaves abnormally, switch DMP
off and unplug it from the power outlet.
h Do not disassemble or modify the DMP, it
can impair printing performance or in some
case will cause a fire or electric shock.
Adjustable settings for colour balance,
brightness, contrast, saturation & sharpen-
ing.
Printing Method: Dye-Diffusion Thermal
Transfer
Resolution: 300 x 300dpi
colour: 16.7 million, continuous tone
Print Speed: 90seconds per print approx.
(includes image processing).
Interface: USB 2.0
Applications: Photo Paper
Ribbon: C3000 - Y, M, C, O 4 panel ribbon
with 50 prints per cassette
Photo Paper: C3000 - 103 x 97mm, 2 x 25
sheets per pack
Paper Feed method: 25 prints maximum in
tray, single sheet feed from a tray
Power Supply: 100 to 240 VAC, 50/60Hz
Approved: UL, FCC and CE
Environment: 5°C to 35°C, 20% to 85%
RH, non-condensation.
Dimensions: 264 x 292 x 132 mm
6 Additional information
Digital Mini Portrait photo system specification
2.1 Mpixel 1/3” CCD sensor, 1600 x 1200
pixels.
No image compression
Integral 3.8” TFT LCD with adjustable
angle of view
On-screen operating menu including one-
touch system calibration feature
Weight: 2.5kg
Lens specification
Focus from 0.4m to infinity
F/2.9 aperture & F/6.9 for strobe exposure
3x Optical zoom, 6mm to 18mm
6.1 Software applications
Polaroid image archiving and badge making
software is available from
www.polaroid.com. Alternatively contact
your nearest Polaroid office / distributor for
more details.
Page 14

English 15
6.2 Media specification
Use only Polaroid C3000 Thermal photo
paper and ribbon.
6.3 Safety & EMC Statement
Digital Mini Portrait System
DC 19V 4.5A
CLASS III
CAUTION:
TO PREVENT ELECTRIC SHOCK DO NOT
REMOVE COVERS THAT ARE SECURED
BY SCREWS. NO USER SERVICEABLE
PARTS INSIDE. REFER SERVICING TO
NEAREST POLAROID SERVICE CENTRE.
Made in the UK by Polaroid (UK) LTD.
LICENSED BY:
POLAROID CORPORATION, 1265 MAIN
STREET, WALTHAM, MA. 02451. U.S.A
OWNER OF THE TRADEMARKS.
POLAROID® AND DIGITAL MINI PORTRAIT® ARE REGISTERED TRADEMARKS
OF POLAROID CORPORATION.
CONFORMS TO UL STD. 60950
CERTIFIED TO CAN/CSA STD. C22.2
No.60950
EN60950
EN61000-6-3: 2001
EMC:
EN50081-1 (1992)
EN55022 (1994) Class A
EN61000-3-2 (2000)
EN61000-3-3 (1995) +A1
EN50082-1 (1998)
EN61000-6-1 (2001)
EN61000-4-2 (1995)
EN61000-4-3 (1996)
ENV50204 (1995)
EN61000-4-4 (1995)
EN61000-4-6 (1996)
EN61000-4-11 (1994)
7 Digital Mini Portrait warranty (outside U.S.A.)
Your Polaroid DMP has been thoroughly
tested and inspected before shipment. All
parts are guaranteed against defects in
materials and workmanship for 1 full year
from date of original purchase (please keep
invoice / receipt as proof of purchase)
Polaroid warranties that this product complies with the following directives:
89/336/EEC, 73/23/EEC
Safety:
During this period Polaroid Corporation will
remedy any defects without charge except
for transport costs. To take advantage of
this warranty, an authorised service centre
must repair the DMP. Damage caused by
accident, mishandling or tampering will be
excluded from your Polaroid Warranty.
This Warranty does not affect your statutory rights.
Page 15

16 English
8 Warranty (U.S.A. only)
Your Polaroid DMP DMP has been thoroughly tested and inspected before shipment. All parts are guaranteed against
defects in materials and workmanship
for one full year from the date of original
purchase. During this period Polaroid
Corporation will remedy any such
defects without charge except for transportation costs. To take advantage of
this warranty, an Authorized Service
Center must repair the DMP.
THIS WARRANTY EXCLUDES ALL CONSEQUENTIAL DAMAGES.
U. S. A.
Polaroid Corporation
Technical Support
Toll free: 1- 800- 432- 5355
www.polaroid.com
9 Service
A Repair Service is available to cover for
failures that are either outside the Warranty period or due to damage caused by
accident or mishandling. For a fixed
charge, plus transport costs, Polaroid
will endeavour to repair and return the
DMP to your site within 15 working
days. Contact your local Polaroid Technical Support Helping for details
Service Contracts are available for sale in
selected markets. These are designed to
provide peace of mind cover for the
working life of your Polaroid DMP. For a
fixed annual charge Polaroid will collect
your faulty unit and endeavour to deliver
an exchange unit within 4 working days
at no additional cost.
Contact your local Polaroid Technical
Support Helpline for details please find
contact details on your registration card
or go to the following website:
www.polaroid.com/service.
9.1 Safety instructions
As with any electrically operated equipment, basic safety precautions should be
observed. Remember:
Follow all instructions.
Do not leave unit unattended.
If unit will not be used for extended period
of time unplug from the electrical outlet.
Do not operate unit, which has been
dropped or damaged until it has been
examined by authorised service centre.
Before storing, allow unit to cool completely.
To avoid electric shock hazards, do not
immerse unit in water or other fluids. Do
not operate unit near water or with wet
hands. If service or repair work is required,
contact authorised service centre. Incorrect re-assembly can cause shock when
unit is used subsequently.
Close supervision is necessary when unit is
used by or near children.
The use of accessories other than those
recommended may cause risk of fire, electric shock or injury.
PLEASE KEEP THESE INSTRUCTIONS
Page 16

d
e
f
g
f
h
i
j
k
l
m
a
b
c
on p q r
1
Page 17

o
P o
r
d
a
i
l
ra
o
i
dP
o
l
a
o
i
P
ol
d
r
o
o
dP
a
ri
l
o
P o
r d
l
a
i
Poari
l
o
d
o
l
o
P
a
r
i
d
l
r
d
a
oi
P
o
k
3
1
i
j
f
g
h
2
3
2
p
q
l
m
n
4
a
b
o
c
d
ac
aa
1
x
EUEU
ad
ab
y
USUS
ae
CANCAN
SYNC
z
USUS
INSINS
af
BRABRA
ag
5
r
e
s
X
t
S
u
RGB
v
w
Page 18

1.2 - 1.6m
3.9 - 5.2ft
6
7
10
8
9
1
11 12
Page 19

13
13
15
16
b
c
a
d
b
c
a
18
Page 20

19
20
21
23
22
24
 Loading...