

Page 1

Digital Microscope Camera
(DMC)
User Guide
Page 2

Table of Contents
Quick startup iv
Introduction 1
Introducing the DMC Digital Microscope Camera 1
System requirements 3
PC systems 3
PowerMac or PowerPC systems 3
Technical assistance 4
Using this manual 4
Setting up 7
Unpacking 7
Camera switches and connectors 8
Setting the SCSI ID 10
Attaching the camera to your microscope 11
Connecting the camera to your PC 13
Installing a SCSI adapter 13
If the DMC is the only SCSI device 14
If your PC has other SCSI devices 15
Installing the DMC software on your PC 16
i
Page 3

Connecting the camera to your PowerMac or PowerPC 18
If the DMC is the only SCSI device 19
If your PowerMac or PowerPC has other SCSI devices 20
Connecting to an Apple PowerBook 21
Installing DMC software on your PowerMac/PowerPC 22
Parfocalizing 24
Using the DMC camera 25
Typical DMC workflow 25
Turning on the camera 26
Starting the DMC application 26
Framing and focusing the image 28
Selecting picture options 28
Shutter speed 29
Film speed 30
Flash mode 30
Color temperature 30
Color or black-and-white 30
Resolution 30
Using the focus indicator 31
Capturing the picture 32
Capturing and enhancing 33
Capturing and transferring to an application 34
Capturing and saving directly to disk 34
ii
Page 4

Maintenance and troubleshooting 35
Caring for the DMC camera 35
Troubleshooting SCSI connection problems 36
PowerMac/PowerPC SCSI ID conflicts 36
Windows 95 SCSI ID registry entries 36
SCSI drivers 36
DMC full one-year warranty 37
Service 37
Radio and television interference 38
DMC camera specifications 41
Software license agreement 43
Polaroid Offices and Service Centers 47
Index 49
iii
Page 5

Quick startup
For more information, see the page indicated.
Setting up
Page
Page
PC/Windows
7 7 1 Unpack the DMC camera.
10 10 2 Set the cameras SCSI ID.
11 11 3 Attach the camera to the microscope.
13 13 3 Connect the camera to your computer.
16 22 4 Install the DMC software on your
(PowerMac/
PowerPC) Steps
computer.
Taking pictures
Page Steps
26 1 Turn on the camera.
26 2 Start your computer, and start your
application or DMC Direct.
28 3 Frame and focus the image.
28 4 Select picture options.
32 5 Capture, enhance and save the picture.
iv
Page 6

Introduction
Introducing the DMC Digital Microscope Camera
The Polaroid DMC Digital Microscope Camera captures
high-quality digital color images from light microscopes and
other optical instruments. The camera uses a unique, millionpixel, 12.15mm CCD (charge coupled device) to capture
pictures with up to 16.7 million colors. It transfers these
pictures in seconds to an IBM-PC-, PowerMac- or PowerPCcompatible computer as high resolution (800x600 pixels) or
super-high resolution (1600x1200 pixels) TIFF images.
Dmccam.ai
Introduction 1
Page 7

Using the Microsoft Windows or PowerMac/PowerPC
software provided with the camera, you can display a
viewfinder image on your computer screen, choose resolution
and other options, enhance color balance, brightness,
contrast and sharpness, then transfer the picture to your
image-processing application or a disk drive.
The camera has a SCSI-2 connection requiring no framegrabber or other special hardware or software. (For use with
IBM PCs or PC-compatible computers, the camera requires a
SCSI adapter board.)
Using a standard .63, 1:1, or larger c-mount adapter, the
camera attaches easily to microscopes for most types of
transmitted-light and reflected-light microscopy.
The camera also features a tripod mount and x-sync
connection for use with standard c-mount lenses on a
copystand.
For more detailed camera specifications, see page 41.
2
Page 8

System requirements
Using the DMC software to view and capture pictures taken
with the DMC camera requires the following hardware and
software. If you do not have the required configuration,
contact your Polaroid dealer.
PC systems
· An IBM PC or compatible computer, with at least a 66 MHz
Pentium-class processor and 20 megabytes (MB) of RAM (32
MB recommended).
· Microsoft Windows 95 or Windows NT operating system.
· A monitor and graphics adapter capable of displaying 24-bit
color (16.7 million colors) is recommended for optimal
display of DMC pictures. (DMC software can be used with
monitors and adapters capable of displaying fewer colors,
but the quality of pictures displayed on the monitor may not
be satisfactory.)
· An ASPI-compliant SCSI adapter and the appropriate
Windows 95 or Windows NT drivers.
· A TWAIN-compliant image-processing application, such as
Adobe Photoshop, is recommended for working with DMC
pictures. If you do not have such an application, you can use
DMC Direct (provided and installed as part of the DMC
software) to capture pictures and save them on your
computers hard drive.)
· Light microscope with a .63 or larger C-mount adapter
PowerMac or
PowerPC systems
· A PowerMac or PowerPC computer or compatible with a
PowerPC processor and 20 megabytes (MB) of RAM. (32
MB is recommended.)
· Apple system software version 7.5 or later.
· An image-processing application, such as Adobe Photoshop,
compatible with Adobe Photoshop plug-in modules, is
Introduction 3
Page 9

· Light microscope with a .63 or larger C-mount adapter
Technical assistance
recommended for working with DMC pictures. If you do not
have such an application, you can use DMC Direct (provided
and installed as part of the DMC software) to transfer
pictures from the camera and to control the camera from the
computer.
Call Polaroid toll-free from within the U.S.A. at 1-800-432-
5355, Monday through Friday, 8 a.m. to 8 p.m., Eastern
time. Polaroid offers a variety of customer support services.
Call for details and applicable fees.
In Canada, call toll-free at 1-800-268-6970. Outside the
U.S.A. and Canada, contact the Polaroid office nearest you.
See Polaroid Offices and Service Centers on page 47.
Technical support is also available over the Internet. Connect
to the Polaroid World Wide Web site at
http://www.polaroid.com.
Using this manual
4
This book explains how to set up and use your Polaroid
DMC camera. It also includes the procedures for installing
the DMC software on your PowerMac or PowerPC
computer or PC, and for taking and saving pictures. To use
these instructions, you should be familiar with the operation
of your PowerMac/PowerPC computer or PC with the
Microsoft Windows 95 operating system.
Heres what youll find in this book:
Quick startup: Summarizes instructions for setting up the
DMC camera and software, and for taking pictures and
transferring them to the computer.
Page 10

Introduction: Briefly describes the DMC camera, lists system
requirements and explains how to obtain technical
assistance.
Setting up: Explains how to install the DMC software on
your PC or PowerMac/PowerPC computer, and how to
connect the DMC camera to your computer.
Using the DMC camera: Provides detailed instructions for
taking and enhancing pictures.
Maintenance and troubleshooting: Contains camera care
information, solutions to problems that might occur, and
warranty and service information.
DMC camera specifications: Detailed camera operating and
physical characteristics.
Software license agreement: License agreement for the DMC
software accompanying the camera.
Polaroid Offices and Service Centers: Telephone numbers of
Polaroid locations throughout the world in case you need
service or support.
Introduction 5
Page 11
Unpacking
Setting up
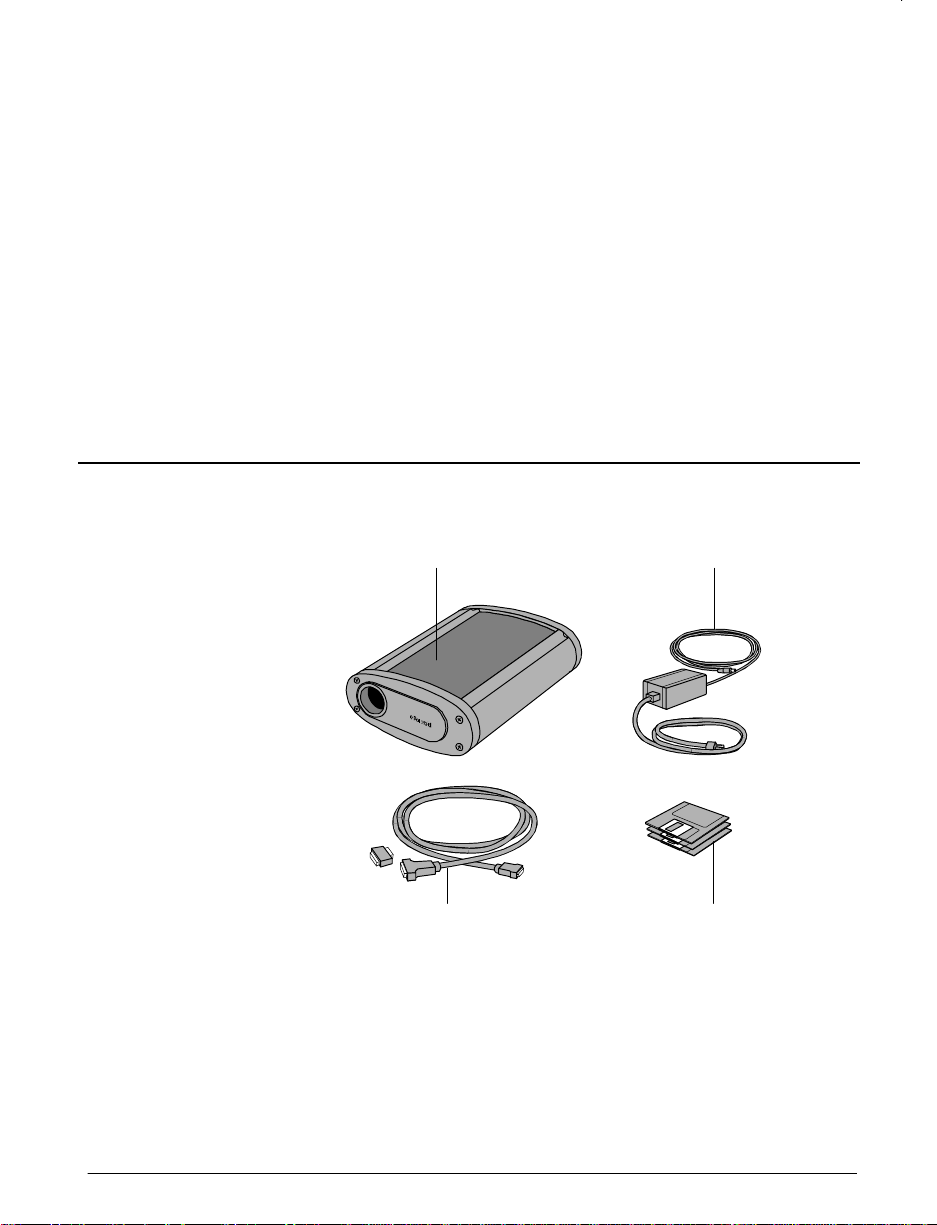
Listed below are the components in the DMC camera
package. If any is missing, contact your dealer immediately.
=>
?@
a DMC camera
b Power adapter: Provides surge-protected 5.8VDC, 3-amp
power for the camera from 110-240VAC power outlets.
Setting up 7
Packag8.cdr
Page 12
c SCSI cable (2 meter) and 25/50 DB to HD SCSI adapter:
Connect the DMC camera to a PowerMac/PowerPC
computer or the PC SCSI-2 adapter.
d Software diskettes: TWAIN driver (for Windows 95 and
Windows NT only), DMC Plug-in software for
PowerMac/PowerPC systems, and Polaroid DMC Direct
camera utility software for Windows 95, Windows NT, and
PowerMac/ PowerPC systems.
The package also contains this users guide, not shown in the
illustration.
WARNING: NOTHING INSIDE THE DMC CAMERA IS
USER-SERVICEABLE. TO AVOID THE POSSIBILITY OF
DAMAGING THE CAMERA OR VOIDING THE
WARRANTY, DO NOT DISASSEMBLE THE CAMERA.
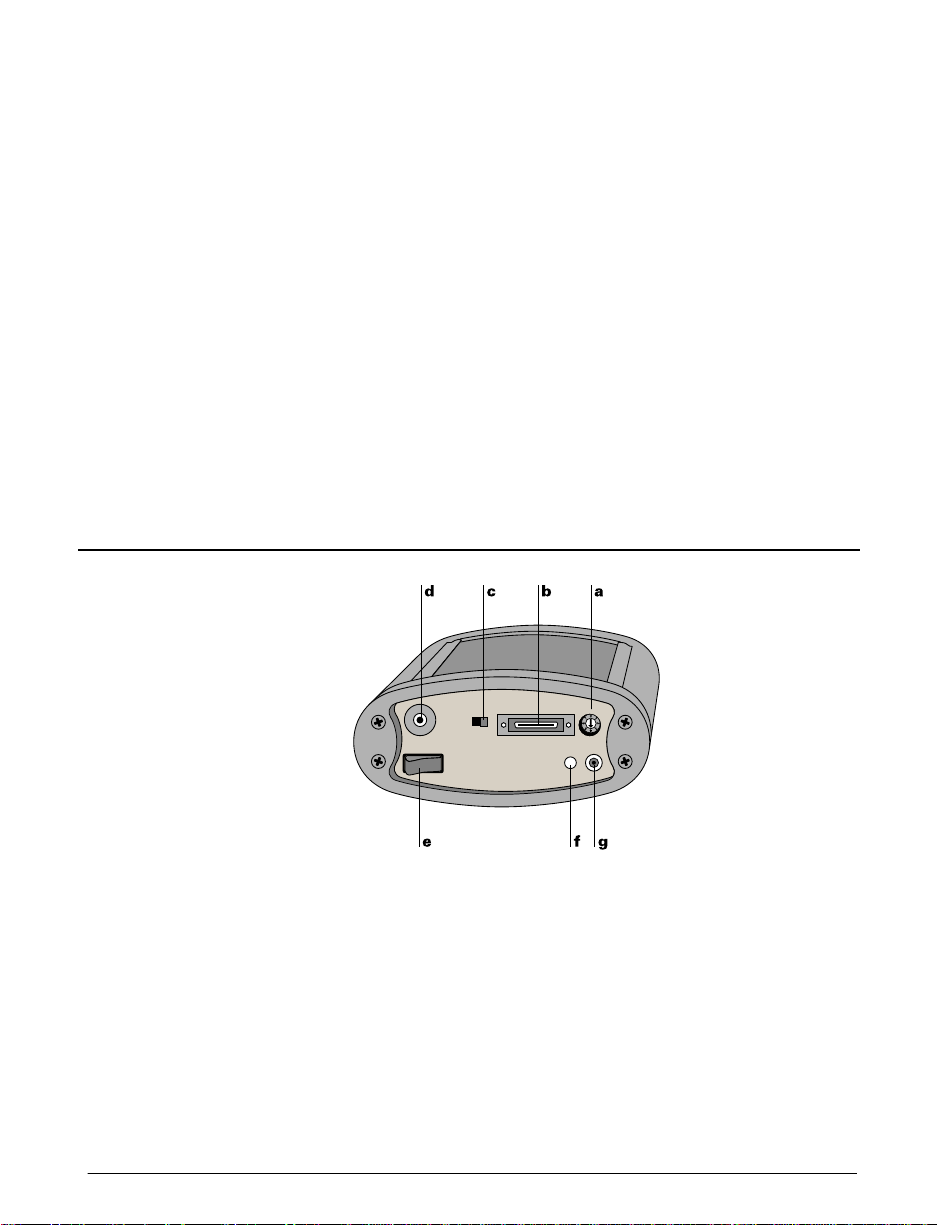
Camera switches and connectors
Camdetl.ai
a SCSI ID selector: Sets the SCSI address of the camera (see
page 10).
b SCSI connector: Connects to the computer SCSI port via the
SCSI cable provided.
c Termination selector: Turns camera SCSI termination on or
off (normally set to On as shown).
8
Page 13
d X-sync connector: Connector for electronic flash, if used
with the camera.
e Power switch: Turns the camera on and off.
f Power indicator LED: Lights to indicate that camera is
powered on.
g Power connector: Connection for the AC power adapter.
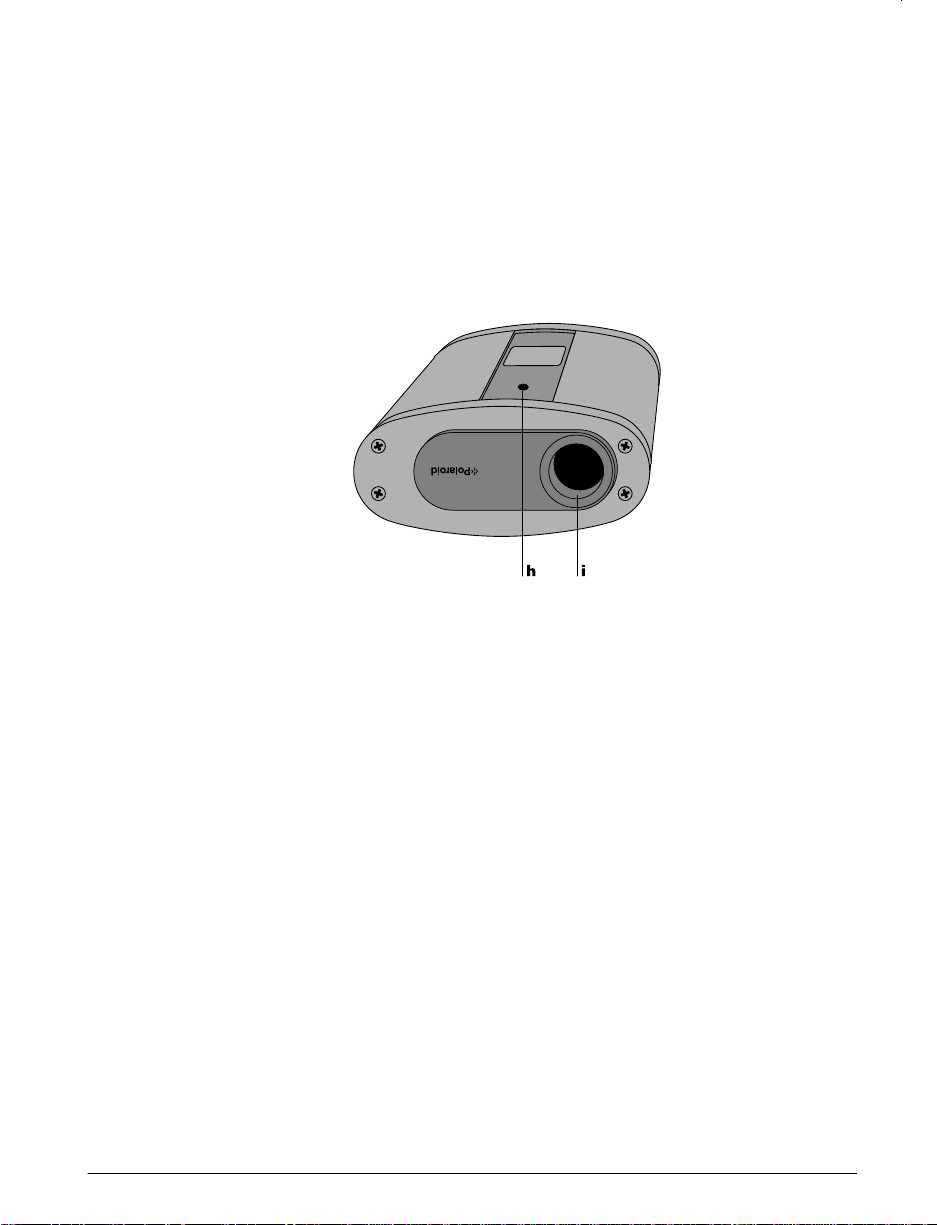
Camdetl2.ai
h Tripod mount: Standard mount for attaching the camera to
a copystand or tripod.
i C-mount: Accepts standard c-mount adapter for attachment
to microscopes, other optical instruments and c-mount
lenses.
Setting up 9
Page 14

Setting the SCSI ID
The DMC camera is a Small Computer Systems Interface
(SCSI) device. You can connect up to seven SCSI devices to
your computer, one to another in a SCSI chain.
The DMC cameras SCSI ID is preset to 4 at the factory. You
do not need to change this number unless another SCSI
device in the chain is already using it. To determine whether
4 is already being used, check the user guides of the other
devices or run a SCSI utility program.
WARNING: EACH SCSI DEVICE CONNECTED TO
YOUR COMPUTER MUST HAVE ITS OWN UNIQUE ID
NUMBER SO YOUR COMPUTER CAN DISTINGUISH IT
FROM OTHER ATTACHED SCSI DEVICES. USING TWO
OR MORE DEVICES WITH THE SAME ID NUMBER
CAN CAUSE THEM TO MALFUNCTION. YOU CAN
LOSE DATA AS A RESULT.
If the DMC is your only external SCSI device or no other
device in the chain is using ID 4, skip the rest of this section
and go on to Attaching the camera to your microscope on
page 11. If you must change the cameras SCSI ID, use the
following steps:
10
1 Make sure the camera power is off and the camera is
disconnected from the computer. If the camera is on, use the
power switch (a) to turn it off.
Pwrswit.ai
Page 15
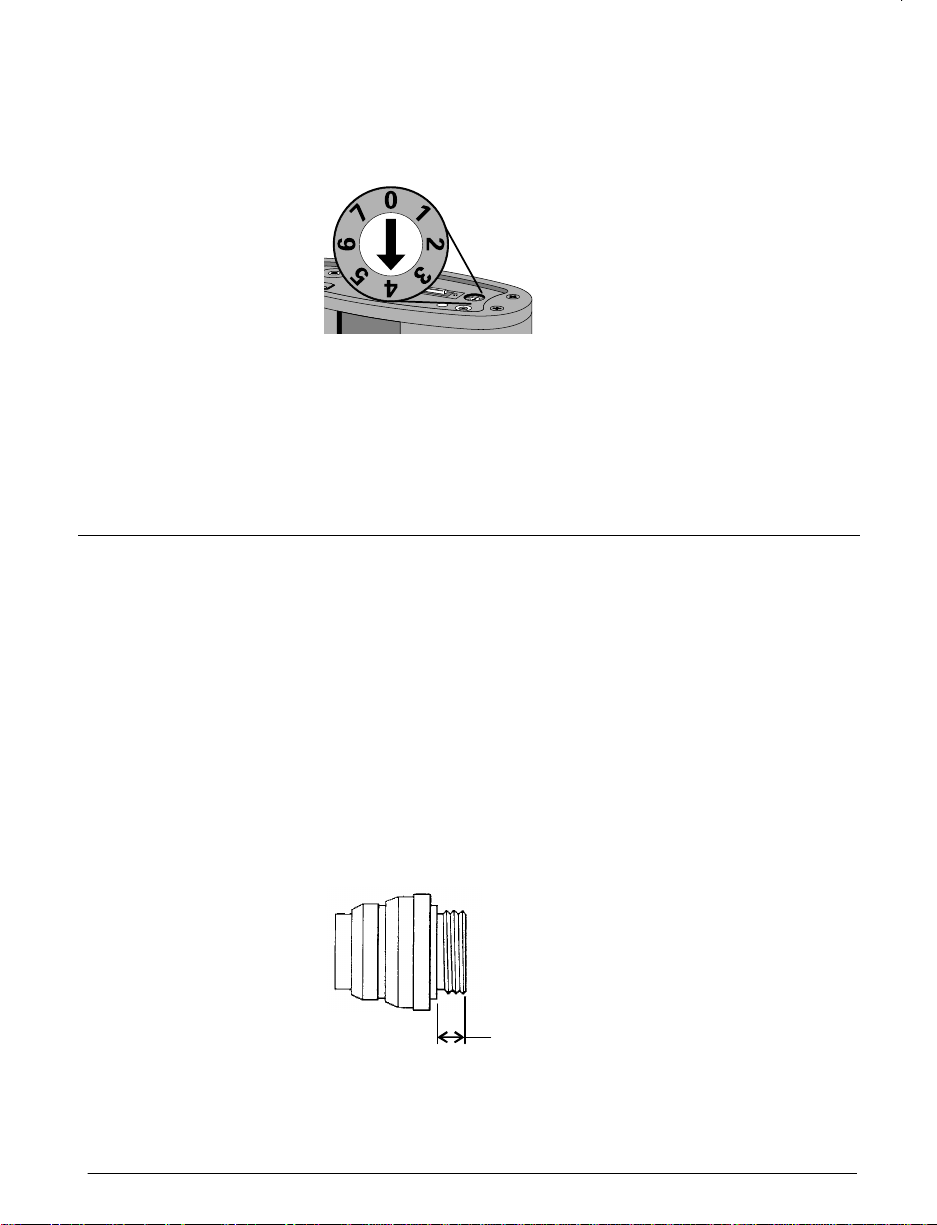
2 Insert a small screwdriver into the slot of the SCSI ID
selector on the camera and rotate the selector until the arrow
points to the desired SCSI ID.
Scsiwit.ai
Note: Do not use 7 or 0, which are customarily reserved for
the computer and for PowerMac/PowerPC hard drives. If
possible, you should also avoid SCSI ID 3, which is often
used for internal CD-ROM drives.
Attaching the camera to your microscope
Note: Attaching the DMC camera to your microscope
requires a .63 or 1:1 c-mount adapter (not provided)
compatible with your microscope. Do not use a .5 c-mount
adapter, because it will produce image vignetting (dark
corners). Refer to the microscopes instruction manual or
contact the microscope manufacturer for more information
about c-mounts.
Caution: Before attaching a c-mount adapter or lens to the
camera, verify that the threaded end of the adapter (a) does
not exceed 0.195 inches (5mm). Longer c-mount adapters
may damage the camera. (The drawing below is actual size to
help you check the thread length of your c-mount adapter.)
=
cmadap2.cdr
Setting up 11
Page 16
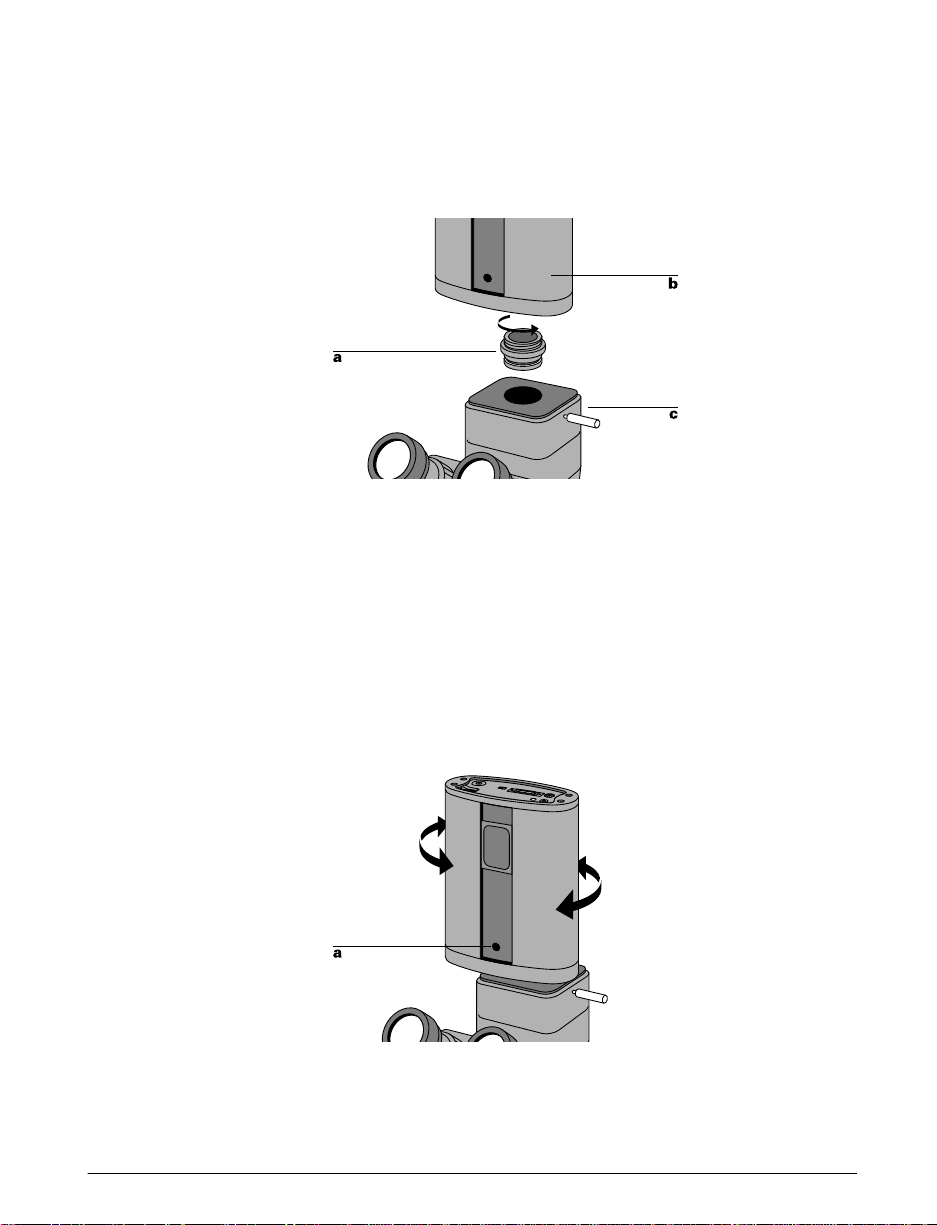
Use the following steps to attach the camera to your
microscope:
1 Screw the threaded side of the c-mount adapter (a) into the
DMC camera (b).
Camtomic.ai
The mounting arrangement shown is typical. Yours may be
different.
Important: Finger-tighten the adapter. Do not use any tools.
2 Following instructions with your microscope or c-mount
adapter, insert the c-mount adapter into the microscope (c).
12
3 Assure that the camera image orientation matches the
microscope eyepiece image by rotating the camera so the
tripod mount (a) faces toward the bottom of the image.
Rotate.ai
Page 17

4 Attach the cables to the camera as shown.
a SCSI cable
b Power adapter cable
Connecting the camera to your PC
How you connect the camera to your PC depends on
whether your computer has a SCSI adapter, and whether you
have additional SCSI devices connected to your computer.
Camcabl.ai
Installing a SCSI
adapter
The DMC camera is a SCSI device designed to connect to a
SCSI adapter on your IBM-compatible computer. If your
computer has a compatible SCSI adapter, you can skip this
section and go to the appropriate connection instructions
below.
If your computer does not have a compatible SCSI adapter,
you must open the computer case and install one. Follow
installation and setup instructions provided with the adapter.
After you install and set up the adapter, be sure you have set
the camera SCSI ID as described on page 8 before continuing
with the appropriate connection instructions below.
Setting up 13
Page 18

If the DMC is the only
SCSI device
If the DMC camera is the only external SCSI device being
used with your computer, turn off the computer and the
camera. Then connect the camera SCSI cable to the
computers SCSI port (a). If you have not already done so,
connect the other end of the SCSI cable (b) to the cameras
SCSI connector as shown on page 13.
1scsipc.ai
Use only the SCSI cable provided with the camera. Other
cables may appear similar, but could damage the camera or
your computer.
After connecting the SCSI cable, connect the camera to AC
power using the power adapter (c).
14
Page 19

If your PC has other
SCSI devices
Follow the steps below if your computer has other external
SCSI devices in addition to the DMC camera. You must
install the DMC camera as the last device in your SCSI chain
as follows:
1 Turn off the computer, all SCSI devices, and the camera.
2 Remove the terminator (a) from the last device in your SCSI
chain.
2scsipc.ai
Note: Keep the terminator. You will need to reconnect it if
you wish to use the computer while the camera is
disconnected from it.
3 If necessary for your installation, attach the 25/50 DB to HD
SCSI adapter (b) to the end of the SCSI cable (c).
Use only the cable provided with the camera. Other cables
may appear similar, but could damage the camera or your
computer.
4 Connect the 25/50 DB to HD SCSI adapter (b) to the
connector from which you removed the terminator.
5 If you have not already done so, connect the other end of the
SCSI cable (d) to the SCSI connector on the DMC camera as
shown on page 13.
6 Connect the camera to AC power using the power adapter
(e).
Setting up 15
Page 20

Note: If a cable or adapter you need is not included with the
DMC camera, Polaroid Technical Assistance (see page 4) can
provide instructions for obtaining it.
IMPORTANT: Always connect the camera to AC power
when it is connected to the computer. If the camera or any
other SCSI device turns off while connected, it could corrupt
data on your hard disk.
Installing the DMC software on your PC
To operate the DMC camera, you must use one of the
following programs on your PC. Both are provided with the
DMC camera and are installed during the procedure given
below.
· DMC TWAIN driver Using the TWAIN driver requires an
image-processing application (not provided) compatible with
the TWAIN specification.
· DMC Direct software If you do not have an imageprocessing application compatible with TWAIN, you can use
DMC Direct to transfer pictures from the DMC to your
computer.
16
To install the DMC software:
1 Turn on the computer and start the Windows program.
2 Insert the DMC for Windows diskette or CD-ROM into the
drive.
3 Click the Windows 95 Start button and choose Run.
4 Type a:\setup (or b:\setup if the diskette is in drive B) and
click OK.
5 Follow instructions on the screen to complete the
installation.
6 When an on-screen message indicates that installation has
been completed, click OK.
Page 21

7 Remove the diskette or CD-ROM from the drive.
8 If you have not already connected the DMC to the computer,
turn off the computer and connect the camera as described
on page 13.
9 Use the power switch (a) to turn the camera on.
Pwrswit.ai
10 Restart your computer.
11 Start DMC Direct and wait for the DMC window to appear,
verifying that the camera and computer are communicating.
Note: If an error message appears instead of the DMC
window, refer to Troubleshooting SCSI connection problems
on page 36 to correct the problem.
12 Proceed to Parfocalizing on page 24.
Setting up 17
dmcmabln.bm
Page 22

Connecting the camera to your PowerMac or PowerPC
The DMC camera is a SCSI device designed to connect to the
SCSI port of your PowerMac or PowerPC computer. How
you connect the DMC depends on whether you have other
SCSI devices connected to your computer.
Be sure to set the cameras SCSI ID as described on page 10
before connecting the camera.
WARNING: IF YOU ARE CONNECTING THE DMC TO
AN APPLE POWERBOOK COMPUTER, READ
"CONNECTING TO AN APPLE POWERBOOK" ON
PAGE 21 BEFORE CONTINUING.
DO NOT CONNECT OR DISCONNECT THE DMC
CAMERA OR ANY OTHER SCSI DEVICE WHILE THE
DEVICE OR YOUR COMPUTER IS TURNED ON.
DOING SO COULD DAMAGE THE DEVICE, YOUR
COMPUTER, OR BOTH. (TURN OFF THE CAMERA
WITH THE POWER SWITCH a.)
18
Pwrswit.ai
Page 23

If the DMC is the only
SCSI device
If the DMC camera is the only external SCSI device being
used with your computer, turn off the computer and the
camera. Then connect the SCSI cable provided to the
computers SCSI port (a). The port is marked with a SCSI
symbol for easy identification. If you have not already done
so, connect the other end of the SCSI cable (b) to the
cameras SCSI connector as shown on page 13.
1scsimac.
Use only the SCSI cable provided with the camera. Other
cables may appear similar, but could damage the camera or
your computer. If you are using an Apple PowerBook
computer, read the special instructions on page 21 before
continuing.
After connecting the SCSI cable, connect the camera to AC
power using the power adapter (c).
IMPORTANT: ALWAYS CONNECT THE CAMERA TO
AC POWER WHEN IT IS CONNECTED TO THE
COMPUTER. IF THE CAMERA OR ANY OTHER SCSI
DEVICE TURNS OFF WHILE CONNECTED, IT COULD
CORRUPT DATA ON YOUR HARD DISK.
WHEN DISCONNECTING THE CAMERA, ALWAYS
DISCONNECT THE SCSI CABLE FROM THE BACK OF
THE COMPUTER BEFORE RESTARTING THE
COMPUTER. FAILURE TO DO SO COULD CORRUPT
DATA ON YOUR HARD DISK.
Setting up 19
Page 24

If your PowerMac or
PowerPC has other
SCSI devices
Because the DMC camera has only one SCSI connector, you
must install it as the last device in your SCSI chain as
follows:
1 Turn off the computer, all SCSI devices, and the camera.
2 Remove the terminator (a) from the last SCSI device in your
SCSI chain.
2scsimac.
Note: Keep the terminator. You must reconnect it if you use
the computer while the camera is not attached.
3 Attach the 25/50 DB to HD SCSI adapter (b) to the end of
the SCSI cable (c).
20
Use only the SCSI cable provided with the camera. Other
cables may appear similar, but could damage the camera or
your computer. If you are using an Apple PowerBook
computer, read the special instructions for PowerBooks in
the following section before continuing.
4 Connect the 25/50 DB to HD SCSI adapter (b) to the
connector from which you removed the terminator.
5 If you have not already done so, connect the other end of the
SCSI cable (d) to the SCSI connector on the DMC camera as
shown on page 13.
6 Connect the camera to AC power with the power adapter
(e).
Page 25

IMPORTANT: ALWAYS CONNECT THE CAMERA TO
AC POWER WHEN IT IS CONNECTED TO THE
COMPUTER. IF THE CAMERA OR ANY OTHER SCSI
DEVICE TURNS OFF WHILE CONNECTED, IT COULD
CORRUPT DATA ON YOUR HARD DISK.
WHEN DISCONNECTING THE CAMERA, ALWAYS
REINSTALL THE TERMINATOR ON THE LAST DEVICE
IN THE SCSI CHAIN BEFORE RESTARTING THE
COMPUTER. FAILURE TO DO SO COULD CORRUPT
DATA ON YOUR HARD DISK.
Connecting to an
Apple PowerBook
In addition to the cables and adapters described in the
previous sections, Apple PowerBook computers require a 1meter SCSI cable (available from your Polaroid dealer) and
an HDI-30/DB25 adapter (available from
PowerMac/PowerPC dealers) to connect the DMC to the
PowerBook SCSI port.
If you are using an Apple PowerBook, do not use the 2-meter
SCSI cable provided with the DMC, and do not use a SCSI
dock adapter or a cable-type adapter. (These cables and
adapters may not work and could corrupt data on your
PowerBook hard disk.)
WARNING: WITH POWERBOOK COMPUTERS, USE A
SCSI CABLE NO LONGER THAN 1 METER TO
CONNECT THE CAMERA TO THE COMPUTER OR TO
THE LAST DEVICE IN THE SCSI CHAIN. LONGER
CABLES MAY CORRUPT DATA OR DAMAGE THE
COMPUTER'S HARD DRIVE.
Other than the exceptions above, follow the instructions for
connecting to PowerMac/PowerPC computers (starting on
page 13) when connecting the DMC camera to an Apple
PowerBook computer.
Setting up 21
Page 26

Installing DMC software on your PowerMac/PowerPC
To take pictures with the DMC camera, you must use one of
the following programs on your PowerMac or PowerPC.
Both are provided with the DMC camera and are installed
during the procedure described below.
· DMC Plug-in software Using the Plug-in after it is installed
requires an image-processing application (not provided)
compatible with Adobe Photoshop plug-in modules.
· DMC Direct software If you do not have an imageprocessing application compatible with Photoshop plug-in
modules, you can use DMC Direct to operate the DMC
camera.
To install the DMC software on your PowerMac or
PowerPC:
1 Insert the DMC for PowerMac/PowerPC disk into an
internal or external drive.
2 Be sure to read any Read Me First sheets packed with the
camera and any Read Me file included on the disk. These
contain important late-breaking product information that
may affect installation or use.
22
3 Double-click the Installer icon to open the Installer program.
4 Click the Install button and follow instructions on the screen.
5 Choose your Photoshop Plug-ins folder.
6 When an on-screen message indicates that installation has
been completed, click OK.
7 If you have not already connected the DMC to the computer,
turn off the computer and connect the camera as described
on page 13.
Page 27

8 Use the power switch (a) to turn the camera on.
k
Pwrswit.ai
9 Restart your computer.
10 Start DMC Direct and wait for the DMC window to appear,
verifying that the camera and computer are communicating.
Note: If an error message appears instead of the DMC
window, refer to "Troubleshooting SCSI connection
problems" on page 36 to correct the problem.
12 Proceed to Parfocalizing (the following section).
Setting up 23
mcmabln
Page 28

Parfocalizing
After installing the camera on the microscope, parfocalize as
described below to assure that the eyepiece image and the
camera image are both in focus simultaneously.
Note: If you are using a 1:1 c-mount adapter, parfocalizing is
not necessary.
Parfocalize as follows:
1 Place a focusing target or specimen under the microscope.
2 Adjust the microscope lighting and focus to optimize the
image viewed through the eyepiece.
3 If a viewfinder image is not visible in the DMC Direct
window on your computer display, click the Preview button
in the main DMC Direct window.
4 Adjust the c-mount on the microscope until the target or
specimen image on the computer display is in focus. (Refer to
your microscope instructions for c-mount adjustment
instructions.)
24
Page 29

Using the DMC camera
Typical DMC workflow
To help you immediately begin using the DMC camera, a
typical workflow sequence is presented below. (After you
become familiar with DMC operation and features, you can
use the camera in the way that best suits your imaging
needs.)
1 Start your imaging application or DMC Direct.
2 If you are using an imaging application, use the Acquire or
Import command to launch the DMC interface.
3 View the subject through the microscope eyepiece, and focus
and position it as desired.
4 In the DMC window on your computer display, fine-tune
subject focus and select shutter and film speed, color
temperature and other options.
5 If necessary, click the Capture and Enhance button and
adjust color balance, contrast, brightness or sharpening.
Using the DMC camera 25
Page 30

6 Transfer the image to your imaging application or to your
hard drive as a TIFF file.
7 Import the image to your presentation, publishing or
archiving application.
Turning on the camera
Turn off your computer before powering up the DMC
camera. Then turn on the camera by pressing the side of the
power switch (a) labeled 1.
After turning on the camera, restart your computer.
Pwrswit.ai
Starting the DMC application
1 Start an image-processing application compatible with
Photoshop plug-ins or TWAIN. If you do not have such an
application, start DMC Direct.
2 If you are using DMC Direct, go directly to step 3.
If you are using a plug-in or TWAIN compatible application,
choose Acquire or Import from the File menu, then choose
Polaroid DMC.
Note: This procedure may be slightly different for some plugin or TWAIN compatible applications.
26
Page 31

3 Wait for the main DMC window to appear.
m
PC:
PowerMac/PowerPC:
dmcmabln.bm
mcmablnk.b
4 If the viewfinder image area is not visible on the left side of
the window, click the expand button (<< or
) to display it.
Using the DMC camera 27
Page 32

Framing and focusing the image
Before attempting to capture an image with the DMC
camera, view the subject through the microscope eyepiece
and adjust its position, focus and lighting according to the
microscope instructions.
When the subject appears as desired in the microscope
eyepiece, continue to the following section.
Selecting picture options
After adjusting the image through the microscope eyepiece,
view the black-and-white viewfinder image in the main DMC
window on your computer display. You can then choose the
optimum picture options as described below.
Note: If a viewfinder image is not visible on your computer
display, click the Preview button. You may also need to
adjust shutter speed or film speed as described below to
make an image visible.
PC window:
28
dmcmain3.bm
Page 33

PowerMac/PowerPC window:
Mcmain.bmp
Shutter speed
Select a shutter speed between 1/500 and 1 second by
dragging the shutter speed slider (a) and observe its effect on
the viewfinder image.
PC:
=
shutspd.cdr
Using the DMC camera 29
Page 34

PowerMac/PowerPC:
=
shutsmac.cdr
Film speed
Flash mode
Color temperature
Color or black-andwhite
Resolution
Choose a film speed (ISO 25, 50 or 100) from the Film Speed
drop-down list box and observe its effect on the viewfinder
image.
If an electronic flash is connected to the x-sync connector of
the camera, click the Flash box to activate it.
If you are capturing a color image, click the appropriate
color temperature (3200K or 5500K) for your lighting.
Choose color (24-bit, 16.7 million colors) or black-and-white
(8-bit, 256 gray shades).
Choose a resolution of 800x600 pixels or 1600x1200 pixels.
Your selection also affects image file size and the time
required to transfer the image to your computer:
Approximate
File size
transfer time*
1600x1200, color 5.6 MB 3 sec
800x600, color 1.4 MB 0.7 sec
1600x1200, black and
1.8 MB 0.9 sec
white
800x600, black and white 0.5 MB 0.2 sec
* Transfer time depends on your computer
speed and available memory.
30
Page 35

Using the focus indicator
The focus indicator (a) at the bottom of the DMC window
helps achieve optimum focus for any selected area of the
image.
PC:
=
PowerMac/PowerPC:
foc_ind.cdr
=
focinmac.cdr
Using the DMC camera 31
Page 36

To use the focus indicator:
1 Using the mouse, move the cursor to the area you want to
use for determining optimum focus. Click the mouse to
define a 50x50-pixel focusing area below and to the right of
the cursor.
2 While watching the focus indicator (a) in the DMC window,
change the microscope focus slightly according to the
microscope instructions.
If the indicator increases in value, your adjustment improved
the focus. If it decreases, your adjustment degraded the
focus.
3 Continue adjusting the microscope focus to obtain a peak
focus indicator value.
Capturing the picture
After selecting picture options as described in the previous
section, you have the following choices for capturing the
image:
32
Capture and enhance.
Capture and transfer to an application (not available in
DMC Direct).
Capture and save directly to disk.
Page 37

m
p
Capturing and
enhancing
Use this procedure to capture the image currently displayed
in the DMC main window and to enhance it with DMC
software:
1 Click the Capture & Enhance button to display the DMC
Enhance window.
PC:
Dmcenh3.b
PowerMac/PowerPC:
Mcprev.bm
Using the DMC camera 33
Page 38

2 Adjust color, contrast, brightness and sharpening as desired
by dragging the sliders. The preview image displays the effect
of any changes you make.
Note: When you open the Enhance window, the sliders are in
the positions you set for the previous image. To reset the
sliders to the settings in effect when you opened the Enhance
window, click Reset.
3 To save the enhanced image to disk, click Save and choose a
folder and file name for the image.
To transfer the image to your image-processing application,
click Transfer. (This option is not available in DMC Direct.)
Follow instructions with your image processing application
for editing the image (if necessary) and saving it.
Capturing and
transferring to an
application
Capturing and saving
directly to disk
Use this procedure to capture the image currently displayed
in the DMC main window and to transfer it to your imageprocessing application. (This option is not available in DMC
Direct.)
1 Click the Capture & Transfer button to display the image in
your image processing application.
2 Follow instructions with your image processing application
for editing the image (if necessary) and saving it.
Use this procedure to capture the image currently displayed
in the DMC main window and to save it to your hard disk
without enhancing it:
1 Click the Capture & Save button.
2 Choose a folder and file name for the image.
34
Page 39

Maintenance and troubleshooting
Caring for the DMC camera
Be sure to keep the DMC camera protected from dirt, dust,
rain and moisture. Damaged caused by these conditions may
not be covered by the warranty.
If the DMC camera body requires cleaning, use a clean, soft
cloth dampened with water. Do not use cleaners of any kind,
and do not spray water or other liquids directly onto the
camera.
When cleaning lenses or other optics attached to the camera,
use only lens-cleaning fluid and lens-cleaning tissue (available
from microscope dealers).
Important: Always protect the CCD sensor in the camera by
placing the cap on the camera c-mount opening whenever the
camera is removed from the microscope.
Maintenance and troubleshooting 35
Page 40

Troubleshooting SCSI connection problems
PowerMac/PowerPC
SCSI ID conflicts
Windows 95 SCSI ID
registry entries
SCSI drivers
The SCSI ID number used for the DMC must be unique, and
must not be used by any other of the computer's internal or
external SCSI devices on any SCSI bus. If another SCSI
device is using the same ID as the DMC camera, the
following message appears on the PowerMac/PowerPC
display: "Unable to communicate with camera..."
To identify the SCSI IDs being used by the devices connected
to your PowerMac or PowerPC, use a program such as SCSI
Explorer or Apple System Profiler (distributed on the Apple
software CD).
When the SCSI ID of the DMC is changed and the computer
running Windows 95 is rebooted, Windows 95 adds another
DMC entry to the registry corresponding to the new SCSI ID.
If you change the DMC SCSI ID back to its original setting,
you must delete the new registry entry before the DMC
software will recognize the camera.
Refer to the Windows 95 documentation for registry-editing
instructions.
Verify that you have the latest software drivers for your SCSI
adapter. Instructions for obtaining updated drivers are
usually packaged with the adapter. You may also be able to
obtain drivers from the adapter manufacturers customer
support department or site on the World Wide Web.
36
Page 41

DMC full one-year warranty
Polaroid Corporation warrants the DMC camera against
defects in manufacture or workmanship for a period of one
year from the date of purchase. To verify the warranty
period, you should keep the invoice, sales receipt, or other
proof of the purchase date.
Should this product or any component or accessory included
with it, with the exception of software, prove to be defective
at any time during the warranty period, Polaroid
Corporation will, at its discretion, either replace or repair
this item, without charge. Please refer to the Software
Warranties under Software License Agreements (page 43) for
the DMC software warranty.
This warranty does not cover damage caused by accident,
incorrect installation, unauthorized modification, and misuse
or abuse. A charge will be made for repair of such damage.
This warranty excludes all consequential damages. Some
jurisdictions do not allow the exclusion or limitation of
consequential damages, so the foregoing exclusion may not
apply to you.
Service
U.S.A. and Canada
Outside North America
If your DMC camera requires service, call Polaroid Technical
Assistance at the numbers on page 4 for instructions.
If you return the camera for service, pack it carefully in its
original shipping carton or other sturdy container, with
plenty of padding. Shipping instructions are available from
Polaroid Technical Assistance specialists.
Please contact your nearest Polaroid office or service center
(see page 47).
Maintenance and troubleshooting 37
Page 42

Radio and television interference
FCC Notice (U.S.A.)
Warning: Changes or modifications to this unit not expressly
approved by the party responsible for compliance could void
the user's authority to operate the equipment.
This equipment has been tested and found to comply with
the limits for a Class B digital device, pursuant to Part 15 of
the FCC rules. These limits are designed to provide
reasonable protection against harmful interference in a
residential installation. This equipment generates, uses and
can radiate radio frequency energy and, if not installed and
used in accordance with the instructions, may cause harmful
interference to radio communications. However, there is no
guarantee that interference will not occur in a particular
installation. If this equipment does cause harmful
interference to radio or television reception, which can be
determined by turning the equipment off and on, the user is
encouraged to try to correct the interference by one or more
of the following measures:
· Reorient or relocate the receiving antenna.
· Increase the separation between the equipment and receiver.
· Connect the equipment to an outlet on a circuit different
from the one to which the receiver is connected.
EMI Notice (Canada)
38
· Consult the dealer or an experienced radio/television
technician for help.
This digital apparatus does not exceed the Class B limits for
radio noise emissions from digital apparatus set out in the
Radio Interference Regulations of the Canadian Department
of Communications.
LE PRESENT APPAREIL NUMERIQUE N'EMET PAS DE
BRUITS RADIOELECTRIQUES DEPASSANT LES
LIMITES APPLICABLES AUX APPAREILS NUMERIQUES
DE CLASS B PRESCRITES DANS LE REGLEMENT SUR
LE BROUILLAGE RADIOELECTRIQUE EDICTE PAR LE
MINISTERE DES COMMUNICATIONS DU CANADA.
Page 43

EMC Statement
(Europe)
Polaroid Corporation certifies that this product conforms to
the following standards:
Safety
Low Voltage Directive 73/23/EEC
IEC 950/EN60950
EMC
89/336/EEC EMC Directive
EN 55022, Class B
EN 50082-1
IEC 801-2
IEC 801-3
IEC 801-4
Use only a harmonized detachable cordset that has
conductors with a cross sectional area equal to or greater
than 1.0mm. This cord shall be rated for 220-240VAC, 10
Amperes. It should be approved by a European agency such
as VDE, SEMKO, ASTA or VTE.
Maintenance and troubleshooting 39
Page 44

DMC camera specifications
Camera type
Sensor resolution and
size
Output resolution
Image transfer
Computer interface
ISO rating
Shutter
Shutter speed
Microscope-mounted, computer-controlled digital camera
Polaroid 1 million pixel, 12.15mm CCD
High resolution: 800x600 pixels, 24-bit color
(16.7 million colors), 1.4MB file
or
800x600 pixels, 8-bit gray scale
(256 gray shades), 450kb file
Super high resolution: 1600x1200 pixels, 24-bit color
(16.7 million colors), 5.6MB file
or
1600x1200 pixels, 8-bit gray
scale (256 gray shades), 1.8MB
file
SCSI data transfer at 2MB/second or greater
SCSI-2
Selectable: 25, 50 or 100 (film speed equivalent)
Scanning aperture, microprocessor-controlled
Selectable: 1/500 to 1 second
DMC camera specifications 41
Page 45

Preview mode
Black and white, up to 5 frames/second
Power adapter
Dimensions
Weight
Operating environment
IEC universal power adapter
Input: 100-240VAC, 0.38A, 50-60Hz (surge protected)
Output: +5.8 VDC, 3.0A
Class II, double-insulated
UL, SA, CE, DVE approved
Height: 7.8 inches (19.8cm)
Length: 4.6 inches (11.7cm)
Width: 2.2 inches (5.6cm)
2.6 pounds (1.2 kg)
Temperature: 32° to 120°F (0° to 48°C)
Relative humidity: 5% to 90%, no condensation
42
Page 46

Software license agreement
Polaroid End User License Agreement
IMPORTANT: THIS IS A LEGAL AGREEMENT. BY
INSTALLING THIS SOFTWARE, YOU ACCEPT ALL THE
TERMS AND CONDITIONS OF THIS AGREEMENT.
This Polaroid Corporation ("Polaroid") End User License
Agreement ("Agreement") is provided with the "Polaroid
Digital Microscope Camera v1" software product and
related documentation (collectively, "Software"). The term
Software also shall include any upgrades, enhancements or
updates of the Software. Please read this Agreement carefully
because at the end you will be asked to accept the terms and
conditions of this Agreement and continue the installation
process or , if you do not wish to accept these terms and
conditions, to decline, in which case the installation process
will be aborted and you will not be able to use the Software.
If you decline to accept the terms and conditions of this
Agreement, thereafter you may restart the installation and
accept the terms and conditions or return the Software to the
place you obtained it for a full refund.
1. Grant of License. Polaroid grants to you the right to use
one copy of the accompanying Polaroid Software on a single
Software license agreement 43
Page 47

terminal connected to a single computer (i.e., with a single
CPU). You may not network the Software or otherwise use it
on more than one computer or computer terminal at the
same time.
2. Copyright. The Software is owned by Polaroid or its
suppliers and is protected by United States Copyright Laws
and International Treaty provisions. Therefore, you must
treat the Software like any other copyrighted material (e.g., a
book or musical recording) except that you may either (a)
make one copy of the Software solely for backup or archival
purposes, or (b) transfer the Software to a single hard disk
provided you keep the original solely for backup or archival
purposes. You may not copy the written materials
accompanying the software.
3. Other Restrictions. You agree not to modify, adapt,
translate, reverse engineer, decompile, disassemble or
otherwise attempt to discover the source code of the
Software. You may not rent or lease the Software, but you
may transfer the Software on a permanent basis provided
you retain no copies and the recipient agrees to the terms of
this Agreement. If Software is an update, any transfer must
include the update and all prior versions.
44
4. Limited Warranty. Polaroid warrants that the Software
media will be free of defects in materials and workmanship
for a period of 90 days from the date of purchase. Polaroid's
entire liability and your exclusive remedy shall be, at
Polaroid's option, either (a) return of the price paid or (b)
repair or replacement of the Software that does not meet
Polaroid's Limited Warranty and which is returned to
Polaroid with a copy of your sales receipt. This limited
Warranty is void if failure of the Software has resulted from
accident, abuse, or misapplication. Any replacement
Software will be warranted for the remainder of the original
warranty period or 30 days, whichever is longer.
5. No Other Warranties. POLAROID MAKES NO OTHER
WARRANTIES WITH RESPECT TO THE SOFTWARE,
EITHER EXPRESS OR IMPLIED, INCLUDING BUT NOT
LIMITED TO IMPLIED WARRANTIES OF
Page 48

MERCHANTABILITY AND FITNESS FOR A
PARTICULAR PURPOSE. Some states and countries do not
allow the exclusion of implied warranties, so the above
exclusions may not apply to you.
6. Limitation of Liability. IN NO EVENT SHALL
POLAROID OR ITS SUPPLIERS BE LIABLE FOR ANY
CONSEQUENTIAL OR INCIDENTAL DAMAGES
(INCLUDING, WITHOUT LIMITATION, DAMAGES FOR
LOSS OF BUSINESS PROFITS, BUSINESS
INTERRUPTION, LOSS OF BUSINESS INFORMATION,
OR OTHER PECUNIARY LOSS) ARISING OUT OF THE
USE OR INABILITY TO USE THIS POLAROID
PRODUCT, EVEN IF POLAROID HAS BEEN ADVISED
OF THE POSSIBILITY OF SUCH DAMAGES. Some states
and countries do not allow the exclusion or limitation of
liability for consequential or incidental damages, so above
limitations may not apply to you.
7. U.S. Government Restricted Rights. The Software are
provided with RESTRICTED RIGHTS. Use, duplication, or
disclosure by the United States Government is subject to
restrictions as set forth in subparagraph (c)(1)(ii) of the rights
in Technical Data and Computer Software clause at DFAR
52.227-7013, or such other applicable government or agency
regulations providing equivalent protection.
Contractor/Manufacturer is Polaroid Corporation, 549
Technology Square, Cambridge, Massachusetts 02139.
8. Governing Law and General Provisions. This Agreement is
governed by the laws of the Commonwealth of
Massachusetts, USA, excluding its conflicts of law rules, and
the laws of the United States of America. If any part of this
Agreement is found void and unenforceable, it will not affect
the validity of the balance of the Agreement, which shall
remain valid and enforceable according to its terms. You
agree that the Software will not be shipped, transferred or
exported into any country or used in any manner prohibited
by the United States Export Administration Act or any other
export laws, restrictions or regulations. This Agreement shall
automatically terminate upon failure by you to comply with
Software license agreement 45
Page 49

its terms. This Agreement may only be modified in writing
signed by an authorized officer of Polaroid.
Your Acceptance of the Foregoing Agreement Will Be
Indicated During Installation
46
Page 50

Polaroid Offices and Service Centers
For information about technical support or service, contact
the Polaroid Office or Service Center nearest you:
Location Telephone
Australia................ 1800 066 021
België.....................02 714 31 02
Belgique................. 02 714 31 06
Brasil .....................0800 11 2177
Canada..................1-800-268-6970
Danmark ...............80 01 59 56
Deutschland ..........069 9509 6056
España................... 01 377 81 03
France....................01 41 91 38 10
Ireland...................01 402 6897
Italia......................02696 33253
Japan.....................(81-3) 3438 8811
Latin America........ (305) 592 4212 (Miami, FL, U.S.A.)
Luxembourg..........08 00 25 42
México ..................01 800 70 72777
Nederland..............020 487 45 34
New Zealand......... 09 377 3773
Norge ....................80 01 18 87
Österreich.............. 06 60 74 33
Portugal................. 05 0544 6017
Puerto Rico............(787) 725 6240
Schweiz..................01 838 53 29
Suisse.....................01 838 53 48
Suomi ....................080 011 7008
Sverige...................08 445 12 31
Svizzera .................01 838 53 49
United Kingdom.... (01) 8130 86508
U.S.A.....................1-800-432-5355
Polaroid Offices and Service Centers 47
Page 51

Index
A
attaching camera to microscope, 11
B
black-and-white or color, choosing, 30
C
camera service, 37
camera specifications, 41
capturing and enhancing, 33
capturing and saving to disk, 34
capturing and transferring to an application,
34
capturing the picture, 32
caring for the camera, 35
cleaning the camera, 35
c-mount adapter, maximum length, 11
color or black-and-white, choosing, 30
color temperature, 30
connecting the camera to your PC, 13
connecting the camera to your
PowerMac/PowerPC, 18
connectors and switches, camera, 8
D
DMC application, starting, 26
drivers, SCSI, 36
E
EMC statement, 39
EMI notice, 38
enhancing, capturing and, 33
F
FCC notice, 38
features, DMC camera, 1
file sizes, 30
film speed, 30
flash mode, 30
focus indicator, 31
focus, optimizing, 31
focusing the image, 28
framing and focusing the image, 28
I
installing DMC software on your
PowerMac/PowerPC, 22
installing the DMC software on your PC, 16
introduction, 1
L
launching the DMC application, 26
license agreement, software, 43
locations, Polaroid, 47
M
maintenance and troubleshooting, 35
microscope, attaching camera to, 11
O
Offices and Service Centers, Polaroid, 47
optimizing focus, 31
Index 49
Page 52

P
parfocalizing, 24
PC system requirements, 3
PC, connecting camera to, 13
PC, setting up, 16
picture options, selecting, 28
Polaroid Offices and Service Centers, 47
PowerBook computers, connecting to, 21
PowerMac/PowerPC SCSI ID conflicts, 36
PowerMac/PowerPC system requirements, 3
PowerMac/PowerPC, connecting camera to, 18
PowerMac/PowerPC, setting up, 22
Q
quick startup, iv
R
radio and television interference, 38
registry entries, Windows 95 SCSI ID, 36
requirements, system, 3
resolution, choosing, 30
S
saving to disk, capturing and, 34
SCSI connection, troubleshooting, 36
SCSI drivers, 36
SCSI ID conflicts, PowerMac/PowerPC, 36
SCSI ID, setting, 10
selecting picture options, 28
Service Centers and Offices, Polaroid, 47
service, camera, 37
setting up, 7
setting up the PC, 16
setting up the PowerMac/PowerPC, 22
shutter speed, 29
software license agreement, 43
specifications, camera, 41
starting the DMC application, 26
switches and connectors, camera, 8
system requirements, 3
T
technical assistance, obtaining, 4
television interference, radio and, 38
transferring to an application, capturing and,
34
troubleshooting SCSI connection, 36
troubleshooting, maintenance and, 35
turning on the camera, 26
typical DMC workflow, 25
U
using the DMC camera, 25
using this manual, 4
W
warranty, camera, 37
workflow, typical DMC, 25
50
 Loading...