

Page 1

DMC 2
Online User Guide
Page 2

Contents
Navigating in This Document . . . . . . . . . . . . . . . . . 7
DMC 2 Camera Features . . . . . . . . . . . . . . . . . . . 9
Taking Pictures . . . . . . . . . . . . . . . . . . . . . 12
Typical Picture-Taking Sequence . . . . . . . . . . . . . . . . . . . . . . 12
Turning the Camera On . . . . . . . . . . . . . . . . . . . . . . . . . 13
Starting the DMC 2 Software . . . . . . . . . . . . . . . . . . . . . . . 14
Selecting a DMC Camera . . . . . . . . . . . . . . . . . . . . . . . . . 15
Framing and Focusing the Preview . . . . . . . . . . . . . . . . . . . . . 16
Choosing a Capture Area . . . . . . . . . . . . . . . . . . . . . . . . . 17
Choosing Color or Grayscale Preview . . . . . . . . . . . . . . . . . . . . 19
Rotating the Image . . . . . . . . . . . . . . . . . . . . . . . . . . . 20
Enlarging the Preview . . . . . . . . . . . . . . . . . . . . . . . . . . 21
Setting Exposure Automatically . . . . . . . . . . . . . . . . . . . . . . 22
Next
Page 3

Calibrating Auto Exposure . . . . . . . . . . . . . . . . . . . . . . . . 23
Setting Exposure Manually . . . . . . . . . . . . . . . . . . . . . . . . 24
Setting Sensitivity. . . . . . . . . . . . . . . . . . . . . . . . . . . . 25
Selecting Color Temperature . . . . . . . . . . . . . . . . . . . . . . . 26
Creating a Custom Color Temperature Setting . . . . . . . . . . . . . . . . 27
Selecting Image Type . . . . . . . . . . . . . . . . . . . . . . . . . . 29
Selecting Image Size . . . . . . . . . . . . . . . . . . . . . . . . . . 30
Image File Sizes . . . . . . . . . . . . . . . . . . . . . . . . . . . . 31
Verifying Sharp Focus Digitally. . . . . . . . . . . . . . . . . . . . . . . 32
Capturing the Image . . . . . . . . . . . . . . . . . . . . . . . . . . 33
Capturing a Rapid Sequence . . . . . . . . . . . . . . . . . . . . . . . 40
Printing the Image . . . . . . . . . . . . . . . . . . . . . . . . . . . 42
Enhancing the Image with DMC 2 Software . . . . . . . . . . . 43
Automatically Adjusting Color Balance . . . . . . . . . . . . . . . . . . . 44
Adjusting Color Balance by Selecting a Whitepoint . . . . . . . . . . . . . . . 45
Adjusting Color Balance by Selecting a Neutral Gray Point . . . . . . . . . . . . 46
Next
2
Page 4

Adjusting Color Balance by Selecting a Blackpoint . . . . . . . . . . . . . . . 47
Manually Adjusting Color Balance . . . . . . . . . . . . . . . . . . . . . 48
Manually Adjusting Dark Levels . . . . . . . . . . . . . . . . . . . . . . 49
Manually Adjusting Brightness. . . . . . . . . . . . . . . . . . . . . . . 50
Adjusting Gamma . . . . . . . . . . . . . . . . . . . . . . . . . . . 51
Viewing a Histogram . . . . . . . . . . . . . . . . . . . . . . . . . . 52
Adjusting Sharpness. . . . . . . . . . . . . . . . . . . . . . . . . . . 54
Viewing the Full Image . . . . . . . . . . . . . . . . . . . . . . . . . . 55
Reducing Grain in Long Exposures . . . . . . . . . . . . . . . . . . . . . 56
Adding a Label . . . . . . . . . . . . . . . . . . . . . . . . . . . . . 57
Adding a Calibrated Micron Marker . . . . . . . . . . . . . . . . . . . . . 58
Creating a Calibrated Micron Marker . . . . . . . . . . . . . . . . . . . . 59
Deleting a Calibrated Micron Marker . . . . . . . . . . . . . . . . . . . . 63
Saving and Reusing Program Settings . . . . . . . . . . . . . . . . . . . . 64
Program Settings You Can Save . . . . . . . . . . . . . . . . . . . . . . 68
Next
3
Page 5

Setting DMC 2 Software Preferences. . . . . . . . . . . . . . 71
General Preferences . . . . . . . . . . . . . . . . . . . . . . . . . . . 72
Remote Preferences . . . . . . . . . . . . . . . . . . . . . . . . . . . 77
Output Preferences . . . . . . . . . . . . . . . . . . . . . . . . . . . 79
Camera Preferences . . . . . . . . . . . . . . . . . . . . . . . . . . . 85
Using the Color Stacker Utility . . . . . . . . . . . . . . . . 86
Creating a Composite Image . . . . . . . . . . . . . . . . . . . . . . . 86
Color Stacker Preview Options . . . . . . . . . . . . . . . . . . . . . . . 88
Camera Maintenance . . . . . . . . . . . . . . . . . . . 89
Cleaning the Camera Optics . . . . . . . . . . . . . . . . . . . . . . . . 90
Cleaning the Camera Body . . . . . . . . . . . . . . . . . . . . . . . . 98
Obtaining Software Updates . . . . . . . . . . . . . . . . 99
DMC 2 Camera Specifications . . . . . . . . . . . . . . . . 100
Next
4
Page 6

System Requirements. . . . . . . . . . . . . . . . . . . 102
PC Minimum System Requirements . . . . . . . . . . . . . . . . . . . . 103
Macintosh Minimum System Requirements. . . . . . . . . . . . . . . . . 104
Installing Software and Setting Up the Camera . . . . . . . . . . 105
Unpacking . . . . . . . . . . . . . . . . . . . . . . . . . . . . . 106
Installing the DMC 2 Software . . . . . . . . . . . . . . . . . . . . . . 107
Attaching the Camera to the Microscope . . . . . . . . . . . . . . . . . . 108
Connecting the Camera to the Computer . . . . . . . . . . . . . . . . . 110
Connecting the Camera to AC Power and Turning On . . . . . . . . . . . . . 115
Taking a Test Picture . . . . . . . . . . . . . . . . . . . . . . . . . 117
Camera Limited Warranty . . . . . . . . . . . . . . . . . 119
Radio and Television Interference . . . . . . . . . . . . . . 120
Copyright and Trademark Notices . . . . . . . . . . . . . . 124
Next
5
Page 7

Polaroid Offices and Service Centers. . . . . . . . . . . . . . 125
Technical Support . . . . . . . . . . . . . . . . . . . . 132
Solving SCSI Communication Problems. . . . . . . . . . . . . 133
Changing Sync Transfer Rate on Some Adaptec SCSI Adapters . . . . . 138
Installing a SCSI Host Adapter . . . . . . . . . . . . . . . . 140
Index . . . . . . . . . . . . . . . . . . . . . . . . 141
6
Page 8

Navigating in This Document
This Polaroid electronic document uses the Adobe Portable Document Format (PDF)
and its associated Acrobat Reader software. You should familiarize yourself with the
controls of the Acrobat reader. Access Help...Reader Online Guide...Viewing PDF
Documents...Navigating Pages for more information.
Polaroid electronic documents provide additional navigation tools at the top of the
screen. The icons have the following meanings:
Click to go to the table of contents.
Click to return to the previous page.
Next
7
Page 9

Click to display these help pages.
Click to open the index.
8
Page 10

DMC 2 Camera Features
The Polaroid DMC 2 Digital Microscope Camera captures high-quality digital color
images from light microscopes and other optical instruments. The camera uses a 2million-pixel, 11mm CCD (charge coupled device) to capture 14-bit linear RGB
images. It transfers these images in seconds to an IBM PC or Power Macintosh compatible computer in TIFF format with 1600x1200 or 800x600 pixels. On IBM PC compatible systems, an additional image size of 400x300 is available.
Next
9
Page 11

Using the software provided with the camera, you can:
• Display a color viewfinder image on your computer screen.
• Choose resolution, exposure, sensitivity, color temperature, and other options.
• Automatically adjust exposure.
• Manually adjust color balance, brightness, contrast and sharpness.
• Verify focus digitally.
• Add a calibrated scale to the image.
• Add a title or other text to the image.
• Transfer the image to your image-editing application or hard drive.
• Capture a rapid sequence of images and select one for transfer to your computer.
Note: The DMC 2 software is compatible with DMC 2 and DMC Ie cameras.
Next
10
Page 12

The camera has a SCSI connection requiring no frame-grabber or other special hardware or software. (The camera requires a SCSI host adapter, usually built into Macintosh computers. SCSI host adapters can also be easily added to PC-compatible
computers.)
Compatible with standard .63, 1:1 or larger c-mount adapters, the camera attaches
easily to microscopes for most types of transmitted-light and reflected-light microscopy.
Multiple DMC 2 cameras can be connected in a SCSI chain to a single computer simultaneously for capturing images from multiple instruments without moving the camera or reconnecting cables.
The camera also features a tripod mount, x-sync connection and remote shutter connection for use with standard c-mount lenses on a copystand or tripod.
Detailed camera specifications
11
Page 13

Taking Pictures
Typical Picture-Taking Sequence
1 Turn on the camera.
2 Start the DMC 2 software.
3 Frame and focus the preview.
4 Choose a capture area
5 Choose color or grayscale preview.
6 Rotate the image.
7 Zoom the preview.
8 Set exposure.
9 Set sensitivity.
10 Select color temperature.
11 Select image type.
12 Select image size.
13 Verify sharp focus digitally.
14 Capture the image.
15 Enhance the image.
12
Page 14

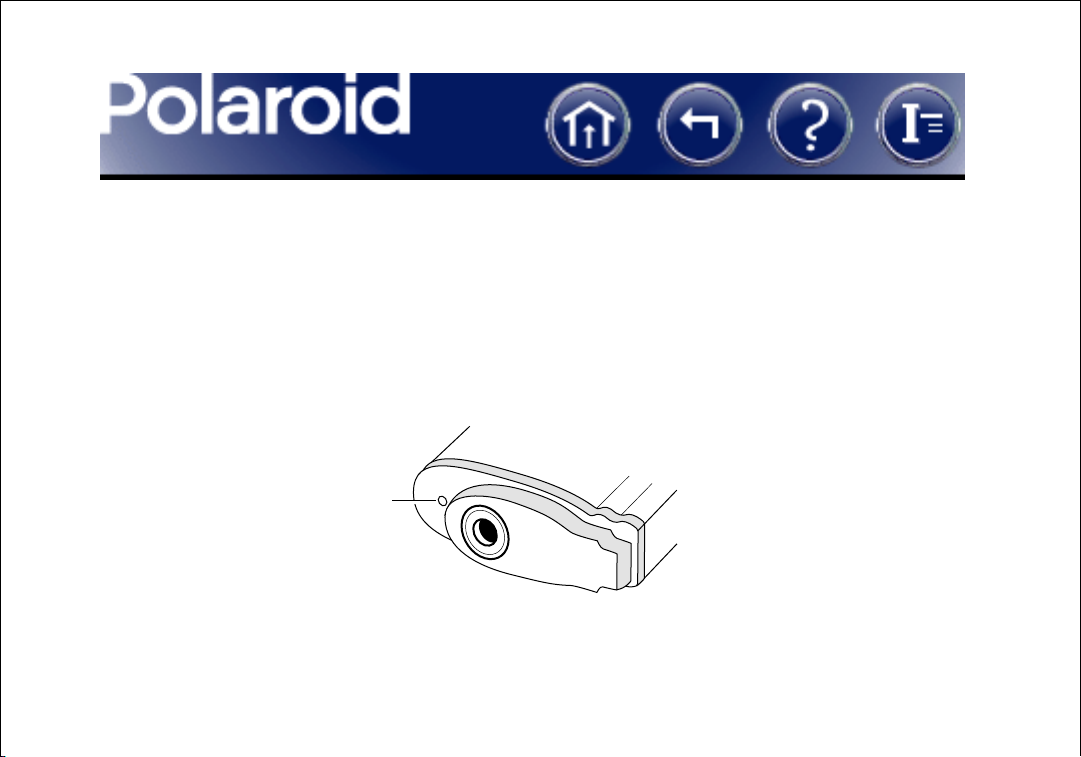
Turning the Camera On
1 Turn off the computer.
2 Turn the camera power switch to on (1).
Power switch (on = 1)
3 Verify that the green and yellow LEDs are on, indicating AC and termination
power are on.
Green LED
Yel lo w L ED
4 Turn on the computer.
13
Page 15

Starting the DMC 2 Software
Macintosh Windows
Double-click Polaroid DMC 2.
The main DMC 2 window appears.
1 Select Programs from the Start menu.
2 Point to Polaroid Digital Microscope
Camera 2 and select Polaroid DMC 2.
The main DMC 2 window appears.
If more than one DMC camera is connected to the computer, you must select the camera to be used in this session. To select a camera, see Selecting a DMC Camera.
14
Page 16

Selecting a DMC Camera
If more than one DMC camera is connected to the computer, use these steps to select
the camera to be used in the current session:
Macintosh Windows
1 Click the Preferences button in
the main DMC 2 window.
2 Click Choose a DMC 2 in the
DMC 2 Preferences box.
3 Choose the SCSI address of the
camera to be used.
4 Click OK to activate the camera.
5 Click Save to close the DMC 2
Preferences box.
1 Click Set Preferences on the Tools
menu.
2 Click the Cameras tab.
3 Click the SCSI address of the camera
to be used.
4 Click OK.
15
Page 17

Framing and Focusing the Preview
1 View the subject through the microscope eyepiece.
2 Adjust subject position, focus and lighting according to the microscope instruc-
tions.
3 If your microscope requires, manually switch the light path to the camera.
4 If a viewfinder image is not visible in the DMC 2 software main window, click the
Preview button.
Note: If clicking Preview does not display an image, you may need to adjust expo-
sure or sensitivity before continuing.
Exposure adjustment instructions.
Sensitivity adjustment instructions.
16
Page 18

Choosing a Capture Area
You can capture the entire DMC frame or a smaller, selected area.
To capture an area smaller than the DMC frame:
1 Adjust exposure to obtain an acceptable image on the Viewfinder Display tab of
the main DMC 2 window.
2 Click the Region of Interest Selection tab.
3 Select the size of the frame to be captured (3/4 or 1/2 frame) from the Capture
Area list.
A box defining the selected capture area appears on the image.
4 Position the capture area as desired by dragging it.
Next
17
Page 19

5 Click the Viewfinder Display tab to view only the capture area. The values avail-
able in the Image Size box correspond to the capture area you selected.
6 Continue with the picture-taking sequence.
18
Page 20

Choosing Color or Grayscale Preview
You can view the preview image in the DMC 2 main window in either color or grayscale. A color preview provides a more accurate representation of the final image,
while a grayscale preview refreshes faster.
To view a color preview image, select Color in the main DMC 2 window. To view a
grayscale preview image, deselect Color.
19
Page 21

Rotating the Image
To correct picture orientation, you can rotate the preview image 180 degrees
by clicking the rotate button.
When you rotate the preview image, the final image is also rotated.
20
Page 22

Enlarging the Preview
You can enlarge the view of the preview image for focusing and closely inspecting
detail while framing. Enlarging the view does not affect the final image.
To enlarge the preview image:
1 Click the image to display the zoom and focus box.
2 Drag the zoom and focus box to the area of interest.
3 To zoom in, click . To zoom out, click .
21
Page 23

Setting Exposure Automatically
1 If you have not done so, calibrate automatic exposure for the current lighting and
specimen conditions. See Calibrating Auto Exposure.
2 Click the Auto button in the main DMC 2 window.
3 Wait a few seconds for the DMC 2 software to optimize the exposure.
22
Page 24

Calibrating Auto Exposure
1 Manually set exposure to the optimum position for the current setup. See Setting
Exposure Manually.
2 Click Calibrate Auto Exposure on the To o l s menu.
3 Click the Set button in the Auto Exposure Calibration box.
23
Page 25

Setting Exposure Manually
Drag the Exposure slider right or left to adjust the camera shutter speed for brightening or darkening the image.
Range: 20 milliseconds (far left) to 8 seconds (far right).
24
Page 26

Setting Sensitivity
Choose a sensitivity (camera gain) setting from the Sensitivity list:
• Low (ISO 25 equivalent)
• Medium (ISO 50 equivalent)
• High (ISO 100 equivalent).
The default setting is Medium (ISO 50 equivalent).
25
Page 27

Selecting Color Temperature
You can select one of the standard color temperatures to match your lighting:
• Tungsten (3200K)
• Daylight (5500K)
These color temperatures are appropriate for many lighting situations, but best
results are often obtained by creating and using a custom color temperature. This custom temperature appears as Custom in the Color Temperature list.
See Creating a Custom Color Temperature.
26
Page 28

Creating a Custom Color Temperature Setting
If the standard color temperature settings are inappropriate for your lighting, you can
create a custom color temperature setting based on the actual lighting.
To create a custom color temperature:
Macintosh Windows
1 Select Calibrate Custom Color Tem-
perature from the Color Temp popup
menu.
2 Obtain a properly exposed and
focused image in the DMC 2 preview
window.
3 Move the specimen to view a clear
area of the slide.
Next
1 Click Calibrate Custom Color Tem-
perature on the To o l s menu.
2 Obtain a properly exposed and
focused image in the DMC 2 preview
window.
3 Move the specimen to view a clear
area of the slide.
27
Page 29

Creating a Custom Color Temperature Setting (continued)
Macintosh Windows
4 Click Calibrate.
5 Wait for the Calibrate Color Tempera-
ture box to close.
6 To use the custom setting, select Cus-
tom from the Color Temp popup
menu.
4 Click Begin.
5 Wait for the Calibrate Custom Color
Temperature box to close.
6 To use the custom setting, select Cus-
tom from the Color Temperature
box.
28
Page 30

Selecting Image Type
You can select one of these image types for your final image from the Image Type box:
• 48-Bit Color (68.7 billion colors)
• 24-Bit Color (16.7 million colors)
• 16-Bit Grayscale (65,000 gray shades)
• 8-Bit Grayscale (256 gray shades)
The image type you choose affects the size of the image file. See Image File Sizes.
Note: Before saving images as 48-bit color or 16-bit grayscale, verify that other applications you intend to use support TIFF images in those formats. For example, Adobe
Photoshop version 5 supports 48-bit color images, but earlier versions do not.
29
Page 31

Selecting Image Size
Choose a final-image size from the Image Size box:
• 1600 x 1200 pixels
• 800 x 600 pixels
• 400 x 300 pixels (Windows systems only)
These sizes are available if your selected region of interest includes the entire frame. If
your region of interest is smaller, the available image sizes correspond to the size of
the selected region.
Larger image sizes usually improve image quality, but they also increase the image file
size and time required to transfer the final image from the camera to your computer.
See Image File Sizes.
30
Page 32

Image File Sizes
The size of the saved TIFF image depends on image type and size, as shown in the following table. (File sizes are approximate.)
Image Size
(Pixels) 48-Bit Color 24-Bit Color 16-Bit Grayscale 8-Bit Grayscale
1600 x 1200
800 x 600
400 x 300
(Windows
only)
11,300 kbyte 5,650 kbyte 3,800 kbyte 1,900 kbyte
2,900 kbyte 1,400 kbyte 1,000 kbyte 500 kbyte
700 kbyte 350 kbyte 240 kbyte 120 kbyte
31
Page 33

Verifying Sharp Focus Digitally
If necessary, you can fine-tune your image focus digitally with the DMC 2 software:
1
Click the image to display the zoom and focus box.
2
Drag the zoom and focus box to the area of interest.
3
Zoom into the area of interest by clicking .
4
Click Focus Tool on the Tools menu.
The Focus Tool box appears.
5
Adjust the microscope focus knob until the two colored indicator bars are farthest
to the right.
The red bar indicates the maximum sharpness achieved so far. The other bar indicates the current sharpness.
6
Close the Focus Tool box by clicking the Close button in the upper right corner.
32
Page 34

Capturing the Image
After you have selected the capture settings in the DMC 2 main window, you are ready
to capture the image and transfer it to the computer.
You have the following three options for capturing the image:
• Capture the image, enhance it with DMC 2 software, then save it as a TIFF file.
• Capture and save the image immediately as a TIFF file.
• Capture and transfer the image to a plug-in compatible application (Macintosh) or
Capture and transfer to a TWAIN-compatible application (Windows).
33
Page 35

Capturing and Enhancing with DMC 2 Software
Use this procedure to capture the image currently displayed in the DMC 2 main window for enhancement with DMC 2 software:
1 Click Capture & Enhance to capture the image, transfer it to computer memory,
and display it in the DMC 2 Enhance window.
2 Use the controls in the Enhance window to enhance the image characteristics, add
a text label, or add a calibrated micron marker.
Instructions for enhancing the image
Next
34
Page 36

3 Do one of the following:
Macintosh Windows
• Save the image to disk by clicking
Save Image (not available when
running the DMC 2 plug-in).
• Transfer the image to a plug-in
compatible application by clicking
Transfer Image (available only
when running the DMC 2 plug-in).
Save the image to disk by clicking the Save button.
Transfer the image to a TWAIN
compatible application by clicking the Transfer button (available only when running the
DMC 2 TWAIN source within the
application).
35
Page 37

Capturing and Saving Immediately to Disk
To capture the image and save it to disk without further enhancement:
1 Click the Capture & Save button.
Note: On Macintosh systems, this option is available only when running the DMC
2 software. When running the DMC 2 plug-in within another application, click
Capture & Transfer. Then save the image within the other application.
2 Choose a folder and filename for the image.
3 Click Save.
36
Page 38

Capturing and Transferring to Another Application (Macintosh)
Note: This option is available only if you are running the DMC 2 plug-in within the
other application. It is not an option if you are running the DMC 2 program.
To capture the image and display it in the application, click the Capture & Transfer
button and wait for the image to appear in your application.
After the image appears, you can edit, print or save it according to instructions provided with the application.
37
Page 39

Capturing and Transferring to Another Application (Windows)
Use these steps if you want to transfer the captured image immediately to another
image-processing or image-analysis program. The procedure you use depends on
whether you opened the DMC 2 program from the Windows Start menu or you
opened the DMC TWAIN software by selecting Acquire from an application's File
menu.
If you opened the DMC 2 program from the Windows Start menu:
1 In the DMC 2 main window, click Set Preferences on the Too l s menu.
2 Click the General tab.
3 Click the Launch External Application box to enable it.
4 In the External Application Path box, type the path and name of the program file
to which you want to transfer the DMC images. You can also click the Browse button and select the program file.
Next
38
Page 40

5 Click OK.
When you click Capture & Save or the save button in the DMC 2 program, the
image appears in the selected application for further enhancement and saving.
If you are running the TWAIN version of DMC 2 software:
If you are in the DMC 2 main window, click Capture & Transfer. Wait for the image to
appear in your program.
If you are in the DMC 2 Enhance window or the Full Image window, click the transfer
button . Wait for the image to appear in your program.
After the image appears in your program, you can edit, print or save it according to
instructions provided with the program.
39
Page 41

Capturing a Rapid Sequence
The DMC camera and software allows you to capture a rapid sequence of images in
the camera memory. After the images are stored, you can select one of the captured
images for transfer to the DMC 2 Enhance window or for saving immediately.
To capture a rapid sequence:
1 Set up the camera and obtain a properly exposed image in the DMC 2 main
window.
2 Connect the remote trigger cable to the camera.
3 Click the Rapid Fire button to display the Thumbnail Gallery.
4 Press the remote trigger button to capture an image and display its thumbnail in
the Thumbnail Gallery.
Next
40
Page 42

5 Repeat step 4 as needed to capture and display additional thumbnails until the
camera buffer is full.
Note: Change the Rapid Fire setting on the General tab of the Set Preferences box
to stop capturing images when the buffer is full or to begin overwriting the first
images captured.
6 Right-click a thumbnail you want to transfer.
A shortcut menu appears.
7 Click Image Output Size and select an image size.
8 To display the image in the Enhance window for image enhancement before sav-
ing, right-click the thumbnail again and click Enhance. Then adjust color, brightness, gamma, etc., as usual and save the image.
To save the image immediately, right-click the thumbnail and click Save.
41
Page 43

Printing the Image
To print the current image from the DMC 2 Enhance window:
Macintosh Windows
Select Print from the File menu. Click the print button to open
your printer dialog box. Choose
the appropriate printer settings
and click OK.
The image prints at 300 dpi and sized to fill the page.
Note: To print at different resolutions or sizes, save the image and open it with an
image-editing application such as Adobe Photoshop.
42
Page 44

Enhancing the Image with DMC 2 Software
After you capture an image by clicking Capture & Enhance in the DMC 2 main window, the captured image is stored in memory and displayed in the DMC 2 Enhance
window. Before printing, saving or transferring this image to another application, you
can apply the following enhancements:
• Automatically adjust color balance
• Adjust color balance by selecting a point
that should be white
• Adjust color balance by selecting a point
that should be neutral gray
• Adjust color balance by selecting a point
that should be black
• Manually adjust color balance
• Manually adjust dark levels
• Manually adjust brightness
• Adjust gamma
• View a histogram
• Adjust sharpness
• Reduce grain in long exposures
•Add a label
• Add a calibrated micron marker
• Save and reuse program settings
43
Page 45

Automatically Adjusting Color Balance
To have the DMC 2 program analyze the current image and automatically set
the color sliders to their optimum position, click the automatic balance button.
This feature is not recommended for fluorescent imaging.
44
Page 46

Adjusting Color Balance by Selecting a Whitepoint
To adjust overall color balance by identifying a whitepoint in the picture, click
the white eyedropper button. Then click on an area of the picture that should
be pure white.
The area you clicked becomes white, and all other colors in the image are
adjusted accordingly.
You may need to repeat the procedure to achieve an optimum white balance.
45
Page 47

Adjusting Color Balance by Selecting a Neutral Gray Point
To adjust overall color balance by identifying a neutral gray point in the picture, click the gray eyedropper button. Then click on an area of the picture
that should be neutral gray, such as a metallic object, concrete, gray brick, or a
shadow falling on a white object.
The area you clicked becomes neutral gray, and all other colors in the image
are adjusted accordingly.
46
Page 48

Adjusting Color Balance by Selecting a Blackpoint
To adjust overall color balance by identifying a blackpoint in the picture, click
the black eyedropper button. Then click on an area of the picture that should
be pure black.
The area you clicked becomes black, and all other colors in the image are
adjusted accordingly
47
Page 49

Manually Adjusting Color Balance
Drag the three Color sliders left or right to adjust color balance.
The effect of your settings appears in the preview image to the left.
48
Page 50

Manually Adjusting Dark Levels
Drag the Dark Levels slider left or right to decrease or increase dark levels.
The effect of your settings appears in the preview image to the left.
49
Page 51

Manually Adjusting Brightness
Drag the Brightness slider right or left to increase or decrease brightness.
The effect of your setting appears in the preview image to the left.
50
Page 52

Adjusting Gamma
Drag the Gamma slider right or left to increase or decrease gamma (the apparent contrast between the highlights and the shadows).
The effect of your setting appears in the preview image to the left.
51
Page 53

Viewing a Histogram
Use the histogram display to judge the distribution of brightness values in the current
image. The horizontal axis represents all possible brightness values in the image (0-
255) and the vertical scale represents the number of pixels at each brightness value.
The Channel list lets you select a channel (Luminosity, Red, Green, Blue, RGB) for the
histogram.
The histogram changes to reflect adjustments in the Exposure setting in the DMC 2
main window and other controls in the Enhance window.
How to view a histogram.
52
Page 54

To view a histogram of brightness levels in the image:
1 If the DMC 2 main window is visible, click Histogram on the To o l s menu.
If the Enhance window is visible, click the histogram button .
2 Select a channel for display from the Channel list (Luminosity, Red, Green, Blue,
RGB).
3 If necessary, adjust the Exposure slider in the main DMC 2 window or adjust the
controls in the Enhance window while viewing their effect on the histogram.
53
Page 55

Adjusting Sharpness
Drag the Sharpness slider left or right to decrease or increase sharpness.
The effect of your setting appears in the preview image to the left.
54
Page 56

Viewing the Full Image
If necessary, you can view the full image for close inspection after capturing but
before saving. When viewing the full image, you can zoom and pan to assure you have
captured the desired area and detail and that enhancements you applied have the
expected results.
To view the full image:
1 In the main DMC 2 window, click Capture & Enhance.
The captured image appears in the Enhance window.
2 Enhance the image as needed.
3 Click the full image button to display the image in the Full Image window.
4 Use the controls in the window to zoom, pan, print or save the image.
55
Page 57

Reducing Grain in Long Exposures
You can reduce image grain in long exposures (longer than 500 milliseconds) by
enabling the DMC 2 multi-frame averaging/dark subtract feature.
To enable or disable multi-frame averaging/dark subtract:
1 Click Set Preferences on the Tools menu.
2 Click the General tab.
3 Click the Multi-Frame Averaging/Dark Subtract box to enable or disable it.
4 If you are enabling the feature, select the number of light frames and dark frames.
Higher light frame and dark frame values usually provide more grain reduction.
5 Click OK.
56
Page 58

Adding a Label
Macintosh Windows
1 Click the Add Text Label box.
2 Type a label or other descriptive infor-
mation in the text box.
3 Select a font and a font size.
1 Click the white Label strip below the
image
2 Type a label or other descriptive infor-
mation.
4 If necessary, click the Bold box to
change the font to bold.
This label appears at the bottom of the image when it is saved, transferred to another
application, or printed.
57
Page 59

Adding a Calibrated Micron Marker
DMC 2 software can add a calibrated scale or micron marker to the lower right corner
of your image, providing an accurate tool for determining dimensions of features in
the image.
To add a micron marker to the image:
1 If you have not already done so, create a calibrated micron marker for the micro-
scope objective you are using.
Creating a calibrated micron marker
2 Click the Add Micron Marker box.
3 Choose the marker appropriate for the microscope objective from the box that
appears next to the Add Micron Marker box.
58
Page 60

Creating a Calibrated Micron Marker
To create a calibrated micron marker you can add to the bottom of images for determining dimensions of features in the image:
Macintosh Windows
1 Place a micrometer horizontally
under the microscope objective and
focus the microscope to obtain a
sharp image of the scale in the DMC 2
main window.
2 Click the Add Micron Marker box.
3 Click the popup menu next to Add
Micron Marker box and select Calibrate Objective.
Next
1 Select Calibrate Objectives from the
Tools menu.
The Calibrate Objectives Tips box
opens.
2 Place a micrometer horizontally
under the microscope objective and
focus the microscope to obtain a
sharp image of the scale in the DMC 2
main window.
59
Page 61

Creating a Calibrated Micron Marker (continued)
Macintosh Windows
The Micron Marker Calibration window opens and displays the micrometer image.
4 Define a measured distance on the
micrometer image by dragging a line
from one micrometer scale mark to
another.
The measured distance appears as a
green line. To correct the distance,
draw a new line.
5 Type the distance represented by the
line in the Distance box.
Next
3 In the Calibrate Objectives Tips box,
click the Snap button.
The Calibrate Objective window opens
and displays the micrometer image
4 Define a measured distance in the
image by clicking on one micrometer
mark, then clicking on a second
micrometer mark.
An “x” appears at each point you
click.
60
Page 62

Creating a Calibrated Micron Marker (continued)
Macintosh Windows
6 Enter or select the units of measure in
the Units popup.
7 Type a name for the marker in the
Marker Name box.
8 Click Save Marker.
(End of Macintosh procedure)
Next
To remove the second mark, click the
Clear button. To remove the second
and the first marks, click the Clear
button twice.
6 Type the distance between the two
marks in the Distance box, and choose
the units of measure for the distance
from the Measurement Unit box.
7 Type a description for this objective
(30 characters, max.) in the objective
description box.
61
Page 63

Creating a Calibrated Micron Marker (continued)
Macintosh Windows
(no further steps for Macintosh systems) 8 If you want this calibrated marker to
be the default marker in the Enhance
window, click the Use as default
objective box.
9 Click OK.
62
Page 64

Deleting a Calibrated Micron Marker
If necessary, you can delete a calibrated micron marker from the list box located
below the Add micro marker box:
1 Click Add micron marker at the bottom of the Enhance window.
2 Click Delete Micron Marker from the list of micron markers.
3 In the Micron Marker box, click the name of the micron marker you want to
delete.
4 Click Delete.
5 To remove additional micron markers, repeat steps 3 and 4.
6 Click Close.
63
Page 65

Saving and Reusing Program Settings
If you develop settings in the Enhancement window that you expect to use frequently,
you can save them to a file, then reload them when necessary.
If necessary, see Program settings you can save.
To save the current program settings in the current settings file:
Macintosh Windows
1 In the Enhancement window, click
Settings.
2 Select Save Settings.
Next
In the Enhancement window, click Save
Settings on the File menu.
64
Page 66

Saving and Reusing Program Settings (continued)
To save the current settings in a new settings file:
Macintosh Windows
1 In the Enhancement window, click
Settings.
2 Type a name for the new settings
file.
3 Select Save.
Next
1 If the main DMC 2 window is open, click
Settings on the File menu to open the
Settings window. Then click New to display the Add New Settings box.
If the Enhance window is open, click
Save Settings As on the File menu to
display the Add New Settings box.
2 In the Settings Name box, type a
descriptive name for the new settings
you are saving.
3 Click OK.
65
Page 67

Saving and Reusing Program Settings (continued)
To load enhancement settings you saved earlier:
Macintosh Windows
1 In the Enhancement window, click
Settings.
2 Select the name of the settings to be
applied.
Next
1 In the main DMC 2 window, click
Settings on the File menu to display
the Settings window.
2 Click the name of the settings you
want to load.
3 Click OK.
66
Page 68

Saving and Reusing Program Settings (continued)
To delete a settings file:
Macintosh Windows
1 In the Enhancement window, click
Settings.
2 Select the name of the settings to be
applied.
3 Click Delete.
1 In the main DMC 2 window, click
Settings on the File menu to display
the Settings window.
2 Click the name of the settings you
want to delete.
3 Click Delete.
4 Click OK.
67
Page 69

Program Settings You Can Save
When you save DMC 2 program settings for reuse (see Saving and Reusing Program
Settings), the following settings are saved.
Main DMC Window Settings
• Color checkbox state
• Exposure
•Sensitivity
Enhance Window Settings
•Red
• Green
•Blue
•Dark Levels
Next
• Color Temperature
• Image Type
• Image Size
• Brightness
• Gamma
•Sharpness
68
Page 70

Program Settings You Can Save (Continued)
Preferences Box -- General Settings
• On each image capture
• Cast found on color balance
• Show preview on startup
•Use flash
• Save Viewfinder ROI settings on exiting the application
Note: The state of the Multi-Frame Averaging/Dark Subtract checkbox and the number of dark and light frames are not saved.
Next
• Overwrite images during Rapid Fire
• Number of Light Frames
• Number of Dark Frames
• Launch External Application
• External Application Path
69
Page 71

Program Settings You Can Save (Continued)
Preferences Box --Remote Settings
• Use Remote Capture
• Transfer to Enhance Window
• Transfer to Application
• Save Directly to File
Preferences Box -- Output Settings
• Highlight property (Specular or NonSpecular)
• Color Channel Mixture
Preferences Box -- Cameras Settings
No Cameras settings are saved.
• Remote Capture Files Folder
• Remote Capture Files Base Name
• Remote Capture Files Image Type
• Color Output Scale
• Grayscale Channel Mixture
• Grayscale Output Scale
70
Page 72

Setting DMC 2 Software Preferences
The DMC 2 Preferences dialog box (Macintosh) and the Set Preferences dialog box
(Windows) let you choose these categories of settings for the DMC 2 software:
• General
•Remote
To display the Preferences box for viewing or changing preferences:
Macintosh Windows
Click the Preferences button in the
main DMC 2 window.
•Output
• Cameras
Click Set Preferences on the Tools
menu.
71
Page 73

General Preferences
Use the General tab to select general DMC 2 software operation preferences.
On each image capture:
Reset to defaults Resets all controls in the Enhance window (Color, Dark Lev-
els, Brightness, Gamma, Sharpness) to their factory-defaults after you capture
a picture.
Use existing settings Leaves all controls in the Enhance window unchanged
after you capture a picture.
Do auto color balance Automatically analyzes the image and sets the Dark
Levels and Brightness sliders in the Enhance window to their optimum values
each time you click the Capture & Enhance button or the Capture & Transfer
button in the Main window. Also sets the Enhance window color sliders to 0,
sets the Gamma slider to 50%, and applies the color cast setting selected under
"Cast found on auto color balance" (described below).
Next
72
Page 74

General Preferences (Continued)
Cast found on auto color balance (available only if Do auto color balance is selected
under “On each image capture”):
Remove it Removes any overall color cast (tint) from the image when performing auto color balance.
Keep it Retains any overall color cast in the image when performing auto color
balance.
Always ask If an overall color cast is detected during auto color balance, displays a dialog box for removing or keeping it.
Next
73
Page 75
General Preferences (Continued)
Show preview on startup Expands the Main window to show a preview image when
the DMC 2 program starts.
Use flash Activates the x-sync flash cable connector on the DMC camera when the
image is captured. The default setting is off (disabled).
X-sync flash cable connector
Next
74
Page 76

General Preferences (Continued)
Save Viewfinder ROI settings When the DMC 2 program is closed, saves the image
capture area (region of interest) selected on the Region of Interest Selection tab in the
DMC 2 main window.
Overwrite Images During Rapid Fire When camera buffer becomes full during a
rapid fire sequence, begins overwriting the first file in the buffer instead of stopping
rapid fire.
Multi-frame Averaging/Dark Subtract Enables multi-frame averaging and dark
frame subtract for reducing grain in long exposures (longer than 500 milliseconds).
After enabling this feature, select the number of light frames and dark frames. (Higher
values increase grain reduction.)
Next
75
Page 77

General Preferences (Continued)
Launch External Application Starts the image-editing application specified in the
External Application Path box when an image is saved to disk. Displays the saved
image in the application.
76
Page 78

Remote Preferences
Use the Remote tab to capture images using the remote trigger. You can specify if you
want the captured images transferred to an image-editing program, the Enhance window, or to files.
Use Remote Capture Captures images using to remote trigger. Select if you want to
capture multiple images remotely.
Transfer to Enhance Window Captures images and automatically transfers them to
the Enhance window where you can manually adjust color balance, dark levels, or
brightness, gamma or sharpness.
Transfer to Application Captures images and automatically transfers the image to an
image editing program.
Next
77
Page 79

Remote Preferences (Continued)
Save Directly to a File Captures images and saves them directly to a file for viewing
and enhancing at a later date.
Remote Capture Files:
Change Allows you to specify a location for your image files if you select Save
Directly to a File. Also allows you to select the file format (TIFF, BMP or JPEG)
and the base name of the saved files.
78
Page 80

Output Preferences
Use the Output tab to select the highlight property and the output defaults of the
images.
Highlight Property:
Specular Usually provides best image results with reflected-light microscopy
specimens containing specular highlights (reflective or metallic areas or points
much brighter than most of the image).
Non-specular Usually provides best results for reflected-light microscopy
without specular highlights and for all transmitted-light microscopy.
Next
79
Page 81

Output Preferences (Continued)
Output Defaults:
For best results, choose the appropriate channel mixture and output scale for your
specimen and the way the image will be used.
Color Channel Mixture
CRT color Optimizes the output image color for display on a monitor.
Identity Leaves the output image color as detected by the camera.
Portrait Optimizes the output image color for studio portrait photogra-
phy software programs.
Fluorescent Optimizes the output color for fluorescent microscopy software programs.
Next
80
Page 82

Output Preferences (Continued)
Color Channel Mixture (continued)
User Use the custom color channel mixture in MATRIX2PUSER.MTX (for
DMC 2 cameras) or MATRIXIEUSER.MTX (for DMC Ie cameras).
Color Output Scale
Tone Scale Optimizes the output image tone values for display on a
monitor.
Linear Sets the tone value of each output pixel in proportion to the
actual transmittance or reflectance measured by the camera.
Logarithmic Sets the tone value of each output pixel in proportion to the
logarithm of the actual transmittance or reflectance measured by the
camera.
Next
81
Page 83

Output Preferences (Continued)
Grayscale Channel Mixture
The Grayscale Channel Mixture uses the following (RGB channels) to produce a
grayscale image:
Luminance Digitally provides the effect of a luminance filter for grayscale imaging.
Red Provides the effect of a red filter.
Green Provides the effect of a green filter.
Blue Provides the effect of a blue filter.
Next
82
Page 84

Output Preferences (Continued)
Grayscale Channel Mixture (continued)
Cyan (DMC Ie cameras only) Provides the effect of a cyan filter.
Magenta (DMC Ie cameras only) Provides the effect of a magenta filter.
Yellow (DMC Ie cameras only) Provides the effect of a yellow filter.
Next
83
Page 85

Output Preferences (Continued)
Grayscale Output Scale
Tone Scale Optimizes the output image tone values for display on a
monitor.
Linear Sets the tone value of each output pixel in proportion to the
actual transmittance or reflectance measured by the camera.
Logarithmic Sets the tone value of each output pixel in proportion to the
logarithm of the actual transmittance or reflectance measured by the
camera.
84
Page 86

Camera Preferences
Use the Select Camera tab to select the active DMC camera when multiple DMC cameras are connected to the computer.
Cameras are identified by their Device IDs (SCSI addresses) and their Adapter IDs. To
select a camera, click the appropriate line in the window and then click OK.
85
Page 87

Using the Color Stacker Utility
The Color Stacker utility provided with DMC 2 software provides a way to combine
three images. This is useful when imaging a single sample with multiple fluorochromes. Instead of viewing separate images, you can process the fluorochromes in
red, green and blue channels and view the result in a single composite image.
Creating a Composite Image
Macintosh Windows
1 Use the DMC 2 camera and software to
capture and save an image for each of
the three color channels. You must
save the images in the TIFF format.
Next
1 Use the DMC 2 camera and software to
capture and save an image for each of
the three color channels. You must
save the images in the TIFF format.
86
Page 88

Creating a Composite Image (Continued)
Macintosh Windows
2 Open the Color Stacker utility (dou-
ble-click Polaroid Color Stacker).
3 Select an image for each color channel
by clicking each color button (Red,
Green and Blue) and selecting the
appropriate TIFF file.
4 Click Create Composite, select a
folder and file name, and save the
composite image.
2 Open the Color Stacker utility (click
the Windows Start button, point to
Polaroid Digital Microscope Camera
2 on the Programs menu, and click
Polaroid Color Stacker).
3 Select an image for each color channel
by clicking each color button (Red,
Green and Blue) and selecting the
appropriate TIFF file.
4 Click Create Composite, select a
folder and file name, and save the
composite image.
87
Page 89

Color Stacker Preview Options
The Color Stacker utility displays a preview of the composite image as you select files
for each color channel. By clicking the Options button at the top of the Color Stacker
window, you can select from one of these composite preview options:
• Show Original Image
• Show Relevant Channel
• Add Channel Progressively
88
Page 90

Camera Maintenance
DMC 2 camera maintenance consists of cleaning the camera when necessary.
Click on either topic below for more information.
Cleaning the camera optics
Cleaning the camera body
89
Page 91

Cleaning the Camera Optics
Important: Protect the DMC 2 camera from dirt, dust, rain and moisture. Damage
caused by these conditions may not be covered by the warranty. Always protect the
shutter, the anti-aliasing filter (behind the shutter), and the CCD sensor by placing the
cap on the camera c-mount opening whenever the camera is removed from the microscope. This will also minimize the need to clean the camera optics.
Caution: The DMC 2 camera is a precision optical instrument. Carefully follow the
instructions in this section when you clean it. Failure to do so could damage the shutter or the anti-aliasing filter and void your warranty.
Next
90
Page 92

Cleaning the Camera Optics (Continued)
Verifying the Location of Dust or Dirt
Avoid needless cleaning of the DMC 2 camera optics by determining the location of
dust or dirt before proceeding. You can determine whether the dust or dirt is in the
camera optics or the microscope optics by comparing two images as follows:
1 Take a picture with the camera in its normal position.
2 Rotate the camera 30 or 40 degrees, and take a second picture of the same speci-
men.
If the spot moves in relation to other elements in the picture, it is caused by dust
on the camera anti-aliasing filter or the c-mount adapter lens. In this case, skip to
step 3 to determine the location.
If the dust remains in the same location relative to other elements in the picture, it
is caused by dust on the microscope optics. Discontinue this procedure and refer
to the cleaning instructions provided with your microscope.
Next
91
Page 93

Cleaning the Camera Optics (Continued)
3 Follow these steps to determine whether the dust spot is on the camera optics or
the c-mount adapter lens:
a Separate the camera from the c-mount.
b Install the lens cap on the DMC 2 camera.
c Clean the c-mount adapter lens according to the manufacturer’s instructions.
d Reattach the c-mount and the DMC 2 camera to the microscope and take a pic-
ture.
e If the spot remains in the image, follow the camera optics cleaning steps.
If the spot is no longer visible, discontinue this procedure.
Next
92
Page 94

Cleaning the Camera Optics (Continued)
Camera Optics Cleaning Steps
1 If you have not already done so, install the shutter-opening software on your com-
puter as follows. (This software opens the shutter, allowing you to clean the camera optics.)
Macintosh Windows
a Copy the file DMC 2 SHUTTER
OPENER INSTALLER from the DMC
2 CD (provided with the camera) to
the desktop.
b Double-click DMC 2 Shutter
Opener Installer.
c Follow instructions on the screen.
Next
No special installation is necessary.
(The shutter-opening software is
installed during DMC 2 software
installation.)
93
Page 95

Cleaning the Camera Optics (Continued)
2 Obtain the following cleaning materials:
• Clean camel-hair brush (small)
• Can of clean-room-grade compressed air
• Bulb-type manual blower
3 Detach the camera from the microscope, and remove the c-mount adapter from
the camera. If you are using the camera with a lens, remove the lens.
4 If the camera is not connected to the computer, turn off the camera and the com-
puter. Then connect the camera to the computer.
5 Turn on the camera, then turn on the computer and wait for it to start.
Next
• Lint-free disposable cleaning wipe
(such as e-wipe) or a high-grade lens
tissue (non-abrasive and lint-free)
• Distilled water or methanol
94
Page 96

Cleaning the Camera Optics (Continued)
6 Run the shutter-opening software:
Macintosh Windows
a Double-click DMC 2 Shutter
Opener.
b Click Open DMC 2 Shutter.
c Click OK.
a Select Programs from the Windows
Start menu.
b Point to Polaroid Digital Micro-
scope Camera 2 and select Shutter
Cleaning Tool.
7 Power down the computer and turn the camera power off. (The shutter remains
open.)
Next
95
Page 97

Cleaning the Camera Optics (Continued)
8 Clean the anti-aliasing filter (behind the shutter) with air. If necessary, gently dis-
lodge any dust with the camel-hair brush.
Caution: Use care when inserting anything into the camera lens opening. The
shutter blades and filter are easily damaged. If using canned air, be sure to hold
the can upright to avoid spraying liquid propellant into the camera. Also avoid
spraying canned air directly at the shutter.
9 If the filter is clean, skip to step 10.
If dust or dirt remains after you use the air and the brush, follow these steps:
a Moisten a lint-free wipe with distilled water or methanol.
b Lightly wipe across the surface of the filter in a single direction only.
Note: Do not go over a previously wiped area with the same wipe, and do not
reuse a wipe. Dirt collected on the wipe can damage the filter.
Next
96
Page 98

Cleaning the Camera Optics (Continued)
c If dust or dirt remains after the first attempt to wipe it away, repeat the proce-
dure with a new, clean wipe.
10 After the filter is clean, close the shutter by turning the camera power switch on
and then off.
11 Reattach the camera to the microscope.
97
Page 99

Cleaning the Camera Body
If the DMC 2 camera body requires cleaning, use a clean, soft cloth dampened with
water.
Do not use cleaners of any kind, and do not spray water or other liquids directly
onto the camera.
98
Page 100

Obtaining Software Updates
For the latest information about DMC 2 software updates, visit the Polaroid Web site:
www.polaroid.com
99
 Loading...