

Page 1
Page 2

Table of contents
1
Introduction
2
Loading film
3
Connecting the power supply
3
Determining the processing time of the
film
3
Setting the exposure control
5
Setting the color-filtration controls
6
Preparing to make a print
7
Exposing the film
7
Processing the film
9
Possible problems, causes
10
Warranty
10
For information or assistance
11
FCC Notice (U.S.A. only)
11
EMI Notice (Canada)
12
Parts and accessories
Illustrations
Pg 13, Parts & Film loading
Pg 14, Film Loading, controls & film
processing
Pg 15, Trouble shooting
Refer to reference numbers in text
Page 3

The numbers throughout the text refer
1
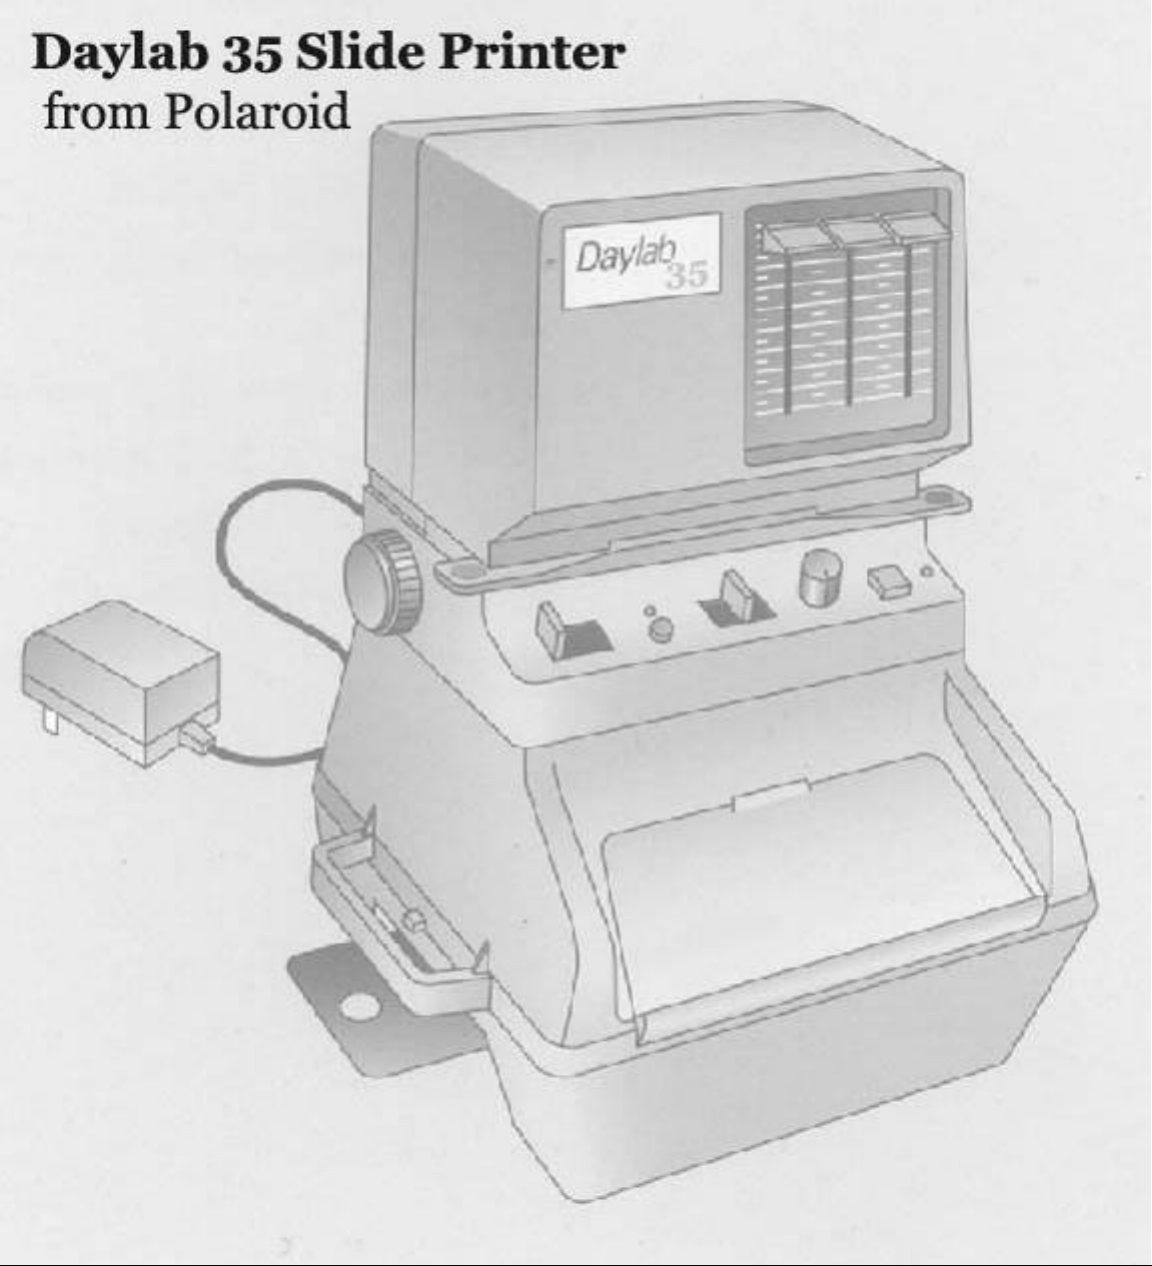
Introduction
The Daylab 35 Slide Printer allows you to
make prints of 35mm slides onto Polaroid
31/4 x 41/4 in. peel-apart instant films.
The Daylab35 is easy to operate and
offers such features as preset focusing,
automatic exposure control, exposure
adjustment, automatic film-development
timing, and built-in color filters for
creative effects. With the Daylab 35, you
can explore a wide range of creative
applications, including the Polaroid
Emulsion and image Transfer processes.
Contact your Polaroid dealer for
additional information.
If you need assistance on how to use
the Daylab 35 Slide Printer or Polaroid
films, or if you should have film-related
questions, please call us toll-free
1-800-343-5000, Mon. Fri., 8 a.m. to 8
p.m. (Eastern Time) from anywhere in the
U.S.A. Or, write to the Customer Care
Center, Polaroid Corporation, 201
Burlington Road, Bedford, MA 01730.
to the Daylab 35 illustrations on the
pages at the back of the manual.
Parts (pg 13)
a
Power supply
b Film-holder dark slide/viewing panel
c Color-filtration controls
d Slide carrier
e Ready indicator
f START button
g Exposure-adjustment dial
h VlEW-OFF-PRINT switch
i Film-processing-timer button
j Film-processing-timer indicator
k Film-type selection switch
I image-preview door
Note: The dark slide/viewing panel has a
dual function. When fully inserted into the
film holder, it serves as a dark slide by
preventing accidental exposure of your
film. Its white surface facilitates image
composition when you project the slide
image onto it with the VIEW lamp.
Page 4

Remove the base of the Daylab 35 by lifting
the exposure unit up. Invert the film holder.
2
Loading film
Unlatch and open the film-holder door
(2): Pull down both ends of the latch and
open the film-holder door (2m).
Before loading film into the film
holder, check that the steel rollers are
clean. Dirt on the rollers may cause a
number of picture problems such as
repeated spots and bars on the pictures,
poor colors, or jammed film, as explained
in Possible problems, causes
Hold the film pack by the edges only.
Insert the closed end of the pack at an
angle (3), then push the pack down into
position.
Check that the white leader and
processing tabs are free, as shown (4),
not caught between the pack and the film
chamber.
Close and latch the film-holder door:
Hold the door closed and push the latch
up overthe end of the film holder (5) so
that it snaps into position.,
Caution: Before continuing with the next
steps, check the dark slide/viewing panel
to be sure that it is inserted all the way
into the film holder. If it is not, you risk
exposing the film.
The black safety-cover tab (5n) must
extend from the film holder. If not, reopen
the door, and straighten the safety-cover
tab.
Grip the tab firmly, and pull the safety
cover straight all the way out of the film
holder (6).
When you remove the safety cover, a
white leader tab (6o) should protrude
from the slot. If it does not, carefully open
the door (doing so in dim light) and free
the tab. Close and latch the door, with the
tab extending outside.
The film holder is now loaded and
ready for the first exposure.
Recommended Polaroid instant films,
for use with the following Daylab 35 applications:
Inter-
negative
-
665
Color applications:
Black and white applications:
Slide Emulsion/Image
copies
679
689
664**
transfer
669669
-
*Use Type 665 positive/negative film to produce a reusable negative of your image to create
multiple black-and-white prints.
**Note that the development time of Type 664 film at 75°F (24°C) and above is only 30 sec.
Page 5

3
Connecting the power supply
Plug the Daylab 35 power supply
(110 125 VAC) into an appropriate
electrical outlet and then into the
connection on the back of the Daylab 35.
Determining the processing time of the film
Processing times vary for different film
types. Also, temperature affects the
processing time of your film. Check your
film instructions for the recommended
processing time so you can select the
appropriate film-exposure settings and
make any necessary adjustments to the
Daylab 35 preset film-processing times.
These settings are discussed in detail in
the next section, Setting the exposure
controls.
Setting the exposure controls (7)
On the front of the Daylab 35 are the 4
controls that you need to make an
exposure: the film-type selection switch,
the VIEW-OFF-PRINT switch, the
exposure-adjustment dial, and the
START
button.
The film type selection switch:
The
Daylab 35 has three exposure settings,
preset for specific Polaroid instant films.
Setting 1 For Tvpe 665 black-and-white
positive/negative film with a speed of ISO
75/19°. The Daylab 35 preset
film-processing time is 30 seconds.
Setting 2 For Type 669 Polacolor
extended-range film with a speed of ISO
80/20°. The preset film-processing time is
60 seconds.
Setting 3: For Polacolor 679, Type 689
ProVivid, and Polapan Pro 100 Type 664
films, with a speed of ISO 100/21°. The
preset film-processing time is 90 seconds
for Type 679 and 689 films. Type 664 film
has a 30-second development time; time
the development manually.
Page 6

4.
The VIEW-OFF-PRINT switch:
VIEW:
Select VIEW to compose an image
on the dark slide/viewing panel. This
setting turns on the lamp that projects
your slide image onto the dark
slide/viewing panel.
Warning:
Never leave your slide under
the VIEW lamp longer than necessary.
Heat from the lamp can damage your slide.
The Daylab 35 has a built-in switch
that automatically shuts off the VIEW lamp
after approximately 4 minutes. This
prevents the lamp from overheating and
damaging your slide. To turn the VIEW
lamp on again, set the VIEW-OFF-PRINT
switch at OFF: then move it back to VlEW.
OFF: After you compose your image,
return the switch to OFF until you are
ready to make a print. Doing so helps
extend the life of the VIEW lamp. When
you finish using the Daylab Jr., always
return the switch to OFF.
PRINT:
Select PRINT when you are ready
to make the exposure. When you select
PRINT, the ready-indicator light to the
right of the START button should be off.
You must wait approximately 15 seconds
until it glows green before you can press
the START button. Note that the built-in
flash that exposes the film is not activated
until you press the START button. The
lamp shuts off automatically following
the exposure.
The exposure adjustment dial: The
exposure adjustment dial lets you adjust
the exposure of your prints. The Daylab
35 has an exposure-correction range with
seven settings. Use the "0" setting at the
midpoint of the range if you have a
properly exposed slide, where no
exposure correction is needed. Turning
the dial from "0" clockwise in the "+"
direction lets you increase the exposure
to lighten your printed image. Turning the
dial from "0" counterclock-wise in the "-"
direction lets you reduce the exposure to
darken your printed image. For more
information see Possible problems,
causes.
The
START
button
:
The START button fires
the built-in flash that exposes the film. If
you press START and the green ready
indicator is not on, the flash does not fire
(the ready indicator turns on 15 seconds
after you select PRINT with the
ViEW-OFF-PRINT switch).
Caution:
To prevent accidental film
exposure, follow the sequence of steps
carefully in Exposing the film.
Page 7

Setting the Color-filtration controls (8)
Correcting prints from color slides
subtract:
add:or
If you want
5
On the front of the Daylab 35 are three
color-filtration controls for correcting
color balance and for creating special
effects. If you want to adjust the color
balance of your print, use the
color-filtration controls to add amounts of
the three primary colors: cyan, magenta
and yellow to your print. Add one color or
a combination of two colors at a time.
The filters are scaled so you can
measure the amount of filtration for each
color. Use "0= for no filtration. Or,
increase the filtration by increments of 5,
up to "80," the maximum filtration level.
As you evaluate the color balance of
your image to determine what correction
it may need, first select a portion of the
image that should be neutral or gray to
detect any undesirable color cast.
Whenever possible, look also at skin
tones for improperly balanced color.
To eliminate the undesired color cast
from your image, you need to add
filtration for the complement of the color
(for color correction, refer to the chart,
Correcting prints from co/or slides).
In color photography, light is broken
down into three primary colors: cyan
(greenish blue, magenta (reddish purple\
and yellow. By pairing these colors in
equal amounts, you can create the
following secondary colors:
CYAN + MAGENTA = BLUE
MAGENTA + YELLOW = BED
YELLOW + CYAN = GREEN
To add a certain color to your printed
image, you must either add that same
color with filtration or decrease its
complement. Use the chart below to
determine what filter or combination of
filters you need to correct your image.
:
CYAN + MAGENTALess YELLOW
More YELLOW
Less RED iMAGENTA t YELLOW)
YELLOW
CYAN
More RED MAGENTA + YELLOW
Less MAGENTA
More MAGENTA MAGENTA
Less BLUE (CYAN + MAGENTA)
More BLUE CYAN + MAGENTA
Less CYAN MAGENTA + YELLOW
More CYAN
Less GREEN (YELLOW + CYAN)
More GREEN
YELLOW + CYAN
YELLOW
CYAN
MAGENTA
YELLOW + CYAN
YELLOW
CYAN + MAGENTA
MAGENTA + YELLOW
CYAN
MAGENTA
YELLOW+ CYAN
CYAN + MAGENTA
YELLOW
CYAN
MAGENTA + YELLOW
YELLOW + CYAN
MAGENTA
Page 8

Note
6
: As you set the filters to make color
adjustments, the Daylab 35 does not
show the effects of the adjustments as
you preview the image projected on the
dark slideviewing panel. Make test
exposures to gauge what effects you want
to achieve with color filtration.
Note:
Adding filtration extends exposure
time. Use the exposure-adjustment dial to
compensate for these changes. Also note
that extending the exposure times can
result in further color shift.
Note:
Use no more than two filters at any
one time.
Note:
You can also use the filters to add
or subtract tonal values to your
black-and-white prints.
Preparing to make a print
Select a slide: The Daylab 35 Iets you
add creative effects to your slides, but it
cannot improve the photographic quality
of your original image. Choose a clean,
dust-free 35mm slide that is in sharp
focus, has an even exposure (neither too
light not too dark and accurately renders
the colors of your subject.
Orient your slide on the slide carrier
Holding the slide carrier with its long
:
edge facing you (the guides that hold the
slide in place face upward), lay your slide
emulsion-side-up /dull-side-up) on the
carrier so that it fits within the guides. Be
sure to orient the slide on the carrier so
the image is upside down and appears as
a mirror image on the dark slide/viewing
panel.
Compose your picture:
With the slide
correctly oriented, insert the slide carrier
into the slide carrier slot (9) Set the
VIEW-OFF-PPINT
switch at
VIEW;
the viewing
light inside the Daylab 35 should now be
on. Open the image-preview door to view
your image projected onto the dark
slideviewing panel (10).
You can move the slide carrier from
side to side to center the image on the
dark slideviewing panel. Notice,
however,that you cannot print the full
format of your slide. You lose
approximately 1/16 in. from the horizontal
dimension of the image.
Also, note that the Daylab 35 has
nonadjustable, fixed focusing.
Warning: Never leave your slide under
the VIEW Iamp longer than necessary.
Heat from the lamp can damage your
slide.
The Daylab 35 has a built-in switch
that automatically shuts offthe VIEW lamp
after approximately 4 minutes. This
prevents the lamp from overheating and
damaging your slide. To turn the VIEW
lamp on again, set the VIEW-OFF-PRINT
switch at OFF; then move it back to VIEW.
Caution: After centering your image on
the dark slideviewing panel, be sure to
close the image-preview door. Leaving
the door open while you expose the film
fogs the print.
Page 9

7
1 Set the film-type selection switch at the
setting appropriate for the type of film
you are using. See
controls.
2 Set the exposure-adjustment dial at the
setting appropriate for your slide. For a
slide image with average lighting
conditions, start with the (0) setting.
3 Set the VIEW-OFF-PRINT switch at PRINT.
4 Set the color filtration controls at the
appropriate settings for your slide. You
should initially set the 3 color-filtration
controls at "0".
5 To expose the film, first close the
image-preview door (11). Then gently
pull the dark slide out of the film holder
as far as it will go.
6 Wait approximately 15 seconds for the
ready-indicator light to turn green. Then
press the START button to fire the flash
that exposes the film. Press the button
gently. The slightest vibration to the
Daylab 35 can blur your printed image.
7 After exposing the film, gently insert the
dark slide/viewing panel back into the fiIm
holder, as far as it can go.
Setting
the exposure
Processing the filmExposing the film
Pull the leader tab:
Grasp the white
leader tab, and pull it straight, all the way
out of the film holder (12). This causes a
second white tab, a larger processing tab
with arrows (
12p
), to appear. If no
processing tab appears, follow the
instructions in if no processing tab
appears when you pull the leader tab.
Pull the processing tab: Grip the
processing tab firmly in the center and
pull it straight, in one smooth continuous
motion, at moderate speed, all the way
out of the film holder (13).
The picture is now developing, so start
timing immediately. Press the
film-processing-timer button on the front
of the Daylab 35. When you press the
button, the film-processing-timer
indicator starts to glow. Do not disturb
the print while the image is developing.
Wait until the Daylab 35 beeps (4 times),
indicating the preset development time
has elapsed (the timer indicator stops
glowing).
Note: Refer to Setting the exposure
controls for detailed information about
the three preset development times.
These times are set for film development
at room temperature (70°F/21°C) When
developing the film above or below room
temperature, check your film instructions
for the development time recommended
for that temperature, and use the
exposure-adjustment dial to make any
exposure adjustments.
After the full development time, separate
the print from the negative, starting at the
corner nearest the processing tab (14).
Do not let the print drop back onto the
damp negative. (See
Caution
at the end of
this section).
Page 10

8
If no processing tab appears when you
pull the Ieader tab:
another leader tab. Instead, carefully
open the film holder, in dim light, without
disturbing the film pack. You can use
your fingertip to make sure the pack does
not move (15). Take hold of the
processing tab that failed to come out,
gently pull it all the way out of the film
holder (16), and discard it.
While the door is open, check the
developer rollers and the processing-tab
slot and, if necessary, clean them. See
Cleaning the developer rollers.
Close and latch the door with the next
leader tab extending outside.
If you accidentally pull two leader
tabs:
Then two processing tabs protrude,
at the same time, from the film holder.
Both pieces of film will be ruined, and
unless you are careful, you may also lose
a third picture.
Do not open the film holder. Grip both
processing tabs firmly, pull them out
together, and discard both pieces of film.
This may cause developer to spread
inside the film holder. Open the door, and
without disturbing the film pack, clean the
developer rollers and the slot for the
processing tab.
Stop! Do not pull
Cleaning the developer rollers:
pressure with both thumbs to lift the steel
loops and remove the roller assembly
(17) from the film holder.
Clean both rollers with a soft, lint-free
cloth, dampened with water, if necessary,
or hold the roller assembly under running
water. As you clean them, rotate both
rollers and inspect them. ( Note that one
roller turns more easily than the other.)
Never scrape the rollers with anything
metallic, nor with your fingernail. Do not
attempt to disassemble the rollers.
Blow any dust or lint out from the film
chamber. Also clean the slot for the
processing tab (18). To reinsert the roller
assembly, slide the rollers into position
and, using both hands, press the steel
loops down flat.
Caution:
process uses a caustic paste. Avoid its
contact with skin, eyes and mouth and
keep it away from children and animals.
If you get some paste on your skin,
wipe it off immediately and wash with
water to avoid an alkali burn.
mouth contact occurs, quickly wash the
area with plenty of water and see a
doctor. Keep discarded materials away
from children, animals, clothing and
furniture.
The Polaroid instant film
Apply
If eye or
Page 11

_
9
An image blurred. out of focus
Most likely cause is:
· Selecting a slide that is not in sharp
focus. Use a properIy focused image.
A black or blank print
Most likely causes are:
· Forgetting to press the START button to
expose the film.
· Forgetting to move the VIEW-OFF-PRINT
switch to PRINT before pressing the START
button to expose the film. (No exposure
will have been made.)
· Leaving the dark slide/viewing panel
inserted in the film holder while
attempting to make an exposure.
A fogged print (light image or no
image at all)
Most likely causes are:
· Opening the image-preview door without
first inserting the dark slide/viewing panel
into the film holder.
· Leaving the image-preview door open
when pressing START to expose the film.
· Using the wrong film-type-selector-switch
setting.
· Removing unused film from the film
holder without reinserting the black
safety cover; then reloading it into the
film holder.
A print either too light or too darkPossible problems, causes
Most likely causes are:
· Using a slide that is overexposed or
underexposed. The Daylab 35 cannot
enhance an improperly exposed original
image.
· Overexposing or underexposing the film.
If the print is overexposed, decrease
exposure with the exposure adjustment
dial by-1 or more, depending on the
severity of the overexposure. If
underexposed, increase exposure with
the exposure-adjustment dial by +1 or
more, depending on the severity of the
underexposure.
An image printed backwards
The slide is oriented incorrectly on the
slide carrier. Be sure that the image
projected on the dark slide/viewing panel
appears as a mirror image of what you
want for your final print.
Repeated white spots (19)
Marks like these result from dirt on the
steel rollers of the film holder. Inspect the
rollers each time you load film, and clean
them whenever necessary.
Page 12

10
A curtain-shaped mark or broad streak
If you start to pull the processing tab and
then stop or hesitate briefly, a
curtain-shaped mark along the print edge
appears. If you stop mid-way into the pull,
a broad streak results. Always pull the
processing tab out in one smooth,
continuous motion.
An oblong in the print(20)
This indicates that you did not pull the
leader tab all the way out. When you then
pulled the processing tab, the leader tab
retracted into the film holder, thus
spoiling the picture. Always pull the
leader tab all the way out of the film
holder.
Underdeveloped edges or corners (21)
These are usually caused by pulling the
processing tab out at an angle. This
prevents the developer from being
spread evenly over the image area. With
color film, pulling the tab at an angle
generally results in orange-red marks
along the edge of the print.
Many small white specks (22)
These indicate that you pulled the
processing tab too swiftly. Pulling the tab
too fast can also cause pink lines, streaks
or blotches on color prints. Pull the
processing tab a little less rapidly, in one
smooth uninterrupted motion.
A muddy looking print
The print was not allowed to develop
long enough before separation from the
negative. Develop pictures for the fulI
time recommended in the film
instructions. Underdeveloped color prints
tend to be a brownish pink.
Warranty
Your Daylab 35 is guaranteed against
defects in materials and workmanship for
one full year from the date of original
purchase. During this period, any such
defects will be remedied without charge,
except for transportation costs. The
warranty excludes damage resulting from
normal wear, mishandling or accident,
and a charge will be made for such
repairs. The warranty excludes the
viewing bulb.
consequential damage. Some
jurisdictions do not allow the
limitation or exclusion of
consequential damages, so the
foregoing may not apply to you.
For information or assistance
For further information or warranty
assistance with the Daylab 35 or for
information or assistance with Polaroid
photographic processes, call Polaroid
Corporation, toll-free at 1-800-343-5000,
Mon.-Fri., 8 AM to 8 PM (Eastern Time).
For service:
35 for service, contact Polaroid
Corporation at 1-800~343-5000 for shipping
instructions and service information.
Polaroid Corporation provides referral
and shipping assistance with the
Daylab 35 with the consent of Pfaff
Manufacturing Inc. and solely as a
service for Polaroid customers. This
service shall not be construed to
warrant or represent the function,
fitness, workmanship or design of any
non-Polaroid products.
This warranty excludes
Before returning the Daylab
Page 13

is no guarantee that interference will not
11
FCC Notice (U.S.A. only)
This equipment has been tested and
found to comply with the limits for a
Class B digital device, pursuant to Part 15
of the FCC Rules. These limits are
designed to provide reasonable
protection against harmful interference
when the equipment is operated in a
residential installation. This equipment
generates, uses, and can radiate radio
frequency energy and, if not installed and
used in accordance with the instruction
manual, may cause harmful interference
to radio communications. However, there
occur in a particular installation. If this
equipment does cause harmful
interference to radio or television
reception, which can be determined by
turning the equipment off and on, the
user is encouraged to try to correct the
interference by one or more of the
following measures:
· Reorient or relocate the receiving antenna
of the radio or television.
· increase the separation between the
equipment and the receiver.
· Connect the equipment to an outlet on a
circuit different from that to which the
receiver is connected.
· Consult the dealer for help.
Note
: Changes or modifications not
expressly approved by the party
responsible for compliance could void the
user's authority to operate this equipment.
EMI Notice (Canada)
This Class B digital apparatus meets all
requirements of the Canadian
Interference-Causing Equipment
Regulations.
Cet appareil numerique de la classe B
respects toutes les exigences du
Reglement sur le materiel broullieur du
Canada.
Page 14

Parts end Accessories
Complete slide-printing system
includes:
Slide printer & 31/4 x 41/4film-holder
Includes
2 heavy-duty trays
Thermometer
Print tongs
Roller
Mylar sheet
Contact paper
Watercolor paper
6 blank watercolor greeting cards with
envelopes
Image- and Emulsion Transfer Guide
A guide to creating transfers from
12
To order Daylab 35 parts or accessories,
call Polaroid Corporation toll-free at
1-800-343-5000, Mon - F r i, 8 AM to 8 PM
(Eastern Time). Listed below are parts
and accessories for the Daylab 35 and the
Daylab 35 Plus.
Order
Item number Description
Daylab 35 Slide Printer
114723
for use with Polaroid 31/4 x 41/4
instant peel-apart films;
Power supply
Polaroid Emulsion/lmage Transfer Kit 619769
35mm to Transfers Guide
1 F51 25
:
Timer
35mm slides
Page 15

Page 16

Page 17

 Loading...