

Page 1
INSTRUCTIONS
DIGITAL CAMERA
D-360L
PREPARATIONS
TAKING PICTURES
DISPLAYING PICTURES
ON THE LCD MONITOR
PRINTING PICTURES
USING A PERSONAL
COMPUTER
MISCELLANEOUS
n Before using your camera, read this manual carefully to ensure correct
use.
n We recommend that you take test shots to get accustomed to your
camera before taking important photographs.
Page 2
IMPORTANT SAFETY INSTRUCTlONS
CAUTION: TO REDUCE THE RISK OF ELECTRIC SHOCK, DO
NOT REMOVE COVER (OR BACK). NO USER-SERVICEABLE
PARTS INSIDE. REFER SERVICING TO QUALIFIED OLYMPUS
SERVICE PERSONNEL.
RISK OF ELECTRIC SHOCK
DO NOT OPEN
CAUTION
The lightning flash with the arrowhead symbol, within an
equilateral triangle, is intended to alert the user to the
presence of uninsulated “dangerous voltage” within the
product's enclosure that may be of sufficient magnitude
to constitute a risk of electric shock to persons.
The exclamation point within an equilateral triangle is
intended to alert the user to the presence of important
operating and maintenance (servicing) instructions in the
literature accompanying the product.
WARNING:
TO REDUCE THE RISK OF FIRE OR SHOCK HAZARD, DO NOT
EXPOSE THIS EQUIPMENT TO RAIN, ANY LIQUID OR
MOISTURE.
Thank you for purchasing the Olympus digital camera. Before you start to
use your new camera, please read these instructions carefully to obtain
optimum performance and a longer service life from the unit. Be sure to
retain this manual for future reference.
22
Page 3

1. Read Instructions — All the safety and operating instructions should be
read before the product is operated.
2. Retain Instructions — The safety and operating instructions should be
retained for future reference.
3. Heed Warnings — All warnings on the product and in the operating
instructions should be adhered to.
4. Follow Instructions — All operating and use instructions should be
followed.
5. Cleaning — Unplug this product from the wall outlet before cleaning. Do
not use liquid cleaners or aerosol cleaners. Use a damp cloth for
cleaning.
6. Attachments — Attachments not recommended by the product
manufacturer may be hazardous and/or cause damage to the product.
Do not use these attachments.
7. Water and Moisture — Do not use this product near water — for
example, near a bath tub, kitchen sink, or laundry tub, in a wet
basement, near a swimming pool or rain.
8. Accessories — Do not place this product on an unstable stand, tripod,
bracket, table, or cart. The product may fall, causing serious injury to a
child or adult, and serious damage to the product. Use only with a tripod,
stand, or bracket. Any mounting of the product should follow the
manufacturer’s instructions, and should use a mounting accessory
recommended by the manufacturer.
9. Power Sources — This product should be operated only from the type of
power source indicated on the label. If you are not sure of the type of
power supply to your home, consult your product dealer or local power
company. For products intended to operate from battery power, or other
sources, refer to the operating instructions.
33
Page 4

10. Grounding or Polarization — This product,when used with an optional AC
adapter, may be equipped with a polarized alternating-current line plug (a
plug having one blade wider than the other). This plug will fit into the
power outlet only one way. This is a safety feature. If you are unable to
insert the plug fully into the outlet, try reversing the plug. If the plug
should still fail to fit, contact your electrician to replace your obsolete
outlet.
11. Power-Cord Protection — Power-supply cords should be routed so that
they are not likely to be walked on or pinched by items placed upon or
against them, paying particular attention to cords at plugs, convenience
receptacles, and the point where they exit from the product.
12. Lightning — For added protection for this product when used with an
optional AC adapter during a lightning storm, or when it is left unattended
and unused for long periods of time, unplug it from the wall outlet and
disconnect the antenna or cable system. This will prevent damage to the
product due to lightning and power-line surges.
13. Overloading — Do not overload wall outlets, extension cords, or integral
convenience receptacles as this can result in a risk of fire or electric
shock.
14. Object and Liquid Entry — Never push objects of any kind into this
product through openings as they may touch dangerous voltage points or
short-out parts that could result in a fire or electric shock. Never spill
liquid of any kind on the product.
15. Servicing — Do not attempt to service this product yourself as opening or
removing covers may expose you to dangerous voltage or other hazards.
Refer all servicing to qualified service personnel.
4
Page 5

16. Damage Requiring Service — If using the optional AC adapter, unplug
this product from the wall outlet and refer servicing to qualified service
personnel under the following conditions:
a) If liquid has been spilled, or objects have fallen into the product.
b) If the product has been exposed to rain or water.
c) If the product does not operate normally by following the operating
instructions. Adjust only those controls that are covered by the
operating instructions as an improper adjustment of other controls
may result in damage and will often require extensive work by a
qualified technician to restore the product to its normal operation.
d) If the product has been dropped or damaged in any way.
e) When the product exhibits a distinct change in performance — this
indicates a need for service.
17. Replacement Parts — When replacement parts are required, be sure the
service technician has used replacement parts specified by the
manufacturer or which have the same characteristics as the original part.
Unauthorized substitutions may result in fire, electric shock, or other
hazards.
18. Safety Check — Upon completion of any service or repairs to this
product, ask the service technician to perform safety checks to determine
that the product is in proper operating condition.
19. Heat — The product should be situated away from heat sources such as
radiators, heat registers, stoves, or other products (including amplifiers)
that produce heat.
5
Page 6

Radio and Television Interference
Change or modifications not expressly approved by the manufacturer may
void the user’s authority to operate this equipment. This equipment has been
tested and found to comply with the limits for Class B digital device, pursuant
to Part 15 of the FCC Rules.These limits are designed to provide reasonable
protection against harmful interference in a residential installation. This
equipment generates, uses, and can radiate radio frequency energy and, if
not installed and used in accordance with the instructions, may cause
harmful interference to radio communications.
However, there is no guarantee that interference will not occur in a particular
installation. If this equipment does cause harmful interference to radio or
television reception, which can be determined by turning the equipment off
and on, the user is encouraged to try to correct the interference by one or
more of the following measures:
•Reorient or relocate the receiving antenna.
•Increase the distance between the camera and receiver.
•Connect the equipment to an outlet on a circuit different from that to which
the receiver is connected.
Only the included RS-232C serial cable should be used to connect the
camera to a personal computer (PC).
Declaration of Conformity
Model Number: D-360L
Trade Name: OLYMPUS
Responsible party: Olympus America Inc.
Address: 2 Corporate Center Drive, Melville, New York 11747-3157
Telephone number: 516-844-5000
This device complies with Part 15 of the FCC rules. Operation is subject to
the following two conditions:
(1)This device may not cause harmful interference, and
(2)This device must accept any interference received, including
interference that may cause undesired operation.
U.S.A.
This Class B digital apparatus meets all requirements of the Canadian
Interference-Causing Equipment Regulations.
6
Page 7

WARNING
• Keep the batteries away from children.
• If a battery is swallowed, see a doctor immediately.
• Dispose of used lithium batteries promptly, in a safe manner that
complies with all applicable laws.
• The lithium battery may present the risk of fire or chemical burn if
mishandled.
• Do not recharge, disassemble, heat above 212°F (100°C) or dispose of in
a fire.
• Before use, wipe the battery clean with a dry soft cloth to assure good
contact.
• Never use metallic tweezers to hold the battery, and never short circuit
the (+) and (–) sides of the battery.
Windows®is a registered trademark of Microsoft Corporation.
Macintosh
All other brand names and product names are registered.
™
is a trademark of Apple Computer Inc.
Legal and other notices
•All contents of this publication are subject to change without notice.
•Although the contents of this publication have been carefully checked to
avoid errors, some may still occur. If you are in doubt about any points or
find mistakes or omissions, please contact us.
•No part of this publication may be reproduced or reprinted except for
personal use without the prior permission of Olympus.
•Olympus makes no representations or warranties regarding any damages,
or benefit expected by using this unit lawfully, or any request from a third
person, which are caused by the inappropriate use of this unit.
•Olympus makes no representations or warranties regarding any damages
or any benefit expected by using this unit lawfully which are caused by
erasing the picture data.
•Olympus reserves all rights to this manual.
7
Page 8
FOR SAFE USE
Danger: Ignoring this Danger mark and operating this product
Warning: Ignoring this Warning mark and operating this product
Caution: Ignoring this Caution mark and operating this product
incorrectly may lead to serious injury or death.
incorrectly may lead to serious injury or death.
incorrectly may lead to injury.
BATTERY HANDLING
IGNORING THE WARNINGS BELOW MAY LEAD TO FLUID LEAK,
BATTERY HEAT GENERATION, FIRE, EXPLOSION, ELECTRIC SHOCK
OR BURNING.
DANGER
1. WHEN USING NiMH BATTERIES, USE OLYMPUS BRAND NiMH
BATTERIES AND CHARGER.
2. DO NOT LOAD OR USE BATTERIES WITH THEIR +/– TERMINALS
UPSIDE DOWN. DO NOT LOAD BATTERIES FORCEFULLY.
3. DO NOT MODIFY OR DISASSEMBLE BATTERIES OR CONNECT
THEM TO THE CAMERA USING SOLDER OR IN ANY OTHER WAY
THAN INSTRUCTED IN THIS MANUAL. IT MAY DESTROY THE
TERMINALS OR CAUSE BATTERY FLUID TO LEAK.
4. DO NOT CONNECT THE TERMINALS WITH METAL OR
CARRY/STORE BATTERIES WITH METALLIC NECKLACES OR
HAIRPINS.
5. DO NOT CONNECT THE CAMERA DIRECTLY TO A POWER OUTLET
OR CIGARETTE LIGHTER IN A VEHICLE.
6. DO NOT THROW BATTERIES INTO FIRE OR HEAT THEM.
7. IF BATTERY FLUID GETS IN YOUR EYES, DO NOT RUB THEM.
WASH THE FLUID OUT WITH CLEAN WATER AND CONTACT A
PHYSICIAN IMMEDIATELY.
8
Page 9

WARNING
1. DO NOT ALLOW BATTERIES TO COME IN CONTACT WITH WATER
OR SEA WATER.
2. DO NOT USE BATTERIES THAT ARE NOT DESIGNATED FOR USE
WITH THIS CAMERA.
3. DO NOT THROW BATTERIES INTO FIRE, EXPOSE THEM TO HEAT,
OR SHORT-CIRCUIT OR DISASSEMBLE THEM.
4. DO NOT USE OLD AND NEW OR CHARGED AND UNCHARGED
BATTERIES, OR BATTERIES OF DIFFERENT
CAPACITIES/KINDS/BRANDS MIXED TOGETHER.
5. DO NOT CHARGE UNCHARGEABLE ALKALINE OR LITHIUM
BATTERIES.
6. DO NOT LOAD OR USE BATTERIES WITH THEIR +/– TERMINALS
UPSIDE DOWN.
7. DO NOT USE BATTERIES IF THEIR BODY IS NOT COVERED BY THE
INSULATING SHEET OR IF THE SHEET IS TORN AS IT MAY CAUSE
FLUID LEAK, FIRE OR INJURY.
8. IF NiMH BATTERIES ARE NOT CHARGED WITHIN THE SPECIFIED
TIME, STOP CHARGING.
9. DO NOT USE BATTERIES IF A FLUID LEAK, CHANGE OF
COLOR/SHAPE OR OTHER ABNORMALITY IS FOUND.
10. STORE AND USE BATTERIES OUT OF CHILDREN’S REACH. IF A
CHILD SWALLOWS BATTERIES, CONTACT A PHYSICIAN
IMMEDIATELY.
11. IF BATTERY FLUID GETS ON SKIN OR CLOTHES, SOAK IT WITH
CLEAN WATER AS IT MAY BURN THE SKIN.
12. DO NOT MODIFY THE BATTERY COMPARTMENT ON THE CAMERA
OR INSERT FOREIGN OBJECTS IN IT.
9
Page 10

CAUTION
1. DO NOT APPLY PHYSICAL SHOCK TO BATTERIES.
2. DO NOT USE OLD AND NEW OR CHARGED AND UNCHARGED
BATTERIES, OR BATTERIES OF DIFFERENT
CAPACITIES/KINDS/BRANDS MIXED TOGETHER.
3. WHEN CHARGING NiMH BATTERIES, CHARGE ALL FOUR
BATTERIES AT THE SAME TIME.
4. CHARGE NiMH BATTERIES BEFORE USING THEM FOR THE FIRST
TIME OR AFTER NOT USING THEM FOR A LONG TIME.
5. KEEP BATTERIES UNLOADED WHEN NOT IN USE FOR A LONG
TIME, AS IT MAY CAUSE FLUID LEAK OR HEAT GENERATION.
6. DO NOT USE BATTERIES IF A FLUID LEAK, CHANGE OF
COLOR/SHAPE OR OTHER ABNORMALITY IS FOUND, AND TAKE
THEM TO AN AUTHORIZED OLYMPUS SERVICE CENTER.
7. DO NOT USE OR STORE BATTERIES UNDER DIRECT SUNLIGHT OR
IN HOT TEMPERATURES SUCH AS IN A HOT VEHICLE OR IN FRONT
OF A HEATER.
8. DO NOT UNLOAD BATTERIES IMMEDIATELY AFTER USING THE
CAMERA FOR A LONG TIME AS THEY GET HOT.
HANDLING
WARNING
1. NEVER TRY TO USE THE FLASH WHEN TAKING PICTURES OF
PEOPLE (ESPECIALLY INFANTS) AT CLOSE RANGE. THE CAMERA’S
FLASH MAY DAMAGE THE SUBJECT’S EYES AT CLOSE RANGE. DO
NOT TAKE PICTURES OF CHILDREN FROM A DISTANCE OF LESS
THAN THREE FEET.
2. DO NOT AIM YOUR CAMERA DIRECTLY AT THE SUN OR OTHER
EXTREMELY BRIGHT OBJECTS. THIS MAY DAMAGE YOUR EYES.
3. DO NOT USE THIS CAMERA IN THE VICINITY OF FLAMMABLE OR
EXPLOSIVE GAS.
10
Page 11

4. DO NOT LEAVE THIS CAMERA WITHIN THE REACH OF INFANTS OR
CHILDREN.
• THE CHILD MIGHT PUT THE STRAP AROUND HIS OR HER NECK.
THIS COULD CAUSE STRANGULATION OR CHOKING.
• THE CHILD MIGHT SWALLOW BATTERIES OR SMALL
ATTACHMENTS. IF THIS HAPPENS, CONTACT A PHYSICIAN
IMMEDIATELY.
• THE CHILD MIGHT ACTIVATE THE FLASH FROM TOO CLOSE AND
CAUSE DAMAGE TO HIS OR HER EYES.
• THE CHILD MAY BE INJURED.
5. BATTERY FLUID MAY LEAK, GENERATING HEAT AND POSSIBLY
CAUSING A FIRE OR EXPLOSION.
• DO NOT USE NON-RECOMMENDED BATTERIES.
• DO NOT THROW BATTERIES INTO A FIRE, OR EXPOSE TO HEAT.
• DO NOT DISASSEMBLE THE UNIT WITH BATTERIES INSIDE.
• DO NOT USE NEW BATTERIES AND OLD BATTERIES TOGETHER.
DO NOT MIX DIFFERENT TYPES OF BATTERIES OR DIFFERENT
MANUFACTURERS’ BATTERIES.
• DO NOT CHARGE ALKALINE AND LITHIUM BATTERIES.
• KEEP UNLOADED BATTERIES OUT OF THE REACH OF INFANTS
AND CHILDREN. IF AN INFANT OR CHILD SWALLOWS THE
BATTERIES, CONTACT A PHYSICIAN IMMEDIATELY.
• DO NOT LOAD THE BATTERIES IN THE OPPOSITE DIRECTION TO
THAT SHOWN IN THESE INSTRUCTIONS.
• NEVER USE ANY BATTERY WHOSE BODY IS NOT COVERED BY
THE INSULATING SHEET.
6. DO NOT STORE THE CAMERA IN HUMID OR DUSTY PLACES. THIS
MAY CAUSE FIRE OR ELECTRIC SHOCK.
7. DO NOT COVER THE FLASH WITH YOUR HAND DURING
OPERATION. DO NOT TOUCH THE FLASH AFTER FIRING IT
CONTINUOUSLY. YOU MAY GET BURNED.
8. IF YOU DROP THE CAMERA IN WATER OR GET WATER INSIDE IT,
UNLOAD THE BATTERIES IMMEDIATELY AND CONTACT YOUR
NEAREST OLYMPUS SERVICE CENTER. LEAVING BATTERIES IN A
WET CAMERA MAY CAUSE FIRE OR ELECTRIC SHOCK.
11
Page 12

CAUTION
1. IF YOU NOTICE AN UNUSUAL SMELL, NOISE, OR SMOKE EMITTING
FROM THIS CAMERA, UNLOAD THE BATTERIES CAREFULLY TO
AVOID BEING BURNED. (WHEN UNLOADING BATTERIES, DO IT
OUTSIDE AWAY FROM FLAMMABLE OBJECTS, AND DO NOT TOUCH
BATTERIES WITH YOUR BARE HANDS.) CONTACT YOUR NEAREST
OLYMPUS SERVICE CENTER IMMEDIATELY.
2. NEVER ATTEMPT TO DISASSEMBLE THIS CAMERA. IT CONTAINS
HIGH-VOLTAGE CIRCUITRY THAT MAY CAUSE ELECTRIC SHOCK
AND INJURY.
3. DO NOT OPERATE THE CAMERA WITH WET HANDS AS YOU MAY
GET AN ELECTRIC SHOCK.
4. DO NOT STORE THE CAMERA IN ANY PLACE EXPOSED TO
EXCESSIVE HEAT. THIS MAY WEAKEN THE PARTS OR CAUSE A
FIRE.
CARE AND STORAGE
HANDLING
n Do not use or store the camera in places exposed to direct sunlight (e.g. a
beach in summer), excessive heat, humidity, extreme variations of
temperature and humidity, sand or dust, excessive moisture, or vibrations
(e.g. in a car).
n Do not use or store the camera near a heater, cooler, or humidifier, or near
a fire, magnetic fields, or volatile materials.
n Do not shake the camera or subject it to shocks.
n Do not leave the camera with its lens pointing towards direct sunlight. This
will damage the lens.
n Do not leave the camera unused for a long period of time. This may cause
battery leakage and can lead to problems including the growth of mold in
the camera. Before using, press the Shutter release button to check
operation.
n Do not turn the camera when it is mounted on a tripod. Turn the tripod head
instead.
n Do not touch any of the camera’s internal parts.
n Do not use the flash for extended periods as this can cause the flash to
become excessively hot. Do not touch the flash when it is hot.
n Do not improperly open or modify the camera, as it may result in a shock or
injury.
12
Page 13

BATTERY HANDLING
n This camera uses four AA NiMH batteries, AA alkaline batteries, AA
lithium batteries or AA NiCd batteries.
n Performance will be limited with alkaline batteries, especially in low
temperatures. NiMH batteries are recommended.
n AA manganese batteries or a CR-V3 lithium battery pack cannot be
used.
n Use the batteries correctly. Incorrect use can cause fluid leakage, heat
generation, or other damage. When replacing batteries, be sure to
load them correctly.
n The batteries may be temporarily disabled when exposed to cold
temperatures. Try to keep the camera and batteries warm when using
the camera in a cold environment. Batteries that are weak in cold
temperatures will be restored under normal temperatures.
n Sweat, oil, etc. can prevent a battery’s terminals from making
electrical contact. To avoid this, wipe both terminals before loading the
battery.
n Keep spare batteries on hand when going on a long trip. New
batteries may be difficult or impossible to obtain abroad.
n When using NiMH batteries or NiCd batteries, make sure to charge
them fully with the correct battery charger.
n Read instructions carefully before handling NiMH batteries or NiCd
batteries.
n NEVER use any battery whose body is not covered by the insulating
sheet, as it may cause a fire or injury.
n Recommended Temperature when Using NiMH Batteries
Operation: 32 ~ 104°F, Charge: 32 ~ 104°F, Storage: -4 ~ 86°F
(Usage outside this temperature range may limit battery performance
or shorten battery life. Unload batteries from the camera when not in
use.)
Important
• “Note” indicates information you should be aware of.
• Actual product may differ slightly from that shown in illustrations.
13
Page 14

CONTENTS
Important safety instructlons.......................................................2
For safe use............................................................................8
Battery handling......................................................................8
Handling ...............................................................................10
Care and storage..................................................................12
Battery handling....................................................................13
Main features............................................................................17
1
PREPARATION......................................................19
Checking the contents..............................................................20
Names of parts.........................................................................21
Attaching the strap....................................................................24
Loading the batteries................................................................25
Using the AC adapter (optional)...............................................27
Inserting SmartMedia ...............................................................28
Adjusting the date and time......................................................29
Learning the basics ..................................................................31
Turning on the power............................................................31
Checking the card.................................................................32
Checking the batteries..........................................................33
Checking the number of storable pictures............................34
Holding the camera...............................................................35
Proper shutter release..........................................................36
Turning off the power............................................................37
2
TAKING PICTURES...............................................39
Taking pictures..........................................................................40
Taking pictures using the optical viewfinder..........................40
Taking pictures using the LCD monitor.................................42
Quick view ............................................................................44
Focus lock ................................................................................45
Autofocus..................................................................................46
Working range..........................................................................48
Using the flash..........................................................................49
Auto-flash .............................................................................50
Red-Eye reducing flash ........................................................50
14
Page 15

Off.........................................................................................51
Fill-In flash ............................................................................51
Slow shutter synchronization flash .......................................52
Red-Eye reducing flash + Slow shutter synchronization
flash......................................................................................52
Macro mode..............................................................................53
Digital Tele mode......................................................................54
Selftimer ...................................................................................55
Record menu............................................................................56
Exposure compensation...........................................................57
Spot metering mode.................................................................58
Selecting the recording mode...................................................59
White balance...........................................................................61
ISO ...........................................................................................62
Sequence mode .......................................................................63
Panorama mode.......................................................................65
Beep sound ..............................................................................67
File number...............................................................................68
Setting reset .............................................................................70
3
DISPLAYING PICTURES ON THE LCD
MONITOR..............................................................71
Displaying recorded pictures....................................................72
Index-display mode ..................................................................74
Protection .................................................................................75
One-frame erase ......................................................................76
Connecting to a television ........................................................77
Display menu............................................................................78
Close-up display mode (3x inspection).....................................79
Slide-show mode......................................................................80
File number display ..................................................................81
Card setup................................................................................82
All-frame erase .....................................................................82
Card format...........................................................................84
LCD brightness.........................................................................86
15
Page 16

CONTENTS (cont.)
4
PRINTING PICTURES...........................................87
Printing pictures........................................................................88
Card print..................................................................................89
Card print menu....................................................................89
Date-print (card)....................................................................90
Print-reserve (card)...............................................................91
Printing with the P-330N/P-330................................................93
5
USING A PERSONAL COMPUTER......................95
Computer system requirements ...............................................96
Installing provided software......................................................97
Connecting to a personal computer..........................................98
Using a personal computer.......................................................99
Transferring data from SmartMedia........................................100
PC Card Adapter ................................................................100
FlashPath Floppydisk Adapter............................................100
Using CAMEDIA Master.........................................................101
Processing images using CAMEDIA Master ..........................103
6
MISCELLANEOUS..............................................109
Questions and answers..........................................................110
Troubleshooting......................................................................112
System chart...........................................................................116
Error codes.............................................................................117
Optional items.........................................................................118
Notes on display and backlight...............................................118
Compatibility of the picture data .............................................119
Specifications .........................................................................120
16
Page 17

MAIN FEATURES
The 1,310,000-pixel CCD delivers the highest picture
n
quality in its class.
Olympus high-recording mode lens equals those found
n
on single lens reflex cameras.
A removable SmartMedia (SSFDC) memory card (with
n
Panorama function) is provided.
With the provided Video output connector, pictures can
n
be viewed on a TV. (P. 77)
In addition to an optical viewfinder, a 1.8" (4.5 cm) LCD
n
monitor is provided for more flexibility when composing
shots and viewing images (can be enlarged 3 times).
(P. 42)
With the Digital Tele mode, the subject can be
n
photographed (cropped to appear) twice as large.*
(P. 54)
Direct printing available via an optional Olympus printer
n
P-330N/P-330, allowing you to print out images
whenever you need them in any quantity. (P. 93) Also,
you can make prints at a lab. (P. 89)
* Available only in the Standard Quality mode.
17
Page 18

18
Page 19

1
PREPARATION
OLYMPUS DIGITAL CAMERA
Page 20

CHECKING THE CONTENTS
Made in Japan
Made in Japan
Camera
Instructions/Warranty card/
Registration card
Strap
Video cable
RS-232C PC serial cable
AA alkaline batteries
(4 pieces)
Software CD
(containing software)
20
SmartMedia (SSFDC-8MB)
Static-free case
Instructions
Write-protect adhesive
seals (4 pieces)
Index labels (2 pieces)
Page 21

NAMES OF PARTS
CAMERA
Erase mode
button (P. 76)
Flash mode button/
Print button (P. 49/89)
Shutter release/
OK button (P. 36)
Flash (P. 49)
Card compartment
cover (P. 28)
Control panel (P. 23)
Lens barrier
(P. 31)
Selftimer signal (P. 55)
Video output
connector (P. 77)
Selftimer/Protect mode button
(P. 55/75)
Macro/Digital Tele button
(P. 53/54)/
Index-Display button (P. 74)
Menu button
(P. 56/78)
Lens
Connector cover
Strap hole (P. 24)
Computer connector
(RS-232C) (P. 98)
AC adapter
connector (P. 27)
21
Page 22

NAMES OF PARTS (cont.)
LCD monitor (P. 42)
Green lamp (P. 40)
Viewfinder (P. 40)
LCD monitor
ON/OFF button
(P. 31)
– button (P. 29)
+ button (P. 29)
Battery compartment open/close
lever (bottom) (P. 25)
VIEWFINDER DISPLAY
Close-up
correction marks
(P. 48)
Autofocus mark (P. 40) /
Backlighting correction mark
(P. 50)
22
Threaded mount (bottom)
Green lamp (P. 40)
Page 23

CONTROL PANEL
SLOW
ISO
SQ
SHQ
WB
SHQ
’00. 12. 23
23 : 45 124
Flash mode (P. 49)
Sequential shooting
(P. 63)
Spot metering
mode (P. 58)
Selftimer (P. 55)
Macro mode
(P. 53)
Exposure compensation (P. 57)
LCD MONITOR
Battery check
White balance (P. 61)
Date
Time
Card error (P. 117)
Battery check (P. 33)
Protect
Recording
mode (P. 59)
Writing
ISO (P. 62)
Number of
storable pictures
(P. 34)
Recording mode
Frame number
23
Page 24

ATTACHING THE STRAP
Attach the strap to the strap hole on the camera.
Caution:
• Attach the strap correctly as shown so that the camera does not fall
off. If the strap is attached incorrectly and the camera comes loose
and falls off, Olympus is not responsible for any damage.
24
Page 25

LOADING THE BATTERIES
This camera uses four AA nickel metal–hydride batteries, AA alkaline
batteries, AA lithium batteries or AA NiCd batteries.
Performance will be limited with alkaline batteries, especially in low
temperatures. NiMH batteries are recommended.
Do not use manganese batteries; they may overheat and destroy the
camera.
1
Make sure that the camera
power is off.
2
2
3
Set the battery compartment
open/close lever to to open
the cover.
3
Insert the new batteries
correctly as shown and close
the battery compartment cover
tightly.
• Do not press the edge of the
battery compartment cover.
25
Page 26

LOADING THE BATTERIES
(cont.)
Note:
• Make sure that the power is off before loading the batteries.
• Do not touch the inside of the battery compartment.
• If the camera is left without batteries for approx. one hour, all the settings
will reset to the default.
• Read “BATTERY HANDLING” on page 8/13.
These batteries cannot be used.
Batteries whose body is not covered by the insulating
sheet at all.
Batteries whose terminal is flat and a part of the
terminal is covered by the insulating sheet.
Batteries whose terminal is raised but not covered
by the insulating sheet.
Batteries whose terminal is flat and not covered by
the insulating sheet.
26
Page 27

USING THE AC ADAPTER (Optional)
An optional Olympus AC adapter allows you to power your digital camera
from a common AC wall outlet.
AC wall outlet
AC adapter
connector
AC adapter
Warning:
Incorrect use may cause a fire or electric shock.
• Be sure to use an Olympus AC adapter. Olympus is not
responsible for any damage caused by the use of other kinds of
AC adapters.
• Use an AC 120V power source.
• NEVER connect or disconnect the AC adapter with wet hands.
• If the cord of the AC adapter is hot, smells like smoke or is
emitting smoke, unplug it immediately and contact your nearest
authorized Olympus service center.
• Make sure that the camera power is off before connecting or
disconnecting the AC adapter.
• Make sure the AC adapter is properly plugged into the outlet.
• When disconnecting, hold the body, not the cord, of the AC
adapter. Never pull, bend, twist or modify the cord.
• If there is any damage on the cord or if there is a contact failure,
stop using it and contact your nearest authorized Olympus
service center.
• Keep the AC adapter disconnected when the camera is not in
use.
Note:
• Olympus 3V adapter cannot be
used.
• When in use for long periods, the
AC adapter may get warm. This
is normal.
27
Page 28
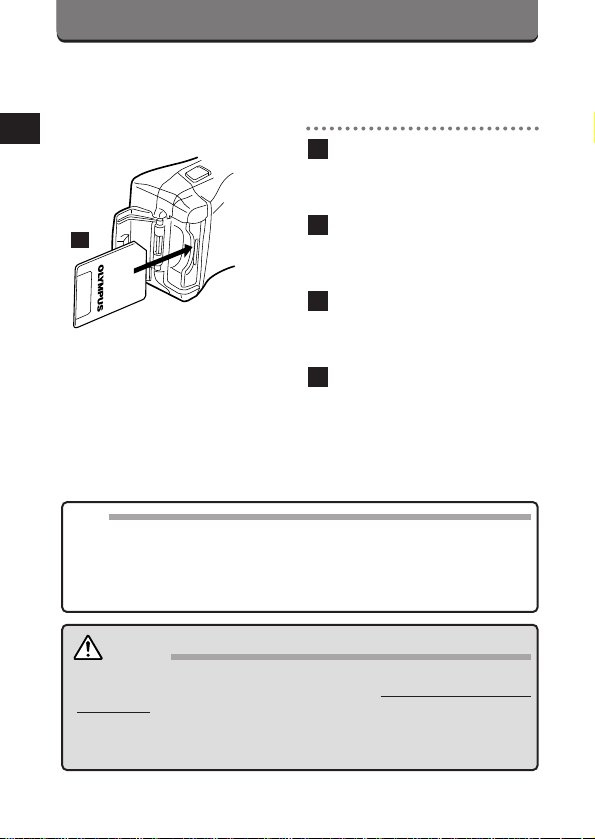
INSERTING SmartMedia
Insert the SmartMedia card in the direction shown.
1
Make sure that the camera
power is off.
2
3
Insert SmartMedia.
Note:
Use 3V (3.3V) cards only. 5V cards cannot be used.
•
• Olympus brand cards are recommended (already formatted). NonOlympus brand cards must be formatted by the camera.
• When using a special function SmartMedia card (optional), insert it in the
same way.
Open the Card compartment
cover.
3
Insert the SmartMedia card
correctly as shown.
4
Close the cover tightly.
Caution:
NEVER open the card cover, eject the card, remove the batteries, or
•
pull the plug while the camera is in operation. It may destroy the data
in the card.
•
The card is a precision instrument. Handle it carefully and do not
subject it to physical shocks.
•
Do not touch the contact area of the card.
28
Page 29

ADJUSTING THE DATE AND TIME
SET
OK
NEXT
–M– –D– –Y–
12. 23. ’00
23 : 45
SET
OK
NEXT
12. 23. ’00
23 : 45
You can adjust the date and time.
1
Close the lens barrier, press
32
LCD monitor
321
the LCD monitor ON/OFF
button, then press the Menu
button several times to
display the screen shown.
2
Select the date order using
the +/– buttons, then press the
OK button.
3
Press the +/– buttons to adjust
the first setting, then press
the OK button. Repeat until
the last setting is adjusted,
then press the OK button to
save the setting.
• If the Menu button is pressed
while the setting is being
entered, it will be canceled and
the next setting menu will
appear.
• If the LCD monitor ON/OFF
button is pressed while the
setting is being entered, it will
be canceled and the LCD
monitor will be turned off.
29
Page 30

ADJUSTING THE DATE AND TIME
(cont.)
• For accurate setting, press the
OK button when the clock hits
00 seconds.
Caution:
• The adjusted date will be canceled when the camera is left without
batteries for approx. one hour (based on our tests). In such a case,
adjust the date again.
Note:
• We recommend that you check the date and time before taking important
pictures.
• The setting will remain even after the power is turned off until it is
readjusted.
• The clock will continue to operate correctly after the year 2000.
30
Page 31

LEARNING THE BASICS
TURNING ON THE POWER
1
Control panel
WBWB
SLOWSLOW
SQSQ
SHQ
ISOISO
2
Note:
• NEVER open the card cover, eject the card, remove the batteries, or pull
the plug while the camera is in operation. It may destroy the data in the
card.
• If you do not operate the camera for three minutes, the camera will be
set to the stand-by mode. After four hours in the stand-by mode, the
power turns off automatically. (Time varies depending on the type of
batteries used.)
1
To turn on the camera in the
Record mode (p. 39 ~ 70),
slide open the lens barrier on
the camera.
• The remaining battery power,
number of storable pictures
and selected recording mode
will be displayed on the control
panel.
2
To turn on the camera in the
Display mode (p. 71 ~ 86),
press the LCD monitor
ON/OFF button with the lens
barrier closed.
31
Page 32

LEARNING THE BASICS (cont.)
SLOWSLOW
ISOISO
SQSQ
SHQSHQ
WBWB
SLOWSLOW
ISOISO
SQSQ
SHQSHQ
WBWB
SET
OK
YES
NO
CHECKING THE CARD
When the power is turned on in the Record mode, the camera checks
the SmartMedia card.
Control
panel
Viewfinder
Control panel
LCD monitor
32
Card error
Green
lamp
When there is no SmartMedia card
in the camera / the card is protected:
The Card error indicator on the
control panel and the Green lamp
blink.
When the card needs to be
formatted:
The Card error indicator on the
control panel lights, and the camera
enters the Card format mode. (p. 84)
Page 33

CHECKING THE BATTERIES
When the power is turned on in the Record mode, the remaining battery
power will be displayed on the control panel.
lights and turns off automatically.
Batteries are OK. You can shoot.
blinks and other indicators on the control panel are displayed
normally.
Battery power is low and batteries should be replaced.
blinks and other indicators on the control panel go out.
Batteries are dead and should be replaced immediately.
Note:
• When taking pictures on a special occasion, on a trip, or in cold
temperatures, keep spare batteries handy.
• When the camera is being operated on batteries that are running low, the
camera may emit several short beeps and blink the number of storable
pictures on the control panel after you take a shot or when you turn on
the power. If this happens, the picture you have just taken will not turn
out properly. Replace the batteries and take the picture again.
33
Page 34

SLOWSLOW
ISOISO
SQSQ
SHQ
WBWB
LEARNING THE BASICS (cont.)
CHECKING THE NUMBER OF STORABLE
PICTURES
When the power is turned on in the Record mode, the number of storable
pictures will appear on the control panel.
Number or storable pictures
• The Green lamp blinks and CARD FULL appears on the LCD monitor
when the number reaches 0. (p. 117)
• The number of storable pictures varies depending on the selected
recording mode. See page 59 for selecting the recording mode.
Approx. Number of Storable Pictures
Recording
mode
Number
of pixels
Memory
capacity
2MB 30 8 9 4 0
4MB 50 16 18 9 1
8MB 122 32 36 18 2
16MB 244 65 73 36 4
32MB 489 130 146 73 8
64MB 978 260 292 148 16
SQ HQ SHQ
640x480 1600x1200
Normal High HQ SHQ SHQ-TIFF
Note:
•Because the amount of data used varies depending on the subject,
more/fewer pictures than the number shown may be photographed.
•The number of storable pictures may not be reduced every time a picture
is taken, or increased when a picture is erased.
34
Page 35

HOLDING THE CAMERA
Hold the camera firmly with both hands while keeping your elbows at
your sides to prevent the camera from moving.
Proper
Improper
Note:
• Do not subject the lens to physical shocks.
• Keep your fingers and the strap away from the lens and flash.
Proper
35
Page 36

LEARNING THE BASICS (cont.)
PROPER SHUTTER RELEASE
Shutter release button
Press the Shutter release button
halfway to lock the focus and
exposure.
• The Green lamp next to the
viewfinder lights.
• If the Green lamp blinks, the focus
or exposure is not locked. Check
the working distance. (p. 48)
Press the Shutter release button
fully to release the shutter and
take the picture.
• The camera emits a beep sound
when the shutter is released.
• The Green lamp blinks while the
picture is being recorded.
Note:
• Press the Shutter release button gently using the ball of your finger.
• Avoid moving the camera when pressing the Shutter release button to
prevent blurry pictures.
36
Page 37

TURNING OFF THE POWER
1
1
2
In the Record mode, slide the
lens barrier closed.
• The displays on the control
2
In the Display mode, press the
LCD monitor ON/OFF button
to turn it off.
panel will go out.
Note:
• The recorded images will remain in the card even after the power is
turned off or the batteries are replaced.
37
Page 38

38
Page 39

2
TAKING PICTURES
OLYMPUS DIGITAL CAMERA
Page 40

TAKING PICTURES
TAKING PICTURES USING THE OPTICAL
VIEWFINDER
Viewfinder
Autofocus mark
2
43
Green lamp
1
Slide open the lens barrier.
2
Compose the picture by
placing the subject within the
autofocus marks in the
viewfinder or using the focus
lock. (p. 45)
3
Press the Shutter release
button halfway to lock the
focus and exposure.
• The Green lamp next to the
viewfinder lights.
• If the Green lamp blinks, the
focus or exposure is not
locked. Check the working
distance. (p. 48)
4
Press the Shutter release
button fully to take the
picture.
5
When the Green lamp stops
blinking (after about 2 ~ 40
seconds), the camera is ready
to take the next picture.
• The Shutter will not release
while the Green lamp is
blinking.
40
Page 41

Caution:
NEVER open the card cover, eject the card, remove the batteries, or
•
pull the plug while the camera is in operation. It may destroy the data
in the card.
Note:
• Printed images will be slightly larger compared with what you see in the
viewfinder or on the LCD monitor.
41
Page 42

TAKING PICTURES (cont.)
TAKING PICTURES USING THE LCD
MONITOR
1
Open the lens barrier. Press
1
1
2
the LCD monitor ON/OFF
button to turn on the LCD
monitor.
• Press the button again to turn
off the monitor.
2
Aim the camera by looking at
the subject through the LCD
monitor.
• Take the picture in the same
way as you would when using
the optical viewfinder. (p. 40)
42
Page 43

Note:
• Do not push the LCD monitor forcibly.
• Pictures that appear on the LCD monitor are for composition purposes
only.
• It is recommended to use the optical viewfinder for less camera
movement and battery consumption.
• It will take longer to record when the LCD monitor is used.
• When the subject is viewed diagonally in the camera, the edges may
appear zigzagged on the LCD monitor. This is not a malfunction; it will be
less noticeable in Display mode.
• A strip of light may appear on the top/bottom of the LCD monitor, but this
is not a malfunction.
• When a picture is taken in a lighted area, such as in sunlight, vertical
lines may appear on the LCD monitor. This is not a malfunction.
• Printed images will be slightly larger compared with what you see in the
viewfinder or on the LCD monitor.
43
Page 44

TAKING PICTURES (cont.)
QUICK VIEW
You can immediately shift from the Record mode to the Display mode,
and check the picture you have just taken.
1
When the lens barrier is open,
quickly press the LCD monitor
ON/OFF button twice.
• The LCD monitor will display
the last picture taken. (p. 72)
2
To return to the Record mode,
press the LCD monitor
ON/OFF button or press the
21
Shutter release button
halfway.
44
Page 45

FOCUS LOCK
If your main subject is not within the autofocus marks, follow the
procedure below to obtain focus. This is called focus lock.
1
Viewfinder
Autofocus mark
Position your subject within
the autofocus marks, and
press the Shutter release
button halfway.
• The Green lamp next to the
viewfinder lights.
2
Recompose the picture while
keeping the Shutter release
button pressed halfway.
3
Press the Shutter release
button fully to take the
picture.
Note:
• If the Green lamp blinks, the focus or exposure is not locked. Check the
working distance. (p. 48)
45
Page 46

AUTOFOCUS
There are certain conditions where the autofocus may not work properly
even when the Green lamp blinks when the Shutter release button is
pressed halfway. When this happens, try the procedure below.
1 Subjects with low contrast
Lock the focus on an object that is at the same distance from the camera
as the subject, then aim at the subject to take the picture. (p. 45)
2 Subjects with no vertical lines
Lock the focus on the subject by holding the camera vertically, then
change it to the horizontal position to take the picture. (p. 45)
46
Page 47

3 Subjects in excessively bright light
Lock the focus on an object that is at the same distance from the camera
as the subject, then aim at the subject to take the picture. (p. 45)
4
Subjects at different distances
Lock the focus on an object that is at the same distance from the
camera as the subject, then aim at the subject to take the picture. (p. 45)
5 Fast-moving subjects at close distances
Lock the focus on an object that is at the same distance from the camera
as the subject, then aim at the subject to take the picture. (p. 45)
47
Page 48

WORKING RANGE
Close-up Correction
The viewfinder’s picture frame shows the area that can be shot for
subjects at ∞. However, the picture area will move lower in the viewfinder
as you get closer to the subject. At 8" (0.2 m), the shaded area is the
actual available image area. In this case, the subject should be
positioned below the close-up correction marks.
Viewfinder
Picture frame
Close-up correction
Image area of picture at close
distance
Take pictures at a distance between 4" ~
• Subjects closer than 4" (0.1 m) may turn out to be out of focus and
incorrectly exposed.
• Using the LCD monitor as a viewfinder makes it easy to take close-up
pictures (turns on automatically in the Macro mode).
• Power consumption increases when the LCD monitor is used.
Working range
Macro mode (p.53) 4" ~ 20" (0.1 m ~ 0.5 m)
Standard mode 20" ~ ∞(0.5 m ~ ∞)
(0.1 m ~ ∞).
∞
48
Page 49

USING THE FLASH
Select the flash mode according to the shooting conditions.
Flash mode
button
You can select the following flash modes with each press of the Flash
mode button.
Flash mode Use
Auto-Flash (p. 50) Automatically fires in low-light
➟
Red-Eye Reducing Flash (p. 50) Significantly reduces the
Flash Off (p. 51) Never fires.
➟
➟
➟
Control panel
HQ
and backlight conditions.
phenomenon of “red-eye”
(subject’s eyes appearing red).
Fill-In Flash (p. 51) Fires regardless of available
Slow Shutter Synchronization For taking photographs
Flash (p. 52) of night views.
Red-Eye Reducing Flash + For taking photographs of
Slow Shutter Synchronization people at night.
Flash (p. 52)
Flash working range: Approx. 8"~9.8 ft
Note:
• The flash is being charged while the Green lamp is blinking. Wait until
the Green lamp goes off to take the picture.
• When using the flash in the Macro mode, the flash may not have the
proper effect. Confirm the result using the LCD monitor.
• The flash cannot be used in the Sequence mode or in the Panorama
mode. (p. 63/65)
• The setting will remain if HOLD is selected in Setting Reset. (p. 70)
➟
➟
light.
SLOW
SLOW
49
Page 50

HQ
USING THE FLASH (cont.)
AUTO-FLASH
In the Auto-Flash mode, the flash will fire automatically in low-light and
backlight conditions.
Viewfinder
Backlighting correction
mark
When you take a picture that is backlit, position the subject within the
backlighting correction marks to fire the flash.
RED-EYE REDUCING FLASH
This mode significantly reduces the phenomenon of “red-eye”.
Control panel
Note:
• The camera emits pre-flashes before the regular flash.
• It takes about a second before the Shutter is released.
• Performance may be limited when the subject is not looking at the preflashes from right in front of the camera, or due to medication/alcohol
intake or individual characteristics.
50
Page 51

OFF (FLASH OVERRIDE)
HQ
In the Off mode, the flash does not fire even in low-light conditions. Use
this mode in situations where flash photography is not desired or is
prohibited, or in twilight/night scenes.
Control panel
Note:
• Since a slow shutter speed is automatically selected in low-light
situations when in the Off mode, the use of a tripod is recommended to
prevent blurred pictures caused by camera movement.
FILL-IN FLASH (FORCED ACTIVATION)
In the Fill-In Flash mode, the flash fires regardless of available light. For
example, this mode can be used to brighten up the subject’s shaded
face. Another use of this mode is to correct the color shift produced by
artificial lights (eg. fluorescent light).
Control panel
HQ
Note:
• Use this mode within the flash working range. (p. 49)
• It may not have the desired effect under excessively bright light.
51
Page 52

SLOW
HQ
USING THE FLASH (cont.)
SLOW SHUTTER SYNCHRONIZATION
FLASH
The flash will fire automatically during the first half of a slow shutter
speed’s release duration. It is especially great for taking photographs of
night views.
Control panel
Note:
• Since the shutter speed is slow, the use of a tripod is recommended to
prevent blurred pictures. Moving subjects will appear blurry when
photographed.
RED-EYE REDUCING FLASH + SLOW
SHUTTER SYNCHRONIZATION FLASH
The flash will fire automatically during the first half of a slow shutter
speed’s release duration. It is especially great for taking photographs of
people at night.
Control panel
SLOW
HQ
Note:
• Since the shutter speed is slow, the use of a tripod is recommended to
prevent blurred pictures. Moving subjects will appear blurry when
photographed.
52
SLOW
SLOW
Page 53

MACRO MODE
HQ
You can get as close as 4" to your subject. An approx. 3" x 4.7" subject
can be photographed fully within the frame.
2 3
LCD monitor
Control panel
Note:
• When using the flash in the Macro mode, the flash may not have the
proper effect. Confirm the result using the LCD monitor. Do not use the
flash when the subject is closer than 8".
• Using the LCD monitor as a viewfinder makes it easy to take close-up
pictures.
• The Macro mode will be canceled when the power is turned off.
1
Open the lens barrier.
2
Press the Macro/Digital Tele
button to turn on the LCD
monitor in the Macro mode.
• appears on the control
panel.
3
Take a picture.
Shooting Range: Approx. 4" ~ 20"
53
Page 54

DIGITAL TELE MODE
SQ
2x1x
The subject can be photographed (cropped to appear) twice as large.
1
Open the lens barrier.
2 3
LCD monitor
Note:
• This mode can only be used in the SQ mode (automatically set).
• The Digital Tele mode will be canceled when the LCD monitor is turned
off.
2
Press the Macro/Digital Tele
button twice to turn on the
LCD monitor in the Digital
Tele mode.
• Press the + button for 2X
magnification.
• Press the – button to return to
1X.
3
Take a picture.
54
Page 55

SELFTIMER
HQ
Use a tripod to hold the camera securely.
2
Control panel
3
1
Open the lens barrier.
2
Press the Selftimer button.
• appears on the control
panel.
3
Aim at your subject, and press
the Shutter release button.
• The shutter will be released
about 12 seconds after the
Shutter release button is
pressed. (The Selftimer signal
lights for 10 sec. and blinks for
2 sec.)
Note:
• The Selftimer is disengaged when the shutter is released.
• To cancel the Selftimer after it has been activated, press the Selftimer
button again.
55
Page 56

RECORD MENU
You can select the following modes with each press of the Menu button
in the Record mode (lens barrier open).
Mode Use
Standard mode For taking standard pictures.
➟
Exposure compensation For setting +/–2 compensation.
Spot metering mode For obtaining the right exposure.
Recording mode For selecting the recording mode.
➟➟➟➟
selection (p. 59)
White balance For presetting the white balance.
➟
➟ ➟ ➟ ➟ ➟
ISO For setting the sensitivity. (p. 62)
Drive For using the Sequence mode. (p. 63)
Card function For taking panorama pictures or using
Beep sound For setting on/off. (p. 67)
File number For selecting the file
Setting reset For keeping changed settings even
(p. 57)
(p. 58)
(p. 61)
optional special function cards. (p. 65)
numbering system. (p. 68)
after the power is turned off. (p. 70)
56
Page 57

EXPOSURE COMPENSATION
0
SET
OK
NEXT
In addition to automatic exposure, you can also adjust it manually by +/–
2 (approx. 0.5 steps). Adjust + when the subject is mostly bright. Adjust –
when the subject is mostly dark.
1
1 2
LCD monitor
Note:
• The setting will remain if HOLD is selected in Setting Reset, but will be
canceled when the batteries are taken out. (p. 70)
• Although the brightness of the LCD monitor can be changed with the
exposure compensation, it may not appear to change when the subject is
mostly dark. In such a case, display the recorded picture on the LCD
monitor to check its brightness.
• The exposure compensation may not work properly when shooting with
the flash.
Open the lens barrier and
press the Menu button to
display the screen shown.
2
Make an adjustment using the
+/– buttons, then press the OK
button to save the setting.
• If the Menu button is pressed
while the setting is being
entered, it will be canceled and
the next setting menu will
appear.
• appears on the control
panel.
57
Page 58

SPOT METERING MODE
HQ
SET
OK
ESP
SPOT
NEXT
The Spot metering mode is used to obtain the right exposure regardless
of the backlight. Place the subject in the center of the autofocus marks.
1
1
LCD monitor
Control panel
2
Open the lens barrier and
press the Menu button several
times to display the screen
shown.
2
Select SPOT using the +/–
buttons, then press the OK
button to save the setting.
• appears on the control
panel.
• If the Menu button is pressed
while the setting is being
entered, it will be canceled and
the next setting menu will
appear.
3
Take a picture.
Note:
• The setting will remain if HOLD is selected in Setting Reset, but will be
canceled when the batteries are taken out. (p. 70)
58
Page 59

SELECTING THE RECORDING MODE
SHQ
SHQ – TIFF
SQ – HIGH
SET
OK
NEXT
QUALITY
HQ
SQ
SHQ
HQ
There are 5 recording modes.
1
1 2
LCD monitor
Control panel
Open the lens barrier and
press the Menu button several
times to display the screen
shown.
2
Select the recording mode
using the +/– buttons, then
press the OK button to save
the setting.
• If the Menu button is pressed
while the setting is being
entered, it will be canceled and
the next setting menu will
appear.
• To select SHQ-TIFF or SQHIGH, press the + button for a
couple of seconds at SHQ or
SQ, respectively.
• The selected recording mode
appears on the control panel.
(With SHQ-TIFF or SQ-HIGH,
SHQ or SQ blinks.)
59
Page 60

SELECTING THE RECORDING MODE
(cont.)
Mode Resolution Compression
SQ 640 x 480 Standard
HQ 1280 x 960 Standard
SHQ 1280 x 960 Minimal (JPEG)
Note:
• The number of storable pictures varies according to the recording mode.
TIFF requires more room in the card than other modes. (p. 34)
• While HQ and SHQ images have the same number of pixels, SHQ uses
lower compression allowing for better image quality when enlarged. It
may take a little longer to record or display images in the SHQ mode.
• The setting will remain even after the power is turned off until it is
readjusted.
No (TIFF – larger file size)
60
Page 61

WHITE BALANCE
WB
SET
OK
NEXT
AUTO
HQ
WB
You can match the white balance to the light source by selecting Auto,
(Daylight), (Overcast), (Tungsten light) or (Fluorescent
light).
1
LCD monitor
Note:
• Select AUTO in normal situations.
• The Preset white balance may not work under special lighting.
• The setting will remain if HOLD is selected in Setting Reset, but will be
canceled when the batteries are taken out. (p. 70)
• Confirm results in the Display mode.
2
Control panel
1
Open the lens barrier and
press the Menu button several
times to display the screen
shown.
2
Select the white balance using
the +/– buttons, then press the
OK button to save the setting.
• If the Menu button is pressed
while the setting is being
entered, it will be canceled and
the next setting menu will
appear.
• WB appears on the control
panel when a setting other
than AUTO is selected.
61
 Loading...