

Page 1
USER GUIDE
GUIDE DE L’UTILISATEUR | MANUALE
UTENTE | BEDIENUNGSANLEITUNG |
GUÍA DE USUARIO | GUIA DO UTILIZADOR
Wi-Fi HD Action Camera
Caméra d’Action HD Wi-Fi |
Action Camera HD Wi-Fi | WLAN HD
Action-Kamera | Cámara de Acción
HD Wi-Fi | Câmara de Ação HD Wi-Fi
Page 2

Hello and welcome to the Polaroid Cube
EN
camera. Let’s get started.
Bonjour et bienvenue dans l’univers de la
FR
caméra Polaroid Cube
Ciao, e benvenuto nella fotocamera
IT
Polaroid Cube
Herzlich willkommen bei der Polaroid
DE
+
™
Cube
Kamera. Es kann losgehen.
Hola y bienvenido al mundo de Polaroid
ES
+
™
Cube
. Empecemos.
Olá e sejam bem-vindos à Polaroid Cube
PT
Vamos começar.
+
™
+
™
. Cominciamo.
. Démarrons.
+
™
+
™
.
Page 3

Overview
EN
What’s in the Box
Get to Know Your Polaroid Cube
Using Your Polaroid Cube+Camera
FR
Que trouve-t-on dans la boîte
Découvrez votre caméra Polaroid Cube+
Utilisation de votre caméra Polaroid Cube
IT
Cosa c’è nella confezione
Impara a conoscere la tua Fotocamera
Polaroid Cube+
Utilizzare la tua Fotocamera Polaroid Cube+
+
Camera
DE
6
7
12
36
37
+
42
70
71
77
Was ist in der Box
Deine Polaroid Cube+ Kamera
Bedienung Deiner Polaroid Cube+ Kamera
ES
Qué hay en la caja
Conozca su cámara Polaroid Cube+
Usando su cámara Polaroid Cube
PT
O que há dentro da caixa
Conheça a sua câmara Polaroid Cube+
Usar a sua câmara Polaroid Cube
+
+
104
105
110
138
139
144
172
173
178
Page 4

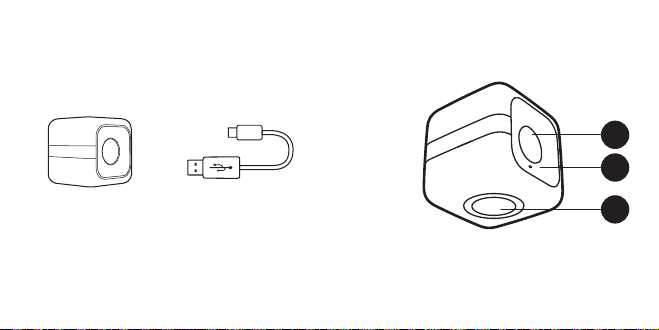
What’s in the Box
Get to Know Your
Polaroid Cube
™
+
Camera
1
2
3
+
Polaroid Cube
HD Action Camera
6 | EN EN | 7
™
Wi-Fi
Micro USB Cable 1. Lens
2. Microphone
3. Magnet
Page 5

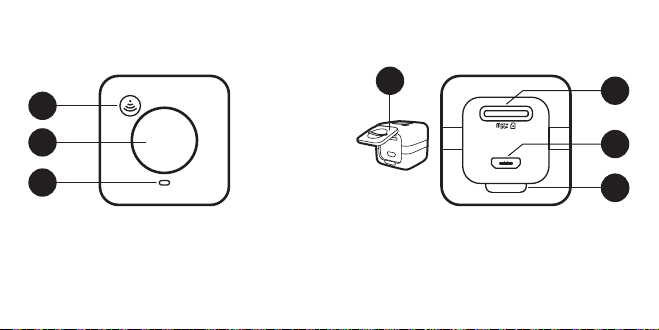
Top View
Back View
7
4
5
6
4. Wi-Fi Button
5. Multifunction Button
6. LED
8 | EN EN | 9
7. Rear Cover
8. MicroSD Slot
9. Micro USB Port
10. Rear Cover Latch
8
9
10
Page 6

Table of Contents
On and Off
SD Card
Photos and Videos
Installing the Cube+ App
Connecting to Wi-Fi
Using the App
Video
Slow Motion
Time-Lapse
Still Photo
Burst Mode
Editing Video, Time-Lapse and
Slow Motion
10 | EN EN | 11
12
13
15
16
16
17
19
20
20
21
22
23
Capturing Stills from Video
Adjusting Other Settings
Saving and Sharing
Battery and Charging
Understanding the LED Functions
Warnings
26
27
28
29
29
33
Page 7

Using Your
Polaroid Cube
On
Hold the multifunction button until the LED
turns green and you hear 3 beeps. All set!
Off
Hold multifunction button until the LED
turns off and you hear 1 long beep followed
by 1 short beep.
Charging the Battery
The battery in your Cube+ comes partially
charged. To charge, connect the included
USB cable to the camera and connect the other
12 | EN EN | 13
™
+
Camera
end of the cable to a power source such as a
computer or wall outlet. No damage will occur
to the camera or battery if used prior to a full
charge. For more detailed information, see
Battery and Charging.
SD Card
A microSD card must be present for your
Polaroid Cube+ to work. To insert a microSD
card, lift the rear cover and with the metal
contacts facing up, insert the card and gently
push in until you hear a click. To remove a
card, gently tap the card and the SD card will
pop out.
If no microSD card is present, your camera
will beep continuously and the LED will blink
Page 8

orange until a new microSD card is inserted.
Your camera will also blink orange if there is
a problem reading the card. You may need to
format your card or try a different card.
When your microSD memory is almost
full (1GB remaining), the LED will blink
alternating orange and red. Once the SD card
is completely full you’ll hear a single short
beep and you will no longer be able to take
photos or videos. The LED will blink orange
and red until the microSD card is removed
or data is transferred from the camera.
Your Polaroid Cube+ camera can accommodate
microSD cards with storage capacities up to
14 | EN EN | 15
128GB. We suggest using microSD cards Class
10 and above. Cards lower than Class 6 may
cause slower recording/reading speed as well
as other unexpected issues.
Still Photos
Press the multifunction button once. You’ll hear
a short beep and the LED will blink red once.
Video
Double press the multifunction button. You’ll
hear two short beeps and the LED will blink
red while you are recording. To stop recording,
press the multifunction button one time. You’ll
hear a single short beep and the LED will return
to a solid green.
Page 9

Install the Polaroid Cube+ App
Downloading the Polaroid Cube+ app will allow
you to access many advanced functions of your
Cube+ camera and will also allow you to use
your smartphone as a viewfinder. Download
the Polaroid Cube+ app from the App Store and
follow the onscreen instructions to set up your
account and sync to your camera.
For FAQs, trouble shooting or customer service,
go to www.polaroidcube.com/support
Connecting to Wi-Fi
Press and hold the Wi-Fi button. You’ll hear
one long beep and the LED will blink blue as
it connects.
– Go to the Settings menu on your smartphone.
16 | EN EN | 17
– Select the Wi-Fi menu.
– Select the CUBE+ XXXXXXXX (the 8-digit
number will vary).
– When prompted, input the Polaroid Cube+
standard Wi-Fi password “1234567890”.
It may take up to 5 seconds for the Wi-Fi
connection to be established. While connected,
the LED will blink a low-intensity blue.
To disconnect from Wi-Fi, press and hold the
Wi-Fi button until you hear a long beep and the
LED stops blinking blue.
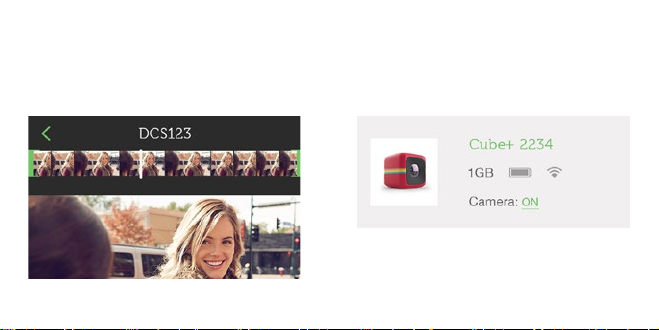
Using the App to Take Photos and Videos
Open the Polaroid Cube+ app. After setting up
your account/signing in, you’ll be taken to the
Page 10

Viewfinder screen. The screen automatically
opens up to video capture. To change to
another capture mode, tap the video icon in
the left bottom corner of the screen. Icons of
other photo/video modes will appear across the
bottom of the screen. Tap the preferred icon to
access that mode.
Your account settings can be adjusted at any
time in the Camera Detail screen of the Cube+
app. Tap or swipe down the small bar located at
the top of the viewfinder screen to reach these
settings. For more details see page 204.
18 | EN EN | 19
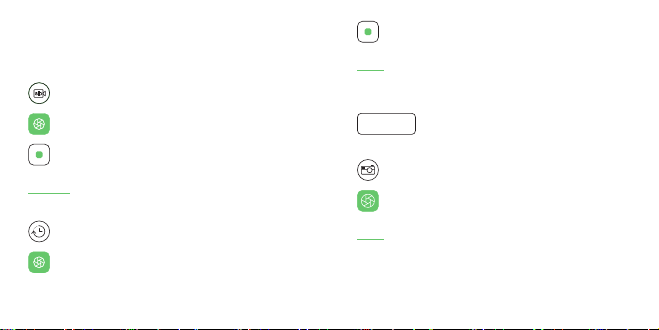
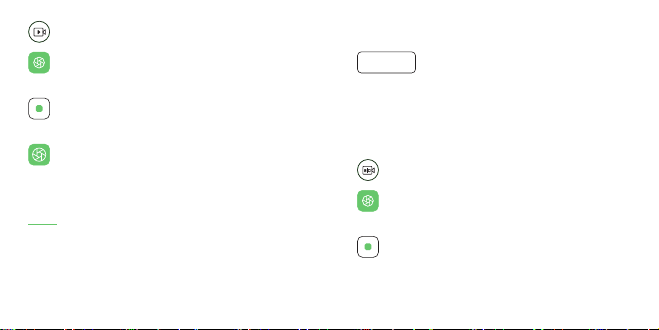
Video
Tap once to begin recording video.
Tap once to stop recording video.
Tap to capture a still image while continuing
to record video (no interruption to video).
1080
Resolution: Tap this number at the top
of the screen to choose between available
resolution options:
1440p at 30fps
1080p at 30 or 60fps
720p at 30 or 60fps
00:00:00
Video Time: Displays video length.
Page 11
NOTE: For best playback on your PC or Mac
of videos captured at 1440p, use QuickTime
or VLC.
slo
Slow Motion
Tap once to begin slow-motion capture.
Tap once to end slow-motion capture.
60 FPS
Resolution: Slow motion is captured
at 720p/120fps.
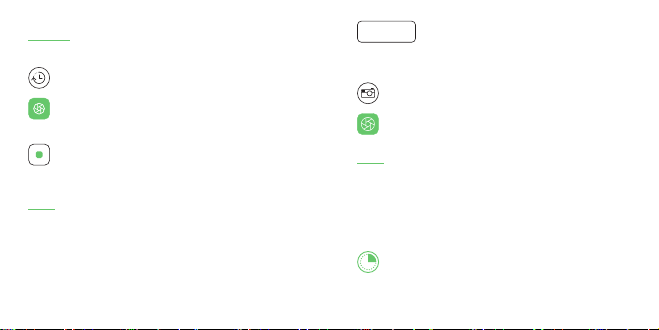
Time-Lapse
Tap once to begin time-lapse capture.
20 | EN EN | 21
Tap once to end time-lapse capture.
Auto
Time-Lapse Settings: Tap this icon at
the top of the screen to choose between
1 second or 3 second time-lapse.
00:00:00
Recording Time: Displays total
length of time-lapse video.
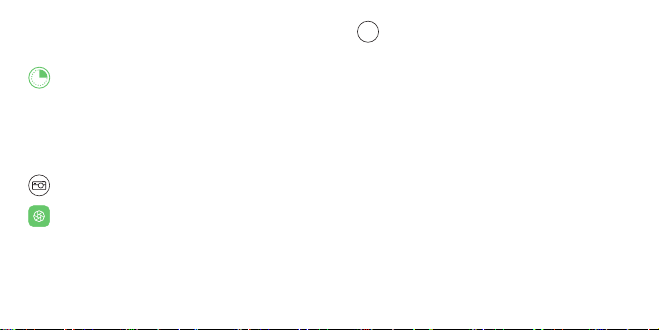
Still Photo
Tap once to take photo.
8MP
Megapixel Settings: Tap this icon at
the top of the screen to choose between
available resolution options:
8 megapixel (8MP)
Page 12
6 megapixel (6MP)
3 megapixel (3MP)
Timer Settings: Tap this icon at the top
of the screen to choose between available
timer settings:
Off
3 seconds
10 seconds
Burst Mode
Tapping and holding the still photo capture
button will allow you to capture several
photos in quick succession. Bursts capture
at 10 frames per second, up to 100 photos
at a time.
22 | EN EN | 23
100
Burst Counter: Displays number of photos
captured.
3MP is the only resolution available in
Burst Mode. Your Cube+ automatically
captures photos at this resolution without
affecting settings for other capture modes.
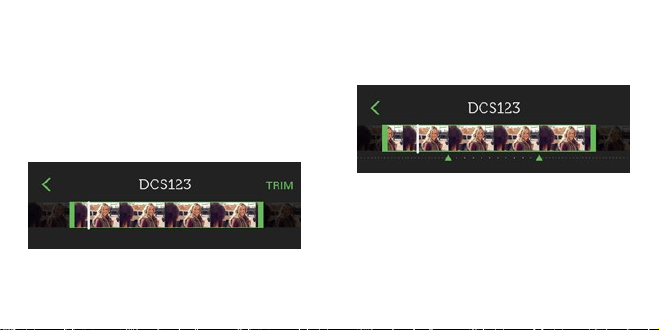
Editing Video, Time-Lapse and Slow Motion
To edit in any of these capture formats, first
select and view in playback mode.
Page 13
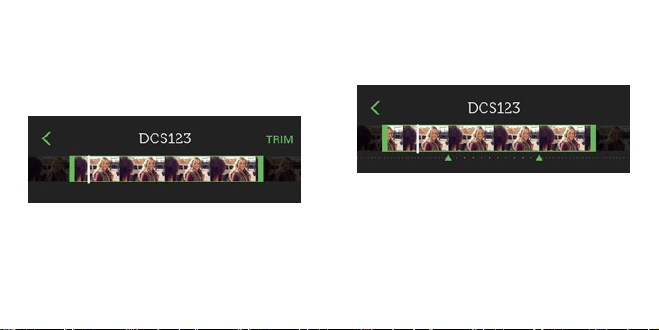
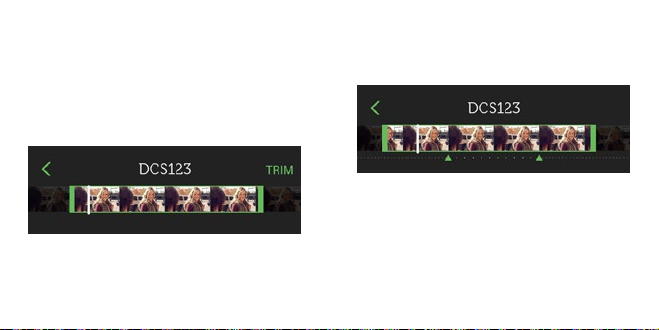
Trim Start and End Frames
Tap and drag the end points to the preferred start
and stop points. Trimmed frames will grey out.
Tap ‘Trim’ from upper right of screen to finalize
edit. (Video Trim not supported on Android.)
24 | EN EN | 25
Slow Motion Start & End Points
Tap and drag the triangles to adjust slow motion
start and end points.
Page 14
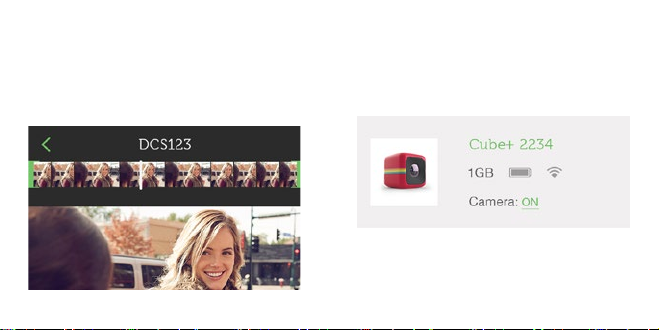
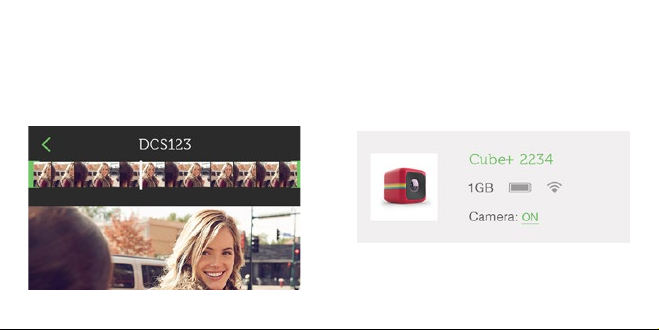
Capture Stills from Video, Time-Lapse
and Slow Motion
Tap any section of the video timeline to zoom
into that section. Tap the image below the
timeline to save it as a still image.
Adjusting Other Settings
You can adjust many of your Cube+ settings
from the Camera Detail screen. To reach the
Camera Detail screen, tap or swipe down the
bar located at the top of the viewfinder screen.
Tap icon [1] to edit camera name and icon.
26 | EN EN | 27
Page 15
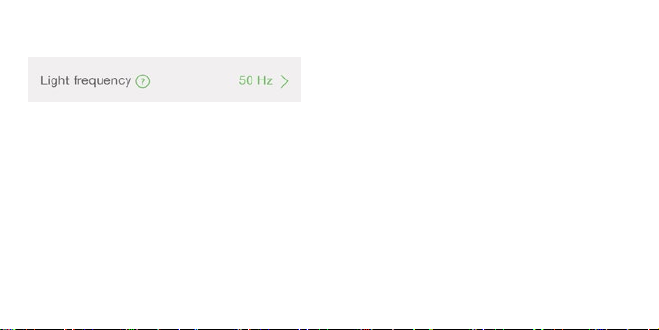
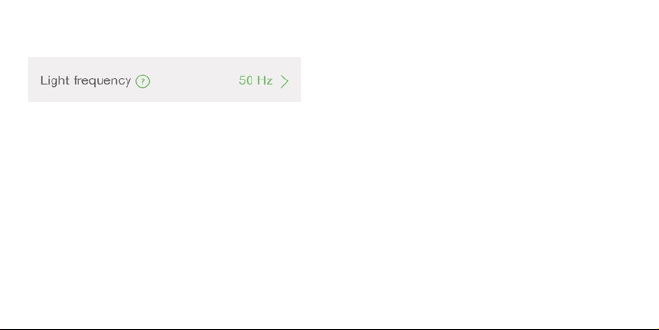
Advanced Camera Settings
Tap the information icons to learn more.
Tap current setting to view other setting
options.
Saving and Sharing
Select your photo(s) or video(s). Tap the Send
icon and then choose to save or share from
the menu. Then follow the prompts that follow
your selection. For more information go to
www.polaroidcube.com/support.
28 | EN EN | 29
Battery and Charging
When battery reaches 10% the LED will glow
orange. Your camera will automatically shut
down if battery level reaches 0%.
To charge your Polaroid Cube+, plug it into
either an outlet or computer, using the included
micro USB cable. The LED will blink orange
while charging. Your camera can still be used
when charging from the wall outlet.
Understanding the LED Functions
Static Green
Camera is on, with sufficient battery power and
SD memory to capture imagery.
Page 16

Single Red Flash with Short Beep
Photo captured.
Rapid Red Flash with Two Short Beeps
Recording video.
Rapid Blue Flash with One Long Beep
Camera is pairing to Wi-Fi.
Intermittent Slow Blue Flashing
Camera is paired to Wi-Fi.
One Blue Flash with One Long Beep
Wi-Fi is being turned off while camera is on.
One Long Beep, No Flashing
Wi-Fi is being turned on while camera is off.
30 | EN EN | 31
One Long Beep, One Short Beep,
No Flashing
Camera is being turned off while Wi-Fi is on.
Static Orange
Battery power is under 10% (around 3.62V).
Camera will turn off when power dips to 3.55V.
Rapid Orange Flash with Continuous
Short Beeps
No SD card present or SD card error. Insert an
SD card or format the SD card and try again. Be
sure to back up all image files from the existing
SD card before formatting.
Page 17

Alternating Orange and Red Flashing
Low SD capacity (1GB remaining): One short
beep will sound when SD reaches capacity and
camera will stop recording.
Rapid Orange Flash While Connected
to Power or PC
Camera battery is charging.
Orange Flash While Connected to PC
Data is transferring between camera and PC.
Overheating
During extended use, your Polaroid Cube+
camera may feel warm to the touch. This
is a normal operating occurrence and does
not indicate any product defect or reason
32 | EN EN | 33
to slow down the fun.
Your Cube+ app will warn you with an error
message if it reaches the maximum safe usage
temperature of 70ºC/ 158ºF. If you see this
warning, stop using your camera and allow it
to cool. If temperatures exceeds 70ºC/ 158ºF,
your camera will first stop recording videos and
photos and eventually shut down. Your camera
can be turned on again after it has cooled down
to a safe temperature.
Magnet Safety Warnings
The magnet mount on your Polaroid Cube+ is a
low-powered magnet. As with any magnet, it is
best to follow these safety precautions.
Page 18

Medical Devices:
Some medical devices can be sensitive to
magnetic fields. If the user has a pacemaker,
defibrillator, implanted insulin pump, or other
electronic medical device or has health issues
that require the use of any such device, avoid
using the Polaroid Cube+ and/or any related
accessories until consulting a physician.
Pregnant Women:
Pregnant Women should consult a physician
before using any magnetic device.
Damage to Electronics/ Magnetic
Storage Media:
Direct contact to magnetic fields may cause
damage to magnetic storage media, hard
34 | EN EN | 35
drives, electronic devices and credit cards/
items with magnetic stripes. To avoid damage,
extend micro USB cord as far as possible from
your computer, or use a longer micro USB cord.
Have questions? Need technical support?
Want to know more? Get in touch at:
cspolaroid@camarketing.com
www.polaroidcube.com
Page 19

Que trouve-t-on dans la boîte
Découvrez votre caméra
Polaroid Cube
™
+
1
2
3
Caméra d’Action HD
Wi-Fi Polaroid Cube
36 | FR FR | 37
+
™
Câble micro USB
1. Objectif
2. Microphone
3. Aimant
Page 20

Vue de dessus
Vue arrière
7
4
5
6
7. Panneau arrière
4. Bouton multifonction
5. Bouton Wi-Fi
6. Voyant LED
38 | FR FR | 39
8. Fente microSD
9. Port micro USB
10. Fixation du panneau arrière
8
9
10
Page 21

Table des matières
Allumer et Éteindre
Carte SD
Photos et Vidéos
Installation de l’appli Cube
Connexion au W i-Fi
Utilisation de l’appli
Vidéo
Ralenti
Mode accéléré
Photo
Mode rafale
Édition de Vidéos, Mode accéléré
et Ralenti
40 | FR FR | 41
+
42
43
45
46
47
48
50
51
52
53
54
55
Capture de photos depuis une vidéo
Autres paramètres
Enregistrement et Partage
Batterie et Chargement
Significations du voyant LED
Avertissements
58
59
60
61
62
67
Page 22

Utilisation de votre caméra
Polaroid Cube
Allumer
Maintenez le bouton multifonction enfoncé
jusqu’à ce que le voyant LED devienne vert et
que vous entendiez 3 bips. Tout est prêt !
Éteindre
Maintenez le bouton multifonction enfoncé
jusqu’à ce que le voyant LED s’éteigne et que
vous entendiez 1 bip long suivi par 1 bip court.
Chargement de la batterie
La batterie de votre Cube+ est fournie
partiellement chargée. Pour la charger,
42 | FR FR | 43
™
+
connectez à la caméra le câble USB inclus
et branchez l’autre partie du câble à une
source de courant telle qu’un ordinateur ou
une prise murale. La caméra ou la batterie ne
subiront aucun dommage si utilisées avant
la charge complète. Pour de plus amples
informations, rendez-vous au chapitre Batterie
et Chargement.
Carte SD
Une carte microSD est indispensable pour
le fonctionnement de votre appareil Polaroid
Cube+. Pour insérer une carte microSD,
soulevez la plaque arrière puis insérez la carte,
les contacts en métal vers le haut, et poussez
doucement jusqu’à ce que vous entendiez
un clic. Pour retirer une carte, pressez-la
Page 23

doucement, et la carte SD s’éjectera.
S’il n’y a aucune carte microSD, votre caméra
continuera à émettre un bip et le voyant LED
clignotera en orange jusqu’à ce qu’une nouvelle
carte microSD soit insérée.
Votre caméra clignotera également en orange
s’il y a un problème de lecture de la carte. Vous
devrez peut-être formater votre carte, ou en
essayer une autre.
Lorsque votre mémoire microSD est
presque pleine (1 Go restant), le voyant LED
clignotera en orange et rouge en alternance.
Une fois que la carte SD est complètement
pleine, vous entendrez un seul bip court, et
44 | FR FR | 45
vous ne pourrez plus prendre de photos ou
vidéos. Le voyant LED clignotera en orange
et rouge jusqu’à ce que la carte microSD soit
retirée ou les données soient transférées de
la caméra.
Votre caméra Polaroid Cube+ est compatible
avec des cartes microSD d’une capacité allant
jusqu’à 128 Go. Nous vous conseillons d’utiliser
des cartes microSD de classe 10 ou supérieure.
Les cartes d’une classe inférieure à 6 pourraient
ralentir la vitesse d’enregistrement/lecture ainsi
que d’autres problèmes imprévus.
Photos
Appuyez une fois sur le bouton multifonction.
Vous entendrez un bip court et le voyant LED
Page 24

clignotera en rouge une fois.
Vidéo
Appuyez deux fois sur le bouton multifonction.
Vous entendrez deux bips courts et le voyant
LED clignotera en rouge pendant votre
enregistrement. Pour arrêter l’enregistrement,
appuyez une fois sur le bouton multifonction.
Vous entendrez un seul bip court et le voyant
LED se rallumera en vert constant.
Installation de l’appli Polaroid Cube
En téléchargeant l’appli Polaroid Cube+, vous
aurez accès à un grand nombre de fonctions
avancées de votre caméra Cube+, et pourrez
également utiliser votre smartphone comme
écran de visée. Téléchargez l’appli Polaroid Cube+
46 | FR FR | 47
+
depuis l’App Store ou Google Play et suivez les
instructions à l’écran pour créer votre compte
et synchroniser votre caméra.
Pour la FAQ, le dépannage ou le service client,
visitez www.polaroidcube.com/support
Connexion au Wi-Fi
Maintenez le bouton Wi-Fi enfoncé. Vous
entendrez un long bip et le voyant LED
clignotera en bleu pour indiquer le début de
la phase de connexion.
– Rendez-vous dans le menu Paramètres de
votre smartphone.
– Sélectionnez le menu Wi-Fi.
– Sélectionnez le Wi-Fi CUBE+ XXXXXXXX
(le nombre à 8 chiffres variera).
Page 25

– À l’invite, inscrivez le mot de passe Wi-Fi
Polaroid Cube+ standard ”1234567890”.
Il faudra environ 5 secondes pour que la
connexion Wi-Fi soit établie. Durant la période
où l’appareil sera connecté, le voyant LED
brillera d’un faible bleu.
Pour vous déconnecter du Wi-Fi, maintenez
appuyé le bouton Wi-Fi jusqu’à ce que vous
entendiez un bip long et que le voyant LED
ne soit plus bleu.
Utilisation de l’appli pour prendre des
photos et des vidéos
Ouvrez l’appli Cube+. Après avoir créé votre
compte et vous être connecté, vous serez
48 | FR FR | 49
redirigé vers l’écran de visée. L’écran s’affiche
automatiquement en mode capture vidéo.
Pour changer le mode de capture, appuyez sur
l’icône vidéo dans le coin inférieur gauche de
l’écran. Les icônes d’autres modes de capture
apparaîtront depuis le bas de l’écran. Appuyez
sur l’icône désirée pour sélectionner le mode
correspondant. Voir plus bas pour plus de détails.
Vos paramètres de compte peuvent aussi être
réglés à tout moment dans l’écran Détails
de l’appareil de l’appli Cube+. Appuyez sur la
petite barre située en haut de l’écran de visée
ou faîtes la glisser vers le bas pour atteindre
l’écran des détails. Pour plus de détails, allez
à la page 204.
Page 26
Vidéo
Appuyez une fois pour lancer
l’enregistrement d’une vidéo.
Appuyez une fois pour arrêter
l’enregistrement d’une vidéo.
Appuyez pour capturer une image fixe
pendant que l’enregistrement vidéo
continue (pas d’interruption de la vidéo).
1080
Résolution : Appuyez sur ce nombre en
haut de l’écran pour choisir la résolution
de votre vidéo :
1440p à 30fps
1080p à 30 ou 60fps
50 | FR FR | 51
720p à 30 ou 60fps
00:00:00
Durée de la vidéo : Affiche la
longueur de la vidéo.
NOTE : Pour un meilleur visionnage sur votre
PC ou Mac des vidéos capturées en 1440p,
utilisez QuickTime ou VLC.
slo
Ralenti
Appuyez une fois pour démarrer une
capture en mode ralenti.
Appuyez une fois pour terminer la capture
en mode ralenti.
Page 27
60 FPS
Résolution : Le mode ralenti enregistre
en 720p/120fps.
Mode accéléré
Appuyez une fois pour démarrer une
capture en mode accéléré.
Appuyez de nouveau pour arrêter la capture
en mode accéléré.
Auto
Réglage du mode accéléré : Appuyez sur
cette icône en haut de l’écran pour choisir
entre un intervalle d’une seconde ou trois
secondes.
52 | FR FR | 53
00:00:00
Durée d’enregistrement : Affiche
la longueur totale de la vidéo en mode
accéléré.
Photo
Appuyez une fois pour prendre une photo.
8MP
Réglage définition : Appuyez sur cette
icône en haut de l’écran pour choisir parmi
les définitions d’image suivantes :
8 mégapixels (8MP)
6 mégapixels (6MP)
3 mégapixels (3MP)
Réglage retardateur : Appuyez sur cette
icône en haut de l’écran pour choisir parmi
Page 28

les options suivantes :
Désactivé
3 secondes
10 secondes
Mode rafale
Maintenez appuyé le bouton de capture
photo pour capturer rapidement une série
de photos. Une rafale peut capturer jusqu’à
100 photos à une vitesse de 10 images
par secondes.
100
Compteur de rafale : Affiche le nombre de
photos capturées.
54 | FR FR | 55
3MP est la seule définition disponible en mode
rafale. Votre Cube+ capture automatiquement
des photos à cette définition sans changer les
réglages des autres modes de capture.
Édition de Vidéos, Mode accéléré et Ralenti
Pour éditer une vidéo dans un de ces formats
de capture, veuillez d’abord la sélectionner, puis
lancez-là en mode lecture.
Page 29
Images de début et fin de coupe
Appuyez et déplacez les curseurs pour
sélectionner le début et la fin de la section
à couper. Les images coupées seront
grisées. Appuyez sur “Découper” dans le
coin supérieur droit de l’écran pour terminer
l’édition. (Le découpage vidéo n’est pas
supporté sur Android.)
56 | FR FR | 57
Images de début et de fin du ralenti
Appuyez et déplacez les triangles pour régler le
début et la fin du ralenti.
Page 30
Capturer des instantanées depuis une vidéo,
une vidéo accélérée et un ralenti
Appuyez sur n’importe quelle section du repère
temporel pour zoomer sur celle-ci. Appuyez
sur l’image sous le repère pour l’enregistrer
en instantanée.
58 | FR FR | 59
Autres paramètres
Vous pouvez gérer la plupart des paramètres de
votre Cube+ depuis l’écran Détails de l’appareil.
Pour y accéder, appuyez ou faîtes glisser vers le
bas la barre située en haut de l’écran de visée.
Appuyez sur l’icône [1] pour changer l’icône et
le nom de l’appareil.
Page 31

Paramètres caméra avancés
Appuyez sur les icônes d’information pour en
savoir plus.
Appuyez sur paramètres courant pour voir
d’autres options.
Enregistrement et Partage
Sélectionnez votre (vos) photo(s) ou vidéo(s).
Appuyez sur l’icône Envoyer et choisissez
depuis le menu entre la sauvegarde ou le
partage. Suivez ensuite les instructions
60 | FR FR | 61
en rapport avec votre sélection. Pour plus
d’infomations, rendez-vous sur le site
www.polaroidcube.com/support.
Batterie et Chargement
Lorsque la batterie atteint 10%, le voyant LED
s’allumera en orange. Votre appareil s’éteindra
automatiquement si le niveau de la batterie
atteint 0%.
Pour recharger votre Polaroid Cube+, branchezla à une prise ou connectez-la à un ordinateur,
en utilisant le câble micro USB inclus. Le voyant
LED clignotera en orange pendant la charge.
Votre caméra peut encore être utilisé lors de la
recharge avec un adaptateur secteur.
Page 32

Significations du voyant LED
Vert constant
La caméra est allumée, avec suffisamment de
charge et de place en mémoire sur la carte SD
pour capturer des images.
Un seul flash rouge et un bip court
Photo capturée.
Flash rouge rapide et deux bips courts
Enregistrement vidéo.
Flash bleu rapide et un bip long
Appariement via Wi-Fi de la caméra en cours.
62 | FR FR | 63
Flash bleu lent intermittent
Appariement via Wi-Fi terminé.
Un flash bleu et un bip long
Le Wi-Fi est désactivé alors que la caméra
est allumée.
Un long bip, pas de clignotement
Le Wi-Fi s’active alors que la caméra est éteinte.
Un long bip suivi d’un court bip, pas
de clignotement
La caméra s’éteint alors que le Wi-Fi est activé.
Orange constant
La batterie est chargée à moins de 10%
(environ 3.62V).
Page 33

La caméra s’éteindra quand la batterie descend
sous 3.55V.
Flash orange rapide avec bips courts
en continu
Pas de carte SD détectée ou erreur de carte SD.
Insérez une carte SD ou formatez la carte SD
et réessayez. Assurez-vous d’avoir sauvegardé
tous les fichiers stockées sur la carte SD avant
de la formater.
Clignotement rouge et orange en alternance
Peu de place sur la carte SD (1GO restant) :
Vous entendrez un court bip quand la carte SD
atteindra la limite de capacité de stockage et la
caméra stoppera tout enregistrement.
64 | FR FR | 65
Clignotement orange rapide tout en
étant connectée à un chargeur secteur
ou un ordinateur
La batterie est en charge.
Flash orange tout en étant connectée
à un ordinateur
Transfert de données entre la caméra et
l’ordinateur..
Surchauffe
Au cours d’une utilisation prolongée, votre
caméra Polaroid Cube+ peut sembler chaude.
C’est un comportement normal et n’indique en
aucun cas un défaut du produit ou une raison
de mettre un frein à votre plaisir d’utilisation.
Page 34

Votre appli Cube+ vous avertira avec un
message d’erreur si la caméra atteint la
température maximale d’utilisation sûre de
70°C/ 158°F. Si vous voyez cet avertissement,
stoppez toute utilisation de votre caméra et
laissez-la refroidir. Si la température dépasse
les 70°C/ 158°F, votre caméra arrêtera en
premier de capturer des vidéos et photos,
puis éventuellement s’éteindra. Vous pourrez
rallumer votre caméra une fois sa température
redescendue à un niveau acceptable.
66 | FR FR | 67
Avertissements de sécurité à propos
de l’aimant
Le support magnétique sur votre Polaroid
Cube+ est un aimant de faible puissance.
Comme avec n’importe quel aimant, il est
préférable de suivre les consignes de sécurité.
Dispositifs médicaux :
Des dispositifs médicaux peuvent être
sensibles à des champs magnétiques. Si
l’utilisateur dispose d’un stimulateur cardiaque,
défibrillateur, pompe à insuline implantée,
ou autre dispositif médical électronique ou
a des problèmes de santé qui nécessitent
l’utilisation d’un tel dispositif, éviter d’utiliser
le Polaroid Cube+ et / ou des accessoires
connexes jusqu’à la consultation d’un médecin.
Page 35

Femmes enceintes :
Les femmes enceintes doivent consulter
un médecin avant d’utiliser un dispositif
magnétique.
Détérioration des appareils électroniques/
supports magnétiques de stockage :
Le contact direct à des champs magnétiques
peut endommager les supports magnétiques
de stockage, les disques durs, les appareils
électroniques et les cartes de crédit/ articles
avec des bandes magnétiques. Pour éviter tout
dommage, étendez le câble USB aussi loin que
possible à partir de votre ordinateur, ou utilisez
un câble micro USB plus long.
68 | FR FR | 69
Vous avez des questions ? Besoin d’assistance
technique ? Vous voulez en savoir plus ?
Contactez-nous en écrivant à :
cspolaroid@camarketing.com
www.polaroidcube.com
Page 36

Cosa c’è nella confezione
Impara a conoscere la tua
Fotocamera Polaroid Cube
™
+
1
2
3
+
Polaroid Cube
Camera HD Wi-Fi
70 | IT IT | 71
™
Action
Cavo micro USB
1. Obiettivo
2. Microfono
3. Magnete
Page 37

Vista dall’alto
Vista posteriore
7
4
5
6
4. Tasto Wi-Fi
5. Pulsante multifunzione
6. LED
72 | IT IT | 73
7. Cover posteriore
8. Slot microSD
9. Porta micro USB
10. Blocco della cover posteriore
8
9
10
Page 38

Sommario
Accensione e Spegnimento
Scheda SD
Foto e Video
Installare l’app Cube
Connettere al Wi-Fi
Usare l’app
Video
Rallentatore
Time-lapse
Foto
Scatto continuo
Modificare Video, Time-lapse e
Rallentatore
74 | IT IT | 75
+
76
77
80
80
81
82
84
85
86
87
88
89
Acquisire istantanee da video
Regolare altre impostazioni
Salvare e Condividere
Batteria e Caricamento
Comprendere le funzioni LED
Avvertenze
92
93
94
95
95
100
Page 39

Utilizzare la tua Fotocamera
Polaroid Cube
Accensione
Tieni premuto il tasto multifunzione finché
il LED non diventa verde e senti 3 beep.
Tutto pronto!
Spegnimento
Tieni premuto il tasto multifunzione finché il
LED non si spegne e senti 1 beep lungo seguito
da 1 beep corto.
Caricare la batteria
La batteria nella tua Cube+ viene resa
disponibile in carica parziale. Per caricare,
76 | IT IT | 77
™
+
connetti il cavo USB incluso alla fotocamera
e connetti l’altra estremità del cavo
all’alimentazione come un computer od una
presa a muro. Non verrà causato alcun danno
alla fotocamera od alla batteria in caso di
utilizzo precedente alla piena carica. Per
maggiori informazioni dettagliate, consulta
Batteria e Caricamento.
Scheda SD
Per far funzionare la tua Polaroid Cube+,
deve essere inserita una scheda microSD.
Per inserire una scheda microSD, alza la cover
posteriore e, con i contatti metallici rivolti
verso l’alto, inserisci la scheda spingendola
con cautela all’interno finché non senti un click.
Per rimuovere una scheda, toccala con cautela
Page 40

e la scheda SD fuoriuscirà.
Se non è presente alcuna scheda microSD,
la tua fotocamera emetterà dei beep
continuamente ed il LED lampeggerà in
arancione finché una nuova scheda microSD
non verrà inserita.
La tua fotocamera lampeggerà in arancione
anche in caso di un problema di lettura
della scheda. Potrebbe essere necessaria la
formattazione della tua scheda o provare una
scheda differente.
Quando la memoria della tua scheda
microSD è quasi piena (1GB rimanente),
il LED lampeggerà alternando arancione
78 | IT IT | 79
e rosso. Una volta che la scheda SD è
completamente piena sentirai un singolo
breve beep e non sarai più in grado di
scattare foto o registrare video. Il LED
lampeggerà in arancione e rosso finché la
scheda SD non verrà rimossa o i dati non
verranno trasferiti dalla fotocamera.
La tua fotocamera Polaroid Cube+ può ospitare
schede SD con capacità fino a 128GB.
Consigliamo di utilizzare schede microSD di
Classe 10 o superiore. Le schede inferiori alla
Classe 6 potrebbero causare una velocità di
registrazione/lettura più lenta così come altri
problemi imprevisti.
Page 41

Foto
Premi il tasto multifunzione una volta. Sentirai
un beep breve ed il LED lampeggerà una volta
in rosso.
Video
Premi due volte il tasto multifunzione. Sentirai
due beep brevi ed il LED lampeggerà in rosso
mentre registri. Per smettere di registrare,
premi il pulsante multifunzione una volta.
Sentirai un beep breve ed il LED tornerà ad
un verde fisso.
Installa l’app Polaroid Cube
Scaricare l’app Polaroid Cube+ ti consentirà
di accedere a diverse funzioni avanzate della
tua fotocamera Cube+ e ti consentirà anche di
80 | IT IT | 81
+
usare il tuo smartphone come mirino. Scarica
l’app Polaroid Cube+ dall’App Store e segui
le istruzioni su schermo per impostare il tuo
account e sincronizzarti alla tua fotocamera.
Per FAQ, risoluzione problemi o customer
service vai su www.polaroidcube.com/support
Connettersi al Wi-Fi
Premi e mantieni il tasto Wi-Fi. Sentirai un
beep lungo ed il LED lampeggerà in blu mentre
si connette.
– Vai al menu Impostazioni sul tuo smartphone.
– Seleziona il menu Wi-Fi.
– Seleziona il CUBE+ XXXXXXXX (il numero a
8 cifre varierà).
– Quando richiesto, inserisci la password
Page 42

standard del Wi-Fi di Polaroid Cube+
“1234567890”.
Potrebbero servire fino a 5 secondi per stabilire
la connessione Wi-Fi. Mentre è connesso, il
LED lampeggerà in un blu a bassa intensità.
Per disconnetterti dal Wi-Fi, premi e mantieni
il tasto Wi-Fi finché non senti un beep lungo e il
LED non smette di lampeggiare in blu.
Usare l’app per scattare foto e
registrare video
Apri l’app Polaroid Cube+. Dopo aver impostato
il tuo account/registrazione, verrai portato alla
schermata del Mirino. La schermata si apre
automaticamente su registrazione video. Per
82 | IT IT | 83
cambiare modalità di registrazione, tocca
l’icona video nell’angolo in basso a sinistra dello
schermo. Compariranno icone di altre modalità
foto/video lungo il fondo dello schermo. Tocca
l’icona preferita per accedere a quella modalità.
Le tue impostazioni dell’account possono
essere regolate in qualunque momento nella
schermata Dettaglio fotocamera dell’app
Cube+. Tocca o scorri verso il basso la piccola
barra situata in cima alla schermata mirino per
raggiungere queste impostazioni. Per maggiori
dettagli, vedi la pagina 204.
Page 43

Video
Tocca una volta per cominciare a
registrare video.
Tocca una volta per smettere di
registrare video.
Tocca per scattare un’immagine istantanea
mentre continui a registrare un video
(nessuna interruzione di video).
1080
Risoluzione: tocca questo numero in
cima allo schermo per scegliere tra le
opzioni di risoluzione disponibili:
1440p a 30fps
1080p a 30 o 60fps
84 | IT IT | 85
720p a 30 o 60fps
00:00:00
Video] Durata video: mostra la
lunghezza del video.
NOTA: per la miglior riproduzione possibile sul
tuo PC o Mac di video registrati a 1440p, usa
QuickTime o VLC.
slo
Rallentatore
Tocca una volta per iniziare la cattura
al rallentatore.
Tocca una volta per terminare la cattura
al rallentatore.
Page 44

60 FPS
Risoluzione: cattura al rallentatore a
720p/120fps.
Time-lapse
Tocca una volta per iniziare la cattura
time-lapse.
Tocca una volta per terminare la cattura
time-lapse.
Auto
Impostazioni time-lapse: tocca
quest’icona in cima allo schermo per
scegliere tra un time-lapse da 1 secondo
o da 3 secondi.
86 | IT IT | 87
00:00:00
Durata di registrazione: mostra la
lunghezza totale del video time-lapse.
Foto
Tocca una volta per scattare foto.
8MP
Impostazioni megapixel: tocca
quest’icona in cima allo schermo per
scegliere tra le opzioni di risoluzione
disponibili:
8 megapixel (8MP)
6 megapixel (6MP)
3 megapixel (3MP)
Page 45

Impostazioni timer: tocca quest’icona
in cima allo schermo per scegliere tra le
impostazioni di timer disponibili:
Off
3 secondi
10 secondi
Scatto continuo
Toccare e mantenere il tasto di cattura
delle foto ti consentirà di scattare diverse
foto in rapida successione. Le sequenze
vengono scattate a 10 frame al secondo,
per un massimo di 100 foto per volta.
88 | IT IT | 89
100
Contatore di sequenza: mostra il numero
di foto scattate.
L’unica risoluzione disponibile in Scatto continuo
è di 3MP. La tua Cube+ scatta automaticamente
foto a questa risoluzione senza influire sulle
impostazioni per altre modalità di cattura.
Modificare Video, Time-lapse e Rallentatore
Per modificare in un qualsiasi di questi formati
di cattura, seleziona prima e visualizza in
modalità playback.
Page 46

Taglia inizio e fine dei frame
Tocca e trascina i bordi dei punti d’inizio e
fine preferiti. I frame tagliati si disabiliteranno.
Tocca “Taglia” in alto a destra dello schermo
per ultimare la modifica. (Taglio dei video non
supportato su Android.)
90 | IT IT | 91
Punti di inizio e fine del rallentatore
Tocca e trascina i triangoli per regolare i punti
di inizio e fine del rallentatore.
Page 47

GEORG: can this translation be shortened at all?]
Scatta istantanee da video, time-lapse
e rallentatore
Tocca una qualsiasi sezione della sequenza
temporale del video per ingrandire quella
sezione. Tocca l’immagine al di sotto della
sequenza temporale per salvarla come
immagine istantanea.
92 | IT IT | 93
Regolare altre impostazioni
Puoi regolare diverse impostazioni della tua
Cube+ dalla schermata Dettaglio fotocamera.
Per accedere alla schermata Dettaglio
fotocamera, tocca o scorri verso il basso la
barra situata in cima alla schermata del mirino.
Tocca l’icona [1] per modificare il nome della
fotocamera e dell’icona.
Page 48

Impostazioni avanzate fotocamera
Tocca le icone informative per saperne di più.
Tocca le impostazioni attuali per visualizzare
altre opzioni di impostazione.
Salvare e Condividere
Seleziona le tue foto o video. Tocca Invia icona e
quindi scegli dal menu se salvare o condividere.
Quindi segui le istruzioni che seguono la tua
selezione. Per maggiori informazioni vai su
www.polaroidcube.com/support.
94 | IT IT | 95
Batteria e Caricamento
Quando la batteria raggiunge il 10%, il LED si
illuminerà in arancione. La tua fotocamera si
spegnerà automaticamente se il livello della
batteria raggiunge lo 0%.
Per caricare la tua Polaroid Cube+, connettila
ad una presa o al computer, utilizzando il cavo
micro USB incluso. Il LED lampeggerà in
arancione durante la carica. La tua fotocamera
può ancora essere usata mentre si carica dalla
presa a muro.
Comprendere le funzioni LED
Verde fisso
La fotocamera è accesa con un livello di batteria
Page 49

sufficiente ed una memoria SD per scattare
immagini.
Flash singolo rosso con beep breve
Foto scattata.
Flash rosso rapido con due beep brevi
Video in registrazione.
Flash blu rapido con un beep lungo
La fotocamera si sta abbinando al Wi-Fi.
Flash lento blu intermittente
La fotocamera è abbinata al Wi-Fi.
Un flash blu con un beep lungo
Il Wi-Fi si sta disattivando mentre la fotocamera
è accesa.
Un beep lungo, senza flash
Il Wi-Fi si sta attivando mentre la fotocamera
è spenta.
Un beep lungo, un beep breve, senza flash
La fotocamera si sta spegnendo mentre il Wi-Fi
è attivo.
Arancione fisso
Il livello della batteria è al di sotto del 10%
(intorno a 3.62V).
La fotocamera si spegnerà quando il livello
96 | IT IT | 97
Page 50

cala a 3.55V.
Flash arancione rapido con continui
beep brevi
Nessuna scheda SD presente od errore della
scheda SD. Inserisci una scheda SD o formatta
la scheda SD e riprova. Assicurati di fare il back
up di tutti i file d’immagine dalla scheda SD
esistente prima di riformattare.
Flash alternato arancione e rosso
Bassa capacità della SD (1GB rimanente): si
sentirà un beep breve quando la SD sarà piena
e la fotocamera smetterà di registrare.
98 | IT IT | 99
Flash arancione rapido durante la
connessione all’elettricità o al PC
La batteria della fotocamera è in carica.
Flash arancione durante la
connessione al PC
I dati vengono trasferiti tra la fotocamera
ed il PC.
Surriscaldamento
Durante l’utilizzo prolungato, la tua Polaroid
Cube+ potrebbe essere calda al tocco. Si tratta
di un’eventualità normale e non indica alcun
difetto o motivo per rallentare il divertimento.
La tua app Cube+ ti avvertirà con un messaggio
di errore se raggiungerà la temperatura normale
Page 51

massima di 70°C/ 158°F. Se vedi questo avviso,
smetti di usare la tua fotocamera e consentile
di raffreddarsi. Se la temperatura eccede i
70°C/ 158°F, la tua fotocamera smetterà prima
di registrare video e foto ed eventualmente
si spegnerà. La tua fotocamera può essere
riaccesa una volta raffreddatasi ad una
temperatura normale.
Avvisi di sicurezza sul magnete
Il magnete montato sulla tua Polaroid Cube+
è un magnete a bassa potenza. Come per ogni
magnete, è meglio seguire queste precauzioni
di sicurezza.
Dispositivi medici:
Alcuni dispositivi medici possono essere
100 | IT IT | 101
sensibili ai campi magnetici. Se l’utente ha un
pacemaker, un defibrillatore, una pompa per
insulina impiantata od altri dispositivi medici
elettronici oppure soffre di una condizione di
salute che richiede l’utilizzo di un qualunque
di questi dispositivi, evitare di usare la
Polaroid Cube+ e/o un qualsiasi accessorio
correlato finché non si consulta un medico.
Donne incinte:
Le donne incinte dovrebbero consultare un
medico prima di usare un qualsiasi dispositivo
magnetico.
Danni a Supporti di archiviazione
elettronici/ magnetici:
Il contatto diretto con i campi magnetici
Page 52

potrebbe causare danni ai supporti di
archiviazione magnetici, hard drive, dispositivi
elettronici o carte di credito/ oggetti con
bande magnetiche. Per evitare danni, estendi
il cavo micro USB il più lontano possibile dal
tuo computer, oppure usa un cavo micro USB
più lungo.
Hai domande? Hai bisogno di supporto tecnico?
Vuoi saperne di più? Contattaci su:
cspolaroid@camarketing.com
www.polaroidcube.com
102 | IT IT | 103
Page 53

™
Was ist in der Box
Lerne Deine Polaroid Cube
+
Kamera kennen
1
2
3
+
Polaroid Cube
HD Action-Kamera
104 | DE DE | 105
™
WLAN
Micro USB-Kabel
1. Objektiv
2. Mikrofon
3. Magnet
Page 54

Draufsicht
Rückansicht
7
4
5
6
4. WLAN-Taste
5. Multifunktionstaste
6. LED
106 | DE DE | 107
7. Hintere Abdeckung
8. MicroSD-Steckplatz
9. Micro USB-Anschluss
10. Riegel für hintere Abdeckung
8
9
10
Page 55

Inhaltsverzeichnis
Ein- und Ausschalten
SD-Karte
Fotos und Videos
Cube+ App installieren
Mit dem WLAN verbinden
App-Benutzung
Video
Zeitlupe
Zeitraffer
Foto
Serienbilder
Videos, Zeitraffer- & Zeitlupenaufnahmen
bearbeiten
108 | DE DE | 109
110
111
113
114
115
116
117
119
120
121
122
123
Bilder aus Videos erstellen
Andere Einstellungen
Speichern und Teilen
Akku und Laden
LED-Funktionen verstehen
Hinweise
126
127
128
129
130
135
Page 56

™
Deine Polaroid Cube
+
Kamera bedienena
Einschalten
Halte die Multifunktionstaste gedrückt, bis die
LED grün leuchtet und Du drei Signaltöne hörst.
Fertig!
Ausschalten
Halte die Multifunktionstaste gedrückt, bis die
LED ausgeht und ein langer Signalton, gefolgt
von einem kurzen Signalton zu hören ist.
Den Akku laden
Der Akku in Deinem Cube+ ist teilweise
geladen. Zum Laden, verbinde das enthaltene
110 | DE DE | 111
USB-Kabel mit der Kamera und schließe
das andere Ende des Kabels an eine
Stromquelle, wie z.B. einen Computer oder
eine Steckdose, an. Der Akku bzw. die Kamera
nimmt keinen Schaden, wenn sie vor einer
vollständigen Ladung verwendet werden. Mehr
Informationen finden Sie unter Akku und Laden.
SD-Karte
Zur Verwendung des Polaroid Cube+ wird eine
microSD-Karte benötigt. Zum Einlegen der
microSD-Karte, die hintere Abeckung öffnen
und die Karte, mit den Metallkontakten nach
oben, in den Steckplatz hineinschieben, bis ein
Klicken zu hören ist. Zum Entfernen, die SDKarte vorsichtig antippen und sie springt heraus.
Page 57

Wenn keine microSD-Karte eingelegt ist, gibt
die Kamera konstant einen Signalton von
sich und die LED blinkt orange, bis eine neue
microSD-Karte eingelegt wird.
Die Kamera blinkt auch orange, wenn es ein
Problem beim Lesen der Karte gibt. Die Karte
muss dann entweder formatiert oder eine
andere Karte benutzt werden.
Wenn die microSD-Karte fast voll ist (1GB
verbleibend), leuchtet die LED abwechselnd
orange und rot. Sobald die SD-Karte voll ist,
ertönt ein kurzer Signalton und es können
keine weiteren Aufnahmen gemacht werden.
Die LED blinkt dann solange orange und rot,
bis die microSD-Karte entfernt wird bzw.
112 | DE DE | 113
Daten von der Kamera übertragen werden.
Die Polaroid Cube+ Kamera kann microSDKarten mit einer Speicherkapazität von
bis zu 128GB verwenden. Wir empfehlen
microSD-Karten Klasse 10 oder höher zu
benutzen. Karten mit einer Klasse niedriger
als 6, können eine langsamere Aufnahme-/
Lesegeschwindigkeit haben sowie andere
unerwartete Probleme verursachen.
Fotos
Drücke einmal auf die Multifunktionstaste.
Du wirst einen kurzen Signalton hören und die
LED wird einmal rot blinken.
Page 58

Videos
Drücke die Multifunktionstaste zweimal. Du
wirst zwei kurze Signaltöne hören und die LED
wird während der Aufnahme rot blinken. Drücke
die Taste erneut, um die Aufnahme zu stoppen.
Du wirst einen kurzen Signalton hören und die
LED wird wieder konstant grün leuchten.
Die Polaroid Cube+ App installieren
Mit der Polaroid Cube + App kannst Du viele
erweiterte Funktionen der Cube+ Kamera
nutzen und Dein Smartphone sogar als Sucher
verwenden. Lade die Polaroid Cube+ App
aus dem App Store herunter und folge den
Anweisungen, um Dein Konto einzurichten und
Deine Kamera zu synchronisieren.
114 | DE DE | 115
Antworten zu häufig gestellten Fragen,
Fehlerbehebung und den Kundendienst findest
Du auf www.polaroidcube.com/support
Mit dem WLAN verbinden
Halte die WLAN-Taste gedrückt. Ein Signalton
ertönt und die LED blinkt blau während des
Verbindungvorgangs.
– Öffne Einstellungen auf Deinem Smartphone.
– Öffne das WLAN-Menü.
– Wähle CUBE+ XXXXXXXX (die 8-stellige
Nummer variiert).
– Wenn Du aufgefordert wirst, gib das
Polaroid Cube+ Standard-WLAN-Passwort
“1234567890” ein.
Es kann bis zu 5 Sekunden dauern, bis eine
Verbindung mit dem WLAN hergestellt ist.
Page 59

Die LED blinkt schwach blau, wenn die Kamera
mit dem Netzwerk verbunden ist.
Um die WLAN-Verbindung zu beenden, halte
die WLAN-Taste gedrückt, bis du einen langen
Signalton hörst und die LED aufhört blau
zu blinken.
Fotos und Videos mit Hilfe der App machen
Öffne die Polaroid Cube+ App. Nach der
Registrierung/Anmeldung, gelangst Du zum
Sucher-Bildschirm. Dieser Bildschirm öffnet
sich automatisch für die Videoaufnahme. Um zu
einem anderen Aufnahmemodus zu wechseln,
tippe auf das Video-Symbol in der linken
unteren Ecke des Bildschirms. Symbole anderer
116 | DE DE | 117
Foto- bzw. Videomodi erscheinen auf dem
unteren Rand des Bildschirms. Tippe auf das
bevorzugte Symbol, um den Modus zu starten.
Für weitere Details siehe unten.
Diese Einstellungen können jederzeit unter
Kameradetails in der Cube+ App angepasst
werden. Um den Menüpunkt zu erreichen,
tippe oder wische die kleine Leiste nach
unten, die sich am oberen Rand des SucherBildschirms befindet. Mehr Informationen
findest Du auf Seite 204.
Video
Einmal tippen, um die Videoaufnahme
zu starten.
Page 60

Einmal tippen, um die Videoaufnahme
zu stoppen.
Einmal tippen, um ein Foto zu machen,
während ein Video aufgenommen wird.
(Aufnahme wird nicht unterbrochen).
1080
Auflösung: Tippe auf die Nummer am
oberen Bildschirmrand, um zwischen den
verfügbaren Auflösungen zu wählen:
1440p bei 30fps
1080p bei 30 oder 60fps
720p bei 30 oder 60fps
118 | DE DE | 119
00:00:00
Videodauer: Zeigt die Länge des
Videos an.
HINWEIS: Für die beste Wiedergabe der Videos
mit 1440p am PC bzw. Mac, benutze entweder
QuickTime oder VLC.
slo
Zeitlupe
Einmal tippen, um die Zeitlupenaufnahme
zu beginnen.
Einmal tippen, um die Zeitlupenaufnahme
zu beenden.
60 FPS
Auflösung: Zeitlupenaufnahmen
werden mit 720p/120fps gemacht.
Page 61

Zeitraffer
Einmal tippen, um die Zeitrafferaufnahme
zu beginnen.
Einmal tippen, um die Zeitrafferaufnahme
zu beenden.
Auto
Zeitraffereinstellungen: Tippe auf das
Symbol am oberen Rand des Bildschirms,
um zwischen einem Zeitraffer von 1
Sekunde bzw. 3 Sekunden zu wählen.
00:00:00
Aufnahmezeit: Zeigt die Länge der
Zeitrafferaufnahme an.
120 | DE DE | 121
Foto
Einmal tippen, um ein Foto zu machen.
8MP
Megapixel-Einstellungen: Tippe auf das
Symbol am oberen Rand des Bildschirms,
um zwischen den verfügbaren Auflösungen
zu wählen:
8 Megapixel (8MP)
6 Megapixel (6MP)
3 Megapixel (3MP)
Zeiteinstellungen: Tippe auf das Symbol
am oberen Rand des Bildschirms, um
zwischen den verfügbaren Timer-Optionen
zu wählen:
Page 62

Aus
3 Sekunden
10 Sekunden
Serienaufnahme
Wenn Du den Fotoauslöser gedrückt hältst,
kannst Du mehrere Fotos hintereinander
machen. Bei Serienaufnahmen werden
10 Bilder pro Sekunde gemacht und bis zu
100 Fotos auf einmal.
100
Aufnahmenzähler: Zeigt die Anzahl der
Aufnahmen an.
Im Serienbildmodus ist 3MP die einzige
verfügbare Auflösung. Der Cube+ nimmt Bilder
122 | DE DE | 123
automatisch mit dieser Auflösung auf, ohne
dabei Einstellungen in anderen Aufnahmemodi
zu verändern.
Videos, Zeitraffer- und Zeitlupenaufnahmen
bearbeiten
Um etwas in diesen Aufnahmemodi zu
bearbeiten, wähle zuerst das Video aus und
spiele es im Wiedergabemodus ab.
Page 63

Anfangs- und Endbilder schneiden
Tippe und ziehe die Endpunkte zu den
bevorzugten Start- und Endpunkten.
Geschnittene Frames werden ausgegraut.
Tippe auf „Zuschneiden“ oben rechts auf dem
Bildschirm, um die Bearbeitung abzuschließen.
(Das Schneiden von Videos wird unter Android
nicht unterstützt.)
124 | DE DE | 125
Start- & Endpunkte der Zeitlupenaufnahme
Tippe und ziehe die Dreiecke, um die Start- und
Endpunkte der Zeitlupenaufnahme einzustellen.
Page 64
Bilder aus Videos, Zeitraffer- und
Zeitlupenaufnahmen erstellen
Tippe auf einen Abschnitt der Videozeitleiste,
um diesen Abschnitt zu vergrößern. Tippe auf
das Bild unterhalb der Zeitleiste, um es als Foto
zu speichern.
126 | DE DE | 127
Andere Einstellungen
Unter Kameradetails können viele der Cube+
Einstellungen angepasst werden. Um den
Menüpunkt zu erreichen, tippe oder wische die
Leiste nach unten, die sich am oberen Rand
des Sucher-Bildschirms befindet.
Auf [1] tippen, um Kameranamen und -symbol
zu bearbeiten.
Page 65
Erweiterte Kameraeinstellungen
Tippe auf die Informations-Symbole, um mehr
zu erfahren.
Auf derzeitige Einstellungen tippen, um
Optionen anzuzeigen.
Speichern und Teilen
Foto(s) und Video(s) auswählen. Auf Senden
tippen und dann kannst Du zwischen Speichern
und Teilen auswählen. Folge dann den
Anweisungen. Mehr Informationen erhältst
128 | DE DE | 129
Du auf www.polaroidcube.com/support.
Akku und Laden
Wenn der Ladezustand des Akkus 10%
erreicht, leuchtet die LED orange auf. Die
Kamera wird sich automatisch abschalten,
wenn der Ladezustand des Akkus 0% erreicht.
Um den Polaroid Cube+ zu laden, schließe ihn
mit Hilfe des enthaltenen micro USB-Kabels an
eine Steckdose bzw. Computer an. Während
des Ladevorgangs blinkt die LED orange. Die
Kamera kann weiterhin benutzt werden, wenn
Sie über die Steckdose aufgeladen wird.
Page 66

LED-Funktionen verstehen
Konstantes Grün
Die Kamera ist eingeschaltet, mit ausreichender
Akkuladung und SD-Speicher für Aufnahmen.
Einzelnes rotes Blinken mit kurzem
Signalton
Foto eingefangen.
Schnelles rotes Blinken mit zwei kurzen
Signaltönen
Video wird aufgenommen.
Schnelles blaues Blinken mit einem langen
Signalton
Die Kamera verbindet sich mit dem WLAN.
130 | DE DE | 131
Zyklisches langsames blaues Blinken
Kamera mit WLAN verbunden.
Einzelnes blaues Blinken mit einem
langen Signalton
WLAN wird ausgeschaltet, während die
Kamera eingeschaltet ist.
Ein langer Signalton, kein Blinken
WLAN wird eingeschaltet, während die Kamera
ausgeschaltet ist.
Ein langer und ein kurzer Signalton,
kein Blinken
Die Kamera wird ausgeschaltet, während das
WLAN angeschaltet ist.
Page 67

Konstantes Orange
Die Akkuladung beträgt weniger als 10%
(ca. 3,62V).
Kamera schaltet sich aus, wenn die Ladung
weniger als 3,55V beträgt.
Schnelles oranges Blinken mit andauernden
kurzen Signaltönen
Keine SD-Karte vorhanden bzw. SD-KartenFehler. SD-Karte einlegen oder formatieren und
erneut versuchen. Vergewissere Dich, dass
Du alle Dateien gesichert hast, bevor Du die
bestehende SD-Karte formatierst.
Wechselndes oranges und rotes Blinken
Niedrige Kapazität der SD-Karte (1 GB
132 | DE DE | 133
verbleibend): Ein kurzer Signalton ertönt,
wenn die SD-Karte voll ist und die Kamera die
Aufnahme stoppt.
Schnelles oranges Blinken, wenn am
Strom bzw. PC angeschlossen
Der Akku der Kamera wird geladen.
Oranges Blinken, wenn am PC
angeschlossen
Datenübertragung zwischen Kamera und PC.
Überhitzung
Bei längerem Gebrauch kann sich der
Polaroid Cube+ bei Berührung warm anfühlen.
Dies ist eine normale Betriebserscheinung und
kein Anzeichen für einen Produktschaden.
Page 68

Die Kamera kann weiterhin mit vollem
Vergnügen benutzt werden.
Die Cube+ App warnt per Fehlermeldung, wenn
die maximal sichere Gebrauchstemperatur
von 70°C/ 158ºF erreicht ist. Wenn dieser
Warnhinweis erscheint, schalte die Kamera aus
und lasse sie abkühlen. Wenn die Temperatur
vn 70°C/ 158ºF überschritten wird, stoppt die
Kamera zunächst die Aufnahme von Fotos und
Videos und schaltet sich dann eventuell aus.
Die Kamera kann wieder eingeschaltet werden,
sobald sie sich auf eine sichere Temperatur
abgekühlt hat.
134 | DE DE | 135
Magnet Sicherheitshinweise
Die Magnethalterung des Polaroid Cube+
hat einen Magneten mit geringer Leistung.
Wie bei anderen Magneten sollte man diese
Vorsichtsmaßnahmen beachten.
Medizinische Geräte:
Einige medizinische Geräte reagieren
empfindlich auf Magnetfelder. Wenn der
Benutzer einen Herzschrittmacher, einen
Defibrillator, eine implantierte Insulinpumpe
oder ein anderes elektronisches, medizinisches
Gerät verwendet oder Gesundheitsprobleme
aufweist, die die Verwendung eines solchen
Geräts erfordern, sollte der Polaroid Cube+
sowie das entsprechende Zubehör erst nach
Rücksprache mit einem Arzt verwendet werden.
Page 69

Schwangere Frauen:
Schwangere Frauen sollten vor der Verwendung
eines magnetischen Geräts einen Arzt
konsultieren.
Schäden an Elektrogeräten/ magnetischen
Speichermedien:
Direkter Kontakt zu Magnetfeldern kann zu
Schäden an magnetischen Speichermedien,
Festplatten, Elektrogeräten und Kreditkarten
bzw. Gegenständen mit Magnetstreifen
führen. Um Schäden zu vermeiden, strecke das
USB-Kabel so weit wie möglich von Deinem
Computer weg oder verwende ein längeres
micro USB-Kabel.
136 | DE DE | 137
Hast Du Fragen? Brauchst Du technische
Unterstützung? Willst Du mehr erfahren?
So kannst uns erreichen:
cspolaroid@camarketing.com
www.polaroidcube.com
Page 70

Qué hay en la caja
Conozca su cámara
Polaroid Cube
™
+
1
2
3
Cámara de Acción HD
Wi-Fi Polaroid Cube
138 | ES ES | 139
+
™
Cable micro USB
1. Lente
2. Micrófono
3. Imán
Page 71

Vista superior
Vista posterior
7
4
5
6
4. Botón Wi-Fi
5. Botón multifunción
6. LED
140 | ES ES | 141
7. Cubierta trasera
8. Ranura microSD
9. Puerto micro USB
10. Pestillo de la cubierta trasera
8
9
10
Page 72

Tabla de contenidos
Encender y Apagar
Tarjeta SD
Fotos y Vídeos
Instalando la app Cube
Conectando a Wi-Fi
Usando la app
Vídeo
Cámara lenta
Time-lapse
Fotografía
Modo de ráfaga
Editando Vídeo, Time-lapse y
Cámara lenta
142 | ES ES | 143
+
144
145
147
148
149
150
152
153
154
155
156
157
Tomando capturas desde vídeo
Ajuste de otras configuraciones
Guardar y Compartir
Batería y Carga
Entendiendo las funciones LED
Advertencias
160
161
162
163
164
168
Page 73

Usando su cámara
Polaroid Cube
Encender
Mantenga pulsado el botón multifunción
hasta que el LED cambie a color verde y oiga
3 pitidos. ¡Todo listo!
Apagar
Mantenga pulsado el botón multifunción hasta
que el LED se apague y oiga 1 pitido largo
seguido de 1 pitido corto.
Cargando la batería
La batería en su Cube+ viene cargada
parcialmente. Para cargarla, conecte el cable
144 | ES ES | 145
™
+
USB incluido a la cámara y conecte el otro
extremo del cable a una fuente de alimentación
tal como un ordenador o a un enchufe de
pared. No les ocurrirá ningún daño a la cámara
o a la batería si se utiliza antes de una carga
completa. Para más información detallada, vea
Batería y Carga.
Tarjeta SD
Debe de estar presente una tarjeta microSD para
que su Polaroid Cube+ funcione. Para insertar
una tarjeta microSD, levante la cubierta trasera
y con los contactos metálicos hacia arriba,
inserte la tarjeta y empuje suavemente hasta
que oiga un clic. Para quitar una tarjeta, toque
suavemente la tarjeta y la tarjeta SD saldrá.
Page 74

Si no hay una tarjeta microSD presente, su
cámara emitirá pitidos continuamente y el LED
parpadeará en naranja hasta que se inserte una
nueva tarjeta microSD.
Su cámara además parpadeará en naranja si
hay un problema al leer la tarjeta. Puede que
necesite formatear su tarjeta o probar una
tarjeta diferente.
Cuando su memoria microSD esté casi llena
(1GB restante), el LED parpadeará alternando
en naranja y rojo. Una vez que la tarjeta
SD esté completamente llena oirá un único
pitido corto y ya no podrá tomar fotos o
vídeos. El LED parpadeará en naranja y rojo
hasta que la tarjeta microSD sea retirada o
146 | ES ES | 147
los datos sean transferidos de la cámara.
Su cámara Polaroid Cube+ puede alojar tarjetas
microSD con capacidades de almacenamiento
de hasta 128GB. Le sugerimos usar tarjetas
microSD de clase 10 o superior. Las tarjetas
menores a clase 6 pueden causar una velocidad
de grabación/lectura más lenta así como
también problemas inesperados.
Fotografías
Presione el botón multifunción una vez. Oirá
un pitido corto y el LED parpadeará en rojo
una vez.
Vídeo
Presione el botón multifunción dos veces.
Page 75

Oirá dos pitidos cortos y el LED parpadeará en
rojo mientras esté grabando. Para detener la
grabación, presione el botón multifunción una
vez. Oirá un único pitido corto y el LED volverá
a un verde fijo.
Instalar la app Polaroid Cube
Descargar la app Polaroid Cube+ le permitirá
acceder a muchas funciones avanzadas de su
cámara Cube+ y también le permitirá usar su
smartphone como un visor. Descargue la app
Polaroid Cube+ desde el App Store y siga las
instrucciones en pantalla para configurar su
cuenta y sincronizar su cámara.
Para preguntas frecuentes, solución de
problemas o servicio al cliente, vaya a
148 | ES ES | 149
+
www.polaroidcube.com/support
Conectando a Wi-Fi
Presione y mantenga el botón Wi-Fi. Oirá un
pitido largo y el LED parpadeará con un color
azul cuando se conecte.
– Vaya al menú de Configuraciones en su
smartphone.
– Seleccione el menú de Wi-Fi.
– Seleccione la CUBE+ XXXXXXXX (el número
de 8 dígitos variará).
– Cuando se le solicite, introduzca la contraseña
estándar de Wi-Fi de la Polaroid Cube+
“1234567890”.
Puede tardar hasta 5 segundos para que se
establezca la conexión Wi-Fi. Mientras esté
conectada, el LED parpadeará con un color azul
Page 76

de baja intensidad.
Para desconectar el Wi-Fi, presione y mantenga
el botón Wi-Fi hasta que oiga un pitido largo y el
LED deje de parpadear en azul.
Usando la app para tomar fotos y vídeos
Inicie la app Polaroid Cube+. Después de
configurar su cuenta/iniciar sesión, accederá
a la pantalla del Visor. La pantalla se abre
automáticamente para la captura de vídeo.
Para cambiar a otro modo de captura, toque el
icono de vídeo en la esquina inferior izquierda
de la pantalla. Los iconos de otros modos de
foto/vídeo aparecerán en la parte inferior de la
pantalla. Toque el icono preferido para acceder
150 | ES ES | 151
a ese modo. Vea abajo para más detalles.
Sus configuraciones de cuenta también se
pueden ajustar en cualquier momento en
la pantalla de Detalles de la cámara de la
app Cube+. Toque o deslice hacia abajo la
barra pequeña ubicada en la parte superior
de la pantalla del visor para acceder a estas
configuraciones. Para más detalles vea la
página 204.
Page 77

Video
Toque una vez para empezar a grabar
vídeo.
Toque una vez para finalizar la grabación
de vídeo.
Toque para tomar una captura mientras
continúa grabando vídeo (sin interrumpir
el vídeo).
1080
Resolución: Toque este número en
la parte superior de la pantalla para
escoger entre las opciones de resolución
disponibles:
1440p a 30fps
152 | ES ES | 153
1080p a 30 o 60fps
720p a 30 o 60fps
00:00:00
Duración de vídeo: Muestra la
duración del vídeo.
NOTA: Para una mejor reproducción de vídeos
capturados a 1440p en su PC o Mac, utilice
QuickTime o VLC.
slo
Cámara lenta
Toque una vez para empezar la captura
de cámara lenta.
Toque una vez para finalizar la captura en
cámara lenta.
Page 78

60 FPS
Resolución: Los vídeos en cámara
lenta son capturados a 720p/120fps.
Time-Lapse
Toque una vez para empezar la captura
de time-lapse.
Toque una vez para finalizar la captura
de time-lapse.
Auto
Configuraciones de time-lapse: Toque
este icono en la parte superior de la
pantalla para escoger entre un intervalo
de time-lapse de 1 o 3 segundos.
00:00:00
Tiempo de grabación: Muestra la
154 | ES ES | 155
duración total del vídeo time-lapse.
Fotografía
Toque una vez para tomar una foto.
8MP
Configuraciones de megapíxeles: Toque
este icono en la parte superior de la
pantalla para escoger entre las opciones
de resolución disponibles:
8 megapíxeles (8MP)
6 megapíxeles (6MP)
3 megapíxeles (3MP)
Configuraciones de temporizador: Toque
este icono en la parte superior de la pantalla
para escoger entre las configuraciones de
Page 79

temporizador disponibles:
Apagado
3 segundos
10 segundos
Modo de ráfaga
Tocando y manteniendo presionado el
botón de captura de fotos le permitirá
capturar varias fotos en una sucesión
rápida. Capture con ráfagas de hasta
10 fotogramas por segundo, hasta
100 fotos a la vez.
100
Contador de ráfaga de fotos: Muestra el
número de fotos capturadas.
156 | ES ES | 157
La única resolución disponible en el Modo
de ráfaga es de 3MP. Su Cube+ captura
automáticamente las fotos en esta resolución
sin afectar las configuraciones en otros modos
de captura.
Editando Vídeo, Time-lapse y Cámara lenta
Para editar en cualquiera de estos formatos de
captura, primero seleccione y vea en el modo
de reproducción.
Page 80
Fotogramas de inicio y fin de recorte
Toque y arrastre los extremos a los puntos
de inicio y fin preferidos. Los fotogramas
recortados se pondrán grises. Toque ‘Recortar’
en la esquina superior derecha de la pantalla
para finalizar la edición. (Recorte de vídeo no
soportado en Android.)
158 | ES ES | 159
Puntos de inicio y fin de cámara lenta
Toque y arrastre los triángulos para ajustar los
puntos de inicio y fin de cámara lenta.
Page 81

Tomar capturas desde Vídeo, Time-lapse y
Cámara lenta
Toque cualquier sección de la línea de tiempo
del vídeo para acercarse a esa sección. Toque
la imagen debajo de la línea de tiempo para
guardarla como captura.
Ajuste de otras configuraciones
Puede ajustar muchas configuraciones de
su Cube+ desde la pantalla de Detalles de la
cámara. Para acceder a la pantalla de Detalles
de la cámara, toque o deslice hacia abajo la
barra ubicada en la parte superior de la pantalla
del visor.
Toque el icono [1] para editar el nombre y el
160 | ES ES | 161
Page 82

icono de la cámara.
Configuraciones avanzadas de la cámara
Toque los iconos de información para aprender
más.
Toque la configuración actual para ver otras
opciones de configuración.
Guardar y Compartir
Seleccione su(s) foto(s) o vídeo(s). Toque
el icono Enviar y después escoja guardar
162 | ES ES | 163
o compartir desde el menú. Después siga
las indicaciones respectivas a su selección.
Para más información vaya a
www.polaroidcube.com/support.
Batería y Carga
Cuando la batería alcance el 10% el LED se
iluminará en naranja. Su cámara se apagará
automáticamente si el nivel de batería alcanza
el 0%.
Para cargar su Polaroid Cube+, conéctela a un
enchufe u ordenador, usando el cable micro USB
incluido. El LED parpadeará en naranja durante la
carga. Su cámara aún se puede utilizar mientras
se carga en el enchufe de pared.
Page 83

Entendiendo las funciones LED
Verde estático
La cámara está encendida, con suficiente
energía de la batería y memoria SD para
capturar imágenes.
Destello único en rojo con un pitido corto
Foto capturada.
Destello rápido en rojo con dos pitidos
cortos
Grabando vídeo.
Destello rápido en azul con un pitido largo
La cámara se está conectando a Wi-Fi.
164 | ES ES | 165
Destello intermitente y lento en azul
La cámara está conectada a Wi-Fi.
Un destello en azul con un pitido largo
Se está apagando el Wi-Fi mientras la cámara
está encendida.
Un pitido largo, sin destello
Se está encendiendo el Wi-Fi mientras la
cámara está apagada.
Un pitido largo, un pitido corto, sin destello
Se está apagando la cámara mientras el Wi-Fi
está encendido.
Naranja estático
La energía de la batería está por debajo del 10%
Page 84

(alrededor de 3,62V).
La cámara se apagará cuando la energía
descienda a 3,55V.
Destello rápido en naranja con continuos
pitidos cortos
No hay tarjeta SD o error de tarjeta SD. Inserte
una tarjeta SD o formatee la tarjeta SD e
inténtelo de nuevo. Asegúrese de guardar
todos los archivos de imagen de la tarjeta SD
existente antes de formatear.
Destello alternando en naranja y rojo
Capacidad de la SD baja (1GB restante):
Sonará un pitido corto cuando la SD alcance su
capacidad y la cámara detendrá la grabación.
166 | ES ES | 167
Destello rápido en naranja mientras está
conectada a la alimentación o al PC
La batería de la cámara está cargando.
Destello en naranja mientras está
conectada al PC
Se están transfiriendo datos entre la cámara
y el PC.
Sobrecalentamiento
Durante el uso prolongado, su cámara
Polaroid Cube+ puede notarse caliente al tacto.
Esta es una situación de funcionamiento normal
y no indica ningún defecto en el producto ni
razón para frenar la diversión.
Su app Cube+ le advertirá con un mensaje
Page 85

de error si alcanza la temperatura máxima de
uso seguro de 70°C/ 158°F. Si observa esta
advertencia, deje de usar su cámara y permita
que se enfríe. Si la temperatura supera los 70°C/
158°F, primero su cámara dejará de tomar fotos
y vídeos y eventualmente se apagará. Su cámara
se puede encender de nuevo una vez que se
haya enfriado hasta una temperatura segura.
Advertencia de seguridad de imanes
El soporte magnético en su Polaroid Cube+ es
un imán de baja potencia, es mejor seguir estas
precauciones de seguridad.
Dispositivos médicos:
Algunos dispositivos médicos pueden ser
sensibles a campos magnéticos. Si el usuario
168 | ES ES | 169
tiene un marcapasos, desfibrilador, bomba de
insulina implantada, u otro dispositivo médico
o tiene problemas de salud que requieren
el empleo de tales dispositivos, evite el uso
de la Polaroid Cube+ y/o cualquier accesorio
relacionado hasta consultarlo con su médico.
Mujeres embarazadas:
Las mujeres embarazadas deben consultar a
un médico antes de usar cualquier dispositivo
magnético.
Daño a medios de almacenamiento
electrónicos/ magnéticos:
El contacto directo a campos magnéticos
puede causar daños a medios de
almacenamiento magnéticos, discos duros,
Page 86

dispositivos electrónicos y tarjetas de crédito/
elementos con bandas magnéticas. Para evitar
daños, extienda el cable USB tan lejos como
sea posible de su ordenador, o use un cable
micro USB más largo.
¿Tiene preguntas? ¿Necesita soporte técnico?
¿Quiere saber más? Póngase en contacto en:
cspolaroid@camarketing.com
www.polaroidcube.com
170 | ES ES | 17 1
Page 87
O que há dentro da caixa
Conheça a sua câmara
Polaroid Cube
™
+
1
2
3
Câmara de Ação HD
Wi-Fi Polaroid Cube
172 | PT PT | 173
+
™
Cabo micro USB
1. Lente
2. Microfone
3. Íman
Page 88
Vista do topo
Vista traseira
7
4
5
6
7. Tampa traseira
4. Botão multifunções
5. Botão Wi-Fi
6. LED
174 | PT PT | 175
8. Entrada microSD
9. Porta micro USB
10. Fecho da tampa traseira
10
10
8
9
Page 89

Índice
Ligar e Desligar
Cartão SD
Fotos e Vídeos
Instalar a app Cube
Ligar ao Wi-Fi
Utilizar a app
Vídeo
Câmara lenta
Time-lapse
Fotografia
Modo de disparo contínuo
Editar Vídeo, Time-lapse e Câmara lenta
Captura de imagens a partir de vídeo
176 | PT PT | 177
+
178
179
181
182
183
184
185
187
187
188
189
190
193
Ajuste de outras definições
Guardar e partilhar
Bateria e Carga
Compreender as funções LED
Avisos
194
195
196
197
201
Page 90

Usar a sua câmara
Polaroid Cube
Ligado
Segure o botão multifunções até que o LED
fique verde e irá ouvir 3 bipes. Tudo pronto!
Desligado
Segure o botão multifunções até que o LED
se apague e irá ouvir 1 bip longo seguido de 1
bip curto.
Carregar a bateria
A bateria na sua Cube+ vem parcialmente
carregada. Para carregar, ligue o cabo USB
que está incluído à câmara e ligue a outra
178 | PT PT | 179
™
+
extremidade do cabo a uma fonte de energia,
tal como um computador ou uma tomada de
parede. A câmara ou a bateria não ficarão com
danos se usadas antes de uma carga completa.
Para informações mais detalhadas, consulte a
secção Bateria e Carga.
Cartão SD
É necessário um cartão microSD para que a
sua Polaroid Cube+ possa funcionar. Para inserir
um cartão microSD, levante a tampa traseira e,
com os contactos metálicos voltados para cima,
insira o cartão e empurre com cuidado até ouvir
um clique. Para retirar um cartão, toque no
cartão com cuidado, e o cartão SD irá sair.
Se nenhum cartão microSD estiver presente,
Page 91

a sua câmara irá emitir um bip contínuo e o
LED piscará a laranja até que um novo cartão
microSD seja inserido.
A sua câmara piscará também a laranja, caso
haja um problema de leitura do cartão. Pode
precisar de formatar o seu cartão ou tentar um
cartão diferente.
Quando a memória do seu cartão microSD
estiver quase cheia (1GB restante), o LED
piscará alternadamente laranja e vermelho.
Quando o cartão SD estiver totalmente
cheio irá ouvir um único bip curto e deixará
de poder tirar fotos ou fazer vídeos. O LED
piscará a laranja e vermelho até que o cartão
microSD seja removido ou que os dados
180 | PT PT | 181
sejam transferidos da câmara.
A sua câmara Polaroid Cube+ pode suportar
cartões microSD com capacidade de
armazenamento até 128GB. Sugerimos que
use cartões microSD de classe 10 ou superior.
Cartões com classe inferior a 6 podem levar a
uma redução da velocidade de gravação/leitura,
bem como outros problemas inesperados.
Fotografias
Pressione o botão multifunções uma vez. Vai
ouvir um bip curto e o LED piscará a vermelho
uma vez.
Vídeo
Pressione duas vezes o botão multifunções.
Page 92

Vai ouvir dois bipes curtos e o LED piscará
a vermelho enquanto estiver a gravar. Para
parar a gravação, pressione uma vez o botão
multifunções. Vai ouvir um único bip curto e
o LED voltará a ficar verde.
Instalar a app Polaroid Cube
Com o download da app da Polaroid Cube+
poderá aceder a várias funcionalidades
avançadas da sua câmara Cube+ assim como
tornar o seu smartphone num visor. Faça o
download da app Polaroid Cube+ através da
App Store e siga as instruções no ecrã para
configurar a sua conta e sincroniza-la com a
sua câmara.
+
Para FAQs, resolução de problemas ou
182 | PT PT | 183
serviço ao cliente, aceda a
www.polaroidcube.com/support
Ligar ao Wi-Fi
Pressione e segure o botão Wi-Fi. Irá ouvir
um bip longo e o LED irá piscar azul enquanto
efetua a ligação.
– Vá ao menu Definições do seu smartphone.
– Selecione o menu Wi-Fi.
– Selecione a CUBE+ XXXXXXXX (o número
de 8 dígitos irá variar).
– Quando solicitado, introduza a palavra-
passe padrão do Wi-Fi da Polaroid Cube+
“1234567890”.
Pode levar até 5 segundos para que a ligação
Wi-Fi seja estabelecida. Enquanto estiver ligado,
o LED irá piscar um azul de baixa intensidade.
Page 93

Para desligar o Wi-Fi, pressione e segure o
botão Wi-Fi até ouvir um bip longo e o LED
parar de piscar a cor azul.
Usar a app para tirar fotos e fazer vídeos
Abra a app Polaroid Cube+. Depois de
configurar a sua conta/fazer o login, será
redirecionado para o ecrã do visor. O ecrã abre
automaticamente a captura de vídeo. Para
mudar para outro modo de captura, toque no
ícone de vídeo no canto inferior esquerdo do
ecrã. Os ícones de outros modos de fotografia/
vídeo aparecem na parte inferior do ecrã.
Toque no ícone pretendido para aceder ao
respetivo modo.
184 | PT PT | 185
As configurações da sua conta podem ser
ajustadas a qualquer momento no ecrã Detalhe
da Câmara da app Cube+. Toque ou deslize
para baixo a barra pequena localizada na parte
superior do ecrã do visor para alcançar estas
definições. Para mais detalhes veja a página 204.
Video
Toque uma vez para começar a gravar o
vídeo.
Toque uma vez para parar a gravação de
vídeo.
Toque para capturar uma imagem estática
durante a gravação de vídeo (sem
Page 94

slo
interrupções no vídeo).
1080
Resolução: Toque neste número no
topo do ecrã para escolher as opções de
resolução disponíveis:
1440p a 30fps
1080p a 30 ou 60fps
720p a 30 ou 60fps
00:00:00
Tempo de vídeo: Mostra a duração
do vídeo.
NOTA: Para obter uma melhor reprodução de
vídeos capturados em 1440p no seu PC ou
Mac, utilize o QuickTime ou VLC.
Câmara lenta
Toque uma vez para começar a captura
em câmara lenta.
Toque uma vez para terminar a captura
em câmara lenta.
60 FPS
Resolução: Câmara lenta é capturada
a 720p/120fps.
Time-Lapse
Toque uma vez para começar a captura
em modo time-lapse.
Toque uma vez para terminar a captura
186 | PT PT | 187
Page 95

em time-lapse.
Auto
Definições time-lapse: Toque neste
ícone no topo do ecrã para escolher entre
1 segundo ou 3 segundos de time-lapse.
00:00:00
Tempo de gravação: Mostra a
duração total do vídeo time-lapse.
Fotografia
Toque uma vez para tirar foto.
8MP
Definições de megapixel: Toque neste
ícone no topo do ecrã para escolher as
resoluções disponíveis:
8 megapixels (8MP)
188 | PT PT | 189
6 megapixels (6MP)
3 megapixels (3MP)
Definições do temporizador: Toque
neste ícone na parte superior do ecrã
para escolher uma das configurações
disponíveis de temporizador:
Desligado
3 segundos
10 segundos
Modo de disparo contínuo
Tocar e manter o botão de captura de foto
premido permite-lhe capturar várias fotos
numa sucessão rápida. O modo contínuo
captura a 10 frames por segundo, até 100
Page 96
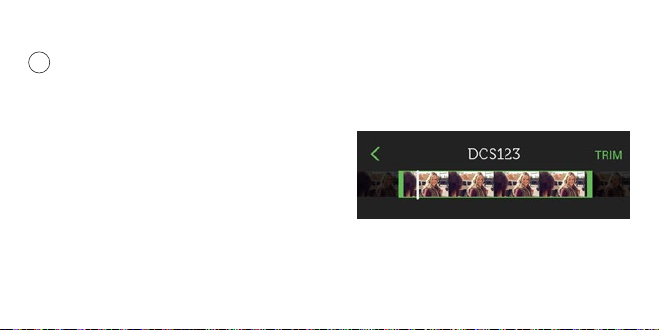
fotos de cada vez.
100
Contador de disparos: Mostra o número
de fotos capturadas.
3MP é a única resolução disponível no
modo de disparo. A sua Cube+ captura fotos
automaticamente com esta resolução sem
afetar as configurações noutros modos
de captura.
Editar Vídeo, Time-lapse e Câmara lenta
Para editar em qualquer um destes formatos
de captura, selecione e veja primeiro no modo
de reprodução.
190 | PT PT | 191
Cortar frames iniciais e finais
Toque e arraste os pontos finais para o início
e fim pretendido. Os frames cortados ficarão
cinzentos. Toque em ‘Cortar’ na parte superior
direita do ecrã para finalizar a edição. (O corte
de vídeo não é suportado em Android.)
Page 97
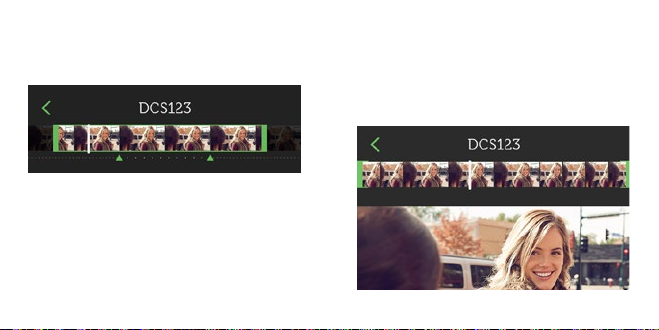
Câmara lenta - Pontos de inicio e fim
Toque e arraste os triângulos para ajustar os
pontos de início e fim da câmara lenta.
192 | PT PT | 193
Captura de imagens a partir de vídeo,
Time-lapse e câmara lenta
Toque em qualquer parte da linha do tempo
do vídeo para fazer zoom. Toque na imagem
abaixo da linha do tempo para a guardar como
imagem estática.
Page 98
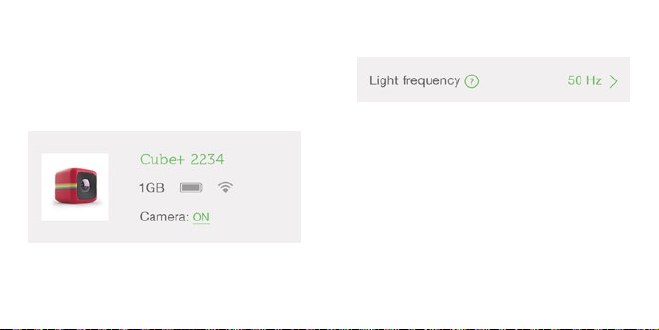
Ajustar outras definições
Pode ajustar várias configurações da sua Cube+
no ecrã de Detalhe da Câmara. Para chegar ao
ecrã de Detalhe da Câmara, toque ou deslize
para baixo a barra localizada na parte superior
do ecrã do visor.
Toque no ícone [1] para editar o nome e
ícone da câmara.
194 | PT PT | 195
Definições avançadas da câmara
Toque nos ícones de informações para
saber mais.
Toque em definições atuais para ver outras
as opções de configuração.
Guardar e Partilhar
Selecione a(s) sua(s) fotografia(s) ou vídeo(s).
Toque no ícone Enviar e de seguida escolha
no menu a opção guardar ou partilhar. Depois,
siga as instruções que se seguem à seleção.
Page 99

Para mais informações aceda a
www.polaroidcube.com/support.
Bateria e Carga
Quando a bateria atingir 10%, o LED acenderá
a cor laranja. A câmara será automaticamente
desligada se o nível da bateria chegar aos 0%.
Para carregar a sua Polaroid Cube+, ligue-a a
uma tomada ou a um computador, usando
o cabo micro USB incluído. O LED piscará a
cor laranja enquanto estiver a carregar. A sua
câmara pode ser utilizada durante a carga a
partir da tomada de parede.
196 | PT PT | 197
Compreender as funções LED
Verde estático
A câmara está ligada, com energia e memória
SD suficiente para capturar imagens.
Piscar vermelho único bip curto
Foto capturada.
Piscar vermelho rápido com dois bips curtos
A gravar vídeo.
Piscar azul rápido com um bip longo
A câmara está a emparelhar com o Wi-Fi.
Piscar azul intermitente e lento
A câmara está emparelhada com o Wi-Fi.
Page 100

Piscar azul único com bip longo
O Wi-Fi está a ser desligado enquanto a câmara
está ligada.
Um bip longo, sem piscar
O Wi-Fi está a ser ligado enquanto a câmara
está desligada.
Um bip longo, um bip curto, sem piscar
A câmara está a ser desligada enquanto o Wi-Fi
está ligado.
Laranja estático
A bateria está abaixo dos 10% (cerca de 3.62V).
A câmara irá desligar quando a carga descer
para os 3.55V.
198 | PT PT | 199
Piscar laranja rápido com bips
curtos contínuos
Nenhum cartão SD presente ou erro no cartão
SD. Insira um cartão SD ou formate o cartão
SD e tente novamente. Faça um backup de
todas as imagens do cartão SD existente antes
de formatar.
Piscar laranja e vermelho alternado
Baixa capacidade SD (1GB restante): Será
emitido um bip curto quando atingir a
capacidade máxima do SD e a câmara irá parar
a gravação.
Piscar laranja rápido enquanto está
ligado à corrente ou PC
Bateria da câmara está a ser carregada.
 Loading...