

Page 1

TABLE OF CONTENTS
IMPORTANT SAFETY AND PRECAUTIONS ...........................................................1
Important Information .................................................................................................................... 1
Important Safety Instructions ........................................................................................................ 2
GENERAL INFORMATION ........................................................................................3
Features ........................................................................................................................................ 3
Overview of the TV – Control Buttons and Indicators ................................................................... 4
Overview of the TV – Connections ............................................................................................... 5
Accessories .................................................................................................................................. 8
Remote Control ............................................................................................................................ 9
CONNECTIONS & APPLICATIONS ........................................................................10
Connecting Video Devices via HDMI .......................................................................................... 10
Connecting Video Devices via DVI ..............................................................................................11
Connecting PC via D-SUB .......................................................................................................... 12
Connecting Devices via Other Cables ........................................................................................ 13
CONTROLS & ADJUSTMENTS ..............................................................................14
General Adjustments .................................................................................................................. 14
ENGLISH
Turning the LCD TV On and Off ........................................................................................................................... 14
Power Consumption ............................................................................................................................................. 16
Initial Setup............................................................................................................................................................ 17
Changing Channels............................................................................................................................................... 21
Adjusting the Volume............................................................................................................................................. 21
Switching Source .................................................................................................................................................. 22
Viewing the Menus and On-Screen Displays......................................................................................................... 22
Switching Language Modes................................................................................................................................... 23
Channel Control ...........................................................................................................................24
Editing the Channel List......................................................................................................................................... 26
Finding Channels Directly...................................................................................................................................... 27
Setting – Up your Favorite Channels..................................................................................................................... 28
Channel Name Editing........................................................................................................................................... 29
I
Page 2

Picture Control ............................................................................................................................ 30
Adjusting the Picture Setting................................................................................................................................. 30
Adjusting the TV Screen........................................................................................................................................ 32
Adjusting the Color Temperature........................................................................................................................... 33
Sound Control ............................................................................................................................. 35
Adjusting the Sound Quality.................................................................................................................................. 35
Choosing a Multi-Channel Television Sound in Analog TV.................................................................................... 36
Choosing a Multi-Track Sound ( MTS ) in Digital TV............................................................................................. 37
Other Sound Settings............................................................................................................................................. 38
Time Setting ................................................................................................................................ 39
Setting the Clock................................................................................................................................................... 39
Setting the On / Off Timer....................................................................................................................................... 40
Viewing Closed Captions ............................................................................................................ 41
Parental Control and Locks ........................................................................................................ 43
Setting Ratings and Channel Locks...................................................................................................................... 43
Changing
Child Lock ............................................................................................................................................................. 49
Reset the Locks Settings ...................................................................................................................................... 49
Your Personal ID Number (PIN)............................................................................................................ 47
System Info ................................................................................................................................. 50
Showing Program Info Data ........................................................................................................ 50
PC mode Adjustments ................................................................................................................ 52
PROGRAMMING REMOTE CONTROL ..................................................................53
Direct Device Code Setup .......................................................................................................... 53
Searching for a Device Code ...................................................................................................... 54
Device Codes ............................................................................................................................. 55
TROUBLESHOOTING .............................................................................................71
SPECIFICATIONS ....................................................................................................74
II
Page 3

ENGLISH
Information on Disposal of Waste Electrical and Electronic Equipment
WEEE STATEMENT
This product contains electrical or electronic materials. The presence of these materials may, if
not disposed of properly, have potential adverse effects on the environment and human health.
Presence of this label on the product means it should not be disposed of as unsorted waste and
must be collected separately. As a consumer, you are responsible for ensuring that this product is
disposed of properly . To fi nd out how to properly dispose of this product, please go to www.polaroid.
com and click on “Company“ or call the customer service number for your country listed in the
instruction manual.
III
Page 4
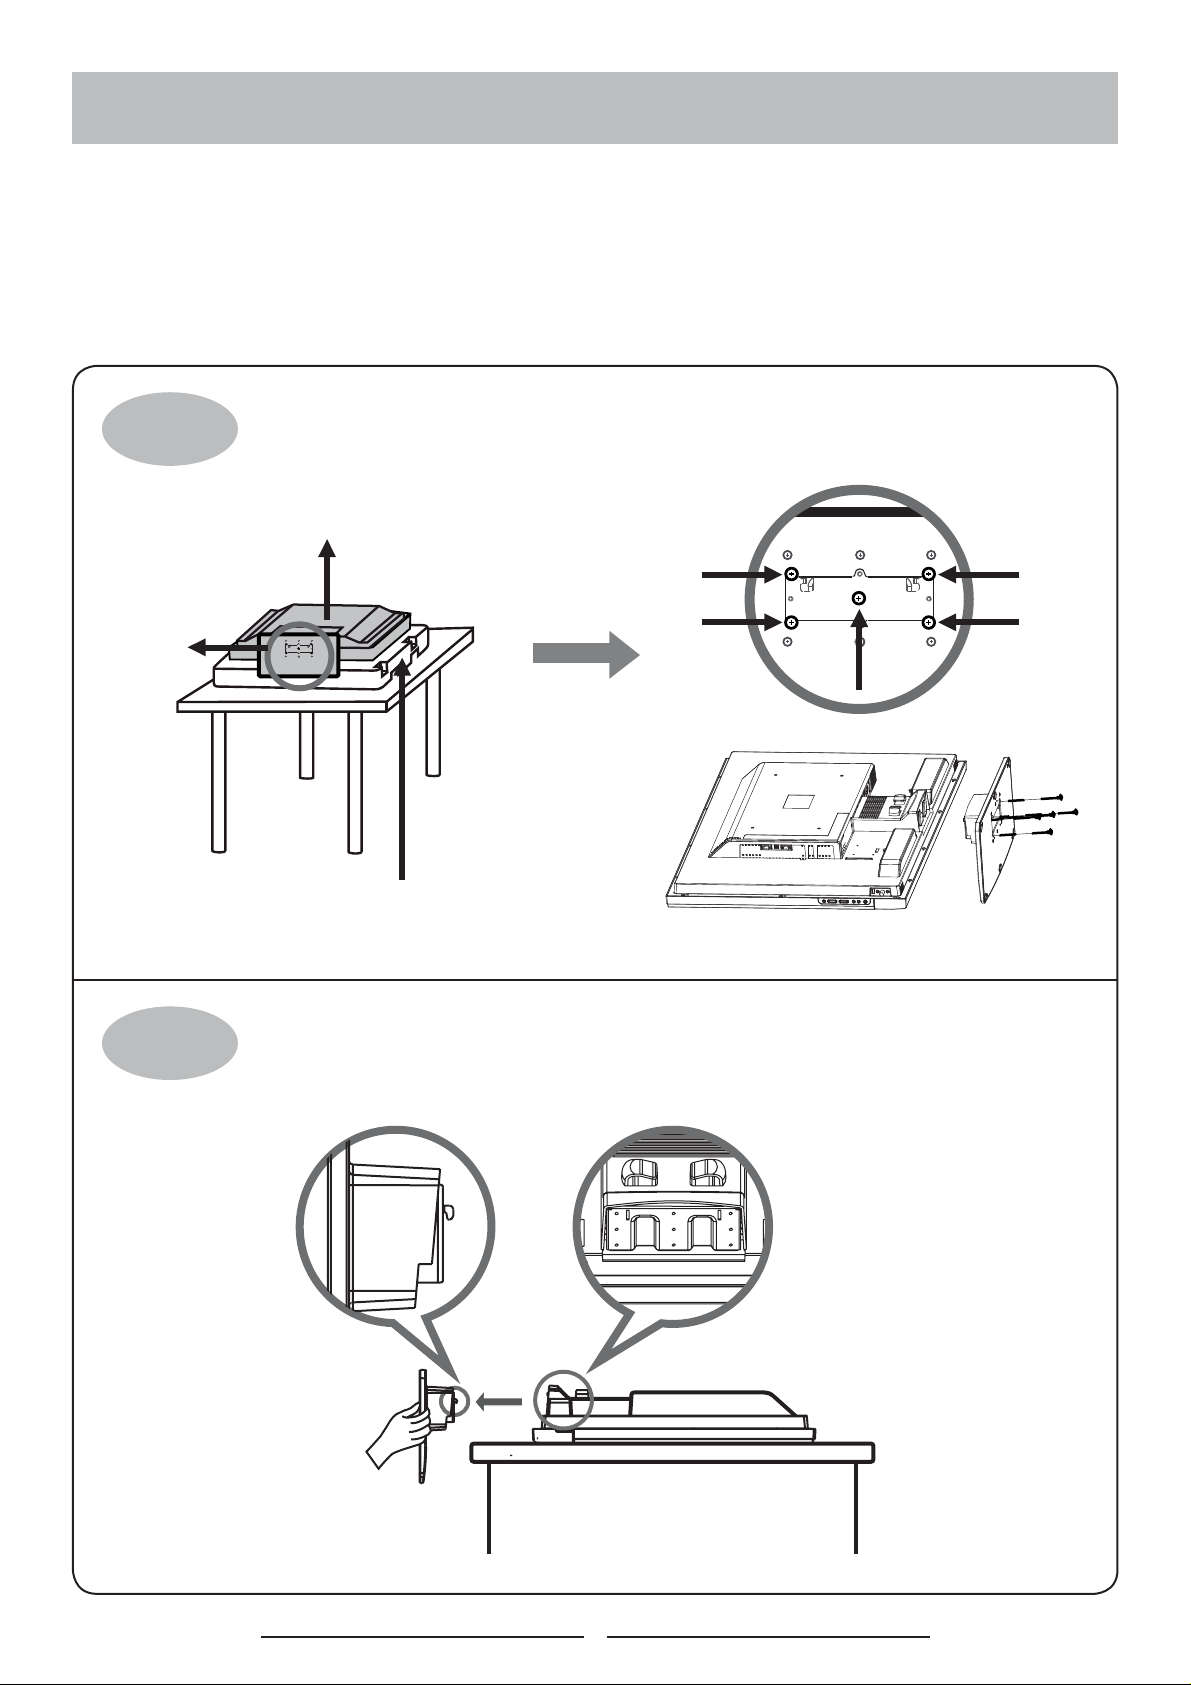
Remove the TV stand
If you prefer to mount your TV, do not attach the stand.
Use the instructions in your wall-mounting kit (not included).
IMPORTANT: Before removing the stand, place the TV on a stable surface
on the bottom foam packaging material or a soft cloth.
STEP 1
Stand
Loosen and remove the 5 screws that
secure the TV stand to the TV.
Unit
Packaging Material or soft cloth
STEP 2
Remove the TV stand from the TV.
IV
Page 5
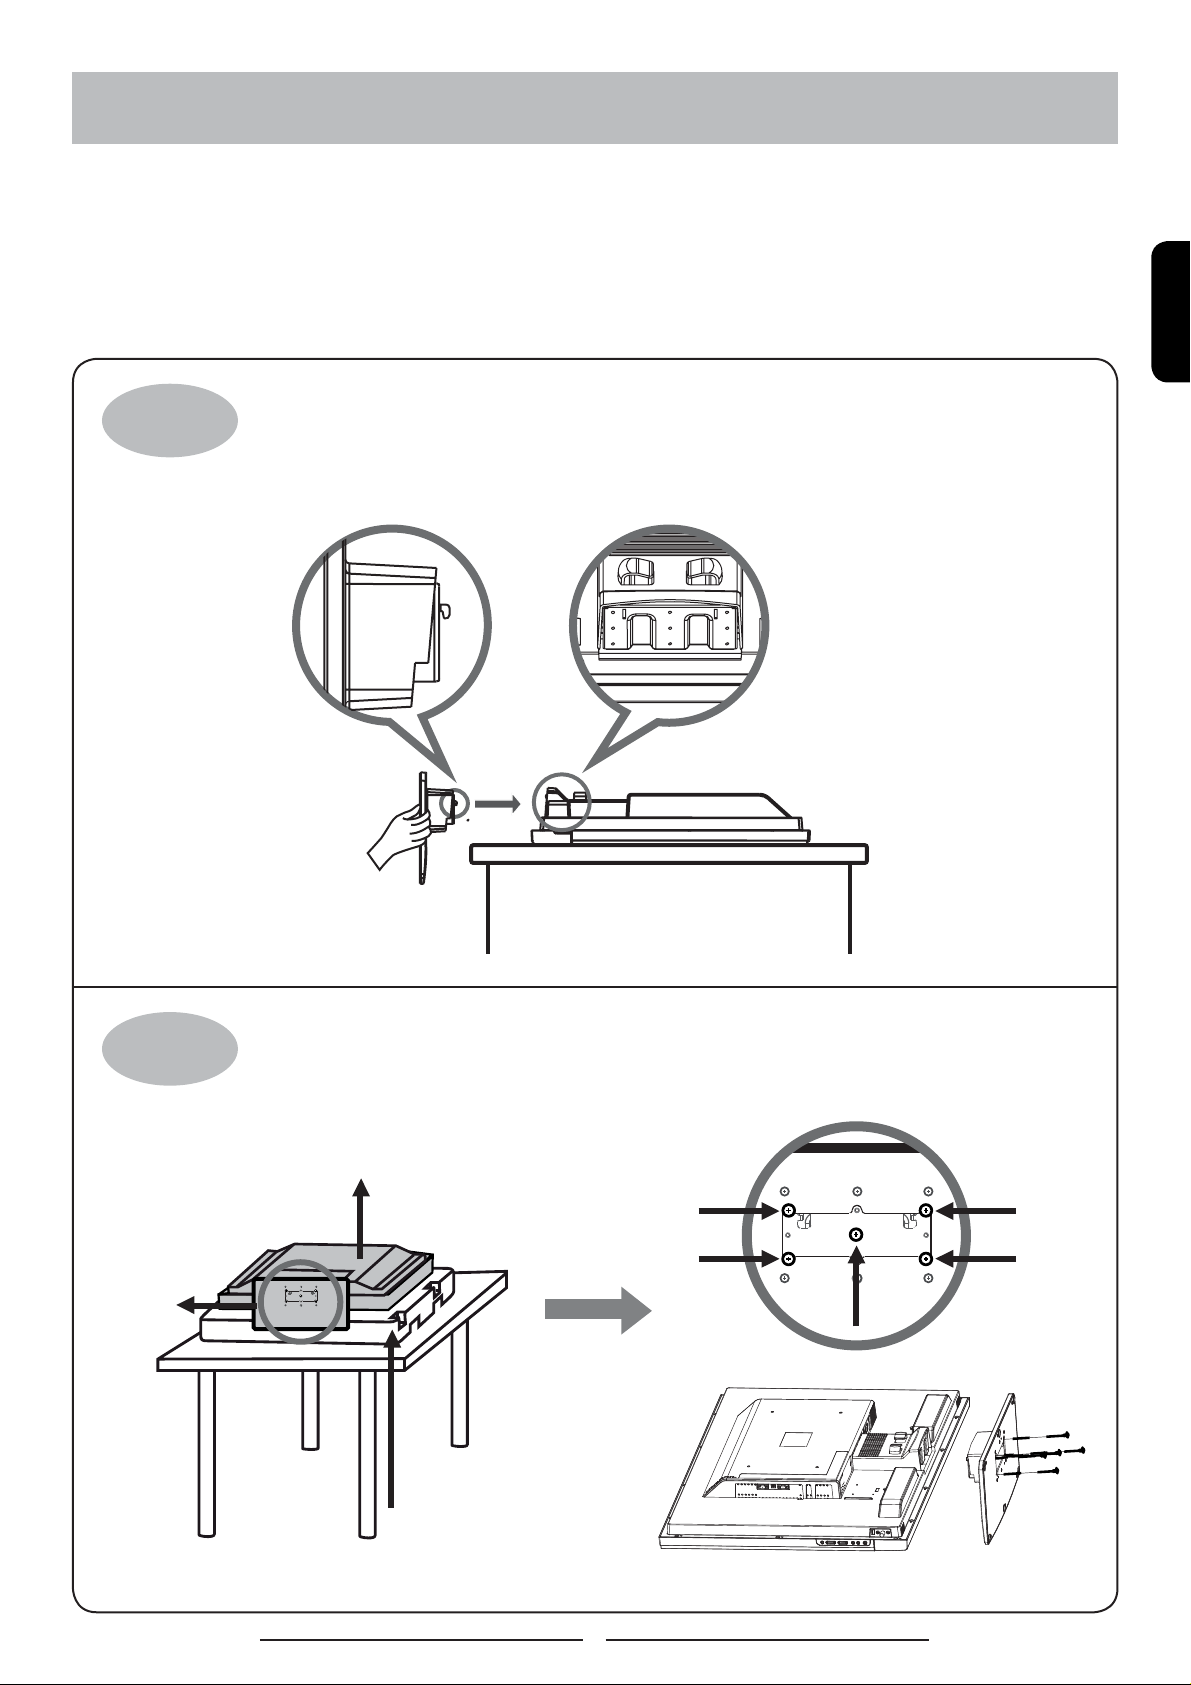
Attaching the stand
These instructions are designed to help you attach your stand easily and safely.
Please read carefully.
IMPORTANT: Attach the stand to your TV with bottom foam packaging material still attached.
STEP 1
Slide the neck of the base into the
bottom of the TV’s back cover until
the clip is secured.
ENGLISH
STEP 2
Stand
Use all 5 screws (provided) to
secure the TV stand to the TV.
Unit
Packaging Material
V
Page 6

IMPORTANT SAFETY AND PRECAUTIONS
This wide active matrix TFT (thin fi lm transistor) liquid crystal monitor is designed for use as a stand
alone TV as well as a display device for video electronics appliances and personal computers.
Important Information
Warning : To reduce the risk of fi re or electric shock, do not expose this product to rain or moisture.
СAUTION
Risk of electric
shock. Do not open.
Caution :To reduce the risk of electric shock, do not attempt to disassemble or modify this device.
There are no user-serviceable parts inside. Refer any service issues to qualifi ed service
personnel.
Caution : FCC/ CSA regulations state that any unauthorized changes or modifi cations to this
equipment may void the user’s authority to operate it.
Important: One Federal Court has held that unauthorized recording of copyrighted TV programs is
an infringement of U.S. copyright laws. Certain Canadian programs may also be copyrighted and
any unauthorized recording in whole or in part may be in violation of these rights.
ENGLISH
Warning : Do not leave stationary images, patterns, PIP windows, or letterbox images on the
screen for prolonged periods of time as this may result in permanent damage to the LCD
panel. This type of damage is not covered under warranty. The following are examples of, but
not limited to, potentially hazardous display output: side bar images, video game patterns,
closed captioning, channel logos and letterbox black bars. To prevent this type of damage, it is
recommended to display constantly moving images that fi ll the screen as often as possible.
According to industrial standards for LCD display technology; there are a certain number of
allowable defective pixels. Although we produce panels with more than 99.9% active cells, there
still may be some cells that do not produce light or remain constantly lit. For further information,
please contact sales or technical support.
1
Page 7

Important Safety Instructions
1. Read these instructions.
2. Keep these instructions.
3. Heed all warnings.
4. Follow all instructions.
5. Do not use this apparatus near water.
6. Clean only with dry cloth.
7. Do not block any ventilation openings. Install in accordance with the manufacturer’s
instructions.
8. Do not install near any heat sources such as radiators, heat registers, stoves, or other
apparatus (including amplifi ers) that produce heat.
9. Do not defeat the safety purpose of the polarized or grounding-type plug. A polarized plug
as two blades with one wider than the other. A grounding type plug has two blades and a
third rounding prong. The wide blade or the third prong are provided for your safety. If the
provided plug does not fi t into your outlet, consult an electrician for replacement of the
obsolete outlet.
10. Protect the power cord from being walked on or pinched particularly at plugs, convenience
receptacles, and the point where they exit from the apparatus.
11. Only use attachments/accessories specifi ed by the manufacturer.
12. Use only with the cart, stand, tripod, bracket, or table specifi ed by the manufacturer, or
sold with the apparatus. When a cart is used, use caution when moving the cart/apparatus
combination to avoid injury from tip-over.
13. Unplug this apparatus during lightning storms or when unused for long periods of time.
14. Refer all servicing to qualifi ed service personnel. Servicing is required when the apparatus
has been damaged in any way, such as power-supply cord or plug is damaged, liquid has
been spilled or objects have fallen into the apparatus, the apparatus has been exposed to
rain or moisture, does not operate normally, or has been dropped.
2
Page 8

GENERAL INFORMATION
Features
Your TV is designed with the latest technology and is a high-performance unit that includes the
following special features:
MULTI-SOURCES INPUT INCLUDED RF IN, D-SUB, HDMI, COMPOSITE, S-VIDEO, AND
COMPONENT.
BUILT-IN COMBO TUNER IS ABLE TO RECEIVE ATSC, NTSC AND CLEAR QAM CABLE
SIGNALS.
Universal remote control provides control of other devices such as Cable Converter, Satellite
Receiver, DVD player, Audio Amplifi er, VCR etc.
For screen size 32”/37” built in 10W dual channel speakers are offered; for 42”, 15W are
ENGLISH
offered.
Embedded video enhancement and noise reduction features for the colorful and clearest picture
possible.
Provided multi-channel sound decoder for stereo and bilingual broadcasts.
Automatic sleep timer control from 15 to 90 minutes.
The sequence is 15→30→45→60 →90.
Automatic Power Off feature after 10 minutes without a signal.
Component video input for high defi nition TV programming (HDTV ready), resolution up to 720p,
1080i.
Automatic Picture Control (APC) and Aspect Ratio Control (ARC) functions for end user
customization of viewing preferences.
3
Page 9
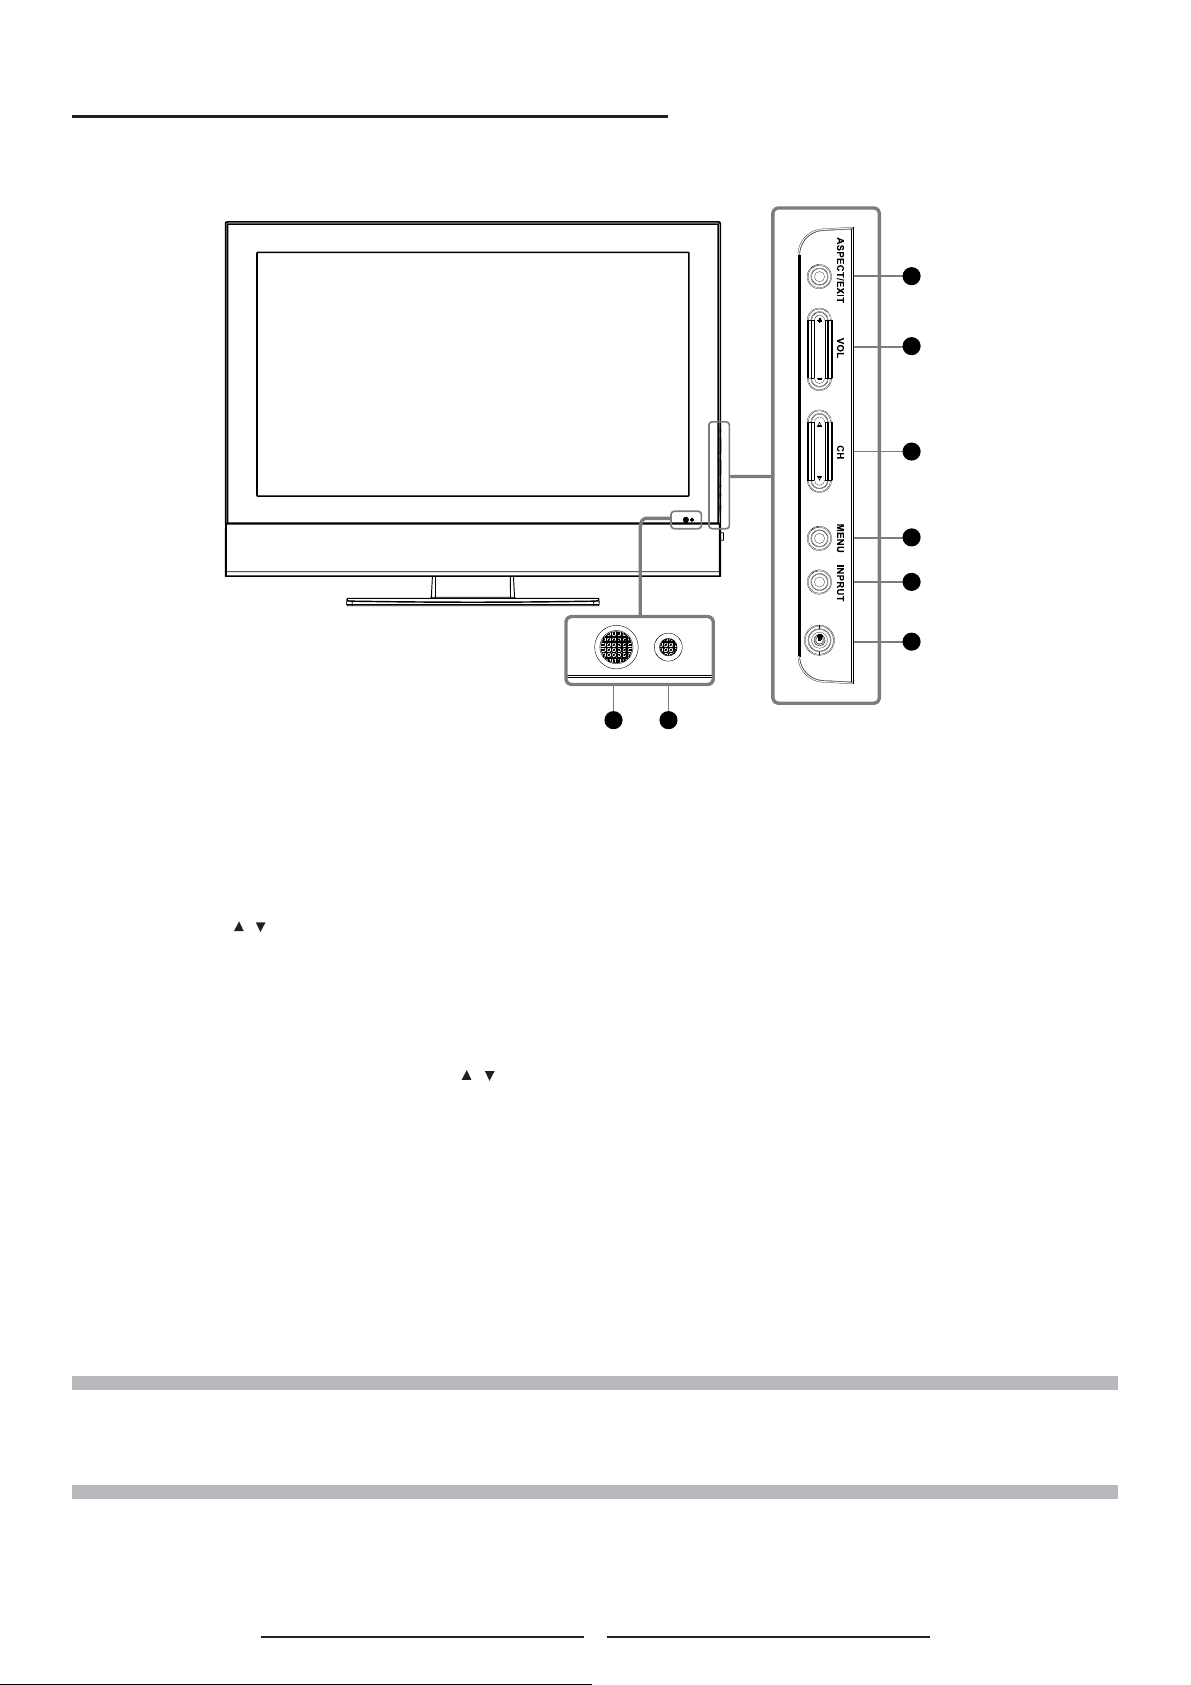
Overview of the TV – Control Buttons and Indicators
1
2
3
4
5
6
7 8
1. ASPECT/ EXIT : Select the display output mode (TV / Video mode: Normal, Full
Screen,Zoom, Subtitle ; PC mode: Normal, Full Screen).
2. VOLUME (+ / -) : Increase/decrease the volume or function as the left/right arrow button
for menu.
3. CHANNEL ( / ) : Change the channel or function as the up/down arrow button for
menu.
4. MENU : Displays the main menu. When OSD (on-screen display) appears, press the
button to select or access a sub-menu.
5. INPUT : Press INPUT button on the side of the TV and the source menu will appear on
the screen. Press the CHANNEL ( / ) button to select your preferred source input (TV,
Video 1 ,Video 2, YPBPR 1 , YPBPR 2 , PC, HDMI 1, HDMI 2 ) and press MENU botton
to confi rm.
6. POWER : Turn the LCD-TV on or off.
7. REMOTE CONTROL SENSOR : Aim the remote control towards this spot on the TV.
8. POWER INDICATOR : BLUE LIGHT ─ power on
PURPLE LIGHT ─ power saving; standby (offered in PC mode)
RED LIGHT ─ power off
NOTE 1 : These buttons on the TV is only for basic settings.
NOTE 2 : The drawing of this LCD-TV in the user manual is for your reference. The actual TV appearance
may differ depending on your purchase.
4
Page 10
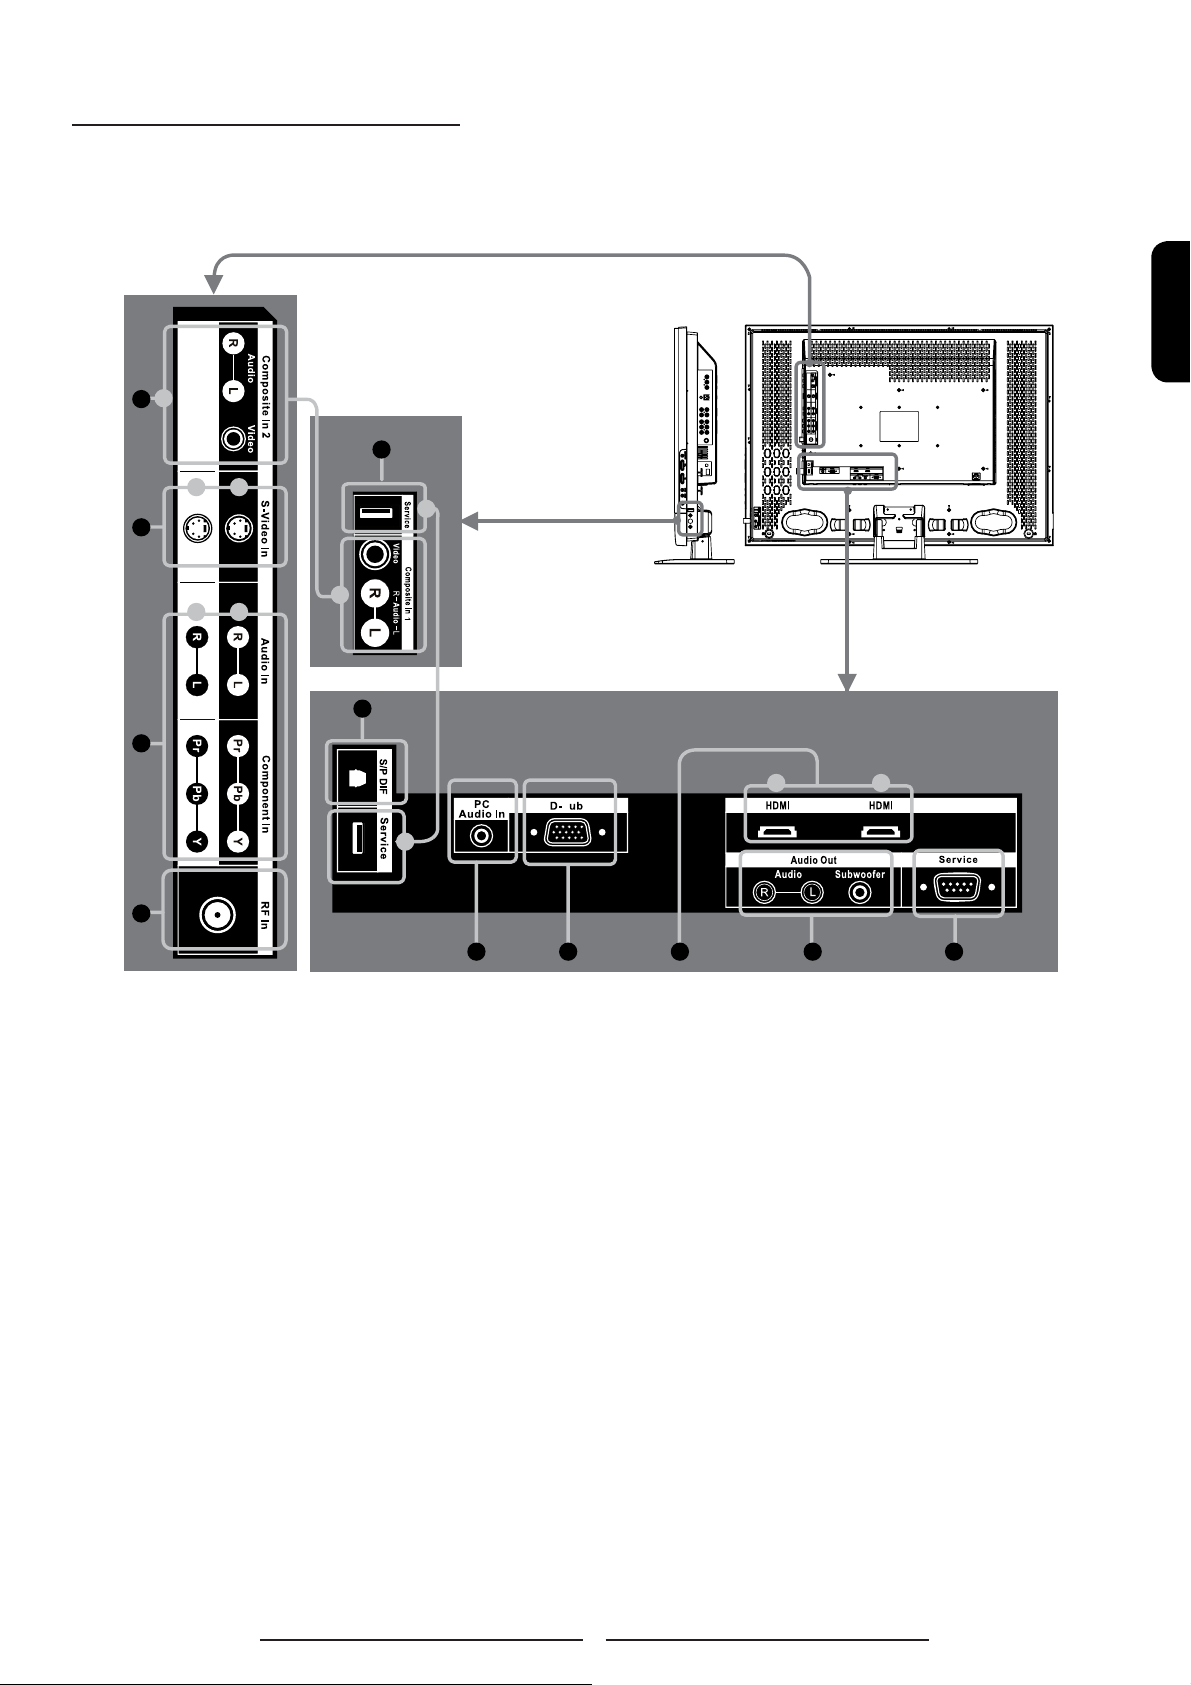
Overview of the TV – Connections
Side and Rear Panel
b
1
5
cd
2
g
ENGLISH
e
f
3
4
a
6
i j
S
h
87 9 10 11
5
Page 11

Jack Descripaion
1( a/b ) Composite In
2 ( c/d ) S-Video
Connects to the Composite video and audio output jacks on your VCR or other video
devices.
Connect to the S-Video output jack on your VCR or other video devices for a sharper
picture.
3 ( e/f ) Component In Connect to your TV’s component video (YPbPr) and audio (L/R) jacks.
4 RF In Connect to an antenna or to a cable TV system.
5 ( g/h ) Service Port Only for service use.
6 S/P DIF Connect to a digital audio component.
7 PC Audio In Connect to the audio output jack of your PC.
8 D-Sub Connect to the video output on your PC. Please use additional cable for sound.
9 ( i/j )
HDMI
(High Defi nition
Multimedia
Interface)
Connect to the HDMI jack of the TV with an HDMI output, such as set-top box, DVD
player, etc. You can also connect the TV with a DVI output by using an HDMI-to-DVI
cable or HDMI-to-DVI adapter. Please use an audio cable, when using HDMI-to-DVI
cable or adapter.
10 Audio Out Connect to the audio input jacks on your Amplifi er/Home theater.
11 Service Port Only for service use.
6
Page 12

Accessories
ENGLISH
LCD - TV
User’s Manual Remote Control & Batteries
Power Cord
7
Page 13
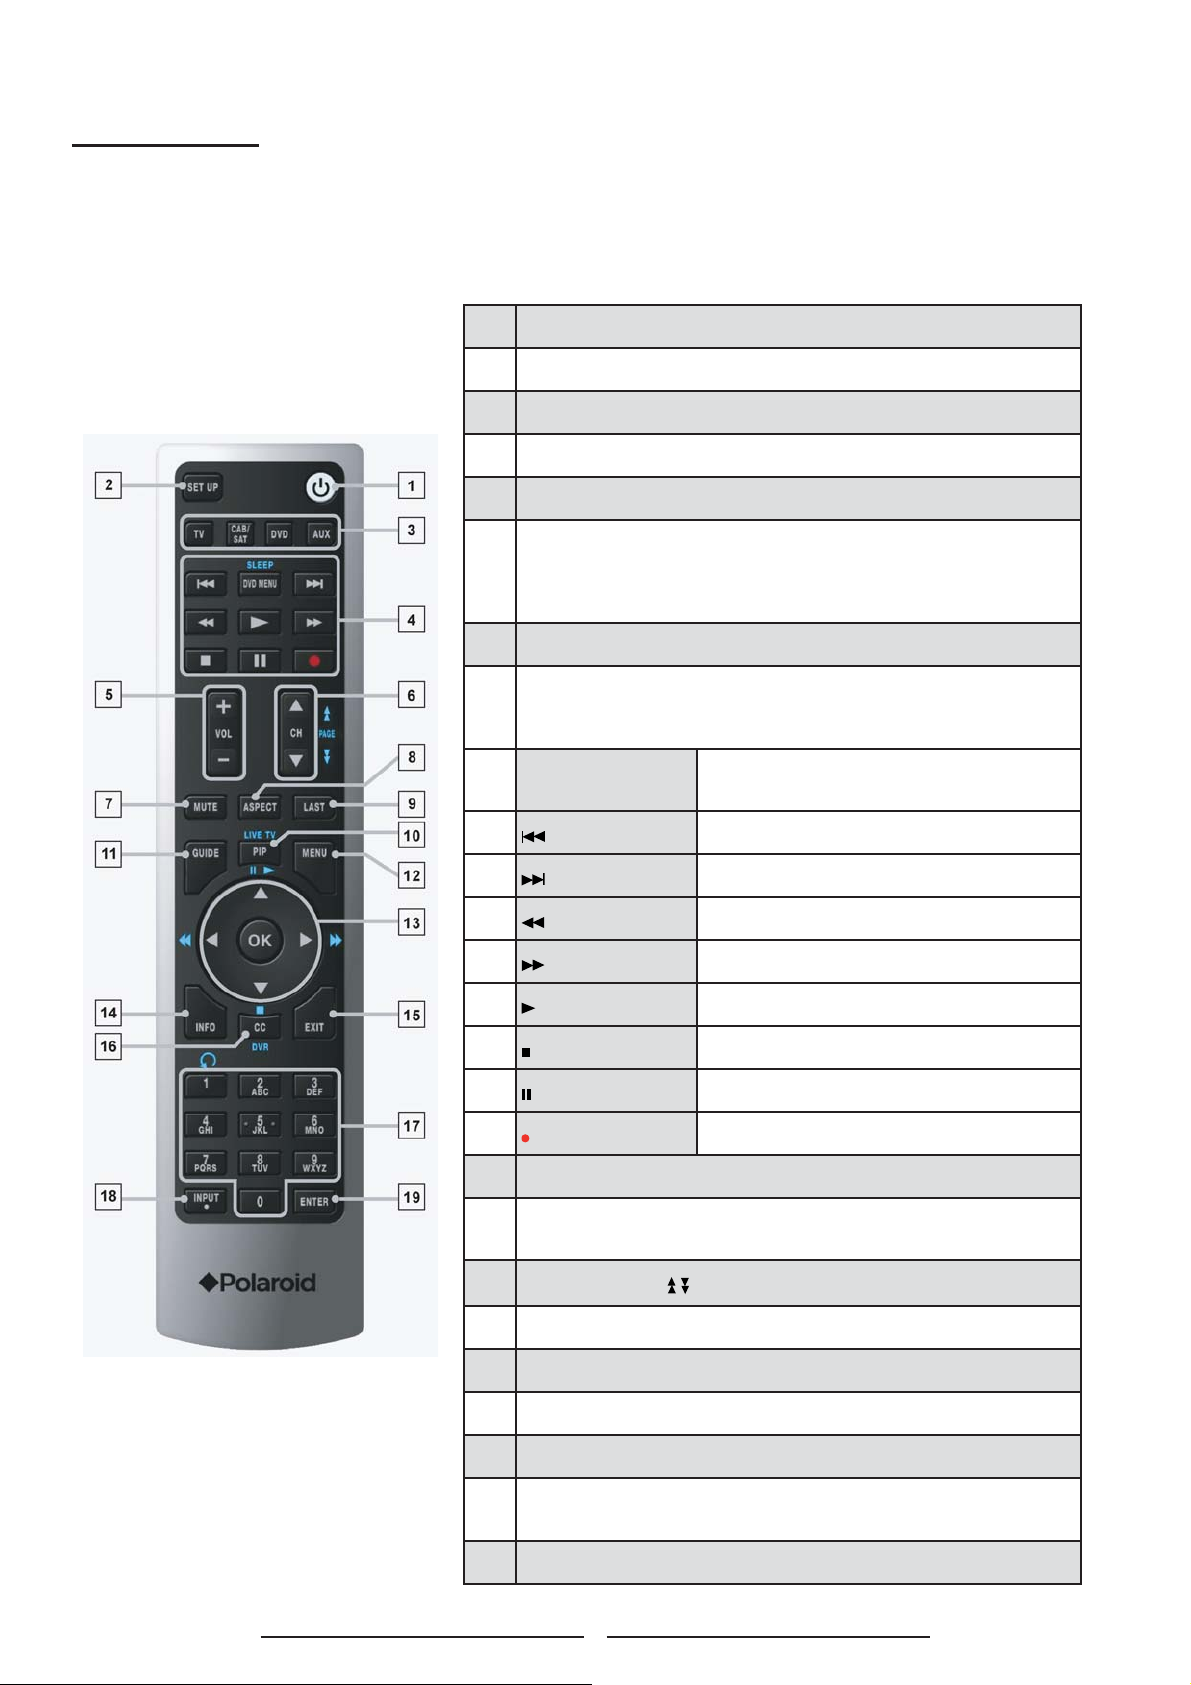
Remote Control
This universal remote control can operate up to four devices. When using the remote control in
mode, please point the remote directly toward the Remote Control Sensor on the front
TV
panel.
If you want to select other devices, simply press one of the buttons: TV, CAB/SAT, DVD or AUX.
1. Power
Turn the device on or off
2. SET UP
Press to program the remote control to operate other devices.
3. TV, CAB/SAT, DVD, AUX
These buttons are designed to operate and control external
devices. Please select one of these buttons fi rst to operate
your selected external device. See page 53-54 for Programming Remote Control.
4. Control buttons
When you switch to CAB/SAT,DVD or AUX mode,these
buttons operate the video device you have programmed into
the remote control.
DVD MENU
/ SLEEP.
Toggles the device menu.
Skip Reverse
Skip Forward
Rewind
Fast Forward
Play
Stop
Pause
Record
5. VOL + -
Press to increase or decrease the volume.If the audio was
muted, pressing VOL + / - will un-mute the audio.
6.
CH ▲▼/ PAGE
Press to change channel.
7. MUTE
Temporarily turn off the sound.
8. ASPECT
Toggle the picture mode between Normal→Full Screen→
Zoom→Subtitle.
9. LAST
8
Page 14
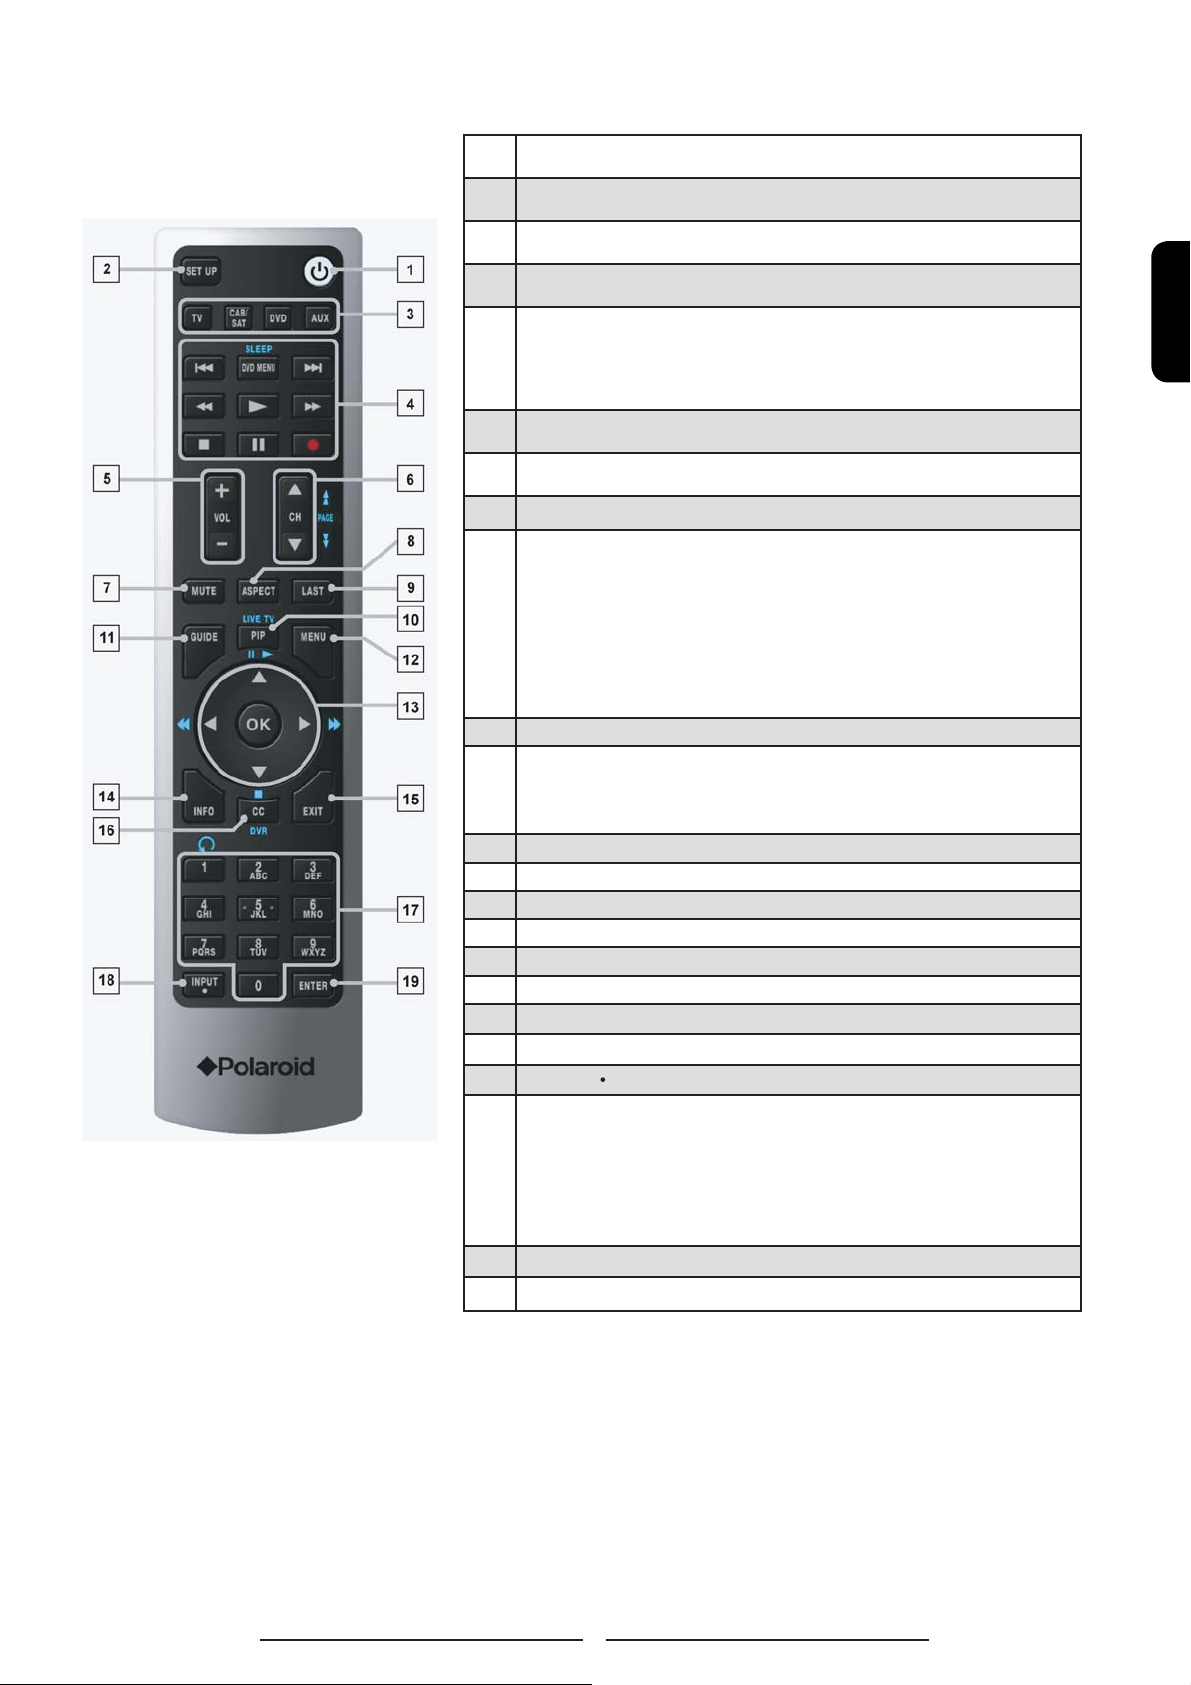
Jumps back and forth between two channels.
10. PIP/LIVE TV
Your TV may not support PIP/LIVE TV.
11. GUIDE
If the system uses TV Guide, the Guide button switches to TV
Guide. If not, and the system is in TV mode, the Guide button switches to broadcast mode and displays the Show Title
Display (with Date and Time).
12. MENU
Toggle the main menu.
13. ▲▼◄ ►
Press to move the on-screen display (OSD) highlight in the
desired direction. In TV mode, please press MENU on the remote to enable OSD picture fi rst and press▲▼◄ ► to adjust
settings.
Arrow keys enables the Show Title Display (with Date and
Time).
The Right ►arrow button will access to the sub-menu.The Left
◄ arrow button will navigate back through the menu
OK
Press to select a currently highlighted on-screen choice.
Without the presence of any UI (User Interface)
screens,including OSD (on-screen display), the button enables Show Title Display (with Date and Time).
14. INFO
See information on the current broadcast.
15. EXIT
Press to exit all UI screens and menus.
16. CC/DVR
Press to enable or disable closed caption.
17. 0 – 9 NUMERIC BUTTONS
To manually select channels.
18. INPUT/
To select the video input source, be sure to exit OSD. The
sequence is TV→Video 1→Video 2→YPBPR 1→YPBPR 2→
PC→HDMI 1→HDMI 2.
To select following sub-channels which display “.“, use this
button along with 0-9 buttons to select digital channels, i.e
12.1.
ENGLISH
19. ENTER
Press to access the sub-menu.
9
Page 15
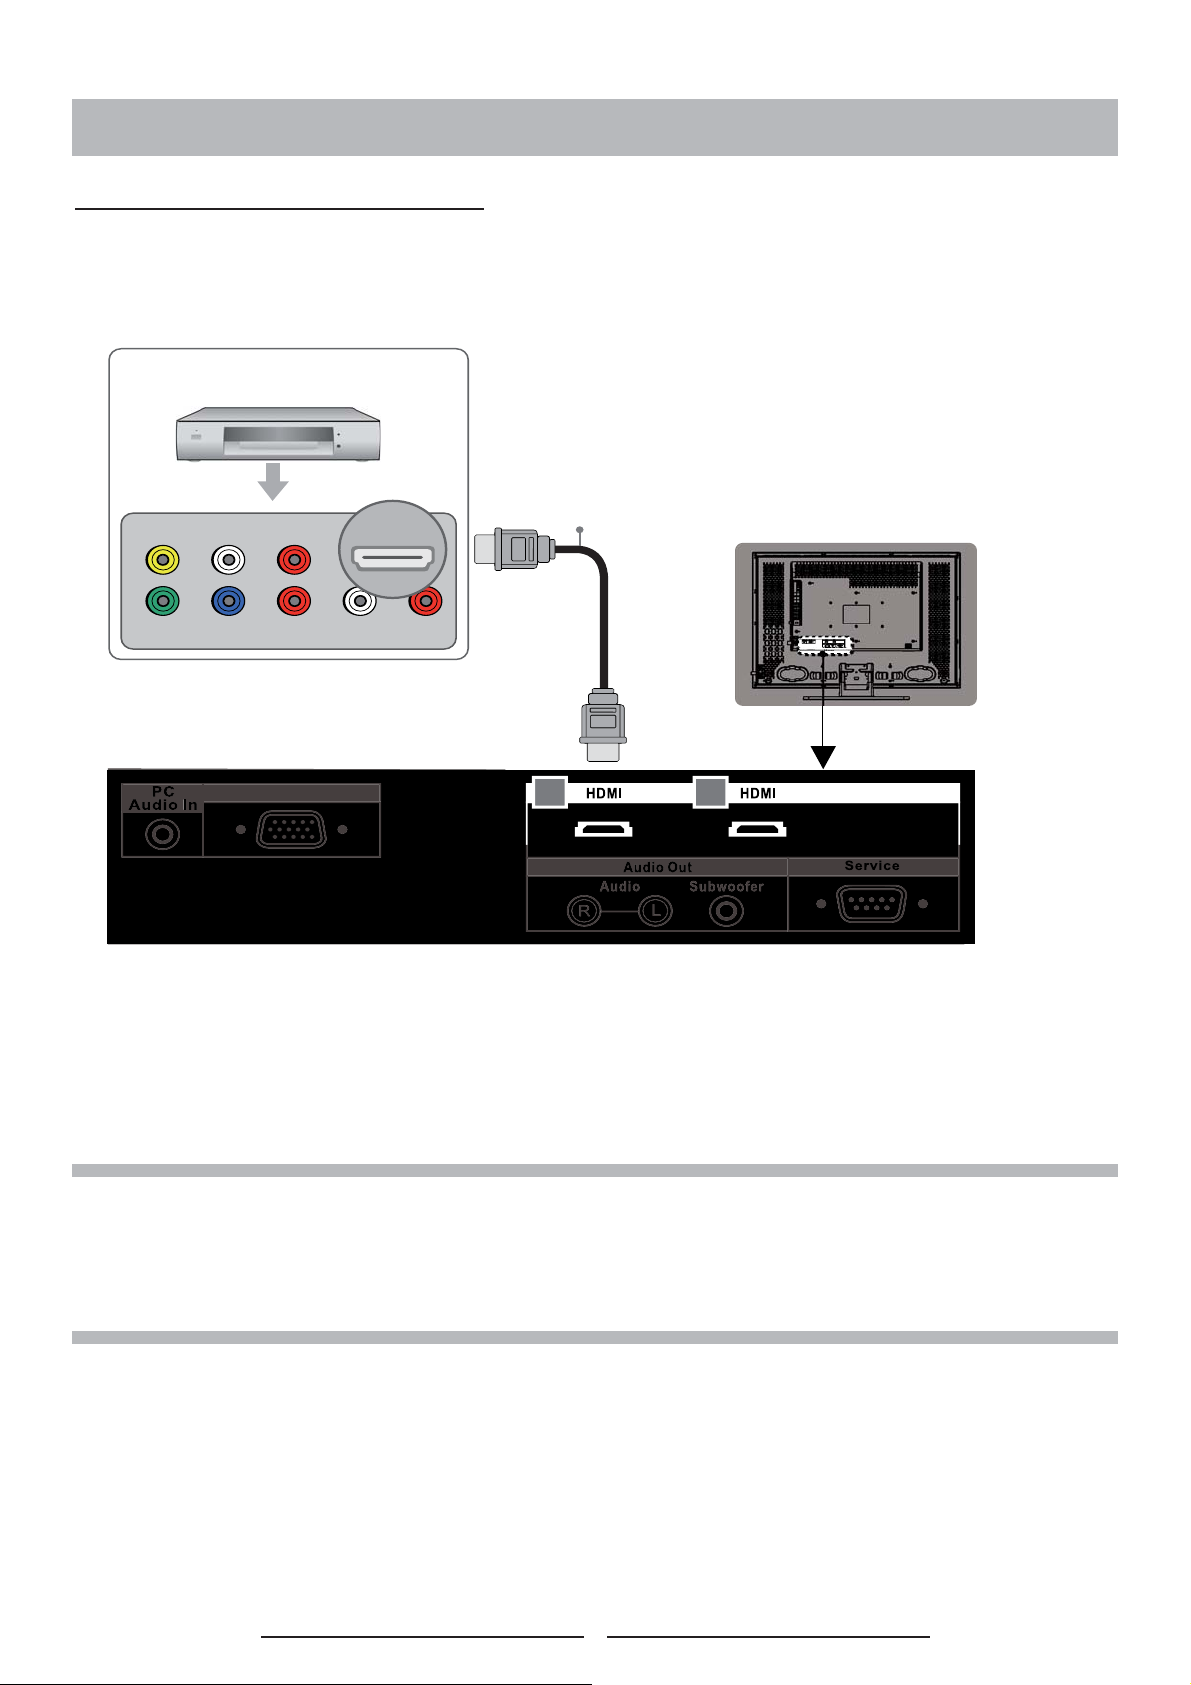
CONNECTIONS & APPLICATIONS
Connecting Video Devices via HDMI
* This can be applied only if there is the HDMI Output connector on the external device.
Video Device
HDMI Cable
VIDEO L R
HDMI
LRYPbPr
D-Sub
NOTE 1 : Video Device – e.g.: DVD Player, Set-top Box…etc.
NOTE 2 : HDMI - High-Defi nition Multimedia Interface
NOTE 3 : No sound connector is needed for an HDMI to HDMI connection.
NOTE 4 : Either HDMI 1 or HDMI 2 will work.
NOTE 5 : Cables not included
1 2
10
Page 16
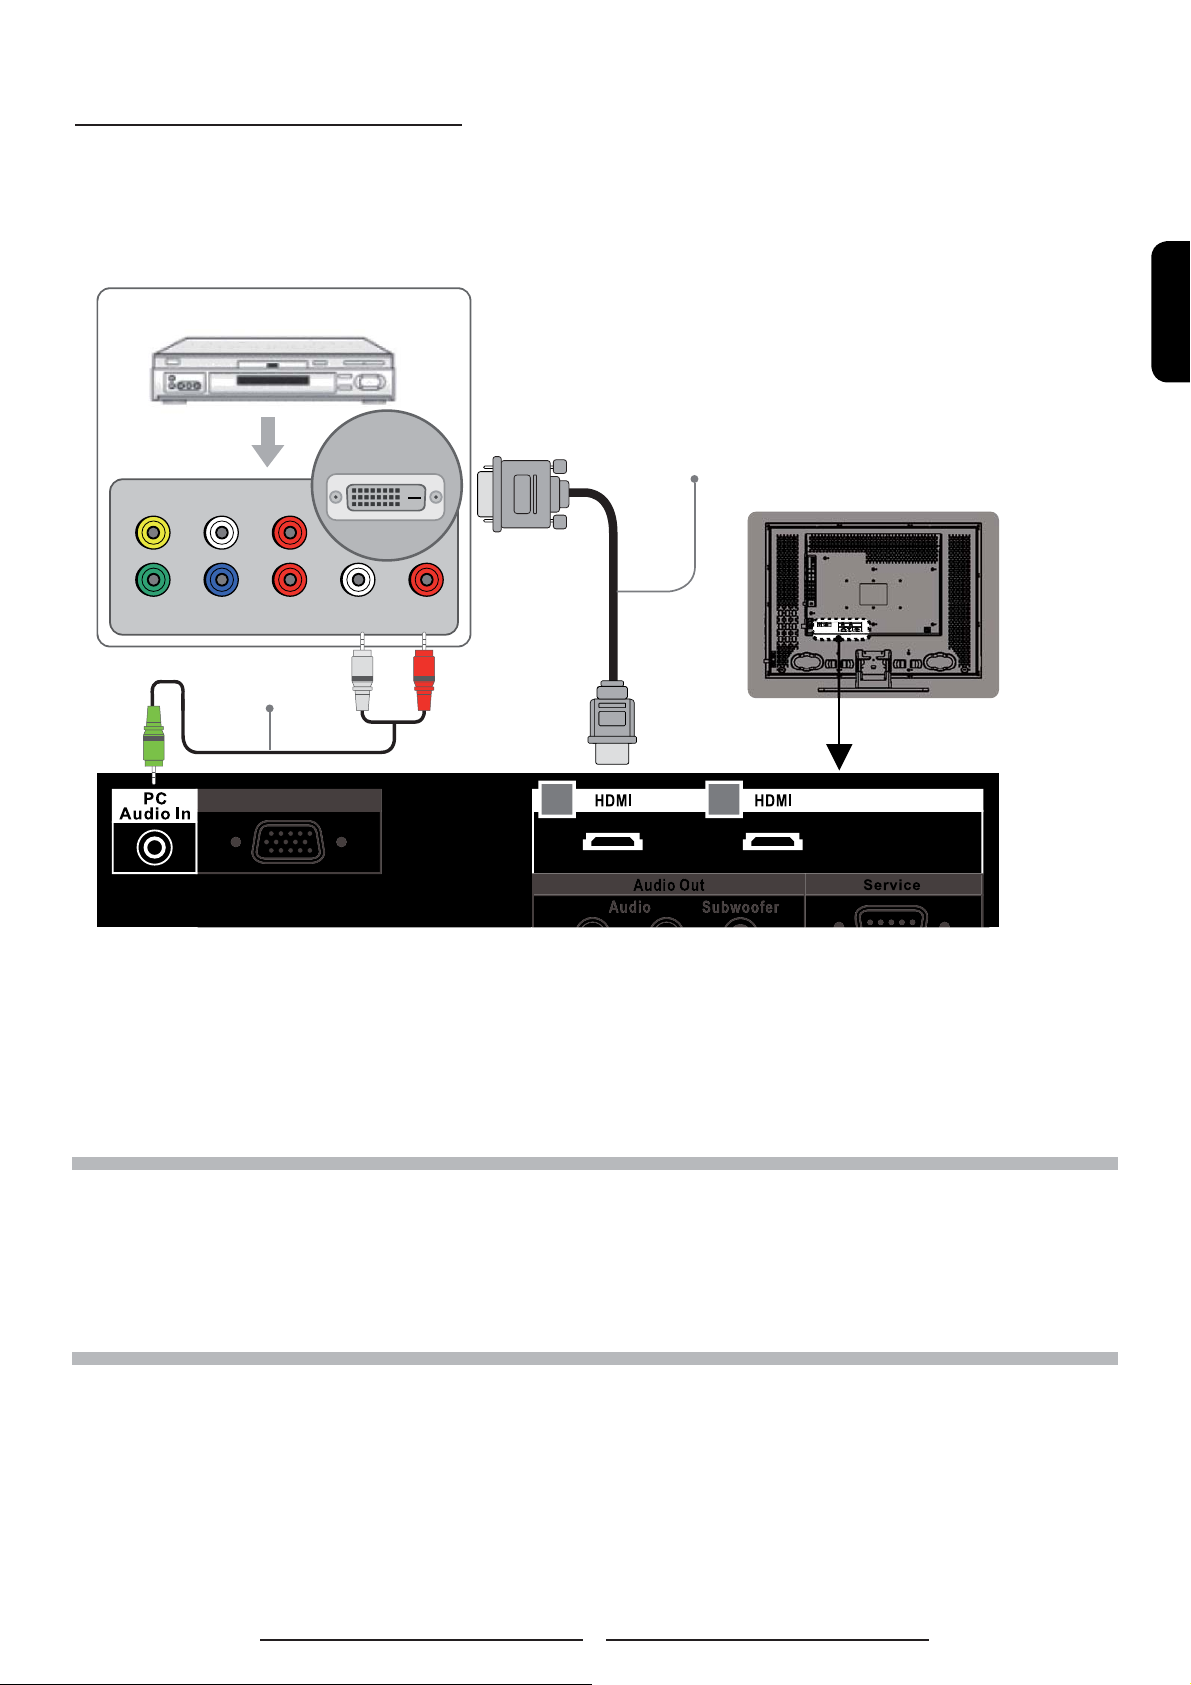
Connecting Video Devices via DVI
* This can be applied only if there is the DVI Output connector on the external device.
Video Device
HDMI-to-DVI Cable
DVI / HDCP
VIDEO L R
LRYPbPr
Audio Cable
or HDMI-to-DVI adapter
ENGLISH
D-Sub
NOTE 1 : To receive video, connect a HDMI-to-DVI cable or HDMI-to-DVI adapter between the HDMI connector
on the TV and the DVI connector on the DVD player/ Set-top box.
NOTE 2 : To receive sound, connect an audio cable between the PC Audio In jack on the TV and Audio Out jack
on the DVD player/ Set-Top box.
NOTE 3 : Either HDMI 1 or HDMI 2 can work appropriately.
NOTE 4 : Cables not included.
1 2
11
Page 17
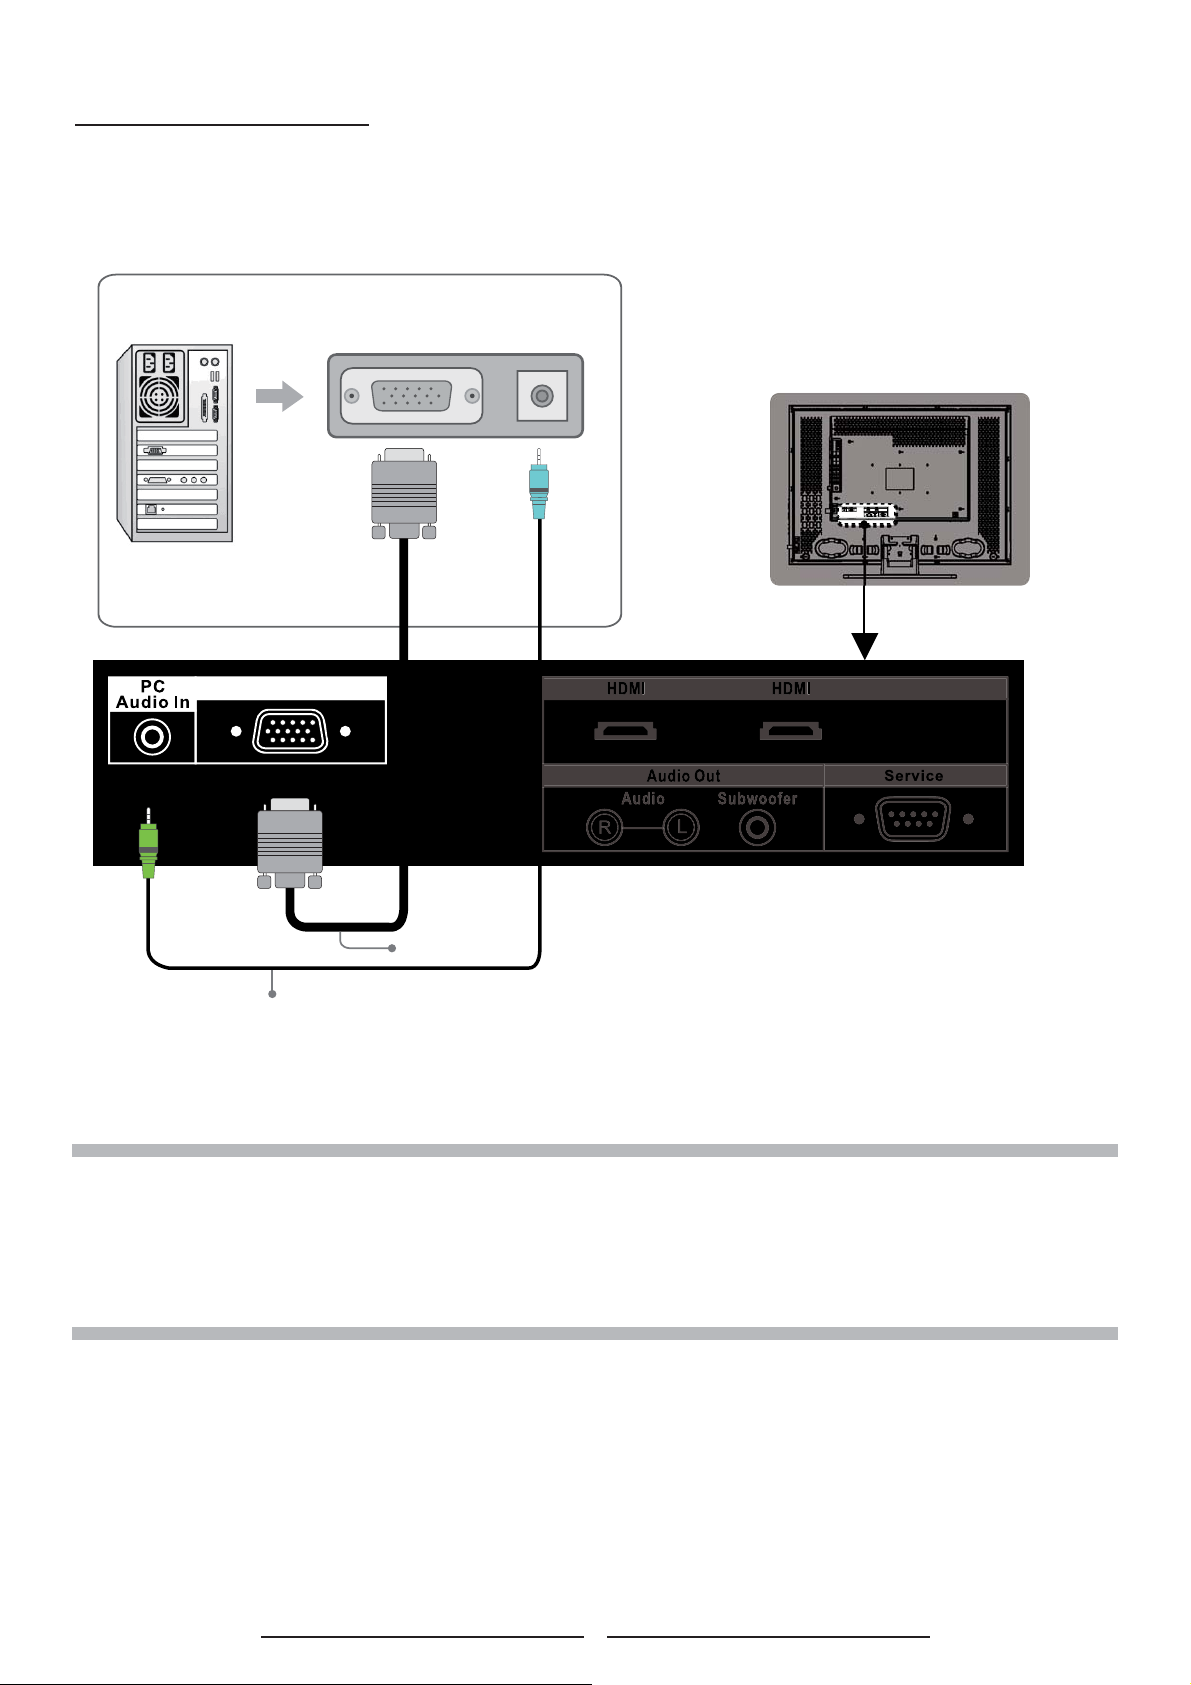
Connecting PC via D-SUB
PC
D-Sub
D-SubPCAudio Out
VGA Cable
Audio Cable
NOTE 1 : To receive video, connect a VGA cable between D-Sub connector on the TV and the D-Sub output
connector on your PC.
NOTE 2 : To receive sound, connect a PC audio cable between PC Audio In jack on the TV and the Audio Out
jack of the sound card on your PC.
NOTE 3 : Cables above not included.
12
Page 18
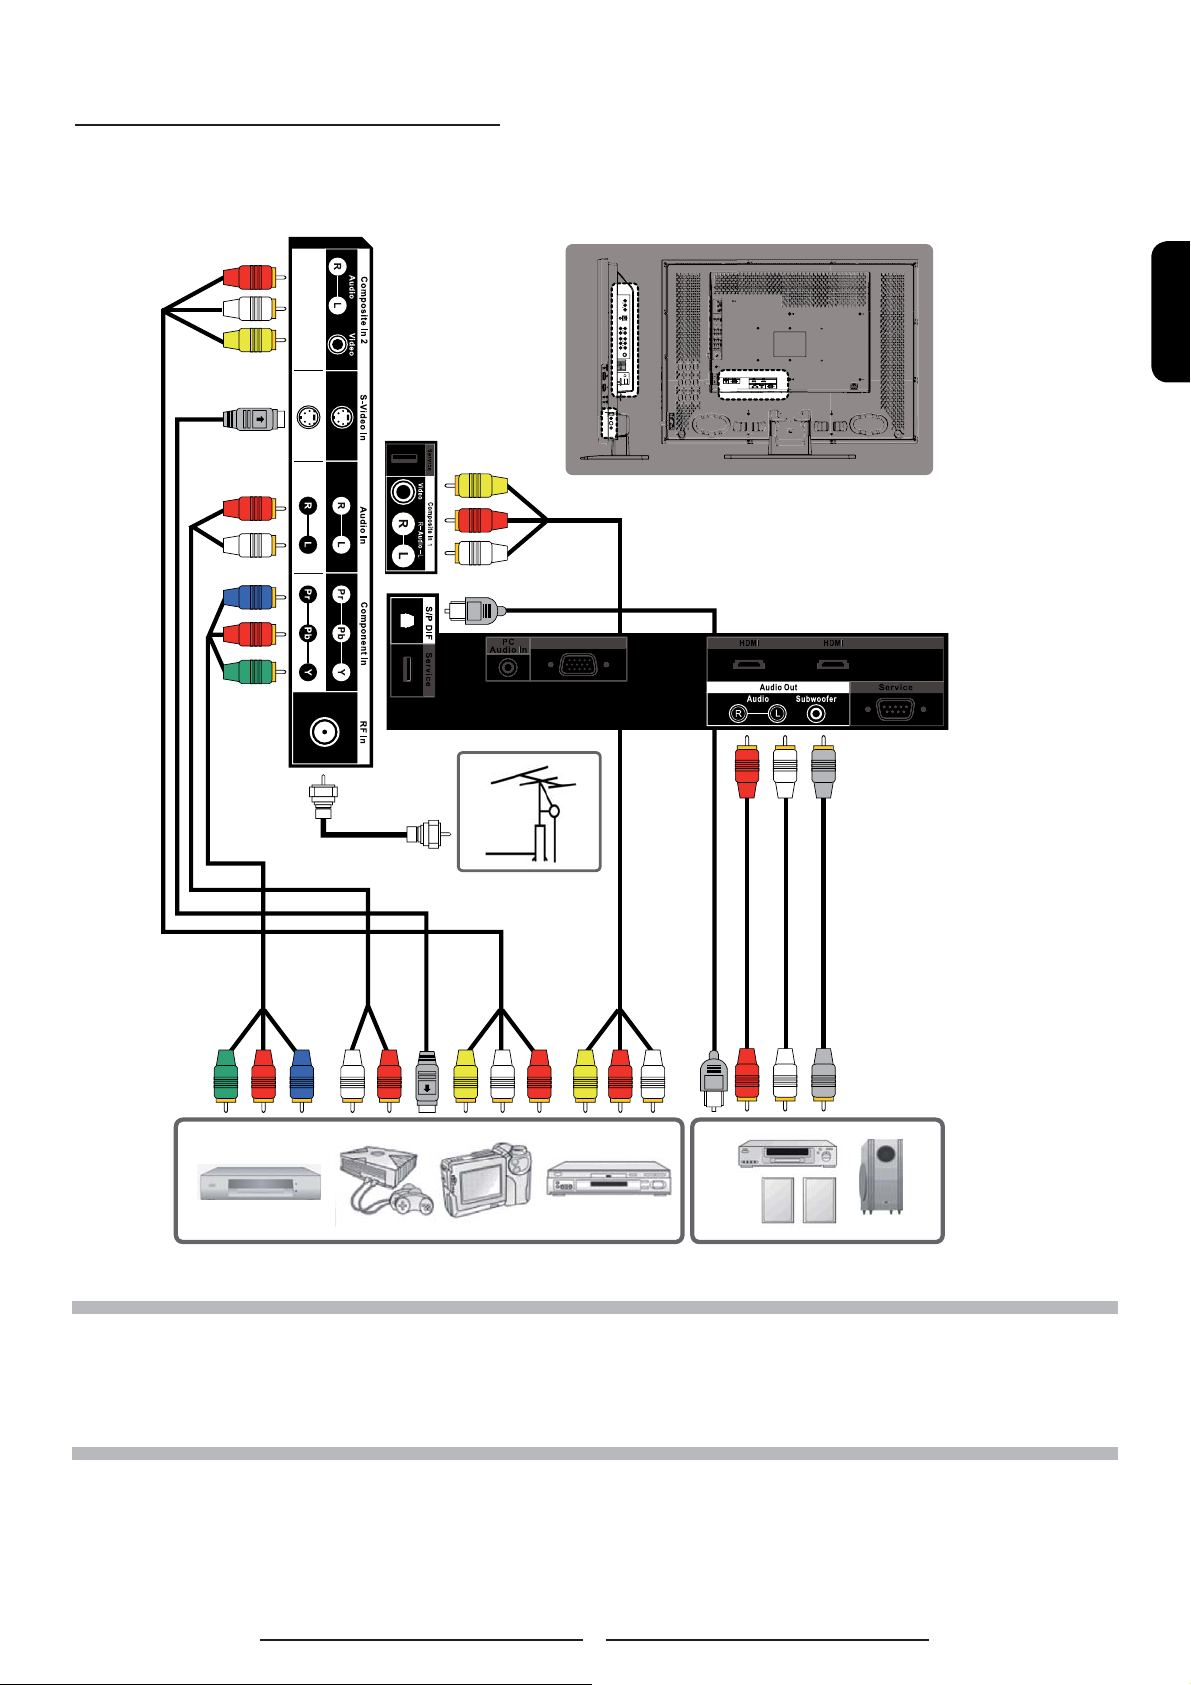
Connecting Devices via Other Cables
ENGLISH
D-Sub
NOTE 1 : To enjoy best audio and video quality, the best to basic level of video quality is Component, S-video,
Composite (A/V) and RF.
NOTE 2 : When using Composite or S-Video cables, make sure you use an audio cable for sound.
NOTE 3 : Cables not included.
13
Page 19

CONTROLS & ADJUSTMENTS
General Adjustments
Turning the LCD TV On and Off
Turn On
Connect the Power Cord into the AC IN located in the back of the
display and the other end to the power outlet on the wall. Press the
Power button on the remote control or right side of the TV to turn
the TV on. Please refer to page 16 to adjust Power Consumption
settings.
The power status light found in the lower right corner of the TV
indicates the following :
BLUE LIGHT ─ power on
PURPLE LIGHT ─ Standby, power saving
(only available in PC mode)
RED LIGHT
32” TVs
37” & 42” TVs
─ power off
AC IN
BLUE
14
Page 20

Turn Off
Press the power button on the remote control or right side of
the TV to turn the TV off.
RED
NOTE : No Signal appears if there is no input source. The TV will power off automatically if an input source is
not selected.
ENGLISH
15
Page 21
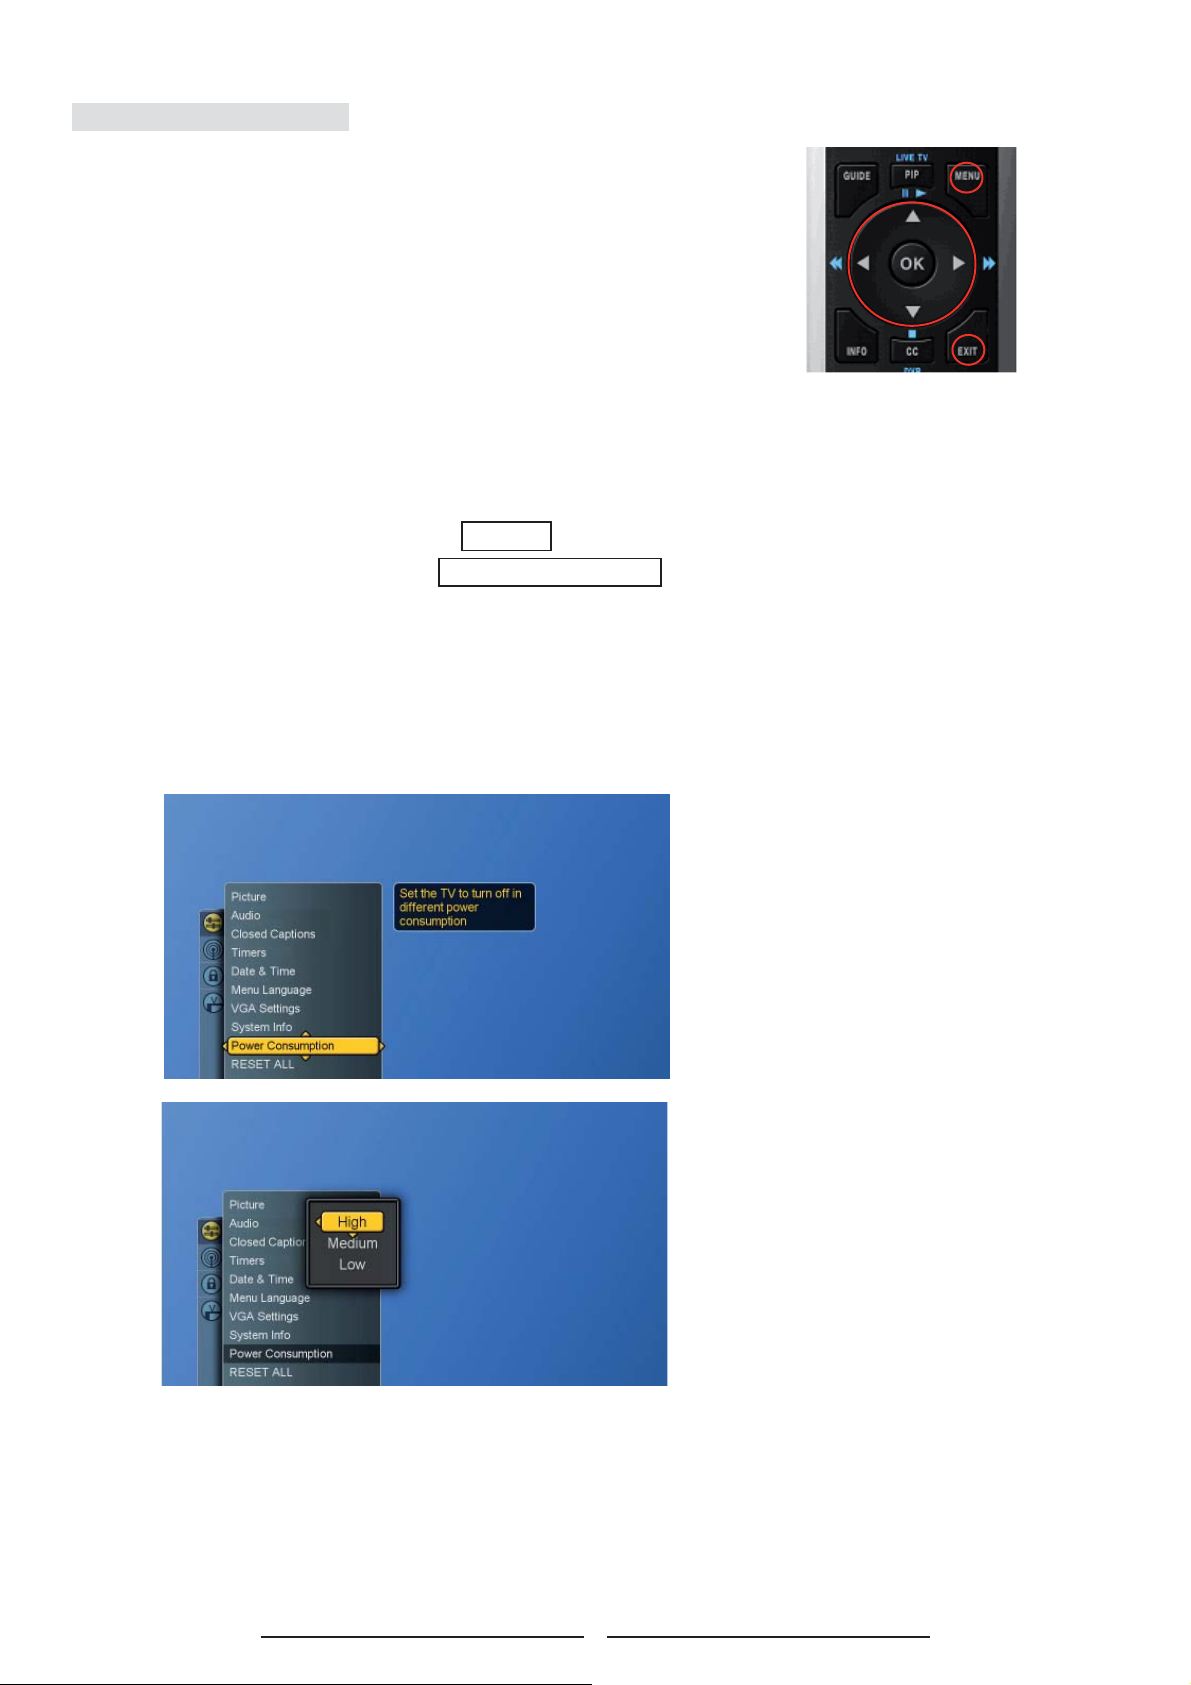
Power Consumption
Power Consumption is a power management technique
which helps to set up the POWER OFF status for the LCD TV
set. There are three modes: Low/Medium/High
Low : The power consumption is no more than 5W in the POWER OFF status.
It takes about 12-15 seconds to turn on the LCD TV set.
Medium : The power consumption within the fi rst hour is less than 35W and
you can turn on TV around 3 seconds. After one hour , the power consumption
is switched to around 5W and it takes 12-15 seconds to turn on the LCD TV.
High : The LCD TV set can be turned immediately and the maximum power
consumption would be less than 35W.
1. Press the MENU button to display the main menu.
2. Press the ▲▼ buttons to select Settings .
3. Press ► / ▼ buttons to select Power Consumption .
4. Press ► button to display the sub-menu.
5. Press ▲▼ and OK buttons to select Low, Medium or High.
6. Press EXIT button to exit all menu or press ◄ button to
return to the previous screen.
16
Page 22
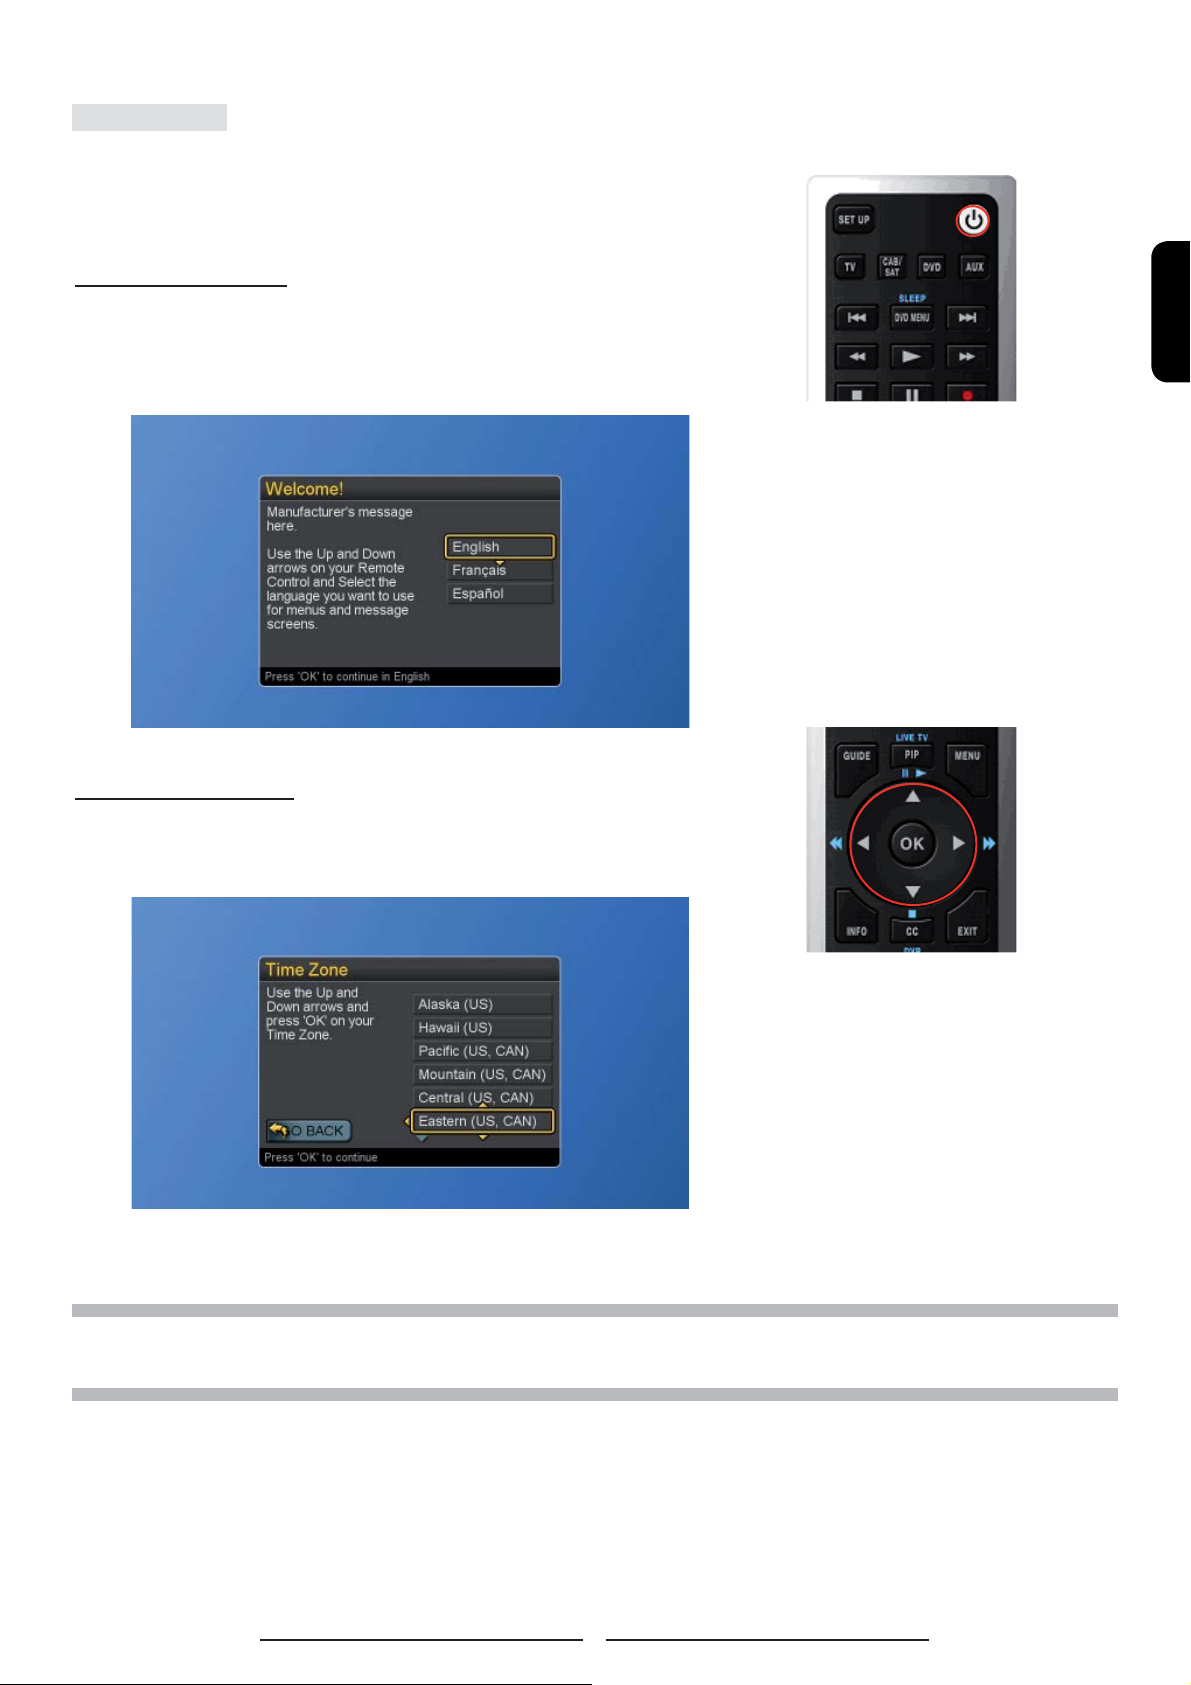
Initial Setup
When the system powers on for the fi rst time, the initial auto
installation is enabled.
Language Selection
1. Press the Power button on the remote control. A welcome
message is displayed. Use the ▲▼ buttons to select the
language you prefer, and press OK button to continue.
Time Zone Selection
2. Press the ▲▼ buttons to select on your Time Zone, and
press OK button to continue.
ENGLISH
NOTE : It takes around 5 to 30 minutes to fi nish the Initial Setup process. The time taken for Initial Setup is
varied according to the number of scanned channels.
17
Page 23
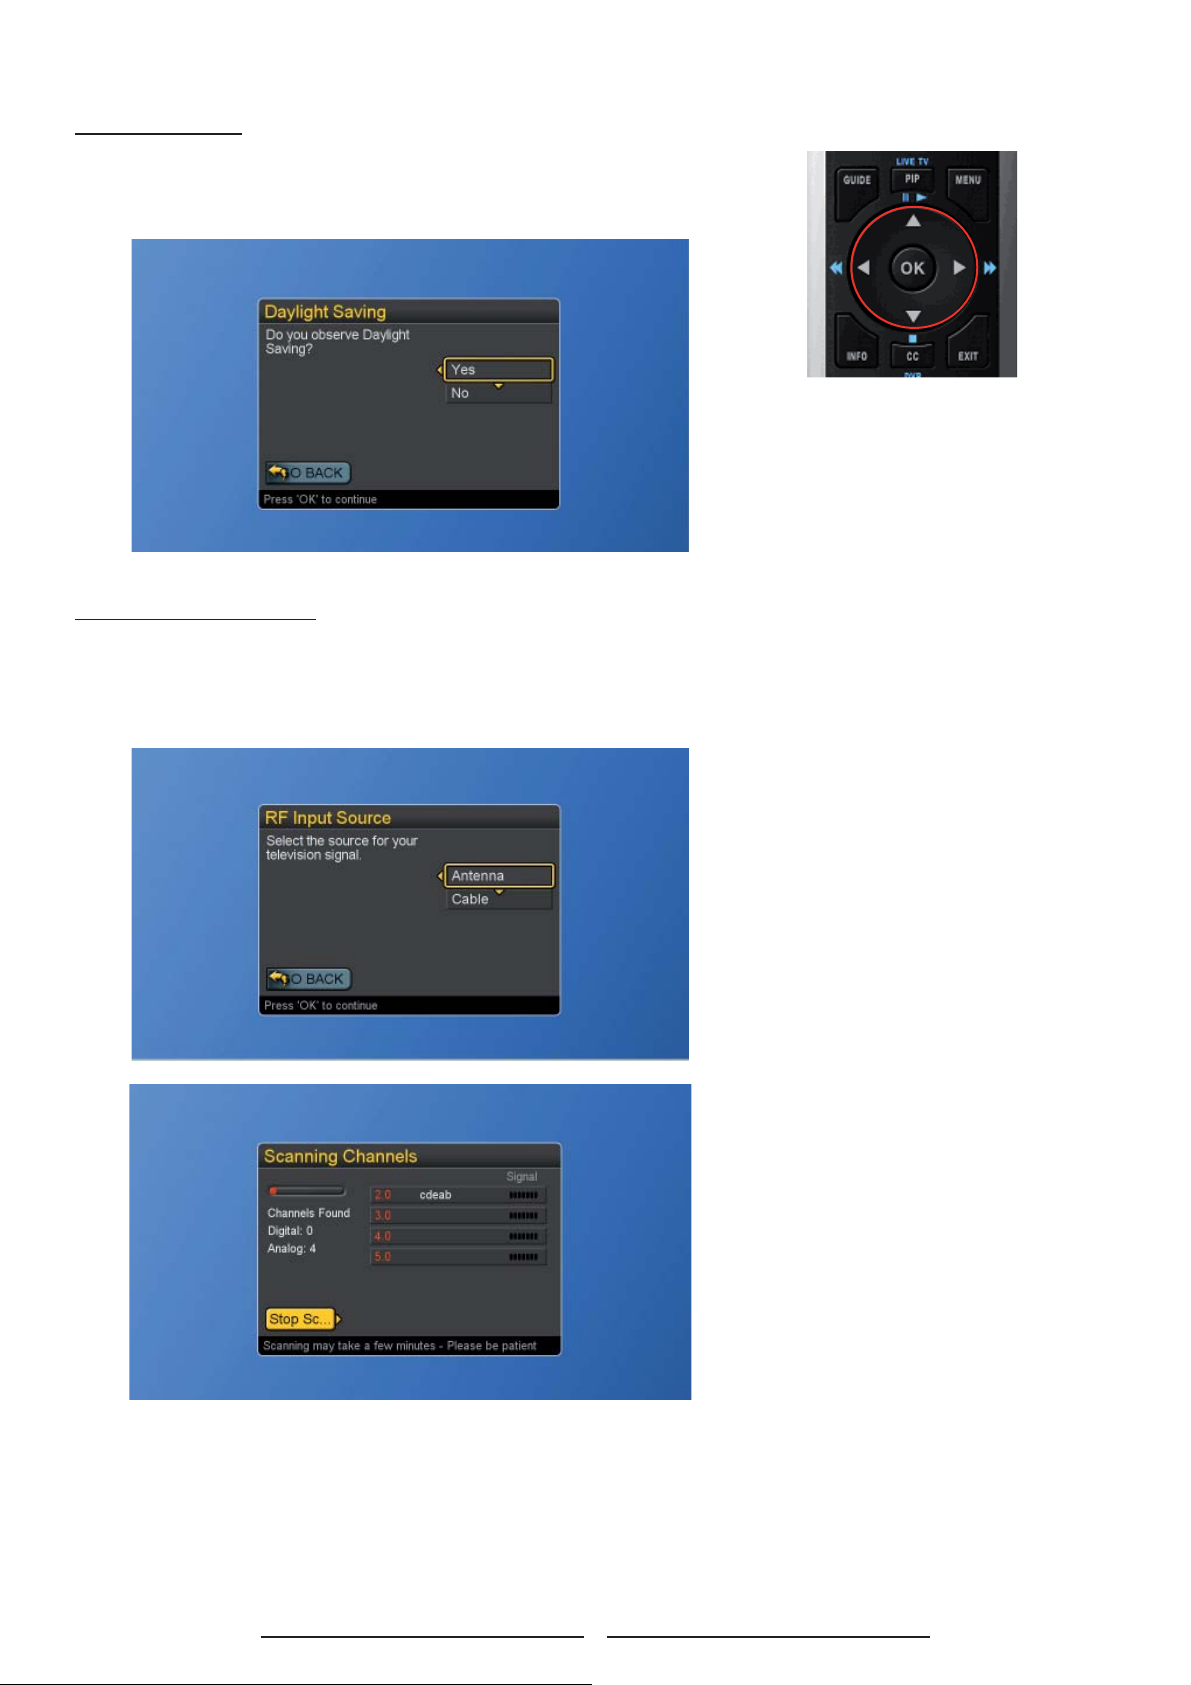
Daylight Saving
3. Press ▲▼ buttons to set the Daylight Savings, and press
OK button to continue.
Input Source Selection
4. Press ▲▼ buttons to select the source for your TV signal,
and press OK button to start scanning. If the user selects
Antenna, the next setup wizard is presented.
18
Page 24
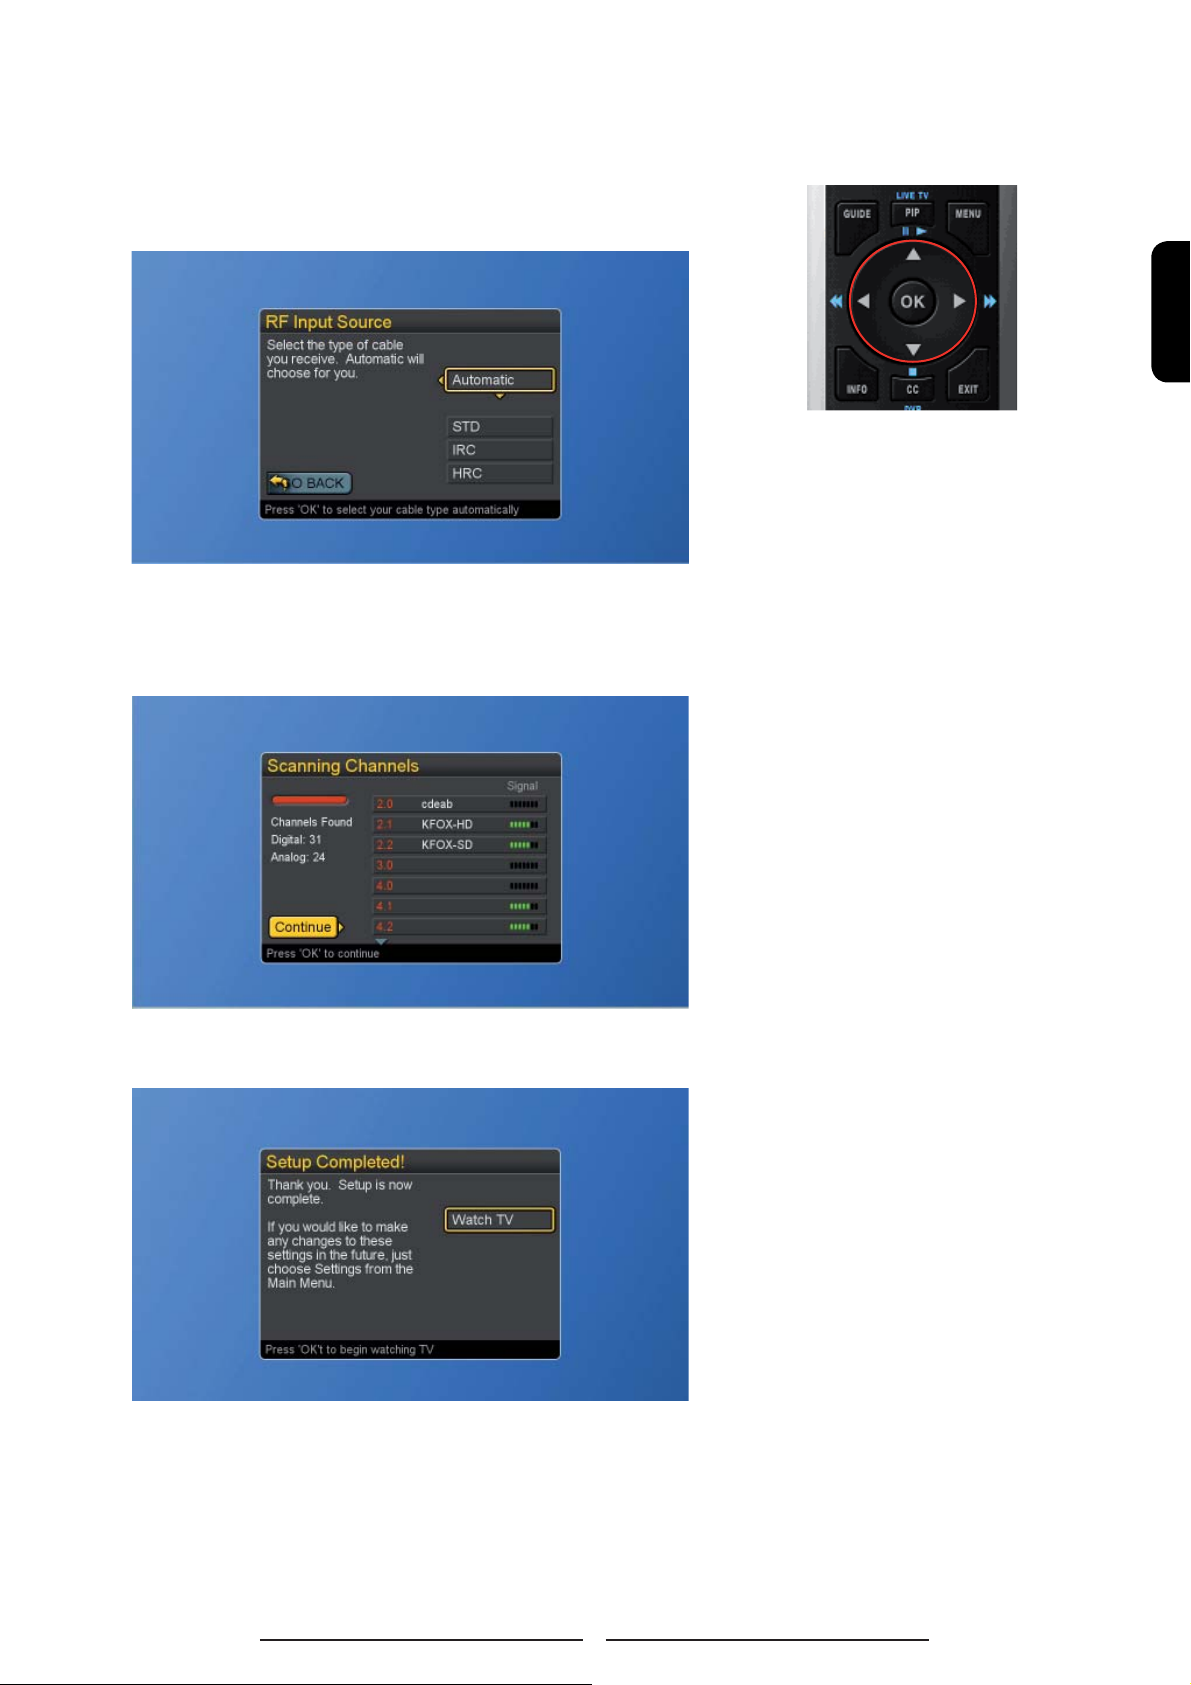
When “Cable” Source is selected, please toggle Automatic,
STD, IRC, or HRC. To have all channels completely scanned,
please select STD, IRC or HRC.
5. After all the available channels are stored, the channel list will
appear.
ENGLISH
6. Press OK and start to watch TV.
19
Page 25
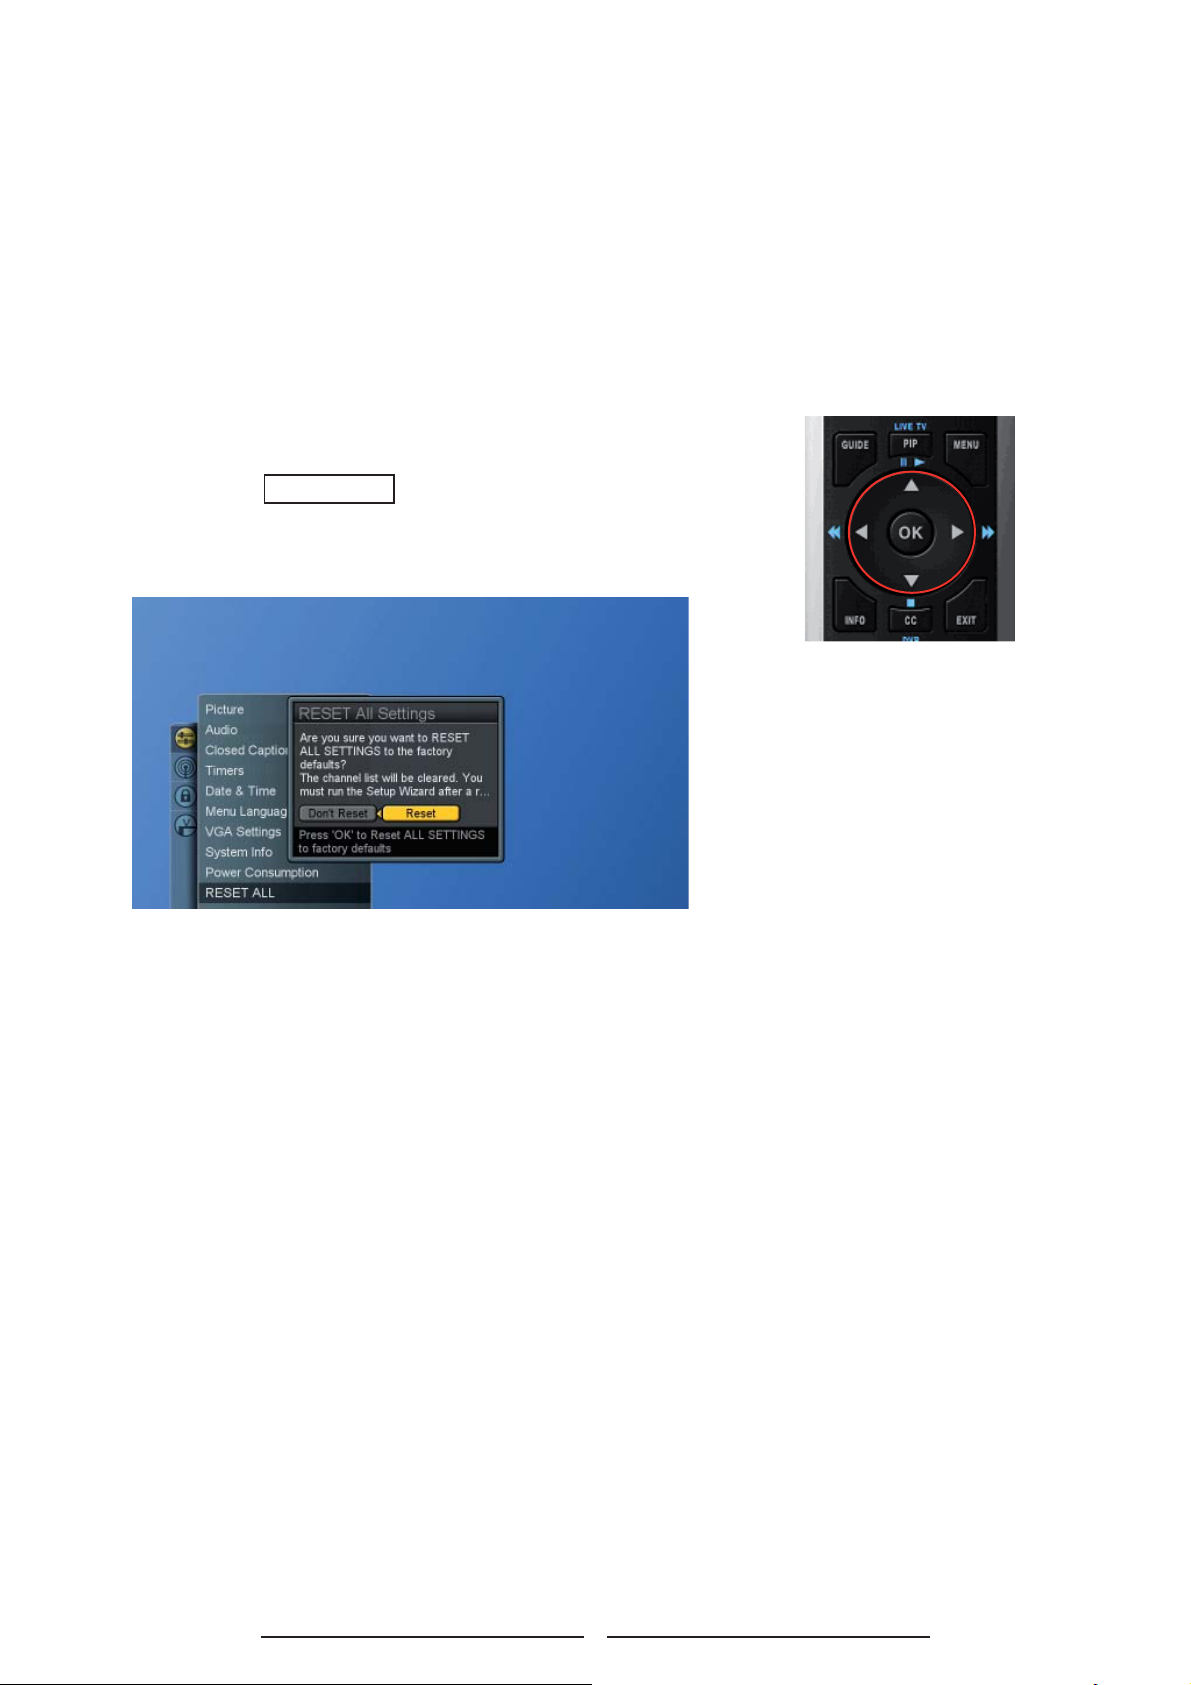
Reset the features
The user can reset all settings back to factory settings,
including
the channel map, all Program Info, Favorite channel lists, etc.
Following Reset, the Setup Wizard resumes to factory default
mode.
If a PIN is set, the PIN entry dialog is displayed before the “Reset
All” Settings dialog box, even if Locks are temporarily off. If no
PIN is set, the dialog is displayed immediately.
1. Press the MENU button to display the main menu.
2. Press the ▲▼ buttons to select Settings and press ► / ▼ buttons
to access the RESET ALL screen.
3. Press the ► to select “Reset” and OK buttons to reset all
settings.
20
Page 26
Changing Channels
Using the Channel buttons
When you press the CH▲/▼buttons, the TV changes
channels in sequence. You will see all the channels that the
TV has memorized. You will not see channels that were not
memorized.
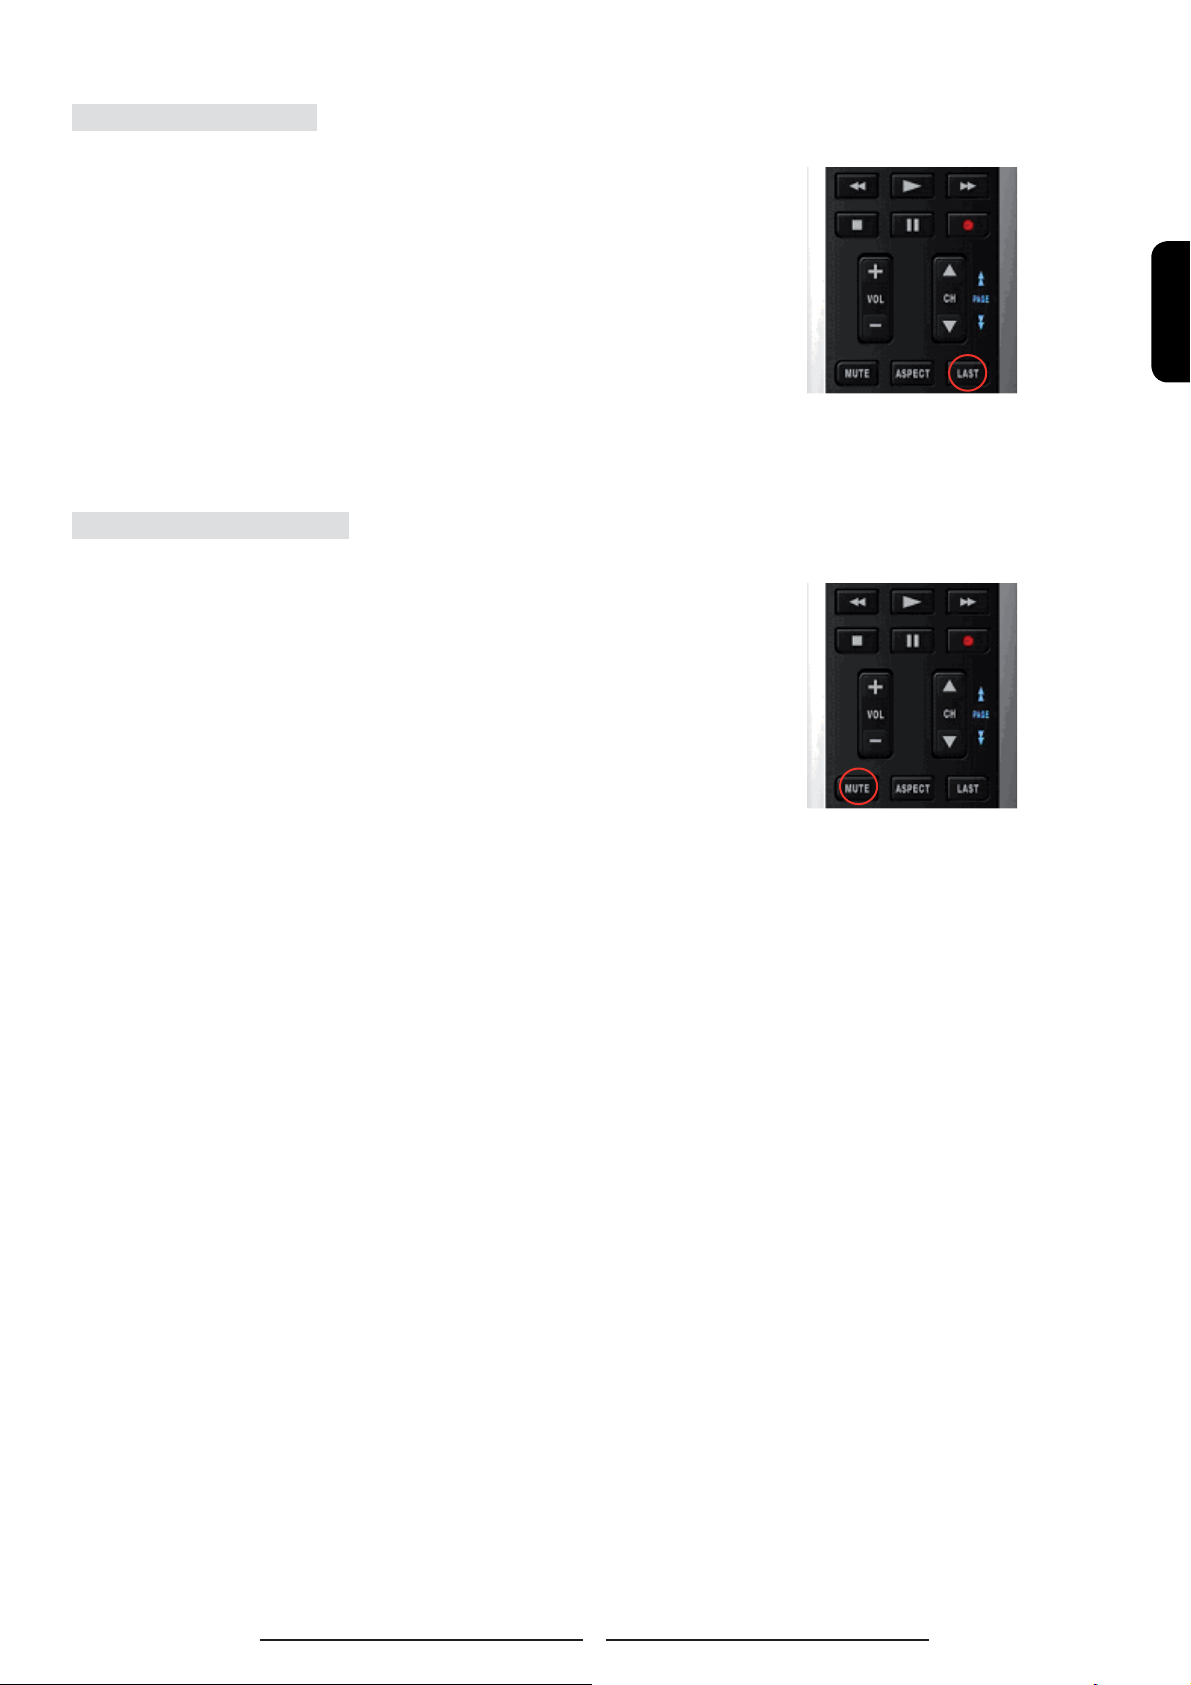
Using the Last button to select the previous channel
To quickly switch between two channels, tune to one channel,
then use the number button to select the second channel. Press
the LAST button to quickly alternate between them.
Adjusting the Volume
Using Volume Control
Press the VOL + / – buttons to increase or decrease the
volume.
Using Mute
At any time, you can turn off the sound using the MUTE button.
1. Press the MUTE button and the sound turns off.
2. Press MUTE again or VOL + / – buttons to return audio back
to the previous volume level.
ENGLISH
21
Page 27

Switching Source
1. Refer to page 10~13 and connect external devices.
2. Press INPUT button repeatedly to choose the desired
source.
Viewing the Menus and On-Screen Displays
Y ou can use the control buttons on the right side of the TV or use
the remote control to viewing the menus.
1. With the power on, press the MENU button.
2. The main menu appears on the screen
3. Press the ▲▼◄ ► buttons to access the sub-menus and
make adjustments.
4. Press EXIT button to exit all menu or press MENU button to
return to the main menu.
22
Page 28

Switching Language Modes
1. Press the MENU button to display the main menu.
2. Press the ▲▼ buttons to select Settings.
3. Press ► / ▼ buttons to select Menu Language.
4. Press ► button to display the sub-menu.
5. Press ▲▼ and OK buttons to select the language.
6. Press EXIT button to exit all menu or press ◄ button to
return to the previous screen.
ENGLISH
23
Page 29

Channel Control
If you did not perform a channel scan during the “Initial Setup”,
please follow the instructions below:
Memorizing Channels
1. Press the MENU button to display the main menu.
2. Press the ▲▼ buttons to select Channels.
3. Press ► / ▼ buttons to select Scan Channels.
4. Press ► button again to display the menu and then press
▲▼ buttons to select the source for your signal.
If users select Cable, the system will detect and select which
cable (i.e. STD, IRC or HRC) is used automatically.
5. Press OK button to display Scan screen.
24
Page 30
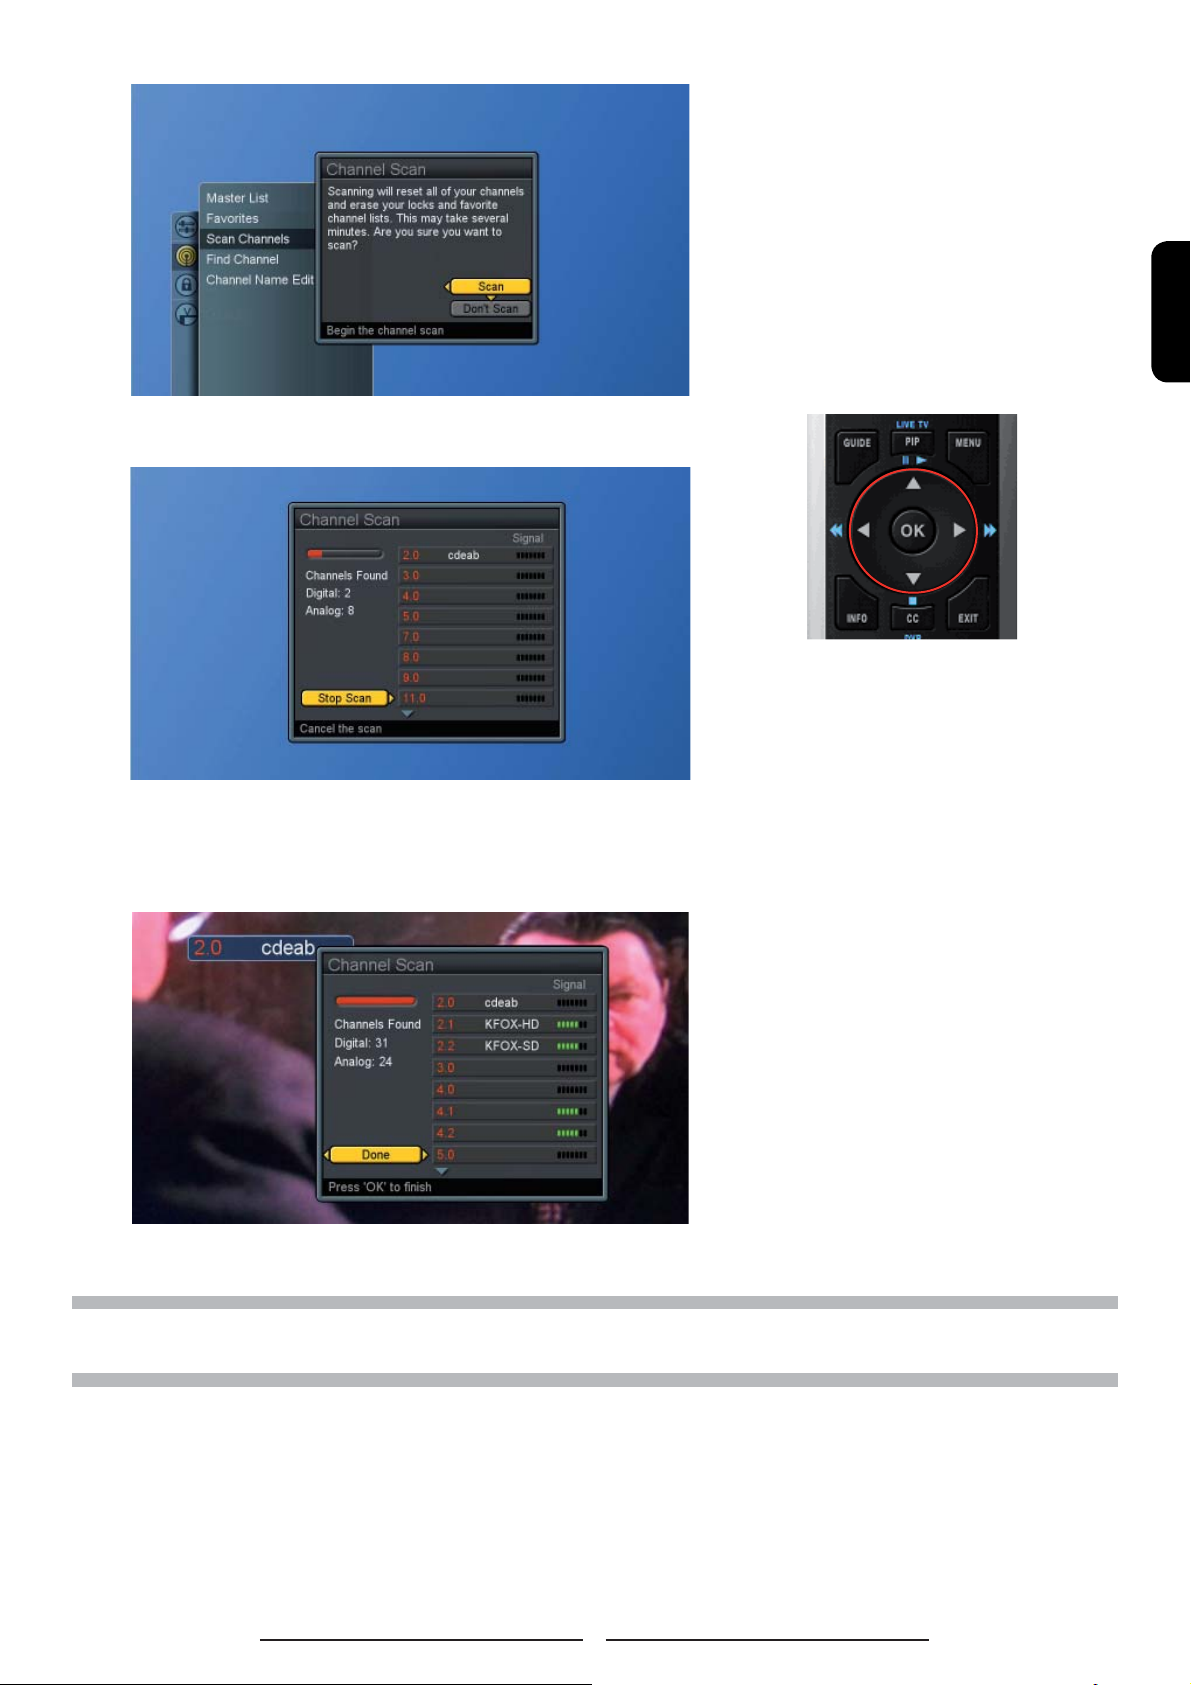
6. Press OK button again to start Channel Scan.
7. Once the scan is completed, the Channel List will show on
the screen and the program of initially scanned channel is
appeared on the screen.
ENGLISH
8. Press OK button to fi nish.
NOTE : If you select Stop Scan, the scan process will be stopped immediately and the scanned channels will be
stored in the non-volatile memory.
25
Page 31

Editing the Channel List
1. Press the MENU button to display the main menu.
2. Press the ▲▼ buttons to select Channels.
3. Press ► button to select Master List.
4. Press ► button again to display the menu and start to edit
the list.
5. Press▲▼◄► and OK buttons to add or remove channels.
6. Press EXIT button to exit all menu or press OK to fi nish.
NOTE : Select “Mark All” in the “Master Channel List” to enable all channels in the list. “Digital Only” enables
just the digital channels. “Unmark All” disables all channels in the list.
26
Page 32

Finding Channels Directly
1. Press the MENU button to display the main menu.
2. Press the ▲▼ buttons to select Channels.
3. Press ► / ▼ buttons to select Find Channel.
4. Press ► button again to display the menu.
5. Use 0-9 buttons to enter the channel numbers and press
OK to scan the entered channel.
6. Press ▼and OK buttons to select DONE and fi nish it.
ENGLISH
NOTE 1 : This TV can automatically tune in scanned and found channels. If your intended channel is not found,
the TV will tune to the previous last found channel.
NOTE 2 : Channels are automatically added to the master list when found.
27
Page 33

Setting – Up your Favorite Channels
1. Press the MENU button to display the main menu.
2. Press the ▲▼ buttons to select Channels.
3. Press ► / ▼ buttons to select Favorites.
4. Press ► button again to display the menu and start to edit
the favorite channels.
5. Press ▲▼and OK buttons to choose which favorite list to
edit.(The system supports 3 favorite channel lists and each
list will store 16 channels,)
6. By marking your preferred channel, this channel will be
included in the Favorite (Fav is shortened for Favorite) List.
To know how to mark your preferred channels, please see
“Editing the Channel List” on page 26.
28
Page 34

Channel Name Editing
1. Press the MENU button to display the main menu.
2. Press the ▲▼ buttons to select Channels.
3. Press ► / ▼ buttons to select Channel Name Edit.
4. Press ► button again to display the channel list.
5. Press ▲▼to choose which channel you want to edit and
OK to confi rm.
ENGLISH
6. Press the ▲▼ ◄ ►buttons to enter the name.
7. Move to “ Done “ and press OK button to fi nish.
29
Page 35

Picture Control
Adjusting the Picture Setting
1. Press the MENU button to display the main menu.
2. Press the ▲▼ buttons to select Settings.
3. Press ► button to access Picture and Picture Settings.
4. Press ► button again to display the menu “Picture Settings:
TV”. A user can make adjustment, when in “Custom” mode.
5. Press ▲▼ and OK buttons to choose the desired item.
6. Press ◄► buttons to make adjustments and press ▲▼
buttons to choose other items.
Brightness : Increase or decrease picture brightness
Contrast : Increase and decrease picture contrast
Saturation : Deepen and lighten picture color
Hue : Modify the tint (fl esh tone redness or
greenness) of color
Sharpness : Soften and sharpen image
30
Page 36

ENGLISH
7. Press OK button to return to the previous screen or press
EXIT button to exit all menu.
NOTE : Settings for Standard, Vivid, Movie, Sports are pre-confi gured.
31
Page 37

Adjusting the TV Screen
1. Press the MENU button to display the main menu.
2. Press the ▲▼ buttons to select Settings.
3. Press ► button to access Picture sub-menu.
4. Press ►/ ▼ button to select Aspect Ratio.
5. Press ► button again to display the menu.
6. Press ▲▼ buttons to choose the different modes and press
OK to confi rm.
Normal : displays the image exactly as broadcast .
Full Screen: stretches the image to fi t the screen
(None of the image is cut off, but the image may be
distorted.)
Zoom : scales the image larger, and will cut off part of the
image
Subtitle : shift the image up to show the subtitle.
32
Page 38
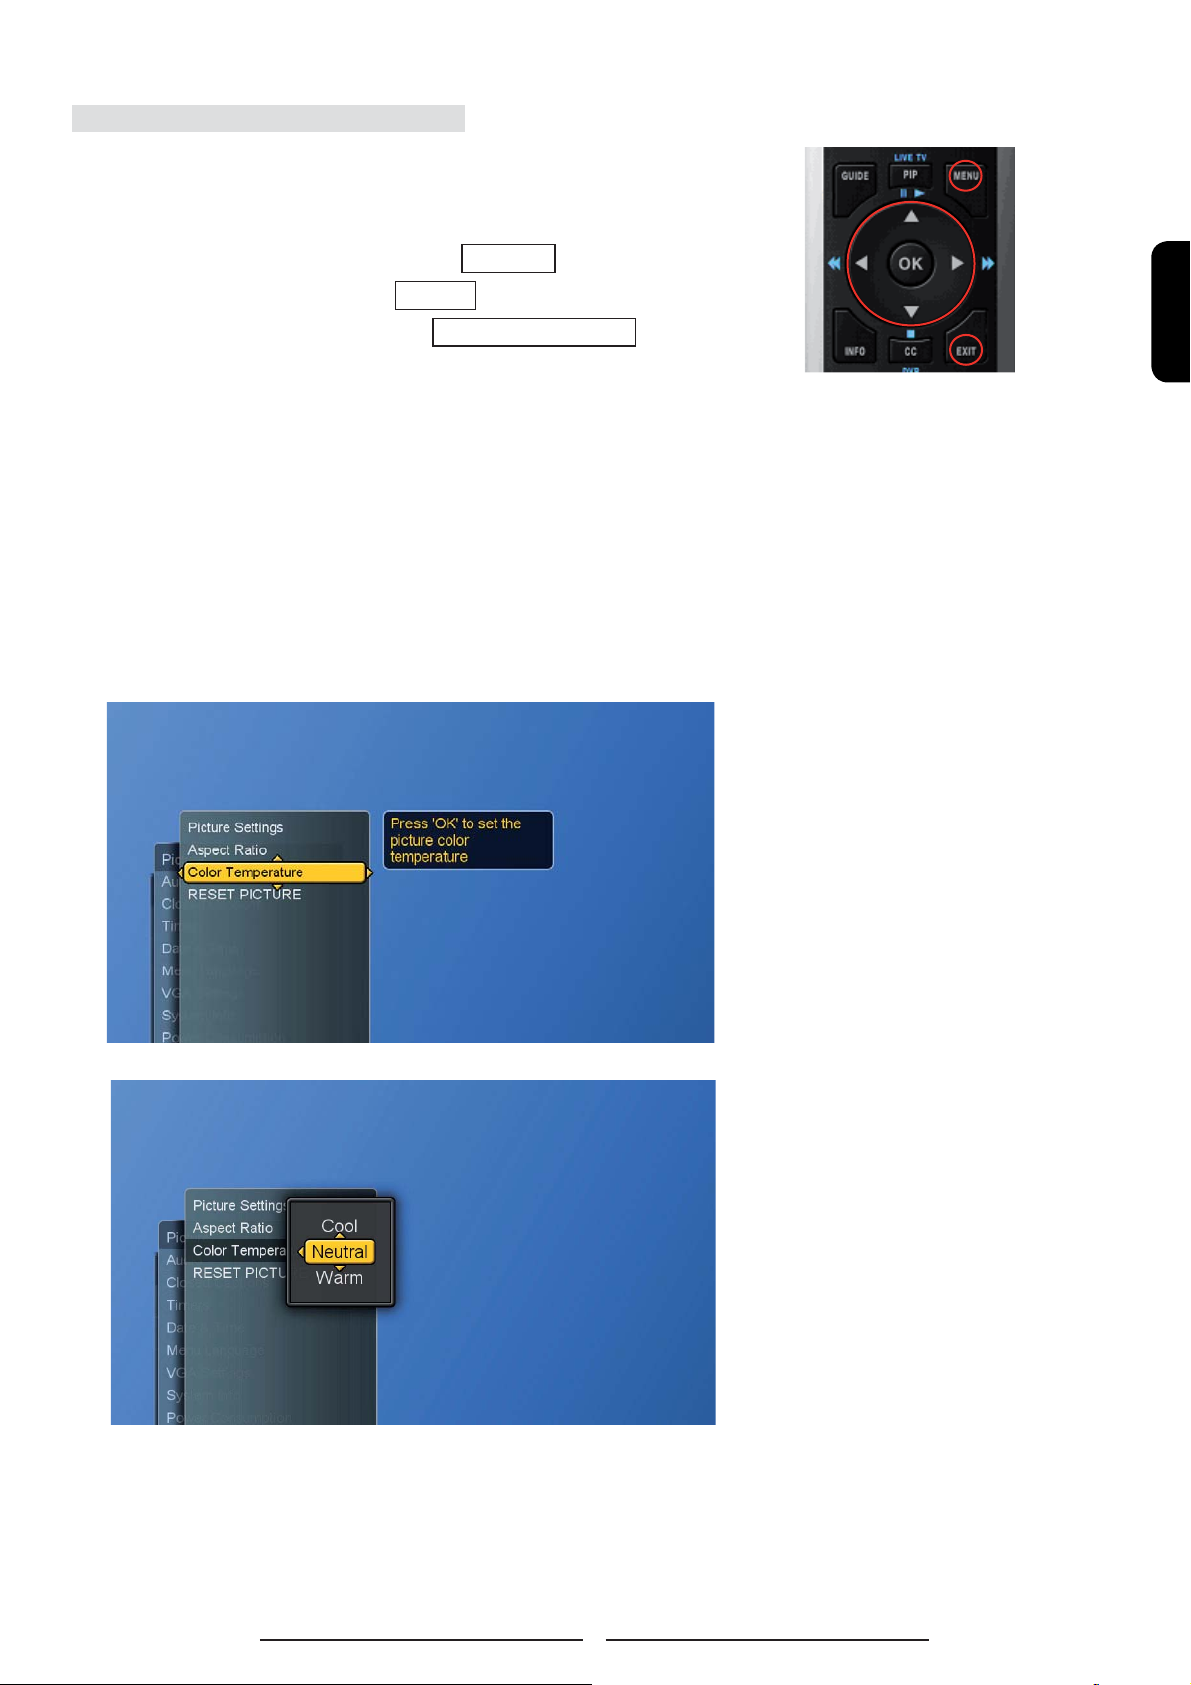
Adjusting the Color Temperature
Adjust the white balance of the picture.
1. Press the MENU button to display the main menu.
2. Press the ▲▼ buttons to select Settings.
3. Press ► button to access Picture sub-menu.
4. Press ►/▼ buttons to select Color Temperature and press
► button on display the menu.
5. Press ▲▼ and OK buttons to choose Cool, Neutral or
Warm.
Cool : a bluish white
Neutral : a normal white
Warm : a reddish white
6. Press ◄ button to return to the previous screen or press
EXIT button to exit all menu.
ENGLISH
33
Page 39
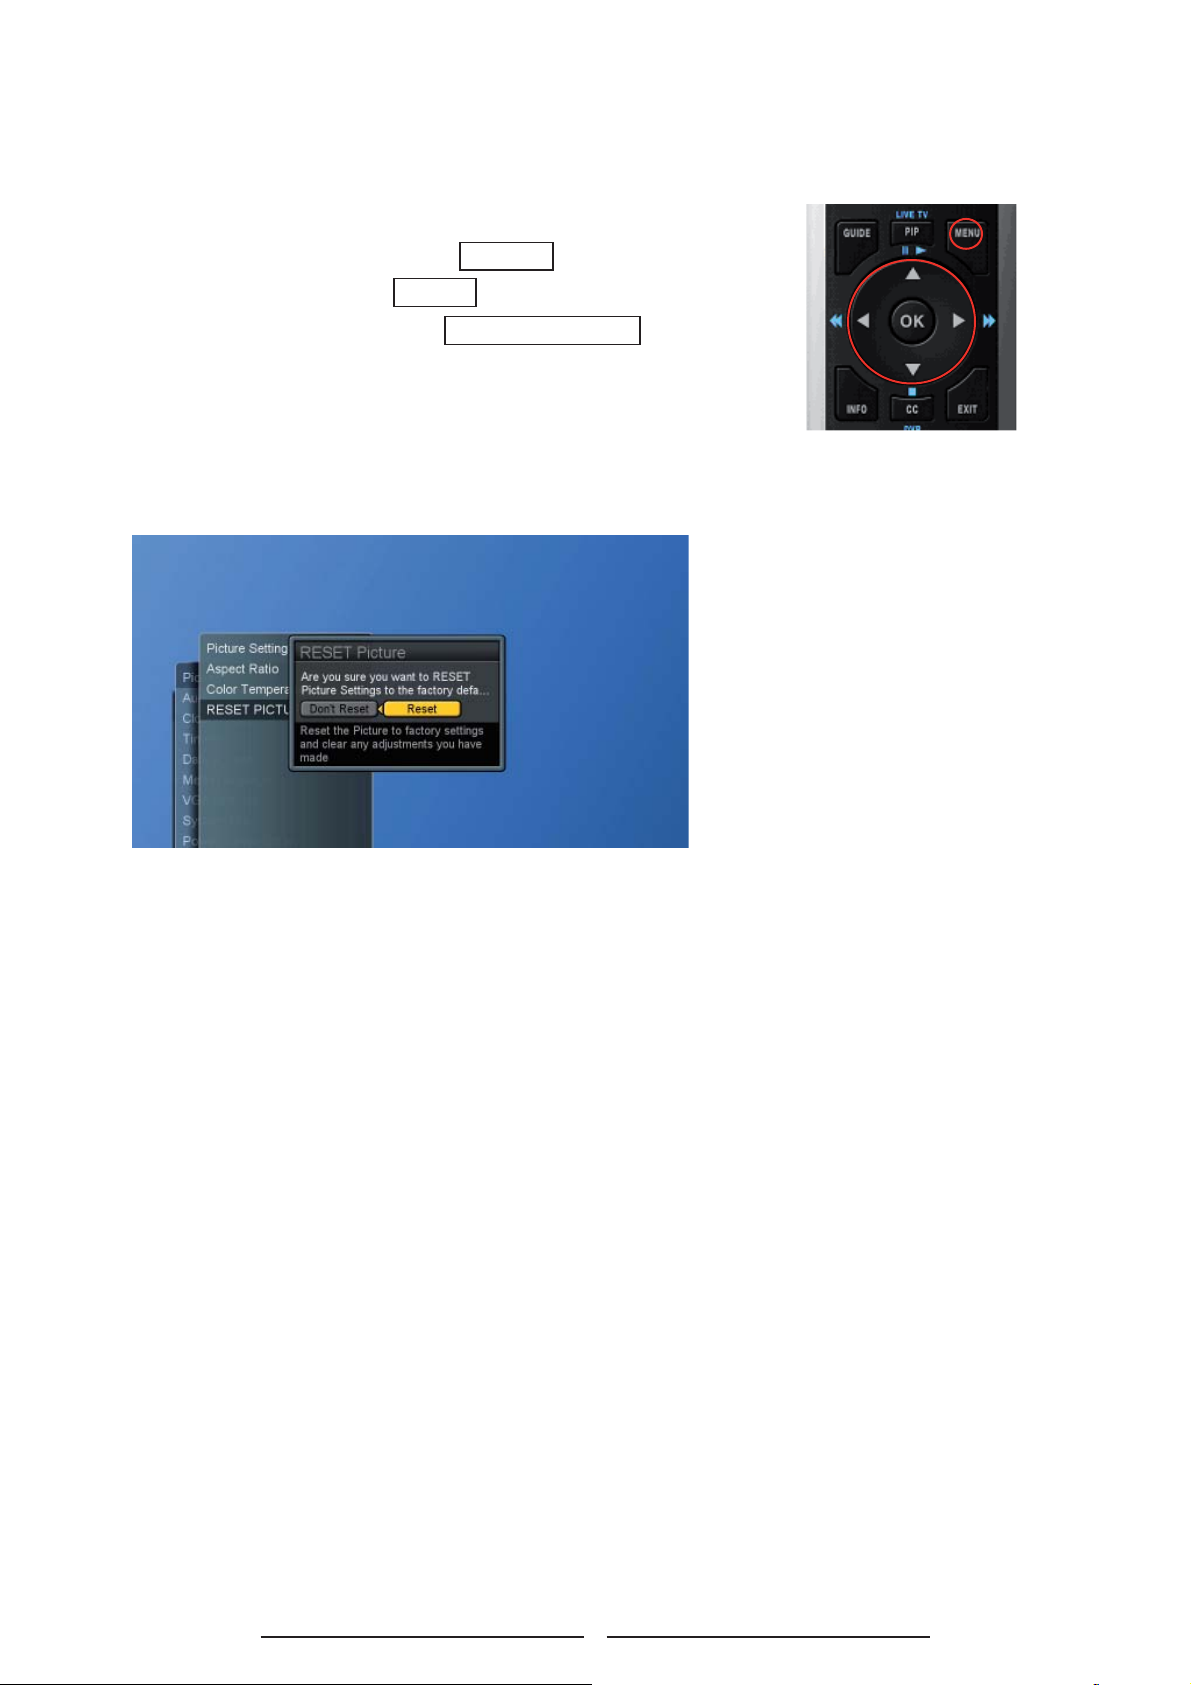
User can reset the picture settings back to factory settings.
1. Press the MENU button to display the main menu.
2. Press the ▲▼ buttons to select Settings
3. Press ► button to access Picture sub-menu.
4. Press ►/▼ buttons to select RESET PICTURE and press
► button
to display the menu.
5. Press ► and OK buttons to reset picture settings.
6. Press ◄ button to return to the previous screen or press
Exit button to exit all menu.
34
Page 40

Sound Control
Adjusting the Sound Quality
1. Press the MENU button to display the main menu.
2. Press the ▲▼ buttons to select Settings.
3. Press ► / ▼ buttons to select Audio.
4. Press ► button to select Bass, T reble & Balance and press
► button again to display the menu.
ENGLISH
5. Press ▲▼ buttons to choose the desired item and press ◄
► buttons to make adjustments.
6. Press OK button to fi nish or EXIT button to exit all menu.
Bass : Adjust low tone of sound.
Treble : Adjust high tone of sound.
Balance : Adjust the volume balance between the left and
right speakers.
35
Page 41

Choosing a Multi-Channel Television Sound in Analog TV
Depending on the particular program being broadcast, you can
listen to Stereo, Mono or a Secondary Audio Program (SAP).
(The shown language in SAP audio is according to offered
broadcast language.)
1. Press the MENU button to display the main menu.
2. Press the ▲▼ buttons to select Settings.
3. Press ► / ▼ buttons to select Audio.
4. Press ► / ▼ buttons to select MTS and press ► button to
display the menu.
5. Press ▲▼ and OK buttons to choose the desired item.
6. Press ◄ button to return to the previous screen or press
EXIT button to exit all menu.
36
Page 42
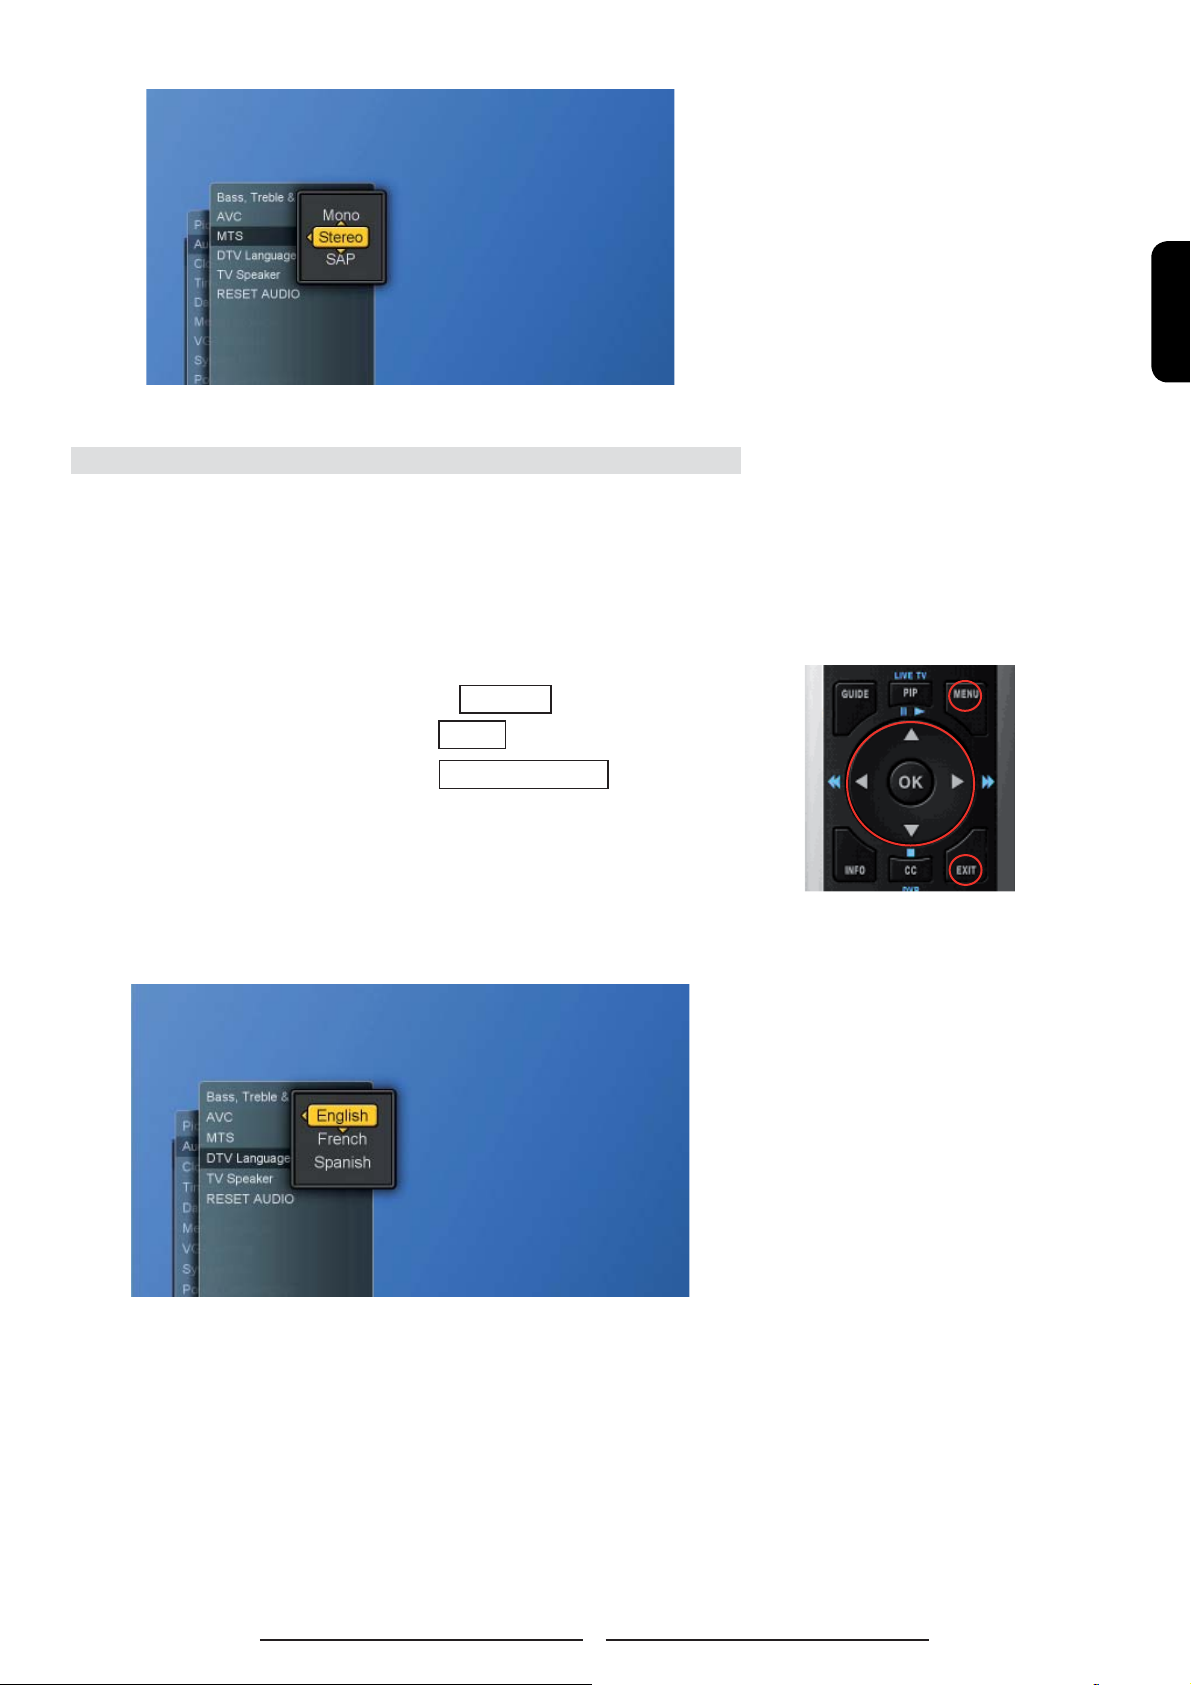
Choosing a Multi-Track Sound ( MTS ) in Digital TV
Preferred Language
The digital -TV transmission system is capable of simultaneous
transmission of many audio tracks (for example, simultaneous
translations of the program into foreign languages).
1. Press the MENU button to display the main menu.
2. Press the ▲▼ buttons to select Settings.
3. Press ► / ▼ buttons to select Audio.
4. Press ► / ▼ buttons to select DTV Language and press ►
button again to display the menu.
5. Press ▲▼ and OK buttons to choose the desired item.
ENGLISH
6. Press ◄ button to return to the previous screen or press
EXIT button to exit all menu.
37
Page 43
Other Sound Settings
1. Press the MENU button to display the main menu.
2. Press the ▲▼ buttons to select Settings.
3. Press ► / ▼ buttons to select Audio.
4. Press ►/ ▼ button to select other items.
5. Press OK button to switch between “ON” and “OFF”.
Automatic Voice Control (AVC)
[ ON ]: AVC can avoid sudden increases or decreases of
volume like commercials.
[ OFF ]: Under special circumstances, such as opera or
symphony, volume can be performed in accordance with
the original sound level.
TV Speaker
Turn the TV Speaker on or off. (Use if your TV is connected to
home theater or stereo.)
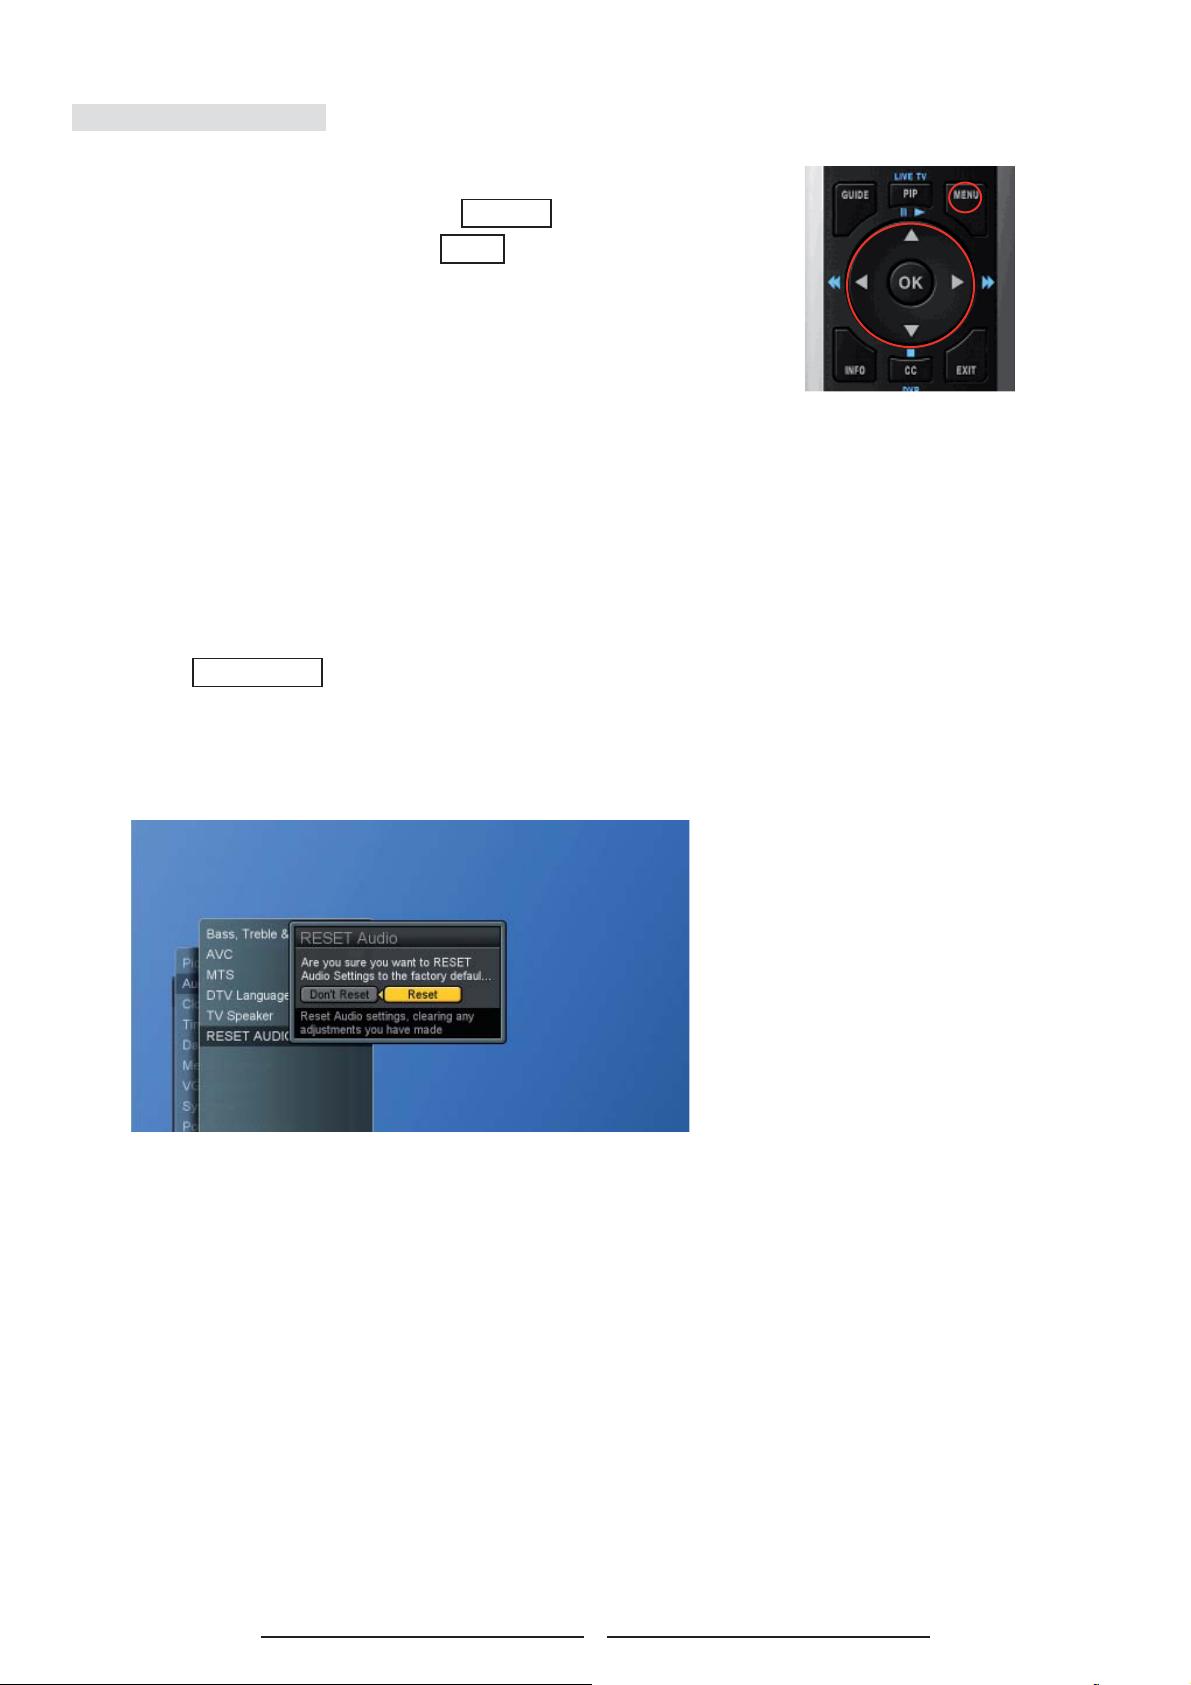
6. User can reset the audio settings back to factory settings.
38
Page 44
Time Setting
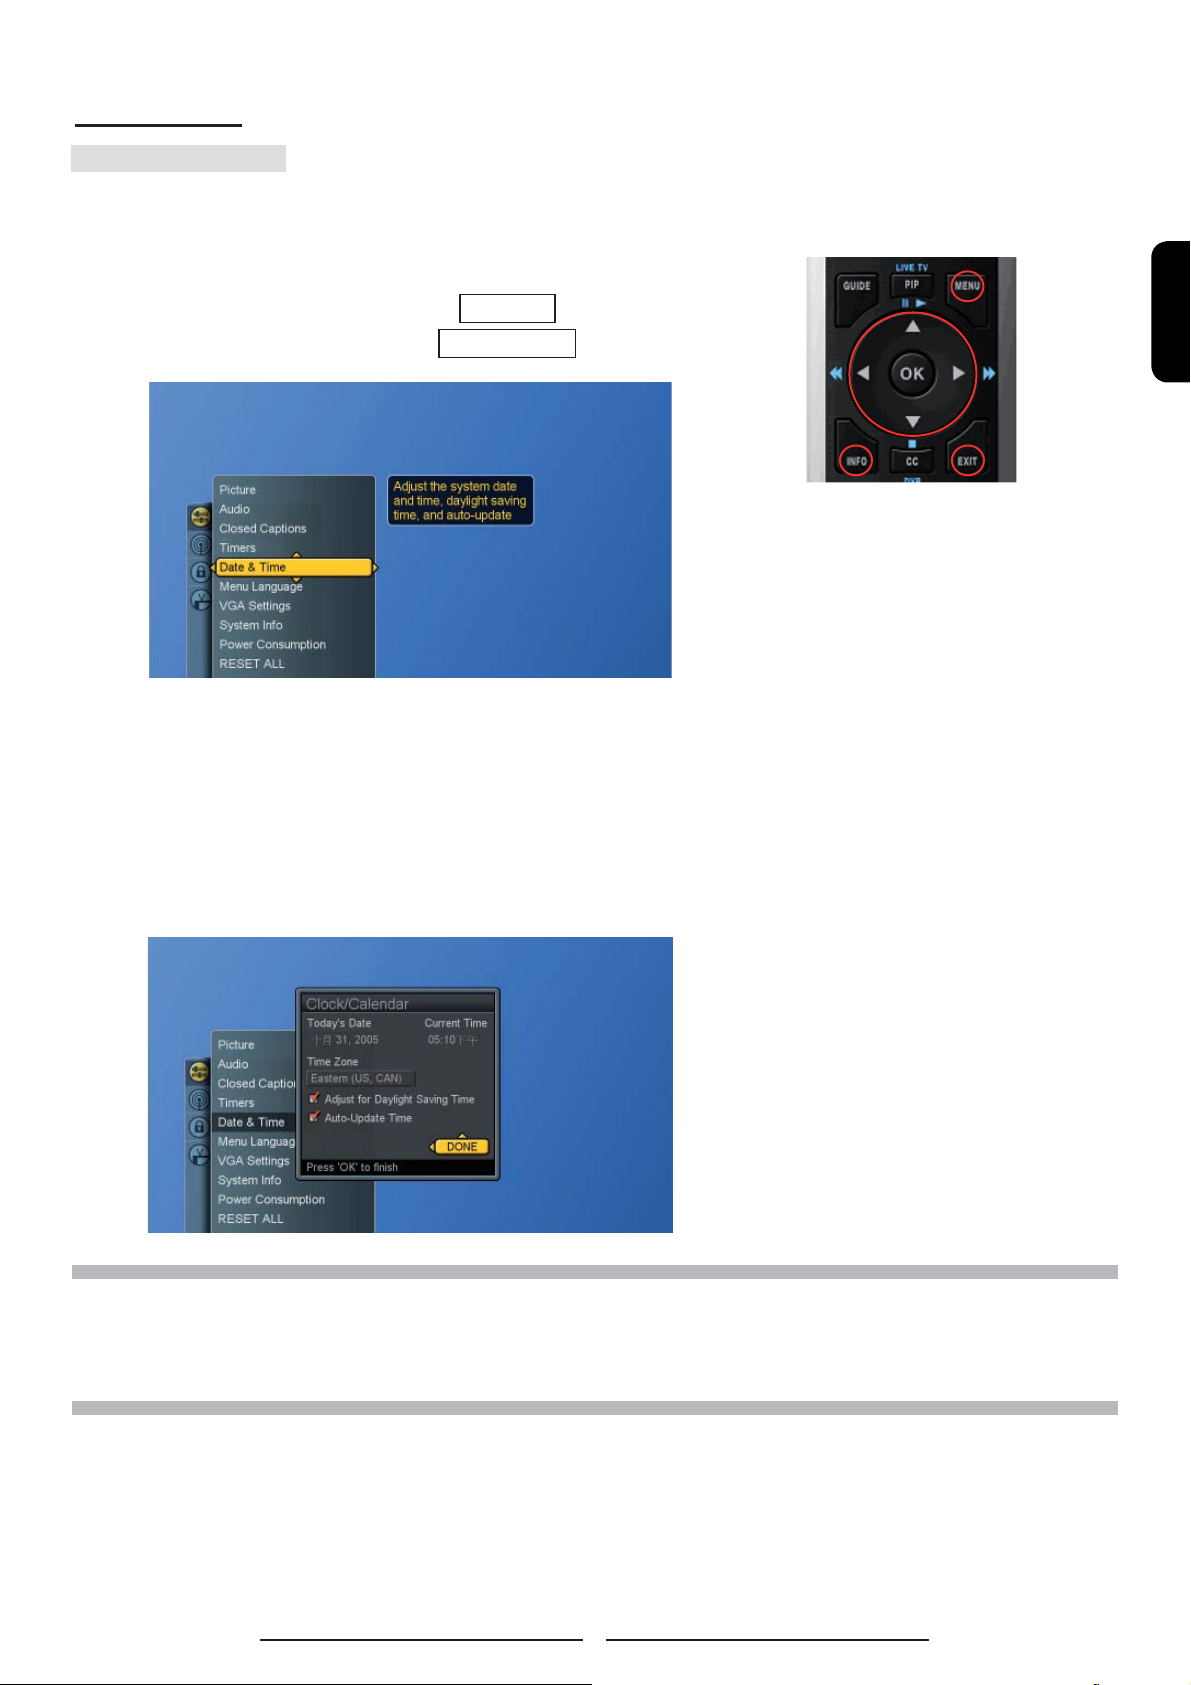
Setting the Clock
Setting the clock is necessary in order to use the various timer
features of the TV.
1. Press the MENU button to display the main menu.
2. Press the ▲▼ buttons to select Settings.
3. Press ► / ▼ buttons to select Date & Time.
4. Press ► button again to display the menu.
5. Press▲▼◄► and OK buttons to move to Today’s Date,
Current Time and T ime Zone.
6. Press OK button to select one item and use ▲▼ ◄ ►
buttons to make the settings.
ENGLISH
7. Press OK button to return to the previous screen or press
EXIT button to exit all menu.
NOTE 1 : The current time will appear when you press the INFO button.
NOTE 2 : When selecting “Auto-Update Time,” the time is set according to the broadcast. When Auto-Update is
on, all other time adjustments except for “Adjust for Daylight Savings Time” and Time Zone are “grayed
out” and cannot be modifi ed by the user.
39
Page 45

Setting the On / Off Timer
The system supports two timers to be used to turn on and off at
scheduled viewing times.
1. Press the MENU button to display the main menu.
2. Press the ▲▼ buttons to select Settings .
3. Press ► / ▼ buttons to select Timers .
4. Press ► button to display the menu.
5. Press the ▲▼ ◄ ► buttons to move to Choose Timer , Days,
Start Time and Duration.
6. Press OK button to select the desired days for the timer to
execute by checking or un-checking the check boxes and
make the settings.
7. Press OK button to return to the previous screen or press
EXIT button to exit all menu.
NOTE 1 : This feature is only available if the clock in the system has been set.
NOTE 2 : Timer 1 takes precedence over Timer 2.
40
Page 46
Viewing Closed Captions
This LCD TV has the ability to decode and display closed
caption content if supported by the program. These captions are
usually used for the hearing impaired or for foreign language
translations.
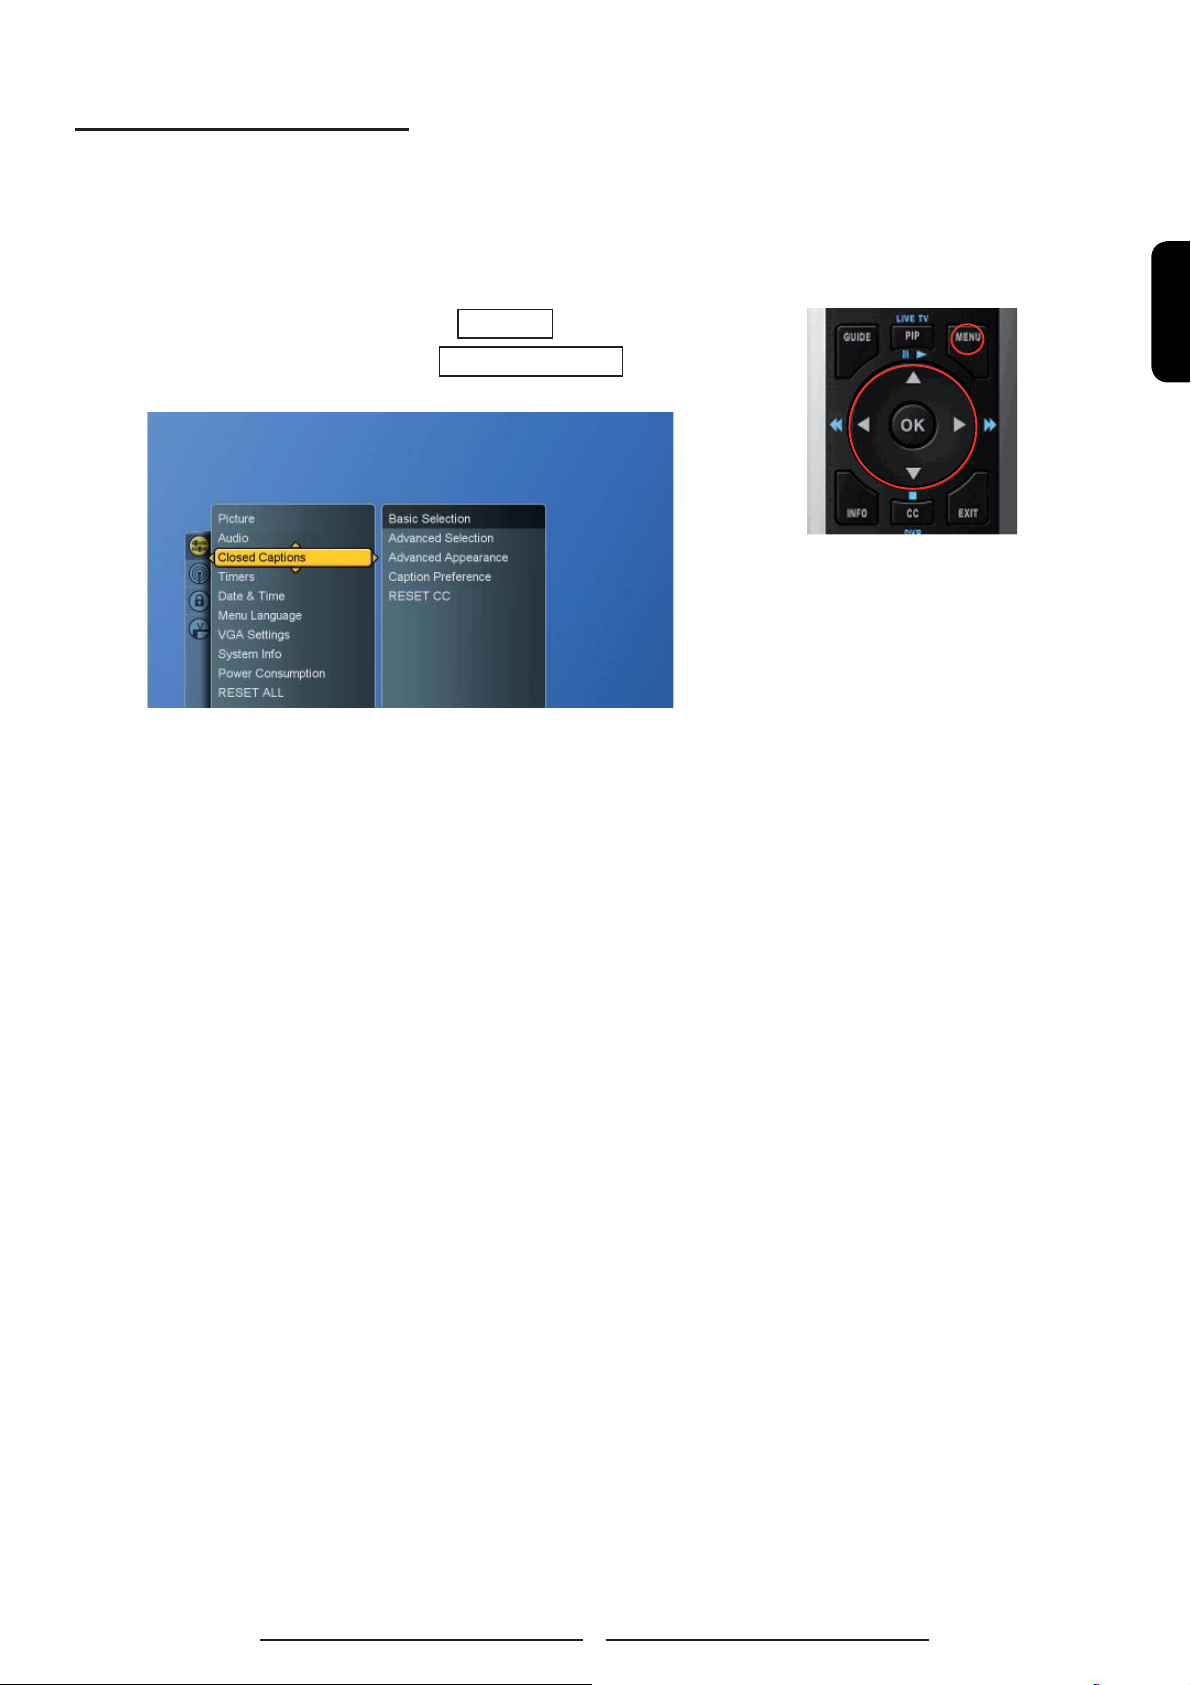
1. Press the MENU button to display the main menu.
2. Press the ▲▼ buttons to select Settings .
3. Press ► / ▼ buttons to select Closed Captions .
ENGLISH
4. Press ► and ▲▼ buttons to select Closed Caption
Service.
5. Press ►button to display the menu.
Basic Selection : the preferred basic selection can take a
value in the range CC1-CC4 and T1-T4.
Advanced Selection : the preferred advanced selection
can take a value in the range CS1-CS6.
Advanced Appearance: allow for controlling
• Window background color
• Window background opacity
• Font size
• Font style
• Font foreground color
• Font foreground opacity
• Font background color
• Font background opacity
• Font edge type
• Font edge color
Caption Preference : applies to digital channels only, can
either be basic, advanced or auto.
41
Page 47

6. User can reset Closed Captioning back to factory settings.
7. Press EXIT button to exit all menu.
NOTE : The Caption feature does not work with Component ( expect for 480i ) Video / PC / HDMI input source.
42
Page 48

Parental Control and Locks
Setting Ratings and Channel Locks
Parental Control
Parental Control allows a user to block viewing of programs
according to their content and rating levels.
1. Press the MENU button to display the main menu.
2. Press the ▲▼ buttons to select Locks and press ► button
to access the PIN Entry menu.
3. Enter your 4-digit PIN to access the Locks sub-menu.
ENGLISH
NOTE : The factory default PIN code is “ 0000 “ .
43
Page 49

5. Press ► and ▲▼buttons to select USA , Canada or Block
Unrated Shows .
* USA custom ratings menu include TV and Movie Ratings.
TV Rating
Rating Code Description Rating Code Description
Age-Based Content-Based
TV-Y All children FV Fantasy Violence
TV-Y7 Directed to children age 7 and older D Suggestive dialogue
TV-G General audience L Strong language
TV-PG Parental guidance suggested S Sexual situations
TV-14 Parents strongly cautioned V Violence
TV-MA Mature audience only
Movie Rating
Rating Code Description
G All children and general audience
PG Parental guidance suggested
PG-13 Parental guidance for children under 13
R Restricted viewing, parental guidance is suggested for children under 17
NC-17 No one under 17 or under allowed
X X Rated
44
Page 50

* Canada custom ratings menu include English and French
Ratings.
French Rating
Rating Code Description
G General programming
ans+ Not recommended for young children
8
13 ans+ Not recommended for ages under 13
16 ans+ Not recommended for ages under 16
18 ans+ Programming restricted to adults
ENGLISH
English Rating
Rating Code Description
C All children
C8+ Children 8 years and older
G General programming
PG Parental Guidance
14+ Viewers 14 and older
18+ Adult programming
45
Page 51
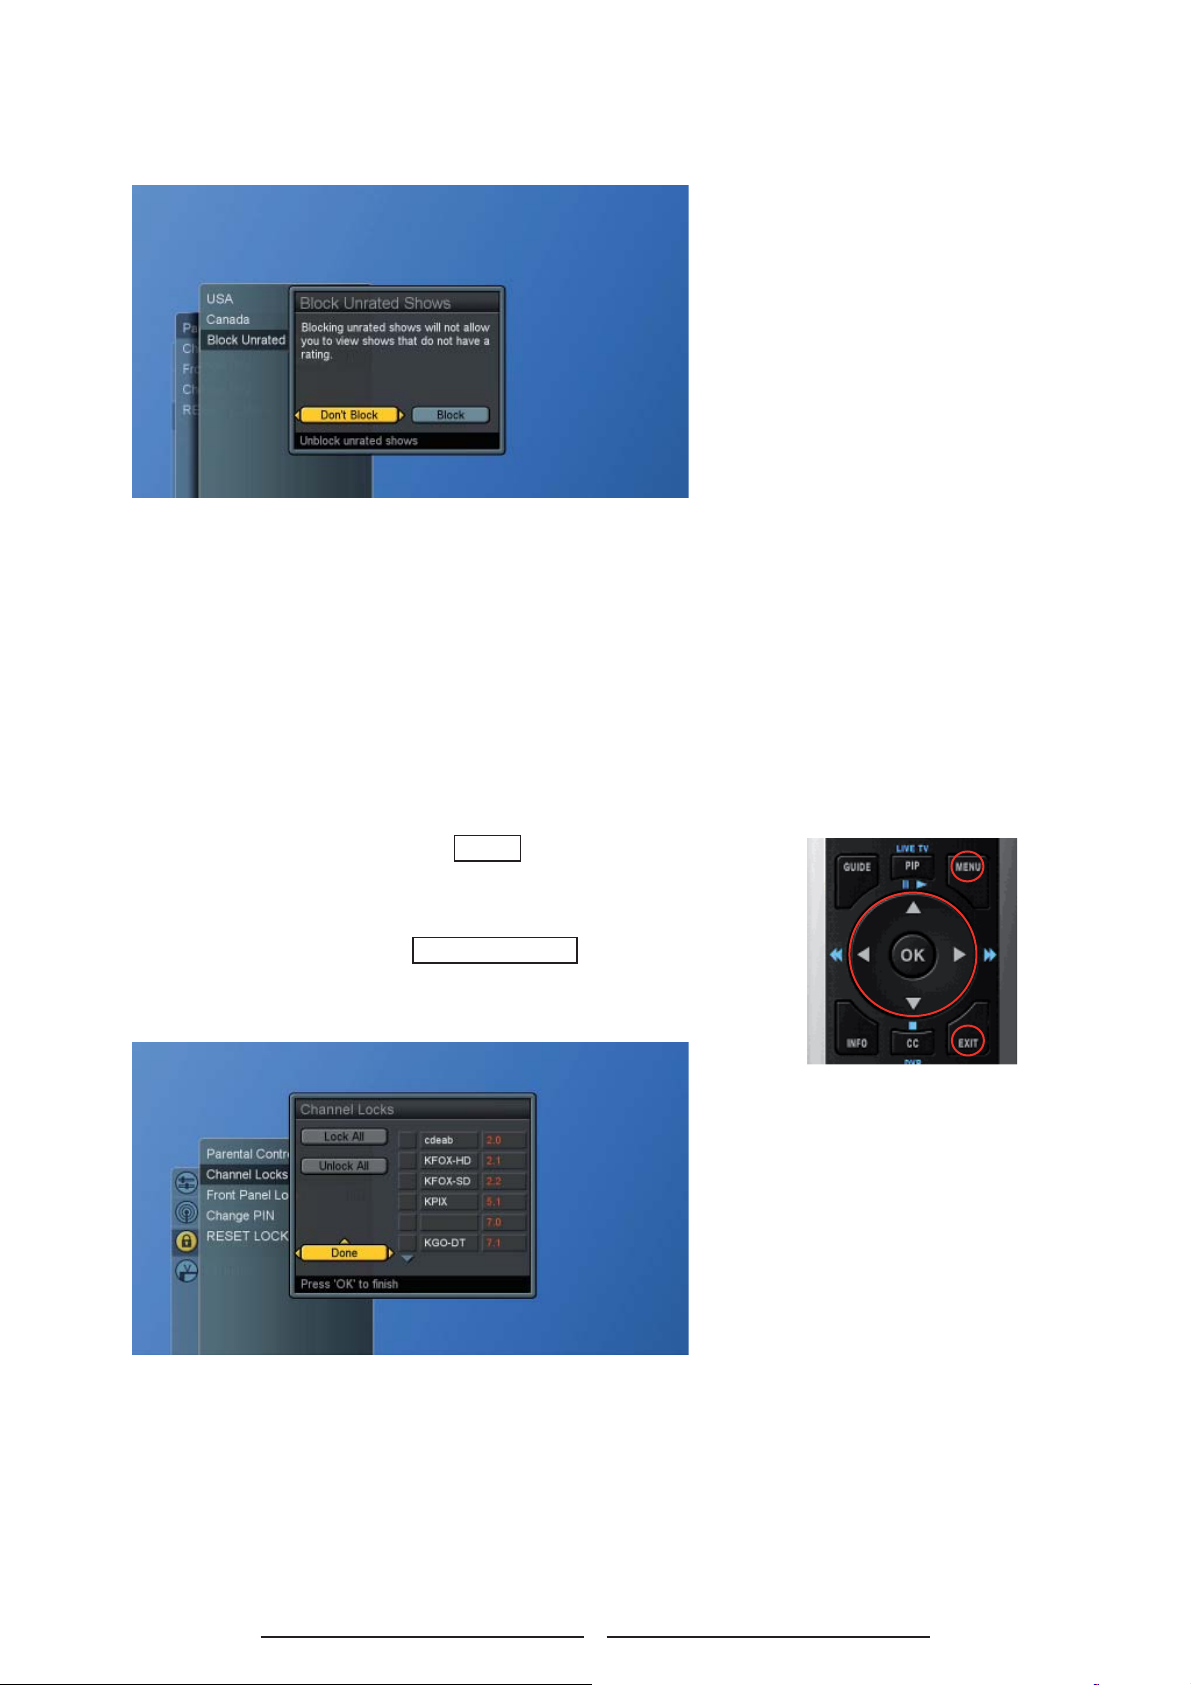
* Block Unrated Shows will warn the user that blocking unrated
TV programs will not allow them to view programs that do not
have a rating.
6. Press EXIT button to exit all menu.
Channel Locks
The user may navigate through the channel list and toggle lock
on or off for a specifi c channel by pressing the OK button. There
are also choices that will Mark All channels and Unmark All.
1. Press the MENU button to display the main menu.
2. Press the ▲▼ buttons to select Locks and press ► buttons
to access the PIN Entry menu.
3. Enter your 4-digit PIN to access the Locks sub-menu.
4. Press▲▼ buttons to select Channel Locks .
46
Page 52

5. Press ► button to display the menu.
6. Press ▲▼◄ ► and OK buttons to select lock or unlock the
channel.
7. Press EXIT button to exit all menu.
NOTE 1 : Note that changes to Channel Locks are effective immediately unless the TV is temporarily unlocked
due to entering a PIN when a Ratings or Channel Lock is encountered.
NOTE 2 : If a new channel is encountered during channel change or added by using the Find Channel feature, its
default state is unlocked.
NOTE 3 : Press “0000,” if a user forgets the PIN. Please remember your password and preserve this manual
well.
Changing Your Personal ID Number (PIN)
Allows the user to set a new PIN. The PIN is a four-digit numerical
PIN masked from display . The user must enter the new PIN, and will
then be prompted a second time for confi rmation.
1. Press the MENU button to display the main menu .
2. Press the ▲▼ buttons to select Locks and press ► buttons to
access the PIN Entry menu.
3. Enter your 4-digit PIN to access the Locks sub-menu.
4. Press ▲▼ buttons to select Change PIN.
ENGLISH
5. Press ► button to display the Change PIN menu.
6. Enter the old 4-digit PIN and enter your new 4-digit PIN.
7. Enter the 4-digit PIN again to confi rm, the Change PIN menu
will disappear when it fi nished.
47
Page 53

8. When a user wants to access the Locks menu next time,
system will request to enter the PIN.
9. If the PIN number is incorrect, the menu will be appeared
as below.
48
Page 54

Child Lock
A user can disable the Front Panel buttons by using the Front Panel
Lock function.
1. Press the MENU button to display the main menu.
2. Press the ▲▼ buttons to select Locks and press ► buttons to
access the PIN Entry menu.
3. Enter your 4-digit PIN to access the Locks sub-menu.
4. Press ▲▼ buttons to select Front Panel Lock.
5. Press OK button to turn on or off.
ENGLISH
Reset the Locks Settings
1. Press the MENU button to display the main menu.
2. Press the ▲▼ buttons to select Locks and press ► buttons to
access the PIN Entry menu.
3. Enter your 4-digit PIN to access the Locks sub-menu.
4. Press ▲▼ buttons to select RESET LOCKS.
5. Press ► button to display the menu.
6. Press ◄ ► buttons to reset the settings.
NOTE : All lock settings are reset, except the PIN. To reset the PIN, please enter Reset All in Settings to resume
settings back to the factory mode.
49
Page 55
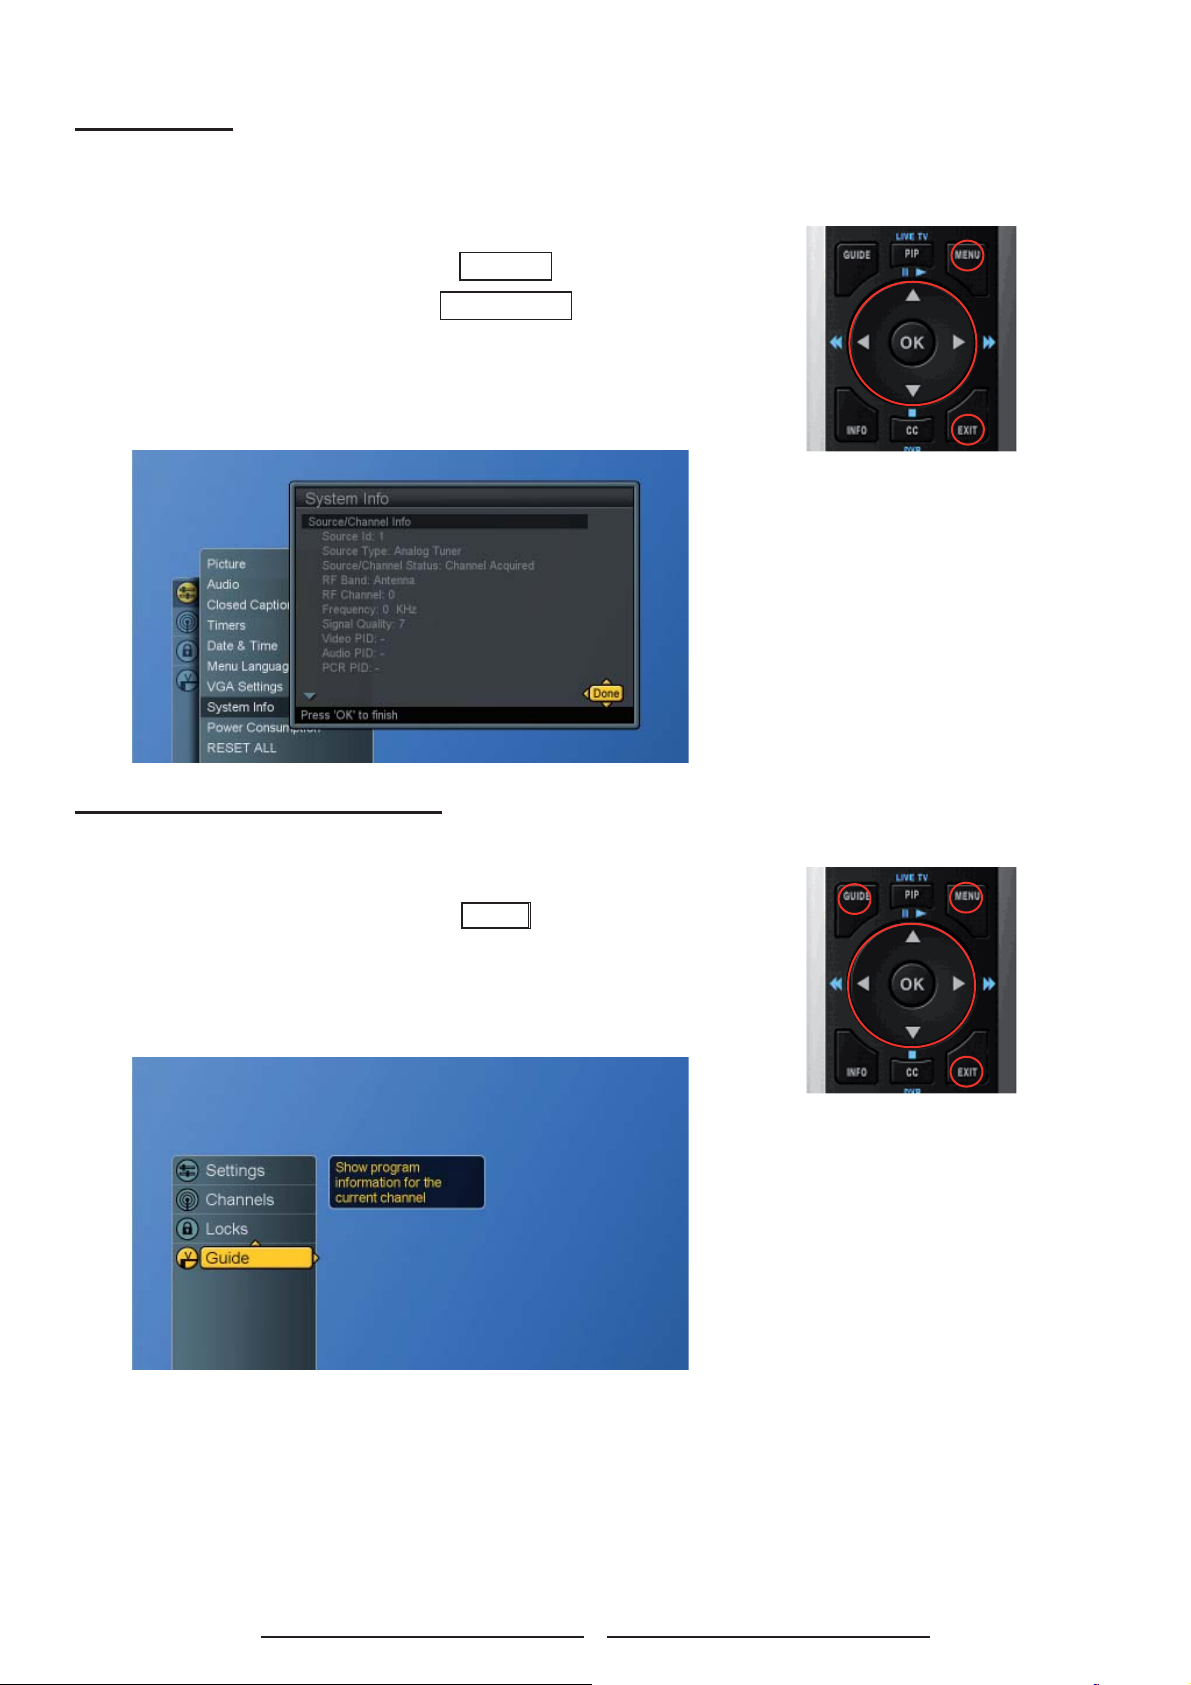
System Info
Display system info.
1. Press the MENU button to display the main menu.
2. Press the ▲▼ buttons to select Settings .
3. Press ► / ▼ buttons to select System Info .
4. Press ► button to show the info.
5. Press EXIT button to exit all menu.
Showing Program Info Data
1. Press the MENU button to display the main menu.
2. Press the ▲▼ buttons to select Guide .
3. Press ► button again to show the info.
4. Press OK to show more information.
5. Press EXIT button to exit all menu.
50
Page 56

ENGLISH
NOTE : Press “Guide” on the remote control to have a quick access to Info data. Repeatedly press “Guide” to
show cyclic info- (a)Title Display only (b) Title and Description Display (c) Cleared
51
Page 57
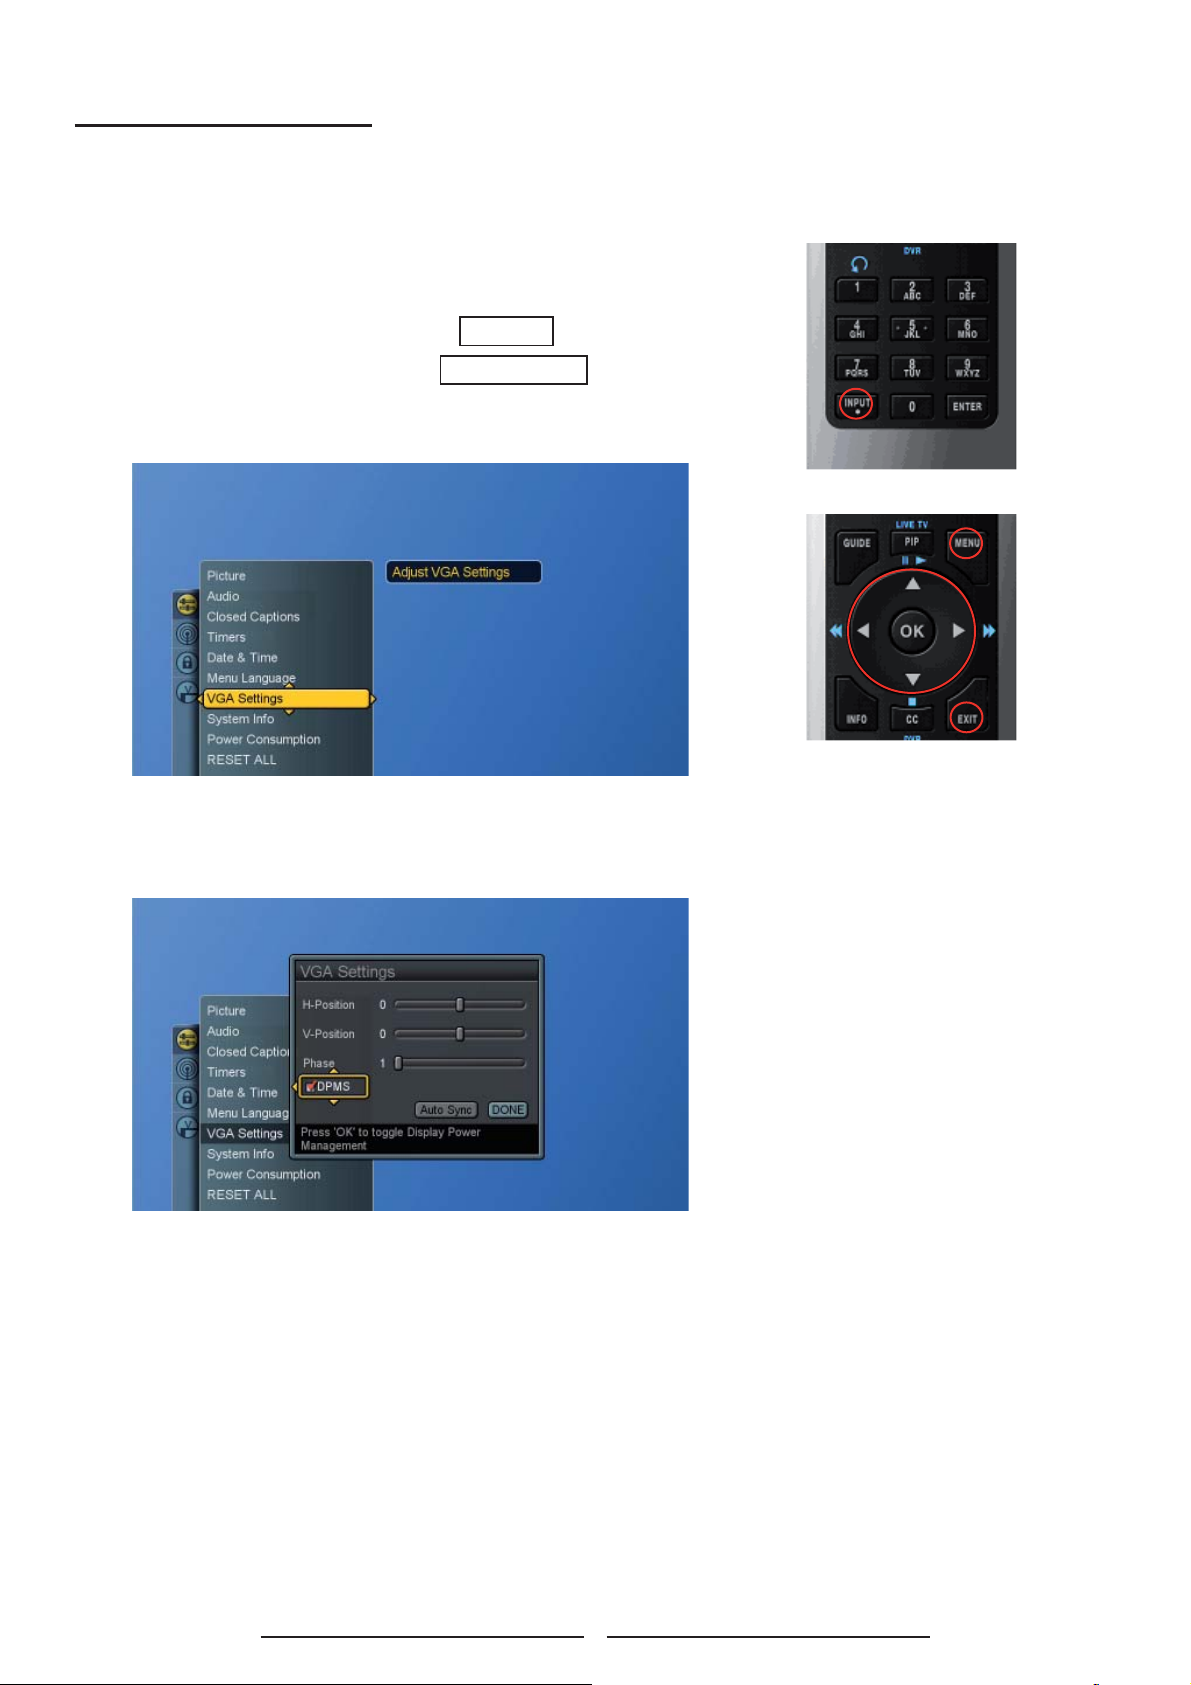
PC mode Adjustments
The “VGA Settings” are to allow the user to control certain VGA
specifi c features.
1. Press INPUT button to select PC source.(see page 22)
2. Press the Menu button to display the main menu.
3. Press the ▲▼ buttons to select Settings .
4. Press ► / ▼ buttons to select VGA Settings .
5. Press ► button to display the menu.
6. Use ▲▼◄ ► buttons to make adjustments.
7. Press EXIT button to exit all menu.
DPMS : enables or disables the display power management
mode when the VGA is the active input source using a
checkbox. When checked, the feature is enabled.
Auto Sync : automatically attempts to determine the ideal
horizontal, vertical, and phase adjustments for the current
VGA input signal.
52
Page 58
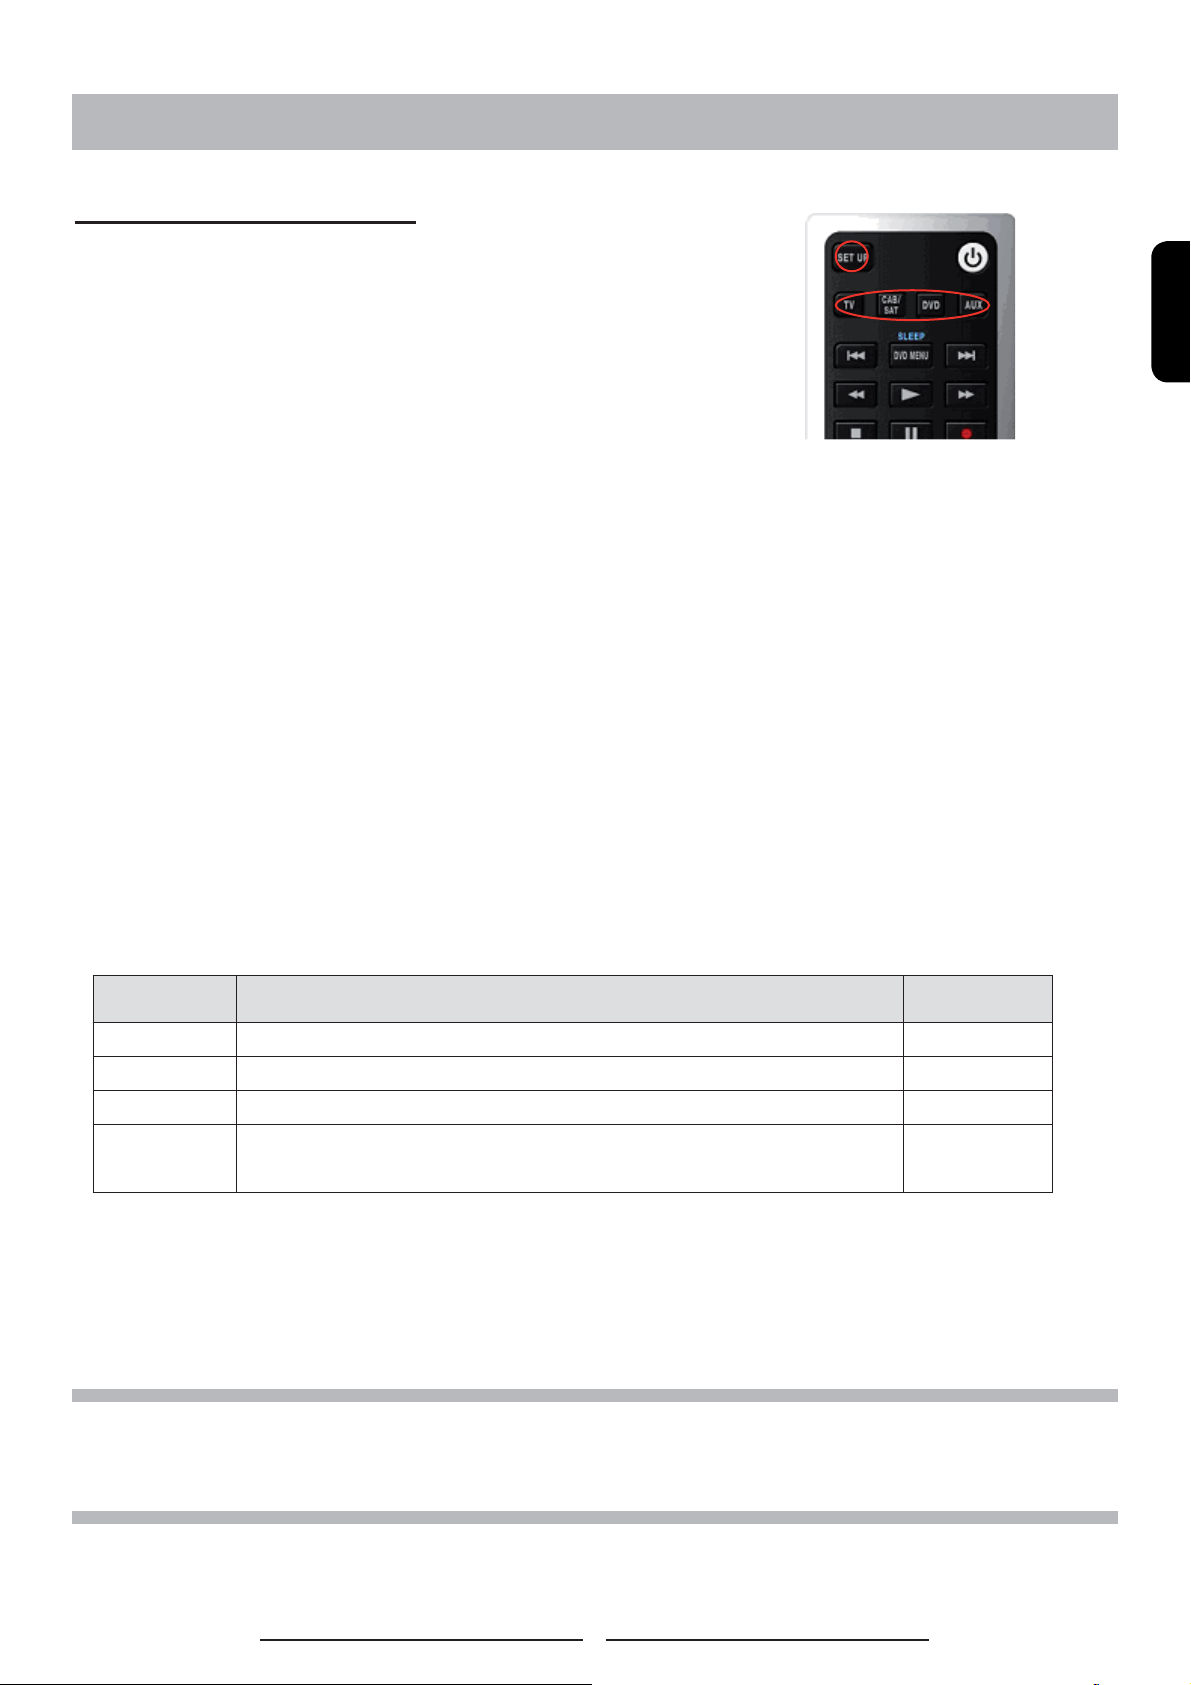
PROGRAMMING REMOTE CONTROL
Direct Device Code Setup
This remote control not only provide control of this TV, but
also provide control over other external devices, i.e. cable
converter, satellite receiver, audio amplifi er, VCR and DVD
player. Please follow the procedures to use programming
function of this remote control:
Each code in the following pages insists 4 digits from 0 to 9.
Mode → <<SET UP>> (Blink twice)→ <Digit> (Blink once) → <Digit> (Blink once) →
<Digit> (Blink once) → <Digit> (Blink twice)
STEP 1 Locate the desired device in the Device code list in the following pages.
STEP 2 Select the mode by pressing DVD, CAB/SAT, or AUX.
STEP 3 Depress and hold <<SET UP>> button for a minimum of 3 seconds. When successful,
this TV will blink twice after pressing <<SET UP>>.
STEP 4 Enter the 4-digit code for the desired device. This TV will blink once on each digit
entry, excluding the last digit. It will blink twice to confi rm whether the valid code is
programmed.
ENGLISH
Mode Device Assignment
Device
Group no.
TV Locked to this TV (Default) -------
DVD Universal VCR, DVD, PVR 2
CAB/SAT Universal Cable, Satellite, Video Accessory 0
AUX
Universal Tuner, Amplifi er, CD, Mini Disc. And Misc. Audio,
Home Automation
3
Example: [DVD]→<<SET UP>> (Blink twice) → <1> (Blink once) → <0> (Blink once) →
<6 > (Blink once) → <1 > (Blink twice)
NOTE 1 : Each digit must be entered within 10 seconds, or the Remote Control shall exit the current
programming state.
NOTE 2 : Two short LED blinks indicate valid code.
NOTE 3 : A long LED display indicates invalid code sequence. The code should be re-entered.
53
Page 59

Searching for a Device Code
If none of the codes listed in Device Codes list is found, you
can search for a set of commands that will work. Your Remote
will sample all the codes in its system to fi nd one that will allow
you to control your device.
As the Remote searches its library, it starts with the most
popular device in the category and works through to the end.
To cycle through each available device code and sample its
functions:
Mode → <<SET UP>> (2 blinks)→ [9] [9] [1] (2 blinks) → <Ch▲▼> → <Ch▲▼> → …
<<SET UP>> (2 blinks)
STEP 1 Select the [MODE] by pressing DVD, CAB/SAT, or AUX.
STEP 2 Depress and hold SET UP button for a minimum of 3 seconds until LED blinks twice.
STEP 3 Enter the code(digit) sequence [9][9][1]. The LED blinks once for every digit entered
except for the last digit, where it shall blink twice to confi rm that [9][9][1] are entered
correctly.
STEP 4 Press Ch
▲▼ repeatedly to cycle through each corresponding function until your
device turns off (or on).
STEP 5 Press SET UP button will store the new device code and returns to normal operation.
The LED blinks twice in confi rmation.
Mode Device Assignment
Device
Group no.
TV Locked to this TV (Default) -------
DVD Universal VCR, DVD, PVR 2
CAB/SAT Universal Cable, Satellite, Video Accessory 0
AUX
Universal Tuner, Amplifi er, CD, Mini Disc. And Misc. Audio,
Home Automation
3
Example: [VCR ] → <<SET UP>> (2 blinks) →[9]→[9]→[1] (2 blinks) → <Ch▲▼> →
<Ch▲▼>→… [SET UP] (2 blinks).
54
Page 60
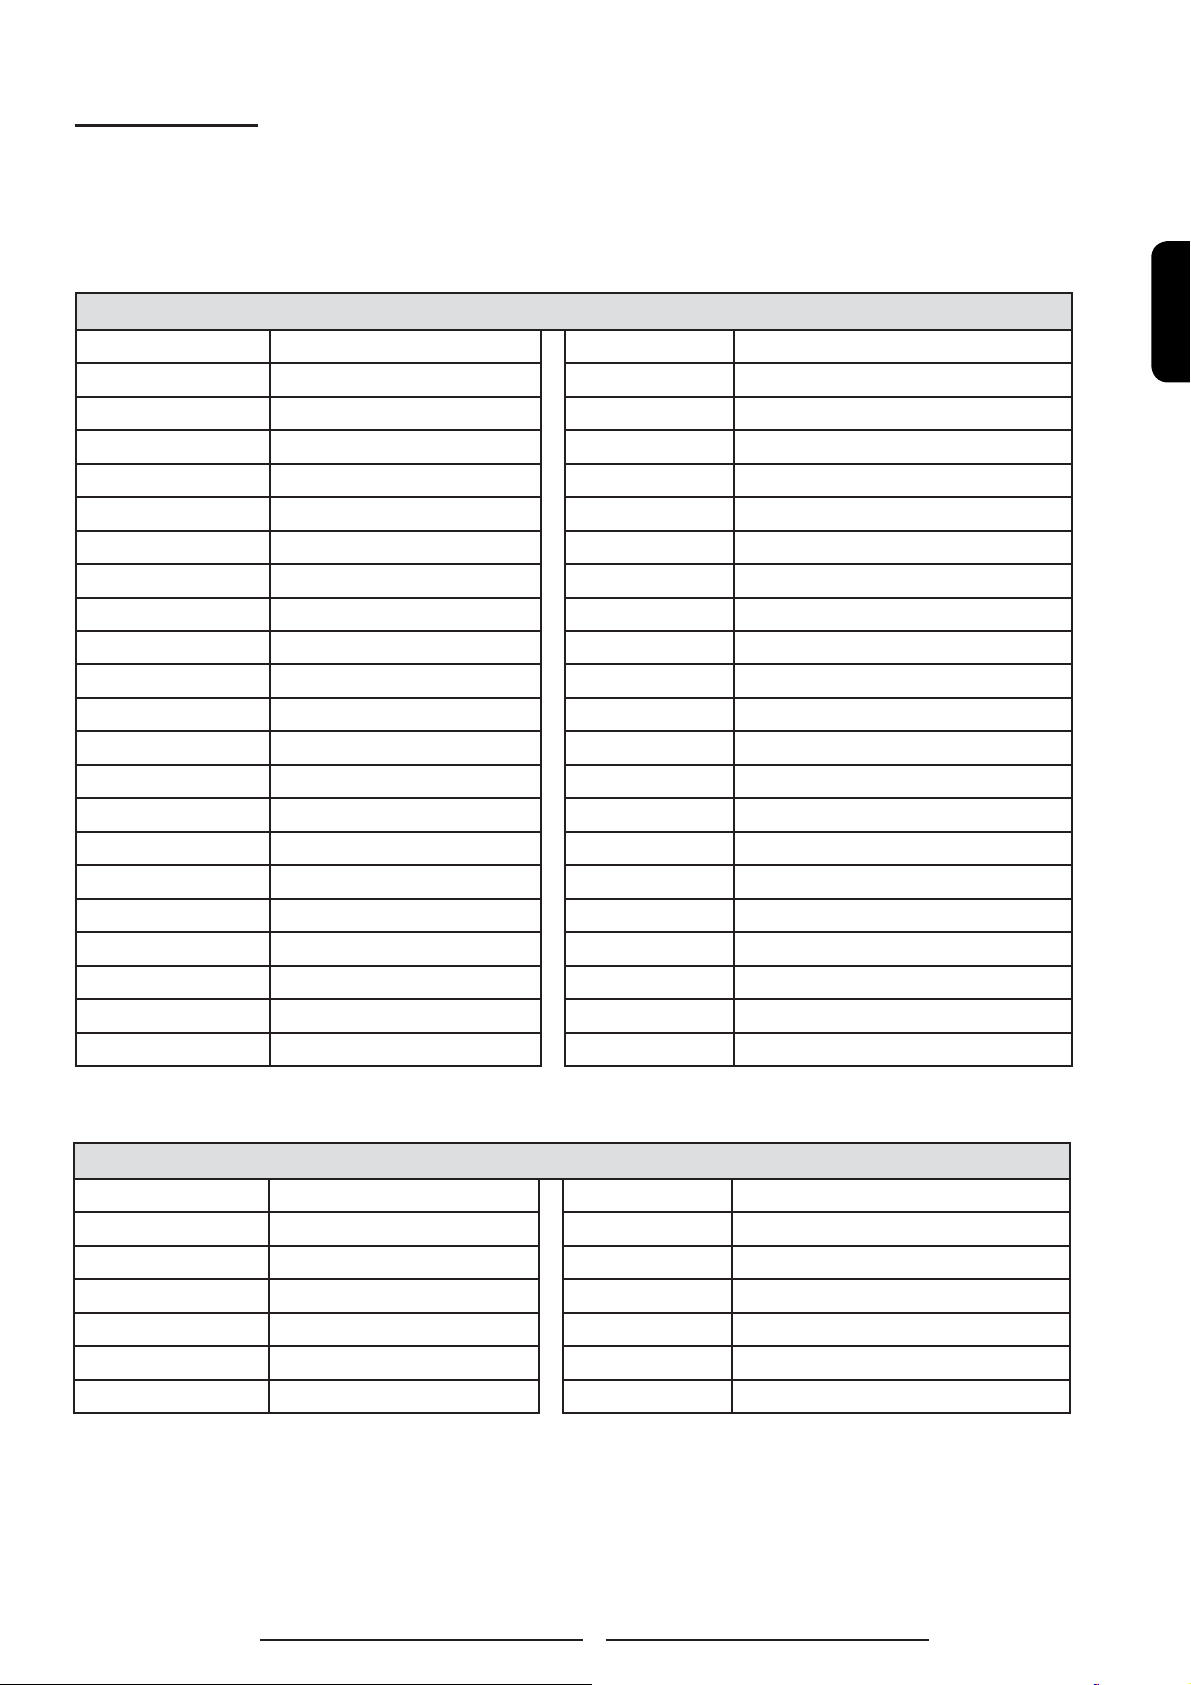
Device Codes
The following sections list the available device codes for each device mode button. If there
is more than one code listed for device, enter the fi rst one, and try the POWER button. If the
device turns on (or off), the code is correct. If it does not, try the next code. Repeat until you
fi nd a code that works.
Audio Amplifi ers
Adcom 0577,1100 Modulaire 0395
Aiwa 0406 NEC 0264
Arcam 0269 Naim 0269
Bose 0674 Nakamichi 0321
Carver 0892,0269 Optimus 0013,0300,0823,0395
Cinema Sound 0160 Panasonic 0308,0521
Curtis Mathes 0300 Pass Labs 0269
Denon 0160 Philips 0892,0269
Durabrand 1561 Pioneer 0013,0300,0823
Elan 0647 Polk Audio 0892,0269
GE 0078 RCA 0013,0300,0823
Grunding 0269 RadioShack 0395
Harman/Kardon 0892 Realistic 0013,0395,0220
JVC 0331 Revox 0269
Left Coast 0892 Sansui 0321
Lenoxx 1561 Shure 0264
Linn 0269 Sony 0815,0220,0689
Luxman 0165 Soundesign 0078
Magnavox 0269 Technics 0308,0521
Marantz 0892,0269,0321 Victor 0331
McIntosh 0251 Wards 0013,0078
Micromega 0269 Yamaha 0354,0133
ENGLISH
Miscellaneous Audio
Altec Lansing 1485 Marantz 1491
Cambridge Soundwirks 1530 Motorola 1464
Creative 0872 Netgear 1785
D-Link 1522 Omnifi 1605
Imerge 1491 Onkyo 1789
Integra 1789 SSI 1522
Jerrold 0520 Yamaha 1809,1810
55
Page 61

Audio Amp/T uners
ADC 0531 Fisher 1801,0801,0042,0360,0219,0008
AMC 1077 Garrard 0463,0424
AMW 1563,1615 Gateway 1517,1567
Aiwa 1243,1405,1388,1641,0189,0121,
0405,0158
Akai 1255,1512,0244,0346 Grunding 0189
Alco 1390 Harman/Kardon 0110,1304,1306,0891,0189,1289
Amphion Media Works 1563,1615 Hewlet Packard 1181
Anam 1609,1074 Hitachi 1273,1801
Apex 1257 Initial 1426
Apex Digital 1774,1257,1430 Inkel 0491
Acram 1189,1120 Integra 0842,0135,1320,1298
Audiotronic 1189 JBL 0110,1306
Audiovox 1390,1627 JVC 1058,1374,1495,1811,0074
B & K 0820,0840,0701,0702 KLH 1428,1390,1412
BK 0702 Kawasaki 1390
Bose 1229,0639,1253 Kenwood 1313,1570,1569,0186,0042,0239,
Brix 1602 Koss 1497,1366,0424
Cairm 0189 LG 1293
Cambridge Soundworks 1370 LXI 0181
Capetronic 0531,0195 Lasonic 1798
Carver 1189,0189,0121,1289,0042,0360,
0008
Casio 0195 Lexicon 1076
Clarinette 0195 Linn 0189
Classic 1352 Liquid Video 1497
Coby 1389 Lloyd’s 0195
Compaq 1136 Lloyds 0195
Cirtertion 1420 MCS 0039,0346
Curtis Mathes 0014,0080,0039 Magnavox 1189,1269,0531,1266,0189,1514,
Daewoo 1250 Marantz 1189,1269,0891,0189,1289,1120, 0039
Dell 1383 McIntosh 1289
Delphi 1414 Micromega 1189,0189
Denon 1142,1360,1306,0121,0004 Misubishi 1393
Emerson 0531,0195,0124 Modulaire 0195
Go Video 1352,1532
0027,0077
Lenoxx 1437
0195,0391,1120
56
Page 62

Audio Amp/T uners
Myrad 1189 Samsung 1295,1500
NAD 0320 Sansui 1189,0189,0346
Nakamichi 1313,0097,1555,0347 Sanyo 1801,1469,1251,0801,0360,0219
New Castle 0502 Scott 0322,0163
Nikko 0322 Sears 0195,0424
Nikkodo 0322 Sharp 0186,1286
Norcent 1389 Sharper Image 1556
Nova 1389 Sherwood 1077,1653,0491,0502,1423
Onkyo 0842,0135,1320,1298,1531 Shinsonic 1426
Optimus 1023,0531,0014,1074,0670,0121,
0186,0080,0195,0738,0801,0042,
0181,0502,0219,0158,0074,0163,
0177
Oritron 1497,1366 Sirius 1811,1602,1627
Outlaw Audio 0391 Sonic Blue 1869,1532,1383
Panasonic 1308,1518,1548,1288,1316,1763,1
764,1633,0309,0367,0039
Penney 0195 Sounddesign 0670
Penneys 0195,0039 Steresphonics 1023
Philips 1189,1269,0891,1266,0189,0391,
1120
Pioneer 1023,1384,0531,0014,0150,0630,
0080,0801,0244,0346
Polaroid 1508 Technics 1308,1518,1633,0309,0039
Polk Audio 0189,1289,1414 Thorens 1 189
Proscan 1254,0054 Thoshiba 0842,0135,0080
Quasar 0039 Venturer 1390
RCA 1023,1609,1254,0531,1511,1390,
1074,0080,0360,0054,1154,0346
RadioShack 1609,0181 Waitec 1352
Siemens 0424
Sony 1058,1441,1258,1759,1758,1622,
1858,1658,1558,1406,0405,0474,
1349,1442,0158
Sunfi re 1313
Teac 1267,1390,1074,1528,0463,0163
Victor 0074
ENGLISH
Realistic 1609,0121,0186,0195,0042,0181,
0158,0163,0177
Regent 1437 XM 1406,1414
Revox 0189 Yamaha 1023,0176,1176,1375,1331,1276, 0186
Rio 1869,1383 Yorx 0195
Rio Audio 1383 Zenith 1293,0857,0346
Saba 1519
Wards 0014,0189,0080,0042,0054,0158
57
Page 63

Cable Converters
A-Mark 0008,0144 Nova Vision 0008
ABC 0237,0003,0008 Novaplex 0008
Accuphase 0003 Pace 0877,1877,0237,0008
Acorn 0237 Panasonic 0000,0008,0144,0107
Action 0237 Paragon 0000,0008,0525
Active 0237 Penneys 0000
Americast 0899 Philips 1305,0317
Archer 0237 Pioneer 0877,1877,0144,0533
BCC 0276 Pulsar 0000
Bell South 0899 Quasar 0000
British Telecom 0003 Regal 0276,0279
Century 0008 Runco 0000
Digeo 1187 Samsung 0003,0144
Director 0476 Scientifi c Atlanta 0877,1877,0477,0237,0003,0000,
0008
Fosgate 0276 Sony 1006
GE 0144 Sprucer 0144
General Instrument 0476,0810,0276,0003 Starcom 0003
Gibraltar 0003 Supercable 0276
GoldStar 0144 Time Waener cable 1877
Hamlin 0009 Torx 0003
Hitachi 0003,0008,0009 Toshiba 0000
Insight 0476,0810 US Electronics 0276,0003,0008
Jerrold 0476,0810,0276,0003 United Cable 0276,0003
Memorex 0000 Videoway 0000
Mitsubishi 0003 Zenith 0000,0008,0525,0899
Motorola 0476,1376,0810,0276,1187
58
Page 64

Satellite Receivers
AlphaStar 0772 Motorola 0869,0856
Bell ExpressVu 0775 NEC 1270
Chaparral 0216 Netsat 0099
DirecTV 0566,0639,1639,1640,0247,0749,
1142,1442,0724,0819,1856,1108,
1609,0392,1392,1076,0099
Dish Network 0775 Optimus 0724
Dish Network System 0775,1775,1005,1505 Panasonic 0701,0247
Dishpro 0775,1775,1005,1505 Paysat 0724
Echostar 0775,1775,1005,1505 Philips 0749,1749,1142,1442,0775,0724,
Expressvu 0775,1775 Pioneer 1142,1442
GE 0566, 0392 Primestar 0869
GOI 0775,1775 Proscan 0566,0392
General Instrument 0869 RCA 0566,1142,1442,0775,0143,0855,
Goodmans 1246 RadioShack 0566,0775,0869
HTS 0775,1775 SKY 0856,0099
Hitachi 1250,0749,0819 Samsung 1142,1442,1276,1108,1609
Houston tracker 0775 Sanyo 1219
Hughes 0749,1749,1142,1442 Sony 0639,1639,1640
Hughes Network
Systems
Innova 0099 Star Trak 0772,0869
0749,1749,1142,1442 Star Choice 0869
Next Level 0869
0722,0819,1076,0099
0392,1392,0566,0775,0869
ENGLISH
JVC 0775,1775 Thomson 0566,0392
Jerrold 0869 Tivo 1142,1442
LG 1226 Toshiba 0749,1749,0790,1285,0819
Magnavox 0724,0722 Ultimate TV 1640,1392
McIntosh 0869 Uniden 0724,0722
Memorex 0724 Voom 0869
Mitsubishi 0749 Zenith 0856,1856
59
Page 65

TVs
A-Mark 0047,0054 Brockwood 0030,0178
AOC 0180,0030 Brocksonic 0236,0463,0180
Accuscan 0047 CXC 0180
Action 0030 Candle 0030
Admiral 0047,0054,0017,0051,0093,0463,
0180
Advent 0761,0783,0815,0817,0842 Capetronic 0030
Adventuri 0000 Carnivale 0030
Agna 0150 Carver 0054
Aiko 0092 Celebrity 0000
Akai 0060,0702,0672,0030,0145,0812 Celera 0765
Albatron 0700,0843 Changhong 0156,0765,0783,0767
Alfi de 0672 Cineral 0451,0092
Alleron 0030 Citek 0047
Ambassador 0150 Citizen 0054,0000,0451,0463,0180,0060,
America Action 0180 Clarion 0180
American High 0000,0060 Classic 0030.0092
Amstrad 0171 Colortyme 0047,0054,0017,0060,0030,0178
Amtron 0000,0180 Commercial Solutions 0047,1447
Anam 0180 Conic 0178
Apex 0156,0748,0765 Contec 0180
Apex Digital 0156,0748,0765,0879,0767 Craig 0180,0171
Audinac 0180 Crosley 0054,0000,0180,0030,0171
Audiovox 0451,0180,0092,0623 Crown 0093,0180,0672
Aumark 0060 Crown Mustang 0672
Aventura 0171 Curtis Mathes 0047,0054,0154,0000,0051,0451,
Baysonic 0180 Daewoo 0451,1661,0672,0178,0092,0623,
Beaumark 0017,0030,0178 Dayton 0092
Belcor 0030 Daytron 0030,0178,0092
Bell & Howell 0054,0154,0093 Dell 1454
Capehart 0017,0030,0178,0092
0030,3392,0171
0093,0180,0060,0702,0030,0178,
0145,0166,1147,1347
1755,1756,0661
Bell and Howell 0054,0154,0093 Delta 1369
BenQ 1756,1032 Denon 0511,0145
Bradford 0180 Dumont 0017,0180,0178
60
Page 66

TVs
Durabrand 0463,0180,0178,0171,1034,1463 Helios 0865
Dwin 0093 Hello Kitty 0451
ESA 0171,0815 Hisense 0748
Eaton 0060 Hitachi 0047,0054,0017,0000,0051,0145,
1145
Electroband 0000 Hyundai 0865
Electrograph 1755 Ima 0236,0180,0178
Electrohome 0154,0000,0150,0030,0178 Infi nity 0054
Emerald 0178 Inteq 0017,0145
Emerson 0047,0154,0451,0236,0463,0180,
0150,0178,0171,0623
Envision 0030 JCB 0000
Fisher 0054,0154,0000 JIL 0030
Fortress 0093 JVC 0054,0053,0030,1253,0731
Funai 0000,0180,0171 Jensen 0761,0815,0817
Futuretech 0180 Jutan 0030
JBL 0054
ENGLISH
GE 0047,0000,0051,0451,0060,0030,
0178,1147,1347,1447
Gateway 1755,1756 KLH 0156,0180,0765,0767
Gemini 0047 KTV 0463,0180,0030
Gibraltar 0017,0000,0030 Kamp 0017,0180
Gibralter 0017,0030 Kawasho 0030
Go Video 0060 Kenwood 0180,0030
GoldStar 0047,0054,0030,0178 Kloss 0030
Goodmans 0360 Kloss Novabeam 0030
Gradiente 0053 Konka 0180
Grundig 0672,0706 LG 0442,0054,1625,0060,0030,0178,
Grundy 0180 LXI 0047,0054,0017,0154,0000,0156,
Grunpy 0180 Lark 0154
Haier 1034 Lloyds 0236,0180,0030
Hallmark 0236,0180,0178 Loewe 0136
Harley Davidson 0000,0180,0060,0030,0178 Logik 0236,0180
Harman/Kardon 0054 MGA 0150,0030,0178
KEC 0180,0060
0700
0051,0093,0060,0053,0030,0178,
0171,0166,1347
Harvard 0180 MGN Technologu 0178
Havermy 0093 MTC 0180,0060,0030,0092
Heathkit 0017 Magnasonic 0054,0000,0156,0093,0030,0092
61
Page 67

TVs
Magnavox 0047,1454,0054,0154,0000,0051,
0250,0180,0060,0030,0092,0171,
0706,1254,1755
Majestic 0017 Penny 0047,0156,0051,0060,0030,0178,
Marantz 1454,0054,0030 Pennys 0047,0000,0156,0051,0250,0060,
Matsushita 0051,0250,0650 Paxonic 0060,0030
Maxcent 1755,1756 Philco 0054,0463,0030,0145
Maxent 1755 Philips 1454,0054,0017,0000,0030,0171,
Megapower 0700 Pilot 0051,0060,0030,0178
Megatron 0047,0178,0145 Pioneer 0166,0866,0679
Memorex 0154,0463,0180,0150,0060,0030,
0178
Micro Genius 0150 Portland 0451,0092
Midland 0047,0017,0051 Precision 0236,0180
Petters 1523
1347
0030,0178
1254,0690
Polaroid 0765,0865,1276,1341,1523
Mitsubishi 0154,0093,0150,1250,0030,0178,
0836
Monivision 0700,0843 Princeton 0700
Motorola 0054,0051,0093,0150 Prism 0051,0250
Multitech 0180 Proscan 0047,0030,1347,1447
NAD 0156,0178,0166,1156,0866 Proton 0178
NEC 0047,0030,0178,1704 Pulsar 0017,0092
NTC 0092 Pulser 0178,0092
NetTV 1755 Quartz 0150,0178
Nikko 0047,0017,0154,0156,0030,0178,
0092,1347
Nikkodo 0030,0178,0092 RCA 0090,1547,0047,0054,0000,0051,
Nishi 0030 Rabbit 0047
Norcent 0748 RadioShack 0047,0154,0180,0150,0030,0178
Nyon 0000 Realistic 0047,0154,0180,0150,0030,0178
Onwa 0180 Runco 0017,0060,0030
Optimus 0154,0250,0093,0180,0150,0030,
0178,0166,0650,0079
Optonica 0093 SSS 0180
Prima 0761,0783,0815,0817
Quasar 0051,0250,0650
0093,0178,1047,1147,1247,1347
SR2000 0154,0171
Orion 0017,0236,0463,0180,0178,1463 SV2000 0054
PCE 0156,0060 SVA 0748,0865
Pace 0092 Sampo 0047,0030,1755,1756
Panda 0706 Sanky 0060,0030
Panasonic 0047,0054,0154,0000,0156,0051,
0250,0093,0236,0150,0060,0053,
0030,0178,0145,1347,0650
Samsung 0047,0054,0017,0154,0060,0702,0030,017
8,1060,0812
62
Page 68

TVs
Sansui 0463,0060,0030 Techwood 0051,0250,0060
Sanyo 088,0047,0054,0154,0000,0463,
0171,1755
Saville 0060 Telecolor 0017
Scotch 0178 Telefunken 0702
Scott 0236,0180,0030,0178 Thomas 0047,0178
Sears 0047,0054,0017,0154,0000,0156,
0051,0093,0060,0053,0030,0178,
0171,0166
Sharp 0054,0093,0180 Tocom 0156
Sheng Chia 0093 Toshiba 0154,0156,0150,1265,0060,0145,
Shivaki 0178 Totevision 0051
Siemens 0145 Toyomenka 0178
Signature 0054 Truetone 0051,0250
Signature 2000 0047,0093,0030 Ultra 0092
Simpson 0030,0178 Universal 0047
Singer 0060,0092 V 1755,1756
Solar Drape 0000 Vector Research 0030
Teknika 0054,0463,0180,0150,0060,0178,
0092
Thomson 0047,1447
0166,1145,1156,1256,1356,1656,
1704,0650
ENGLISH
Sony 1100,0017,0154,0000,0150,0053 Victor 1100,0053
Soundesign 0180,0178 Vidikron 0054
Spectravision 0156,0178 Vidtech 0178
Squareview 0171 Viewsonic 1755
Starlite 0236,0180 Viking 0060
Studio Experience 0843 Visio 1755,1756
Supreme 0000 Vizio 1756
Sylvania 0047,0054,0154,0000,0051,0030,
0178,0092,0171
Symphonic 0000,0180,0178,0171 Waycon 0156
TMK 0236,0180,0178 Welton 0178
TNCi 0017 Westinghouse 0451
TVS 0463 White Westinghouse 0451,0236,463,0623
Tandy 0093 World 0451,0236,0463,0180
Tatung 0000,0051,1756 XR1000 0154,0180,0171
Teac 0154,0706 Yamaha 0030
Wards 0047,0054,0017,0154,0000,0156,
0051,0093,0236,0180,0060,0030,
0178,0166,1147,1347,1156,0866
Technics 0047,0054,0017,0051,0250,1347,
0650
Technovox 0030 Zenith 0047,0017,0000,0093,0463,0030
York 0030
0178,0145,0092,0171,1145,0812
63
Page 69

VCRs
A-Mark 0000,0037,0240 Crosley 0000,0035,0081
ABS 1972 Crown 0072
Admiral 0060,0048,0039,0047,0104,0209 Curtis Mathes 1035,0000,0035,0060,0162,0240,
0041
Adventura 0000,0037,0240 CyberPower 1972
Adyson 0072 Cybernex 0240
Aiwa 0124,0000,0037 Daewoo 1278,0037,0045
Akai 0175,0041 Daytron 0037
Alba 0209,0072 Dell 1972
Alienware 1972 Denon 0081,0042
Allegro 0039 Derwant 0041
American High 0035,0081 DirecTV 0739
Amstrad 0000 Dual 0000
Asha 0240 Durabrand 0039
Astra 0035,0240 Dynatech 0000,0240
Audiovox 0037 Electrohome 0000,0060,0037,0240,0043,0209
Avis 0000,0072 Electrophnic 0037
Beaumark 0240 Emerald 0184,0121
Bell & Howell 0000,0035,0048,0039,0104 Emerex 0032
Bell and Howell 0000,0035,0048,0039,0104 Emerson 1479,1278,0000,0037,0184,0240,
0121,0043,0209
Broksonic 1479,0184,0121,0209 Fisher 0000,0039,0047,0104
CCE 0072 Fuji 0035,0033
Calix 0037 Fujitsu 0000
Candle 0037 Funai 0000,0037,0072
Canon 0035 GE 1035,1060,0807,0000,0035,0060,
0048,0240
Carrera 0240 Garrard 0000
Carver 0035,0081 Gateway 1972
Citizen 1278,0000,0035,0037,0240,0209 Gemini 0060
Classic 0037 Genexxa 0000,0037
Colortyme 0035,0060,0045 Go Video 0614,0240
Colt 0000,0072 GoldStar 1237,0000,0035,0037,0039
Craig 0037,0047,0240,0072 Goodmans 0000,0037,0081,0072
Criterion 0000,0072 Gradiente 0000
64
Page 70

VCRs
Granada 0081,0042 MEI 0035
Grundig 0081 MGA 0060,0240,0043
HI-Q 0000,0035,0047 MGN Technology 0240
HP 1972 MTC 0000,0240,0072
Harley Davidson 0000 MTX 0000
Harman/Kardon 0081 Magnasonic 1278,0000,0037,0240,0072
Harvard 0072 Magnavox 1781,0000,0618,0035,0037,0048,
0039,0081,0240
Harwood 0072 Magnin 0240
Hewleet Packard 1972 Marantz 0035,0081
Hitachi 0089,0000,0035,0037,0045,0042,
0041
Howard Computers 1972 Matsui 0037,0209
Hughes Network
Systems
Humax 0739 Media Center PC 1972
Hush 1972 Memorex 1237,0000,0035,0037,0048,0039,
Hytek 0000,0047,0072 Metz 0037
ITT Nokia 0240,0041 Microsoft 1972
JVC 0067,0041 Midland 0240
Janeil 0240 Mind 1972
Jensen 0067,0041 Minolta 0042
KEC 0037 Mitsubishi 0807,0000,0060,0048,0047,0042,0067,00
KLH 0072 Movie Walker 0072
0739,0042 Matsushita 0035,0081,0162
Marta 0037
0047,0162,0240,0104,0209,0072
43,0041
ENGLISH
KTV 0000 Multitech 0000,0039,0072
Kenwood 0067,0041 NAD 0240,0104
Kodak 0035,0037 NAP 0035,0037,0039,0033,0042
LG 0037,0240 NEC 0067,0104,0041
LXI 0000,0037,0042,0067 Newtech 0072
Linksys 1972 Nikko 0037
Lloyd’s 0000 Nikkodo 0037
Lloyds 0000,0240,0072 Nishi 0240
Loewe 0081 Niveus Media 1972
Logik 0000,0240,0072 Noblex 0240
M Electronic 0240 Northgate 1972
65
Page 71

VCRs
Olympus 0035,0162,0104 STS 0042
Onkyo 0222 SV2000 0000,0072
Optimus 0000,0035,0037,1062,0048,0047,
0162,0240,0104
Orion 1479,0000,0184,0240,0104,0121,
0209
Panama 0035 Samtron 0240
Panasonic 0225,1035,0000,0614,0616,0035,
1062,0162
Penny 1237,1035,0035,0037,0042,0240 Sansui 1479,0000,0067,0240,0209,0041,
Pennys 0000,0035,0037,0047,0081,0162,
0042,0067,0240
Pentax 0042 Scott 0184,0045,0121,0043
Philco 0000,0038,0081,0209 Sears 1237,0000,0035,0060,0037,0048,
Philips 0000,0616,0618,0739,0035,0048,
0081,0162,0045,0209
Pilot 0037 Shintom 0000,0039,0240,0072
Pioneer 0081,0162,0042,0067 Shogun 0240
Polk Audio 0081 Siemens 0037,0104
Profi tronic 0240 Signature 0035
Proscan 1060,0060 Signature2000 0000,0035,0060,0037,0048
SVA 0000
Samsung 0000,1014,0739,0060,0045,0240
Sanky 0048,0039
0072
Sanyo 0159,0000,0047,0240,0104
0039,0047,0033,0162,0045,0067,
0104,0043,0209,0041,0072
Sharp 0807,0000,0048,0047,0032
Protec 0000,0072 Singer 0037,0240,0072
Protech 0072 Sonic Blue 0614,0616
Pulsar 0039,0240 Sony 1232,0000,0636,1972,0035,0047,
0032,0033,0067
Pulser 0240 Soundmaster 0000
Quartz 0035,0047 Stack9 1972
Quasar 1035,0035,0162 Sylvania 1781,0000,0035,0081,0043
RCA 1035,1060,0807,0000,0880,0035,
0060,0048,0045,0042,0240
RadioShack 0000,0035,0037,0048,0047,0162,
0240,0104
Radix 0037 TMK 0000,0240
Randex 0037 TNIX 0037
Realistic 0000,0035,0037,0048,0047,0162,
0240,0104,0121
Replay TV 0614,0616 T andy 0000,0104
Ricavision 1972 Tatung 0000,0048,0081,0067,0041
Runco 0039 Teac 0000,0067,0041
Symphonic 0000,0240
Systemax 1972
Tagar Systems 1972
66
Page 72
VCRs
Technics 0000,0035,0060,0037,0039,0162 Victor 0067,0041
Tenika 0000,0035,0037 Video Concepts 0045
Telecorder 0240 Videomagic 0037
Telefunken 0041 Videosonic 0000,0240,0072
Thomas 0000 Viewsonic 1972
Thomson 0060,0041 Villain 0000
Tivo 0618,0636,0739,1503 Voodoo 1972
Tocom 0240 Wards 0000,0035,0060,0037,0048,0039,
0047,0081,0033,0045,0042,0240,
0043,0041,0072
Toshiba 0845,1145,0000,1503,1008,1972,
0045,0240,0043,0209,0041
Totevision 0037,0240 World 0209
Touch 1972 XR-1000 0000,0035,0072
Trix 0037 XR1000 0000,0035,0240,0072
Ultra 0045 Yamaha 0041
Unitech 0240 ZT Group 1972
Vector 0045 Zenith 1479,0000,0037,0039,0033,0209,
Vector Research 0184 iBUYPOWER 1972
Vextra 0072
White Westinghouse 0000,0209,0072
0041
DVD Players
3D LAB 0503,0539 Axion 0801,0869,0741
ENGLISH
Advent 1016 Blaupunkt 0717
Aiwa 0641 Blue Parade 0571
Akai 0899,0770,0705 Blue Sky 0695,0699
Alba 0672,0717 Brandt 0651
Alco 0709 Broksonic 0695,0868
Allegro 0869 California Audio Labs 0490
Apex 0533,0672,1056,1061,0830,0794,0
796,0797,1100,1020,0717,0755
Apex Digital 0672,1056,1061,0830,0794,0796,
0797,1100,1004,1020,0717,0755
Aspire 1168 CineVision 0869,0876,0833
Audiovox 0790,0717,1071,1121,1122 Cinea 0831
Celestial 1020
Centrex 0672,1004
67
Page 73

DVD Players
Citizen 1003,1277 GoldStar 0801,0869,0741
Clairtone 0571 Goodmans 0790
Coby 0778,1107 Gradiente 0490,0651
Craig 0831 Greenhill 0717
Creative 0503,0539 Grundig 0539,0705
Curtis Mathes 1087 Harman/Kardon 0582,0702
CyberHome 0816,1023,1117,1024,1129,0874 Hitachi 0573,0664,1247
Cytron 0705 Hiteker 0672
DVD2000 0521 IRT 0783
Daewoo 0869,1172,0784,0770,1169,0705,
0833
Dansai 0770 Integra 0571,0627
Decca 0770 JBL 0702
Denon 0490,0634 JMB 0695
Denver 0778 JVC 0623,1164,0558,0867
DiviDo 0705 Jensen 1016
Digitrex 0672 KLH 1020,0790,0717,1149
Disney 0675,1270 KLH Digital 0717
Dual 0675 Kawasaki 0790
Durabrand 1127 Kenwood 0490,0534
Electrohome 1003 Kloss 0533
Emerson 0675,0821,1268,0591 Koss 1061,0651
Enterprise 0591 LG 0801,0591,0869,0741
Entivo 0503,0539 Lasonic 0798,0627
Enzer 0770 Lecson 1533
Firstline 0651 Lenoxx 1127
Fisher 0670 Lite-On 1058,1158
Initial 0717
Funai 0675,1268,1334 LiteOn 1058,1158,1416,1440
GE 0522,0717,0815 Loewe 0511,0741
GPX 0699 Logix 0783
Gateway 1158,1073 Magnasonic 0675,0651
General Electric 0717 Magnavox 0503,0539,0675,0646,0821
Go Video 0573,1075,1044,0744,0717,0869,
0741,0783,1158,1099,1304,1730,
0833,0715
Go Vision 1071 McIntosh 1533
Marantz 0503,0539,0675
68
Page 74

DVD Players
Medion 0651
Memorex 0695,1270,0831 Realistic 0571
Microsoft 0522 Reoc 0752
Minato 0752 Revoy 0699
Mintek 0717,0839 Rio 0869
Mitsubishi 0521,1521 Rotel 0623
NAD 0591,0741 Rowa 1004,0823
NEC 0785,0869 SVA 0717
Naiko 0770 Saba 0651
Nesa 0717 Sampo 0752
Nexx Tech 1402 Samsung 0490,0573,0820,1075,0899,1044,
0744
Norcent 1003,1107 Sansui 0695
Onkyo 0792,0503,0627 Sanyo 0695,0675,0670,1334,0873
Optimus 0571 Schneider 0783
Orion 0695 Schwaiger 0752
Oritron 0651 Sensory Science 1158
Palsonic 0672 Sharp 0675,1256,0752,0630
Paniasonic 0503,0490,1762,0703,1362,1462,
1490,0571
Philips 0503,0539,0675,1267,0646,0854,
1354,1260
Phonotrend 0699 Shinsonic 0533,0839
Sharper Image 1117
Sherwood 0770,1043
ENGLISH
PianoDisc 1204 Slim Art 0784
Pioneer 0571,0525,0631 Sonic Blue 0573,0869,0783,1099,0175
Polaroid 1061,1020 Sony 0533,1033,1461,0864,1533
Polk Audio 0539 Sova 1122
Portland 0770 Superscan 0821
Prima 1016 Sylvania 0675,0821,1268,0630
Provision 0778 Symphonic 0675,0821,1268,1334
Proceed 0672 Tatung 0770
Proscan 0522 Teac 0809,0571,0790,0717
Prosonic 0699 Technics 0490,0703
Qwestar 0651 Technika 0770
RCA 0522,0571,0822,1132,1022,0790,
0717
RadioShack 0571 Theta Digital 0571
Tevion 0651
69
Page 75

DVD Players
Thomson 0511,0522 Venturer 0790
Toshiba 0503,0695,1045,1154,0573,0539 Wesder 0699
US Logic 0839 Xbox 0522
USLogic 0839 Yamaha 0490,0539,0545
Unimax 0770 Zenith 0503,0591,0869,0741
Universum 0591 Zeus 0784
Urban Concepts 0503,0539 iLo 1348
70
Page 76

TROUBLESHOOTING
There is no picture or sound.
▪ Make sure the AC cord is connected.
▪ Verify that there is a valid source signal.
▪ Make sure the correct input mode is selected.
There is no picture from AV.
▪ Make sure the BRIGHTNESS is properly adjusted.
▪ The fl orescent lamp may have reached the end of its life. Contact
an authorized service center.
▪ Make sure the video source is plugged into the composite video-in
port.
There is no sound.
▪ Make sure the volume is not set to minimum.
▪ Make sure the sound is not muted
▪ Make sure that headphones are not connected.
ENGLISH
There is no picture or sound , just noise.
▪ The source signal may be weak.
▪ Your provider may be experiencing diffi culties.
▪ Check your input connections.
Picture is not clear.
▪ The source signal may be weak.
▪ The provider may be experiencing diffi culties.
▪ Check input connections.
71
Page 77

Picture is light or improperly tinted.
▪ Check the Hue, Saturation and Color adjustments.
▪ Reset the TV to the factory default settings.
The picture is too dark.
▪ Select a different APC mode.
▪ Check the Brightness of Picture Settings.
▪ The fl uorescent lamp may have reached the end of its life. Contact
an authorized service center.
Remote control does not work.
▪ Install new batteries.
▪ Make sure the remote sensor window isn’t blocked.
▪ Make sure the system is in the right mode (TV, CAB/SAT, DVD or
AUX.)
There are stripes on the screen or colors fade.
▪ There may be interference from other appliances.
▪ There may be interference between the video source cable and
the power cable.
▪ Make sure the power and video cables are not touching.
Check the Hue, Saturation and Color adjustments
72
Page 78

The picture is not sharp.
▪ The signal source may be weak.
▪ The provider may be experiencing diffi culties.
▪ Check input connections.
▪ Check the Sharpness of Picture Settings.
The picture moves.
▪ The source signal may be weak.
▪ The provider may be experiencing diffi culties.
▪ Check input connections.
The picture is doubled or tripled.
ENGLISH
The picture is spotted.
▪ The source signal may be weak.
▪ Check input connections.
▪ There may be interference from other appliances nearby or
around the LCD TV.
73
Page 79

SPECIFICATIONS
ITEMS 32”
Screen Size 31.51” TFT-LCD Panel
Aspect Ratio 16:9
Resolution 1366 x 768
Display Area (opening) H x V 697.68 mm x 392.25 mm
Panel
TV Function
Video Input
PC Input
Audio Input
Audio Output
Pixel Pitch 0.51075 mm x 0.51075 mm
Display colors 16.7 M
Contrast Ratio 1200 : 1 (typ.)
Brightness (center) 500 cd / m
Viewing Angle (CR≥20) 176o Hor. / 176o Ver. (typ.)
Response Time (GTG) 8 ms (typ.)
Broadcasting System Analog : NTSC M / N Digital : ATSC/Clear QAM
Receiving Channel Analog : PLL181Ch., CATV 125Ch Digital : 54M Hz~864M Hz
Sound System Analog : Multi-channel TV Sound Digital : Multi-Track Sound
Resolution Analog : 480i Digital : 1080i, 720p,480p, 480i
Data Broadcasting Close Caption , V - Chip
Composite Signal CVBS x 2
Y, C Signal S-Video x 2
Component Signal Y Pb Pr x 2 (720P / 1080i , HDTV ready )
HDMI Connection HDMI x 2
VGA Connection D-Sub 15 pin
Scanning Frequency f
Audio 1
Audio 2 Component
Audio 3
Speaker ( build-in)
Line Out
Digital Audio Out S / PDIF ( for HDMI and DTV) .
Function Keys Power , Source , Menu , Up/Down(Channel) , +/-(Volume) , ARC/EXIT
2
(typ.)
31.5 ~ 60KHz / fV = 56 ~ 75Hz
H =
Composite
S - Video
PC
10W + 10W (rms) @THD < 10%
Left / Right
Feature
Power
Dimension
Weight (net)
Video Performance
Audio Performance Subwoofer, Auto Volume Control (AVC)
Other Control Sleep Timer, Timer On, Timer Off
Power Supply AC 100V ~ 240V , 50 / 60Hz
Power Consumption < 180 W
W x H x D 828.0 mm * 651 .3mm * 240.0mm
Without Accessories 22Kg
3D Comb-fi lter , 3D De-interlace , Aspect Ratio Control (ARC) ,
Auto Picture Control, Video Enhance, Noise Reduction
74
Page 80

ITEMS 37”
Screen Size 37.02” TFT-LCD Panel
Aspect Ratio 16:9
Resolution 1366 x 768
Display Area (opening) H x V 819.6 mm x 460.8 mm
ENGLISH
Panel
TV Function
Video Input
PC Input
Audio Input
Audio Output
Pixel Pitch 0.6 mm x 0.6 mm
Display colors 16.7 M
Contrast Ratio 1200 : 1 (typ.)
2
Brightness (center) 500 cd / m
Viewing Angle (CR≥10) 170o Hor. / 170o Ver. (typ.)
Response Time (GTG) 8 ms (typ.)
Broadcasting System Analog : NTSC M / N Digital : ATSC/Clear QAM
Receiving Channel Analog : PLL181Ch., CATV 125Ch Digital : 54M Hz~864M Hz
Sound System Analog : Multi-channel TV Sound Digital : Multi-Track Sound
Resolution Analog : 480i Digital : 1080i, 720p,480p, 480i
Data Broadcasting Close Caption , V - Chip
Composite Signal CVBS x 2
Y, C Signal S-Video x 2
Component Signal Y Pb Pr x 2 (720P / 1080i , HDTV ready )
HDMI Connection HDMI x 2
VGA Connection D-Sub 15 pin x 1
Scanning Frequency f
Audio 1
Audio 2 Component
Audio 3
Speaker ( build-in)
Line Out
Digital Audio Out S / PDIF ( for HDMI and DTV) .
Function Keys Power , Source , Menu , Up/Down(Channel) , +/-(Volume) , ARC/EXIT
31.5 ~ 60KHz / fV = 56 ~ 75Hz
H =
Composite
S - Video
PC
10W + 10W (rms) @THD < 10%
Left / Right
(typ.)
Feature
Power
Dimension
Weight (net)
Video Performance
Audio Performance Subwoofer, Auto Volume Control (AVC)
Other Control Sleep Timer, Timer On , Timer Off .
Power Supply AC 100V ~ 240V , 50 / 60Hz
Power Consumption < 220 W
W x H x D 947.0 mm * 722.0 mm * 240.0mm
Without Accessories 25Kg
3D Comb-fi lter , 3D De-interlace , Aspect Ratio Control (ARC) ,
Auto Picture Control, Video Enhance, Noise Reduction .
75
Page 81

Panel
TV Function
Video Input
PC Input
Audio Input
Audio Output
ITEMS 42”
Screen Size 42.02” TFT-LCD Panel
Aspect Ratio 16:9
Resolution 1366 x 768
Display Area (opening) H x V 930.25 mm x 523.01 mm
Pixel Pitch 0.68 mm x 0.68 mm
Display colors 16.7 M
Contrast Ratio 1500 : 1 (typ.)
Brightness (center) 500 cd / m
Viewing Angle (CR>10) 178o Hor. / 178o Ver. (typ.)
Response Time (GTG) 8 ms (typ.)
Broadcasting System Analog : NTSC M / N Digital : ATSC/Clear QAM
Receiving Channel Analog : PLL181Ch., CATV 125Ch Digital : 54M Hz~864M Hz
Sound System Analog : Multi-channel TV Sound Digital : Multi-Track Sound
Resolution Analog : 480i Digital : 1080i, 720p,480p, 480i
Data Broadcasting Close Caption , V - Chip
Composite Signal CVBS x 2
Y, C Signal S-Video x 2
Component Signal Y Pb Pr x 2 (720P / 1080i , HDTV ready )
HDMI Connection HDMI x 2
VGA Connection D-Sub 15 pin
Scanning Frequency f
Audio 1
Audio 2 Component
Audio 3
Speaker ( build-in)
Line Out
Digital Audio Out S / PDIF ( for HDMI and DTV) .
Function Keys Power , Source , Menu , Up/Down(Channel) , +/-(Volume) , ARC/EXIT
H =
Composite
S - Video
PC
15W + 15W (rms) @THD < 10%
Left / Right
2
(typ.)
31.5 ~ 60KHz / fV = 56 ~ 75Hz
Feature
Power
Dimension
Weight (net)
“Polaroid” and “Polaroid and Pixel” are trademarks of Polaroid Corporation, Waltham, MA, USA.
Video Performance
Audio Performance Subwoofer, Auto Volume Control (AVC)
Other Control Sleep Timer, Timer On, Timer Off
Power Supply AC 100V ~ 240V , 50 / 60Hz
Power Consumption < 300 W
W x H x D 1067.0 mm * 815.0 mm * 270.0mm
Without Accessories 36.1Kg
3D Comb-fi lter , 3D De-interlace , Aspect Ratio Control (ARC) ,
Auto Picture Control, Video Enhance, Noise Reduction
For service, support and warranty information, visit www.polaroid.com.
76
20070315
 Loading...