

Page 1
IMPORTANT INFORMATION
OWNER’S MANUAL
Page 2
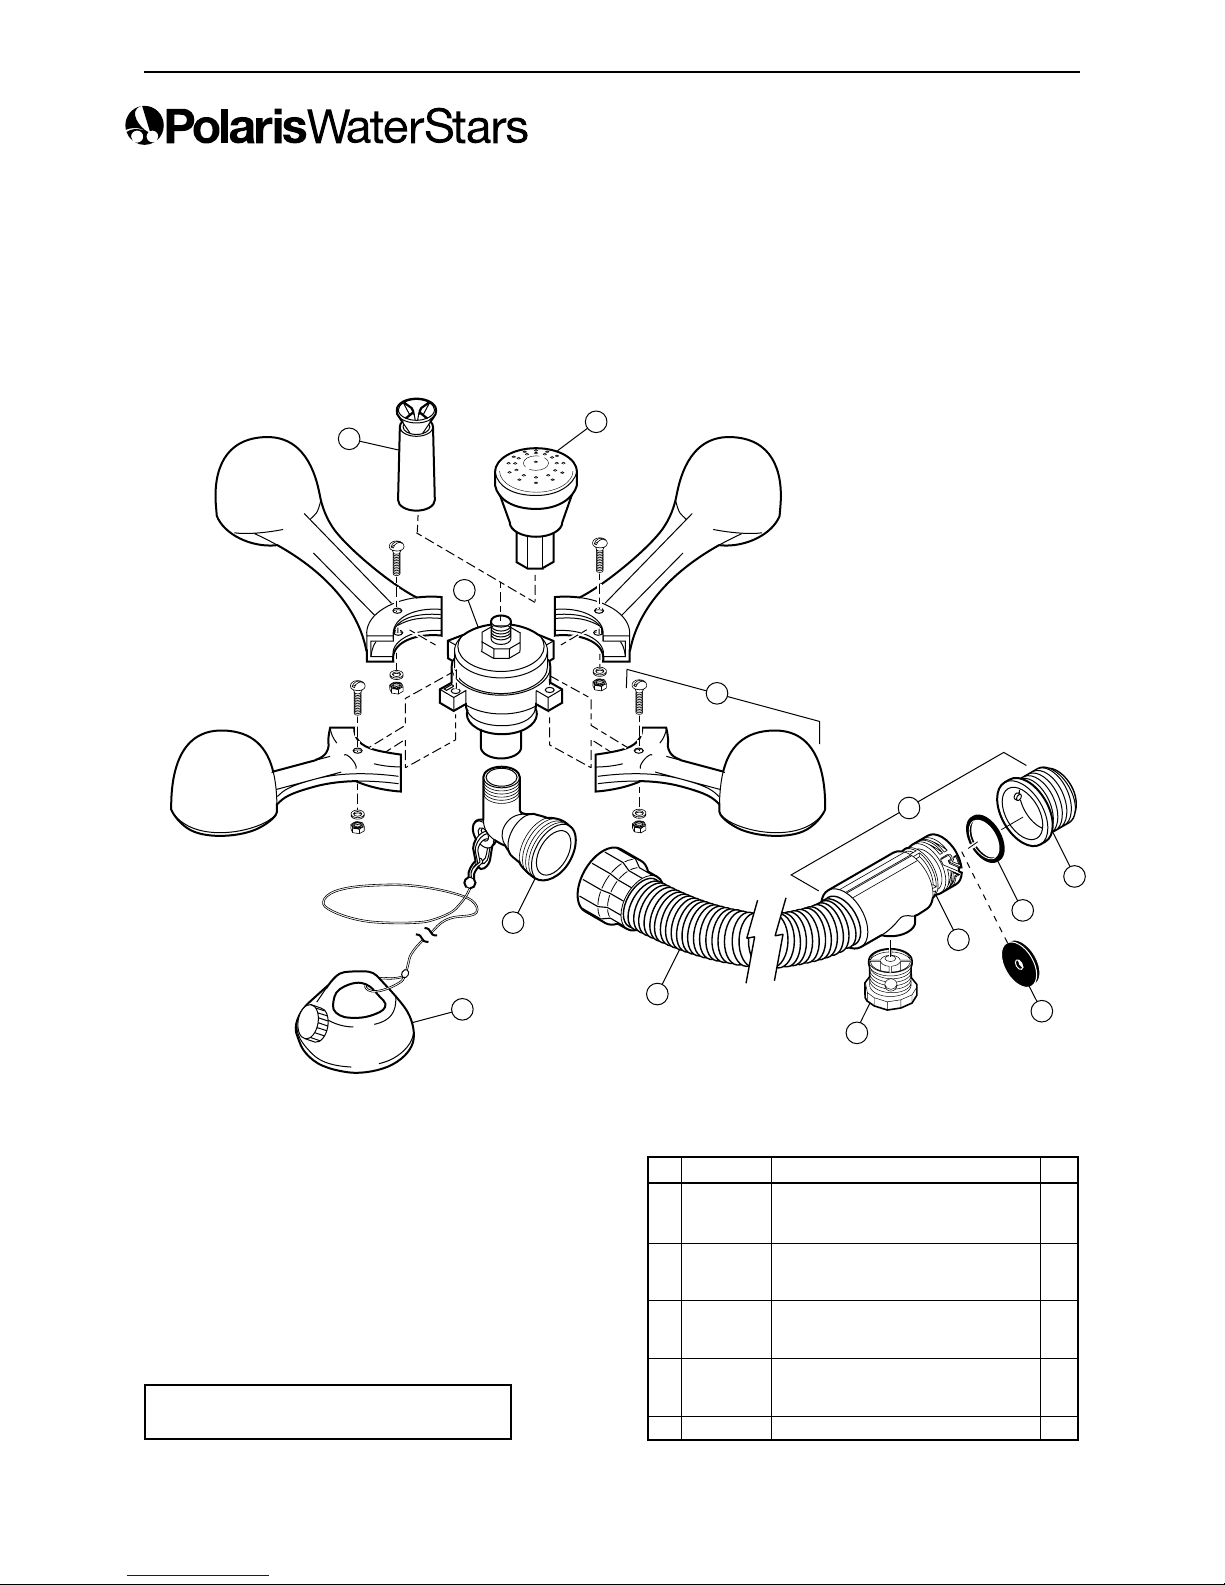
To ensure proper operation and long life for the
Polaris, be sure to insist on genuine Polaris parts.
No. Part # Description Qty
1 7-240-00 Fountain Head, Glory 1
2 7-230-00 Fountain Head, 3-tier 1
3 7-225-00 Center Assembly 1
4 7-200-00 Pod 4
5 7-260-00 Elbow 1
6 7-270-00 Anchor Assembly 1
7 7-310-00 Hose Kit, 10 Foot 1
8 11-203-00 Adjustable Plug, UWF 1
9 6-502-00 Quick Disconnect, UWF 1
10 6-505-00 O-ring, UWF/QD 1
11 6-500-00 Universal Wall Fitting (UWF) 1
12 7-295-00 UWF Connector Assembly 1
13 11-103-00 Restrictor Washer 1
Exploded Parts Diagram
1
3
5
6
2
4
12
11
10
9
7
13
8
Page 3
I. Introduction
Your new Polaris WaterStars will create a
beautiful fountain from the pressure of a typical
filtration pump. The greater the water pressure
delivered to the WaterStars, the higher your
fountain display can be.
The WaterStars comes with the universal wall
fitting connector assembly. Once the universal
wall fitting is installed, it is possible to quickly
and easily switch from a Polaris pool cleaner to
the Polaris WaterStars and back again. If the
pool cleaner is not equipped with a quick
disconnectXXX to fitting the universal wall
fitting, it can be converted to this improved
system with parts available through a
participating Polaris dealer.
If you do not currently have a pool cleaner,
please see Section V on page 3 for instruction
about Polaris automatic pool cleaners.
II. Installation Instructions
A. WaterStars Components
The Polaris WaterStars box contains:
•
Center As bly with Pods
• 3-tier Fountain Head
•
Glory Fountain Head
• 90-degree Elbow
•
Anchor Assembly
• Complete Hose Assembly with Quick
Disconnect and Universal Wall Fitting
• Restrictor Washer
B. Installing the Universal Wall Fitting
Note: It is important to hav a clean pool filter
before installing the WaterStars.
1. Turn on the pool fil tion pump and flush out
the plumbing line. Turn off the pump.
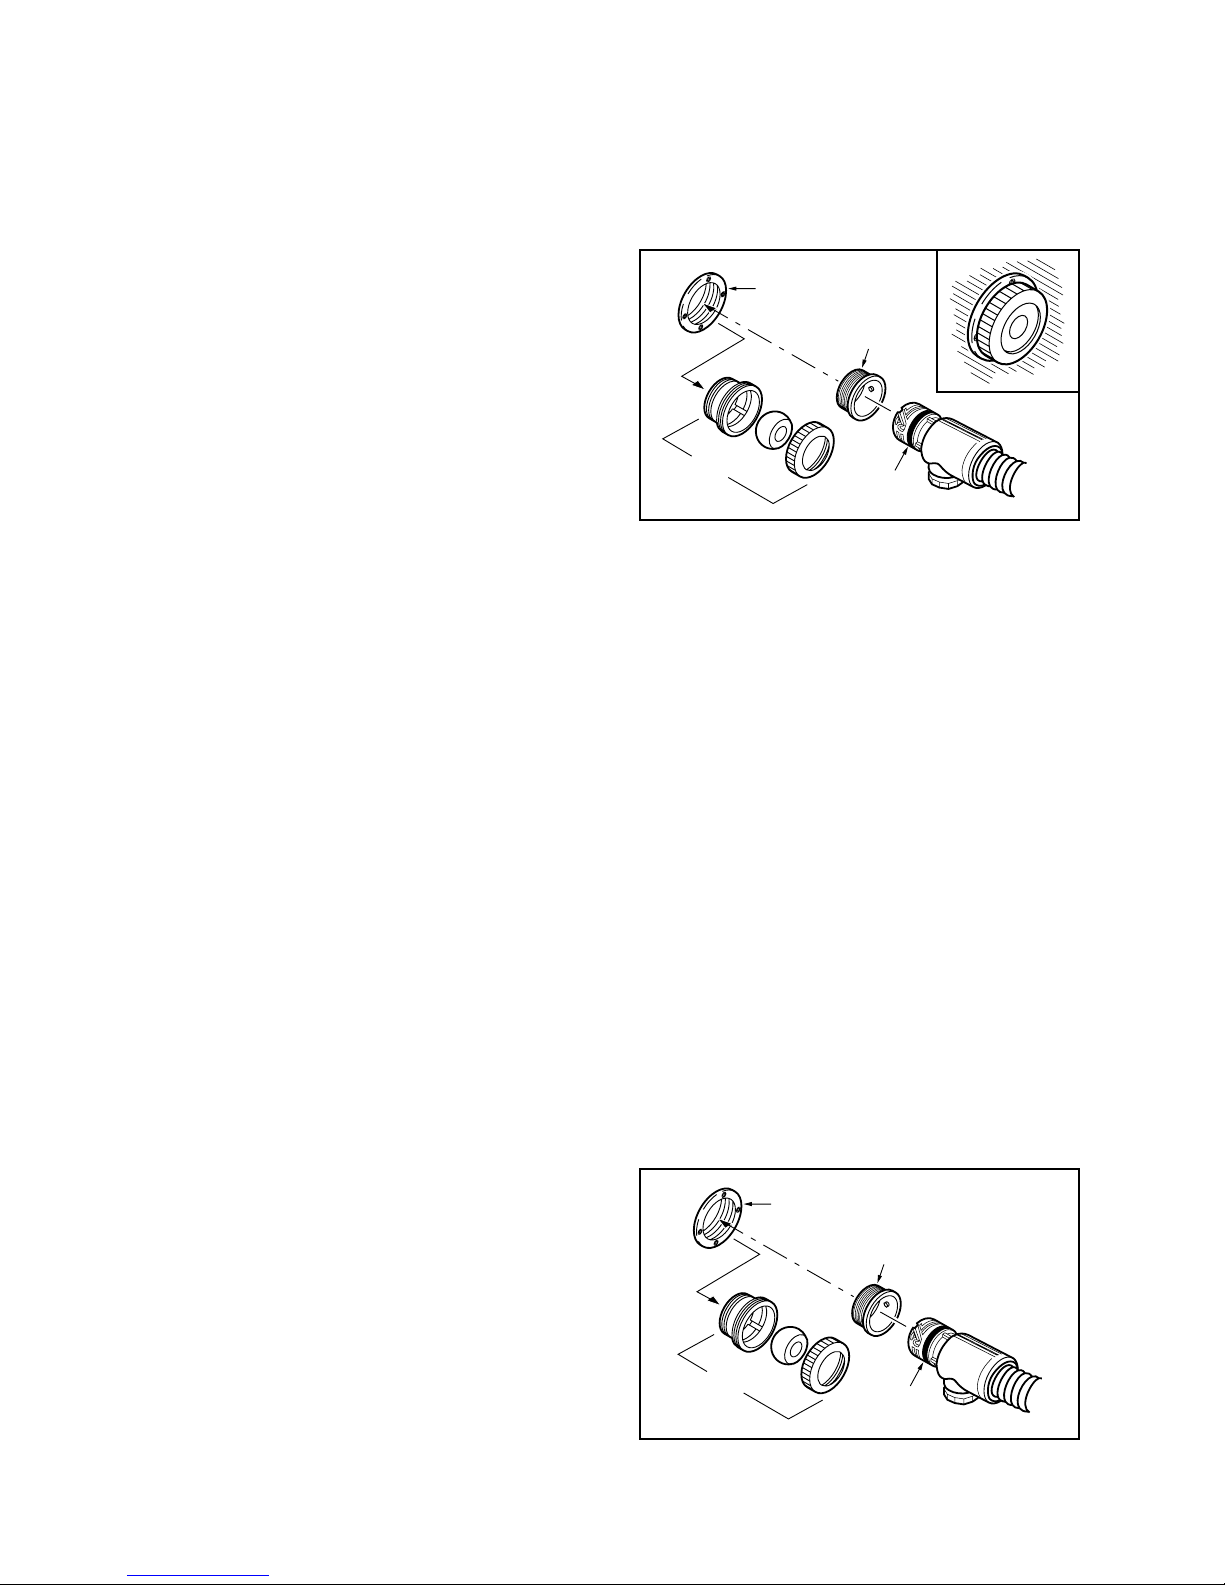
2. Unscrew the universal wall fitting from the
quick disconnect
• If the return line has 1-1/2" female threads
exposed, screw in the universal wall fitting by
hand. Turn the quick disconnect clock wise into
the universal wall fitting to tighten it into place.
Once the universal wall fitting is secure, the
quick disconnect can be removed without
reusing the universal wall fitting.
• If the return line for the Polaris looks like the
one below, remove the parts shown and install
the universal wall fitting as described above.
NOTE: If the pool does not have a 1-1/2" threaded
fitting, a special adapter kit will be required to
install the WaterStars. For further informtion,
contact your participating Polaris dealer
.
C. Assembling the WaterStars
1. Select either the 3-tiered fountain head or
the glory fountain head. Save the unused head
so you can change the water display as desired.
Screw the head onto the center as bly, being
careful not to over tighten.
2. Screw the small end of the elbow into the
bottom of the center assembly
3. Remove the cap from the anchor and fill it
with sand or small rocks. Add water to eliminate
any air inside the anchor and screw on the cap.
4. Attach the clip on the end of the anchor
cord to the eyelet on the elbow.
5. Attach the hose to the large end of the elbow.
6. With the pool filtration pump off, connect
the hose to the pool wall by turning the quick
disconnect clockwise into the universal wall
fitting. Pull away from the pool wall to secure.
1
1-1/2" Return Line
Universal
Wall Fitting
Remove
Quick
Disconnect
1-1/2" Return Line
Universal
Wall Fitting
Remove
Quick
Disconnect
Page 4

2
7. Unscrew the adjustable plug to completely
expose the holes before turning on the
WaterStars. After the initial option, the
adjustable plug can be adjusted (see Section III).
Please Note: Once the WaterStars is in the
pool, the pods should fill with enough water to
float evenly on the surface of the pool.
8. Pull the fountain to the desired location in
the pool. If the fountain will not reach the desired
area, you may want to add an additional ten foot
hose section available through a participating
Polaris dealer (part #7-310-00).
If the fountain will not remain in the desired area,
or if it will not anchor properly, you may want to
shorten the hose as described below.
D. Cutting the Hose
Please remember that once the hose has been
cut, it may be too short for the fountain to be
moved to a new location at a later time.
1. After choosing the desired location for the
fountain, measure the amount of hose that you
wish to remove and disconnect the WaterStars
from the pool wall.
2. Collapse the hose inside the quick
disconnect with your fingers and pull off the
quick disconnect.
3. Cut off the desired amount of hose.
4. Recollapse the hose and slide it back into
the quick disconnect. Be sure only one hose
corrugation is inside the lip of the quick
disconnect.
5. Remove the adjustable plug and slide your
finger through the open ing to pop the hose back
to its original shape. Replace the adjustable plug
and reconnect the WaterStars to the pool wall.
III. Adjustments
A. Fountain Height Adjustment
An adjustable plug is installed in the quick
disconnect to allow the height of the fountain to
be manually adjusted. Loosening the adjustable
plug will decrease the height of the fountain,
while tightening the plug will increase it.
If you have a Polaris 380, 280, or 180 and have
too much water pressure, you will need to install
the restrictor washer included with the fountain.
Snap the restrictor washer into the quick
disconnect. If you still have too much water
pressure, call our Customer Service Department
at 1-800-VAC-SWEEP.
B. Glory Display Presentation
Tightening or loosening the spreader in
combination with tightening or loosening the
adjustable plug will vary the display of the glory
fountain head. Experiment with different
combinations of the two adjustments until you
are satisfied with the water display.
Quick Disconnect
Collapse Here
Quick
Disconnect
Restrictor
Adjustable
Plug
Washer
Insert to Here
Spreader
Glory
Fountain
Head
Page 5

3
IV. Storage
Store the WaterStars in a secure place out of
direct sun light; the original box serves as an
excellent storage container. Take care to drain
the WaterStars, especially if it will be stored
where it will be subjected to freezing
temperatures. When storing the WaterStars for
the winter, remove the universal wall fitting. With
the quick disconnect attached to the universal
wall fitting, pull the quick disconnect away from
the wall while unscrewing the universal wall
fitting. Leave the universal wall fitting attached
to the quick disconnect during storage. In some
cases, it may be necessary to use the universal
wall fitting removal tool (part #10- 00), available
from your participating Polaris dealer.
Page 6

4
Limited Warranty
Polaris WaterStars
You have just purchased one of the finest spa and pool products made. It is
warranted for one year, subject to the following terms and conditions:
1. WaterStars is warranted to the original owner for one year from the date of chase
with proof of purchase. This warranty covers defects in materials and workmanship.
2. Parts returned under this warranty will be in spected. XXage which, in our
judgment, occurred be cause of misuse, neglegence or accident is not covered by this
warranty. This warranty is void if the product has been altered or tampered with in any
way, or if the serial number has been effaced, altered, or removed. Nomal wear because
of ordinary usage is not covered under this warranty.
3. The WaterStars owner may send parts presumed defective directly to Polaris Pool
Sys tems, Inc., freight prepaid. Polaris agrees that the products are defective and cov ered
by this warranty, Polaris will repair or replace, at its option, and return the parts freight
pre-paid, with no charge for repairs.
THIS LIMITED WARRANTY IS IN LIEU OF ALL OTHER WARRANTIES,
EXPRESSED OR IMPLIED, INCLUDING THE IMPLIED WARRANTIES OF
MERCHANTABILITY AND FITNESS FOR A PARTICULAR PURPOSE, AND ALL
SUCH OTHER WARRANTIES ARE DISCLAIMED EXCEPT TO THE EXTENT
ANY IMPLIED WARRANTY MAY BE IMPOSED BY STATE CONSUMER LAW.
ANY SUCH IMPLIED WARRANTY IMPOSED BY STATE CONSUMER LAW IS
LIMITED IN DU TION TO ONE (1) YEAR FROM THE DATE OF PURCHASE.
IN NO EVENT SHALL POLARIS BE LIABLE FOR INITIAL OR
CONSEQUENTIAL DAMAGES OF ANY NATURE OR KIND, OR FOR DAMAGES
TO PERSONS OR PROPERTY.
Some states do not allow limitations on how long an implied warranty lasts, or the
exclusion or limitation of inital or conXXtial dam ages, so the above limitations may not
apply to you.
This limited warranty is valid only in the United States of America and Canada, and it
does not apply to Polaris fountains sold or installed in any other country.
Page 7

©2002 Polaris Pools Systems, Inc. All Rights Reserved. 7-1-0609 7/02
 Loading...