


2016 Rider’s Manual
Cross Country®
Cross Country 8-Ball®
Cross Country Tour®
Cross Country® Magnum™

California Proposition 65 Warning
This product contains or emits chemicals known to the state of California to cause cancer and birth defects or other reproductive harm.

2016 Rider’s Manual
Cross Country®
Cross Country 8-Ball®
Cross Country Tour®
Cross Country® Magnum™
1
Copyright© 2015 Polaris Industries Inc.
All information contained within this publication is based on the latest product information available at the time of publication. Product improvements or other changes may result in differences between this manual and the motorcycle. Depictions and/or procedures in this publication are intended for reference use only.
No liability can be accepted for omissions or inaccuracies. Polaris Industries reserves the right to make changes at any time, without notice and without incurring obligation to make the same or similar changes to motorcycles previously built. Any reprinting or reuse of the depictions and/or procedures contained within, whether whole or in part, is expressly prohibited.
All reference to RIGHT, LEFT, FRONT, REAR are from the operator’s perspective seated in a normal riding position.
Features of VICTORY Motorcycles are covered by U.S. Patent Nos: 6,976,691; 6,407,663; D489670; D482311; D482304; D481980; D481973; D474142.
The following are trademarks of Polaris Industries Inc.:
POLARIS®, FREEDOM®, VICTORY®, VICTORY MOTORCYCLES®, CROSS COUNTRY®, CROSS COUNTRY TOUR®, CROSS COUNTRY 8-BALL® and MAGNUM™.
DUNLOP® is a registered trademark of Dunlop Tire Corporation. LOCTITE® is a registered trademark of Henkel Corporation.
Sirius® and XM® and all related marks and logos are trademarks of Sirius XM Radio Inc. iPod® is a registered trademark of Apple Inc.
Garmin® and zumo® are registered trademarks of Garmin Ltd. or its subsidiaries.
Pandora® , the Pandora logo, and the Pandora trade dress are trademarks or registered trademarks of Pandora Media, Inc. Used with permission.
Printed in U.S.A.
P/N 9926244
2

 WARNING
Improper vehicle use can result in SEVERE INJURY or DEATH.
NEVER Operate:
•If you are under the age of 16 and without a driver’s license with motorcycle endorsement
•Under the influence of drugs or alcohol
•Off-road
•With more than one passenger (motorcycle must be equipped with passenger foot pegs)
•With weight that exceeds maximum weight rating
ALWAYS:
•Wear a helmet, eye protection, gloves, long-sleeve shirt, long pants and over-the-ankle boots.
•Make sure any passenger reads and understands all safety labels.
•Be aware of your surroundings and driving conditions.
•Keep both hands on the handlebars and both feet on the footrests when riding.
•Use only genuine VICTORY accessories designed for your model.
ALWAYS USE AN |
NEVER USE WITH |
APPROVED HELMET |
DRUGS OR ALCOHOL. |
AND PROTECTIVE |
|
GEAR. |
|
READ RIDER’S MANUAL. FOLLOW ALL INSTRUCTIONS AND WARNINGS.
Safety Training
Safety training is a top priority for POLARIS. POLARIS strongly encourages you to take a rider education course from the Motorcycle Safety Foundation or another qualified instructor. The course will help you develop or refresh your expertise in safe riding habits through instruction and riding.
For information on Motorcycle Safety Foundation rider education courses in your area, call 1-800- 446-9227 or visit their home page at www.msf-usa.org.
3
4
Table of Contents
Introduction . . . . . . . . . . . . . . . . . . . . . . . . . . . . . . . . . . . . . . . . . 6
Safety . . . . . . . . . . . . . . . . . . . . . . . . . . . . . . . . . . . . . . . . . . . . . . 7
Reporting Safety Defects . . . . . . . . . . . . . . . . . . . . . . . 17
Component Identification . . . . . . . . . . . . . . . . . . . . . . . . . . . . . 18
Instruments, Features & Controls. . . . . . . . . . . . . . . . . . . . . . . . 21
Pre-Ride Inspections . . . . . . . . . . . . . . . . . . . . . . . . . . . . . . . . . 34
Operation . . . . . . . . . . . . . . . . . . . . . . . . . . . . . . . . . . . . . . . . . . 42
Maintenance. . . . . . . . . . . . . . . . . . . . . . . . . . . . . . . . . . . . . . . . 51
Cleaning and Storage. . . . . . . . . . . . . . . . . . . . . . . . . . . . . . . . . 91
Warranties . . . . . . . . . . . . . . . . . . . . . . . . . . . . . . . . . . . . . . . . . 99
Specifications . . . . . . . . . . . . . . . . . . . . . . . . . . . . . . . . . . . . . . 106
Cross Country/Cross Country Tour Audio System . . . . . . . . . . 109
Cross Country 8-Ball Audio System. . . . . . . . . . . . . . . . . . . . . 128
Cross Country Magnum Audio System . . . . . . . . . . . . . . . . . . 129
Index . . . . . . . . . . . . . . . . . . . . . . . . . . . . . . . . . . . . . . . . . . . . 156
5
Introduction
Thank you for purchasing a Polaris vehicle, and welcome to our world-wide family of Polaris owners. We proudly produce an exciting line of utility and recreational products.
•Snowmobiles
•All-terrain vehicles (ATVs)
•Low emission vehicles (LEVs)
•RANGER® utility vehicles
•RZR® sport vehicles
•VICTORY® motorcycles
•INDIAN® motorcycles
•GEM® electric vehicles
For the safe and enjoyable operation of your vehicle, be sure to follow the instructions and recommendations in this rider’s manual. Keep this manual with the motorcycle, especially when ownership changes. If your rider’s manual is misplaced or damaged, please purchase a replacement from your VICTORY dealer.
All references in this manual to RIGHT, LEFT, FRONT or REAR are from the operator’s perspective when seated in a normal riding position. If you have questions about the operation or maintenance of your motorcycle after you've read this manual, please see your VICTORY dealer. To locate the nearest authorized VICTORY dealer, call 1-800-POLARIS or visit www.polaris.com.
VICTORY motorcycles comply with all federal, state and local safety and emission regulations for the area of intended sale.
6

Safety
About the Rider's Manual
 WARNING
Failure to follow recommended precautions and procedures could result in severe injury or death. Always heed all safety precautions and follow all operation, inspection and maintenance procedures outlined in this manual.
This rider’s manual contains information that is essential to safe riding and proper maintenance of your VICTORY motorcycle. Anyone who uses the motorcycle (operators and passengers) must read the rider’s manual before riding. Carefully read and understand the information found in the Safety section. Understand and follow the procedures outlined in the Maintenance section to keep your VICTORY motorcycle in top condition on the road or in storage. Bring the manual with you when you ride. Following the precautions and procedures in the manual will add to your enjoyment and help keep you riding safely. If you lose or damage this manual, you can purchase a new one through any authorized VICTORY dealer. The rider’s manual should be considered part of the motorcycle and remain with it if sold.
Safety Symbols and Signal Words
The following signal words and symbols appear throughout this manual and on your vehicle. Your safety and the safety of others is involved when these words and symbols are used. Become familiar with their meanings before reading the manual.
The safety alert symbol indicates a potential personal injury hazard.
DANGER
A DANGER indicates a hazardous situation that, if not avoided, will result in death or serious injury.
WARNING
A WARNING indicates a hazardous situation that, if not avoided, could result in death or serious injury.
CAUTION
A CAUTION indicates a hazardous situation that, if not avoided, could result in minor or moderate injury.
NOTICE
A NOTICE indicates a situation that could result in property damage.
The Prohibition Safety Sign indicates an action NOT to take in order to avoid a hazard.
The Mandatory Action Sign indicates an action that NEEDS to be taken to avoid a hazard.
7

Safety
Safe Riding Practices
 WARNING
Improper use of this motorcycle can result in serious injury or death to you, your passenger and others. To minimize the risk of injury, read and understand the information contained in this section before operating the motorcycle. This section contains safety information specific to the VICTORY motorcycle, as well as information about general motorcycle safety. Anyone who rides the motorcycle (operators and passengers) must follow these safety precautions.
Motorcycling has inherent risks.
You can minimize those risks, but you can't eliminate them completely. Even if you're an experienced motorcycle operator or passenger, read all of the safety information in this manual before operating the motorcycle.
•Take a rider education course from the Motorcycle Safety Foundation or another qualified instructor. The course will help you develop or refresh your expertise in safe riding habits through instruction and riding. For information on Motorcycle Safety Foundation rider education courses in your area, call 1-800-446-9227 or visit their web site at www.msfusa.org.
•Read and understand all information in this rider’s manual.
•Observe all maintenance requirements specified in this manual. For assistance, see the VICTORY Service Manual or your authorized VICTORY dealer.
Design characteristics affect how you should ride the VICTORY motorcycle:
•The motorcycle is designed for on-road use with one rider and one passenger. See the manufacturer’s label (on the left side of the frame at the steering head). The label contains the Vehicle Identification Number (VIN) and Gross Vehicle Weight Rating (GVWR) and Gross Axle Weight Rating (GAWR) information. Never exceed the GVWR or the GAWR.
•Riding off-road, riding with more than one passenger, or carrying weight exceeding the maximum weight rating can make handling difficult, which could cause loss of control.
•During the first 500 miles (800 km) of operation, follow all break-in procedures as outlined in the break-in section beginning on page 42. Failure to do so can result in serious engine damage.
•Some VICTORY motorcycles include saddlebags, a windshield, a trunk, luggage racks or a passenger backrest as standard equipment. To maintain stability, be prepared to reduce the operating speed of motorcycles equipped with these items.
8
Safety
Safe Riding Practices
Follow these general safe riding practices:
•Before each ride, perform the pre-ride inspections as outlined beginning on page 34. Failure to do so may result in damage to the motorcycle or an accident.
•Until you're thoroughly familiar with the motorcycle and all of its controls, practice riding where there is little or no traffic. Practice riding at a moderate speed on various road surfaces and in different weather conditions.
•Know your skills and limits, and ride within them.
•Allow only licensed, experienced operators to ride your motorcycle, and then only after they have become familiar with its controls and operation. Make sure all riders read and understand this rider’s manual before riding.
•Do not ride when you're fatigued, ill or under the influence of alcohol, prescription drugs, over-the-counter drugs or any other drugs. Fatigue, illness, alcohol and drugs can cause drowsiness, loss of coordination and loss of balance. They can also affect your awareness and judgment.
•If your motorcycle operates abnormally, correct the problem immediately. See the VICTORY Service Manual or an authorized VICTORY dealer.
•Ride defensively, as if you are invisible to other motorists, even in broad daylight. A motorist's failure to see or recognize a motorcycle is the leading cause of automobile/ motorcycle accidents. Ride where you're clearly visible to other motorists, and observe their behavior carefully.
•Be especially cautious at intersections, as these are the most likely places for an accident.
•To prevent loss of control, keep your hands on the handlebars and your feet on the footrests.
•Be aware that the highway bar is not designed to protect the rider from injury in a collision.
•Do not move or operate the motorcycle with the steering locked (if equipped), as the severely restricted steering could result in loss of control.
•Obey the speed limit and adjust your speed and riding technique based on road, weather and traffic conditions. As you travel faster, the influence of all other conditions increases, which can affect the motorcycle's stability and increase the possibility of losing control.
9
Safety
Safe Riding Practices
•Reduce speed when:
•the road has potholes, or is otherwise rough or uneven.
•the road contains sand, dirt, gravel or other loose substances.
•the road is wet, icy or oily.
•the road contains painted surfaces, manhole covers, metal grating, railway crossings or other slippery surfaces.
•The weather is windy, rainy or otherwise causing slippery or rapidly changing conditions.
•Traffic is heavy, congested, not allowing sufficient space between vehicles or otherwise not flowing smoothly.
•You are being passed in either direction by a large vehicle that may produce a wind blast in its wake.
•To maximize braking effectiveness, use the front and rear brakes together. Be aware of the following braking facts and practices:
•The rear brake provides 40% of the motorcycle's stopping power, at most. Use the front and rear brakes together.
•To avoid skidding, apply the brakes gradually when the road is wet or rough, or contains loose or other slippery substances.
•If possible, avoid applying the brakes while making a turn. Motorcycle tires have less traction during turns, so braking will increase the possibility of skidding. Bring the motorcycle to the upright position before applying the brakes.
•When approaching a curve, choose a speed and lean angle that allows you to pass through the curve in your own lane without applying the brakes. Excessive speed, improper lean angle or braking in a curve can cause loss of control.
•Ground clearance is reduced when the motorcycle leans. Do not allow components to contact the road surface when leaning the motorcycle in a curve, as this could cause loss of control.
•Retract the sidestand fully before riding. If the sidestand is not fully retracted, it could contact the road surface and cause loss of control.
•Do not tow a trailer. Towing a trailer can make the motorcycle hard to handle.
Anti-Lock Brake System Response
•When the anti-lock brakes engage during a braking event, the rider will feel pulsing at the brake levers. Continue to apply steady pressure to the brakes for the best stopping performance.
10
Safety
Safe Riding Practices
Carrying a Passenger
Do not carry a passenger unless the motorcycle is equipped with passenger seat and passenger footrests.
To carry a passenger safely:
•Do not exceed the gross vehicle weight rating (GVWR) for your motorcycle. See the manufacturer’s label (on the left side of the frame at the steering head).
•Direct the passenger to hold onto you or to the passenger hand grips with both hands and to keep both feet on the passenger footrests. Do not carry a passenger who cannot place both feet firmly on the passenger footrests. A passenger who is not holding on properly, or who cannot reach the passenger footrests, can shift their body erratically, which can make the motorcycle hard to handle and cause loss of control.
•To obtain the best ride and handling characteristics, adjust the rear shock absorber air pressure. See page 64.
•Before riding, be sure your passenger knows safe riding procedures. Discuss any safety information unfamiliar to your passenger. A passenger who is unaware of safe riding procedures may distract you or make movements that make the motorcycle hard to handle.
•Adjust your riding style to compensate for the differences in handling, acceleration and braking caused by the additional weight of the passenger. Failure to do so can cause loss of control.
Protective Apparel
Wear protective apparel to decrease the risk of injury and increase riding comfort.
•Always wear a helmet that meets or exceeds established safety standards. Approved helmets in the USA and Canada bear a U.S. Department of Transportation (DOT) label. Laws in some areas require that you wear an approved helmet. Head injuries are the leading cause of fatalities in accidents involving motorcycles. Statistics prove that an approved helmet is the most effective protection in preventing or reducing head injuries.
•Wear eye protection to protect eyes from wind or airborne particles and objects. Laws in some areas require that you wear eye protection. VICTORY recommends that you wear approved Personal Protective Equipment (PPE) bearing markings such as VESC 8, V-8, Z87.1, or CE. Make sure protective eyewear is kept clean.
•All riders should wear bright or light-colored and/or reflective clothing to improve visibility to other motorists. A motorist's failure to see or recognize a motorcycle is the leading cause of automobile/motorcycle accidents.
•Wear gloves, a jacket, heavy boots and long pants to prevent or reduce injury from abrasions, lacerations or burns should the motorcycle fall. Wear boots with low heels, as high heels can catch on pedals or footrests. The combination of boots and pants should completely cover legs, ankles and feet, protecting skin from engine and exhaust system heat.
•Do not wear loose, flowing clothing or long boot laces, as they can catch on handlebars, levers or footrests, or they can become entangled in the wheels, causing loss of control and serious injury.
11
Safety
Use of Accessories
Because VICTORY cannot test and make specific recommendations concerning every accessory or combination of accessories sold, the operator is responsible for determining that the motorcycle can be safely operated with any accessories or additional weight. Use the following guidelines when choosing and installing accessories:
•Do not install accessories that impair the stability, handling or operation of the motorcycle or operator visibility. Before installing an accessory, be sure that it does not:
•Reduce ground clearance when the motorcycle is either leaned or in a vertical position.
•Limit suspension or steering travel or your ability to operate controls.
•Displace you from your normal riding position.
•Obscure lights or reflectors.
•Bulky or large accessories can cause instability (due to the lifting or buffeting effects of wind) and loss of control.
•Do not install electrical accessories that exceed the capacity of the motorcycle’s electrical system. Never install higher wattage light bulbs than those supplied as original equipment. An electrical failure could result and cause hazardous loss of engine power or lights, or damage to the electrical system. See page 87.
•Use only genuine VICTORY accessories designed for your model.
Modifications
Modifying the motorcycle by removing any equipment or by adding equipment not approved by VICTORY may void your warranty. Such modifications could make the motorcycle unsafe to ride and could result in severe injury to operator or passengers, as well as damage to the motorcycle. Some modifications may not be legal in your area of operation. If in doubt, contact your authorized VICTORY dealer.
Parking the Motorcycle
When leaving the motorcycle unattended, turn the engine off. Remove the ignition key to prevent unauthorized use by minors or those without proper motorcycle certification and training.
Park the motorcycle where people are not likely to touch the hot engine or exhaust system or place combustible materials near these hot areas. Do not park near a flammable source such as a kerosene heater or an open flame, where hot components could ignite combustible materials.
Park the motorcycle on a firm, level surface. Sloped or soft surfaces may not support the motorcycle. If you must park on a slope or soft surface, follow the precautions outlined on page 49.
12
Safety
Carrying Cargo
Use the following guidelines when attaching cargo or accessories to the motorcycle. Where applicable, these guidelines also refer to the contents of any accessories.
•Keep cargo and accessory weight to a minimum, and keep items as close to the motorcycle as possible to minimize a change in the motorcycle’s center of gravity. Changing the center of gravity can cause loss of stability and handling and could cause loss of control.
•Distribute weight evenly on both sides of the motorcycle. Maintain even weight distribution by checking accessories and cargo to make sure they’re securely attached to the motorcycle before riding and whenever you take a break from riding. Uneven weight distribution, or accessories or cargo that shift suddenly while you’re riding can make the motorcycle hard to handle, can cause loss of control, or cargo could fall from the motorcycle creating a hazard for surrounding vehicles.
•Do not attach large or heavy cargo such as sleeping bags, duffel bags or tents to the handlebars, front fork area or front fender. Cargo or accessories placed in these areas can cause instability (due to improper weight distribution or aerodynamic changes) and could cause loss of control. Such items can also block air flow to the engine and cause overheating that can damage the engine.
•Do not exceed the maximum cargo weight limit of any accessory (see accessory instructions and labels). Do not attach cargo to an accessory not designed for that purpose. Either circumstance could result in an accessory failure that could cause loss of control.
•Do not attach anything to the motorcycle unless specifically designed for that purpose by VICTORY.
Saddlebags, Trunk (if equipped), Luggage Racks (if equipped)
WARNING! Operating this vehicle without saddlebags could result in severe injury or death. Never operate this vehicle if the saddlebags are not in place and properly secured.
WARNING! Never install an accessory trunk to the CROSS COUNTRY MAGNUM. This model is not designed for operation with a trunk. Always ensure both fender close-outs are installed before operating.
Whenever operating a motorcycle with saddlebags:
•Never ride at excessive speeds. Saddlebags, combined with the lifting or buffeting effects of wind, can make the motorcycle unstable and cause loss of control.
•Distribute weight evenly on both sides of the motorcycle.
•Do not exceed the maximum cargo weight limit of any saddlebag, luggage rack or trunk. A weight capacity label is attached to these components for reference.
•NEVER EXCEED GROSS VEHICLE WEIGHT RATING (GVWR) or the GROSS AXLE WEIGHT RATING (GAWR), regardless of whether or not the saddlebags, racks and/or trunk are loaded to capacity. Exceeding the weight rating can reduce stability and handling and cause loss of control.
13
Safety
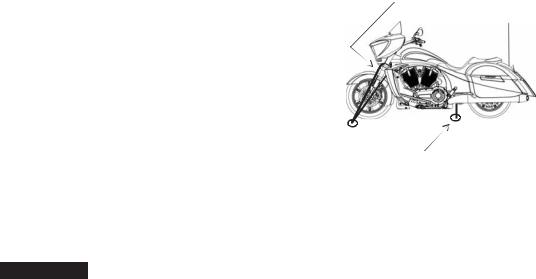
Transporting the Motorcycle
If you must transport the motorcycle:
•Use a truck or trailer. Do not tow the motorcycle with another vehicle, as towing will impair the motorcycle's steering and handling.
•Position and restrain the motorcycle so it remains upright on the truck or trailer. If the motorcycle leans to one side, gasoline may leak from the fuel tank and result in a fire hazard or damage to the finish.
•Do not restrain the motorcycle using the handlebars.
•Place tiedown straps around the fork tubes above the lower triple clamp. Place tiedowns as wide apart as possible on the truck or trailer bed for best stability.
To lower triple clamp
(one tiedown each side)
To swing arm (one tiedown each side)
Fuel and Exhaust Safety
Always heed these fuel safety warnings when refueling or servicing the fuel system. For fueling procedures, see page 43.
 WARNING
Gasoline is highly flammable and explosive under certain conditions.
•Always exercise extreme caution whenever handling gasoline.
•Always turn off the engine before refueling.
•Always refuel outdoors or in a well-ventilated area.
•Open the fuel cap slowly. Do not overfill the tank. Do not fill the tank neck.
•Do not smoke or allow open flames or sparks in or near the area where refueling is performed or where gasoline is stored.
Gasoline and gasoline vapors are poisonous and can cause severe injury.
•Do not swallow gasoline, inhale gasoline vapors, or spill gasoline. If you swallow gasoline, inhale more than a few breaths of gasoline vapor, or get gasoline in your eyes, see a physician immediately.
•If gasoline spills on your skin or clothing, immediately wash it off with soap and water and change clothing.
Exhaust gases contain carbon monoxide, a colorless, odorless gas that can cause loss of consciousness or death in a short time.
•Never start the engine or let it run in an enclosed area.
•Never inhale exhaust gases.
14

Safety
Safety Maintenance
 WARNING
Failure to perform safety maintenance as recommended can result in difficult handling and loss of control, which could result in serious injury or death. Always perform the safety maintenance procedures as recommended in this manual. Perform maintenance and repairs promptly as outlined in the VICTORY Service Manual, or see your authorized VICTORY dealer for service.
•Before each ride, perform the Pre-Ride Inspections. See page 34.
•Perform all periodic maintenance at the recommended intervals outlined in the Periodic Maintenance section beginning on page 52.
•Always maintain proper tire pressure, tread condition and wheel and tire balance. Inspect tires regularly and replace worn or damaged tires promptly. Use only approved replacement tires. See the VICTORY Service Manual or your authorized VICTORY dealer.
•Always ensure proper steering head bearing adjustment. Regularly inspect the rear shock absorber and the front forks for fluid leaks or damage. Make any necessary repairs promptly.
•Clean the motorcycle thoroughly to reveal items in need of repair.
•Fasteners must meet original specifications for quality, finish and type to ensure safety. Use only genuine VICTORY replacement parts, and ensure that all fasteners are tightened to the proper torque.
Electromagnetic Interference
This vehicle complies with the requirements of European directive 97/24/EC Chapter 8, United Nations ECE regulation 10 and Canadian ICES-002.
15
Safety
Gross Vehicle Weight Rating (GVWR)
WARNING! Exceeding the gross vehicle weight rating of your motorcycle can reduce stability and handling and could cause loss of control. NEVER exceed the GVWR of your motorcycle.
The maximum load capacity of your motorcycle is the maximum weight you may add to your motorcycle without exceeding the GVWR. This capacity is determined by calculating the difference between your motorcycle’s GVWR and wet weight.
Refer to the specification section beginning on page 106 or the Manufacturing Information/ VIN label on the motorcycle frame for model-specific information. See page 17.
When determining the weight you will be adding to your motorcycle, and to ensure you do not exceed the maximum load capacity, include the following:
•operator body weight
•passenger body weight
•weight of all riders’ apparel and items in or on apparel
•weight of any accessories and their contents
•weight of any additional cargo on the motorcycle
16
Safety
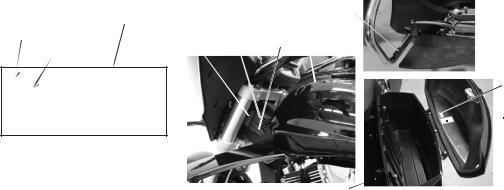
Safety and Information Labels
Labels are model-specific and market-specific. Your motorcycle may not contain all of the labels shown.
1.Vehicle Identification Number (VIN)
2.Vehicle Emission Control Information (VECI)
3.Noise Emission Control Information (NECI)
4.Operator/Fuel Warning
5.Cargo Information (in saddlebags)
6.Shock Air Pressure label
7.Saddlebag Warning
8.Highway Bar Warning
Date of Manufacture |
|
|
8 |
|
|
|
4 |
||
GVWR Information |
1 |
2 |
||
3 |
||||
VIN Number |
|
|||
|
|
|
 5
5


 6
6
Tire / Wheel Information
GAWR Information
7
Reporting Safety Defects
If you believe that your vehicle has a defect that could result in a crash or cause injury or death, you should immediately inform the National Highway Traffic Safety Administration (NHTSA) in addition to notifying Polaris Industries in writing.
If NHTSA receives similar complaints, it may open an investigation, and if it finds that a safety defect exists in a group of vehicles, it may order a recall and remedy campaign. However, NHTSA cannot become involved in individual problems between you, your dealer or Polaris Industries.
To contact NHTSA, or obtain other information about motor vehicle safety, you may either call the Vehicle Safety Hotline toll-free at 1-888-327-4236 (TTY: 1-800-424-9153), visit the NHTSA website at www.safercar.gov, or write to:
ADMINISTRATOR, NHTSA
1200 New Jersey Avenue, SE West Building
Washington, DC 20590
17
Identification
Ignition Key Number
The ignition key number is stamped on the small metal tag attached to the key ring. Remove the tag and record the number on page 108. Store the tag in a safe place.
Additional keys can be copied from one of the original keys. A VICTORY key blank is required. If you lose both original keys, you will need the following:
•Key number (recorded on page 108)
•A new key blank from a VICTORY dealer
•Proof of ownership
•A locksmith or VICTORY dealer with the equipment necessary to cut a new key
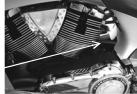
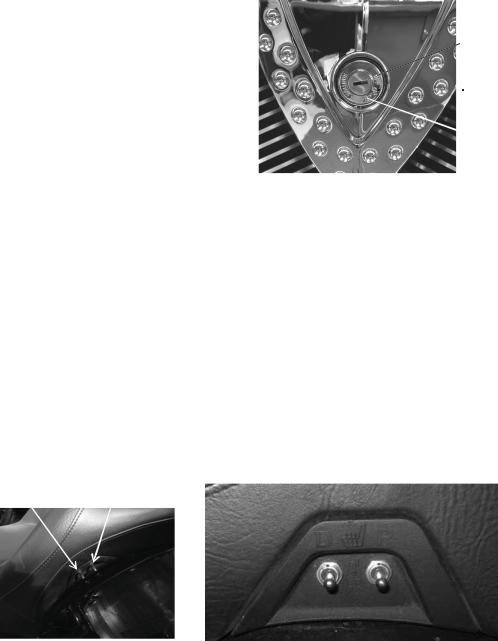
Engine Identification Number
The engine number is stamped into the right crankcase behind the rear cylinder. Record the number in the space provided on page 108.
Engine
Number
18

Left Side View
1.Spark Plugs
2.Front Brake Caliper
3.Oil Cooler
4.Battery
5.Gear Shift Pedal
6.Operator Footrest
7.Sidestand
8.Oil Drain Plug
9.Oil Filter
10.Passenger Footpeg
11.Rear Brake Caliper
12.Evaporative Emissions Canister
13.Diagnostic Connector (under cover)
Right Side View
1.Exhaust Mufflers
2.Drive Belt Guard
3.Drive Sprocket (under cover)
4.Engine Oil Fill Cap / Dipstick
5.Rear Brake Fluid Reservoir
6.Rear Brake Pedal
7.Air Filter
8.Headlamp
9.Mirror
10.Fuel Tank
11.Access Cover
12.Fuse Box (under cover)
13.Accessory Fuse (under cover)
14.Rear Shock Air Fitting (under cover)
15.Radio Antenna (if equipped)
16.License Plate Bracket
Identification
1  13
13
2
3 |
|
|
|
8 |
10 |
|
5 |
7 |
|
9 |
|
11 |
|
|
|
|
|
|
|
12 |
|
|
|
|
|
9 |
7 |
|
|
|
|
|
|
|
15 |
|
|
12 |
10 |
|
|
|
|
|
|
|
||
14 |
13 |
|
11 |
|
8 |
|
16 |
|
|
||||
|
|
|
|
|
|
1 |
|
|
5 |
|
|
2 |
3 |
4 |
6 |
||
|
|||||
|
|
|
19
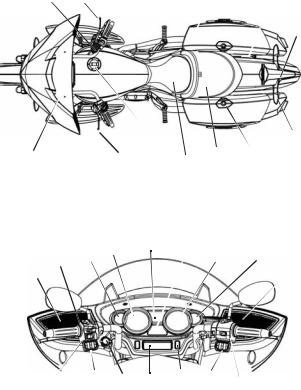
Identification
Top View
1.Windshield
2.Clutch Lever
3.Fuel Filler Cap
4.Operator Seat
5.Passenger Seat
6.Saddlebag Latch
7.Turn Signals
8.Tail Lamps
9.Fender Closeouts (MAGNUM)
10.USB Cord (MAGNUM)
11.Front Brake Lever
12.Front Brake Fluid Reservoir
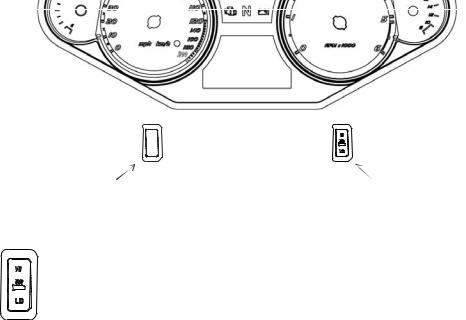
Console
1.Speakers
2.Mode Switch
3.Fuel Gauge
4.Speedometer
5.Indicator Lamp Display
6.Multi-Function Display
7.Tachometer
8.Volt Meter
9.Left Handlebar Switches
10.iPod Cord, Auxiliary Cord, Mini USB and/or 12-Volt Outlet (as equipped) (left compartment)
11.Audio Control Switches
12.12-Volt Accessory Outlet
13.Radio Display
14.Heated Grip Switch (if equipped)
15.Cruise Control Switches (if equipped)
16.Right Handlebar Switches
12 |
11 |
10 |
9 |
|
|
|
8
|
|
3 |
|
7 |
|
|
|
|
|
1 |
2 |
4 |
5 |
6 |
|
|
|
|
|
3 |
4 |
5 |
6 |
8 |
2 |
|
7 |
|||
|
|
||||
1 |
|
|
|
|
1 |
9 |
11 |
12 |
13 |
14 |
15 |
16 |
|
||||||
|
10 |
|
|
|
|
|
20
Instruments, Features and Controls
Ignition Switch
The ignition key operates the ignition switch and parking lights. The ignition switch provides electrical power to the ignition, the lighting system and all electrical switches and buttons. Before starting the engine, read the instructions for starting the engine. See page 44.
OFF
In the OFF position, all electrical circuits are inactive and the ignition key can be removed. Turn the ignition switch to the OFF position and remove the ignition key when leaving the motorcycle unattended.
ON
 Off
Off
 On
On
 Park
Park
In the ON position, all electrical circuits are energized and the ignition key cannot be removed. The headlamp, taillight, and instrument lights illuminate. The engine stop/run switch must be in the RUN position to start the engine or activate the turn signals and other electrical features.
PARK
In the PARK position, the taillight, indicator lights and license plate light illuminate. The radio can be operated and the instrumentation is active. The emergency flashers can be activated, and the ignition key can be removed. You must push the ignition key into the switch while selecting the PARK position.
Seat Heater Switches
If equipped, the seat heater switches are located on the lower left edge of the seat. Toggle Up: High
Toggle Down: Low
Toggle Center: Off
Driver’s |
Passenger’s |
Seat Switch |
Seat Switch |
21
Instruments, Features and Controls
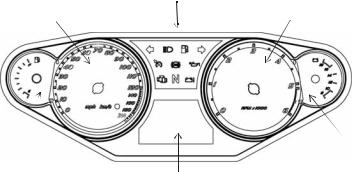
Instrument Cluster
The instrument cluster includes the speedometer, tachometer, fuel gauge, volt meter, indicator lamps and multi-function display.
Indicator Lamps
Speedometer |
Tachometer |
Fuel Gauge |
Volt Meter |
Multi-Function Display
Speedometer
The speedometer displays vehicle speed in either miles per hour or kilometers per hour.
Tachometer
The tachometer displays engine speed in revolutions per minute (RPM). A red line on the face of the gauge indicates the maximum safe engine speed.
WARNING! Excessive engine speed can cause engine damage or failure, which could result in serious injury or death. Do not allow engine speed to exceed the red line.
Fuel Gauge
The fuel gauge displays fuel level. The key must be in the ON or PARK position. For the most accurate reading, sit on the motorcycle and bring it to the upright position.
Volt Meter
When the key is in the ON position, the volt meter displays battery voltage. If the engine is not running, approximate battery voltage displays. If the engine is running, approximate charging voltage displays.
22
Instruments, Features and Controls
Instrument Cluster
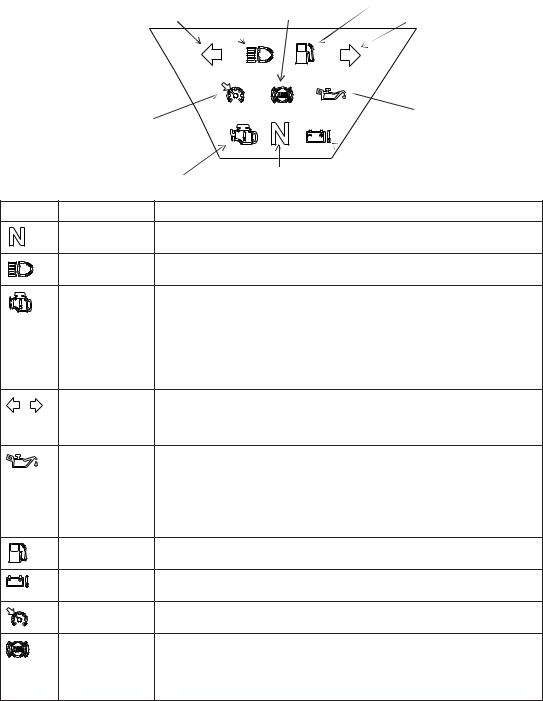
Indicator Lamps
High Beam |
Anti-Lock |
Low Fuel |
Brake System |
||
Left Turn |
(ABS) |
Right Turn |
|
Cruise Control |
|
|
Oil Pressure |
|
|
|
|
|
|
Check Engine |
Neutral |
Battery Warning |
|
Lamp |
Indicates |
|
Condition |
|
|
Neutral |
This lamp illuminates when the transmission is in neutral and the ignition |
||
|
|
key is in the ON or PARK position. |
|
|
|
High Beam |
This lamp illuminates when the headlamp switch is set to high beam. |
||
|
Check Engine |
This lamp illuminates momentarily when the ignition switch is in the ON |
||
|
|
position and the engine is off. This indicates proper function. If this lamp |
||
|
|
illuminates while the engine is running, contact an authorized VICTORY |
||
|
|
dealer promptly for diagnosis. The light will remain on if the tilt sensor |
||
|
|
shuts down the engine. See page 32. If abnormal sensor or engine |
||
|
|
operation is detected the light will remain on as long as the fault |
||
|
|
condition exists. Retrieve the error codes for diagnosis. See page 24. |
||
|
|
This lamp is also known as a malfunction indicator lamp (MIL). |
||
|
Turn Signal |
One arrow flashes when the corresponding turn signal is activated. Both |
||
|
|
arrows flash when the hazard signal is activated. If a bulb fails, or if there |
||
|
|
is a short circuit in the signal system, the lamp flashes at more than |
||
|
|
twice the normal rate. |
|
|
|
Low Oil |
This lamp illuminates when the ignition switch is in the ON position and |
||
|
Pressure |
the engine is off, indicating that the indicator circuit is functioning |
||
|
|
properly. This lamp also illuminates if engine oil pressure drops below |
||
|
|
safe operating pressure. If this lamp illuminates while the engine is |
||
|
|
running, turn the engine off as soon as safely possible and check the oil |
||
|
|
level. If the oil level is correct and the lamp remains on after the engine is |
||
|
|
restarted, turn the engine off immediately. |
||
|
Low Fuel |
This lamp illuminates when approximately one gallon (3.8 liters) of fuel |
||
|
|
remains in the fuel tank. |
|
|
|
Low Battery |
This lamp illuminates when battery voltage is low. Make sure the |
||
|
Warning |
charging system is operating properly. See page 90. |
||
|
Cruise Control |
Before using the cruise control, read the safety and operation |
||
|
Engaged |
procedures beginning on page 47. |
|
|
|
Anti-Lock Brake |
The ABS indicator always illuminates when the key is in the ON position |
||
|
System Not |
and remains on until the anti-lock system activates, which occurs when |
||
|
Activated |
vehicle speed exceeds 6 MPH (10 km/h). When the lamp is illuminated, |
||
|
(if equipped) |
the anti-lock brakes will not activate, but the conventional brake system |
||
|
|
will continue to operate normally. |
|
|
23
Instruments, Features and Controls
Instrument Cluster
Multi-Function Display
Use the mode button to toggle through the modes of the multi-function display. See page 27.
Permanently Displayed Modes
• |
Clock |
Clock |
|
|
|
|
|
|
|
|
|
|
||
|
|
|
|
|
|
|
|
|
|
|||||
• |
Gear Position |
|
|
|
|
|
|
|
|
|
|
|
|
|
|
|
|
|
|
|
|
|
|
|
|
|
|
||
• |
Ambient Temperature |
Gear |
|
|
|
|
|
|
|
|
|
|
|
|
|
|
|
|
|
|
|
|
|
|
|
||||
Trip Computer Modes |
|
|
|
|
|
|
|
|
|
|||||
|
|
|
|
|
|
|
|
|||||||
Position |
|
|
|
|
|
|
|
|
|
|
|
|
||
|
|
|
|
|
|
|
|
|
|
|
|
|||
• |
Odometer |
|
|
|
|
|
|
|
|
|
|
|
||
|
|
|
|
|
|
|
|
|
|
|
|
|
||
• Trip Odometers (Trip 1, Trip 2) |
|
|
|
|
|
|
|
|
|
|
|
|
|
|
|
|
|
|
|
|
|
|
|
|
|
|
|
||
• |
Average Fuel Economy |
Trip Computer |
Temperature |
|||||||||||
• |
Average Speed |
|
|
|
|
|
|
|||||||
|
|
|
|
|
|
|
|
|
|
|
|
|
||
•Fuel Range
•Instantaneous Fuel Economy
•Trip Hours Meter
Tip: Press and hold the mode button to reset the trip odometer, average fuel economy, average speed or trip hours meter.
Engine Error Codes
The error screen displays only when the CHECK ENGINE light is on or when it goes on and off during one ignition cycle. Error codes are not stored. When the key is turned OFF, the code and message is lost, but will reappear if the fault reoccurs after restarting the engine.
If the CHECK ENGINE indicator lamp illuminates, retrieve the error codes from the display.
1.If the error codes are not displayed, use the mode button to toggle until “Err” displays in the clock area.
2.Record the three code numbers displayed in the gear position, temperature and odometer displays.
3.See an authorized VICTORY dealer for code details and diagnosis.
Error Code |
Failure Mode |
Number (0-9) |
Indicator (FMI) |
“Err” 88:888188 F
C
Avg |
Speed Range |
Inst Time |
|
TRIP 2 |
88:88: 8.8miles / gal |
||
TRIP 1 |
|
|
km / h |
Suspect Parameter Number (SPN)
24

Instruments, Features and Controls
Instrument Cluster
Multi-Function Display
Display Units (Standard/Metric)
The display can be changed to display either standard or metric units of measurement.
Tip: To exit the set-up mode at any time, wait 10 seconds. The display automatically exits and returns to the odometer display.
|
Standard Display |
Metric Display |
|
Distance |
Miles |
Kilometers |
|
Fuel |
U.S. Gallons |
I = Imperial Gallons |
Liter = Liters |
Temperature |
Fahrenheit |
Celsius |
|
Time |
12-Hour Clock |
24-Hour Clock |
|
Display Units (Standard/Metric)
1.Turn the key to the OFF position.
2.Press and hold the mode button while turning the key to the ON or PARK position.
3.When the display flashes the distance setting, tap the mode button to advance to the desired setting.
4.Press and hold the mode button to save the setting and advance to the next display option.
5.Repeat the procedure to change remaining display settings.
Clock
Tip: The clock must be reset any time the battery has been disconnected or discharged.
1. Turn the key to ON or PARK. Use the mode button to toggle to the odometer display.
Tip: If LOW FUEL is flashing, the display will not enter the CLOCK SET mode.
2.Press and hold the mode button until the hour segment flashes. Release the button.
3.With the segment flashing, tap the mode button to advance to the desired setting.
4.Press and hold the mode button until the next segment flashes. Release the button.
5.Repeat steps 3-4 twice to set the 10-minute and 1-minute segments. After completing the 1-minute segment, step 4 will save the new settings and exit the clock mode.
6.Turn the key to the OFF position.
25
Instruments, Features and Controls
Instrument Cluster
Multi-Function Display
Odometer/Trip Odometer
The odometer displays the total distance traveled by the vehicle. The trip odometer displays distance traveled since the trip odometer was reset. To view the trip odometer, turn the key to the ON position. Use the mode button to toggle to the trip odometer.
To reset the trip odometer, toggle to the trip odometer, then press and hold the mode button until the trip odometer resets.
Gear Position
Gear position displays only when the vehicle is moving and the clutch is engaged. If the vehicle stops moving, or if the clutch is disengaged, “--” will show in the display.
Temperature
The key must be in the ON or PARK position to display ambient air temperature.
Console Switches
High
Off
Low
|
|
|
|
|
Hand Grip |
|
|
|
Optional Accessory |
||
Switch |
Heater Switch |
|
Hand Grip Heater Switch
Press the top (high heat) or bottom (low heat) of the rocker switch to turn the hand grip heaters on. Move the switch to the center position to turn the heaters off.
26
Instruments, Features and Controls
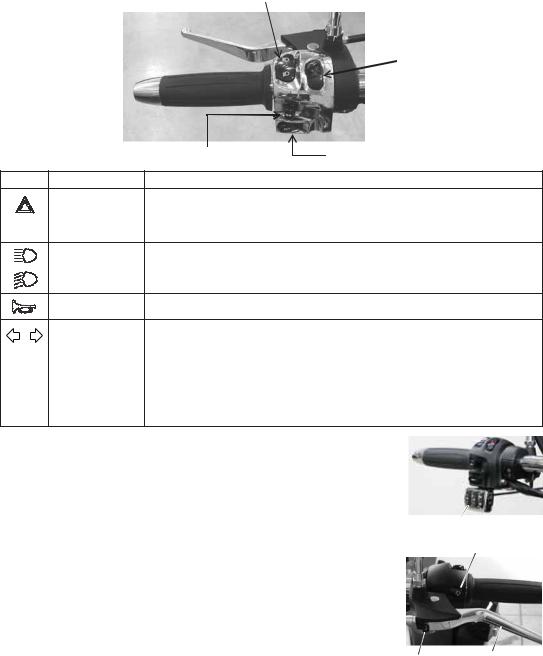
Left Handlebar Switches
High/Low Light Switch 
Flasher
 (Hazard)
Switch
|
|
Turn Signal Switch |
Horn Button |
Lamp |
Switch |
|
Description |
|
Emergency |
The emergency flasher switch activates and cancels the emergency |
|
|
Flasher Switch |
flashers. When the emergency flashers are active, all of the turn signals |
|
|
(Hazard Switch) |
flash. Press the top of the switch to activate the emergency flashers. Press |
|
|
|
the bottom of the switch to cancel the flashers. |
|
|
High Beam/Low |
The headlight high/low beam switch toggles the headlight between high |
|
|
Beam Light |
beam and low beam. To activate the high beam, press the upper portion of |
|
|
Switch |
the switch; to activate the low beam, press the lower portion of the switch. |
|
|
Horn Button |
To sound the horn, press the horn button. |
|
|
Turn Signal |
Move the switch to the left to activate the left turn signals. Move the switch |
|
|
Switch |
to the right to activate the right turn signals. A signal will deactivate |
|
|
|
automatically when speed or distance reach predetermined levels. To |
|
|
|
cancel a signal manually, move the switch to the center position and push |
|
|
|
it inward. |
|
|
|
Momentary Feature: Move the turn signal switch left or right and hold it in |
|
|
|
that position for at least one second. The momentary feature will activate |
|
|
|
and the signal will then cancel when the switch is released. |
|
Audio Switches (if equipped)
See page 109 for audio systems operation.
Mode Button
The mode button is located on the front side of the left handlebar switch. Use the mode button to toggle through the modes of the multi-function display. If “Err” displays while toggling through the features, a system error has been logged. See page 24.
Use the mode button to set the display units to either standard or metric units of measurement. See page 25.
Starter Interlock Switch
The starter interlock switch prevents the electric starter from operating when the transmission is in gear and the clutch is engaged (lever released). Read the engine starting procedures beginning on page 44 before starting the engine.
WARNING! Never start the engine with the transmission in gear and the clutch disengaged unless you are properly seated with the front brake applied.
Audio Switches
Mode Button
Interlock Clutch
Switch Lever
27
Instruments, Features and Controls
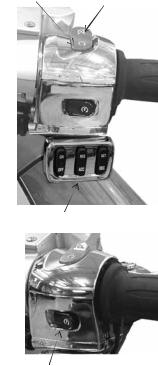
Right Handlebar Switches
Engine Stop/Run Switch
The engine stop/run switch is located on the right handlebar. This switch completes or interrupts the ignition, starter and fuel pump circuits. Use the engine stop/run switch to turn the engine off quickly. Turn the key off after the engine stops.
•Press the bottom of the switch (RUN) to complete the circuits and allow the engine to start and run.
•Press the top of the switch (STOP) to interrupt the circuits and stop the engine. The engine should not start or run when the switch is in the STOP position.
Cruise Control Switches (if equipped)
Refer to the Cruise Control section of this manual (beginning on page 47) for cruise control operation.
Engine Starter Switch
Run Stop
Cruise Control Switches
The starter switch is located on the right handlebar. Use the starter switch to start the engine and operate in reverse (if equipped). The switch will operate only when the engine stop/ run switch is in the RUN position and the transmission is in neutral (or the clutch is disengaged). The reverse lever (if equipped)
must also be disengaged.
Tip: If the reverse system fuse has blown, the starter switch will not function even if the reverse lever is disengaged. Replace the fuse. See page 86.
Read the engine starting procedures before starting the engine. |
Starter Switch |
See page 44. |
|
•Press the right side of the starter switch to engage the starter motor.
•See page 50 for reverse operation.
28
 Loading...