

Page 1
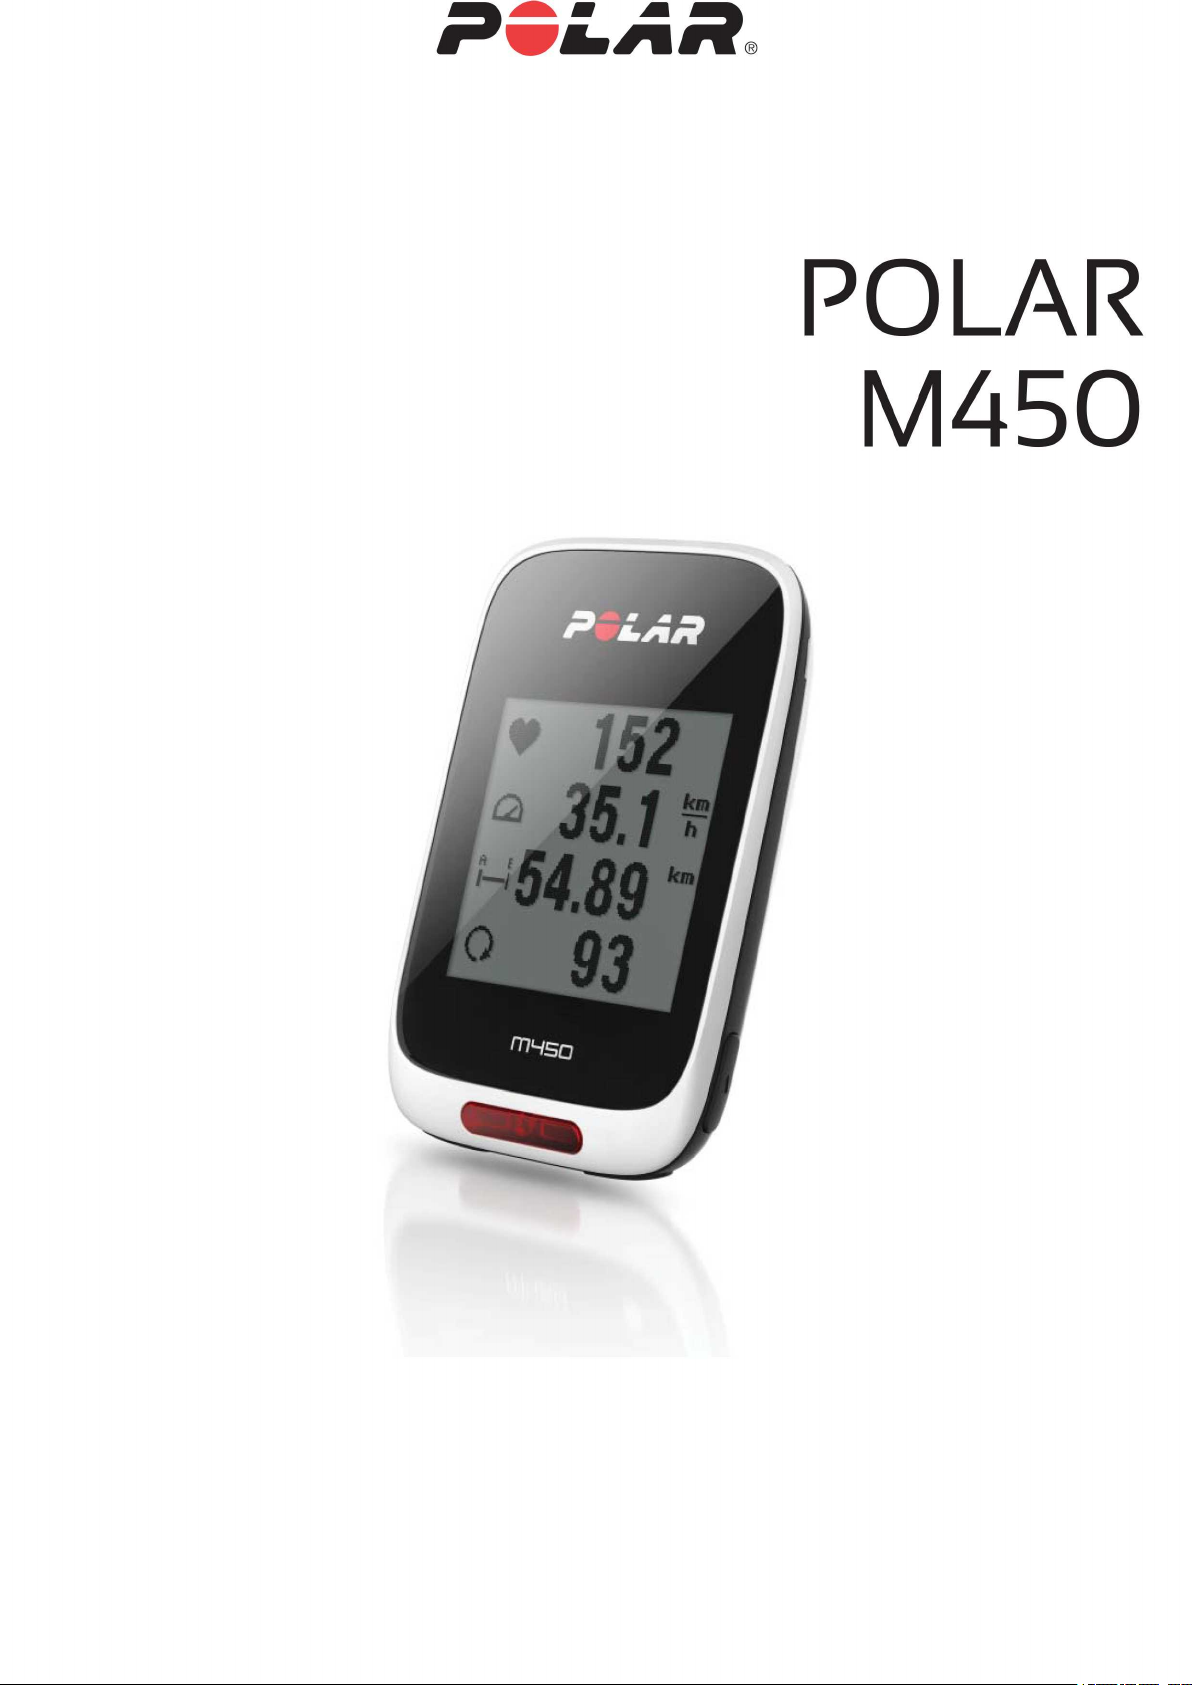
M450 USER MANUAL
Page 2

CONTENTS
Contents 2
Polar M450 User Manual 10
Introduction 10
M450 10
H7 Heart Rate Sensor 10
USB Cable 11
Polar Flow Mobile App 11
Polar FlowSync Software 11
Polar Flow Web Service 11
Get Started 12
Set Up Your M450 12
Set Up in the Polar Flow Web Service 12
Set Up from the Device 13
Charge the Battery 13
Battery Operating Time 14
Low Battery Notifications 15
Button functions and menu structure 15
Button Functions 15
Light 15
2
Page 3

Back 16
Start 16
Up / Down 16
Menu Structure 16
Diary 17
Settings 17
Tests 17
Interval Timer 18
Favorites 18
Pairing sensors with M450 18
Pairing Compatible Bluetooth Smart ® Sensors with M450 18
Pair a Mobile Device with M450 18
Delete a Pairing 19
Settings 20
Sport Profile Settings 20
Settings 21
Physical Settings 22
Weight 22
Height 22
Date of Birth 23
Sex 23
3
Page 4

Training Background 23
Maximum Heart Rate 23
General Settings 24
Pair and Sync 24
Front Light Settings 24
Flight Mode 24
Time 25
Date 25
Week's Starting Day 25
Button Sounds 25
Button Lock 25
Units 25
Language 25
About Your Product 26
Quick Menu 26
Firmware Update 28
How to Update Firmware 28
Install Bike Mount 30
Polar Adjustable Bike Mount 30
Compatible Sensors 31
Polar H7 Heart Rate Sensor Bluetooth® Smart 31
4
Page 5

Pair Heart Rate Sensor withM450 31
Polar Speed Sensor Bluetooth® Smart 31
Pair a Speed Sensor with M450 32
Measuring Wheel Size 32
Polar Cadence Sensor Bluetooth® Smart 33
Pair Cadence Sensor with M450 34
Polar LOOK Kéo Power Sensor Bluetooth® Smart 34
Pair Kéo Power with M450 35
Power Settings on M450 36
Calibrate Kéo Power before starting a training session 36
Training 37
Wear Heart Rate Sensor 37
Start a Training Session 37
Start a Session with Training Target 39
Start a Session with Interval Timer 39
Functions During Training 40
Take a Lap 40
Lock a Heart Rate, Speed or Power Zone 40
Change Phase During a Phased Session 41
Change Settings in Quick Menu 41
Pause/Stop a Training Session 41
5
Page 6

After Training 43
Training Summary on Your M450 43
Polar Flow App 46
Polar Flow Web Service 46
Features 47
AssistedGPS (A-GPS) 47
A-GPS Expiry Date 47
GPS Features 48
Back to Start 48
Barometer 48
Smart Coaching 49
Training Benefit 50
Training Load and Recovery 51
Fitness Test 52
Before the Test 52
Performing the Test 53
Test Results 53
Fitness Level Classes 53
Men 53
Women 54
Vo2max 54
6
Page 7

Orthostatic Test 55
Before the Test 55
Performing the test 56
Test Results 56
Heart Rate Zones 57
Smart Calories 62
Speed and Power Zones 62
Settings 62
During Training 63
After Training 63
Sport Profiles 63
Changeable Cover 64
Polar Flow Web Service 66
Training Targets 67
Create a Training Target 67
Quick Target 67
Phased Target 68
Favorites 68
Favorites 68
Add a Training Target to Favorites: 69
Edit a Favorite 69
7
Page 8

Remove a Favorite 69
Sport Profiles in Flow Web Service 69
Add a Sport Profile 69
Edit a Sport Profile 70
Basics 70
Heart Rate 70
Training Views 70
Polar Flow App 73
Syncing 74
Sync with Flow Web Service via FlowSync 74
Sync with Flow App 74
Caring for Your M450 76
M450 76
Heart Rate Sensor 76
Storing 77
Service 77
Important Information 78
Batteries 78
Changing Heart Rate Sensor Battery 78
Precautions 79
Interference During Training 79
8
Page 9

Minimizing Risks When Training 80
Technical Specification 81
M450 81
H7 Heart Rate Sensor 82
Polar FlowSync Software 83
Polar Flow mobile application compatibility 83
Water resistance of Polar products 83
Limited International Polar Guarantee 84
Regulatory information 85
RF Exposure Information 86
Disclaimer 86
9
Page 10
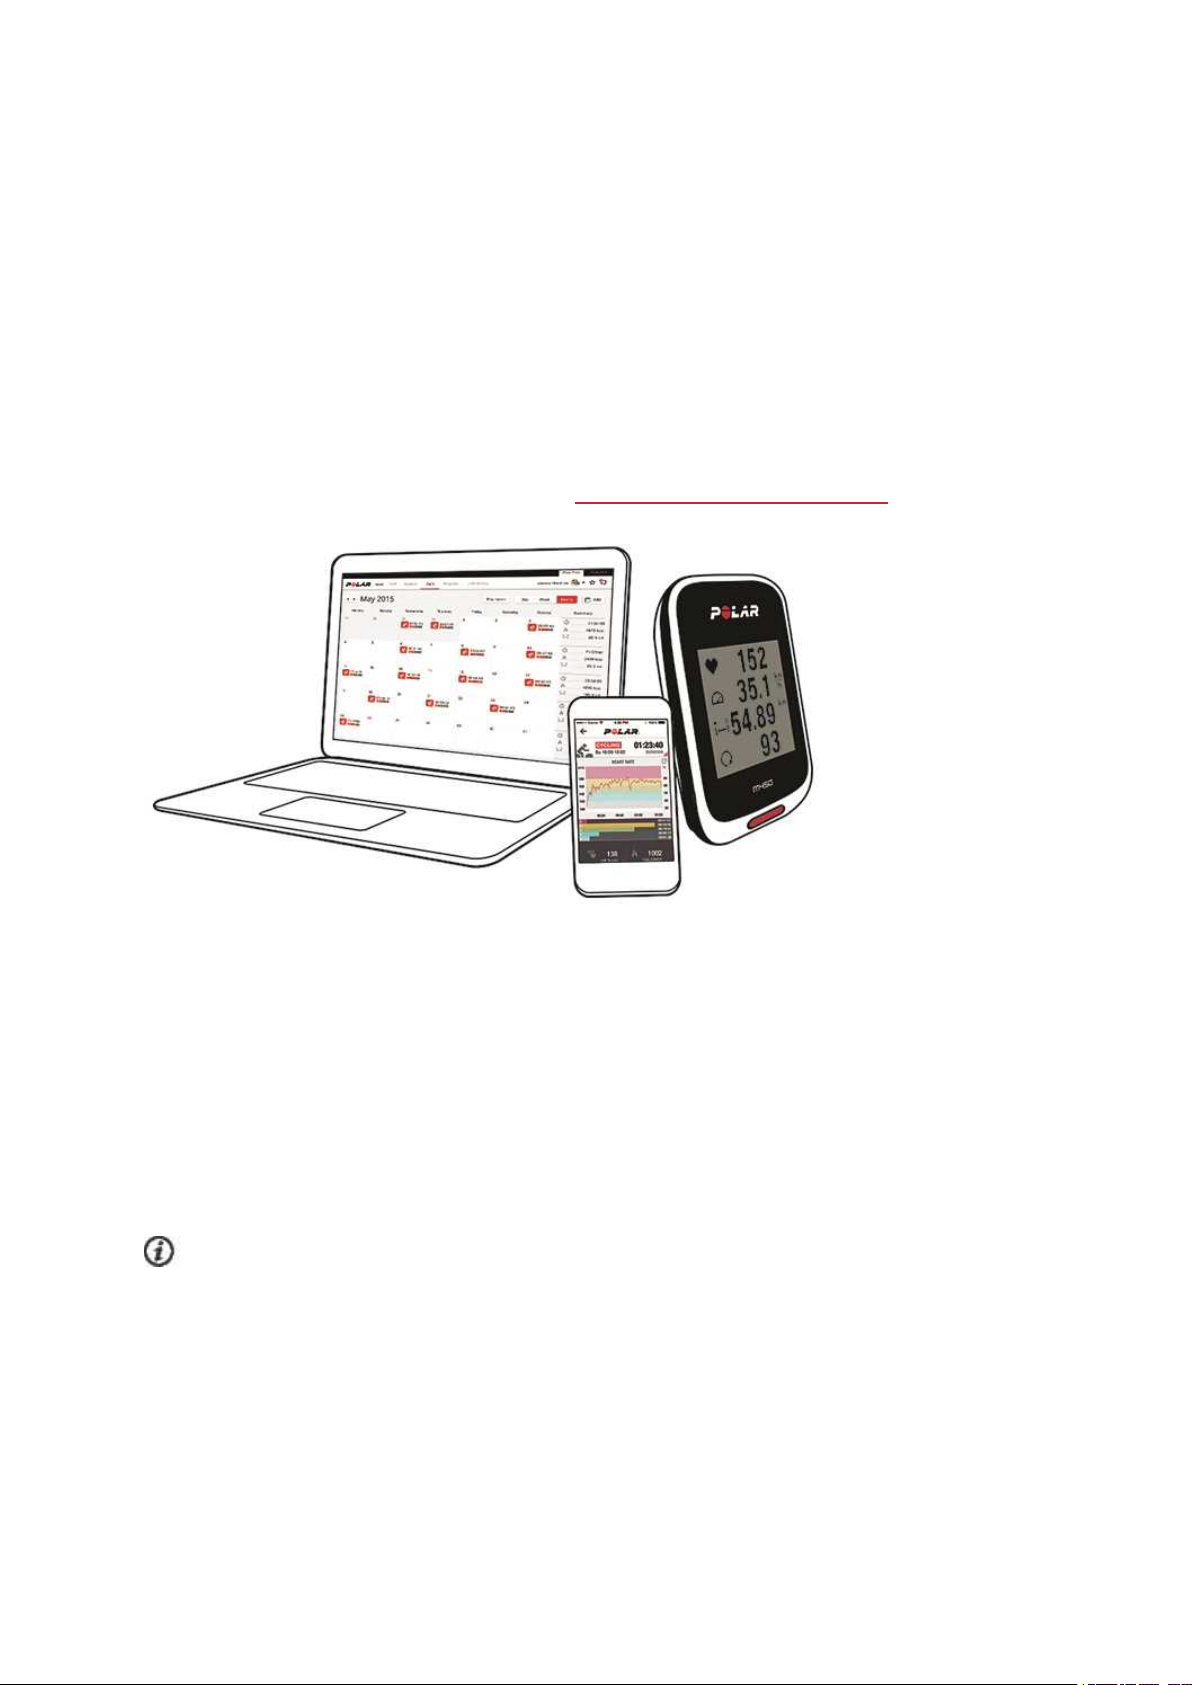
POLAR M450 USER MANUAL
INTRODUCTION
Congratulations on your new M450! Designed for cycling enthusiasts, M450 with GPS and Smart
Coaching encourages you to push your boundaries and perform at your best. Get an instant overview of
your training right after a session with the Flow app. Plan and analyze your training in detail with the
Flow web service.
This user manual helps you get started with your new training companion. To check the video tutorials
and the latest version of this user manual, go to www.polar.com/en/support/M450.
M450
View your training data, such as heart rate, speed, distance and altitude.
H7 HEART RATE SENSOR
See live, accurate heart rate on your M450 during training. Your heart rate is information used to analyze
how your session went.
Only included in M450 with heart rate sensor sets. If you bought a set that does not include a heart
rate sensor, not to worry, you can always buy one later.
10
Page 11

USB CABLE
Use the USB cable to charge the battery and to sync data between your M450 and the Polar Flow web
service via FlowSync software.
POLAR FLOW MOBILE APP
View your training data at a glance after every session. Flow app syncs your training data wirelessly to
the Polar Flow web service. Download it from the App Store or Google Play.
POLAR FLOWSYNC SOFTWARE
Flowsync software allows you to sync data between your M450 and the Flow web service on your
computer via the USB cable. Go to flow.polar.com/start to download and install Polar FlowSync
software.
POLAR FLOW WEB SERVICE
Plan and analyze every detail of your training, customize your device and learn more about your
performance at polar.com/flow.
11
Page 12

GET STARTED
Set Up Your M450 12
Set Up in the Polar Flow Web Service 12
Set Up from the Device 13
Charge the Battery 13
Battery Operating Time 14
Low Battery Notifications 15
Button functions and menu structure 15
Button Functions 15
Menu Structure 16
Pairing sensors with M450 18
Pairing Compatible Bluetooth Smart ® Sensors with M450 18
Pair a Mobile Device with M450 18
Delete a Pairing 19
SET UP YOUR M450
Please do the setup in the Polar Flow web service. Thereyou can fill in all the physical details required for
accurate training data at once. You can also select language and get the latest firmware for your M450.
To do the setup in the Flow web service, you need a computer with an Internet connection.
Alternatively, if you can't get to a computer with an Internet connection right away, you can start from
the device. Please note that the device contains only part of the settings. To make sure you get
to enjoy your M450 at its best, it's important that you do the setup in the Polar Flow web service later.
M450 is delivered in sleep mode. It wakes up when you plug it into a computer or a USB charger. If the
battery is completely empty, it takes a couple of minutes for the charging animation to appear.
SET UP IN THE POLAR FLOW WEB SERVICE
1. Go to flow.polar.com/start and download the Polar FlowSync software, which you need to
connect your M450 to the Flow web service.
2. Open the installation package and follow the on-screen instructions for installing the software.
3. Once the installation is complete, FlowSync opens automatically and asks you to plug in your
Polar device.
4. Plug M450 into your computer’s USB port with the USB cable. M450 wakes up and starts
charging. Let your computer install any USB drivers if it suggests so.
12
Page 13

5. The Flow web service opens automatically on your internet browser. Create a Polar account or
sign in if you already have one. Fill in your physical settings precisely as they have an effect on
calorie calculation and other Smart Coaching features.
6. Start synchronization by clicking Done, and the settings will be synchronized between M450 and
the service. FlowSync status will change to completed, once the synchronization is done.
The languages you can choose in the Polar Flow web service are:Dansk, Deutsch, English, Español,
Français, Italiano,
Svenska.
日 本 語
, Nederlands, Norsk, Polski, Português,
简 体 中 文
, Русский, Suomi or
SET UP FROM THE DEVICE
Plug M450 into your computer’s USB port or a USB charger with the cable that came in the box. Choose
language is displayed. Press START to choose English.Your M450 is delivered with English only, but you
can add other languages when doing the setup in the Polar Flow web service later.
Set the following data, and confirm each selection with the Start button. If you want to return and
change a setting at any point, press Back until you reach the setting you want to change.
1. Time format : Choose12 h or 24 h. With 12 h, select AM or PM. Then set the local time.
2. Date : Enter the current date.
3. Units : Choose metric (kg, cm) or imperial (lb, ft) units.
4. Weight : Enter your weight.
5. Height : Enter your height.
6. Date of birth : Enter your date of birth.
7. Sex : Choose Male or Female.
8. Training background : Occasional (0-1 h/week), Regular (1-3 h/week), Frequent (3-5
h/week), Heavy (5-8 h/week), Semi-Pro (8-12 h/week), Pro (12+ h/week). For more
information on training background, see Physical Settings.
9. Ready to go! is displayed when you're done with the settings, and M450 goes to time view.
CHARGE THE BATTERY
The M450 has an internal, rechargeable battery. Use the USB cable included in the product set to charge
it via the USB port on your computer. You can also charge the battery via a wall outlet. When charging
via a wall outlet use a USB power adapter (not included in the product set). If you use an AC adapter,
make sure that the adapter is marked with "output 5Vdc" and that it provides a minimum of 500mA.
Only use an adequately safety approved AC adapter (marked with "LPS", "Limited Power Supply" or "UL
listed").
13
Page 14
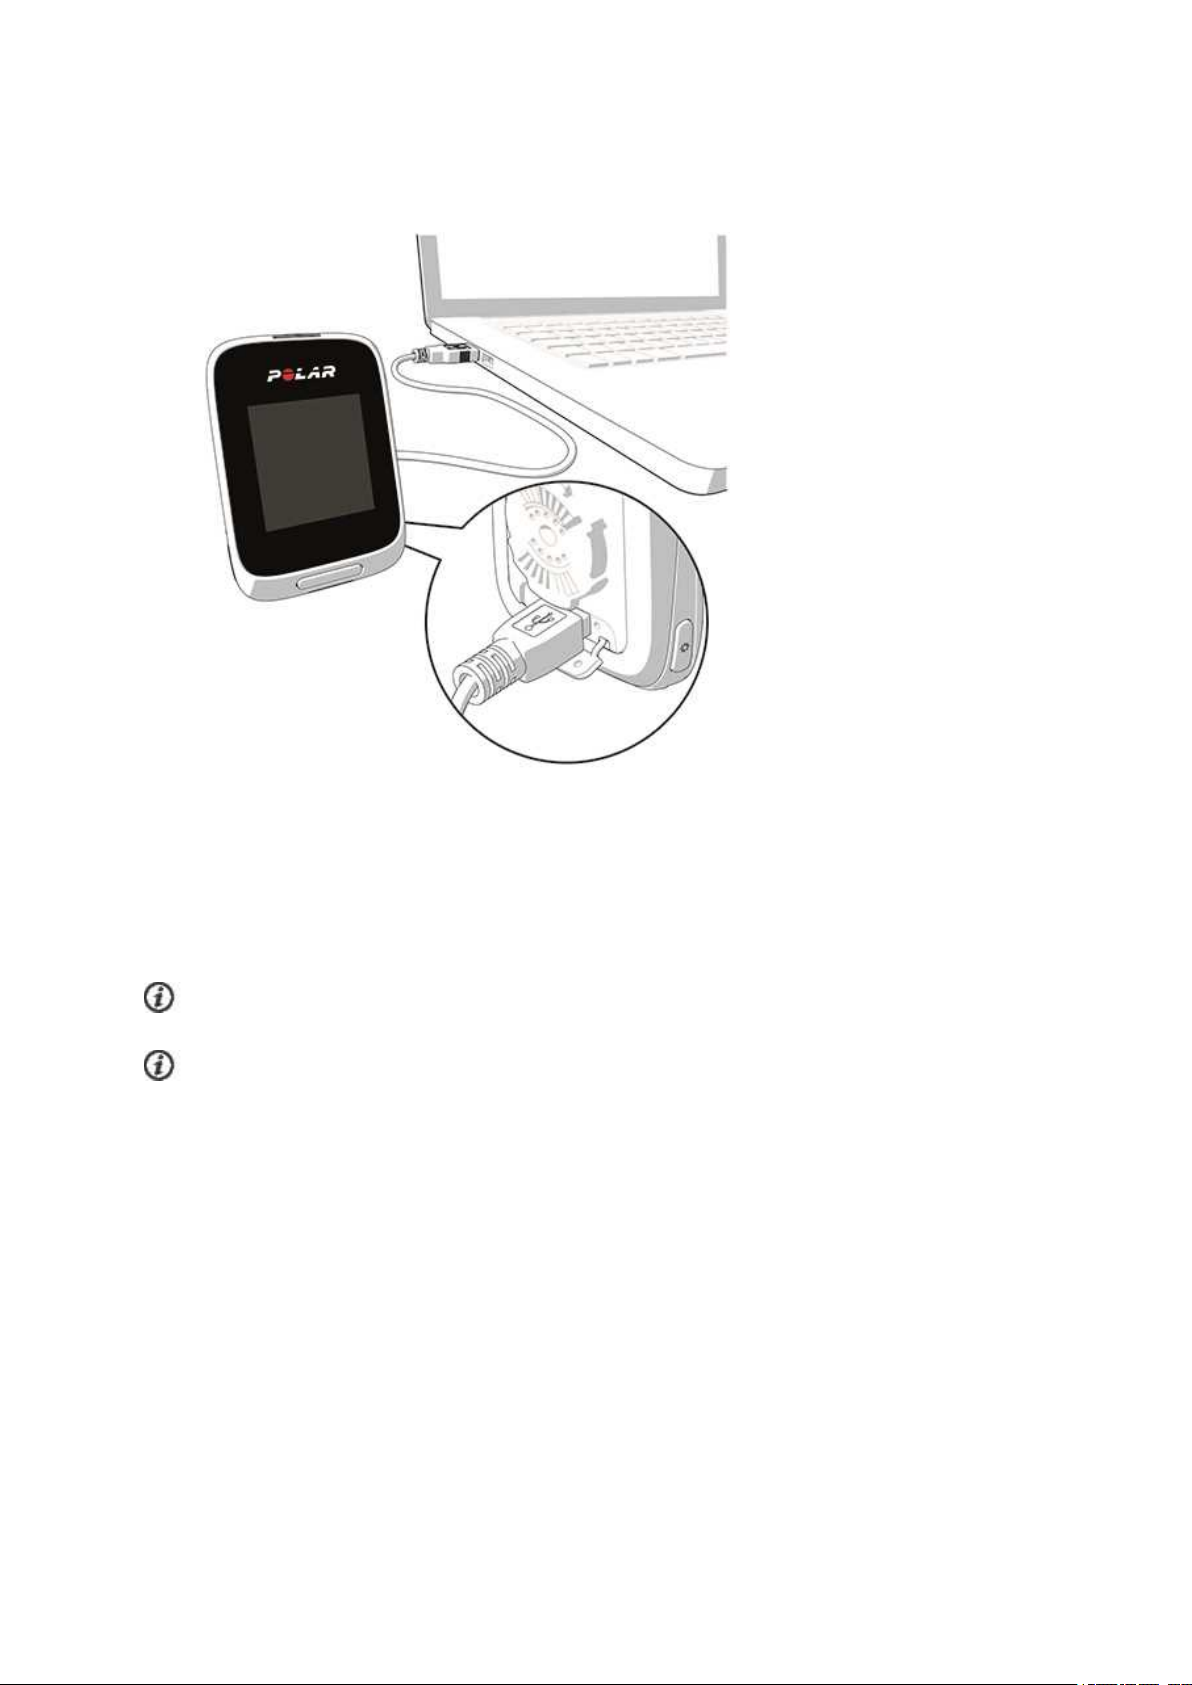
1. Lift the rubber cover off the USB port. Plug the micro USB connector into the USB port in the
M450, and plug the other end of the cable into your PC.
2. Charging appears on the display.
3. When M450 is fully charged, Charging completed is displayed.
Don't leave the battery fully discharged for a long period of time or keep it fully charged all the time,
because it might affect the battery life time. Keep the USB port cover closed when not in use.
Do not charge the battery when the M450 is wet.
Do not charge the battery in temperatures under 0 °C / 32°F or over +50 °C / 122 °F. Charging your
M450 in an environment where temperature is not within this temperature range may permanently
damage the battery capacity - especially if the temperature is higher.
BATTERY OPERATING TIME
The battery operating time is up to 16 hours with GPS and heart rate sensor. The operating time
depends on many factors, such as the temperature of the environment in which you use your M450, the
features you select and use (e.g. the use of the front light reduces the operating time), and battery aging.
The operating time is significantly reduced in temperatures well below freezing.
14
Page 15
LOW BATTERY NOTIFICATIONS
Battery low. Charge
The battery charge is low. It is recommended to charge M450.
Charge before training
The charge is too low for recording a training session.
A new training session cannot be started before charging M450.
When the display is blank, M450 has either gone to sleep mode or its battery is empty. M450 goes to
sleep mode automatically when it's in time view and you haven't pressed any button for ten minutes. It
wakes up from sleep mode when you press any button. If it doesn't wake up, it's time to charge.
BUTTON FUNCTIONS AND MENU STRUCTURE
BUTTON FUNCTIONS
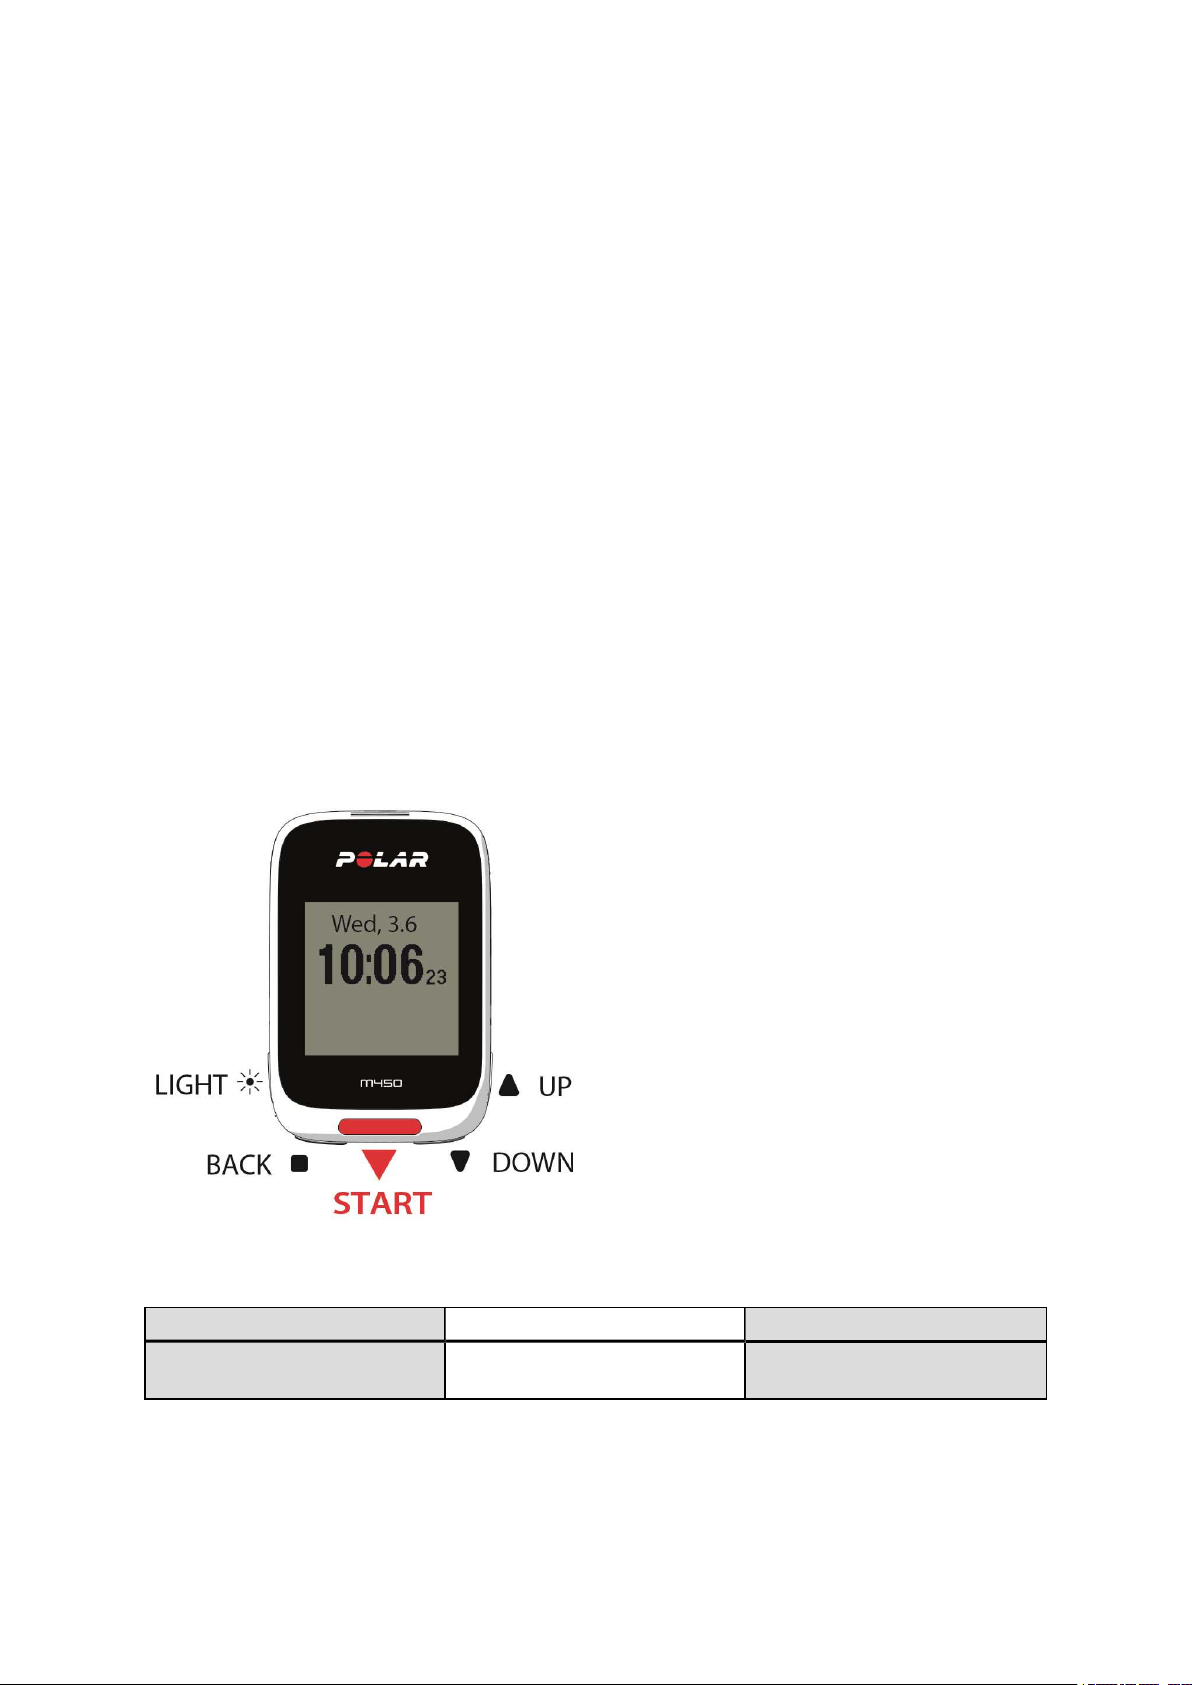
M450 has five buttons that have different functionalities depending on the situation of use. See the
tables below to find out what functionalities the buttons have in different modes.
LIGHT
TIMEVIEWANDMENU PRE-TRAINING MODE DURING TRAINING
• Illuminate the display • Illuminate the display • Illuminate the display
15
Page 16
TIMEVIEWANDMENU PRE-TRAINING MODE DURING TRAINING
• Press and hold to lock
buttons
BACK
TIMEVIEWANDMENU PRE-TRAINING MODE DURING TRAINING
• Exit the menu
• Return to the previous
level
• Leave settings unchanged
• Cancel selections
• Press and hold to enter
sport profile settings
• Press and hold to enter
Quick Menu
• Return to time view • Pause training by pressing
once
• Press and hold for 3
seconds to stop training
recording
• Press and hold to return
to time view from menu
• Press and hold to sync
with Flow app in time view
START
TIMEVIEWANDMENU PRE-TRAINING MODE DURING TRAINING
• Confirm selections
• Enter pre-training mode
• Confirm the selection
shown on the display
• Start a training session • Press and hold to set
zone lock on/off
• Continue training
recording when paused
• Press to record a lap
UP / DOWN
TIMEVIEWANDMENU PRE-TRAINING MODE DURING TRAINING
• Move through selection
lists
• Move through sports list • Change training view
• Adjust a selected value
MENU STRUCTURE
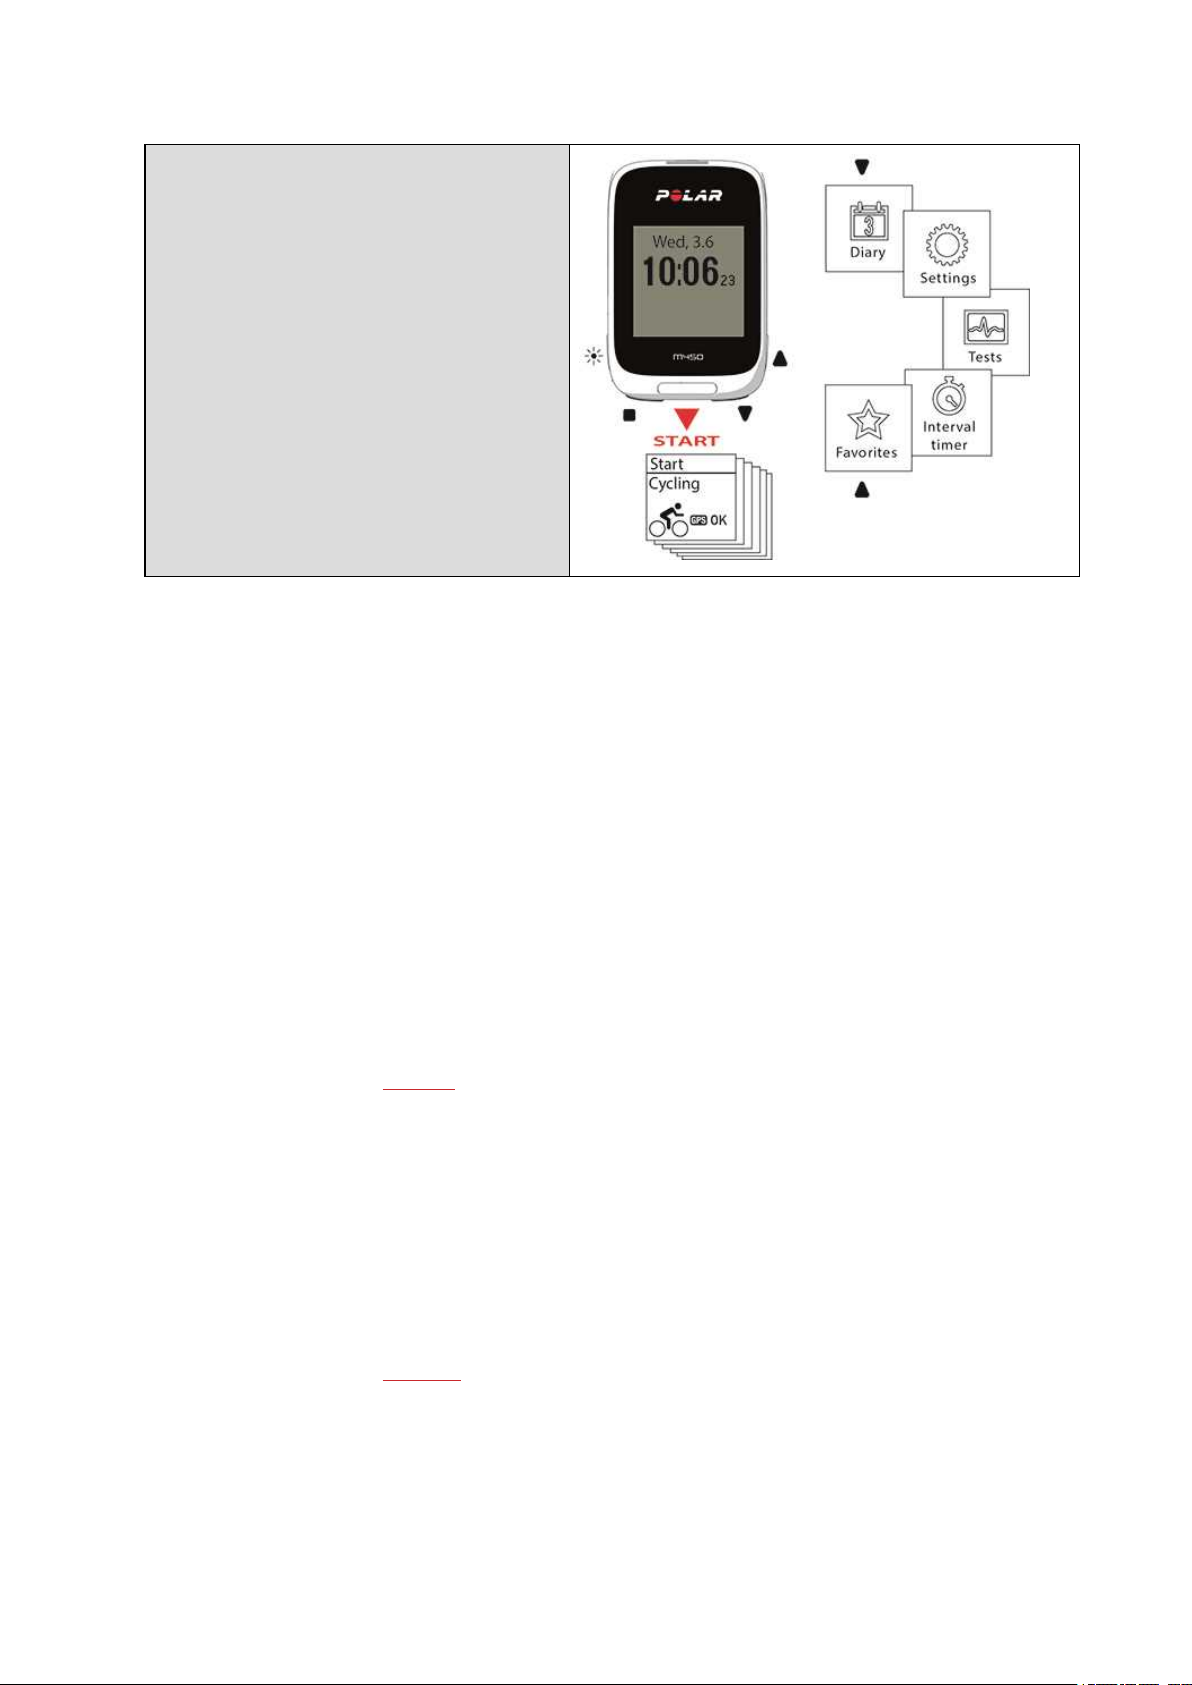
Enter and browse through the menu by pressing UP or DOWN. Confirm selections with the START
button, and return with the BACK button.
16
Page 17
In the menu you'll find:
• Diary
• Settings
• Tests
• Interval timer
• Favorites
DIARY
In Diary you'll see the current week, past four weeks and next four weeks. Select a day to see your
training sessions of that day, the training summary of each session and the tests you have done.You can
also see your planned training sessions.
SETTINGS
In Settings you can edit:
• Sport profiles
• Physical settings
• General settings
• Watch settings
For more information, see Settings.
TESTS
In Tests, you'll find:
Orthostatic test
Fitness test
For more information, see Features.
17
Page 18

INTERVAL TIMER
Set time and/or distance based interval timers to precisely time work and recovery phases in your
interval training sessions.
For more information, see Start a Training Session.
FAVORITES
In Favorites you'll find training targets that you have saved as favorites in the Flow web service.
For more information, see Favorites.
PAIRING SENSORS WITH M450
Before taking a new Bluetooth Smart ® heart rate sensor, cycling sensor or mobile device (smartphone,
tablet) into use, it has to be paired with your M450. Pairing only takes a few seconds, and ensures that
your M450 receives signals from your sensors and devices only, and allows disturbance-freetraining in a
group. Before entering an event or race, make sure that you do the pairing at home to prevent
interference due to data transmission.
PAIRING COMPATIBLE BLUETOOTH SMART ® SENSORS WITH M450
For instructions on pairing specific sensors, see Compatible Sensors.
PAIR A MOBILE DEVICE WITH M450
Before pairing a mobile device, create a Polar account if you do not already have one, and download
Flow app from the App Store or Google Play. Make sure you have also downloaded and installed
FlowSync software onto your computer from flow.polar.com/start, and registered your M450 in the
Flow web service.
Before trying to pair, make sure your mobile device has Bluetooth turned on, and airplane mode/flight
mode is not turned on.
To pair a mobile device:
1. In M450, go to Settings > General settings > Pair and sync > Pair mobile device and press
START
2. Once your device is found, the device ID Polar mobile xxxxxxxx is displayed on M450.
3. Press START, Connecting to device is displayed, followed by Connecting to app.
18
Page 19

4. Accept the Bluetooth pairing request on your mobile device and type in the pin code shown on
your M450.
5. Pairing completed is displayed when you are done.
or
1. On your mobile device, open Flow app and sign in with your Polar account.
2. Wait for the Connect product view to appear on your mobile device (Searching for Polar M450)
is displayed.
3. In M450 time mode, press and hold BACK.
4. Connecting to device is displayed, followed by Connecting to app.
5. Accept the Bluetooth pairing request on your mobile device and type in the pin code shown on
your M450.
6. Pairing completed is displayed when you are done.
DELETE A PAIRING
To delete a pairing with a sensor or mobile device:
1. Go to Settings > General settings > Pair and sync > Paired devices and press START.
2. Choose the device you want to remove from the list and press START.
3. Delete pairing? is displayed, choose Yes and press START.
4. Pairing deleted is displayed when you are done.
19
Page 20

SETTINGS
Sport Profile Settings 20
Settings 21
Physical Settings 22
Weight 22
Height 22
Date of Birth 23
Sex 23
Training Background 23
Maximum Heart Rate 23
General Settings 24
Pair and Sync 24
Front Light Settings 24
Flight Mode 24
Time 25
Date 25
Week's Starting Day 25
Button Sounds 25
Button Lock 25
Units 25
Language 25
About Your Product 26
Quick Menu 26
Firmware Update 28
How to Update Firmware 28
SPORT PROFILE SETTINGS
Adjust the sport profile settings to best suit your training needs. In M450, you can edit certain sport
profiles settings in Settings > Sport profiles. You can, for example, set the GPSon or off in different
sports. A wider range of customization options is availablein the Flow web service. For more
information, see Sport Profiles in Flow.
There are six sport profiles on your M450 by default:
• Cycling
• Road cycling
• Indoor cycling
20
Page 21

• Mountain biking
• Other outdoor
• Other indoor
In the Flow web service you can add new sports to your list, and sync them to your M450. You can have
a maximum of 20 sports on your M450 at a time. The number of sport profiles in the Flow web service is
not limited.
If you have edited your sport profiles in the Flow web service before your first training session,and
synced them to your M450, the sport profile list will contain the edited sport profiles.
SETTINGS
To view or modify sport profile settings, go to Settings > Sport profiles and choose the profile you
want to modify. You can also access the settings of the currently selected profile from pre-training mode
by pressing and holding LIGHT.
• Training sounds: Choose Off, Soft, Loud or Very loud.
• Heart rate settings: Heart rate view: Choose Beats per minute (bpm) or % of maximum.
Check HR zone limits: Check the limits for each heart rate zone. HR visible to other device:
Choose On or Off. If you choose On, other compatibledevices (e.g. gym equipment) can detect your
heart rate.
• Bike power settings: Power view: Set how you want to view your power data (Watts (W),
Watts/kg (W/kg) or % of FTP). Power, rolling average: Choose 1, 3, 5,10, 15, 30 or 60 second
rolling average of power data. Set FTP value: Set your FTP (Functional Threshold Power) value. The
setting range is 60 to 600 watts. Check power zone limits: Check your power zone limits.
Bike power settings are visible only if you have paired the sensor. For more information on
calibration, see Polar LOOK Kéo Power Sensor Bluetooth® Smart.
• GPS recording: Choose Off or On.
• Bike settings: Wheel size: Set the wheel size in millimeters. For more information, see
Measuring wheel size. Crank length: Set the crank length in millimeters. Used sensors: View all the
sensors you have linked to the bike.
• Speed settings: Speed view: Choose km/h (kilometers per hour) or min/km(minutes per
kilometer). If you have chosen imperial units, choosemph (miles per hour) or min/mi (minutes per
mile). Check speed zone limits: Check the limits for each speed zone.
21
Page 22

• Automatic pause sett.: Automatic pause: Choose On or Off. If you set the automatic pause
On, your session is automatically paused when you stop moving. Activation speed:set the speed
at which recording is paused.
• Automatic lap: Choose Off, Lap distance or Lap duration. If you choose Lap distance, set the
distance after which each lap is taken. If you choose Lap duration, set the duration after which each
lap is taken.
To use automatic pause or distance-based automatic lap, you must have the GPS function on or Polar
Speed Sensor Bluetooth® Smart in use.
PHYSICAL SETTINGS
To view and edit your physical settings, go to Settings > Physical settings. It is important that you are
precise with the physical settings, especially when setting your weight, height, date of birth and sex, as
they have an impact on the accuracy of the measuring values, such as the heart rate zone limits and
calorie expenditure.
In Physical settings you'll find:
• Weight
• Height
• Date of birth
• Sex
• Training background
• Maximum heart rate
WEIGHT
Set your weight in kilograms (kg) or pounds (lbs).
HEIGHT
Set your height in centimeters (metric) or in feet and inches (imperial).
22
Page 23

DATE OF BIRTH
Set your birthday. The order in which the date settings are depends on which time and date format you
have chosen (24h: day - month - year / 12h: month - day - year).
SEX
Select Male or Female.
TRAINING BACKGROUND
Training background is an assessment of your long-term physical activity level. Select the alternative that
best describes the overall amount and intensity of your physical activity during the past three months.
• Occasional (0-1h/week): You do not participate regularly in programmed recreational sport or
heavy physical activity, e.g. you walk only for pleasure or exercise hard enough to cause heavy
breathing or perspiration only occasionally.
• Regular (1-3h/week): You participate regularly in recreational sports, e.g. you run 5-10 km or 3-6
miles per week or spend 1-3 hours per week in comparable physical activity, or your work requires
modest physical activity.
• Frequent (3-5h/week): You participate at least 3 times a week in heavy physical exercise, e.g. you
run 20-50 km/12-31 miles per week or spend 3-5 hours per week in comparable physical activity.
• Heavy (5-8h/week): You participate in heavy physical exercise at least 5 times a week, and you
may sometimes take part in mass sports events.
• Semi-pro (8-12h/week): You participate in heavy physical exercise almost daily, and you exercise
to improve performance for competitive purposes.
• Pro (>12h/week): You are an endurance athlete. You participate in heavy physical exercise to
improve your performance for competitive purposes.
MAXIMUM HEART RATE
Set your maximum heart rate, if you know your current maximum heart rate value. Your age-predicted
maximum heart rate value (220-age) is displayed as a default setting when you set this value for the first
time.
HR
during maximum physical exertion.The most accurate method for determining your individual HR
to perform a maximal exercise stress test in a laboratory. HR
intensity. It is individual and depends on age and hereditary factors.
is used to estimate energy expenditure. HR
max
is the highest number of heartbeats per minute
max
is also crucial when determining training
max
max
is
23
Page 24

GENERAL SETTINGS
To view and edit your general settings, go to Settings > General settings
In General settings you'll find:
• Pair and sync
• Front light settings
• Flight mode
• Time
• Date
• Week's starting day
• Button sounds
• Button lock
• Units
• Language
• About your product
PAIR AND SYNC
• Pair and sync mobile device: Pair mobile devices with your M450.
• Pair other device: Pair heart rate sensors and cycling sensors with your M450.
• Paired devices: View all the devices you have paired with your M450.
• Sync data: Sync data with Flow app. Sync data becomes visible after you have paired your M450
with a mobile device.
FRONT LIGHT SETTINGS
• Front light: Choose Manual front light or Automatic front light
• Manual front light: Manage the front light manually from the quick menu.
• Automatic front light: The M450 turns the front light on and off according to light condition.
• Activation level: Choose Dark, Dusk or Light.
• Blink rate: Choose Blinking off, Slow, Fast or Very fast.
FLIGHT MODE
Choose On or Off
24
Page 25

Flight mode cuts off all wireless communication from the device. You cannot use it in training sessions
with Bluetooth® Smart sensors nor when syncing your data to the Polar Flow mobile app because
Bluetooth® Smart is disabled.
TIME
Set the time format: 24 h or 12 h.Then set the time of day.
DATE
Set the date. Also set the Date format, you can choose mm/dd/yyyy, dd/mm/yyyy, yyyy/mm/dd,
dd-mm-yyyy, yyyy-mm-dd, dd.mm.yyyy or yyyy.mm.dd.
When you sync your M450 with the Flow web service via the FlowSync software or via the Flow app, the
time and date settings are automatically updated according to the computer's or phone's watch settings.
WEEK'S STARTING DAY
Choose the starting day of each week. Choose Monday, Saturday or Sunday.
BUTTON SOUNDS
Set the button sounds On or Off.
Please note that this selection does not modify training sounds. Training sounds are modified in sport
profile settings. For more information, see "Sport Profile Settings" on page20.
BUTTON LOCK
Choose Manual lock or Automatic lock.In Manual lock you can lock the buttons by manually from
the Quick menu. In Automatic Lock the button lock automatically goes on after 60 seconds.
UNITS
Choose metric (kg, cm) or imperial (lb, ft). Set the units used to measure weight, height, distance and
speed.
LANGUAGE
Choose: Dansk, Deutsch, English, Español, Français, Italiano, 日 本 語, Nederlands, Norsk, Polski,
Português, 简 体 中 文 , Русский, Suomi or Svenska. Set the language of your M450.
25
Page 26

ABOUT YOUR PRODUCT
Check the device ID of your M450, as well as the firmware version, HW model and A-GPS expiry date.
QUICK MENU
In pre-training mode, press and hold LIGHT to access the settings of the currently chosen sport profile:
• Training sounds: Choose Off, Soft, Loud or Very loud.
• Heart rate settings: Heart rate view: Choose Beats per minute (bpm) or % of maximum.
Check HR zone limits: Check the limits for each heart rate zone. HR visible to other device:
Choose On or Off. If you choose On, other compatibledevices (e.g. gym equipment) can detect your
heart rate.
• Bike power settings: Power view: Set how you want to view your power data (Watts (W),
Watts/kg (W/kg) or % of FTP). Power, rolling average: Choose 1, 3, 5,10, 15, 30 or 60 second
rolling average of power data. Set FTP value: Set your FTP (Functional Threshold Power) value. The
setting range is 60 to 600 watts. Check power zone limits: Check your power zone limits.
Bike power settings are visible only if you have paired the sensor. For more information on
calibration, see Polar LOOK Kéo Power Sensor Bluetooth® Smart.
• GPS recording: Choose Off or On.
• Calibrate power sensor: Power sensor calibration is visible only if you have paired the sensor. For
more information on calibration, see Polar LOOK Kéo Power Sensor Bluetooth® Smart.
• Bike settings: Used sensors: View all the sensors you have linked to the bike.
• Calibrate altitude: Set the correct altitude. It is recommended to always manually calibrate
altitudewhen you know your current altitude.
• Speed settings: Speed view: Choose km/h (kilometers per hour) or min/km(minutes per
kilometer). If you have chosen imperial units, choosemph (miles per hour) or min/mi (minutes per
mile). Check speed zone limits: Check the limits for each speed zone.
• Automatic pause sett.: Automatic pause: Choose On or Off. If you set the automatic pause
On, your session is automatically paused when you stop moving. Activation speed:set the speed
at which recording is paused.
• Automatic lap:Choose Off, Lap distance or Lap duration. If you choose Lap distance, set the
distance after which each lap is taken. If you choose Lap duration, set the duration after which each
lap is taken.
In training view, press and hold LIGHT to enter Quick menu. You'll find:
26
Page 27

• Lock buttons: Press START to lock buttons. To unlock, press and hold LIGHT.
• Set front light on or off.
• Set backlight on or off.
• Calibrate power sensor: Power sensor calibration is visible only if you have paired the sensor. For
more information on calibration, see Polar LOOK Kéo Power Sensor Bluetooth® Smart.
• Calibrate altitude: Set the correct altitude. It is recommended to always manually calibrate
altitudewhen you know your current altitude.
• Interval timer: Create time and/or distance based interval timers to precisely time work and
recovery phases in your interval training sessions.
• Current location info*: Current location and the number of visible satellites.
• Choose Set location guide on*, and press START. Location guide arrow view set on is
displayed, and M450 goes to Back to Start view.
*This selection is only available if GPS is set on for the sport profile.
In pause mode, press and hold LIGHT to enter Quick menu.You'll find:
• Lock buttons: Press START to lock buttons. To unlock, press and hold LIGHT.
• Set front lighton or off.
• Training sounds: Choose Off, Soft, Loud or Very loud.
• Heart rate settings: Heart rate view: Choose Beats per minute (bpm) or % of maximum.
Check HR zone limits: Check the limits for each heart rate zone. HR visible to other device:
Choose On or Off. If you choose On, other compatibledevices (e.g. gym equipment) can detect your
heart rate.
• Bike power settings: Power view: Set how you want to view your power data (Watts (W),
Watts/kg (W/kg) or % of FTP). Power, rolling average: Choose 1, 3, 5,10, 15, 30 or 60 second
rolling average of power data. Set FTP value: Set your FTP (Functional Threshold Power) value. The
setting range is 60 to 600 watts. Check power zone limits: Check your power zone limits.
Bike power settings are visible only if you have paired the sensor. For more information on
calibration, see Polar LOOK Kéo Power Sensor Bluetooth® Smart.
• GPS recording: Choose Off or On.
• Calibrate power sensor: Power sensor calibration is visible only if you have paired the sensor. For
more information on calibration, see Polar LOOK Kéo Power Sensor Bluetooth® Smart.
• Bike settings: Used sensors: View all the sensors you have linked to the bike.
27
Page 28

• Calibrate altitude: Set the correct altitude. It is recommended to always manually calibrate
altitudewhen you know your current altitude.
• Speed settings: Speed view: Choose km/h (kilometers per hour) or min/km (minutes per
kilometer). If you have chosen imperial units, choosemph (miles per hour) or min/mi (minutes per
mile). Check speed zone limits: Check the limits for each speed zone.
• Automatic pause sett.: Automatic pause: Choose On or Off. If you set the automatic pause
On, your session is automatically paused when you stop moving. Activation speed:set the speed
at which recording is paused.
• Automatic lap:Choose Off, Lap distance or Lap duration. If you choose Lap distance, set the
distance after which each lap is taken. If you choose Lap duration, set the duration after which each
lap is taken.
To use automatic pause or distance-based automatic lap, you must have the GPS function on or Polar
Speed Sensor Bluetooth® Smart in use.
FIRMWARE UPDATE
The firmware of your M450 can be updated. Any time a new firmware version is available, FlowSync will
notify you when connecting M450 to your computer with the USB cable. The firmware updates are
downloaded via the USB cable and FlowSync software. Flow app will also notify you when new firmware
is available.
Firmware updates are performed to improve the functionality of your M450. They can include
improvements to existing features, completely new features or bug fixes, for example.
HOW TO UPDATE FIRMWARE
To update the firmware of your M450, you must have:
• A Flow web service account
• Installed FlowSync software
• Registered your M450 in the Flow web service
Go to flow.polar.com/start, and create your Polar account in the Polar Flow web service and download
and install FlowSync software onto your PC.
To update the firmware:
28
Page 29

1. Plug the micro USB connector into the USB port in the M450, and plug the other end of the cable
into your PC.
2. FlowSync starts syncing your data.
3. After syncing, you are asked to update the firmware.
4. Choose Yes. New firmware is installed (this may take some time), and M450 restarts.
Before updating the firmware, the most important data from your M450 is synced to the Flow web
service. Therefore you will not lose important data when updating.
29
Page 30
INSTALL BIKE MOUNT
POLAR ADJUSTABLE BIKE MOUNT
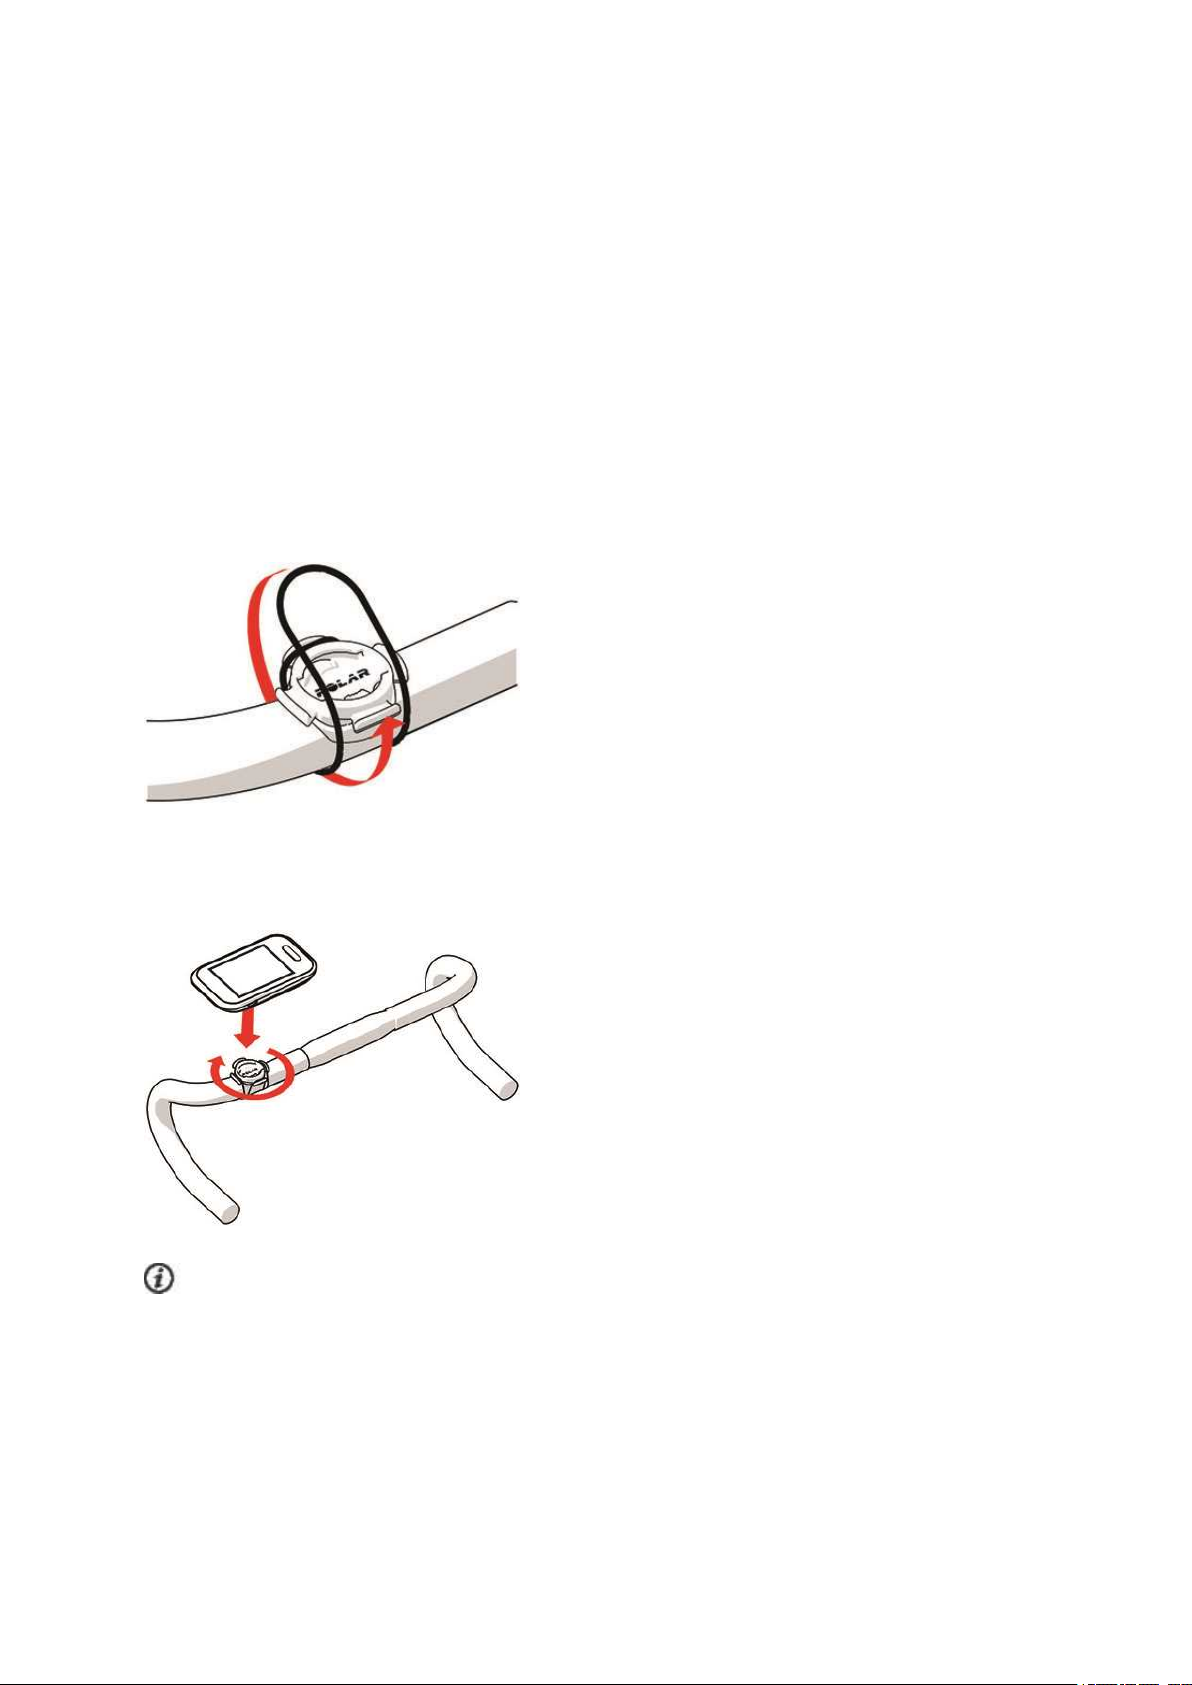
You can install the Polar Adjustable Bike Mount either on the stem of your bike, or on the left or right
hand side of the handle bar.
1. Place the rubber baseon the stem/handlebar.
2. Position the bike mount on the rubber base so that the POLAR logo is in line with the handlebar.
3. Secure the bike mount onto the stem/handlebar with the O-ring.
4. Align the ledges on the back of the M450 with the slots on the bike mount and turn clockwise until the
M450 is in place.
For the best GPS performance, make sure the display is facing up.
30
Page 31

COMPATIBLE SENSORS
POLAR H7 HEART RATE SENSOR BLUETOOTH® SMART
Polar heart rate sensor consists of comfortable strap and connector. It detects your heart rate accurately
and sends the data to the M450 in real time.
Heart rate data gives you an insight into your physical condition and how your body responds to
training. Although there are many subjective clues as to how your body is doing during exercise
(perceived exertion, breathing rate, physical sensations), none is as reliable as measuring heart rate. It is
objective and is affected by both internal and external factors - meaning you will have a dependable
measure of your physical state.
PAIR HEART RATE SENSOR WITHM450
Wear your heart rate sensor as instructed in Wear Heart Rate Sensor. There are two ways to pair a heart
rate sensor with your M450:
1. Go to General Settings > Pair and sync > Pair other device and press START.
2. M450 starts searching for your heart rate sensor.
3. Once the heart rate sensor is found, the device ID, for example, Pair Polar H7xxxxxxxx, is
displayed. Choose the heart rate sensor you want to pair.
4. Press START, Pairing is displayed.
5. Pairing completed is displayed when you are done.
or
1. Press START in time view to enter pre-training mode.
2. To pair, touch your sensor with M450 is displayed, touch your heart rate sensor with M450,
and wait for it to be found.
3. M450 lists the heart rate sensors it finds.The device ID, for example, Pair Polar H7xxxxxxxx, is
displayed. Choose the heart rate sensor you want to pair and then choose Yes.
4. Pairing completed is shown when you are done.
POLAR SPEED SENSOR BLUETOOTH® SMART
There are a range of factors that can affect your cycling speed. Obviously fitness is one of them,
however, weather conditions and the varying gradients of the road play a huge part too. The most
advanced way of measuring how these factors affect your performance speed is with the aerodynamic
speed sensor.
31
Page 32

• Measures your current, average and maximum speeds
• Track your average speed to see your progress and performance improve
• Light yet tough, and easy to attach
PAIR A SPEED SENSOR WITH M450
Make sure the speed sensor has been correctly installed. For more information on installing the speed
sensor refer to the user manual of the speed sensor.
There are two ways to pair a speed sensor with your M450:
1. Go to General Settings > Pair and sync > Pair other device and press START.
2. M450 starts searching for the speed sensor. Rotate the wheel a few times to activate the sensor.
The flashing red light on the sensor indicates that the sensor is activated.
3. Once the speed sensor is found, Polar SPD xxxxxxxx is displayed.
4. Press START, Pairing is displayed.
5. Pairing completed is displayed when the pairing is ready.
6. Sensor linked to: is displayed. Choose Bike 1, Bike 2 or Bike 3. Confirm with START.
7. Set wheel size is displayed. Set the size and press START.
The first cycling sensor you pair will automatically be linked to Bike 1.
or
1. Press START in time view to enter pre-training mode.
2. M450 starts searching for your speed sensor. Rotate the wheel a few times to activate the sensor.
The flashing red light on the sensor indicates that the sensor is activated.
3. The device ID Pair Polar SPD xxxxxxxx is displayed. Choose Yes.
4. Pairing completed is displayed when the pairing is ready.
5. Sensor linked to: is displayed. Choose Bike 1, Bike 2 or Bike 3. Confirm with START.
6. Set wheel size is displayed. Set the size and press START.
MEASURING WHEEL SIZE
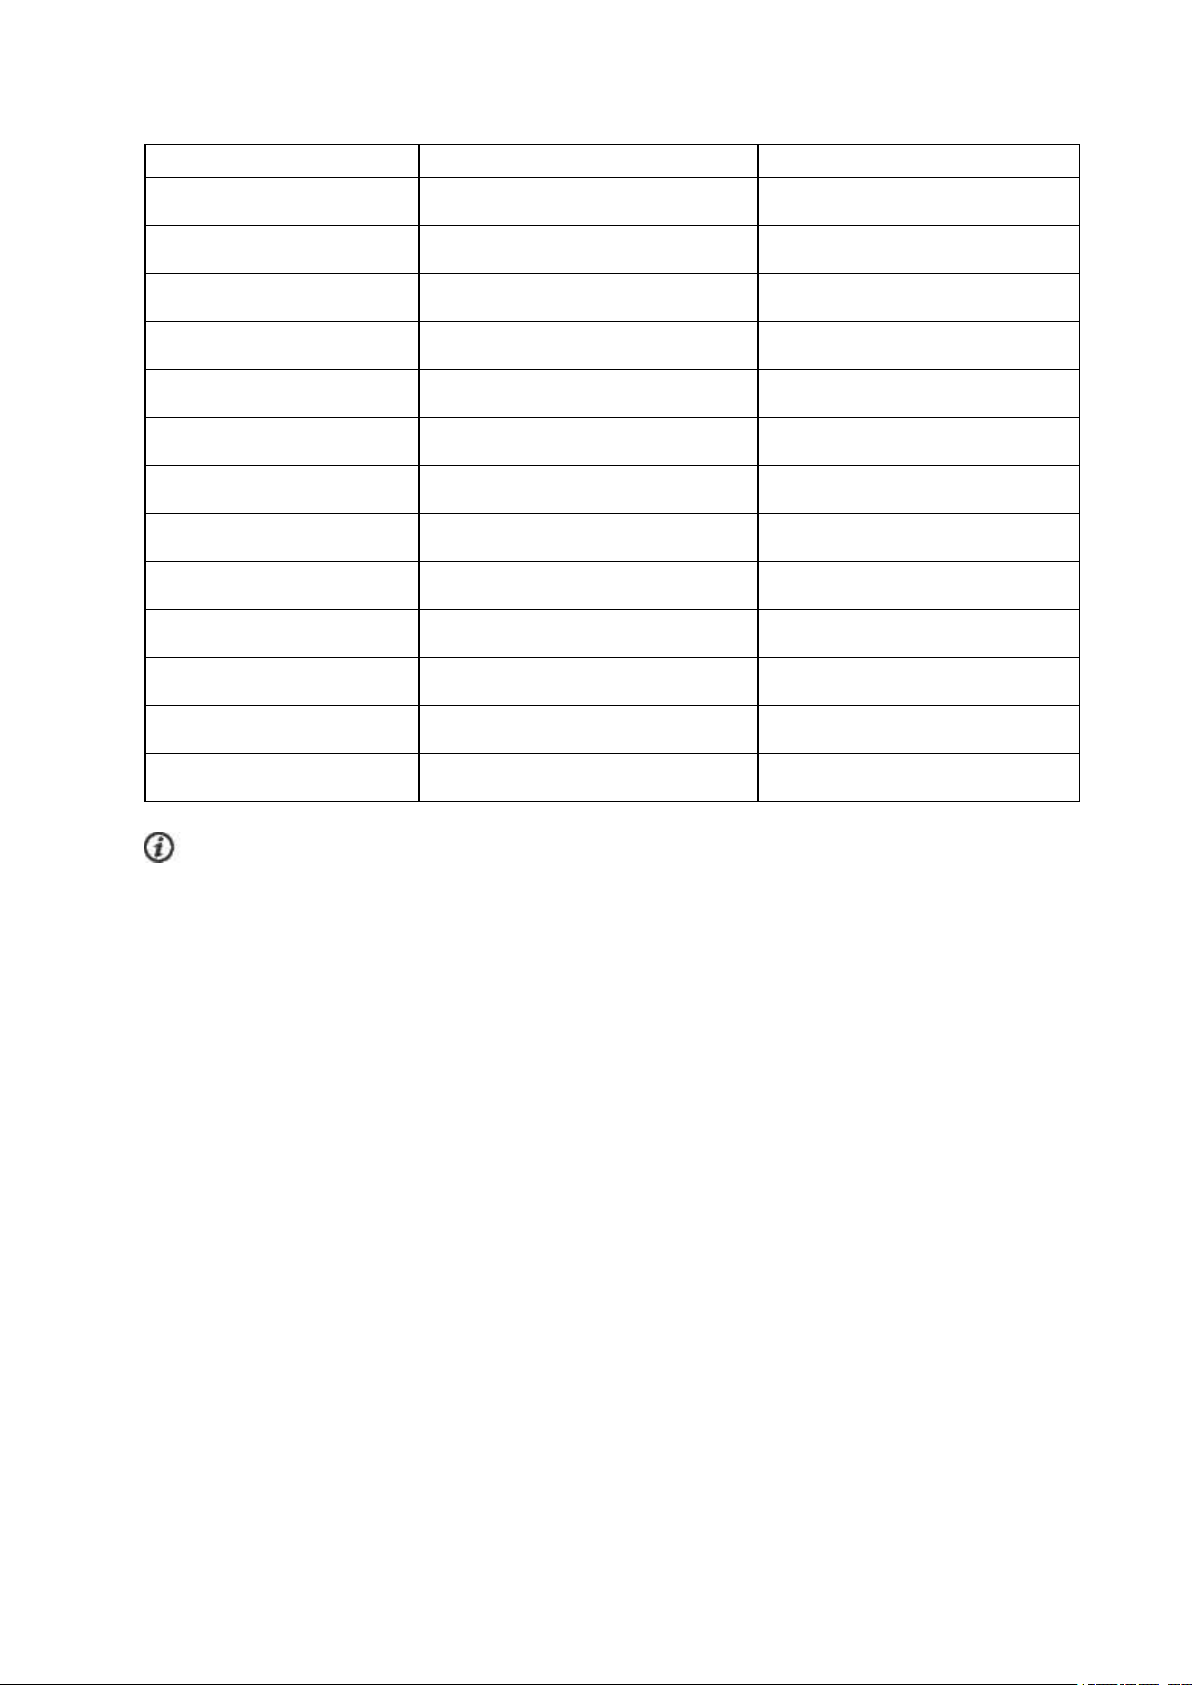
Wheel size settings are a prerequisite for correct cycling information. There are two ways of determining
the wheel size of your bike:
Method 1
Look for the diameter in inches or in ETRTO printed on the wheel. Match it to the wheel size in
millimeters in the right column of the chart.
32
Page 33
ETRTO Wheel size diameter (inches) Wheel size setting (mm)
25-559 26 x 1.0 1884
23-571 650 x 23C 1909
35-559 26 x 1.50 1947
37-622 700 x 35C 1958
52-559 26 x 1.95 2022
20-622 700 x 20C 2051
52-559 26 x 2.0 2054
23-622 700 x 23C 2070
25-622 700 x 25C 2080
28-622 700 x 28 2101
32-622 700 x 32C 2126
42-622 700 x 40C 2189
47-622 700 x 47C 2220
Wheel sizes on the chart are advisory as wheel size depends on the wheel type and air pressure.
Method 2
• Measure the wheel manually for the most accurate result.
• Use the valve to mark the point where the wheel touches the ground. Draw a line on the ground to
mark that point. Move your bike forward on a flat surface for one complete rotation. The tireshould
be perpendicular to the ground. Draw another line on the ground at the valve to mark a full rotation.
Measure the distance between the two lines.
• Subtract 4 mm to account for your weight on the bike to get your wheel circumference.
POLAR CADENCE SENSOR BLUETOOTH® SMART
The most practical way of measuring your cycling session is with our advanced wireless cadence sensor.
It measures your real-time, average and maximum cycling cadence as revolutions per minute so you can
compare the technique of your ride against previous rides.
33
Page 34

• Improves your cycling technique and identifies your optimal cadence
• Interference-free cadence data lets you evaluate your individual performance
• Designed to be aerodynamic and light
PAIR CADENCE SENSOR WITH M450
Make sure the cadence sensor has been correctly installed. For more information on installing the
cadence sensor refer to the user manual of the cadence sensor.
There are two ways to pair a cadence sensor with your M450:
1. Go to General Settings > Pair and sync > Pair other device and press START.
2. M450 starts searching for the cadence sensor. Rotate the crank a few times to activate the
sensor. The flashing red light on the sensor indicates that the sensor is activated.
3. Once the cadence sensor is found, Polar CAD xxxxxxxx is displayed.
4. Press START, Pairing is displayed.
5. Pairing completed is displayed when the pairing is ready.
6. Sensor linked to: is displayed. Choose Bike 1, Bike 2 or Bike 3. Confirm with START.
The first cycling sensor you pair will automatically be linked to Bike 1.
or
1. Press START in time view to enter pre-training mode.
2. M450 starts searching for your cadence sensor. Rotate the crank a few times to activate the
sensor. The flashing red light on the sensor indicates that the sensor is activated.
3. The device ID Pair Polar CAD xxxxxxxx is displayed. Choose Yes.
4. Pairing completed is displayed when the pairing is ready.
5. Sensor linked to: is displayed. Choose Bike 1, Bike 2 or Bike 3. Confirm with START.
POLAR LOOK KÉO POWER SENSOR
With Polar LOOK Kéo Power, you can truly develop your cycling performance and technique. Perfect for
ambitious cyclists, this system uses Bluetooth® Smart technology and consumes only a little energy.
BLUETOOTH
® SMART
• Measures your power output (in Watts) and force (in Newton).
• Easy to set up and switch between bikes.
• M450 shows your power output in Watts, Watts/kg or % of FTP (functional threshold power).
• M450 shows your left/right balance and current, average and maximum cadence.
Kéo Power Bluetooth® Smart set includes two pedals and two power transmitters.
34
Page 35

Kéo Power Essential Bluetooth® Smart is an economical choice for basic power measurement. It
measures your power output and force with the left hand pedal and provides your total power/force by
multiplying the measurement by two. The set includes two pedals and one power transmitter.
PAIR KÉO POWER WITH M450
Before pairing Kéo Power make sure you have installed it correctly. For information on mounting the
pedals and installing the transmitters see the Polar LOOK Kéo Power user manual that came in the
product box, or the video tutorial.
If you have two power transmitters, you need to pair the transmitters one at a time. After pairing the
first transmitter, you can immediately pair the second one. Check the device ID on the backside of each
transmitter to make sure you find the correct transmitters from the list.
There are two ways to pair Keó Power with your M450:
1. Go to General Settings > Pair and sync > Pair other device and press START.
2. Rotate the cranks to wake up the transmitters. M450 starts searching for Kéo Power.
3. Once the it is found, Polar PWR xxxxxxxx is displayed.
4. Press START, Pairing is displayed.
5. Pairing completed is displayed when you are done.
6. Sensor linked to: is displayed. Choose Bike 1, Bike 2 or Bike 3. Confirm with START. Do you
have another pedal to pair? is displayed. If you have two transmitters, choose Yes to pair the
other one.
7. Set crank length: Set the crank length in millimeters.
The first cycling sensor you pair will automatically be linked to Bike 1.
or
1. Press START in time view to enter pre-training mode.
2. Rotate the cranks to wake up the transmitters.
3. The device ID Pair Polar PWR xxxxxxxx is displayed. Choose Yes.
4. Pairing completed is shown when you are done.
5. Sensor linked to: is displayed. Choose Bike 1, Bike 2 or Bike 3. Confirm with START. Do you
have another pedal to pair? is displayed. If you have two transmitters, choose Yes to pair the
other one.
6. Set crank length: Set the crank length in millimeters.
35
Page 36

POWER SETTINGS ON M450
Adjust the power settings to best suit your training needs. Edit the power settings in Settings > Sport
profiles. Choose the profile you want to edit, and then choose Bike power settings.
In the Bike power settings, you'll find:
• Power view: Choose Watts (W), Watts/kg (W/kg) or % of FTP.
• Power, rolling average: Choose 1, 3, 5,10, 15, 30 or 60 second rolling average of power data.
• Set FTP value: Set your FTP value. The setting range is 60 to 600 watts.
• Check power zone limits: Check your power zone limits.
CALIBRATE KÉO POWER BEFORE STARTING A TRAINING SESSION
To calibrate Kéo power:
1. Wake up the transmitters by rotating the cranks.
2. In M450 time mode, press START to enter pre-training mode, and then choose one of the cycling
sport profiles.
3. Accuracy of power changed. Recalibrate? is displayed on your M450. Choose Yes to start
calibration.
4. Keep the bike upright and cranks in place until calibration is completed. The calibration takes a
couple of seconds.
5. When the calibration is complete a green LEDwill blink on the transmitters, and you can start your
session.
To ensure the calibration is done properly:
• Do not put any weight on the pedals during calibration.
• Do not interrupt the calibration.
When the calibration is complete a green LEDwill blink on the transmitters, and you can start your
session.
The temperature of your training environment affects calibration accuracy. If you're going to train
outdoors, for example, take your bike outdoors half an hour before doing the calibration. This way your
bike's temperature is about the same as that of your training environment.
36
Page 37
TRAINING
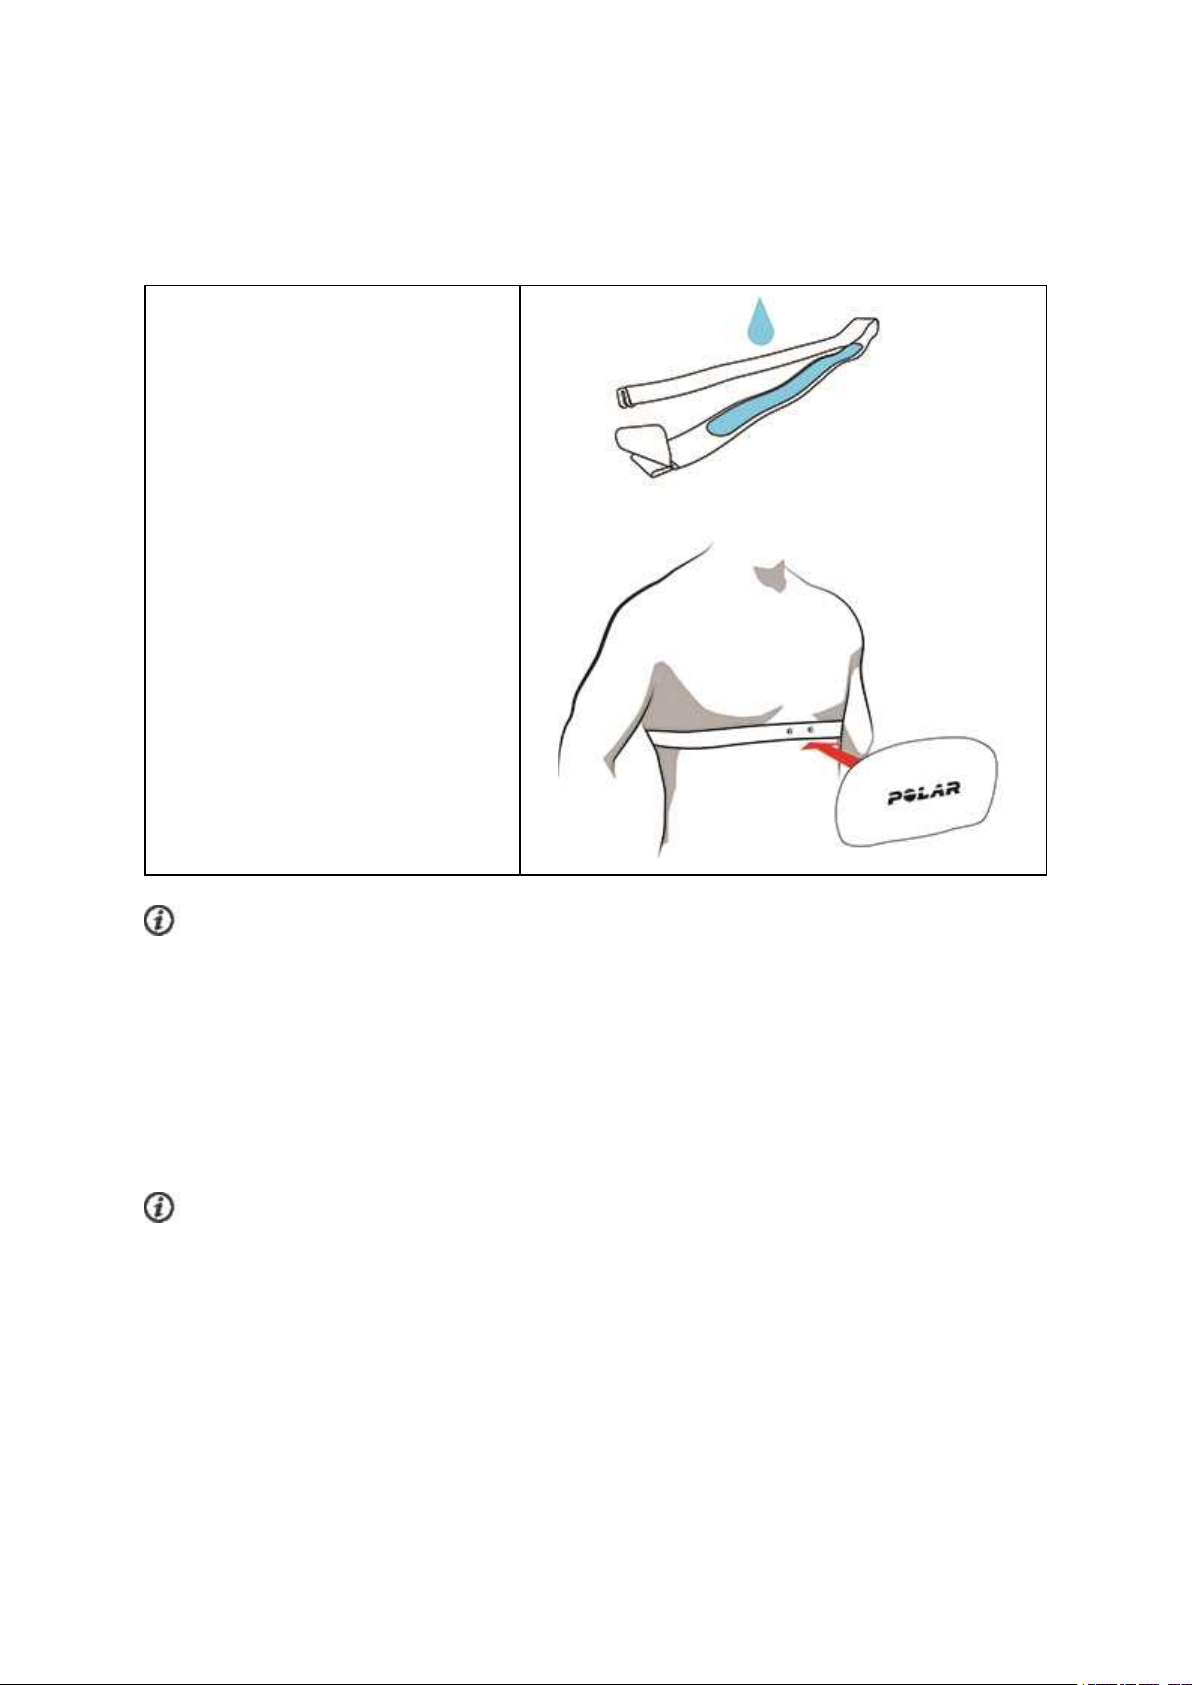
WEAR HEART RATE SENSOR
1. Moisten the electrode areas of
the strap.
2. Attach the connector to the
strap.
3. Adjust the strap length to fit
tightly but comfortably. Tie the
strap around your chest, just
below the chest muscles, and
attach the hook to the other end
of the strap.
4. Check that the moist electrode
areas are firmly against your skin
and that the Polar logo of the
connector is in a central and
upright position.
Detach the connector from the strap, and rinse the strap under running water after every training
session. Sweat and moisture may keep the heart rate sensor activated, so also remember to wipe it dry.
START A TRAINING SESSION
1. In time view, press START to enter pre-training mode.
2. In pre-training mode, choose the sport profile you want to use with UP/DOWN.
To change the sport profile settings before starting your session in pre-training mode, press and hold
LIGHT to enter the Quick Menu. To return to the pre-training mode, press BACK.
37
Page 38
If you have set the GPS function on in this sport profile and/or a compatible Bluetooth® Smart sensor in
use, M450 will automatically start searching for the signals.
Stay in the pre-training mode until M450 has found the GPS and sensor signals and your
heart rate to make sure your training data is accurate. To catch the GPS satellite signals, go
outdoors and away from tall buildings and trees. Keep your M450 still with the display facing upwards
during the search. Hold the position until M450 has found the satellite signals.
Finding GPS satelllite signals is faster with the help of assisted GPS (A-GPS). The A-GPS data file is
automatically updated to your M450 when you sync your M450 with the Flow web servicevia the
FlowSync software. If the A-GPS data file has expired or you haven't synced your M450 yet, more time
may be needed for finding the satellite signals. For more information, see Assisted GPS (A-GPS).
3. When M450 has found all the signals, press START. Recording started is displayed and you
can start training.
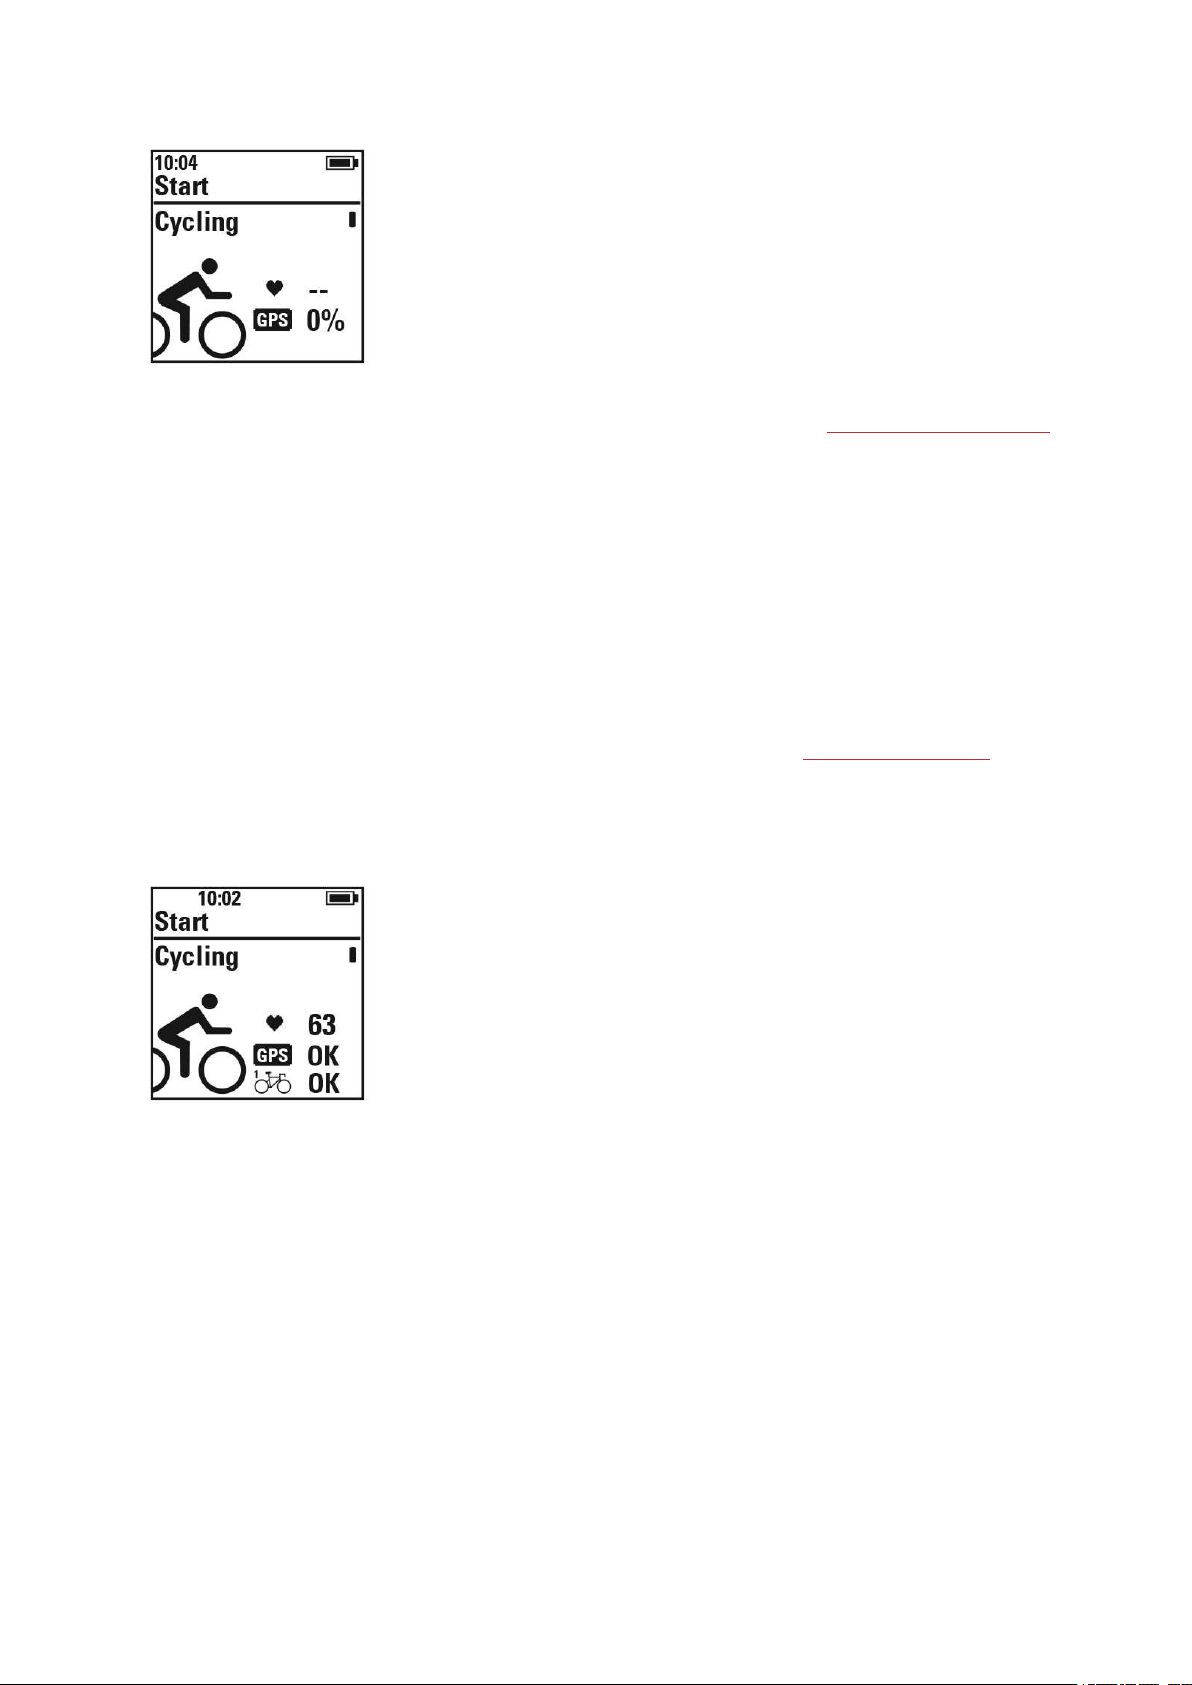
Heart rate: M450 has found your heart rate sensor signal, when your heart rate is shown.
GPS: The percentage value shown next to the GPSicon indicates when the GPS is ready. When it reaches
100 %, OK is displayed.
Cycling sensors: OK is shown next to the bike icon when M450 has found the sensor signals. If you
have linked sensors to more than one bike, you'll see a number next to the bike icon indicating the bike
in use. M450 chooses the bike to which the nearest sensor is linked.
Example:
38
Page 39

You've linked a speed sensor to Bike 1, and another speed sensor to Bike 2. Both bikes are nearby
when you enter the pre-training modein M450. The speed sensor linked to Bike 1 is closer to the M450.
Therefore, M450 chooses Bike 1 for the ride. Number 1 is show next to the bike icon.
If you wanted to use Bike 2 instead, do either of the following:
• Return to the time mode. Then, increase the distance between M450 and Bike 1 so that Bike 2 is
the one nearest to M450. Enter the pre-training mode again.
• Touch the sensor in Bike 2 with M450.
START A SESSION WITH TRAINING TARGET
You can create detailed training targets in the Flow web service and sync them to your M450 via
Flowsync software or Flow app. During training you can easily follow the guidance on your device.
To start a training session with a training target, do as follows:
1. Begin by going to Diary or Favorites.
2. In Diary, choose the day the target is scheduled and press START, and then choose the target
from the list and press START. Any notes you have added to the target are displayed.
or
In Favorites, choose the target from the list and press START. Any notes you have added to the
target are displayed.
3. Press START to enter the pre-training mode, and choose the sport profile you want to use.
4. When M450 has found all the signals, press START. Recording started is displayed and you can
start training.
For more information on training targets, see Training Targets.
START A SESSION WITH INTERVAL TIMER
You can set one repeating or two alternating time and/or distance based timers for guiding your work
and recovery phases in interval training.
39
Page 40

1. Begin by going to Timers > Interval timer. Choose Set timer(s) to create new timers.
2. Choose Time-based or Distance-based:
• Time-based:Define minutes and seconds for the timer and press START.
• Distance-based:Set the distance for the timer and press START.
3. Set another timer? is shown. To set another timer, choose Yes and repeat step 2.
4. When completed, choose Start X.XX km / XX:XX and press START to enter the pre-training
mode, and then choose the sport profile you want to use.
5. When M450 has found all the signals, press START. Recording started is displayed and you can
start training.
You can also start the Interval timer during the session, for example after warm-up. Press and hold
LIGHT to enter Quick menu, and then choose Interval timer.
FUNCTIONS DURING TRAINING
TAKE A LAP
Press START to record a lap. Laps can also be taken automatically. In sport profile settings, set
Automatic lap to Lap distance or Lap duration. If you choose Lap distance, set the distance after
which each lap is taken. If you choose Lap duration, set the duration after each lap is taken.
LOCK A HEART RATE, SPEED OR POWER ZONE
Press and hold START to lock the heart rate, speed or power zone you are currently in. To lock/unlock the
zone, press and hold START. If your heart rate, speed or power goes beyond the locked zone, you will be
notified with audio feedback.
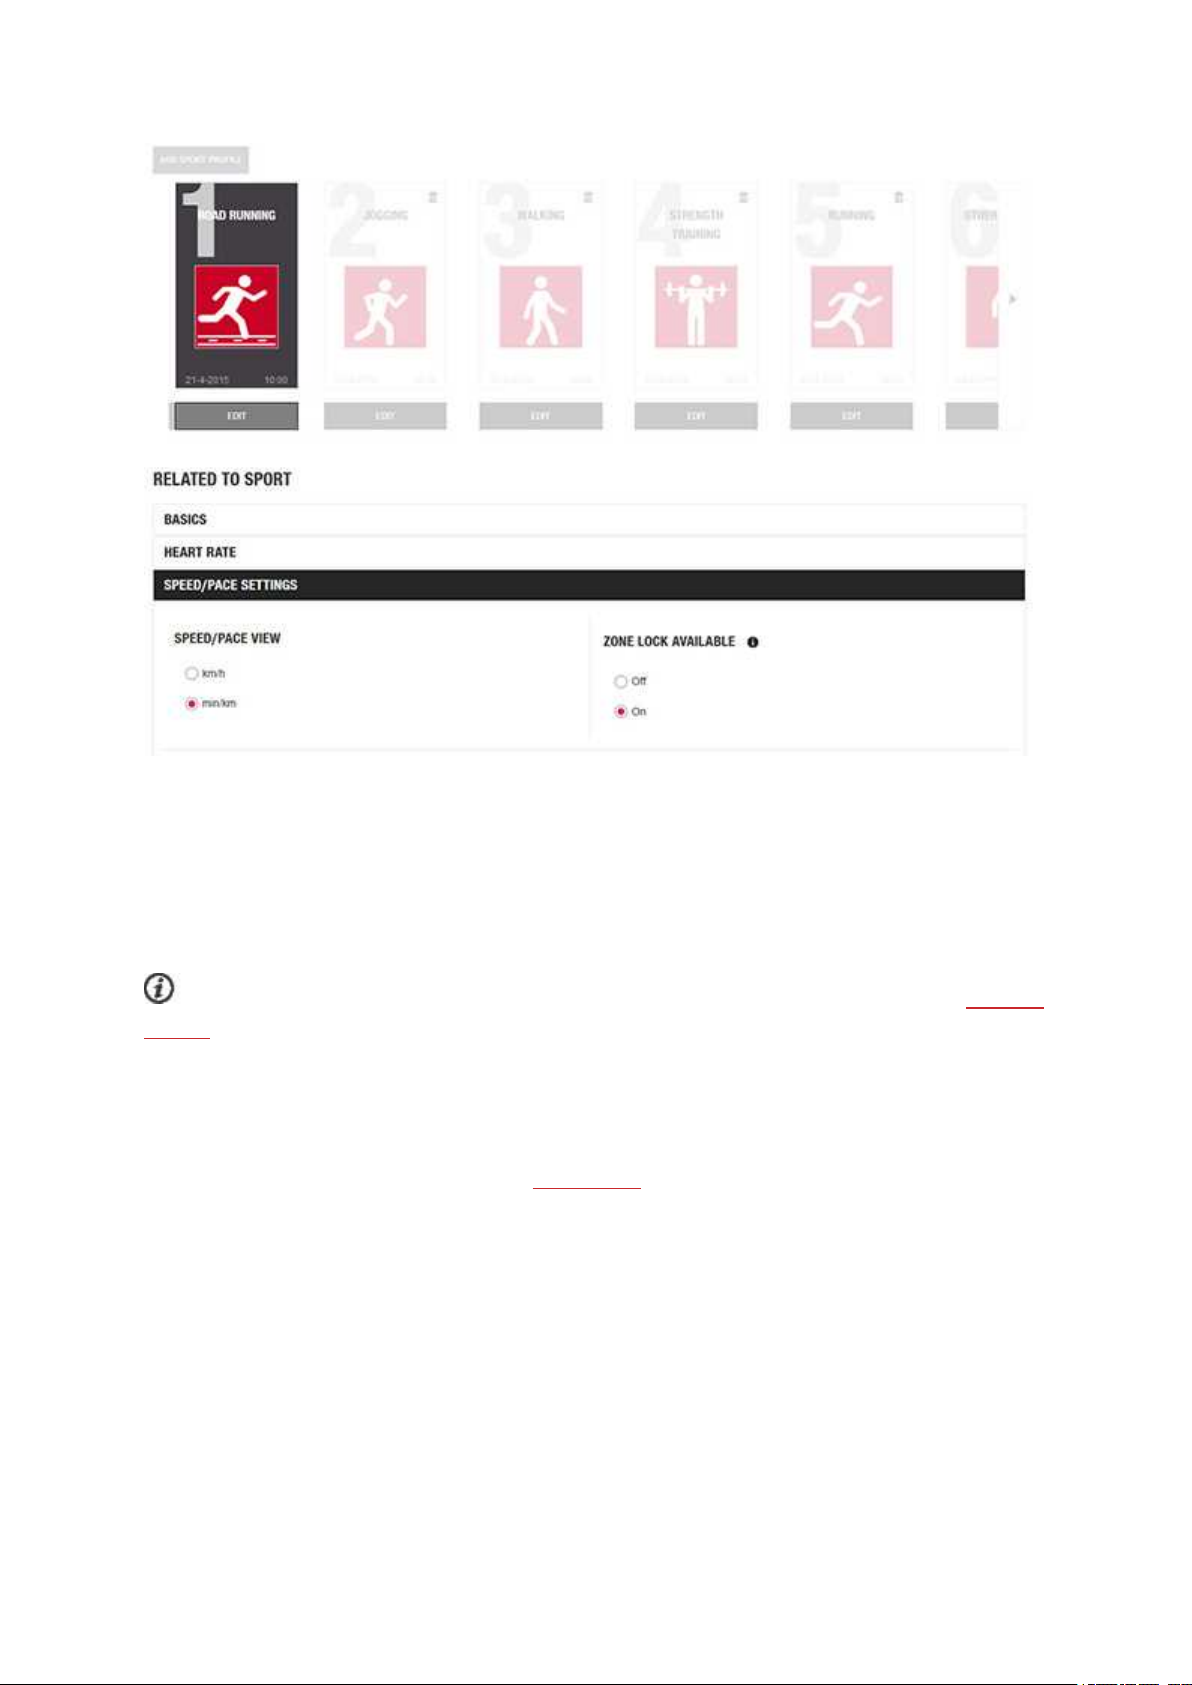
The heart rate, speed and power zones can be activated in the Flow web service. You can individually
customize the zones for each sport profile they’re available in. To edit the zones, sign in to the Flow web
service, and click your name in the upper right corner. Choose Sport Profiles, and the sport profile you want
to edit. The zones can be set under Heart rate, Speed/Pace and Power Settings. After editing the zones,
sync them to your training device via FlowSync.
40
Page 41
CHANGE PHASE DURING A PHASED SESSION
Press and hold LIGHT. Quick menu is displayed. Choose Start next phase from the list, and press
START. If you have chosen automatic phase change, the phase will change automatically when you have
finished a phase. You will be notified with audio feedback.
You can create phased training targets in the Flow web service. For more information, see Training
Targets.
CHANGE SETTINGS IN QUICK MENU
Press and hold LIGHT. Quick menu is displayed. You can change certain settings without pausing your
training session. For more information, see Quick Menu.
PAUSE/STOP A TRAINING SESSION
1. To pause a training session, press the BACK button. Recording paused is displayed and the
M450 goes to pause mode. To continue your training session, press START.
2. To stop a training session, press and hold the BACK button for three seconds during training
recording or in pause mode until Recording ended is displayed.
41
Page 42

Pause time is not included in the total training time.
42
Page 43
AFTER TRAINING
Get instant analysis and in-depth insights into your training with M450, Flow app and Flow web service.
TRAINING SUMMARY ON YOUR M450
After each training session, you'll get an instant training summary of your session. To view your training
summary later, go to Diary and choose the day, and then choose the summary of the session you want
to view.
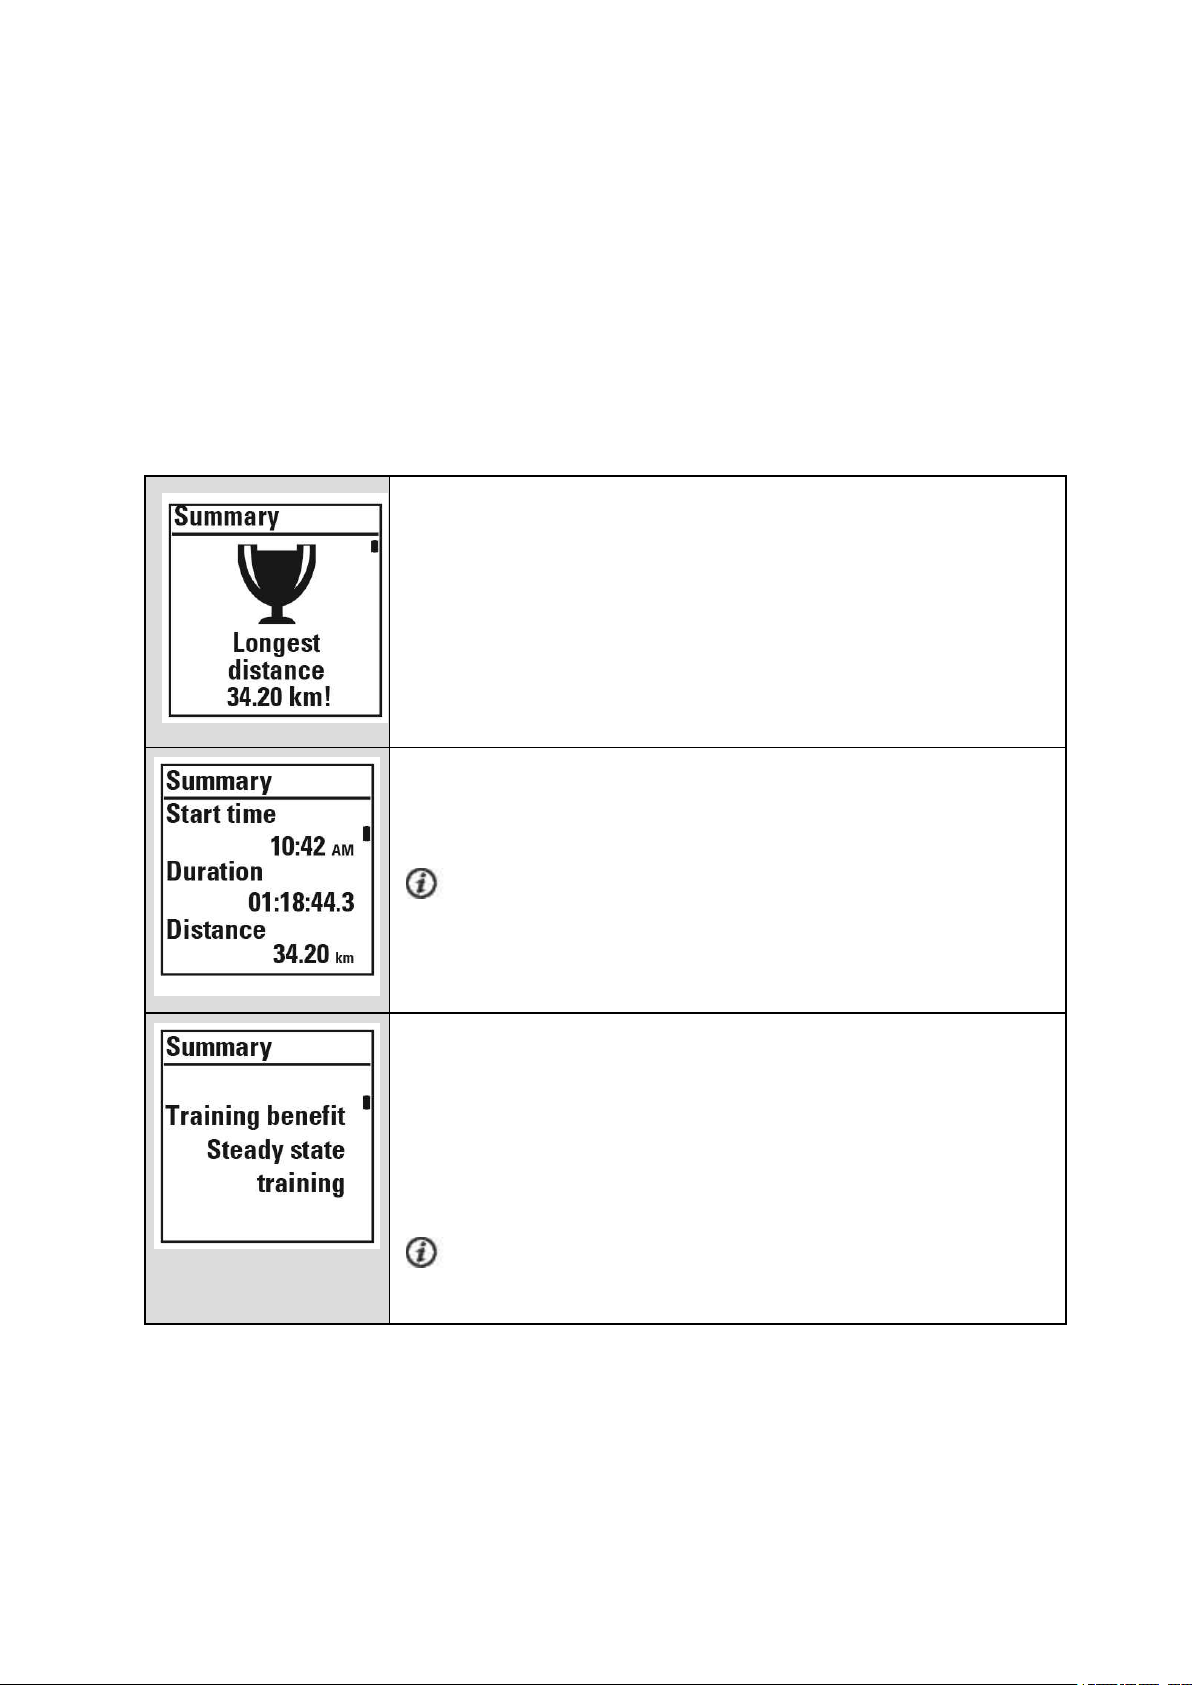
M450 rewards you every time you reach your Personal best result in
average speed/pace, distance or calories. The Personal best results are
separate for each sport profile.
Time when you started the session, duration of the session and
distance covered during the session.
Distance is visible if the GPS function was on or Polar Speed Sensor
Bluetooth® Smart in use.
Textual feedback on your performance. The feedback is based on
training time distribution on heart rate zones, calorie expenditure and
duration of the session.
Press START for more details.
Training benefit is shown if you used a heart rate sensor and
trained for at least a total of 10 minutes in the heart rate zones.
43
Page 44
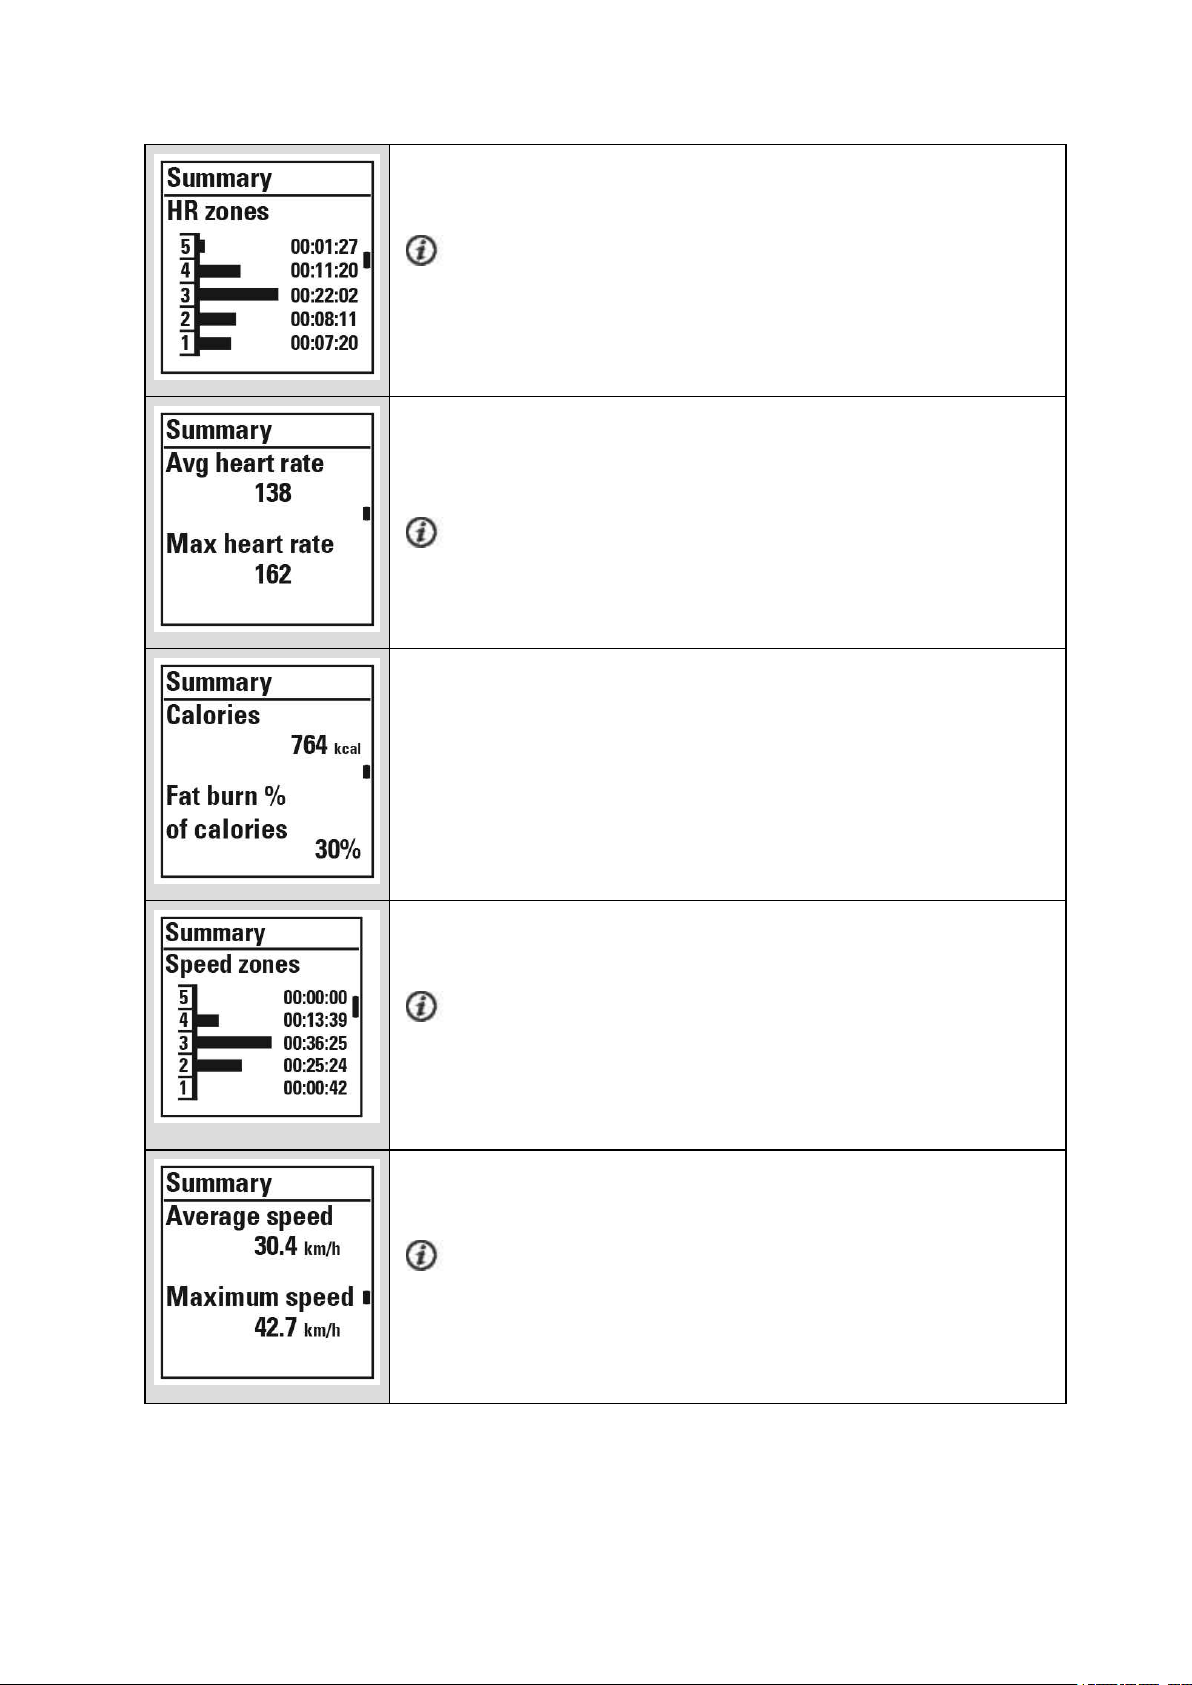
Time you spent on each heart rate zone.
Visible if you used a heart rate sensor.
Your average and maximum heart rate are shown in beats per minute
and percentage of maximum heart rate.
Visible if you used a heart rate sensor.
Calories burned during the session and fat burn % of calories.
Time you spent in each speed zone.
Visible if the GPS function was on or Polar Speed Sensor Bluetooth®
Smart in use.
Average and maximum speed/pace of the session.
Visible if the GPS functionwas on or Polar Speed Sensor Bluetooth®
Smart in use.
44
Page 45
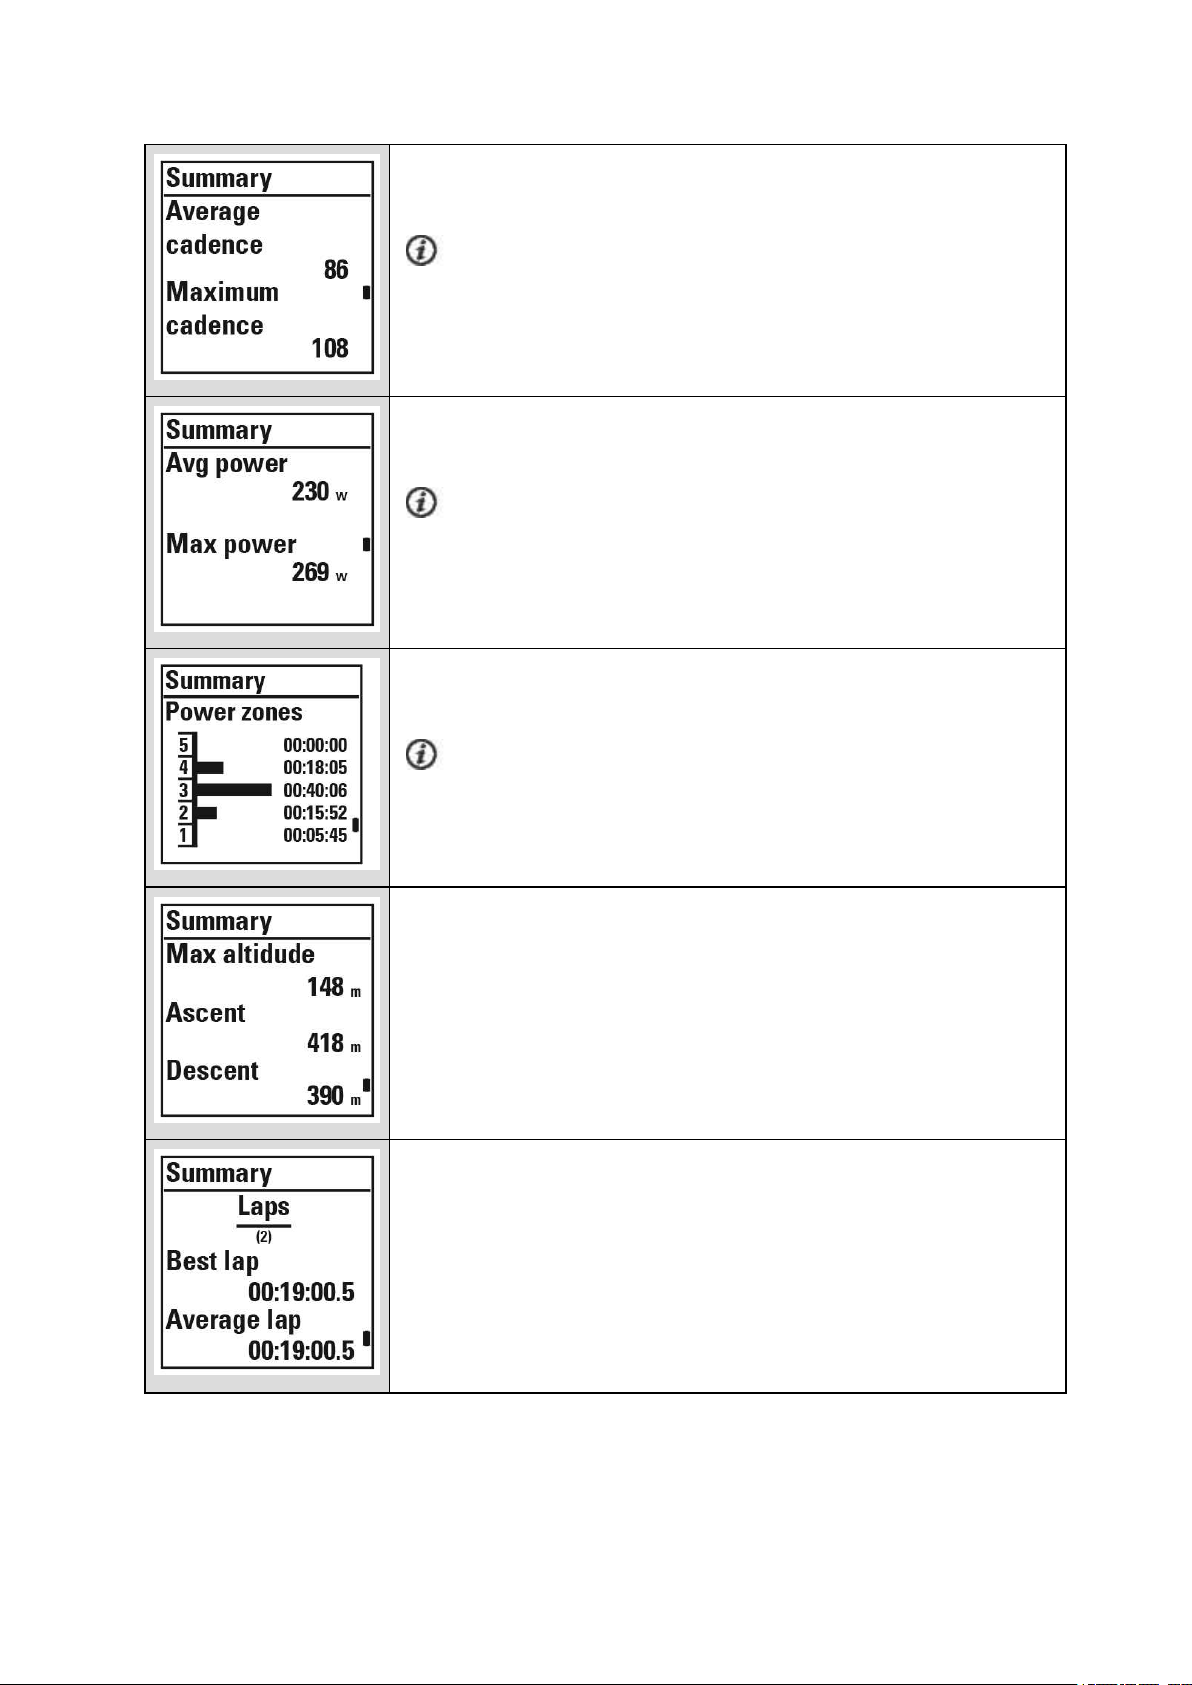
Average and maximum cadence of the session.
Visible if Polar LOOK Kéo Power sensor or Polar Cadence Sensor
Bluetooth® Smart in use.
Average and maximum power of the session.
Visible if Polar LOOK Kéo Power sensor in use.
Time you spent on each power zone.
Visible if Polar LOOK Kéo Power sensor in use.
Maximum altitude, ascended meters/feet and descended meters/feet.
The number of laps and the best and averageduration of a lap.
Press START for more details.
45
Page 46
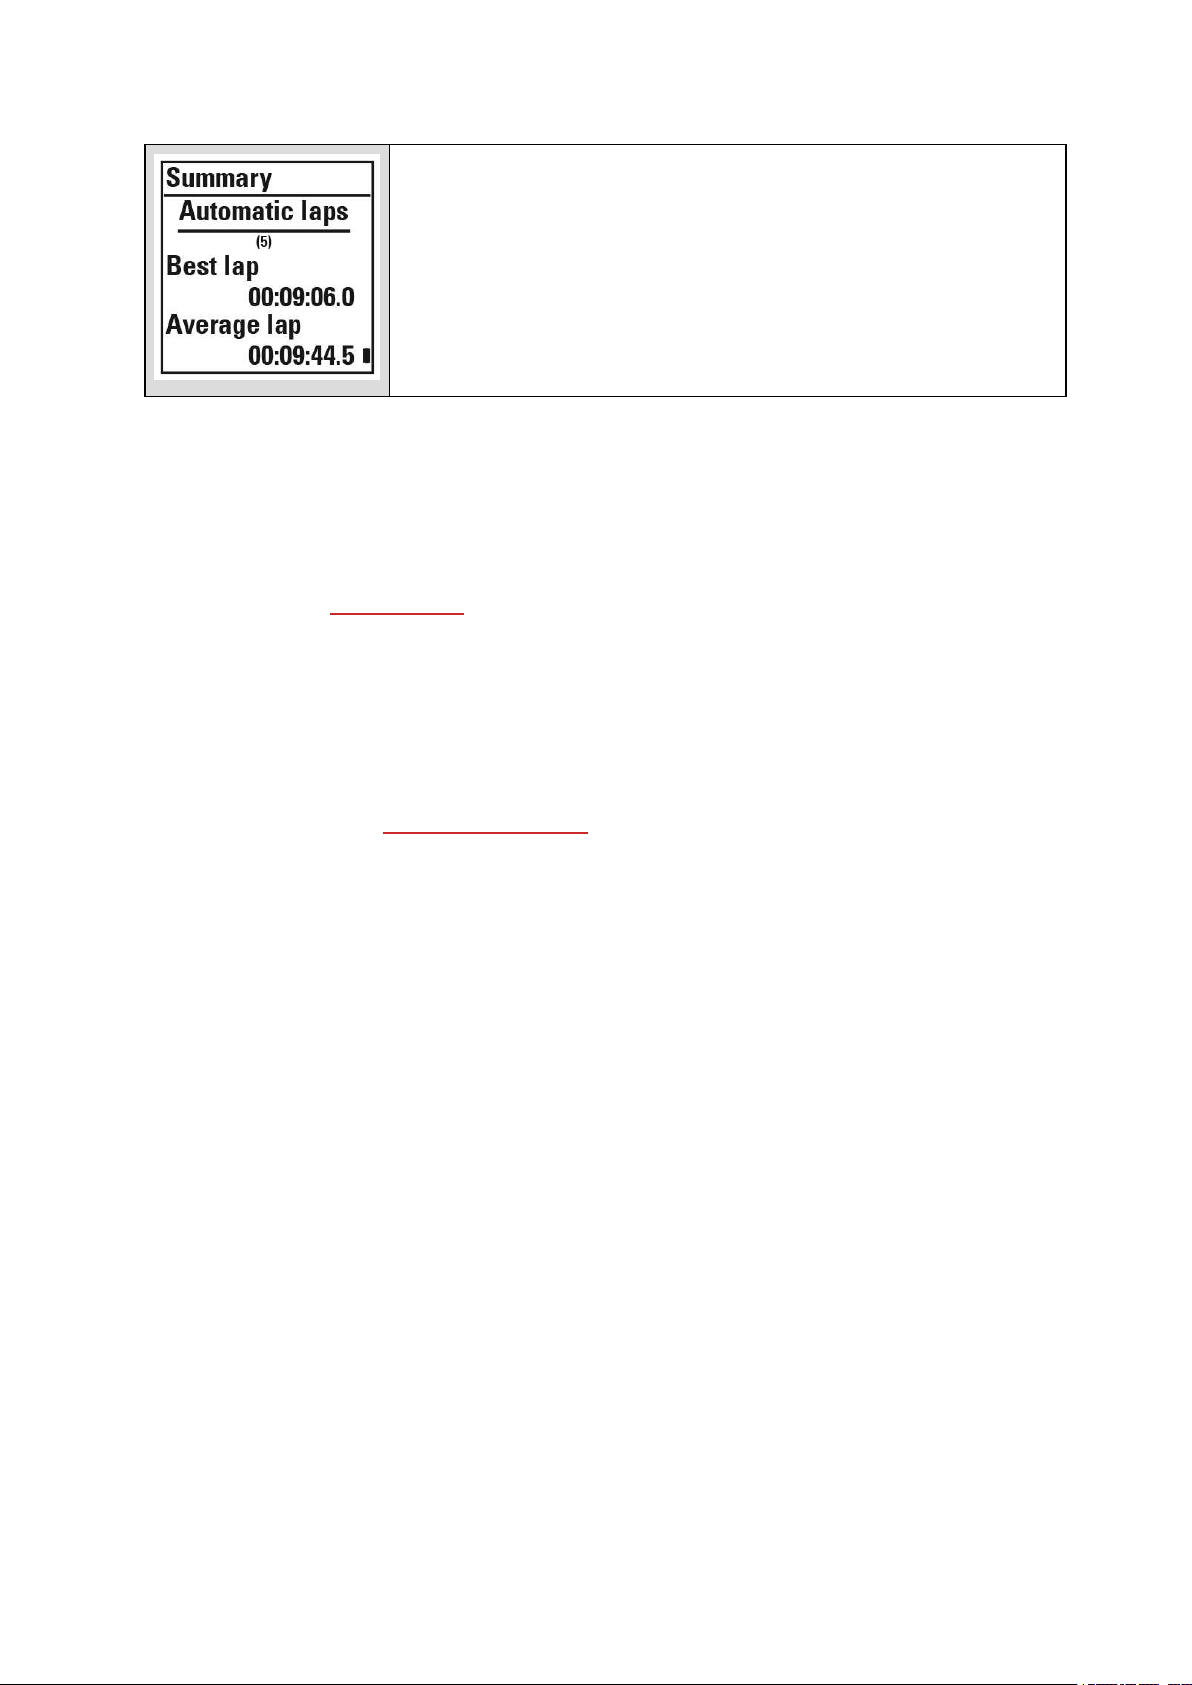
The number of automatic laps and the best and average duration of an
automatic lap.
Press START for more details.
POLAR FLOW APP
Sync your M450 with Flow app to analyze your data at a glance after each session. The Flow app allows
you to see a quick overview of your training data.
For information, see Polar Flow App.
POLAR FLOW WEB SERVICE
The Polar Flow web service allows you to analyze every detail of your training and learn more about your
performance. Follow your progress and also share your best sessions with others.
For more information, see Polar Flow Web Service.
46
Page 47

FEATURES
AssistedGPS (A-GPS) 47
GPS Features 48
Back to Start 48
Barometer 48
Smart Coaching 49
Training Benefit 50
Training Load and Recovery 51
Fitness Test 52
Orthostatic Test 55
Heart Rate Zones 57
Smart Calories 62
Speed and Power Zones 62
Settings 62
During Training 63
After Training 63
Sport Profiles 63
ASSISTEDGPS (A-GPS)
The M450 has built-in GPS that provides accurate speed and distance measurement for a range of
outdoor sports, and allows you to see your route on map in the Flow app and web service after your
session.
M450 uses AssistNow® Offline service to acquire a fast satellite fix. The AssistNow Offline service
provides A-GPS data that tells your M450 the predicted positions of the GPS satellites. This way the
M450 knows where to search for the satellites and thus is able to acquire signals from them within
seconds, even under difficult signal conditions.
The A-GPS data updates once a day. The latest A-GPS data file is automatically updated to your M450
when you sync your M450 with the Flow web service via the FlowSync software.
A-GPS EXPIRY DATE
The A-GPS data file is valid for up to 14 days. Finding GPS satelllite signals is relatively fast during the first
three days. Time needed for the satellite fix progressively increases during the 10th-14th days. Regular
updates help to ensure a fast satellite fix.
47
Page 48

You can check the expiry date for the current A-GPS data file from your M450. In M450, go to Settings
> General settings > About your product > A-GPS exp. date. If the data file has expired, sync your
M450 with the Flow web service via the FlowSync software to update A-GPS data.
Once the A-GPS data file has expired, more time may be needed for finding the satellite signals.
GPS FEATURES
M450 includes the following GPS features:
• Distance: Accurate distance during and after your session.
• Speed/Pace: Accurate speed/pace information during and after your session.
• Back to start: Directs you to your starting point in the shortest distance possible, as well as shows
the distance to your starting point. Now you can check out more adventurous routes and explore
them safely, knowing that you're only a touch of a button away from seeing the direction to where
you started.
BACK TO START
The back to start feature guides you back to the starting point of your session.
To use the back to start feature:
1. Press and hold LIGHT. Quick menu is displayed.
2. Choose Set location guide on, Location guide arrow view set on is displayed, and M450
goes to Back to Start view.
To return to your starting point:
• Keep moving in order for M450 to determine which direction you are going. An arrow will point in
the direction of your starting point.
• To get back to the starting point, always turn in the direction of the arrow.
• The M450 also shows the bearing and the direct distance (beeline) between you and the starting
point.
When in unfamiliar surroundings, always keep a map at hand in case the M450 loses the satellite
signal or the battery runs out.
BAROMETER
The barometer features include:
48
Page 49

• Altitude, ascent and descent
• Temperature during training (can be viewed on the display)
• Inclinometer (Requires Speed Sensor Bluetooth® Smart)
• Real time VAM (mean ascent velocity)
• Altitude-compensated calories
M450 measures altitudewith an atmospheric air pressure sensor and converts the measured air
pressure into an altitude reading. This is the most accurate way to measure altitude and altitude changes
(ascent / descent) after calibration. Ascent and descent are shown in meters/feet. Uphill/downhill
steepness is shown in percentages and grade, and is only visible during training when using a Speed
Sensor Bluetooth® Smart.
To make sure that the altitude reading remains accurate, it needs to be calibrated whenever a reliable
reference, such as a peak or a topographic map, is available or when at sea level. Pressure variations due
to weather conditions, or indoor air-conditioning, may affect altitude readings.
The temperature shown is the temperature of your M450.
Altitude is automatically calibrated with GPS, and it will be shown in gray until it's calibrated. To get the
most accurate altitude readings, it's recommended to always calibrate altitude manually when you know
your current altitude. Manual calibration can be done in the pre-training view or in the training view quick
menu. For more information, see Quick Menu.
SMART COACHING
Whether it’s assessing your day-to-day fitness levels, creating individual training plans, working out at the
right intensity or receiving instant feedback, Smart Coaching offers a choice of unique, easy-to-use
features, personalized to your needs and designed for maximum enjoyment and motivation when
training.
M450 includes the following Smart Coaching features:
• Training Benefit
• Training Load and Recovery (this feature is available in the Polar Flow web service)
• Fitness Test
• Orthostatic Test
• Heart rate zones
• Smart calories
49
Page 50
TRAINING BENEFIT
The Training Benefit feature helps you better understand the effectiveness of your training. This feature
requires the use of the heart rate sensor. After each training session you get textual feedback on your
performance providing that you have trained at least a total of 10 minutes in the sport zones. The
feedback is based on training time distribution on sport zones, calorie expenditure and duration. In
Training Files you get the feedback in more detail. The descriptions of different training benefit options
arelisted in the table below
Feedback Benefit
Maximum training+ That was a hard session! You improved your sprint speed and
the nervous system of your muscles, which make you more efficient. This session also increased your resistance to fatigue.
Maximum training That was a hard session! You improved your sprint speed and
the nervous system of your muscles, which make you more efficient.
Maximum & Tempo training What a session! You improved your speed and efficiency. This
session also significantly developed your aerobic fitness and
your ability to sustain high intensity effort for longer.
Tempo & Maximum training What a session! You significantly improved your aerobic fitness
and your ability to sustain high intensity effort for longer. This
session also developed your speed and efficiency.
Tempo training+ Great pace in a long session! You improved your aerobic fit-
ness, speed, and ability to sustain high intensity effort for
longer. This session also increased your resistance to fatigue.
Tempo training Great pace! You improved your aerobic fitness, speed, and abil-
ity to sustain high intensity effort for longer.
Tempo & Steady state training Good pace! You improved your ability to sustain high intensity
effort for longer. This session also developed your aerobic fitness and the endurance of your muscles.
Steady state & Tempo training Good pace! You improved your aerobic fitness and the endur-
ance of your muscles. This session also developed your ability
to sustain high intensity effort for longer.
Steady state training + Excellent! This long session improved the endurance of your
muscles and your aerobic fitness. It also increased your resistance to fatigue.
50
Page 51
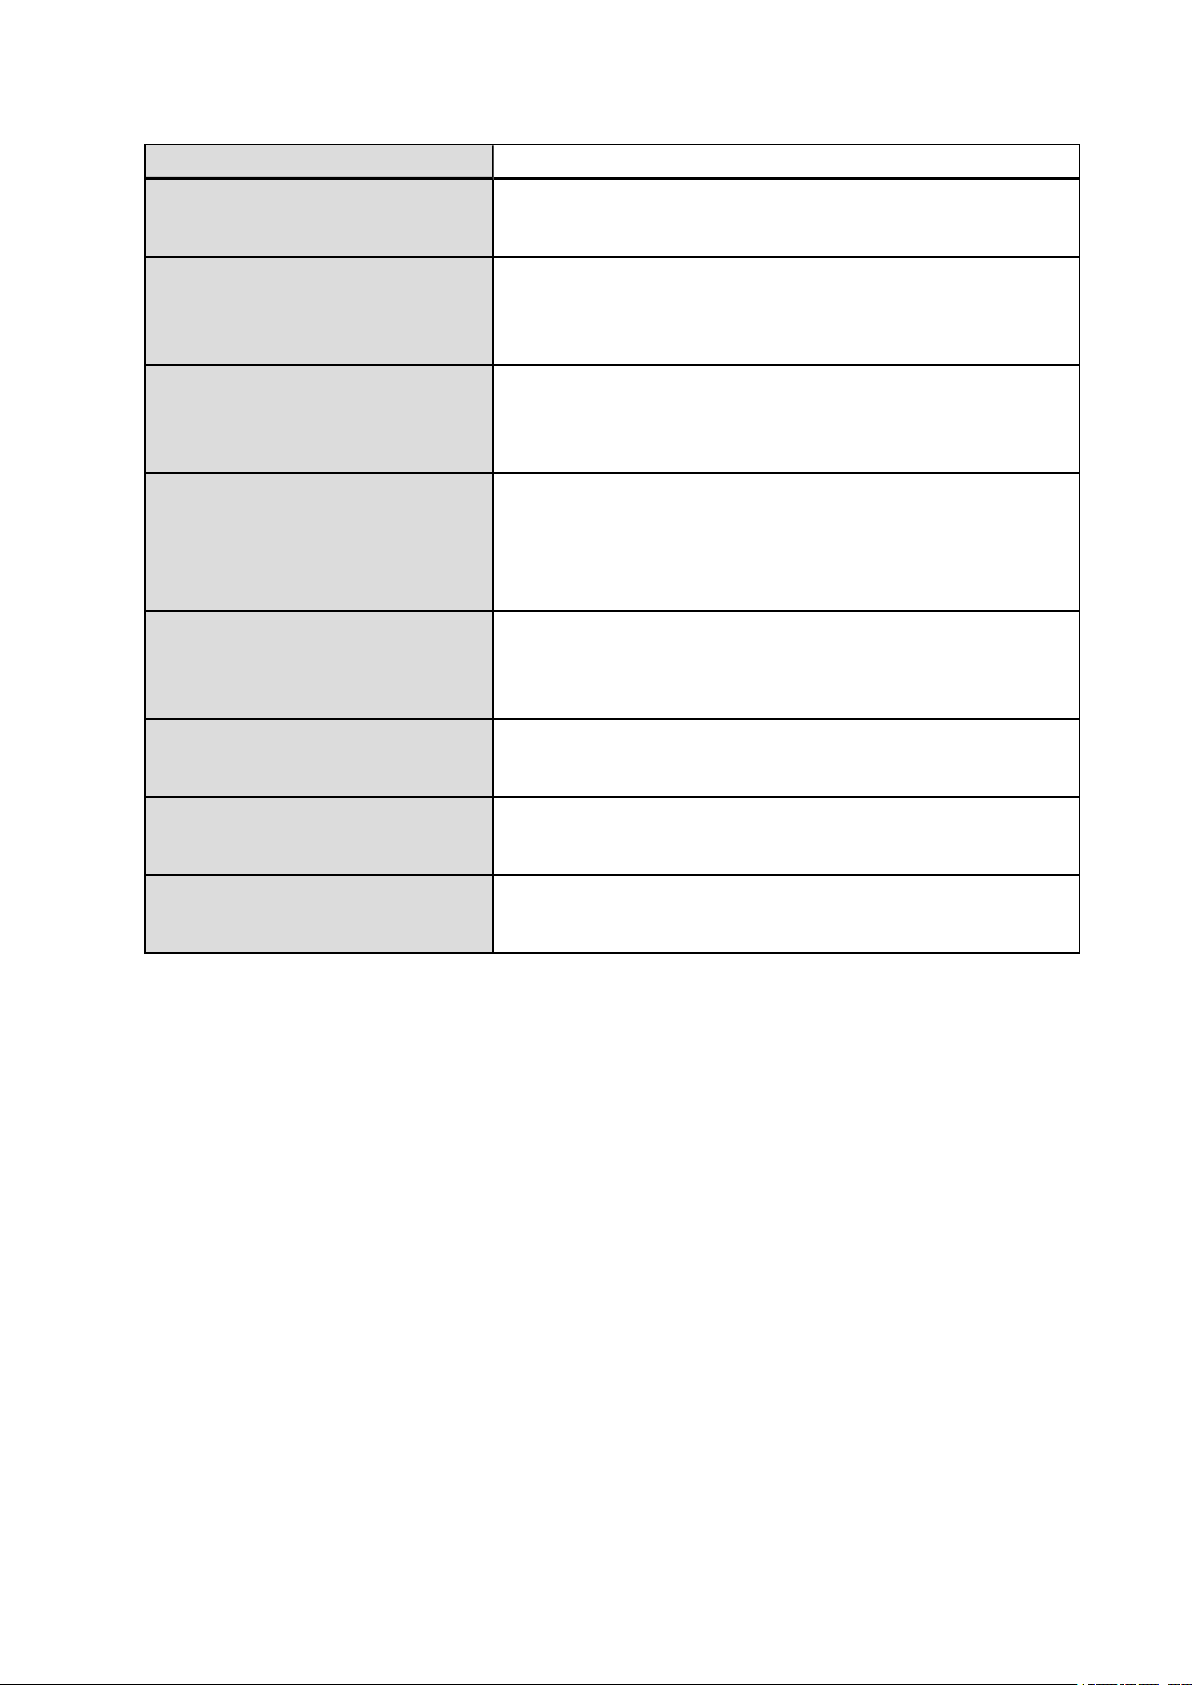
Feedback Benefit
Steady state training Excellent! You improved the endurance of your muscles and
your aerobic fitness.
Steady state & Basic training, long Excellent! This long session improved the endurance of your
muscles and your aerobic fitness. It also developed your basic
endurance and your body's ability to burn fat during exercise.
Steady state & Basic training Excellent! You improved the endurance of your muscles and
your aerobic fitness. This session also developed your basic
endurance and your body's ability to burn fat during exercise.
Basic & Steady state training, long Great! This long session improved your basic endurance and
your body's ability to burn fat during exercise. It also
developed the endurance of your muscles and your aerobic fitness.
Basic & Steady state training Great! You improved your basic endurance and your body's
ability to burn fat during exercise. This session also developed
the endurance of your muscles and your aerobic fitness.
Basic training, long Great! This long, low intensity session improved your basic
endurance and your body's ability to burn fat during exercise.
Basic training Well done! This low intensity session improved your basic
endurance and your body's ability to burn fat during exercise.
Recovery training Very nice session for your recovery. Light exercise like this
allows your body to adapt to your training.
TRAINING LOAD AND RECOVERY
The training load feature in the Diary in Polar Flow web service will conveniently tell you how hard your
training session was, and how much time is needed for complete recovery. This feature tells you if you
have recovered enough for your next session, helping you find the balance between rest and training. In
Polar Flow web service you can control your total workload, optimize your training, and monitor your
performance development.
Training load takes into consideration different factors which affect your training load and recovery time,
such as heart rate during training, duration of training, and your individual factors, e.g. sex, age, height,
and weight. Continuous monitoring of training load and recovery will help you recognizepersonal limits,
avoid over or under training, and adjust training intensity and duration according to your daily and
weekly targets.
51
Page 52

Training Load feature helps you to control total workload, optimize your training, and monitor your
performance development. The feature makes different kinds of training sessions comparable with each
other, and helps you to find the perfect balance between rest and training.
FITNESS TEST
The Polar Fitness Test is an easy, safe and quick way to estimate your aerobic (cardiovascular) fitness at
rest. The result, Polar OwnIndex, is comparable to maximal oxygen uptake (VO
used to evaluate aerobic fitness. Your long-term training background, heart rate, heart rate variability at
rest, gender, age, height, and body weight all influence OwnIndex. The Polar Fitness Test is developed for
use by healthy adults.
Aerobic fitness relates to how well your cardiovascular system works to transport oxygen to your body.
The better your aerobic fitness, the stronger and more efficient your heart is. Good aerobic fitness has
many health benefits. For example, it helps in decreasing the risk of high blood pressure and your risk of
cardiovascular diseases and stroke. If you want to improve your aerobic fitness it takes, on average, six
weeks of regular training to see a noticeable change in your OwnIndex. Less fit individuals see progress
even more rapidly. The better your aerobic fitness, the smaller the improvements in your OwnIndex.
Aerobic fitness is best improved by training types that use large muscle groups. Such activities include
running, cycling, walking, rowing, swimming, skating, and cross-country skiing. To monitor your progress,
start by measuring your OwnIndex a couple of times during the first two weeks in order to get a baseline
value, and then repeat the test approximately once a month.
), which is commonly
2max
To make sure the test results are reliable, the following basic requirements apply:
• You can perform the test anywhere - at home, at the office, at a health club - provided the testing
environment is peaceful. There should be no disturbing noises (e.g. television, radio, or telephone)
and no other people talking to you.
• Always take the test in the same environment and at the same hour.
• Avoid eating a heavy meal or smoking 2-3 hours prior to testing.
• Avoid heavy physical exertion, alcohol, and pharmaceutical stimulants on the test day and the
previous day.
• You should be relaxed and calm. Lie down and relax for 1-3 minutes before starting the test.
BEFORE THE TEST
Wear your heart rate sensor. For more information, see Wear Heart Rate Sensor.
Before starting the test, make sure your physical settings including training background are accurate in
Settings > Physical settings
52
Page 53
PERFORMING THE TEST
To perform the fitness test, go toTests > Fitness Test > Relax and start the test.
• Searching for heart rate is displayed. When heart rate is found, a heart rate graph, your current
heart rate and Lie down & relax is shown on the display. Stay relaxed and limit body movements
and communication with other people.
• You can interrupt the test in any phase by pressing BACK. Test canceled is displayed.
If M450 cannot receive your heart rate signal, the message Test failed is displayed. In which case, you
should check that the heart rate sensor electrodes are wet and that the textile strap fits snugly.
TEST RESULTS
When the test is over, you hear two beeps along with a description of your fitness test result and your
estimated VO
Update to VO2max to physical settings? is displayed.
2max
is displayed.
• Select Yes to save the value to your Physical settings.
• Select No only if you know your recently measured VO
fitness level class from the result.
Your latest test result is shown in Tests > Fitness test > Latest result. Only your most recently
performed test result is shown.
For a visual analysis of your Fitness test results, go to the Flow web service and select the test from your
Diary to view details from it.
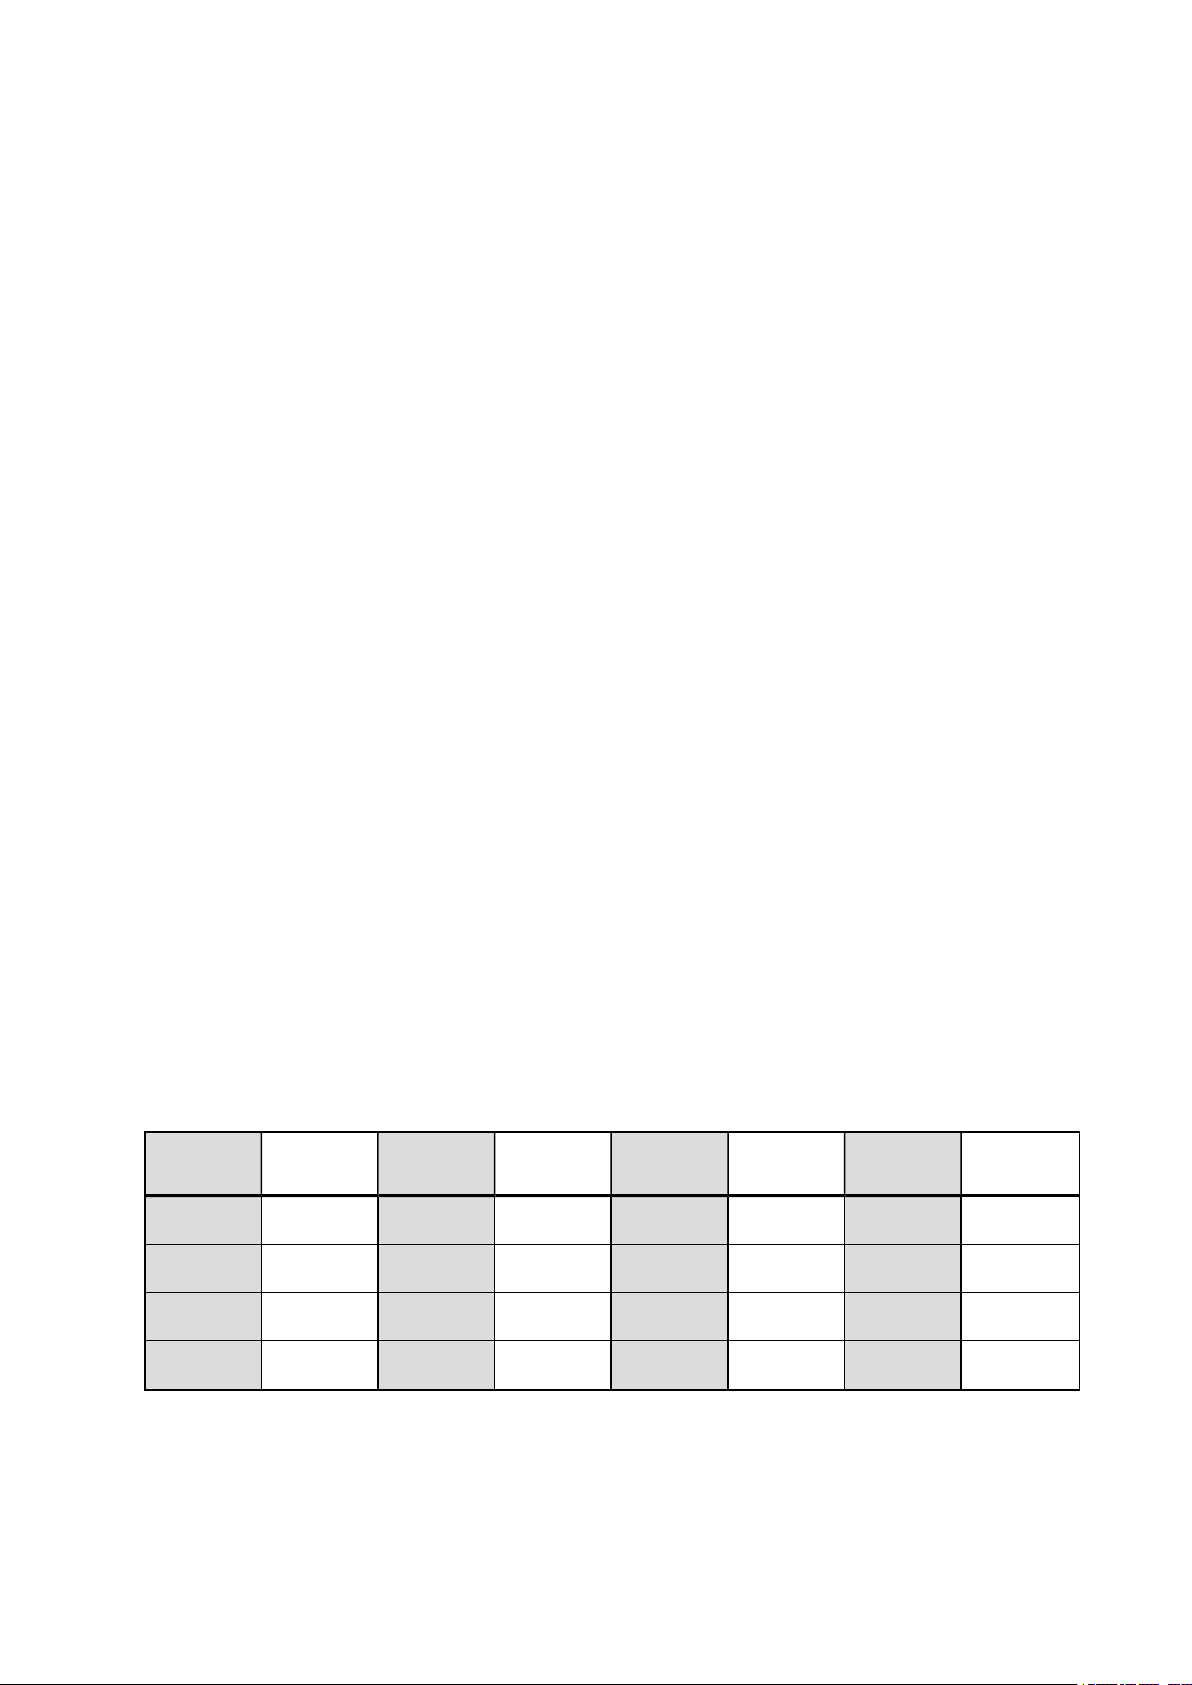
Fitness Level Classes
Men
Age /
Years
20-24 < 32 32-37 38-43 44-50 51-56 57-62 > 62
25-29 < 31 31-35 36-42 43-48 49-53 54-59 > 59
30-34 < 29 29-34 35-40 41-45 46-51 52-56 > 56
Very low Low Fair Moderate Good Very good Elite
value, and if it differs more than one
2max
35-39 < 28 28-32 33-38 39-43 44-48 49-54 > 54
53
Page 54
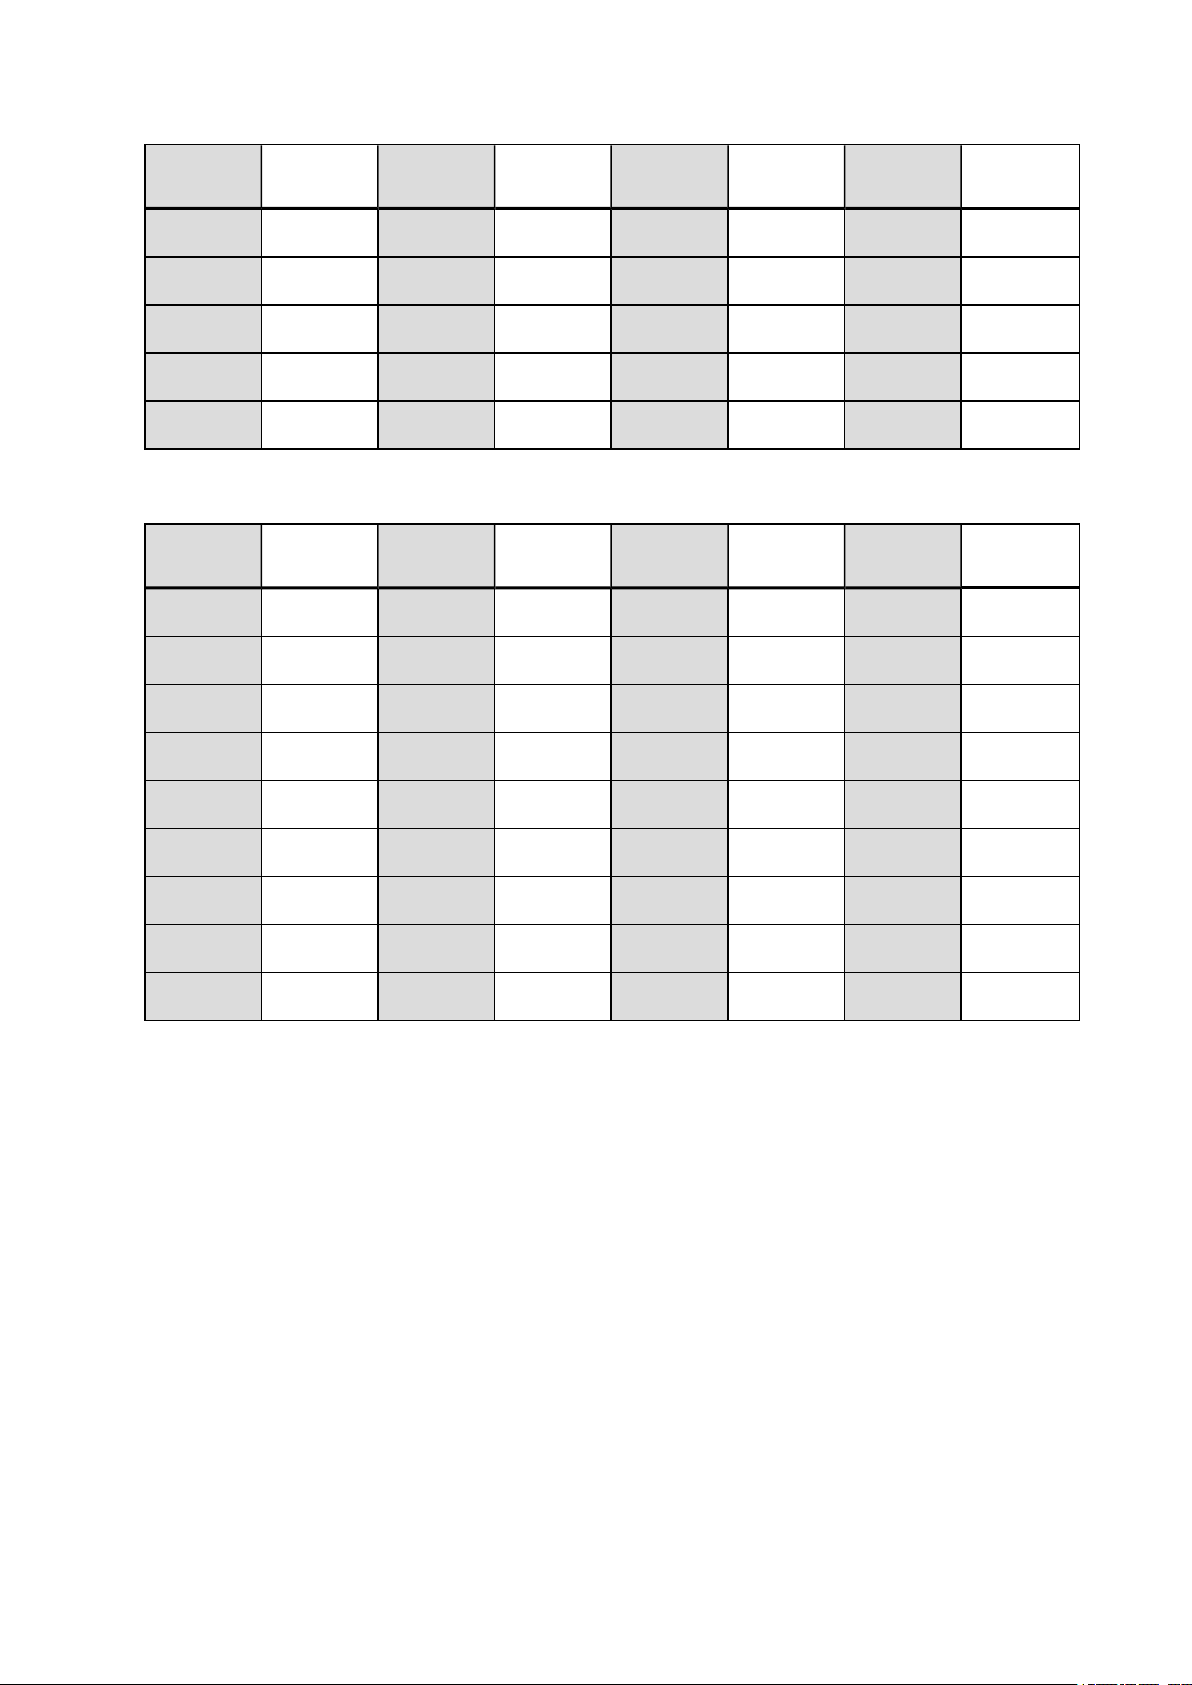
Age /
Very low Low Fair Moderate Good Very good Elite
Years
40-44 < 26 26-31 32-35 36-41 42-46 47-51 > 51
45-49 < 25 25-29 30-34 35-39 40-43 44-48 > 48
50-54 < 24 24-27 28-32 33-36 37-41 42-46 > 46
55-59 < 22 22-26 27-30 31-34 35-39 40-43 > 43
60-65 < 21 21-24 25-28 29-32 33-36 37-40 > 40
Women
Age /
Very low Low Fair Moderate Good Very good Elite
Years
20-24 < 27 27-31 32-36 37-41 42-46 47-51 > 51
25-29 < 26 26-30 31-35 36-40 41-44 45-49 > 49
30-34 < 25 25-29 30-33 34-37 38-42 43-46 > 46
35-39 < 24 24-27 28-31 32-35 36-40 41-44 > 44
40-44 < 22 22-25 26-29 30-33 34-37 38-41 > 41
45-49 < 21 21-23 24-27 28-31 32-35 36-38 > 38
50-54 < 19 19-22 23-25 26-29 30-32 33-36 > 36
55-59 < 18 18-20 21-23 24-27 28-30 31-33 > 33
60-65 < 16 16-18 19-21 22-24 25-27 28-30 > 30
The classification is based on a literature review of 62 studies whereVO
was measured directly in
2max
healthy adult subjects in the USA, Canada and 7 European countries. Reference: Shvartz E, Reibold RC.
Aerobic fitness norms for males and females aged 6 to 75 years: a review. Aviat Space Environ Med;
61:3-11, 1990.
VO
2MAX
A clear link exists between maximal oxygen consumption (VO2
fitness because oxygen delivery to tissues is dependent on lung and heart function. VO2
) of the body and cardiorespiratory
max
max
(maximal
oxygen uptake, maximal aerobic power) is the maximal rate at which oxygen can be used by the body
during maximal exercise; it is related directly to the maximal capacity of the heart to deliver blood to the
muscles. VO2
can be measured or predicted by fitness tests (e.g. maximal exercise tests, submaximal
max
54
Page 55

exercise tests, Polar Fitness Test). VO2
predictor of performance capability in endurance events such as distance running, cycling, cross-country
skiing, and swimming.
is a good index of cardiorespiratory fitness and a good
max
VO2
divided by the person’s body weight in kilograms (ml/kg/min = ml ■ kg-1■ min-1).
can be expressed either as milliliters per minute (ml/min = ml ■ min-1) or this value can be
max
ORTHOSTATIC TEST
Orthostatic test is a generally used tool for monitoring the balance between training and recovery. It is
based on the training-induced changes in the function of your autonomic nervous system. Orthostatic
test results are affected by several external factors, such as mental stress, sleep, latent illness,
environmental changes (temperature, altitude), and others. Long term follow-up helps you to optimize
your training and prevent overtraining.
Orthostatic test is based on the measurement of heart rate and heart rate variability. Changes in heart
rate and heart rate variability reflect the changes in autonomic regulation of the cardiovascular system.
During the test HRrest, HRstand and HRpeak are measured. Heart rate and heart rate variability
measured during orthostatic test are good indicators of disturbances in the autonomic nervous system,
for example fatigue or overtraining. However, heart rate responses to fatigue and overtraining are
always individual, and require longer term follow-up.
BEFORE THE TEST
When you perform the test for the first time, six baseline tests should be conducted over a period of two
weeks to determine your personal baseline value. These baseline measurements should be taken during
two typical basic training weeks, not during heavy training weeks. The baseline measurements should
include tests taken both after training days and after recovery days.
After the baseline recordings, you should continue to perform the test 2-3 times a week. Test yourself
weekly in the morning following both a recovery day and a heavy training day (or a series of heavy
training days). An optional third test can be performed after a normal training day. The test may not
provide reliable information during detraining or in a very irregular training period. If you take a break
from exercise for 14 days or longer, you should consider resetting your long-term averages and perform
the baseline tests again
The test should always be taken in standardized/similar conditions in order to get the most reliable
results. It is recommended that you take the test in the morning before breakfast. The following basic
requirements apply:
Wear the heart rate sensor.
•
55
Page 56

• You should be relaxed and calm.
You can be seated in a relaxed position or lying in bed. The position should always be the same when
•
you do the test.
The test can take place anywhere – at home, in the office, at a health club – as long as the test
•
environment is peaceful. There should be no disturbing noises (for example, television, radio or
telephone) or other people talking to you.
Avoid eating, drinking and smoking 2-3 hours prior to the test.
•
• It is recommended to perform the test regularly and at the same time of day to get comparable
test results, preferably in the morning after waking up.
PERFORMING THE TEST
Choose Tests > Orthostatic test > Relax and start the test. Searching for heart rate is
displayed. When heart rate is found Lie down & relax is shown on the display.
• Your heart rate graph is shown on the display. Do not move during this first part of the test, which
lasts 3 minutes.
• After 3 minutes, the M450 will beep and Stand up is displayed. Stand up and remain standing still
for 3 minutes.
• After 3 minutes, the M450 will beep again and the test is finished.
• You can interrupt the test in any phase by pressing BACK. Test canceled is displayed.
If M450 cannot receive your heart rate signal, the message Test failed is displayed. In which case, you
should check that the heart rate sensor electrodes are wet and that the textile strap fits snugly.
TEST RESULTS
As a result you see your HRrest, HRstand and HRpeak values compared with the average of your
previous results.
Your latest test result is shown in Tests > Orthostatic test > Latest result. Only your most recently
performed test result is shown.
In the Flow web service you can follow your test results in the long-term. For a visual analysis of your
Orthostatic test results, go to the Flow web service and select the test from your Diary to view details
from it.
56
Page 57
HEART RATE ZONES
Polar heart rate zones introduce a new level of effectiveness in heart rate-based training. Training is
divided into five heart rate zones based on percentages of maximum heart rate. With heart rate zones,
you can easily select and monitor training intensities.
Target zone Intensity % of HR
Example: Heart
max
rate zones (in
HR
heart rate (220-age).
= Maximum
max
beats per
minute) for a 30-
years-old person,
whose maximum
heart rate is 190
bpm (220–30).
MAXIMUM 90–100% 171–190 bpm
Example durations
less than 5
minutes
Training effect
Benefits:
Maximal or
near maximal
effort for
breathing
and muscles.
Feels like:
Very
exhausting
for breathing
and muscles.
57
Recommend
ed for: Very
experienced
and fit
athletes.
Short
intervals
only, usually
in final
preparation
for short
events.
Page 58
Target zone Intensity % of HR
HR
= Maximum
max
heart rate (220-age).
Example: Heart
max
rate zones (in
beats per
minute) for a 30-
years-old person,
whose maximum
heart rate is 190
bpm (220–30).
Example durations
Training effect
HARD
80–90% 152–172 bpm 2–10 minutes
Benefits:
Increased
ability to
sustain high
speed
endurance.
Feels like:
Causes
muscular
fatigue and
heavy
breathing.
Recommend
ed for:
Experienced
athletes for
year-round
training, and
for various
durations.
Becomes
more
important
during pre
competition
season.
MODERATE
70–80% 133–152
bpm
58
10–40 minutes
Benefits:
Enhances
Page 59
Target zone Intensity % of HR
HR
= Maximum
max
heart rate (220-age).
Example: Heart
max
rate zones (in
beats per
minute) for a 30-
years-old person,
whose maximum
heart rate is 190
bpm (220–30).
Example durations
Training effect
general
training pace,
makes
moderate
intensity
efforts easier
and
improves
efficiency.
Feels like:
Steady,
controlled,
fast
breathing.
LIGHT
60–70% 114-133 bpm 40–80 minutes
59
Recommend
ed for:
Athletes
training for
events, or
looking for
performance
gains.
Benefits:
Improves
general base
fitness,
improves
Page 60
Target zone Intensity % of HR
HR
= Maximum
max
heart rate (220-age).
Example: Heart
max
rate zones (in
beats per
minute) for a 30-
years-old person,
whose maximum
heart rate is 190
bpm (220–30).
Example durations
Training effect
recovery and
boosts
metabolism.
Feels like:
Comfortable
and easy, low
muscle and
cardiovascul
ar load.
VERY LIGHT
50–60% 104–114 bpm 20–40 minutes
Recommend
ed for:
Everybody
for long
training
sessions
during base
training
periods and
for recovery
exercises
during
competition
season.
Benefits:
Helps to
warm up and
cool down
and assists
60
Page 61
Target zone Intensity % of HR
HR
= Maximum
max
heart rate (220-age).
Example: Heart
max
rate zones (in
beats per
minute) for a 30-
years-old person,
whose maximum
heart rate is 190
bpm (220–30).
Example durations
Training effect
recovery.
Feels like:
Very easy,
little strain.
Recommend
ed for: For
recovery and
cool-down,
throughout
training
season.
Training in heart rate zone 1 is done at a very low intensity. The main training principle is that
performance improves when recovering after, and not only during training. Accelerate the recovery
process with very light intensity training.
Training in heart rate zone 2 is for endurancetraining, an essential part of any training program. Training
sessions in this zone are easy and aerobic. Long-duration training in this light zone results in effective
energy expenditure. Progress will require persistence.
Aerobic power is enhanced in heart rate zone 3. The training intensity is higher than in sport zones 1 and
2, but still mainly aerobic. Training in sport zone 3 may, for example, consist of intervals followed by
recovery. Training in this zone is especially effective for improving the efficiency of blood circulation in
the heart and skeletal muscles.
If your goal is to compete at top potential, you will have to train in heart rate zones 4 and 5. In these
zones, you exercise anaerobically in intervals of up to 10 minutes. The shorter the interval, the higher the
intensity. Sufficient recovery between intervals is very important. The training pattern in zones 4 and 5 is
designed to produce peak performance.
61
Page 62

The Polar target heart rate zones can be personalized by using a laboratory measured HRmax value, or
by taking a field test to measure the value yourself. When training in a target heart rate zone, try to make
use of the entire zone. The mid-zone is a good target, but keeping your heart rate at that exact level all
the time is not necessary. Heart rate gradually adjusts to training intensity. For instance, when crossing
from heart rate target zone 1 to 3, the circulatory system and heart rate will adjust in 3-5 minutes.
Heart rate responds to training intensity depending on factors such as fitness and recovery levels, as well
as environmental factors. It is important to look out for subjective feelings of fatigue, and to adjust your
training program accordingly.
SMART CALORIES
The most accurate calorie counter on the market calculates the number of calories burned. The energy
expenditure calculation is based on:
• Body weight, height, age, gender
• Individual maximum heart rate (HR
max
)
• Heart rate during training
• Individual maximal oxygen uptake (VO2
max
)
• Altitude
SPEED AND POWER ZONES
With the speed and power zones you can easily monitor speed or power during your session, and adjust
your speed or power to achieve the targeted training effect. The zones can be used to guide the
efficiency of your training during sessions, and help you mix different training intensities for optimal
results.
SETTINGS
The speed and power zone settings can be adjusted in the Flow web service. They can be turned on or
off in the sport profiles they are available in. There are five different zones, and the zone limits can be
manually adjusted or you can use the default ones. They are sport specific, allowing you to adjust the
zones to best suit each sport. The zones are available in running sports (including team sports that
involve running), cycling sports as well as rowing and canoeing.
Default
If you choose Default, you cannot change the limits. The default zones are optimized for a person with
a relatively high fitness level.
62
Page 63
Free
If you choose Free, all limits can be changed. For example, if you have tested your actual thresholds,
such as the anaerobic and aerobic thresholds, or the upper and lower lactate thresholds, you can train
with the zones based on your individual threshold speed or pace. We recommend that you set your
anaerobic threshold speed and pace as the minimum for zone 5. If you also use the aerobic threshold,
set that as the minimum of zone 3.
You can create training targets based on speed zones. After synchronizing the targets via FlowSync,
you’ll receive guidance from your training device during training.
DURING TRAINING
During your training you can view which zone you are currently training in and the time spent in each
zone.
AFTER TRAINING
In the training summary on M450, you'll see an overview of the time spent in each speed or power zone.
After syncing, detailed visual speed or power zone information can be viewed in the Flow web service.
SPORT PROFILES
Lets you list all your favorite sports and define specific settings for each one of them. For example, you
can create tailored views for each sport you do and choose what data you want to see when you train:
just your heart rate or just speed and distance – whatever suits you and your training needs and
requirements best.
For more information, see Sport Profiles Settings and Sport Profiles in Flow Web Service.
Please note that in a number of indoor sports, group sports and team sports profiles the HR
visible to other devices setting is enabled by default. This means that compatible devices
using Bluetooth Smart wireless technology, e.g. gym equipment, can detect your heart rate.
You can check which sport profiles have Bluetooth broadcasting enabled by default from
the Polar Sport profiles list. You can enable or disable Bluetooth broadcasting from sport
profilesettings.
63
Page 64
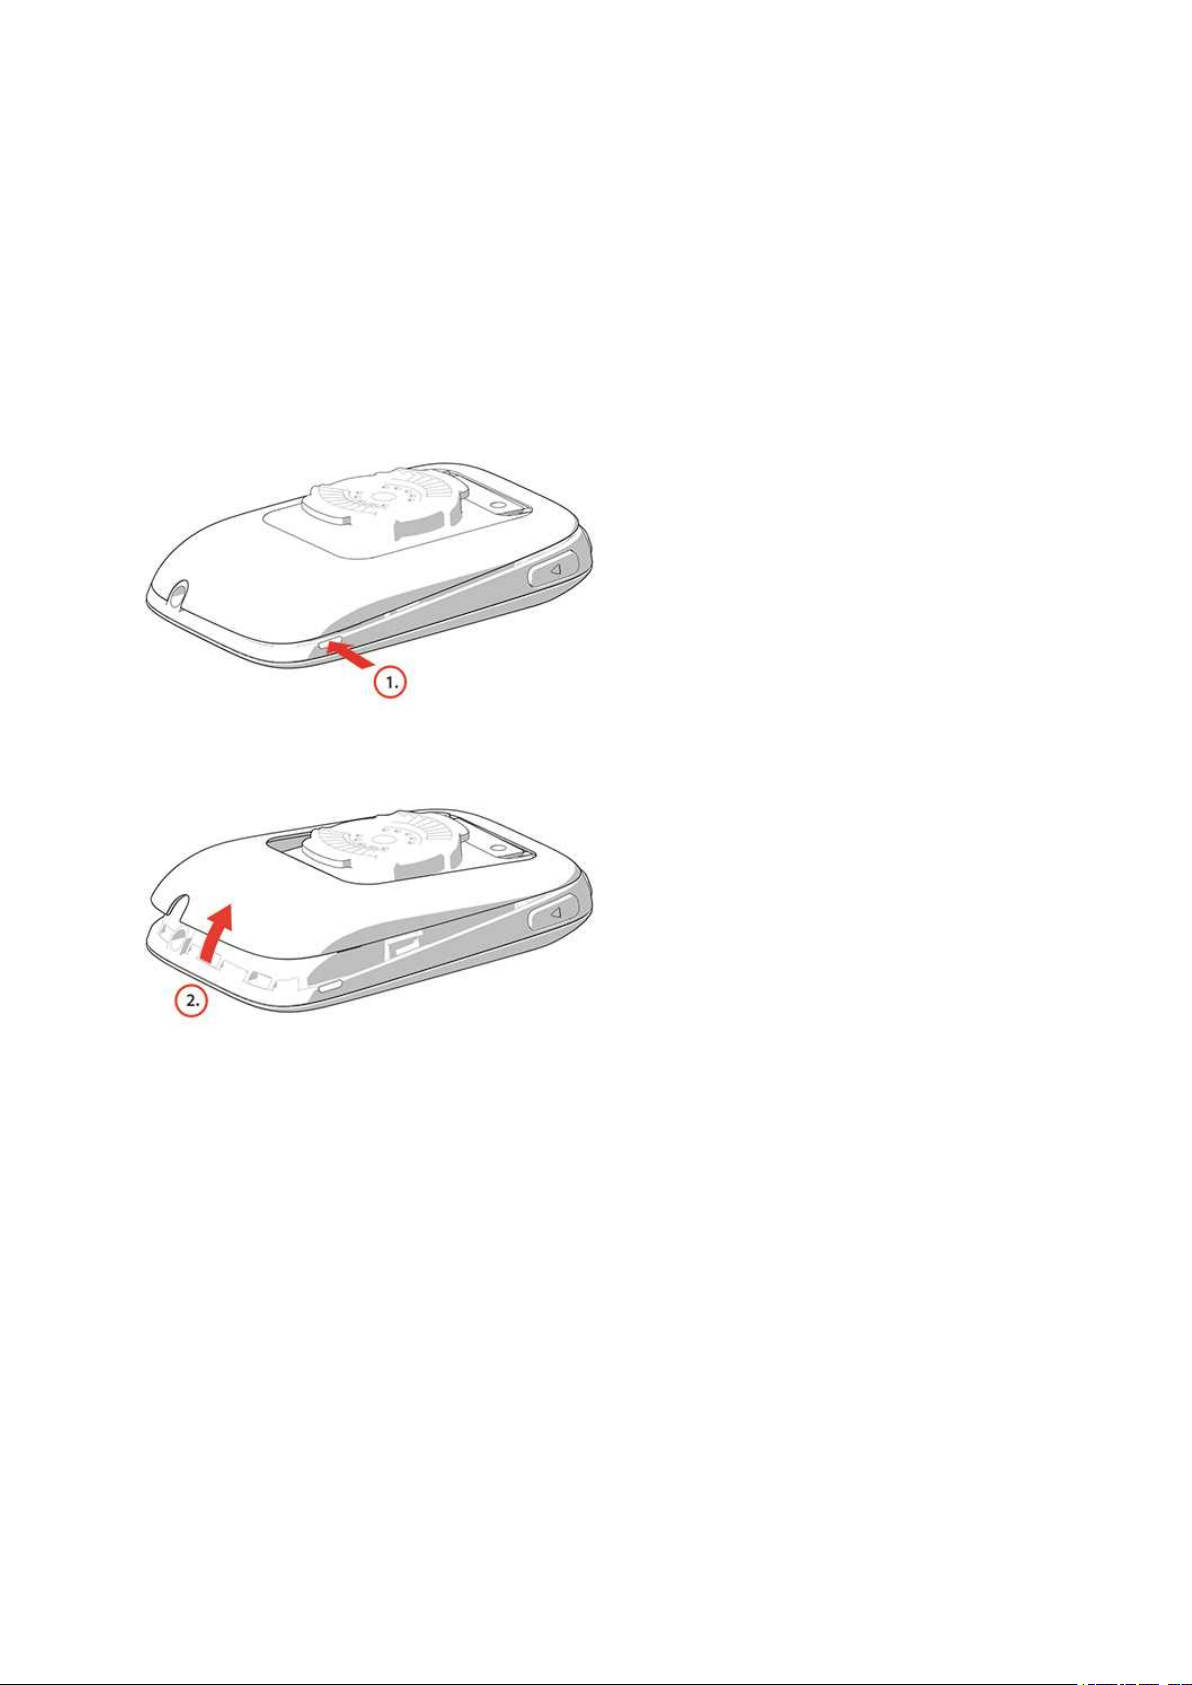
CHANGEABLE COVER
Change the M450 back cover to match the colors of your bike perfectly! You can buy additional back
covers in different colors separately.
To change the cover
At the top right corner of M450, put your thumbnail in the groove between the case and the back cover
to open the cover slightly.
Using your other thumbnail, open the cover a bit more from the top of M450. Then, lift the cover off.
Place the bottom edge of the color back cover against the bottom edge of M450 (1). Then press the top
of the cover until it snaps into place (2).
64
Page 65
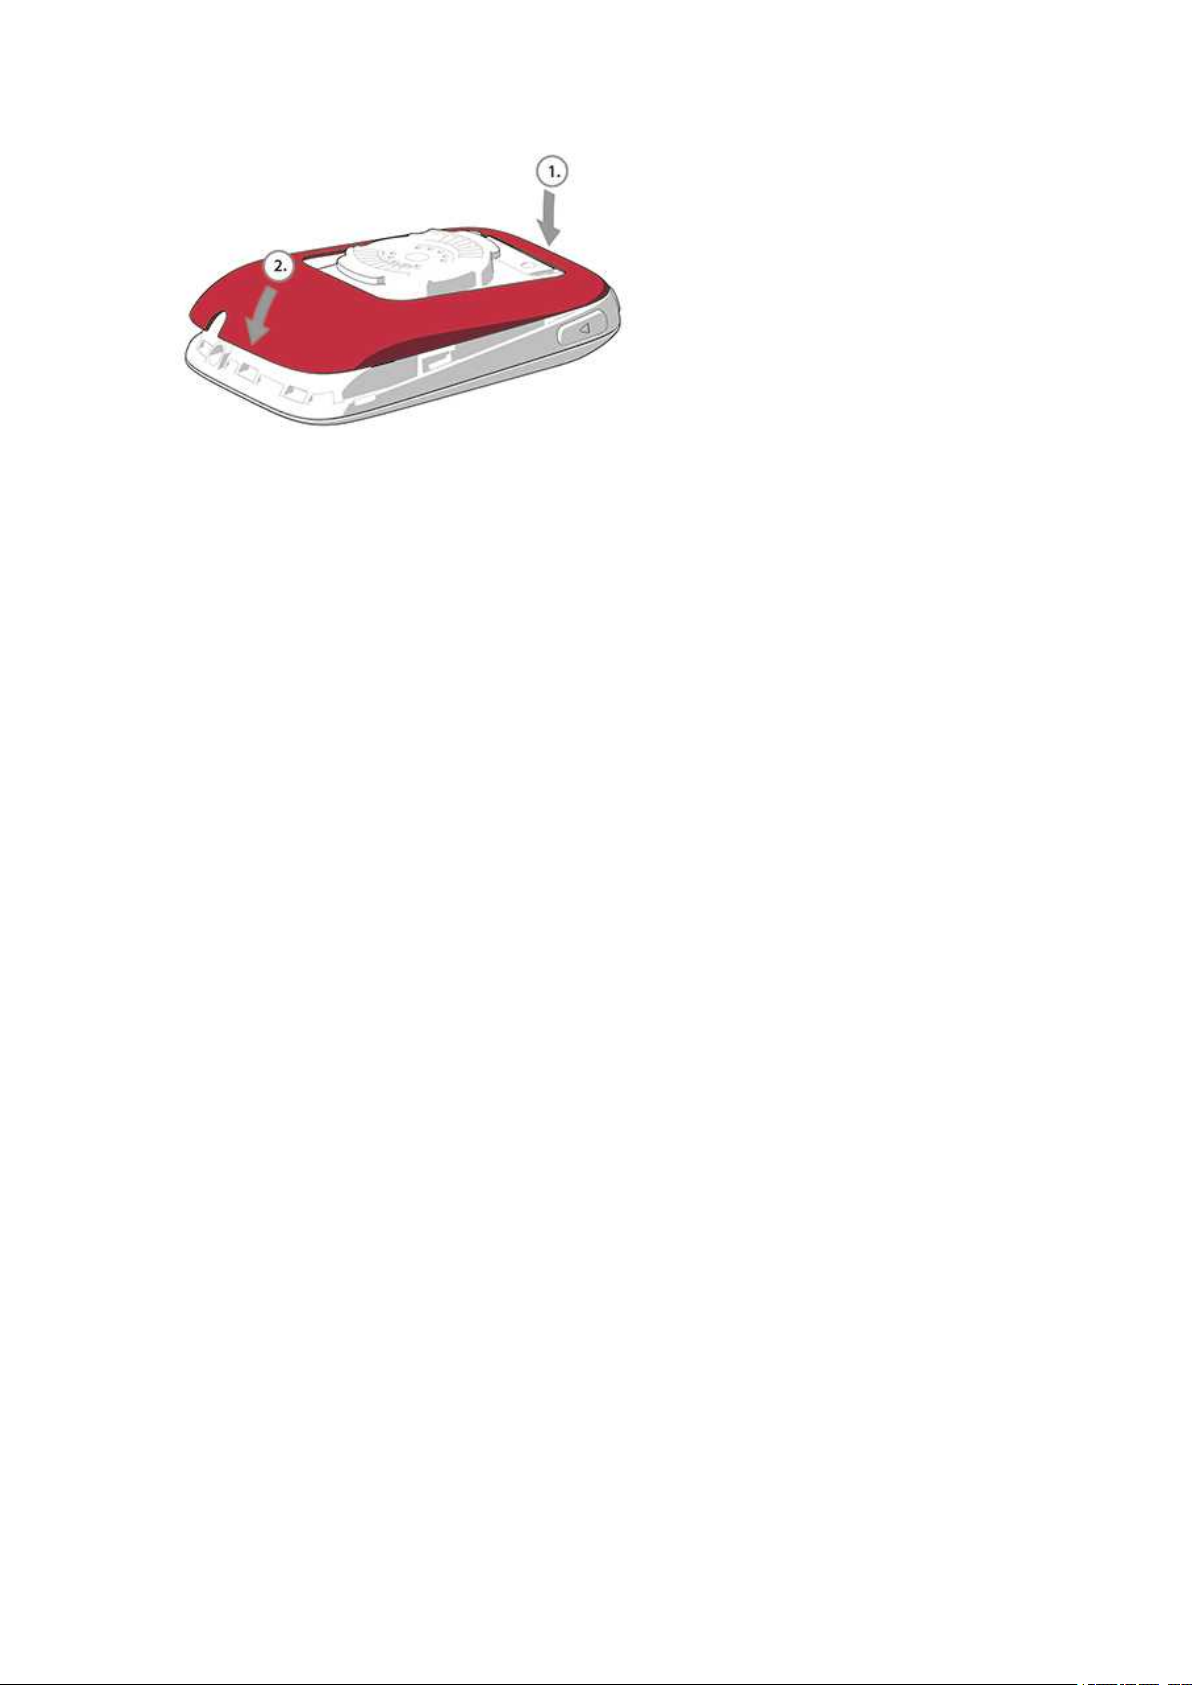
65
Page 66

POLAR FLOW WEB SERVICE
The Polar Flow web service allows you to plan and analyze every detail of your training and learn more
about your performance. Set up and customize M450 to perfectly fit your training needs by adding
sports and tailoring settings and training views. Follow and visually analyze your progress, create training
targets,and add them to your favorites.
With the Flow web service you can:
• Analyze all of your training details with visual graphs and a route view
• Compare specific data with others like laps or speed vs. heart rate
• See how your training load affects your cumulative recovery status
• See long-term progress by following the trends and details which matter to you the most
• Follow your progress with sports specific weekly or monthly reports
• Share highlights with your followers
• Relive your and other users' sessions afterward
To start using the Flow web service, go to flow.polar.com/start, and create your Polar account if you do
not already have one. Download and install FlowSync software from the same place to allow you to sync
data between M450 and Flow web service.
Feed
In Feed you can see what you've been up to lately, plus you can seeyour friends' activities and
comments.
Explore
In Explore you can discover training sessions and routes by browsing the map. You can add routes to
your favorites but they will not be synced to the M450. See public training sessions that other users
have shared, and relive your own or other people’s routes and see where the highlights happened.
Diary
In Diary you can see your scheduled training sessions, as well as review past results. Information shown
includes: training plans in day, week or month view, individual sessions, tests and weekly summaries.
Progress
66
Page 67

In Progress you can follow your development with reports. Reports are a handy way to follow your
progress in training over longer periods. In week, month and year reports you can choose the sport for
the report. In custom period, you can choose both the period and the sport. Choose the time period and
sport for report from the drop down lists, and press the wheel icon to choose what data you want to
view in the report graph.
For support and more information about using the Flow web service, go to,
www.polar.com/en/support/flow
TRAINING TARGETS
Create detailed training targets in the Flow web service and sync them to your M450 via Flowsync
software or Flow app. During training you can easily follow the guidance on your device.
• Quick Target: Fill in one value. Choose a duration, distance or calorie target.
• Phased Target: You can split your training into phases and create a different target duration or
distance and intensity for each of them. This one is for e.g. creating an interval training session, and
adding proper warmup and cool down phases to it.
• Favorites: Create a target, and add it to Favorites to easily access it every time want to perform it
again.
Remember to sync your training targets to your M450 from the Flow web service via FlowSync or Flow
App. If you do not sync them, they are only visible in your Flow web service Diary or Favorites list.
CREATE A TRAINING TARGET
1. Go to Diary, and click Add > Training target.
2. In the Add training target view, choose Quick, Phased or Favorite (Race Pace target is not
available for Polar M450).
QUICK TARGET
1. Choose Quick.
2. Choose Sport, enter Target name (required), Date (optional) and Time(optional) and any
Notes (optional) you want to add.
3. Fill in one of the following values: duration, distance or calories . You can only fill in one of the
values.
4.
Click Save to add the target to your Diary, or the favorites icon to add it to your Favorites.
67
Page 68

PHASED TARGET
1. Choose Phased.
2. Choose Sport, enter Target name (required), Date (optional) and Time(optional) and any
Notes (optional) you want to add.
3. Add phases to your target. Choose distance or duration for each phase, manual or automatic next
phase start and the intensity.
4.
Click Save to add the target to your Diary, or the favorites icon to add it to your Favorites.
FAVORITES
If you have created a target, and added it to your favorites you can use it as a scheduled target.
1. Choose Favorites. Your training target favorites are shown.
2. Click the favorite you want to use as a template for your target.
3. Choose Sport, enter Target name (required), Date (optional) and Time (optional) and any
Notes (optional) you want to add.
4. You can edit the target if you wish, or leave it as it is.
5. Click Update changes to save changes made to the favorite. Click Add to diary to add the target
to your Diary without updating the favorite.
After syncing your training targets to your M450, you can find:
• Scheduled training targets in Diary (current week and the next 4 weeks)
• Training targets listed as favorites in Favorites
When starting your session, access your target from Diary or Favorites.
For information on starting a training target session, see "Start a Training Session" on page37
FAVORITES
In Favorites, you can store and manage your favorite training targets. Your M450 can have a maximum
of 20 favorites at a time. The number of favorites in the Flow web service is not limited. If you have over
20 favorites in the Flow web service, the first 20 in the list are transferred to your M450 when syncing.
You can change the order of your favorites by dragging and dropping them. Choose the favorite you
want to move and drag it into the place you want to put it in the list.
68
Page 69

ADD A TRAINING TARGET TO FAVORITES:
1. Create a training target.
2.
Click the favorites icon in the lower right corner of the page.
3. The target is added to your favorites
or
1. Choose an existing target from your Diary.
2.
Click the favorites icon in the lower right corner of the page.
3. The target is added to your favorites.
EDIT A FAVORITE
1.
Click the favorites icon in the upper right corner next to your name. All your favorite routes
and training targets are shown.
2. Choose the favorite you want to edit. Change the name of the target, or choose edit in the lower
right corner to modify the target.
REMOVE A FAVORITE
Click the delete icon in upper right corner of the training target to remove it from the favorites list.
SPORT PROFILES IN FLOW WEB SERVICE
There are six sport profiles on your M450 by default. In the Flow web service you can add new sport
profiles to your sports list, as well as edit them and existing profiles. Your M450 can contain a maximum
of 20 sport profiles. The number of sport profiles in the Flow web serviceis not limited. If you have over
20 sport profiles in the Flow web service, the first 20 in the list are transferred to your M450 when
syncing.
You can change the order of your sport profiles by dragging and dropping them. Choose the sport you
want to move and drag it into the place you want to put it in the list.
ADD A SPORT PROFILE
In the Flow web service:
1. Click your name/profile photo in the upper right corner.
2. Choose Sport Profiles.
3. Click Add sport profile, and choose the sport from the list.
4. The sport is added to your sport list.
69
Page 70
EDIT A SPORT PROFILE
In the Flow web service:
1. Click your name/profile photo in the upper right corner.
2. Choose Sport profiles.
3. Click Edit under the sport you want to edit.
In each sport profile, you can edit the following information:
BASICS
• Automatic lap (Can be set to duration or distance-based)
• Training sounds
• Speed view
HEART RATE
• Heart rate view (choose beats per minute (bpm) or % of maximum.)
• Heart rate visible to other devices (Other compatible devices using Bluetooth ® Smart wireless
technology (e.g. gym equipment) can detect your heart rate.)
• Heart rate zone settings (With the heart rate zones you can easily select and monitor training
intensities. If you choose Default, you cannot change heart rate limits. If you choose Free, all limits
can be changed. Default heart rate zone limits are calculated from your maximum heart rate.
TRAINING VIEWS
Choose what information you see on your training views during your sessions. You can have a total of
eight different training views for each sport profile. Each training view can have a maximum of four
different data fields.
Click the pencil icon on an existing view to edit it, or add a new view. You can select one to four items for
your view from seven categories:
TIME ENVIRONMENT BODYMEASUREMENT DISTANCE
• Time of day
• Duration
• Lap time
• Automatic lap
time
• Altitude
• Ascent
• Lap ascent
• Automatic lap
ascent
• Heart rate
• Average heart
rate
• Lap HR average
• Automatic lap
• Distance
• Lap distance
• Automatic lap
distance
70
Page 71
TIME ENVIRONMENT BODYMEASUREMENT DISTANCE
• Last lap time • Descent
• Lap descent
• Automatic lap
descent
• Lap VAM
• Inclinometer
• Temperature
average heart rate
• Last lap average
heart rate
• Maximum heart
rate
• Lap maximum
heart rate
• Automatic lap
maximum heart
rate
• Last lap
maximum heart
rate
• Calories
• HR zone pointer
• Time in HR zones
• HR limits
SPEED CADENCE POWER
• Speed/pace
• Average speed/pace
• Lap average speed/pace
• Automatic lap average
speed/pace
• Last lap average
speed/pace
• Maximum speed/pace
• Lap maximum
speed/pace
• Automatic lap max
speed/pace
• Last lap maximum
speed/pace
• Speed/pace zone pointer
• Distance in speed/pace
• Cadence
• Average cadence
• Lap average cadence
• Automatic lap average
cadence
• Last lap average cadence
• Maximum cadence
• Lap maximum cadence
• Power
• Rolling average power
• Average power
• Lap average power
• Automatic lap average
power
• Last lap average power
• Maximum power
• Lap maximum power
• Automatic lap maximum
power
• Last lap maximum power
• Power zone pointer
• Force max of revolution
• Left/right balance
71
Page 72
SPEED CADENCE POWER
zones
• Time in speed/pace zones
• Speed/pace limits
• Average left/right balance
• Lap average left/right
balance
• Automatic lap average
left/right balance
• Last lap average left/right
balance
Depending on your power view selection in Sport profile settings, the power output is shown in W
(Watts), W/kg (Watts/kg) or FTP % (% of functional threshold power).
When you are done with the sport profile settings, click save. To sync the settings to your M450, press
synchronize in FlowSync.
Please note that in a number of indoor sports, group sports and team sports profiles the HR
visible to other devices setting is enabled by default. This means that compatible devices
using Bluetooth Smart wireless technology, e.g. gym equipment, can detect your heart rate.
You can check which sport profiles have Bluetooth broadcasting enabled by default from
the Polar Sport profiles list. You can enable or disable Bluetooth broadcasting from sport
profilesettings.
72
Page 73

POLAR FLOW APP
Polar Flow app allows you to see an instant visual interpretation of your training data straight after your
session. It lets you easily access your training targets and view test results. Flow app is the easiest way to
sync your training data from your M450 with the Flow web service.
When using the app with your M450, you can:
• Get a quick overview of your training and analyze every detail of your performance right away
• Route view on a map
• Training Benefit
• Training Load and recovery time
• Start time and duration of your session
• Average and maximum speed/pace and distance
• Average and maximum heart rate, cumulative heart rate zones
• Calories and fat burn % of calories
• Maximum altitude, ascent and descent
• Lap details
• See your progress with weekly summaries in the calendar
Before you can start using the Flow app, you need have your M450 registered in the Flow web service.
The registration takes place when you set up your M450 at flow.polar.com/start. For more information, see
Set Up Your M450.
To start using the Flow app, download it from the App Store or Google Play onto your mobile device. For
support and more information on using the Polar Flow app, go to www.polar.com/en/support/Flow_
app. Before taking a new mobile device (smartphone, tablet) into use, you need to pair it with your
M450. For more information, see Pairing.
To see your training data in the Flow app, you must sync your M450 with it after your session. For
information on syncing M450 with the Flow app, see Syncing.
73
Page 74

SYNCING
You can transfer data from your M450 via the USB cable with the FlowSync software or wirelessly via
Bluetooth Smart® with the Polar Flow app. To be able sync data between your M450 and the Flow web
service and app, you need to have a Polar account and the FlowSync software. Go to
flow.polar.com/start, and create your Polar account in the Polar Flow web service and download and
install the FlowSync software onto your PC. Download the Flow app onto your mobile from the App
Store or Google Play.
Remember to sync and keep your data up-to-date between your M450, the web service and the mobile
app wherever you are.
SYNC WITH FLOW WEB SERVICE VIA FLOWSYNC
To sync data with the Flow web service you need FlowSync software. Go to flow.polar.com/start, and
download and install it before trying to sync.
1. Plug the micro USB connector into the USB port in the M450, and plug the other end of the cable
into your PC. Make sure FlowSync software is running.
2. The FlowSync window opens on your computer, and the syncing starts.
3. Completed is displayed when you are done.
Every time you plug in your M450 to your computer, the Polar FlowSync software will transfer your data
to the Polar Flow web service and sync any settings you may have changed. If the syncing does not
automatically start, start FlowSync from the desktop icon (Windows) or from the applications folder
(Mac OS X). Every time a firmwareupdate is available, FlowSync will notify you, and request you to install
it.
If you change settings in the Flow web service while your M450 is plugged into your computer, press the
synchronize button on FlowSync to transfer to the settings to your M450.
For support and more information about using the Flow web service, go to
www.polar.com/en/support/flow.
For support and more information about using FlowSync software, go to
www.polar.com/en/support/FlowSync.
SYNC WITH FLOW APP
Before syncing make sure:
74
Page 75

• You have a Polar account and Flow app
• You have registered your M450 in the Flow web service and synced data via FlowSync software at
least once.
• Your mobile device has Bluetooth turned on, and airplane mode/flight mode is not turned on.
• You have paired your M450 with your mobile. For more information , "Pairing"
There are two ways to sync your data:
1. Sign into Flow app and press and hold the BACK button on your M450.
2. Connecting to device is displayed, followed by Connecting to app.
3. Syncing completed is displayed when you are done.
or
1. Sign into Flow app and go to Settings > General settings > Pair and sync > Sync data and
press the START button on your M450.
2. Connecting to device is displayed, followed by Connecting to app.
3. Syncing completed is displayed when you are done.
When you sync your M450 with the Flow app, your training data is also synced automatically via an
internet connection to the Flow web service.
For support and more information about using Polar Flow app, go to www.polar.com/en/support/Flow_
app.
75
Page 76

CARING FOR YOUR M450
Like any electronic device, the Polar M450 should be kept clean and treated with care. The instructions
below will help you fulfill the guarantee obligations, keep the device in peak condition and avoid any
issues in charging or syncing.
M450
Keep your training device clean. Use a damp paper towel to wipe dirt from the training device. To
maintain the water resistance, do not wash the training device with a pressure washer. Do not immerse
the training device in water. Never use alcohol or any abrasive material such as steel wool or cleaning
chemicals.
The USB cable must be connected carefully to avoid damaging the device's USB port.
After each time of using the USB port of the training device, check visually that there is no hair, dust or
other dirt on the sealing surface area of the lid/back case. Gently wipe to remove any dirt. Do not use
any sharp tools or equipment for cleaning, which could cause scratches to the plastic parts.
Not suitable for bathing or swimming. Protected against wash splashes and raindrops. Do not
immerse the training device in water. Using the training device in excessive rainfall may cause interference
on GPS reception.
Do not leave the device in extreme cold (below –10 °C/14 °F) and heat (above 50 °C/120 °F)
or under direct sunlight.
HEART RATE SENSOR
Connector: Detach the connector from the strap after every use and dry the connector with a soft
towel. Clean the connector with a mild soap and water solution when needed. Never use alcohol or any
abrasive material (e.g. steel wool or cleaning chemicals).
Strap: Rinse the strap under running water after every use and hang to dry. Clean the strap gently with a
mild soap and water solution when needed. Do not use moisturizing soaps, because they can leave
residue on the strap. Do not soak, iron, dry clean or bleach the strap. Do not stretch the strap or bend
the electrode areas sharply.
Check the washing instructions on the label of the strap.
76
Page 77

STORING
M450: Keep your training devicein a cool and dry place. Do not keep it in a damp environment, in nonbreathable material (a plastic bag or a sports bag) nor with conductive material (a wet towel). Do not
expose the training device to direct sunlight for extended periods, such as by leaving it in a car or
mounted on the bike mount. It is recommended to store the training device partially or fully charged.
The battery slowly loses its charge when it is stored. If you are going to store the training device for
several months, it is recommended to recharge it after a few months. This will prolong the battery
lifetime.
Heart rate sensor: Dry and store the heart rate sensor strap and the connector separately to maximize
the battery lifetime. Keep the heart rate sensor in a cool and dry place. To prevent snap oxidation, do
not store the heart rate sensor wet in non-breathing material, such as a sports bag. Do not expose the
heart rate sensor to direct sunlight for extended periods.
SERVICE
During the two-year guarantee/warranty period we recommend that you have service done by an
authorized Polar Service Center only. The warranty does not cover damage or consequential damage
caused by service not authorized by Polar Electro. For further information, see Limited International
Polar Guarantee.
For contact information and all Polar Service Center addresses, visit www.polar.com/support and
country-specific websites.
The username for your Polar Account is always your email address. The same username and password
arevalid for Polar product registration, Polar Flow web service and app, Polar discussion forum and
newsletter registration.
77
Page 78

IMPORTANT INFORMATION
BATTERIES
The Polar M450 has an internal, rechargeable battery. Rechargeable batteries have a limited number of
charge cycles. You can charge and dischargethe battery over 300 times before a notable decrease in its
capacity. The number of charge cycles also varies according to use and operating conditions.
At the end of the working life of the product Polar encourages you to minimize possible effects of waste
on the environment and human health by following local waste disposal regulations and, where possible,
utilizing separate collection of electronic devices. Do not dispose of this product as unsorted municipal
waste.
The Polar H7 heart rate sensor has a user changeable battery. To changethe battery yourself, please
follow the instructions carefully as instructed in Changing Heart Rate Sensor Battery.
Keep the batteries away from children. If swallowed, contact a doctor immediately. Batteries should be
disposed of properly according to local regulations.
CHANGING HEART RATE SENSOR BATTERY
To change the battery of the heart rate sensor yourself, carefully follow the instructions below:
When changing the battery, make sure the sealing ring is not damaged, in which case you should replace
it with a new one. You can purchase the sealing ring/battery kits at well-equipped Polar retailers and
authorized Polar Services. In the USA and Canada, the additional sealing rings are available at authorized
Polar Service Centers. In the USA the sealing ring/battery kits are also available at www.polar.com/us-en.
When handling a new, fully charged battery, avoid clasp-like contact, i.e. simultaneously from both sides,
with metal or electrically conducting tools, like tweezers. This may short circuit the battery, causing it to
discharge more rapidly. Typically, short circuiting does not damage the battery, but it may decrease the
capacity and the lifetime of the battery.
78
Page 79
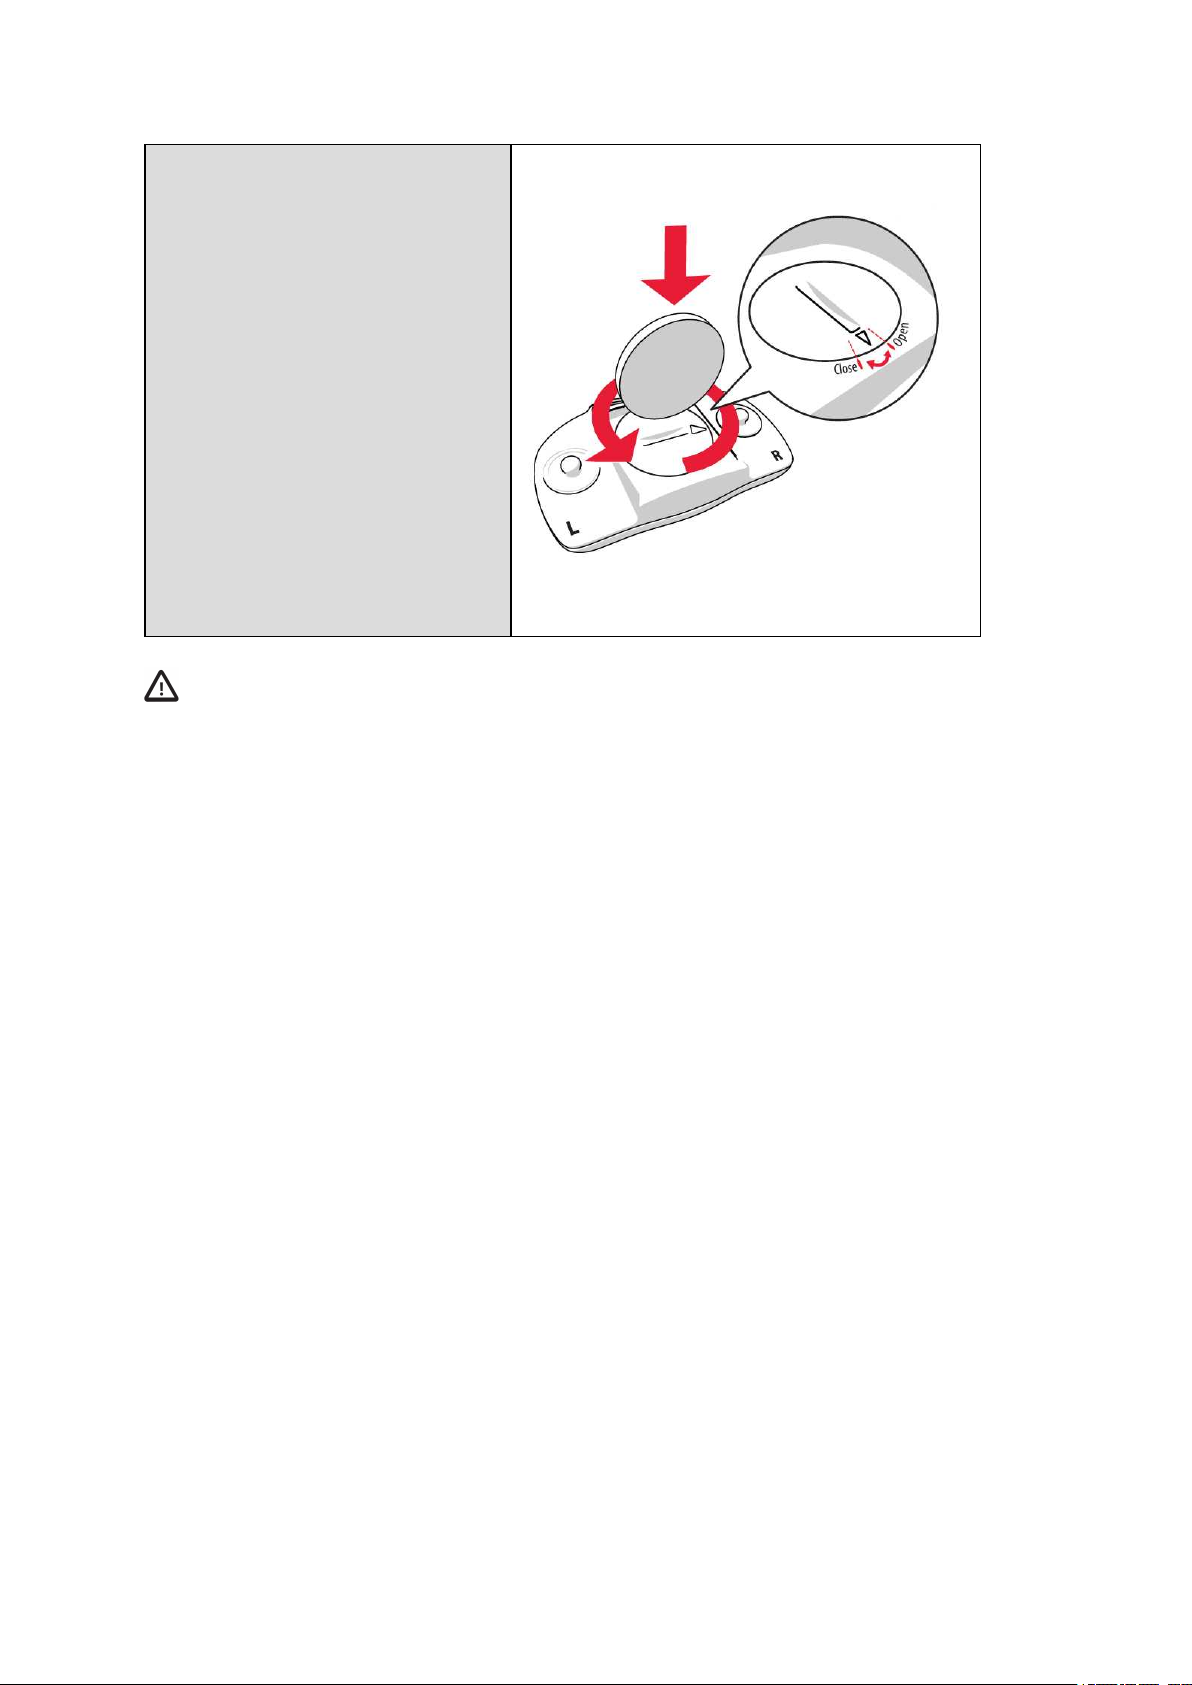
1. Using a coin, open the battery
cover by turning it
counterclockwise to OPEN.
2. Insert the battery (CR 2025)
inside the cover with the
positive (+) side against the
cover. Make surethe sealing
ring is in the groove to ensure
water resistance.
3. Press the cover back into the
connector.
4. Use the coin to turn the cover
clockwise to CLOSE.
Danger of explosion if the battery is replaced with wrong type.
PRECAUTIONS
The Polar M450 training device shows your performance indicators. The training device is designed to
indicate the level of physiological strain and recovery during and after an exercise session.It measures
heart rate, speed and distance. It also measures cycling cadence when used with a cadencesensor and
power output when used with Kéo Power Bluetooth® Smart. No other use is intended or implied.
The training device should not be used for obtaining environmental measurements that require
professional or industrial precision.
INTERFERENCE DURING TRAINING
Electromagnetic Interference and Training Equipment
Disturbancemay occur near electrical devices. Also WLAN base stations may cause interference when
training with the training device. To avoid erratic reading or misbehavior, move away from possible
sources of disturbance.
Training equipment with electronic or electrical components such as LED displays, motors and electrical
brakes may cause interfering stray signals. To solve these problems, try the following:
79
Page 80

1. Remove the heart rate sensor strap from your chest and use the training equipment as you would
normally.
2. Move the training device around until you find an area in which it displays no stray reading or
does not flash the heart symbol. Interference is often worst directly in front of the display panel
of the equipment, while the left or right side of the display is relatively free of disturbance.
3. Put the heart rate sensor strap back on your chest and keep the training device in this
interference-free area as much as possible.
If the training device still does not work with the training equipment, it may be electrically too noisy for
wireless heart rate measurement.
MINIMIZING RISKS WHEN TRAINING
Training may include some risk. Before beginning a regular training program, it is recommended that you
answer the following questions concerning your health status. If you answer yes to any of these
questions, we recommend that you consult a doctor before starting any training program.
• Have you been physically inactive for the past 5 years?
• Do you have high blood pressure or high blood cholesterol?
• Are you taking any blood pressure or heart medication?
• Do you have a history of breathing problems?
• Do you have symptoms of any disease?
• Are you recovering from a serious illness or medical treatment?
• Do you use a pacemaker or other implanted electronic device?
• Do you smoke?
• Are you pregnant?
Note that in addition to training intensity, medications for heart conditions, blood pressure,
psychological conditions, asthma, breathing, etc., as well as some energy drinks, alcohol, and nicotine
may also affect heart rate.
It is important to be sensitive to your body’s responses during training. If you feel unexpected pain
or excessive fatigue when training, it is recommended that you stop the training or
continue at a lighter intensity.
Note! If you are using a pacemaker or other implanted electronic device, you can use Polar products. In
theory interference to pacemaker caused by Polar products should not be possible. In practice no
reports exist to suggest anyone ever having experienced interference. We cannot however issue an
official guarantee on our products’ suitability with all pacemakers or other implanted devices due to the
variety of devices available. If you have any doubts, or if you experience any unusual sensations while
80
Page 81
using Polar products, please consult your physician or contact the implanted electronic device
manufacturer to determine safety in your case.
If you are allergic to any substance that comes into contact with your skin or if you suspect an allergic
reaction due to using the product, check the listed materials in Technical Specifications. If you experience
any skin reaction, stop using the product and consult your physician. Also inform Polar Customer Care
about your skin reaction. To avoid any skin reaction to the heart rate sensor, wear it over a shirt, but
moisten the shirt well under the electrodes to ensure flawless operation.
The combined impact of moisture and intense abrasion may cause color to come off the
heart rate sensor’s surface, possibly staining light-colored clothes. It may also cause a darker
color to comeoff clothing, possibly staining lighter-colored training devices. To keep a lightcolored training device glowing for years to come, please make surethe clothing you wear
while training does not bleed color. If you use perfume or insect repellent on your skin, you
must ensure that it does not come into contact with the training device or the heart rate
sensor. If you train in cold conditions (-20 °C to -10 °C / -4 °F to 14 °F) we recommend that
you wear the training deviceunder the sleeve of your jacket, directly on your skin.
TECHNICAL SPECIFICATION
M450
Battery type: Rechargeable 400mAh, 4,35V battery
Operating time:
Operating temperature:
Training devicematerials: PC+GF, ABS, PC, PMMA, TPU
Watch accuracy: Better than ± 0.5 seconds / day at 25
Up to 16 hours with GPS and heart
rate sensor
-10 °C to +50 °C / 14 °F to 122 °F
Using or storing your M450 in an
environment where temperature is
not within this temperature range
may permanently damage the
battery capacity - especially if the
temperature is higher.
°C / 77 °F temperature
81
Page 82
GPS accuracy: Distance ±2%, speed ±2 km/h
Altitude resolution: 1 m
Ascent/Descent resolution: 5 m
Maximum altitude: 9000 m / 29525 ft
Sample rate: 1 s
Accuracy of heart rate monitor: ± 1% or 1 bpm, whichever larger. Defin-
ition applies to stable conditions.
Heart rate measuring range: 15-240 bpm
Current speed display range:
Water resistance: IPX7 (rainproof, not suitable for swim-
Memory capacity: 70 h training with GPS and heart rate
Display resolution: 128 x 128
0-399 km/h 247.9 mph
ming)
depending on your language settings
H7 HEART RATE SENSOR
Battery life: 200 h
Battery type: CR 2025
Battery sealing ring: O-ring 20.0 x 1.0 Material FPM
Operating temperature: -10 °C to +50 °C/14 °F to 122 °F
Connector material: Polyamide
Strap material: 38% Polyamide, 29% Polyurethane,
20% Elastane, 13% Polyester
Water resistance: 30 m
Uses Bluetooth® Smart wireless technology.
82
Page 83

POLAR FLOWSYNC SOFTWARE
To use FlowSync software you need a computer with Microsoft Windows or Mac operating system with
an internet connection and a free USB port.
Check the latest compatibility information from support.polar.com.
POLAR FLOW MOBILE APPLICATION COMPATIBILITY
Check the latest compatibility information from support.polar.com.
WATER RESISTANCE OF POLAR PRODUCTS
Most Polar products can be worn when swimming. They are not, however, diving instruments. To
maintain water resistance, do not press the buttons of the device under water. When measuring heart
rate in water with a GymLink compatible Polar device and heart rate sensor, you may experience
interference for the following reasons:
l Pool water with high chlorine content, and seawater are very conductive. The electrodes of the
heart rate sensor may short-circuit, preventing ECG signals from being detected by the heart rate
sensor.
l Jumping into water or strenuous muscle movement during competitive swimming may shift the
heart rate sensor to a location on the body where ECG signals cannot be picked up.
l The ECG signal strength is individual and may vary depending on the individual’s tissue
composition. Problems occur morefrequently when measuring heart rate in water.
Polar devices with wrist-based heart rate measurement are suitable for swimming and bathing.
They will collect your activity data from your wrist movements also when swimming. In our tests,
however, we found that the wrist-based heart rate measurement doesn’t work optimally in water, so we
cannot recommend wrist-based heart rate measurement for swimming.
In the watch industry, water resistance is generally indicated as meters, which means the static water
pressure of that depth. Polar uses this same indication system. Water resistance of Polar products is
tested according to International Standard ISO 22810 or IEC60529. Every Polar devicethat has water
resistance indication is tested before the delivery to stand water pressure.
Polar products are divided into four different categories according to their water resistance. Check the
back of your Polar product for the water resistance category, and compare it to the chart below. Please
note that these definitions do not necessarily apply to products of other manufacturers.
83
Page 84

When performing any underwater activity, the dynamic pressure generated by moving in water is greater
than the static pressure. This means that moving the product under water subjects it to a greater
pressure than if the product were stationary.
Marking on the
back of the
product
Water resistant IPX7 OK - - - Do not wash with a pres-
Water resistant IPX8 OK OK - - Minimum for bathing
Water resistant
Water resistant
20/30/50 meters
Suitable for swim-
ming
Wash
splashes,
sweat,
raindrops
etc.
OK OK - - Minimum for bathing
Bathing
and swimming
Skin diving
with
snorkel
(no air
tanks)
SCUBA
diving
(with
air
tanks)
Water resistant characteristics
sure washer.
Protected against
splashes, raindrops etc.
Reference standard:
IEC60529.
and swimming.
Reference standard:
IEC60529.
and swimming.
Reference standard:
ISO22810.
Water resistant 100
meters
OK OK OK - For frequent use in
water but not SCUBA
diving.
Reference standard:
ISO22810.
LIMITED INTERNATIONAL POLAR GUARANTEE
• Polar Electro Oy issues a limited international guarantee for Polar products. For products which
have been sold in the USA or Canada, guarantee is issued by Polar Electro, Inc.
• Polar Electro Oy/Polar Electro Inc. guarantees the original consumer/purchaser of the Polar product
that the product will be free from defects in material or workmanship for two (2) years from the date
of purchase, with the exception of wristbands made of silicone or plastic, which are subject to a
guarantee period of one (1) year from the date of purchase.
84
Page 85

• The guarantee does not cover normal wear and tear of the battery, or other normal wear and tear,
damage due to misuse, abuse, accidents or non-compliance with the precautions; improper
maintenance, commercial use, cracked, broken or scratched cases/displays, textile armband or textile
or leather wristband, elastic strap (e.g. heart rate sensor chest strap) and Polar apparel.
• The guarantee does also not cover any damage/s, losses, costs or expenses, direct, indirect or
incidental, consequential or special, arising out of, or related to the product.
• Guarantee does not cover products which have been purchased second hand.
• During the guarantee period, the product will be either repaired or replaced at any of the
authorized Polar Central Services regardless of the country of purchase.
• Guarantee issued by Polar Electro Oy/Inc. does not affect the consumer’s statutory rights under
applicable national or state laws in force, or the consumer’s rights against the dealer arising from their
sales/purchase contract.
• You should keep the receipt as a proof of purchase!
• Guarantee with respect to any product will be limited to countries where the product has been
initially marketed by Polar Electro Oy/Inc.
Manufactured by Polar Electro Oy, Professorintie 5, 90440 KEMPELE, Finland Tel +358 8 5202 100, Fax
+358 8 5202 300, www.polar.com.
Polar Electro Oy is a ISO 9001:2015 certified company.
© 2019 Polar Electro Oy, 90440 KEMPELE, Finland. All rights reserved. No part of this manual may be
used or reproduced in any form or by any means without prior written permission of Polar Electro Oy.
The names and logos in this user manual or in the packageof this product are trademarks of Polar
Electro Oy. The names and logos marked with a ® symbol in this user manual or in the package of this
product are registered trademarks of Polar Electro Oy. Windows is a registered trademark of Microsoft
Corporation and Mac OS is a registered trademark of Apple Inc. The Bluetooth® word mark and logos
areregistered trademarks owned by Bluetooth SIG, Inc. and any use of such marks by Polar Electro Oy is
under license.
REGULATORY INFORMATION
This product is compliant with Directives 2014/53/EU and 2011/65/EU. The relevant
Declaration of Conformity and other regulatory information for each product are
available at www.polar.com/en/regulatory_information.
85
Page 86
This crossed out wheeled bin marking shows that Polar products are electronic devices
and are in the scope of Directive 2012/19/EU of the European Parliament and of the
Council on waste electrical and electronic equipment (WEEE) and batteries and
accumulators used in products are in the scope of Directive 2006/66/EC of the
European Parliament and of the Council of 6 September 2006 on batteries and
accumulators and waste batteries and accumulators. These products and
batteries/accumulators inside Polar products should thus be disposed of separately in
EU countries. Polar encourages you to minimize possible effects of waste on the
environment and human health also outside the European Union by following local
waste disposal regulations and, where possible, utilize separate collection of electronic
devices for products, and battery and accumulator collection for batteries and
accumulators.
To see the M450-specific regulatory labels, go to Settings > General settings > About your product.
Regulatory markings printed on the device can be found on the back of the case, under the back
cover. For instructions on removing the back cover, see Changeable cover.
RF EXPOSURE INFORMATION
Polar M450 device was evaluated for body-worn operations with the separation distance of 1 cm (0.39
inches) between the user’s body and the device.
To comply with FCC and Industry Canada RF exposure requirements, a minimum separation distance of
1 cm (0.39 inches) must be maintained between the user's body and the device.
If positioned less than 10 mm from the body the SAR measurement of the device may exceed the FCC
and Industry Canada exposure guidelines for body-worn operations.
DISCLAIMER
• The material in this manual is for informational purposes only. The products it describes are subject
to change without prior notice, due to the manufacturer’s continuous development program.
• Polar Electro Inc./Polar Electro Oy makes no representations or warranties with respect to this
manual or with respect to the products described herein.
• Polar Electro Inc./Polar Electro Oy shall not be liable for any damages, losses, costs or expenses,
direct, indirect or incidental, consequential or special, arising out of, or related to the use of this
material or the products described herein.
1.3 EN 10/2019
86
 Loading...