

Page 1

Polar CS100
™
User Manual
Page 2

ENGLISH – 5
CONTENTS
The information relevant to using the product with the transmitter is in blue text.
1. INTRODUCTION TO THE POLAR CYCLING COMPUTER ........................................................................................................7
1.1 PRODUCT ELEMENTS ...............................................................................................................................................7
1.2 USING YOUR CYCLING COMPUTER FOR THE FIRST TIME ...........................................................................................8
1.3 INSTALLING THE BIKE MOUNT, CYCLING COMPUTER AND SPEED SENSOR ..............................................................12
1.3.1 Bike Mount and Cycling Computer..............................................................................................................12
1.3.2 Speed Sensor ..............................................................................................................................................13
1.4 WEARING YOUR TRANSMITTER ............................................................................................................................... 15
2. EXERCISING
....................................................................................................................................................................16
2.1 EXERCISE RECORDING AND HEART RATE MEASURING ...........................................................................................16
2.2 FUNCTIONS DURING EXERCISE ..............................................................................................................................18
2.3 STOPPING THE EXERCISE AND VIEWING SUMMARY FILE .........................................................................................22
3. VIEWING RECORDED INFORMATION - FILE .....................................................................................................................23
4. TOTAL VALUES ................................................................................................................................................................. 27
5. SETTINGS ........................................................................................................................................................................31
5.1 RIDING DISTANCE FOR ESTIMATED TIME OF ARRIVAL FUNCTION AND
AUTOMATIC LAP RECORDING SETTINGS (CYCLING SET) ..........................................................................................31
5.2 TIMER SETTINGS (TIMER SET) ................................................................................................................................33
5.3 HEART RATE LIMITS SETTINGS (LIMITS SET) ........................................................................................................... 34
5.3.1 OwnZone .....................................................................................................................................................36
5.4 BICYCLE SETTINGS (BIKE SET) ............................................................................................................................... 39
Page 3

6 – ENGLISH
5.5 WATCH SETTINGS (WATCH SET) ..............................................................................................................................43
5.6 PERSONAL INFORMATION SETTINGS (USER SET) ....................................................................................................45
5.7 CYCLING COMPUTER SOUNDS AND UNITS SETTINGS (GENERAL SET) .....................................................................48
6. EDIT YOUR CYCLING COMPUTER SETTINGS WITH A COMPUTER .....................................................................................49
7. CARE AND MAINTENANCE ................................................................................................................................................50
8. PRECAUTIONS ................................................................................................................................................................. 54
9. FREQUENTLY ASKED QUESTIONS .....................................................................................................................................56
10. TECHNICAL SPECIFICATIONS ..........................................................................................................................................58
11. LIMITED POLAR INTERNATIONAL GUARANTEE .................................................................................................................60
12. POLAR DISCLAIMER ........................................................................................................................................................61
13. INDEX ..............................................................................................................................................................................62
Page 4
ENGLISH – 7
1. INTRODUCTION TO THE POLAR CYCLING COMPUTER
1.1 PRODUCT ELEMENTS
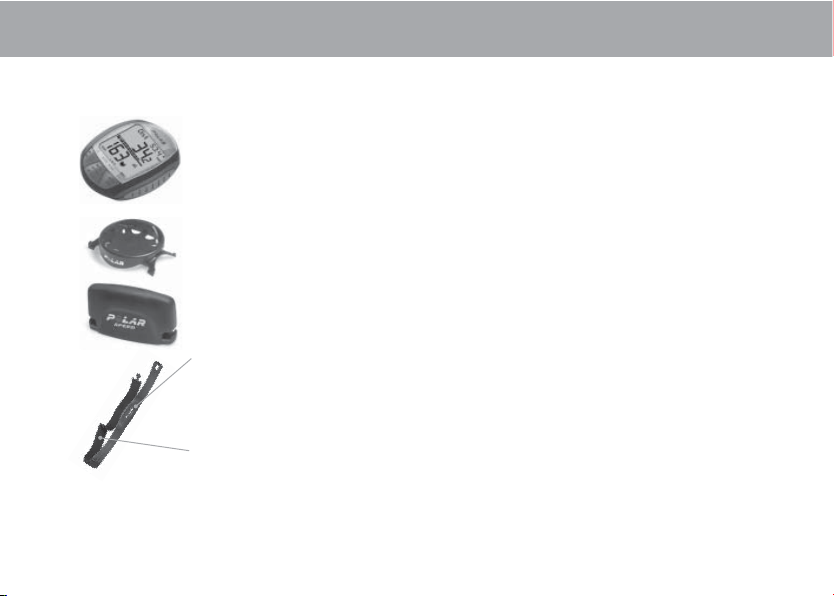
The Polar cycling computer package consists of the following parts:
Cycling Computer
The cycling computer displays and records
your cycling and exercise data during
exercise. Enter your personal settings into
the cycling computer and analyze exercise
information after workouts.
Polar Bike Mount™
Secure the bike mount to your bike and
attach the cycling computer to it.
Polar Speed Sensor™
A wireless speed sensor measures speed and
distance during cycling.
Polar Coded Transmitter
CS100 set includes a transmitter. The
transmitter sends your heart rate signal to
the cycling computer
. The electrode areas
on the back of the transmitter detect your
heart rate.
An elastic strap holds the transmitter
around your chest.
The information relevant to using the product
with the transmitter is in blue text.
Polar Web Services
www
.polarpersonaltrainer
.com is a complete web service tailored
to support your training goals. Free registration gives you access
to a personalized training program, training diary, useful articles,
and much more. In addition, you can get the latest product tips and
support online at www.polar.com.
The latest version of this user manual can be downloaded at
www.polar.com/support.
CS100b set does not include a transmitter, but you can buy it as an
accessory product.
Page 5
8 – ENGLISH
1.2 USING YOUR CYCLING COMPUTER FOR THE FIRST TIME
Enter your settings in the Basic Settings mode (time, date, units, and personal settings).
How to enter Basic Settings
Entering accurate personal information ensures that you receive correct feedback based on your performance
(calorie consumption, OwnZone determination etc).
Activate the cycling computer by pressing the MIDDLE button.
The display fi lls with numbers and letters.
1. Press the MIDDLE button. BASIC SET is displayed.
2. Continue by pressing the MIDDLE button and follow the steps below:
The display reads: Press the RIGHT button to set the fl ashing value Press the MIDDLE button to accept
the value
3. Time Set
•
Time Mode 24h / 12h
• AM / PM (for 12h format)
RIGHT
• Set 24h or 12h format.
RIGHT
• Set AM or PM.
MIDDLE
MIDDLE
Page 6

ENGLISH – 9
The display reads: Press the RIGHT button to set the fl ashing value Press the MIDDLE button to accept
the value
• Hours
• Minutes
4. Date
Set**
•
Day / Month
• Month / Day
• Year
RIGHT
• Set the hours.*
RIGHT
• Set the minutes.*
RIGHT
• Set the day (in 24h format) or
the month (in 12h format).*
RIGHT
• Set the month (in 24h format) or
the day (in 12h format).*
RIGHT
• Set the year.*
MIDDLE
MIDDLE
MIDDLE
MIDDLE
MIDDLE
Note:
• *The numbers scroll faster if you press and hold the RIGHT button as you adjust the value.
• **The date will be displayed according to the time format selected (24h: day - month - year / 12h: month - day - year).
• After a change of battery or after you reset the cycling computer, you only need to set the time and date in the Basic Settings. You can
skip the rest of the settings by pressing and holding the LEFT button.
Page 7

10 – ENGLISH
The display reads: Press the RIGHT button to set the fl ashing value Press the MIDDLE button to accept
the value
5. Unit
kg/cm or lb/ft
6.
Weight
kg/lb
7. Height
cm/ft
8. Birthday
• Day / Month
• Month / Day
• Year
RIGHT
• Set the units for weight and height:
kg/cm or lb/ft.
RIGHT
• Set your weight in kilograms or pounds.
Note: If you chose the wrong units, you can still
change them by pressing the LEFT button and
returning to step 5.
RIGHT
• Set your height in cm or ft.
• Set inches (if you chose lb/ft).
RIGHT
• Set the day (in 24h format) or
the month (in 12h format).
RIGHT
• Set the month (in 24h format) or
the day (in 12h format).
RIGHT
• Set the year.
MIDDLE
MIDDLE
MIDDLE
MIDDLE
MIDDLE
MIDDLE
MIDDLE
Page 8

ENGLISH – 11
The display reads: Press the RIGHT button to set the fl ashing value Press the MIDDLE button to accept
the value
9. Sex
Male / Female
RIGHT
•
Set male or female.
MIDDLE
• Settings done is displayed.
• To change your settings, press the LEFT button until you return to the desired setting.
• To accept the settings, press the MIDDLE button and the cycling computer goes to the Time mode.
The cycling computer goes to the power save mode (blank screen) by pressing the LEFT button or if you do not press any
button in the Time mode for fi ve minutes. You can turn the cycling computer on again by pressing any button.
Page 9

12 – ENGLISH
1.3 INSTALLING THE BIKE MOUNT, CYCLING COMPUTER AND SPEED SENSOR
1.3.1 BIKE MOUNT AND CYCLING COMPUTER
2.
1. You can install the bike mount and the cycling computer on the left or right side of the handlebar or on the stem with
cable ties.
3.
2. Place the rubber part on the
handlebar or stem and
insert the bike mount on top
of it.
3. Pass the cable ties over the
bike mount and adjust
them around the handlebar/
stem. Secure the bike mount
fi rmly. Cut off any excess
cable tie ends.
4. Position the cycling computer on to the bike mount. Turn
the cycling computer clockwise until you hear a click.
You can release the cycling computer by pressing it
down and simultaneously turning it counter clockwise.
Page 10
ENGLISH – 13
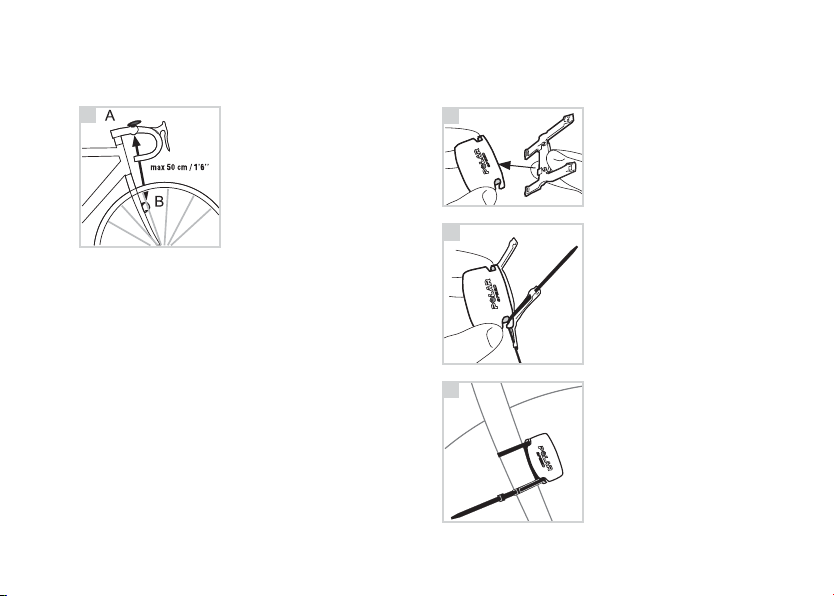
1.3.2 SPEED SENSOR
To install the speed sensor and spoke magnet, you need cutters and a small screwdriver.
1. Attach the speed sensor
to the opposite side of the
front fork from the mounted
cycling computer.
The speed sensor and the
cycling computer should be
no more than 30-40 cm/
1’-1’3’’ apart.
2. Attach the rubber part to the
sensor.
2.
In case, the cycling computer is attached to the stem or if
you are exercising in surroundings with electromagnetic
interference, the distance should be minimized (minimum
30 cm/1’). The speed sensor and cycling computer should
form approximately a 90° angle.
Should the distance between the cycling computer and the
speed sensor be longer than recommended (for example
on mountain bikes due to the front suspension), the speed
sensor could be attached on the same side of the front
fork as the cycling computer. In this case the maximum
distance is 50 cm/1´6”.
3.
4.
3. Pass the cable ties through
the speed sensor and rubber
part holes.
4. Adjust the sensor to the front
fork so that the POLAR logo
faces outwards. Adjust the
ties loosely. Do not tighten
them fully yet.
1.
Page 11

14 – ENGLISH
5. Attach the magnet to a spoke
at the same level as the
sensor. The magnet hole
must be facing the speed
sensor. Fasten the magnet
to the spoke and tighten it
loosely with a screwdriver.
Do not tighten it fully yet.
5.
max
4 mm /
0’16”
Fine-tune the positioning of both the magnet and the speed
sensor so that the magnet passes close to the sensor but
does not touch it. Adjust the sensor towards the wheel/
spokes as much as possible. The gap between the sensor
and the magnet should be under 4 mm/0’16’’. The gap is
correct when you can fi t a cable tie just about between the
magnet and the sensor.
Rotate the front tyre so that you can see a speed reading on
the display of your cycling computer. The reading indicates
that the magnet and the speed sensor are positioned
correctly. Once the magnet and the speed sensor are positioned correctly, tighten the screw to the magnet with a
screwdriver. Also tighten the cable ties securely and cut
off any excess cable tie ends.
Your safety is important to us. While riding your bike,
please keep your eyes on the road to prevent any accidents
and injury. Check that you can turn the handlebar normally
and that the cable wires for brakes or gearing do not catch
on the bike mount or the speed sensor. Check also that the
bike mount or speed sensor does not hamper pedaling or
the use of brakes or gearing.
Before you start cycling, you should set the wheel size of
your bicycle into the cycling computer. For further information
see pages 39-42.
Page 12
ENGLISH – 15
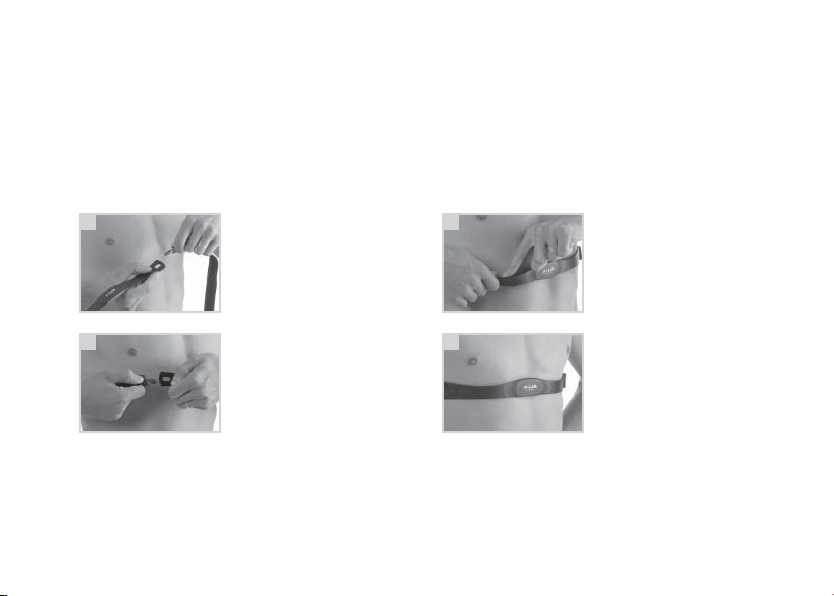
1.4 WEARING YOUR TRANSMITTER
Coded heart rate transmission reduces interference from other heart rate monitors that are close by. To make sure that the
code search is successful and to ensure trouble-free heart rate monitoring, keep the cycling computer within 1 meter/
3 feet of your transmitter. Check that you are not near other people with heart rate monitors or any source of electromagnetic
disturbance. For further information on interference, see Precautions on page 53.
To measure your heart rate, you need to wear the transmitter.
See detailed washing instructions in Care and Maintenance chapter.
1.
2.
3.
4.
1. Attach one end of the
transmitter to the elastic
strap.
2. Adjust the strap length to fi t
snugly and comfortably.
Secure the strap around your
chest, just below the chest
muscles, and buckle the
strap to the transmitter.
3. Lift the transmitter off your
chest and moisten the two
grooved electrode areas on
the back.
4. Check that the wet electrode
areas are fi rmly against your
skin and that the Polar logo
is in a central, upright
position.
See the following chapter for how to start measuring your
heart rate.
Page 13
16 – ENGLISH
2. EXERCISING
2.1 EXERCISE RECORDING AND HEART RATE MEASURING
You can record one Exercise File. There are two ways to start exercise recording. If you turn on the AutoStart function,
the cycling computer automatically starts and stops exercise recording when you start and stop cycling. If the AutoStart
function is off, you can start exercise recording by pressing the MIDDLE button. For further information on AutoStart and
how to set the function on/off, see pages 39-40.
Starting exercise without the transmitter:
1. Attach the bike mount and speed sensor on your bicycle
according to the instructions on pages 12-14.
2. Set your cycling computer on to the mounted bike mount.
3. Activate your blank cycling computer by pressing the MIDDLE
button. Before you start cycling, wait for 15 seconds until the
framed heart symbol
disappears from the Time mode
display. Now the computer is ready to record your exercise.
4. If you have turned AutoStart on, your speed appears on the
display when you start cycling. If you have turned AutoStart off,
you can start exercise recording by pressing the MIDDLE button
and your speed appears on the display. Your exercise time also
starts running.
5. If you have turned AutoStart on, the cycling computer
automatically stops exercise recording when you stop cycling.
If AutoStart is off, you can stop the exercise by pressing the
LEFT button twice. For further information on Stopping the
exercise, see page 22.
Starting exercise with the transmitter:
1.
W
ear the transmitter as described in the section “Wearing your
Transmitter” on page 15. Attach the bike mount and speed sensor
on your bicycle according to the instructions on pages 12-14.
2. Activate your blank cycling computer by pressing the MIDDLE
button and start from the Time mode. The cycling computer will
automatically read your heart rate. Wait until the computer
detects your heart rate and the framed, fl ashing heart symbol
appears on the display in 15 seconds.* Exercise time is not
recorded yet.
3. Set your cycling computer on to the mounted bike mount. If you
have turned AutoStart on, your heart rate value and speed
appear on the display when you start cycling. If you have turned
AutoStart off, you can start exercise recording by pressing the
MIDDLE button and your heart rate value and speed appear on
the display. Your exercise time also starts running.
4. If you have turned AutoStart on, the cycling computer
automatically stops exercise recording when you stop cycling.
If AutoStart is off, you can stop the exercise by pressing the
LEFT button twice. For further information on Stopping the
exercise, see page 22.
Page 14

ENGLISH – 17
• If your heart rate is not displayed and 00 appears on the display, the heart rate detection has stopped. Bring the cycling
computer near the Polar logo on the transmitter to restart the heart rate detection. No button press is needed.
• If OwnZone® is selected, the OwnZone determination procedure begins when exercise recording starts. For further
information, see the section OwnZone on page 36.
• To skip the OwnZone determination and use the previously determined OwnZone, press the MIDDLE button when OwnZone
symbol appears on the display. If you have not determined your OwnZone before, your age-based heart rate
limits will be used.
Note: * A frame around the heart rate symbol indicates a coded heart rate transmission.
• If the cycling computer does not display your heart rate, make sure that the transmitter electrodes are moist and that the strap is
snug enough.
Page 15
18 – ENGLISH
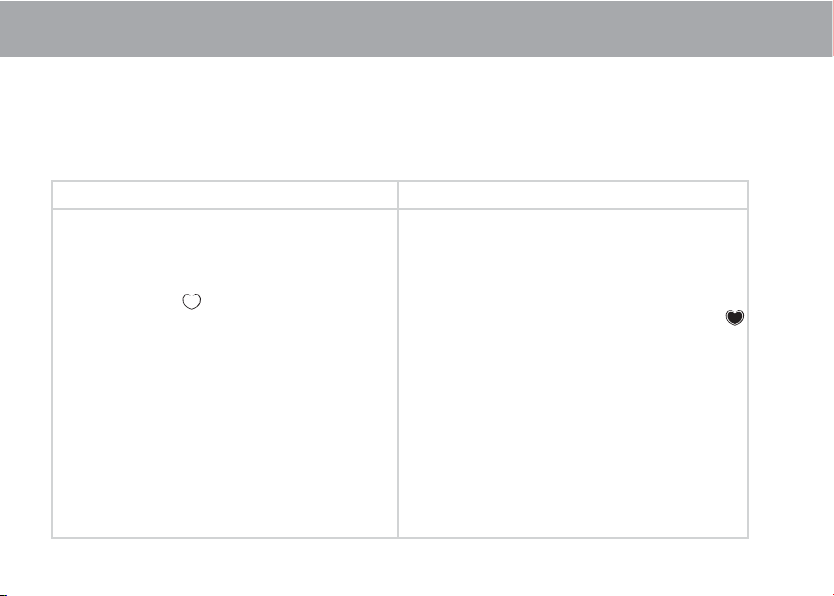
Speed and heart rate are also displayed graphically. The more bars are displayed, the higher
your heart rate or speed and vice versa. One speed bar represents 5 km/h or 3 mph, and when all ten bars are displayed your
speed is 50 km/h or 30 mph or higher.
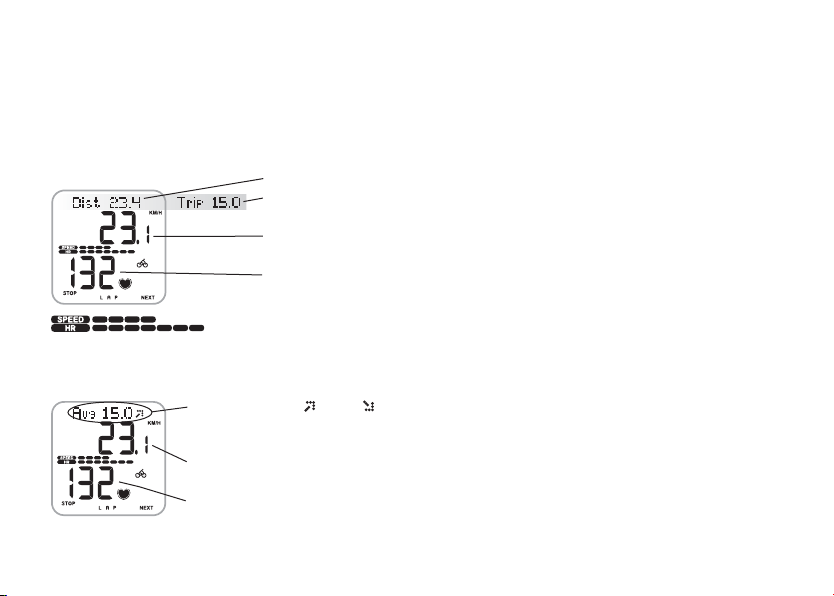
2.
Average speed rise
or drop
indicator.
Speed
Heart rate
Note: You can also press and hold the RIGHT button to set the computer
to browse the views automatically. Scrolling can be turned off by
pressing and holding the RIGHT button.
1. Ridden distance alternates with trip distance when you have taken at least one lap time.
Trip dist ance is reset to zero each time you take a lap time by pressing the MIDDLE button.
Riding speed (km/h or m/h)
Heart rate. If there is no heart rate reading or you have not set your user information,
the speed is displayed instead.
2.2 FUNCTIONS DURING EXERCISE
Note: Your exercise information is saved only if the stopwatch, i.e. your exercise duration, has been running for more than one minute or at
least one lap has been stored.
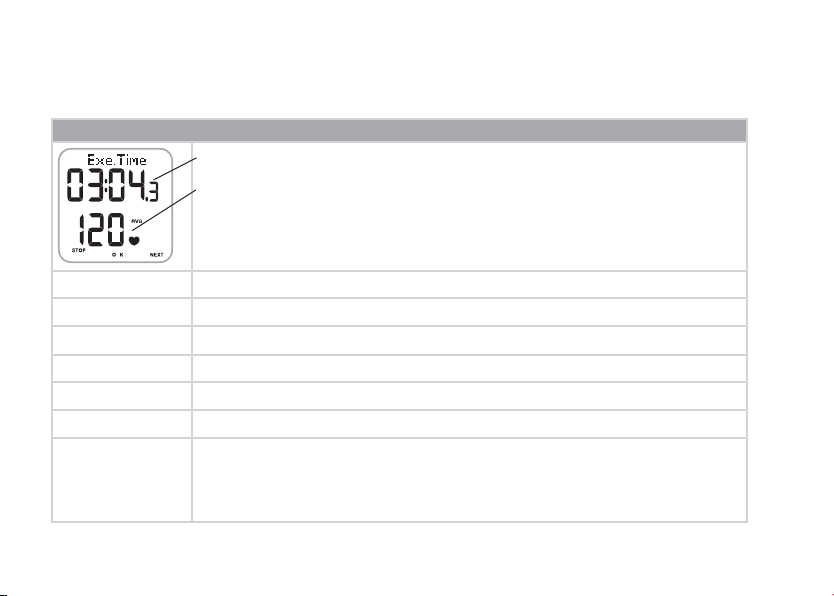
Changing the display information: Press the RIGHT button to view the following options during exercise:
Page 16
ENGLISH – 19
5.
4.
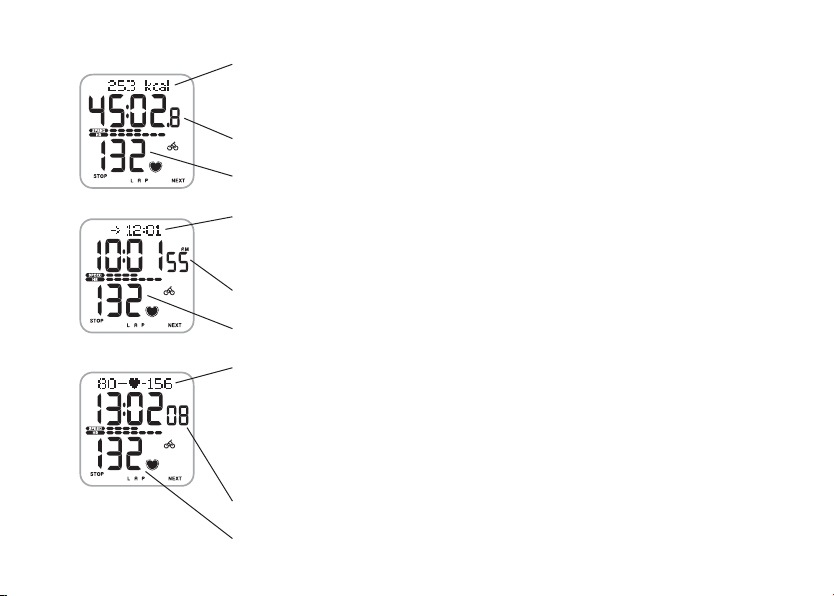
3. The kilocalories you have burned so far. The cumulation of kilocalories starts as your heart rate
is displayed. If there is no heart rate reading or you have not set your user information, the speed
is displayed instead of calorie information.
Stopwatch, i.e., exercise duration.
Heart rate
The estimated time of arrival, or if the riding distance function is off, the speed is displayed
instead. If you set the distance you are going to ride, the cycling computer estimates your arrival
time to the destination according to your riding speed. For further information, see page 31.
T
ime of day
Heart rate
Heart rate limits:
On the left, you can see your lower heart rate limit and on the right your
upper heart rate limit. The heart rate symbol moves left or right according to your heart rate.
If the heart symbol is not visible, it means your heart rate is either below the fl
ashing lower
heart rate limit or above the fl ashing upper heart rate limit. In this case an alarm goes on,
provided the sounds are turned on. If there is no heart rate reading, the limits are not displayed.
For further information, see page 34.
Time you have exercised in target zone, i.e., within the heart rate limits.
Heart rate
Page 17
20 – ENGLISH
Target Zone Alarm: With the Target Zone Alarm you can make sure you exercise at the right intensity. When the target zone
heart rate limits are activated, the cycling computer sounds an alarm if you are above or below your heart rate limits. You
can set the limits for your target zone in the Settings/Limits SET menu. For further information, see page 34.
If you are out of your target zone, the heart rate value starts fl ashing and the cycling computer beeps with each heartbeat.
The symbol in the upper right corner of the display
indicates that the Target Zone Alarm sound is activated. Note that
the button sounds can also be set on/off in the Settings mode. To turning the sounds on or off, see page 48.
Note: When heart rate limits are not activated, no Target Zone Alarm in the exercise recording will sound, nor will target zone information be
placed in the Summary File or File.
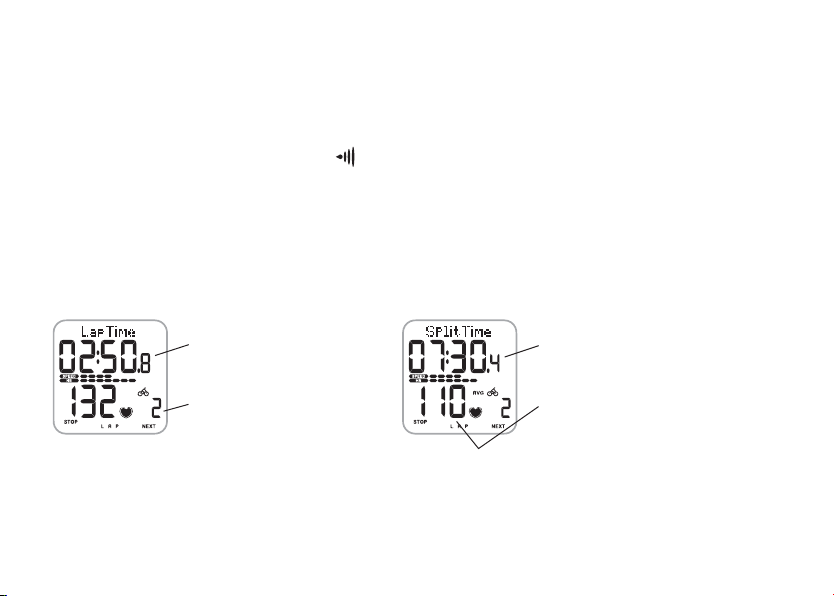
Storing Lap and Split Time: Press the MIDDLE button to store lap and split time.
Lap time indicates elapsed time for one lap. Split time is elapsed time from the beginning of the exercise until storing a lap
time (for example from the beginning of the exercise until the 4th lap was stored).
Lap time
Number of the lap
Split time
Average heart rate calculated
from the beginning of the lap.
Note:
• If you have activated the AutoLap function in the Settings mode, your cycling computer automatically records laps when you reach the
set distance, e.g., every kilometer or mile. For further information, see page 31.
• You can store up to 50 lap times. When the lap memory is full, LapTime FULL text will be displayed. You can take lap times during your
exercise, but they are no longer recorded.
Page 18

ENGLISH – 21
Timers: The timers of your cycling computer work during your exercise recording. The cycling computer beeps and shows
when the timer time matches. If only timer 1 is on, the same timer beeps always after the set time has elapsed during your
exercise. If timer 2 is also on, the timers alternate during your exercise. For further information, see page 33.
Pausing Exercise:
1. Press the LEFT button. Exercise recording, stopwatch, and other calculations are paused.
2. To continue, press the MIDDLE button.
Exercising in the dark: If you activate the backlight by pressing and holding the MIDDLE button during an exercise
recording, the backlight will reactivate automatically during the same exercise every time you press any button.
Note: If the maximum fi le recording time (99 hours 59 min 59 s) is exceeded, the cycling computer beeps, pauses recording and displays
HALT. Stop recording by pressing the LEFT button.
Page 19
22 – ENGLISH
Recorded Exercise File Information
Duration of recorded exercise.
Average heart rate.
Heart rate limits used during your exercise (if limits are set).
Time spent in target heart rate zone.
Kilocalories burnt during exercise.
A
verage speed.
Average cadence.*
Ridden distance.
T
ime used for cycling.
E.g., if you stop cycling but do not stop the exercise recording the cycled time counting will automatically stop,
but the exercised time will continue to elapse.
If the AutoStart function is activated, the exercise and cycled time is the same, because the cycling computer
automatically starts and stops the recording as you start and stop cycling.
Limits
In Zone
Kcal
AvgSpeed
Avg Cad.
Distance
RideTime
*Optional Polar Cadence Sensor required.
2.3 STOPPING THE EXERCISE AND VIEWING SUMMARY FILE
1. Press the LEFT button to pause the exercise recording. Paused is displayed.
2. Press the LEFT button. Summary FILE is displayed and the following information starts automatically scrolling:
Page 20
ENGLISH – 23
3. VIEWING RECORDED INFORMATION - FILE
The Exercise File allows you to review cycling and exercise information collected while recording
an exercise session. The cycling computer starts recording information in a File as soon as
you start recording by pressing the MIDDLE button or using AutoStart function. Your exercise
information is saved only if the stopwatch has been on for more than one minute or at least one
lap has been stored.
Viewing Exercise File
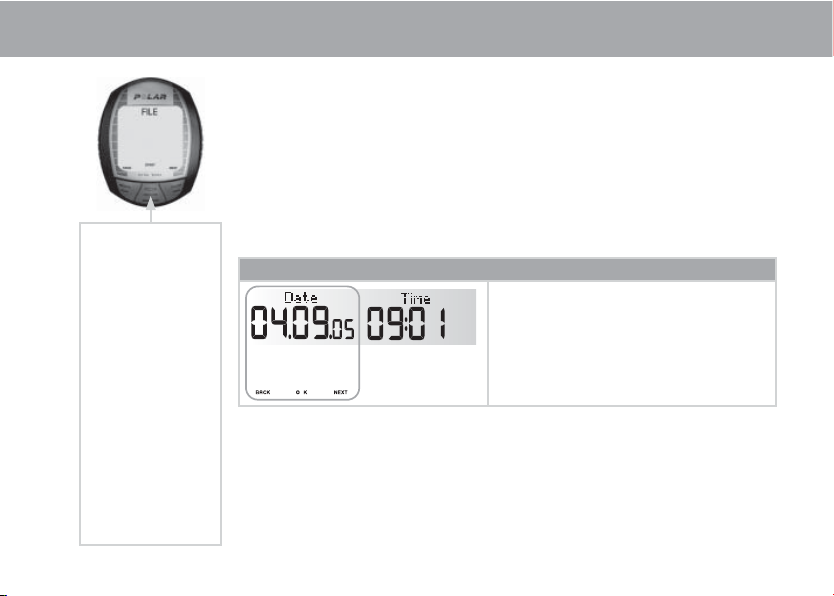
1. In the Time mode, press the RIGHT button. FILE is displayed.
2. Press the MIDDLE button. Date and Time alternate on the display.
Press MIDDLE
• Date/Time
Press RIGHT
• Exe.Time/Avg HR/Max HR
Press RIGHT
• Limits
Press RIGHT
• In/Above/Below Zone
Press RIGHT
• Kcal
Press RIGHT
• Distance
Press RIGHT
• Avg/MaxSpeed
Press RIGHT
• Avg/Max.Cad*
Press RIGHT
• RideTime
Press RIGHT
• Laps
Recorded Exercise File Information
The date and time when the exercise started alternate
on the display.
*Optional Polar Cadence Sensor required.
Page 21

24 – ENGLISH
Recorded Exercise File Information
Duration of recorded exercise.
The average heart rate and maximum heart rate alternate in heartbeats per minute (bpm).
Note: If you set heart rate limits in percentages of your maximum heart rate, these values are
displayed also as percentages of your maximum heart rate (%).
The heart rate limits (in bpm or %) used during the exercise (if limits are set).
The exercise time that you have spent within (In Zone), above and below your target zone
limits (if limits are set) alternate on the display
.
Expended kilocalories during the exercise.
Ridden distance.
A
verage and maximum speed.
Exe.Time
Avg HR / Max HR
Limits
In/Above/Below
Zone
Kcal
Distance
A
vgSpeed
Max
Note:
• The alternating information switches automatically on the display. For quick scrolling, press the MIDDLE button.
• Press and hold the MIDDLE button to turn the backlight on in the File mode.
3. Press the RIGHT button to browse through the recorded information.
Page 22
ENGLISH – 25
Recorded Exercise File Information
Average and maximum cadence.*
Time used for cycling.
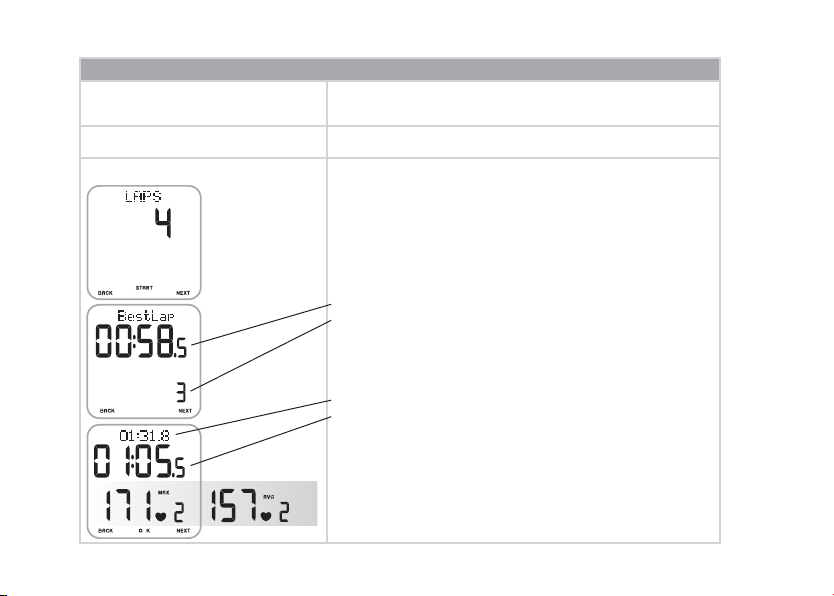
Number of laps while exercising.
Note:
Lap information is displayed if you have stored at least one lap during
your exercise.
4. To view the best lap, press the MIDDLE button.
The best lap information is displayed:
The fastest lap time.
The number of the best lap.
5. Browse the laps with the RIGHT button. By pressing the MIDDLE button
you can browse the following lap information:
Split time.
Lap time.
The maximum heart rate and the average heart rate during the lap alternate
on the display
.
Note:
The last lap is automatically recorded when the exercise has been
stopped by pressing the LEFT button, but it is never the best lap.
Avg Cad.
Max
RideTime
LAPS
*Optional Polar Cadence Sensor required.
Page 23
26 – ENGLISH
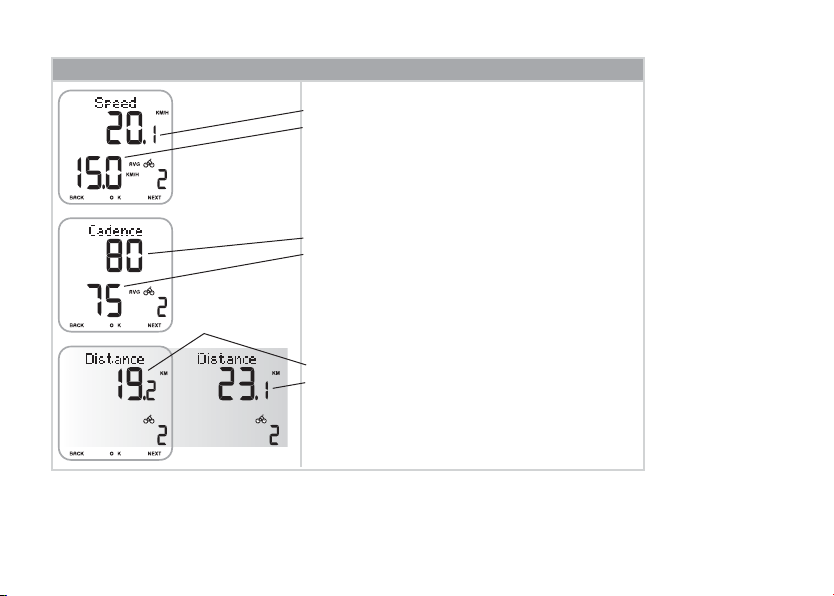
Recorded Exercise File Information
Speed
The speed when you recorded the lap.
Average speed during the lap.
Cadence*
The cadence when you recorded the lap.
A
verage cadence during the lap.
Distance
The Lap and
Split distances alternate on the display.
• To return to the Time mode, press and hold the LEFT button.
*Optional Polar Cadence Sensor required.
Page 24
ENGLISH – 27
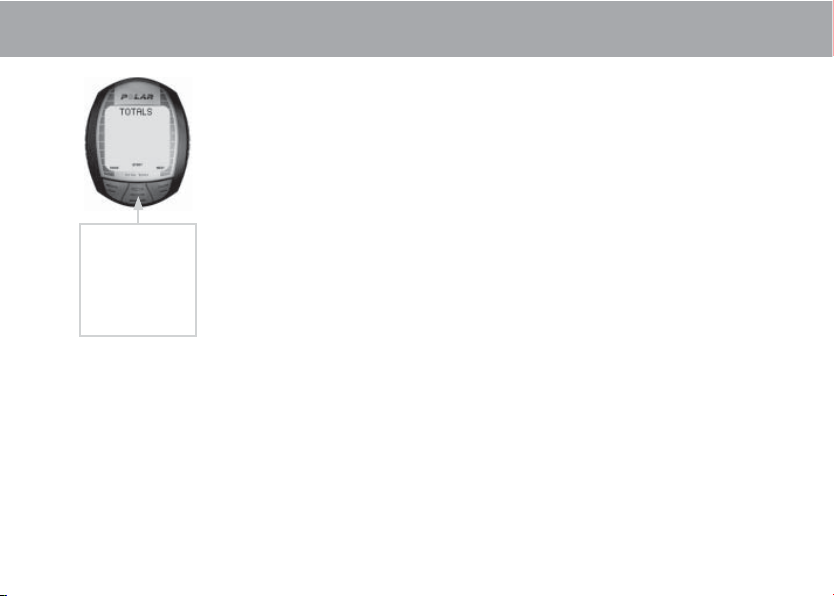
4. TOTAL VALUES
Total values include cumulative and maximum values of information recorded during your
training sessions. Use the Total values fi le as a daily and weekly counter of your training values.
The values are updated automatically, when exercise recording is stopped.
In addition to the daily and weekly values, you can view the seasonal cumulative and maximum
values. These values are collected until you reset them, which means that you can use this
function for example as a monthly counter of your training values. For further information on
how to reset the values, see page 30.
• Today’s TOTALS The cycling computer automatically resets the total values to zero at
midnight (00:00).
• ThisWeek TOTALS The cycling computer automatically resets the total values to zero
between Sunday and Monday at midnight (00:00).
• Season’s TOTALS Reset the total values to zero by yourself whenever you want.
Press MIDDLE
• Today’s TOTALS
Press RIGHT
• ThisWeek TOTALS
Press RIGHT
• Season’s TOTALS
Viewing the Total Values
1. In the Time mode, press the RIGHT button until TOTALS is displayed.
2. Press the MIDDLE button. Today’s TOTALS is displayed.
3. Select the time scale (Today’s, ThisWe ek or Seas on’s) you want to view with the RIGHT button.
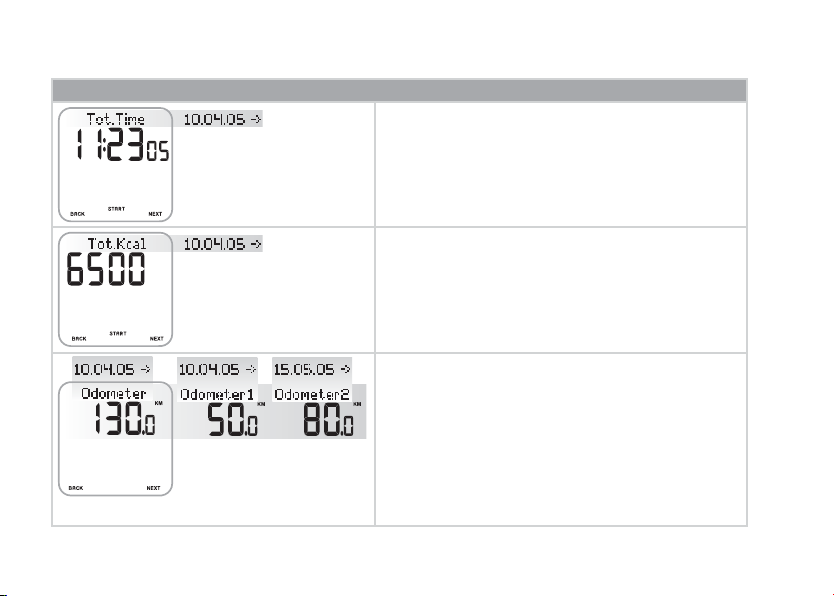
4. Press the MIDDLE button. Tot.Time and the total time are displayed.
5. If you choose Today’s TOTALS or ThisWeek TOTALS you can use the RIGHT button to browse through following information:
Tot.Time, Tot.Kcal, Distance1, Distance2*, MaxSpeed, Max.Cad** and RideTime.
*You need to do bike settings to see values for bike 1 and bike 2.
**Optional Polar Cadence Sensor required.
Page 25
28 – ENGLISH
Total Values
6. If you choose Season’s TOTALS you can use the RIGHT button to browse through following information:
The date when cumulation started.
Total cumulative exercise duration.
The date when cumulation started.
Total cumulative burned kilocalories.
The date when cumulation started.
Odometer alternates with the date when cumulation started and the
cumulation for both bike 1 and bike 2.
Note:
The odometer measures the cumulative ridden distance and it can
only be reset by using the UpLink. For further information, see page 49.
Page 26
ENGLISH – 29
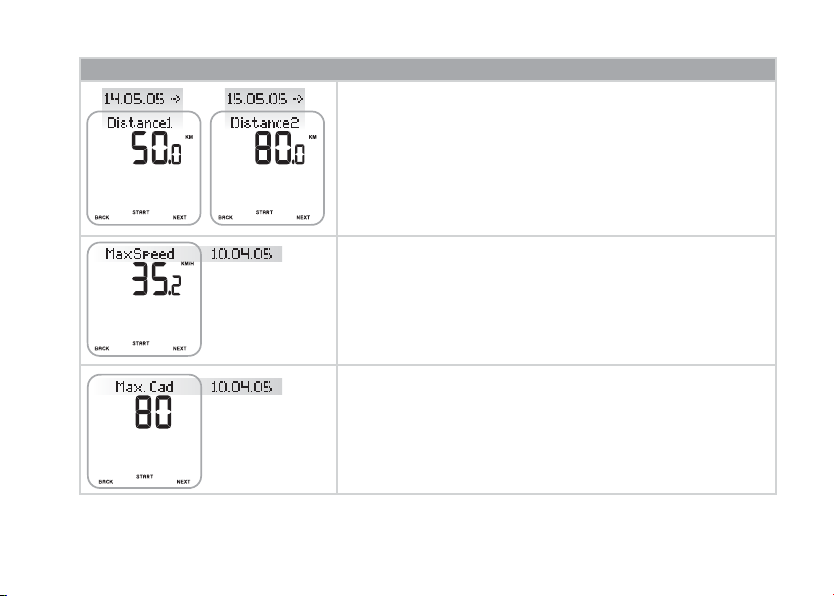
Total Values
The date when cumulation started.
The ridden distance cumulation for bike 1 and bike 2 (Distance1 is updated when
bike 1 is used and Distance2 is updated when bike 2 is used).
The date when updated.
Maximum speed of the season.
The date when updated.
Maximum cadence of the season.*
*Optional Polar Cadence Sensor required.
Page 27
30 – ENGLISH
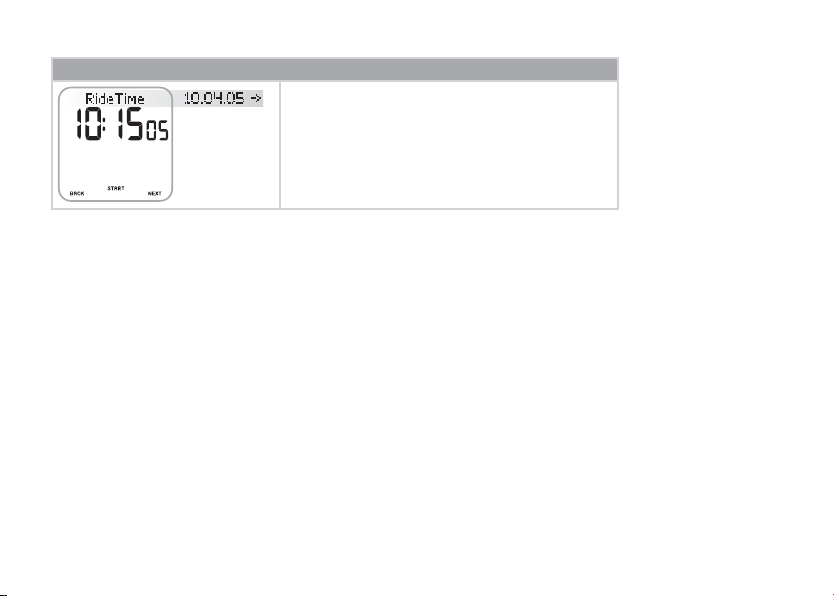
Total Values
The date when cumulation started.
Total cumulative ridden duration.
• To return to the Time mode, press and hold the LEFT button.
Resetting Season’s TOTALS or Returning the Previous Maximum Speed or Cadence* Value
Use Total values as a seasonal (or daily/weekly) counter of your exercise values by resetting them once a season. Instead of
resetting, you can return the previous maximum speed and cadence* value. Once reset or returned, a value cannot be retrieved.
Start with any display in the previous table (Tot.Time, Tot.Kcal, Distance1/2, MaxSpeed, Max.Cad*, RideTime).
1. Press the MIDDLE button to start resetting the desired value. Reset? is displayed. In MaxSpeed and Max.Cad* displays
you can continue by pressing the RIGHT button to return the previous value. Select Return Old using the MIDDLE button.
2. Press the MIDDLE button. Are You Sure is displayed.
3. If sure, press the MIDDLE button.
Alternatively, to cancel the reset, press the LEFT button.
• To return to the Time mode, press and hold the LEFT button.
Note: The odometer can be reset only by using the UpLink. For further information, see page 49.
*Optional Polar Cadence Sensor required.
Page 28
ENGLISH – 31
5. SETTINGS
You can view or change the settings in the Settings menu.
Tip: Settings can also be confi gured using the Polar UpLink Tool™. They can then be transferred to your
cycling computer from your PC. For further information, see page 49.
To set values:
• Adjust or select a value with the RIGHT button.
• Accept your selection and proceed in the menu with the MIDDLE button.
• Cancel your selection or return to the previous mode or menu by pressing the LEFT button.
5.1 RIDING DISTANCE FOR ESTIMATED TIME OF ARRIVAL FUNCTION AND
AUTOMATIC LAP RECORDING SETTINGS (CYCLING SET)
In the cycling settings you can make two different settings:
• RideDist: Setting riding distance.
Set the distance you are going to ride and the cycling computer will estimate your arrival
time to the destination according to your riding speed.
• AutoLap: Automatic lap recording.
Set the distance for the automatic lap and the cycling computer will record the lap
information every time you reach this distance. For example, if you set 1 km/m, the cycling
computer will record lap information every kilometer or mile.
Press MIDDLE
• Cycling SET
Press RIGHT
• Timer SET
Press RIGHT
• Limits SET
Press RIGHT
• Bike SET
Press RIGHT
• Watch SET
Press RIGHT
• User SET
Press RIGHT
• General SET
Page 29

32 – ENGLISH
Both functions work during your exercise recording. For further information, see pages 18-20.
1. In the Time mode, press the RIGHT button until SETTINGS is displayed.
2. Press the MIDDLE button. Cycling SET is displayed.
3. Continue by pressing the MIDDLE button and follow the steps below:
The display reads: Press the RIGHT button to set the fl ashing value Press the MIDDLE button to accept
the value
4. RideDist
On / OFF
5. RideDist
On
6. AutoLap
On / OFF
7. AutoLap
On
RIGHT
•
T
urn the riding distance function on or off.
RIGHT
• Adjust the kilometers or miles.
RIGHT
• Turn the automatic lap recording function on
or off.
RIGHT
• Adjust the kilometers or miles.
MIDDLE
(Skip step 5, if you turned the function off)
MIDDLE
MIDDLE
(Skip step 7, if you turned the function off)
MIDDLE
• To return to the Time mode, press and hold the LEFT button.
Page 30

ENGLISH – 33
5.2 TIMER SETTINGS (TIMER SET)
You r c ycl ing co mpu ter is eq uip ped wi th two al ter nat ing ti mer s. The ti mer s w ork du rin g y our ex erc ise re cor din g.
Tip: Use the timers for example as a reminder to drink at certain intervals or as a training tool in interval training, so that you know when
to switch from a harder to a lighter period and vice versa.
1. In the Time mode, press the RIGHT button until SETTINGS is displayed.
2. Press the MIDDLE button. Cycling SET is displayed.
3. Press the RIGHT button. Timer SET is displayed.
4. Continue by pressing the MIDDLE button and follow the steps below:
The display reads: Press the RIGHT button to set the fl ashing value Press the MIDDLE button to accept
the value
5. Timer 1
On / OFF
6. T
imer 1
On
RIGHT
• Turn the Timer on or off.
RIGHT
• Adjust the minutes (0-99 minutes).
RIGHT
• Adjust the seconds (0-59 seconds).
MIDDLE
(Skip step 6, if you turned the function off)
MIDDLE
MIDDLE
• To set timer 2, repeat steps 5 and 6.
• To return to the Time mode, press and hold the LEFT button.
Page 31

34 – ENGLISH
5.3 HEART RATE LIMITS SETTINGS (LIMITS SET)
In the heart rate limits settings (Limits SET) you can choose the heart rate limit type:
• Manual Limits: You can create a target heart rate zone by setting the upper and the lower heart rate limits manually.
• OwnZone: The cycling computer is able to determine your individual aerobic (cadiovascular) exercise heart rate
zone automatically. This is called OwnZone (OZ). OwnZone ensures that you exercise within safe
limits. For further information, see page 36.
• Limits Off: You can also deactivate target zone limits, when there are no target heart rate limits during the
exercise recording, and no target heart rate zone values (In Zone) are calculated in the summary File
or File.
Use OwnZone or the target heart rate zone to maintain a particular level of intensity, depending on your objectives.
1. In the Time mode, press the RIGHT button until SETTINGS is displayed.
2. Press the MIDDLE button. Cycling SET is displayed.
3. Press the RIGHT button until Limits SET is displayed.
Page 32

ENGLISH – 35
The display reads: Press the RIGHT button to set the fl ashing value Press the MIDDLE button to accept
the value
5. TYPE
Manual / OwnZone / Off
6. HR / HR%
SET
7. HighLimit
8. LowLimit
RIGHT
• Select Manual or OwnZone (automatic defi nition
of your personal heart rate zone) or Off.
RIGHT
• Select heart rate displayed as beats per minute
(bpm) or as % of your maximum heart rate
(% HR
max
).
RIGHT
• Adjust the upper heart rate limit.
RIGHT
• Adjust the lower heart rate limit.
MIDDLE
(Skip steps 6-8, if you turned the function off)
MIDDLE
(Skip steps 7-8, if you chose OwnZone)
MIDDLE
MIDDLE
4. Continue by pressing the MIDDLE button and follow the steps below:
• To return to the Time mode, press and hold the LEFT button.
Page 33

36 – ENGLISH
5.3.1 OWNZONE
The Polar cycling computer is able to determine your individual aerobic (cardiovascular) exercise heart rate zone
automatically. This is called OwnZone (OZ).
OwnZone is based on measuring changes in heart rate variability during your warm up. Heart rate variability refl ects
changes in your physiology. For most adults OwnZone corresponds to 65-85 % of maximum heart rate. OwnZone can be
determined in 1-5 minutes during a warm-up period by cycling, walking or jogging. OwnZone may be easier to fi nd during
indoor cycling than outdoor cycling because the speed is easier to control. The main idea is that you start exercising slowly
at a light intensity, i.e., heart rate lower than 100 bpm/50 % HR
max
. You then gradually increase the intensity of your
exercise to raise your heart rate as smoothly as possible. Using OwnZone makes exercise easier and more enjoyable.
OwnZone has been developed for healthy people. Some health conditions may cause heart rate variability based OwnZone
determination to fail, for example high blood pressure, some cardiac arrhythmias, and some medications.
Page 34

ENGLISH – 37
Determining Your OwnZone Heart Rate Limits
Before you start to determine your OwnZone, make sure of the following:
• You have entered your user settings correctly. The cycling computer will ask for missing information (for example date of
birth) before accepting limit settings.
• You have activated the OwnZone limits. With the OwnZone function on, the cycling computer will automatically determine
your OwnZone every time you start recording an exercise session.
You should redefi ne your OwnZone:
• when changing your exercise environment or exercise mode;
• if you are returning to exercise after a more than one week off;
• if you feel unusual about the physical state of your body when starting to exercise. For example you are stressed, not
recovered from the previous training or not feeling well;
• after changing your settings.
1. Start from the Time mode and press the MIDDLE button. The OwnZone symbol
appears on the display. If you
want to skip OwnZone determination and use the previously determined OwnZone, press the MIDDLE button.
2. OwnZone determination starts. Determination of your OwnZone happens in fi ve stages.
Cycle or walk at a slow pace for 1 min. Keep your heart rate below 100 bpm/ 50 % HR
max
during this fi rst
stage. After each stage you will hear a beep (if the sound settings are on) and the display automatically
illuminates (if you have switched the backlight on once before), indicating the end of the stage.
Cycle or walk at a normal pace for 1 min. Slowly increase your heart rate by 10-20 bpm/ 5 % HR
max
.
Cycle or walk at a brisk pace for 1 min. Slowly increase your heart rate by 10-20 bpm/ 5 % HR
max
.
Cycle at a brisk pace or jog at a slow pace for 1 min. Slowly increase your heart rate by 10-20 bpm/ 5 % HR
max
.
Cycle or jog at a brisk pace or run for 1 min.
Page 35

38 – ENGLISH
3. At some point during the stages, you hear two beeps. Your OwnZone has been determined. If the determination was
successful, OwnZone and Updated alternate with the heart rate limits on the display. The limits are displayed as beats
per minute (bpm) or as a percentage of your maximum heart rate (%HR
max
) depending on your settings.
4. If the determination was not successful, your previously determined OwnZone limits will be used and OwnZone appears
with the limits on the display. If you are determining your OwnZone for the fi rst time, then the limits based on your age
will be used.
You can now continue with your exercise. Try to stay within the given heart rate zone to maximize exercise benefi ts.
For further information on OwnZone, see www.polar.com.
Page 36

ENGLISH – 39
5.4 BICYCLE SETTINGS (BIKE SET)
You can set two bike preferences for the cycling computer. Prepare the settings for both bikes; when you start exercise
recording, just select bike 1 or 2. For both bikes you can prepare the following settings:
• AutoStart on/off The AutoStart function starts or stops automatically the exercise recording when you start or
stop cycling.
• Cadence on/off A wireless cadence sensor measures the speed at which you turn the pedals of your bicycle.
An optional Polar Cadence sensor is required.
• Wheel Wheel size settings are a prerequisite for cycling information. For further information, see the
following page.
1. In the Time mode, press the RIGHT button until SETTINGS is displayed.
2. Press the MIDDLE button. Cycling SET is displayed.
3. Press the RIGHT button until Bike SET is displayed.
Page 37

40 – ENGLISH
The display reads: Press the RIGHT button to set the fl ashing value Press the MIDDLE button to accept
the value
5. Bike 1 / 2
6. AutoStart
On / OFF
7. Cadence*
On / OFF
8. Wheel
RIGHT
• Select which bike settings you want to set:
bike 1 or 2.
RIGHT
• Turn AutoStart function on or off.
RIGHT
• Turn cadence function on or off.
RIGHT
• Adjust the wheel size (mm) of your bicycle.
MIDDLE
MIDDLE
MIDDLE
MIDDLE
4. Continue by pressing the MIDDLE button and follow the steps below:
• To return to the Time mode, press and hold the LEFT button.
Note:
• The wheel size is always indicated in millimeters, as it is more accurate.
• The speed and distance measuring functions are always on.
*Optional Polar Cadence Sensor required.
Page 38

ENGLISH – 41
You have the following alternatives for fi nding out the wheel size of your bike:*
METHOD 1.
Look at the wheel of your bike and fi nd the wheel diameter printed on it.
On the chart below, fi nd your wheel diameter in inches or in ETRTO reading and match it to the wheel size in millimeters on
the right.
Note: *Wheel sizes on the above chart are advisory as wheel size depends on the wheel type and air pressure.
25-559 26 x 1.0 1884
23-571 650 x 23C 1909
35-559 26 x 1.50 1947
37-622 700 x 35C 1958
47-559 26 x 1.95 2022
20-622 700 x 20C 2051
52-559 26 x 2.0 2054
23-622 700 x 23C 2070
25-622 700 x 25C 2080
28-622 700 x 28 2101
32-622 700 x 32C 2126
42-622 700 x 40C 2189
47-622 700 x 47C 2220
ETRTO Wheel size diameter (inches) Wheel size setting (mm)
Page 39

42 – ENGLISH
METHOD 2.
Mark the tread of the front tire with a line and roll the tire perpendicular to the ground. You can also use the valve as a
mark. Mark a line on the ground. Move your bike on a fl at surface straight ahead for one complete wheel rotation. Check that
the tire is perpendicular to the ground. Draw another line on the ground exactly where the mark on the front tire touches the
ground.
mm
-4 mm
mm
Measure the distance between the two lines on the ground.
Subtract 4 mm to account for your weight on the bike to get your wheel circumference.
This is the value you must set on the cycling computer.
Page 40

ENGLISH – 43
5.5 WATCH SETTINGS (WATCH SET)
In the Watch SET menu, you can change the time of day and date settings.
1. In the Time mode, press the RIGHT button until SETTINGS is displayed.
2. Press the MIDDLE button. Cycling SET is displayed.
3. Press the RIGHT button until Watch SET is displayed.
4. Continue by pressing the MIDDLE button and follow the steps below:
The display reads: Press the RIGHT button to set the fl ashing value Press the MIDDLE button to accept
the value
5. Time
• T
ime Mode 24h/12h
• AM / PM
(if you use 12h format)
RIGHT
• Set 24h or 12h time mode.
RIGHT
• Set AM or PM.
RIGHT
• Set the hours.
RIGHT
• Set the minutes.
MIDDLE
MIDDLE
MIDDLE
MIDDLE
Page 41

44 – ENGLISH
The display reads: Press the RIGHT button to set the fl ashing value Press the MIDDLE button to accept
the value
6. Date*
• Day / Month
• Month / Day
• Year
RIGHT
•
Set the day (in 24h mode) or
the month (in 12h mode).
RIGHT
• Set the month (in 24h mode) or
the day (in 12h mode).
RIGHT
• Set the year.
MIDDLE
MIDDLE
MIDDLE
• To return to the Time mode, press and hold the LEFT button.
Note: *The order in which you set date settings depends on which time mode you have chosen (24h: day - month - year /
12h: month - day - year).
Page 42

ENGLISH – 45
5.6 PERSONAL INFORMATION SETTINGS (USER SET)
Entering your personal information ensures that your calorie counter operates with the highest possible degree of accuracy.
1. In the Time mode, press the RIGHT button until SETTINGS is displayed.
2. Press the MIDDLE button. Cycling SET is displayed.
3. Press the RIGHT button until User SET is displayed.
4. Continue by pressing the MIDDLE button and follow the steps below:
The display reads: Press the RIGHT button to set the fl ashing value Press the MIDDLE button to accept
the value
5. Weight
kg/lb
6. Height
cm/ft
RIGHT
•
Set your weight in kilograms or pounds.
RIGHT
•
Set your height in cm or ft.
• Set inches (if you chose lb/ft).
MIDDLE
MIDDLE
MIDDLE
Page 43

46 – ENGLISH
The display reads: Press the RIGHT button to set the fl ashing value Press the MIDDLE button to accept
the value
7. Birthday
• Day / Month
• Month / Day
• Y
ear
8.
HR Max
9. HR Sit
10. Sex
• Male / Female
RIGHT
• Set the day (in 24 h mode) or
the month (in 12 h mode).
RIGHT
• Set the month (in 24h mode) or
the day (in 12h mode).
RIGHT
• Set the year.
RIGHT
• Adjust HR
max
, if you know your laboratory
measured current maximum heart rate
value. Your age-predicted maximum heart rate
value (220-age) is displayed as a default
setting when you set this value for the fi rst
time.
RIGHT
• Adjust your heart rate value in a sitting
position (see the instructions on the next page).
RIGHT
• Set male or female.
MIDDLE
MIDDLE
MIDDLE
MIDDLE
MIDDLE
MIDDLE
• To return to the Time mode, press and hold the LEFT button.
Page 44

ENGLISH – 47
Maximum heart rate value (HR
max
)
HR
max
is used to estimate energy expenditure. HR
max
is the highest number of heartbeats per minute during maximum
physical exertion. HR
max
is also useful when determining exercise intensity. The most accurate method for determining your
individual HR
max
is to perform a maximal exercise stress test in a laboratory.
Heart rate value in a sitting position (HR
sit
)
HR
sit
is used to estimate energy expenditure. HR
sit
should be your typical heart rate when you are not doing any physical
activity (while sitting). To determine your HR
sit
easily, wear your transmitter, hold your cycling computer in your hand, sit
down and do not engage in any physical activity. After two or three minutes, press the MIDDLE button in the Time mode to
view your heart rate. This is your HR
sit
.
To calculate your HR
sit
more precisely, repeat the procedure several times and calculate your average.
Page 45

48 – ENGLISH
5.7 CYCLING COMPUTER SOUNDS AND UNITS SETTINGS (GENERAL SET)
You can view and change the following settings in the General SET:
• Sounds Activity sounds for the cycling computer on or off .
• KeySound Button sounds for the cycling computer on or off.
• Units The Unit settings affect the personal information and watch settings.
1. In the Time mode, press the RIGHT button until SETTINGS is displayed.
2. Press the MIDDLE button. Cycling SET is displayed.
3. Press the RIGHT button until General SET is displayed.
4. Continue by pressing the MIDDLE button and follow the steps below:
The display reads: Press the RIGHT button to set the fl ashing value Press the MIDDLE button to accept
the value
5. Sound
On / OFF
6. KeySound
On / OFF
7.
kg/cm or lb/ft
Unit
RIGHT
• Turn activity sounds on or off.
RIGHT
• Turn button sounds on or off.
RIGHT
• Select kg/cm or lb/ft units.
MIDDLE
MIDDLE
MIDDLE
• To return to the Time mode, press and hold the LEFT button.
Page 46

ENGLISH – 49
6. EDIT YOUR CYCLING COMPUTER SETTINGS WITH A COMPUTER
The Polar cycling computer offers you the option of editing your cycling computer settings with the Polar UpLink Tool and
your computer. You can also personalize the display of your cycling computer by downloading logos. For this you need the
Polar UpLink Tool.
You can download the Polar UpLink Tool at www.polar.com or www.polarpersonaltrainer.com. In order to be able to use the
Polar UpLink Tool, you need a computer with a sound card and dynamic loudspeakers or headphones. For further information
on system requirements, see the chapter Technical Specifi cations. See www.polar.com or www.polarpersonaltrainer.com for
further instructions.
Page 47

50 – ENGLISH
7. CARE AND MAINTENANCE
Caring for Your Product
Like any electronic device, your Polar cycling computer
should be treated with care. The suggestions below will
help you to fulfi ll guarantee obligations and enjoy this
product for many years to come.
Wash the transmitter regularly after use with a mild soap
and water solution and a soft brush if needed. Do not dry
the transmitter with anything other than a soft towel.
Mishandling may damage the electrodes. Do not bend or
stretch the transmitter
. This may damage the electrodes.
Keep your cycling computer
, transmitter and sensors
in a cool and dry place. Do not keep them in a damp
environment, in non-breathable material (a plastic bag or
a sports bag) nor with conductive material (a wet towel).
The cycling computer,
transmitter and sensors are water
resistant, and can be used in rainy weather. To maintain
the water resistance, do not wash the cycling computer
or the sensors with a pressure washer or sink them under
water. Do not expose to direct sunlight for extended periods
such as by leaving it in a car or mounted on the bike
mount.
Keep your cycling computer clean. Clean the cycling
computer and sensors with a mild soap and water solution
and rinse them with clean water. Do not immerse them
in water. Dry them carefully with a soft towel. Never use
alcohol or any abrasive material such as steel wool or
cleaning chemicals.
Avoid hard hits to the cycling computer and speed sensor,
as these may damage the sensor units.
Page 48

ENGLISH – 51
Service
During the two-year guarantee/warranty period we
recommend that you have service done by an authorized
Polar Service Center only. The warranty does not cover
damage or consequential damage caused by service not
authorized by Polar Electro.
For contact information and all Polar Service Center
addresses, visit www.polar.com/support and country
specifi c websites.
Register your Polar product at http://register.polar.fi / to
ensure we can keep improving our products and services to
better meet your needs.
Note: The username for your Polar Account is always your email
address. The same username and password are valid for Polar
product registration, polarpersonaltrainer.com, Polar discussion
forum and Newsletter registration.
Transmitter and Speed Sensor Battery
Contact your authorized Polar Service Center for a replacement transmitter or speed sensor.
Cycling Computer Battery
The CS100 cycling computer has a user changeable
battery. To change the battery yourself, please follow the
instructions carefully.
Note: In order to ensure the maximum lifespan of the battery
cover, open it only when you need to change the battery.
• The low battery indicator and LowBatt. is displayed when
10-15% of the cycling computer battery capacity is left and
the battery should be replaced. The backlight and cycling
computer sounds are automatically deactivated when is
displayed.
• Excessive use of the backlight drains the cycling computer’s
battery more rapidly.
• In cold conditions the low battery indicator may appear,
but the indicator disappears when you return to warmer
temperature.
Change Batteries Yourself
When changing the battery, make sure the sealing ring is
not damaged, in which case you should replace it with a
new one. You can purchase the sealing ring/battery kits at
well-equipped Polar retailers and authorized Polar Services.
Page 49

52 – ENGLISH
1. Using a coin that sits tight into
the back cover groove, open
the battery cover by pressing
slightly and unscrewing
counter clockwise.
2. Remove the battery cover.
The battery is attached to
the cover, which should be
carefully lifted with a suitable
sized small rigid stick or
bar, such as a toothpick. A
non-metal tool is preferable.
Remove the battery and
In the USA and Canada, the additional sealing rings are
available at authorized Polar Service Centers. In the USA
the sealing ring/battery kits are also available at www.
shoppolar.com.
Keep the batteries away from children. If swallowed,
contact a doctor immediately.
Batteries should be properly disposed of according to local
regulations.
When handling a new, fully charged battery, avoid clasplike contact, i.e. simultaneous from both sides, with metal
or electrically conducting tools, like tweezers. This may
short-circuit the battery causing it to discharge more
rapidly. Typically, short circuiting does not damage the
battery, but it may decrease the capacity and lifetime of
the battery.
Danger of explosion if the battery is replaced with wrong
type.
Changing Cycling Computer Battery
replace with a new one. Be careful not to damage the
threads of the back cover.
3. Place the negative (-) side of the battery against the
cycling computer and the positive (+) side against the
cover.
1.
2.
Page 50

ENGLISH – 53
4. The sealing ring of the battery cover is also attached to
the cover. Only replace the sealing ring if it is damaged.
Before closing the battery cover, make sure that the
cover’s sealing ring is undamaged and it is placed
correctly in its groove.
5. Put the battery cover in its place and close it by screwing
the cover clockwise with a coin. Make sure that the cover
is closed properly!
Note: After a battery change re-enter time and date settings in
the Basic Settings. For further information, see page 8.
Page 51

54 – ENGLISH
8. PRECAUTIONS
The Polar cycling computer shows your performance
indicators. It indicates the level of physiological strain and
intensity during your training session. It also measures
speed and distance when cycling with a Polar speed sensor.
No other use is intended or implied.
Electromagnetic Interference
Disturbances may occur near high voltage power lines,
traffi c lights, overhead lines of electric railways, electric
bus lines or trams, televisions, car motors, bike computers,
some motor driven exercise equipment, cellular phones, or
when you walk through electric security gates.
Minimizing Risks When Training
Training may include some risk. Before beginning a regular
training program, answer the following questions concerning your health status. If you answer yes to any of these
questions, consult a physician before starting any training
program.
• Have you been physically inactive for the past fi ve years?
• Do you have high blood pressure or high blood cholesterol?
• Do you have symptoms of any disease?
• Are you taking any blood pressure or heart medication?
• Do you have a history of breathing problems?
• Are you recovering from a serious illness or medical
treatment?
• Do you use a pacemaker or another implanted electronic
device?
• Do you smoke?
• Are you pregnant?
In addition to exercise intensity, medications for heart conditions, blood pressure, psychological conditions, asthma,
breathing, etc., as well as some energy drinks, alcohol,
nicotine and drugs may also affect heart rate.
It is important to be sensitive to your body’s responses
during exercise. If you feel unexpected pain or excessive
fatigue when exercising, it is recommended that you stop
the exercise or continue at a lighter intensity.
Note! If you are using a pacemaker, you can use Polar
training computers. In theory interference to pacemaker
caused by Polar products should not be possible. In
practice no reports exist to suggest anyone ever having
Page 52

ENGLISH – 55
experienced interference. We cannot however issue an
offi cial guarantee on our products’ suitability with all
pacemakers or other implanted devices due to the variety
of devices available. If you have any doubts, or if you
experience any unusual sensations while using Polar
products, please consult your physician or contact the
implanted electronic device manufacturer to determine
safety in your case.
If you are allergic to any substance that comes into
contact with your skin or if you suspect an allergic
reaction due to using the product, check the listed
materials on page 58. To avoid any skin reaction to the
transmitter, wear it over a shirt. However, moisten the shirt
well under the electrodes to ensure fl awless operation.
Note:
The combined impact of moisture and intense
abrasion may cause a black color to come off the
transmitter’s surface, possibly staining light-colored
clothes. If you use insect repellent on your skin, you
must ensure that it does not come into contact with the
transmitter.
Training equipment with electronic components may
cause interfering stray signals. To tackle these problems,
try the following:
1. Remove the transmitter from your chest and use the
training equipment as you would normally.
2. Move the wrist unit around until you fi
nd an area in
which it displays no stray reading or does not fl ash the
heart symbol. Interference is often worst right in front
of the display panel of the equipment, while the left or
right side of the display is relatively free of disturbance.
3. Put the transmitter back on your chest and keep the
wrist unit in this interference-free area as much as
possible.
If the CS100 still does not work, the piece of equipment
may be electrically too noisy for wireless heart rate
measurement.
Page 53

56 – ENGLISH
9. FREQUENTLY ASKED QUESTIONS
What should I do if...
...the display of the cycling computer is blank?
If you are using the cycling computer for the fi rst time:
The cycling computer is in battery saving mode when it is
dispatched from the factory. To activate it, press the MIDDLE button
twice. The Basic Settings starts. For further information, see page 8.
If you have been using the cycling computer before:
The cycling computer goes to the power save mode (blank), if you
do not press any button in the Time mode for fi ve minutes. You
can turn the cycling computer on again by pressing any button.
Alternatively the battery may be dead (see the next question for
further instructions).
...the battery of the cycling computer must be replaced?
We recommend having all service done by an authorized Polar
Service Center. This is especially necessary to ensure that the
guarantee remains valid and is not affected by incorrect repair
procedures performed by an unauthorized agent. Polar Service
will test your cycling computer for water resistance after battery
replacement and make a full periodic check of the complete cycling
computer set.
...there are no reactions to any buttons?
If there are no reactions to any buttons, reset the cycling computer.
Resetting only clears the date and time, not the recorded Files or
Totals. Reset the cycling computer by pressing and holding all
buttons until the display is fi lled with digits. By pressing any button
the cycling computer goes to the Basic Settings mode (BASIC SET
is displayed). For further information, see page 8. If this does not
work, have the batteries checked.
Note: If you do not press any button after you reset the cycling
computer, within one minute the cycling computer goes to the Time
mode.
...the
symbol is activated?
Usually the fi rst sign of an expiring battery is the low battery
indicator
on the display. For further information, see page 51.
Note: Due to cold conditions the low battery indicator may
appear, but the indicator disappears when you return to a warmer
temperature.
...another person with a cycling computer or a heart rate monitor
is causing interference?
Move away from that person and continue your exercise normally.
Alternatively, to avoid other person’s heart rate signals:
1.
T
ake the transmitter off your chest for 30 seconds. Stay away
from the person with the other device.
2. Put the transmitter back on and bring the cycling computer up
to your chest near the transmitter’s Polar logo. The cycling
computer will start looking for a heart rate signal again.
Continue your exercise normally.
Page 54

ENGLISH – 57
...the cycling computer does not measure the calories?
In order to measure the calories you burn, you need to wear the
transmitter during recording.
...the heart rate, speed or distance reading becomes erratic or
extremely high?
Strong electromagnetic signals can cause erratic readings. So move
away from possible sources of disturbance such as high-voltage
power lines, traffi
c lights, electric railways or trams, car motors,
bike computers, some motor
-driven exercise equipment (like fi tness
testers) or cellular phones.
If the erratic heart rate reading continues after you have moved
away from the source of disturbance, slow down your speed and
check your pulse manually
. If you feel it corresponds to the high
reading on the display
, you may be experiencing cardiac arrhythmia.
Most cases of arrhythmia are not serious, but consult your doctor
nevertheless.
To avoid crosstalk from another cyclist with a speed sensor, keep a
distance of at least one meter/ 3’4’
’ between your cycling computer
and the speed sensor of the other cyclist.
...there is no heart rate reading (00)?
•
Check that the electrodes of the transmitter are moistened and
that you are wearing it as instructed.
• Make sure the transmitter is clean.
• Check that you are not near high voltage power lines,
televisions, cellular phones, or other sources of electromagnetic
interference. Also make sure that you are not near (1 m/3 ft)
other heart rate monitor users, when starting your exercise
recording.
• Cardiac arrhythmia may cause irregular readings or a cardiac
event may have altered your ECG waveform. In these cases,
consult your physician.
...there is no speed reading while cycling?
•
Check the correct position and distance of the sensor with the
magnet and the cycling computer.
• Check that you have set the correct cycling settings in your
cycling computer. For further information, see page 39.
• If the 00 reading appears irregularly, this may be due to
temporary electromagnetic interference in your current
surroundings.
• If the 00 reading is constant, you may have exceeded
4500 riding hours and the battery is empty.
Page 55

58 – ENGLISH
10. TECHNICAL SPECIFICATIONS
Cycling computer
Material: Thermoplastic polymer case
Watch accuracy: better than ±0.5 seconds per day at
25 °C/ 77 °F temperature.
Heart rate accuracy: ±1% or 1 bpm, whichever larger, the defi nition
applies to steady state conditions. Heart rate is displayed as number
of heartbeats per minute (bpm) or as % of your maximum heart rate.
Heart rate measuring range: 15-240
Maximum time recorded to File:
99 h 59 min 59 s
Limited values of information
to the exersice fi le:
1 training fi le
Current speed display range: 0-127 km/h or 0-75 mph
Operating temperature: -10 °C to +50 °C / +14 °F
to +122 °F
Battery life: Average 2 years in normal use
(1 h/day, 7 days/week)
Battery type: CR 2032
Battery sealing ring: OR 23.6 x 1.0 (silicon rubber)
Transmitter
Battery life: Average 2500 hours of use
Battery type: Built-in Lithium Cell
Operating temperature: -10 °C to +50 °C / +14 °F to +122 °F
Transmitter material: Polyurethane
Elastic strap
Buckle material: Polyurethane
Fabric material: Nylon, polyester, and natural rubber,
including a small amount of latex
Speed sensor
Speed sensor battery life: Average 4500 hours of use
Accuracy: ±1 %
Material: Thermoplastic polymer case
Operating temperature: -10 °C to +50 °C / +14 °F to +122 °F
SYSTEM REQUIREMENTS
Polar UpLink Tool
– PC
– Microsoft Windows XP/Vista/7
– Sound card
– Dynamic loudspeakers or headphones
The Polar CS100 cycling computer applies the following patented
technologies, among others:
• OwnZone
®
assessment for determining personal target heart rate
limits for the day
Page 56

ENGLISH – 59
Water resistance of Polar products is tested according to International Standard ISO 2281. Products are divided into three different categories
according to their water resistance. Check the back of your Polar product for the water resistance category and compare it to the chart below.
Please note that these defi nitions do not necessarily apply to products of other manufacturers.
Marking on the
case back
Water resistant
Water resistant
30m / 50m
Water resistant 100m
Wash splashes, sweat,
raindrops etc.
X
X
X
Bathing and
swimming
X
X
Skin diving with
snorkel (no air tanks)
X
SCUBA diving
(with air tanks)
Water resistant
characteristics
Splashes, raindrops etc.
Minimum for bathing
and swimming
For frequent use in water
but no SCUBA diving
Page 57

60 – ENGLISH
11. LIMITED POLAR INTERNATIONAL GUARANTEE
• This guarantee does not affect the consumer’s statutory rights under applicable national or state laws in force, or the consumer’s rights
against the dealer arising from their sales/purchase contract.
• This limited Polar international guarantee is issued by Polar Electro Inc. for consumers who have purchased this product in the USA or
Canada. This limited Polar international guarantee is issued by Polar Electro Oy for consumers who have purchased this product in other
countries.
• Polar Electro Oy/Polar Electro Inc. guarantees the original consumer/purchaser of this device that the product will be free from defects in
material or workmanship for two (2) years from the date of purchase.
• The receipt of the original purchase is your proof of purchase!
• The guarantee does not cover the battery, normal wear and tear, damage due to misuse, abuse, accidents or non-compliance with the
precautions; improper maintenance, commercial use, cracked, broken or scratched cases/displays, elastic strap and Polar apparel.
• The guarantee does not cover any damage/s, losses, costs or expenses, direct, indirect or incidental, consequential or special, arising out
of, or related to the product.
• Items purchased second hand are not covered by the two (2) year warranty, unless otherwise stipulated by local law.
• During the guarantee period, the product will be either repaired or replaced at any of the authorized Polar Service Centers regardless of the
country of purchase.
Guarantee with respect to any product will be limited to countries where the product has been initially marketed.
This product is compliant with Directives 93/42/EEC, 1999/5/EC and 2011/65/EU.
The relevant Declaration of Conformity is available at www.polar.com/support.
This crossed out wheeled bin marking shows that Polar products are electronic devices and are in the scope of Directive 2002/96/EC
of the European Parliament and of the Council on waste electrical and electronic equipment (WEEE) and batteries and accumulators used in products are in the scope of Directive 2006/66/EC of the European Parliament and of the Council of 6 September 2006
on batteries and accumulators and waste batteries and accumulators. These products and batteries/accumulators inside Polar
products should thus be disposed of separately in EU countries.
This marking shows that the product is protected against electric shocks.
0537
Page 58

ENGLISH – 61
12. POLAR DISCLAIMER
• The material in this manual is for informational purposes only. The products it describes are subject to change without prior notice,
due to the manufacturer’s continuous development program.
• Polar Electro Inc./Polar Electro Oy makes no representations or warranties with respect to this manual or with respect to the products
described herein.
• Polar Electro Inc./Polar Electro Oy shall not be liable for any damages, losses, costs or expenses, direct, indirect or incidental,
consequential or special, arising out of, or related to the use of this material of the products described herein.
This product is protected by one or several of the following patents:
FI68734, DE3439238, GB2149514, HK812/1989, US4625733, FI88223, DE4215549, FR92.06120, GB2257523, HK113/1996, SG9591671-4,
US5491474, FI88972, FR92.09150, GB2258587, HK306/1996, SG9592117-7, US5486818, FI96380, US5611346, EP665947, DE69414362,
FI4150, DE20008882.3, US6477397, FR0006504, FI4069, DE29910633, GB2339833, US6272365, FI107776, US6327486, FI110915,
US6537227, US6277080, FI111514, GB2326240, US6361502, US6418394, US6229454, EP836165, FI100924, WO96/20640, US6104947,
US5719825, US5848027, EP1055158, US6714812, FI88972, FR92.09150, GB2258587, HK306/1996, SG9592117-7, US5486818.
Other patents pending.
Polar Electro Oy is a ISO 9001:2008 certifi ed company.
Copyright © 2005–2013 Polar Electro Oy, FI-90440 KEMPELE.
All rights reserved. No part of this manual may be used or reproduced in any form or by any means without prior written permission of
Polar Electro Oy.
The names and logos in this user manual or in the package of this product are trademarks of Polar Electro Oy. The names and logos marked
with a ® symbol in this user manual or in the package of this product are registered trademarks of Polar Electro Oy. Windows is a registered
trademark of Microsoft Corporation and Mac OS is a registered trademark of Apple Inc.
Manufactured by:
Polar Electro Oy, Professorintie 5, FI-90440 KEMPELE
Tel +358 8 5202 100, fax +358 8 5202 300
www.polar.com
Page 59

62 – ENGLISH
13. INDEX
24h/12h time mode .............................................................9
AutoLap .............................................................................20
AutoStart ...........................................................................16
Backlight...........................................................................21
Bike settings.................. ................................................... 39
Battery replacement .................................................... 51-53
Date settings............................................................... 43-44
File .................................................................................... 23
Halt ................................................................................... 21
Heart rate
............................................................. 16-17
Heart rate limits ................................................................34
HR
sit
.................................................................................. 47
LapTime full ...................................................................... 20
Low battery indication ...............................................51
Recording an exercise .......................................................16
Reset the cycling computer ............................................... 56
Settings.............................................................................31
Sounds on/off ....................................................................20
Speed sensor .................................................................7, 13
Start measuring your heart rate ........................................16
Stopwatch ......................................................................... 18
Target Zone Alarm ......................................................20
Timers ............................................................................... 33
Total Values ......................................................................27
Transmitter .......................................................................15
Unit setting ....................................................................... 48
UpLink Tool........................................................................49
User settings
.....................................................................45
17945730.01 EMANUAL CS100 ENG
Page 60

Manufactured by
Polar Electro Oy
Professorintie 5
FIN-90440 KEMPELE
Tel +358 8 5202 100
Fax +358 8 5202 300
www.polar.com
Page 61

Polar CS100
™
Gebrauchsanleitung
Page 62

DEUTSCH – 5
INHALT
Informationen in blauer Schrift betreffen die Benutzung des Gerätes mit dem Herzfrequenz-Sender.
1. EINFÜHRUNG IN DEN POLAR FAHRRADCOMPUTER ...........................................................................................................7
1.1 BESTANDTEILE IHRES FAHRRADCOMPUTERS ...........................................................................................................7
1.2 SO STELLEN SIE IHREN FAHRRADCOMPUTER EIN ..................................................................................................... 8
1.3 INSTALLIEREN DER FAHRRADHALTERUNG, DES FAHRRADCOMPUTERS UND DES GESCHWINDIGKEITSMESSERS ....12
1.3.1 Fahrradhalterung und Fahrradcomputer ....................................................................................................12
1.3.2 Geschwindigkeitsmesser ............................................................................................................................ 13
1.4 SO TRAGEN SIE DEN SENDER ................................................................................................................................. 15
2. TRAINING ........................................................................................................................................................................
16
2.1 TRAININGSAUFZEICHNUNG UND HERZFREQUENZ-MESSUNG ..................................................................................16
2.2 FUNKTIONEN WÄHREND DES TRAININGS ................................................................................................................18
2.3 BEENDEN DES TRAININGS UND ABRUFEN DER DATEI-ZUSAMMENFASSUNG ...........................................................22
3. ABRUFEN DER GESPEICHERTEN INFORMATIONEN - FILE/DATEI ..................................................................................... 23
4. GESAMT-DATEI (TOTALS) ................................................................................................................................................. 27
5. EINSTELLUNGEN ..............................................................................................................................................................31
5.1 EINGABE DER FAHRSTRECKE MIT BERECHNUNG DER VORAUSSICHTLICHEN ANKUNFTSZEIT AM ZIEL UND
AUTOMATISCHE RUNDENAUFZEICHNUNG (CYCLING SET) .......................................................................................31
5.2 EINSTELLEN DER TIMER (TIMER SET) ..................................................................................................................... 33
5.3 EINSTELLEN DER HERZFREQUENZ-GRENZWERTE (LIMITS SET) ..............................................................................34
5.3.1 OwnZone .......................................................................................................................................................34
5.4 EINSTELLEN DER FAHRRAD-FUNKTIONEN (BIKE SET) .............................................................................................39
Page 63

6 – DEUTSCH
5.5 EINSTELLEN DER UHREN-FUNKTIONEN (WATCH SET) .............................................................................................43
5.6 EINSTELLEN DER PERSÖNLICHEN BENUTZERINFORMATIONEN (USER SET) ............................................................45
5.7 EINSTELLEN DER SIGNALTÖNE UND MASSEINHEITEN DES FAHRRADCOMPUTERS (GENERAL SET) ..........................48
6. SO STELLEN SIE IHREN FAHRRADCOMPUTER MITHILFE IHRES COMPUTERS EIN ............................................................49
7. PFLEGE UND WARTUNG ...................................................................................................................................................50
8. WICHTIGE HINWEISE.......................................................................................................................................................53
9. HÄUFIG GESTELLTE FRAGEN............................................................................................................................................55
10. TECHNISCHE SPEZIFIKATIONEN ......................................................................................................................................57
11. WELTWEITE GARANTIE DES HERSTELLERS ......................................................................................................................58
12. AUSSCHLUSSKLAUSEL FÜR HAFTUNG ..............................................................................................................................59
13. INDEX ..............................................................................................................................................................................62
Page 64

DEUTSCH – 7
1. EINFÜHRUNG IN DEN POLAR FAHRRADCOMPUTER
1.1 BESTANDTEILE IHRES FAHRRADCOMPUTERS
Das Polar Fahrradcomputer-Set besteht aus folgenden Teilen:
Fahrradcomputer
Während des Trainings zeigt der Fahrradcomputer
Ihre Herzfrequenz und Trainingsdaten an und
speichert diese. Geben Sie Ihre persönlichen
Daten ein und lassen Sie den Fahrradcomputer
die Trainingsinformationen nach dem Training
analysieren.
Polar Fahrradhalterung
Befestigen Sie die Fahrradhalterung an Ihrem
Fahrrad und bringen Sie den Fahrradcomputer
darauf an.
Polar Geschwindigkeitsmesser
Der kabellose Geschwindigkeitssensor misst
Geschwindigkeit und zurückgelegte Strecke
während der Fahrt.
Polar codierter Sender
Der CS100 Radcomputer ist mit (CS100-Set) oder ohne (CS100b-Set) Herzfrequenz-Sender arhältlich. Falls Sie bereits
einen codierten Polar Sender besitzen, können Sie diesen für Ihren CS100 Radcomputer verwenden. Anderenfalls können
Sie den Sender auch als Zubehör kaufen. Tragen Sie während des Trainings den Sender. Die Elektroden auf der Rückseite
des Senders messen über die Aktionsspannung Ihrer Haut EKG-genau Ihre Herzfrequenz. Der Sender übermittelt diese per
Funk an Ihren Fahrradcomputer.
Mit dem elastischen Gurt befestigen Sie den Sender in der richtigen Position um Ihren Brustkorb.
Informationen in blauer Schrift betreffen die Benutzung des Gerätes mit dem Sender.
Polar Internet-Service
Unser Internet-Service unter polarpersonaltrainer.com unterstützt
Sie bei der Erreichung Ihrer Trainingsziele. Die kostenlose
Registrierung gibt Ihnen Zugang zu einem individuellen TrainingsProgramm, einem persönlichen Trainingstagebuch, informativen
Artikel und vielem mehr. Zusätzlich erhalten Sie die neuesten
Produkttipps und eine Online-Unterstützung unter www.polar.com.
Die aktuellste Version dieser Gebrauchsanleitung kann unter www.
polar.com/support heruntergeladen werden.
Page 65

8 – DEUTSCH
1.2 SO STELLEN SIE IHREN FAHRRADCOMPUTER EIN
Geben Sie Ihre Daten in dem Modus Settings (Basiseingaben) ein (Uhrzeit, Datum, Maßeinheiten und Ihre persönlichen
Benutzerinformationen).
So nehmen Sie die Basiseingaben vor
Geben Sie Ihre persönlichen Informationen so präzise wie möglich ein, dann erhalten Sie genaue Rückmeldungen betreffend
Ihre Leistung (Kalorienverbrauch, OwnZone Bestimmung etc.).
Aktivieren Sie den Fahrradcomputer durch Drücken der MITTLEREN Taste.
Das Display füllt sich mit Zahlen und Buchstaben.
1. Drücken Sie die MITTLERE Taste. BASIC SET wird angezeigt.
2. Fahren Sie fort, indem Sie die MITTLERE Taste drücken und den unten angegebenen Schritten folgen:
3. Time Set (Uhrzeiteingabe)
• 24h/12h
• AM/PM
(für den 12-Std.-Modus)
RECHTE Taste
• Wählen Sie den 24-Std.- oder den 12-Std.-Modus.
RECHTE Taste
• Wählen Sie AM oder PM.
MITTLERE Taste
MITTLERE Taste
Displayanzeige: Drücken Sie die RECHTE Taste, um den
blinkenden Wert einzustellen.
Drücken Sie zur Bestätigung die
MITTLERE Taste.
Page 66

DEUTSCH – 9
• Hours (Stunden)
• Minutes (Minuten)
4. Date Set (Datumseingabe)**
• Day/Month (Tag/Monat)
• Month/Day (Monat/Tag)
• Year (Jahr)
RECHTE Taste
• Stellen Sie die Stunden ein.*
RECHTE Taste
• Stellen Sie die Minuten ein.*
RECHTE Taste
• Stellen Sie den Tag (im 24-Std.-Modus) oder
den Monat (im 12-Std.-Modus) ein.*
RECHTE Taste
• Stellen Sie den Monat (im 24-Std.-Modus) oder
den Tag (im 12-Std.-Modus) ein.*
RECHTE Taste
• Stellen Sie das Jahr ein.*
MITTLERE Taste
MITTLERE Taste
MITTLERE Taste
MITTLERE Taste
MITTLERE Taste
Hinweis:
• *Sie können die Zahlen schneller verändern, wenn Sie bei der Einstellung des Wertes die RECHTE Taste gedrückt halten.
• **Das Datum wird entsprechend dem ausgewählten Uhrzeit-Format angezeigt. (24-Std.-Modus: Tag - Monat - Jahr/
12-Std.-Modus: Monat - Tag - Jahr).
• Nach einem Batteriewechsel oder Reset des Fahrradcomputers müssen Sie lediglich die Uhrzeit und das Datum in den Basiseingaben
neu einstellen. Sie können den Rest der Eingaben durch Drücken und Halten der LINKEN Taste überspringen.
Displayanzeige: Drücken Sie die RECHTE Taste, um den
blinkenden Wert einzustellen.
Drücken Sie zur Bestätigung die
MITTLERE Taste.
Page 67

10 – DEUTSCH
5. Unit (Maßeinheiten)
(kg/cm)/(lb/ft)
6. Weight (Gewicht)
kg/lb
7. Height (Größe)
cm/ft
8. Birthday (Geburtsdatum)
• Day/Month (Tag/Monat)
• Month/Day (Monat/Tag)
• Year (Jahr)
RECHTE Taste
• Wählen Sie die Maßeinheit für das Gewicht und
die Größe aus: kg/cm oder lb/ft.
RECHTE Taste
• Geben Sie Ihr Gewicht in Kilogramm oder Pfund ein.
Hinweis: Falls Sie die falsche Maßeinheit gewählt
haben, können Sie diese immer noch ändern, indem Sie
die LINKE Taste drücken und zu Schritt 5. zurückkehren.
RECHTE Taste
• Geben Sie Ihre Größe in cm oder ft ein.
• Geben Sie die Inches ein (falls Sie sich für lb/ft
entschieden haben).
RECHTE Taste
• Geben Sie den Tag (im 24-Std.-Modus) oder
den Monat (im 12-Std.-Modus) ein.
RECHTE Taste
• Geben Sie den Monat (im 24-Std.-Modus) oder
den Tag (im 12-Std.-Modus) ein.
RECHTE Taste
• Geben Sie das Jahr ein.
MITTLERE Taste
MITTLERE Taste
MITTLERE Taste
MITTLERE Taste
MITTLERE Taste
MITTLERE Taste
MITTLERE Taste
Displayanzeige: Drücken Sie die RECHTE Taste, um den
blinkenden Wert einzustellen.
Drücken Sie zur Bestätigung die
MITTLERE Taste.
Page 68

DEUTSCH – 11
9. Sex (Geschlecht)
Male/Female
(männlich/weiblich)
RECHTE Taste
• Geben Sie männlich oder weiblich ein.
MITTLERE Taste
• Settings done (Eingaben ok) wird angezeigt.
• Sie können Ihre Eingaben ändern, indem Sie die LINKE Taste kurz so oft drücken, bis Sie den gewünschten Menüpunkt
erreicht haben.
• Akzeptieren Sie die Eingaben durch Drücken der MITTLEREN Taste, der Fahrradcomputer kehrt in die Uhrzeitanzeige
zurück.
Der Fahrradcomputer geht in den Energiespar-Modus (leeres Display), wenn Sie die LINKE Taste drücken oder in der Uhrzeitanzeige fünf Minuten lang keine Taste betätigt wird. Durch Drücken einer beliebigen Taste können Sie die Anzeige des
Fahrradcomputers wieder einschalten.
Displayanzeige: Drücken Sie die RECHTE Taste, um den
blinkenden Wert einzustellen.
Drücken Sie zur Bestätigung die
MITTLERE Taste.
Page 69

12 – DEUTSCH
1.3 INSTALLIEREN DER FAHRRADHALTERUNG, DES FAHRRADCOMPUTERS UND
DES GESCHWINDIGKEITSMESSERS
1.3.1 FAHRRADHALTERUNG UND FAHRRADCOMPUTER
1. Sie können die Fahrradhalterung mit Fahrradcomputer links oder rechts von der Lenkerklemmung oder direkt auf dem
Lenkervorbau befestigen.
2. Legen Sie das Gummi-Pad
auf den Lenker oder den
Lenkervorbau und legen Sie
dann die Fahrradhalterung
darauf.
3. Legen Sie Kabelbinder
um beide Seiten der
Fahrradhalterung und führen
Sie sie dann auf der anderen
Seite der Lenkstange/des
Lenkervorbaus zusammen.
Ziehen Sie die Kabelbinder
fest, sodass die
Fahrradhalterung
fest anliegt. Schneiden Sie überhängende Enden der
Kabelbinder ab.
4. Positionieren Sie den Fahrradcomputer auf der
Fahrradhalterung und drehen Sie den Fahrradcomputer
im Uhrzeigersinn, bis Sie ein Klicken hören. Nun ist er
eingerastet. Sie lösen den Fahrradcomputer wieder,
indem Sie ihn herunterdrücken und gleichzeitig gegen
den Uhrzeigersinn drehen.
2.
3.
Page 70

DEUTSCH – 13
1.3.2 GESCHWINDIGKEITSMESSER
Für die Installierung des Geschwindigkeitssenors und des Speichenmagneten benötigen Sie ein Messer und einen kleinen
Schraubendreher.
1. Suchen Sie an der
Vorderseite der vorderen
Gabel eine geeignete Stelle
für den Radcomputer.
Wenn der Radcomputer
am Lenker befestigt ist,
sollte der Sensor auf der
gegenüberliegenden
Gabelaußenseite befestigt werden. Der Sensor (B)
sollte maximal in einem Abstand von 30-40 cm zum
angebrachten Radcomputer (A) befestigt werden. Wenn
der Radcomputer auf dem Lenkervorbau befestigt ist oder
wenn Sie in einer Umgebung trainieren sollten, in der
elektromagnetische Störungen auftreten, verringern Sie
den Abstand (Mindestabstand: 30 cm). Der Radcomputer
und der Geschwindigkeitssensor sollten im 90 Grad-Winkel
zueinander befestigt sein.
Sollte der empfohlene Maximalabstand zwischen
Radcomputer und Sensor nicht eingehalten werden können
(z. B. an Mountain Bikes), kann der Sensor auch an der
Gabel unterhalb des Radcomputers (also nicht an der
gegenüberliegenden) installiert werden. In diesem Fall darf
der Abstand maximal 50 cm betragen.
2. Befestigen Sie das Gummi Pad am Sensor.
3. Führen Sie die Kabelbinder
durch die Öffnungen des
Sensors und des Gummi Pads.
4. Befestigen Sie den Sensor so
an der vorderen Gabel, dass
das POLAR Logo nach außen
zeigt. Lassen Sie die
Kabelbinder locker. Ziehen
Sie sie noch nicht ganz fest.
3.
4.
1.
2.
Page 71

14 – DEUTSCH
5. Setzen Sie den Magneten
so auf eine Speiche, dass
er sich auf gleicher Höhe
mit dem Sensor befi ndet. Die
Öffnung des Magneten muss
sich gegenüber dem
Geschwindigkeitssensor
befi nden. Befestigen Sie den
Magneten auf der Speiche und ziehen Sie ihn locker - aber
noch nicht vollständig - mit einem Schraubendreher fest.
Stimmen Sie die Positionen des Magneten und des Sensors
so ab, dass sich der Magnet nahe am Sensor vorbeibewegt,
ihn jedoch nicht berührt. Richten Sie den Sensor so gut
wie möglich auf das Rad/die Speichen aus. Der maximale
Abstand zwischen Sensor und Magnet sollte 4 mm nicht
überschreiten. Der Abstand ist korrekt, wenn Sie
zwischen Sensor und Magnet nur noch einen Kabelbinder
durchschieben können.
Bewegen Sie Ihr Vorderrad, sodass Sie die
Geschwindigkeitsanzeige auf der Anzeige sehen.
Die Anzeige sichert die richtige Positionierung von
Geschwindigkeitssensor und Magnet. Nach exakter
Positionierung ziehen Sie die Schraube am Magneten
mit einem Schraubendreher fest. Ziehen Sie auch die
Kabelbinder richtig fest und schneiden Sie überstehende
Enden ab.
Ihre Sicherheit ist uns wichtig. Wenn Sie mit dem Fahrrad
fahren, achten Sie bitte auf den Verkehr, um Unfälle und
Verletzungen zu vermeiden. Prüfen Sie, ob sich der Lenker
normal drehen lässt und vergewissern Sie sich, dass
Bremszug oder Schaltzug nicht an der Fahrradhalterung
oder dem Geschwindigkeitssensor hängenbleiben.
Kontrollieren Sie auch, dass durch die Fahrradhalterung
und den Geschwindigkeitssensor weder das Treten noch der
Einsatz von Bremse oder Gangschaltung behindert werden.
Vor dem Fahrrad fahren sollten Sie den Reifenumfang
Ihres Fahrrades in den Fahrradcomputer eingeben. Weitere
Informationen fi nden Sie auf den Seiten 39-42.
5.
max
4 mm /
0’16”
Page 72

DEUTSCH – 15
1.4 SO TRAGEN SIE DEN SENDER
Die codierte Herzfrequenz-Übertragung reduziert Interferenzen zu anderen in der Nähe befi ndlichen Herzfrequenz-Messgeräten.
Um eine erfolgreiche Codesuche und eine einwandfreie Herzfrequenz-Messung sicherzustellen, halten Sie Ihren
Fahrradcomputer innerhalb der Reichweite des Senders (1 Meter). Achten Sie darauf, dass Sie sich nicht in der Nähe
anderer Personen mit Herzfrequenz-Messgeräten oder Quellen elektromagnetischer Störungen befi nden (weitere Informationen
über Interferenzen erhalten Sie in dem Kapitel „Wichtige Hinweise” auf Seite 54).
Um die Herzfrequenz zu messen, müssen Sie Ihren Sender tragen.
Um die Lebensdauer des Senders zu erhöhen, beachten Sie bitte die ausführlichen Anweisungen zur Reinigung des
Senders im Kapitel „Pfl ege und Wartung“.
1.
2.
3.
4.
1. Befestigen Sie ein Ende des
elastischen Gurtes an dem
Sender.
2. Stellen Sie die Gurtlänge so
ein, dass der Gurt gut,
jedoch nicht zu locker oder zu
eng anliegt. Legen Sie den
Gurt so um die Brust, dass er
3. Heben Sie den Sender leicht
an und befeuchten Sie die
zwei geriffelten Elektroden
auf der Rückseite des
Senders.
4. Überprüfen Sie, ob die
befeuchteten Elektroden
direkt auf der Haut aufl iegen
und das Polar Logo des
Lesen Sie im folgenden Kapitel, wie Sie Ihre Herzfrequenz
messen.
bei Herren unter dem Brustmuskel und bei Damen unter
dem Brustansatz sitzt und lassen Sie den Verschluss
einrasten.
Senders nach außen zeigt und in der richtigen Position sitzt.
Page 73
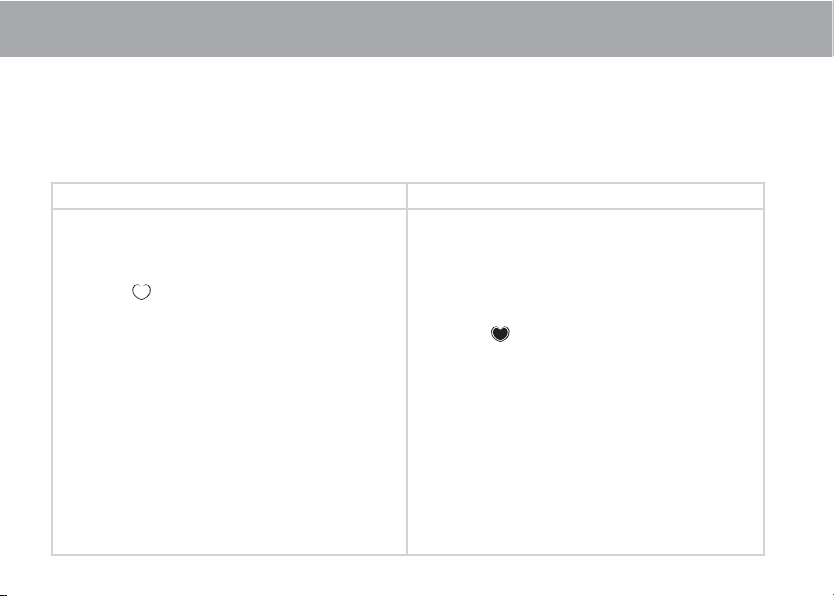
16 – DEUTSCH
2. TRAINING
2.1 TRAININGSAUFZEICHNUNG UND HERZFREQUENZ-MESSUNG
Sie können eine Trainingsdatei aufzeichnen und haben zwei Möglichkeiten, die Trainingsaufzeichnung zu starten. Wenn Sie die
AutoStart-Funktion einschalten, dann startet und beendet der Fahrradcomputer die Trainingsaufzeichnung automatisch, wenn
Sie mit dem Rad fahren beginnen bzw. das Rad fahren unterbrechen. Wenn die AutoStart-Funktion jedoch ausgeschaltet ist, können
Sie die Trainingsaufzeichnung manuell durch Drücken der MITTLEREN Taste starten und beenden. Weitere Informationen über
den AutoStart und darüber, wie die Funktion ein- und ausgeschaltet werden kann, fi nden Sie auf den Seiten 39-40.
Starten der Trainingsaufzeichnung ohne den Herzfrequenz-Sender:
1. Befestigen Sie die Fahrradhalterung und den
Geschwindigkeitsmesser wie auf den Seiten 12-14 beschrieben.
2. Setzen Sie Ihren Fahrradcomputer in die Fahrradhalterung.
3. Aktivieren Sie Ihren Fahrradcomputer durch Drücken der
MITTLEREN Taste. Warten Sie ca. 15 Sekunden, bis das umrahmte
Herzsymbol
vom Display der Uhrzeitanzeige verschwindet.
Jetzt können Sie los fahren.
4. Wenn Sie die Funktion AutoStart eingeschaltet haben, erscheint
Ihre Geschwindigkeit im Display, sobald Sie los fahren. Haben Sie
die Funktion AutoStart ausgeschaltet, können Sie das Training
durch Drücken der MITTLEREN Taste aufzeichnen. Die
Geschwindigkeitsanzeige erscheint auf dem Display und die
Stoppuhr beginnt zu laufen.
5. Bei eingeschalteter AutoStart-Funktion beendet der
Fahrradcomputer die Trainingsaufzeichnung automatisch, wenn
Sie anhalten. Bei ausgeschalteter AutoStart-Funktion können Sie
das Training durch Drücken der LINKEN Taste anhalten,
drücken Sie die Taste erneut, um zur Uhrzeitanzeige
zurückzukehren. Weitere Informationen darüber, wie Sie das
Training beenden können, fi nden Sie auf Seite 22.
Starten der Trainingsaufzeichnung mit dem Herzfrequenz-Sender:
1. Tragen Sie den Sender wie im Kapitel „So tragen Sie den Sender”
auf Seite 15 beschrieben. Befestigen Sie die Fahrradhalterung und
den Geschwindigkeitsmesser wie auf den Seiten 12-14 beschrieben.
2. Aktivieren Sie das leere Display des Fahrradcomputers durch
Drücken der MITTLEREN Taste und beginnen Sie in der Uhrzeit-
anzeige. Der Fahrradcomputer ermittelt automatisch Ihre
Herzfrequenz. Warten Sie ca. 15 Sekunden, bis der Computer Ihre
Herzfrequenz ermittelt hat und das umrandete, blinkende
Herzsymbol
im Display erscheint.* Die Trainingszeit wird noch
nicht aufgezeichnet.
3. Setzen Sie Ihren Fahrradcomputer in die Fahrradhalterung. Wenn
Sie die Funktion AutoStart eingeschaltet haben, erscheinen Ihre
Herzfrequenz und Ihre Geschwindigkeit im Display, sobald Sie
losfahren. Haben Sie die Funktion AutoStart ausgeschaltet, können
Sie das Training durch Drücken der MITTLEREN Taste aufzeichnen,
sobald Ihre Herzfrequenz und Ihre Geschwindigkeit im Display
erscheinen. Ihre Trainingszeit beginnt ebenfalls zu laufen.
4. Bei eingeschalteter AutoStart-Funktion beendet der
Fahrradcomputer die Trainingsaufzeichnung automatisch, wenn
Sie anhalten. Bei ausgeschalteter AutoStart-Funktion können Sie
das Training durch Drücken der LINKEN Taste anhalten, drücken
Sie die Taste erneut, um zur Uhrzeitanzeige zurückzukehren.
Weitere Informationen darüber, wie Sie das Training beenden
können, fi nden Sie auf Seite 22.
Page 74

DEUTSCH – 17
• Wird die Herzfrequenz nicht angezeigt und 00 erscheint im Display, dann wird die Herzfrequenz nicht mehr ermittelt.
Indem Sie den Fahrradcomputer in die Nähe des Polar Logos des Senders bringen, starten Sie die Herzfrequenz-
Bestimmung erneut. Sie müssen hierzu keine Taste drücken.
• Wenn Sie sich für OwnZone® entschieden haben, wird Ihre OwnZone bestimmt, sobald die Trainingsaufzeichnung
beginnt. Weitere Informationen hierüber fi nden Sie in dem Kapitel OwnZone auf Seite 36.
• Um die OwnZone Bestimmung zu überspringen und mit der zuvor ermittelten OwnZone zu trainieren, drücken Sie die
MITTLERE Taste, wenn das OwnZone Symbol in der Anzeige erscheint. Falls Sie Ihre OwnZone zuvor noch
nicht bestimmt haben, werden Ihre altersabhängigen Herzfrequenz-Grenzwerte verwendet.
Hinweis: * Ein Herzsymbol mit Rahmen zeigt, dass die Herzfrequenz-Übertragung codiert ist.
• Sollte der Fahrradcomputer Ihre Herzfrequenz nicht anzeigen, dann vergewissern Sie sich, dass die Elektroden des Senders gut
angefeuchtet sind und fl ach auf der Haut aufl iegen.
Page 75

18 – DEUTSCH
2.
Anstieg oder Abfall der
durchschnittlichen Geschwindigkeit.
Geschwindigkeit
Herzfrequenz
1. Die zurückgelegte Strecke (Dist) und die Zwischenstrecke (Trip) werden abwechselnd
angezeigt, wenn Sie eine Rundenzeit nehmen.
Die Zwischenstrecke wird jedesmal auf Null zurückgestellt, wenn Sie während des Trainings
durch Drücken der MITTLEREN Taste eine Rundenzeit nehmen.
Fahrgeschwindigkeit (km/h oder m/h)
Herzfrequenz. Wenn keine Herzfrequenz angezeigt wird oder Sie Ihre Benutzerinformationen
nicht eingegeben haben, wird anstelle dessen die durchschnittliche Geschwindigkeit
angezeigt.
2.2 FUNKTIONEN WÄHREND DES TRAININGS
Hinweis: Ihre Trainingsinformationen werden nur gespeichert, wenn die Stoppuhr länger als eine Minute läuft und Sie somit länger als eine
Minute trainiert haben oder wenn bereits eine Runde gespeichert wurde.
Information des Displays wechseln: Drücken Sie die RECHTE Taste, um sich während des Trainings die folgenden Optionen
anzeigen zu lassen:
Auch die Geschwindigkeit und die Herzfrequenz werden graphisch dargestellt. Je höher die
Herzfrequenz bzw. je größer die Geschwindigkeit, desto mehr Balken werden angezeigt. Ein Geschwindigkeitsbalken steht für
5km/h, das bedeutet, dass Ihre Geschwindigkeit 50 km/h oder mehr beträgt, wenn zehn Balken angezeigt werden.
Hinweis: Sie können die RECHTE Taste auch gedrückt halten, damit der
Fahrradcomputer die Anzeigen automatisch wechselt. Der automatische
Anzeigenwechsel kann durch Drücken und Halten der RECHTEN Taste
ebenso wieder ausgeschaltet werden.
Page 76

DEUTSCH – 19
5.
4.
3. Die bisher verbrannten Kilokalorien. Die Kilokalorienzählung beginnt mit der Anzeige der
Herzfrequenz. Wenn keine Herzfrequenz angezeigt wird oder Sie Ihre Benutzerinformationen nicht
eingegeben haben, wird anstelle der Kilokalorien die Geschwindigkeit angezeigt.
Stoppuhr, d. h. Trainingsdauer.
Herzfrequenz
Die voraussichtliche Ankunftszeit oder wenn die Anzeige der zurückgelegten Strecke ausgeschaltet
ist, wird stattdessen die Geschwindigkeit angezeigt. Wenn Sie die Entfernung eingeben, die Sie
zu fahren beabsichtigen, dann berechnet der Fahrradcomputer Ihre Ankunftszeit entsprechend
Ihrer Fahrgeschwindigkeit. Weitere Informationen fi nden Sie auf Seite 31.
Uhrzeit
Herzfrequenz
Herzfrequenz-Grenzwerte: Auf der linken Seite sehen Sie Ihren unteren und auf der rechten Seite
Ihren oberen Herzfrequenz-Grenzwert. Das Herzfrequenz-Symbol bewegt sich entsprechend Ihrer
Herzfrequenz nach links oder rechts. Sollte das Herzsymbol nicht sichtbar sein, bedeutet dies,
dass Ihre Herzfrequenz entweder oberhalb des blinkenden oberen Herzfrequenz-Grenzwertes oder
unterhalb des blinkenden unteren Herzfrequenz-Grenzwertes liegt. In diesem Fall ertönt ein Signal,
sofern die Signaltöne eingeschaltet sind. Wird die Herzfrequenz nicht angezeigt, werden auch die
Grenzwerte nicht angezeigt. Weitere Informationen fi nden Sie auf Seite 34.
Trainingszeit innerhalb der Zielzone, d. h. innerhalb der Herzfrequenz-Grenzwerte.
Herzfrequenz
Page 77

20 – DEUTSCH
Zielzonenalarm: Mit dem Zielzonenalarm können Sie sicherstellen, dass Sie mit einer für Sie richtigen Trainingsintensität
trainieren. Sind die Zielzonen-Grenzwerte aktiviert, ertönt ein Signalton, sobald Sie ober- oder unterhalb Ihrer HerzfrequenzGrenzwerte trainieren. Sie können Ihre Zielzonen-Grenzwerte in dem Menü Settings/Limits SET eingeben. Weiter Informationen
erhalten Sie auf Seite 34. Wenn Sie sich außerhalb Ihrer Zielzone befi nden, blinkt die Herzfrequenz-Anzeige und ein
akustisches Signal ertönt bei jedem Herzschlag.
Das Symbol in der oberen rechten Ecke des Displays zeigt an, dass der Zielzonenalarm eingeschaltet ist. Bitte beachten
Sie, dass die Tastensignaltöne auch im Einstellungs-Modus (Settings) ein- und ausgeschaltet werden können. Lesen Sie auf
Seite 48, wie Sie die Signaltöne ein- und ausschalten können.
Hinweis: Bei ausgeschalteten Herzfrequenz-Grenzwerten ertönt im Trainingsaufzeichnungs-Modus weder ein Zielzonenalarm noch werden
Zielzoneninformationen in der Datei-Zusammenfassung oder der Datei gespeichert.
Aufzeichnung von Runden- und Zwischenzeiten: Drücken Sie die MITTLERE Taste, um Runden- und Zwischenzeiten zu
speichern.
Die Rundenzeit ist die Zeit, die für eine Runde benötigt wird. Die Zwischenzeit wird gemessen vom Trainingsbeginn bis zur
Speicherung einer Rundenzeit (z. B. vom Beginn des Trainings bis zur Speicherung der vierten Runde).
Rundenzeit
Rundenzahl
Zwischenzeit
Seit Rundenbeginn berechnete
durchschnittliche Herzfrequenz.
Page 78

DEUTSCH – 21
Hinweis:
• Wenn Sie die AutoLap-Funktion im Einstellungs-Modus aktiviert haben, zeichnet Ihr Fahrradcomputer automatisch die Rundenzeiten auf,
wenn die voreingestellte Distanz gefahren wurde, z. B. nach jedem Kilometer. Für weitere Informationen, siehe Seite 31.
• Sie können bis zu 50 Rundenzeiten speichern. Wenn der Rundenzeitenspeicher voll ist, erscheint LapTime FULL (Rundenzeit voll) im
Display. Sie können zwar weiterhin Rundenzeiten nehmen, diese werden jedoch nicht mehr gespeichert.
Timer: Die Timer Ihres Fahrradcomputers sind während der Trainingsaufzeichnung in Betrieb. Durch ein akustisches Signal
zeigt der Fahrradcomputer an, dass die Timerzeit erreicht ist. Ist nur Timer 1 eingeschaltet, wird während Ihres Trainings nur
durch diesen Timer jeweils nach Verstreichen der voreingestellten Zeit ein akustisches Signal ausgelöst. Ist auch der Timer
2 aktiviert, wechseln die Timer sich während Ihres Trainings ab. Weitere Informationen erhalten Sie auf Seite 33.
Trainingspause:
1. Drücken Sie die LINKE Taste. Die Trainingsaufzeichnung, die Stoppuhr und andere Berechnungen pausieren
(Paused wird angezeigt).
2. Setzen Sie die Aufzeichnung durch Drücken der MITTLEREN Taste fort.
Im Dunkeln trainieren: Wenn Sie die Displaybeleuchtung während einer Trainingsaufzeichnung durch Drücken und Halten
der MITTLEREN Taste einschalten, wird die Displaybeleuchtung während derselben Trainingseinheit jedesmal erneut
eingeschaltet, sobald Sie eine beliebige Taste drücken.
Hinweis: Wird die maximale Speicherzeit pro Datei von 99 Std. 59 Min. 59 Sek. überschritten, ertönt ein akustisches Signal, die
Trainingsaufzeichnung pausiert und in der Anzeige erscheint HALT. Beenden Sie die Aufzeichnung durch Drücken der LINKEN Taste.
Page 79

22 – DEUTSCH
Gespeicherte Trainingsinformationen
Dauer des gespeicherten Trainings.
Durchschnittliche Herzfrequenz des Trainings.
Während des Trainings verwendete Herzfrequenz-Grenzwerte (vorausgesetzt Grenzwerte wurden eingestellt).
Innnerhalb der Herzfrequenz-Grenzwerte verbrachte Zeit.
Kilokalorien, die während der Trainingseinheit verbrannt wurden.
Durchschnittliche Geschwindigkeit.
Durchschnittliche Trittfrequenz.*
Zurückgelegte Strecke.
Gefahrene Zeit.
Wenn Sie z. B. anhalten, aber die Trainingsaufzeichnung nicht stoppen, dann wird auch die gefahrene Zeit
automatisch nicht weiter aufgezeichnet, wohingegen die Trainingszeit weiterläuft.
Bei eingeschalteter AutoStart-Funktion stimmen Trainingszeit und gefahrene Zeit überein, da der
Fahrradcomputer die Aufzeichnung beim Fahren automatisch startet und beim Anhalten automatisch stoppt.
Limits
In Zone
Kcal
AvgSpeed
Avg Cad.
Distance
RideTime
*Separater Polar Trittfrequenzmesser erforderlich.
2.3 BEENDEN DES TRAININGS UND ABRUFEN DER DATEI-ZUSAMMENFASSUNG
1. Drücken Sie die LINKE Taste, um die Trainingsaufzeichnung vorübergehend anzuhalten. Paused erscheint im Display.
2. Drücken Sie die LINKE Taste erneut. Summary FILE (Summendatei) erscheint und die folgenden Informationen werden
abwechselnd angezeigt:
Page 80

DEUTSCH – 23
3. ABRUFEN GESPEICHERTER INFORMATIONEN - FILE/DATEI
MITTLERE Taste drücken
• Date/Time
RECHTE Taste drücken
• Exe.Time/Avg HF/Max HF
RECHTE Taste drücken
• Limits
RECHTE Taste drücken
• In/Above/Below Zone
RECHTE Taste drücken
• Kcal
RECHTE Taste drücken
• Distance
RECHTE Taste drücken
• Avg/MAX Speed
RECHTE Taste drücken
• Avg/MAX Cad.*
RECHTE Taste drücken
• RideTime
RECHTE Taste drücken
• LAPS
Gespeicherte Trainingsinformationen
Aufzeichnungs-Datum und Start-Uhrzeit werden
abwechselnd angezeigt.
In der Trainingsdatei können Sie Rad- und Trainingsinformationen der aufgezeichneten
Trainingseinheit anschauen. Der Fahrradcomputer beginnt, Informationen in der Datei
aufzuzeichnen, sobald Sie durch Drücken der MITTLEREN Taste die Aufzeichnung starten oder
die AutoStart-Funktion verwenden. Ihre Trainingsinformationen werden nur gespeichert, wenn
die Stoppuhr länger als eine Minute gelaufen ist oder mindestens eine Runde gespeichert wurde.
Abrufen der Trainingsdatei
1. Drücken Sie in der Uhrzeitanzeige die RECHTE Taste. FILE (Datei) erscheint im Display.
2. Drücken Sie die MITTLERE Taste. Date (Datum) und Time (Uhrzeit) werden abwechselnd im
Display angezeigt. Das Datum der Dateiaufzeichnung und die Uhrzeit, zu der die Datei
gestartet wurde, werden abwechselnd im Display angezeigt.
*Separater Polar Trittfrequenzmesser erforderlich.
Page 81

24 – DEUTSCH
Gespeicherte Trainingsinformationen
Dauer des gespeicherten Trainings.
Wechsel zwischen durchschnittlicher und maximaler Herzfrequenz in Schlägen pro Minute (bpm).
Hinweis: Wenn Sie Ihre Herzfrequenz-Grenzwerte als Prozentsätze Ihrer maximalen Herzfrequenz eingeben,
werden diese Werte auch als Prozentsätze ihrer maximalen Herzfrequenz (%) angezeigt.
Die Herzfrequenz-Grenzwerte (in Schlägen pro Minute oder %), die während des Trainings verwendet werden,
(vorausgesetzt die Grenzwerte wurden eingestellt).
Im Wechsel: Trainingszeit innerhalb, oberhalb und unterhalb Ihrer Zielzone (vorausgesetzt die Grenzwerte
wurden eingestellt).
Kalorienverbrauch.
Zurückgelegte Strecke.
Durchschnittliche und maximale Geschwindigkeit.
Exe.Time
AVG/MAX
Limits
In/Above/Below
Zone
Kcal
Distance
AvgSpeed
MAX
Hinweis:
• Die sich abwechselnden Informationen wechseln sich automatisch im Display ab. Um schnell zwischen diesen hin- und herzublättern,
drücken Sie die MITTLERE Taste.
• Drücken und Halten Sie die MITTLERE Taste, um die Displaybleuchtung im Datei-Modus einzuschalten.
3. Drücken Sie die RECHTE Taste, um durch die gespeicherten Informationen zu blättern.
Page 82

DEUTSCH – 25
Gespeicherte Trainingsinformationen
Durchschnittliche und maximale Trittfrequenz.*
Fahrzeit.
Gespeicherte Rundenanzahl.
Hinweis: Die Rundeninformation wird angezeigt, wenn Sie mindestens eine Runde
während Ihrer Trainingseinheit gespeichert haben.
4.
Drücken Sie die MITTLERE
Taste, um sich die beste Runde anzusehen.
Die Information für die beste Runde erscheint in der Anzeige:
Die schnellste Rundenzeit.
Die Nummer der besten Runde.
5. Blättern Sie mit der RECHTEN Taste durch die Runden. Durch Drücken der MITTLEREN
Taste können Sie sich folgende Rundeninformation nacheinander ansehen:
Zwischenzeit.
Rundenzeit.
Die maximale Herzfrequenz und die durchschnittliche Herzfrequenz der Runde wechseln
sich im Display ab.
Hinweis: Die letzte Runde wird automatisch aufgezeichnet, wenn das Training durch
Drücken der LINKEN Taste beendet wurde; sie ist jedoch niemals die beste Runde.
Avg Cad.
MAX
RideTime
LAPS
* Separater Polar Trittfrequenzmesser erforderlich.
Page 83

26 – DEUTSCH
Gespeicherte Trainingsinformationen
Geschwindigkeit
Geschwindigkeit zum Zeitpunkt der Rundenaufzeichnung.
Durchschnittliche Geschwindigkeit der Runde.
Trittfrequenz*
Trittfrequenz zum Zeitpunkt der Rundenaufzeichnung.
Durchschnittliche Trittfrequenz der Runde.
Zurückgelegte Strecke
Wechsel von Runden- und
Zwischenstrecke.
• Halten Sie die LINKE Taste gedrückt, um in die Uhrzeitanzeige zurückzukehren.
*Separater Polar Trittfrequenzmesser erforderlich.
Page 84

DEUTSCH – 27
4. GESAMT-DATEI (TOTALS)
MITTLERE Taste drücken
• Today’s TOTALS
RECHTE Taste drücken
• ThisWeek TOTALS
RECHTE Taste drücken
• Season’s TOTALS
Die Gesamt-Datei umfasst die kumulierten und maximalen Werte mehrerer Trainingseinheiten. Sie
können die Gesamt-Datei nutzen, um z. B. einen Tages- und Wochenüberblick über Ihre Trainingsinformationen zu erhalten. Alle Werte werden automatisch aktualisiert, sobald das aufgezeichnete
Training beendet wird.
Zusätzlich zu den Tages- (Today’s TOTALS) und Wochenwerten (ThisWeek TOTALS) können Sie auch
die kumulierten und maximalen Werte, die über einen gewissen Zeitraum (Season’s TOTALS/saisonale
Werte) gespeichert wurden, abrufen. Diese Werte werden erfasst, bis Sie sie zurückstellen und das
bedeutet, dass Sie Ihre Trainingsinformationen mit dieser Funktion z. B. monatlich berechnen lassen
können. Weitere Informationen über die Zurückstellung der Werte erhalten Sie auf Seite 30.
• Tageswerte/Today’s TOTALS Der Fahrradcomputer stellt die Gesamtwerte täglich
automatisch um Mitternacht (00:00) auf Null.
• Wochenwerte/ThisWeek TOTALS In der Nacht von Sonntag auf Montag stellt der Fahrradcomputer
die Gesamtwerte automatisch um Mitternacht (00:00) auf Null.
• Saisonale Werte/Season’s TOTALS Stellen Sie die Gesamtwerte auf Null, wann immer Sie es
möchten.
Abrufen der Gesamt-Datei
1. Drücken Sie in der Uhrzeitanzeige kurz so oft die RECHTE Taste, bis TOTALS im Display erscheint.
2. Drücken Sie die MITTLERE Taste. Today’s TOTALS wird angezeigt.
3. Wählen Sie mit der RECHTEN Taste die Zeitskala (Today’s, ThisWeek or Season’s), die Sie abrufen möchten.
4. Drücken Sie die MITTLERE Taste. Tot.Time und die Gesamtzeit werden angezeigt.
5. Wenn Sie Today’s TOTALS oder ThisWeek TOTALS gewählt haben, dann können Sie mit der RECHTEN Taste durch folgende
Informationen blättern: Gesamtzeit (Tot.Time), Gesamtkalorienverbrauch (Tot.Kcal), Strecke 1 (Distance1), Strecke 2*
(Distance2*), maximale Geschwindigkeit (MaxSpeed), maximale Trittfrequenz** (Max.Cad**) und Fahrzeit (RideTime).
*Um Werte für Fahrrad 1 (bike 1) und Fahrrad 2 (bike 2) abrufen zu können, müssen Sie die Fahrradeinstellungen vorgenommen haben.
**Separater Polar Trittfrequenzmesser erforderlich.
Page 85

28 – DEUTSCH
Gesamt-Datei
Beginn der Kumulierung.
Kumulierte Trainingsdauer.
Beginn der Kumulierung.
Kumulierter Kalorienverbrauch.
Beginn der Kumulierung.
Der Kilometerstand variiert entsprechend dem Beginn der Kumulierung
und den kumulierten Werten für Fahrrad 1 bzw. Fahrrad 2.
Hinweis: Der Kilometerzähler misst die kumulierte Gesamtstrecke und
kann nur per UpLink Tool zurückgestellt werden. Weitere Informationen
erhalten Sie auf Seite 49.
6. Falls Sie sich für die saisonalen Werte (Season’s TOTALS) entscheiden, können Sie mit der RECHTEN Taste durch folgende
Informationen blättern:
Page 86

DEUTSCH – 29
Gesamt-Datei
Beginn der Kumulierung.
Kumulierung der zurückgelegten Strecke für Fahrrad 1 bzw. Fahrrad 2 (Strecke 1 wird
bei Benutzung von Fahrrad 1 aktualisiert und Strecke 2 bei Benutzung von Fahrrad 2).
Das Datum der Aktualisierung.
Saisonale maximale Geschwindigkeit.
Datum der Aktualisierung.
Saisonale maximale Trittfrequenz.*
*Separater Polar Trittfrequenzmesser erforderlich.
Page 87

30 – DEUTSCH
Gesamt-Datei
Beginn der Kumulierung.
Kumulierte Fahrzeit.
• Halten Sie die LINKE Taste gedrückt, um in die Uhrzeitanzeige zurückzukehren.
Zurückstellen der Season’s TOTALS oder Wiederherstellen der vorherigen Maximalwerte für
Geschwindigkeit oder Trittfrequenz*
Sie können die Gesamt-Datei als saisonalen (oder täglichen/wöchentlichen) Zähler Ihrer Trainingswerte nutzen, indem Sie
diese einmal in der Saison auf Null zurückstellen. Wenn Sie die Gesamt-Datei nicht auf Null zurücksetzen möchten, können Sie
auch die vorherigen Maximalwerte für Geschwindigkeit und Trittfrequenz* wiederherstellen. Sind Werte einmal zurück- oder
wiederhergestellt, können Sie dies nicht rückgängig machen.
Beginnen Sie mit einer beliebigen Anzeige der vorangegangen Tabelle (Tot.Time, Tot.Kcal, Distance1/2, MaxSpeed, Max.Cad*,
Ride Time).
1. Drücken Sie die MITTLERE Taste, um den gewünschten Wert zurückzustellen. Reset? erscheint im Display. In der MaxSpeed
und Max.Cad* Anzeige können Sie durch Drücken der RECHTEN Taste fortfahren, um den vorherigen Wert wiederherzustellen.
Wählen Sie Return Old durch Drücken der MITTLEREN Taste aus.
2. Drücken Sie die MITTLERE Taste. Are You Sure/Sind Sie sicher wird angezeigt.
3. Wenn Sie sich sicher sind, drücken Sie die MITTLERE Taste.
Alternativ haben Sie die Möglichkeit, den Reset abzubrechen, indem Sie die LINKE Taste drücken.
• Halten Sie die LINKE Taste gedrückt, um in die Uhrzeitanzeige zurückzukehren.
Hinweis: Den Kilometerzähler können Sie nur mittels UpLink Tool zurückstellen. Weitere Informationen erhalten Sie auf Seite 49.
*Separater Polar Trittfrequenzmesser erforderlich.
Page 88

DEUTSCH – 31
5. EINSTELLUNGEN
MITTLERE Taste drücken
• Cycling SET
RECHTE Taste drücken
• Timer SET
RECHTE Taste drücken
• Limits SET
RECHTE Taste drücken
• Bike SET
RECHTE Taste drücken
• Watch SET
RECHTE Taste drücken
• User SET
RECHTE Taste drücken
• General SET
Im Menü Settings können Sie die Einstellungen abrufen oder verändern.
Tipp: Sie können die Einstellungen ebenso mit der Polar UpLink Tool™ -Funktion vornehmen und diese dann von
Ihrem PC auf Ihren Fahrradcomputer übertragen. Weitere Informationen hierzu fi nden Sie auf Seite 49.
Einstellen der Werte:
• Stellen Sie einen Wert ein oder wählen Sie einen Wert mit der RECHTEN Taste aus.
• Bestätigen Sie Ihre Wahl und fahren Sie im Menü mit der MITTLEREN Taste fort.
• Brechen Sie Ihre Auswahl ab oder kehren Sie durch Drücken der LINKEN Taste in den vorherigen
Modus oder den vorherigen Menüpunkt zurück.
5.1 EINGABE DER FAHRSTRECKE MIT BERECHNUNG DER VORAUSSICHTLICHEN
ANKUNFTSZEIT AM ZIEL UND AUTOMATISCHE RUNDENAUFZEICHNUNG
(CYCLING SET)
In den Fahrradeinstellungen können Sie zwei verschiedene Einstellungen vornehmen:
• RideDist: Einstellen der Fahrstrecke.
Stellen Sie die Strecke ein, die Sie zu fahren beabsichtigen, und der Fahrradcomputer wird Ihre
Ankunftszeit am Ziel entsprechend Ihrer Fahrgeschwindigkeit berechnen.
• AutoLap: Automatische Rundenaufzeichnung.
Stellen Sie die Distanz für die AutoLap-Funktion ein.
Wenn Sie die AutoLap-Funktion nutzen, zeichnet der Fahrradcomputer kontinuierlich und
automatisch die Rundenzeiten auf, wenn Sie die vor eingestellte Distanz gefahren sind. Zum
Beispiel: Wenn Sie die AutoLap-Distanz auf 1 km einstellen, wird automatisch jeden Kilometer
eine Rundenzeit aufgezeichnet.
Page 89

32 – DEUTSCH
Während Ihrer Trainingsaufzeichnung sind beide Funktionen in Betrieb. Weitere Informationen fi nden Sie auf den Seiten
18-21.
1. Ausgehend von der Uhrzeitanzeige drücken Sie kurz so oft die RECHTE Taste, bis SETTINGS im Display erscheint.
2. Drücken Sie die MITTLERE Taste. Cycling SET wird angezeigt.
3. Fahren Sie fort, indem Sie die MITTLERE Taste drücken und den nachstehenden Schritten folgen:
4. RideDist
On / OFF (ein/aus)
5. RideDist
On (ein)
6. AutoLap
On / OFF (ein/aus)
7. AutoLap
On (ein)
RECHTE Taste
• Schalten Sie die Strecken-Mess-Funktion ein
oder aus.
RECHTE Taste
• Stellen Sie die Kilometer ein.
RECHTE Taste
• Schalten Sie die automatische
Rundenaufzeichnung ein oder aus.
RECHTE Taste
• Stellen Sie die Kilometer ein.
MITTLERE Taste
(überspringen Sie Schritt 5., wenn Sie die
Funktion ausgeschaltet haben)
MITTLERE Taste
MITTLERE Taste
(überspringen Sie Schritt 7., wenn Sie die
Funktion ausgeschaltet haben)
MITTLERE Taste
• Halten Sie die LINKE Taste gedrückt, um in die Uhrzeitanzeige zurückzukehren.
Displayanzeige: Drücken Sie die RECHTE Taste, um den
blinkenden Wert einzustellen.
Drücken Sie zur Bestätigung die
MITTLERE Taste.
Page 90

DEUTSCH – 33
5. Timer 1
On / OFF (ein/aus)
6. Timer 1
On (ein)
RECHTE Taste
• Schalten Sie den Timer ein oder aus.
RECHTE Taste
• Stellen Sie die Minuten ein (0-99 Minuten).
RECHTE Taste
• Stellen Sie die Sekunden ein (0-59 Sekunden).
MITTLERE Taste
(überspringen Sie Schritt 6., wenn Sie die
Funktion ausgeschaltet haben)
MITTLERE Taste
MITTLERE Taste
5.2 EINSTELLEN DER TIMER (TIMER SET)
Ihr Fahrradcomputer ist mit zwei alternierenden Timern ausgestattet, die während Ihrer Trainingsaufzeichnung in Betrieb sind.
Tipp: Benutzen Sie die Timer z. B., um sich daran erinnern zu lassen, dass Sie von Zeit zu Zeit etwas trinken oder zum Einstellen von
Zeitintervallen, damit Sie wissen, wann Sie z. B. von einer hohen zu einer leichten Trainingsintensität wechseln und umgekehrt.
1. Ausgehend von der Uhrzeitanzeige drücken Sie kurz so oft die RECHTE Taste, bis SETTINGS angezeigt wird.
2. Drücken Sie die MITTLERE Taste. Cycling SET erscheint im Display.
3. Drücken Sie die RECHTE Taste. Timer SET wird angezeigt.
4. Fahren Sie durch Drücken der MITTLEREN Taste fort und folgen Sie den nachstehenden Schritten:
• Um den Timer 2 einzustellen, wiederholen Sie die Schritte 5. und 6. Sie können Timer 2 nur einstellen, wenn Sie den Timer 1
eingestellt haben.
• Halten Sie die LINKE Taste gedrückt, um in die Uhrzeitanzeige zurückzukehren.
Displayanzeige: Drücken Sie die RECHTE Taste, um den
blinkenden Wert einzustellen.
Drücken Sie zur Bestätigung die
MITTLERE Taste.
Page 91

34 – DEUTSCH
5.3 EINSTELLEN DER HERZFREQUENZ-GRENZWERTE (LIMITS SET)
Bei der Einstellung der Herzfrequenz-Grenzwerte (Limits SET) können Sie können Sie den Grenzwert-Typ auswählen:
• Manuelle Einstellung der Grenzwerte: Sie können eine Herzfrequenz-Zielzone erstellen, indem Sie die oberen und
(Manual Limits) unteren Herzfrequenz-Grenzwerte manuell eingeben.
• OwnZone: Ihr Fahrradcomputer ist in der Lage, Ihre individuelle persönliche Herzfrequenz Trainingszone automatisch zu bestimmen. Diese Trainingszone wird OwnZone
(OZ) genannt. Die OwnZone garantiert Ihnen ein Training im aeroben Bereich.
Weitere Informationen fi nden Sie auf Seite 36.
• Herzfrequenz-Zielzone ausschalten: Sie können die Herzfrequenz-Zielzone auch ausschalten, somit werden während
(Limits Off) der Trainingsaufzeichnung keine Herzfrequenz-Grenzwerte angezeigt und in der
Datei-Zusammenfassung oder Datei keine Herzfrequenz-Zielzonen-Werte
(InZone) berechnet.
Nutzen Sie die OwnZone oder die Herzfrequenz-Grenzwerte, um eine bestimmte Trainingsintensität gemäß Ihren
Trainingszielen beizubehalten.
1. Ausgehend von der Uhrzeitanzeige drücken Sie kurz so oft die RECHTE Taste, bis SETTINGS in der Anzeige erscheint.
2. Drücken Sie die MITTLERE Taste. Cycling SET wird angezeigt.
3. Drücken Sie kurz so oft die RECHTE Taste, bis Limits SET im Display erscheint.
Page 92

DEUTSCH – 35
5. TYPE
Manual/OwnZone/Off
6. HR/HR %
SET
7. HighLimit
8. LowLimit
RECHTE Taste
• Wählen Sie Manual (manuelle Eingabe) oder
OwnZone (automatische Bestimmung Ihrer
persönlichen Herzfrequenz-Zielzone) oder Off
(aus).
RECHTE Taste
• Wählen Sie die Anzeige Ihrer Herzfrequenz
in Schlägen pro Minute (HR) oder als % Ihrer
maximalen Herzfrequenz (% HF
max
).
RECHTE Taste
• Stellen Sie den oberen Herzfrequenz-Grenzwert
ein.
RECHTE Taste
• Stellen Sie den unteren Herzfrequenz-Grenzwert
ein.
MITTLERE Taste
(überspringen Sie die Schritte 6.-8., wenn Sie
die Funktion ausgeschaltet haben)
MITTLERE Taste
(überspringen Sie die Schritte 7.-8., wenn Sie
sich für die OwnZone-Funktion entscheiden)
MITTLERE Taste
MITTLERE Taste
4. Fahren Sie durch Drücken der MITTLEREN Taste fort und folgen Sie den nachstehenden Schritten:
• Halten Sie die LINKE Taste gedrückt, um in die Uhrzeitanzeige zurückzukehren.
Displayanzeige: Drücken Sie die RECHTE Taste, um den
blinkenden Wert einzustellen.
Drücken Sie zur Bestätigung die
MITTLERE Taste.
Page 93

36 – DEUTSCH
5.3.1 OWNZONE
Die OwnZone (OZ)-Funktion bestimmt Ihre persönliche Trainingszone. Die OwnZone Methode sorgt für ein vielseitiges Training
und basiert auf Messung und Analyse der Herzfrequenz-Variabilität während der Aufwärmphase. Die HerzfrequenzVariabilität spiegelt die physiologischen Veränderungen in Ihrem Körper wider. Bei den meisten Erwachsenen enspricht die
OwnZone einer Intensität von ca. 65-85 % der maximalen Herzfrequenz. Die OwnZone kann täglich variieren und hängt von
Ihrer körperlichen und geistigen Verfassung ab (zum Beispiel, wenn Sie sich gestresst oder von der vorausgegangenen
Trainingseinheit noch nicht vollständig erholt fühlen). Das Training mit der OwnZone macht mehr Freude und ist leichter.
Sie müssen sich keine Gedanken über Berechnungen oder Faustformeln für die Bestimmung Ihrer Trainingsintensitätszone
machen.
Die OwnZone wird während der Aufwärmphase einer Trainingseinheit ermittelt. Die Ermittlung dauert ca. 1-5 Minuten. Am
einfachsten lässt sich die OwnZone durch Rad fahren, Gehen oder Laufen festlegen. Evtl. fällt es Ihnen am leichtesten, die
OwnZone beim Indoor Cycling zu ermitteln, da hier die Geschwindigkeit einfacher zu kontrollieren ist. Das Prinzip ist, dass
Sie sehr langsam und mit einer leichten Intensität zu trainieren beginnen und dann stufenweise Ihre Herzfrequenz erhöhen.
War die Bestimmung der OwnZone aufgrund Ihrer Herzfrequenz-Variation nicht erfolgreich, so wird Ihre zuletzt bestimmte
OwnZone oder Ihre altersabhängige Zielzone (65-85 % der HF
max
) verwendet.
Die OwnZone wurde für gesunde Menschen entwickelt. Manche Gesundheitszustände können die Herzfrequenz-Variabilitätsbasierte OwnZone-Bestimmung unmöglich machen, so zum Beispiel Bluthochdruck, manche Herzrhythmusstörungen und
bestimmte Medikamte.
Page 94

DEUTSCH – 37
Bestimmen Ihrer OwnZone Herzfrequenz-Grenzwerte
Überprüfen Sie vor Bestimmung Ihrer OwnZone:
• ob Sie Ihre persönlichen Benutzerinformationen korrekt eingegeben haben. Der Fahrradcomputer fragt Sie vor der
Akzeptierung der Einstellung nach den fehlenden Informationen (z. B. nach dem Geburtsdatum).
• Sie die OwnZone-Funktion eingeschaltet haben. Bei aktivierter OwnZone-Funktion bestimmt der Fahrradcomputer
automatisch Ihre OwnZone, sobald Sie mit der Aufzeichnung einer Trainingseinheit beginnen.
Sie sollten Ihre OwnZone immer neu bestimmen:
• wenn Sie die Trainingsumgebung oder die Trainingsform ändern;
• wenn Sie nach einer Pause von mehr als einer Woche das Training wieder aufnehmen;
• wenn Ihr physisches Wohlbefi nden bei Trainingsbeginn vom Normalzustand abweicht, z. B. durch Stress, mangelnder
Erholung von der letzten Trainingseinheit, oder Krankheit;
• wenn Sie Ihre Einstellungen geändert haben.
1. Ausgehend von der Uhrzeitanzeige drücken Sie die MITTLERE Taste. Das OwnZone Symbol
erscheint im
Display. Falls Sie die OwnZone Bestimmung überspringen und die zuvor bestimmte OwnZone benutzen möchten, drücken
Sie die MITTLERE Taste erneut.
2. Die Bestimmung der OwnZone beginnt und läuft in 5 Stufen ab. Jede Stufe dauert 1 Minute.
Beginnen Sie mit dem Rad fahren und halten Sie Ihre Herzfrequenz in dieser ersten Phase unter 100 Schlägen/
Minute bzw. 50 % Ihrer HF
max
. Nach jeder einminütigen Phase hören Sie einen Signalton (wenn die Signaltöne
eingeschaltet sind), und die Displaybeleuchtung leuchtet am Ende der Phase automatisch auf (wenn Sie die
Beleuchtung bereits einmal zuvor aktiviert haben).
Fahren Sie weiter Rad und erhöhen Sie Ihre Herzfrequenz langsam um 10-20 Schläge/Minute bzw. 5 % Ihrer HF
max
.
Steigern Sie Ihre Herzfrequenz nochmals langsam um 10-20 Schläge/Minute bzw. 5 % Ihrer HF
max
.
Erhöhen Sie Ihre Herzfrequenz langsam um weitere 10-20 Schläge/Minute bzw. 5 % Ihrer HF
max
.
Auch in der letzten Phase steigern Sie Ihre Herzfrequenz nochmals langsam um 10-20 Schläge/Minute bzw. 5 %
Ihrer HF
max
.
Sie können die OwnZone auch fürs Walken/Laufen bestimmen. Erhöhen Sie hierfür Ihre Geschwindigkeit stufenweise
von Walken zu langsamen (Stufe 4) bzw. „normalem” Laufen (Stufe 5). Bestimmen Sie die OwnZone jedoch immer
sportartspezifi sch.
Page 95

38 – DEUTSCH
3. An einem gewissen Punkt während der Phasen hören Sie zwei akustische Signale. Diese melden, dass Ihre OwnZone
bestimmt wurde. Wenn die Bestimmung erfolgreich war, werden OwnZone und Updated abwechselnd gemeinsam mit
den Herzfrequenz-Grenzwerten angezeigt. Die Grenzwerte werden entsprechend Ihren Einstellungen angezeigt
(als Schläge pro Minute oder % der HF
max
).
4. Sollte die Bestimmung misslungen sein, werden Ihre zuletzt bestimmten OwnZone Werte verwendet und angezeigt.
Wenn Sie die OwnZone zum ersten Mal bestimmt haben, wird Ihre altersabhängige Zielzone verwendet.
Sie können jetzt mit dem Training fortfahren. Versuchen Sie, in diesen vorgegeben Herzfrequenz-Grenzwerten zu trainieren,
um den besten Trainingserfolg zu erzielen.
Weitere Informationen zur OwnZone erhalten Sie auf den Internetseiten www.polar.com.
Page 96

DEUTSCH – 39
5.4 EINSTELLEN DER FAHRRAD-FUNKTIONEN (BIKE SET)
Sie können in den Fahrradcomputer Einstellungen für zwei verschiedene Fahrräder eingeben. Nehmen Sie die Einstellungen
für beide Fahrräder vor. Wenn Sie mit der Trainingsaufzeichnung beginnen, wählen Sie einfach Fahrrad 1 oder 2. Sie können
für beide Fahrräder folgende Einstellungen vornehmen:
• AutoStart ein/aus Die Funktion AutoStart startet oder beendet die Trainingsaufzeichnung automatisch,
wenn Sie mit dem Rad fahren beginnen oder es unterbrechen.
• Cadence (Trittfrequenz) ein/aus Der kabellose Trittfrequenzmesser misst die Pedalumdrehungen pro Minute.
Der separate Polar Trittfrequenzmesser ist hierfür erforderlich.
• Wheel (Reifenumfang) Die Eingabe des Reifenumfangs ist Voraussetzung für die Fahrradinformationen.
Weitere Informationen fi nden Sie auf der folgenden Seite.
1. Ausgehend von der Uhrzeitanzeige drücken Sie kurz so oft die RECHTE Taste, bis SETTINGS im Display erscheint.
2. Drücken Sie die MITTLERE Taste. Cycling SET wird angezeigt.
3. Drücken Sie kurz so oft die RECHTE Taste, bis Bike SET in der Anzeige erscheint.
Page 97

40 – DEUTSCH
5. Bike 1 / 2 (Fahrrad 1/2)
6. AutoStart
On / OFF (AutoStart ein/aus)
7. Cadence*
On / OFF
(Trittfrequenz ein/aus)
8. Wheel (Reifenumfang)
RECHTE Taste
• Wählen Sie aus, für welches Fahrrad Sie
Einstellungen vornehmen möchten: Fahrrad 1 oder 2.
RECHTE Taste
• Schalten Sie die Funktion AutoStart ein oder aus.
RECHTE Taste
• Schalten Sie die Funktion Trittfrequenz ein oder aus.
RECHTE Taste
• Stellen Sie den Reifenumfang Ihres Fahrrades in mm
ein.
MITTLERE Taste
MITTLERE Taste
MITTLERE Taste
MITTLERE Taste
4. Fahren Sie durch Drücken der MITTLEREN Taste fort und folgen Sie nachstehenden Schritten:
• Halten Sie die LINKE Taste gedrückt, um in die Uhrzeitanzeige zurückzukehren.
Hinweis:
• Wegen der höheren Genauigkeit wird der Reifenumfang immer in Millimetern angegeben.
• Die Geschwindigkeits- und Strecken-Mess-Funktionen sind stets eingeschaltet.
*Separater Polar Trittfrequenzmesser erforderlich.
Displayanzeige: Drücken Sie die RECHTE Taste, um den
blinkenden Wert einzustellen.
Drücken Sie zur Bestätigung die
MITTLERE Taste.
Page 98

DEUTSCH – 41
Sie haben die folgenden Alternativen zur Ermittlung des Reifenumfangs Ihres Fahrrades:*
METHODE 1:
Lesen Sie auf dem Reifen Ihres Fahrrades die in Zoll angegebene Reifengröße ab. Der Tabelle unten können Sie den der
jeweiligen Reifengröße entsprechenden Reifenumfang in Millimetern entnehmen:
Hinweis: *Die Reifengrößen in der Tabelle sind Richtwerte, da diese von dem Reifentyp und Luftdruck abhängen.
25-559 26 x 1.0 1884
23-571 650 x 23C 1909
35-559 26 x 1.50 1947
37-622 700 x 35C 1958
47-559 26 x 1.95 2022
20-622 700 x 20C 2051
52-559 26 x 2.0 2054
23-622 700 x 23C 2070
25-622 700 x 25C 2080
28-622 700 x 28 2101
32-622 700 x 32C 2126
42-622 700 x 40C 2189
47-622 700 x 47C 2220
ETRTO Reifengröße (Zoll) Reifenumfang (mm)
Page 99

42 – DEUTSCH
mm
-4 mm
mm
METHODE 2:
Markieren Sie eine Stelle auf dem Reifenmantel des Vorderrades. Als Markierung ist das Ventil geeignet. Bringen Sie
diese Markierung mit einer Markierung auf der Straße zur Deckung. Stützen Sie sich auf den Lenker und schieben Sie das
Fahrrad, bis das Vorderrad genau eine Umdrehung vollzogen hat. Markieren Sie jetzt die Stelle auf dem Boden, an der die
Reifenmarkierung wieder den Boden berührt.
Messen Sie den Abstand zwischen den beiden Bodenmarkierungen, und Sie erhalten jetzt den
Reifenumfang.
Subtrahieren Sie wegen Ihres Gewichts auf dem Fahrrad 4 mm von der gemessenen Zahl.
Dies ist der Wert, den Sie in den Fahrradcomputer eingeben müssen.
Page 100

DEUTSCH – 43
5. Time
• Time Mode 24h/12h
(Uhrzeit-Modus 24h/12h)
• AM/PM
(für den 12-Std.-Modus)
RECHTE Taste
• Wählen Sie den 24-Std.- oder den 12-Std.-Modus.
RECHTE Taste
• Wählen Sie AM oder PM.
RECHTE Taste
• Stellen Sie die Stunden ein.
RECHTE Taste
• Stellen Sie die Minuten ein.
MITTLERE Taste
MITTLERE Taste
MITTLERE Taste
MITTLERE Taste
5.5 EINSTELLEN DER UHREN-FUNKTIONEN (WATCH SET)
In dem Menü Uhreinstellungen können Sie die Tageszeit und die Datumseinstellungen vornehmen und verändern.
1. Ausgehend von der Uhrzeitanzeige drücken Sie kurz so oft die RECHTE Taste, bis SETTINGS im Display erscheint.
2. Drücken Sie die MITTLERE Taste. Cycling SET wird angezeigt.
3. Drücken Sie kurz so oft die RECHTE Taste, bis Watch SET erscheint.
4. Fahren Sie durch Drücken der MITTLEREN Taste fort und folgen Sie den nachstehenden Schritten:
Displayanzeige: Drücken Sie die RECHTE Taste, um den
blinkenden Wert einzustellen.
Drücken Sie zur Bestätigung die
MITTLERE Taste.
 Loading...