

Page 1

CONTENTS
The information relevant to using the product with the transmitter is in blue text.
1. INTRODUCTION TO THE POLAR CYCLING COMPUTER ........................................................................................................7
1.1 PRODUCT ELEMENTS ...............................................................................................................................................7
1.2 USING YOUR CYCLING COMPUTER FOR THE FIRST TIME ...........................................................................................8
1.3 INSTALLING THE BIKE MOUNT, CYCLING COMPUTER AND SPEED SENSOR ..............................................................12
1.3.1 Bike Mount and Cycling Computer..............................................................................................................12
1.3.2 Speed Sensor ..............................................................................................................................................13
1.4 WEARING YOUR TRANSMITTER ...............................................................................................................................15
2. EXERCISING .................................................................................................................................................................... 16
2.1 EXERCISE RECORDING AND HEART RATE MEASURING ...........................................................................................16
2.2 FUNCTIONS DURING EXERCISE ..............................................................................................................................18
2.3 STOPPING THE EXERCISE AND VIEWING SUMMARY FILE .........................................................................................22
3. VIEWING RECORDED INFORMATION - FILE .....................................................................................................................23
4. TOTAL VALUES .................................................................................................................................................................27
5. SETTINGS ........................................................................................................................................................................31
5.1 RIDING DISTANCE FOR ESTIMATED TIME OF ARRIVAL FUNCTION AND
AUTOMATIC LAP RECORDING SETTINGS (CYCLING SET) ..........................................................................................31
5.2 TIMER SETTINGS (TIMER SET) ................................................................................................................................33
5.3 HEART RATE LIMITS SETTINGS (LIMITS SET) ...........................................................................................................34
5.3.1 OwnZone .....................................................................................................................................................36
5.4 BICYCLE SETTINGS (BIKE SET) ...............................................................................................................................39
ENGLISH – 5
Page 2

5.5 WATCH SETTINGS (WATCH SET) ..............................................................................................................................43
5.6 PERSONAL INFORMATION SETTINGS (USER SET) ....................................................................................................45
5.7 CYCLING COMPUTER SOUNDS AND UNITS SETTINGS (GENERAL SET) .....................................................................48
6. EDIT YOUR CYCLING COMPUTER SETTINGS WITH A COMPUTER .....................................................................................49
7. CARE AND MAINTENANCE ................................................................................................................................................50
8. PRECAUTIONS ................................................................................................................................................................. 53
9. FREQUENTLY ASKED QUESTIONS .....................................................................................................................................55
10. TECHNICAL SPECIFICATIONS ..........................................................................................................................................57
11. LIMITED POLAR INTERNATIONAL GUARANTEE .................................................................................................................58
12. POLAR DISCLAIMER ........................................................................................................................................................59
13. INDEX ..............................................................................................................................................................................60
6 – ENGLISH
Page 3

1. INTRODUCTION TO THE POLAR CYCLING COMPUTER
1.1 PRODUCT ELEMENTS
The Polar cycling computer package consists of the following parts:
CS100b set does not include a transmitter, but you can buy it as an
accessory product.
Cycling Computer
The cycling computer displays and records
your cycling and exercise data during
exercise. Enter your personal settings into
the cycling computer and analyze exercise
information after workouts.
Polar Bike Mount™
Secure the bike mount to your bike and
attach the cycling computer to it.
Polar Speed Sensor™
A wireless speed sensor measures speed and
distance during cycling.
Polar Coded Transmitter
CS100 set includes a transmitter. The
transmitter sends your heart rate signal to
the cycling computer. The electrode areas
on the back of the transmitter detect your
heart rate.
An elastic strap holds the transmitter
around your chest.
The information relevant to using the product
with the transmitter is in blue text.
Polar Web Services
www.PolarCyclingCoach.com is a complete web service tailored to
support your training goals. Free registration gives you access to a
personalized training program, training diary, useful articles, and
much more. In addition, you can get the latest product tips and
support online at www.polar.fi .
Customer Service and International Guarantee Information
If your cycling computer needs repair, send it with a Return Card for
service to your Polar Service Center. The two-year Polar guarantee is
issued to the original customer/purchaser of the product. Keep the
International Guarantee Card as your proof of purchase.
ENGLISH – 7
Page 4

1.2 USING YOUR CYCLING COMPUTER FOR THE FIRST TIME
Enter your settings in the Basic Settings mode (time, date, units, and personal settings).
How to enter Basic Settings
Entering accurate personal information ensures that you receive correct feedback based on your performance (calorie
consumption, OwnZone determination etc).
Activate the cycling computer by pressing the MIDDLE button.
The display fi lls with numbers and letters.
1. Press the MIDDLE button. BASIC SET is displayed.
2. Continue by pressing the MIDDLE button and follow the steps below:
The display reads: Press the RIGHT button to set the fl ashing value Press the MIDDLE button to accept
the value
3. Time Set
• Time Mode 24h / 12h
• AM / PM (for 12h format)
8 – ENGLISH
RIGHT
• Set 24h or 12h format.
RIGHT
• Set AM or PM.
MIDDLE
MIDDLE
Page 5

The display reads: Press the RIGHT button to set the fl ashing value Press the MIDDLE button to accept
the value
• Hours
• Minutes
4. Date Set**
• Day / Month
RIGHT
• Set the hours.*
RIGHT
• Set the minutes.*
RIGHT
• Set the day (in 24h format) or
MIDDLE
MIDDLE
MIDDLE
the month (in 12h format).*
• Month / Day
RIGHT
• Set the month (in 24h format) or
MIDDLE
the day (in 12h format).*
• Year
RIGHT
• Set the year.*
MIDDLE
Note:
• *The numbers scroll faster if you press and hold the RIGHT button as you adjust the value.
• **The date will be displayed according to the time format selected (24h: day - month - year / 12h: month - day - year).
• After a change of battery or after you reset the cycling computer, you only need to set the time and date in the Basic Settings. You can
skip the rest of the settings by pressing and holding the LEFT button.
ENGLISH – 9
Page 6

The display reads: Press the RIGHT button to set the fl ashing value Press the MIDDLE button to accept
the value
5. Unit
kg/cm or lb/ft
6. Weight
kg/lb
RIGHT
• Set the units for weight and height:
kg/cm or lb/ft.
RIGHT
• Set your weight in kilograms or pounds.
MIDDLE
MIDDLE
Note: If you chose the wrong units, you can still
change them by pressing the LEFT button and
returning to step 5.
7. Height
cm/ft
8. Birthday
• Day / Month
• Month / Day
• Year
RIGHT
• Set your height in cm or ft.
• Set inches (if you chose lb/ft).
RIGHT
• Set the day (in 24h format) or
the month (in 12h format).
RIGHT
• Set the month (in 24h format) or
the day (in 12h format).
RIGHT
MIDDLE
MIDDLE
MIDDLE
MIDDLE
MIDDLE
• Set the year.
10 – ENGLISH
Page 7

The display reads: Press the RIGHT button to set the fl ashing value Press the MIDDLE button to accept
the value
9. Sex
Male / Female
RIGHT
• Set male or female.
MIDDLE
• Settings done is displayed.
• To change your settings, press the LEFT button until you return to the desired setting.
• To accept the settings, press the MIDDLE button and the cycling computer goes to the Time mode.
The cycling computer goes to the power save mode (blank screen) by pressing the LEFT button or if you do not press any
button in the Time mode for fi ve minutes. You can turn the cycling computer on again by pressing any button.
ENGLISH – 11
Page 8

1.3 INSTALLING THE BIKE MOUNT, CYCLING COMPUTER AND SPEED SENSOR
1.3.1 BIKE MOUNT AND CYCLING COMPUTER
1. You can install the bike mount and the cycling computer on the left or right side of the handlebar or on the stem with
cable ties.
2.
3.
12 – ENGLISH
2. Place the rubber part on the
handlebar or stem and
insert the bike mount on top
of it.
3. Pass the cable ties over the
bike mount and adjust
them around the handlebar/
stem. Secure the bike mount
fi rmly. Cut off any excess
cable tie ends.
4. Position the cycling computer on to the bike mount. Turn
the cycling computer clockwise until you hear a click.
You can release the cycling computer by pressing it
down and simultaneously turning it counter clockwise.
Page 9

1.3.2 SPEED SENSOR
To install the speed sensor and spoke magnet, you need cutters and a small screwdriver.
1.
1. Attach the speed sensor
2.
to the opposite side of the
front fork from the mounted
cycling computer.
The speed sensor and the
cycling computer should be
no more than 30-40 cm/
3.
1’-1’3’’ apart.
In case, the cycling computer is attached to the stem or if
you are exercising in surroundings with electromagnetic
interference, the distance should be minimized (minimum
30 cm/1’). The speed sensor and cycling computer should
form approximately a 90° angle.
Should the distance between the cycling computer and the
4.
speed sensor be longer than recommended (for example
on mountain bikes due to the front suspension), the speed
sensor could be attached on the same side of the front
fork as the cycling computer. In this case the maximum
distance is 50 cm/1´6”.
2. Attach the rubber part to the
sensor.
3. Pass the cable ties through
the speed sensor and rubber
part holes.
4. Adjust the sensor to the front
fork so that the POLAR logo
faces outwards. Adjust the
ties loosely. Do not tighten
them fully yet.
ENGLISH – 13
Page 10

5.
5. Attach the magnet to a spoke
at the same level as the
sensor. The magnet hole
must be facing the speed
max
4 mm /
0’16”
sensor. Fasten the magnet
to the spoke and tighten it
loosely with a screwdriver.
Do not tighten it fully yet.
Fine-tune the positioning of both the magnet and the speed
sensor so that the magnet passes close to the sensor but
does not touch it. Adjust the sensor towards the wheel/
spokes as much as possible. The gap between the sensor
and the magnet should be under 4 mm/0’16’’. The gap is
correct when you can fi t a cable tie just about between the
magnet and the sensor.
Rotate the front tyre so that you can see a speed reading on
the display of your cycling computer. The reading indicates
that the magnet and the speed sensor are positioned
correctly. Once the magnet and the speed sensor are positioned correctly, tighten the screw to the magnet with a
screwdriver. Also tighten the cable ties securely and cut
off any excess cable tie ends.
14 – ENGLISH
Your safety is important to us. While riding your bike,
please keep your eyes on the road to prevent any accidents
and injury. Check that you can turn the handlebar normally
and that the cable wires for brakes or gearing do not catch
on the bike mount or the speed sensor. Check also that the
bike mount or speed sensor does not hamper pedaling or
the use of brakes or gearing.
Before you start cycling, you should set the wheel size of
your bicycle into the cycling computer. For further information
see pages 39-42.
Page 11

1.4 WEARING YOUR TRANSMITTER
Coded heart rate transmission reduces interference from other heart rate monitors that are close by. To make sure that the
code search is successful and to ensure trouble-free heart rate monitoring, keep the cycling computer within 1 meter/
3 feet of your transmitter. Check that you are not near other people with heart rate monitors or any source of electromagnetic
disturbance. For further information on interference, see Precautions on page 53.
To measure your heart rate, you need to wear the transmitter.
1.
1. Attach one end of the
3.
transmitter to the elastic
strap.
3. Lift the transmitter off your
chest and moisten the two
grooved electrode areas on
the back.
2.
2. Adjust the strap length to fi t
4.
snugly and comfortably.
Secure the strap around your
chest, just below the chest
muscles, and buckle the
4. Check that the wet electrode
areas are fi rmly against your
skin and that the Polar logo
is in a central, upright
position.
strap to the transmitter.
See the following chapter for how to start measuring your
heart rate.
ENGLISH – 15
Page 12

2. EXERCISING
2.1 EXERCISE RECORDING AND HEART RATE MEASURING
You can record one Exercise File. There are two ways to start exercise recording. If you turn on the AutoStart function,
the cycling computer automatically starts and stops exercise recording when you start and stop cycling. If the AutoStart
function is off, you can start exercise recording by pressing the MIDDLE button. For further information on AutoStart and
how to set the function on/off, see pages 39-40.
Starting exercise without the transmitter:
1. Attach the bike mount and speed sensor on your bicycle
according to the instructions on pages 12-14.
2. Set your cycling computer on to the mounted bike mount.
3. Activate your blank cycling computer by pressing the MIDDLE
button. Before you start cycling, wait for 15 seconds until the
framed heart symbol
display. Now the computer is ready to record your exercise.
4. If you have turned AutoStart on, your speed appears on the
display when you start cycling. If you have turned AutoStart off,
you can start exercise recording by pressing the MIDDLE button
and your speed appears on the display. Your exercise time also
starts running.
5. If you have turned AutoStart on, the cycling computer
automatically stops exercise recording when you stop cycling.
If AutoStart is off, you can stop the exercise by pressing the
LEFT button twice. For further information on Stopping the
exercise, see page 22.
16 – ENGLISH
disappears from the Time mode
Starting exercise with the transmitter:
1. Wear the transmitter as described in the section “Wearing your
Transmitter” on page 15. Attach the bike mount and speed sensor
on your bicycle according to the instructions on pages 12-14.
2. Activate your blank cycling computer by pressing the MIDDLE
button and start from the Time mode. The cycling computer will
automatically read your heart rate. Wait until the computer
detects your heart rate and the framed, fl ashing heart symbol
appears on the display in 15 seconds.* Exercise time is not
recorded yet.
3. Set your cycling computer on to the mounted bike mount. If you
have turned AutoStart on, your heart rate value and speed
appear on the display when you start cycling. If you have turned
AutoStart off, you can start exercise recording by pressing the
MIDDLE button and your heart rate value and speed appear on
the display. Your exercise time also starts running.
4. If you have turned AutoStart on, the cycling computer
automatically stops exercise recording when you stop cycling.
If AutoStart is off, you can stop the exercise by pressing the
LEFT button twice. For further information on Stopping the
exercise, see page 22.
Page 13

• If your heart rate is not displayed and 00 appears on the display, the heart rate detection has stopped. Bring the cycling
computer near the Polar logo on the transmitter to restart the heart rate detection. No button press is needed.
• If OwnZone® is selected, the OwnZone determination procedure begins when exercise recording starts. For further
information, see the section OwnZone on page 36.
• To skip the OwnZone determination and use the previously determined OwnZone, press the MIDDLE button when OwnZone
symbol
appears on the display. If you have not determined your OwnZone before, your age-based heart rate
limits will be used.
Note: * A frame around the heart rate symbol indicates a coded heart rate transmission.
• If the cycling computer does not display your heart rate, make sure that the transmitter electrodes are moist and that the strap is
snug enough.
ENGLISH – 17
Page 14
2.2 FUNCTIONS DURING EXERCISE
Note: Your exercise information is saved only if the stopwatch, i.e. your exercise duration, has been running for more than one minute or at
least one lap has been stored.
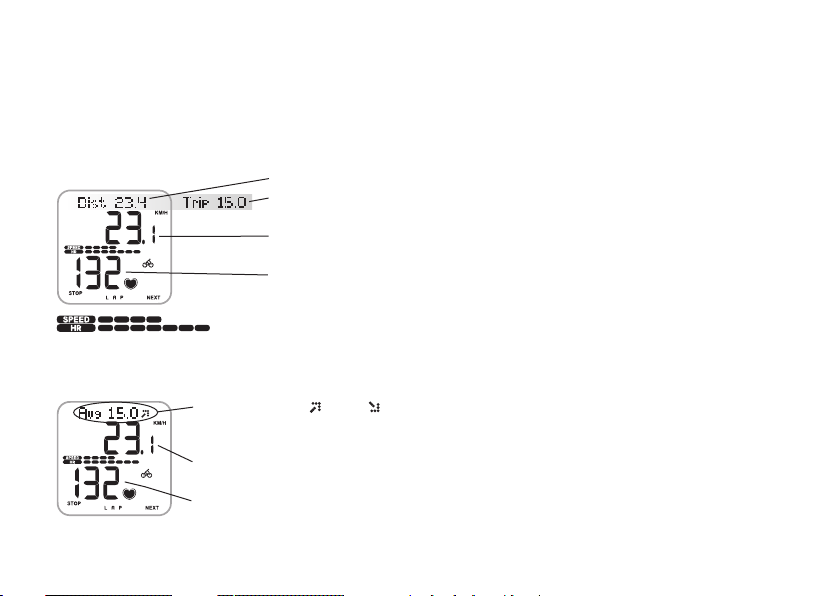
Changing the display information: Press the RIGHT button to view the following options during exercise:
1.
Speed and heart rate are also displayed graphically. The more bars are displayed, the higher
your heart rate or speed and vice versa. One speed bar represents 5 km/h or 3 mph, and when all ten bars are displayed your
speed is 50 km/h or 30 mph or higher.
2.
Average speed rise or drop
indicator.
Speed
Heart rate
18 – ENGLISH
Ridden distance alternates with trip distance when you have taken at least one lap time.
Trip distance is reset to zero each time you take a lap time by pressing the MIDDLE button.
Riding speed (km/h or m/h)
Heart rate. If there is no heart rate reading or you have not set your user information,
the speed is displayed instead.
Note: You can also press and hold the RIGHT button to set the computer
to browse the views automatically. Scrolling can be turned off by
pressing and holding the RIGHT button.
Page 15
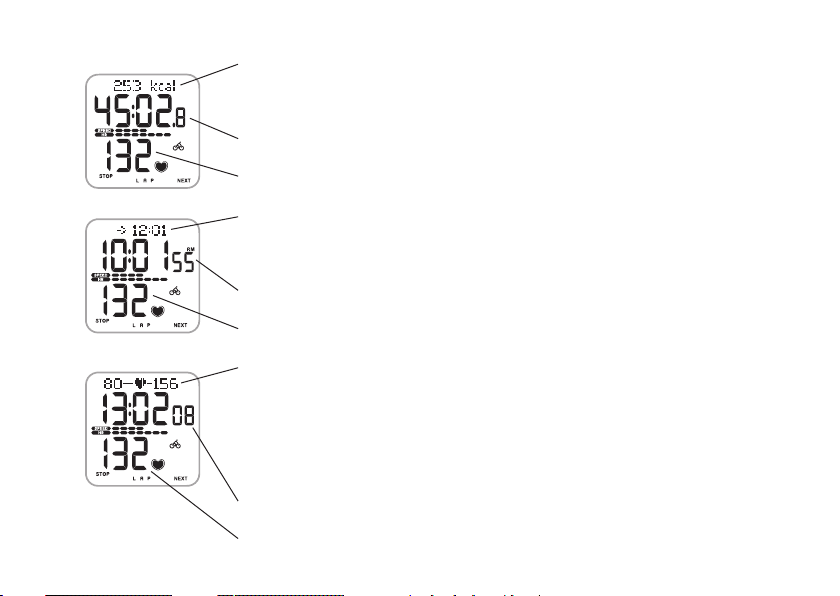
3.
The kilocalories you have burned so far. The cumulation of kilocalories starts as your heart rate
is displayed. If there is no heart rate reading or you have not set your user information, the speed
is displayed instead of calorie information.
Stopwatch, i.e., exercise duration.
Heart rate
4.
The estimated time of arrival, or if the riding distance function is off, the speed is displayed
instead. If you set the distance you are going to ride, the cycling computer estimates your arrival
time to the destination according to your riding speed. For further information, see page 31.
Time of day
Heart rate
5.
Heart rate limits: On the left, you can see your lower heart rate limit and on the right your
upper heart rate limit. The heart rate symbol moves left or right according to your heart rate.
If the heart symbol is not visible, it means your heart rate is either below the fl ashing lower
heart rate limit or above the fl ashing upper heart rate limit. In this case an alarm goes on,
provided the sounds are turned on. If there is no heart rate reading, the limits are not displayed.
For further information, see page 34.
Time you have exercised in target zone, i.e., within the heart rate limits.
Heart rate
ENGLISH – 19
Page 16
Target Zone Alarm: With the Target Zone Alarm you can make sure you exercise at the right intensity. When the target zone
heart rate limits are activated, the cycling computer sounds an alarm if you are above or below your heart rate limits. You
can set the limits for your target zone in the Settings/Limits SET menu. For further information, see page 34.
If you are out of your target zone, the heart rate value starts fl ashing and the cycling computer beeps with each heartbeat.
The symbol in the upper right corner of the display indicates that the Target Zone Alarm sound is activated. Note that
the button sounds can also be set on/off in the Settings mode. To turning the sounds on or off, see page 48.
Note: When heart rate limits are not activated, no Target Zone Alarm in the exercise recording will sound, nor will target zone information be
placed in the Summary File or File.
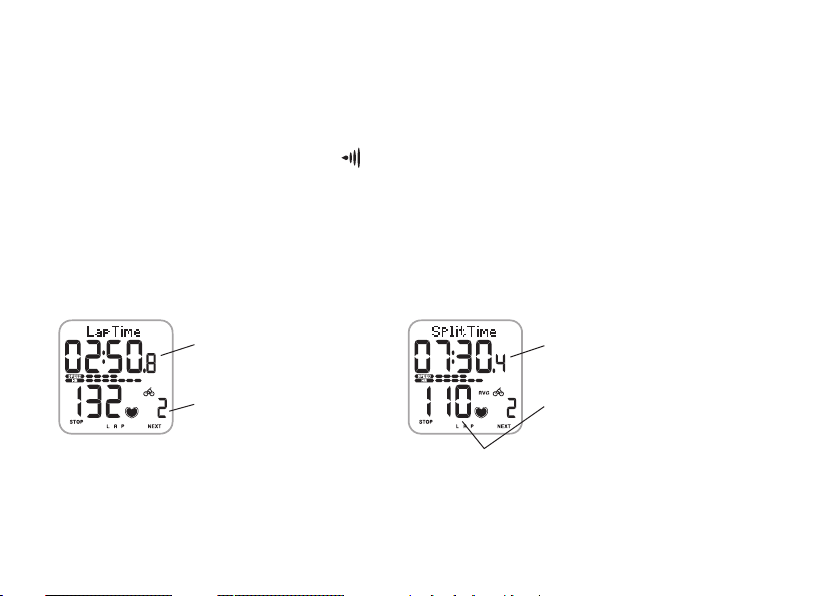
Storing Lap and Split Time: Press the MIDDLE button to store lap and split time.
Lap time indicates elapsed time for one lap. Split time is elapsed time from the beginning of the exercise until storing a lap
time (for example from the beginning of the exercise until the 4th lap was stored).
Lap time
Number of the lap
Split time
Average heart rate calculated
from the beginning of the lap.
Note:
• If you have activated the AutoLap function in the Settings mode, your cycling computer automatically records laps when you reach the
set distance, e.g., every kilometer or mile. For further information, see page 31.
• You can store up to 50 lap times. When the lap memory is full, LapTime FULL text will be displayed. You can take lap times during your
exercise, but they are no longer recorded.
20 – ENGLISH
Page 17

Timers: The timers of your cycling computer work during your exercise recording. The cycling computer beeps and shows
when the timer time matches. If only timer 1 is on, the same timer beeps always after the set time has elapsed during your
exercise. If timer 2 is also on, the timers alternate during your exercise. For further information, see page 33.
Pausing Exercise:
1. Press the LEFT button. Exercise recording, stopwatch, and other calculations are paused.
2. To continue, press the MIDDLE button.
Exercising in the dark: If you activate the backlight by pressing and holding the MIDDLE button during an exercise
recording, the backlight will reactivate automatically during the same exercise every time you press any button.
Note: If the maximum fi le recording time (99 hours 59 min 59 s) is exceeded, the cycling computer beeps, pauses recording and displays
HALT. Stop recording by pressing the LEFT button.
ENGLISH – 21
Page 18

2.3 STOPPING THE EXERCISE AND VIEWING SUMMARY FILE
1. Press the LEFT button to pause the exercise recording. Paused is displayed.
2. Press the LEFT button. Summary FILE is displayed and the following information starts automatically scrolling:
Recorded Exercise File Information
Duration of recorded exercise.
Average heart rate.
Limits
In Zone
Kcal
AvgSpeed
Avg Cad.
Distance
RideTime
*Optional Polar Cadence Sensor required.
22 – ENGLISH
Heart rate limits used during your exercise (if limits are set).
Time spent in target heart rate zone.
Kilocalories burnt during exercise.
Average speed.
Average cadence.*
Ridden distance.
Time used for cycling.
E.g., if you stop cycling but do not stop the exercise recording the cycled time counting will automatically stop,
but the exercised time will continue to elapse.
If the AutoStart function is activated, the exercise and cycled time is the same, because the cycling computer
automatically starts and stops the recording as you start and stop cycling.
Page 19

3. VIEWING RECORDED INFORMATION - FILE
The Exercise File allows you to review cycling and exercise information collected while recording
an exercise session. The cycling computer starts recording information in a File as soon as
you start recording by pressing the MIDDLE button or using AutoStart function. Your exercise
information is saved only if the stopwatch has been on for more than one minute or at least one
lap has been stored.
Viewing Exercise File
Press MIDDLE
• Date/Time
Press RIGHT
• Exe.Time/Avg HR/Max HR
Press RIGHT
• Limits
Press RIGHT
• In/Above/Below Zone
Press RIGHT
• Kcal
Press RIGHT
• Distance
Press RIGHT
• Avg/MaxSpeed
Press RIGHT
• Avg/Max.Cad*
Press RIGHT
• RideTime
Press RIGHT
• Laps
1. In the Time mode, press the RIGHT button. FILE is displayed.
2. Press the MIDDLE button. Date and Time alternate on the display.
Recorded Exercise File Information
*Optional Polar Cadence Sensor required.
The date and time when the exercise started alternate
on the display.
ENGLISH – 23
Page 20

3. Press the RIGHT button to browse through the recorded information.
Recorded Exercise File Information
Exe.Time
Avg HR / Max HR
Limits
In/Above/Below
Zone
Kcal
Distance
AvgSpeed
Max
Note:
• The alternating information switches automatically on the display. For quick scrolling, press the MIDDLE button.
• Press and hold the MIDDLE button to turn the backlight on in the File mode.
24 – ENGLISH
Duration of recorded exercise.
The average heart rate and maximum heart rate alternate in heartbeats per minute (bpm).
Note: If you set heart rate limits in percentages of your maximum heart rate, these values are
displayed also as percentages of your maximum heart rate (%).
The heart rate limits (in bpm or %) used during the exercise (if limits are set).
The exercise time that you have spent within (In Zone), above and below your target zone
limits (if limits are set) alternate on the display.
Expended kilocalories during the exercise.
Ridden distance.
Average and maximum speed.
Page 21

Recorded Exercise File Information
Avg Cad.
Max
RideTime
LAPS
Average and maximum cadence.*
Time used for cycling.
Number of laps while exercising.
Note: Lap information is displayed if you have stored at least one lap during
your exercise.
4. To view the best lap, press the MIDDLE button.
The best lap information is displayed:
The fastest lap time.
The number of the best lap.
5. Browse the laps with the RIGHT button. By pressing the MIDDLE button
you can browse the following lap information:
Split time.
Lap time.
The maximum heart rate and the average heart rate during the lap alternate
on the display.
Note: The last lap is automatically recorded when the exercise has been
stopped by pressing the LEFT button, but it is never the best lap.
*Optional Polar Cadence Sensor required.
ENGLISH – 25
Page 22

Recorded Exercise File Information
Speed
The speed when you recorded the lap.
Average speed during the lap.
Cadence*
The cadence when you recorded the lap.
Average cadence during the lap.
Distance
The Lap and
Split distances alternate on the display.
• To return to the Time mode, press and hold the LEFT button.
*Optional Polar Cadence Sensor required.
26 – ENGLISH
Page 23

4. TOTAL VALUES
Total values include cumulative and maximum values of information recorded during your
training sessions. Use the Total values fi le as a daily and weekly counter of your training values.
The values are updated automatically, when exercise recording is stopped.
In addition to the daily and weekly values, you can view the seasonal cumulative and maximum
values. These values are collected until you reset them, which means that you can use this
function for example as a monthly counter of your training values. For further information on
how to reset the values, see page 30.
Press MIDDLE
• Today’s TOTALS
Press RIGHT
• ThisWeek TOTALS
Press RIGHT
• Season’s TOTALS
Viewing the Total Values
1. In the Time mode, press the RIGHT button until TOTALS is displayed.
2. Press the MIDDLE button. Today’s TOTALS is displayed.
3. Select the time scale (Today’s, ThisWeek or Season’s) you want to view with the RIGHT button.
4. Press the MIDDLE button. Tot.Time and the total time are displayed.
5. If you choose Today’s TOTALS or ThisWeek TOTALS you can use the RIGHT button to browse through following information:
Tot.Time, Tot.Kcal, Distance1, Distance2*, MaxSpeed, Max.Cad** and RideTime.
*You need to do bike settings to see values for bike 1 and bike 2.
**Optional Polar Cadence Sensor required.
• Today’s TOTALS The cycling computer automatically resets the total values to zero at
midnight (00:00).
• ThisWeek TOTALS The cycling computer automatically resets the total values to zero
between Sunday and Monday at midnight (00:00).
• Season’s TOTALS Reset the total values to zero by yourself whenever you want.
ENGLISH – 27
Page 24

6. If you choose Season’s TOTALS you can use the RIGHT button to browse through following information:
Total Values
The date when cumulation started.
Total cumulative exercise duration.
The date when cumulation started.
Total cumulative burned kilocalories.
The date when cumulation started.
Odometer alternates with the date when cumulation started and the
cumulation for both bike 1 and bike 2.
Note: The odometer measures the cumulative ridden distance and it can
only be reset by using the UpLink. For further information, see page 49.
28 – ENGLISH
Page 25

Total Values
*Optional Polar Cadence Sensor required.
The date when cumulation started.
The ridden distance cumulation for bike 1 and bike 2 (Distance1 is updated when
bike 1 is used and Distance2 is updated when bike 2 is used).
The date when updated.
Maximum speed of the season.
The date when updated.
Maximum cadence of the season.*
ENGLISH – 29
Page 26

Total Values
The date when cumulation started.
Total cumulative ridden duration.
• To return to the Time mode, press and hold the LEFT button.
Resetting Season’s TOTALS or Returning the Previous Maximum Speed or Cadence* Value
Use Total values as a seasonal (or daily/weekly) counter of your exercise values by resetting them once a season. Instead of
resetting, you can return the previous maximum speed and cadence* value. Once reset or returned, a value cannot be retrieved.
Start with any display in the previous table (Tot.Time, Tot.Kcal, Distance1/2, MaxSpeed, Max.Cad*, RideTime).
1. Press the MIDDLE button to start resetting the desired value. Reset? is displayed. In MaxSpeed and Max.Cad* displays
you can continue by pressing the RIGHT button to return the previous value. Select Return Old using the MIDDLE button.
2. Press the MIDDLE button. Are You Sure is displayed.
3. If sure, press the MIDDLE button.
Alternatively, to cancel the reset, press the LEFT button.
• To return to the Time mode, press and hold the LEFT button.
Note: The odometer can be reset only by using the UpLink. For further information, see page 49.
*Optional Polar Cadence Sensor required.
30 – ENGLISH
Page 27

5. SETTINGS
Press MIDDLE
• Cycling SET
Press RIGHT
• Timer SET
Press RIGHT
• Limits SET
Press RIGHT
• Bike SET
Press RIGHT
• Watch SET
Press RIGHT
• User SET
Press RIGHT
• General SET
You can view or change the settings in the Settings menu.
Tip : Settings can also be confi gured using the Polar UpLink Tool™. They can then be transferred to your
cycling computer from your PC. For further information, see page 49.
To set values:
• Adjust or select a value with the RIGHT button.
• Accept your selection and proceed in the menu with the MIDDLE button.
• Cancel your selection or return to the previous mode or menu by pressing the LEFT button.
5.1 RIDING DISTANCE FOR ESTIMATED TIME OF ARRIVAL FUNCTION AND
AUTOMATIC LAP RECORDING SETTINGS (CYCLING SET)
In the cycling settings you can make two different settings:
• RideDist: Setting riding distance.
Set the distance you are going to ride and the cycling computer will estimate your arrival
time to the destination according to your riding speed.
• AutoLap: Automatic lap recording.
Set the distance for the automatic lap and the cycling computer will record the lap
information every time you reach this distance. For example, if you set 1 km/m, the cycling
computer will record lap information every kilometer or mile.
ENGLISH – 31
Page 28

Both functions work during your exercise recording. For further information, see pages 18-20.
1. In the Time mode, press the RIGHT button until SETTINGS is displayed.
2. Press the MIDDLE button. Cycling SET is displayed.
3. Continue by pressing the MIDDLE button and follow the steps below:
The display reads: Press the RIGHT button to set the fl ashing value Press the MIDDLE button to accept
the value
4. RideDist
On / OFF
5. RideDist
On
6. AutoLap
On / OFF
7. AutoLap
On
RIGHT
• Turn the riding distance function on or off.
RIGHT
• Adjust the kilometers or miles.
RIGHT
• Turn the automatic lap recording function on
or off.
RIGHT
• Adjust the kilometers or miles.
MIDDLE
(Skip step 5, if you turned the function off)
MIDDLE
MIDDLE
(Skip step 7, if you turned the function off)
MIDDLE
• To return to the Time mode, press and hold the LEFT button.
32 – ENGLISH
Page 29

5.2 TIMER SETTINGS (TIMER SET)
Your cycling computer is equipped with two alternating timers. The timers work during your exercise recording.
Tip: Use the timers for example as a reminder to drink at certain intervals or as a training tool in interval training, so that you know when
to switch from a harder to a lighter period and vice versa.
1. In the Time mode, press the RIGHT button until SETTINGS is displayed.
2. Press the MIDDLE button. Cycling SET is displayed.
3. Press the RIGHT button. Timer SET is displayed.
4. Continue by pressing the MIDDLE button and follow the steps below:
The display reads: Press the RIGHT button to set the fl ashing value Press the MIDDLE button to accept
the value
5. Timer 1
On / OFF
6. Timer 1
On
RIGHT
• Turn the Timer on or off.
RIGHT
• Adjust the minutes (0-99 minutes).
RIGHT
• Adjust the seconds (0-59 seconds).
• To set timer 2, repeat steps 5 and 6.
• To return to the Time mode, press and hold the LEFT button.
MIDDLE
(Skip step 6, if you turned the function off)
MIDDLE
MIDDLE
ENGLISH – 33
Page 30

5.3 HEART RATE LIMITS SETTINGS (LIMITS SET)
In the heart rate limits settings (Limits SET) you can choose the heart rate limit type:
• Manual Limits: You can create a target heart rate zone by setting the upper and the lower heart rate limits manually.
• OwnZone: The cycling computer is able to determine your individual aerobic (cadiovascular) exercise heart rate
zone automatically. This is called OwnZone (OZ). OwnZone ensures that you exercise within safe
limits. For further information, see page 36.
• Limits Off: You can also deactivate target zone limits, when there are no target heart rate limits during the
exercise recording, and no target heart rate zone values (In Zone) are calculated in the summary File
or File.
Use OwnZone or the target heart rate zone to maintain a particular level of intensity, depending on your objectives.
1. In the Time mode, press the RIGHT button until SETTINGS is displayed.
2. Press the MIDDLE button. Cycling SET is displayed.
3. Press the RIGHT button until Limits SET is displayed.
34 – ENGLISH
Page 31

4. Continue by pressing the MIDDLE button and follow the steps below:
The display reads: Press the RIGHT button to set the fl ashing value Press the MIDDLE button to accept
the value
5. TYPE
Manual / OwnZone / Off
6. HR / HR%
SET
7. HighLimit
8. LowLimit
RIGHT
• Select Manual or OwnZone (automatic defi nition
of your personal heart rate zone) or Off.
RIGHT
• Select heart rate displayed as beats per minute
(bpm) or as % of your maximum heart rate
).
(% HR
max
RIGHT
• Adjust the upper heart rate limit.
RIGHT
• Adjust the lower heart rate limit.
MIDDLE
(Skip steps 6-8, if you turned the function off)
MIDDLE
(Skip steps 7-8, if you chose OwnZone)
MIDDLE
MIDDLE
• To return to the Time mode, press and hold the LEFT button.
ENGLISH – 35
Page 32

5.3.1 OWNZONE
The Polar cycling computer is able to determine your individual aerobic (cardiovascular) exercise heart rate zone
automatically. This is called OwnZone (OZ).
OwnZone is based on measuring changes in heart rate variability during your warm up. Heart rate variability refl ects
changes in your physiology. For most adults OwnZone corresponds to 65-85 % of maximum heart rate. OwnZone can be
determined in 1-5 minutes during a warm-up period by cycling, walking or jogging. OwnZone may be easier to fi nd during
indoor cycling than outdoor cycling because the speed is easier to control. The main idea is that you start exercising slowly
at a light intensity, i.e., heart rate lower than 100 bpm/50 % HR
. You then gradually increase the intensity of your
max
exercise to raise your heart rate as smoothly as possible. Using OwnZone makes exercise easier and more enjoyable.
OwnZone has been developed for healthy people. Some health conditions may cause heart rate variability based OwnZone
determination to fail, for example high blood pressure, some cardiac arrhythmias, and some medications.
36 – ENGLISH
Page 33

Determining Your OwnZone Heart Rate Limits
Before you start to determine your OwnZone, make sure of the following:
• You have entered your user settings correctly. The cycling computer will ask for missing information (for example date of
birth) before accepting limit settings.
• You have activated the OwnZone limits. With the OwnZone function on, the cycling computer will automatically determine
your OwnZone every time you start recording an exercise session.
You should redefi ne your OwnZone:
• when changing your exercise environment or exercise mode;
• if you are returning to exercise after a more than one week off;
• if you feel unusual about the physical state of your body when starting to exercise. For example you are stressed, not
recovered from the previous training or not feeling well;
• after changing your settings.
1. Start from the Time mode and press the MIDDLE button. The OwnZone symbol appears on the display. If you
want to skip OwnZone determination and use the previously determined OwnZone, press the MIDDLE button.
2. OwnZone determination starts. Determination of your OwnZone happens in fi ve stages.
stage. After each stage you will hear a beep (if the sound settings are on) and the display automatically
Cycle or walk at a slow pace for 1 min. Keep your heart rate below 100 bpm/ 50 % HR
illuminates (if you have switched the backlight on once before), indicating the end of the stage.
Cycle or walk at a normal pace for 1 min. Slowly increase your heart rate by 10-20 bpm/ 5 % HR
Cycle or walk at a brisk pace for 1 min. Slowly increase your heart rate by 10-20 bpm/ 5 % HR
Cycle at a brisk pace or jog at a slow pace for 1 min. Slowly increase your heart rate by 10-20 bpm/ 5 % HR
Cycle or jog at a brisk pace or run for 1 min.
during this fi rst
max
max
.
max
ENGLISH – 37
.
max
.
Page 34

3. At some point during the stages, you hear two beeps. Your OwnZone has been determined. If the determination was
successful, OwnZone and Updated alternate with the heart rate limits on the display. The limits are displayed as beats
per minute (bpm) or as a percentage of your maximum heart rate (%HR
) depending on your settings.
max
4. If the determination was not successful, your previously determined OwnZone limits will be used and OwnZone appears
with the limits on the display. If you are determining your OwnZone for the fi rst time, then the limits based on your age
will be used.
You can now continue with your exercise. Try to stay within the given heart rate zone to maximize exercise benefi ts.
For further information on OwnZone, see www.polar.fi and www.polarownzone.com.
38 – ENGLISH
Page 35

5.4 BICYCLE SETTINGS (BIKE SET)
You can set two bike preferences for the cycling computer. Prepare the settings for both bikes; when you start exercise
recording, just select bike 1 or 2. For both bikes you can prepare the following settings:
• AutoStart on/off The AutoStart function starts or stops automatically the exercise recording when you start or
stop cycling.
• Cadence on/off A wireless cadence sensor measures the speed at which you turn the pedals of your bicycle.
An optional Polar Cadence sensor is required.
• Wheel Wheel size settings are a prerequisite for cycling information. For further information, see the
following page.
1. In the Time mode, press the RIGHT button until SETTINGS is displayed.
2. Press the MIDDLE button. Cycling SET is displayed.
3. Press the RIGHT button until Bike SET is displayed.
ENGLISH – 39
Page 36

4. Continue by pressing the MIDDLE button and follow the steps below:
The display reads: Press the RIGHT button to set the fl ashing value Press the MIDDLE button to accept
the value
5. Bike 1 / 2
6. AutoStart
On / OFF
7. Cadence*
On / OFF
8. Wheel
RIGHT
• Select which bike settings you want to set:
bike 1 or 2.
RIGHT
• Turn AutoStart function on or off.
RIGHT
• Turn cadence function on or off.
RIGHT
• Adjust the wheel size (mm) of your bicycle.
MIDDLE
MIDDLE
MIDDLE
MIDDLE
• To return to the Time mode, press and hold the LEFT button.
Note:
• The wheel size is always indicated in millimeters, as it is more accurate.
• The speed and distance measuring functions are always on.
*Optional Polar Cadence Sensor required.
40 – ENGLISH
Page 37

You have the following alternatives for fi nding out the wheel size of your bike:*
METHOD 1.
Look at the wheel of your bike and fi nd the wheel diameter printed on it.
On the chart below, fi nd your wheel diameter in inches or in ERTRO reading and match it to the wheel size in millimeters on
the right.
ERTRO Wheel size diameter (inches) Wheel size setting (mm)
25-559 26 x 1.0 1884
23-571 650 x 23C 1909
35-559 26 x 1.50 1947
37-622 700 x 35C 1958
47-559 26 x 1.95 2022
20-622 700 x 20C 2051
52-559 26 x 2.0 2054
23-622 700 x 23C 2070
25-622 700 x 25C 2080
28-622 700 x 28 2101
32-622 700 x 32C 2126
42-622 700 x 40C 2189
47-622 700 x 47C 2220
Note: *Wheel sizes on the above chart are advisory as wheel size depends on the wheel type and air pressure.
ENGLISH – 41
Page 38

METHOD 2.
Mark the tread of the front tire with a line and roll the tire perpendicular to the ground. You can also use the valve as a
mark. Mark a line on the ground. Move your bike on a fl at surface straight ahead for one complete wheel rotation. Check that
the tire is perpendicular to the ground. Draw another line on the ground exactly where the mark on the front tire touches the
ground.
-4 mm
mm
mm
42 – ENGLISH
Measure the distance between the two lines on the ground.
Subtract 4 mm to account for your weight on the bike to get your wheel circumference.
This is the value you must set on the cycling computer.
Page 39

5.5 WATCH SETTINGS (WATCH SET)
In the Watch SET menu, you can change the time of day and date settings.
1. In the Time mode, press the RIGHT button until SETTINGS is displayed.
2. Press the MIDDLE button. Cycling SET is displayed.
3. Press the RIGHT button until Watch SET is displayed.
4. Continue by pressing the MIDDLE button and follow the steps below:
The display reads: Press the RIGHT button to set the fl ashing value Press the MIDDLE button to accept
the value
5. Time
• Time Mode 24h/12h
• AM / PM
(if you use 12h format)
RIGHT
• Set 24h or 12h time mode.
RIGHT
• Set AM or PM.
RIGHT
• Set the hours.
RIGHT
• Set the minutes.
MIDDLE
MIDDLE
MIDDLE
MIDDLE
ENGLISH – 43
Page 40

The display reads: Press the RIGHT button to set the fl ashing value Press the MIDDLE button to accept
the value
6. Date*
• Day / Month
• Month / Day
• Year
RIGHT
• Set the day (in 24h mode) or
the month (in 12h mode).
RIGHT
• Set the month (in 24h mode) or
the day (in 12h mode).
RIGHT
• Set the year.
MIDDLE
MIDDLE
MIDDLE
• To return to the Time mode, press and hold the LEFT button.
Note: *The order in which you set date settings depends on which time mode you have chosen (24h: day - month - year /
12h: month - day - year).
44 – ENGLISH
Page 41

5.6 PERSONAL INFORMATION SETTINGS (USER SET)
Entering your personal information ensures that your calorie counter operates with the highest possible degree of accuracy.
1. In the Time mode, press the RIGHT button until SETTINGS is displayed.
2. Press the MIDDLE button. Cycling SET is displayed.
3. Press the RIGHT button until User SET is displayed.
4. Continue by pressing the MIDDLE button and follow the steps below:
The display reads: Press the RIGHT button to set the fl ashing value Press the MIDDLE button to accept
the value
5. Weight
kg/lb
6. Height
cm/ft
RIGHT
• Set your weight in kilograms or pounds.
RIGHT
• Set your height in cm or ft.
• Set inches (if you chose lb/ft).
MIDDLE
MIDDLE
MIDDLE
ENGLISH – 45
Page 42

The display reads: Press the RIGHT button to set the fl ashing value Press the MIDDLE button to accept
the value
7. Birthday
• Day / Month
• Month / Day
RIGHT
• Set the day (in 24 h mode) or
the month (in 12 h mode).
RIGHT
• Set the month (in 24h mode) or
MIDDLE
MIDDLE
the day (in 12h mode).
• Year
RIGHT
MIDDLE
• Set the year.
8. HR Max
RIGHT
• Adjust HR
measured current maximum heart rate
, if you know your laboratory
max
MIDDLE
value. Your age-predicted maximum heart rate
value (220-age) is displayed as a default
setting when you set this value for the fi rst
time.
9. HR Sit
RIGHT
• Adjust your heart rate value in a sitting
MIDDLE
position (see the instructions on the next page).
10. Sex
• Male / Female
RIGHT
• Set male or female.
MIDDLE
• To return to the Time mode, press and hold the LEFT button.
46 – ENGLISH
Page 43

Maximum heart rate value (HR
HR
is used to estimate energy expenditure. HR
max
physical exertion. HR
individual HR
is also useful when determining exercise intensity. The most accurate method for determining your
max
is to perform a maximal exercise stress test in a laboratory.
max
max
)
is the highest number of heartbeats per minute during maximum
max
Heart rate value in a sitting position (HR
HR
is used to estimate energy expenditure. HR
sit
activity (while sitting). To determine your HR
)
sit
should be your typical heart rate when you are not doing any physical
sit
easily, wear your transmitter, hold your cycling computer in your hand, sit
sit
down and do not engage in any physical activity. After two or three minutes, press the MIDDLE button in the Time mode to
view your heart rate. This is your HR
To calculate your HR
more precisely, repeat the procedure several times and calculate your average.
sit
.
sit
ENGLISH – 47
Page 44

5.7 CYCLING COMPUTER SOUNDS AND UNITS SETTINGS (GENERAL SET)
You can view and change the following settings in the General SET:
• Sounds Activity sounds for the cycling computer on or off .
• KeySound Button sounds for the cycling computer on or off.
• Units The Unit settings affect the personal information and watch settings.
1. In the Time mode, press the RIGHT button until SETTINGS is displayed.
2. Press the MIDDLE button. Cycling SET is displayed.
3. Press the RIGHT button until General SET is displayed.
4. Continue by pressing the MIDDLE button and follow the steps below:
The display reads: Press the RIGHT button to set the fl ashing value Press the MIDDLE button to accept
the value
5. Sound
On / OFF
6. KeySound
On / OFF
7. kg/cm or lb/ft
Unit
• To return to the Time mode, press and hold the LEFT button.
48 – ENGLISH
RIGHT
• Turn activity sounds on or off.
RIGHT
• Turn button sounds on or off.
RIGHT
• Select kg/cm or lb/ft units.
MIDDLE
MIDDLE
MIDDLE
Page 45

6. EDIT YOUR CYCLING COMPUTER SETTINGS WITH A COMPUTER
The Polar cycling computer offers you the option of editing your cycling computer settings with the Polar UpLink Tool and
your computer. You can also personalize the display of your cycling computer by downloading logos. For this you need the
Polar UpLink Tool.
You can download the Polar UpLink Tool at www.polar.fi or www.PolarCyclingCoach.com. In order to be able to use the Polar
UpLink Tool, you need a computer with a sound card and dynamic loudspeakers or headphones. For further information on
system requirements, see the chapter Technical Specifi cations. See www.polar.fi or www.PolarCyclingCoach.com for further
instructions.
ENGLISH – 49
Page 46

7. CARE AND MAINTENANCE
Like any electronic device, your Polar cycling computer should be treated with care. The suggestions below will help you to
fulfi ll guarantee obligations and enjoy this product for many years to come.
Taking Care of Your Cycling Computer
• The cycling computer and speed sensor are water resistant, so you can use them in the rain. To maintain the water
resistance, do not wash the cycling computer or the speed sensor with a pressure washer or sink them under water.
• Store your cycling computer and
in non-breathable material (such as a plastic bag or a sports bag) or with conductive material such as a wet towel.
Sweat and moisture can keep the transmitter electrodes wet and the transmitter activated, shortening battery life.
• Keep your cycling computer clean. Clean it and speed sensor with a mild soap and water solution and in the end rinse
them with clean water. Do not immerse them in water. Dry them carefully with a soft towel. Never use alcohol or any
abrasive material such as steel wool or cleaning chemicals.
• The operating temperatures of cycling computer and speed sensor are -10 °C to +50 °C / +14 °F to +122 °F.
• Wash the transmitter regularly after use with a mild soap and water solution and a soft brush if needed. Do not dry the
transmitter with anything other than a soft towel. Mishandling may damage the electrodes.
• Do not bend or stretch the transmitter. This may damage the electrodes.
• Avoid hard hits to the speed sensor as these may damage the sensor.
• Do not expose the cycling computer to direct sunlight for extended periods, such as by leaving it in a car or mounted on
the bike mount.
Service
During the two-year guarantee/warranty period we recommend that you service the product at an authorized Polar Service
Center only. The warranty does not cover damage or consequential damage caused by service not authorized by Polar Electro.
50 – ENGLISH
transmitter in a cool and dry place. Do not store them in a damp environment,
Page 47

Transmitter and Speed Sensor Battery
Contact your authorized Polar Service Center for a replacement transmitter or speed sensor.
Cycling Computer Battery
We recommend that you have the battery replaced by an authorized Polar Service Center. Avoid opening the sealed battery
cover, but if you choose to change the battery yourself, follow the instructions on the next page.
Note: In order to ensure the maximum lifespan of the battery cover, open it only when you need to change the battery.
The low battery indicator and LowBatt. is displayed when 10-15% of the cycling computer battery capacity is left and the battery
•
should be replaced. The backlight and cycling computer sounds are automatically deactivated when
• Excessive use of the backlight drains the cycling computer’s battery more rapidly.
• In cold conditions the low battery indicator may appear, but the indicator disappears when you return to warmer temperature.
is displayed.
ENGLISH – 51
Page 48

1.
2.
52 – ENGLISH
To change the cycling computer battery, you need a small screwdriver, coin and battery
(CR 2032).
1. Using a coin that sits tight into the back cover groove, open the battery cover by pressing
slightly and unscrewing counter clockwise.
2. Remove the battery cover. The battery is attached to the cover, which should be carefully
lifted using a screwdriver. Remove the battery and replace with a new one. Be careful not to
damage the threads of the back cover.
3. Place the negative (-) side of the battery against the cycling computer and the positive (+)
side against the cover.
4. The sealing ring of the battery cover is also attached to the cover. Only replace the sealing
ring if it is damaged. Before closing the battery cover, make sure that the cover’s sealing ring
is undamaged and it is placed correctly in its groove.
5. Put the battery cover in its place and close it by screwing the cover clockwise with a coin.
Make sure that the cover is closed properly!
Note:
• If used according to the manufacture’s instructions, the battery’s sealing ring will last for the cycling
computer’s operating life. However, if the sealing ring is damaged we recommend that you contact a
Polar Service Center. Replacement sealing rings are only available from an authorized Polar Service
Center.
• After a battery change re-enter time and date settings in the Basic Settings. For further information,
see page 8.
• Keep the batteries away from children. If swallowed, contact a doctor immediately.
• Batteries should be disposed of properly according to local regulations.
Page 49

8. PRECAUTIONS
The Polar cycling computer shows your performance indicators. It indicates the level of physiological strain and intensity
during your exercise. It also measures speed and distance when cycling with a Polar speed sensor. No other use is intended
or implied.
Electromagnetic Interference
Disturbances may occur near high voltage power lines, traffi c lights, overhead lines of electric railways, electric bus lines
or trams, televisions, car motors, bike computers, some motor driven exercise equipment, cellular phones, or when you walk
through electric security gates.
Minimizing Possible Risks When Exercising
Exercise may include some risk. Before beginning a regular exercise program, it is recommended that you answer the
following questions concerning your health status. If you answer yes to any of these questions, we recommend that you
consult a doctor before starting any training program.
• Have you been physically inactive for the past 5 years?
• Do you have high blood pressure or high blood cholesterol?
• Do you have symptoms of any disease?
• Are you taking any blood pressure or heart medication?
• Do you have a history of breathing problems?
• Are you recovering from a serious illness or medical treatment?
• Do you use a pacemaker or another implanted electronic device?
• Do you smoke?
• Are you pregnant?
ENGLISH – 53
Page 50

Note that in addition to exercise intensity, medications for heart, blood pressure, psychological conditions, asthma,
breathing, etc., as well as some energy drinks, alcohol, and nicotine may also affect your heart rate.
It is important to be sensitive to your body’s responses during exercise. If you feel unexpected pain or excessive fatigue
when exercising, it is recommended that you stop the exercise or continue at a lighter intensity.
Notice to individuals with pacemakers, defi brillators or other implanted electronic devices. Individuals who have a
pacemaker use the Polar cycling computer at their own risk. Before starting use, we always recommend a maximal exercise
stress test under a doctor’s supervision. The test is to ensure the safety and reliability of the simultaneous use of the
pacemaker and the Polar cycling computer.
If you are allergic to any substance that comes into contact with your skin or if you suspect an allergic reaction due to
using the product, check the listed materials on page 57. To avoid any skin reaction to the
transmitter, wear it over a shirt.
However, moisten the shirt well under the electrodes to ensure fl awless operation.
The combined impact of moisture and intense abrasion may cause a black color to come off the transmitter’s surface,
which might stain light-colored clothes.
54 – ENGLISH
Page 51

9. FREQUENTLY ASKED QUESTIONS
What should I do if...
...the display of the cycling computer is blank?
If you are using the cycling computer for the fi rst time:
The cycling computer is in battery saving mode when it is
dispatched from the factory. To activate it, press the MIDDLE button
twice. The Basic Settings starts. For further information, see page 8.
If you have been using the cycling computer before:
The cycling computer goes to the power save mode (blank), if you
do not press any button in the Time mode for fi ve minutes. You
can turn the cycling computer on again by pressing any button.
Alternatively the battery may be dead (see the next question for
further instructions).
...the battery of the cycling computer must be replaced?
We recommend having all service done by an authorized Polar
Service Center. This is especially necessary to ensure that the
guarantee remains valid and is not affected by incorrect repair
procedures performed by an unauthorized agent. Polar Service
will test your cycling computer for water resistance after battery
replacement and make a full periodic check of the complete cycling
computer set.
...there are no reactions to any buttons?
If there are no reactions to any buttons, reset the cycling computer.
Resetting only clears the date and time, not the recorded Files or
Totals. Reset the cycling computer by pressing and holding all
buttons until the display is fi lled with digits. By pressing any button
the cycling computer goes to the Basic Settings mode (BASIC SET
is displayed). For further information, see page 8. If this does not
work, have the batteries checked.
Note: If you do not press any button after you reset the cycling
computer, within one minute the cycling computer goes to the Time
mode.
symbol is activated?
...the
Usually the fi rst sign of an expiring battery is the low battery
indicator
Note: Due to cold conditions the low battery indicator may
appear, but the indicator disappears when you return to a warmer
temperature.
...another person with a cycling computer or a heart rate monitor
is causing interference?
Move away from that person and continue your exercise normally.
Alternatively, to avoid other person’s heart rate signals:
1. Take the transmitter off your chest for 30 seconds. Stay away
from the person with the other device.
2. Put the transmitter back on and bring the cycling computer up
to your chest near the transmitter’s Polar logo. The cycling
computer will start looking for a heart rate signal again.
Continue your exercise normally.
on the display. For further information, see page 51.
ENGLISH – 55
Page 52

...the cycling computer does not measure the calories?
In order to measure the calories you burn, you need to wear the
transmitter during recording.
...the heart rate, speed or distance reading becomes erratic or
extremely high?
Strong electromagnetic signals can cause erratic readings. So move
away from possible sources of disturbance such as high-voltage
power lines, traffi c lights, electric railways or trams, car motors,
bike computers, some motor-driven exercise equipment (like fi tness
testers) or cellular phones.
If the erratic heart rate reading continues after you have moved
away from the source of disturbance, slow down your speed and
check your pulse manually. If you feel it corresponds to the high
reading on the display, you may be experiencing cardiac arrhythmia.
Most cases of arrhythmia are not serious, but consult your doctor
nevertheless.
To avoid crosstalk from another cyclist with a speed sensor, keep a
distance of at least one meter/ 3’4’’ between your cycling computer
and the speed sensor of the other cyclist.
56 – ENGLISH
...there is no heart rate reading (00)?
• Check that the electrodes of the transmitter are moistened and
that you are wearing it as instructed.
• Make sure the transmitter is clean.
• Check that you are not near high voltage power lines,
televisions, cellular phones, or other sources of electromagnetic
interference. Also make sure that you are not near (1 m/3 ft)
other heart rate monitor users, when starting your exercise
recording.
• Cardiac arrhythmia may cause irregular readings or a cardiac
event may have altered your ECG waveform. In these cases,
consult your physician.
...there is no speed reading while cycling?
• Check the correct position and distance of the sensor with the
magnet and the cycling computer.
• Check that you have set the correct cycling settings in your
cycling computer. For further information, see page 39.
• If the 00 reading appears irregularly, this may be due to
temporary electromagnetic interference in your current
surroundings.
• If the 00 reading is constant, you may have exceeded
4500 riding hours and the battery is empty.
Page 53

10. TECHNICAL SPECIFICATIONS
Cycling computer
Material: Thermoplastic polymer case
Watch accuracy: better than ±0.5 seconds per day at
25 °C/ 77 °F temperature.
Heart rate accuracy: ±1% or 1 bpm, whichever larger, the defi nition
applies to steady state conditions. Heart rate is displayed as number of
heartbeats per minute (bpm) or as % of your maximum heart rate.
Heart rate measuring range: 15-240
Maximum time recorded to File: 99 h 59 min 59 s
Limited values of information
to the exersice fi le: 1 exercise fi le
Current speed display range: 0-127 km/h or 0-75 mph
Operating temperature: -10 °C to +50 °C / +14 °F to +122 °F
Battery life: Average 2 years in normal use
(1 h/day, 7 days/week)
Battery type: CR 2032
Battery sealing ring: OR 23.6 x 1.0 (silicon rubber)
Water resistance of Polar products is tested according to International
Standard ISO 2281. Products are divided into three different categories
according to their water resistance. Check the back of your Polar product
for the water resistance category and compare it to the chart below.
Please note that these defi nitions do not necessarily apply to products of
other manufacturers.
Marking on the
case back
Water resistant
Wash splashes, sweat,
raindrops etc.
X
Bathing and
swimming
Transmitter
Battery life: Average 2500 hours of use
Battery type: Built-in Lithium Cell
Operating temperature: -10 °C to +50 °C / +14 °F to +122 °F
Transmitter material: Polyurethane
Elastic strap
Buckle material: Polyurethane
Fabric material: Nylon, polyester, and natural rubber,
including a small amount of latex
Speed sensor
Speed sensor battery life: Average 4500 hours of use
Accuracy: ±1 %
Material: Thermoplastic polymer case
Operating temperature: -10 °C to +50 °C / +14 °F to +122 °F
SYSTEM REQUIREMENTS
Polar UpLink Tool
- PC
- Windows® 98/98SE/ME/2000/XP
- Sound card
- Dynamic loudspeakers or headphones
Skin diving with
snorkel (no air tanks)
SCUBA diving
(with air tanks)
Water resistant
characteristics
Splashes, raindrops etc.
Water resistant 50m
Water resistant 100m
X
X
X
X
X
Minimum for bathing
and swimming
For frequent use in water
but no SCUBA diving
ENGLISH – 57
Page 54

11. LIMITED POLAR INTERNATIONAL GUARANTEE
• This limited Polar international guarantee is issued by Polar Electro Inc. for those consumers who have purchased this product in the USA
or Canada. This limited Polar international guarantee is issued by Polar Electro Oy for those consumers who have purchased this product
in other countries.
• Polar Electro Oy/Polar Electro Inc. guarantees to the original consumer/purchaser of this device that the product will be free from defects
in material or workmanship for two years from the date of purchase.
• Please keep the receipt or International Guarantee Card, which is your proof of purchase!
• The guarantee does not cover the battery, damage due to misuse, abuse, accidents or non-compliance with the precautions;
improper maintenance, commercial use, cracked or broken cases and elastic strap.
• The guarantee does not cover any damage/s, losses, costs or expenses, direct, indirect or incidental, consequential or special,
arising out of, or related to the product. During the guarantee period, the product will be either repaired or replaced at an authorized
Service Center free of charge.
• This guarantee does not affect the consumer’s statutory rights under applicable national or state laws in force, or the consumer’s rights
against the dealer arising from their sales/purchase contract.
This CE marking shows compliance of this product with Directive 93/42/EEC.
0537
This crossed out wheeled bin marking shows that Polar products are electronic devices and are in the scope of Directive 2002/96/EC
of the European Parliament and of the Council on waste electrical and electronic equipment (WEEE). These products should thus be
disposed of separately in EU countries. Polar encourages you to minimize possible effects of waste on the environment and human
health also outside the European Union by following local waste disposal regulations and, where possible, utilize separate collection of
electronic devices.
Polar Electro Oy is a ISO 9001:2000 certifi ed company.
Copyright © 2005 Polar Electro Oy, FIN-90440 KEMPELE, Finland.
All rights reserved. No part of this manual may be used or reproduced in any form or by any means without prior written permission of
Polar Electro Oy.
The names and logos marked with a ™ symbol in this user manual or in the package of this product are trademarks of Polar Electro Oy.
The names and logos marked with a ® symbol in this user manual or in the package of this product are registered trademarks of
Polar Electro Oy, except that Windows is a registered trademark of Microsoft Corporation.
58 – ENGLISH
Page 55

12. POLAR DISCLAIMER
• The material in this manual is for informational purposes only. The products it describes are subject to change without prior notice,
due to the manufacturer’s continuous development program.
• Polar Electro Inc./Polar Electro Oy makes no representations or warranties with respect to this manual or with respect to the products
described herein.
• Polar Electro Inc./Polar Electro Oy shall not be liable for any damages, losses, costs or expenses, direct, indirect or incidental,
consequential or special, arising out of, or related to the use of this material of the products described herein.
This product is protected by one or several of the following patents:
FI68734, DE3439238, GB2149514, HK812/1989, US4625733, FI88223, DE4215549, FR92.06120, GB2257523, HK113/1996, SG9591671-4,
US5491474, FI88972, FR92.09150, GB2258587, HK306/1996, SG9592117-7, US5486818, FI96380, US5611346, EP665947, DE69414362,
FI4150, DE20008882.3, US6477397, FR0006504, FI4069, DE29910633, GB2339833, US6272365, FI107776, US6327486, FI110915,
US6537227, US6277080, FI111514, GB2326240, US6361502, US6418394, US6229454, EP836165, FI100924, WO96/20640, US6104947,
US5719825, US5848027, EP1055158, US6714812, FI88972, FR92.09150, GB2258587, HK306/1996, SG9592117-7, US5486818.
Other patents pending.
Manufactured by:
Polar Electro Oy
Professorintie 5
FIN-90440 KEMPELE
Tel +358 8 5202 100
Fax +358 8 5202 300
www.polar.fi
ENGLISH – 59
Page 56

13. INDEX
24h/12h time mode .............................................................9
AutoLap .............................................................................20
AutoStart ...........................................................................16
Backlight...........................................................................21
Bike settings.................. ...................................................39
Battery replacement .................................................... 51-52
Date settings............................................................... 43-44
File ....................................................................................23
Halt ...................................................................................21
Heart rate ............................................................. 16-17
Heart rate limits ................................................................34
HR
..................................................................................47
sit
LapTime full ......................................................................20
Low battery indication ...............................................51
Recording an exercise .......................................................16
Reset the cycling computer ...............................................55
Settings.............................................................................31
Sounds on/off ....................................................................20
Speed sensor .................................................................7, 13
Start measuring your heart rate ........................................16
Stopwatch .........................................................................18
Target Zone Alarm ......................................................20
Timers ...............................................................................33
60 – ENGLISH
Total Values ......................................................................27
Transmitter .......................................................................15
Unit setting .......................................................................48
UpLink Tool........................................................................49
User settings .....................................................................45
 Loading...