

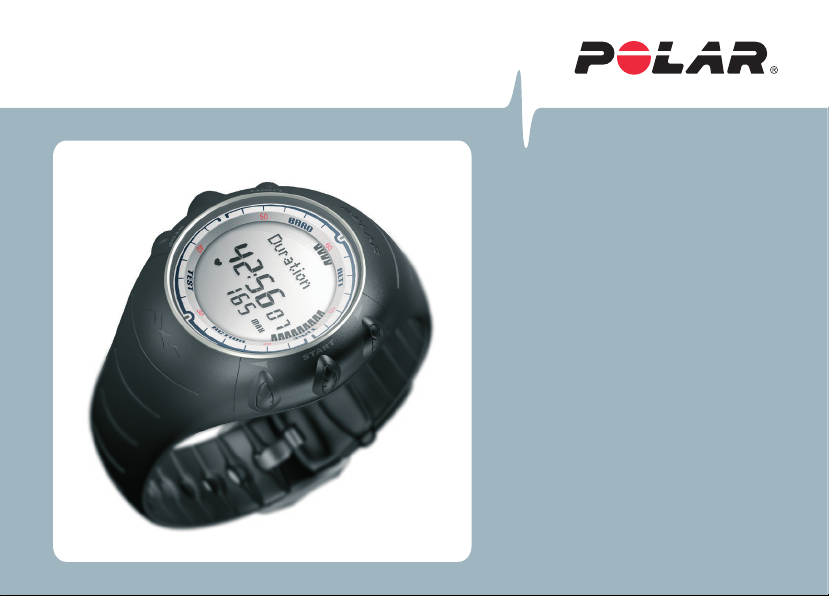
USER MANUAL
Polar
Outdoor Computer
17925349.00 ENG B ENG
AXN300™
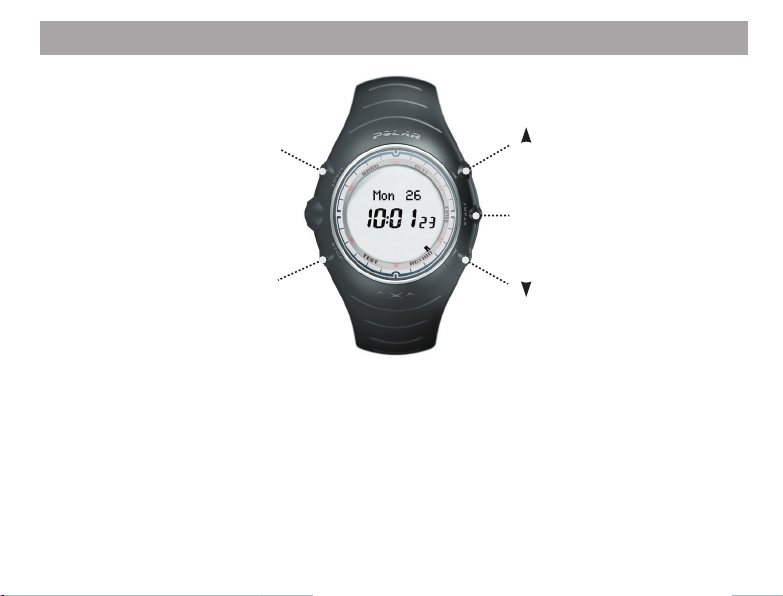
BUTTONS
Light/
Keylock
Stop
Dear customer,
Congratulations on your purchase of a Polar Outdoor Computer!
We are proud to offer a product targeted and tailored for all outdoor
enthusiasts.
Your Polar Outdoor Computer will provide you with the confidence and
security to get the most from your outdoor activities.
Please read this manual carefully to familiarize yourself with your
Outdoor Computer and practice the use of the Outdoor Computer before
Up
Start
Down
using it in outdoor sports. This manual contains the information you
need to use and maintain your Outdoor Computer. The function map on
the back of the front cover is a quick guide to the versatile features of
the Polar Outdoor Computer. Cut it out and take it with you. Please
check www.polar.fi for more detailed product support and
www.PolarOutdoorGuide.com for a personalized exercise program and
diary.
Polar wishes you many enjoyable outdoor adventures.
Reach your peak with Polar!
AXN300 QUICK GUIDE
Button symbols:
Start: Press Start button
Up
: Press Up button
Stop: Press and hold the Stop button to return to the starting point (Time main mode) from any mode.
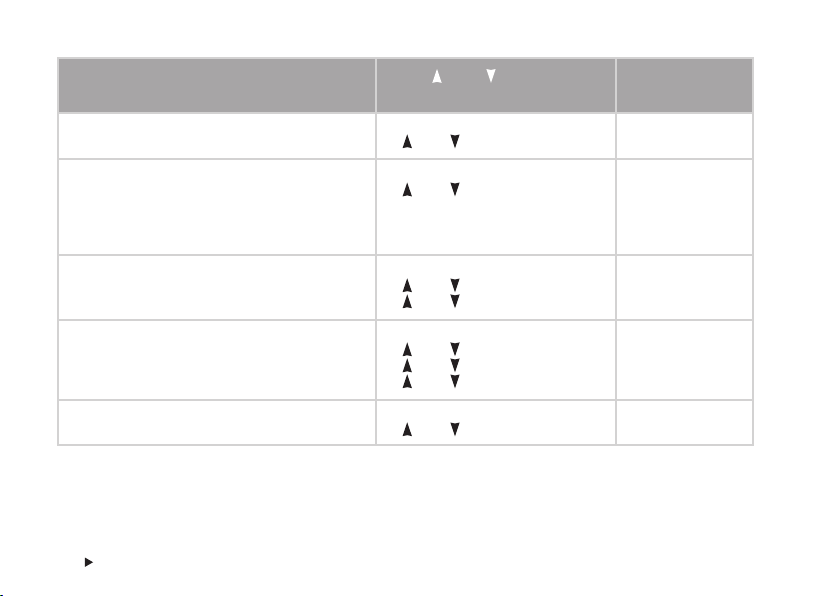
Menu
WATCH SET
FILES
SETTINGS
STOPWATCH
COUNTDOWN
CONNECT
Stop
Up
Start
Activate:
ALTI/BARO
Altitude
SCALE
Altitude
CALIBRATION
Stop
Up
Start
Activate:
BARO/ALTI
Barometer
CALIBRATION
Stop
Up
Start
Fitness
TEST
Stop
Up
Start
Start
Action:
REC ON
Stop

POLAR OUTDOOR COMPUTER SET
AXN300
Wrist Unit
With the wrist unit, you can monitor
your outdoor activity and environment.
Polar T31 Coded™ Transmitter
The transmitter detects and transmits
your heart rate to the wrist unit. Wear
the transmitter to measure your heart
rate during your outdoor activity or
fitness test.
The electrode areas are on the back
of the transmitter. The electrodes
detect your heart rate signal.
Elastic Strap
The elastic strap holds the transmitter
around your chest.
User Manual with Quick Guide
This User Manual contains necessary information on using your Outdoor
Computer. For a quick reference, take the function map included in
the Quick Guide with you when going out for your activities.
Customer Service, Registration and
International Guarantee Information
If your Polar Outdoor Computer needs repair, return it with the Return
Card for service to your Polar Service Centre. Complete the customer
registration section and mail it to Customer Registration within two
weeks of the date of purchase to help us continue developing products
and services that meet your needs.
The Polar two-year guarantee is issued to the original consumer/
purchaser of the product. Keep the International Guarantee Card as
your proof of purchase.
Polar Web Services
www.PolarOutdoorGuide.com web service offers you a personalized
exercise program and diary free of charge. Moreover, you can get
product tips and support online at www.polar.fi.

CONTENTS
Quick Guide ............................................................................................................................................................................. 3
1. THE WRIST UNIT BUTTONS AND THEIR FUNCTIONS ......................................................................................................... 8
1.1 USING YOUR OUTDOOR COMPUTER FOR THE FIRST TIME ........................................................................................ 9
2. THE MAIN FUNCTIONS OF THE POLAR OUTDOOR COMPUTER ......................................................................................... 11
2.1 TIME MAIN MODE .................................................................................................................................................. 13
2.2 ALTI MAIN MODE (ALTIMETER) .............................................................................................................................. 15
2.3 BARO MAIN MODE (BAROMETER) ......................................................................................................................... 19
2.4 TEST MAIN MODE .................................................................................................................................................. 22
2.5 ACTION MAIN MODE .............................................................................................................................................. 22
3. MEASURING AND RECORDING WITH YOUR OUTDOOR COMPUTER ................................................................................. 25
3.1 ACTION SUB MODE ............................................................................................................................................... 25
3.1.1 Why Monitor Your Heart Rate when engaging in Outdoor Sports? .......................................................... 25
3.1.2 Putting Your Transmitter on ................................................................................................................... 25
3.1.3 Recording Your Action .................................................................................................................... 27
3.1.4 Features during Your Action Recording .................................................................................................. 29
3.1.5 FileView during Action Recording........................................................................................................... 29
3.1.6 Stopping or Pausing Action Recording ................................................................................................... 30
3.2 ALTI SUB MODE (ALTIMETER) ................................................................................................................................ 31
3.2.1 Activating the Altimeter ................................................................................................................. 31
5 ENGLISH CONTENTS

3.2.2 Setting the Scale for the Graphical Trend .............................................................................................. 32
3.2.3 Calibrating Altitude ............................................................................................................................... 33
3.3 BARO SUB MODE (BAROMETER) ........................................................................................................................... 35
3.3.1 Activating the Barometer ............................................................................................................... 35
3.3.2 Calibrating the Barometer ..................................................................................................................... 36
3.4 TEST SUB MODE ................................................................................................................................................... 38
3.4.1 Performing the Polar Fitness Test .......................................................................................................... 38
3.4.2 OwnIndex - Fitness Test Result .............................................................................................................. 40
3.4.3 OwnIndex Interpretation ........................................................................................................................ 41
4. ADJUSTING SETTINGS, REVIEWING FILES AND USING TIMERS (TIME MAIN MODE) ........................................................ 42
4.1 WATCH SETTINGS.................................................................................................................................................. 42
4.1.1 Setting Alarms ................................................................................................................................. 43
4.1.2 Changing the Time of Day and Setting the Dual Time (Time Set) ........................................................... 44
4.1.3 Changing the Date ................................................................................................................................ 46
4.1.4 Setting Reminders ................................................................................................................................. 46
4.2 FILES .................................................................................................................................................................... 48
4.2.1 Auto Log ................................................................................................................................................ 48
4.2.2 Action File .............................................................................................................................................. 50
Deleting Files One by One ...................................................................................................................... 54
Deleting All Files .................................................................................................................................... 55
4.2.3 Season Total Values ............................................................................................................................... 55
4.3 SETTINGS ............................................................................................................................................................. 60
4.3.1 Setting User Information ....................................................................................................................... 60
CONTENTS6

4.3.2 General Settings .................................................................................................................................... 65
Setting Heart Rate Limits for the Target Zone Alarm .............................................................................65
Changing the Units ............................................................................................................................... 67
Setting Rate for Vertical Speed .............................................................................................................. 68
Setting Intro ON/OFF .............................................................................................................................. 70
Setting Sound ON/OFF ..................................................................................................................... 71
4.4 STOPWATCH.......................................................................................................................................................... 72
4.5 COUNTDOWN TIMER ............................................................................................................................................. 73
4.6 TRANSFERRING SETTINGS FROM PC WITH POLAR UPLINK TOOL ............................................................................ 75
5. CARE AND MAINTENANCE .............................................................................................................................................. 76
6. SAFE OPERATION OF YOUR OUTDOOR COMPUTER ......................................................................................................... 79
7. FREQUENTLY ASKED QUESTIONS ................................................................................................................................... 80
8. TECHNICAL SPECIFICATIONS......................................................................................................................................... 81
9. LIMITED POLAR INTERNATIONAL GUARANTEE ................................................................................................................ 82
10. POLAR DISCLAIMER ....................................................................................................................................................... 83
11. INDEX ............................................................................................................................................................................ 84
7CONTENTS
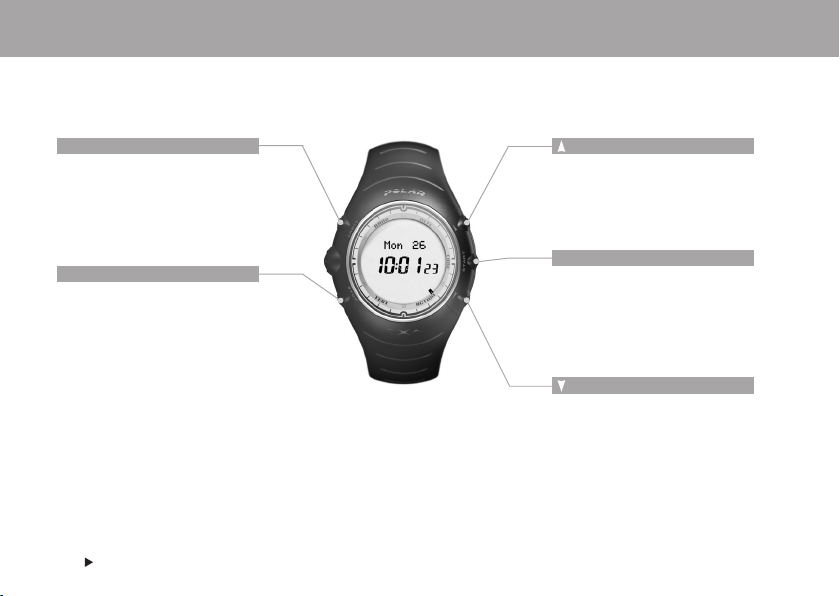
1. THE WRIST UNIT BUTTONS AND THEIR FUNCTIONS
The button symbols of the Outdoor Computer are on the case of the wrist unit.
The main mode names are on the lens frame.
Light button
•Turn the backlight on in all modes in
the dark
•Turn the Keylock on or off (press and
hold the button at least 1 second).
Keylock prevents accidental pressing
of the button.
Stop button
• Stop, pause or cancel the function
• Exit the menu and return to the
previous level of the menu
• Return to the Time mode from any
mode (press and hold the button at
least 1 second)
Note:
There are different types of button presses for different operations:
• Normal press: press and release the button.
• Long press: press and hold the button (at least 1 second). Use long presses for shortcuts (described in the main modes).
THE WRIST UNIT BUTTONS AND THEIR FUNCTIONS8
Up button
• Move to the next mode or menu level
• Increase the selected value
•Turn the sounds on or off during
Action recording (press and hold the
button at least 1 second).
Start button
• Start, enter or accept the function
• Enter the displayed mode or menu
and move to a lower menu level
•View your file summary during Action
recording (press and hold the button
at least 1 second)
Down button
• Move to a previous mode or menu
level
• Decrease the selected value

1.1 USING YOUR OUTDOOR COMPUTER FOR THE FIRST TIME
Enter your settings in the Basic Settings mode (time, date, units, and personal settings) when you start to use the Outdoor
Computer for the first time. Alternatively, you can prepare the settings with the Polar UpLink Tool that you can download free
of charge from www.polar.fi. For further information, see page 75.
How to enter the Basic Settings
You only need to activate the blank wrist unit once. Once
activated, the wrist unit cannot be turned off.
Activate the wrist unit by pressing the Start button.
The display fills up with numbers and texts.
1. Press the Start button. Basic SETTINGS is displayed.
Note:
• The numbers scroll faster if you press and hold the Up
button as you adjust the value.
• After the battery is changed or after you reset the wrist unit,
you only need to set the time and date in the Basic Settings.
You can skip the rest of the settings by pressing and holding
the Stop button.
or Down
2. Continue by pressing the Start button and follow the
steps below:
The display reads: Press Up or
3. Time
• Set 12h/24h (time mode)
• Set AM/PM
(if you chose 12h)
• Set hours
• Set Min (minutes)
4. Date
• DD (set days) or
MM (set month: if you
chose 12h)
• MM (set month) or
DD (set days: if you
chose 12h)
• YY (set year)
Down
button to
set the flashing
value
Up
/ Down
Up / Down
Up / Down
Up / Down
Up / Down
Up / Down
Up / Down
Press the Start
button to
accept
Start
Start
Start
Start
Start
Start
Start
9THE WRIST UNIT BUTTONS AND THEIR FUNCTIONS
The display reads:
5. Units:
•1 (M/HPA/°C) or 2 (FT/INHG/°F)
6. Weight:
• Set KILOGRAM or POUNDS
or Down button
Press Up
to set the flashing value
Up / Down
Up / Down
Press the Start
button to accept
Start
Start
Note: If you chose the wrong units, you can still change them by
pressing and holding the Light button.
7. Height
• Set CM or FT
• Set INCH (inches, if you chose Units 2)
8. Birthday:
• DD (set days) or MM (set month: if you chose 12h)
• MM (set month) or DD (set days: if you chose 12h)
• YY (set year)
9. Sex
• Set MALE or FEMALE
Up / Down
Up / Down
Up / Down
Up / Down
Up / Down
Up / Down
Start
Start
Start
Start
Start
Start
• Settings OK? is displayed. To change your settings, press the Stop button until you return to the desired setting mode.
•To accept the settings, press the Start button. The Basic Settings are completed and the display automatically goes to
the Time main mode.
THE WRIST UNIT BUTTONS AND THEIR FUNCTIONS10

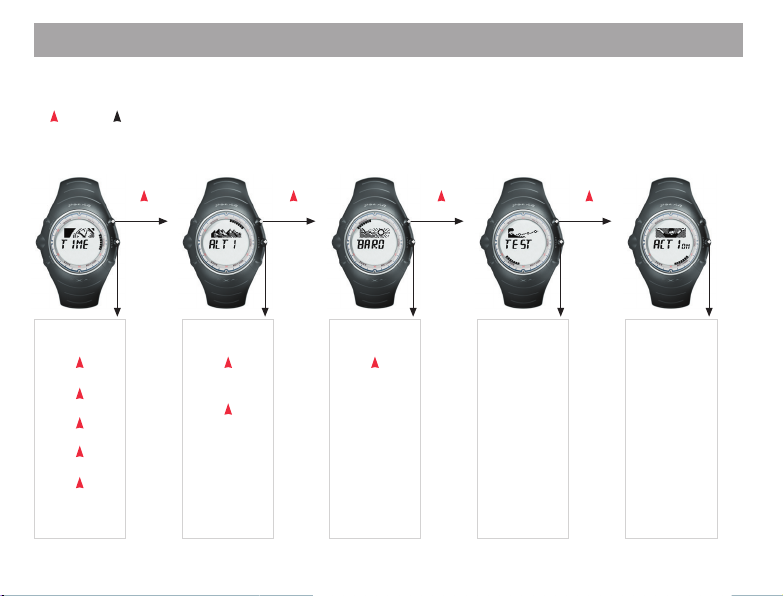
2. THE MAIN FUNCTIONS OF THE POLAR OUTDOOR COMPUTER
The Polar Outdoor Computer has five main modes:
•Time (home mode)
• Alti (altimeter)
• Baro (barometer)
•Test (fitness test)
• Action (recording your activity)
This section describes you how to use these different modes. The function map side of the Quick Guide introduces you to
browsing the main modes and their sub modes – consult it as needed!
To browse the main modes use the Up or Down button. Alternatively you can browse the
main modes (Time, Alti, Baro, Action) by using the HeartTouch function in case you cannot
press the buttons, such as when you are wearing gloves. The HeartTouch function operates only
when you are wearing a transmitter.
Activate the HeartTouch function by bringing your wrist unit close to the Polar logo of your
transmitter.
Note:
• If your heart rate is not detected and there is - - in the lower row (in Altimeter, Action or Time main mode) the browsing of the main modes does
not work. Instead the wrist unit starts detecting for your heart rate.
• To change the HeartTouch function to turn the backlight on instead of browsing the main modes, use the Polar UpLink Tool. For further information,
see page 75.
11THE MAIN FUNCTIONS OF THE POLAR OUTDOOR COMPUTER

Mode level indicators
To start browsing the sub modes use the Start button in the Time, Alti and Baro main modes.
When browsing the sub modes, the symbol indicates how deep in a mode you are. In the
example picture, the wrist unit is in the first level of the Time main mode.
When browsing the modes or menus, you can see which mode or menu you are in by the flashing
mode level indicator. In the example picture, the lowest symbol is flashing, which indicates that
the WATCH SET is the first menu of the six menus in the Time main mode.
THE MAIN FUNCTIONS OF THE POLAR OUTDOOR COMPUTER12
2.1 TIME MAIN MODE
Use the Time main mode as a watch, as it includes the date, alarms, and reminders. The Time main mode is your home
mode, to which you can return from any mode or menu by pressing and holding the Stop button.
The Time sub modes allow you to enter watch, user, and general settings. You can also use the stopwatch and CountDown
timers, view memory files, and connect the wrist unit to a PC. For further information, see page 42.
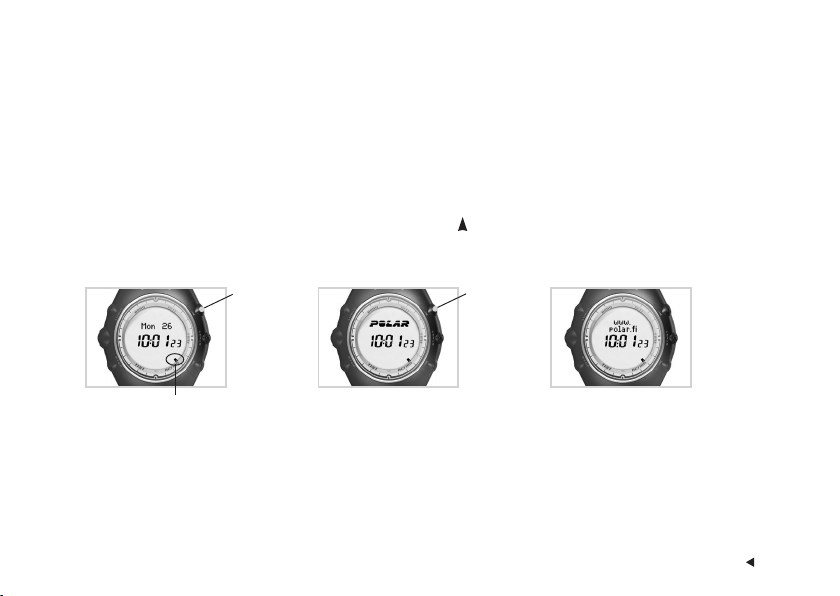
Changing the upper row information
To change the information in the upper row, press and hold the Up button:
1. Weekday and date 2. Downloadable picture logo 3. Downloadable text logo
Press and
hold
Press and
hold
Moving symbol indicates the
seconds.
To personalize your wrist unit, create and transfer a picture or text logo to the wrist
unit from your PC. For further information, see page 75.
13THE MAIN FUNCTIONS OF THE POLAR OUTDOOR COMPUTER
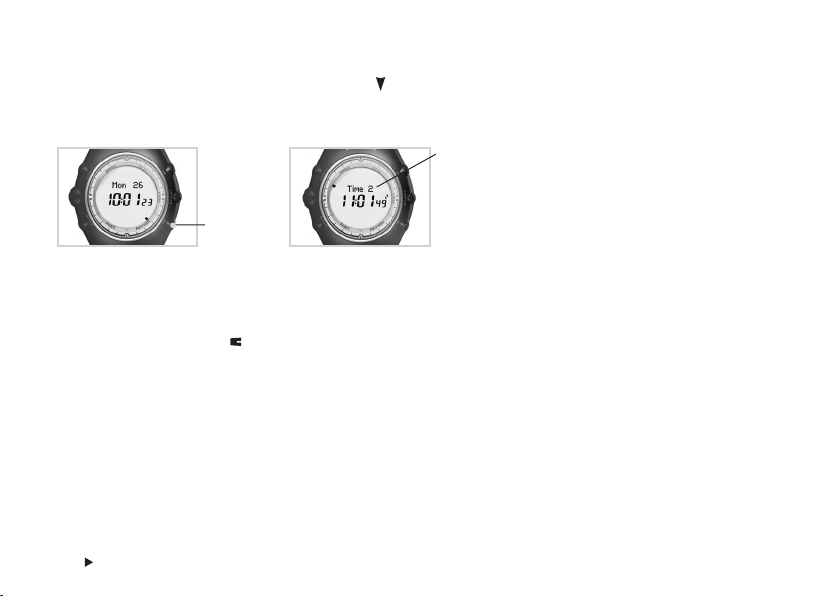
Changing the dual time
To swap between Time 1 and 2, press and hold the Down button:
1. Time 1 2. Time 2
Time 2 is displayed for
a few seconds.
Press and
hold
For further information on setting the two different times, see page 44.
Note:
• AM/PM indicates that you are using the 12h time mode. To change the time settings, see page 44.
• The flashing mode level symbol
• During Action recording, you can also see your heart rate in the Time main mode, if you wear the transmitter. For further information, see page 27.
THE MAIN FUNCTIONS OF THE POLAR OUTDOOR COMPUTER14
indicates that the stopwatch or CountDown timer is on. For further information, see page 72.
2.2 ALTI MAIN MODE (ALTIMETER)
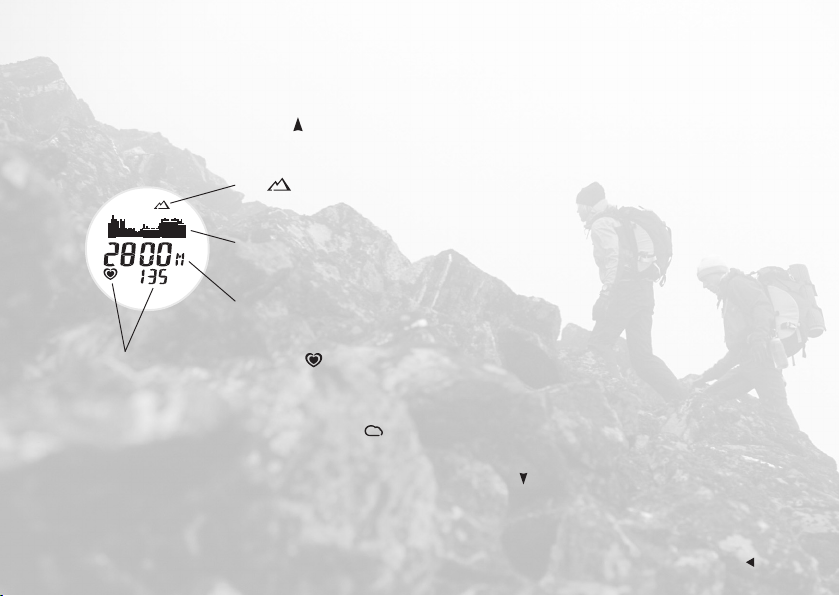
Use the Alti main mode to check your altitude when you are moving.
In the Time main mode, press the Up button to enter the Alti main mode.
The Alti main mode includes the following information:
The altimeter symbol is displayed when the altimeter
is active. To activate the altimeter, see page 31.
The graphical altitude trend.
The most recently updated point.
The current altitude reading.
2800 m equals 9186 ft.
If you are wearing your transmitter, the heart rate symbol with your current
heart beats per minute are displayed.
Note:
• If the altimeter is inactive and the barometer is active
reading remains in the display.
• If your heart rate is not displayed and - - appears in the display, the heart rate detection has stopped. Bring the wrist unit near the Polar logo on
the transmitter to restart the heart rate detection. Alternatively, press and hold the Down
, the graphical altitude trend shows a straight line and the last measured altitude
button to change the lower row information.
15THE MAIN FUNCTIONS OF THE POLAR OUTDOOR COMPUTER

Graphical Altitude Trend
The graph shows how the altitude has changed.
Altitude
The most recently updated point.
Time
Altitude
• The scale used in the graph to display altitude depends on your settings. For further information, see page 32.
Time
• The graph is updated every 15 minutes, if Action recording is not on. The entire graph shows you
the last 11 hours 45 minutes.
• If Action recording is on ( is in the display), the graph is updated every 15 seconds. The entire graph shows you
the last 11 minutes 45 seconds.
THE MAIN FUNCTIONS OF THE POLAR OUTDOOR COMPUTER16
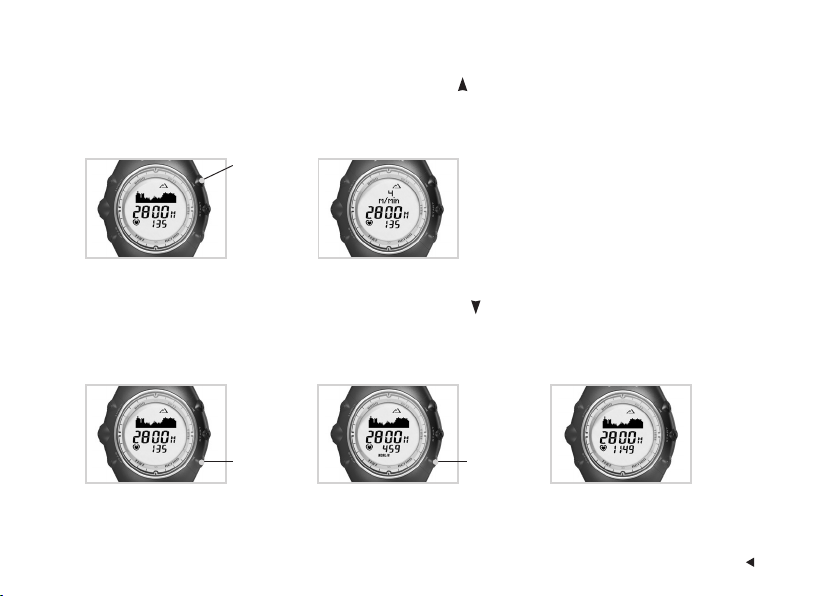
Changing the upper row information:
To change the information in the upper row, press and hold the Up button:
1. Graphical altitude trend 2. Vertical speed while ascending or
descending (m/min or ft/min)
Press and
hold
Changing the lower row information:
To change the information in the lower row, press and hold the Down button:
1. Heart rate* 2. Current rate of calories
3. Time of day
burned (kcal/h)*
Press and
hold
*To monitor your heart rate, wear the transmitter. To monitor the amount of calories you burn, wear the transmitter and turn Action recording on in the
Action main mode. For further information, see page 22.
Press and
hold
17THE MAIN FUNCTIONS OF THE POLAR OUTDOOR COMPUTER

1.
Altimeter Display Examples
1. To monitor how your energy expenditure rate changes in accordance with your pace and
altitude during your activity, select your
the
amount calories
2800 m equals 9186 ft.
burned per hour.
vertical speed
while ascending or descending and
2.
THE MAIN FUNCTIONS OF THE POLAR OUTDOOR COMPUTER18
2. To monitor how your body reacts to changes in pace and altitude, select your
while ascending or descending and your
Note:
• When wearing the transmitter and recording your activity, the heart rate reading flashes and the wrist unit
sounds an alarm if your heart rate is above or below the preset target zone. You can turn the Target Zone Alarm
sound
on or off in the Action main mode. For further information, see page 29.
•You can also change the upper and lower row information while recording your activity.
heart rate
.
vertical speed
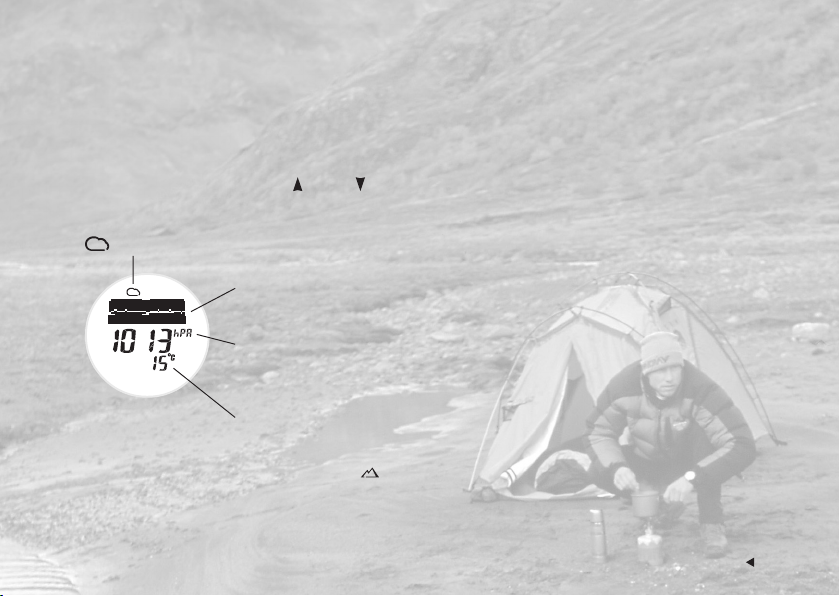
2.3 BARO MAIN MODE (BAROMETER)
Use the Baro main mode to check the sea level or absolute barometric pressure and temperature.
All changes in barometric pressure are interpreted as being due to changes in weather conditions. You can interpret the
weather conditions from measured barometric pressure changes, when you stay at the same altitude.
In the Time main mode, press the Up or Down button until you enter the Baro main mode.
The Baro main mode includes the following information:
The barometer symbol indicates that the barometer is active. To activate the barometer, see page 35.
Graphical barometer trend. Use the trend with the sea level
pressure reading to analyze changes in the weather.
Sea level pressure (hPa/inHg) = the value of the barometric
pressure at your current location reduced to sea level.
1013 hPa equals 29.90 InHg.
Temperature reading (°C/°F).
15 °C equals 59 °F.
Note: If the barometer is inactive and the altimeter is active , the graphical
trend is a straight line. The last measured pressure reading remains in the display,
absolute pressure reading though will be updated.
19THE MAIN FUNCTIONS OF THE POLAR OUTDOOR COMPUTER
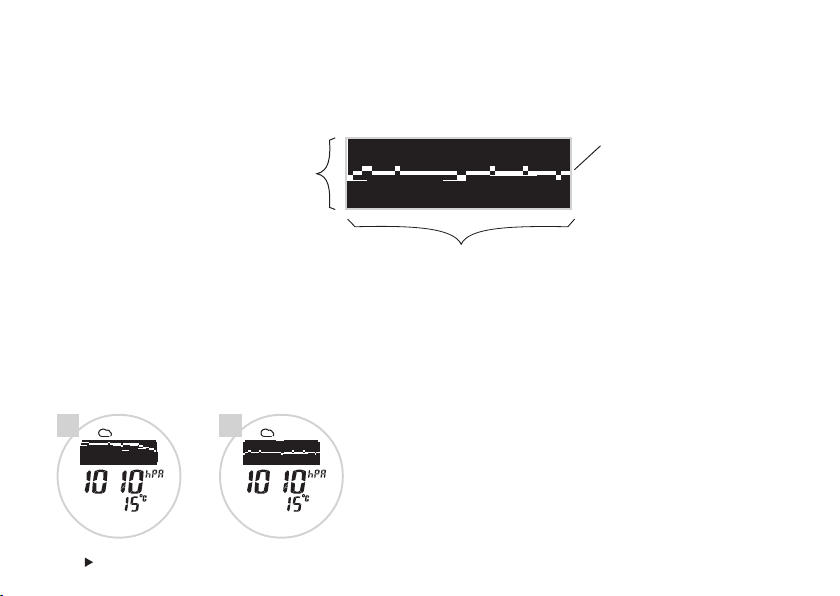
Graphical Barometer Trend
The graph shows how the sea level pressure has changed. Pressure readings vary locally and seasonally and also according
to the altitude. Check you local average pressures and learn to interpret the trend according to your local readings.
Sea level pressure:
The entire axis equals 15 hPa or 0.75 inHg.
One white pixel equals 1 hPa or 0.05 inHg.
The most recently
updated point.
The trend is updated
every 15 minutes.
Time: last 11 hours and 45 minutes
• If the trend rises, the weather is likely to improve.
• If the trend drops, the weather is likely to get worse. The longer or more rapidly the trend drops, the greater the chance of
a storm.
Example: You switched the barometer on when camping for the night. In the morning, you can interpret from the trend how
the weather is likely to develop.
1. 2.
1. In example one, the pressure has dropped.
2. In example two, the pressure has remained quite stabile.
THE MAIN FUNCTIONS OF THE POLAR OUTDOOR COMPUTER20
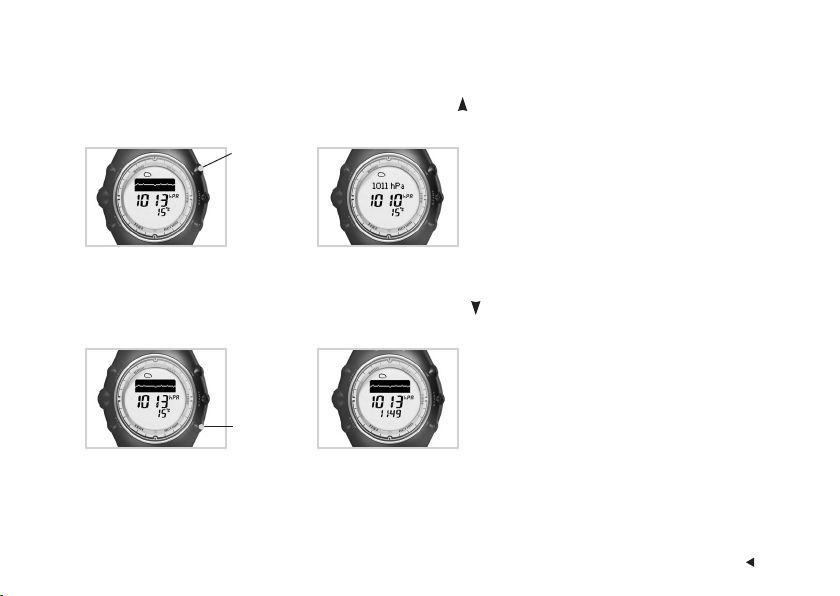
Changing the upper row information:
As in the Alti main mode, you can change the display to show the information that you need.
To change the information in the upper row, press and hold the Up button:
1. Barometer trend 2. Absolute pressure reading (hPa/inHg)
Press and
hold
Absolute pressure reading is your
current location’s barometric
pressure.
1011 hPa equals 29.85 inHg.
Changing the lower row information:
To change the information in the lower row, press and hold the Down button:
1. Temperature (°C/°F) 2. Time of day
Press and
hold
Note:
• Because your body temperature affects the actual temperature reading, the best way to obtain an accurate temperature is to take your wrist unit
off for at least 10 minutes.
•You can also change the upper and lower row information while recording your activity.
21THE MAIN FUNCTIONS OF THE POLAR OUTDOOR COMPUTER

2.4 TEST MAIN MODE
In the Test main mode, you can do the Polar Fitness Test to measure your OwnIndex® value (comparable to maximal oxygen
uptake, VO
) to find out your aerobic fitness level. For further information, see page 38.
2max
In the Time main mode, press the Up or Down button until you enter the Test main mode.
2.5 ACTION MAIN MODE
Use the Action main mode to record your physical activity and changes in altitude.
When you start recording your activity, a variety of information, including activity duration, vertical speed while ascending or
descending and altitude, are recorded in an Action File. If you want also to record your heart rate and energy expenditure in
calories, wear the transmitter. For further information on wearing the transmitter, see page 25.
THE MAIN FUNCTIONS OF THE POLAR OUTDOOR COMPUTER22
In the Time main mode, use the Down button to enter the Action main mode.
The Action main mode includes the following information:
Preset heart rate limits.
Altimeter or barometer symbol
(depending on which function is activated).
Action duration.
Flashing heart symbol and your current heart rate, if a heart beat is detected.
Start Action recording by pressing the Start button. For further information, see page 27.
Note: To record the altimeter information in an Action File, make sure that the altimeter is activated .
23THE MAIN FUNCTIONS OF THE POLAR OUTDOOR COMPUTER
Changing the lower row information
To change the information in the lower row, press and hold the Down button:
1. Your current heart rate
(beats per minute)
*The number of calories burned is measured after you have started recording.
Note:
•You can also change the lower row information while Action recording.
•Your current heart rate is also displayed in the Alti and Time main modes while Action recording.
• If your heart rate is not displayed and
the transmitter to restart the heart rate detection.
THE MAIN FUNCTIONS OF THE POLAR OUTDOOR COMPUTER24
2. Current rate of calories
burned (kcal/h)*
Press
and hold
- -
appears in the display, the heart rate detection has stopped. Bring the wrist unit near the Polar logo on
3. Calories burned during
Action recording (kcal)*
Press
and hold
4. Your current heart
rate as a percentage
of your maximum
heart rate
Press
and hold
See futher information on how
to use the heart rate as % of
your maximum heart rate in
page 65.

3. MEASURING AND RECORDING WITH YOUR OUTDOOR COMPUTER
3.1 ACTION SUB MODE
3.1.1 WHY MONITOR YOUR HEART RATE WHEN ENGAGING IN OUTDOOR SPORTS?
There are many reasons to monitor your heart rate during outdoor activities:
Planning - You can use heart rate in planning your training for various activities.
Intensity - Your heart rate is an accurate measure of the intensity of the activity – you will know how hard you are
working.
Pace - You can use heart rate to set a pace that you will be able to maintain.
Progress - Your heart rate allows you to objectively measure improvements in your fitness level. For a particular speed
and time or journey, your heart rate should decrease due to improvements in your fitness.
Safety - Monitor your heart rate during and after activity to keep yourself from pushing too hard or overtraining.
Adaptation - Your heart rate responds to internal and external factors acting on your body (for example, altitude,
temperature and humidity).
3.1.2 PUTTING YOUR TRANSMITTER ON
Although you can use your wrist unit as a watch and record performance and environmental data without wearing the
transmitter, wear the transmitter when you want to measure and record your heart rate and calorie expenditure.
25MEASURING AND RECORDING WITH YOUR OUTDOOR COMPUTER

1.
1. Attach one end of the transmitter to the elastic strap.
2. Adjust the transmitter’s strap length to fit snugly and comfortably. Secure the strap around
your chest, just below the chest muscles, and buckle the strap to the transmitter.
3. Lift the transmitter off your chest and moisten the two grooved electrode areas on the back.
2.
4. Check that the wet electrode areas are firmly against your skin and that the Polar logo is in a
central, upright position.
To ensure trouble-free heart rate monitoring, start your heart rate monitoring in a place with the
fewest possible electromagnetic disturbances (skilifts, computers, mobile phones, other people
using heart rate monitors, high voltage power lines, cars, motor driven exercise equipment, etc.)
3.
before going out.
When you put your transmitter on, it starts to detect your heart rate, which is then transmitted
to the wrist unit. A heart symbol starts flashing in the Action (or Alti) main mode and your heart
rate in beats per minute (bpm) appears in a maximum of 15 seconds.
4.
MEASURING AND RECORDING WITH YOUR OUTDOOR COMPUTER26
Note:
• If the wrist unit does not display your heart rate, check that the transmitter electrodes are wet and that
the strap is snug enough.
• When you go biking, we recommend attaching the wrist unit to the Polar Bike Mount™.

3.1.3 RECORDING YOUR ACTION
1. In the Time main mode, press the Down button to enter the Action Main mode. Your heart rate appears in a few seconds
if you are wearing the transmitter. To start Action recording, press the Start button.
Alternatively, you can quickstart Action recording in the Time main mode by pressing and holding the Start button.
2. The wrist unit displays Action: REC ON and the Action timer starts running. Your activity information is recorded in an
Action File. For further information, see page 50. The Action recording mode displays the following information:
Altimeter or barometer symbol depending on which one is active.
Heart rate trend graph.
indicates recording.
Flashing heart symbol* and your heart rate.
* A frame around the heart rate symbol indicates a coded heart rate transmission. Heart rate coding reduces
interference from other heart rate monitors that are close by. To ensure that the code search is successful make sure that
there is no other heart rate monitor within reception range (1 meter / 3 feet) before the framed heart rate appears.
A heart rate symbol without a frame indicates an non-coded heart rate transmission. However, the heart rate
measurement works in a non-coded mode.
27MEASURING AND RECORDING WITH YOUR OUTDOOR COMPUTER

Graphical Heart Rate Trend
The graph shows how your heart rate has changed.
Heart Rate:
The entire axis equals 15 beats per
minute and one pixel equals 1 bpm.
The most recently updated point.
The trend is updated every 15
seconds.
Time: last 11 minutes and 45 seconds
Note:
• If the Action recording is on and you are wearing the transmitter, your current heart rate is also displayed in the Time and Alti main modes.
•You can change the lower row information by pressing and holding the Down
• If the maximum recording time of one Action File (99 hours 59 min 59 s) becomes full, the wrist unit beeps and automatically pauses Action
recording and displays the HALT text. Stop Action recording by pressing the Stop button and start recording in another Action file, if there is
memory left. For further information on how to release memory for new files by deleting files, see page 54.
MEASURING AND RECORDING WITH YOUR OUTDOOR COMPUTER28
button in the Action main mode.

3.1.4 FEATURES DURING YOUR ACTION RECORDING
In the Action main mode you can use the following functions during your Action recording.
To turn the sounds on or off: Press and hold the Up button. The symbol indicates that the button, activity and
Tar get Zone Alarm sounds are on.
Tar get Zone Alarm: With the Target Zone Alarm you can make sure you exercise at the correct intensity. After you set your
heart rate limits, the wrist unit sounds an alarm when you are above or below your heart rate limits. You can set the heart
rate limits for your target zone in the Settings/General menu. For further information, see page 65.
How it works: The heart rate value starts flashing and your wrist unit beeps with each heartbeat if you are out of your target
zone. The Target Zone Alarm also works in the Alti and Time main modes during Action recording.
Note: If the heart rate limits are turned off, there is no Target Zone Alarm in the Action mode and no target zone information is placed in the Action File.
Exercising in the dark: After you have pressed the Light button once, the display automatically illuminates each time you
press a button or bring the wrist unit near the Polar logo on the transmitter, until you stop Action recording.
3.1.5 FILEVIEW DURING ACTION RECORDING
If you want to view your information during Action recording, you can check the summary of the information recorded so far.
The FileView function is available in all main modes except in the Test main mode.
29MEASURING AND RECORDING WITH YOUR OUTDOOR COMPUTER

1. Press and hold the Start button during recording to
activate the FileView function.
2. FileView SPLIT is displayed.
FileView starts automatically scrolling through the
following information:
FileView
SPLIT Split time
HR AVG Average heart rate
HR MAX Maximum heart rate
KCAL Accumulated calories
VERT.SPD AVG Average ascent rate*
VERT.SPD MAX Maximum ascent rate*
VERT.SPD AVG Average descent rate*
VERT.SPD MAX Maximum descent rate*
SLOPES Number of slopes you have gone down*
ALTITUDE MAX (M/FT) Maximum Altitude*
ALTITUDE MIN (M/FT) Minimum Altitude*
ASCENT Ascended meters / feet*
DESCENT Descended meters / feet*
MEASURING AND RECORDING WITH YOUR OUTDOOR COMPUTER30
3. To freeze the display for a few secods, press the Start
button. To continue automatic scrolling, press the Start
button again. To browse the FileView press the Up or
Down button.
To stop viewing information while recording, press the
Stop button. The wrist unit returns to the Action
recording mode.
*These values are not displayed if your Barometer was active during
Action recording
The wrist unit automatically counts a descent of at least 50 m /
165 ft as a slope.
.
3.1.6 STOPPING OR PAUSING ACTION RECORDING
You can pause recording in any main mode. The wrist unit
returns to the Action mode.
1. Press the Stop button to pause Action recording. The
wrist unit displays: Action PAUSED.
Flashing indicates that your Action recording is
paused.
2. To continue recording, press the Start button. Action
recording starts again.
Alternatively to stop recording, press the Stop button
again. Action STOPPED is displayed for a few seconds
before the wrist unit returns to the Time main mode.

3.2 ALTI SUB MODE (ALTIMETER)
In the Alti sub mode, you can:
• Activate your altimeter.
• Set the altitude scale for the graphical trend to suit the type of activity you will be doing.
• Calibrate the altitude.
Press Start
• ACTIVATE
Press Up
• SCALE
Press Up
• CALIBRATION
3.2.1 ACTIVATING THE ALTIMETER
The altimeter converts the measured barometric pressure to an altitude reading. Due to the fact
that both the altimeter and the barometer use barometric pressure, you can activate only one of
these features at a time. Therefore, you must activate your altimeter to use it. It is recommended
that you calibrate the altimeter after activating it. For further information, see page 33.
The wrist unit records altimeter information automatically and continuously in a one-week
circular memory, called Auto Log, if the altimeter is activated.
1. In the Time main mode, press the Up button to enter the Alti main mode.
2. In the Alti main mode, press the Start button. Activate: ALTI or BARO is displayed.
31MEASURING AND RECORDING WITH YOUR OUTDOOR COMPUTER

3. Continue by pressing the Start button and follow the step below:
4. The display reads:
Activate: ALTI or BARO
Press the Up or Down button
to select ALTI (altimeter).
Press the Start button to active
the selected function.
•To return to the Time main mode, press and hold the Stop button.
Note: Activating the altimeter locks off the sea level pressure reading.
3.2.2 SETTING THE SCALE FOR THE GRAPHICAL TREND
The optional scales for the altitude graphical trend are:
Altitude
1 m / 3 ft, 10 m / 30 ft and 100 m / 300 ft.
The table below contains recommended graphical trend scale settings for different activties.
Activity
Hiking - level to moderate terrain 1 1 m / 3 ft 15 m or 45 ft
Hiking - moderate to steep terrain, 10 10 m / 30 ft 150 m or 450 ft
Back-country skiing or snowboarding
Downhill skiing or snowboarding 100 100 m / 300 ft 1500 m or 4500 ft
MEASURING AND RECORDING WITH YOUR OUTDOOR COMPUTER32
Scale
Graphical Trend Scale:
One pixel equals
Graphical Trend Scale:
The total altitude axis equals

To set the scale:
1. In the Alti main mode, press the Start button. Use the Up button until Altitude SCALE is displayed.
2. Continue by pressing the Start button and follow the step below:
3. The display reads:
Altitude SCALE
Press the Up or Down button
to select the desired scale.
Press the Start button.
• The wrist unit returns to the
Altitude SCALE menu.
•To return to the Time main mode, press and hold the Stop button.
3.2.3 CALIBRATING ALTITUDE
Calibrate your altimeter often to ensure it remains accurate. Set the reference altitude whenever a reliable reference, such
as a peak or a topographic map, is available.
Tip: When calibrating the altimeter, the barometer is calibrated simultaneously.
If you do not know the altitude of your position, but you do know the exact sea level pressure of your location, you can calibrate the sea level pressure
to help determine the altitude and vice versa. For further information on the barometer calibration, see page 36.
33MEASURING AND RECORDING WITH YOUR OUTDOOR COMPUTER

1. In the Alti main mode, press the Start button. Press the Down button. Altitude CALIBRATION is displayed.
2. Continue by pressing the Start button and follow the step below:
3. The display reads:
Altitude
CALIBRATION
Press the Up or Down button
to set the flashing altitude value
of your current location.
Press the Start button to accept
the value.
• Calibration OK is displayed and
the wrist unit returns to the Alti
main mode.
•To return to the Time main mode, press and hold the Stop button.
Note: To cancel the calibration, press the Stop button when the calibrated value flashes. Calibration FAILED is displayed and the wrist unit returns to the
Altitude CALIBRATION display.
MEASURING AND RECORDING WITH YOUR OUTDOOR COMPUTER34

3.3 BARO SUB MODE (BAROMETER)
In the Baro sub mode, you can:
• Activate your barometer.
• Calibrate the sea level pressure.
3.3.1 ACTIVATING THE BAROMETER
Press Start
• ACTIVATE
Press Up
• CALIBRATION
Because barometric pressure decreases considerably when the altitude increases, it is
recommended that you use the barometer when you stay at the same altitude for a longer period
of time, for example, when camping overnight.
It is recommended that you calibrate the barometer after activating it. For further information,
see the following page.
The wrist unit records barometer information automatically and continuously in a one-week
circular memory, called Auto Log, if the barometer is activated.
1. In the Time main mode, press the Up button to enter the Alti main mode.
2. In the Alti main mode, press the Start button. Activate: ALTI or BARO is displayed.
35MEASURING AND RECORDING WITH YOUR OUTDOOR COMPUTER

3. Continue by pressing the Start button and follow the step below:
4. The display reads:
Activate: ALTI or BARO
Press the Up or Down button
to select BARO (barometer).
Press the Start button to active
the selected function.
•To return to the Time main mode, press and hold the Stop button.
Note: Due to the fact that both the altimeter and barometer measurements are based on barometric pressure, you can use only one of these features at a time.
Activating the barometer turns off the altimeter and vice versa.
Tip: How to Predict Weather Changes when Using the Altimeter
If you notice that the altitude reading is significantly off (you know your altitude is about 2000 m / 6500 ft, but the altimeter reads
3000 m / 9500 ft), this could result from a change in weather conditions. You should prepare yourself for a change in the weather.
3.3.2 CALIBRATING THE BAROMETER
Calibrate the barometer by setting the sea level pressure. Information sources such as weather stations, airports, or Internet
weather pages can provide you with your sea level pressure reference value. Calibrate your barometer often to ensure it
remains accurate.
Tip: When calibrating the barometer, the altimeter is calibrated simultaneously.
If you do not know the current sea level pressure, but you know your exact altitude, you can calibrate the current altitude of your position to help
determine the sea level pressure of your location and vice versa. For further information on altimeter calibration, see page 33.
MEASURING AND RECORDING WITH YOUR OUTDOOR COMPUTER36

1. In the Baro main mode, press the Start button. Press the Down button. Barometer CALIBRATION is displayed.
2. Continue by pressing the Start button and follow the step below:
3. The display reads:
Barometer
SEA LEVEL
Press the Up or Down button
to set the flashing sea level
pressure value.
Press the Start button to
accept the value.
• Calibration OK is displayed
and the wrist unit returns to
the Baro main mode.
•To return to the Time main mode, press and hold the Stop button.
Note: To cancel the calibration, press the Stop button during calibration. Calibration FAILED is displayed and the wrist unit returns to the Barometer
CALIBRATION display.
37MEASURING AND RECORDING WITH YOUR OUTDOOR COMPUTER

3.4 TEST SUB MODE
3.4.1 PERFORMING THE POLAR FITNESS TEST
To monitor the progress of your aerobic fitness, perform the
Fitness Test a couple of times during the first two weeks of
your activity to get a baseline value. Thereafter, repeat the
test approximately once a month to follow the changes in
your fitness.
Before you can perform the test, you need to enter your
personal user information and long term physical activity in
the Settings/User menu (see page 60) and to wear your
transmitter (see page 25). It takes 3-5 minutes to perform
the test. The test is intended for healthy adults.
To get reliable test results, follow these basic requirements:
• The test can take place anywhere as long as the testing
environment is peaceful. There should be no disturbing
noises (e.g., television, radio or telephone), and no other
people talking to you.
• Keep the testing place, time of day, and environment
similar every time you take the test.
•Avoid eating a heavy meal, drinking coffee or smoking
2-3 hours prior to performing the test.
MEASURING AND RECORDING WITH YOUR OUTDOOR COMPUTER38
• Limit heavy physical exertions, and avoid alcoholic
beverages or pharmacological stimulants on the test
day and the day before.
• Lie down and relax for 1-3 minutes before the test.
To Perform the Test
1. In the Time main mode, press the Up or Down
button until you enter the Test main mode.
2. If you have taken the test before, your latest OwnIndex
value and the test date are displayed.
3. Press the Start button to start the test. The wrist unit
starts searching for your heart rate. The test begins as
Test ON and your heart rate are
displayed. The increasing number of arrows indicates
that the test is in progress.
Note: If the wrist unit displays: Setting Missing, set your weight, height,
date of birth, sex and activity level before performing the test. For further
information, see page 60.

4. Stay relaxed. Keep your hands beside your body and limit your body movements and communication with other people.
5.
Fitness class
Test date
OwnIndex
5. When your test is over, your current OwnIndex and its interpretation are
displayed. For further information on the interpretation, see page 41.
6. Press the Start button. If the test result is different from the previous result,
the wrist unit asks: Save new VALUE?
Saving the OwnIndex value automatically updates your OwnIndex in the
User Set/VO
setting mode. For further information, see page 60.
2max
7. To save your OwnIndex value, press the Start button.
Alternatively, if you do not want to update your OwnIndex value, press the Stop button.
The wrist unit returns to the Test main mode.
•To return to the Time main mode, press and hold the Stop button.
Canceling the Test
Press the Stop button to stop the test at any time during testing. Your test is interrupted and your last OwnIndex value is not
replaced.
If the wrist unit does not receive your heart rate at the beginning or during the test, the test fails. Check that the transmitter
electrodes are wet and that the strap is snug enough.
39MEASURING AND RECORDING WITH YOUR OUTDOOR COMPUTER

3.4.2 OWNINDEX - FITNESS TEST RESULT
OwnIndex is a value that is comparable to your maximal oxygen uptake (VO
in ml/kg/min), a commonly used descriptor of
2max
aerobic fitness. Aerobic (cardiovascular) fitness relates to how well your cardiovascular system works to transport and utilize
oxygen in your body. The stronger and more efficient your heart is, the better your aerobic fitness is. VO
of performance capability in endurance and outdoor sports. OwnIndex or your preset VO
value is used in the estimation of
2max
is a good indicator
2max
your energy expenditure.
If you want to improve your aerobic fitness, it takes a minimum of 6 weeks on average to see a noticeable change in your
OwnIndex. Less fit individuals see progress even more rapidly, while more fit individuals need more time. Aerobic fitness is
improved by exercise types that employ large muscle groups over longer periods of time (more than 30 minutes). OwnIndex is
based on your heart rate and heart rate variability at rest, age, gender, height, body weight, and the self-assessed physical
activity level given in the Settings: User menu.
MEASURING AND RECORDING WITH YOUR OUTDOOR COMPUTER40

3.4.3 OWNINDEX INTERPRETATION
Your OwnIndex is most meaningful when comparing your individual values and changes in them. OwnIndex can also be
interpreted in accordance with your gender and age. Locate your OwnIndex in the table to find out your current aerobic
fitness classification, compared to those who are of the same age and gender.
12 3 4 5 6 7
Age (very (low) (fair) (middle) (good) (very (elite)
(years) low) good)
20-24 < 32 32-37 38-43 44-50 51-56 57-62 >62
25-29 < 31 31-35 36-42 43-48 49-53 54-59 >59
MEN
30-34 < 29 29-34 35-40 41-45 46-51 52-56 >56
35-39 < 28 28-32 33-38 39-43 44-48 49-54 >54
40-44 < 26 26-31 32-35 36-41 42-46 47-51 >51
45-49 < 25 25-29 30-34 35-39 40-43 44-48 >48
50-54 < 24 24-27 28-32 33-36 37-41 42-46 >46
55-59 < 22 22-26 27-30 31-34 35-39 40-43 >43
60-65 < 21 21-24 25-28 29-32 33-36 37-40 >40
20-24 < 27 27-31 32-36 37-41 42-46 47-51 >51
25-29 < 26 26-30 31-35 36-40 41-44 45-49 >49
30-34 < 25 25-29 30-33 34-37 38-42 43-46 >46
35-39 < 24 24-27 28-31 32-35 36-40 41-44 >44
WOMEN
40-44 < 22 22-25 26-29 30-33 34-37 38-41 >41
45-49 < 21 21-23 24-27 28-31 32-35 36-38 >38
50-54 < 19 19-22 23-25 26-29 30-32 33-36 >36
55-59 < 18 18-20 21-23 24-27 28-30 31-33 >33
60-65 < 16 16-18 19-21 22-24 25-27 28-30 >30
This classification is based on a literature review of 62 studies where
VO
was measured directly in healthy adults in the USA, Canada and
2max
7 European countries. Reference: Shvartz E, Reibold RC: Aerobic fitness
norms for males and females aged 6 to 75 years: a review. Aviat Space
Environ Med; 61:3-11, 1990.
The values in the table are typical for individuals who are
not competing in sports. Top athletes typically score
OwnIndex values above 70 (men) and 60 (women). Values
as high as 95 can be reached by Olympic level endurance
athletes.
41MEASURING AND RECORDING WITH YOUR OUTDOOR COMPUTER

4. ADJUSTING SETTINGS, REVIEWING FILES AND USING TIMERS (TIME MAIN MODE)
In the Time sub modes, you can specify watch, user, and wrist unit settings, as well as use
Stopwatch and CountDown timers, view memory files, and connect to a PC. For further
information, see page 75.
Press Start
• WATCH SET
Press Up
• FILES
Press Up
• SETTINGS
Press Up
• STOPWATCH
Press Up
• COUNTDOWN
Press Up
• CONNECT
ADJUSTING SETTINGS, REVIEWING FILES AND USING TIMERS (TIME MAIN MODE)42
Press Start
• ALARM
Press Up
• TIME
Press Up
• DATE
Press Up
• REMINDER
4.1 WATCH SETTINGS
In addition to normal watch functions, the Polar Outdoor
Computer includes everything you need to keep your day
organized:
• Three Daily Alarms with snooze functions.
•Two different time zone settings.
• Date and weekday.
• Five reminders.
When setting values:
• Select or adjust a value with the Up or Down button.
• Accept your selection and go deeper in the menu with the Start
button.
• Cancel your selection or return to the previous mode or menu
by pressing the Stop button.

4.1.1 SETTING ALARMS
In the Setting Alarm menu, you can set three Daily Alarms. Do not worry about forgetting to turn your alarm clock on in the
evenings – once turned on the Alarms work every day. If you have difficulties waking up, use your wrist unit’s snooze function
to sleep that ten extra valuable minutes.
1. In the Time main mode, press the Start button. Menu WATCH SET is displayed.
2. Press the Start button. WatchSet ALARM is displayed.
3. Continue by pressing the Start button and follow the steps below:
The display reads: Press Up or Down button
4. ALARM 1
SET
5. SET ON or OFF
6. SET AM/PM
(if you use 12h)
7. SET HOURS
8. SET MIN
to set the flashing value
Up
/ Down
• select the one of the three daily Alarms.
Up
/ Down
• turn the Alarm on or off.
Up
/ Down
• select AM or PM.
Up
/ Down
• adjust the flashing hours.
Up
/ Down
• adjust the flashing minutes.
Press the Start button
to accept
Start
Start
(Skip step 6 if you use 24h time mode.)
Start
Start
Start
•To set another Alarm, return to step 4.
•To return to the Time main mode, press and hold the Stop button.
43ADJUSTING SETTINGS, REVIEWING FILES AND USING TIMERS (TIME MAIN MODE)

How the Alarm works
The Alarm works in all modes. When the Alarm sounds, Daily Alarm! with a flashing backlight is displayed. The alarm
stays on for a minute if you do not turn it off by pressing the Stop button. Alternatively, if you want to sleep an extra 10
minutes, press the Up, Down or Start button: Snooze is displayed. The alarm will sound again after 10 minutes. To cancel
the snooze and Alarm, press the Stop button in Snooze mode.
Note: If the battery low symbol appears in the display, you cannot activate the Alarm.
4.1.2 CHANGING THE TIME OF DAY AND SETTING THE DUAL TIME (TIME SET)
In the Time Set menu, you can change the time of day for your wrist unit and set the time for two different time zones. The
dual time feature can be used when you travel to check the time at home before calling from abroad, or for other uses.
1. In the Time main mode, press the Start button. Menu WATCH SET is displayed.
2. Press the Start button. WatchSet ALARM is displayed.
3. Press the Up button. WatchSet TIME is displayed.
ADJUSTING SETTINGS, REVIEWING FILES AND USING TIMERS (TIME MAIN MODE)44

4. Continue by pressing the Start button and follow the steps below:
The display reads: Press Up or Down button
5. Time 1
SET
6. SET 12h/24h time mode
7. SET AM/PM
(if you chose 12h mode)
8. SET HOURS
9. SET MIN
to set the flashing value
/ Down
Up
• select the time zone (1 or 2).
Up
/ Down
• select flashing 12h or 24h.
Up
/ Down
• select AM or PM.
Up
/ Down
• adjust the flashing hours.
Up
/ Down
• adjust the flashing minutes.
•To set another time zone, return to step 5.
•To return to the Time main mode, press and hold the Stop button.
Press the Start button
to accept
Start
Start
(If you chose 24h mode, skip step 7.)
Start
Start
Start
45ADJUSTING SETTINGS, REVIEWING FILES AND USING TIMERS (TIME MAIN MODE)

4.1.3 CHANGING THE DATE
1. In the Time main mode, press the Start button. Menu WATCH SET is displayed.
2. Press the Start button. WatchSet ALARM is displayed.
3. Press the Up or Down button until WatchSet DATE is displayed.
4. Continue by pressing the Start button and follow the steps below:
The display reads: Press Up or Down button
5. Date: DD.MM.YY or
MM.DD.YY (if you use
12h mode)
6. MM (month) or
DD (days: 12h mode)
7. YY (year)
to set the flashing value
Up
/ Down
• select the flashing day or month (12h mode).
Up
/ Down
• select the flashing month or day (12h mode).
/ Down
Up
• select the flashing year.
Press the Start button
to accept
Start
Start
Start
•To return to the Time main mode, press and hold the Stop button.
4.1.4 SETTING REMINDERS
Set five reminders to indicate important events, meetings, and other times during your day.
1. In the Time main mode, press the Start button. Menu WATCH SET is displayed.
2. Press the Start button. WatchSet ALARM is displayed.
ADJUSTING SETTINGS, REVIEWING FILES AND USING TIMERS (TIME MAIN MODE)46

3. Press the Down button. WatchSet REMINDER is displayed.
4. Continue by pressing the Start button and follow the steps below:
The display reads: Press Up or Down button
5. Remind1
6. SET ON or OFF
to set the flashing value
/ Down
Up
• select one of the five reminders.
/ Down
Up
• turn the reminder on or off.
Press the Start button
to accept
Start
Start
(If you selected OFF, skip the following
settings for the reminder.)
• In 24h mode, Adjust: day, month, year, hours, and minutes or in 12h mode: month, day, year, AM/PM, hours, and minutes
with the Up or Down buttons. Press the Start button after each selection.
•To set another reminder, return to step 5.
•To return to the Time main mode, press and hold the Stop button.
You can transfer the reminder data, with an identifying name and time, to the wrist unit with the Polar UpLink Tool.
For further information, see page 75.
How the Reminder Works
The Reminder Alarm is shown in all modes. When the Reminder Alarm sounds, the number of the reminder (or its name if you
have set it with a PC) is displayed. The Alarm stays on for one minute unless you turn it off by pressing the Start, Stop, Up
or Down button.
47ADJUSTING SETTINGS, REVIEWING FILES AND USING TIMERS (TIME MAIN MODE)

4.2 FILES
• AUTO LOG
Press Up
• ACTION FILE
Press Up
• SEASON TOT.
ADJUSTING SETTINGS, REVIEWING FILES AND USING TIMERS (TIME MAIN MODE)48
Press Start
There are three types of files for recording information in your wrist unit:
• Auto Log: includes one week of altitude or barometer information recorded automatically
and continuously depending on which feature you have used.
• Action File: includes the information you have recorded during your activity.
• Season Total Values: includes cumulative and maximum values for the information recorded
for your activities.
4.2.1 AUTO LOG
Auto Log allows you to review altimeter or barometer readings for the past week without having
to record an Action File. It is perfect for reviewing the altitudes of a long trek or looking at
weather trends.
The wrist unit continuously records altimeter or barometer information every 15 minutes in a one
week running memory, called Auto Log. It does not require you to start recording. When the
memory is full, the oldest information is overwritten.
Viewing the Auto Log
1. In the Time main mode, press the Start button. Menu WATCH SET is displayed.
2. Press the Up button. Menu FILES is displayed.
3. Press the Start button. Files AUTO LOG is displayed.

4. Press the Start button. The most recent recorded information (END) is displayed:
Graphical altitude or barometric pressure trend. END indicates the ending point of the
graph. It is the most recently recorded graphical trend information.
Date when the information was recorded.
Time when the information was recorded (if you use 12h mode: A or P alternates with the time,
A= AM and P= PM).
Note: END/START indicates the ending/starting point of the recorded graphical trend.
5. Use the Up or Down button to scroll through the recorded information.
The graph indicator moves to show the current displayed point in the graph and the date and time when the information
was recorded.
If the indicator is on a point where the
altimeter was active , only the altitude
information is shown.
If the indicator is on a point where the
barometer was active , only the
barometric pressure information is shown.
49ADJUSTING SETTINGS, REVIEWING FILES AND USING TIMERS (TIME MAIN MODE)

6. To view more detailed information for a date, press the Start button to select the date.
The following information is displayed:
Graphical altitude or barometric trend.
Altitude or barometric pressure value at the time the information was recorded.
Time and date when the information was recorded alternate.
7. Use the Up or Down button to scroll through the information, which was recorded every
15 minutes.
1500 meters equals
4921 feet.
8. To exit the menu, press the Stop button. Return to step 5.
9. To view an Action File, press the Stop button and press the Up button. Files ACTION FILE is
displayed.
•To return to the Time main mode, press and hold the Stop button.
4.2.2 ACTION FILE
The Action File allows you to review heart rate, energy expenditure and performance data collected while Action recording.
The wrist unit starts recording activity information in an Action File as soon as you start Action recording in the Action main
mode. One Action File is generated at a time. The bigger the file number, the more recent the file is. You can record a
maximum of 80 files.
ADJUSTING SETTINGS, REVIEWING FILES AND USING TIMERS (TIME MAIN MODE)50

Viewing the Action File
1. In the Time main mode, press the Start button. Menu WATCH SET is displayed.
2. Press the Up button. Menu FILES is displayed.
3. Press the Start button. Files AUTO LOG is displayed.
4. Press the Up button. Files ACTION FILE is displayed.
5. Press the Start button. The last Action File is displayed:
Action File number.
Date and time when the file was recorded.
Note: If the wrist unit displays: File Rec ACTIVE, stop Action recording to view the Action Files.
6. Use the Up or Down button to browse through the files.
Note: If you press the Up button first you see Delete ALL FILES? For further information, see page 55. Press the Up button to view the first Action File.
51ADJUSTING SETTINGS, REVIEWING FILES AND USING TIMERS (TIME MAIN MODE)

7. To view the information recorded in a file, press the Start button to select the file.
Use the Up or Down button to browse through the recorded information.
Recorded Action File Information
Duration or recorded activity.
Maximum and average heart rate readings.
Limits, INZONE, ABOVE,Time spent in, above, and below your target zone during your activity.
BELOW alternates Heart rate limits.
Calories, KCAL Total accumulated calories burned during the activity.
Slope COUNT Accumulated number of slopes.*
*These values are not displayed if the barometer was active.
The wrist unit automatically counts a descent of at least 50 m / 165 ft as a slope.
ADJUSTING SETTINGS, REVIEWING FILES AND USING TIMERS (TIME MAIN MODE)52

Recorded Action File Information
Total ascended meters/feet.
Maximum and average ascent rate alternate.*
Total descended meters/feet.
Maximum and average descent rate alternate.*
*These values are not displayed if the barometer was active.
53ADJUSTING SETTINGS, REVIEWING FILES AND USING TIMERS (TIME MAIN MODE)

Recorded Action File Information
Altitude MAX/MIN Highest and lowest altitude points.*
File Delete? To delete this file.
*These values are not displayed if the barometer was active.
•To stop viewing the File details, press the Stop button to return to the File List (go to step 6).
•To return to the Time main mode, press and hold the Stop button.
Deleting Files One by One
You can release memory by deleting files. Once you have deleted a file, you cannot retrieve it.
1. In the Files ACTION FILE display, press the Start button.
2. Use the Up or Down button to browse the files.
3. Press the Start button to select an Action File with the desired number.
4. Press the Down button. File DELETE? is displayed.
If you do not want to delete the file, cancel the deletion by pressing the Up or Down button. You can continue
browsing the Action File information.
5. Press the Start button. The wrist unit asks: Are you SURE?
6. To delete the file, press the Start button. File DELETED is displayed.
Alternatively, to cancel the deletion, press the Stop button.
The wrist unit returns to the Action File display.
•To continue deleting your files, go to step 2.
•To return to the Time main mode, press and hold the Stop button.
ADJUSTING SETTINGS, REVIEWING FILES AND USING TIMERS (TIME MAIN MODE)54

Deleting All Files
1. In the Files ACTION FILE display, press the Start button and the Up button.
2. The wrist unit asks: Delete ALL FILES? If you do not want to delete all the files, press the Up or Down button.
You can continue browsing the Action Files.
3. Press the Start button. The wrist unit asks: Are you SURE?
4. To delete all the files, press the Start button. Files DELETED is displayed.
Alternatively, to cancel the deletion: press the Stop button twice.
The wrist unit returns to the Files ACTION FILE display.
•To return to the Time main mode, press and hold the Stop button.
4.2.3 SEASON TOTAL VALUES
Use the Season Total Values file as a weekly/monthly counter of your activity values.
The Season Total Values are updated automatically, when Action recording is stopped. This function keeps track of your
cumulative and maximum values starting from the last reset. For further information on how to reset the values, see page 59.
Viewing the Season Total Values
1. In the Time main mode, press the Start button. Menu WATCH SET is displayed.
2. Press the Up button. Menu FILES is displayed.
3. Press the Start button. Files AUTO LOG is displayed.
4. Press the Down button. Files SEASON TOT. is displayed.
5. In the Season Total Values menu, press the Start button. The total calories burned (Tot.Kcal) are displayed.
55ADJUSTING SETTINGS, REVIEWING FILES AND USING TIMERS (TIME MAIN MODE)

6. Use the Up or Down button to browse through the following information:
Season Total Values
The date when the total calories burned was last reset.
The total calories burned from the previous reset.
Your heart rate must be measured during action recording to update
the total burned calories.
The date when the number of slopes was last reset.
The cumulative number of slopes, commencing from the previous reset.*
The date when the maximum ascent rate was recorded.
Maximum ascent rate.*
* The altimeter must be on during action recording to update these values. The value is not updated if the barometer was activated.
ADJUSTING SETTINGS, REVIEWING FILES AND USING TIMERS (TIME MAIN MODE)56

Season Total Values
The date when the maximum descent rate was recorded.
Maximum descent rate.*
The date when the total altitude ascended was last reset.
Cumulative altitude ascended, commencing from the previous reset.*
The date when the total altitude descended was last reset.
Cumulative altitude descended, commencing from the previous reset.*
* The altimeter must be on during action recording to update these values. The value is not updated if the barometer was activated.
57ADJUSTING SETTINGS, REVIEWING FILES AND USING TIMERS (TIME MAIN MODE)

Season Total Values
The date when the maximum altitude was recorded.
Maximum altitude.*
* The altimeter must be on during action recording to update these values. The value is not updated
if the barometer was activated.
7. To stop viewing the values, press the Stop button.
•To return to the Time main mode, press and hold the Stop button.
ADJUSTING SETTINGS, REVIEWING FILES AND USING TIMERS (TIME MAIN MODE)58

Using the previously recorded maximum altitude in the Season Total Values
If the altimeter gives a faulty maximum reading, you can correct the recorded reading by using the previously recorded
maximum altitude.
1. In the Altitude max. display, press the Start button to start using the previous maximum altitude value. The wrist unit
asks: Altitude RESET?
2. Press the Up button. Your previous maximum altitude is displayed.
The wrist unit asks: Altitude RETURN OLD?
3. Press the Start button. The wrist unit asks: Are you SURE?
4. If you are sure, press the Start button.
Alternatively, to cancel the reset, press the Stop button.
Resetting the Season Total Values to zero
Use the Season Total Values as a seasonal (or weekly/monthly) counter of your activity values by resetting them to zero once
a season. Once you have reset a value, you cannot retrieve it.
Start with any display in the previous table (Tot.Kcal, Slopes, Vert.Speed max, Vert.Speed max, Ascent, Descent or
Altitude max).
1. Press the Start button to start resetting the desired value. The wrist unit asks: RESET?
2. Press the Start button. The wrist unit asks: Are you SURE?
3. If you are sure that you want to reset the value to zero, press the Start button.
Alternatively, to cancel the reset, press the Stop button.
59ADJUSTING SETTINGS, REVIEWING FILES AND USING TIMERS (TIME MAIN MODE)

4.3 SETTINGS
The Settings menus allow you to manually enter memory, user, and wrist unit settings. You can
also prepare your settings with the Polar UpLink Tool and transfer them to your wrist unit from
your PC. For further information, see page 75.
Note: You are not able to enter the Settings menu when you are using Action recording.
Press Start
• USER
Press Up
• GENERAL
ADJUSTING SETTINGS, REVIEWING FILES AND USING TIMERS (TIME MAIN MODE)60
4.3.1 SETTING USER INFORMATION
Entering your personal information ensures that your calorie counter and Fitness Test will
operate with the highest possible degree of accuracy.
1. In the Time main mode, press the Start button. Menu WATCH SET is displayed.
2. Press the Up or Down button until Menu SETTINGS is displayed.
3. Press the Start button. Settings USER is displayed.
4. Press the Start button to specify the user information settings and follow the steps below:
The display reads: Press Up or Down button
5. Weight
SET KILOGRAM or POUNDS Up
Note:
• The units of weight and height depend on your choice in the units settings. If you chose the wrong units,
you can still change them by pressing and holding the Light button.
•To change your settings, press the Stop button and return to step 4.
to set the flashing value
/ Down Start
Press the Start
button to accept

The display reads: Press Up or Down
button to set the flashing value
6. Height
• Set CM or FT
• Set INCH (if you use Units 2)
Up
/ Down
Up / Down
7. Birthday
• DD (set days) or
MM (set month: if you chose 12h)
• MM (set month) or
Up / Down
Up / Down
DD (set days: if you chose 12h)
• YY (set year)
Up / Down
8. Sex
SET MALE or FEMALE
9. Activity
Set LOW, MODERATE, HIGH or TOP
(see the instructions on page 63).
10. VO
SET
2max
The wrist unit suggests a value of 36 for
females and a value of 45 for males as a
default setting when you set this value for
the first time (see the instructions on
Up / Down
Up / Down
• select your activity level for the Fitness Test.
Up
/ Down
• adjust this, if you know your laboratory
measured current maximal oxygen uptake
value.
page 64).
Press the Start
button to accept
Start
Start
Start
Start
Start
Start
Start
Start
61ADJUSTING SETTINGS, REVIEWING FILES AND USING TIMERS (TIME MAIN MODE)

The display reads: Press Up or Down
button to set the flashing value
SET
11. HR
max
Your age-predicted maximum heart rate
value (220-age) is displayed as a default
setting when you set this value for
the first time (see the instructions on
Up
/ Down
• adjust this, if you know your laboratory
measured current maximum heart rate
value.
page 64).
SET
12. HR
sit
Your heart rate value in sitting position
(see the instructions on page 64).
/ Down
Up
• adjust your heart rate value in a sitting
position.
•To return to the Time main mode, press and hold the Stop button.
ADJUSTING SETTINGS, REVIEWING FILES AND USING TIMERS (TIME MAIN MODE)62
Press the Start
button to accept
Start
Start

Activity Level
The activity level is an assessment of your level of physical activity. Select the alternative that best describes the overall
amount and intensity of your physical activity in the past half-a-year.
Activity Level
Low (occasional) You occasionally participate in outdoor activities or other
Moderate (consistent) You spend 1/2-2 hours/week participating in outdoor activities
High (committed) You spend 2-3 hours/week participating in vigorous outdoor
Top (competitor) You participate in vigorous outdoor activities or other forms of
Description
exercise that causes heavy breathing or perspiration. You do
not engaged in regular exercise program or sport activity.
or other forms of exercise, or your work requires modest
physical activity.
Example: you run or hike 5-10 km/week (3-6 miles/week).
strenuous
activities or other forms of
occasionally go on long outdoor excursions (1-3 days) or
participate in competitive events.
Example: you run or hike 10-20 km/week (6-12 miles/week).
strenuous
exercise at least 5 times/week. You are most likely
exercising to improve your performance or to prepare for a long
outdoor excursion.
exercise. You may
63ADJUSTING SETTINGS, REVIEWING FILES AND USING TIMERS (TIME MAIN MODE)

Maximal oxygen uptake value (VO
VO
, is used in the estimation of energy expenditure. VO
2max
during maximum exertion. It is also known as maximum aerobic power or maximal oxygen intake/consumption. VO
, ml/kg/min)
2max
is the maximum capacity for oxygen consumption by your body
2max
2max
commonly used determinant of aerobic (cardiovascular) fitness. Aerobic fitness relates to how well your cardiovascular
system works to transport and utilize oxygen in your body. The most accurate way of determining your individual VO
2max
perform a maximal exercise stress test in a laboratory.
Note: If you do not know this value, you can determine a comparable value, your OwnIndex, by taking the Fitness Test. For further information,
see page 38.
is a
is to
Maximum heart rate value (HR
HR
is used in the estimation of energy expenditure. HR
max
maximum physical exertion. HR
determining your individual HR
Heart rate value in a sitting position (HR
HR
is used in the estimation of energy expenditure. In order to get the most accurate energy expenditure estimate, HR
sit
should be your typical heart rate when you are not doing any physical activity (while sitting). To easily determine your HR
)
max
is a useful tool for determining the intensity of acitivity. The most accurate way of
max
is to perform a maximal exercise stress test in a laboratory.
max
)
sit
is the highest number of heartbeats per minute during
max
sit
sit
sit down and put on your transmitter. In the Time main mode, use the Down button to see your heart rate. Look at your
wrist unit after 2 to 3 minutes. This is your HR
. To more precisely calculate your HR
sit
, wear your Outdoor Computer for one
sit
normal day. Occasionally when you sit and do not engage in any physical activity for 2-3 minutes, write down your heart rate
value. In the evening, calculate the average value.
ADJUSTING SETTINGS, REVIEWING FILES AND USING TIMERS (TIME MAIN MODE)64
,

4.3.2 GENERAL SETTINGS
Press Start
• HR LIMITS
Press Up
• UNITS
Press Up
• VERT. SPEED
Press Up
• INTRO
Press Up
• SOUND
Set the general settings for your wrist unit in the Settings/General menu. You can set the
following information:
•Your personal target heart rate zone.
• Units of measurement.
•Vertical speed, i.e., the ascent or descent rate in minutes or hours.
• Whether intro pictures for the main modes are switched on or off.
• Whether button and activity sounds for the wrist unit are switch on or off.
Setting Heart Rate Limits for the Target Zone Alarm
Setting lower and upper heart rate limits allows you to create a target heart rate zone. Use this
feature to help you maintain a particular level of intensity, depending on your objectives.
The wrist unit default target heart rate zone is 80-160 bpm. Your target zone can also be
expressed as percentages of your HR
For example, if your maximum heart rate is 200 bpm, 60%-85% of your HR
(see page 62).
max
is 120-170 bpm.
max
1. In the Time main mode, press the Start button. Menu WATCH SET is displayed.
2. Use the Up or Down button until Menu SETTINGS is displayed.
3. Press the Start button. Settings USER is displayed.
4. Press the Down button. Settings GENERAL is displayed.
5. Press the Start button. Set HR LIMITS is displayed.
65ADJUSTING SETTINGS, REVIEWING FILES AND USING TIMERS (TIME MAIN MODE)

6. Press the Start button to specify your heart rate limits and follow the steps below:
The display reads: Press Up or Down button
7. Limit High:
• SET ON or OFF
• SET LIMIT
8. Limit Low:
• SET ON or OFF
• SET LIMIT
to set the flashing value
Up
/ Down
• turn the upper limit on or off.
/ Down
Up
• adjust the upper limit.
/ Down
Up
• turn the lower limit on or off.
/ Down
Up
• adjust the lower limit. The lower limit
cannot be higher than the upper limit value.
Press the Start button
to accept
Start
• if you turn the limit off, move to step 8.
Start
Start
• if you turn the limit off, skip the rest of the steps.
Start
•To return to the Time main mode, press and hold the Stop button.
For further information on how the Target Zone Alarm works, see page 29.
Note: If you turn the heart rate limits off, there is no Target Zone Alarm in the Action main mode and no limit values are calculated in the Action File.
Tip: How to use the Target Heart Rate Zones
When it comes to preparing for most outdoor activities, harder is not always better. Vary the intensity of your training according to your goals and
fitness level. Do some exercises at light to moderate intensity (60-70% of your HR
activity, the more low intensity activity you should do. For further information on the target zones and for a personalised exercise program,
see www.PolarOutdoorGuide.com.
ADJUSTING SETTINGS, REVIEWING FILES AND USING TIMERS (TIME MAIN MODE)66
) and some at higher intensity. The longer your planned
max

Changing the Units
The Units settings affect the following features:
Units 1
Personal information
Altitude
Barometric pressure
Vertical speed while ascending or descending*
Temperature
*To change the rate for vertical speed, see the following section.
kg
cm
m
hPa
m/min
m/h
°C
Units 2
lb
ft
ft
inHg
ft/min
ft/h
°F
1. In the Time main mode, press the Start button. Menu WATCH SET is displayed.
2. Use the Up or Down button until Menu SETTINGS is displayed.
3. Press the Start button. Settings USER is displayed.
4. Press the Down button. Settings GENERAL is displayed.
67ADJUSTING SETTINGS, REVIEWING FILES AND USING TIMERS (TIME MAIN MODE)

5. Press the Start button. Set HR LIMITS is displayed.
6. Use the Up button. Set UNITS is displayed.
7. Press the Start button and follow the step below:
8. The display reads:
Units
Press the Up or Down button
to select the flashing Units 1 or 2.
Press the Start button to
accept.
1: M / HPA / °C or
2: FT / INHG / °F
•To return to the Time main mode, press and hold the Stop button.
Setting Rate for Vertical Speed
The vertical speed setting defines if the ascent/descent rate is displayed as meter/ feet per minute or hour.
You can monitor your ascent or descent rate when the altimeter is activated in the Alti main mode.
Rate for Vertical Speed
Rate per minute ...fast changes in altitude can be expected, such as when you are
Rate per hour ...you are hiking in terrain with no steep hills or mountains.
ADJUSTING SETTINGS, REVIEWING FILES AND USING TIMERS (TIME MAIN MODE)68
Use when...
downhill skiing or mountaneering.

1. In the Time main mode, press the Start button. Menu WATCH SET is displayed.
2. Use the Up or Down button until Menu SETTINGS is displayed.
3. Press the Start button. Settings USER is displayed.
4. Press the Down button. Settings GENERAL is displayed.
5. Press the Start button. Set HR LIMITS is displayed.
6. Press the Up or Down button until Set VERT. SPEED is displayed.
7. Press the Start button to specify the rate for the vertical speed:
8. The display reads:
Vert. speed RATE SET M/FT
Press the Up or Down button
to select the vertical speed per
minute (Min) or hour.
•To return to the Time main mode, press and hold the Stop button.
Press the Start button to
accept.
69ADJUSTING SETTINGS, REVIEWING FILES AND USING TIMERS (TIME MAIN MODE)

Setting Intro ON/OFF
When you browse the main modes, the main mode introduction
animation is displayed for a few seconds before you enter the
main mode display. If you do not want the intro to be displayed,
turn the intro off.
1. In the Time main mode, press the Start button. Menu WATCH SET is displayed.
2. Use the Up or Down button until Menu SETTINGS is displayed.
3. Press the Start button. Settings USER is displayed.
4. Press the Down button. Settings GENERAL is displayed.
5. Press the Start button. Set HR LIMITS is displayed.
6. Press the Up or Down button until Set INTRO is displayed.
7. Press the Start button to turn the introduction animation on or off:
8. The display reads:
Set INTRO
Press the Up or Down button
to switch the intro on or off.
ON or OFF
•To return to the Time main mode, press and hold the Stop button.
ADJUSTING SETTINGS, REVIEWING FILES AND USING TIMERS (TIME MAIN MODE)70
Press the Start button to
accept.

Setting Sound ON/OFF
The sound settings affect the following sounds: the button sound, Heart Rate Target Zone Alarms, and the start and stop
sounds of the Stopwatch, CountDown and Action timers. The sound settings do not affect the watch alarms (Daily Alarms
and reminders) or Fitness Test Completed/Failed Sound.
1. In the Time main mode, press the Start button. Menu WATCH SET is displayed.
2. Use the Up or Down button until Menu SETTINGS is displayed.
3. Press the Start button. Settings USER is displayed.
4. Press the Down button. Settings GENERAL is displayed.
5. Press the Start button. Set HR LIMITS is displayed.
6. Press the Down button. Set SOUND is displayed.
7. Press the Start button to turn the sound on or off:
The display reads:
Set SOUND
Press the Up or Down button
to switch the sound on or off.
Press the Start button to
accept.
ON or OFF
•To return to the Time main mode, press and hold the Stop button.
Note: The wrist unit sounds are turned off when the low battery symbol is displayed. However, the Watch Alarm will work if it is set before the symbol
appears.
71ADJUSTING SETTINGS, REVIEWING FILES AND USING TIMERS (TIME MAIN MODE)

4.4 STOPWATCH
Use the stopwatch when you want to monitor the duration of an event with intermediate times, such as during a trail run, or
if you want to know how much time it takes to climb a certain hill.
1. In the Time main mode, press the Start button. Menu WATCH SET is displayed.
2. Press the Up or Down button until Menu STOPWATCH is displayed.
Start
Stop
You can reset the stopwatch to zero, when the stopwatch is paused. Press and hold the Stop button until the reading is reset
to zero.
Note: Other timers do not affect the stopwatch. You can use the stopwatch independently while using Action recording and other functions.
ADJUSTING SETTINGS, REVIEWING FILES AND USING TIMERS (TIME MAIN MODE)72
3. Press the Start button to start the stopwatch. The stopwatch starts running.
4. To take split times, press the Start button. StopWatch SPLIT is displayed.
5. To stop the stopwatch, press the Stop button. StopWatch PAUSED is
displayed.
6. To restart the stopwatch, press the Start button. To return to the Time main
mode and use other functons while the stopwatch is running, press and hold
the Stop button.

4.5 COUNTDOWN TIMER
The CountDown timer works like the stopwatch, but it counts the time down to zero from a preset value.
Set the CountDown timer time and start the timer in the CountDown menu.
1. To go to the CountDown menu, press the Start button in the Time main mode and press the Up or Down button until
Menu COUNTDOWN is displayed.
2. Press the Start button to set the timer time.
3. Use the Up or Down button to adjust the hours, minutes, and seconds. Press the Start button after each selection.
After setting the seconds the CountDown timer starts running.
4. Press the Start button to take split times.
5. If you want to pause the CountDown timer, press the Stop button. CountDown PAUSED is displayed.
6. To restart the CountDown timer, press the Start button.
7. To return to the Time main mode and use other functons while the CountDown timer is running, press and hold the Stop
button.
The CountDown timer remembers the preset value.
• If you use the same value, you do not need to set a new time when you use your CountDown timer the next time.
• If you want to reset the CountDown timer to the preset value when you have paused it, press and hold the Start button.
• If you want to reset the CountDown timer when you have paused it, press and hold the Stop button. The CountDown timer
is reset to zero. You can now set the CountDown value again.
73ADJUSTING SETTINGS, REVIEWING FILES AND USING TIMERS (TIME MAIN MODE)

How it works: In the Time main mode, the flashing indicator in the outer circle informs you that the stopwatch or
CountDown timer is on. As the timer stops, the wrist unit sounds an alarm briefly and displays: COUNTDOWN 00:00.00.
Press any button (except the Light button) and the wrist unit returns to the mode you were using. Other timers do not affect
the CountDown timer.
Tip: How to use the CountDown Timer to prevent dehydration
Set your CountDown timer to remind you to take regular small drinks throughout your activity. Plan to drink at least 250 ml / 4 oz. of water or other
fluid each hour, more if you are in a hot and/or humid environment. If your heart rate is gradually rising although there is no increase in speed,
increase your fluid intake. Do not wait until you are thirsty to drink – that means you are already dehydrated.
ADJUSTING SETTINGS, REVIEWING FILES AND USING TIMERS (TIME MAIN MODE)74

4.6 TRANSFERRING SETTINGS FROM PC WITH POLAR UPLINK TOOL
The Polar Outdoor Computer Product offers you the option of transferring the following functions with the Polar UpLink Tool
directly to your wrist unit:
• Wrist unit settings, reminders and logos.
• Changing the HeartTouch function.
You can download Polar UpLink Tool from www.polar.fi. In order to be able to use the Polar UpLink Tool, you need a computer
with a sound card and dynamic loudspeakers or headphones. See www.polar.fi for further instructions.
75ADJUSTING SETTINGS, REVIEWING FILES AND USING TIMERS (TIME MAIN MODE)

5. CARE AND MAINTENANCE
Like any electronic device, your Polar Outdoor Computer should be treated with care. The suggestions below will help you
fulfill the guarantee obligations and enjoy this product for many years to come.
Store your wrist unit and transmitter in a cool and dry place. Do not store them in a damp environment, in non-breathable
material (i.e., a plastic bag) or with conductive material such as a wet towel.
Taking Care of Your Outdoor Computer
• Keep your unit clean. Clean it with a mild soap and water solution. Dry it carefully with a soft towel. Never use alcohol or
any abrasive material such as steel wool or cleaning chemicals.
• The operating temperature of the wrist unit is -10 °C to +60 °C / +14 °F to +140 °F and
the storage temperature is -20 °C to +70 °C / -4 °F to +158 °F.
• Do not expose the Outdoor Computer to direct sunlight for extended periods, such as by leaving it in a car.
• Keep the air pressure channels (the openings on the side of the wrist unit) clean to make sure that the altitude and
temperature measurements work. Do not insert any objects into the openings.
• Do not bend or stretch the transmitter. This may damage the electrodes.
• Do not dry the transmitter in any other way than with a towel. Mishandling may damage the electrodes.
Using Your Polar Outdoor Computer in Water
Heart rate monitoring in water may suffer from interference because pool water with a high chlorine content and seawater
are very conductive. The electrodes of the transmitter may short-circuit, which prevents the transmitter unit from detecting
ECG signals. The wrist unit is water resistant to 100 m / 330 ft so you can wear it, e.g., when swimming. The Polar Outdoor
Computer is not, however, a diving instrument. Therefore, the functions should not be used for underwater activities and the
buttons should not be pressed while under water.
CARE AND MAINTENANCE76

Service
During the two-year guarantee/warranty period we
recommend that you have service done by an authorized
Polar Service Center only. The warranty does not cover
damage or consequential damage caused by service not
authorized by Polar Electro.
Transmitter Battery
Contact your authorized Polar Service Center for a
replacement transmitter. Polar recycles used transmitters.
See your Customer Care and Registration Card for detailed
instructions.
Changing Wrist Unit Battery
Avoid opening the sealed battery cover during the
guarantee period. We recommend that you have the battery
replaced by an authorized Polar Service Center. If you
choose to change the battery yourself, follow the
instructions.
Note: In order to ensure the maximum lifespan of the battery cover, open
it only when you need to change the battery or reset the wrist unit. We
recommend that you change the sealing ring of the battery cover every
time you change the battery. Additional sealing rings are available from
an authorized Polar Service Center only.
To change the wrist unit battery, you need a small screw
driver, sealing ring, coin and battery (CR 2032). The low
battery indicator is displayed when 10-15% of the wrist
unit battery capacity is left.
Note:
• Excessive use of the backlight and altimeter drain the wrist unit’s
battery more rapidly.
• In cold conditions the low battery indicator
indicator is deactivated when you return to a normal temperature.
• The backlight and wrist unit sounds are automatically turned off
when
is displayed. However the Watch Alarm sound works if you
have activated the Watch Alarm before the
may appear, but the
symbol appears.
77CARE AND MAINTENANCE

1.
1. Open the battery cover by
screwing it counterclockwise
(OPEN direction) with a coin
that sits tight into the back
cover groove.
2.
2. Remove the battery cover. Put a small screw driver in
the hole indicated by the two arrows. Carefully lift the
battery using the screw driver and replace it with a new
battery. Be carefull not to damage the threads of the
back cover.
3. Place the negative (-) side of the battery against the
bottom and the positive (+) side against the cover.
4. Remove the sealing ring of the battery cover and replace
it with a new ring. Make sure that the cover's sealing
ring is placed correctly in its groove.
CARE AND MAINTENANCE78
5. Put the battery cover in its place and close it by
screwing the cover clockwise (CLOSE direction) with a
coin. Make sure that the cover is closed properly! It is
recommended that the altimeter or barometer is
calibrated after battery replacement.
Note:
• After a battery change re-enter the Basic Settings. For further
information, see page 9.
• Keep the batteries away from children. If swallowed, contact a
doctor immediately.
• Batteries should be disposed of properly according to local
regulations.

6. SAFE OPERATION OF YOUR OUTDOOR COMPUTER
The Polar Outdoor Computer shows environmental conditions such as altitude, barometric pressure, and your performance
indicators. It indicates the level of physiological strain and intensity during your activity. No other use is intended or implied.
The Polar Outdoor Computer should not be used for obtaining environmental measurements that require professional or
industrial precision. Furthermore, the device should not be used to obtain measurements when engaged in airborne or
underwater activities.
Minimizing Possible Risks during Physical Outdoor Activities
Physical activity always includes some risk. Before starting regular outdoor activity, it is recommended that you answer the
following questions concerning your health status. If you answer yes to any of these questions, we recommend that you consult
a doctor before starting any activity.
• Have you been physically inactive for the past 5 years?
• Do you have high blood pressure or high blood cholesterol?
• Do you have symptoms of any disease?
• Are you taking any blood pressure or heart medication?
• Do you have a history of breathing problems?
• Are you recovering from a serious illness or medical treatment?
• Do you use a pacemaker or another implanted electronic device?
• Do you smoke?
• Are you pregnant?
Note that in addition to activity intensity, heart, blood pressure, psychical
conditions, asthma, breathing etc. medication as well as some energy
drinks, alcohol and nicotine can affect your heart rate.
It is important to be sensitive to your body’s reactions during activity.
If you feel unexpected pain or excessive fatigue during activity, it is
recommended that you stop or continue at a lighter intensity.
Notice to individuals with pacemakers, defibrillators or other implanted
electronic devices. Individuals who have a pacemaker use the Outdoor
Computer's heart rate monitoring at their own risk. Before starting use,
we always recommend a maximal exercise stress test under a doctor’s
supervision. The test is to ensure the safety and reliability of the
simultaneous use of the pacemaker and the Polar Outdoor Computer.
If you are allergic to any substance that comes into contact with your
skin or if you suspect an allergic reaction due to using the product,
check the listed materials on page 81. To avoid any skin reaction risk
with the transmitter, wear it over a shirt. However, moisten the shirt well
under the electrodes to ensure flawless operation.
79SAFE OPERATION OF YOUR OUTDOOR COMPUTER

7. FREQUENTLY ASKED QUESTIONS
What should I do if…
…there are no reactions to any buttons?
If there are no reactions to any buttons, reset the wrist unit. Resetting only
clears the date and Daily Alarm times, not the recorded files or Auto Log.
The altimeter and barometer calibration values return to their default values
(standard sea level pressure 1013 hPa/29.90 inHg). To reset the wrist
unit, take off the battery and put it back to its place. For further
information, see page 77.
Note: If you do not press any button after you reset the wrist unit, within
one minute the wrist unit goes to the Time main mode.
…the heart rate reading becomes erratic or extremely high?
You may have come within range of strong electromagnetic signals, which
can cause erratic readings. This may occur near high voltage power lines,
traffic lights, overhead lines of electric railways or trams, skilifts,
car motors, bike computers, some motor driven exercise equipment (e.g.,
fitness testers) or cellular phones. Check your surroundings and move
further away from the source of the disturbance.
…the altitude reading changes even though I stay at the same
altitude?
Altitude measurement is based on barometric pressure. Changes in
altitude or weather cause changes in the pressure. For example, if you
stay at the same altitude but the weather and pressure changes, the
altimeter interprets the pressure change as a change in altitude.
FREQUENTLY ASKED QUESTIONS80
…the barometric pressure readings are inaccurate?
Your barometer may show faulty barometric pressures if it is exposed to
external interference like strong wind or air conditioning. It is also important
that you stay at the same altitude when using the barometer. If the readings
are constantly inaccurate, dirt may be blocking the air pressure channels.
In this case, send the Outdoor Computer to a Polar Service Center.
…the battery of the wrist unit must be replaced?
We recommend having all service done by an authorized Polar Service
Center. This is especially necessary to ensure that the guarantee remains
valid and is not affected by incorrect repair procedures performed by an
unauthorized agent. Polar Service will test your wrist unit for water
resistance after battery replacement and make a full periodic check of
the complete Outdoor Computer.
…the display is blank?
The Outdoor Computer is in battery saving mode when it is dispatched
from the factory. To activate it, press the Start button twice. The Basic
Settings starts. For further information, see page 9.
…the symbol
Usually the first sign of an expired battery is the low battery indicator on
the display. For further information, see page 77.
Note: Due to cold conditions the low battery indicator may appear, but
the indicator is deactivated when you return to a normal temperature.
is activated?

8. TECHNICAL SPECIFICATIONS
Wrist Unit The wrist unit is a Class 1 Laser Product.
Battery life: Average 1 year in normal use
Battery type: CR 2032
Battery sealing ring: O-ring 21.50 x 0.60
Operating temperature: -10 °C to +60 °C / +14 °F to +140 °F
Storage temperature: -20 °C to +70 °C / -4 °F to +158 °F
Water resistance: up to 100 m /330 ft
Wrist strap material: Polyurethane
Back cover and Wrist strap buckle material:
Stainless steel complying with the EU Directive 94/27/EU and its
amendment 1999/C 205/05 on the release of nickel from products
intended to come into direct and prolonged contact with the skin.
Watch
Accuracy: better than ± 0.5 seconds / day at 25 °C / 77 °F temperature.
Heart Rate Monitor
Accuracy: ± 1% or 1 bpm, whichever larger, definition applies to steady
state conditions.
Heart rate measuring range: 15-240
Altimeter
The Polar wrist unit calculates altitude by using the standard average
altitude at defined air pressures according to ISO 2533.
Display range: -550 m to +9000 m / -1800 ft to +29500 ft
Resolution: 1 m / 5 ft
Ascent/Descent
resolution: 5 m / 20 ft
Vertical speed resolution: 1 m per min or 50 m per hour /
Temperature compensated
5 ft per min or 200 ft per hour
Barometer
Display range: Current sea level pressure 800 hPa to 1100 hPa /
Resolution: 1 hPa / 0.05 inHg
Thermometer
Display range: -20 °C to +60 °C / -4 °F to 140 °F
Resolution: 1 °C / 1 °F
Transmitter
Battery life: Average 2500 hours of use
Battery type: Built-in Lithium Cell
Operating temperature: -10 °C to +50 °C / 14 °F to 122 °F
Storage temperature: -40 °C to +70 °C / -40 °F to +158 °F
Transmitter Material: Polyurethane
Waterproof
Elastic strap
Buckle material: Polyurethane
Fabric material: Nylon, polyester, and natural rubber
Limit Values of information recorded to Action File
Maximum of 80 Action Files
Maximum Action time recorded to Action File: 99 h 59 min 59 s
23.60 inHg to 32.50 inHg
Absolute pressure 300 hPa to 1100 hPa /
8.85 inHg to 32.50 inHg
including a small amount of latex
81TECHNICAL SPECIFICATIONS

9. LIMITED POLAR INTERNATIONAL GUARANTEE
• This limited Polar international guarantee is issued by Polar Electro Inc. for the consumers who have purchased this product in the USA or Canada.
This limited Polar international guarantee is issued by Polar Electro Oy for the consumers who have purchased this product in other countries.
• Polar Electro Oy/Polar Electro Inc. guarantees to the original consumer/purchaser of this device that the product will be free from defects in material
or workmanship for two years from the date of purchase.
• Please keep the receipt or International Guarantee Card, which is your proof of purchase!
• The guarantee does not cover the battery, damage due to misuse, abuse, accidents or non-compliance with the precautions; improper maintenance,
commercial use, cracked or broken cases and elastic strap.
• Guarantee does not cover any damage/s, losses, costs or expenses, direct, indirect or incidental, consequential or special, arising out of,
or related to the product. During the guarantee period the product will be either repaired or replaced at an authorized Service Center free of charge.
• This guarantee does not affect the consumer’s statutory rights under applicable national or state laws in force, or the consumer’s rights against the
dealer arising from their sales/purchase contract.
This CE marking shows compliance of this product with
Directive 93/42/EEC.
Polar Electro Oy is a ISO 9001:2000 certified company.
Copyright © 2004 Polar Electro Oy, FIN-90440 KEMPELE, Finland.
All rights reserved. No part of this manual may be used or reproduced in any form or by any means without prior written permission of Polar Electro Oy.
The names and logos marked with a ™ symbol in this user manual or in the package of this product are trademarks of Polar Electro Oy.
The names and logos marked with a ® symbol in this user manual or in the package of this product are registered trademarks of Polar Electro Oy.
LIMITED POLAR INTERNATIONAL GUARANTEE82

10. POLAR DISCLAIMER
• The material in this manual is for informational purposes only. The products it describes are subject to change without
prior notice, due to the manufacturer’s continuous development program.
• Polar Electro Inc./Polar Electro Oy makes no representations or warranties with respect to this manual or with respect to
the products described herein.
• Polar Electro Inc./Polar Electro Oy shall not be liable for any damages, losses, costs or expenses, direct, indirect or
incidental, consequential or special, arising out of, or related to the use of this material of the products described herein.
This product is protected by one or several of the following patents:
US 6277080, US 6361502, US 6418394, US 6537227, US 4625733, US 6272365, US 6477397, US 5611346, US 5486818,
US 5491474. Other patents pending.
Manufactured by:
Polar Electro Oy
Professorintie 5
FIN-90440 KEMPELE
Tel +358 8 5202 100
Fax +358 8 5202 300
www.polar.fi
83POLAR DISCLAIMER

11. INDEX
12h/24h time mode .................................................................... 9, 14, 44
Absolute barometric pressure ............................................................... 21
Alarm on/off
Action File ....................................................................................... 27, 50
Ascent/ Ascent rate ............................................................ 17, 30, 53, 56
Auto Log ................................................................................... 31, 35, 48
Backlight ................................................................................................ 8
Battery replacement ............................................................................. 77
Calibrating the altitude ........................................................................ 33
Calibrating the barometer .................................................................... 36
CountDown timer .................................................................................. 73
Date settings .................................................................................... 9, 46
Deleting a file ....................................................................................... 54
Descent/ Descent rate ........................................................ 17, 30, 53, 56
Dual Time ....................................................................................... 14, 44
Energy expenditure ................................................................... 17, 24, 60
FileView ................................................................................................ 29
Fitness Test .................................................................................... 38, 60
Graphical altitude trend ................................................................. 16, 32
Graphical barometer trend ................................................................... 20
Graphical heart rate trend .................................................................... 28
Heart rate
Heart rate limits ............................................................................. 29, 65
HeartTouch function ............................................................................. 11
HR
sit
Keylock
Low battery indication
OwnIndex .............................................................................................. 40
Recall activity information ................................................................... 50
.................................................................................. 43
.................................................................... 15, 22, 25, 30
...................................................................................................... 64
............................................................................................... 8
......................................................... 71, 77, 80
INDEX84
Recording an Action
Reminders ............................................................................................ 46
Reset the wrist unit .............................................................................. 80
Return to the Time display ...................................................................... 8
Season Total Values .............................................................................. 55
Snooze .................................................................................................. 44
Slope counter ............................................................................ 30, 52, 56
Sound on/off
Start measuring your heart rate ........................................................... 25
Stopwatch ............................................................................................ 72
Target Zone Alarm ................................................................................ 29
Temperature ......................................................................................... 21
Transmitter ..................................................................................... 25, 77
Units setting ......................................................................................... 67
UpLink Tool ........................................................................................... 75
User settings ........................................................................................ 60
Vertical speed settings ................................................................... 67, 68
.............................................................. 22, 27
............................................................................. 29, 71
 Loading...