

Page 1

For AndroidTM 9
Enterprise Mobility
PM90
User Manual
Copyright © 2006 – 2019
Point Mobile Co., Ltd. All rights reserved
Google, Android, Google Play and other marks are
trademarks of Google LLC.
Page 2

PM90 Android 9 User Manual
1
©2006 – 2019 POINTMOBILE Co., Ltd. All rights reserved
User Manual
Please note your phone is battery-embedded design with removable battery and battery cover. Unauthorized
personnel are strictly prohibited from disassembling the phone. Make sure to use only the power adapter (5V
2A Output AC/DC) that came with PM90.
In case your phone does not work as expected, you are strongly recommended to restart it by pressing and
holding the power button for at least 12 seconds until the startup screen appears. If your phone has
encountered a serious error and cannot be recovered, you should reset your phone to factory settings by using
the menu, either “Backup & Reset”, or “Factory Reset”. For more details, please refer to “Factory data reset”
section on page 75
Note: Please be cautious while performing the factory data reset. Because this will erase personalized
settings and data saved in your phone, such as SMS, Contacts, Music, etc.
Screenshots in this manual may different compare with latest Android App version
Rev 02
Page 3

PM90 Android 9 User Manual
2
©2006 – 2019 POINTMOBILE Co., Ltd. All rights reserved
Table of Contents
User Manual .......................................................................................................................................................................... 1
Table of Contents ................................................................................................................................................................. 2
Getting Started ...................................................................................................................................................................... 4
Major Parts ........................................................................................................................................................................ 4
Setup PM90....................................................................................................................................................................... 7
Turn On/Off PM90 ............................................................................................................................................................ 9
Hot swap the Battery ..................................................................................................................................................... 10
Charge PM90 .................................................................................................................................................................. 12
Learning the basics ............................................................................................................................................................ 14
Use a keypad .................................................................................................................................................................. 14
Use a touch screen ........................................................................................................................................................ 16
Setup Wizard ................................................................................................................................................................... 18
Home Screen, Apps and Widget.................................................................................................................................. 24
Status & Notifications Icons .......................................................................................................................................... 33
Set a Lock screen ........................................................................................................................................................... 35
Manage a display ........................................................................................................................................................... 37
Make a call ...................................................................................................................................................................... 40
Add to a contact .............................................................................................................................................................. 42
Connect to your Wi-Fi network ..................................................................................................................................... 44
Make a Wi-Fi hotspot ..................................................................................................................................................... 46
Connect with Bluetooth device ..................................................................................................................................... 47
Use a Camera ................................................................................................................................................................. 49
Manage files and folders ............................................................................................................................................... 51
MTP connection with PC ............................................................................................................................................... 58
Scanner Settings ................................................................................................................................................................ 61
Use a Scanner ................................................................................................................................................................ 61
Scan a Barcode .............................................................................................................................................................. 68
OS Update ........................................................................................................................................................................... 70
OS Image update from a Storage ................................................................................................................................ 70
OS Image update from the FOTA ................................................................................................................................ 73
Factory data reset .............................................................................................................................................................. 75
Page 4

PM90 Android 9 User Manual
3
©2006 – 2019 POINTMOBILE Co., Ltd. All rights reserved
Factory data reset from Settings .................................................................................................................................. 75
Force Factory data reset ............................................................................................................................................... 78
Safety and Legal Info ......................................................................................................................................................... 81
Page 5
PM90 Android 9 User Manual
4
©2006 – 2019 POINTMOBILE Co., Ltd. All rights reserved
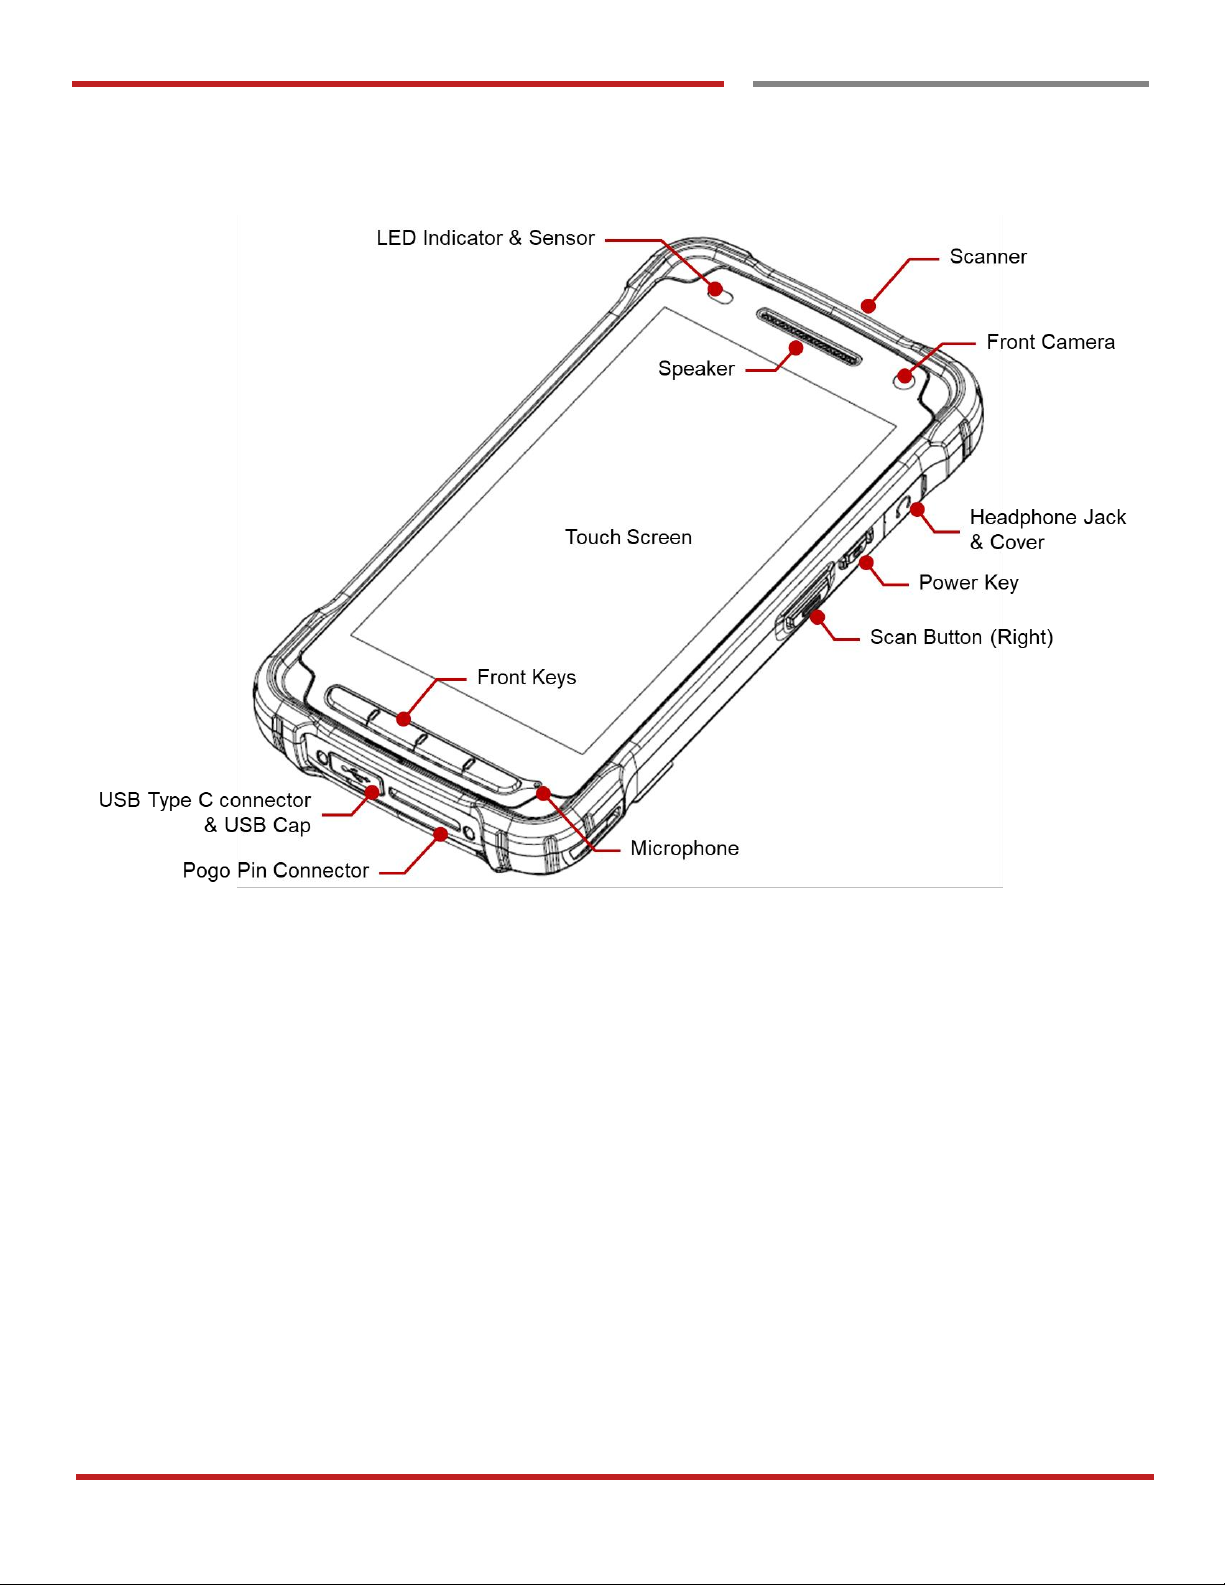
Getting Started
Major Parts
Major Parts
Getting Started
Page 6
PM90 Android 9 User Manual
5
©2006 – 2019 POINTMOBILE Co., Ltd. All rights reserved
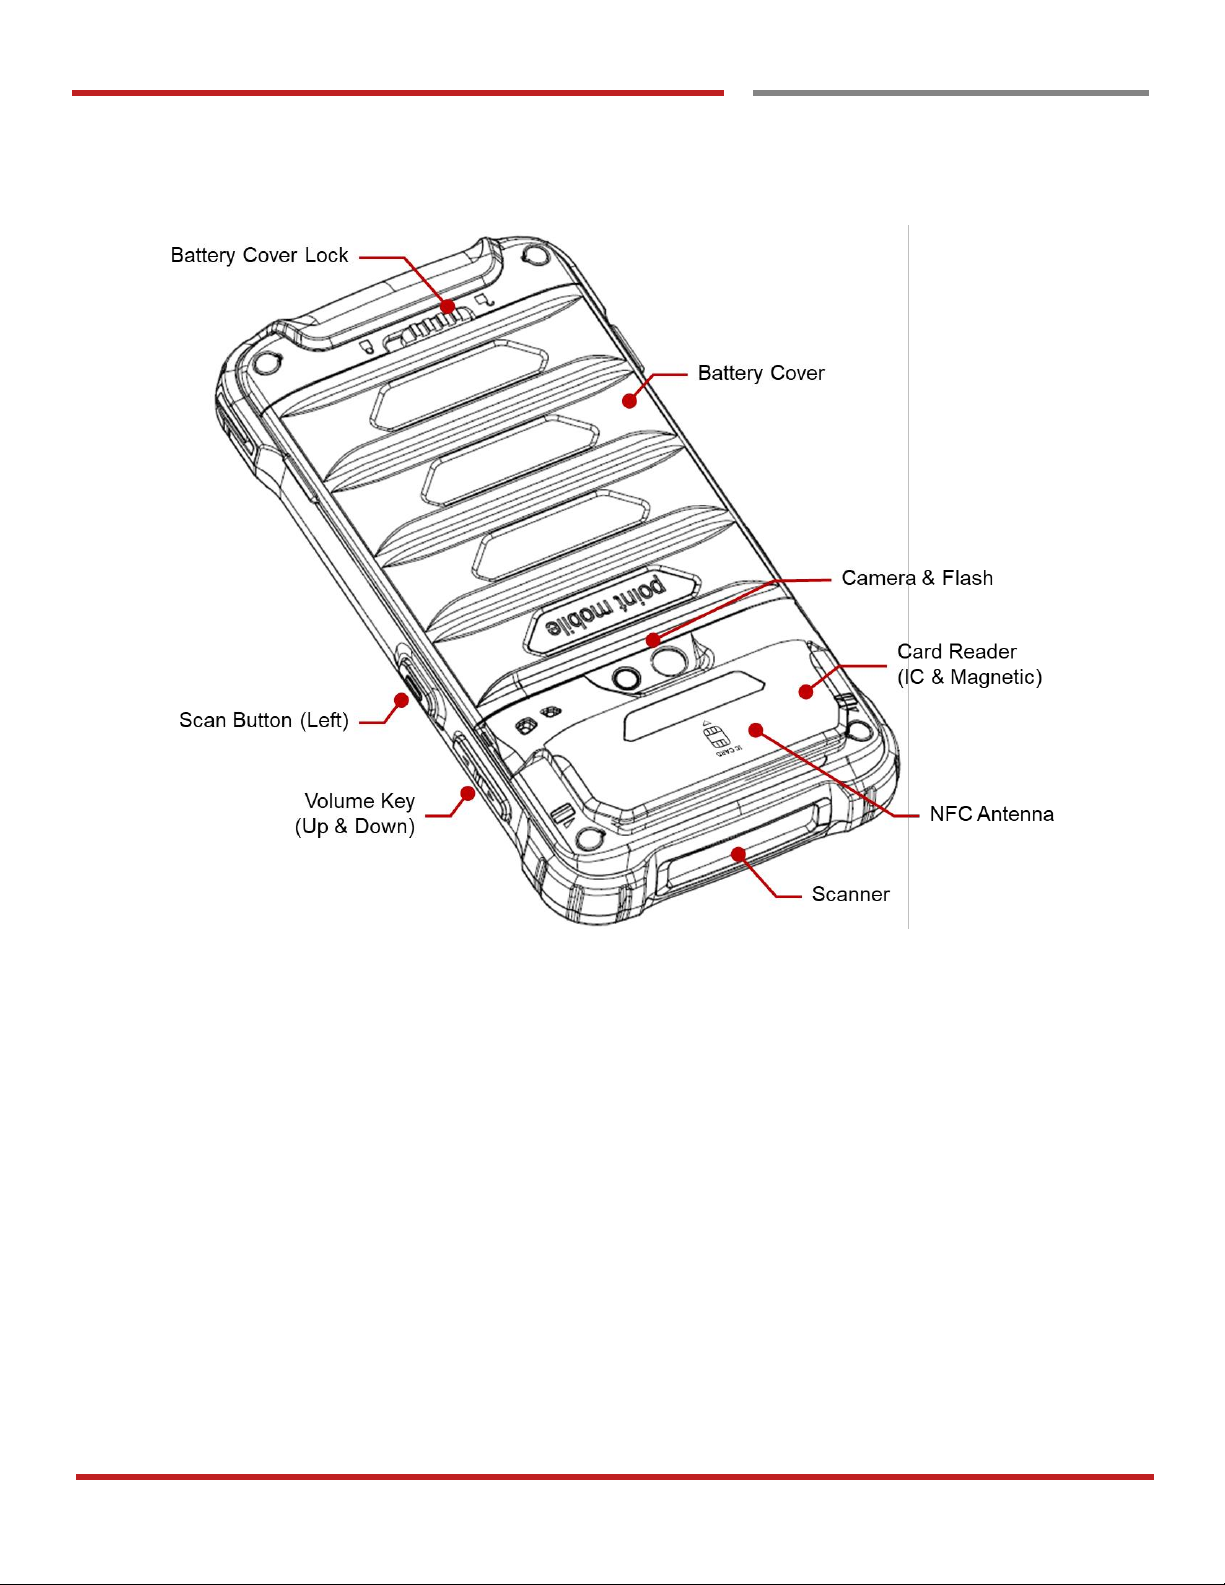
Getting `Started
Major Parts
Getting Started
Page 7
PM90 Android 9 User Manual
6
©2006 – 2019 POINTMOBILE Co., Ltd. All rights reserved
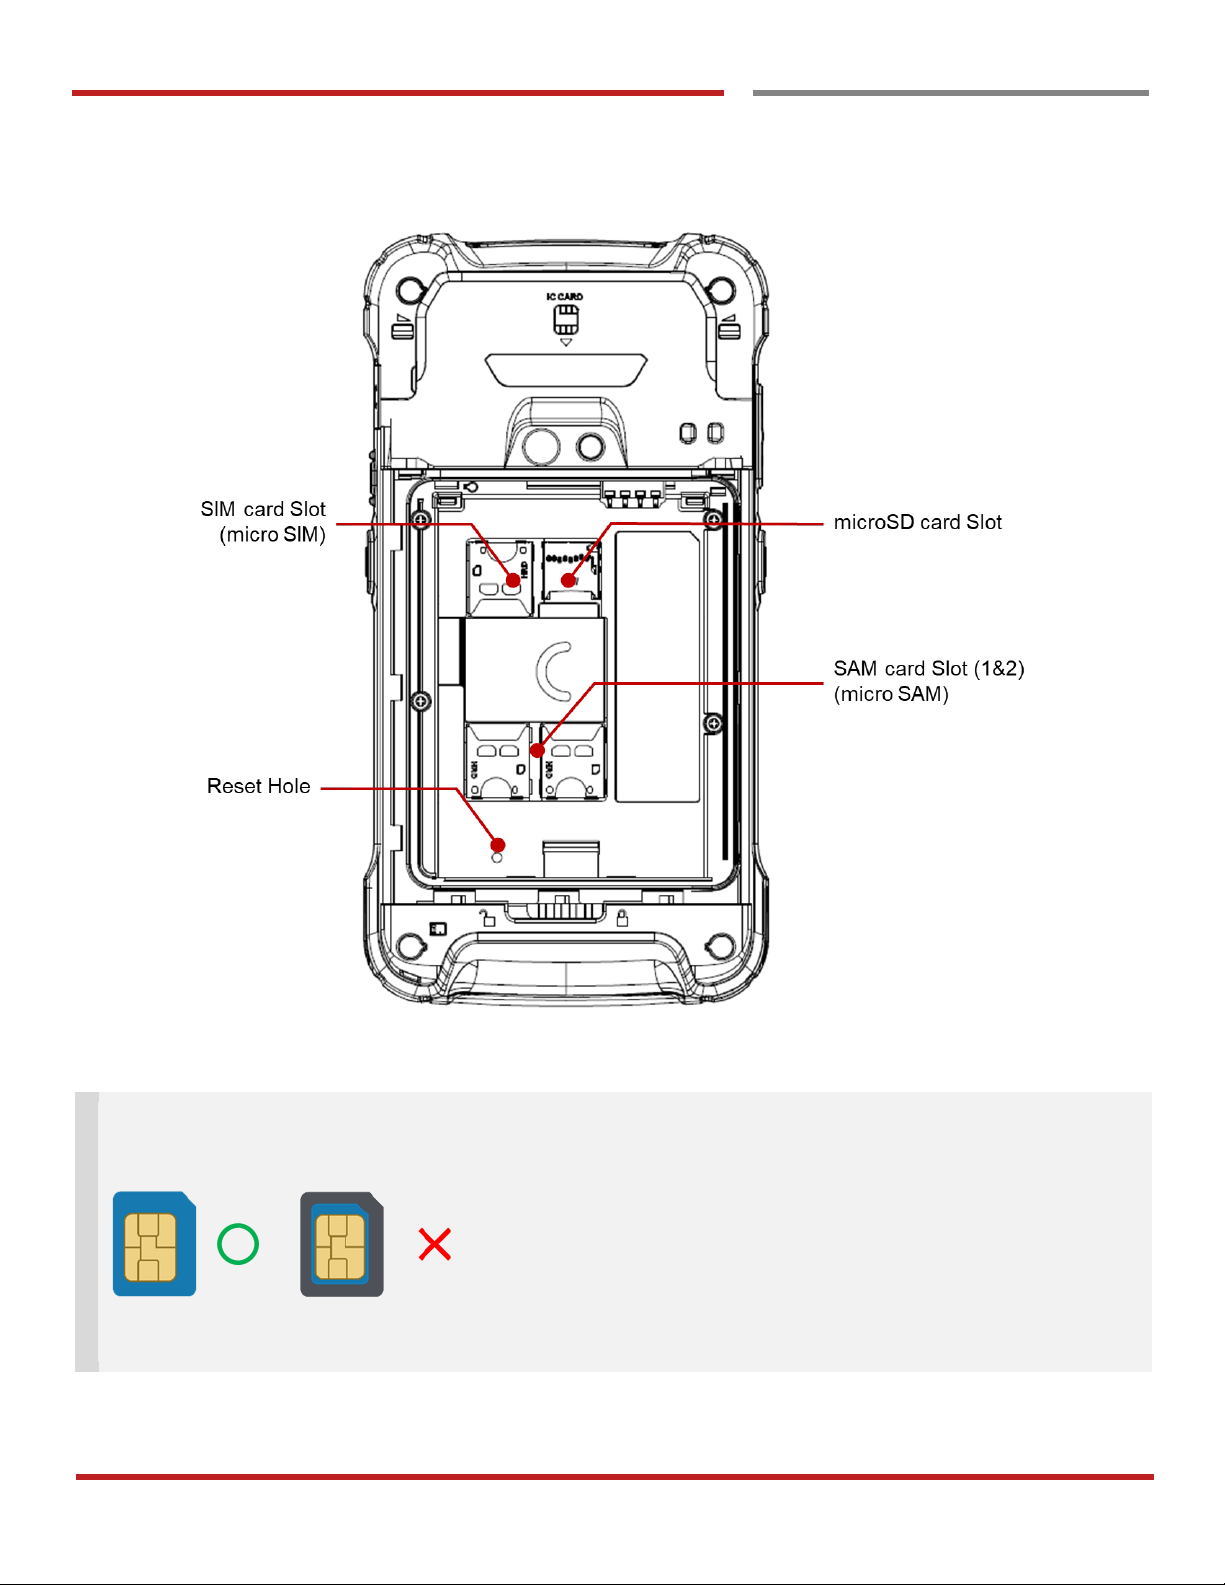
Getting `Started
Major Parts
Getting Started
Note 1: PM90 only supports the micro SIM cards. Do not insert a size modified card with SIM adapter.
Size modified card is thicker than the standard Nano SIM card and may damage the card slot
Note 2: PM90 supports up to 32GB microSD card
Page 8
PM90 Android 9 User Manual
7
©2006 – 2019 POINTMOBILE Co., Ltd. All rights reserved
Started
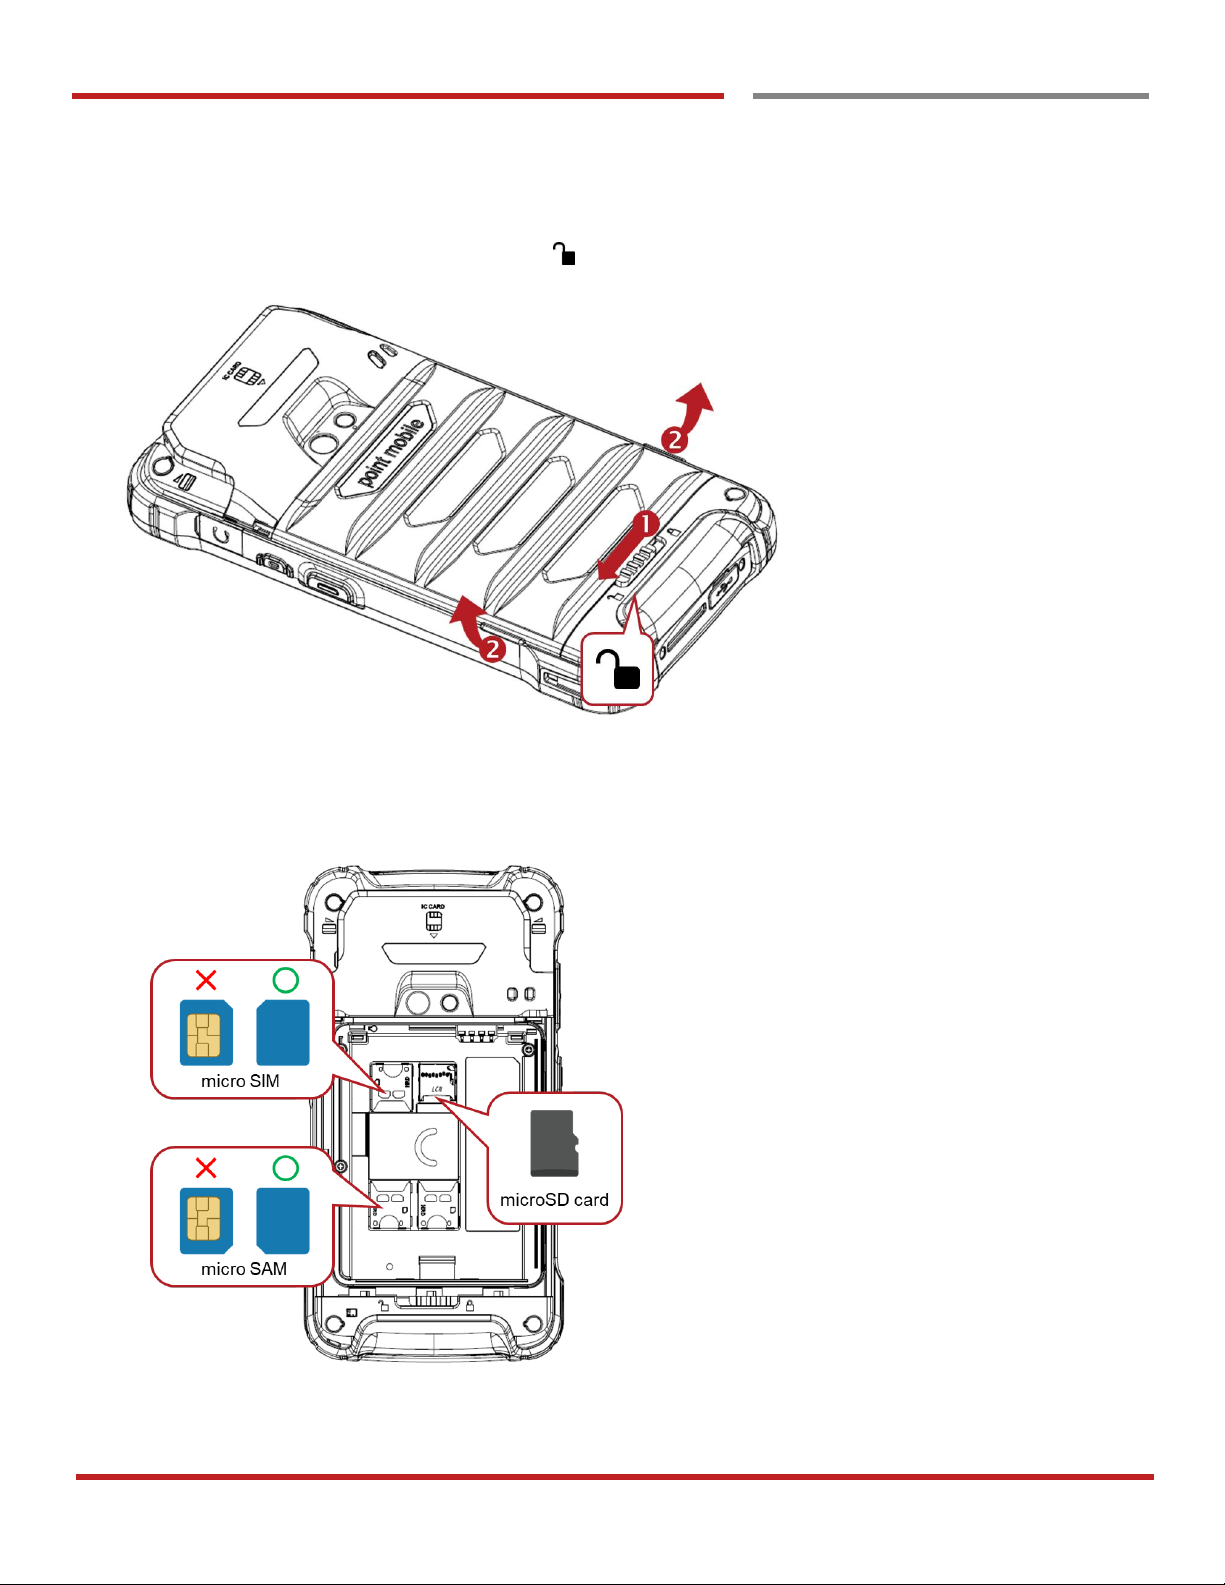
Setup PM90
Setup PM90
Getting Started
Remove the Battery Cover
1. Slide Battery Cover Lock to the Unlock position
2. Pull up the Battery Cover from bottom side area
Install micro SIM card, micro SAM card and microSD card
1. Insert the micro SIM card, micro SAM card and microSD card into each slot
(Gold contact should face down)
2. To remove the card, gently slide it out of the slot.
Page 9
PM90 Android 9 User Manual
8
©2006 – 2019 POINTMOBILE Co., Ltd. All rights reserved
Getting `Started
Setup PM90
Getting Started
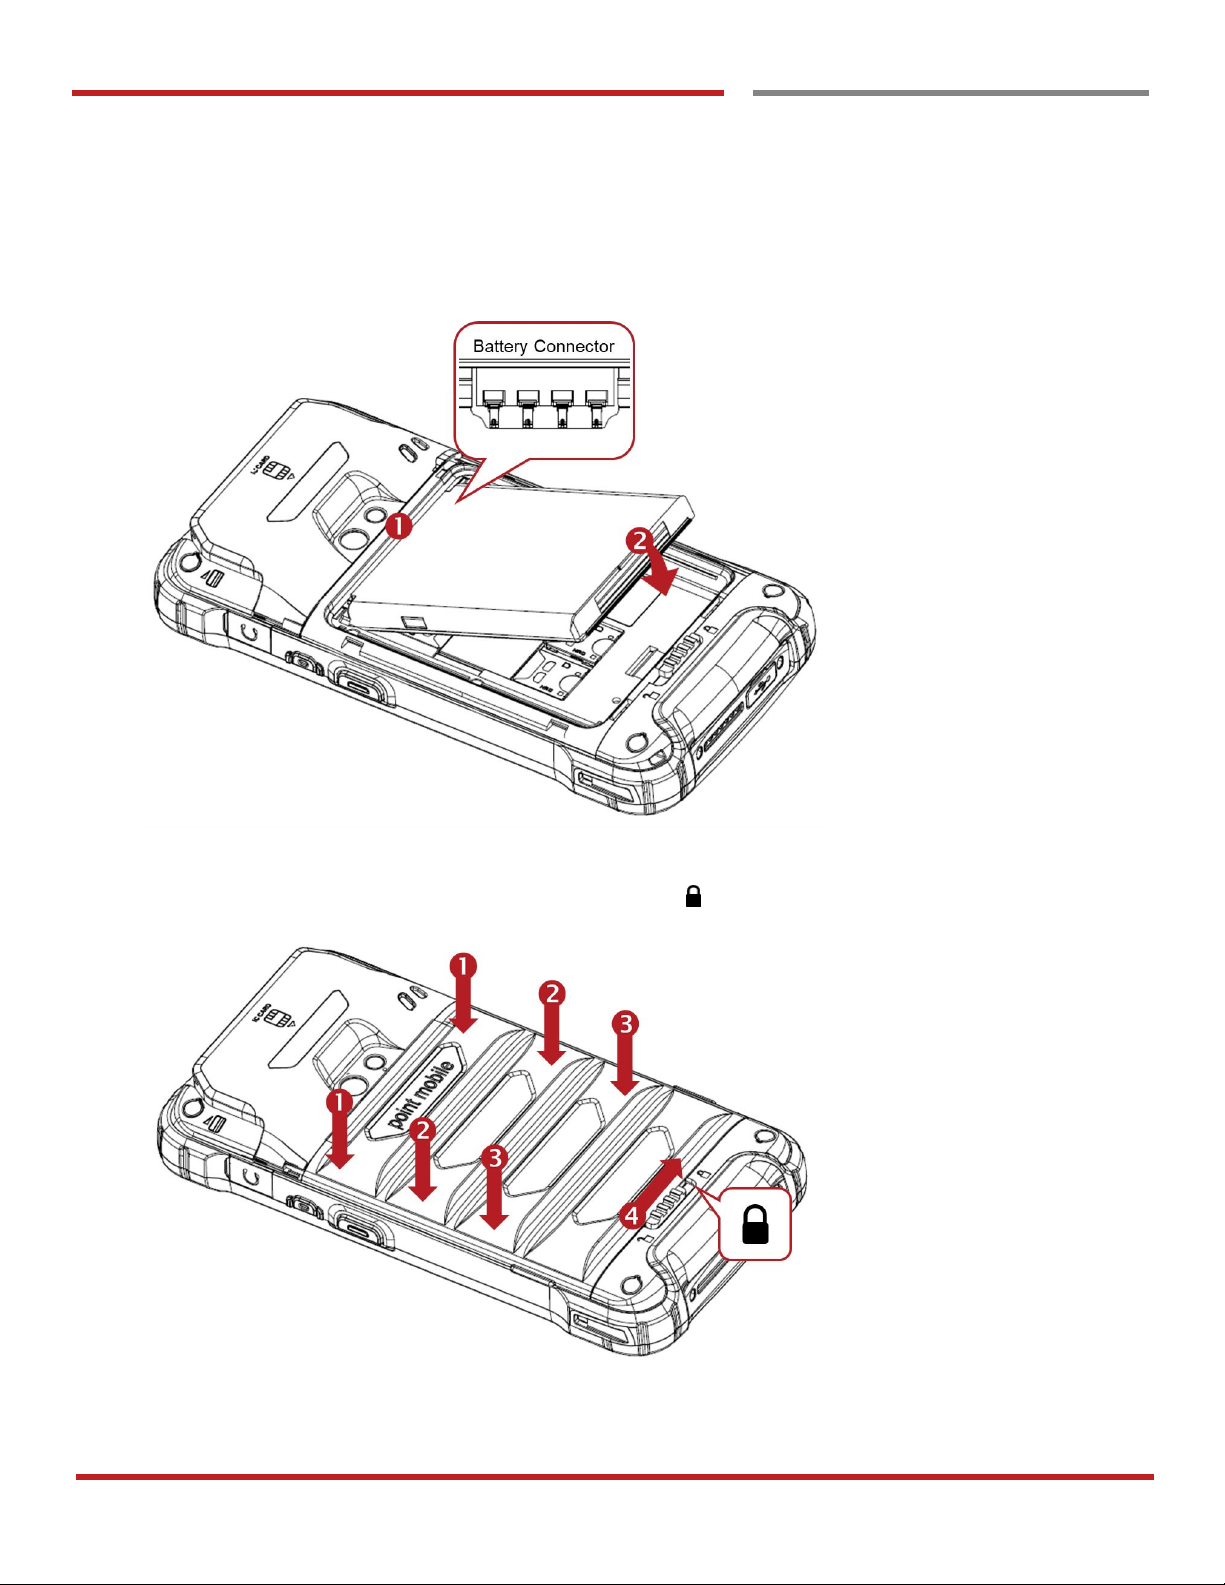
Insert the Battery
1. Insert Battery from the top first, and then put in the bottom. Make sure battery contact Battery
Connector
2. Insert the Battery Cover from the top area first and then put in bottom area. Press Battery Cover with
both hand and Make sure Battery Cover Lock is Lock position
Page 10
PM90 Android 9 User Manual
9
©2006 – 2019 POINTMOBILE Co., Ltd. All rights reserved
Turn On/Off PM90
Turn On/Off PM90
Getting Started
Turn On
1. Press and hold the Power Key for a few seconds
2. When PM90 enter to the boot mode, it will display “SMART BEYOND RUGGED” logo
3. Release the Power Key and wait until PM90 finish booting
Note: If you cannot turn on your PM90, please try below steps
- To turn on PM90, battery needs to be charged certain level. Please charge first
- Press and hold the “Power key” for over 12 seconds to force reboot
- Press and release the Reset Hole and then turn on PM90 again
Turn Off
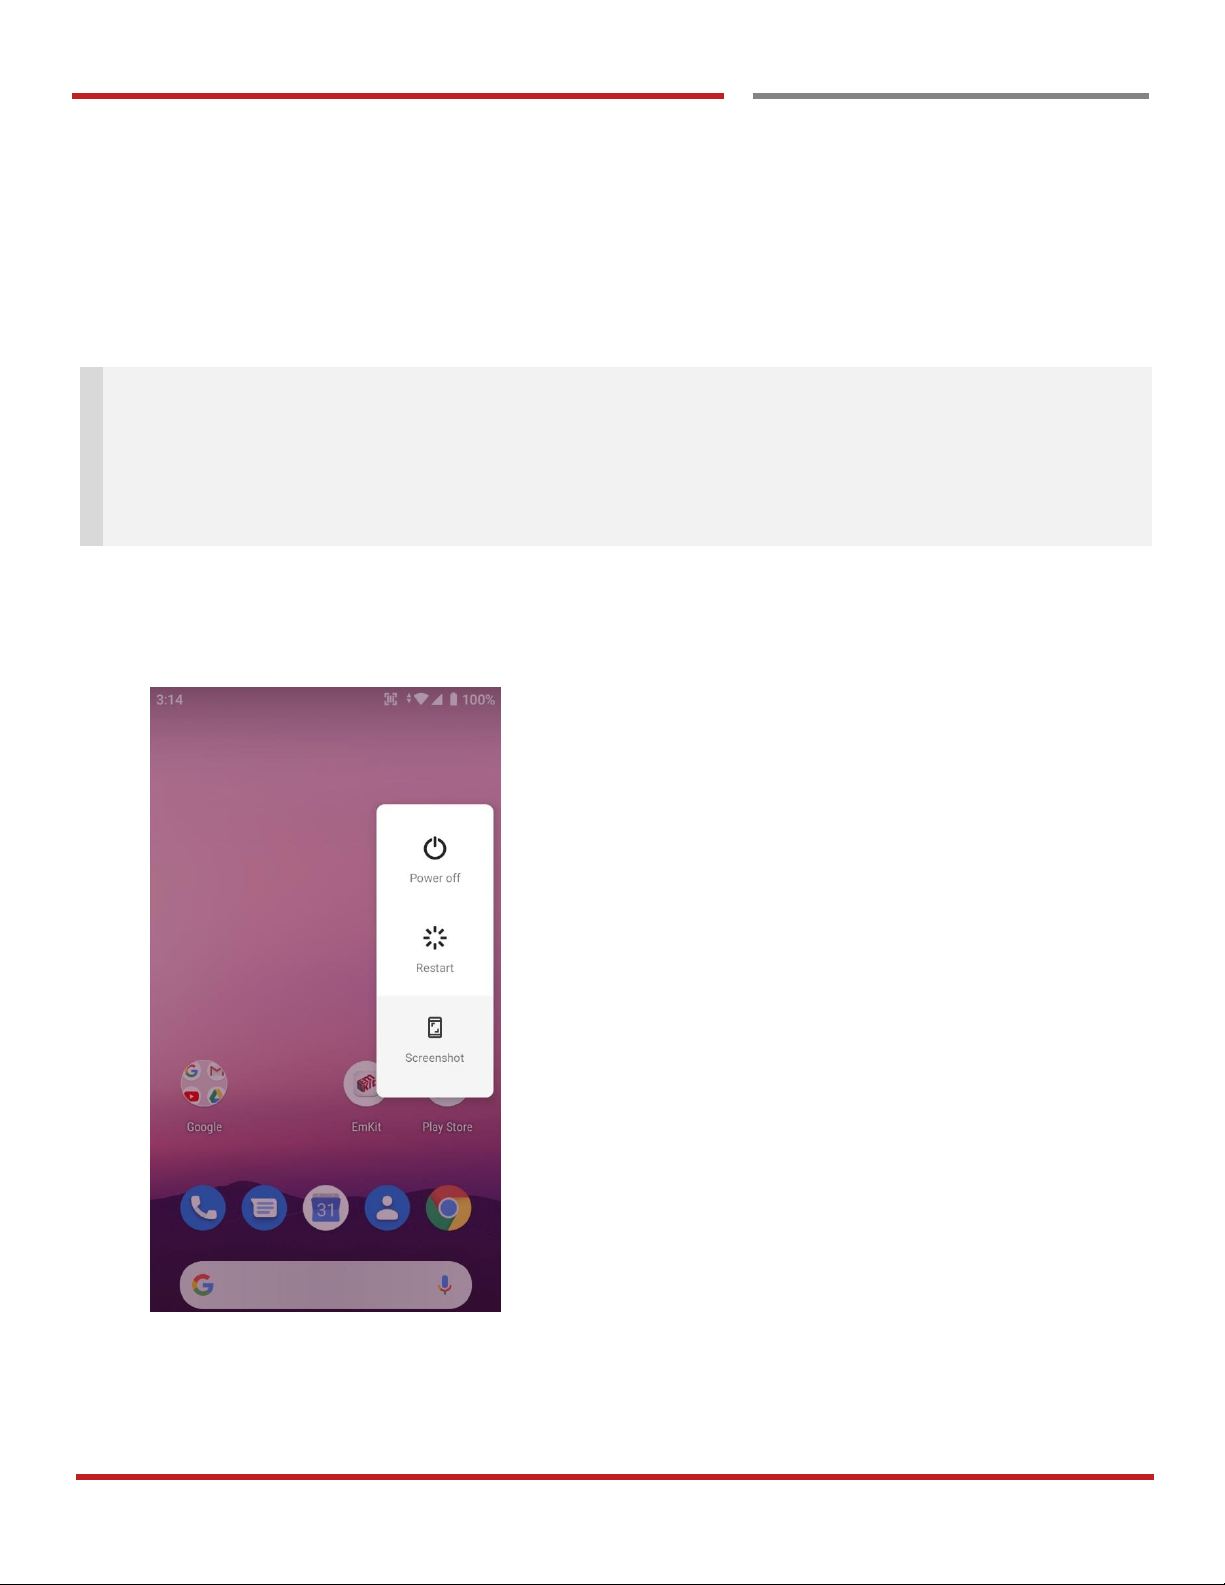
1. Press and hold the “Power Key” until you see the power menu
2. Touch Power Off
Page 11
PM90 Android 9 User Manual
10
©2006 – 2019 POINTMOBILE Co., Ltd. All rights reserved
Hot swap the Battery
Hot swap the Battery
Getting Started
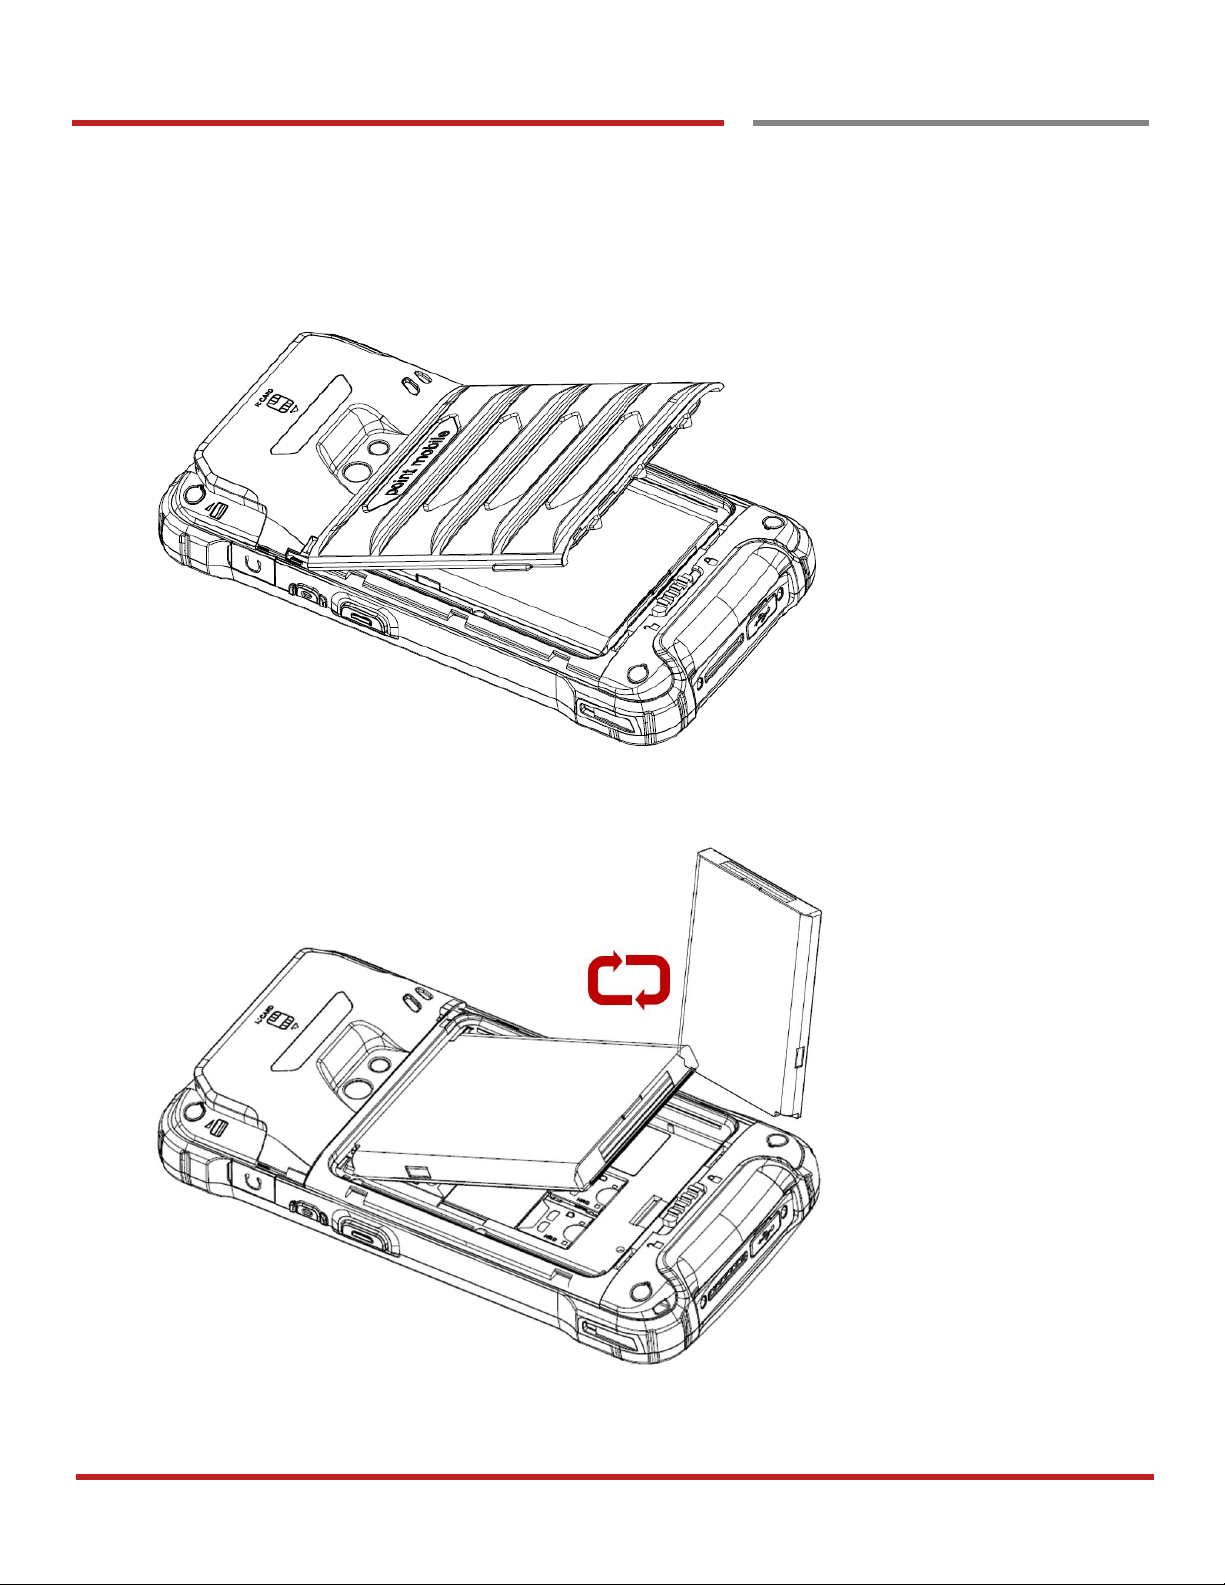
When Battery level is low, you can replace the battery without turning off and on the PM90
1. Remove Battery Cover
2. Replace the Battery
Page 12
PM90 Android 9 User Manual
11
©2006 – 2019 POINTMOBILE Co., Ltd. All rights reserved
Getting `Started
Hot swap the Battery
Getting Started
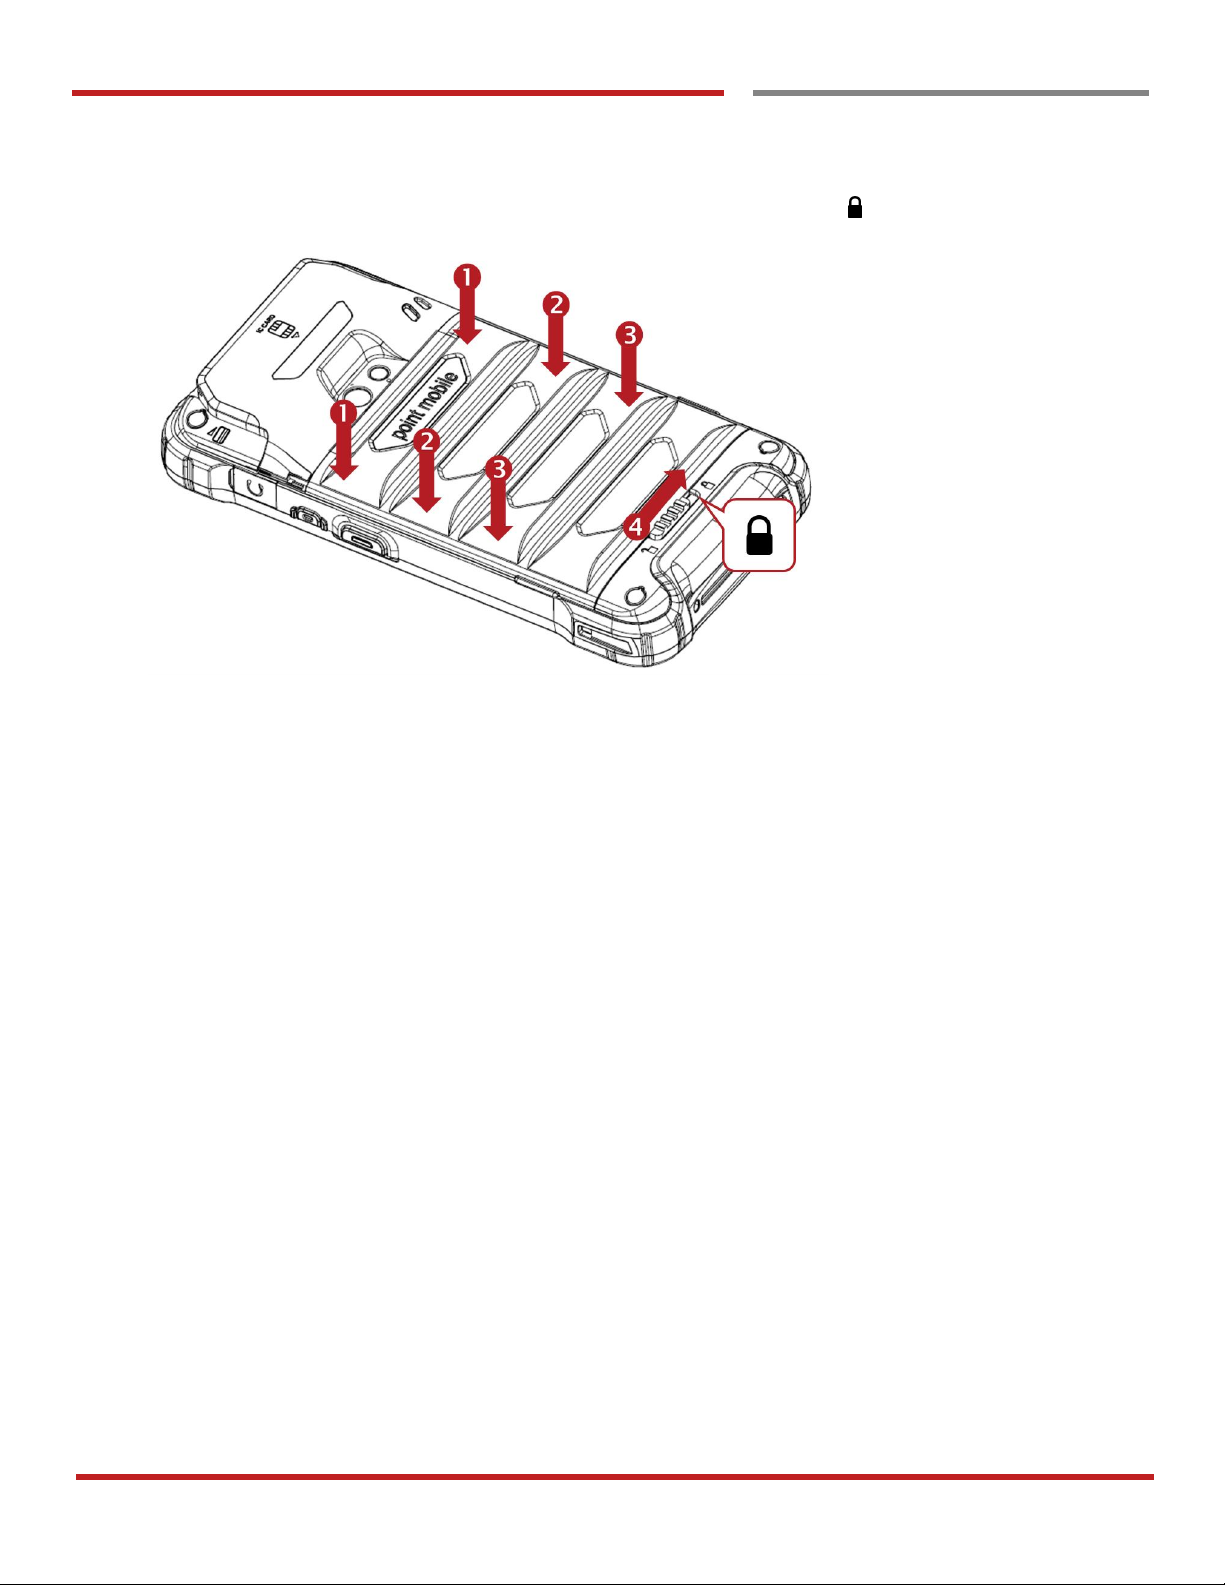
3. Close the Battery Cover firmly. Make sure Battery Cover Lock is Lock position
Page 13
PM90 Android 9 User Manual
12
©2006 – 2019 POINTMOBILE Co., Ltd. All rights reserved
Charge PM90
Charge PM90
Getting Started
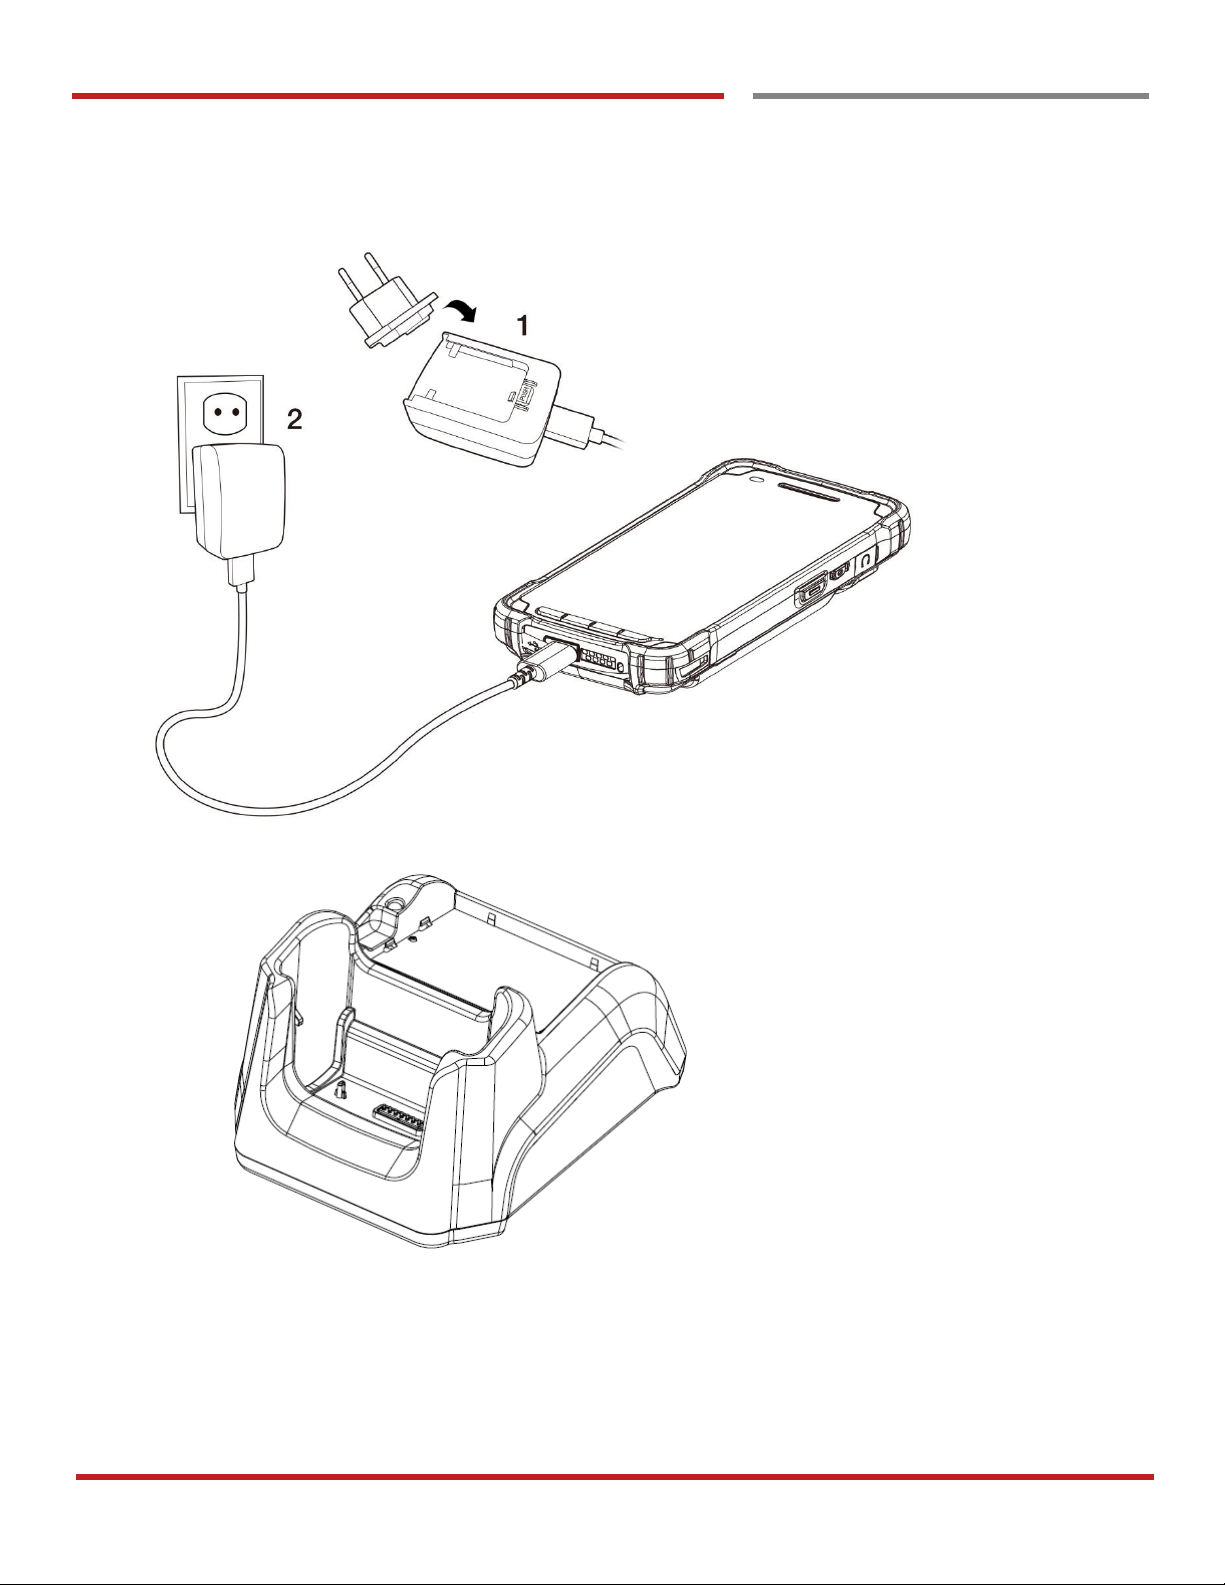
1. Assemble the country code and AC adapter first. Connect USB cable to assembled AC adapter
2. Connect another side, USB type C connector to the PM90 and apply the power from wall socket
You can also charge the PM90 with cradle (optional accessory)
Page 14

PM90 Android 9 User Manual
13
©2006 – 2019 POINTMOBILE Co., Ltd. All rights reserved
Getting `Started
Charge PM90
Getting Started
3. LED indicator will display charging status
Steady Red
Battery is charging or Battery level is low
Blinking Red
Battery level is critical low
Steady Green
Battery is fully charged
Battery specification
Standard Battery
2,900mAh 3.85V
Extended Battery
5,800mAh 3.85V
Backup Battery
60mAh 3.7V
Charging time
Standard Battery : About 4 hours
Extend Battery : About 6 hours
Note: Always use an original charger and cable from the Point Mobile. Other chargers and cables may
damage PM90.
In addition, make sure connector, charger, cables are not wet
Page 15
PM90 Android 9 User Manual
14
©2006 – 2019 POINTMOBILE Co., Ltd. All rights reserved
Learning the basics
Use a keypad
Use a keypad
Learning the basics
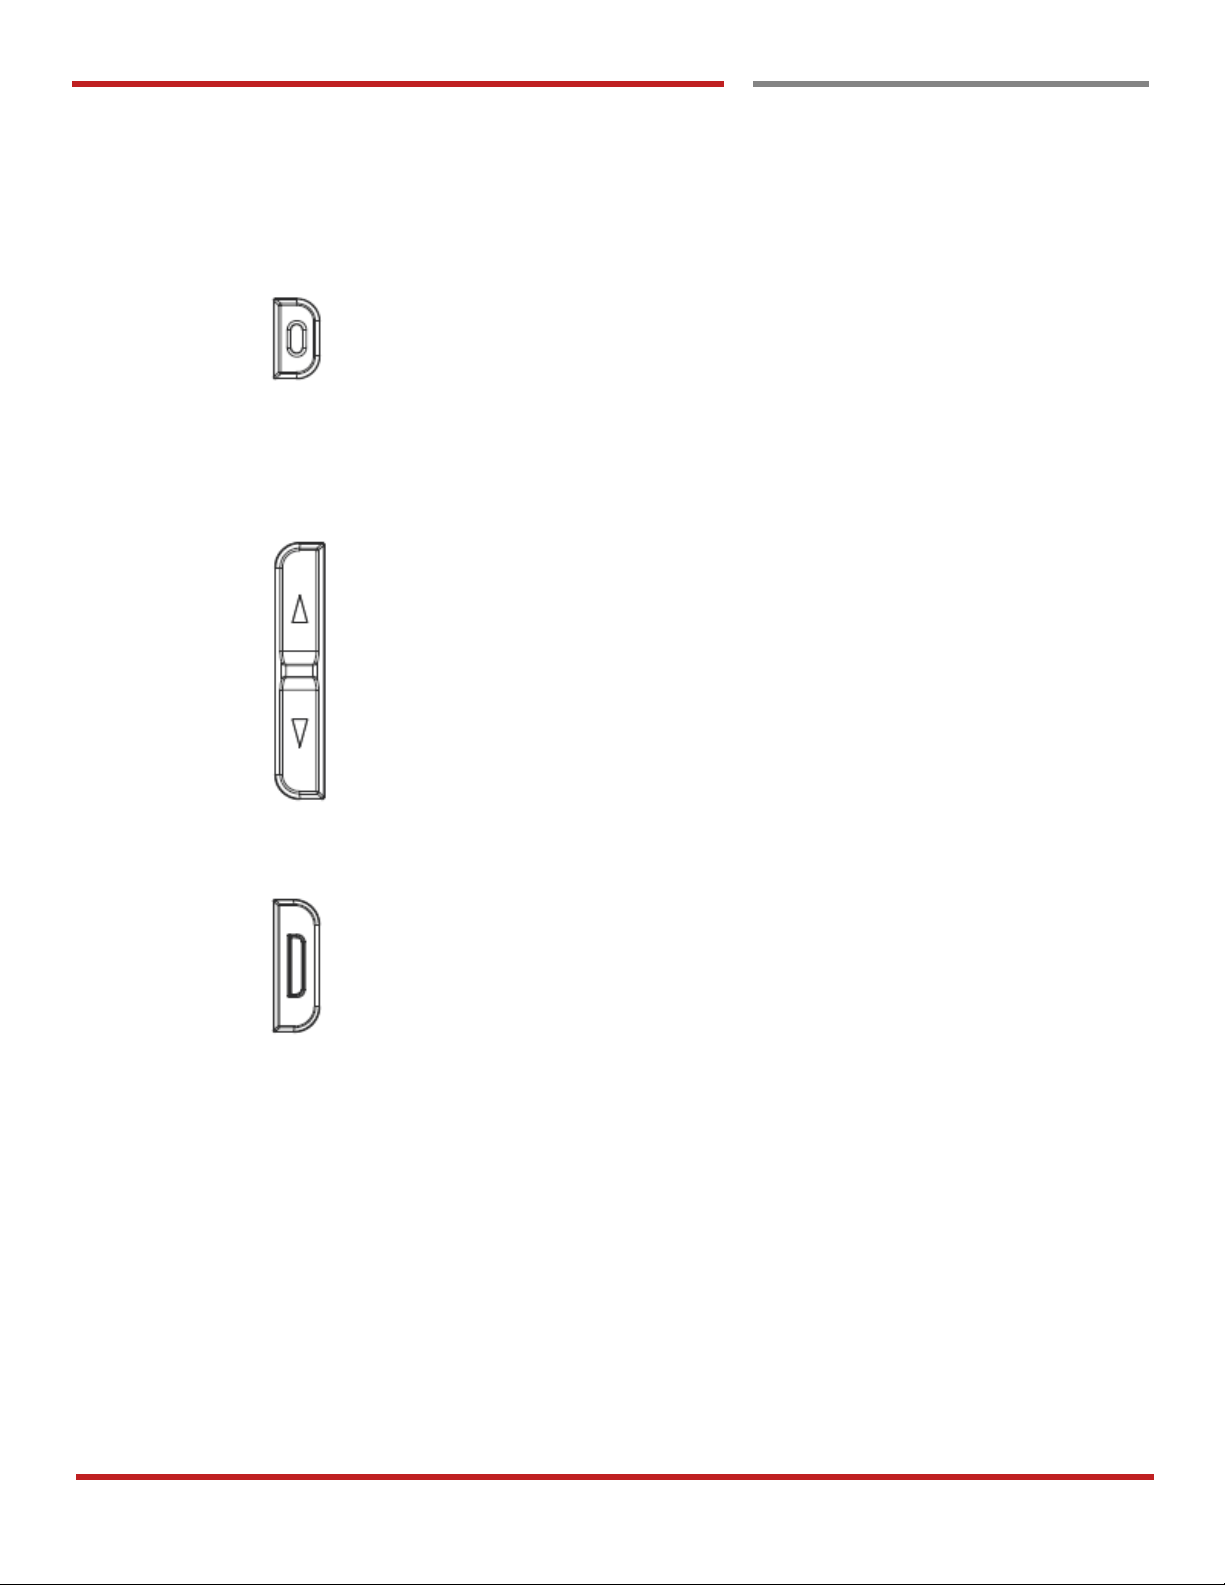
Power key
Press
- Lock the screen / Light up the screen.
Press and hold
- Display the power menu “Power Off / Restart / Screenshot”
Press and hold over 12 seconds
- Force rebooting
Press and hold the Power key and Volume Down key together
- Screen capture
Volume keys
In general
- Adjusts the media and ringtone volume
- Mute the ringtone during an incoming call (Volume Up / Down key)
In voice call
- Adjusts the volume (Speaker or Headphone)
In camera preview
- Take a photo (Volume Up / Down key)
Scan Button
When Scan Wedge mode is activated
- By pressing, PM90 scan the barcode
Page 16
PM90 Android 9 User Manual
15
©2006 – 2019 POINTMOBILE Co., Ltd. All rights reserved
Learning the basics
Use a keypad
Learning the basics
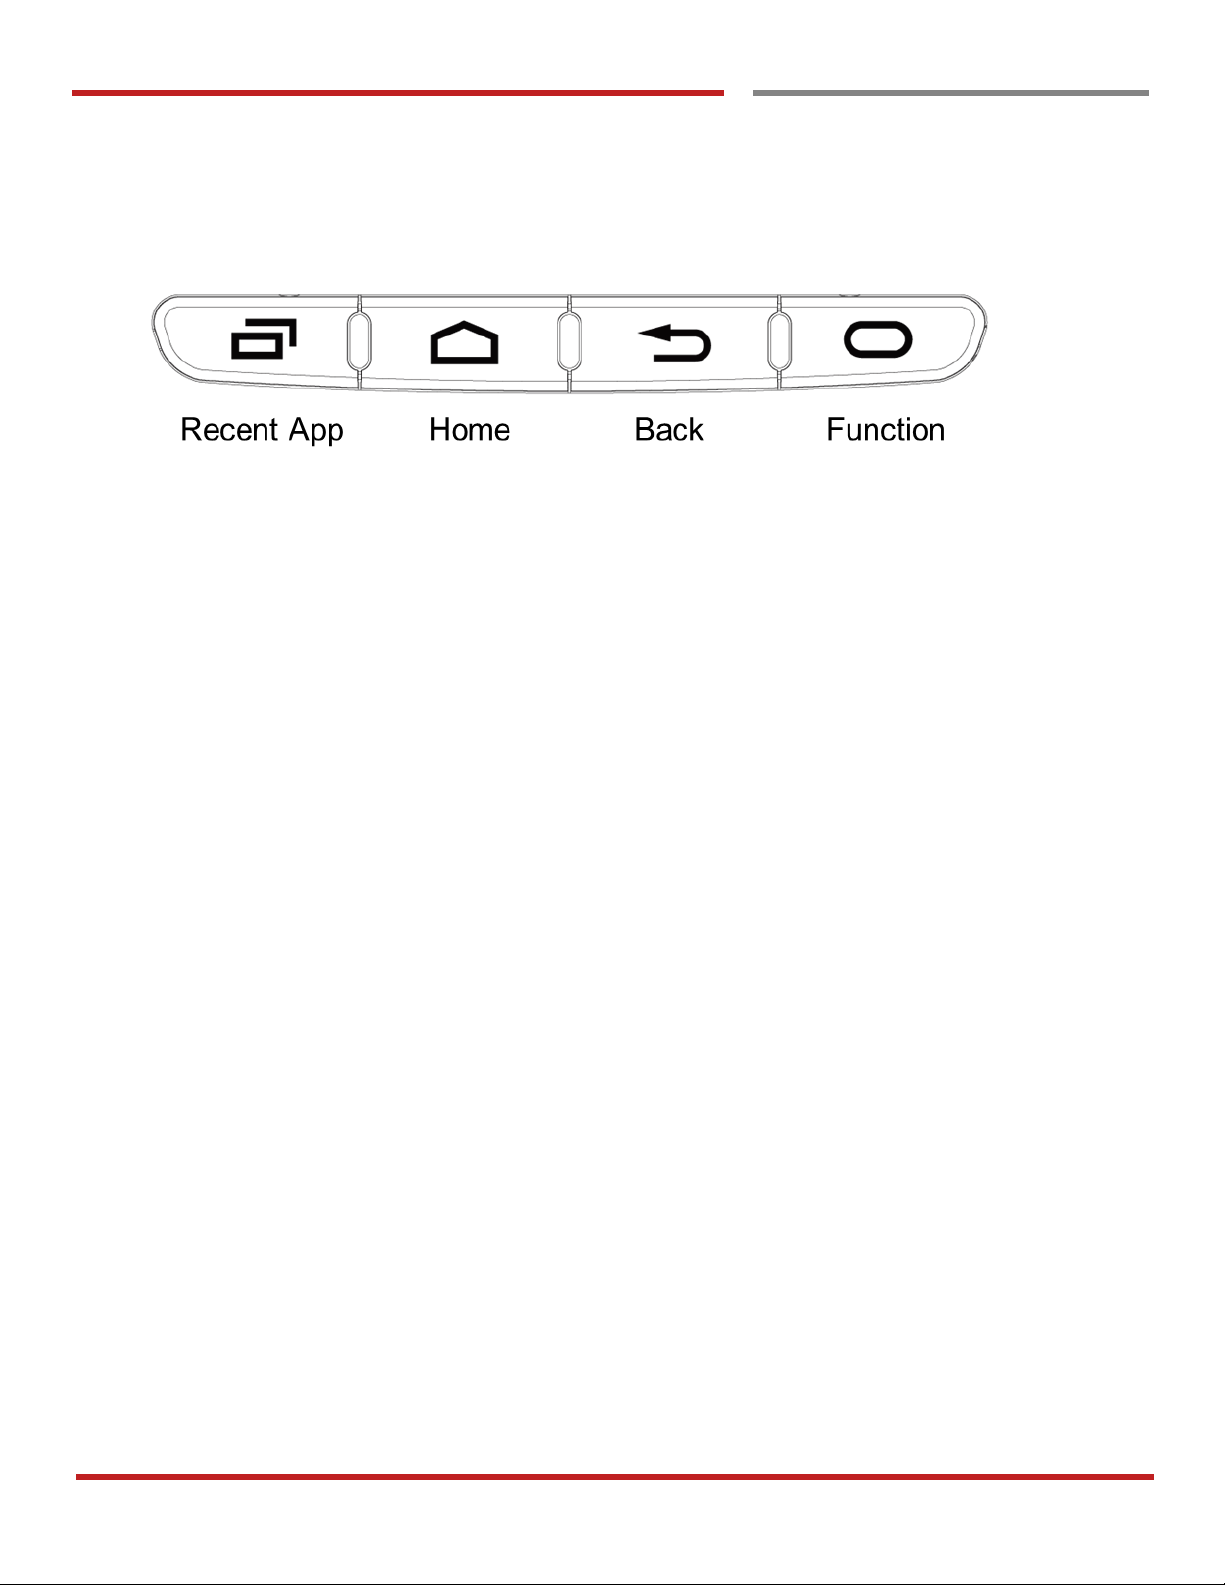
Front Keys
Recent App
Press to see recently used apps
Home
From any apps or screens, press to return to the Home screen
Back
Press to go back to the previous screen, or to close a dialog box, options
menu, notification panel, etc
Function
Press to run the function or run the preset action. You can set EmKit Program Buttons
Page 17
PM90 Android 9 User Manual
16
©2006 – 2019 POINTMOBILE Co., Ltd. All rights reserved
Learning the basics
Use a touch screen
Use a touch screen
Learning the basics
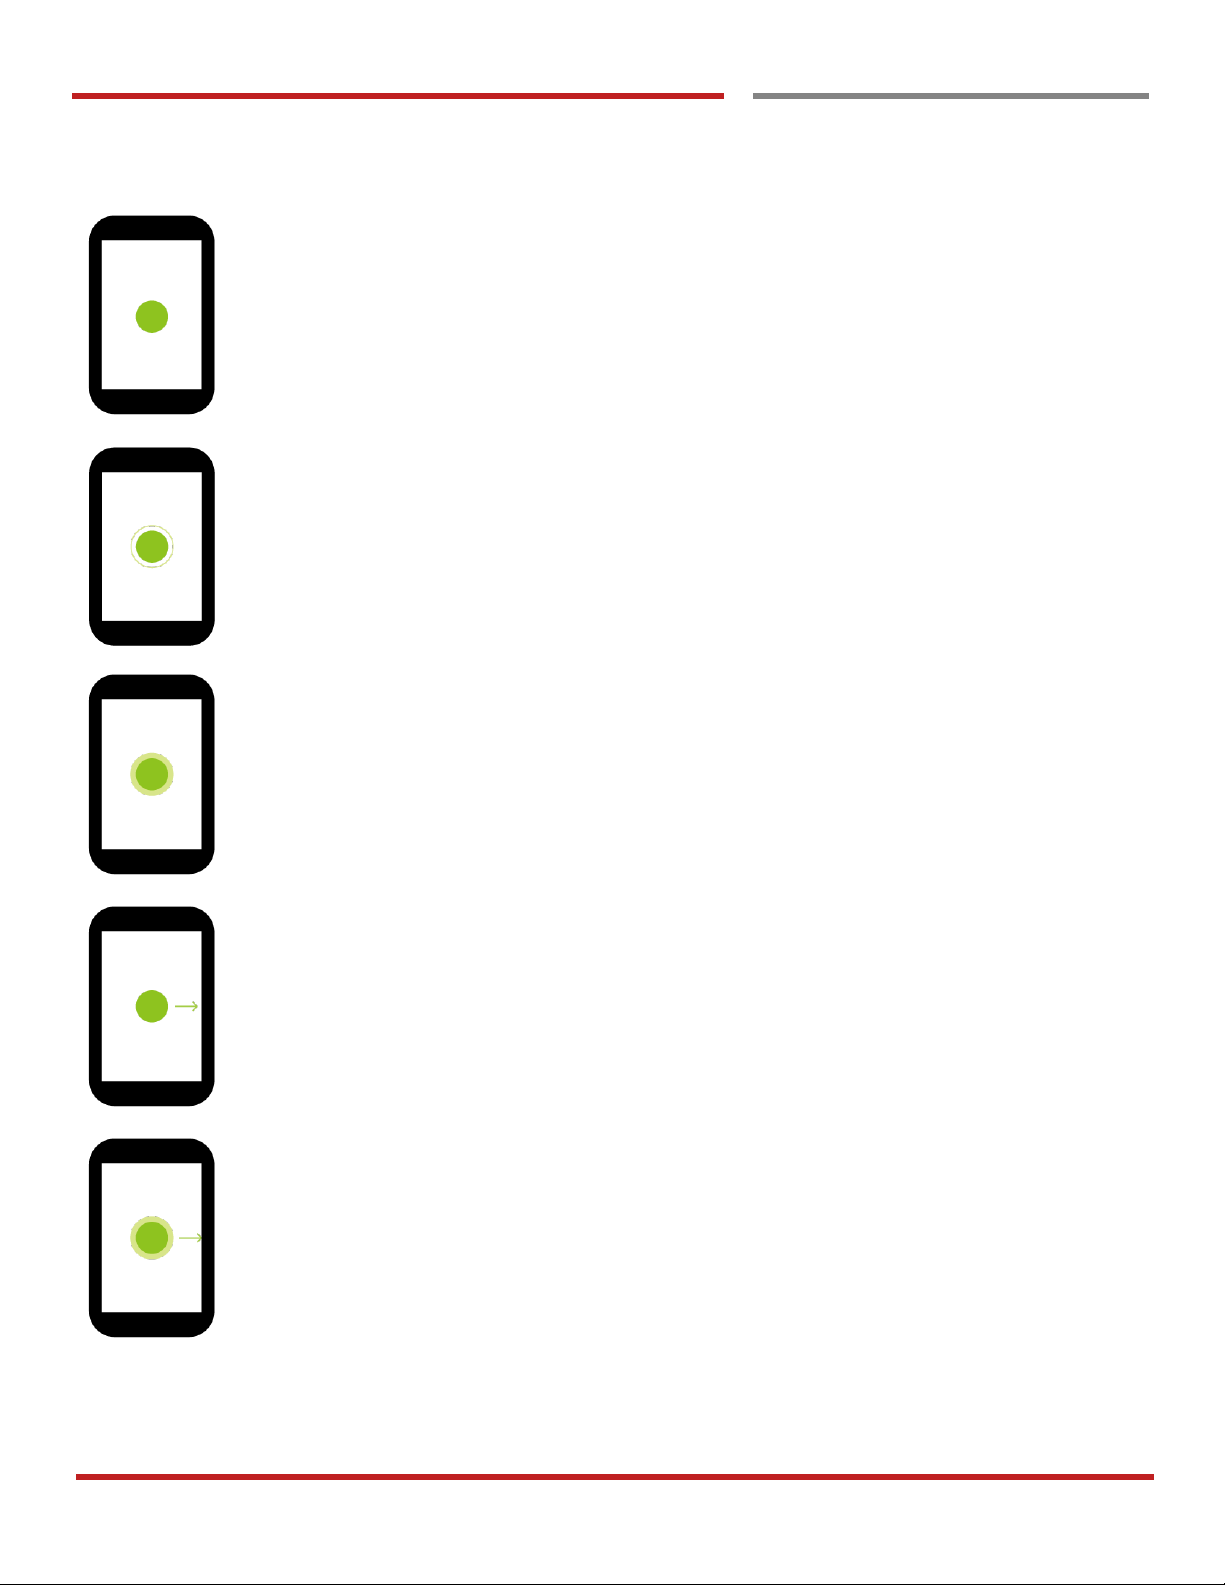
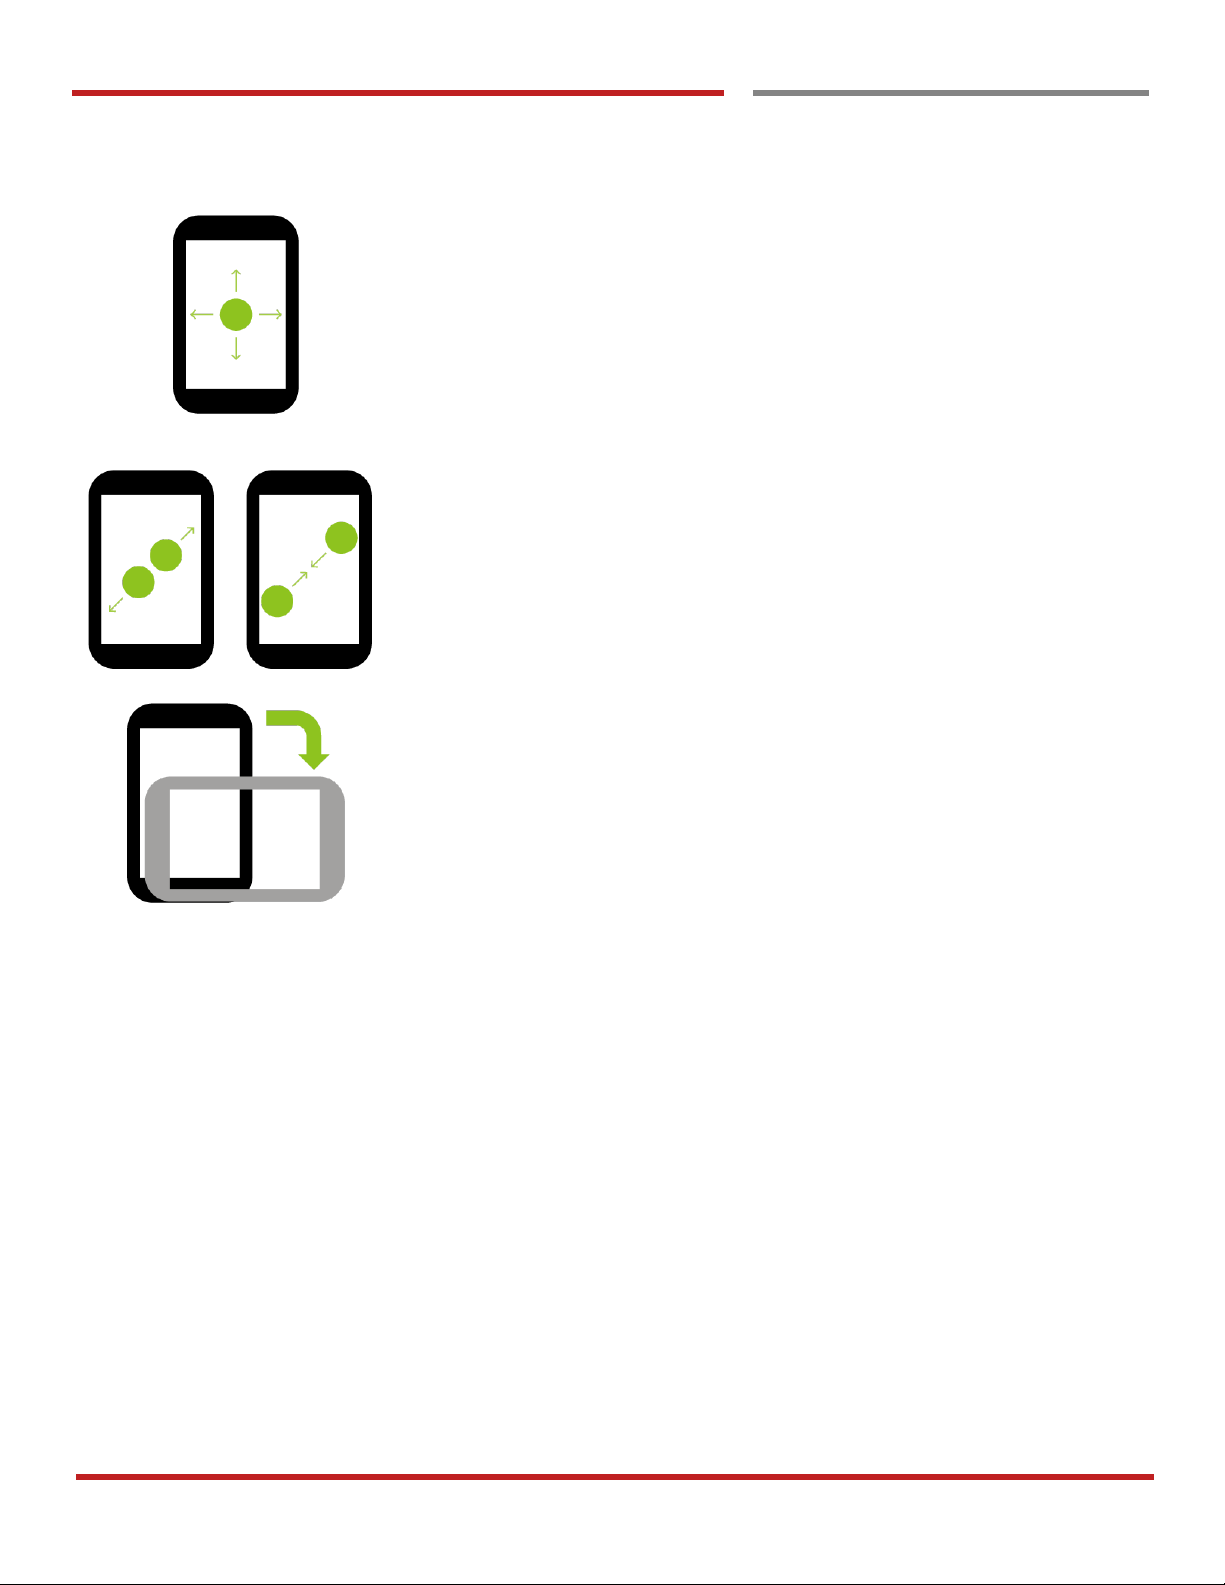
Touch
One-finger press
Double touch
One-finger press, lift, one-finger press, lift for Zoom in
Long press
One-finger press, wait, lift for Select an item
Drag, Swipe, or Fling
One-finger press, move, lift for Scroll or Tilt
Long-press drag
One-finger press, wait, move, lift for Pick up and move or Select multiple items
Page 18
PM90 Android 9 User Manual
17
©2006 – 2019 POINTMOBILE Co., Ltd. All rights reserved
Learning the basics
Use a touch screen
Learning the basics
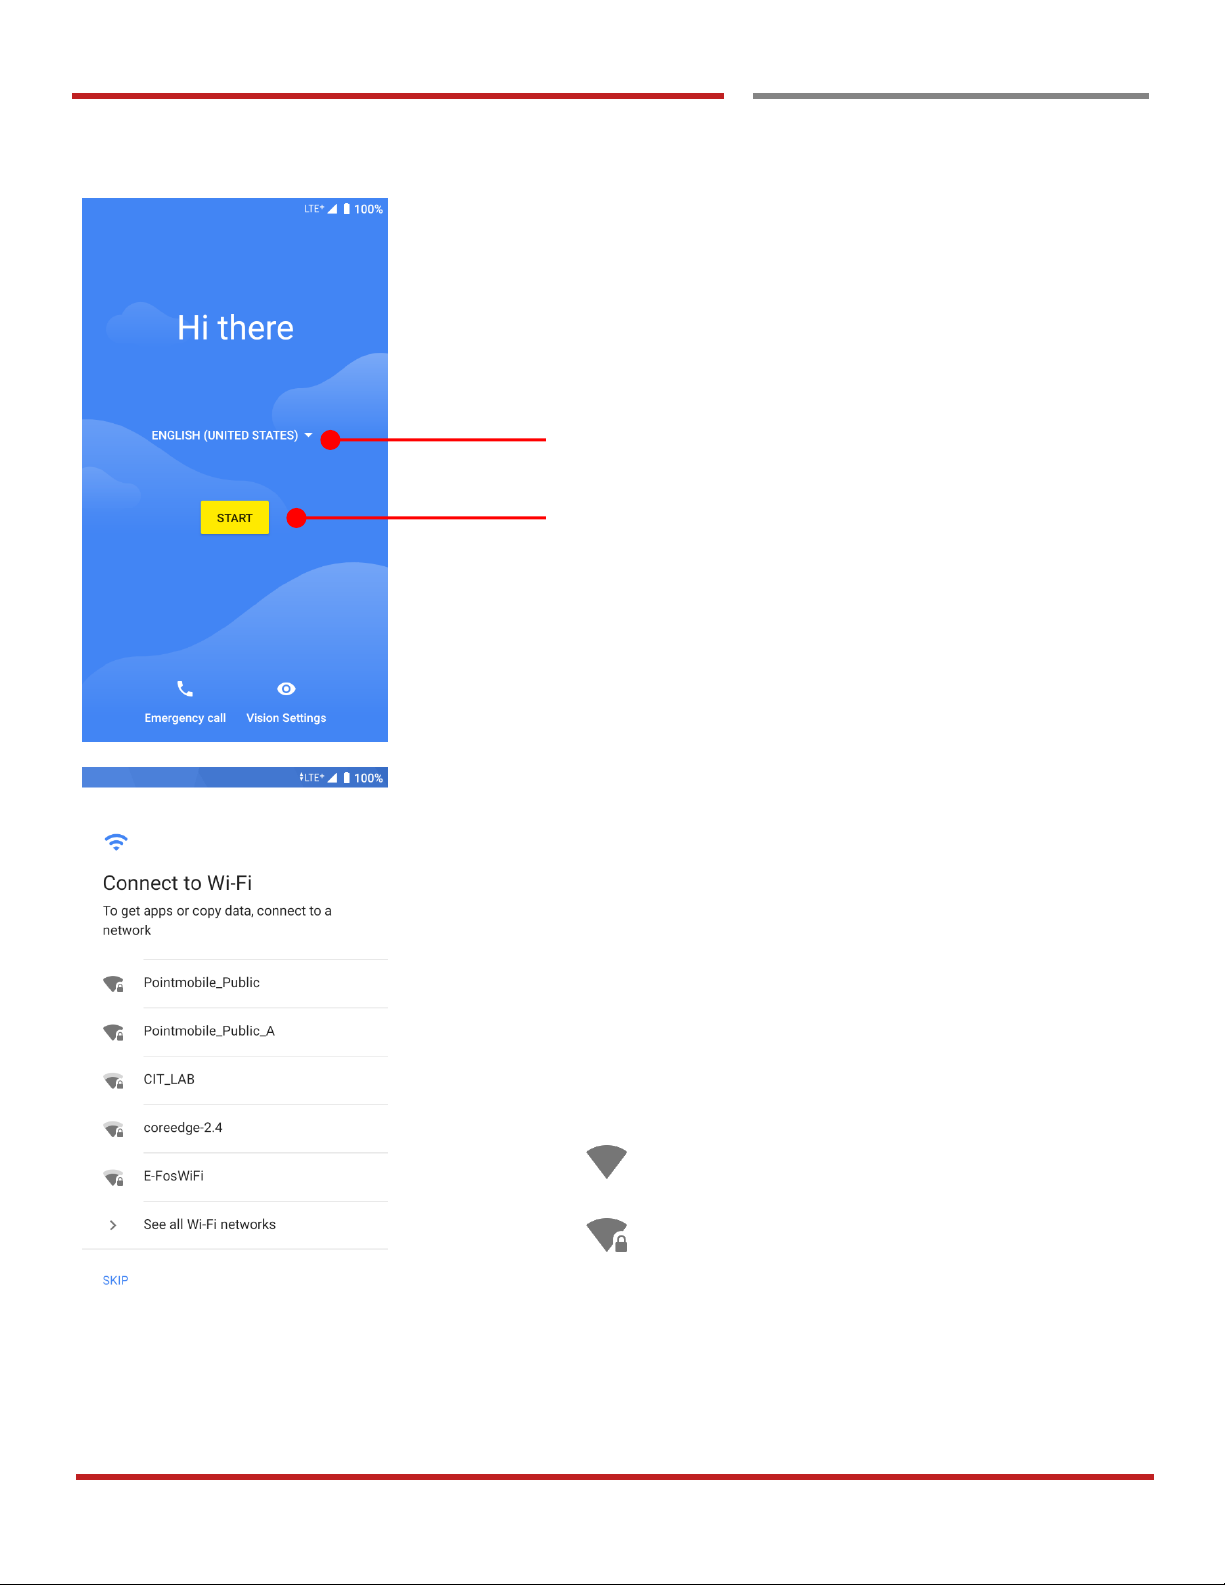
Scroll
Vertical or horizontal Swipe in a single direction
Pinch Open & Close
Two-finger press, move outwards and in words, lift for Zoom in and out
Rotate
When PM90 is turning sideways, screen orientation is changing
Page 19
PM90 Android 9 User Manual
18
©2006 – 2019 POINTMOBILE Co., Ltd. All rights reserved
Learning the basics
Setup Wizard
Setup Wizard
Learning the basics
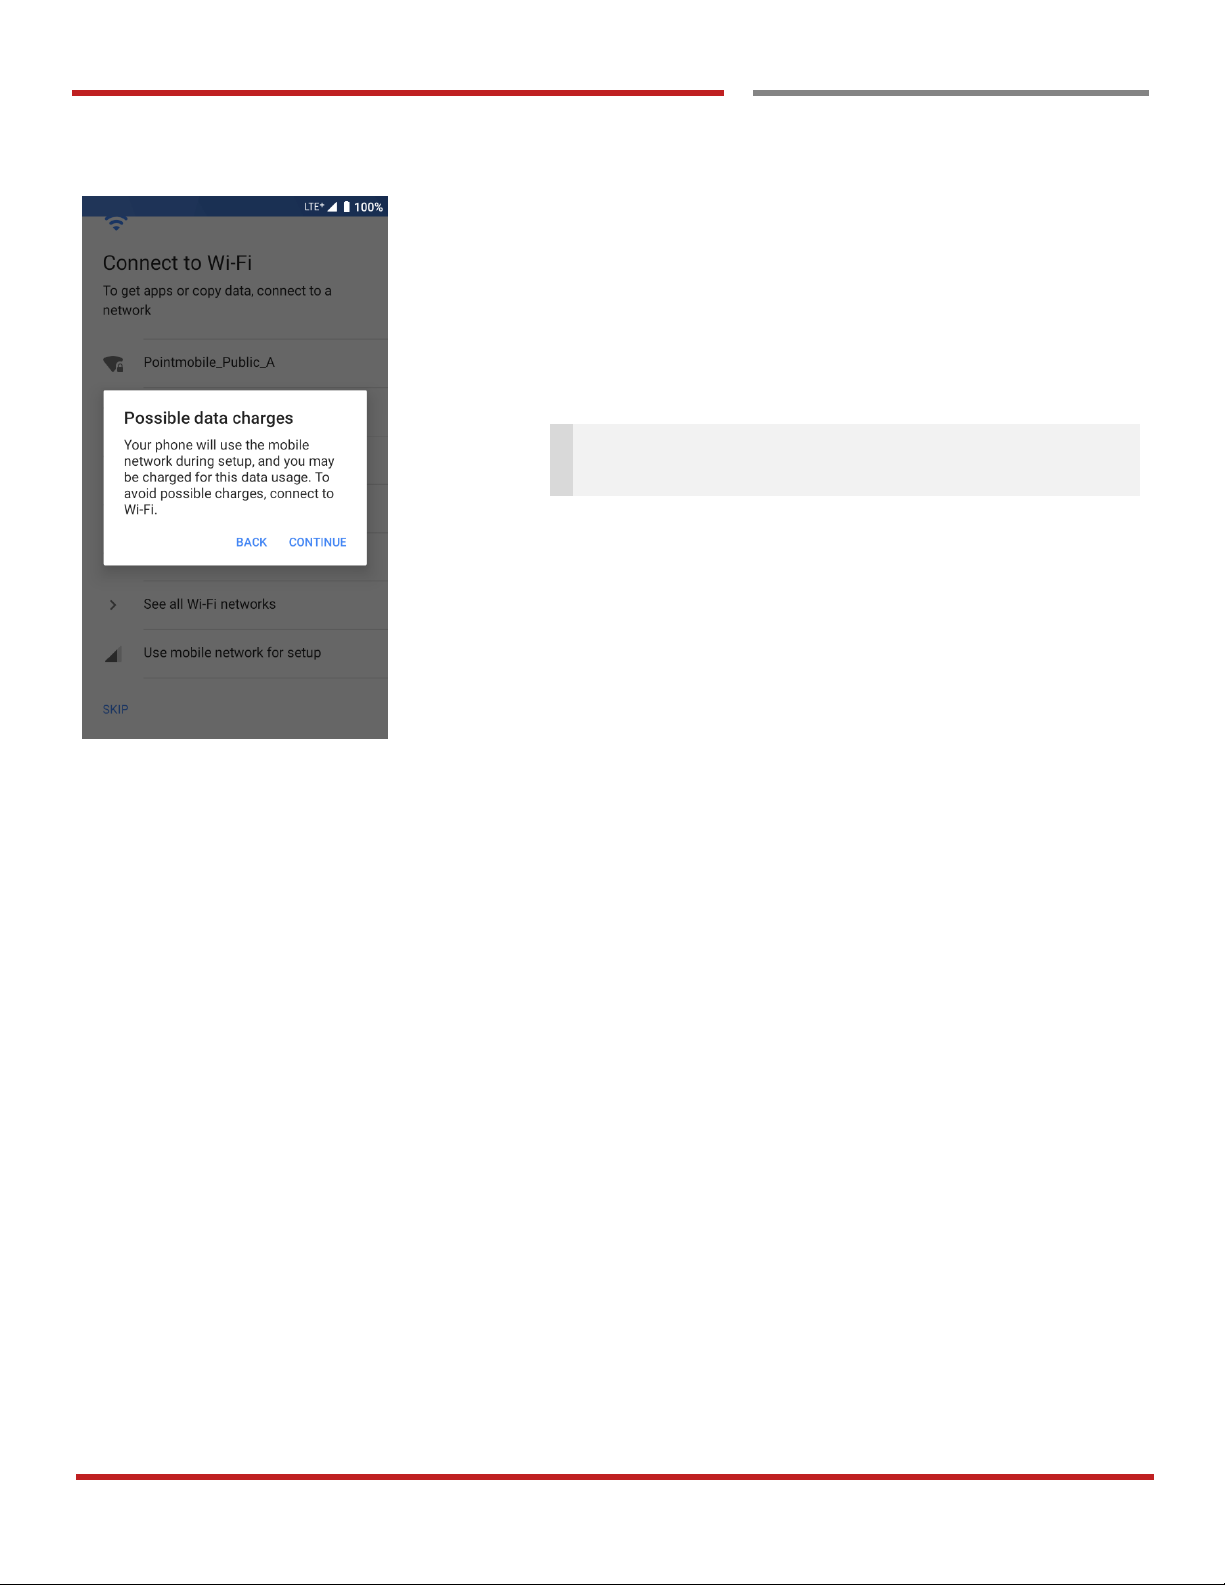
When you power on your device very first time or boot after
factory reset, you need to setup your device first
Language Selection
- Choose your language during setup process.
Touch to start setup your device
To setup your device, Android requires internet connection.
Please connect to your Wi-Fi network or use mobile network
in this step
Icon means: Open Wi-Fi network. You don’t need
to enter the password
Icon means: Secured Wi-Fi network. To connect
this Wi-Fi, you need to enter the password
Page 20
PM90 Android 9 User Manual
19
©2006 – 2019 POINTMOBILE Co., Ltd. All rights reserved
Setup Wizard
Setup Wizard
Learning the basics
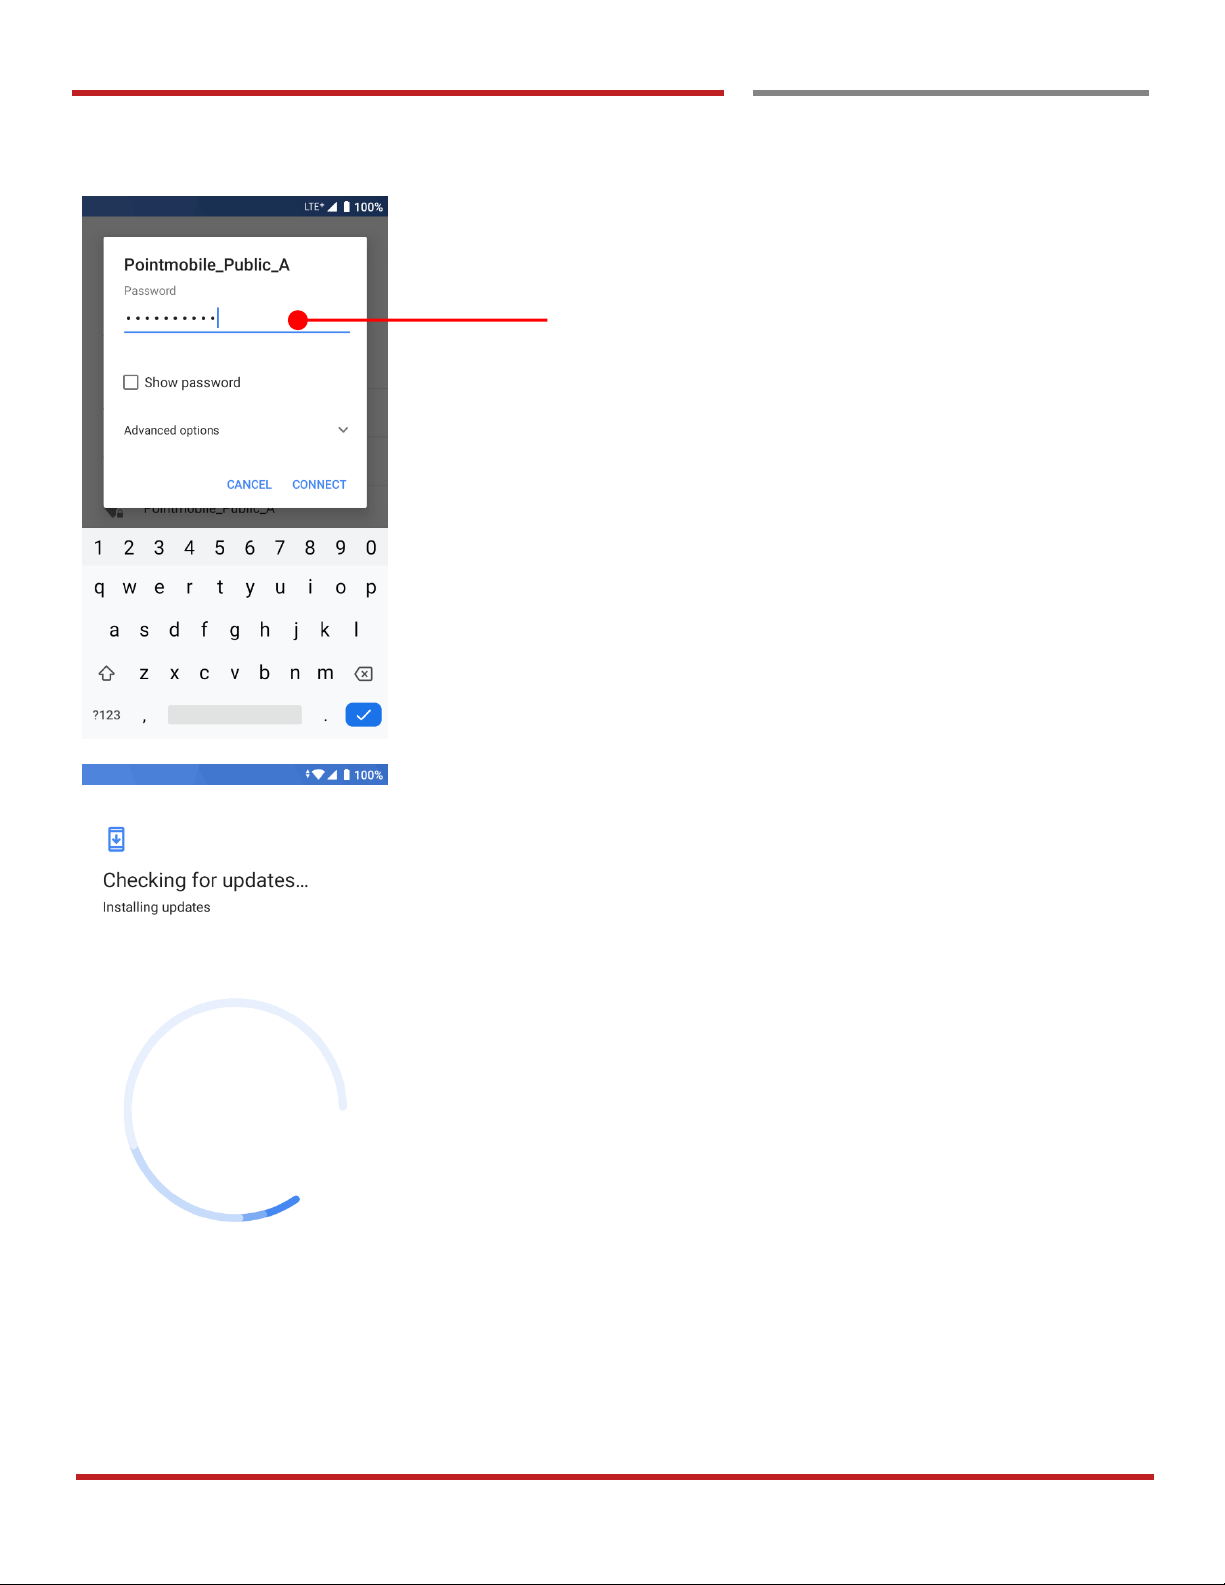
Note: If you choose Use mobile network for setup
option, you may be charged for mobile data usage.
Page 21
PM90 Android 9 User Manual
20
©2006 – 2019 POINTMOBILE Co., Ltd. All rights reserved
Setup Wizard
Learning the basics
Please select Wi-Fi network and input the password (If
required)
Android will check updates in Setup process and move to
next step
Page 22
PM90 Android 9 User Manual
21
©2006 – 2019 POINTMOBILE Co., Ltd. All rights reserved
Setup Wizard
Setup Wizard
Learning the basics
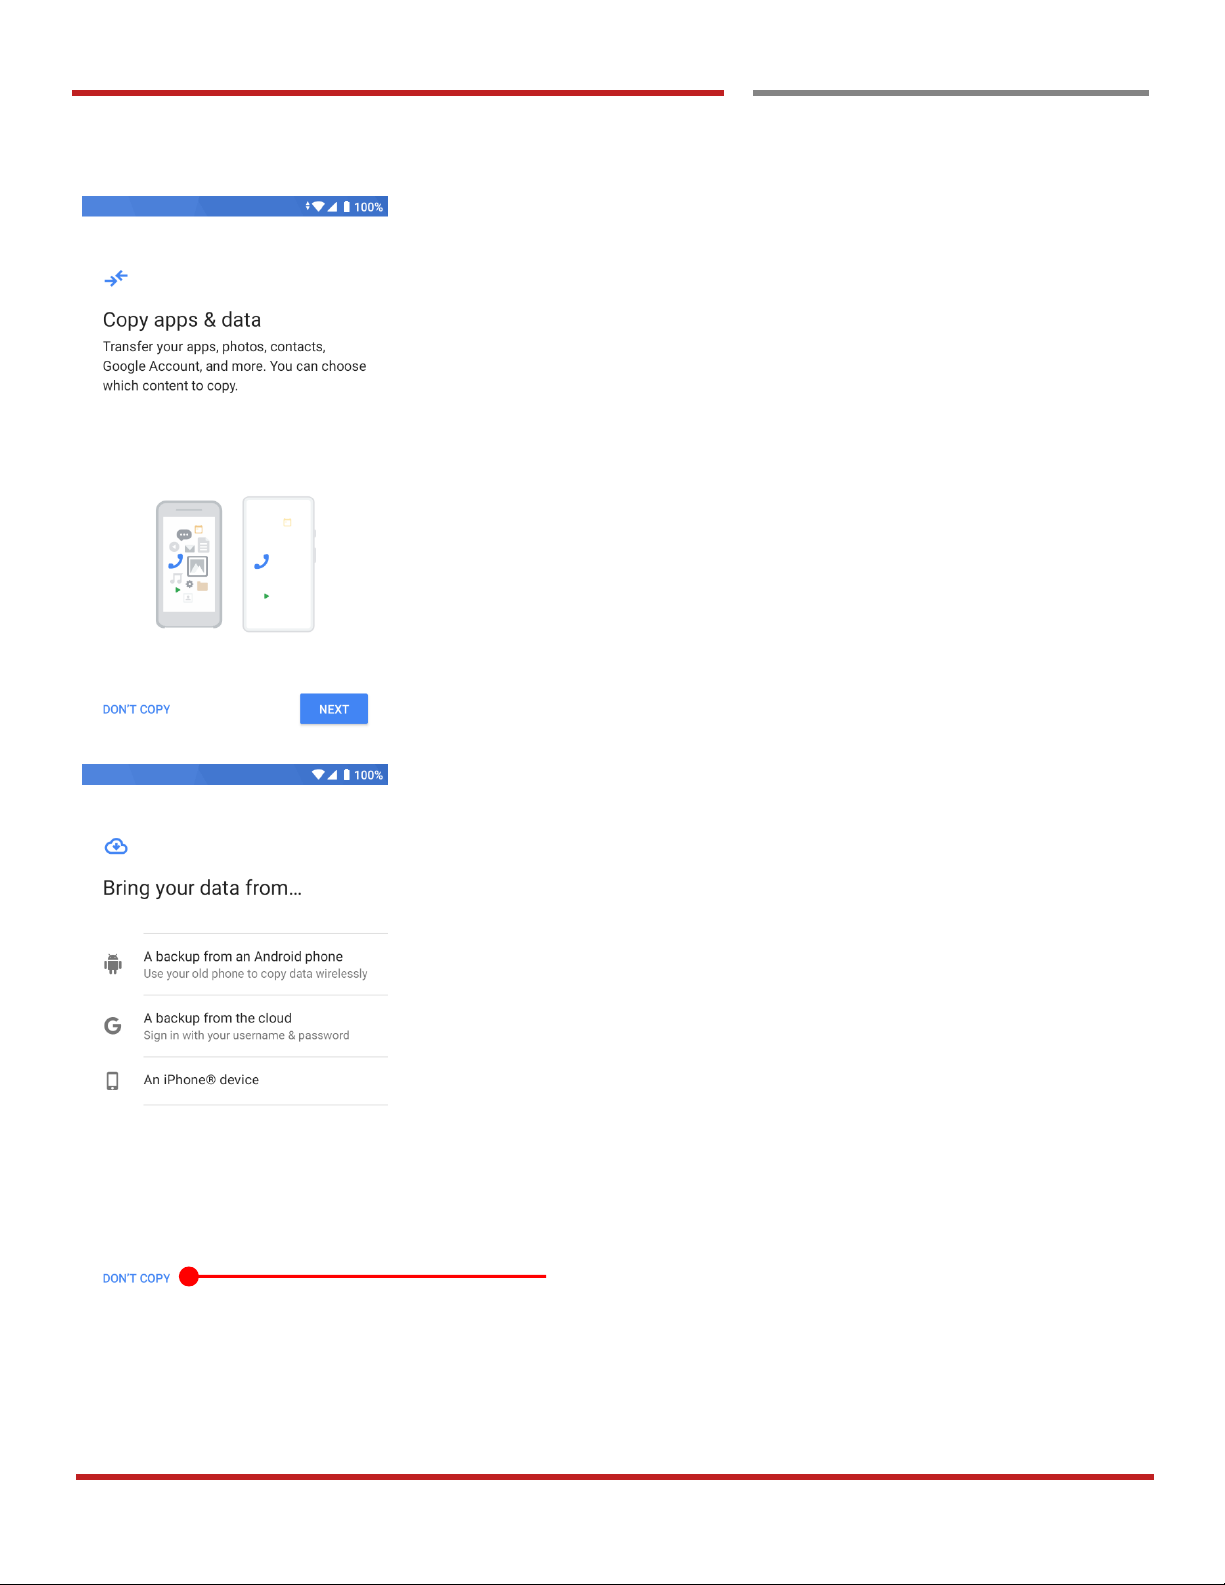
After internet connection, Android will ask set PM90 as new
device or copy apps & data from Google account
Next
- You can copy your settings from other Android
phone or Google account or iPhone
Don’t Copy
- Set your PM90 as your new device
Next option
- PM90 will sync the setting from other Android phone
or Google account or iPhone
Touch to go back previous step
Page 23
PM90 Android 9 User Manual
22
©2006 – 2019 POINTMOBILE Co., Ltd. All rights reserved
dd
Setup Wizard
Learning the basics
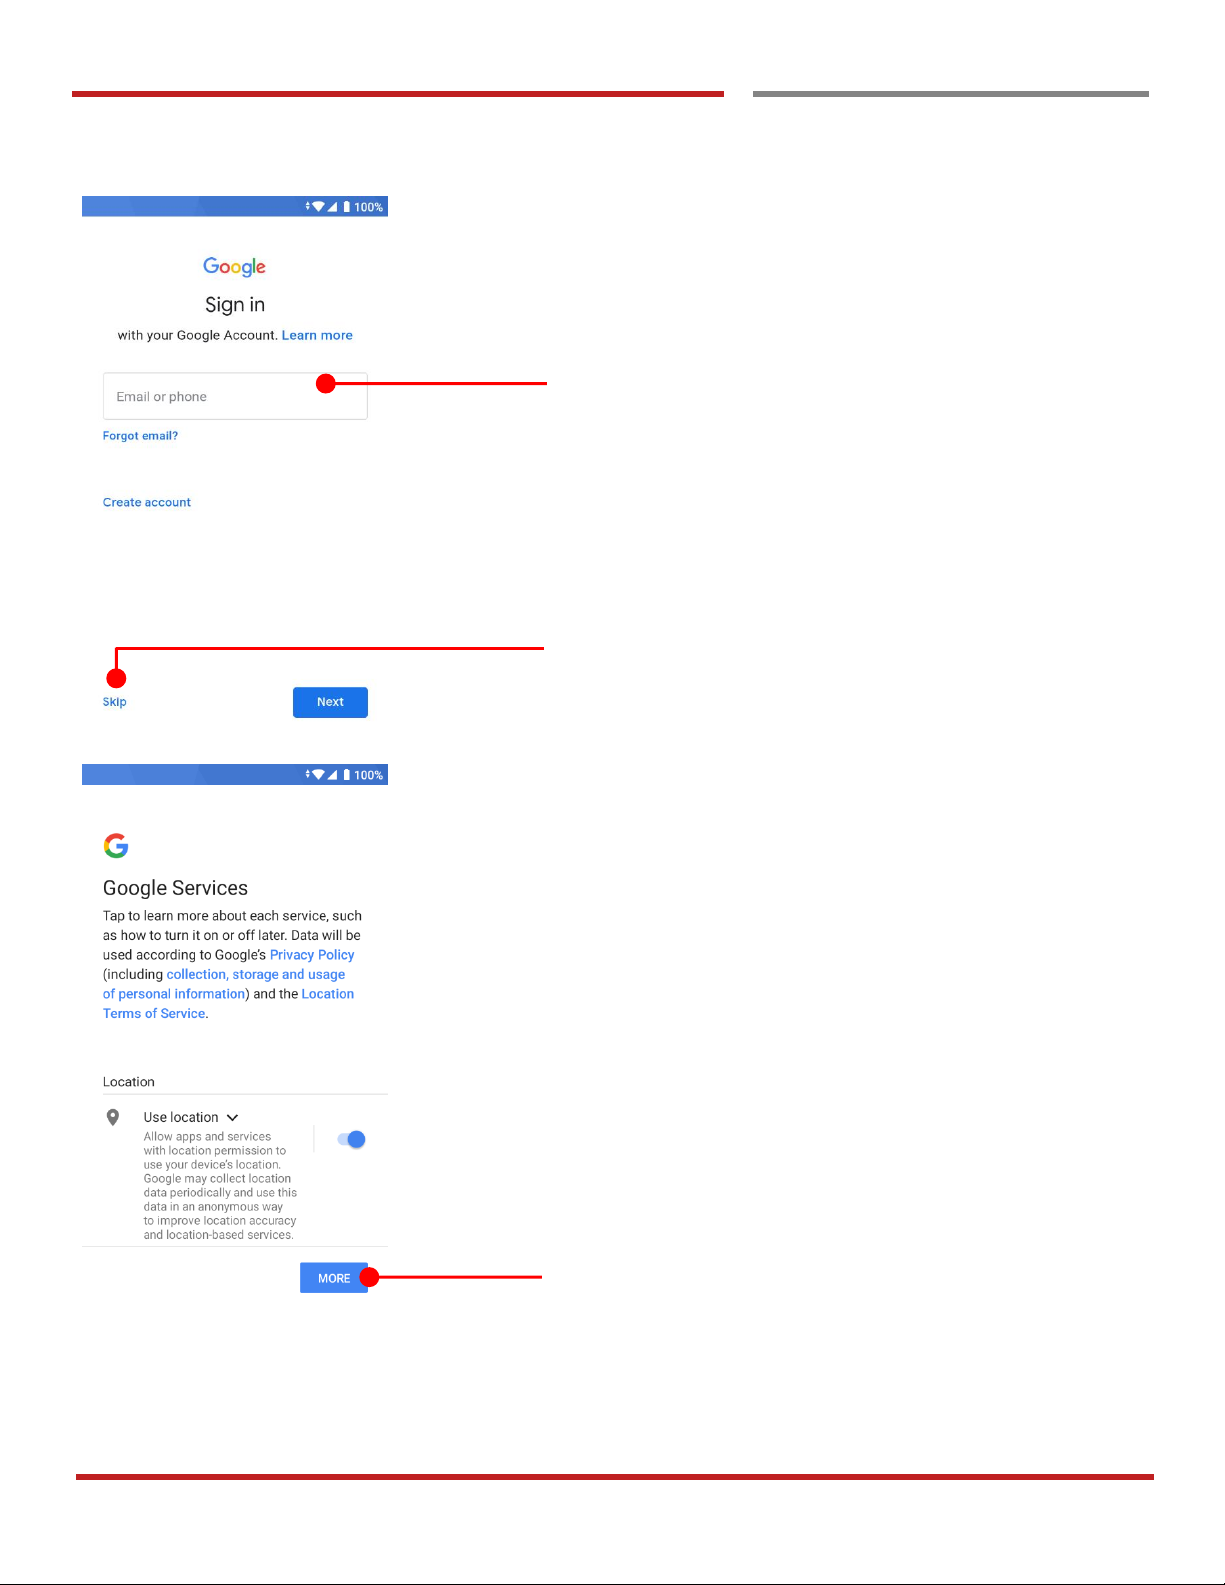
Don’t Copy option
Please sign in with Google Account
You can skip this Google Account sign in process and set
later.
Navigate to Settings → Users & accounts → Add
account → Google
To review the Google services option, please touch MORE
button. You can turn On/Off specific service
Page 24
PM90 Android 9 User Manual
23
©2006 – 2019 POINTMOBILE Co., Ltd. All rights reserved
Setup Wizard
Learning the basics
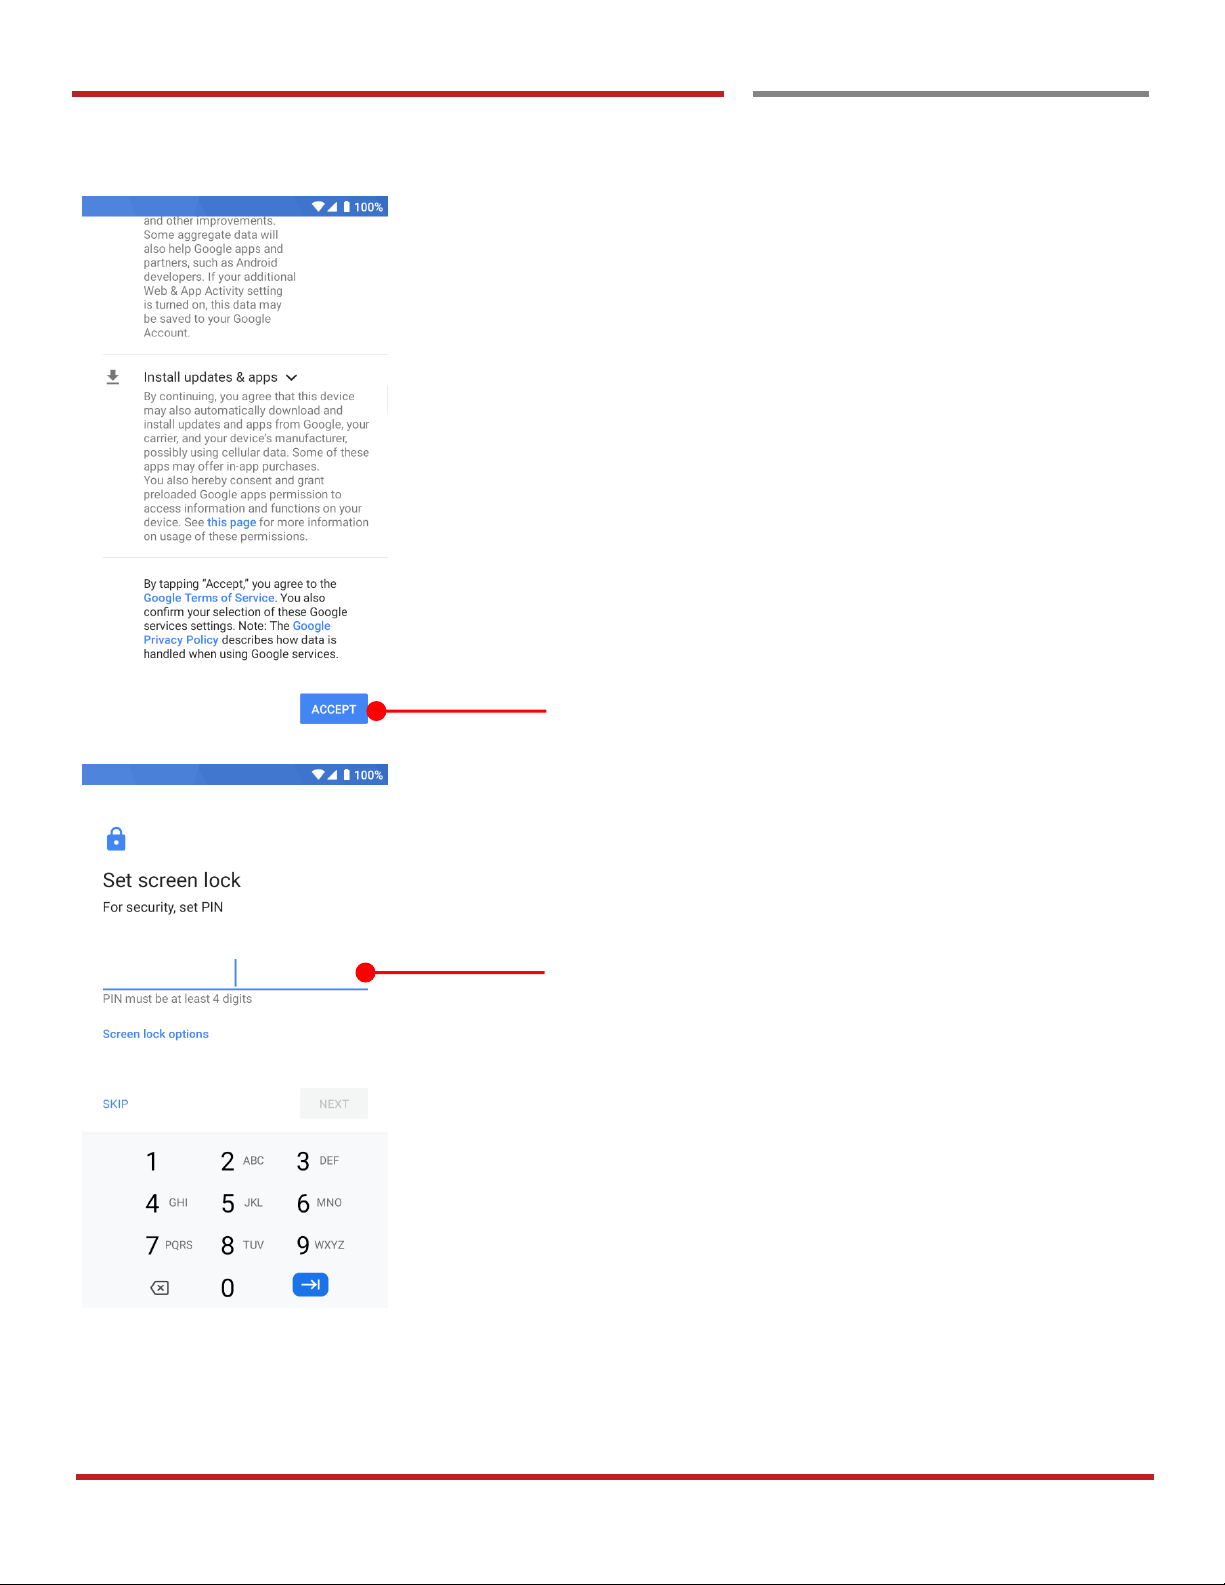
After your reviewing and set Google services option, touch
ACCEPT button for next step
Choose security option for lock screen. You set specific
pattern or PIN or password here.
You may skip this process and set later.
Navigate to Settings →Security & location → Screen
lock
Page 25
PM90 Android 9 User Manual
24
©2006 – 2019 POINTMOBILE Co., Ltd. All rights reserved
Home Screen, Apps and Widget
Home Screen, Apps and Widget
Learning the basics
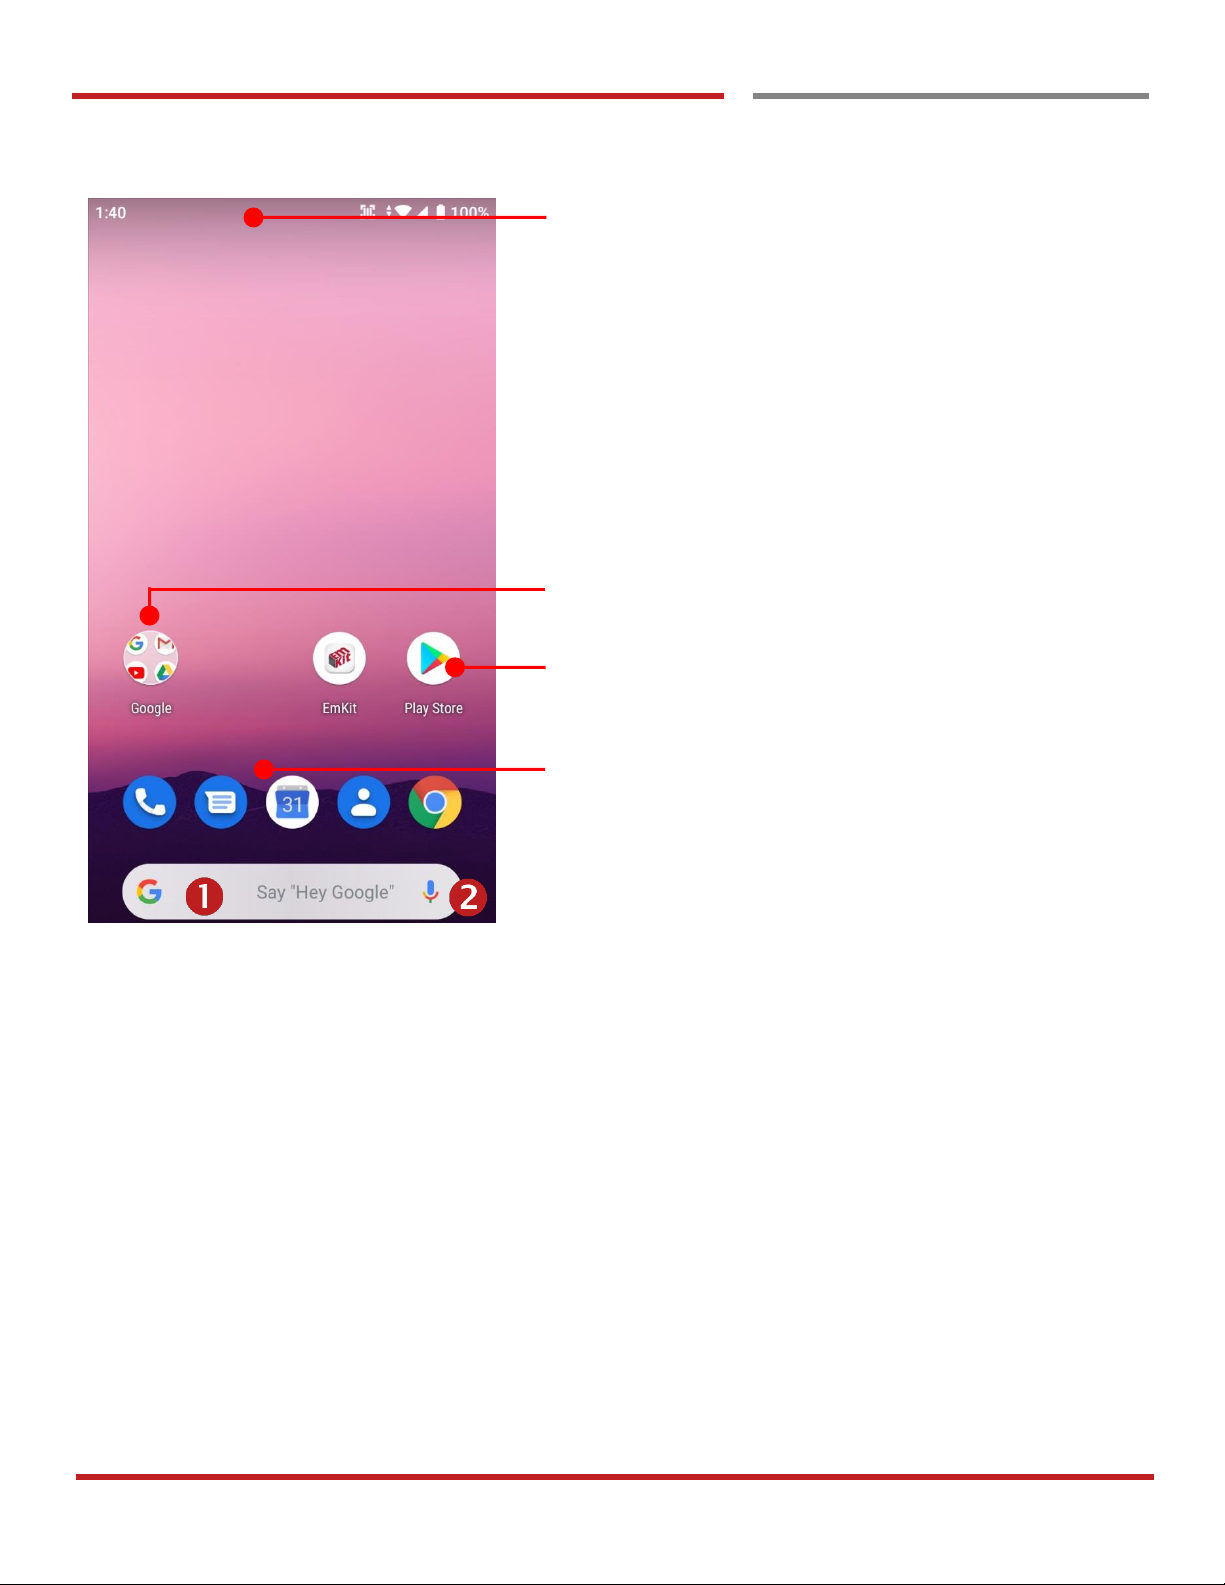
Status Bar
- Status / Notification
- Drag down to open the Quick settings panel
App Folder (Google collections)
- App icons are organized in the folder
Touch an icon to run an app, open a folder, etc
Favorite tray apps
- Touch to run an app
- Touch and hold to reorganize
Search Bar
- Touch 1 to search by text
- Touch 2 to search by voice
Page 26
PM90 Android 9 User Manual
25
©2006 – 2019 POINTMOBILE Co., Ltd. All rights reserved
basics
Home Screen, Apps and Widget
Learning the basics
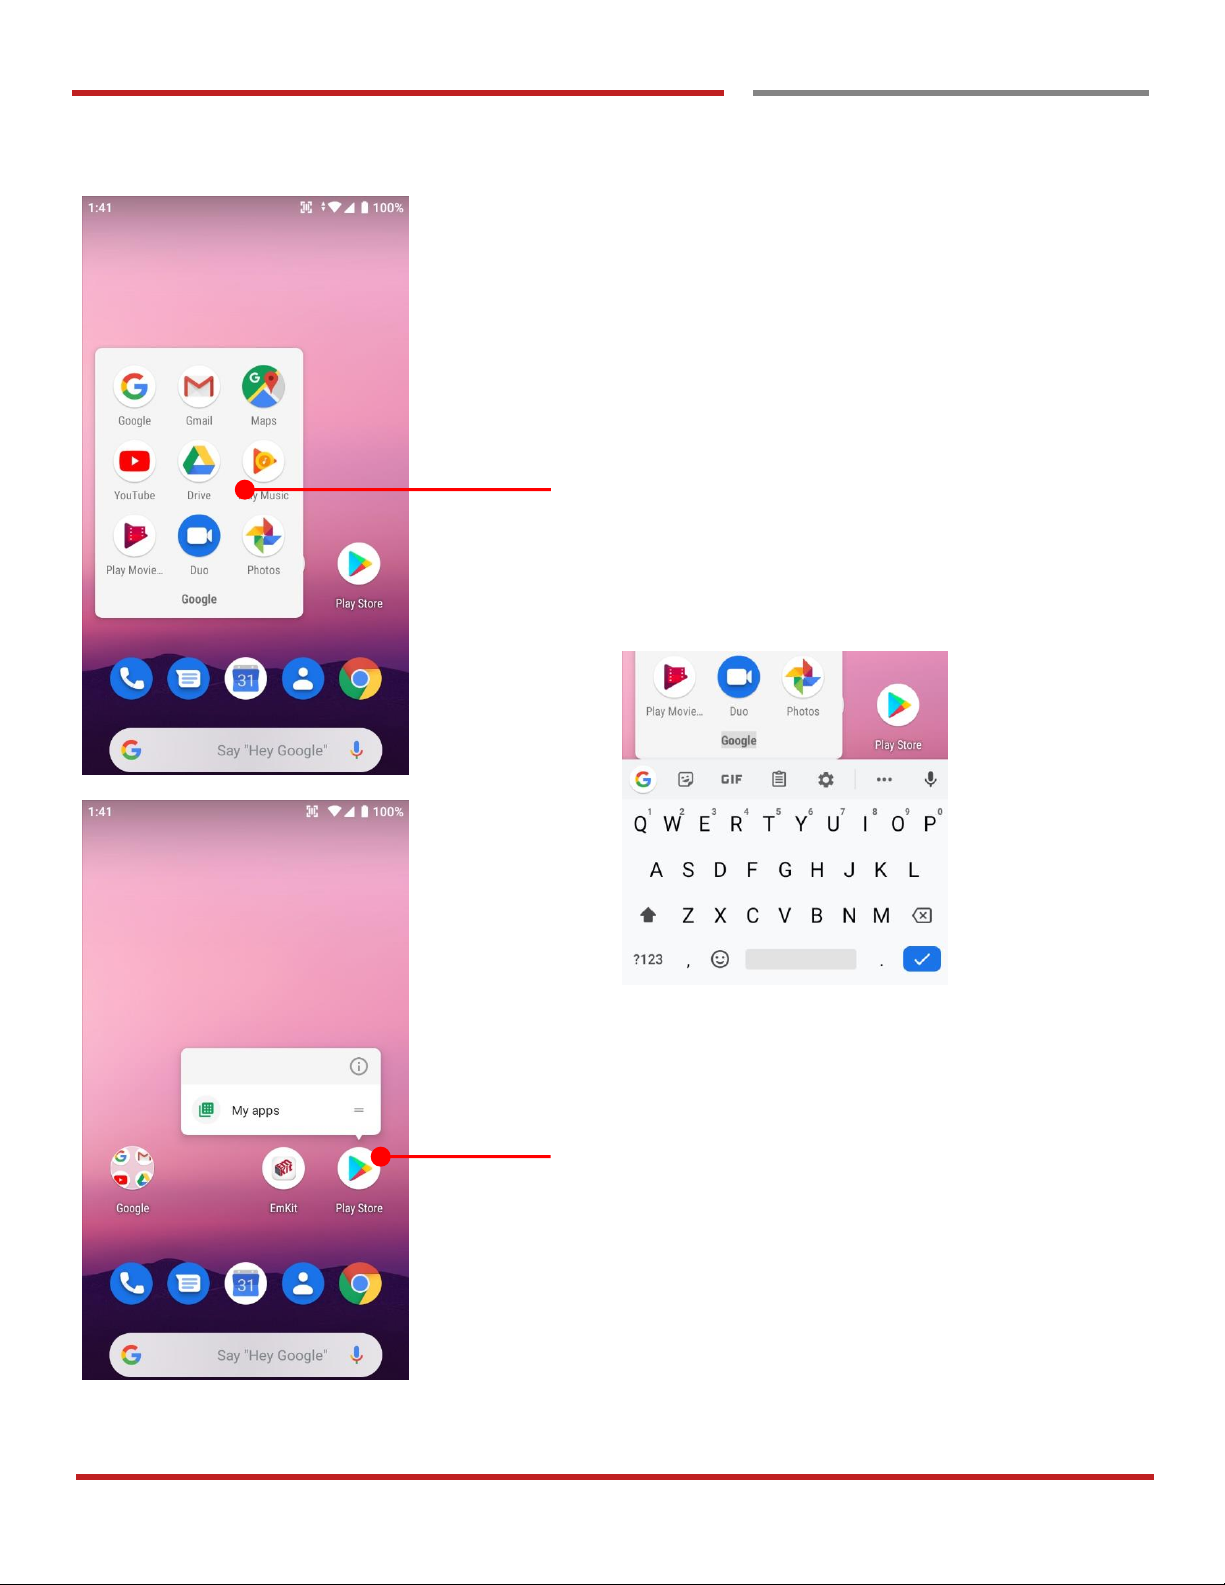
To access App folder (Google App collections)
- Touch the app folder then you will see apps in the
folder
- To change app folder’s name, touch the bottom area
of the App folder
To see App’s option for quick access
- Long press the app icon. Then you will see options
from the app. Here option may different by app
Page 27
PM90 Android 9 User Manual
26
©2006 – 2019 POINTMOBILE Co., Ltd. All rights reserved
Learning the basics
Home Screen, Apps and Widget
Learning the basics
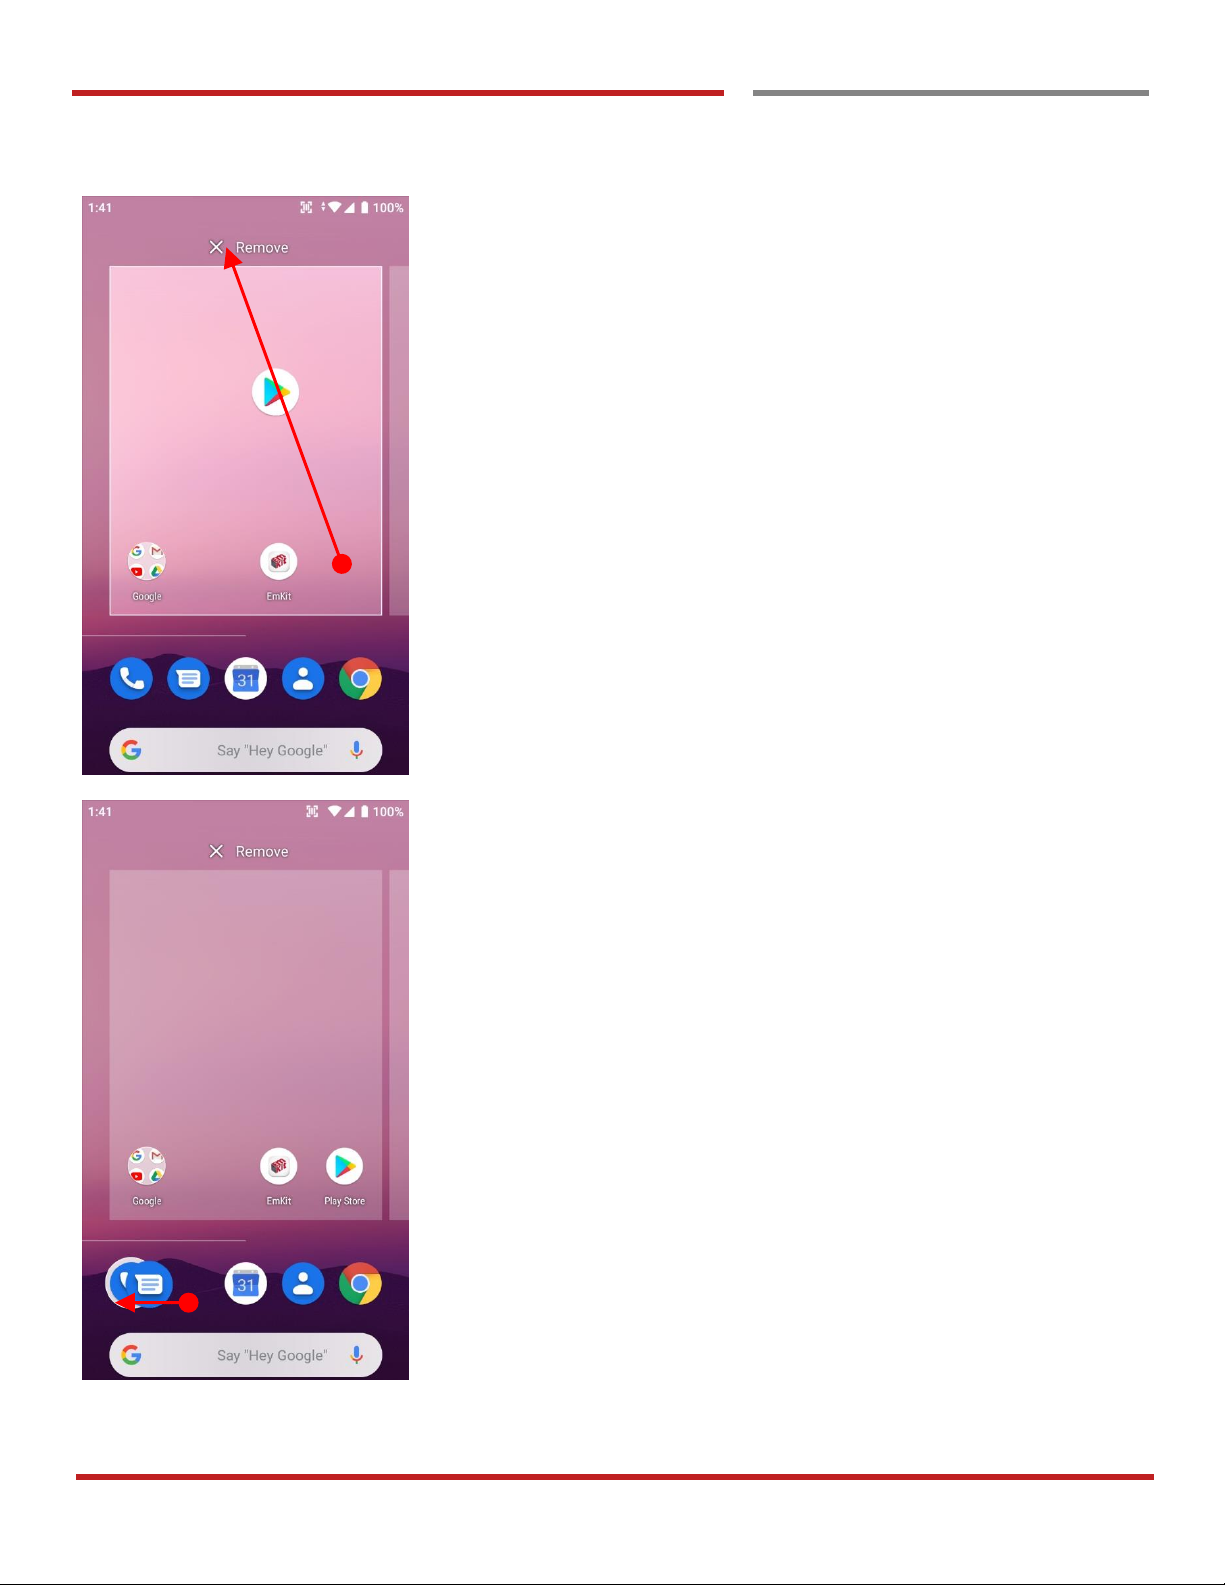
Organize the app icon in the home screen
- Long-press drag the app icon and place where you
want. You may place app icon to next panel
- If you want to remove the app icon, drag it to
Remove area and release
Create “App Folder”
- Long press the app icon to another app icon. This
will create the App Folder
- To set the folder name, touch the Unnamed Folder
and rename it
Page 28
PM90 Android 9 User Manual
27
©2006 – 2019 POINTMOBILE Co., Ltd. All rights reserved
the
Home Screen, Apps and Widget
Learning the basics
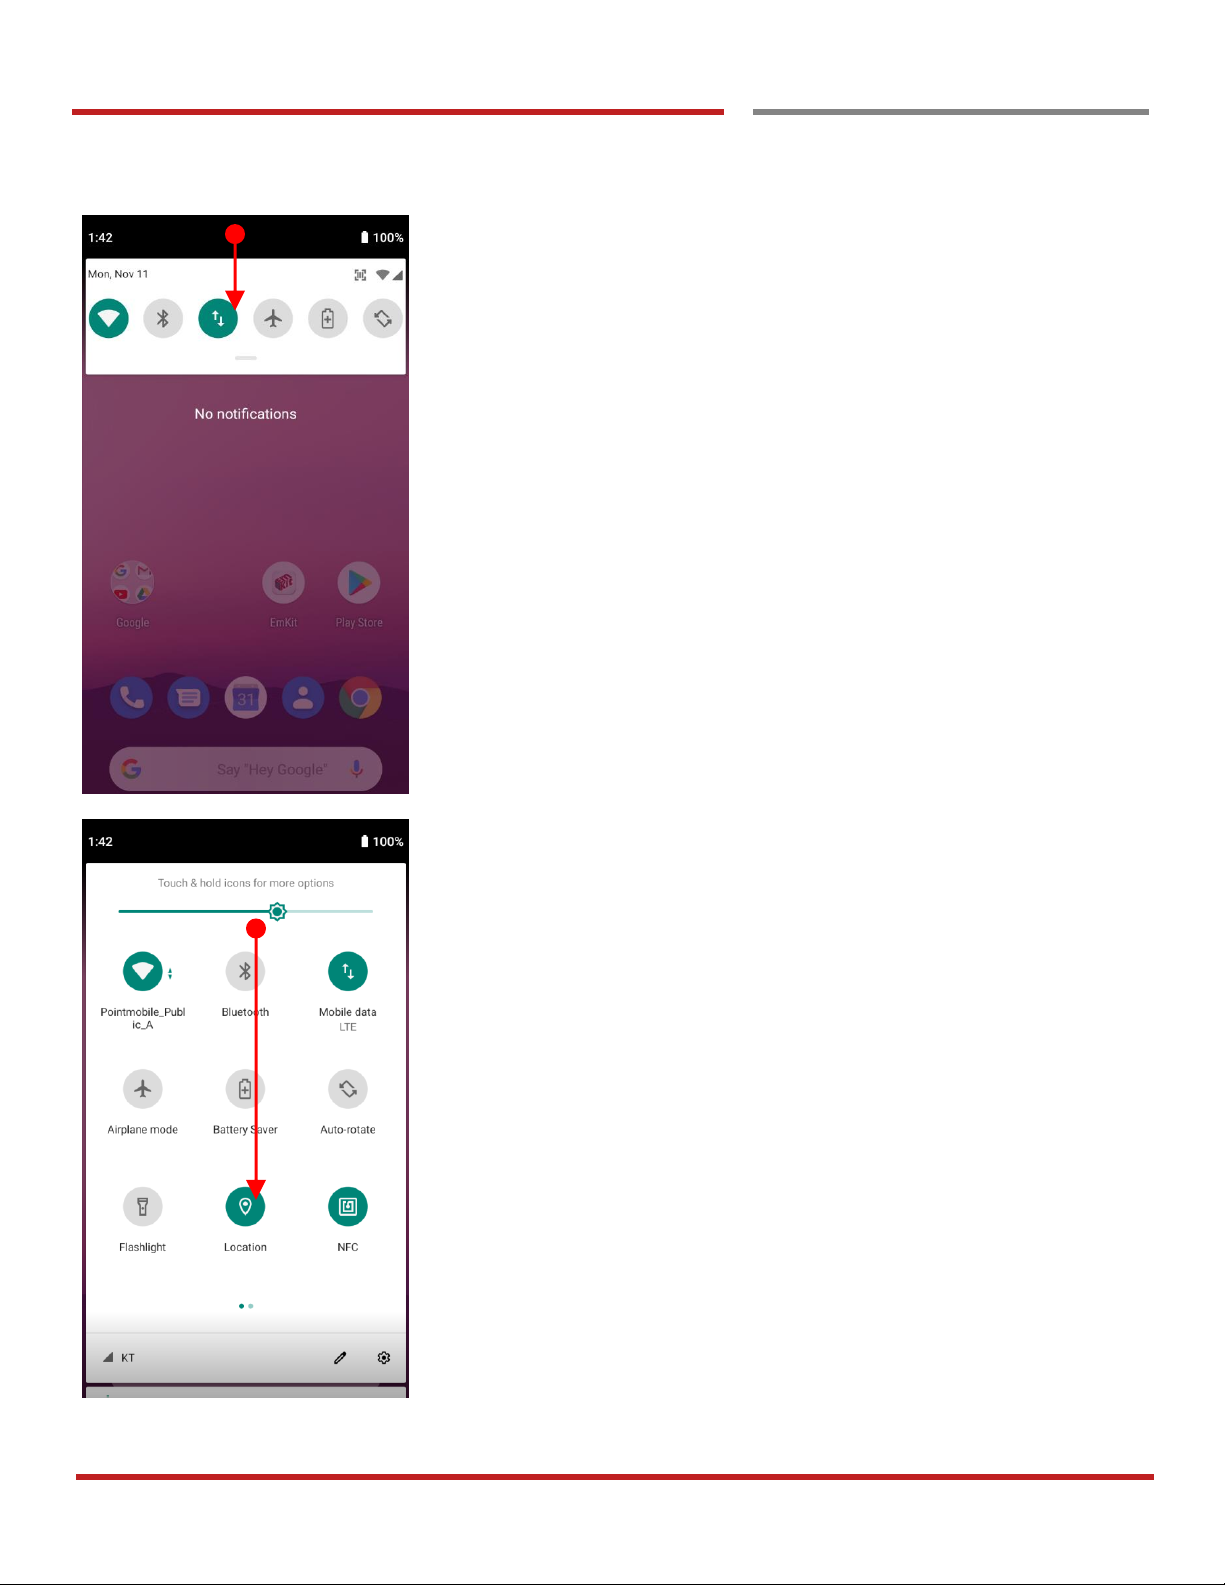
Notification panel
When there is notification from the Android (system) or the
App, you can check details by drag down the Status Bar.
Quick setting panel
You can access Quick setting panel by drag down the
Notification panel. You can enable / disable system
settings or change modes easily.
Page 29
PM90 Android 9 User Manual
28
©2006 – 2019 POINTMOBILE Co., Ltd. All rights reserved
Home Screen, Apps and Widget
Learning the basics
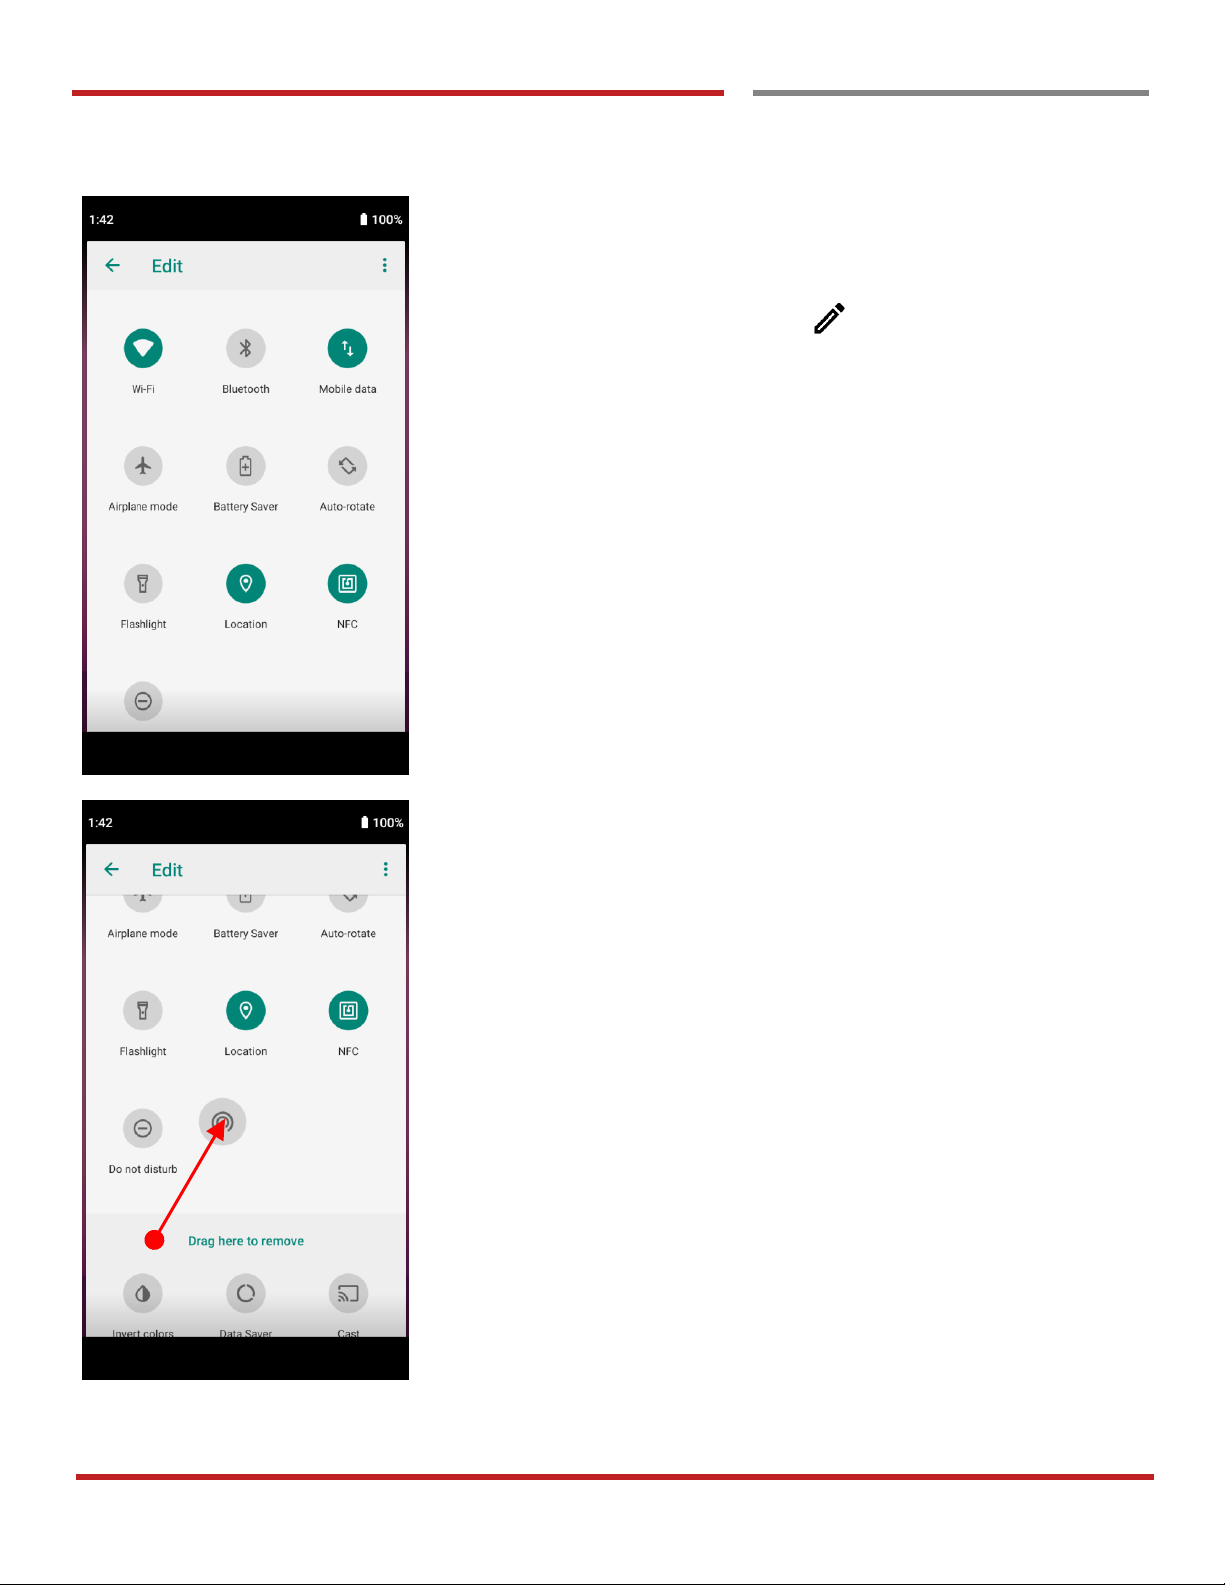
Edit Quick settings panel
To change the order of icons in the Quick settings panel or
add more icons, touch the Edit icon
By dragging the icon, you can customize the Quick settings
panel
Page 30
PM90 Android 9 User Manual
29
©2006 – 2019 POINTMOBILE Co., Ltd. All rights reserved
Learning the basics
Home Screen, Apps and Widget
Learning the basics
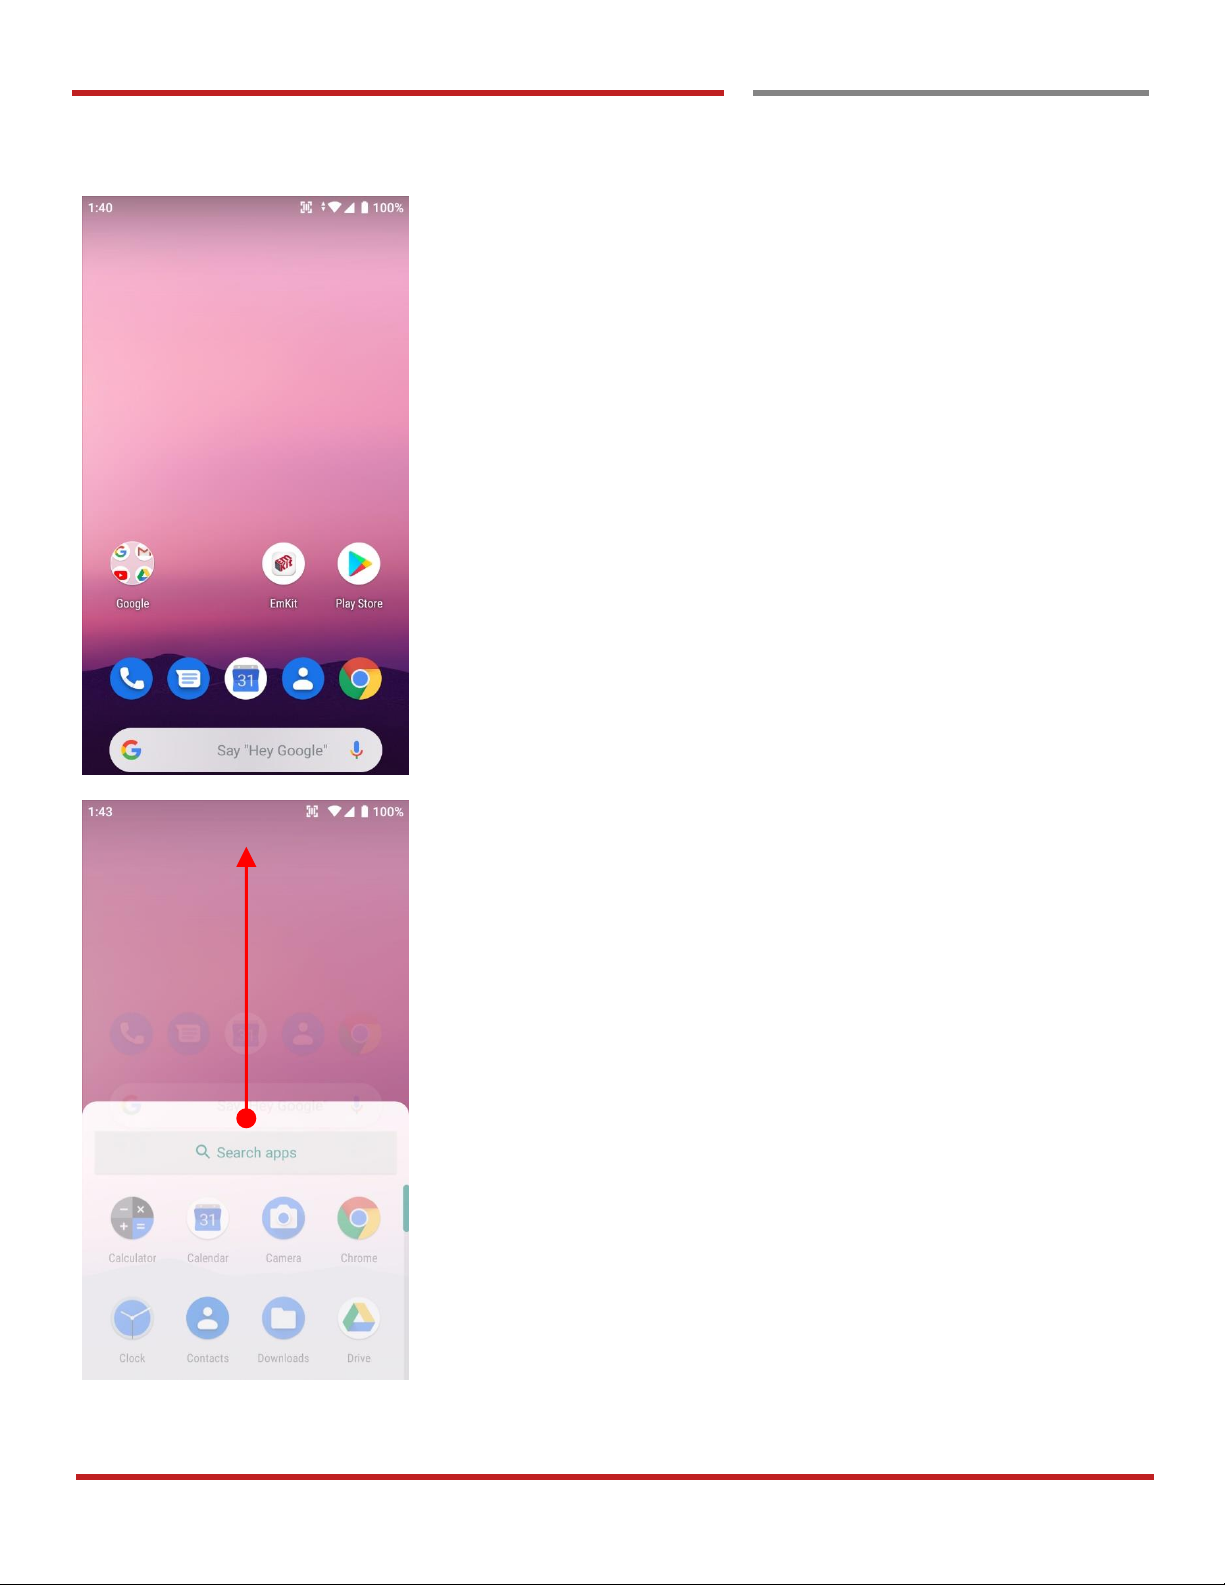
By drag up (swipe up) the Home Screen, you can access to
app list in your PM90
Page 31
PM90 Android 9 User Manual
30
©2006 – 2019 POINTMOBILE Co., Ltd. All rights reserved
Learning the basics
Home Screen, Apps and Widget
Learning the basics
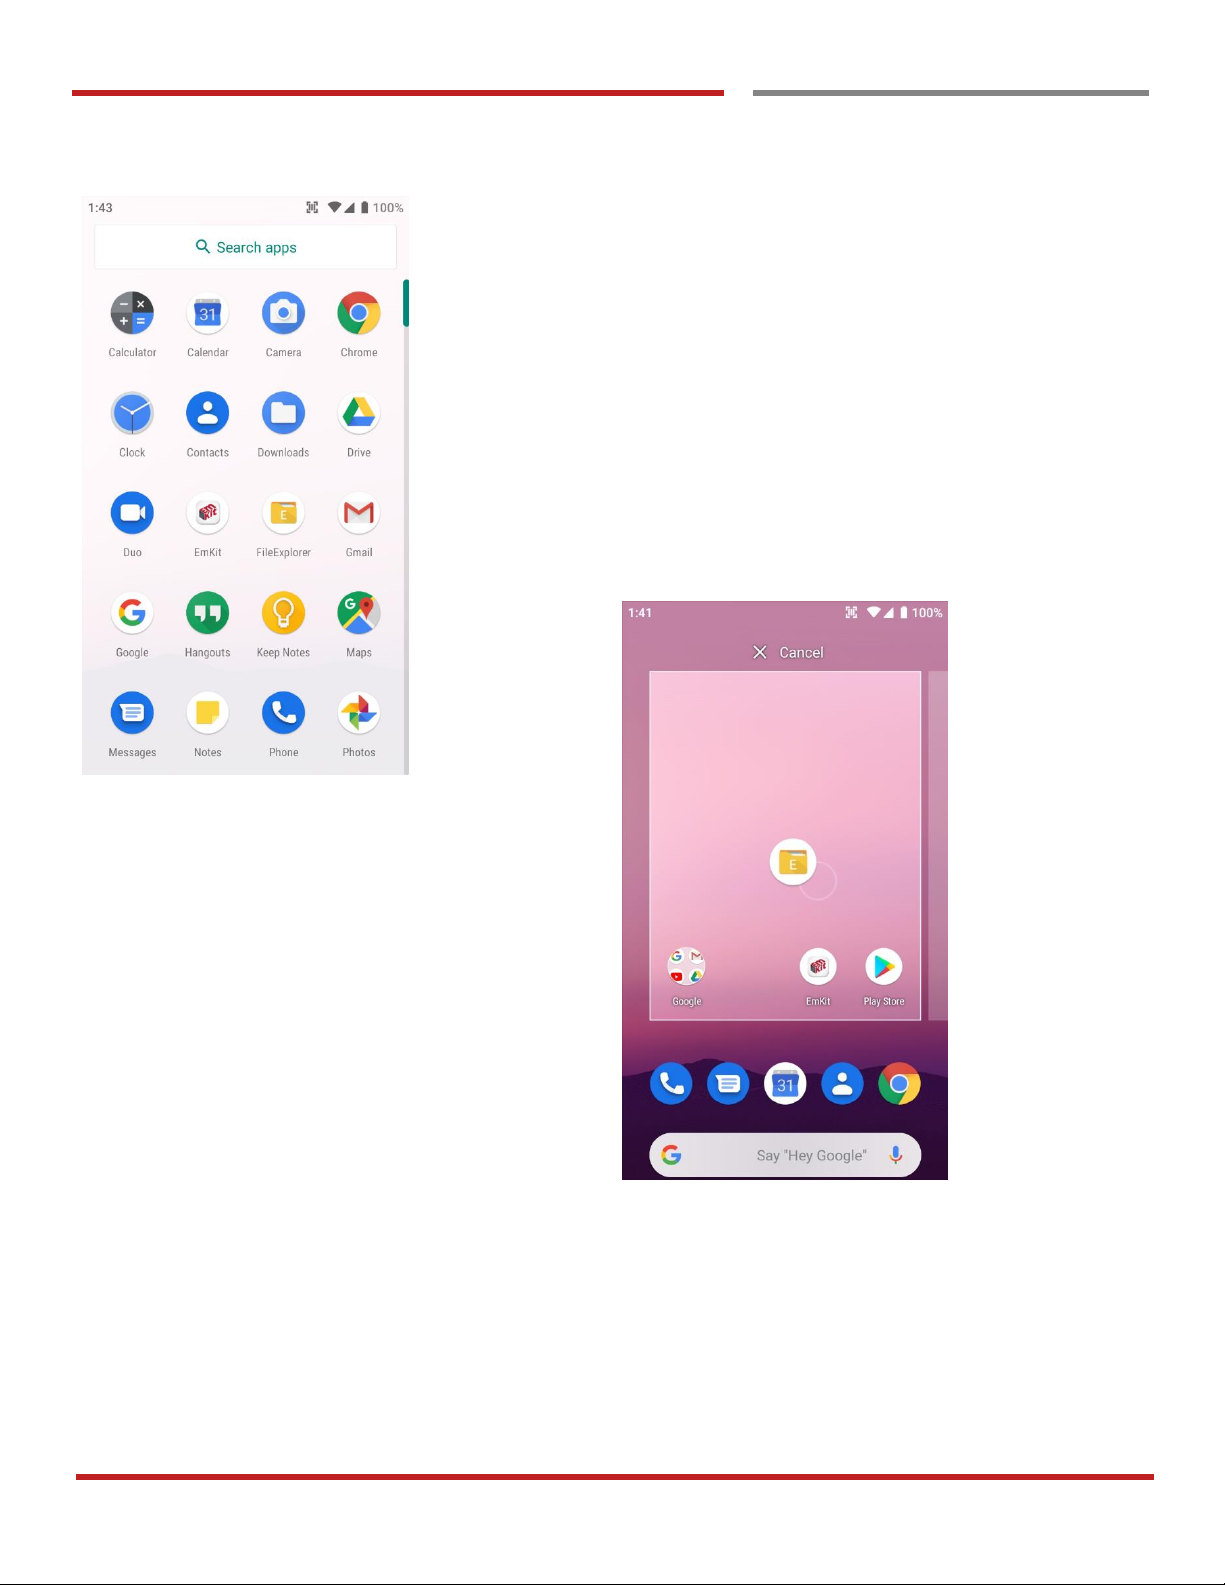
All installed apps are listed alphabetically
- Touch an app icon to run.
- Long press, specific app icon to place to the Home
Screen.
Page 32
PM90 Android 9 User Manual
31
©2006 – 2019 POINTMOBILE Co., Ltd. All rights reserved
Learning the basics
Home Screen, Apps and Widget
Learning the basics
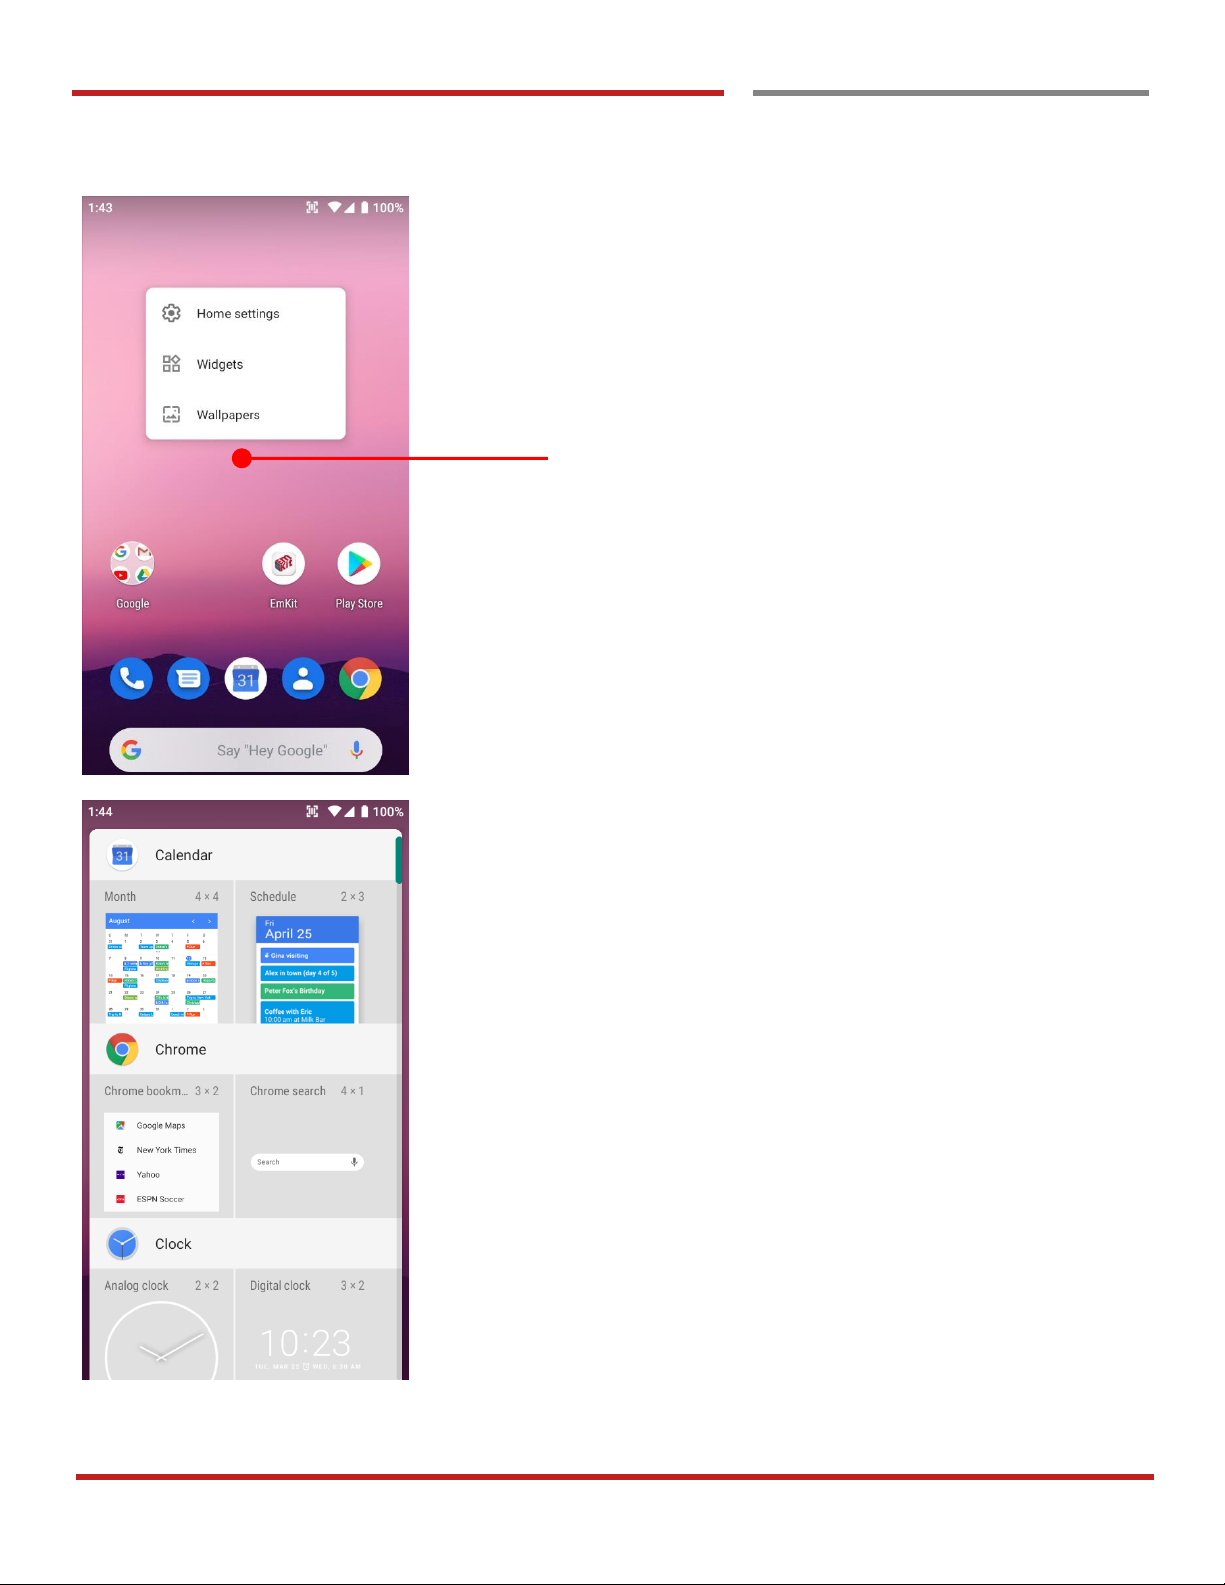
To add a Widget in the Home screen, long press the empty
space. Then you will see Home settings, Widgets,
Wallpapers menu. Touch Widgets
Available widgets are listed. Among the list select the widget
which you want to add and place it to the Home screen by
drag and drop
Page 33
PM90 Android 9 User Manual
32
©2006 – 2019 POINTMOBILE Co., Ltd. All rights reserved
Learning the basics
Home Screen, Apps and Widget
Learning the basics
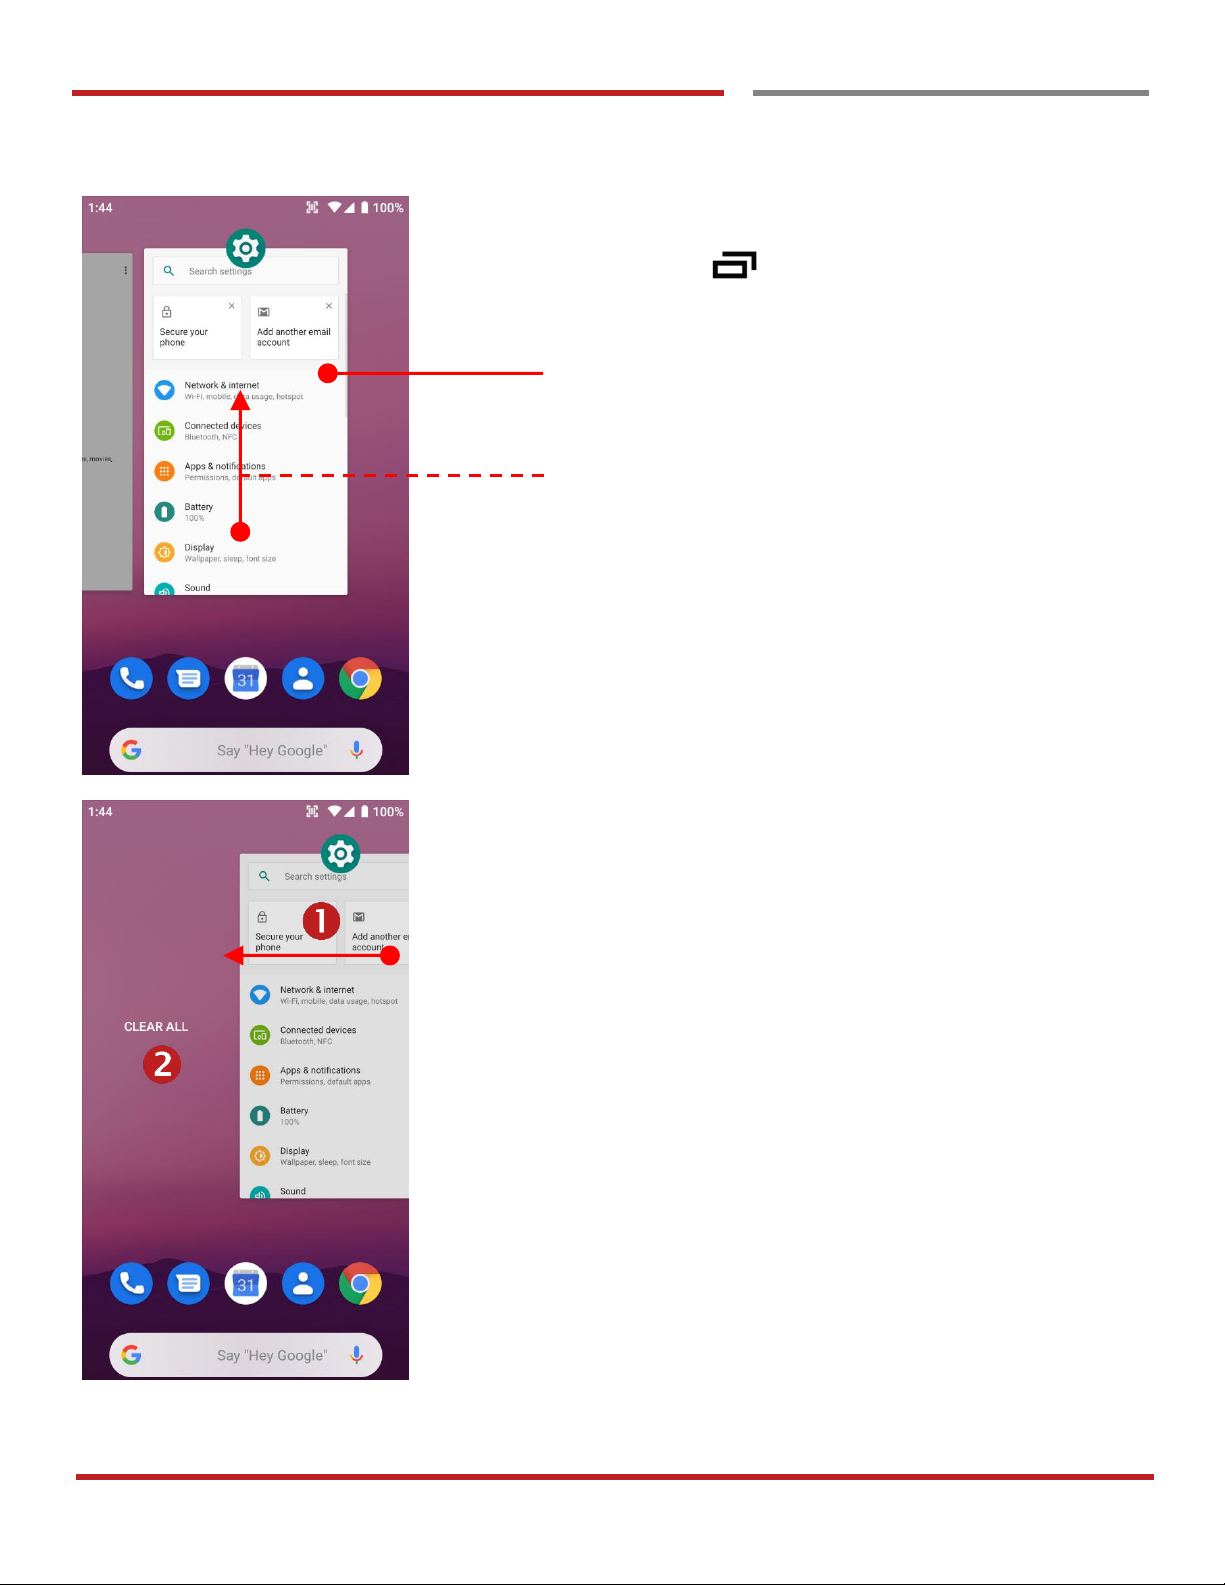
By pressing the Recent button in the keypad, you
can see app lists which you have been access
Touch the app, if you want to access again.
If you want to Close an individual app, Drag up (swipe up)
the app
If you close all of the apps,
1. Drag (swipe) the recent app list
2. And then touch CLEAR ALL
Page 34
PM90 Android 9 User Manual
33
©2006 – 2019 POINTMOBILE Co., Ltd. All rights reserved
Learning the basics
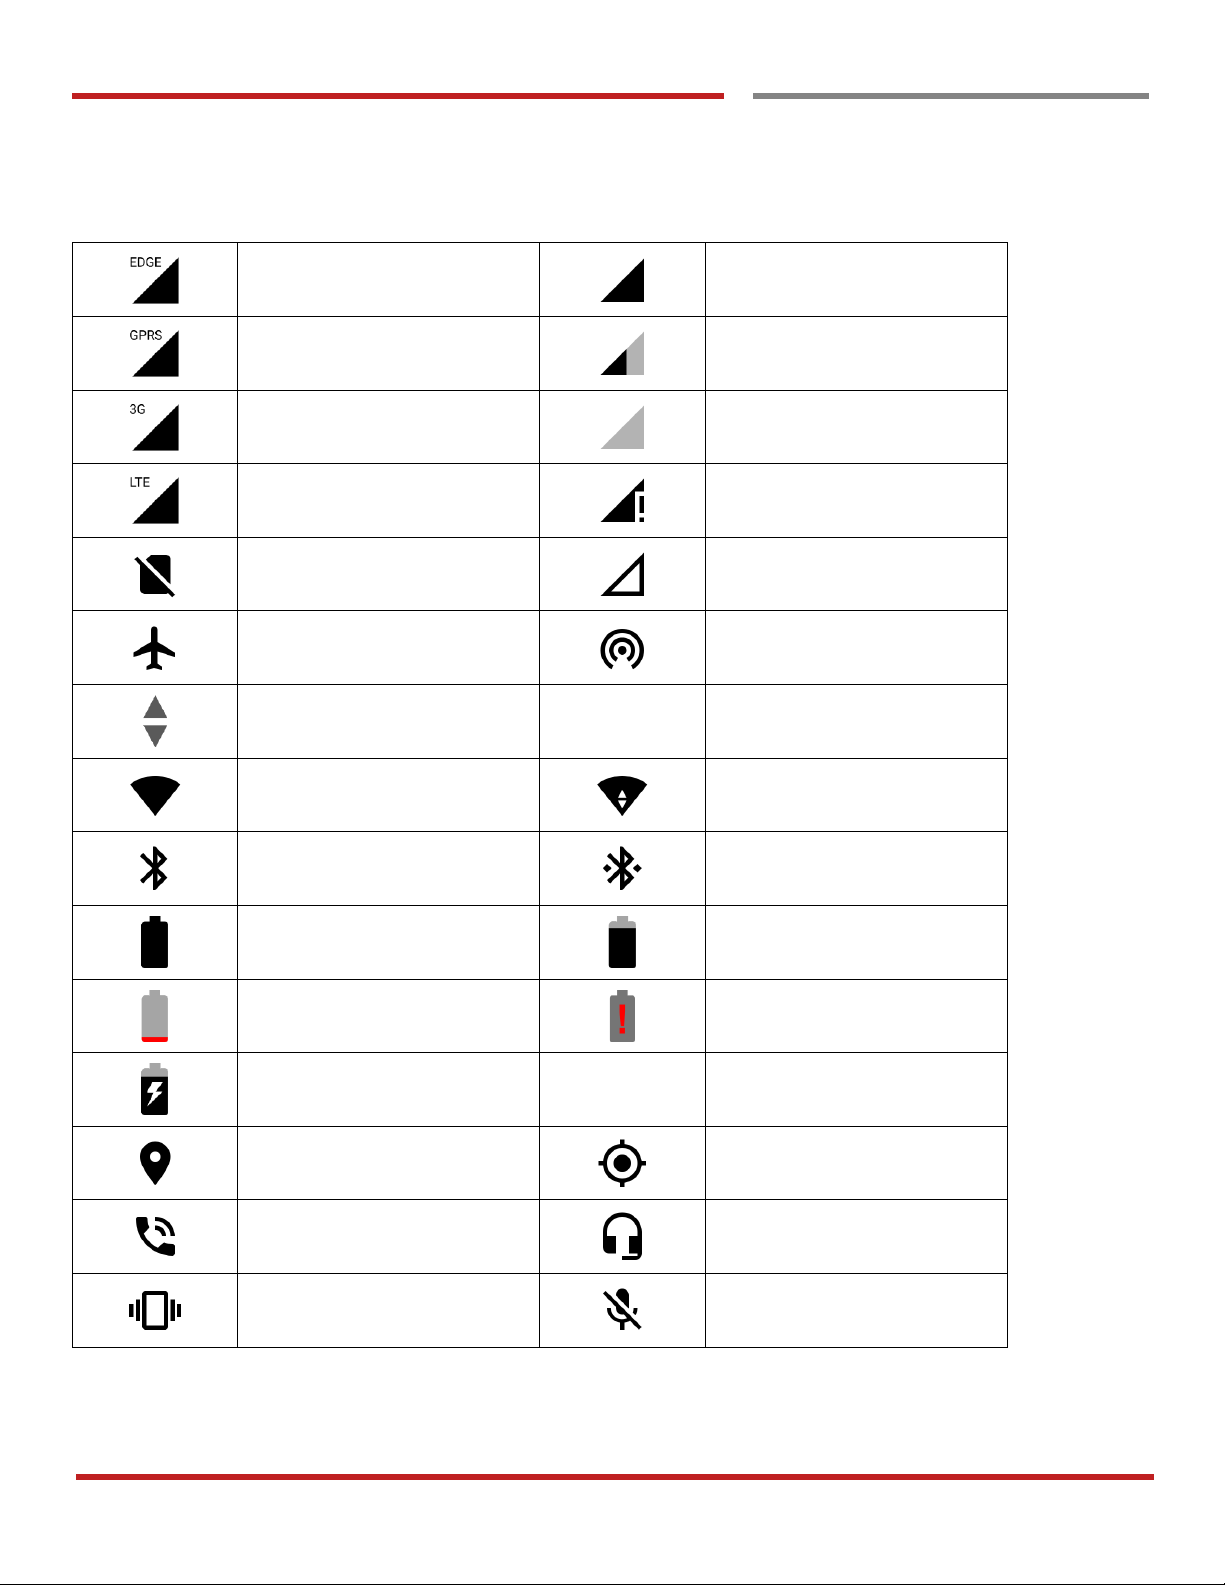
Status & Notifications Icons
Status & Notifications Icons
Learning the basics
Status icons
EDGE connected
Strong signal
GPRS connected
Good signal
3G connected
Weak signal
LTE connected
Connection issue
No SIM card installed
No data connection
Airplane mode
Hotspot enabled
Data communication
Wi-Fi turned on
Connected to a Wi-Fi
network
Bluetooth turned on
Connected to a Bluetooth
device
Battery is full
Battery is partially drained
Battery is low
Battery is very low
Battery is charging
Location service turned on
Using location service
Speaker phone tuned on
Headset with MIC
connected
Vibrate mode
Phone mic is mute
Page 35
PM90 Android 9 User Manual
34
©2006 – 2019 POINTMOBILE Co., Ltd. All rights reserved
Status & Notifications Icons
Status & Notifications Icons
Learning the basics
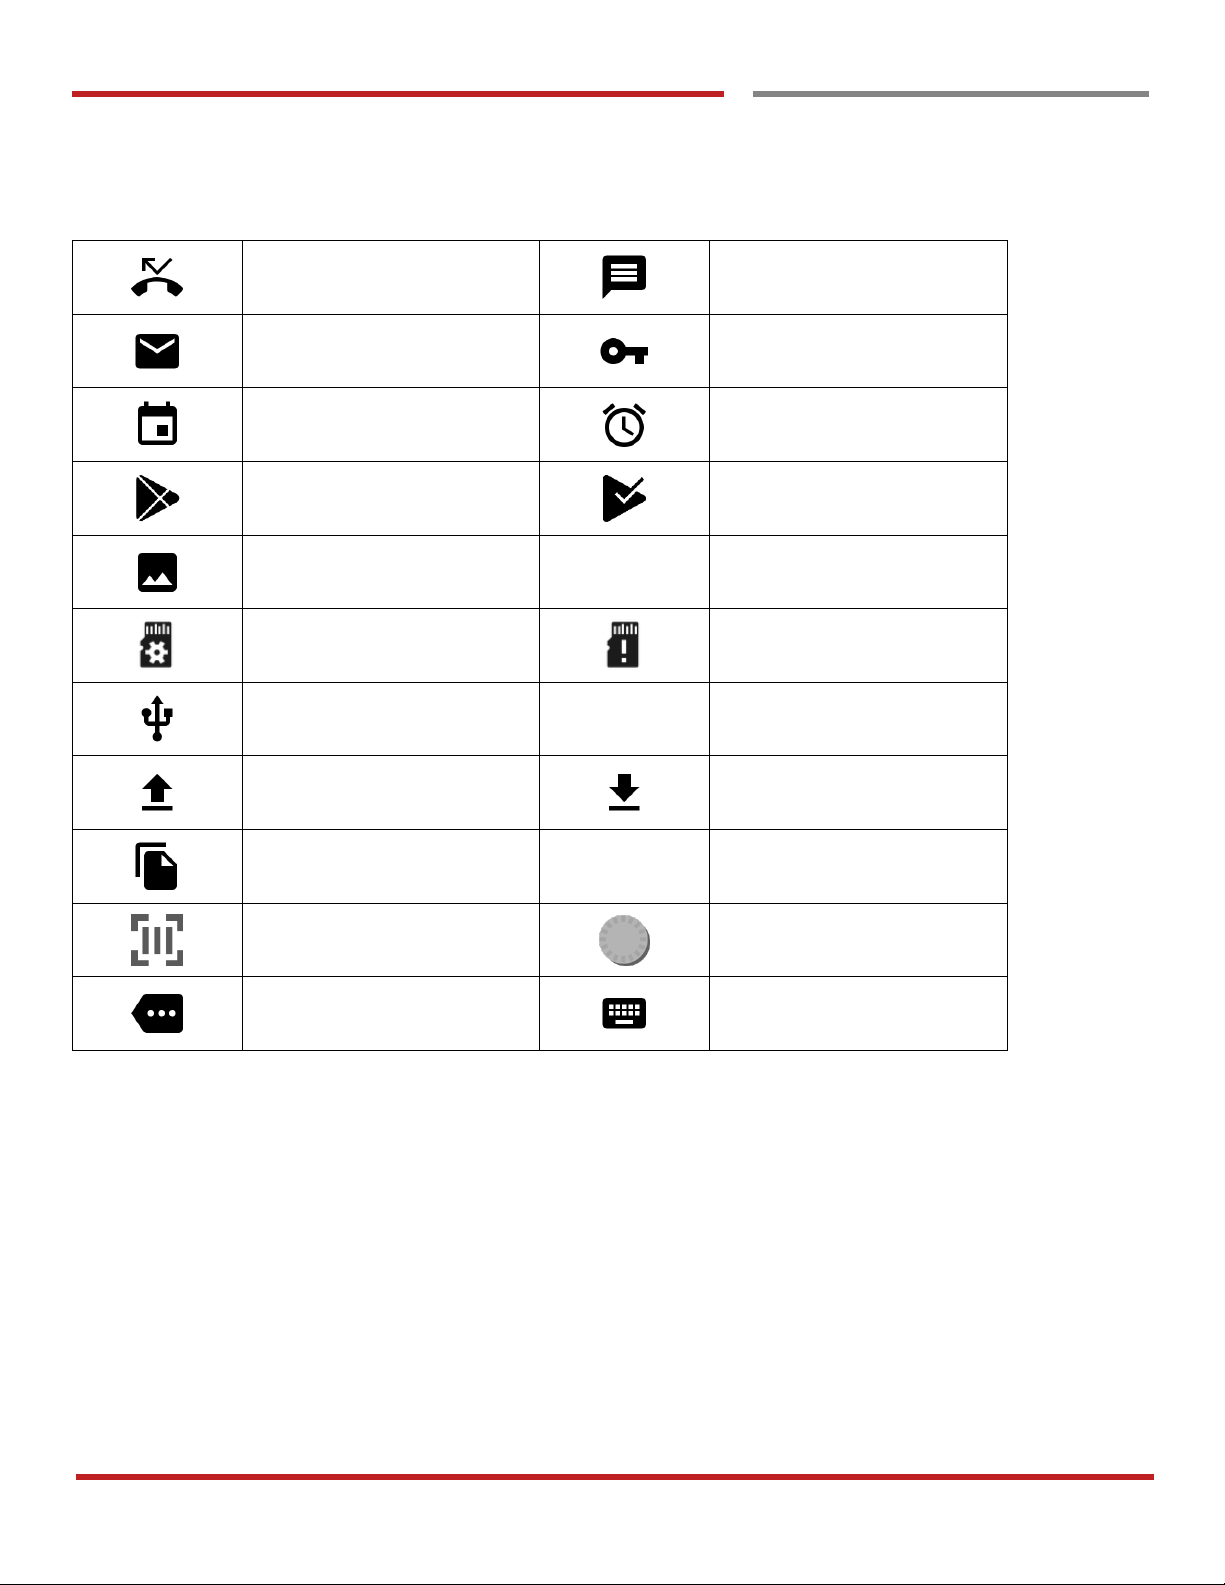
Notification icons
Missed call
New SMS or MMS message
New Email
Connected to VPN network
Upcoming event
Alarm is set
App update available
App updated
Screenshot captured
Preparing SD card
SD card removed,
unexpectedly
OTG device connected
File uploaded
File downloaded
File copied
Scanner turned on
USB connect mode
selection
There are more notifications
Other input method
available
Page 36
PM90 Android 9 User Manual
35
©2006 – 2019 POINTMOBILE Co., Ltd. All rights reserved
Learning the basics
Set a Lock screen
Set a Lock screen
Learning the basics
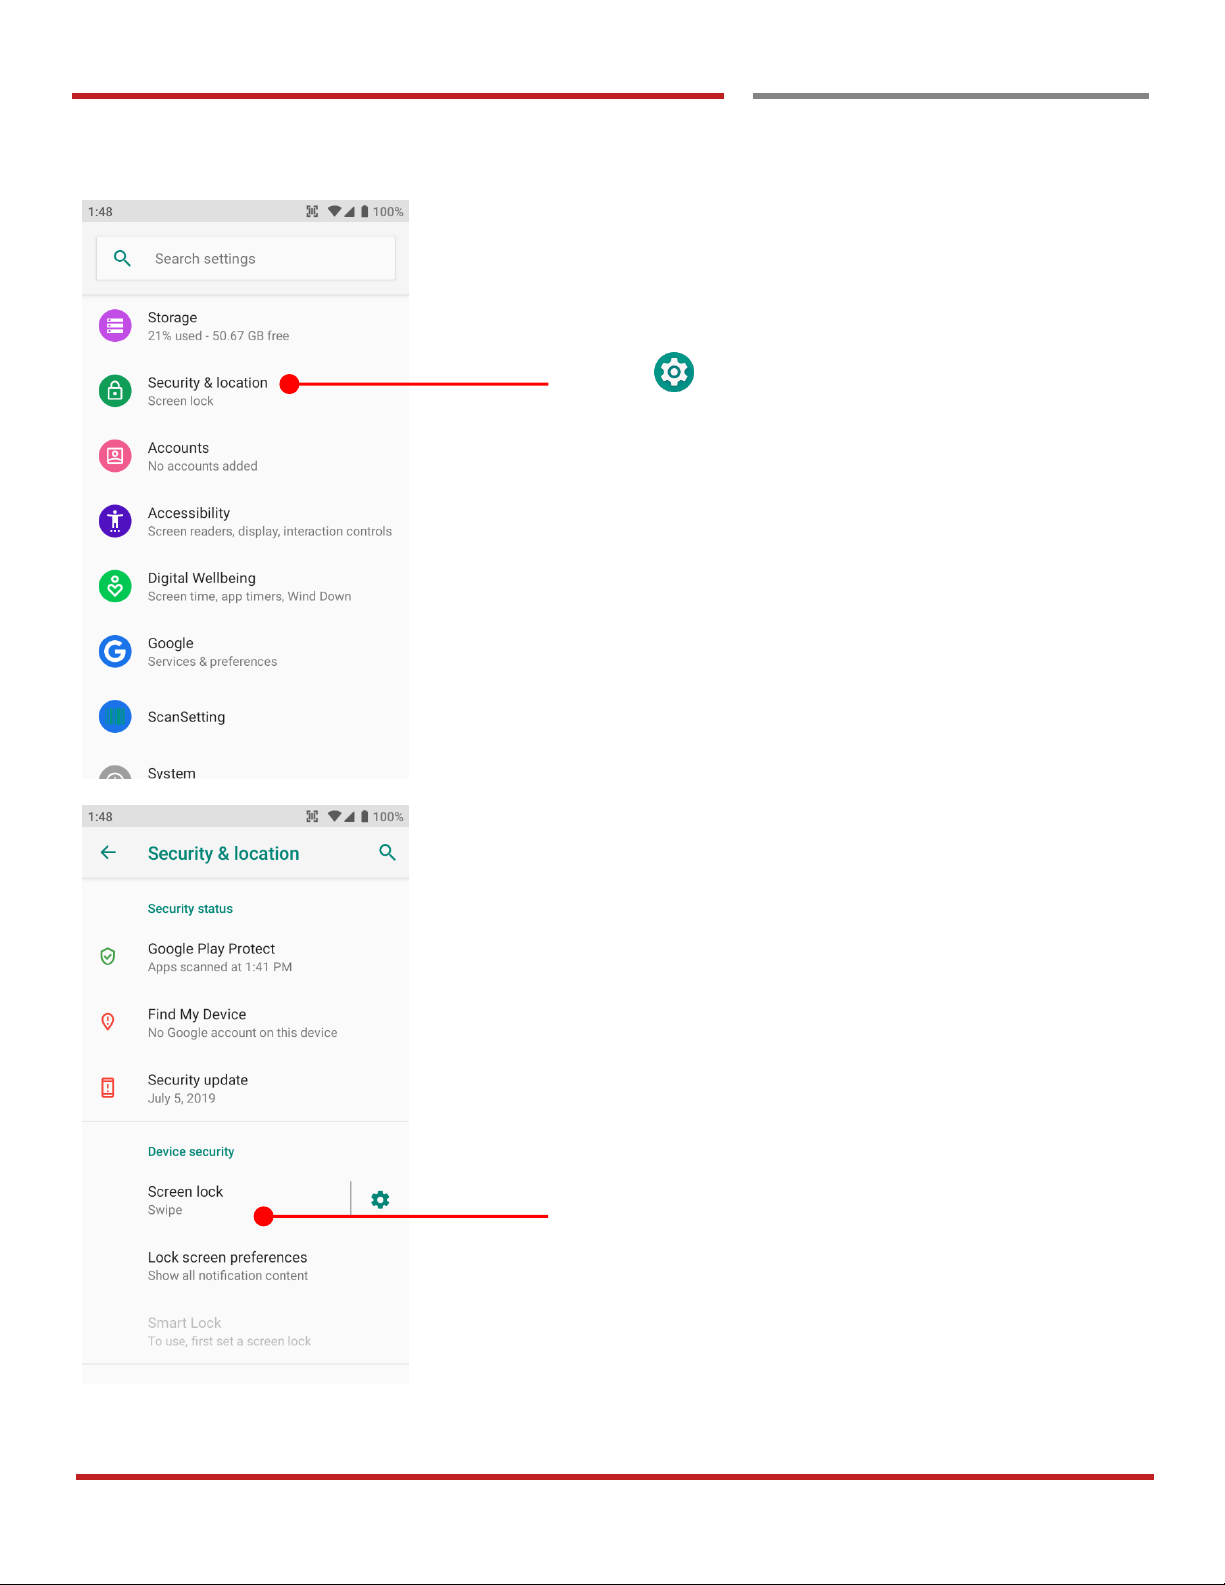
Settings and then Security & location
Touch Screen lock
You can see Screen lock type which is currently set.
To change the screen lock, please touch the menu.
Page 37
PM90 Android 9 User Manual
36
©2006 – 2019 POINTMOBILE Co., Ltd. All rights reserved
Learning the basics
Set a Lock screen
Learning the basics
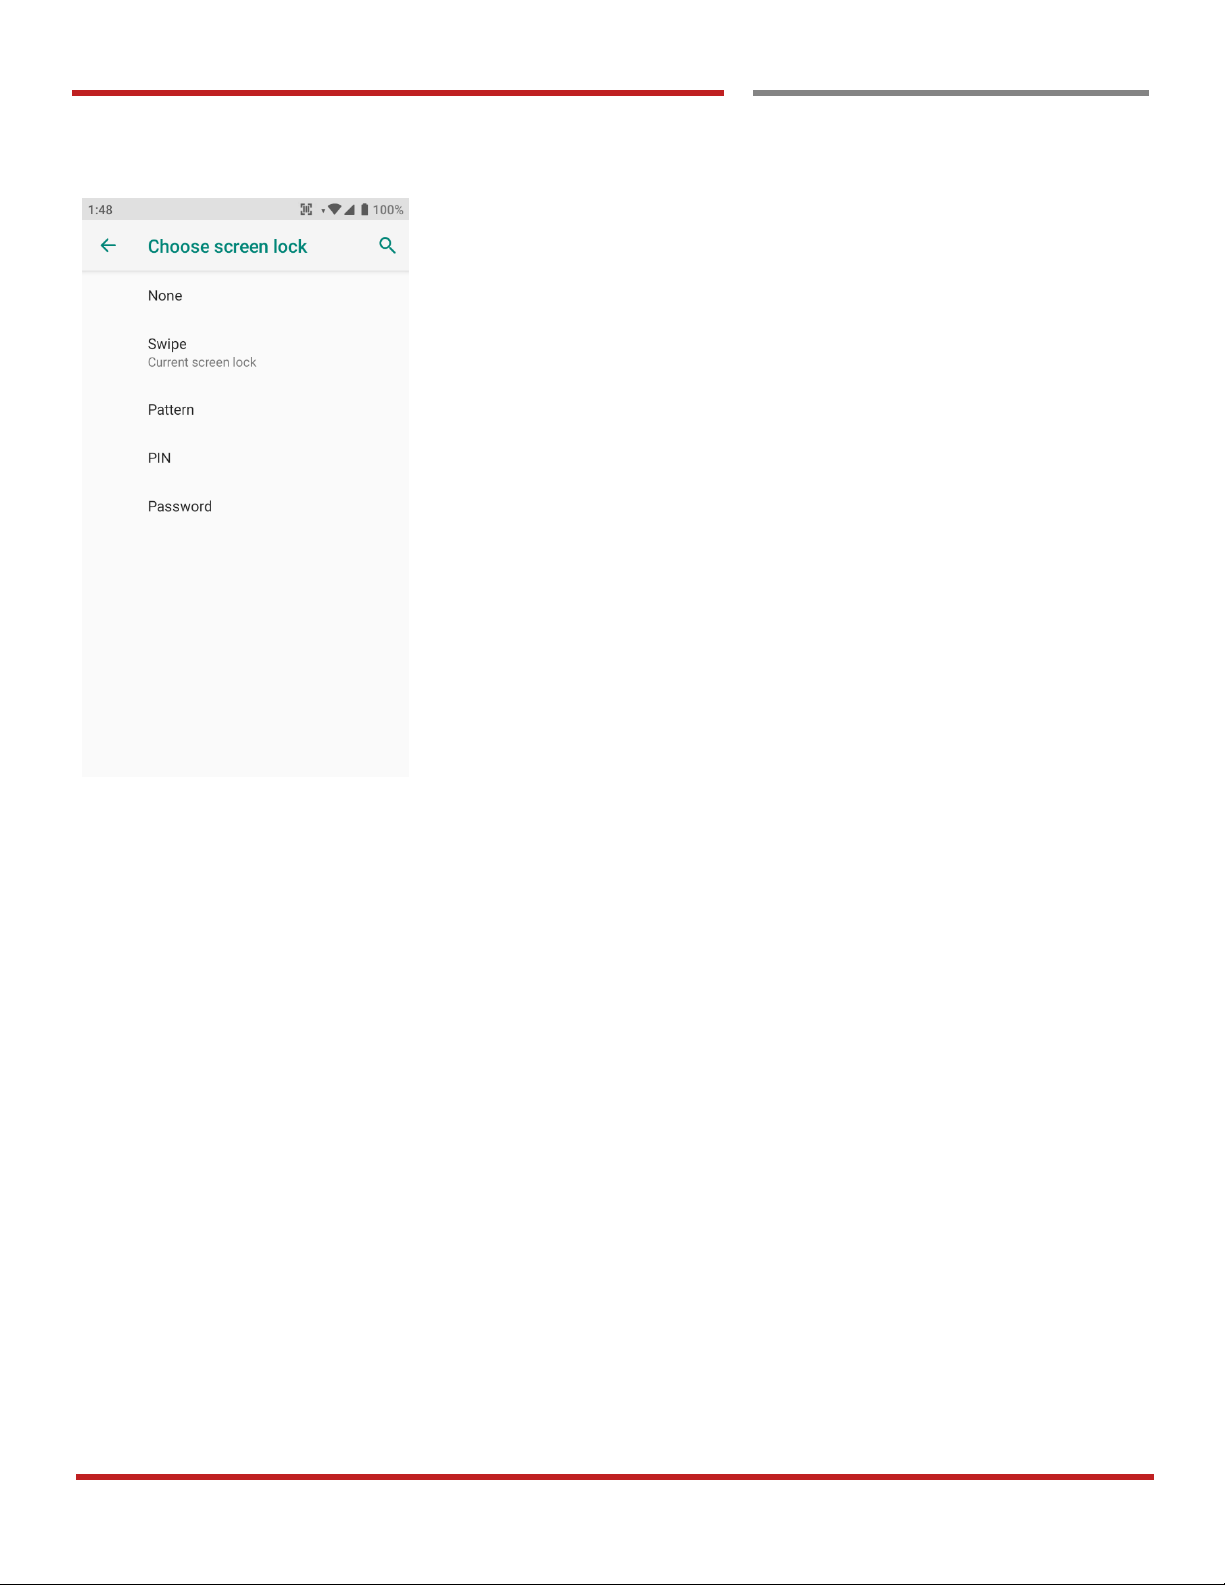
None :
Swipe :
Pattern :
PIN :
Password :
PM90 screen unlock immediately
To unlock the screen, user should swipe the
screen
To unlock the screen, user draw the pattern
To unlock the screen, user should input the
pin
(Numbers. At least 4 digits)
To unlock the screen, user should input the
password
(Numbers & Alphabet combination. At least
4 characters)
Page 38
PM90 Android 9 User Manual
37
©2006 – 2019 POINTMOBILE Co., Ltd. All rights reserved
Learning the basics
Manage a display
Manage a display
Learning the basics
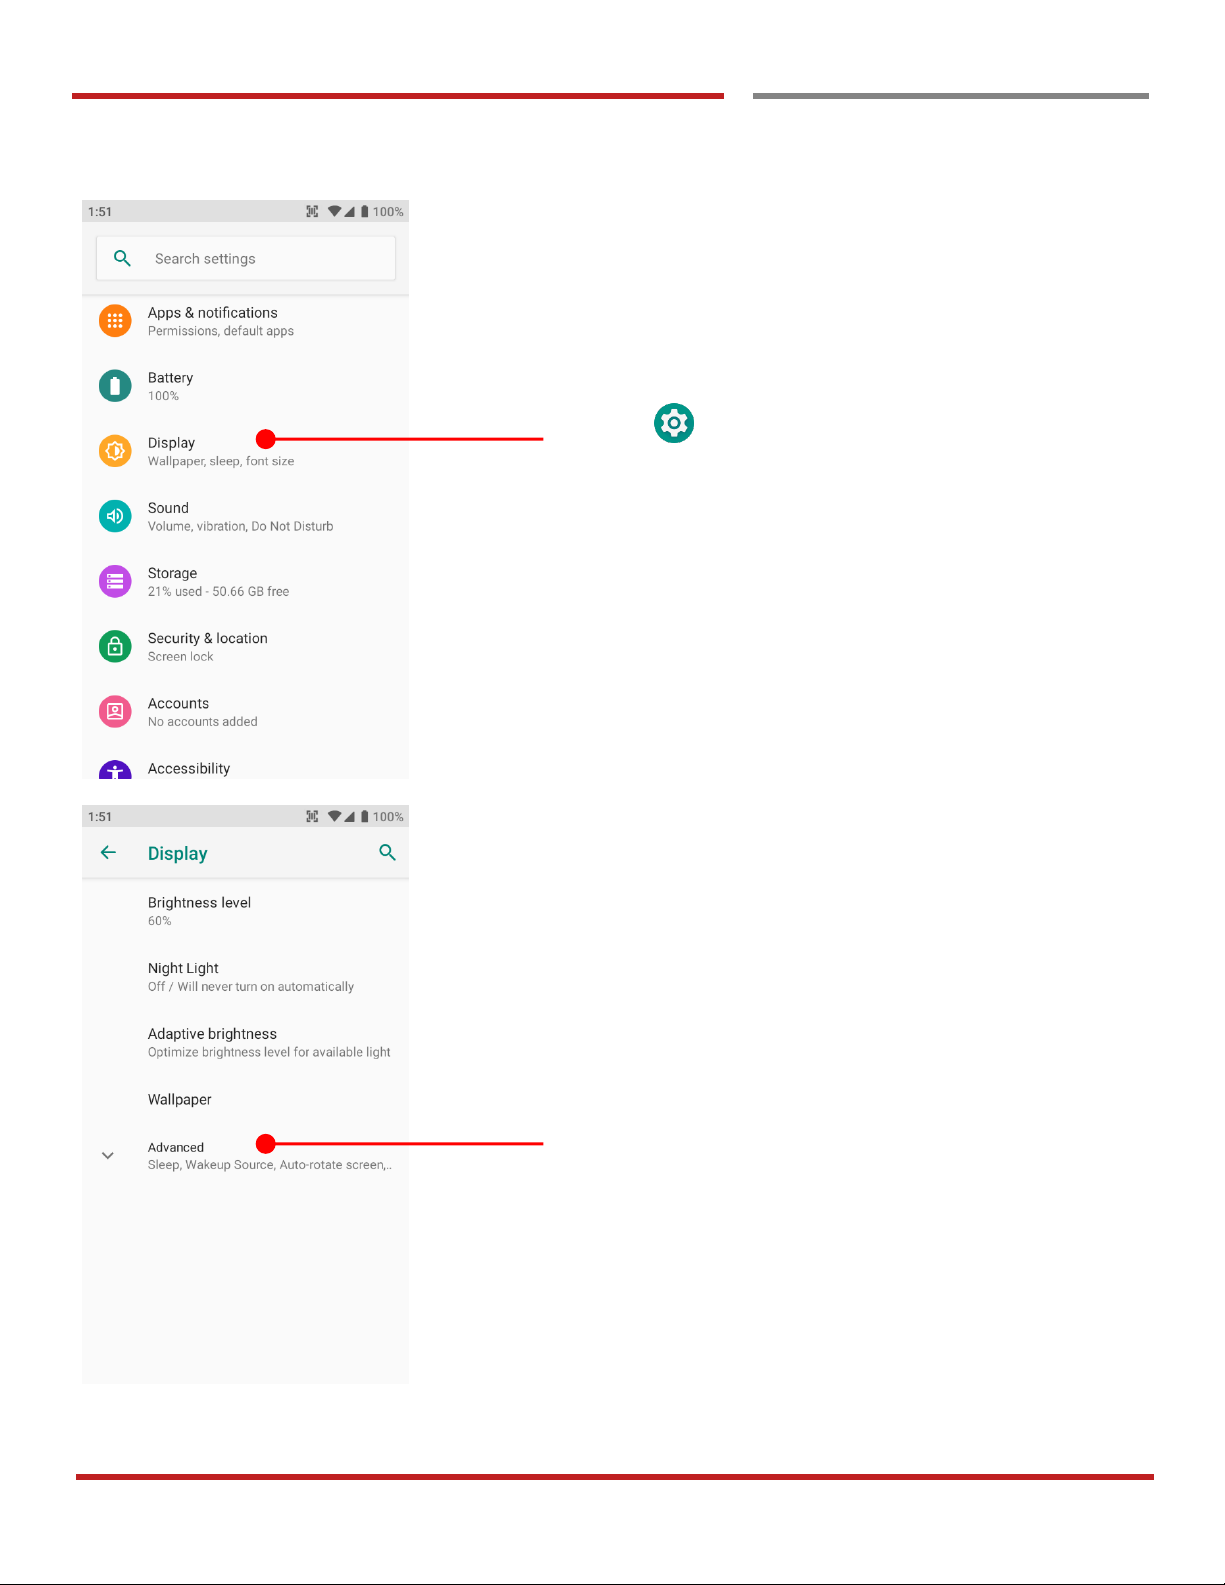
Settings and then Display
Brightness
level :
Night Light :
Adaptive
brightness :
This setting changes the screen
brightness level
Set amber screen of PM90
By enable this option, PM90 auto adjust
the screen brightness
Touch Advanced
Page 39
PM90 Android 9 User Manual
38
©2006 – 2019 POINTMOBILE Co., Ltd. All rights reserved
Learning the basics
Manage a display
Learning the basics
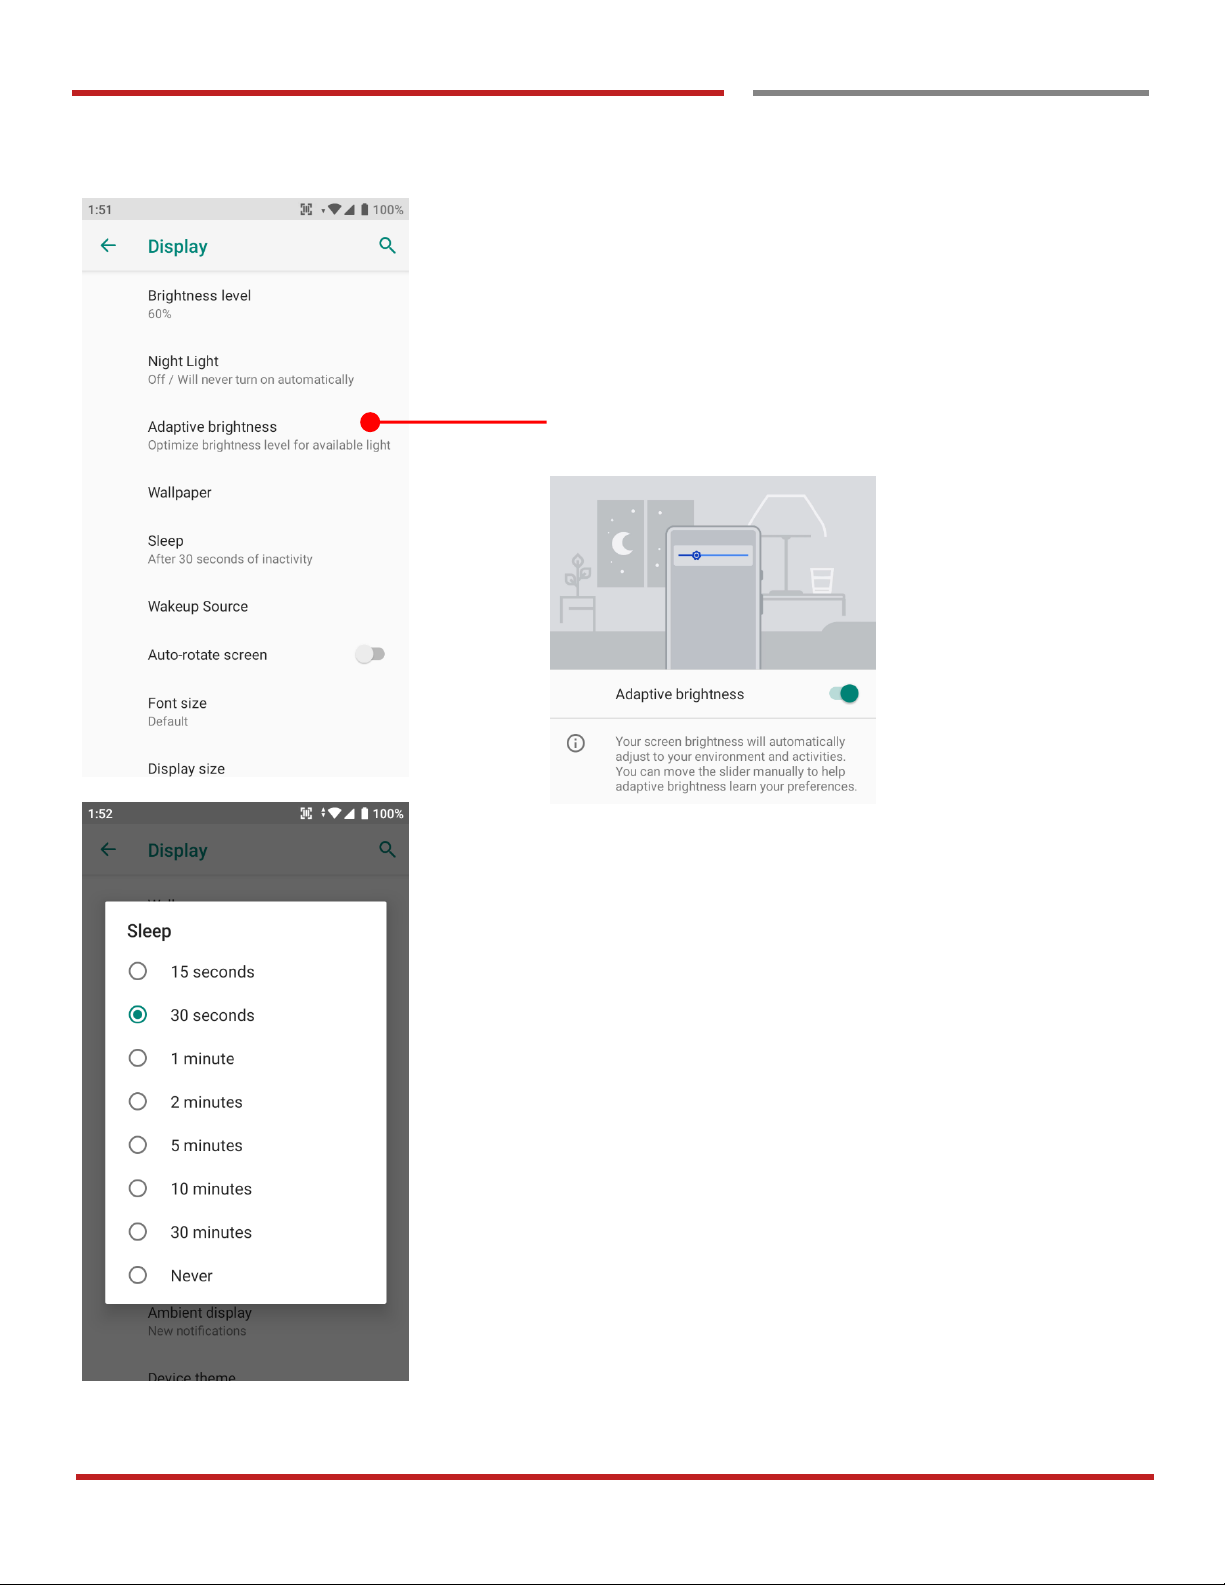
Adaptive brightness
If you let PM90 auto adjust the brightness level, please
enable this option
Sleep
To change device sleep time, change option here
Page 40
PM90 Android 9 User Manual
39
©2006 – 2019 POINTMOBILE Co., Ltd. All rights reserved
Learning the basics
Manage a display
Learning the basics
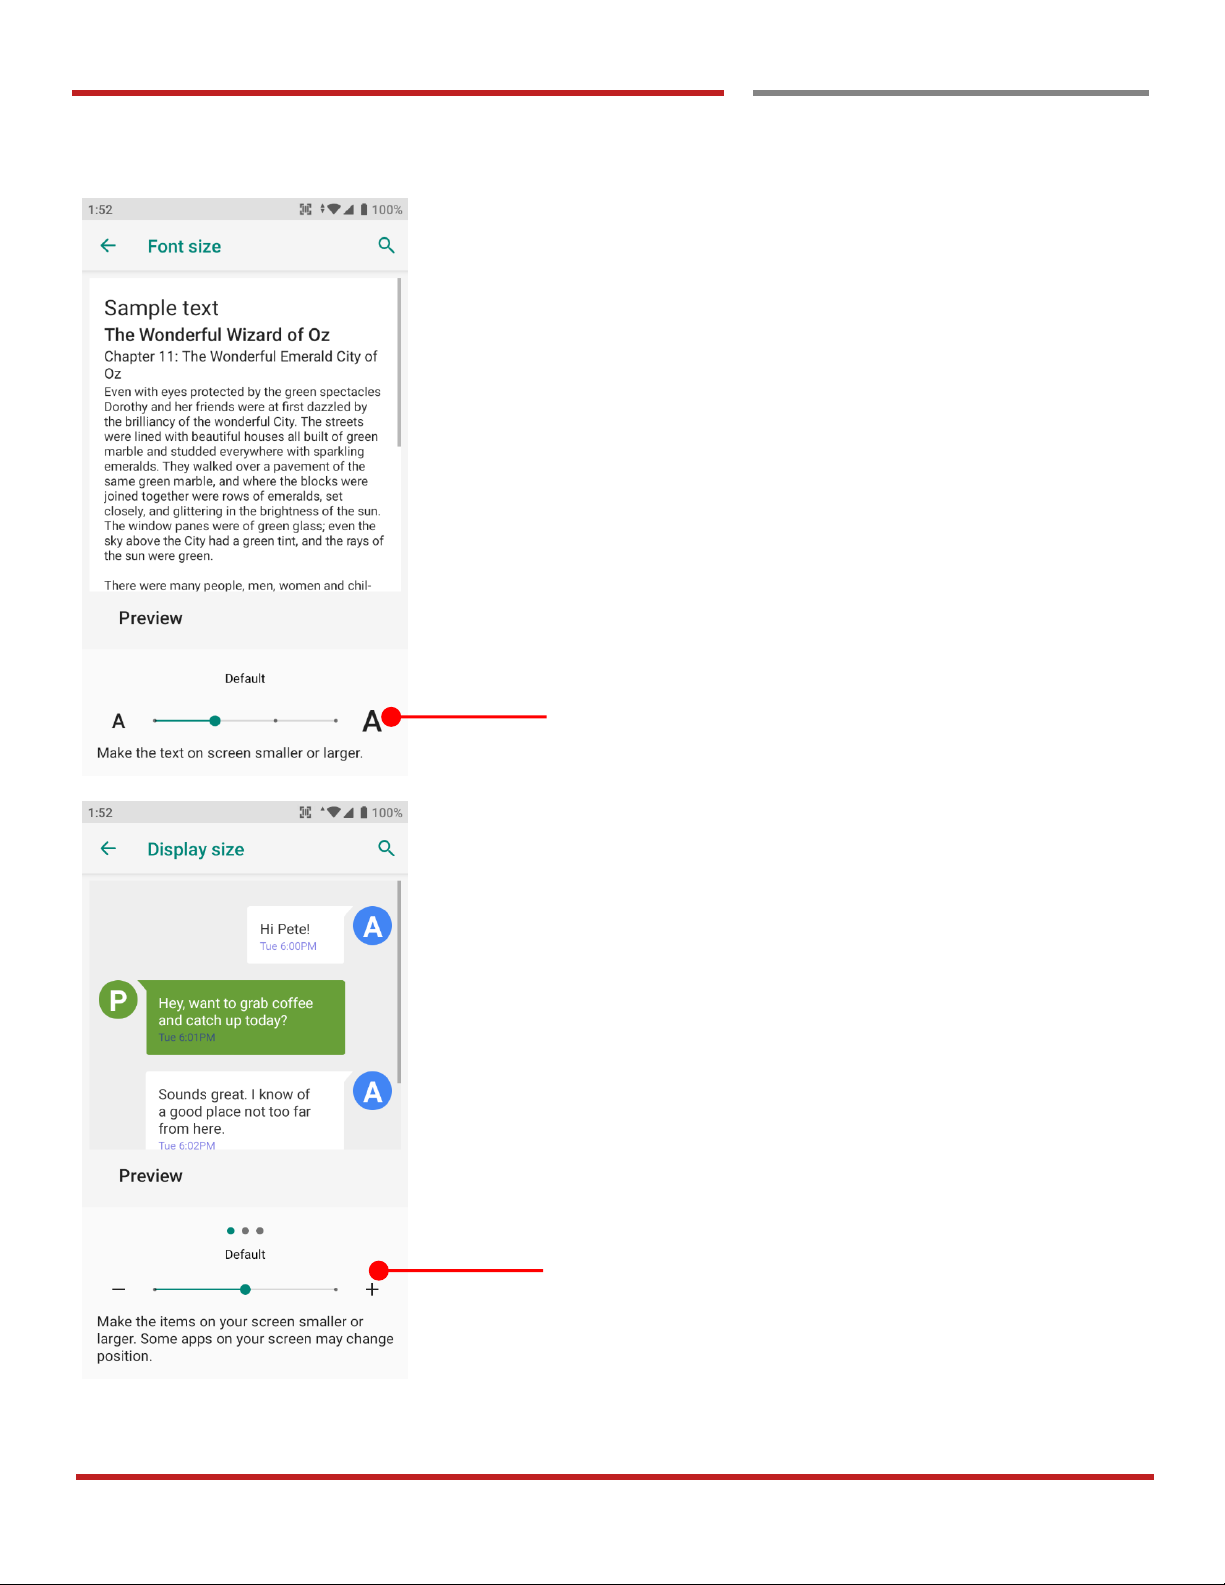
Font size
Change the overall font size of PM90. Please adjust the
slider
Display size
Change the amount of the display item of PM90. Please
adjust the slider
Page 41
PM90 Android 9 User Manual
40
©2006 – 2019 POINTMOBILE Co., Ltd. All rights reserved
Learning the basics
Make a call
Make a call
Learning the basics
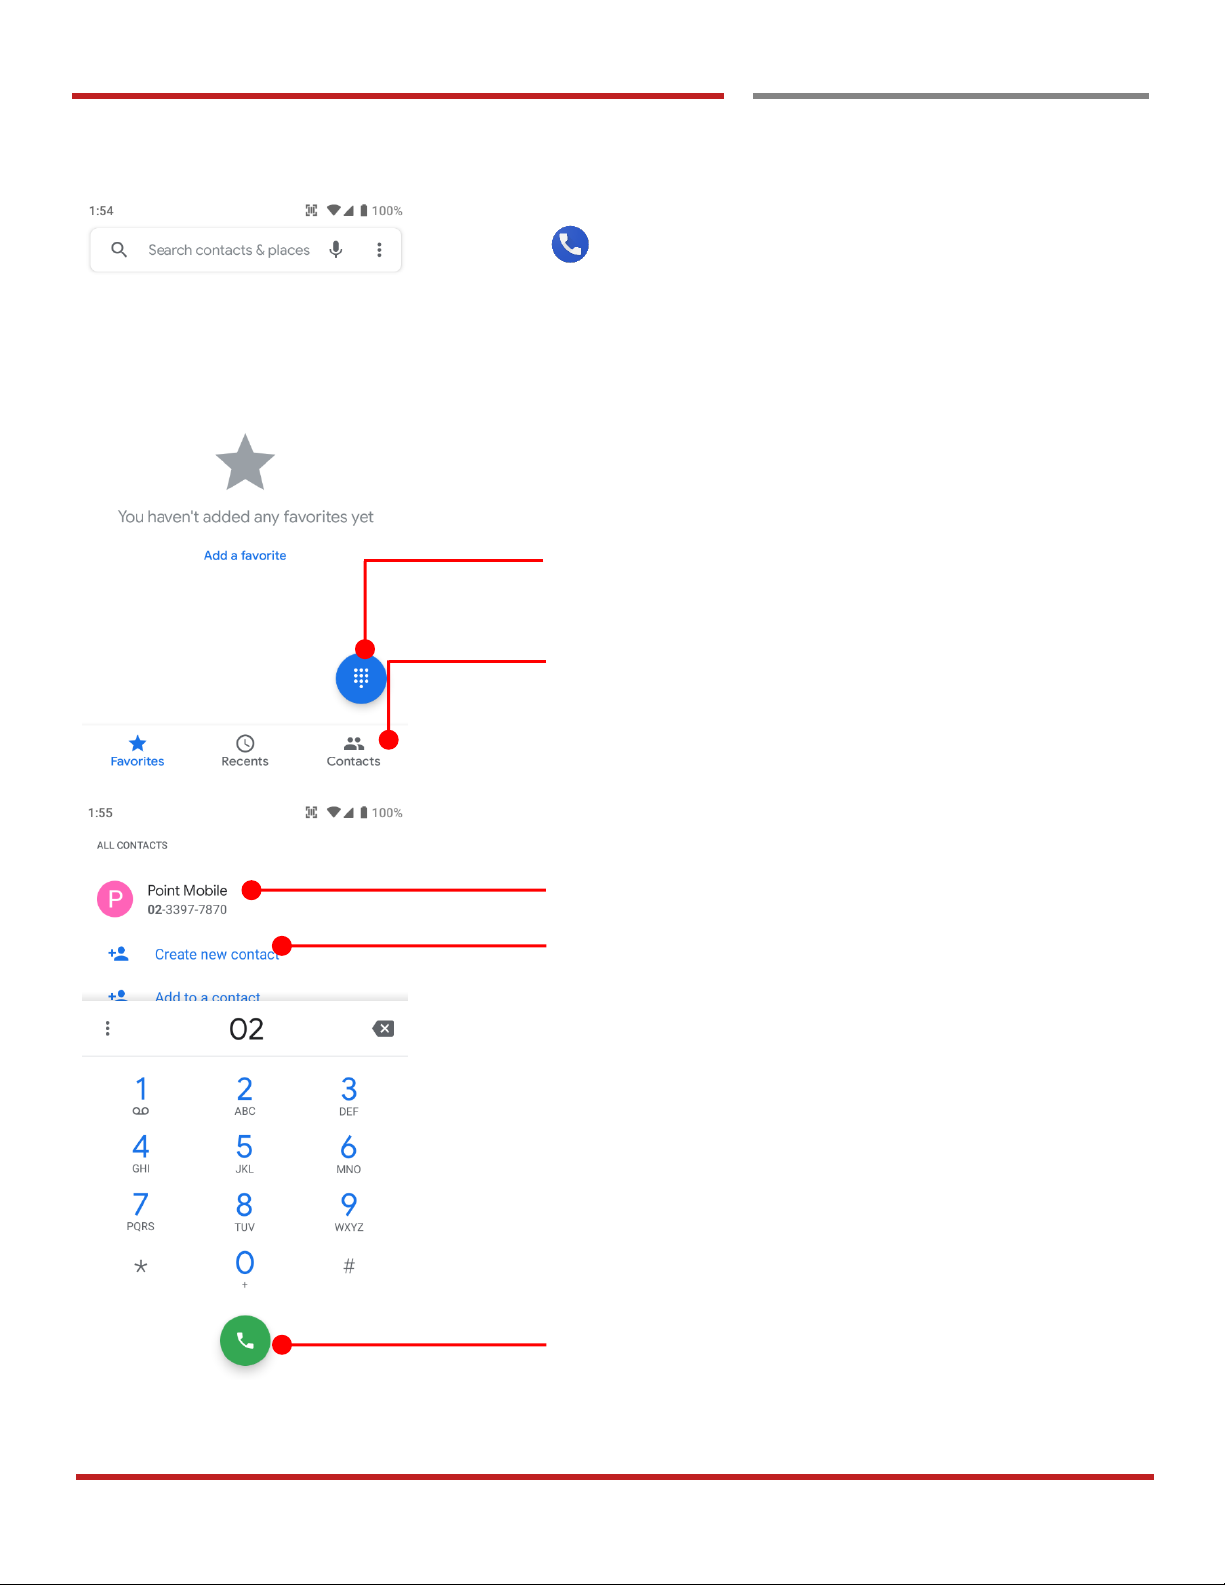
icon in the favorite tray app drawer
Touch to use a dialer
Touch to access the Favorites, Recents and Contacts.
- To make a call from recent call list or missed call,
select Recents tab
- To make a call from your contact list, select
Contacts
Suggested phone number(s)
CONTACTS save options
Touch to place a call
Page 42
PM90 Android 9 User Manual
41
©2006 – 2019 POINTMOBILE Co., Ltd. All rights reserved
Make a call
Make a call
Learning the basics
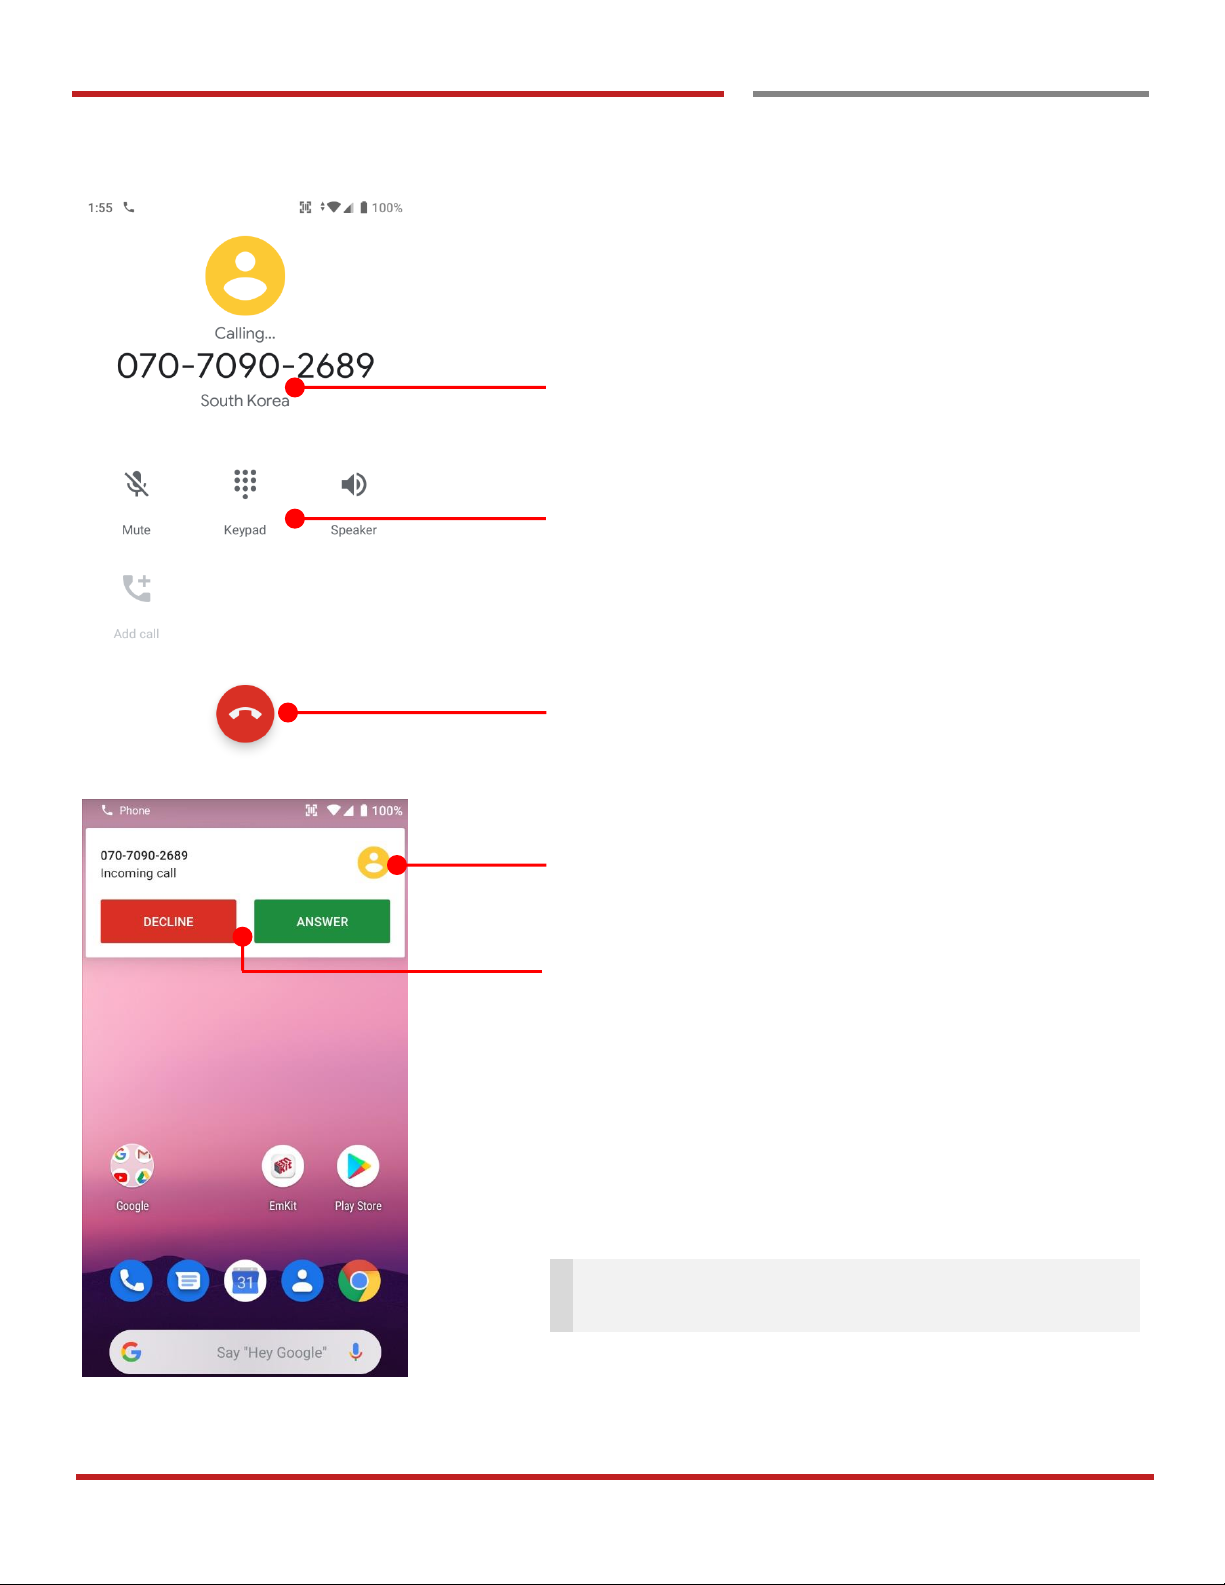
Calling information
- Mute : Touch to mute the mic
- Keypad : Touch to input keypad during a call
- Speaker : Touch to make a speakerphone call
Touch to end a call
Caller information
Decline : Touch to refuse a call
Answer : Touch to answer a call
Tip: To mute the ringtone volume of an incoming call,
press the Volume down or Volume up key
Page 43
PM90 Android 9 User Manual
42
©2006 – 2019 POINTMOBILE Co., Ltd. All rights reserved
Learning the basics
Add to a contact
Add to a contact
Learning the basics
Learning the basics
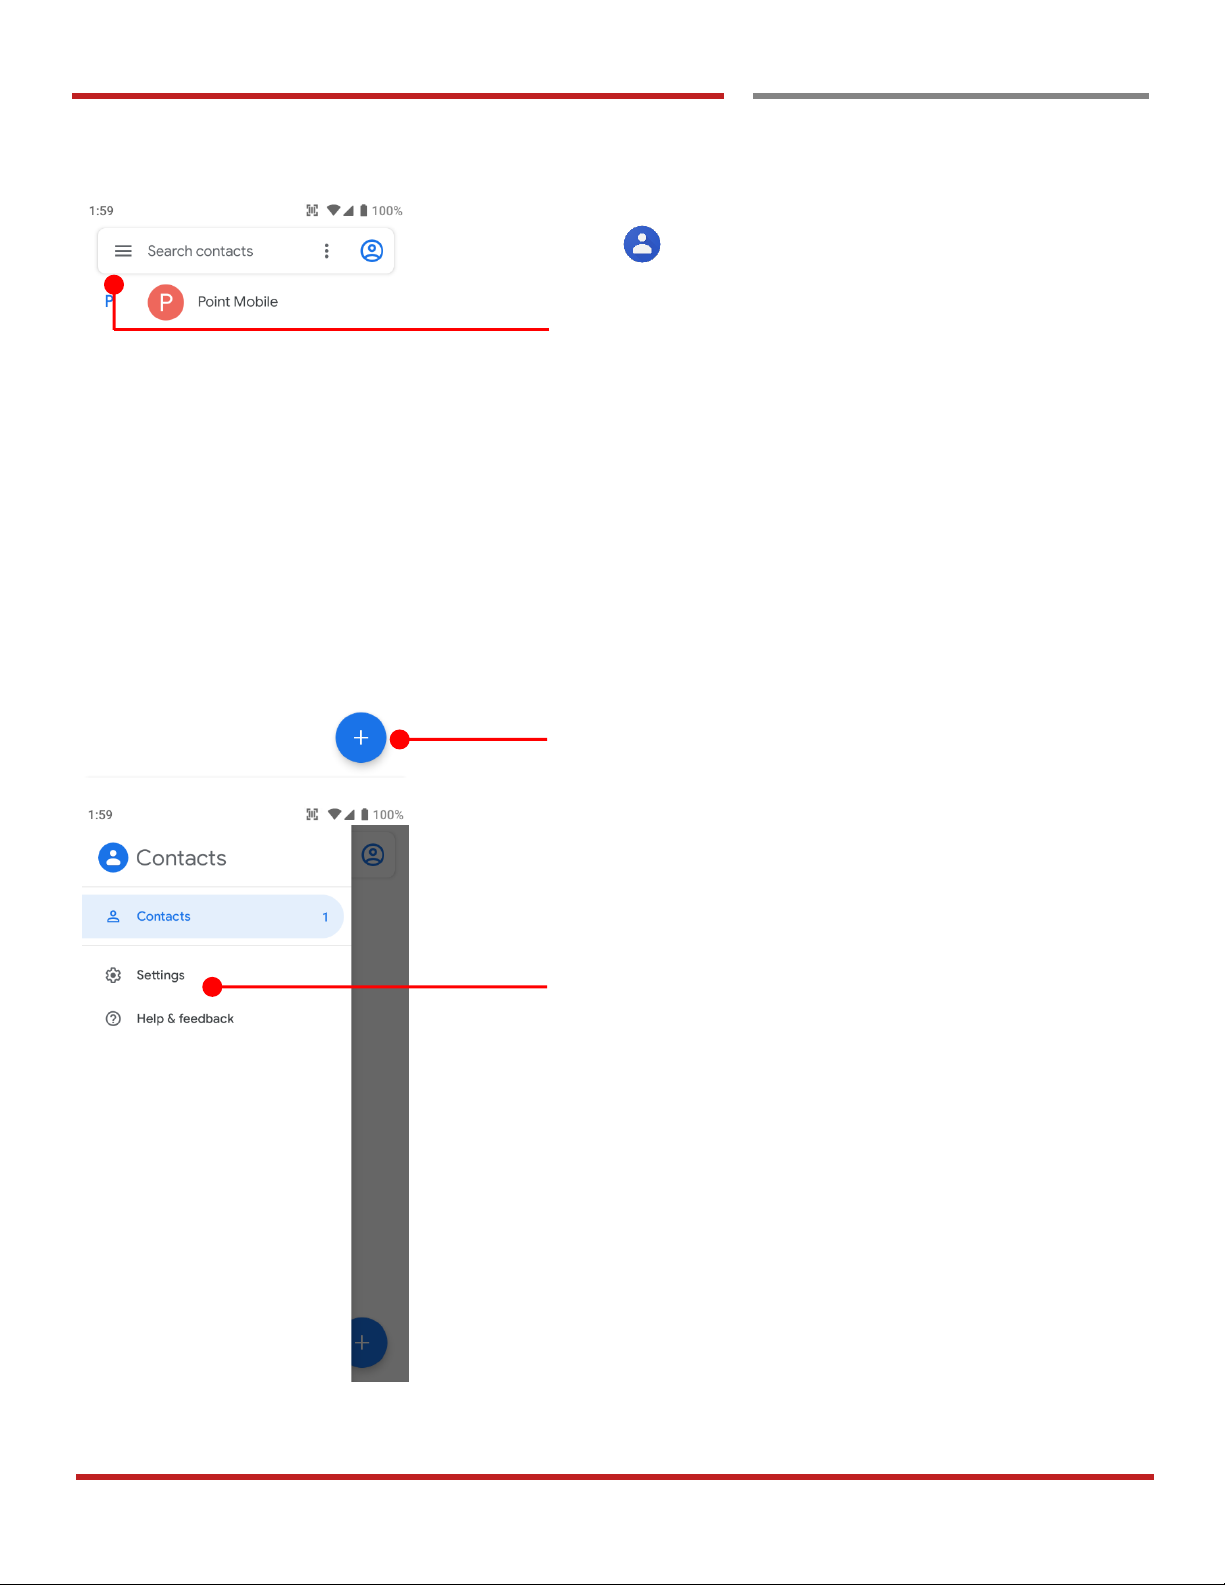
Touch icon in the Favorite tray apps
Touch to see Contacts options
Touch to add a new contact
Touch to set more detail settings
Page 44
PM90 Android 9 User Manual
43
©2006 – 2019 POINTMOBILE Co., Ltd. All rights reserved
Add to a contact
Add to a contact
Learning the basics
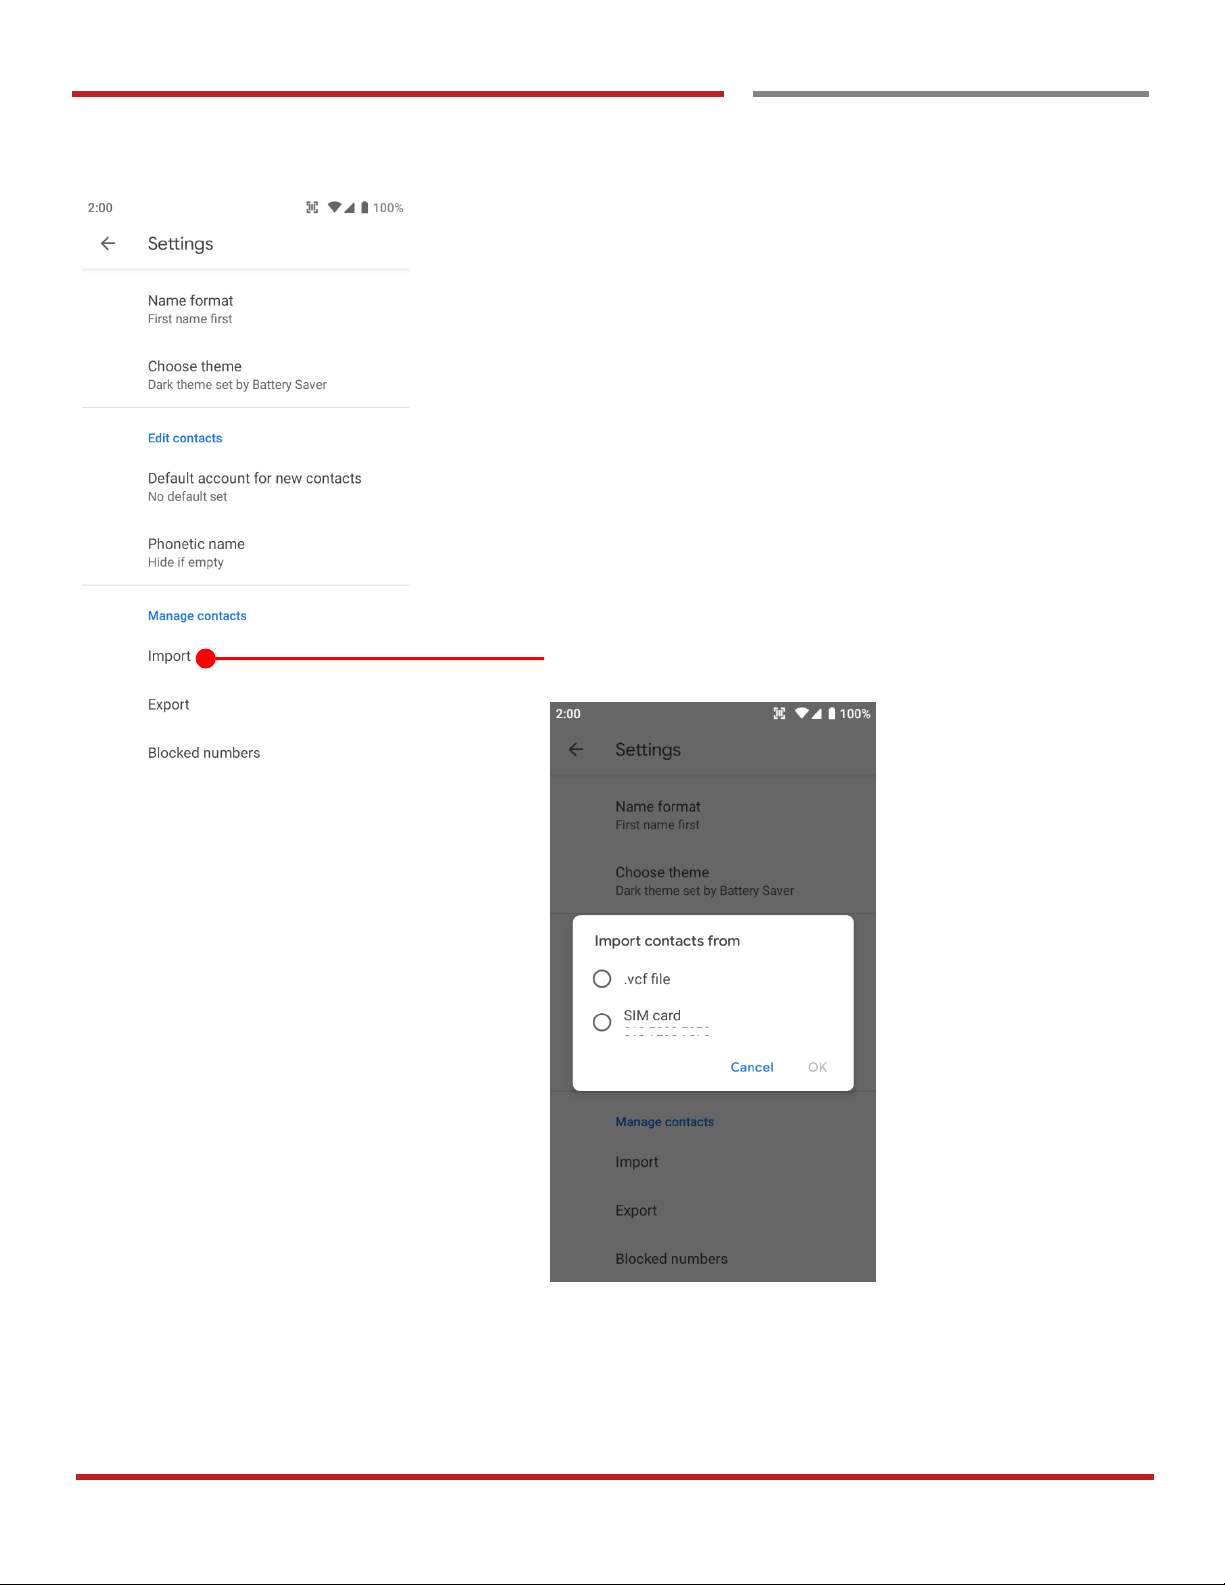
Touch to import contact information from vcf (vCard) file or
SIM card
Page 45
PM90 Android 9 User Manual
44
©2006 – 2019 POINTMOBILE Co., Ltd. All rights reserved
Learning the basics
Connect to your Wi-Fi network
Connect to your Wi-Fi network
Learning the basics
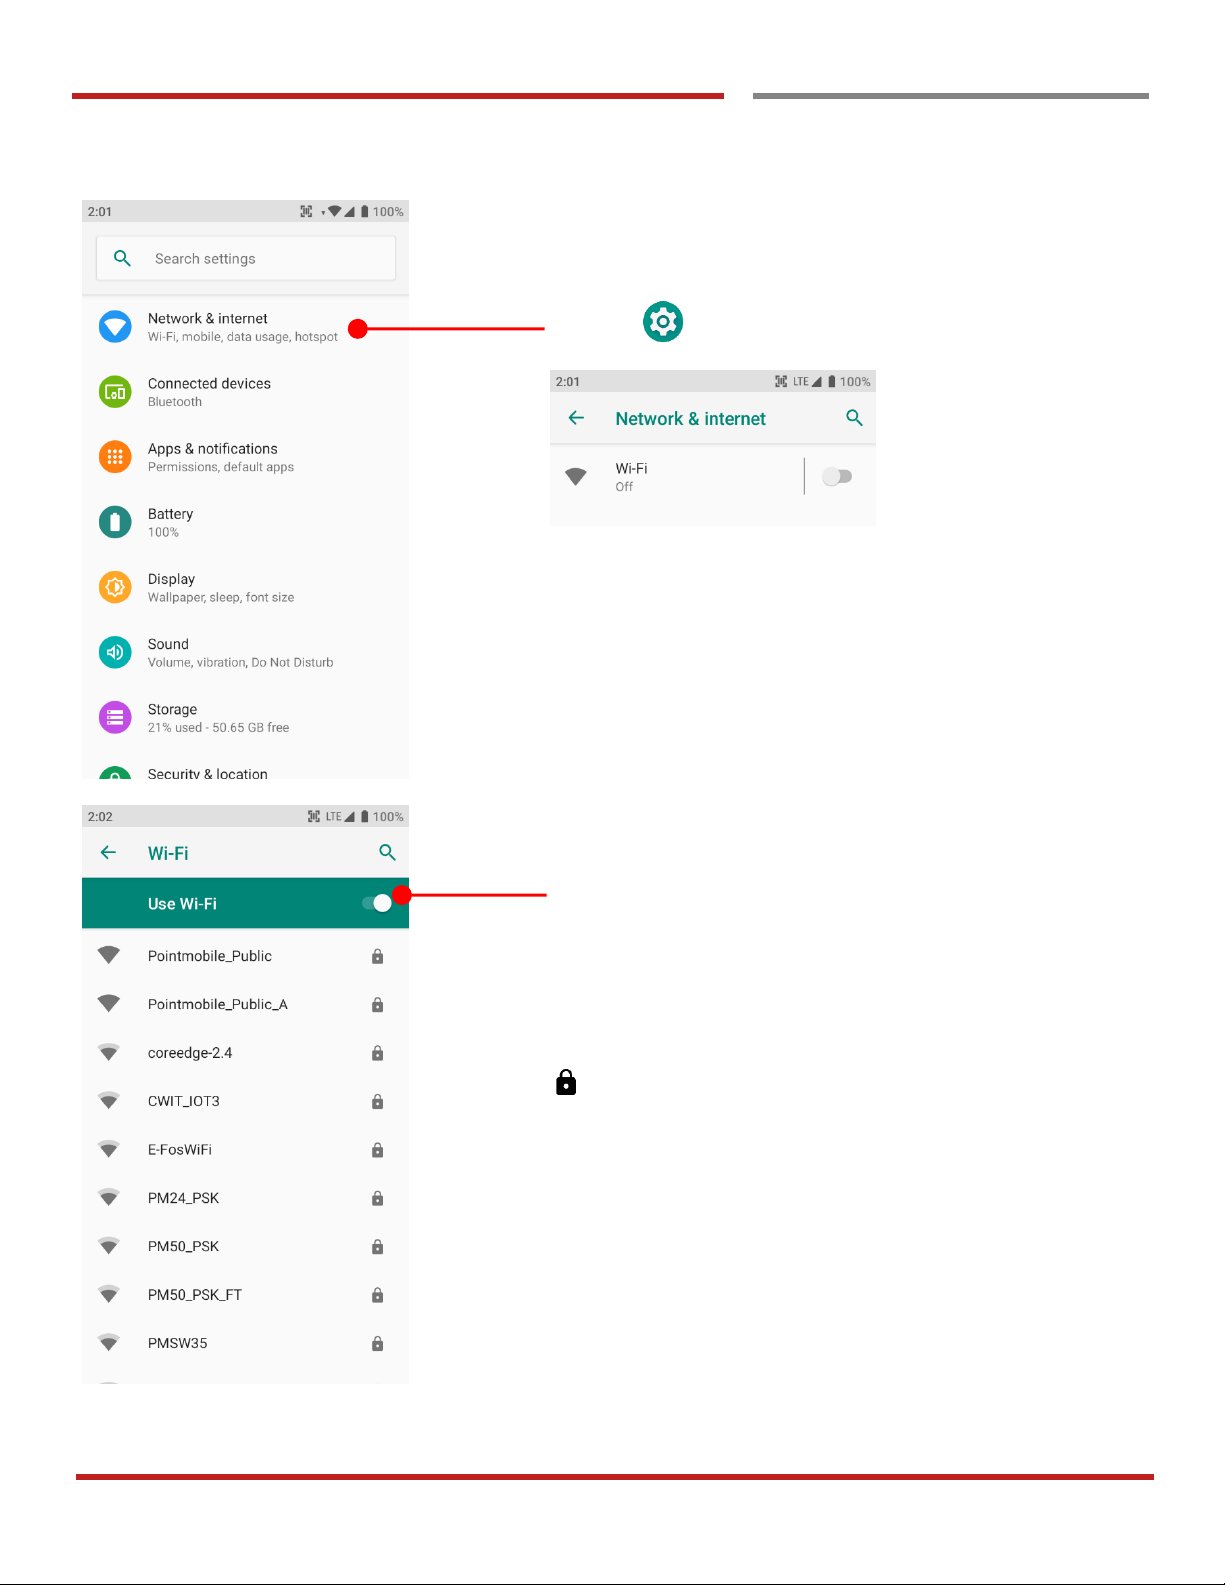
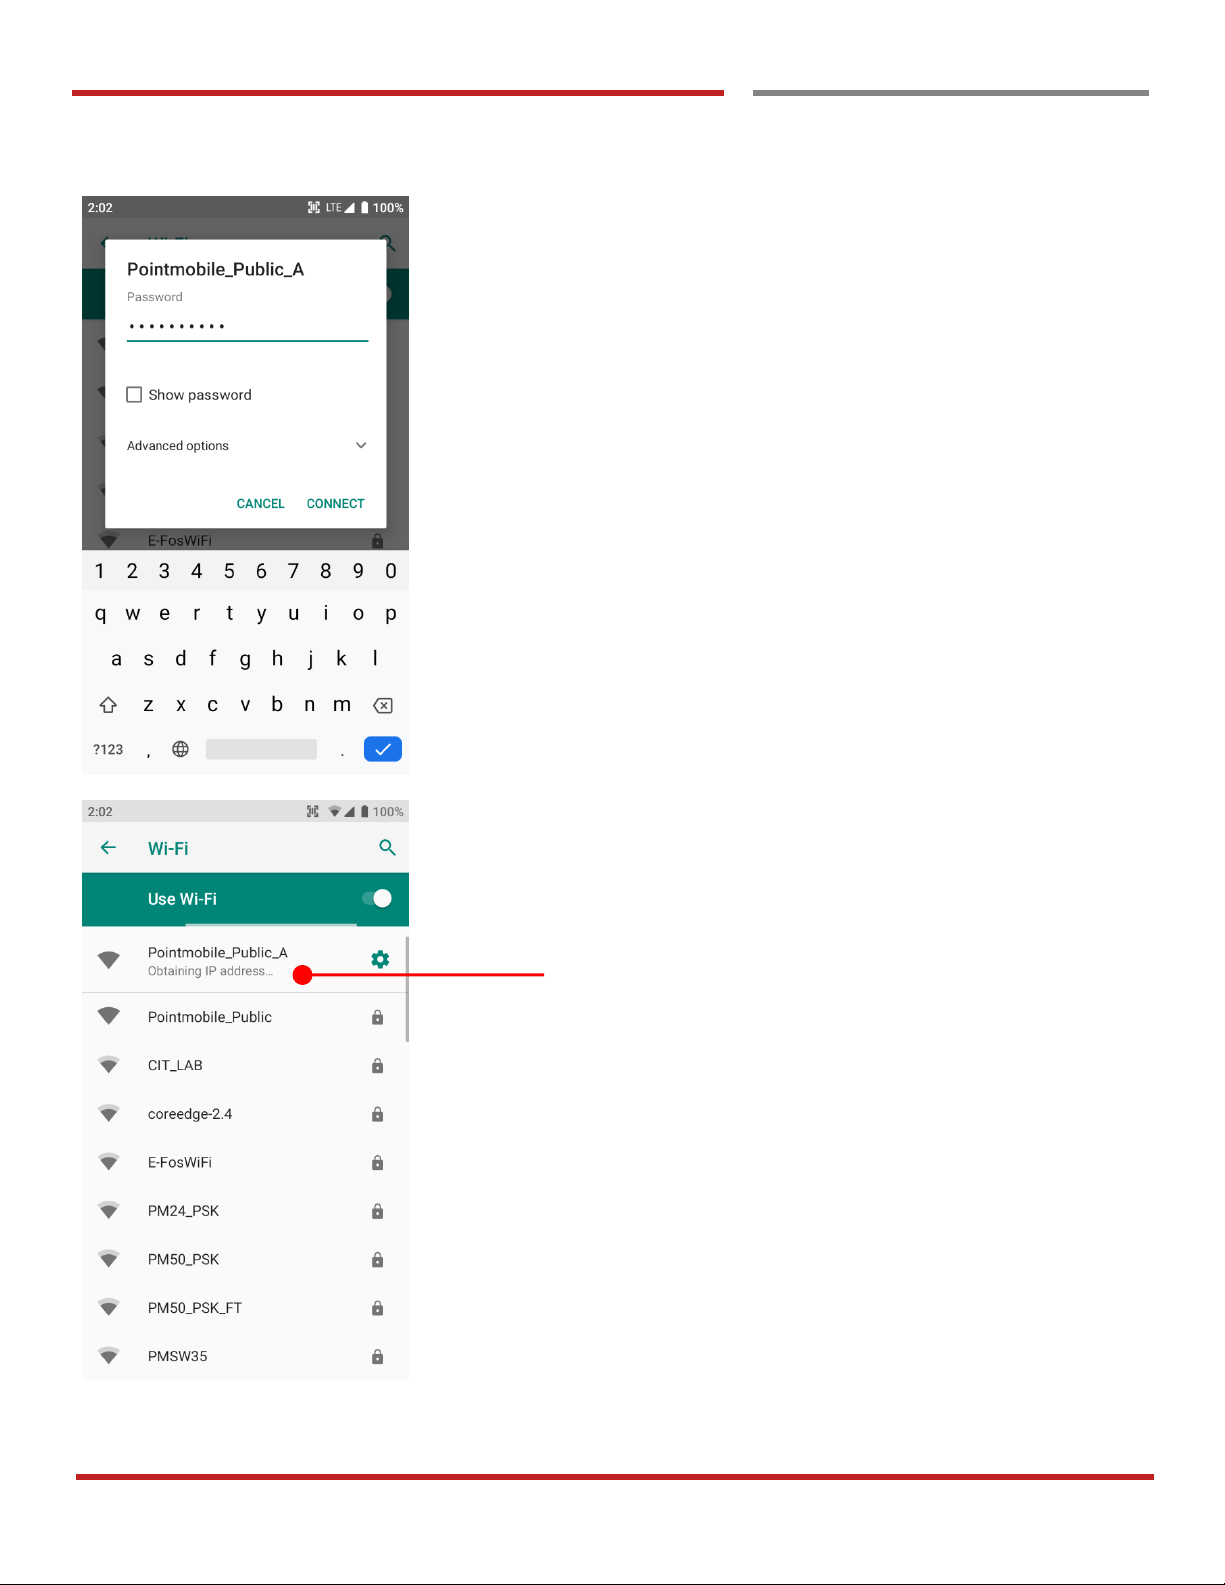
Settings → Network & Internet and then Wi-Fi
Touch to turn On/Off the W-Fi
You can see nearby Wi-Fi network.
Each AP’s SSID information listed by signal strength
Icon means : Secured Wi-Fi network. To connect this
Wi-Fi network, you need to enter the password
Page 46
PM90 Android 9 User Manual
45
©2006 – 2019 POINTMOBILE Co., Ltd. All rights reserved
Learning the basics
Connect to your Wi-Fi network
Learning the basics
Touch SSID, which you want to connect.
To connect to the secured Wi-Fi network, enter the
password
PM90 is obtaining the IP address from the selected AP
Page 47
PM90 Android 9 User Manual
46
©2006 – 2019 POINTMOBILE Co., Ltd. All rights reserved
Learning the basics
Make a Wi-Fi hotspot
Make a Wi-Fi hotspot
Learning the basics
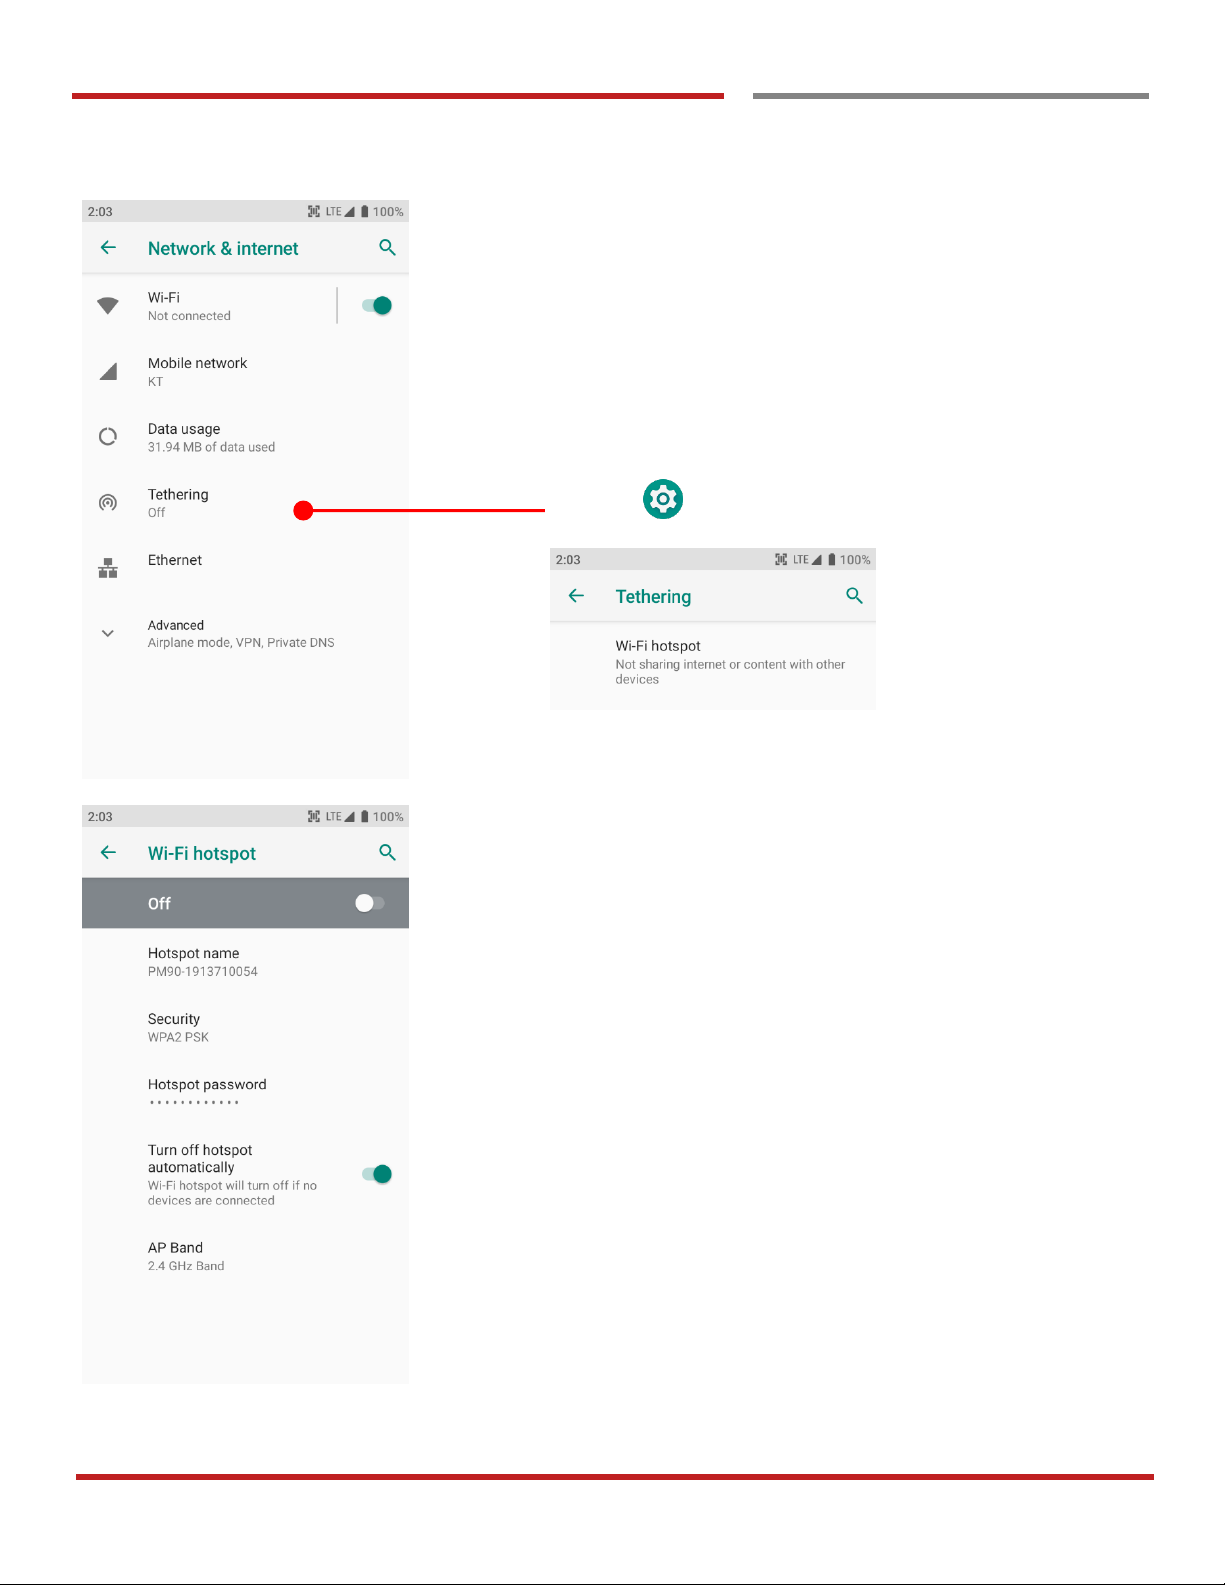
Settings → Network & Internet and then Tethering
You can change W-Fi hotspot option here.
Hotspot SSID name, Security option, Hotspot Password and
Hotspot’s Band
Page 48
PM90 Android 9 User Manual
47
©2006 – 2019 POINTMOBILE Co., Ltd. All rights reserved
Connect with Bluetooth device
Connect with Bluetooth device
Learning the basics
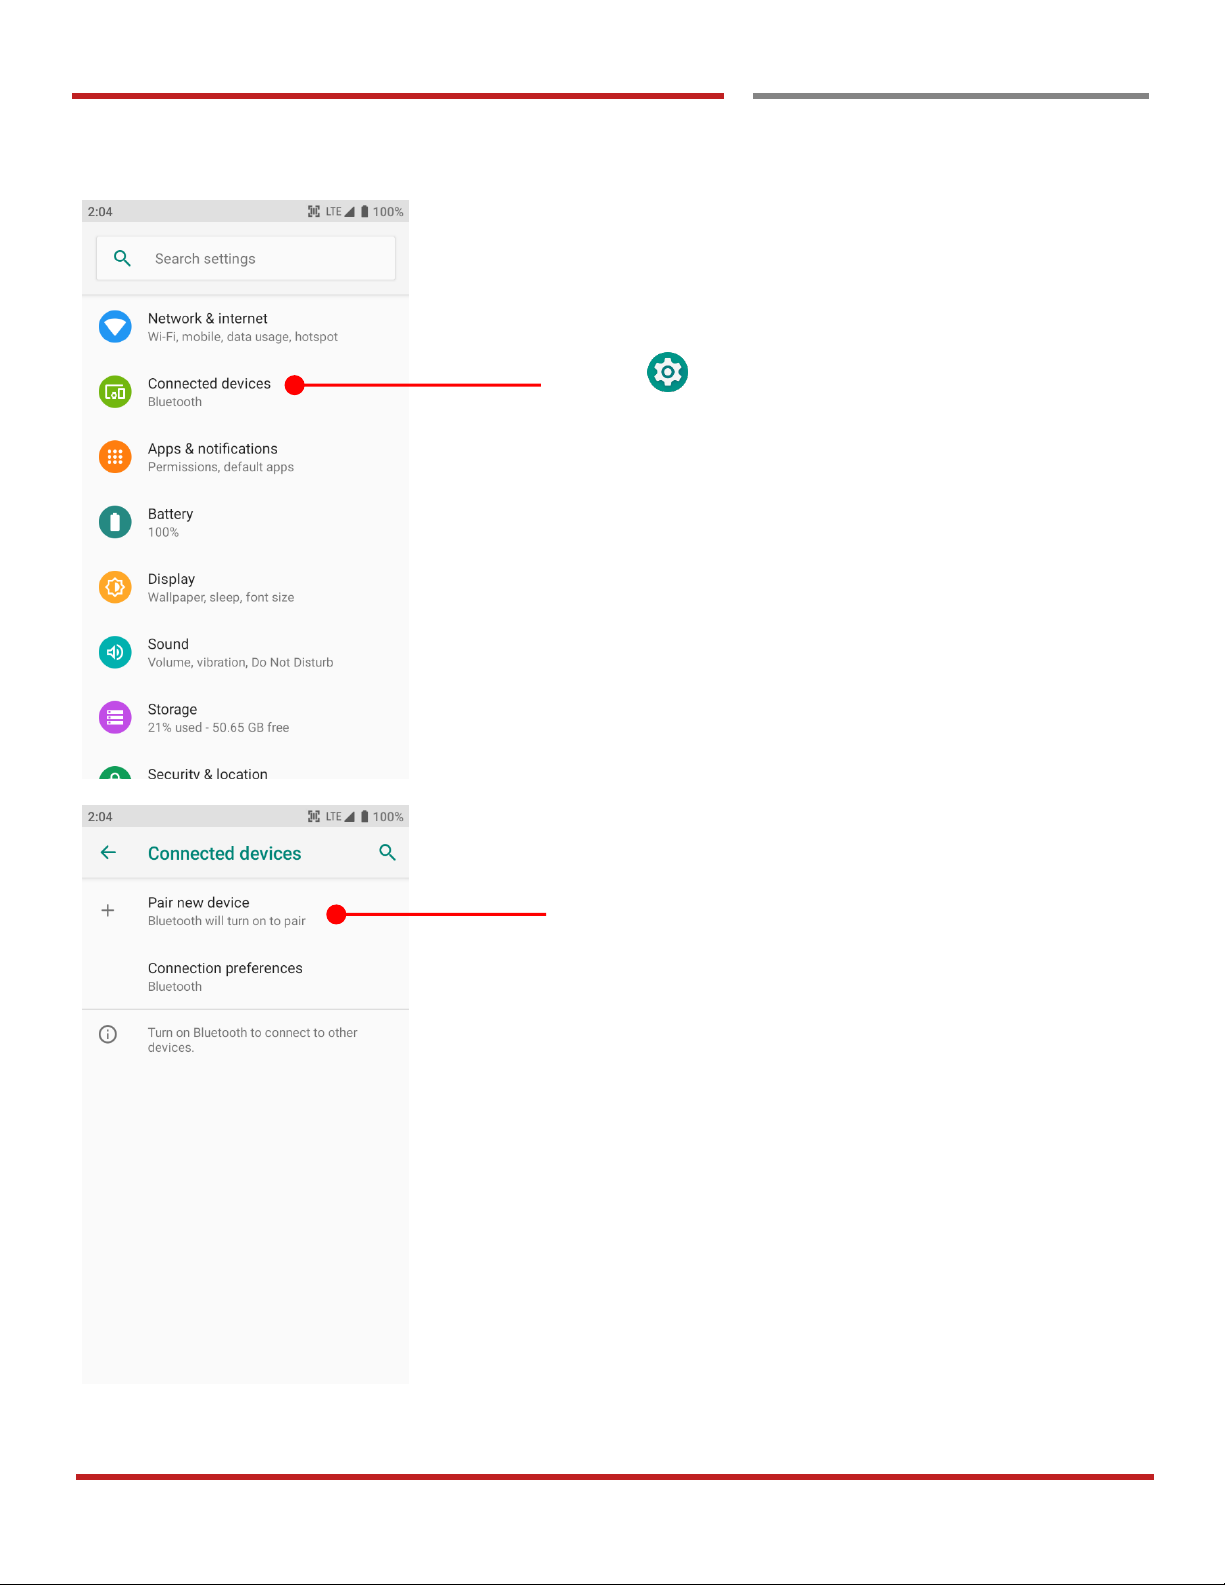
Settings and then Connected devices
Touch Pair new device
Page 49
PM90 Android 9 User Manual
48
©2006 – 2019 POINTMOBILE Co., Ltd. All rights reserved
Make a Wi-Fi hotspot
Connect with Bluetooth device
Learning the basics
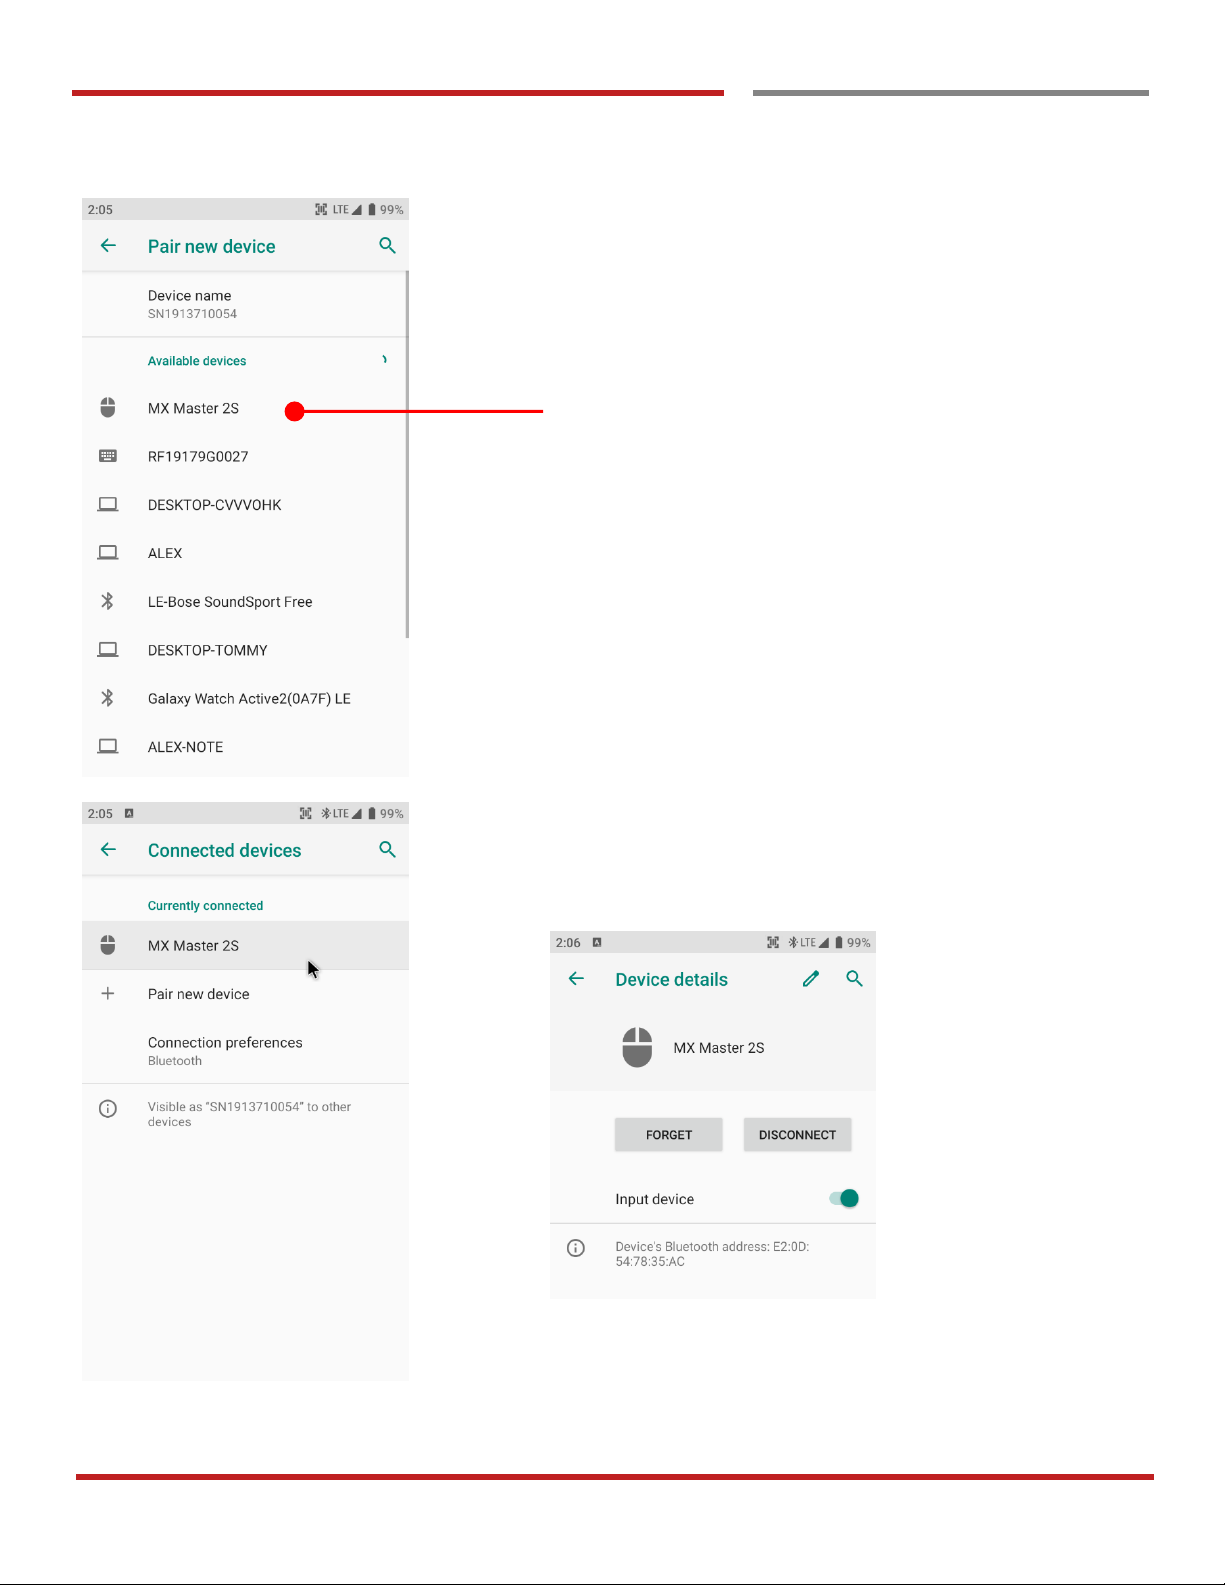
PM90 will list up nearby Bluetooth devices. Touch to make a
pairing (You may input the password)
Bluetooth device is connected with PM90.
Touch the device for advanced setup
Page 50
PM90 Android 9 User Manual
49
©2006 – 2019 POINTMOBILE Co., Ltd. All rights reserved
Learning the basics
Use a Camera
Use a Camera
Learning the basics
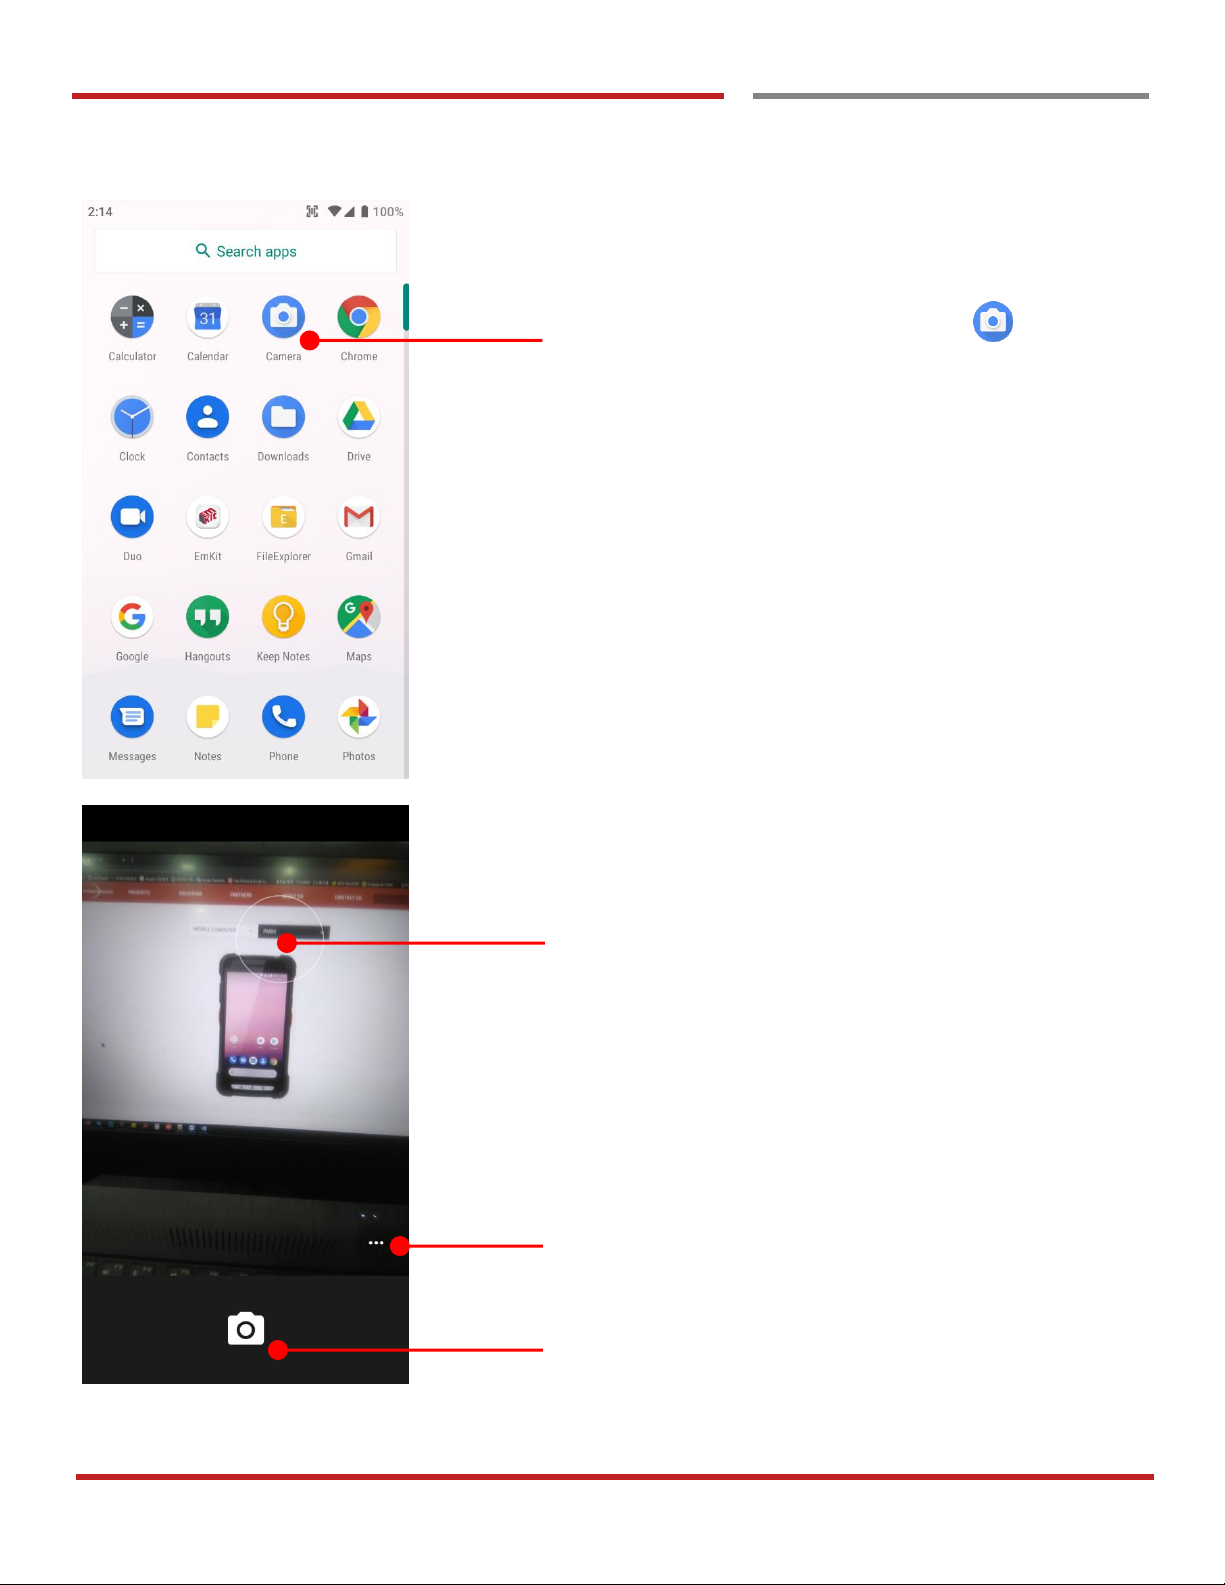
Navigate to App list and then Camera app
Auto focusing area. You can change the focusing area by
touching the other area
Touch for Camera / Video option
Take a picture or recode a video
Page 51
PM90 Android 9 User Manual
50
©2006 – 2019 POINTMOBILE Co., Ltd. All rights reserved
Make a Wi-Fi hotspot
Use a Camera
Learning the basics
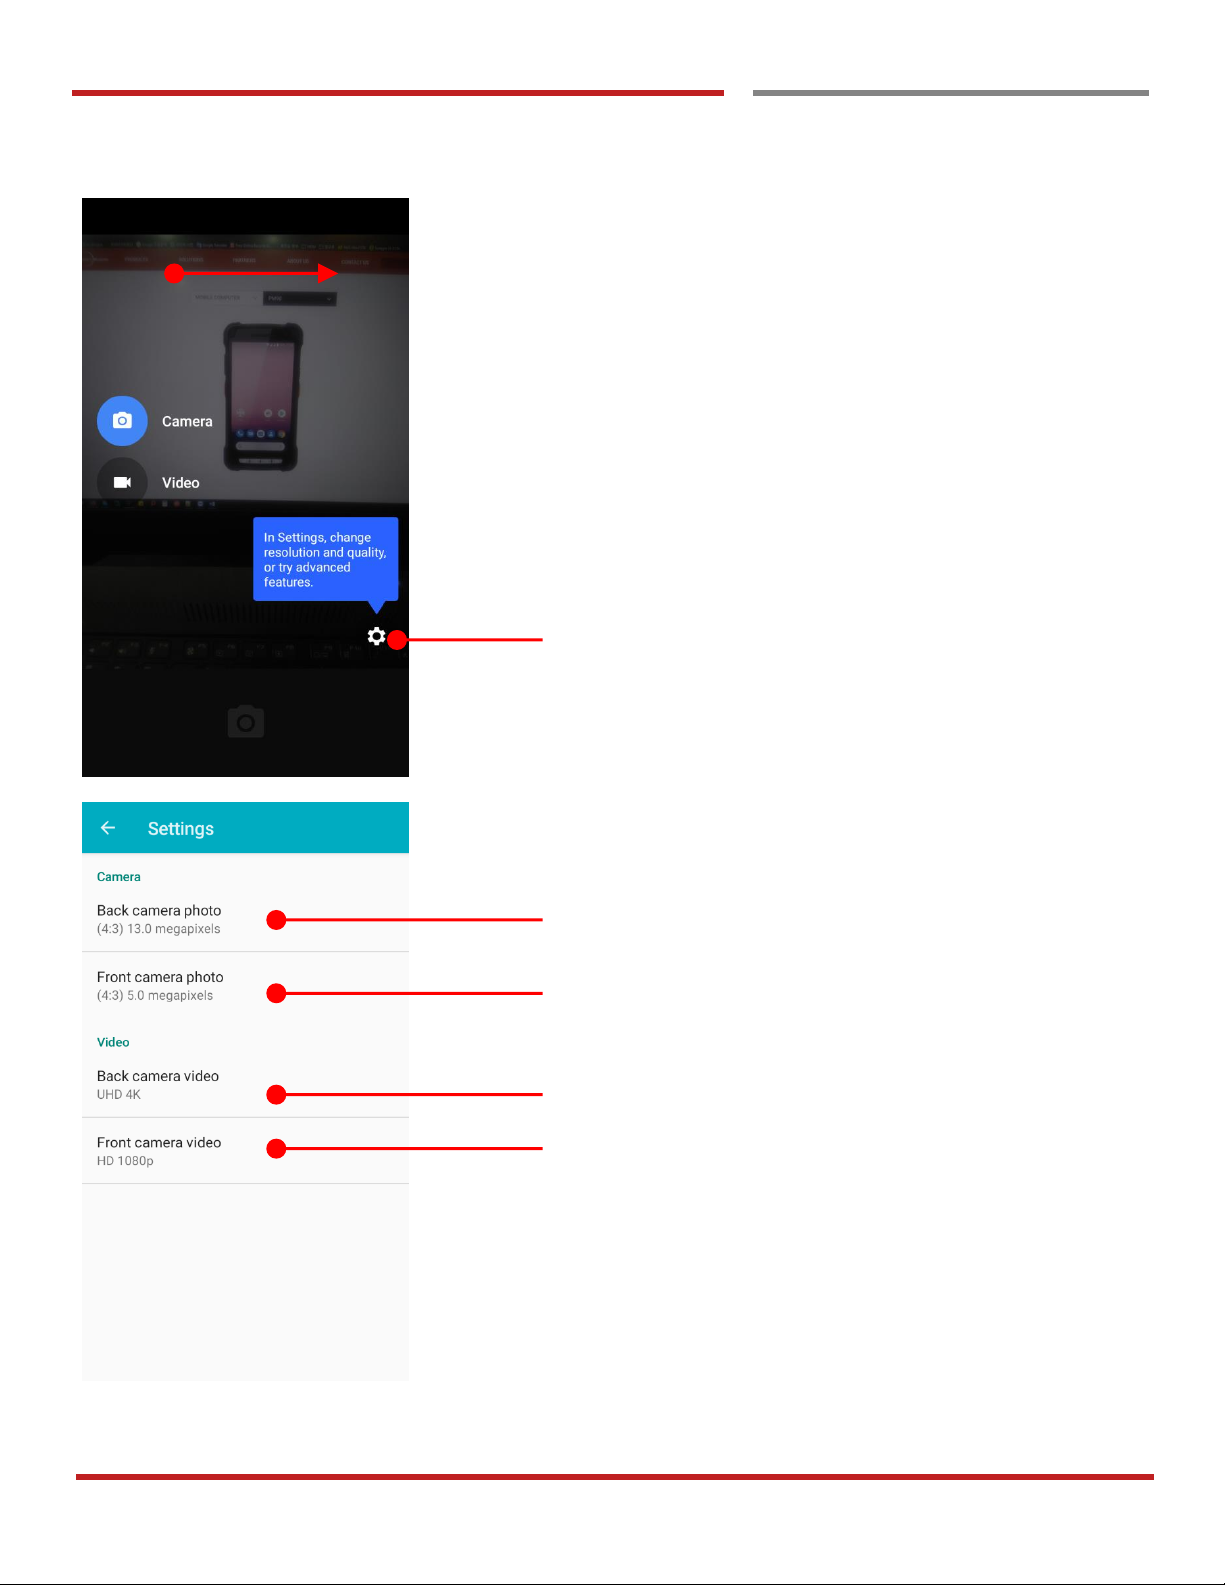
Swipe to change the Camera / Video mode or access to
Settings
Settings
Set rear camera image saving quality
Set front camera image saving quality
Set rear camera video saving quality
Set front camera video saving quality
Page 52
PM90 Android 9 User Manual
51
©2006 – 2019 POINTMOBILE Co., Ltd. All rights reserved
Learning the basics
Manage files and folders
Manage files and folders
Learning the basics
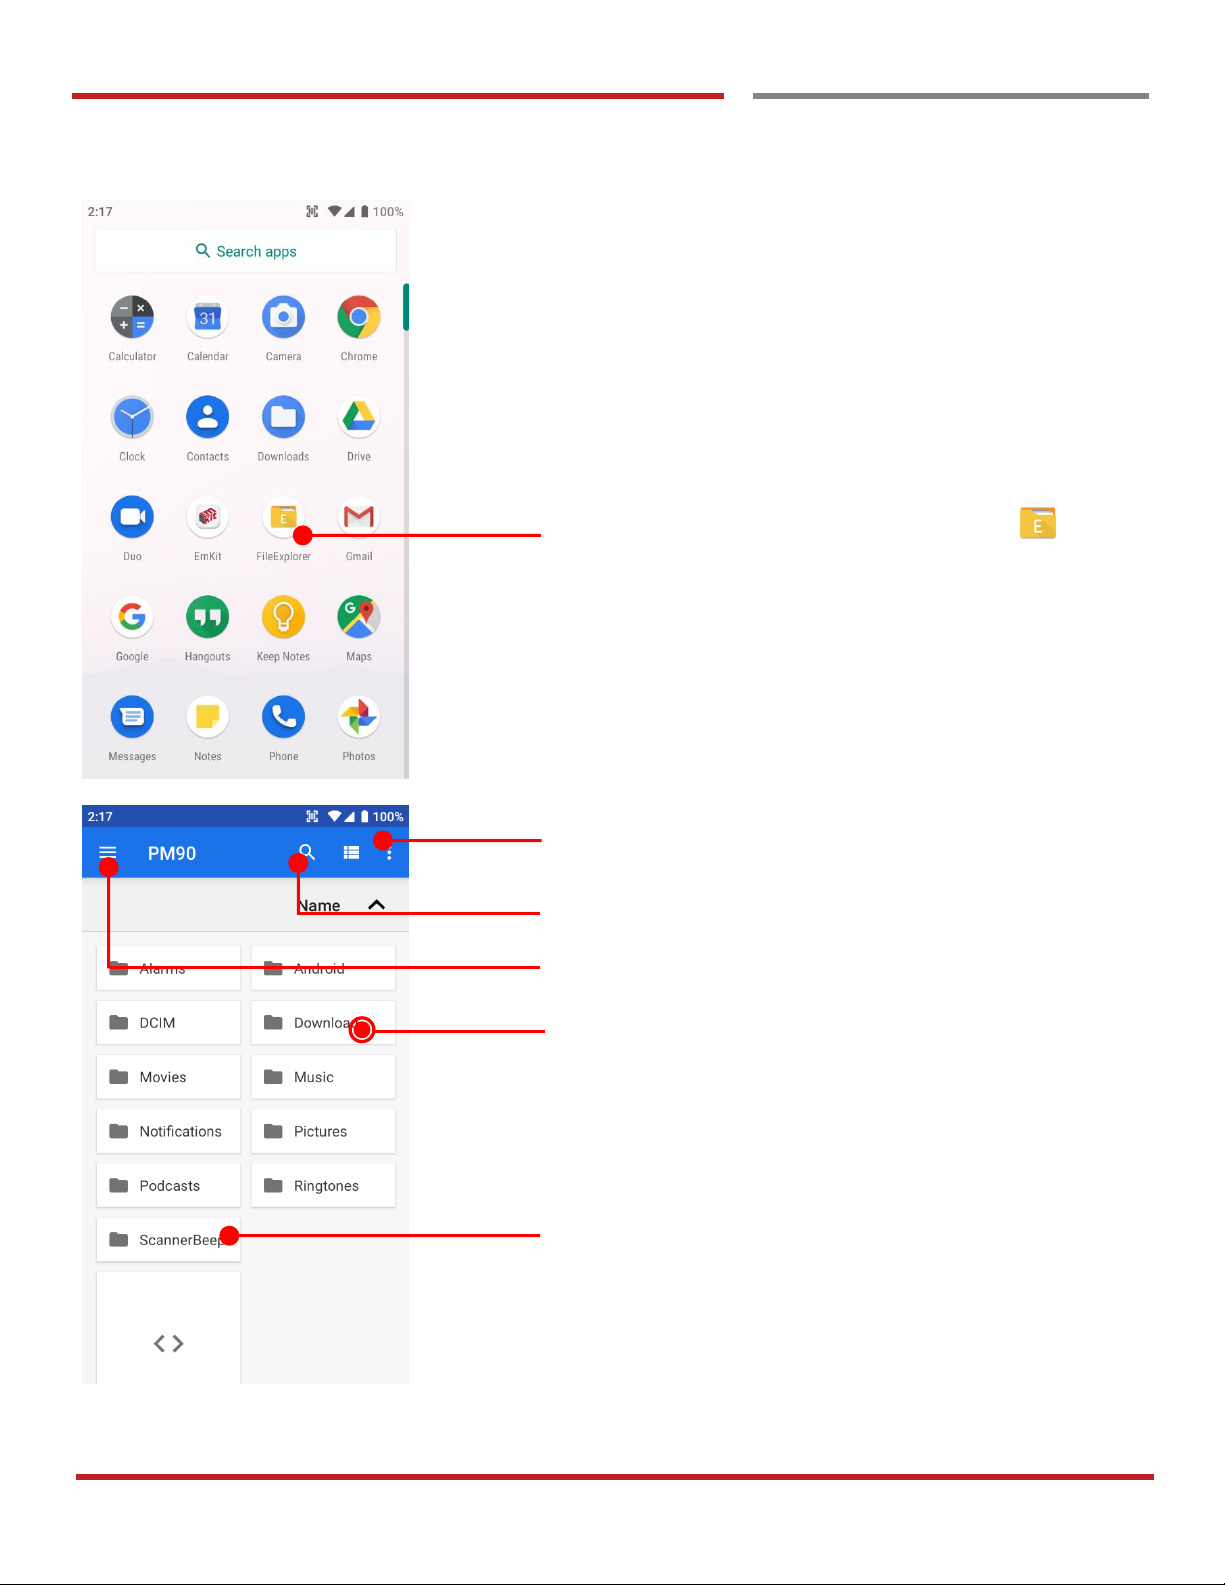
Navigate to App list and then File Explorer app
Touch for advanced menu
File search
Select media file type or storage
Long tap to select a file or folder
Touch to navigate folder / open the file or install an apk file
Page 53
PM90 Android 9 User Manual
52
©2006 – 2019 POINTMOBILE Co., Ltd. All rights reserved
Make a Wi-Fi hotspot
Manage files and folders
Learning the basics
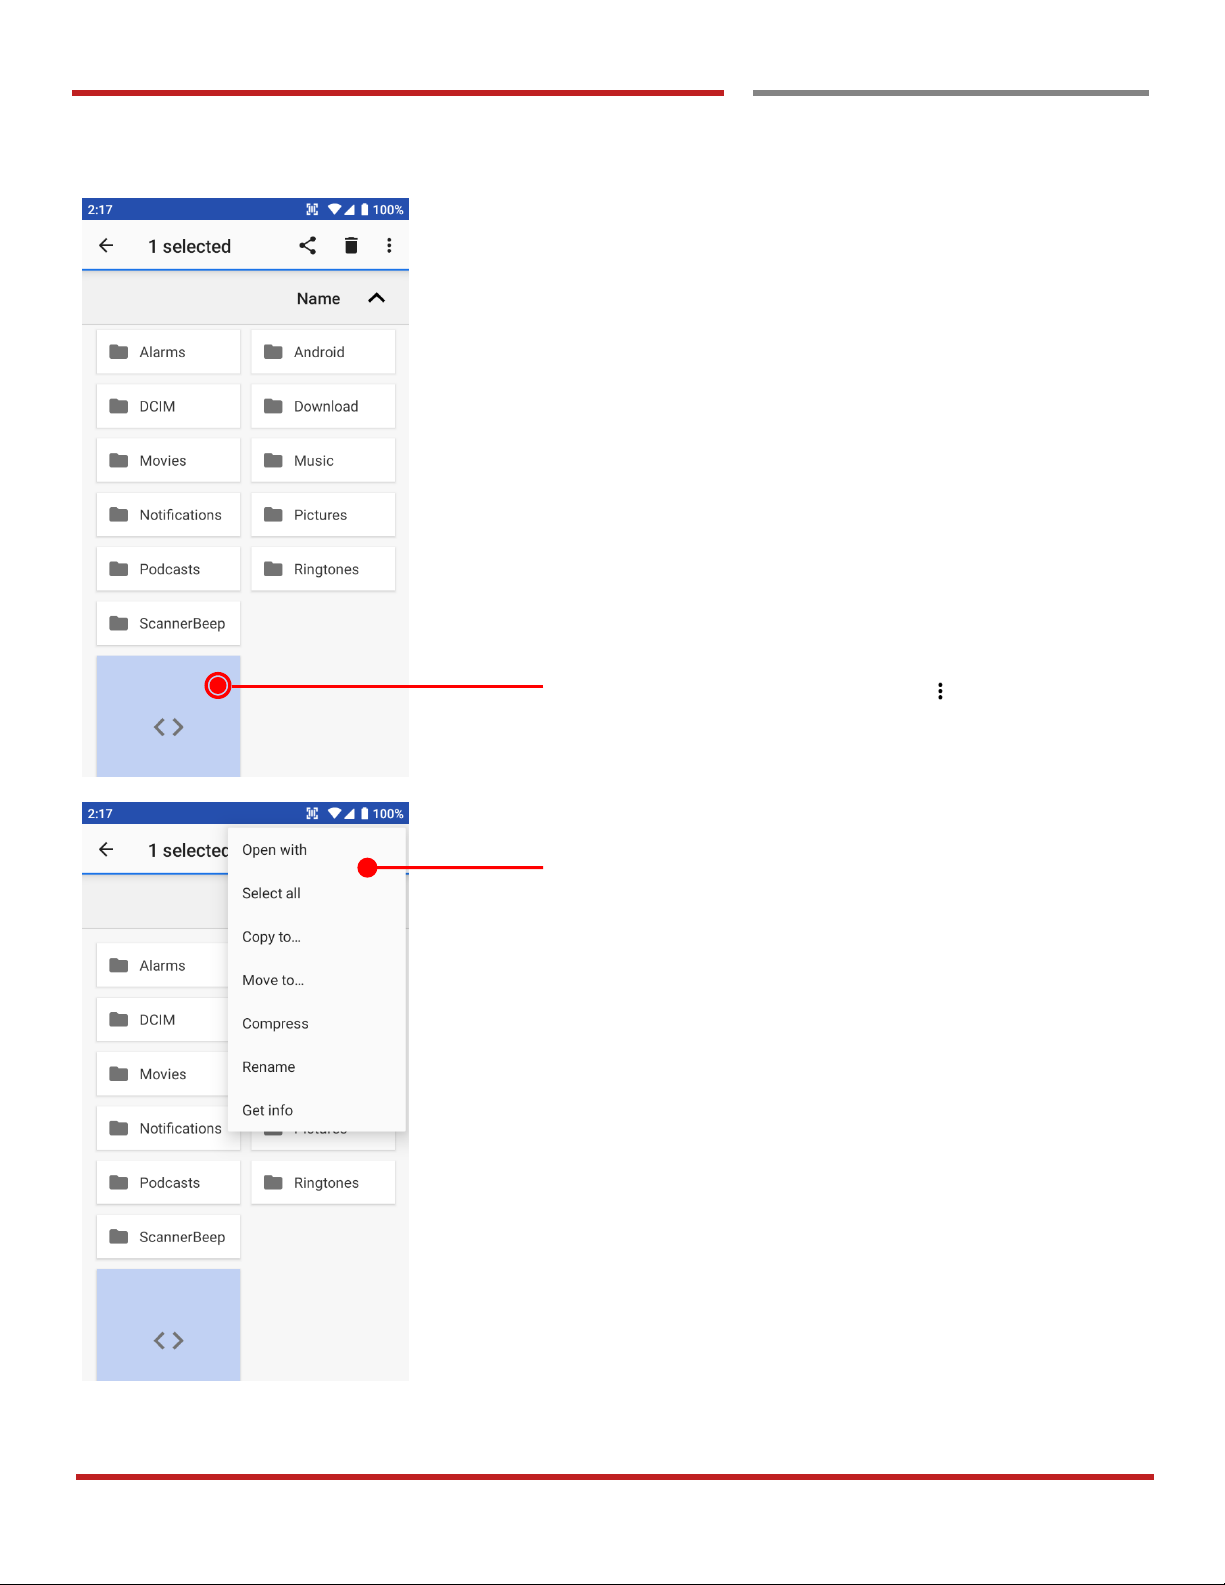
Long tap the file and touch option icon in top-left corner
Now you can copy and move to specific folder or rename
the file or folder
Page 54
PM90 Android 9 User Manual
53
©2006 – 2019 POINTMOBILE Co., Ltd. All rights reserved
Make a Wi-Fi hotspot
Manage files and folders
Learning the basics
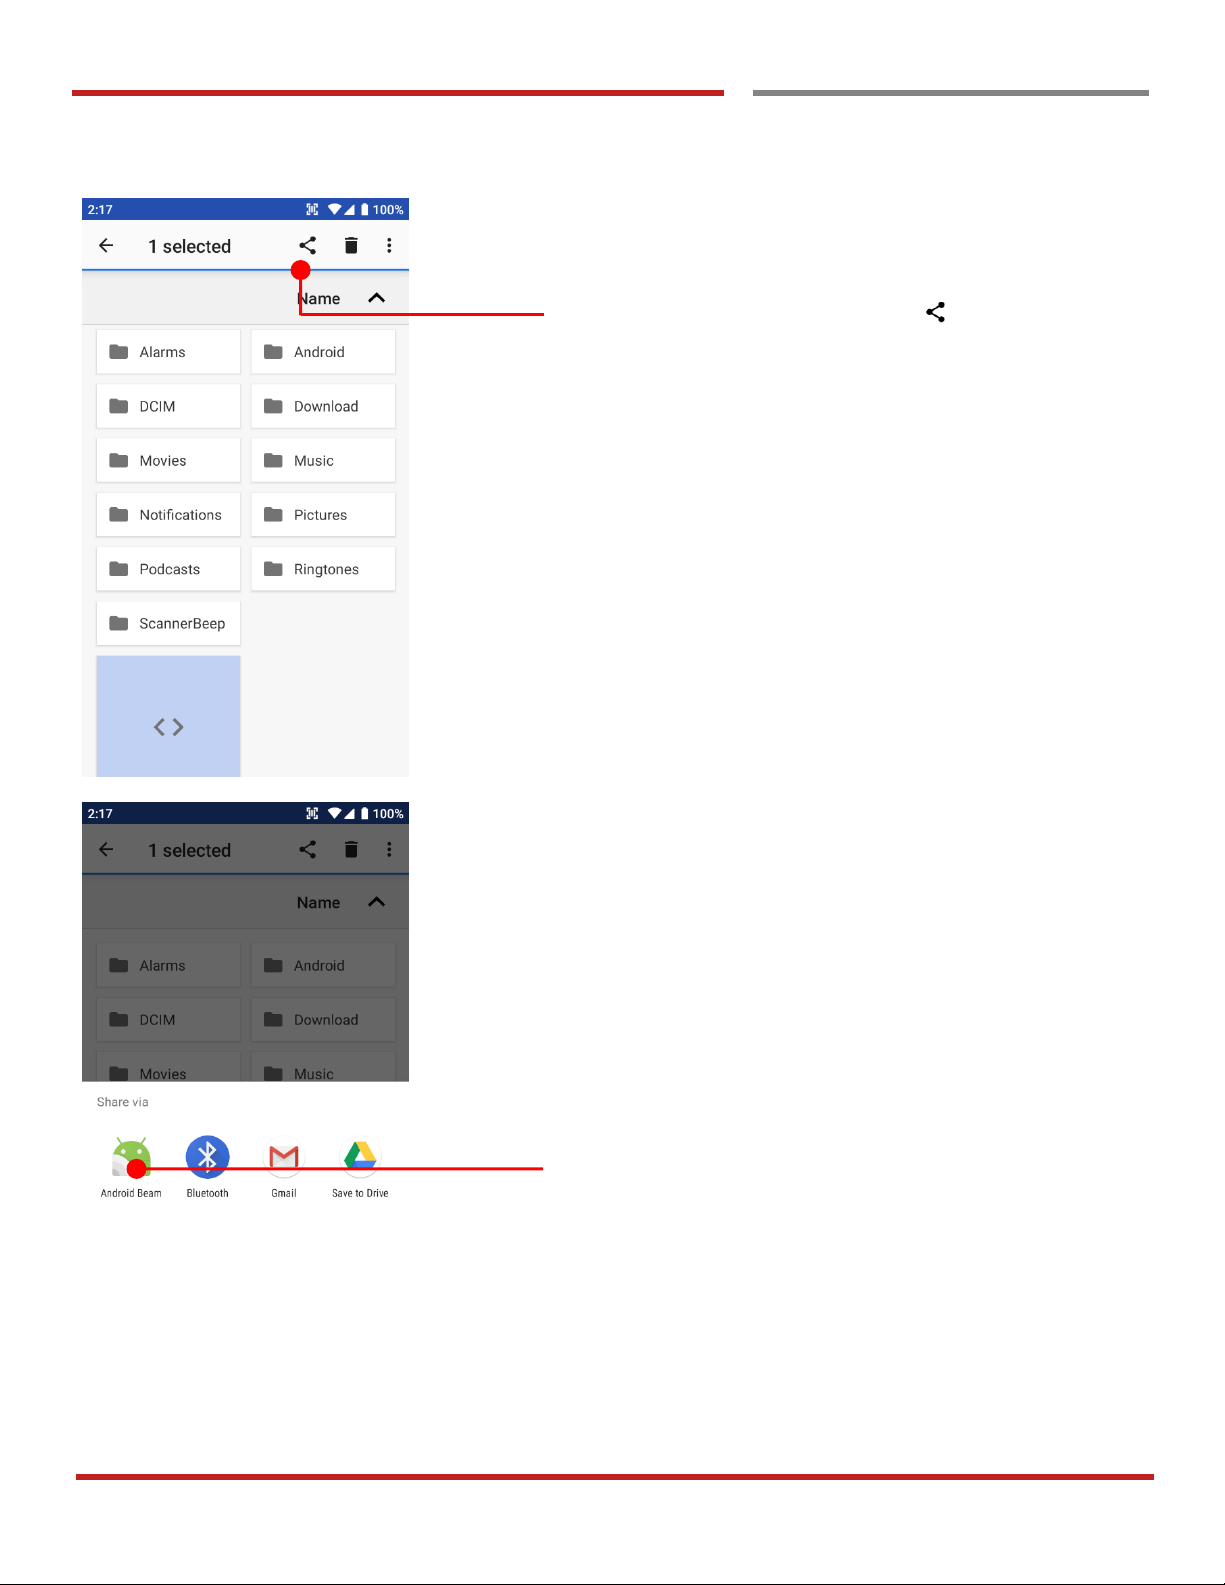
Share a file
Long tap the file and touch share icon in the menu
Now you can share selected file to nearby device or attach
to Gmail or upload to Google Drive. Manual describe
Android Beam sharing via NFC
Page 55
PM90 Android 9 User Manual
54
©2006 – 2019 POINTMOBILE Co., Ltd. All rights reserved
Make a Wi-Fi hotspot
Manage files and folders
Learning the basics
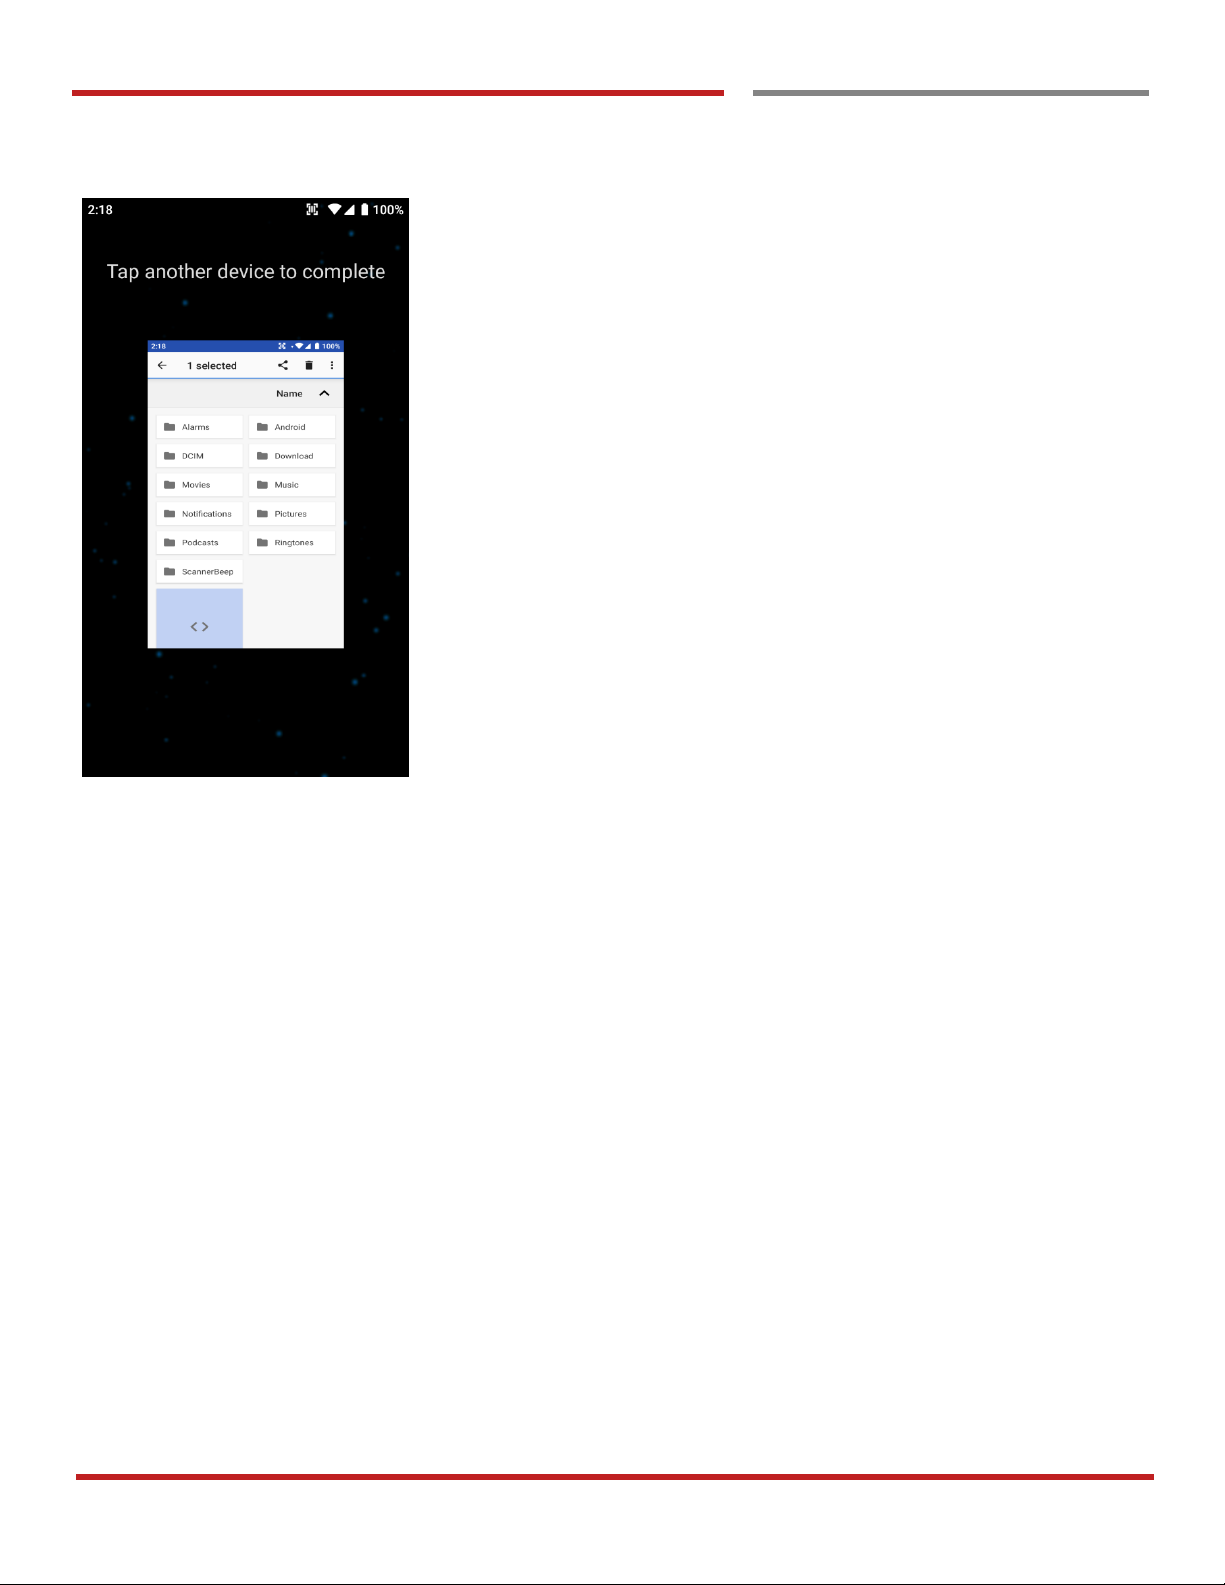
Now tag another device to PM90
PM90 will transfer the file
Page 56
PM90 Android 9 User Manual
55
©2006 – 2019 POINTMOBILE Co., Ltd. All rights reserved
Make a Wi-Fi hotspot
Manage files and folders
Learning the basics
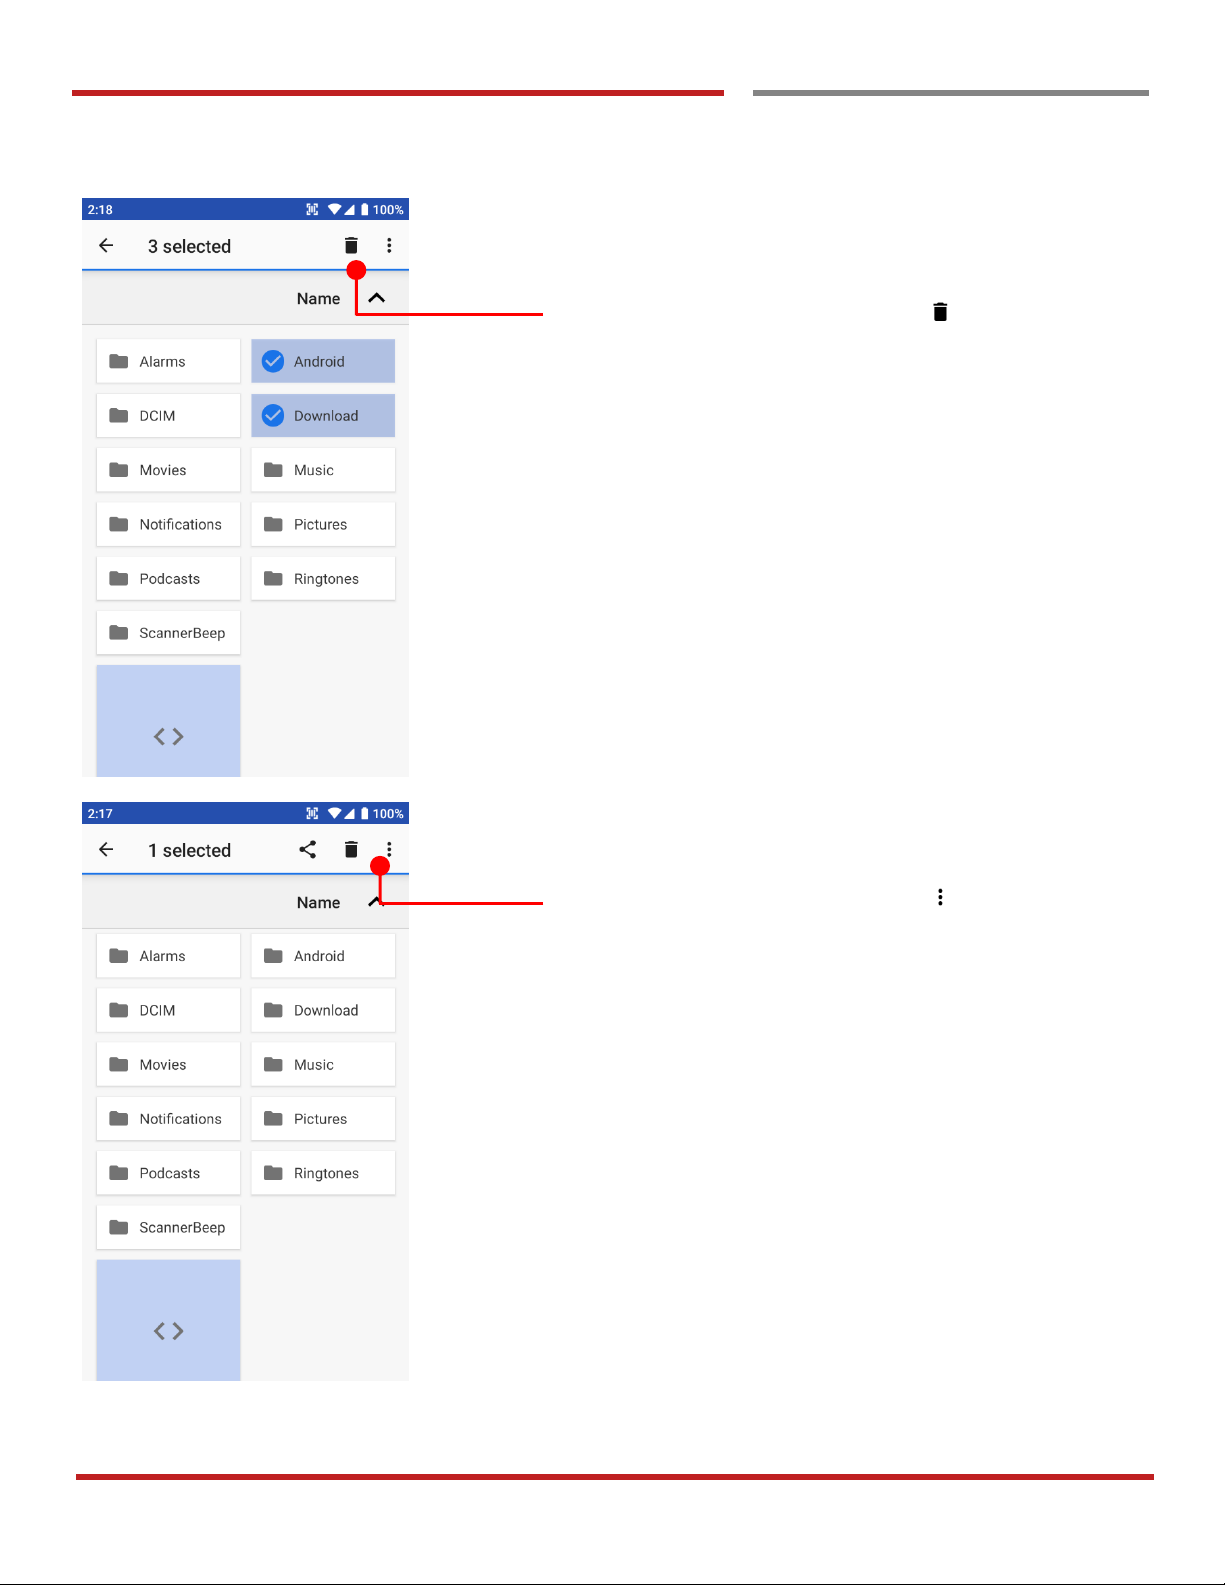
Delete files
Long tap the file and touch delete icon in the menu
Copy or move files
Long tap the file and touch option icon in top-left corner
Page 57
PM90 Android 9 User Manual
56
©2006 – 2019 POINTMOBILE Co., Ltd. All rights reserved
Make a Wi-Fi Make a Wi-Fi hotspot
Manage files and folders
Learning the basics
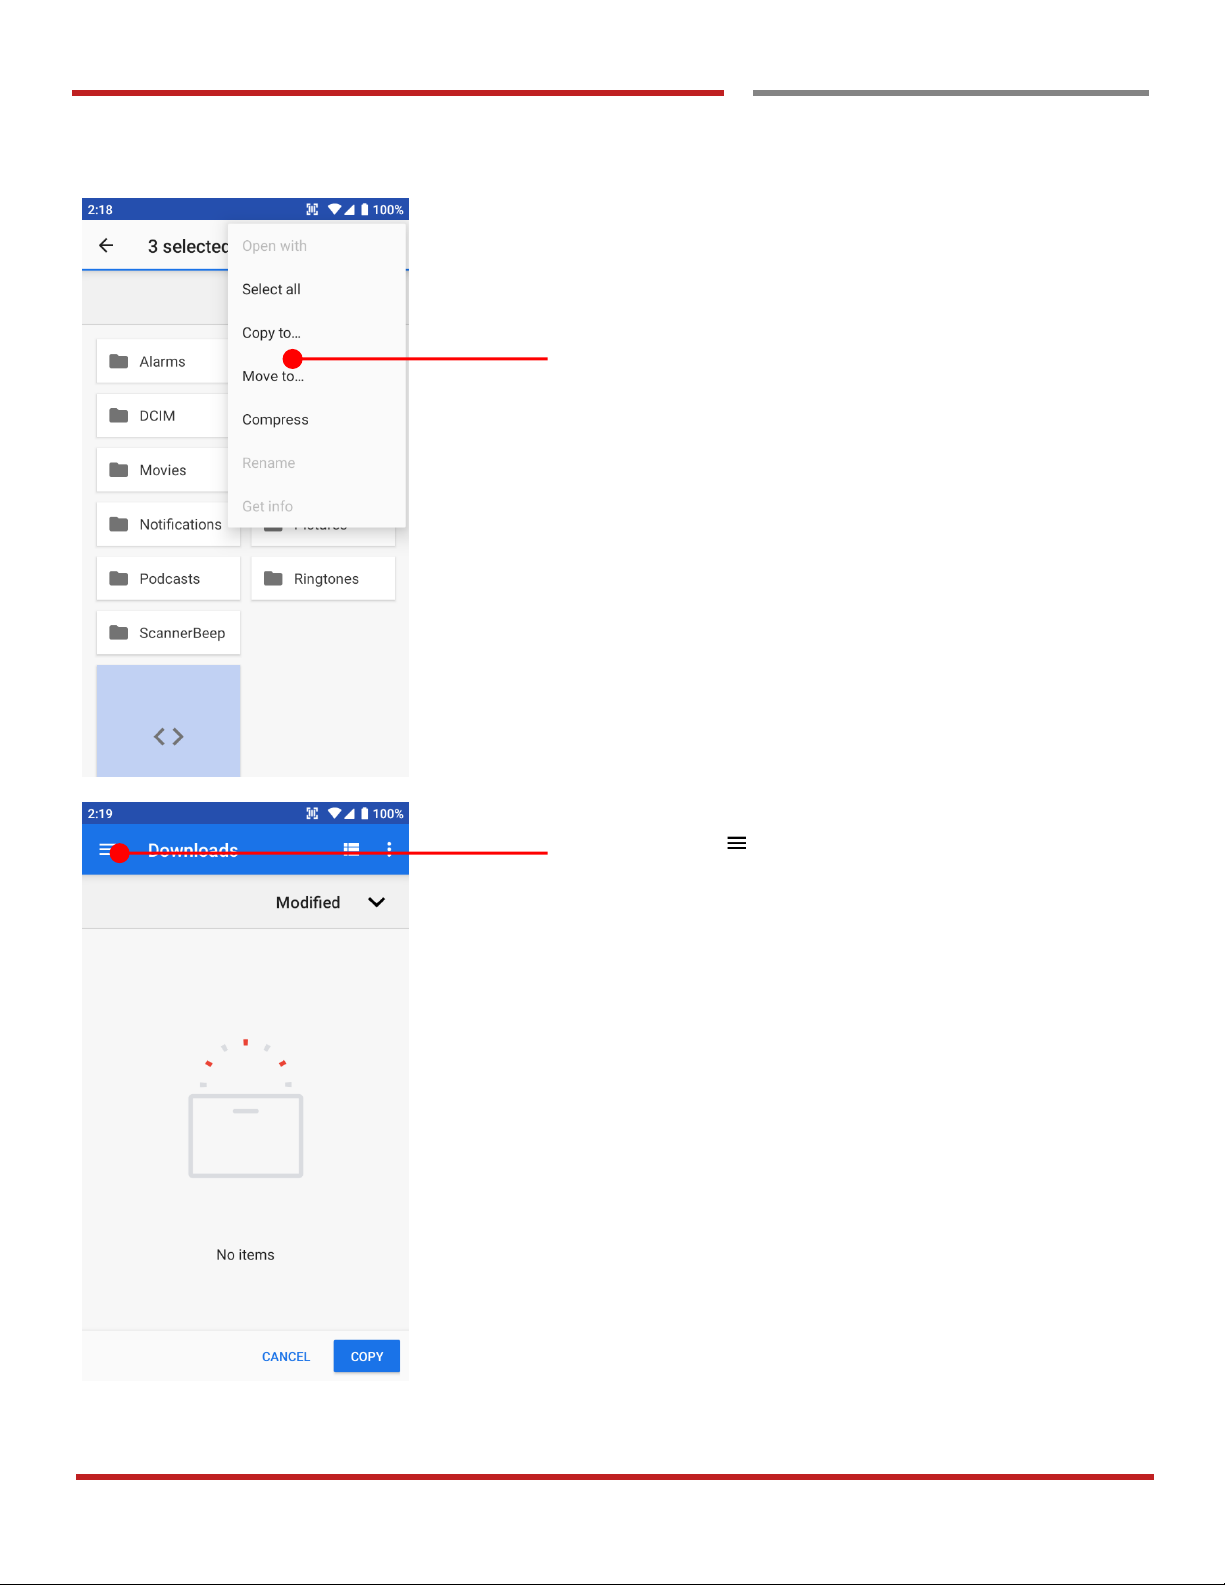
Touch Copy to… or Move to… in the menu
Touch menu icon to navigate file location
Page 58
PM90 Android 9 User Manual
57
©2006 – 2019 POINTMOBILE Co., Ltd. All rights reserved
Make a Wi-Fi Make a Wi-Fi hotspot
Manage files and folders
Learning the basics
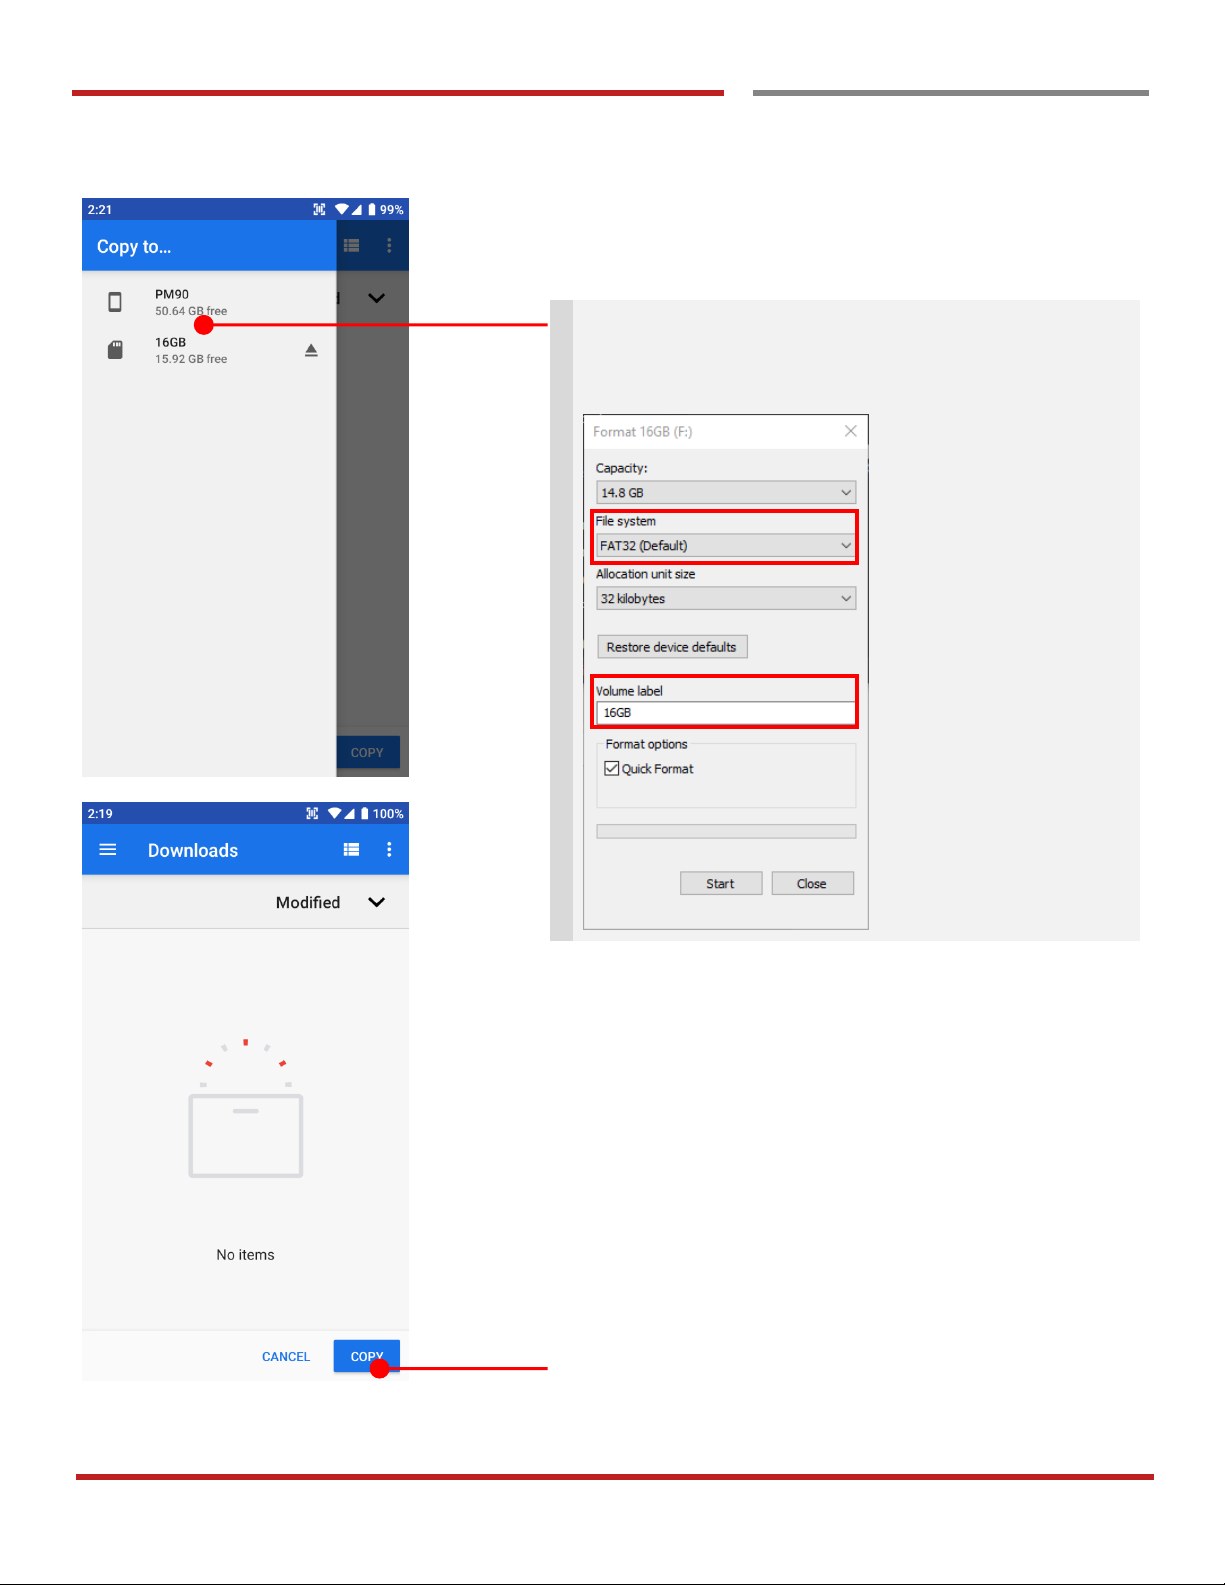
Touch the storage where copy or move to
Note: Please format the SD card as FAT32 and make
sure set the label as below screenshot from the
computer
Touch COPY
Page 59
PM90 Android 9 User Manual
58
©2006 – 2019 POINTMOBILE Co., Ltd. All rights reserved
Learning the basics
MTP connection with PC
MTP connection with PC
Learning the basics
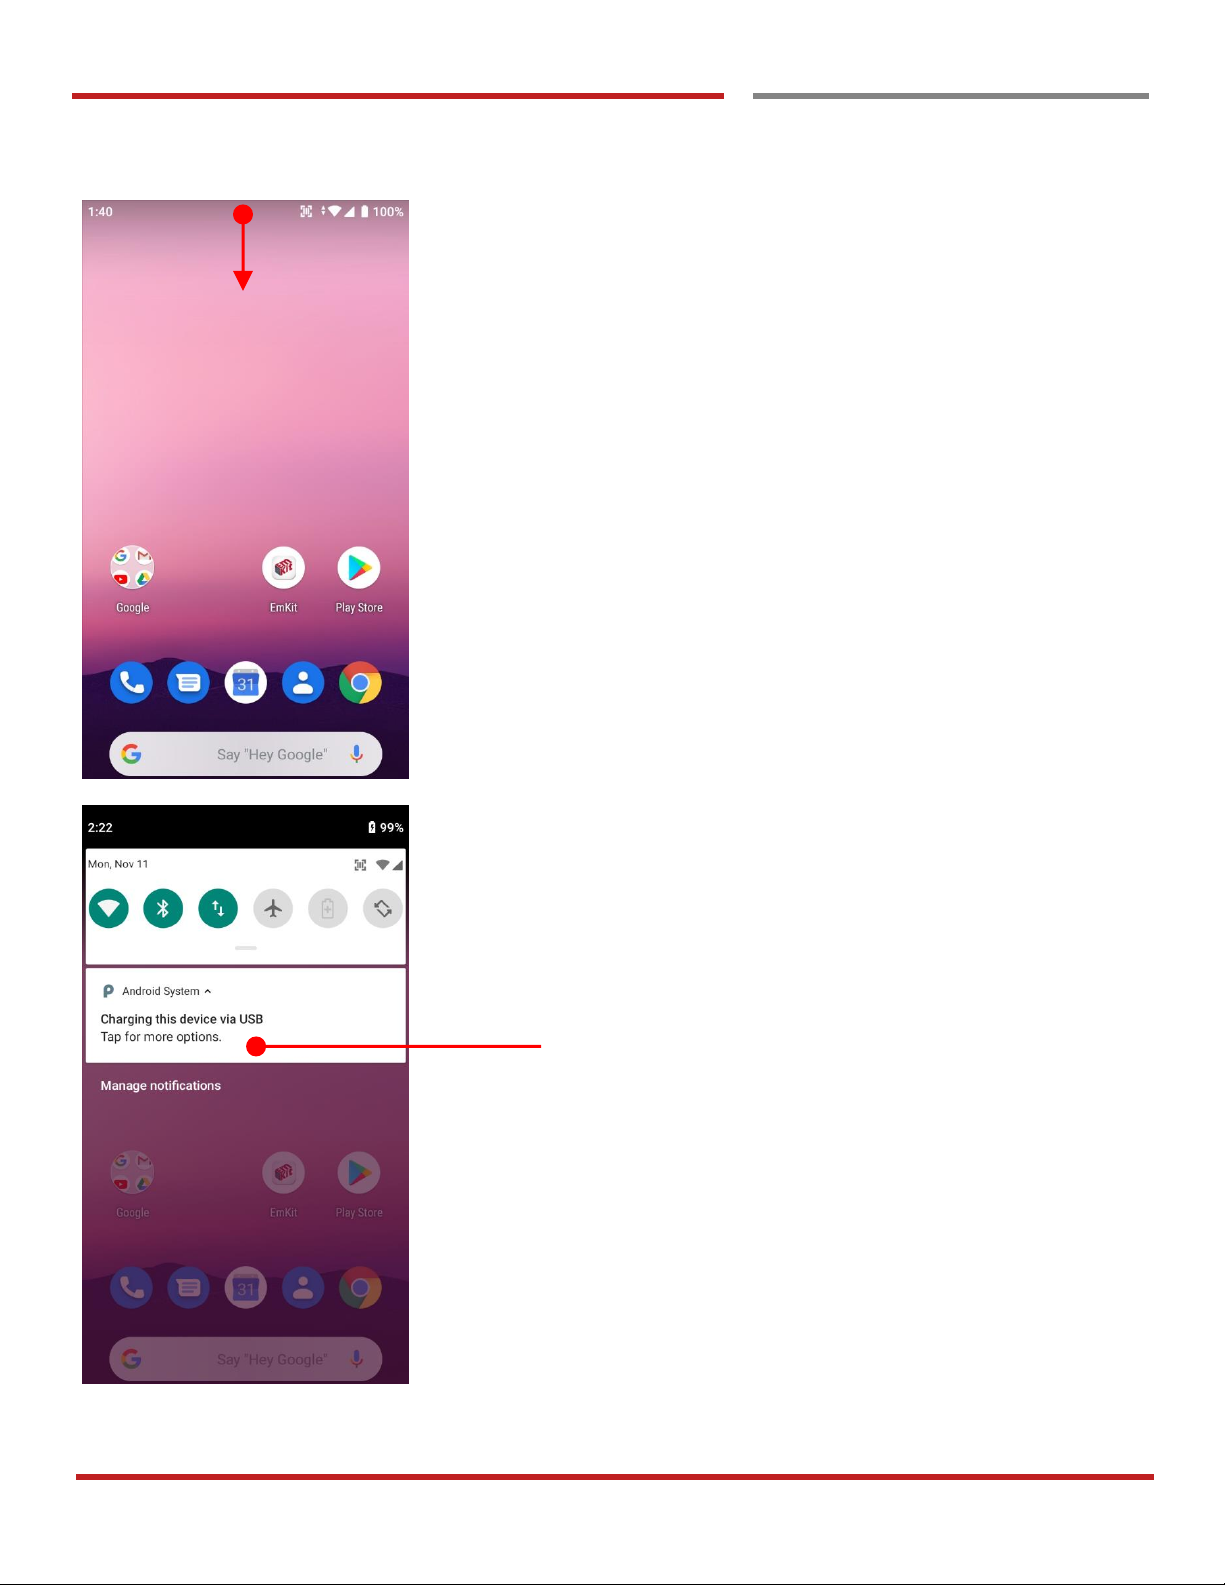
To browse files and folders in the PM90 in your PC, please
change USB connect option
Scroll down the Status Bar
Touch USB connect option
Page 60
PM90 Android 9 User Manual
59
©2006 – 2019 POINTMOBILE Co., Ltd. All rights reserved
Make a Wi-Fi hotspot
MTP connection with PC
Learning the basics
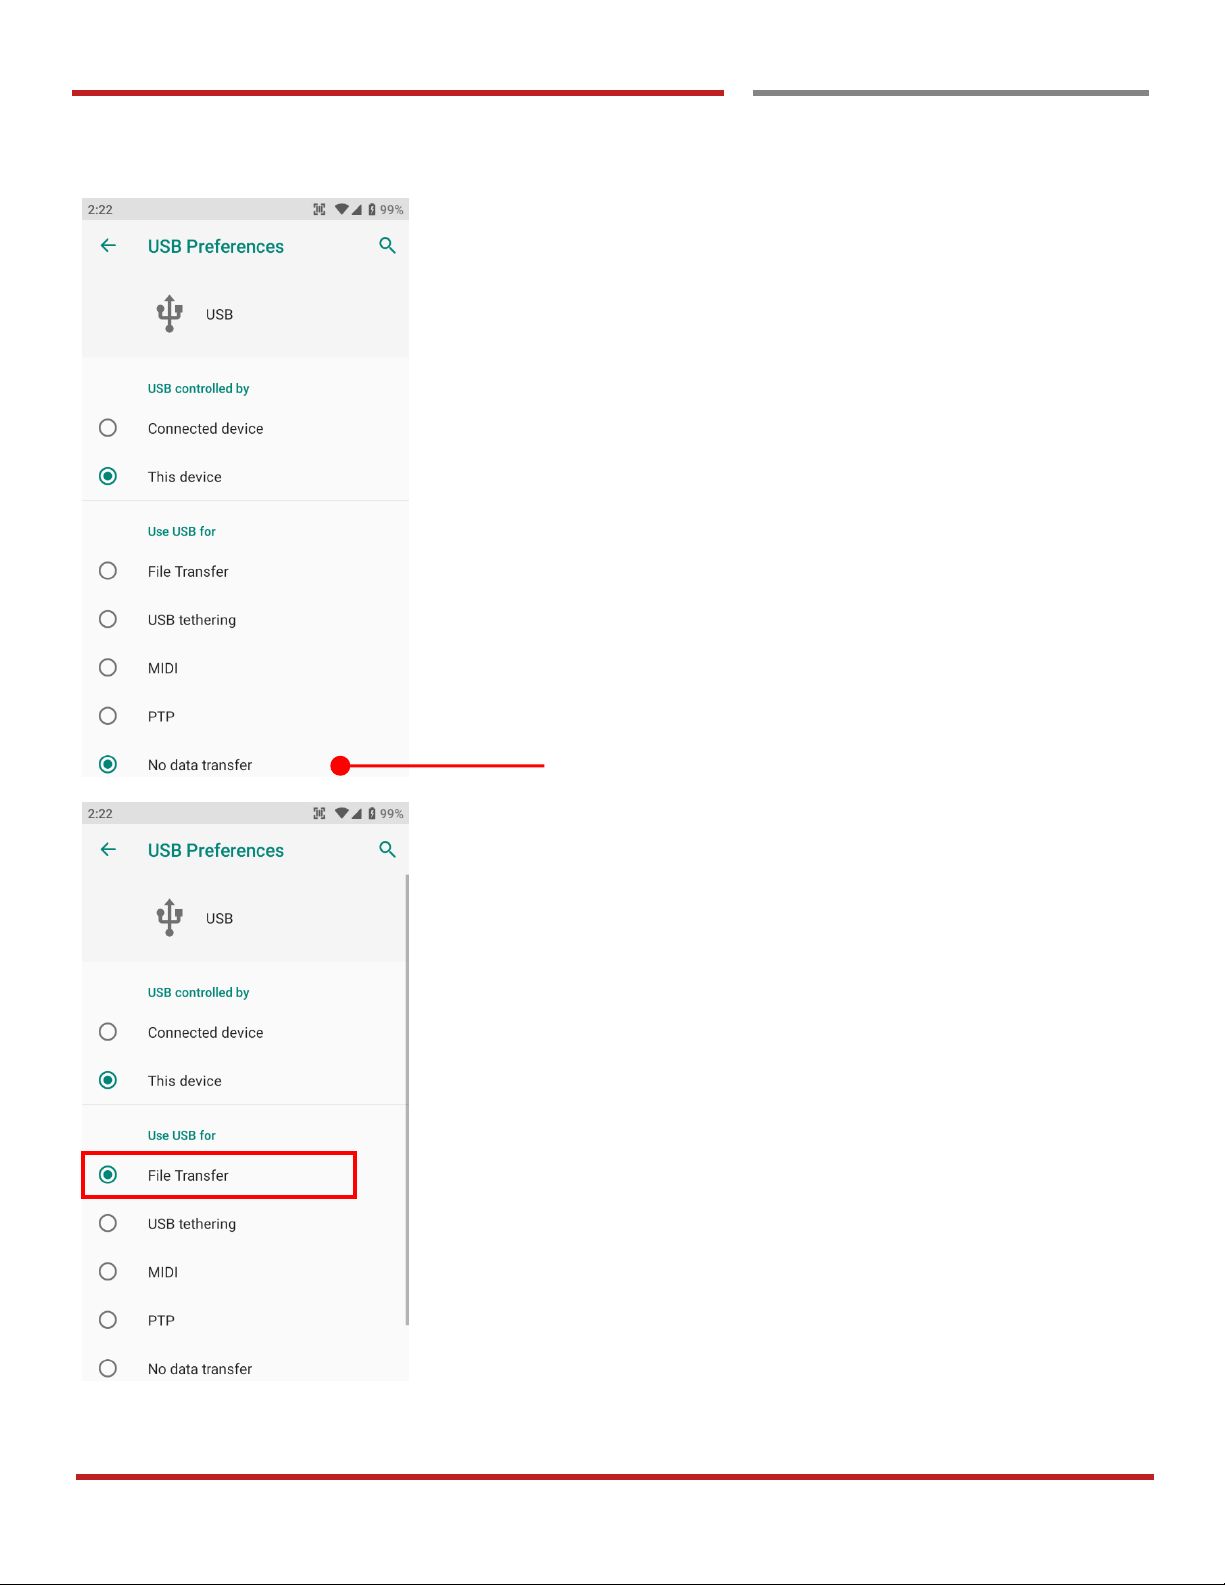
Change option to File Transfer from No data transfer
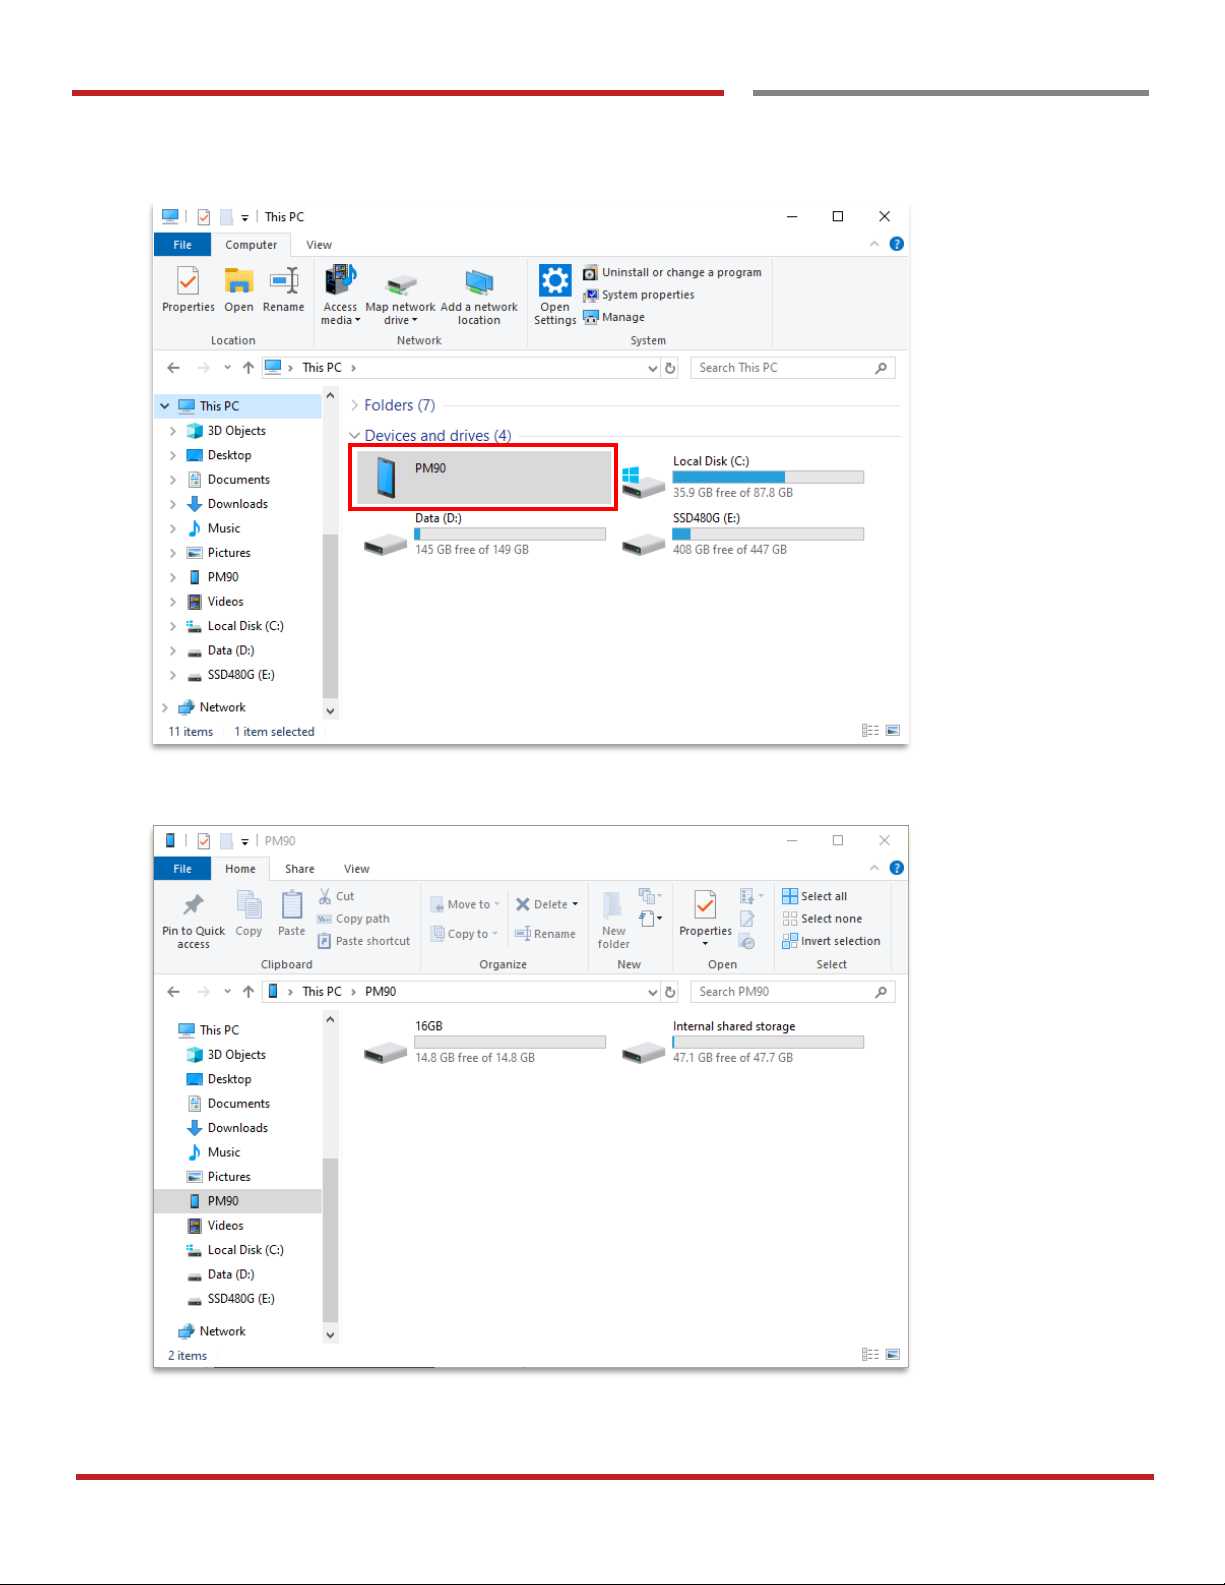
Now your PC recognize PM90 as MTP device
Page 61
PM90 Android 9 User Manual
60
©2006 – 2019 POINTMOBILE Co., Ltd. All rights reserved
Make a Wi-Fi hotspot
MTP connection with PC
Learning the basics
Page 62
PM90 Android 9 User Manual
61
©2006 – 2019 POINTMOBILE Co., Ltd. All rights reserved
Scanner Settings
Use a Scanner
Use a Scanner
Scanner Settings
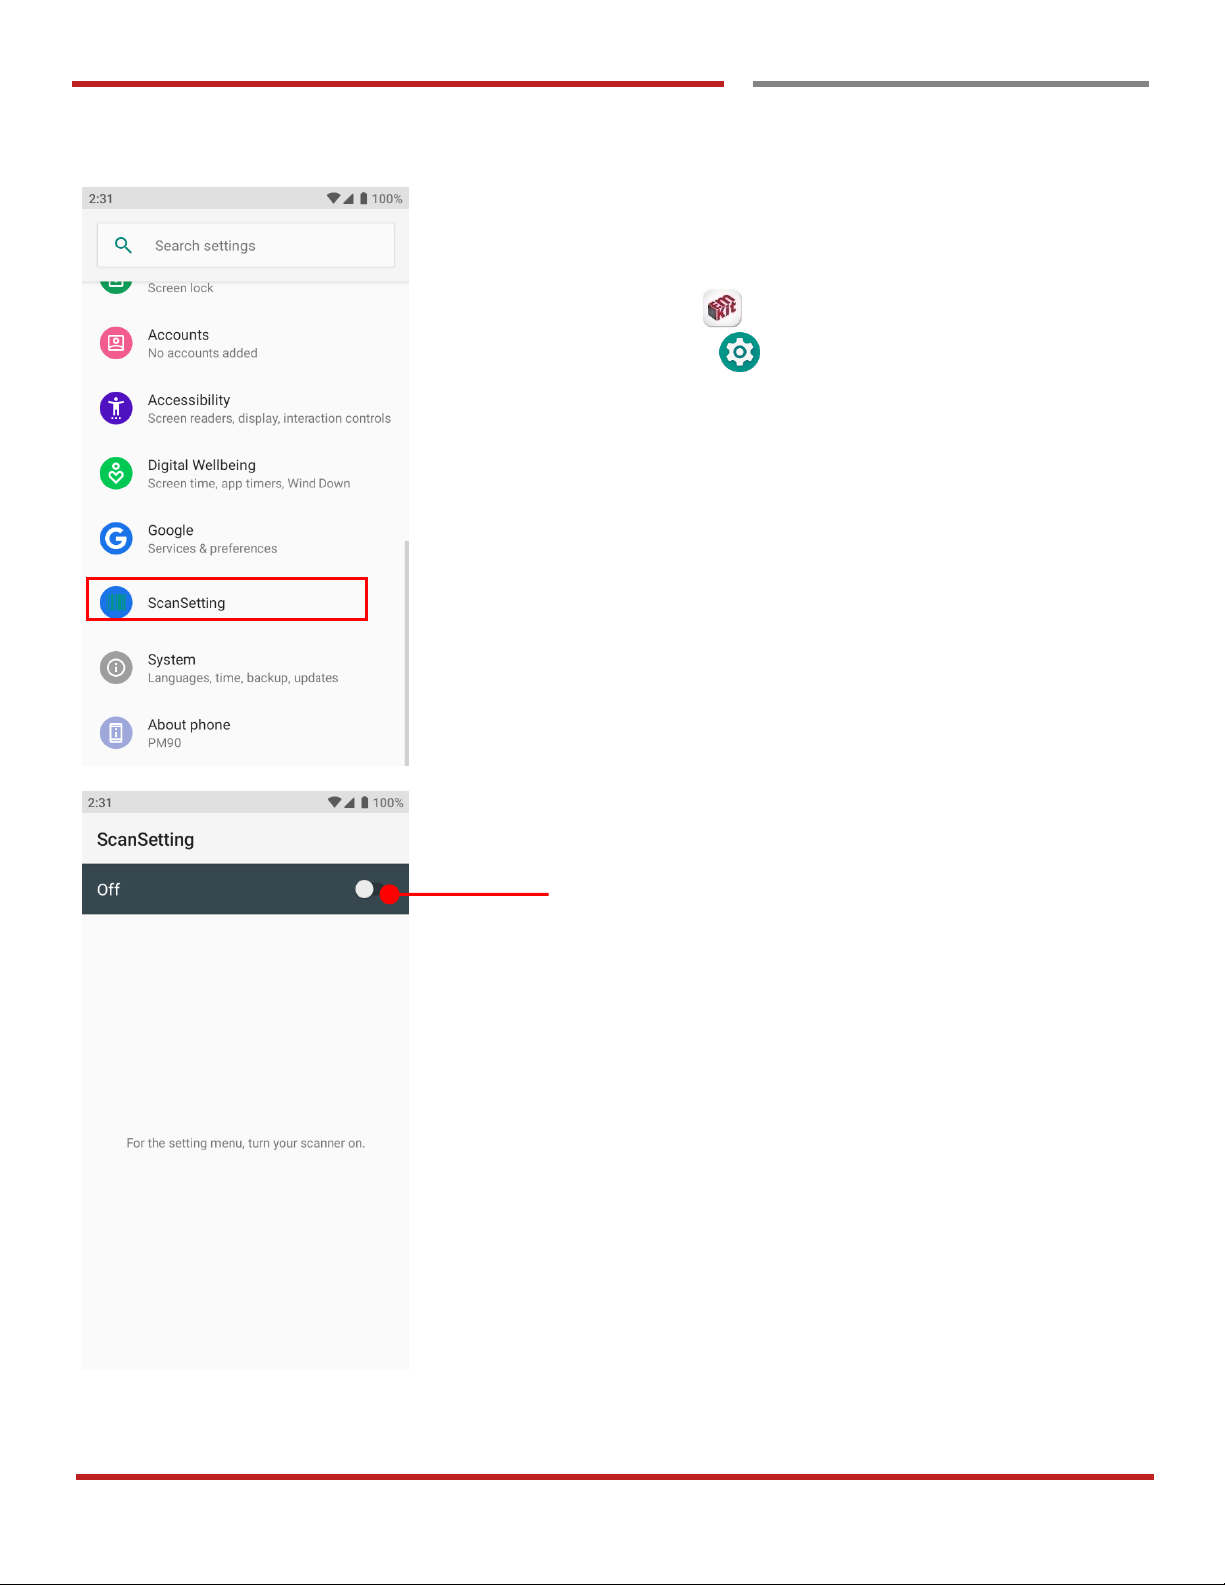
Default setting of Scanner is Off
To use the Scanner,
- Touch EmKit and then ScanSetting
- Settings and then ScanSettings
Touch to turn on the Scanner
Page 63
PM90 Android 9 User Manual
62
©2006 – 2019 POINTMOBILE Co., Ltd. All rights reserved
Scanner Settings
Use a Scanner
Scanner Settings
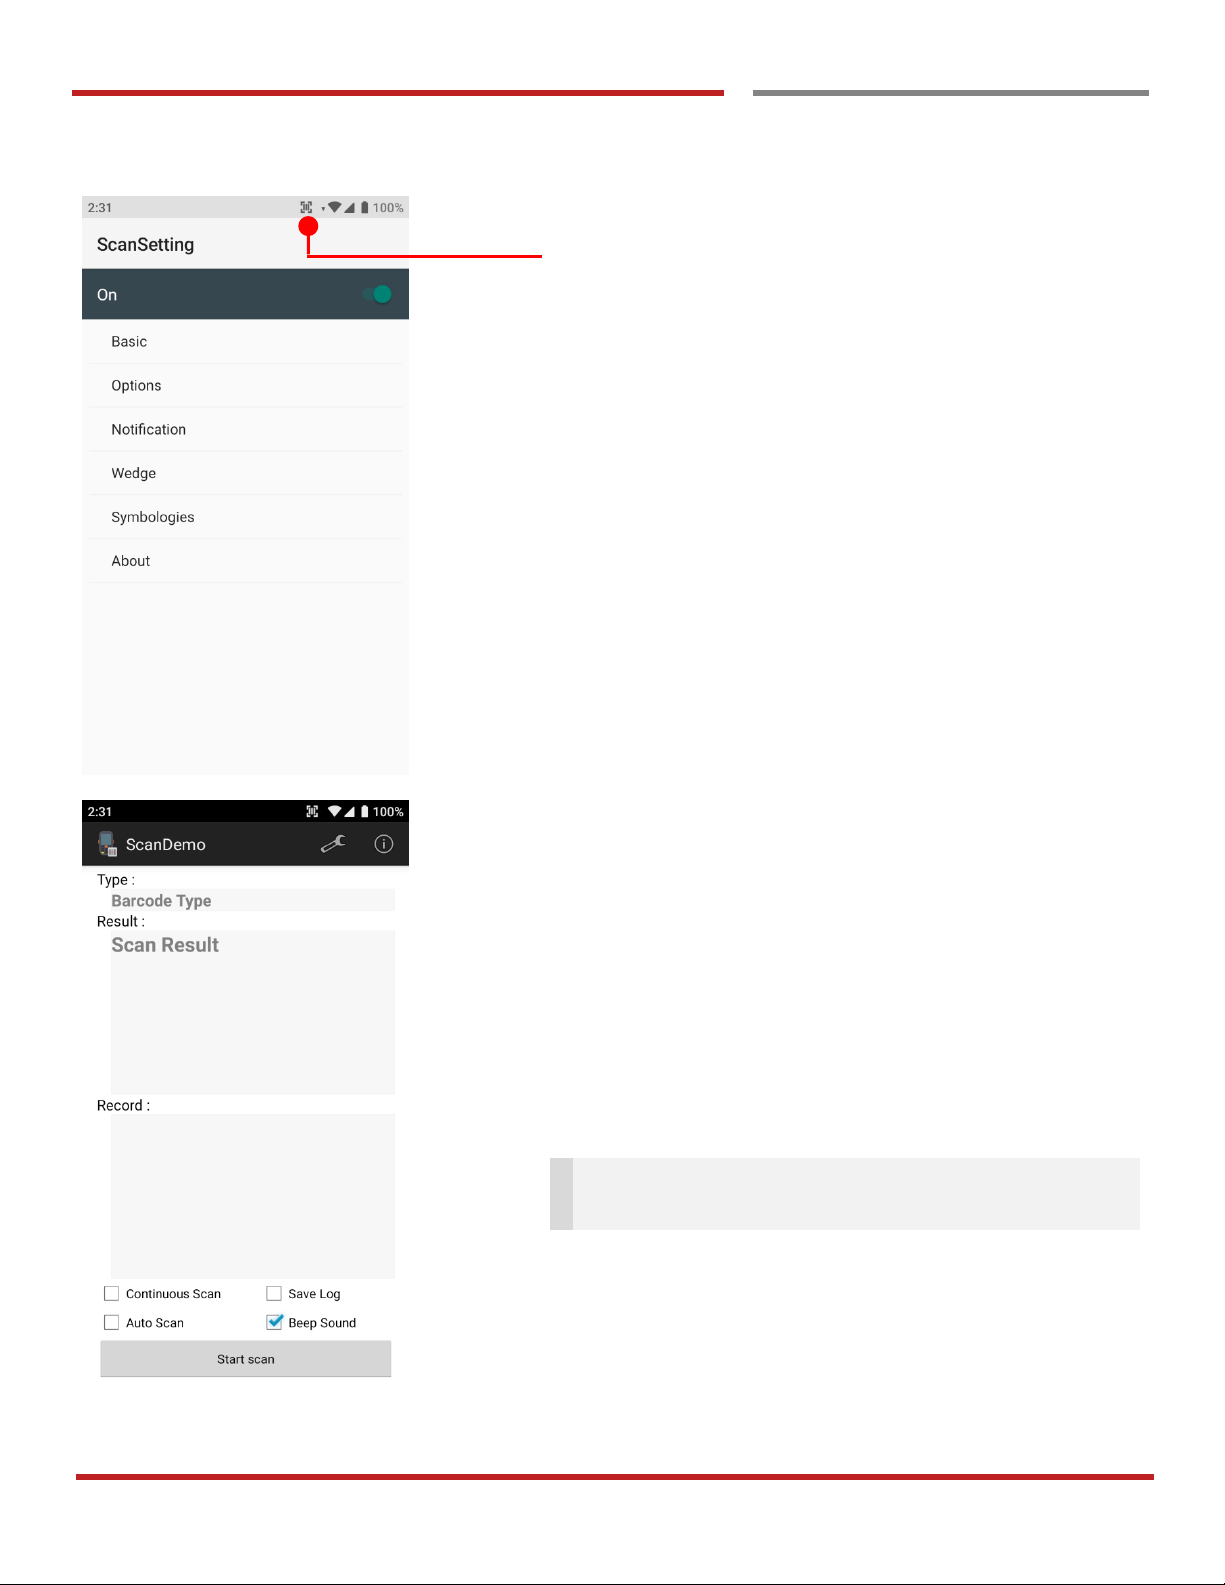
Now you can see Scanner Wedge icon in the Status Bar
Note: When “Scanner” turned on, you can scan the
barcode with ScanDemo in the EmKit
Page 64
PM90 Android 9 User Manual
63
©2006 – 2019 POINTMOBILE Co., Ltd. All rights reserved
Scanner Settings
Use a Scanner
Scanner Settings
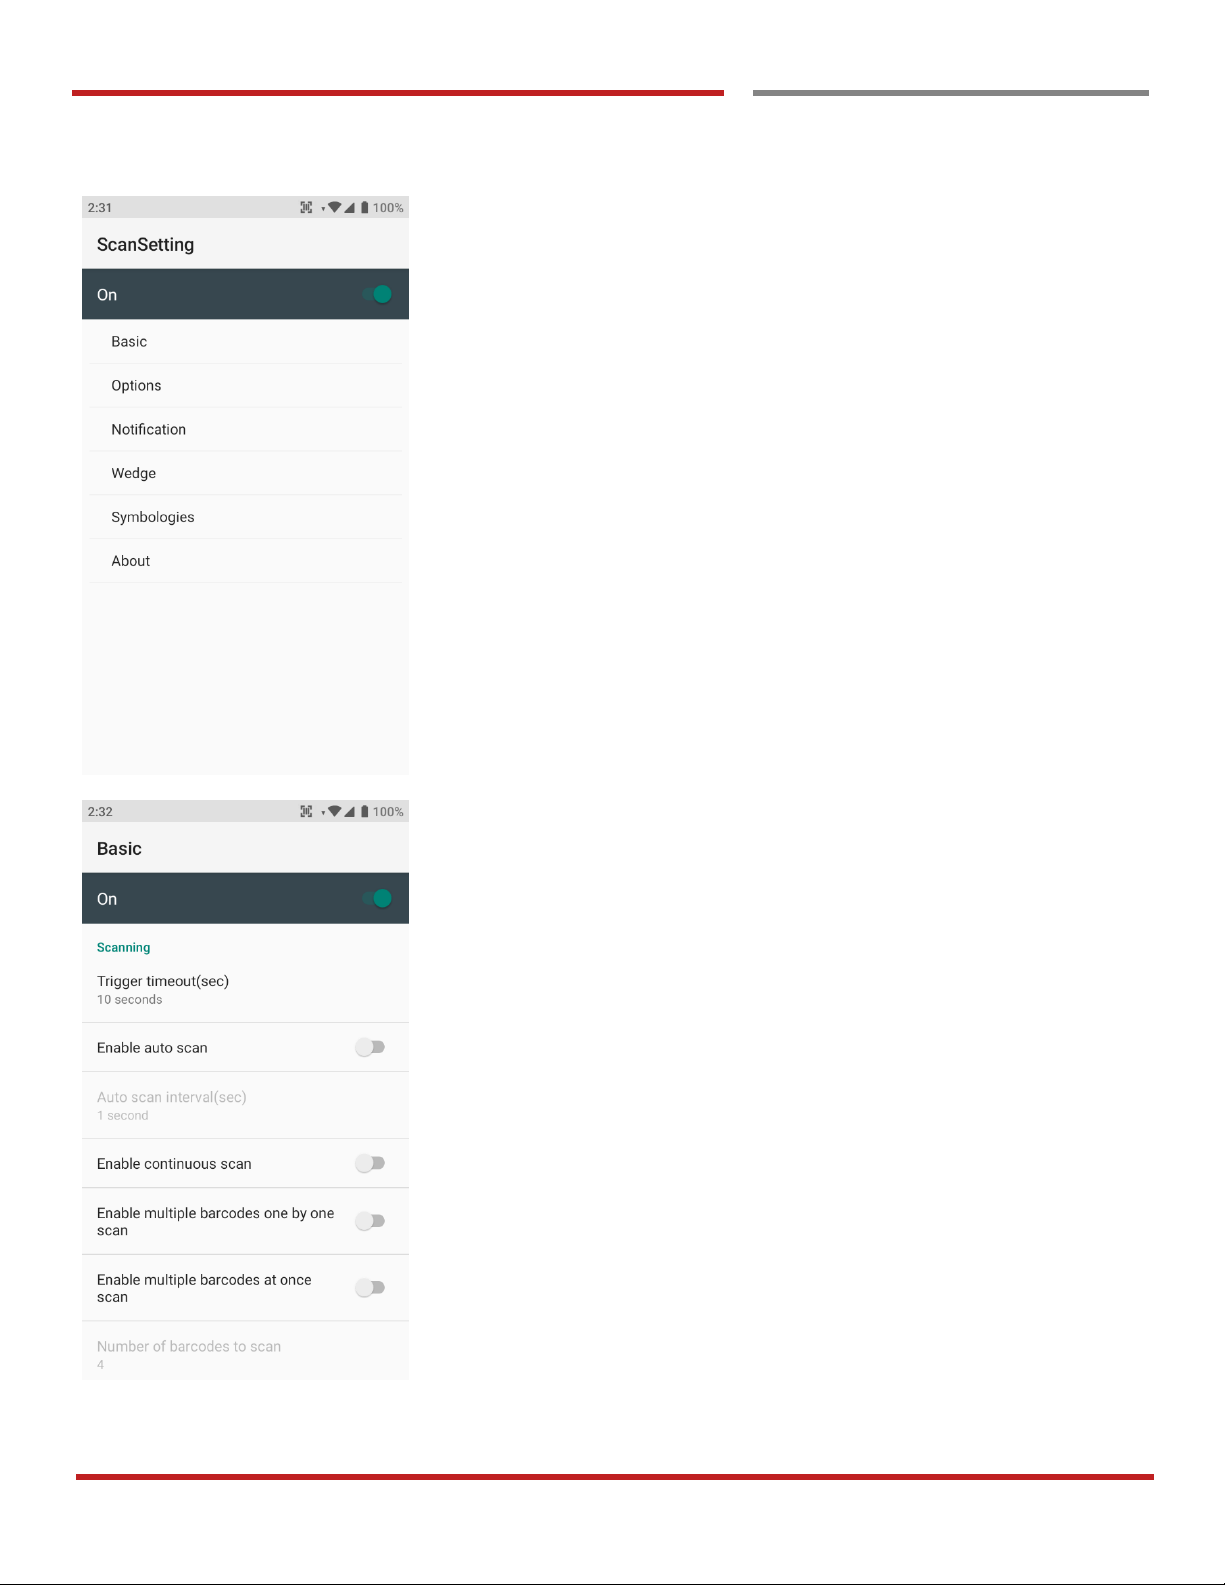
Scanner setting details
Scanner setting consist with Basic, Options, Notification,
Wedge, Symbologies, and About
In the Basic, you can set Scanning option and Wedge
mode option
In the Scanning option, you can change Scanner’s Trigger
timeout and set Auto scan & Continues scan options
Page 65
PM90 Android 9 User Manual
64
©2006 – 2019 POINTMOBILE Co., Ltd. All rights reserved
Scanner Settings
Use a Scanner
Scanner Settings
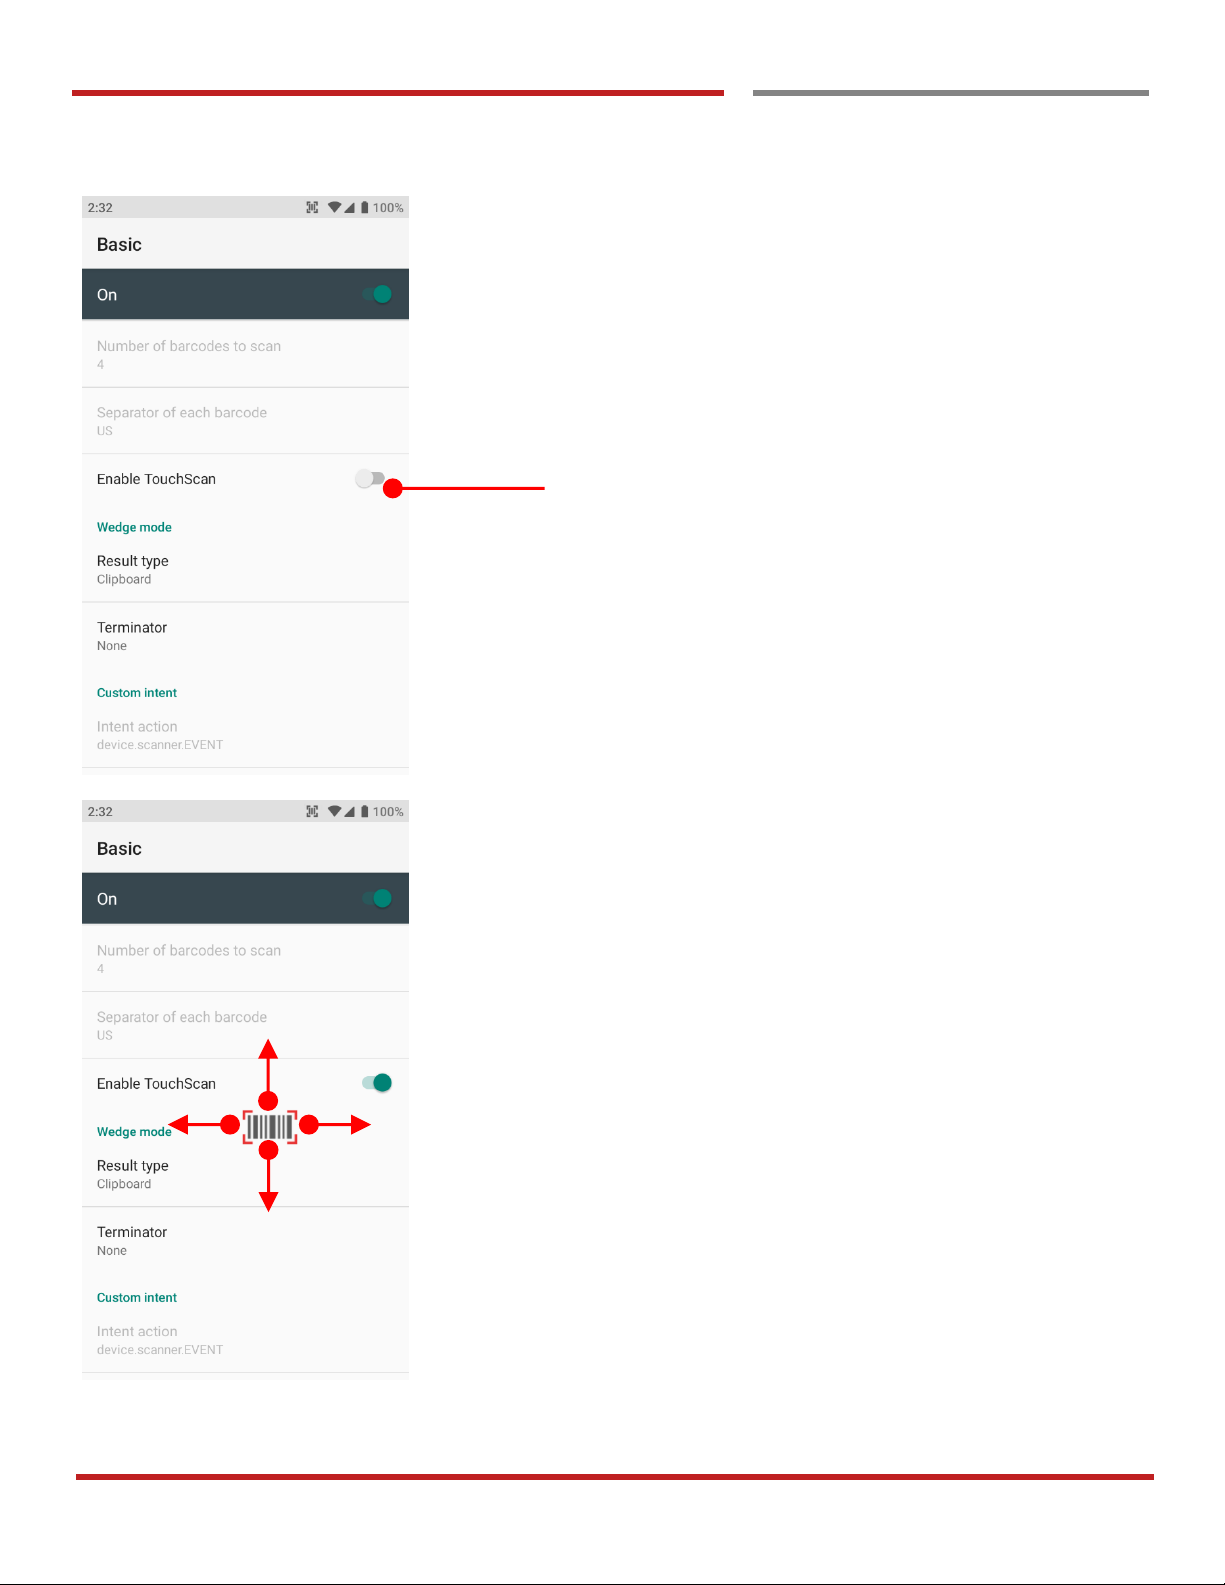
TouchScan is software scanner button.
Touch to enable this function
You can place TouchScan icon any position.
Touch the icon to read a barcode.
Page 66
PM90 Android 9 User Manual
65
©2006 – 2019 POINTMOBILE Co., Ltd. All rights reserved
Use a Scanner
Scanner Settings
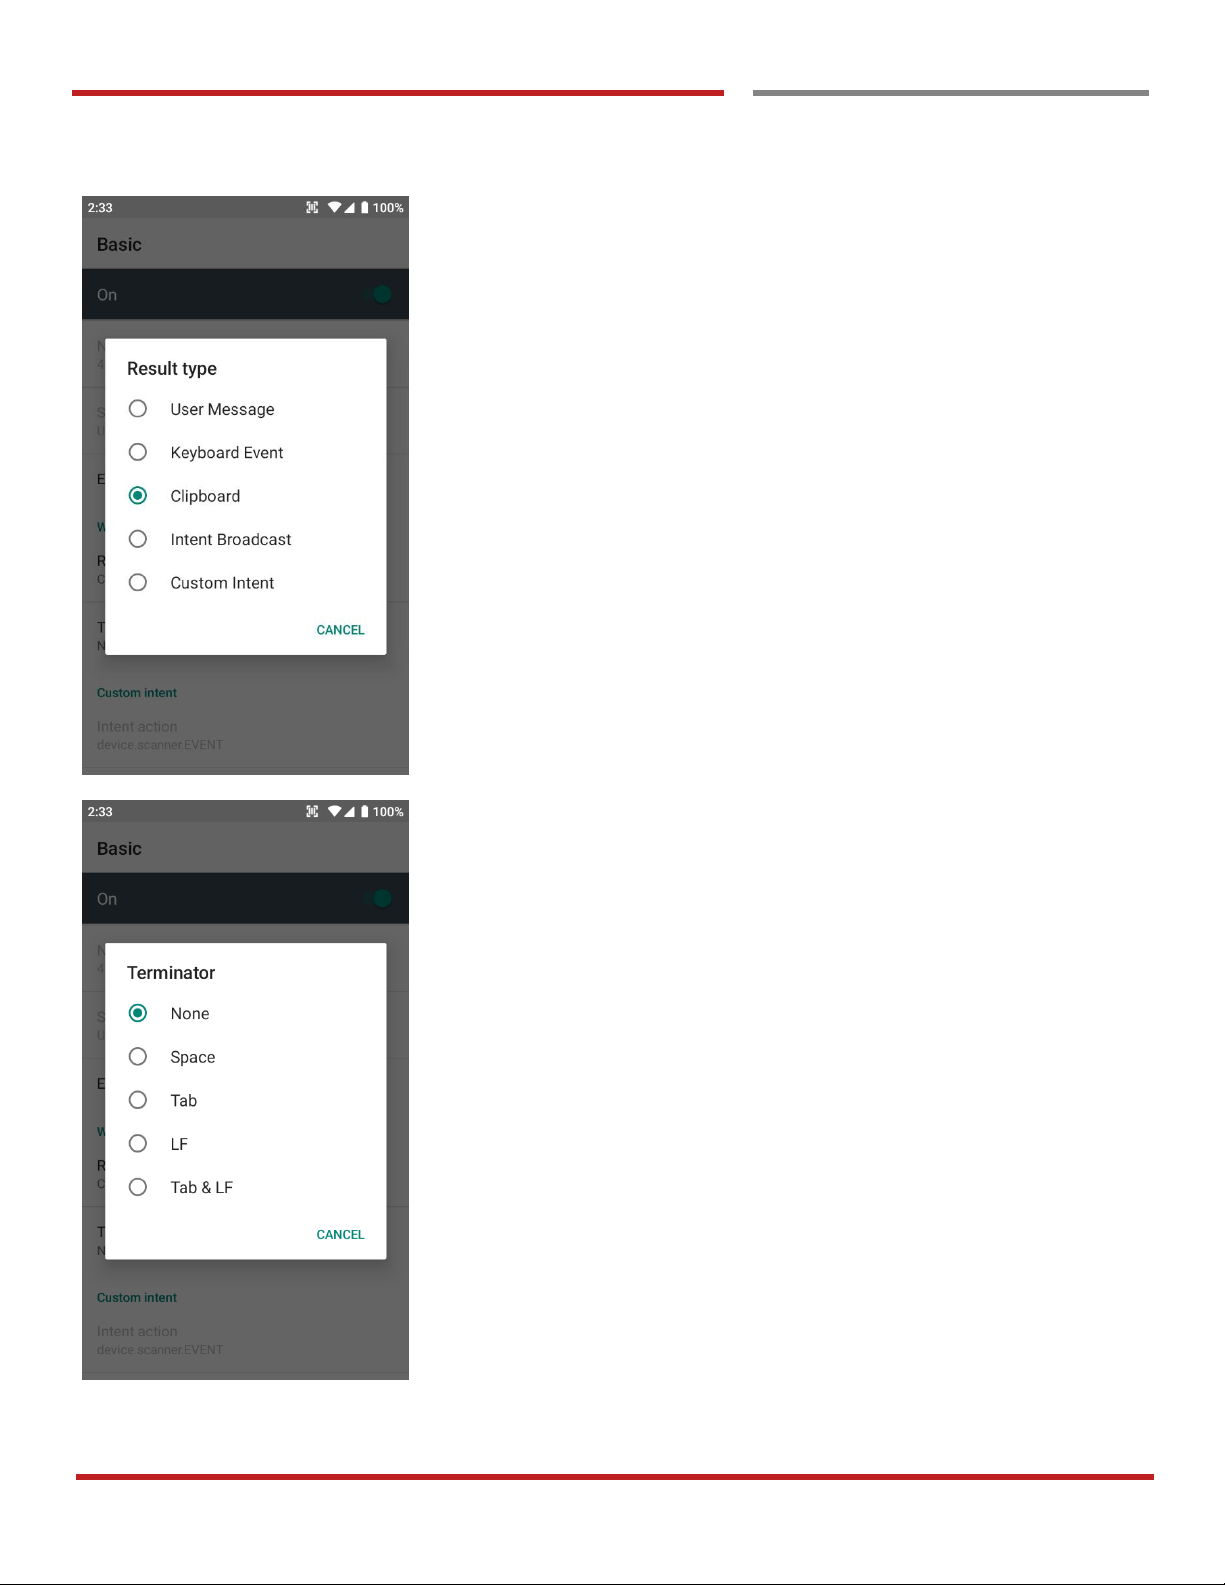
In the Wedge menu you can change, decode scan data’s
result type handling User Message, Keyboard Event,
Clipboard, Intent Broadcast or Custom Intent
Also, you can set Terminator as None, Space, Tab, LF or
Tab & LF
Page 67
PM90 Android 9 User Manual
66
©2006 – 2019 POINTMOBILE Co., Ltd. All rights reserved
Scanner Settings
Use a Scanner
Scanner Settings
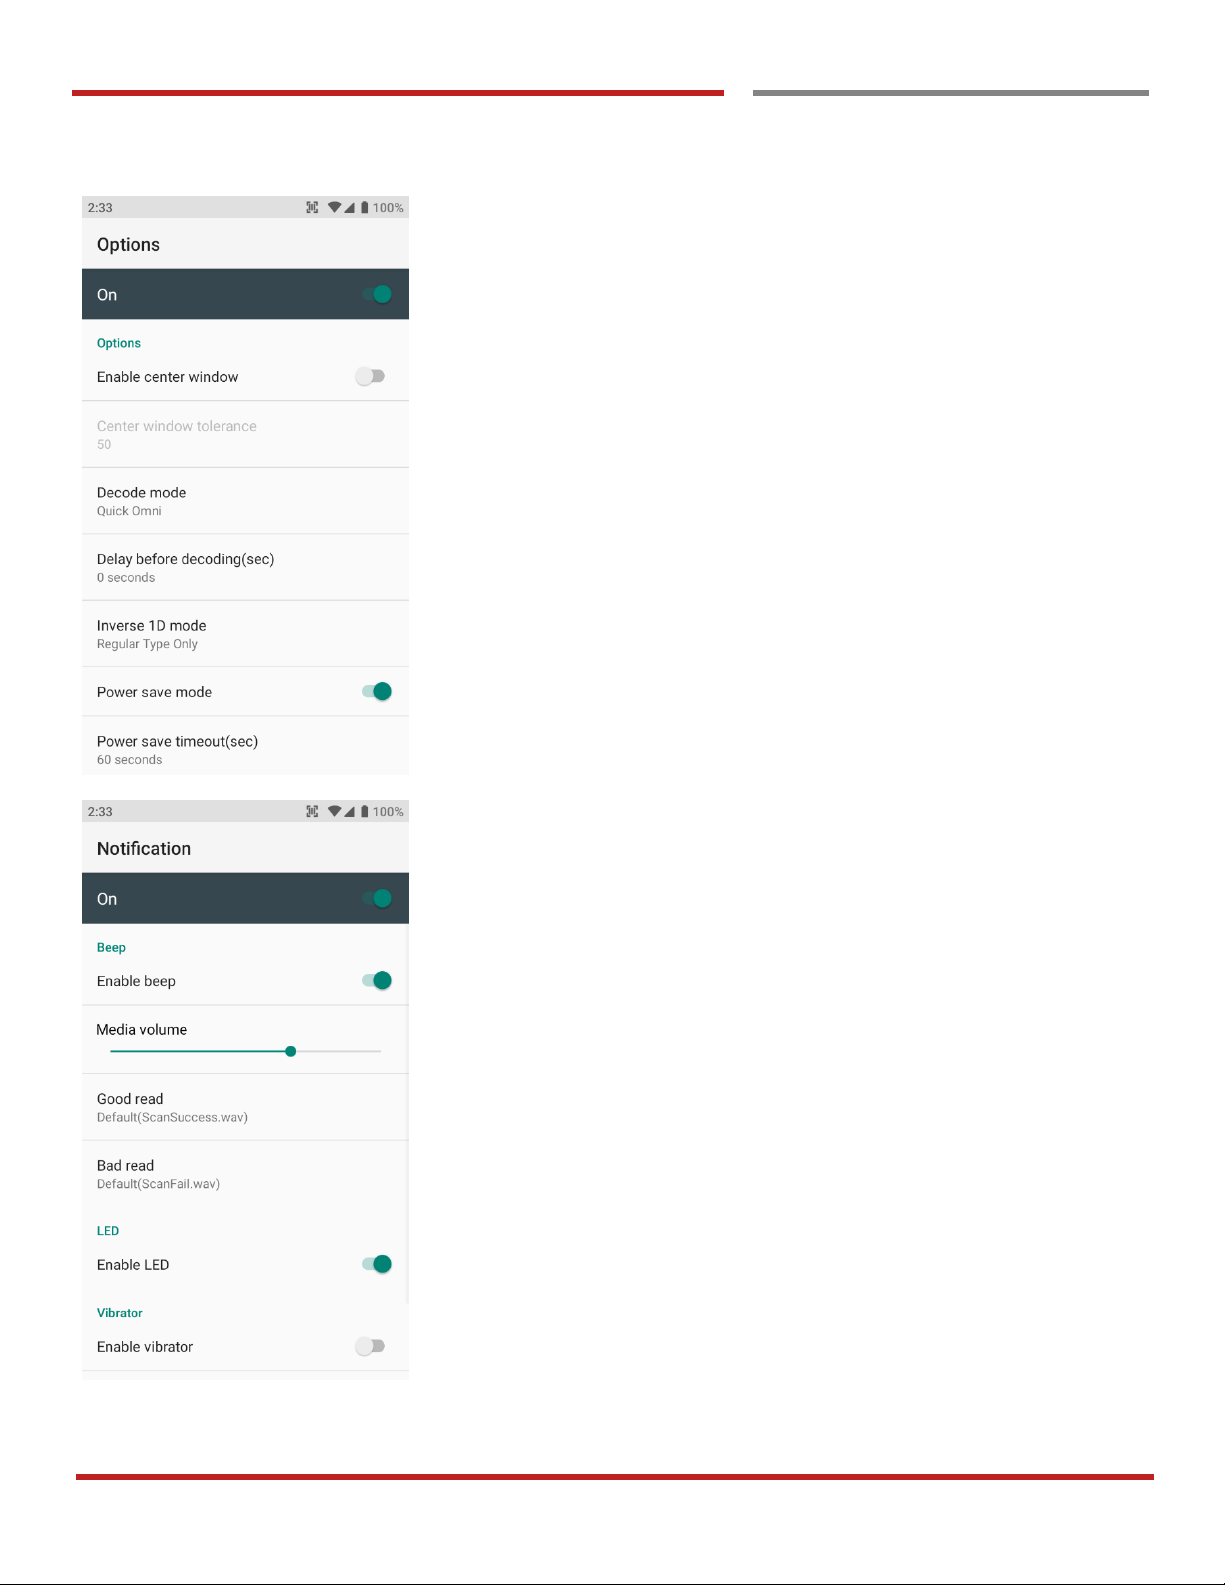
In the Options, you can enable/disable the Center
Window, set Decode mode, Power save mode and
enable/disable Aimer & Illumination option
In the Notification, you can change the volume level,
notification sound, LED and vibration option
Page 68
PM90 Android 9 User Manual
67
©2006 – 2019 POINTMOBILE Co., Ltd. All rights reserved
Scanner Settings
Use a Scanner
Scanner Settings
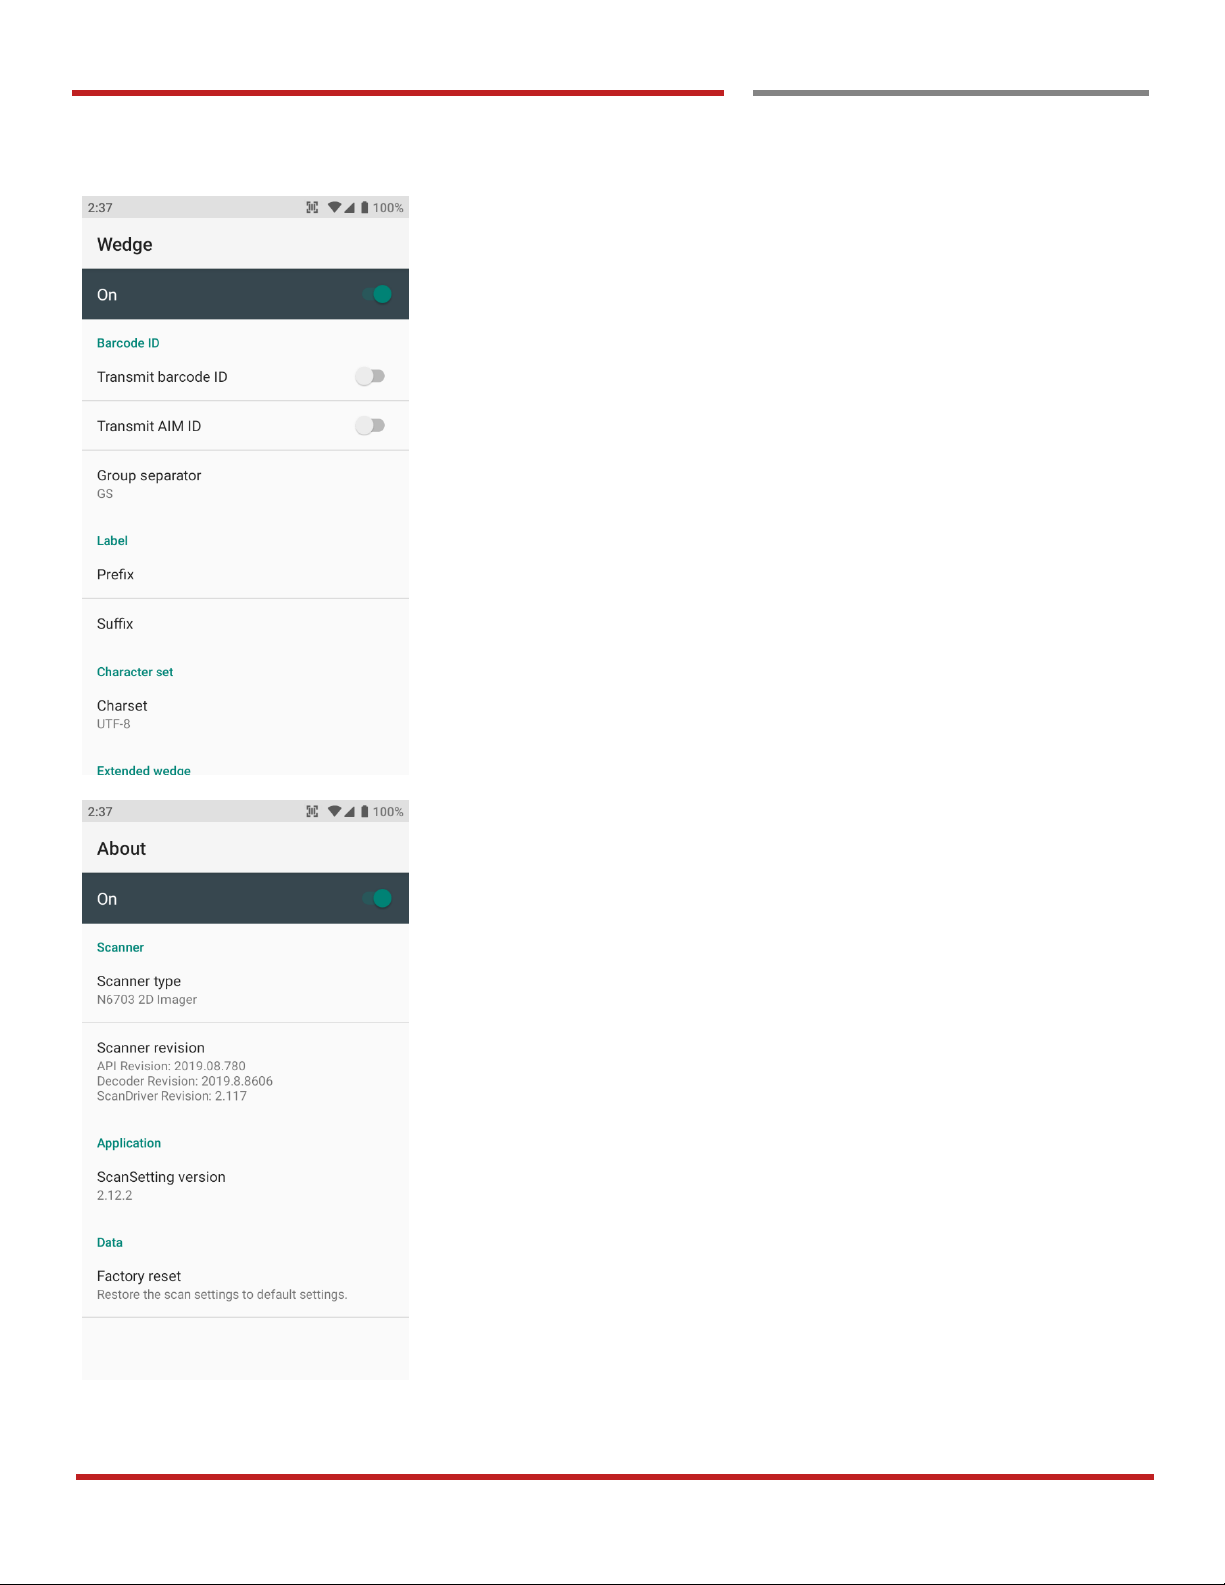
In the Wedge, you can enable/disable Barcode ID and Aim
ID, set Group separator, Prefix & Suffix, Character set
and Extended Wedge.
In the About, you can check your Scanner’s information and
restore Scanner’s settings to default
Page 69
PM90 Android 9 User Manual
68
©2006 – 2019 POINTMOBILE Co., Ltd. All rights reserved
Scan a Barcode
Scan a Barcode
Scanner Settings
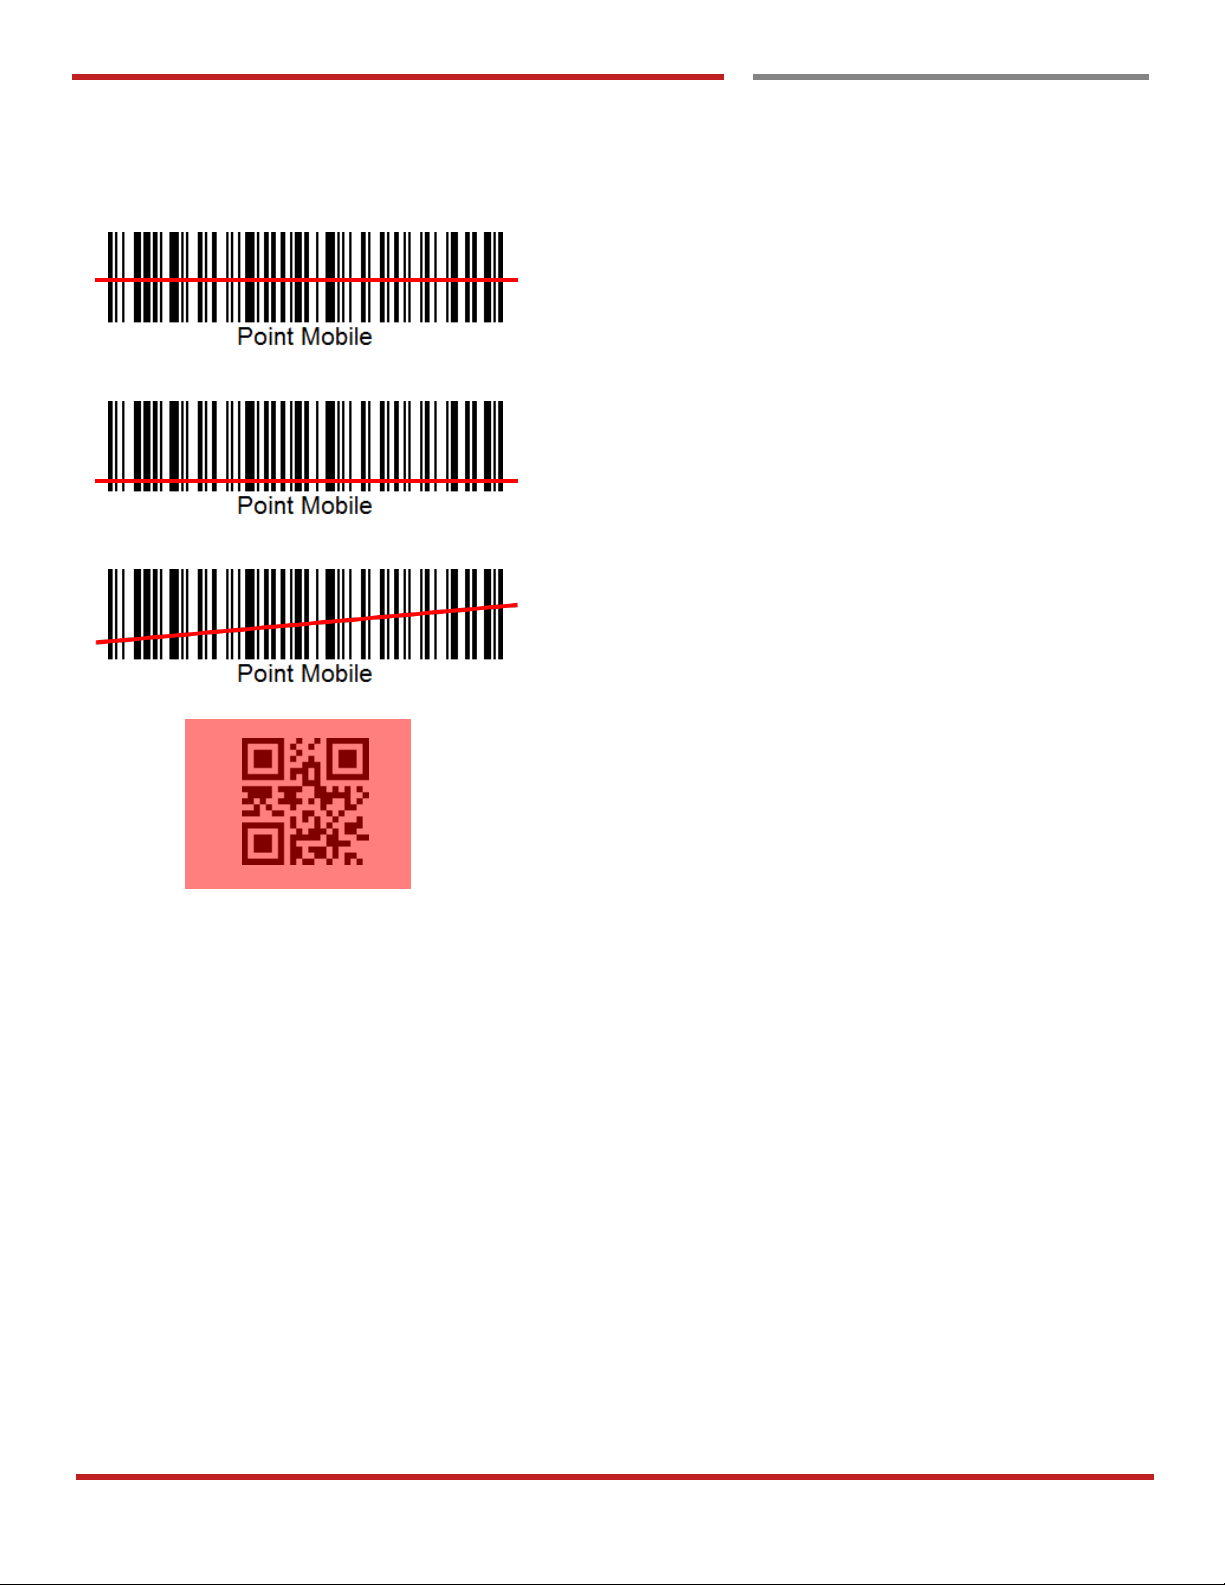
Example of good Barcode reading
Idle barcode scan
Please aim the middle of barcode
Even you aim the barcode slightly upper or down area or
angle is slightly tilted, you can read the barcode
Page 70
PM90 Android 9 User Manual
69
©2006 – 2019 POINTMOBILE Co., Ltd. All rights reserved
Scan a Barcode
Scan a Barcode
Scanner Settings
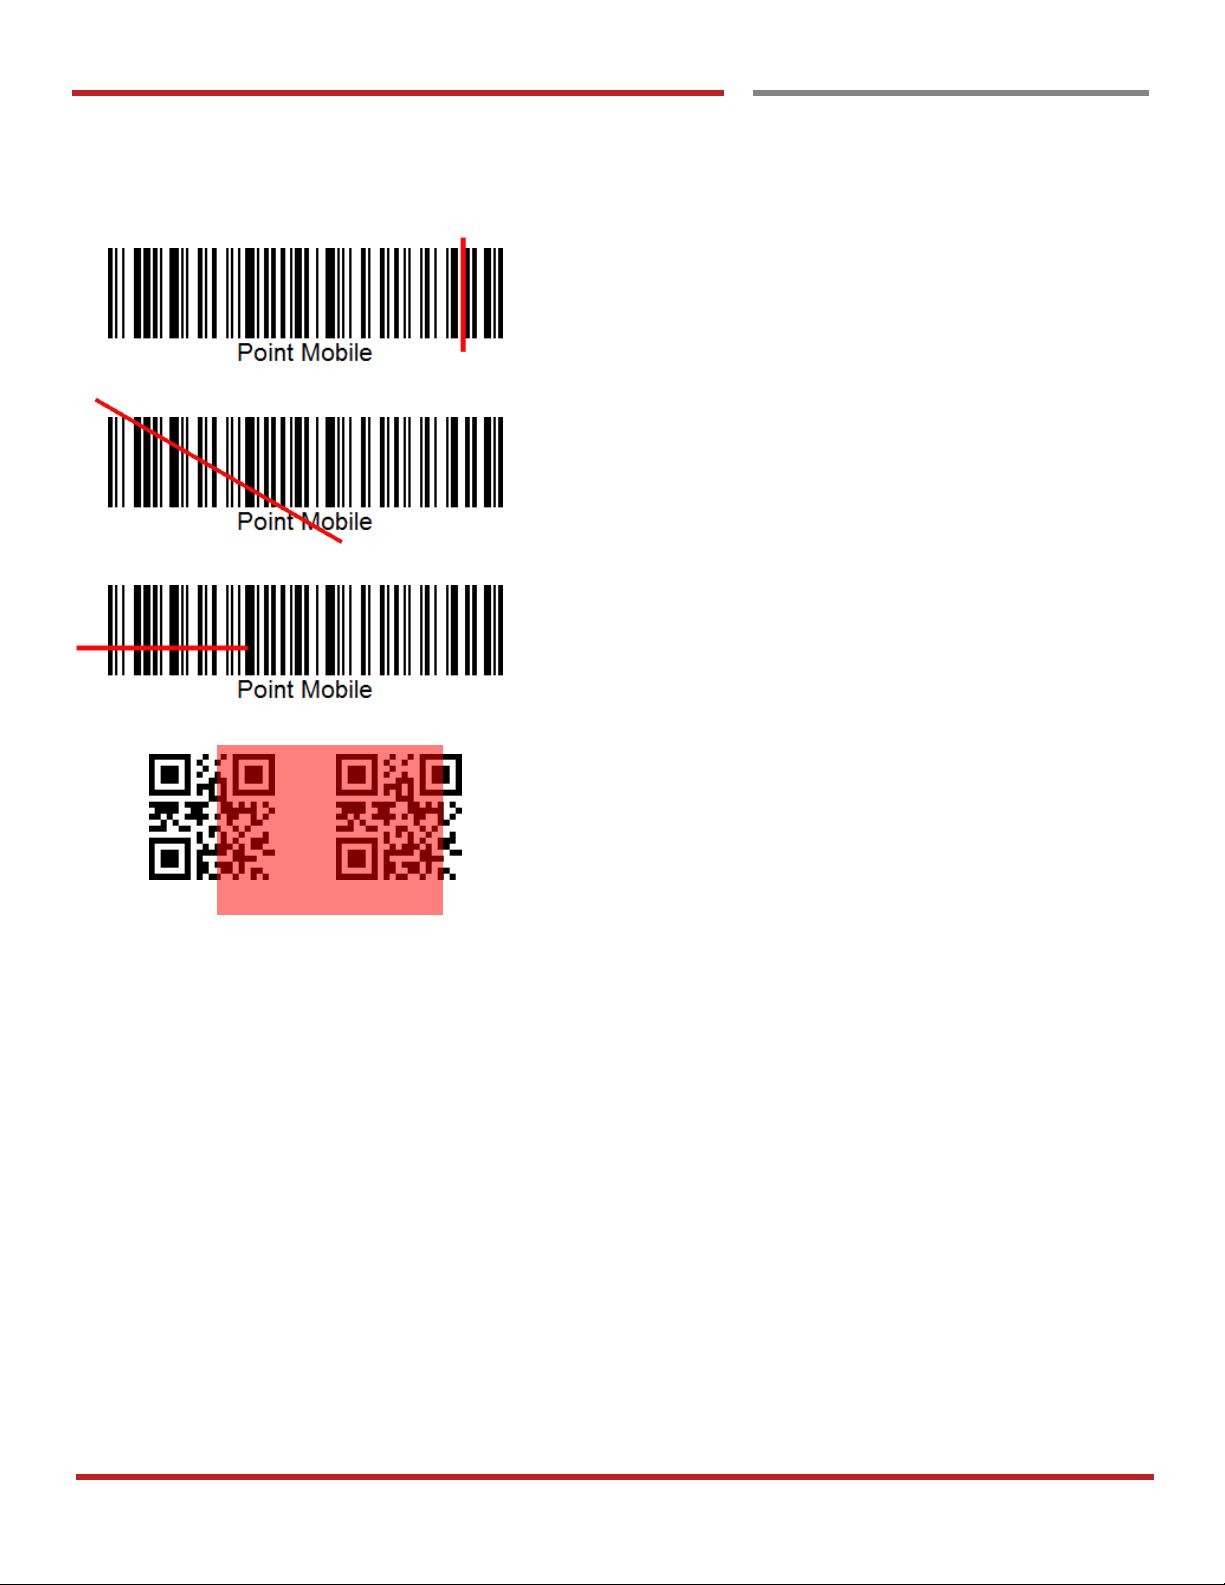
Example of bad Barcode reading
If you aim the barcode wrong direction or tilt too much, you
can’t read the barcode
If you aim part of Barcode or aim two barcodes together,
you can’t read the barcode
Page 71
PM90 Android 9 User Manual
70
©2006 – 2019 POINTMOBILE Co., Ltd. All rights reserved
OS Update
OS Image update from a Storage
OS Image update from a Storage
OS Update
Note: To update OS image, copy or place OS image
file into the root folder of “Internal Storage” or “External
Storage”
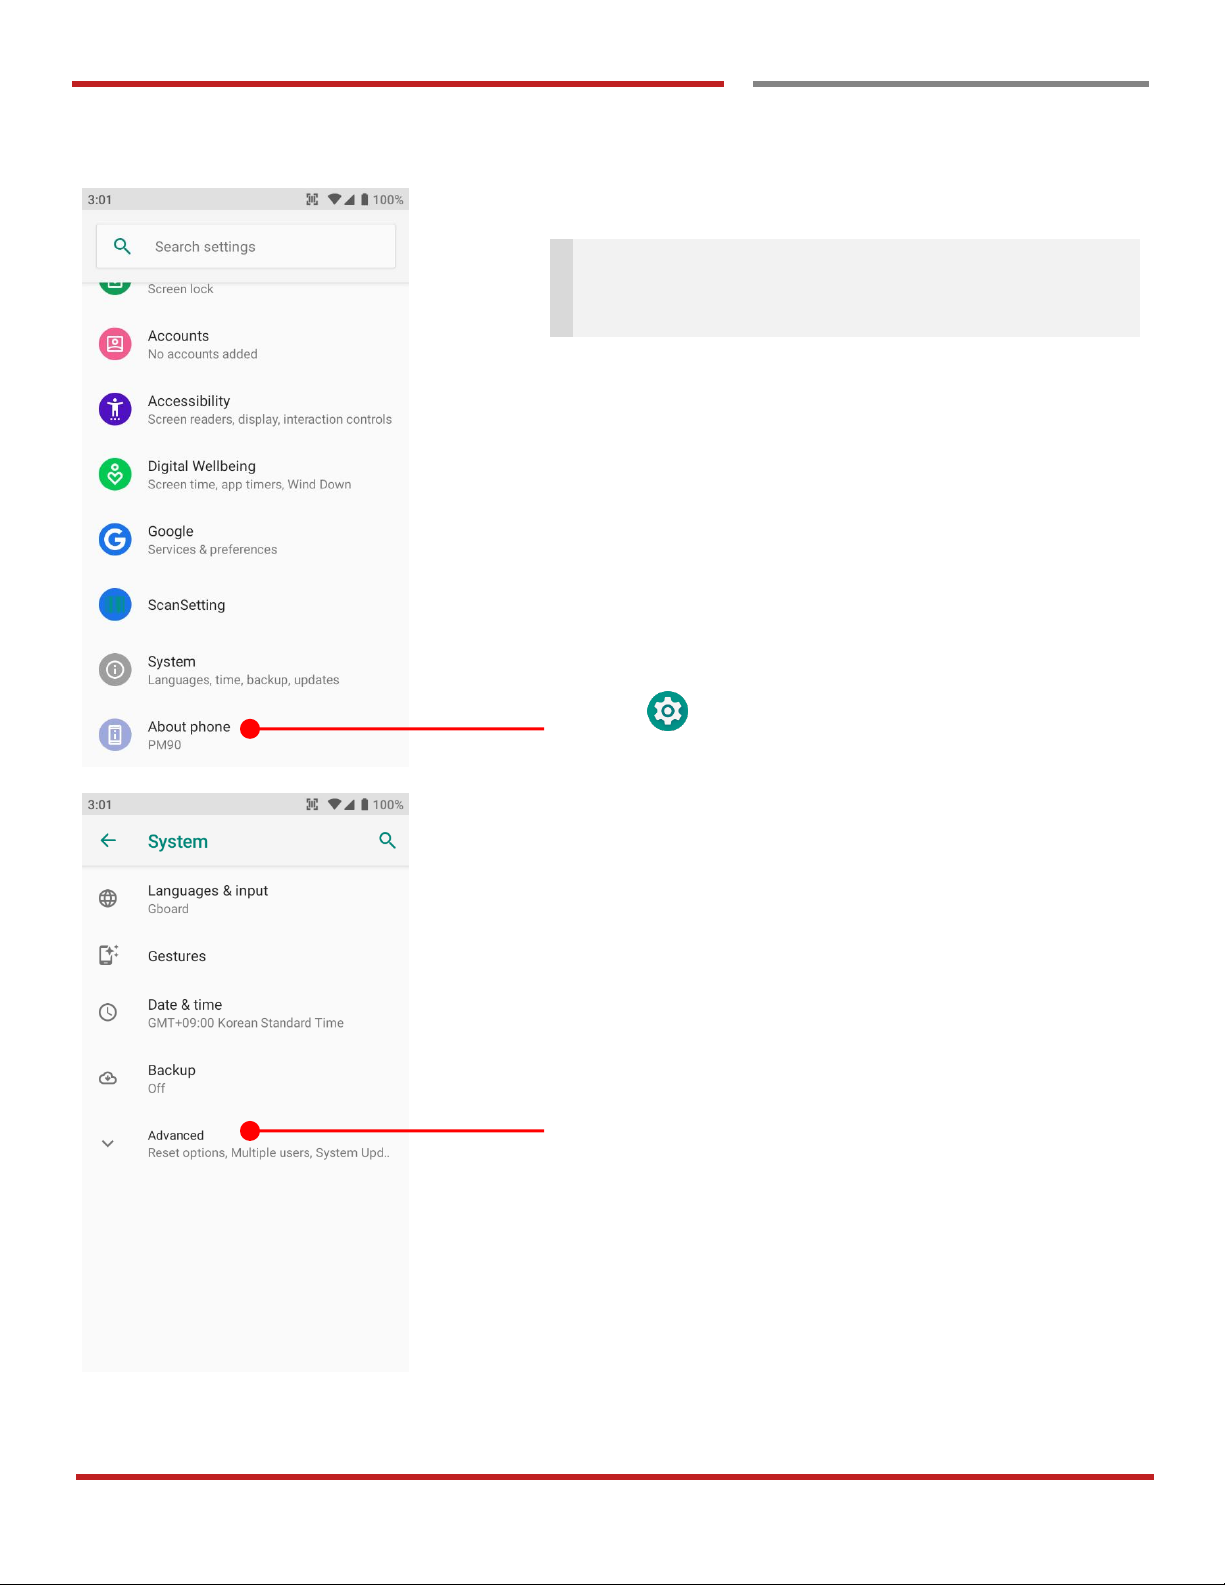
Settings and then About phone
Touch Advanced
Page 72
PM90 Android 9 User Manual
71
©2006 – 2019 POINTMOBILE Co., Ltd. All rights reserved
OS Update
OS Image update from a Storage
OS Update
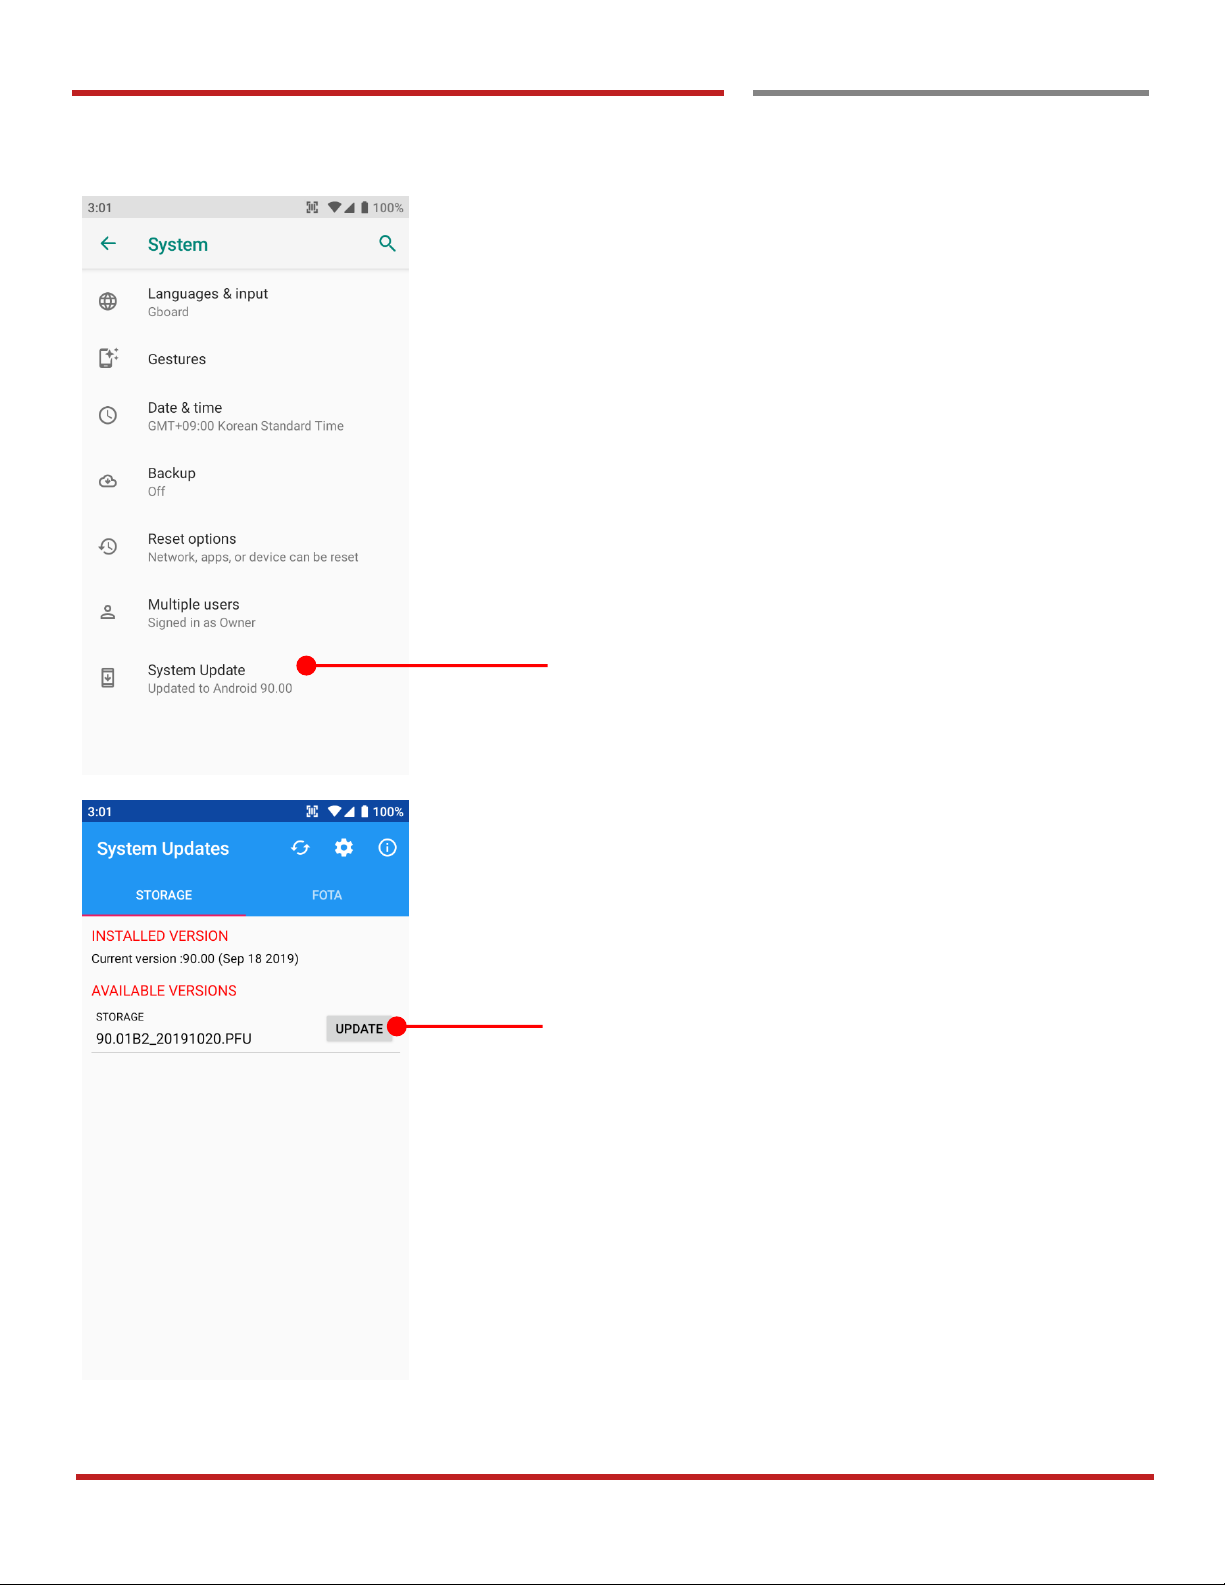
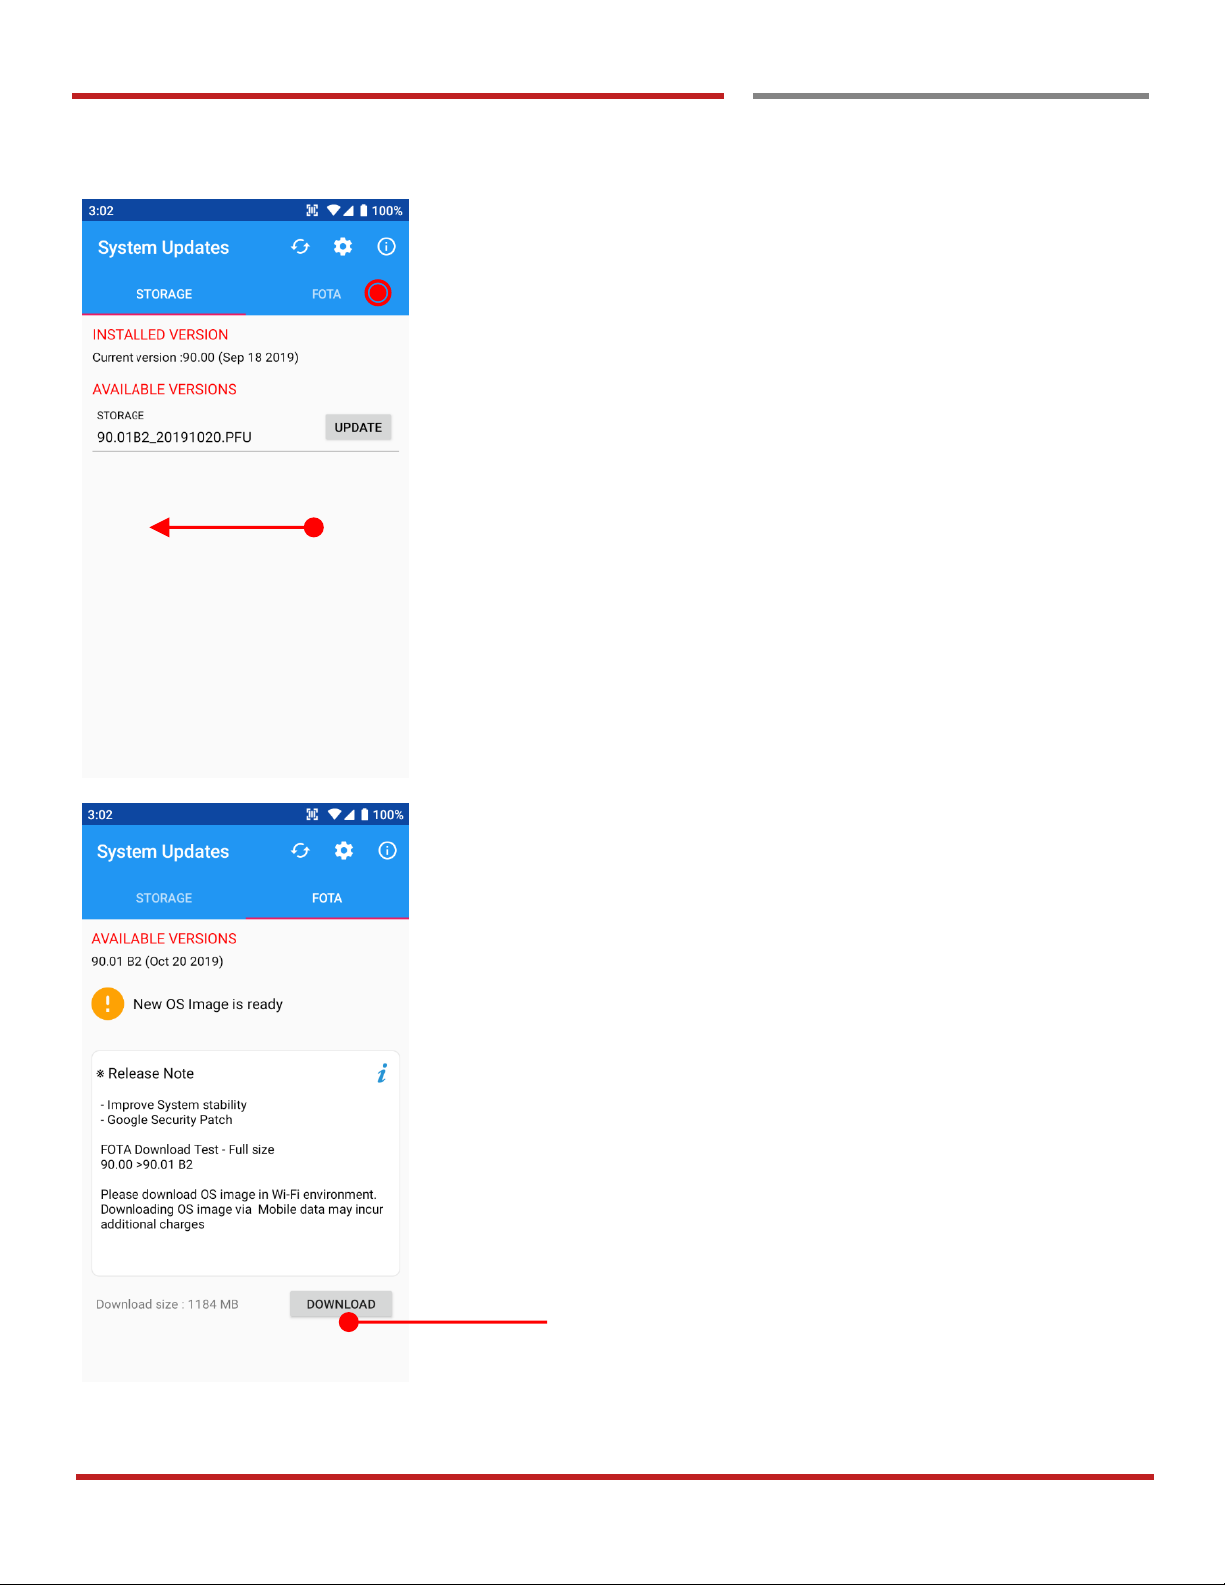
Touch System Updates
Your PM90 will check storage and display available OS
image. Touch UPDATE
Page 73
PM90 Android 9 User Manual
72
©2006 – 2019 POINTMOBILE Co., Ltd. All rights reserved
OS Image update from a Storage
OS Update
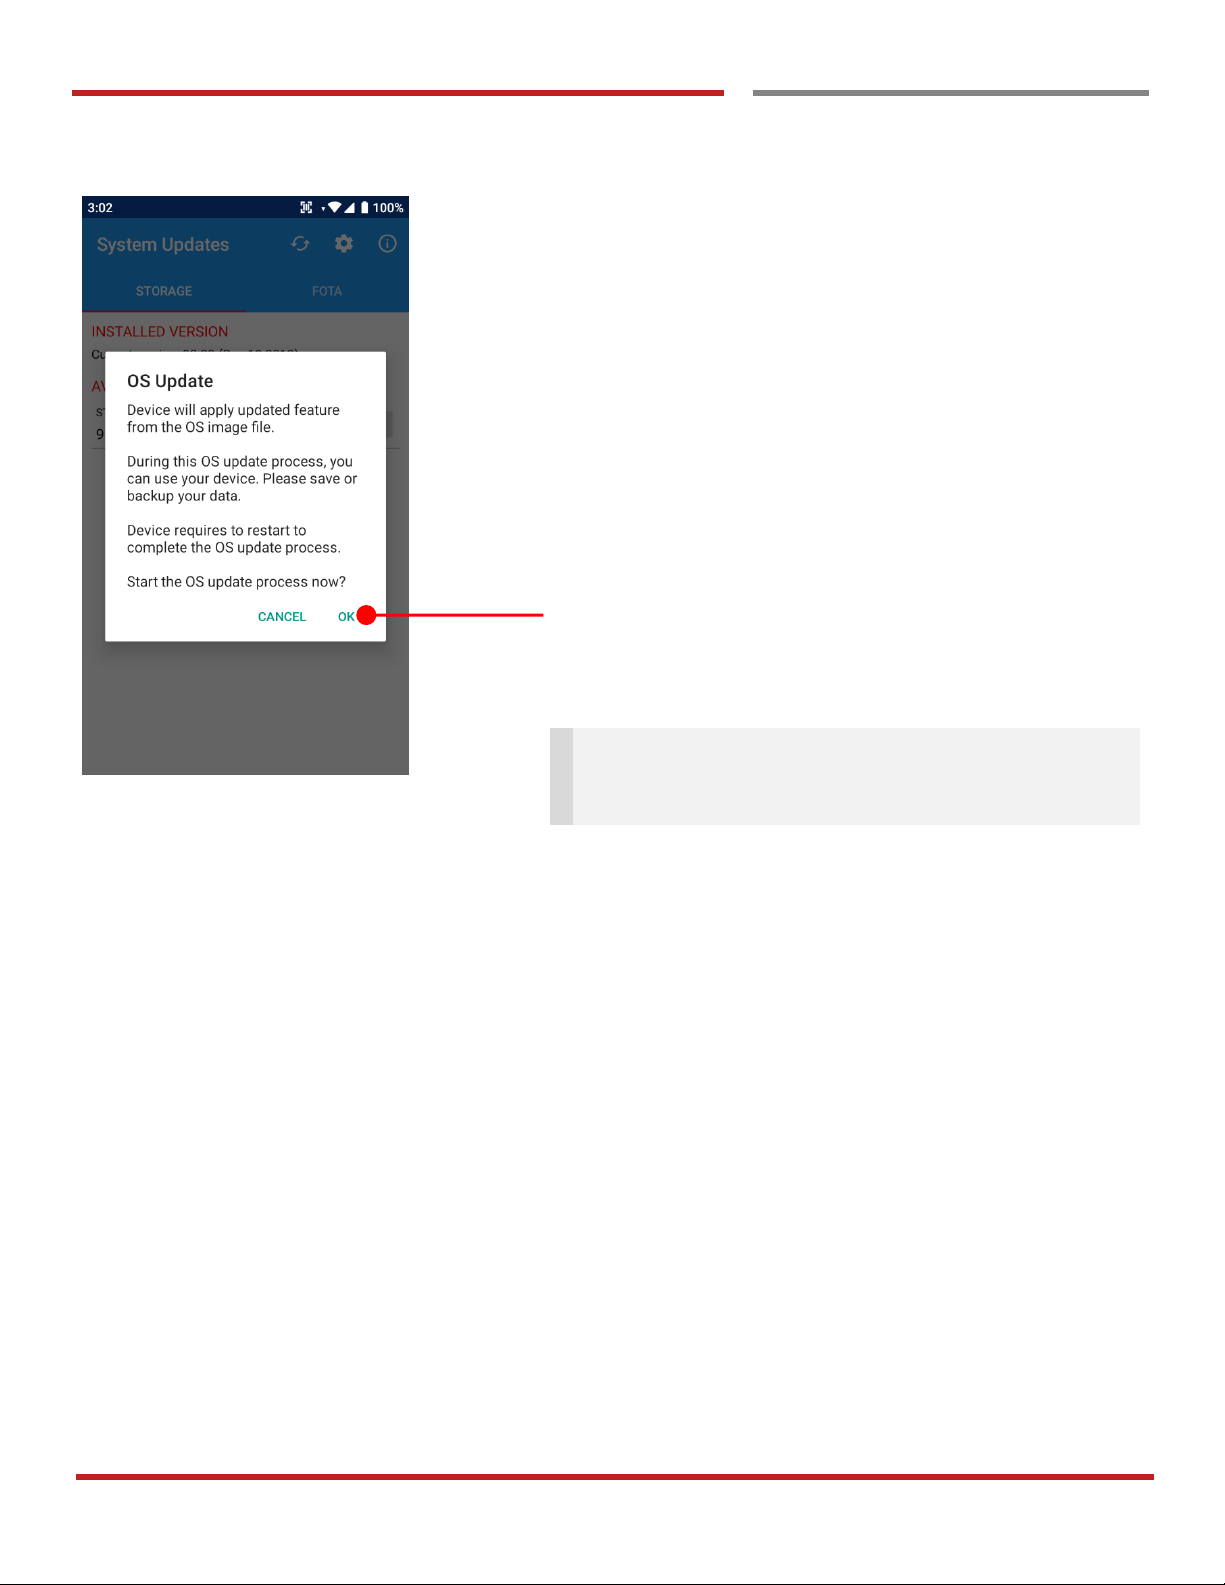
By touching the OK button, your PM90 start to update the
OS image.
Please save the data before restart to complete OS update
process.
Note: Remaining battery level must be higher than
20%. Otherwise PM90 will not start OS update process.
Please check battery level first
Page 74
PM90 Android 9 User Manual
73
©2006 – 2019 POINTMOBILE Co., Ltd. All rights reserved
OS Update
OS Image update from the FOTA
OS Image update from the FOTA
OS Update
Swipe or touch FOTA tab
PM90 will compare the OS image between FOTA server
and current OS image.
If there is newer OS image in the FOTA server, App will
suggest download latest OS image
Touch DOWNLOAD
Page 75
PM90 Android 9 User Manual
74
©2006 – 2019 POINTMOBILE Co., Ltd. All rights reserved
OS Update
OS Image update from the FOTA
OS Update
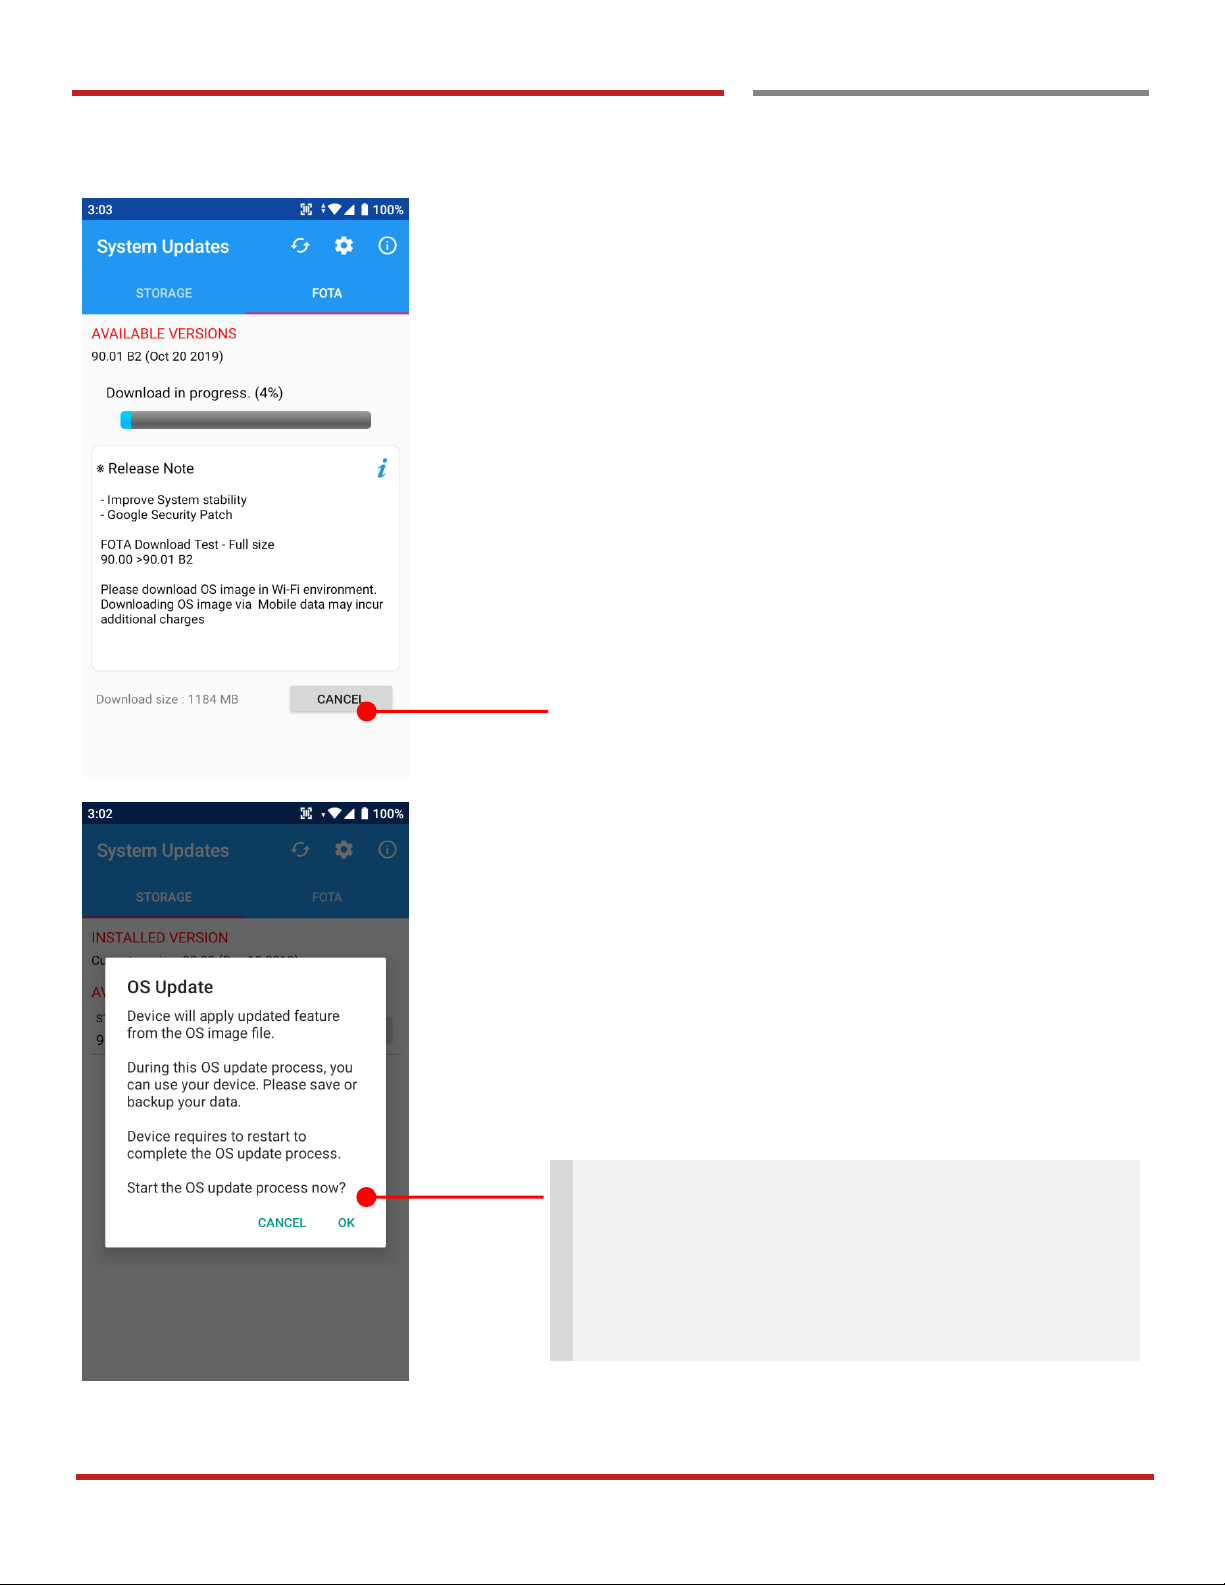
Touch to cancel the download process
By touching the OK button, your PM90 start to update the
OS image.
Please save the data before restart to complete OS update
process.
Note: Default OS image download setting of FOTA
Client is “Download over Wi-Fi only” Please connect to
the nearby Wi-Fi network for FOTA service
Remaining battery level must be higher than 20%.
Otherwise PM90 will not start OS update process.
Please check battery level first
Page 76
PM90 Android 9 User Manual
75
©2006 – 2019 POINTMOBILE Co., Ltd. All rights reserved
Factory data reset
Factory data reset from Settings
Factory data reset from Settings
Factory data reset
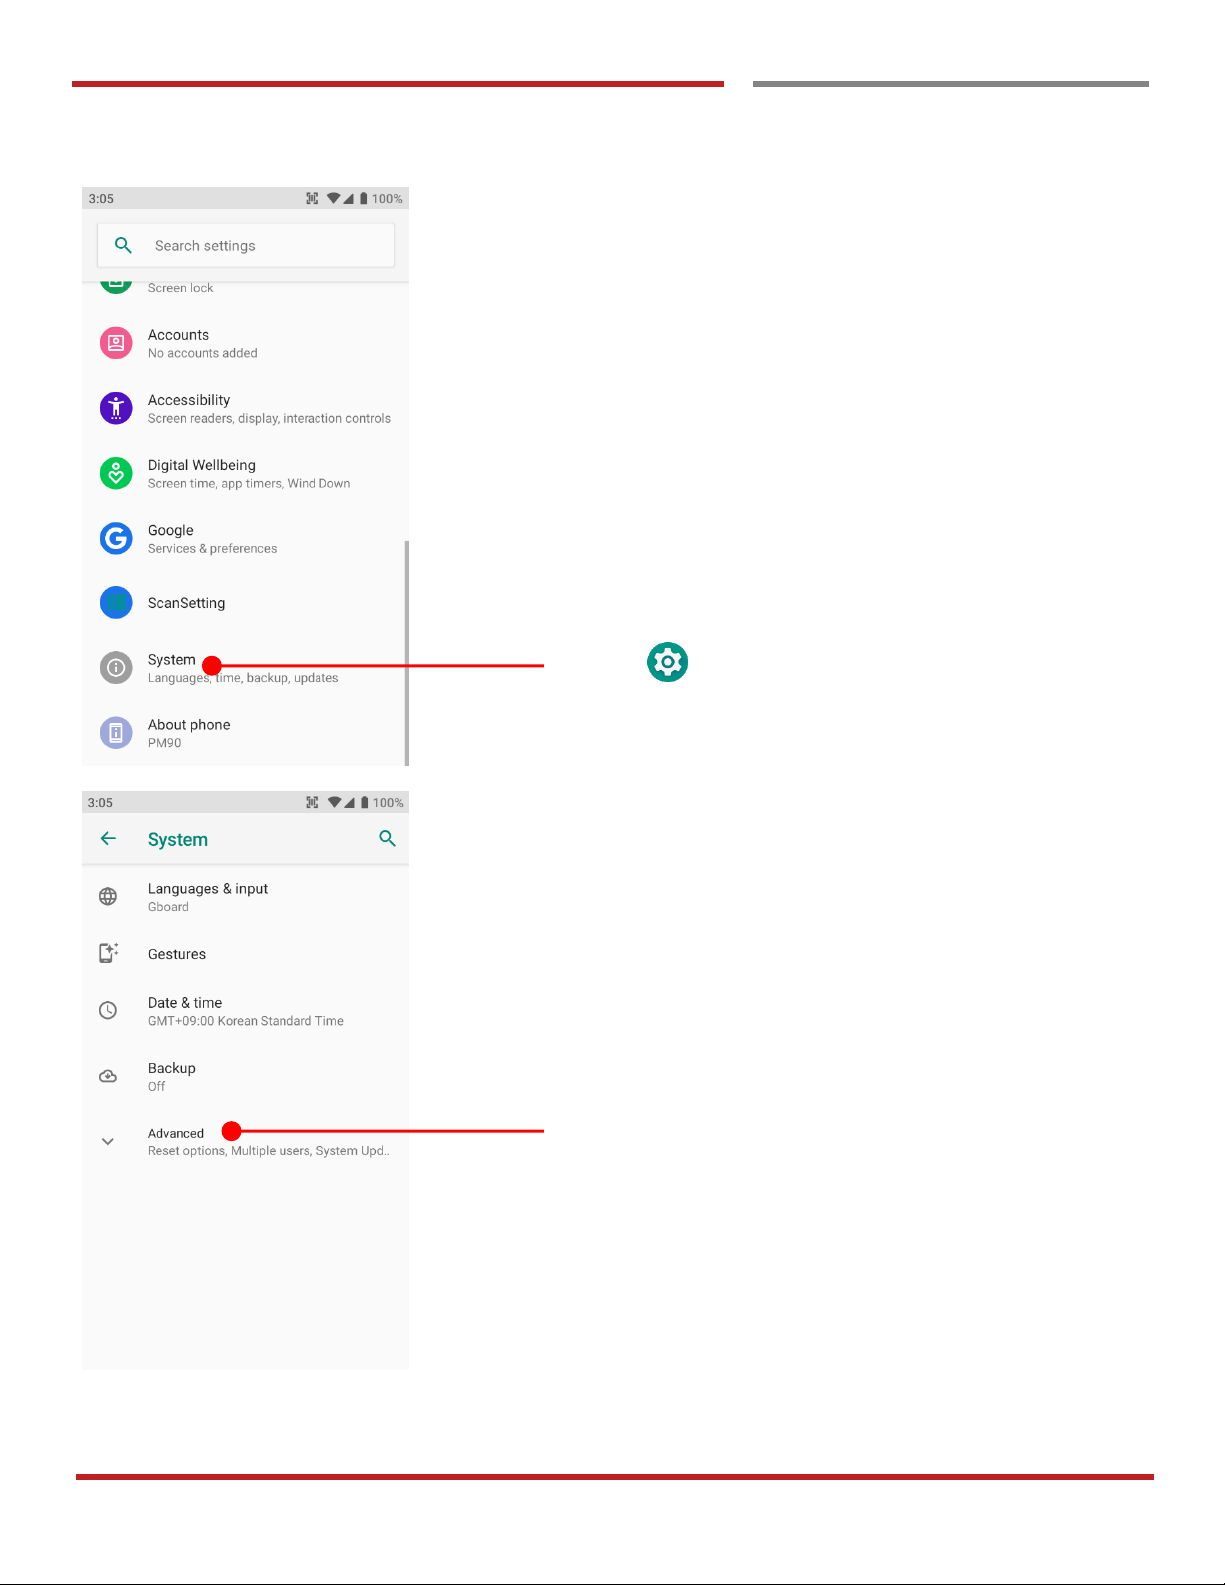
Settings and then System
Touch Advanced
Page 77
PM90 Android 9 User Manual
76
©2006 – 2019 POINTMOBILE Co., Ltd. All rights reserved
Factory data reset from Settings
Factory data reset
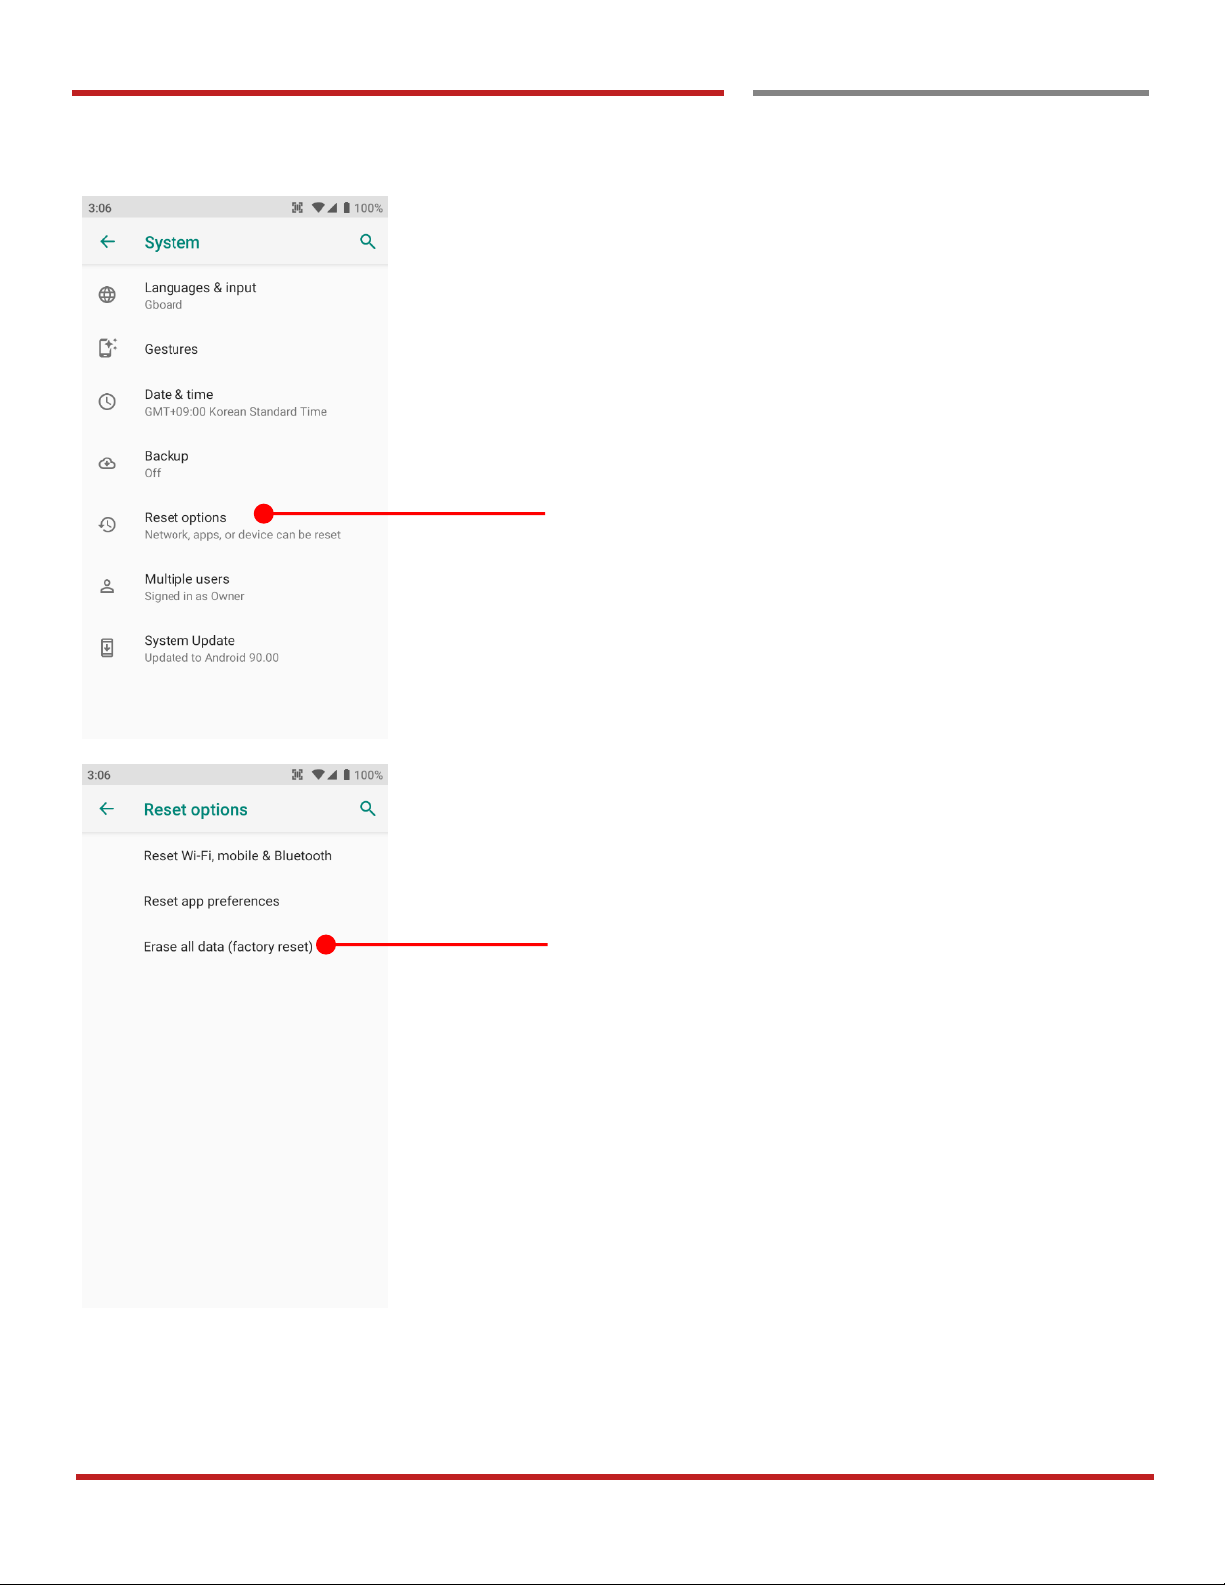
Touch Reset options
Touch Erase all data (factory reset)
Page 78
PM90 Android 9 User Manual
77
©2006 – 2019 POINTMOBILE Co., Ltd. All rights reserved
Factory data reset from Settings
Factory data reset
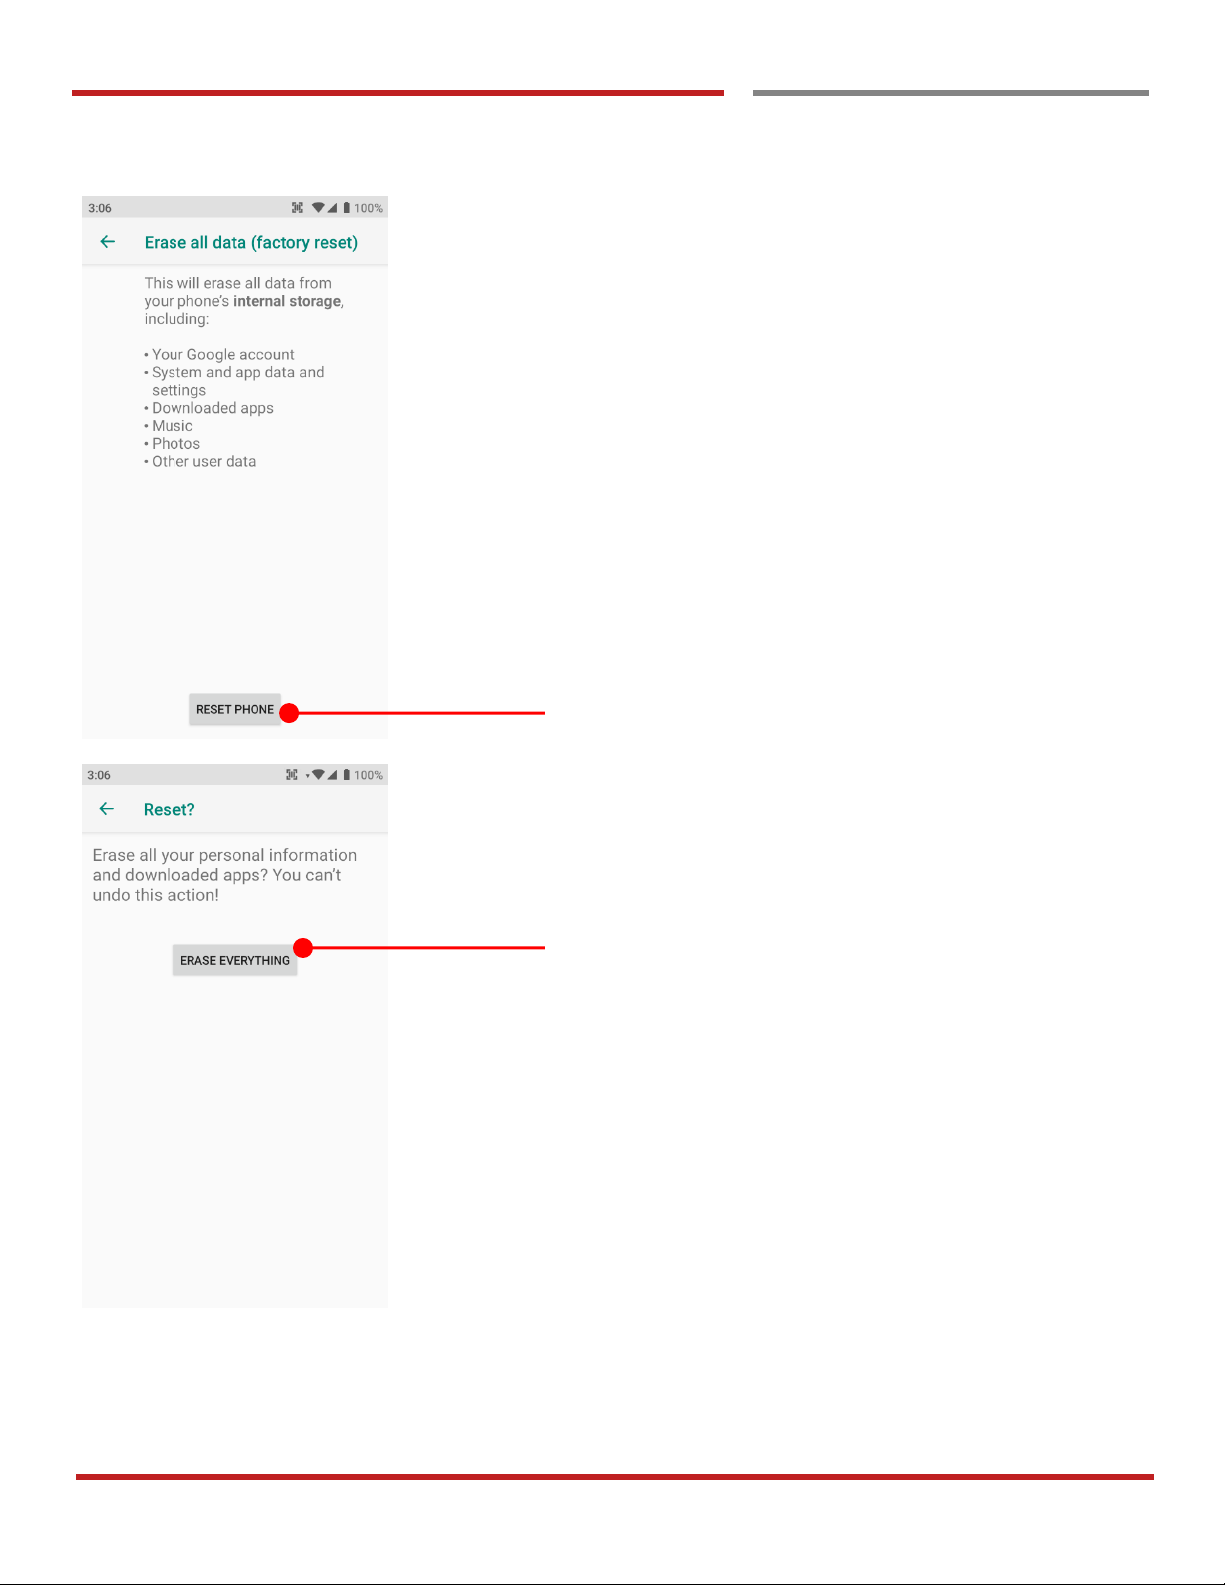
Please review reset item lists and touch RESET PHONE
Please note, all apps and data in the internal storage will be
deleted and restored to “Factory default” and this process
cannot Undo
Touch ERASE EVERYTHING
Page 79
PM90 Android 9 User Manual
78
©2006 – 2019 POINTMOBILE Co., Ltd. All rights reserved
Factory data Reset
Force Factory data reset
Force Factory data reset
Factory data reset
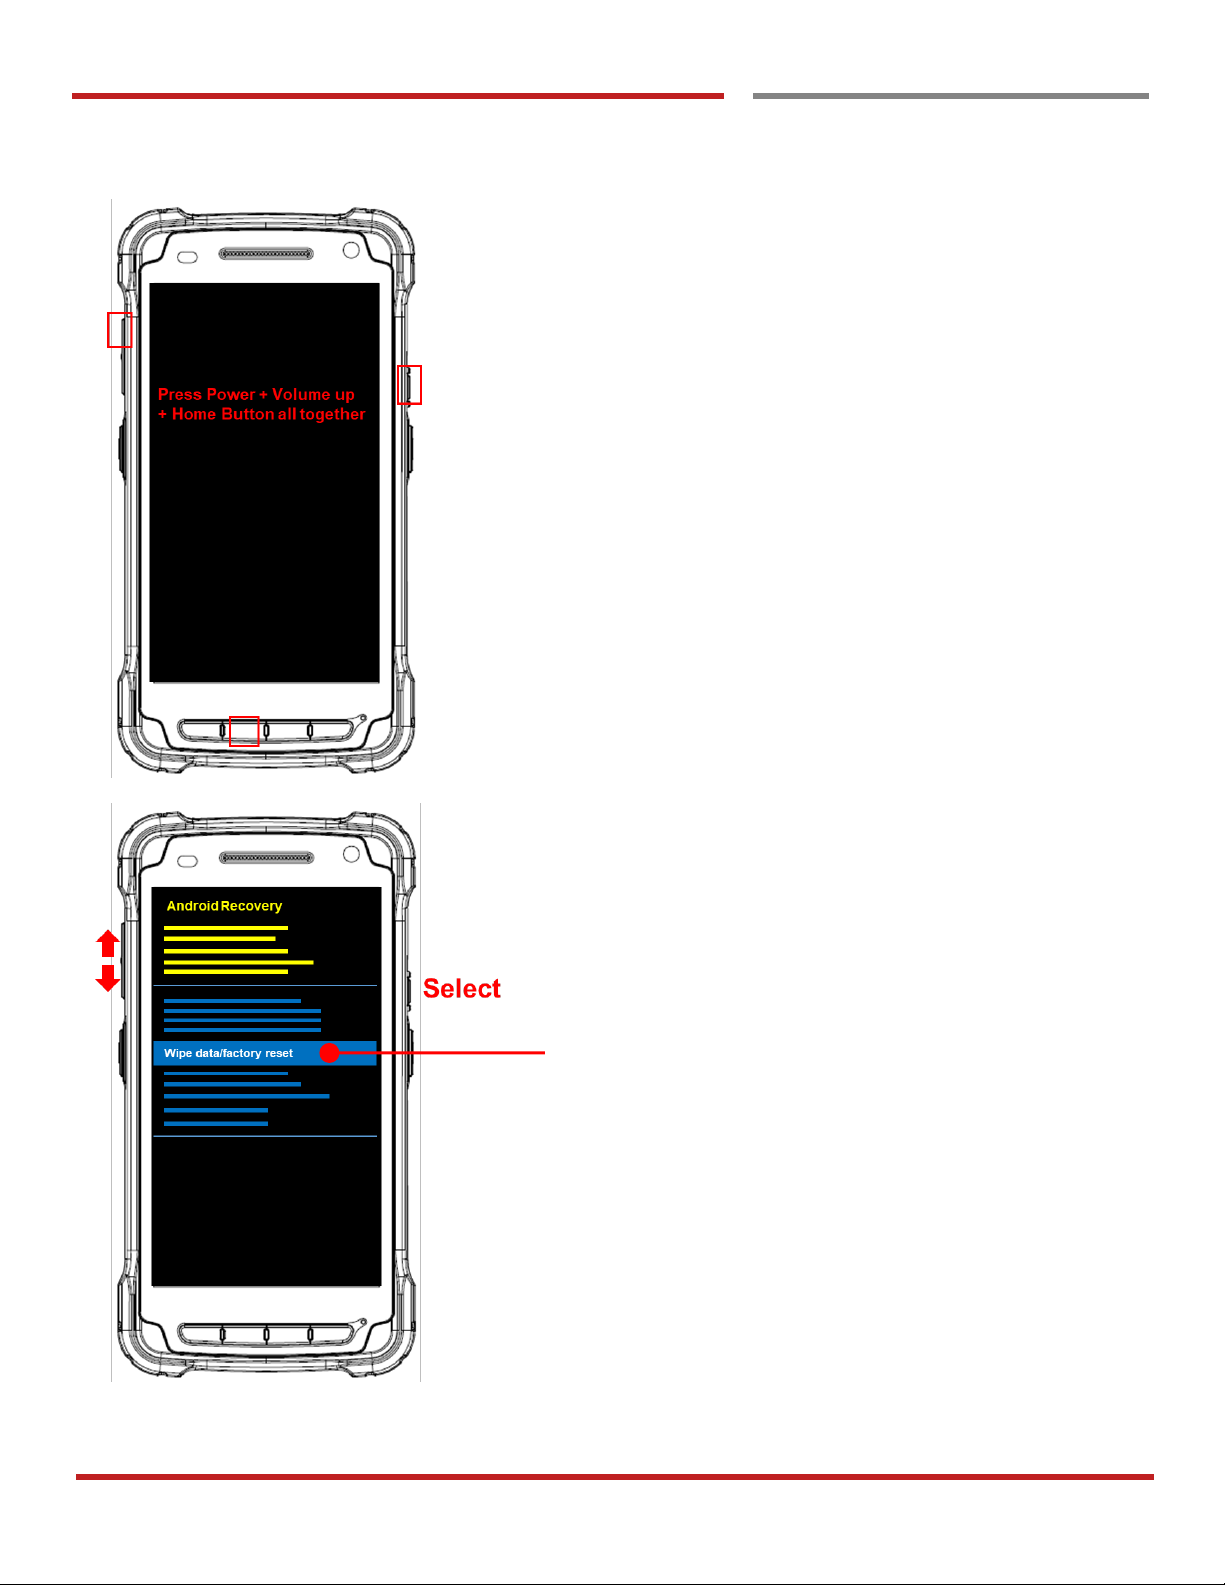
Force Factory data reset your PM90
You can perform “force” factory data reset your PM90.
When your PM90 turned off, press Power + Volume Up +
Home button all together. After you see Smart Beyond
Rugged logo display, you may release the keys.
PM90 enter to the Android Recovery mode. In this mode,
Volume up is Move Up in the menu tree and Volume down
is Move Down in the menu tree. Power Button is Select
Select Wipe data/factory reset
Page 80
PM90 Android 9 User Manual
79
©2006 – 2019 POINTMOBILE Co., Ltd. All rights reserved
Factory data Reset
Force Factory data reset
Factory data reset
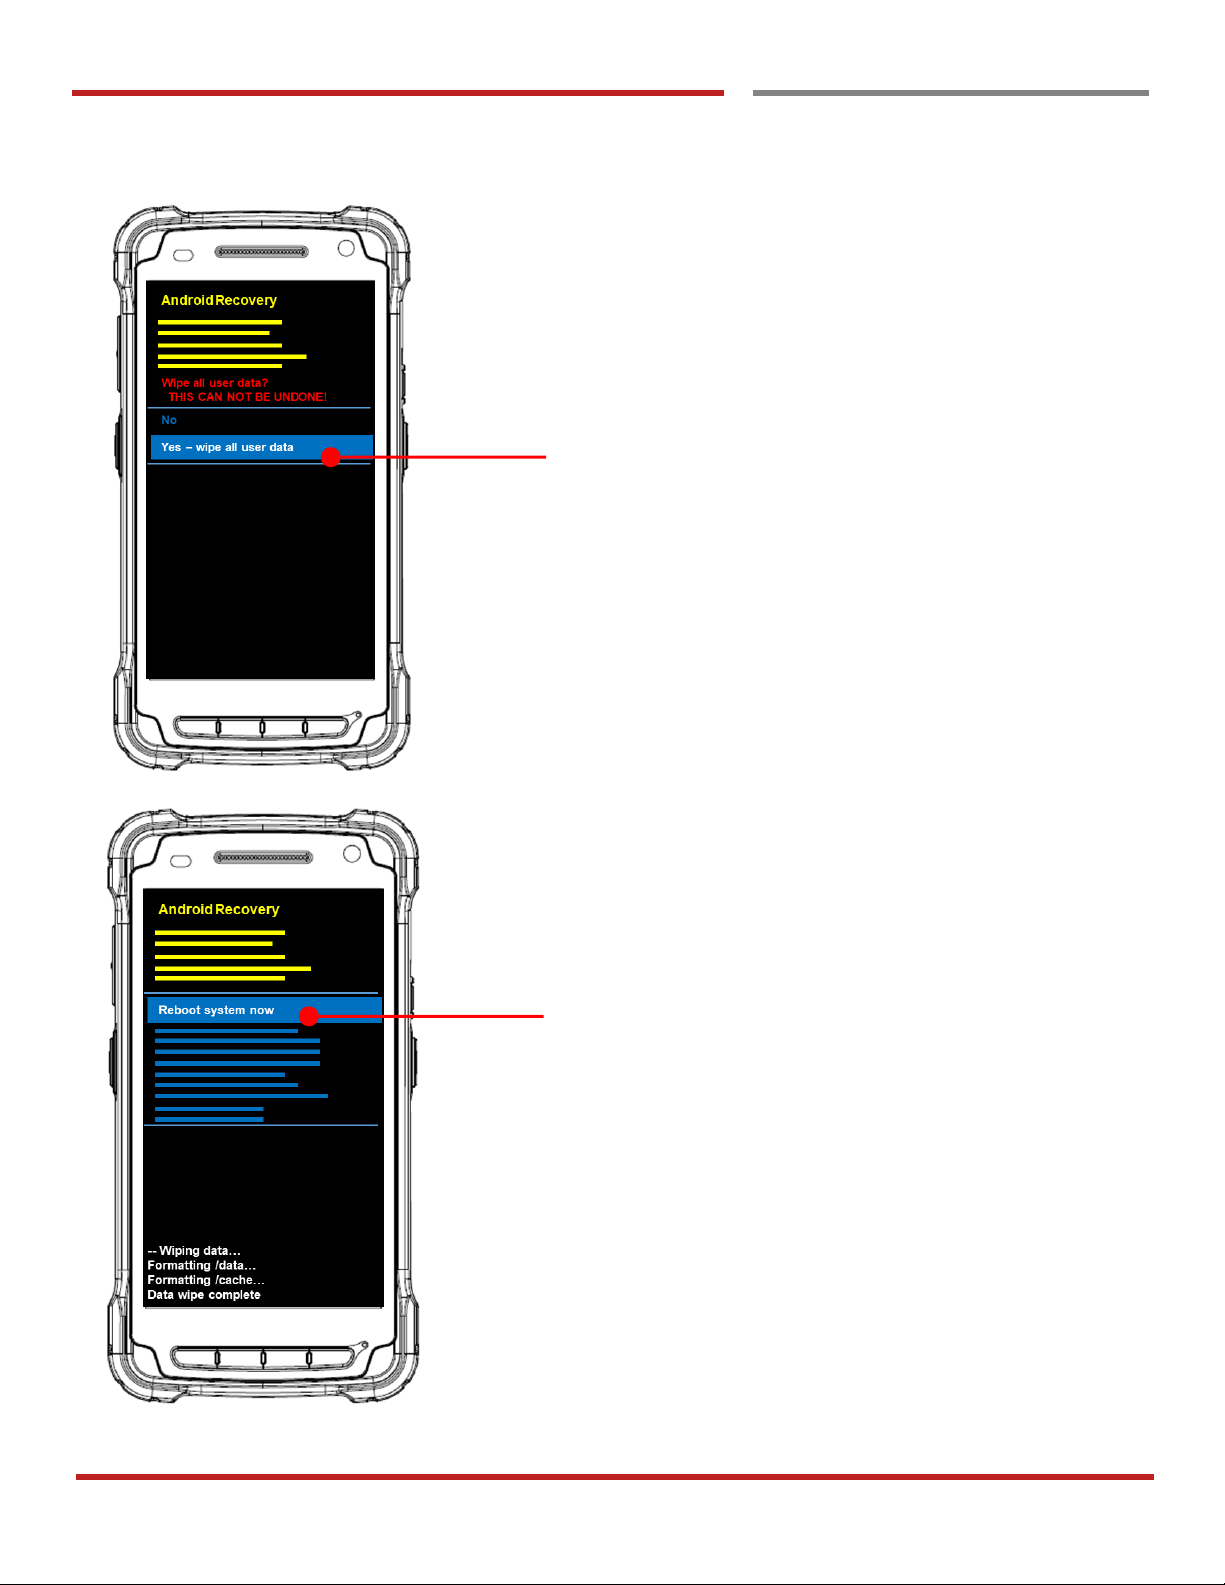
Select Yes wipe all user data to perform the Factory data
reset.
After data wiping, please select Reboot system now to
finish the Force Factory data reset process
Page 81
PM90 Android 9 User Manual
80
©2006 – 2019 POINTMOBILE Co., Ltd. All rights reserved
Factory data Reset
Force Factory data reset
Factory data reset
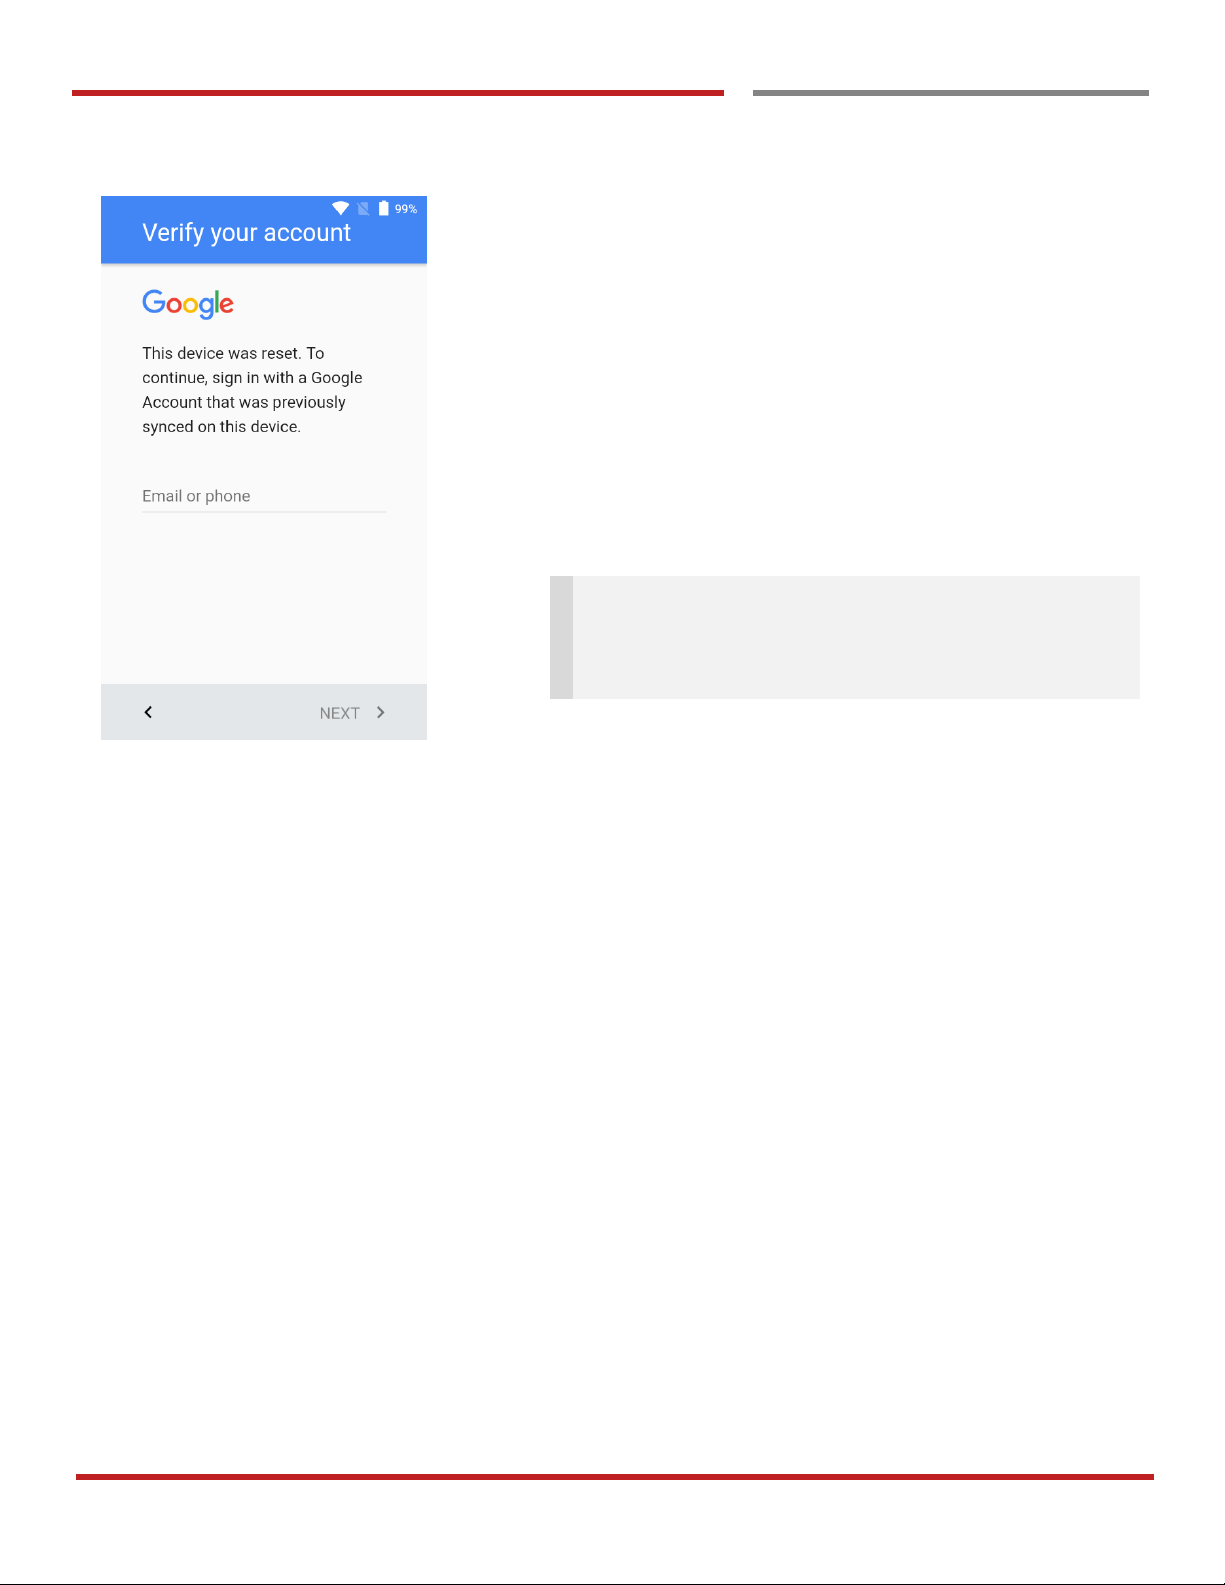
After Force factory reset, if PM Android Device locked by
Factory Reset Protection, then please enter to Fast Boot
mode and execute command
- fastboot erase config
- fastboot reboot
Note: Factory Reset Protection (FRP) is a security
method that was designed to make sure someone can't
just wipe and factory reset your device if you've lost it or
it was stolen
Page 82

PM90 Android 9 User Manual
81
©2006 – 2019 POINTMOBILE Co., Ltd. All rights reserved
Safety and Legal Info
Safety and Legal Info
Battery Warning
CAUTION
IF MISUSED OR MISTREATED THE BATTERY MAY PRESENT A RISK OF FIRE OR CHEMICAL BURN.
RISK OF EXPLOSION IF BATTERY IS REPLACED BY AN INCORRECT TYPE.
DISPOSE OF USED BATTERIES ACCORDING TO THE INSTRUCTIONS.
ATTENTION
Un remplacement inadéquat de la batterie ou une utilisation incompatible de l’appareil peut présenter
des risques de brulures, d’incendie, d’explosion ou d’autres dangers.
Jetez les piles en lithium-ion conformément aux régulations locales.
Body-worn Operation
This device was tested for typical bodyworn operations with the Front & back of
the device kept 0.59 inches (1.5cm) between the
user’s body and the Front & back of the device. To comply with FCC RF
exposure requirements, a minimum separation distance of
0.59 inches (1.5cm) must be maintained between the user’s body and the Front
& back of the device. Any beltclips, holsters, and
similar accessories containing metallic components may not be used. Bodyworn accessories that cannot maintain 0.59 inches (1.5cm)
separation distance between the user’s body and the Front & back of the
device, and have not been tested for typical body-worn
operations may not comply with FCC RF exposure limits and should be avoided.
Page 83

PM90 Android 9 User Manual
82
©2006 – 2019 POINTMOBILE Co., Ltd. All rights reserved
FCC Warning
This device complies with part 15 of the FCC Rules. Operation is subject to the following two conditions:
(1)This device may not cause harmful interference, and (2) this device must accept any interference received,
including interference that may cause undesired operation.
This equipment has been tested and found to comply with the limits for a Class B digital device, pursuant to
part 15 of the FCC Rules. These limits are designed to provide reasonable protection against harmful
interference in a residential installation. This equipment generates, uses and can radiate radio frequency
energy and, if not installed and used in accordance with the instructions, may cause harmful interference to
radio communications. However, there is no guarantee that interference will not occur in a particular
installation. If this equipment does cause harmful interference to radio or television reception, which can be
determined by turning the equipment off and on, the user is encouraged to try to correct the interference by
one or more of the following measures:
- Reorient or relocate the receiving antenna.
- Increase the separation between the equipment and receiver.
- Connect the equipment into an outlet on a circuit different from that to which the receiver is connected.
- Consult the dealer or an experienced radio/TV technician for help.
Caution : Any changes or modifications to this device not expressly approved by the party responsible for
compliance could void your authority to operate the equipment.
IC (Industry Canada) Warning
This device complies with Industry Canada license-exempt RSS standard(s).Operation is subject to the
following two conditions: (1) This device may not cause interference; and (2) This device must accept any
interference, including interference that may cause undesired operation of the device.
Le present appareil est conforme aux CNR d’Industrie Canada applicables aux appareils radio exempts de
licence. L’exploitation est autorisee aux deux conditions suivantes : (1) l’appareil ne doit pas produire de
brouillage, et (2) l’utilisateur de l’appareil doit accepter tout brouillage radioelectrique subi, meme si
lebrouillage est susceptible d’en compromettre le fonctionnement
This device is restricted to indoor use only within the 5.15 ~ 5.35GHz Band.
Cet appareil est restreint a l’utilisation a l’interieur seulement dans la bande 5.15 ~ 5.35GHz.
This equipment complies with FCC/IC radiation exposure limits set forth for an uncontrolled environment. This
transmitter must not be collocated or operating in conjunction with any other antenna or transmitter unless
authorized to do so by the FCC/IC.
Cet equipement est conforme aux limites d’exposition aux radiations FCC / IC definies pour un environnement
non controle. Cet emetteur ne doit pas etre colocalise ou fonctionner en conjonction avec une autre antenne
ou un autre emetteur, a moins d’etre autorise a le faire par le FCC / IC
Page 84

PM90 Android 9 User Manual
83
©2006 – 2019 POINTMOBILE Co., Ltd. All rights reserved
Laser Warning
- LASER LIGHT. DO NOT STARE INTO BEAM. CLASS 2 LASER PRODUCT. 1.0 mW MAX OUTPUT 650
nm.
(LUMIERE LASER, NE PAS REGARDER DIRECTEMENT DANS LE FAISCEAU, PRODUIT LASER DE
CLASSE 2, SORTIE MAX. DE 1,0 MW: 650 nm.)
- Complies With 21CFR 1040.10 and 1040.11 except for deviations pursuant to Laser Notice No.50 dated June
24 2007. (Cet appareil a ete teste et reconnu conforme aux normes 21 CFR 1040.10 et 1040.11sauf pour les
derogations en accord avec l’avis de conformite sur les lasers No. 50, en date du 24 juin 2007.)
E-label
Users can access to the product certificate information in Settings → About phone → Certificates.
WCDMA/LTE feature is optional. Some product options only include WLAN feature.
FCC ID : V2X-PM90G (PHONE), V2X-PM90W (WLAN)
IC ID : 10664A-PM90G (PHONE), 10664A-PM90W (WLAN)
Page 85
PM90 Android 9 User Manual
84
©2006 – 2019 POINTMOBILE Co., Ltd. All rights reserved
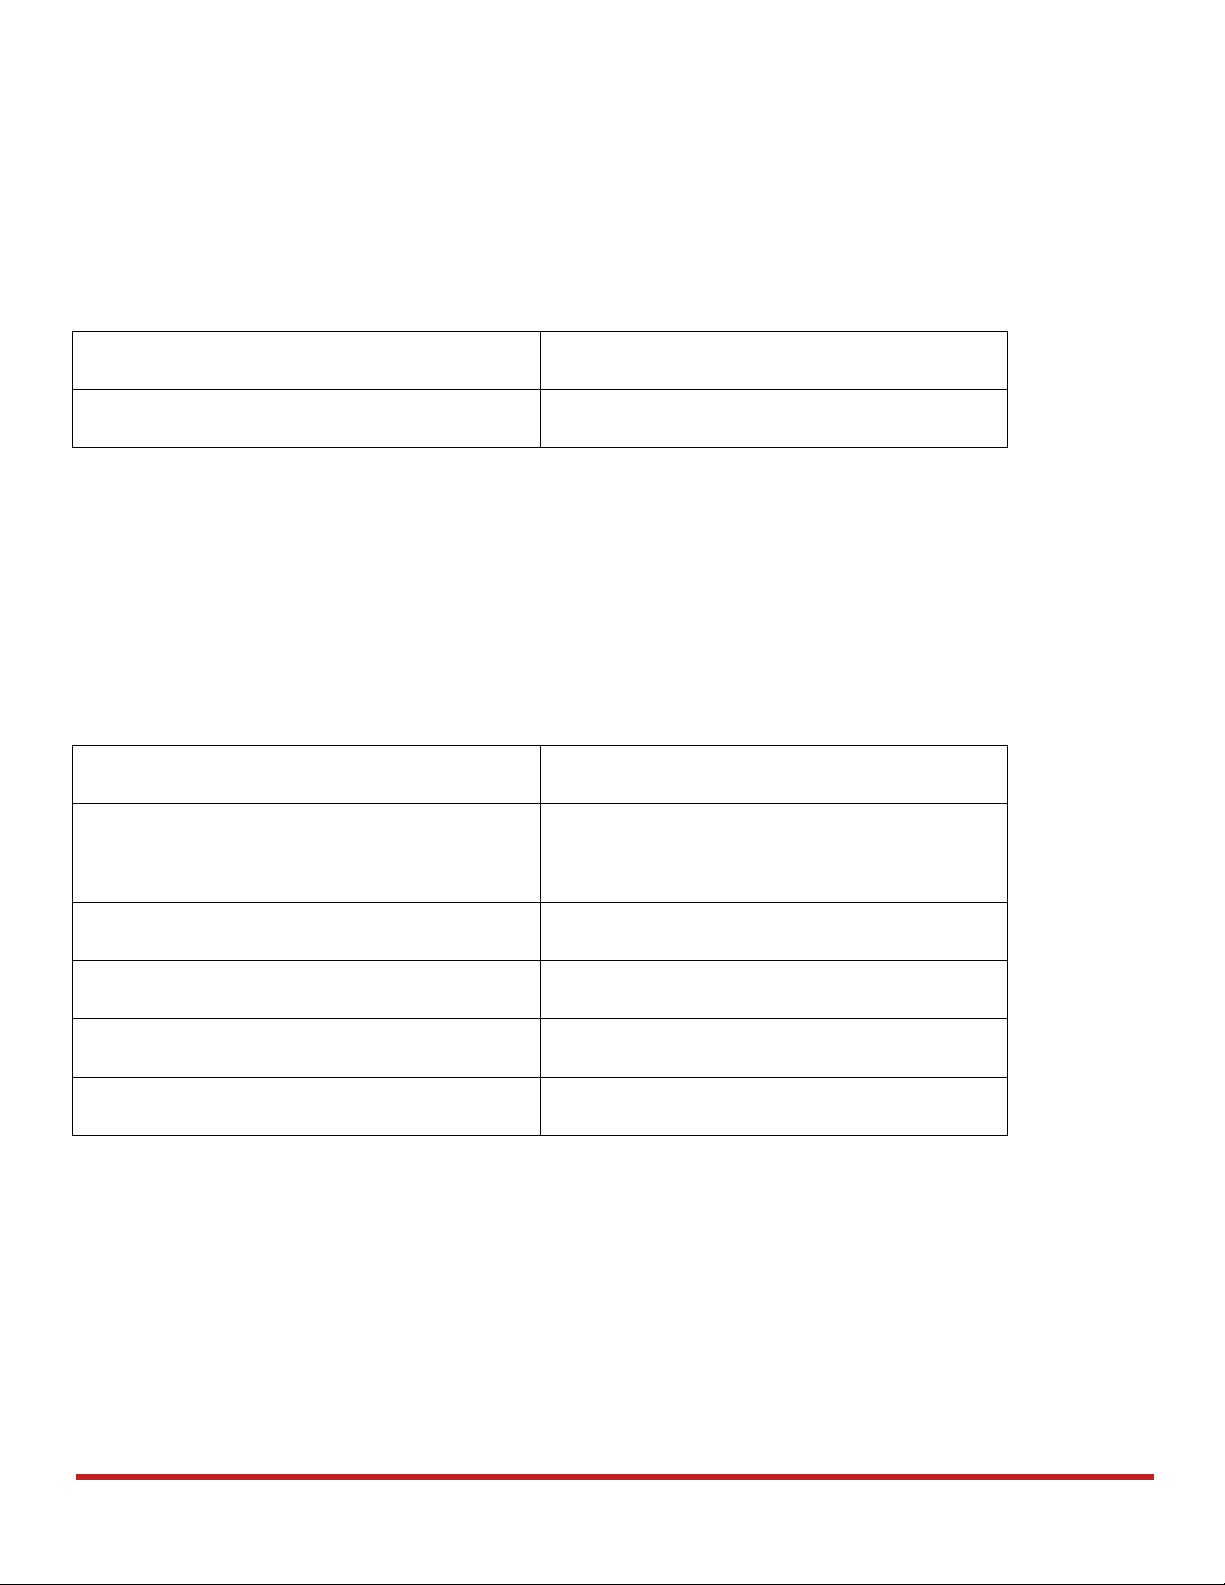
KC 사용 안전정보
본 제품의 전자파흡수율은 과학기술정보통신부의 「전자파 인체보호기준」을 만족합니다.
본 제품은 국립전파연구원의 「전자파흡수율 측정기준」에 따라 최대 출력 조건에서 귀에 근접하여
시험되었으며, 최대 전자파 흡수율 측정값은 다음과 같습니다.
Model 명
PM90
머리 전자파흡수율
0.971 W/kg
※ 전자파흡수율 (SAR : Specific Absorption Rate)은 휴대전화를 사용할 때 인체에 흡수될 수 있는 전자파의
양으로 우리나라는 국제권고기준인 2 W/kg 보다 엄격한 1.6 W/kg 기준을 적용하고 있습니다.
※ 전자파흡수율에 대한 자세한 정보는 국립전파연구원 (www.rra.go.kr) 또는 제조사 홈페이지에서 확인할 수
있습니다.
※ 본 기기는 인체로부터 15 mm 이상 이격 하여 사용하는 것을 권장합니다
적합성 평가
내용
기자재의 명칭
LTE 이동통신용 무선설비의
기기(육상이동국의 송수신장치)
모델명
PM90
상호명
주식회사 포인트모바일
제조자/제조국가
주식회사 포인트모바일 / 중국
제조년월
2019
Page 86
POINT MOBILE. CO., LTD.
Offline
Tel: +82-2-3397-7870~1
ARS: +82-1800-3010
Fax: +82-2-3397-7872
Address: B-9F Kabul Great Valley, 32, Digital-ro 9-gil,
Geumcheon-gu, Seoul, Korea 08512
Copyright © 2006-2019 Point Mobile Co., Ltd. All rights reserved. Point Mobile Co., Ltd. is the designer and manufacturer of handheld mobiles.
Point Mobile Co., Ltd. Logo are registered trademarks and symbols of Point Mobile Co., Ltd. Features and specifications are subject to change without prior notice.
Online
Website: http://www.pointmobile.co.kr/
E-mail: [email protected]
 Loading...