

Digital Voice Recorder(EVR-100)

Thank you for choosing Pogo’s exciting new digital product, the RipFlash Trio Digital
Voice Recorder(EVR-100).
For optimum performance please read the User Guide before operating the recorder.
Highlights and features
Components and accessories
Player controls
Mode menus
Power sources
Power On/Off
Playback/Stop
Hold On
Hold Off
Search and Seek
Volume controls
Setting Menu
Mode change
Using the Internal Microphone
Using the External Microphone
Using Line-in Recording
a.Recording Telephone Conversations
b.Recording Mobile Phone Conversations
c.Recording From an External Source
Setting the MONO/STEREO Mode
Selecting Recording Quality
VOR(Voice Operating Recordign) Function
Adjusting the Playing Speed
Setting the Repeat Function
Repeat Segment(A B)
Listening to Music with the Internal Speaker
Setting the Equalizer
Setting the Repeat Function
Changing FM Channels
Storing FM Channels
Overwriting FM channels
Listening to Preset FM Channels
Recording FM Rradio
Listening to Recorded Broadcasting
Deleting Items Stored in Memory
Safety Precautions
Troubleshooting
Technical specifications
Installing VR Manager
Connecting the RipFlash Trio to the PC
Understanding toolbar icons
Formatting Internal Memory
Downloading Files to the RipFlash Trio
Uploading Files to Your PC
Deleting Files from Your PC
MoodLogic
4
5
6
7~8
9~10
25
26
27
28
28
28
29
29
30
31
32
33
34
34
35
36
37
38~41
42
43
44
11
11
11~12
12
13
13
13
14
15
16
20
22
18
23
19
17
24
17
21
17
The RipFlash Trio Digital Voice Recorder is a portable digital audio player as well as digital voice recorder.
Users can save recorded voices as MP3 files, making the RipFlash Trio a very useful/powerful tool for
saving business discussions, meetings, consultations, telephone/mobile phone conversations, school
lectures, foreign language lesson/education tapes, FM broadcasts, as well s instaneous ideas and
interviews. You can replay high quality sounds or messages from the device repeatedly and/or save them
on your PC.
Unlike other voice recorders, the RipFlash Trio can save your voice as an MP3 file without the benefit of a
PC(direct encoding), making it convenient to listen and play saved songs and nessages through the builtin speaker as well as on your PC. Listening to saved MP3 music and FM broadcasting has never been
easier!
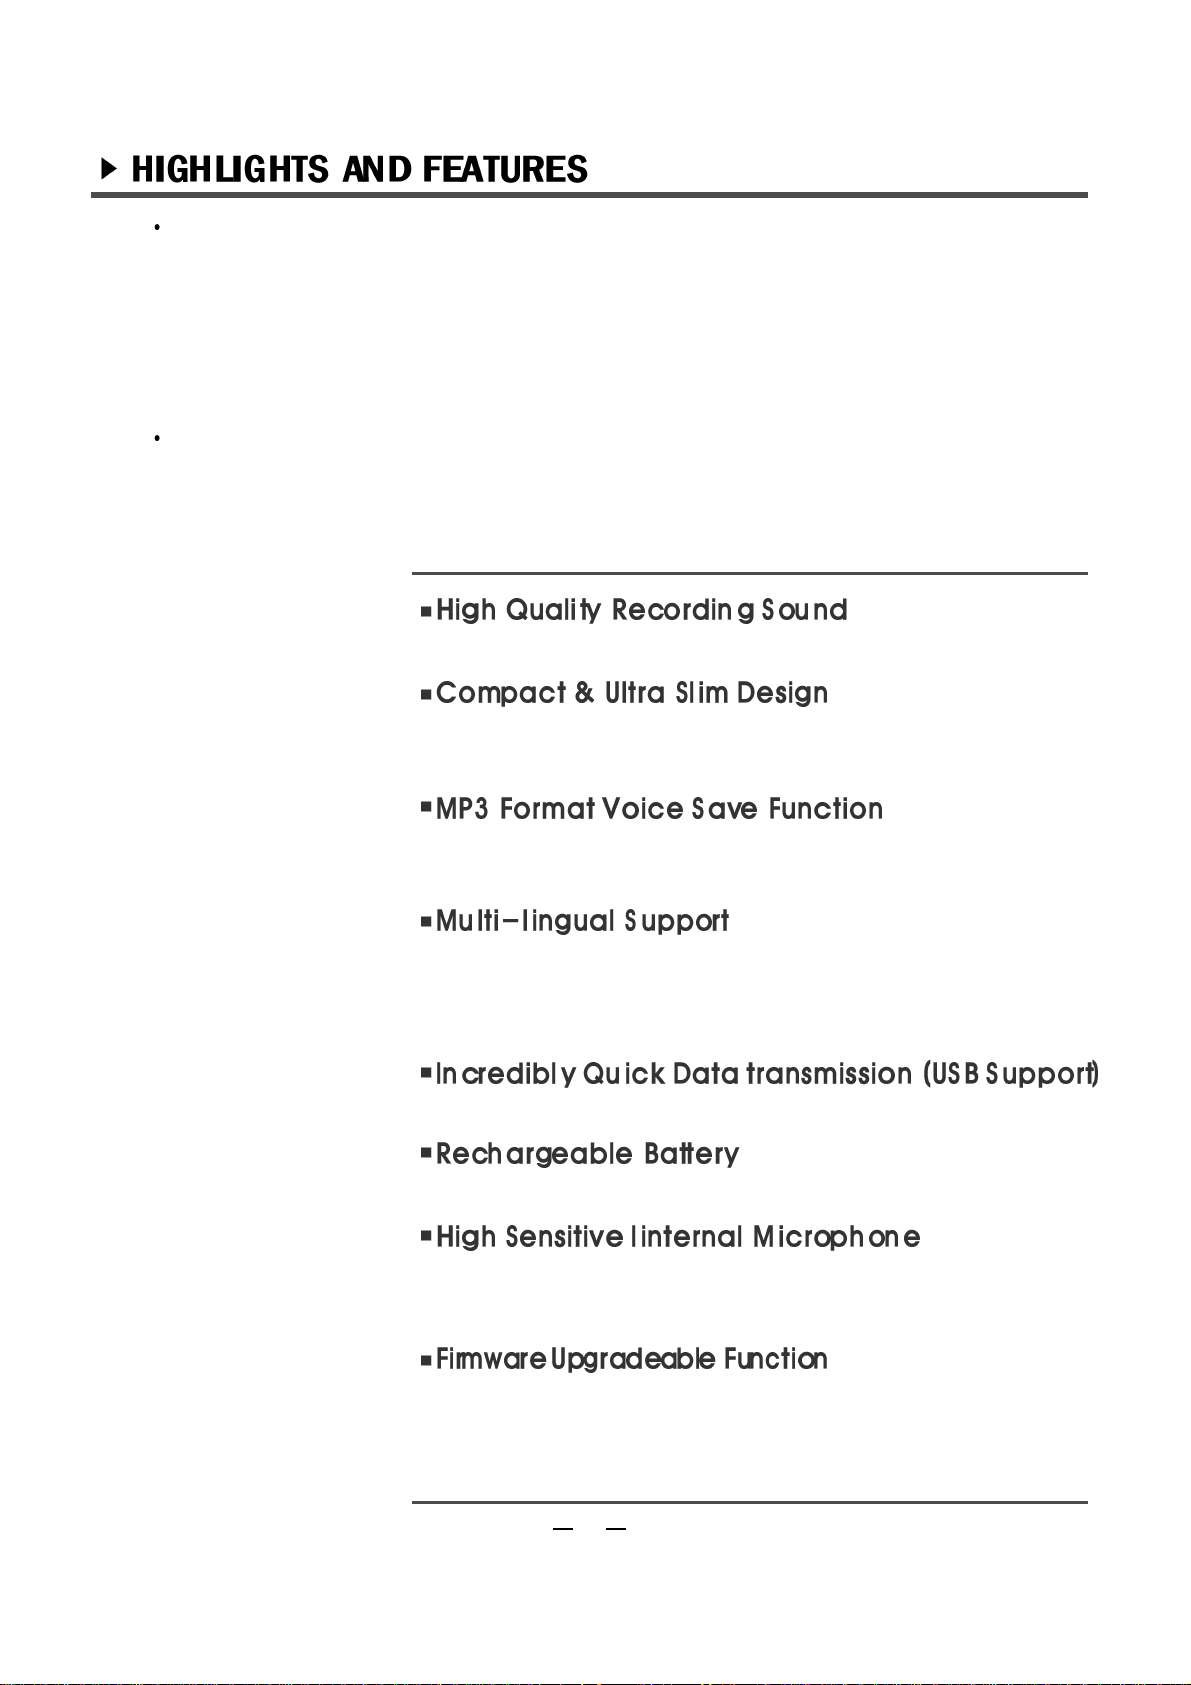
Record high quality audio, sound or voice files as MP3 files.
The RipFlash Trio is smaller than a business card with an eye-catching
9.5mm ultra-slim design.
Users can save high quality audio, sound or voice recordings as
permanent MP3 files on a PC.
The RipFlash Trio supports various languages, such as English, Korean,
Chinese, Japanese, and French etc., dispalyable on the LCD screen.
Download files in record speed with the USB interface.
An omnidirectional, highly sensitive internal microphone allows sounds to be
captured and recorded from all directions.
The RipFlash Trio offers firmware upgradeability. Users can easily update the
functions to have access to the latest emerging standards and enhanced
features.
4
The battery can be charged via the USB port.
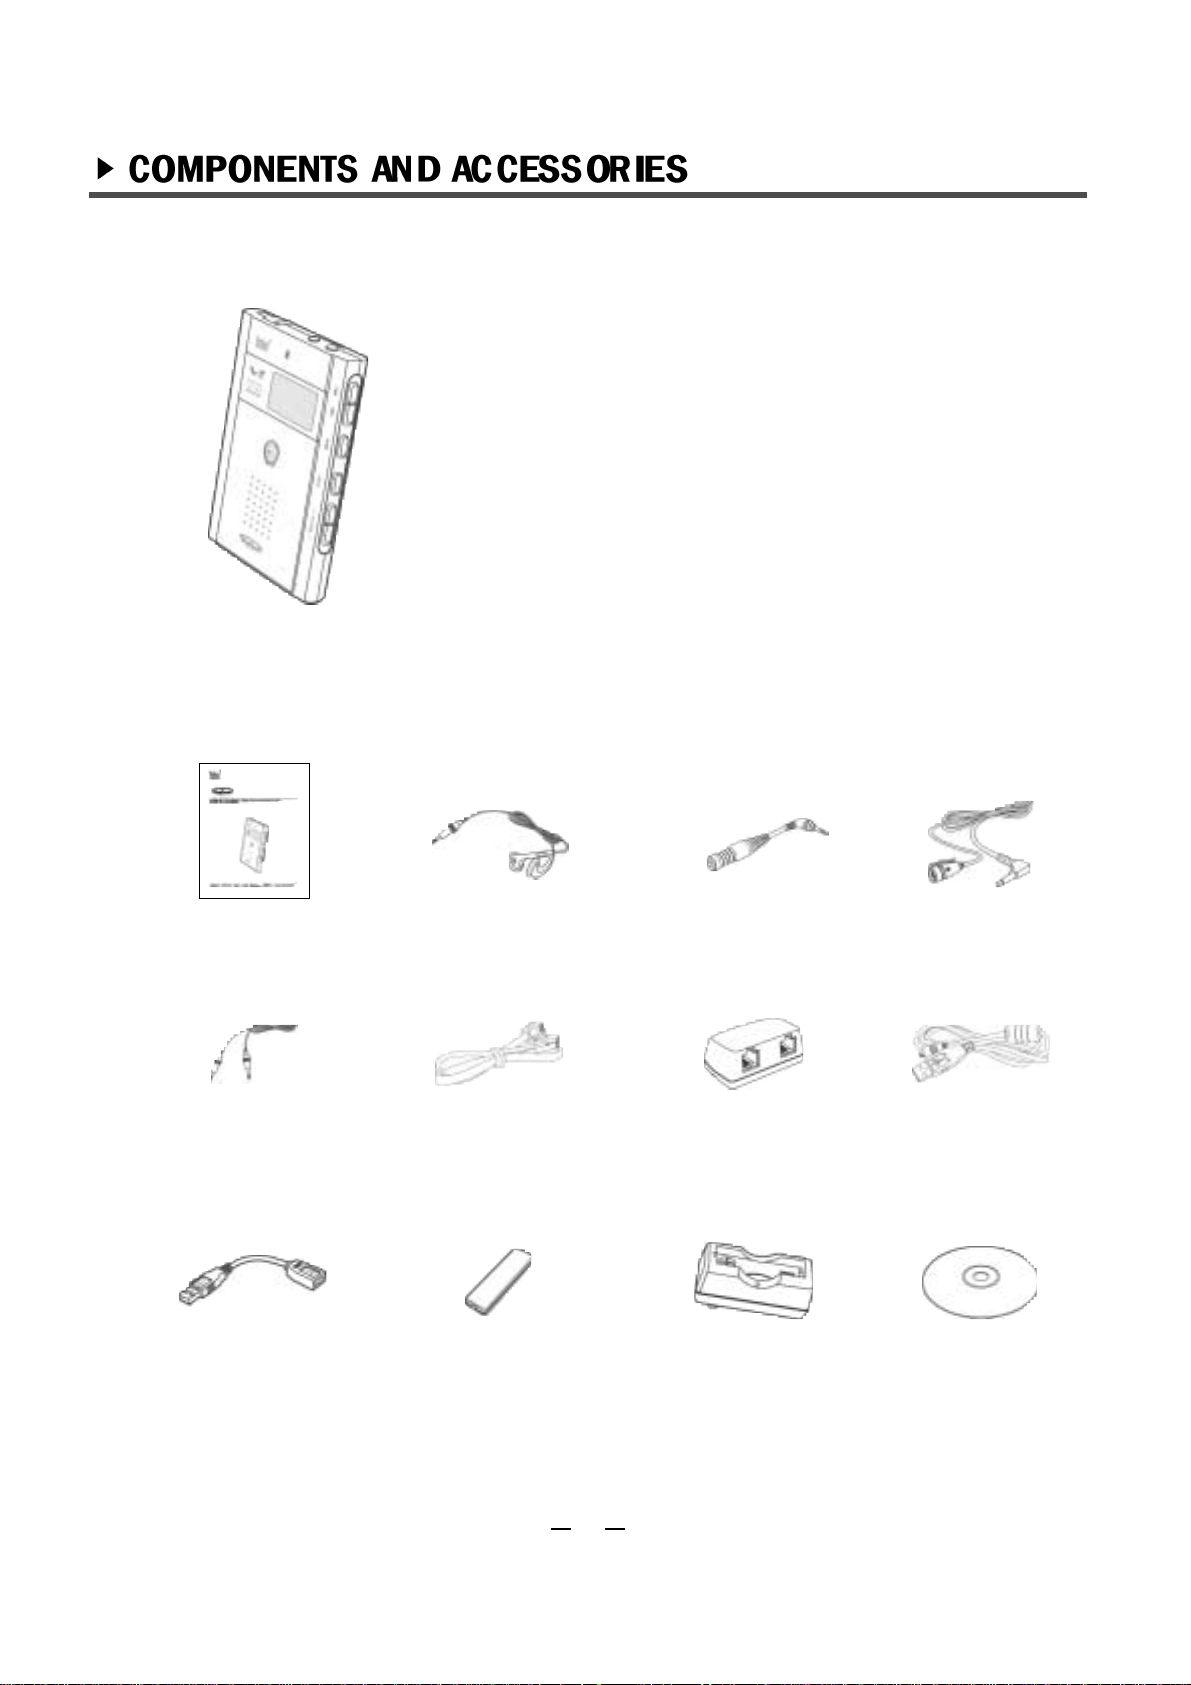
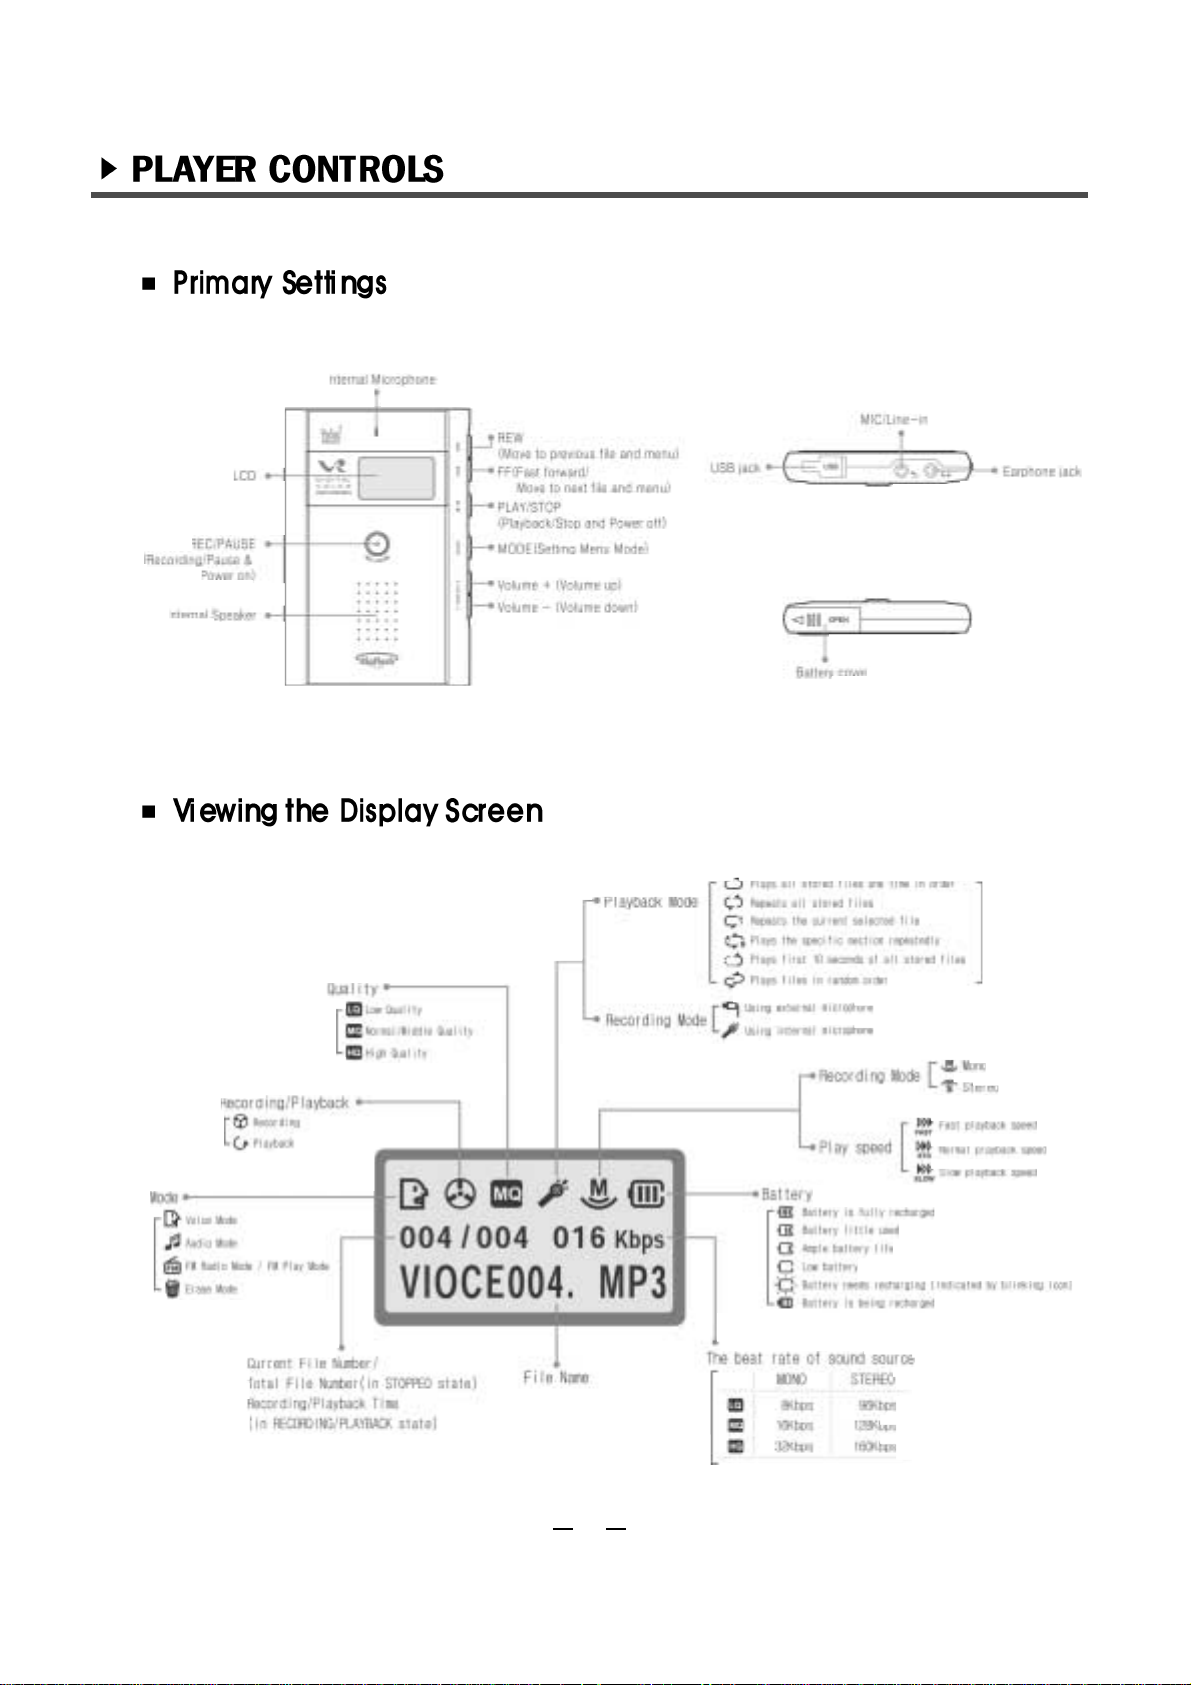
RipFlash Trio Primary Settings
User Guide External
Microphone
Telephone
Recording Adapter
Line in/out
cable
Telephone
Recording Cable
Earphone
Connector
USB Cable
PC install CD discUSB Power Converter Ni-MH 1.2V
Rechargeable Battery
Quick Charger
Stereo Earphones
567
8

Slide the battery cover in the direction of the arrow.
Open the battery cover in the downward direction as the
picture indicates.
Insert the rechargeable battery as shown in the picture.
Adjust the (+)(-) polarities of the batteries in the
compartment.
Close the battery cover.
Remember to check the remaining battery life before recharging
9
Note
The battery life is 10 hours maximum if the
earphone is used.

Connect the USB cable to the USB connector
(port) of the PC when the PC is powerd on(as
shown in the picture on the left.)
Connect the USB cable to the USB power
converter.
Connect the USB cable to the USB port of
PC when the player is powerd on.
Press the MODE button on the player and
select the following mode(s) in order:
[SYSTEM]-[CHARGE]-[ON].
Charging will begin.
You can recharge the player by connecting it to a USB port from the PC. A blinking icon
indicates the battery is in need of recharging.
10
To extend the life of your battery, recharge the battery while the icon is still blinking.
To discontinue recharging, select the following mode(s) in order:
[SYSTEM]-[CHARGE]-[OFF].
The battery takes 5~6 hours to fully-recharge.
Note
It is possible to recharge even if the battery is not fully discharged.(No need for
discharging)

To power on, press the REC button for 2 seconds.
To power off, press the PLAY/STOP Button 2 or more
seconds.
Pressing the PLAY/STOP button will play a file when the
RipFlash Trio is powered on.
Press the MODE button to go to the Menu.
Select HOLD ON, and then press the PLAY/STOP button.
If the MODE button in held for longer than 2 seconds the MODE will be changed into 4 Section
Mode.
11
Note
If yor power on the main setting, the last setting
(MODE) will be displayed on the LCD.
Note
If the REC button is pressed longer than 2 seconds,
the RipFlash Trio will start recording automatically.
Note
The RipFlash Trio is automatically powered off after
3 minutes of non-use.

Press the MODE button to exit the menu.
Press any buttons(except MODE button) to make sure
KEY HOLD message is displayed on the LCD.
While the Hold button is on, press the MODE button.
Press the FF/REW button to move to OFF , then press
the PLAY/STOP button.
12
( ) mark means user s current setting.

During playback in the Stop mode, press the FF/REW
button to navigate to the desired file.
Adjust the volume by pressing (+)/(-) buttons.
(If press (+)/(-) for a long time, volume level
continuously goes up.)
Press and hold the FF/REW button until the desired
time, the RipFlash Trio will start playback from that
point.(SEEK Function)
The menu for each mode can be set during PLAYBACK or STOP.
With earphone use the volume level is controllable from 0
to 30.
With internal speaker use the volume level is controllable
from 0 to 24.
quickly press the
MODE button.
Go to Menu:
press the FF/REW
button to move the
menu.
Move to Menu:
press the PLAY/STOP
button to select menu.
Select Menu:
press the MODE
button to exit menu.
Exit Menu:
13

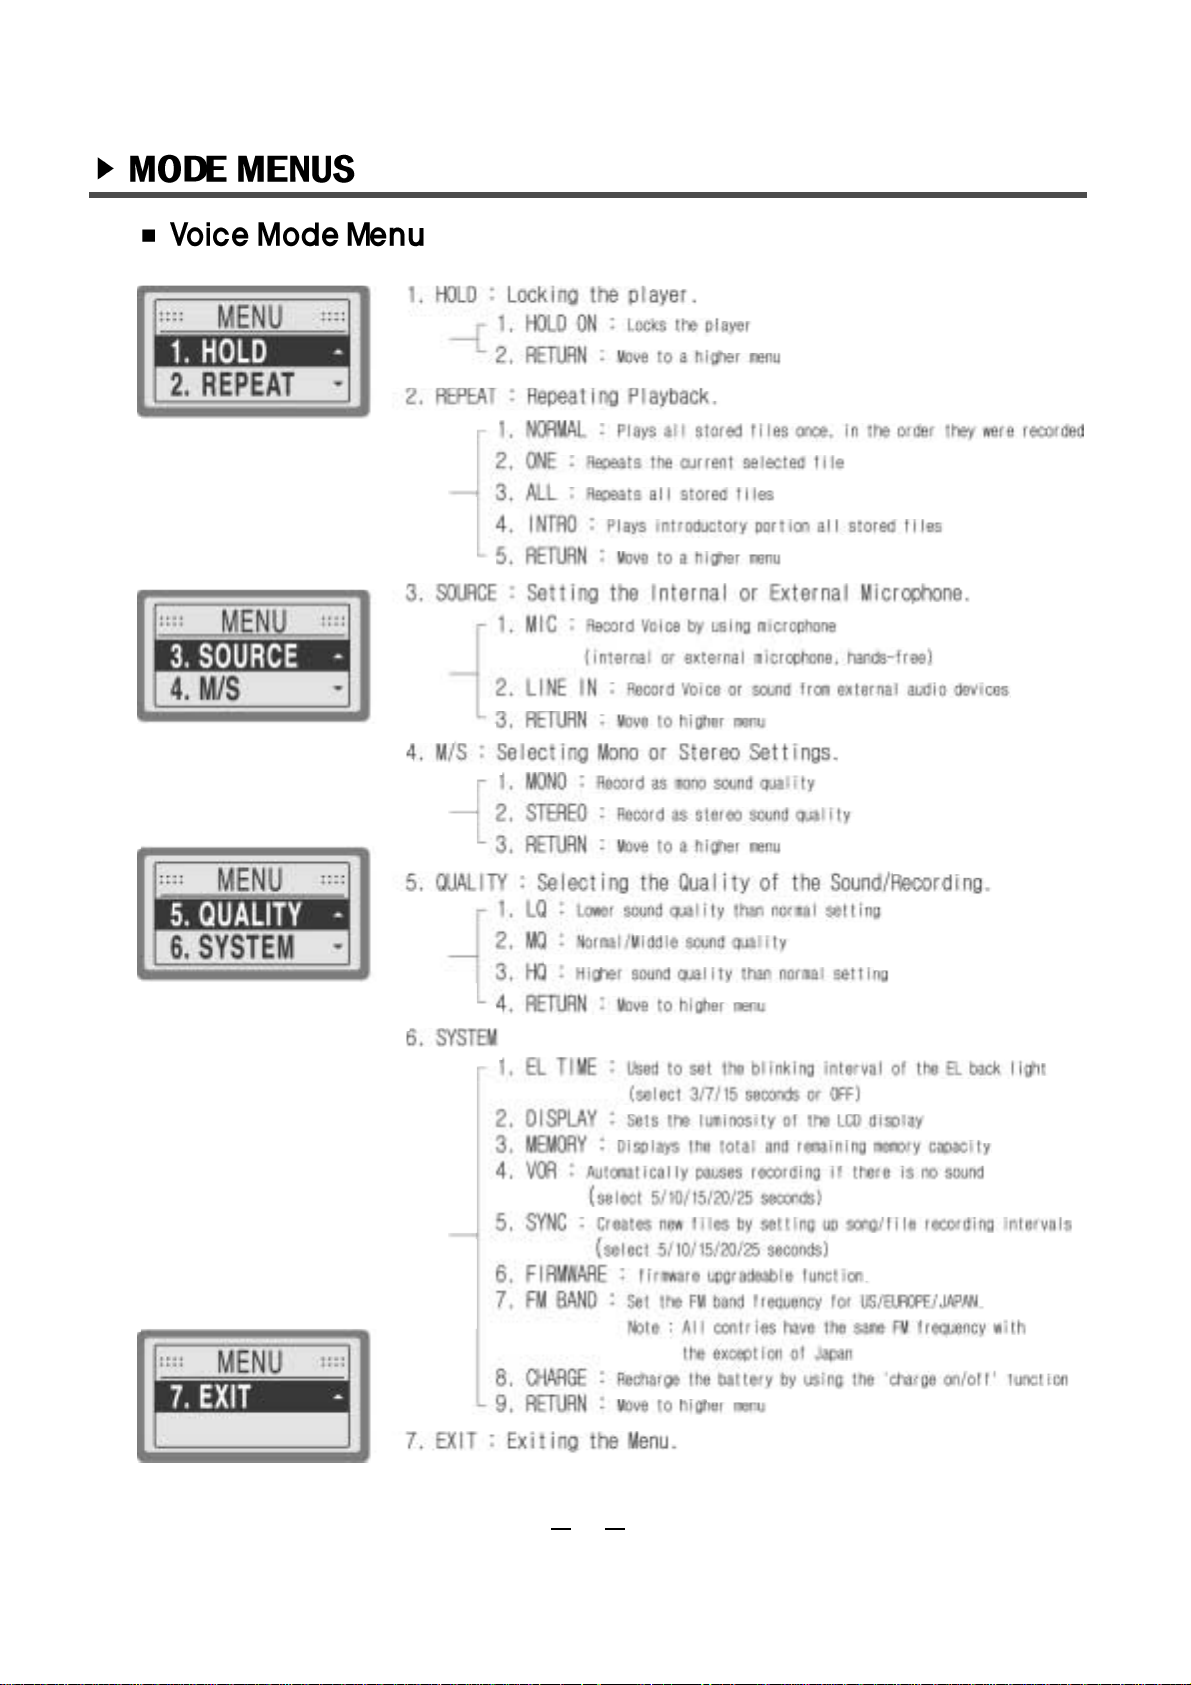
VOICE MODE
Voice Recording and Playback.
FM RADIO MODE
User can save FM frequencies and record/listen to FM
broadcasting as well.
FM PLAY MODE
Play back recorded FM radio and/or broadcasting.
ERASE MODE
Erase each files and/or folder of VOICE MODE, AUDIO MODE
and FM PLAY MODE.
The RipFlash Trio has 5 MODES: VOICE MODE - FM RADIO MODE - FM PLAY MODE - ERASE
MODE - AUDIO MODE.
To navigate to the next mode, press the MODE button for 2 seconds while the RipFlash Trio is in the
STOP state.
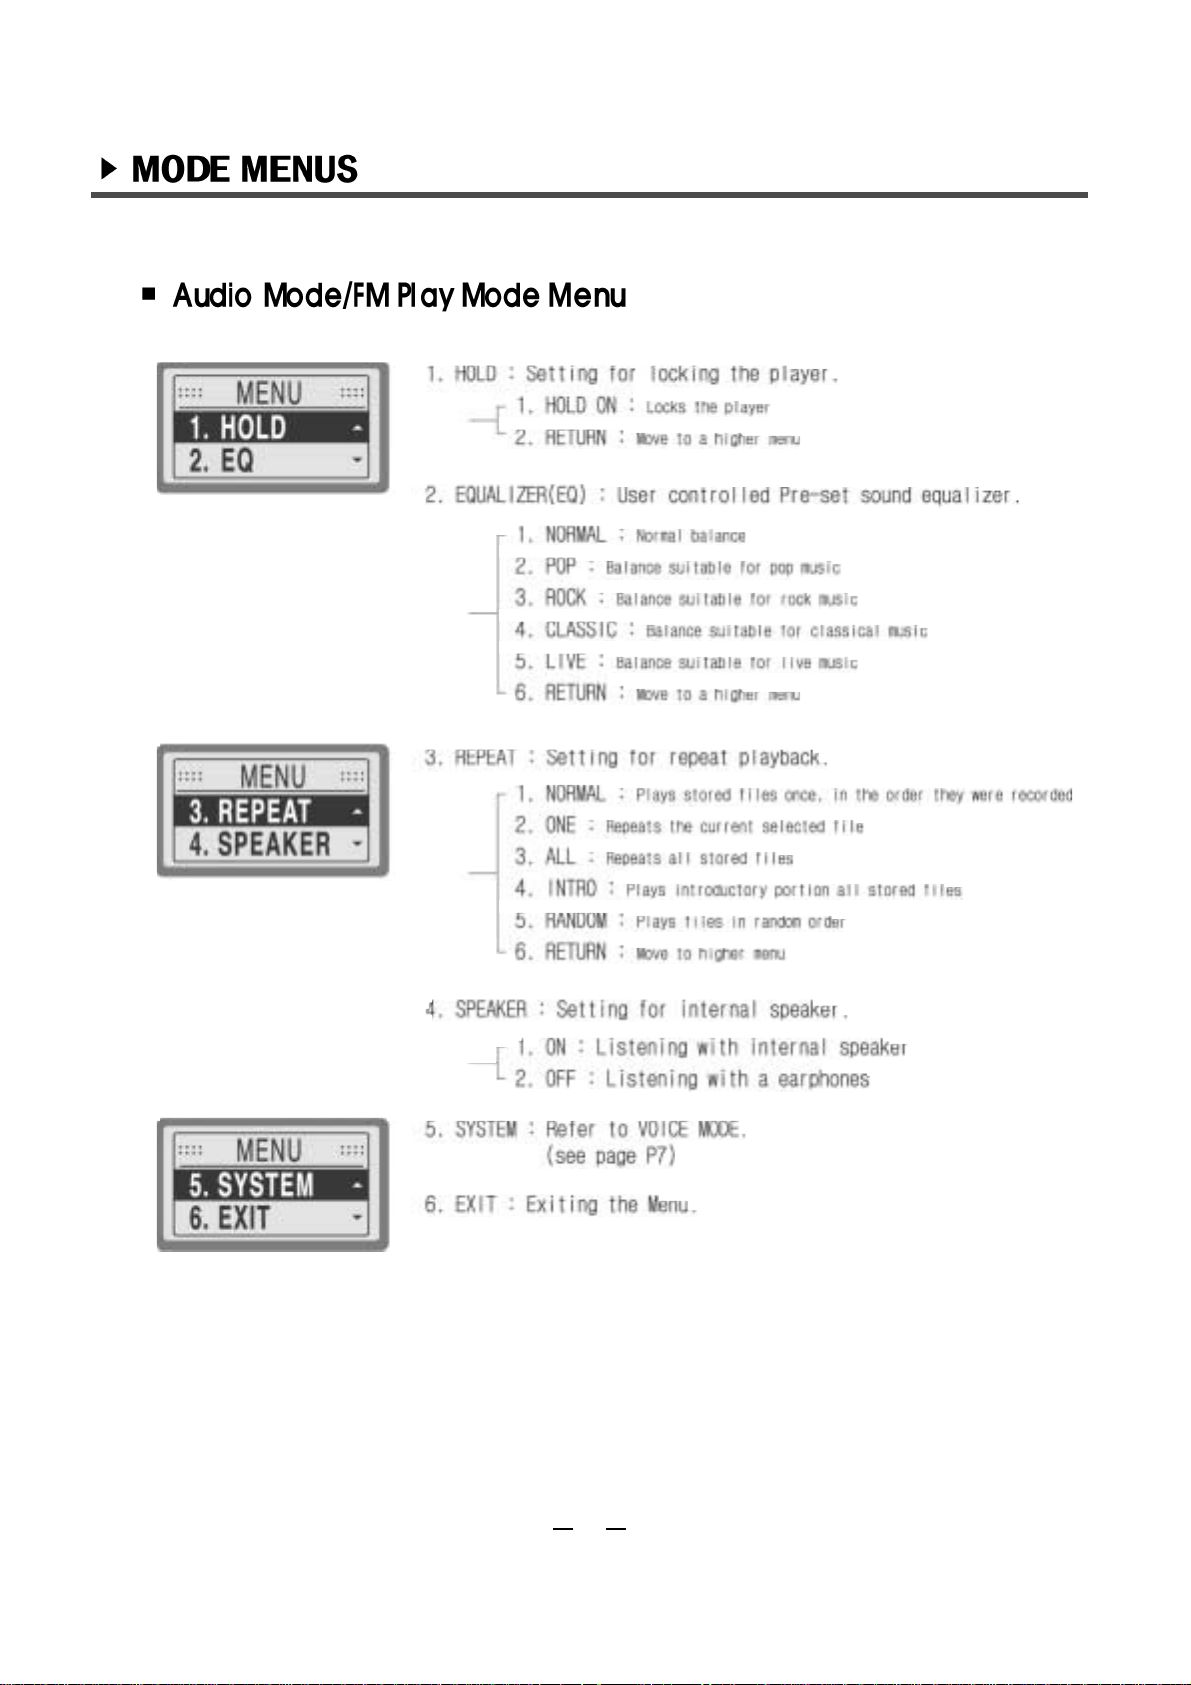
AUDIO MODE
Playback MP3 and WMA audio files.
14
Note
This mode is available only if a recorded FM
broadcast/music file already exists.
Note
By pressing the REC button in STOP state, the recording
function is activated.

Press the MODE button to move to MENU in Voice Mode.
Press the FF/REW button to move to SOURCE
menu, and then press the PLAY/STOP button to
select.
Press the FF/REW button to move to MIC menu; press
the PLAY/STOP to select it and press the MODE button to
exit MENU.
In the STOP state of0/ODE(or AUDIO MODE), press
the REC button to start recording.
During recording, the REC icon( ) will appear on the LCD display and the blue LED light will blink.
The blue LED light will appear solid if the pause button is pressed once. By pressing the REC button
again, recording will resume and the LED light will blink.
Recorded file(s) automatically assigned the next available number following the last recorded file.
Before recording, set the Internal/External Microphone, Mono/Stereo, Quality and VOR
function(s). For instructions on setting these functions, refer to pages 19~21.
15
Note
Press the REC/PAUSE button to pause
recording temporarily. Press the PLAY/STOP
button to stop recording.

Use the same method described for the external
microphone: set [MENU]-[SOURCE]-[MIC].
Connect the external microphone to external jack of the
RipFlash Trio using earphone connector.
In the STOP state of VOICE MODE(or AUDIO MODE),
press the REC button to start recording.
To pause recording, press the REC/PAUSE button. To
stop recording, press the PLAY/STOP button.
16

Connect the audio cable to the microphone jack
of the RipFlash Trio using the earphone
connector(
). Connect the other head of the
audio cable to telephone adapter(
). Connect
the incoming telephone line
(a service line) to the telephone adapter(
).
Connect the telephone cable between the
telephone and telephone adapter(
).
Use the same method as using an external microphone: set [MENU]-[SOURCE]-[MIC].
To record a telephone conversation in VOICE
MODE(or AUDIO MODE), press the REC button
to start recording.
Connect the Jack of the hands free
set(optional) to the earphone jack of the mobile
phone. Next, connect the
jack of the hands
free set using the earphone connector to the
microphone jack of the RipFlash Trio.
To record a telephone conversation in VOICE
MODE(or AUDIO MODE), press the REC button
to start recording.
To pause recording, press the REC/PAUSE
button. To stop recording, press the
PLAY/STOP button.
17
Note
To pause recording, press the REC/PAUSE
button and to stop recording, press the
PLAY/STOP button.
Note
This function is only applicable if the mobile phone has an earphone jack. Some mobile
phones might not be compatible(operate properly).

Connect the audio cable to micro- phone
jack of the RipFlash Trio using the
earphone connector(a) and connect the
other head of audio cable to the earphone
jack of the audio devices.
Press the REC button to start recording.
To pause recording, press the REC/
Pause button. To stop recording, press the
PLAY/STOP button.
If the volume level of your external device is too high, it can cause some noise/distortion. Before
recording, set [MENU]-[SOURCE]-[LINE IN].
Recording quality and timetable (based on 128MB)
LINE- IN
MONO
8 Kbps
16 Kbps
32 Kbps
Max.2180Min
Max.1090Min
Max.540Min
MIC
MONO
8 Kbps
16 Kbps
32 Kbps
Max.2180 Min
Max.1090 Min
Max.540 Min
STEREO
96 Kbps
128 Kbps
160 Kbps
Max.180Min
Max.130Min
Max.100Min
LQ
MQ
HQ
The sound quality is automatically set to MONO when the internal microphone is in use.
the STEREO mode is only applicable with the external microphone or external
audio devices.
When recording from an external sound source, such as an audio devices, select STEREO/HQ
mode for high quality recording soudn.
in this mode the recording time will be reduced.
18
Note
Note

Quickly press the MODE button.
Press the FF/REW button to move to the M/S menu and
then press the PLAY/STOP button.
Press the FF/REW button to choose either MONO or
STEREO, and then press the PALY/STOP button.
Press the MODE button to exit the menu. Make sure the
icon on the LCD.
If an audio cable will be used for recording purposes set the MODE prior to recording.
If you select [MENU]-[SOURCE]-[MIC] and move to M/S MODE, MONO!! message will appear on
the LCD.
STEREO is only available when connecting external devices and by setting the following MODE:
[MENU]-[SOURCE]-[LINE IN].
19

Press the MODE button.
Press the FF/REW button to move to the QUALITY menu,
and then press the PLAY/STOP button.
Press the FF/REW button to select among LQ, MQ and
HQ, and then press the PLAY/STOP button.
Press the MODE button to exit menu, make sure the icon is
on the LCD.
It is recommended that recording quality be selected prior to actual recording.
20

Quickly press the MODE button. Press the FF/REW
button to move to SYSTEM menu, and then press the
PLAY/STOP button.
Press the FF/REW button to move to VOR menu, then
press the PLAY/STOP button and select
VOR ON.
Then press the PLAY/STOP button.
Press the FF/REW button to select your desired time and
press the PLAY/STOP button.
Press the MODE button to exit the menu and make
sure the setting(VOR time) is on during recording.
To automatically pause recording when there is no sound or voice present (and prevent
unnecessary recording), use the VOR function. This function maximizes recording time and is
very useful for recording telephone conversations and lectures. User can set the VOR time.
User can select VOR times of 5, 10, 15, 20 and 25 seconds.
The VOR function might not operate properly if a loud, grinding noise is present.
21

Press the MODE button 2 seconds to change to VOICE
MODE(or AUDIO MODE, FM PLAY MODE).
Press the FF/REW button to select the desired file and
then press the PLAY/STOP button to play. (To stop, press
PLAY/STOP button again.)
To change the play speed, press the MODE button up to 2
seconds during playback. The SPEED icon will be
displayed on the LCD. To select your desired speed,
press (+)(-).
To cancel the play speed setting, press the MODE button
2 seconds.
User can control the play speed during the playback of every file in each MODE(VOICE MODE,
AUDIO MODE, FM PLAY MODE).
If user disconnect the earphone from the RipFlash Trio during the playback of a recorded sound or
voice file, the user can listen to the sound or voice through the internal(built-in) speaker.
User controllable play speed during playback.
22

Press the MODE button.
Press the FF/REW button to navigate to REPEAT and
then press the PLAY/STOP.
Press the FF/REW button to select NORMAL-ONE-ALLINTRO and then press the PLAY/STOP button.
Press the MODE button to exit the menu(make sure the
REPEAT icon is on the LCD display).
User can set REPEAT method.
23

Press the PLAY/STOP button to play the selected file in
VOICE MODE.
Press the REC button to set the start point(the beginning
of a section).
Press the REC button once again to set the end point(the
ending of a section). The specific section you selected will
be played repeatedly.
Press the REC button again to stop repeat the segment
mode.
Play and listen to the specific section repeatedly.
24
Note
If the RipFlash Trio is changed to any other MODE during the repeat segment mode, the selected
segment(A
B) mode will be released.
 Loading...