

Page 1
Page 2

Page 3

Table of contents
Preparations ––
Preparations
Basic operation--
Basic operation
Additional operation --
Additional operation
CD-Ripping
Delete
Encoding function
Recording the voice
Connection to computer --
--Connection to computer
Installing Manager software
Deleting Manager software
Connecting to computer
Downloading files to DMR-300
Uploading files
Deleting files
Formatting the memory
Moodlogic
--Moodlogic
Appendix --
--Appendix
System requirements
Trouble shooting
Specification
Installation --
Installation
Page 4

WARNING
DANGEROUS VOLTAGE
Uninsulated Dangerous Voltage, that may be of
!
To reduce the risk of fire or electric shock, do not expose this appliance
to rain or moisture.
To avoid electrical shock; do not open the case. Refer servicing to
qualified personnel.
CAUTION : Use of the controls or adjustments of procedure other than
sufficient magnitude to constitute a risk of electric
shock to person is present within this product’s
enclosure.
ATTENTION
The owner’s manual contains important operating and maintenance
instructions. For your safety, it is necessary to refer to the manual.
those specific herein may result in hazardous radiation.
Page 5

WARNING
Do not operate the unit during the driving, bicycling or operating other
machine.
Do not insert metal with the batteries. (risk of fire)
It is recommended that you follow the listed guide line to prevent damage of
hearing.
Establish a safe sound level.
► Slowly increase the level of volume until you can hear comfortably.
► Once you have established a comfortable listening level, DO NOT
INCREASE THE SOUND LEVEL FURTHER.
(Over 80dB noise can be harmful under constant exposure. 80dB: average
city traffic, alarm clock buzzer at two feet)
Do not drop or give mechanical shock to the unit.
Do not place the unit in locations described below :
► Places exposed to direct sunlight, extreme heat or magnetized places
► Humid or moist places
► No ventilation or dust places
Do not clean it with thinner, alcohol or benzene.
Page 6
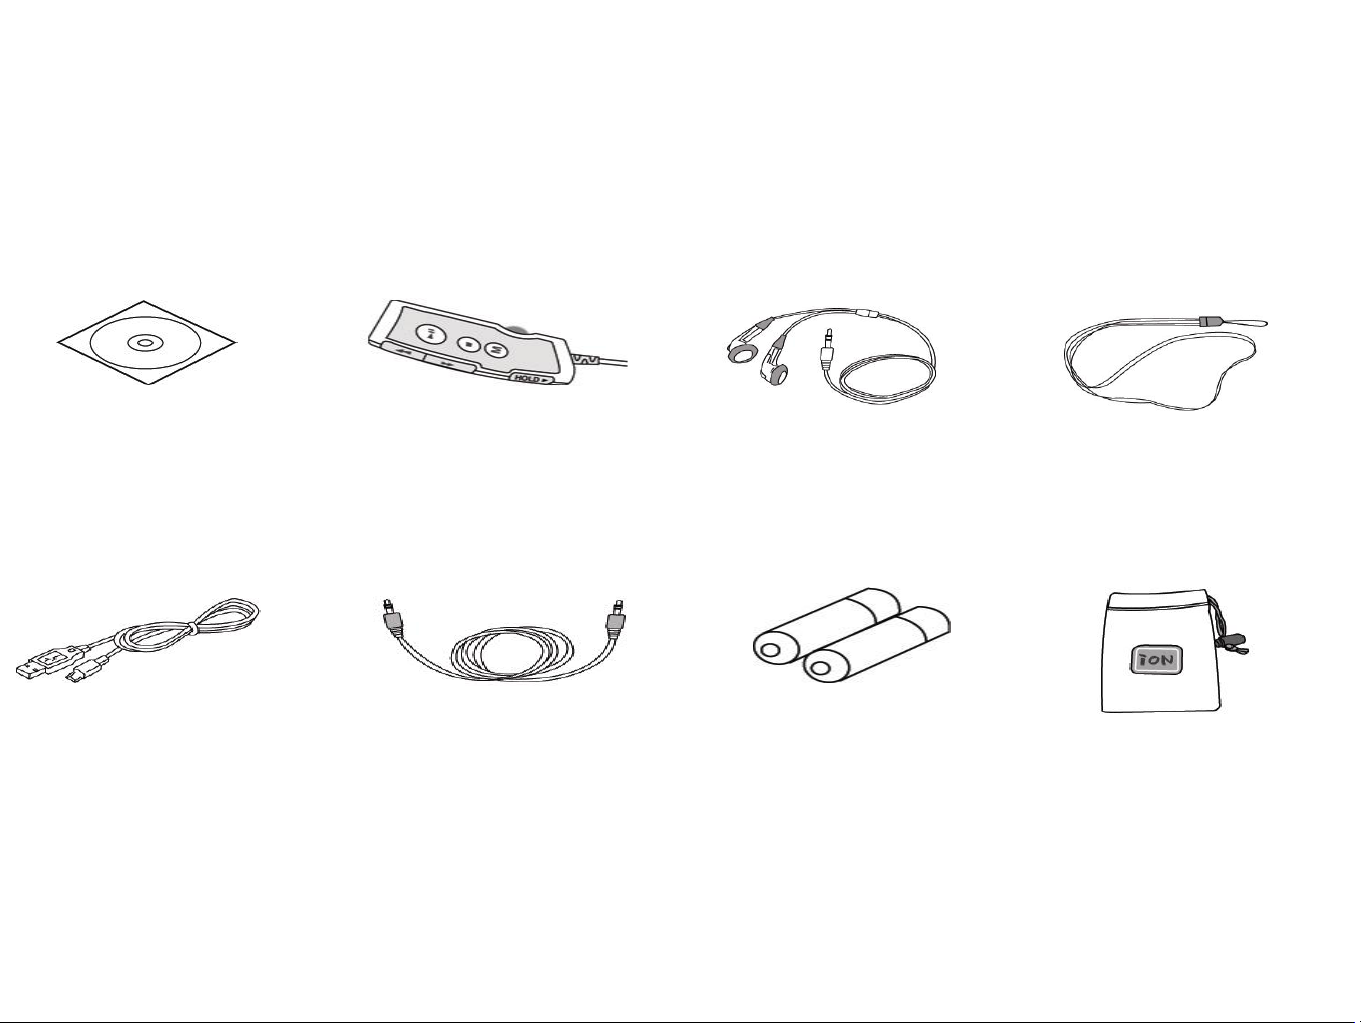
Components
Software
installation CD
USB cable
Remote
control
Line in cable Carrying
Stereo Ear
phone
2 AAA Size
batteries
Necklace
bag
Page 7
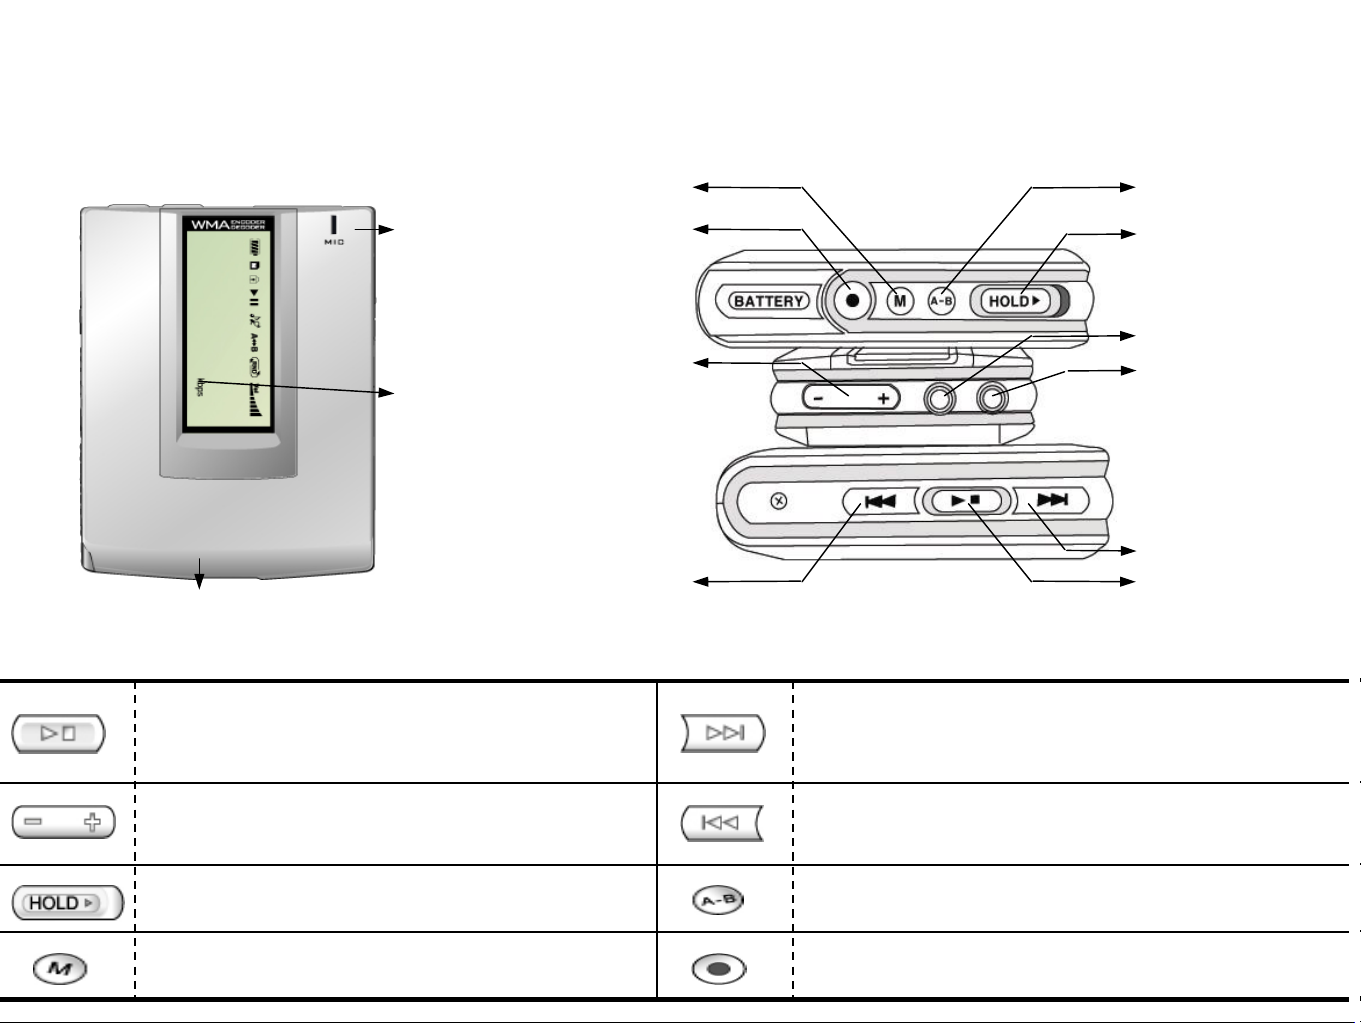
Using buttons and controls
MIC
LCD
Neck strap holder
Power On / Play / Pause / Stop /
Power Off
MENU
Record
VOLUME
REVERSE
Local Repeat
HOLD Switch
Earphone jack
Line-IN
FORWARD
POWER ON/OFF
PLAY/PAUSE/STOP
Play the next track
/ Fast forward in the current track
Volume
Play the previous track
/ Rewind the current track
Local repeatHold switch
Record (Voice/Music)Mode MENU
Page 8
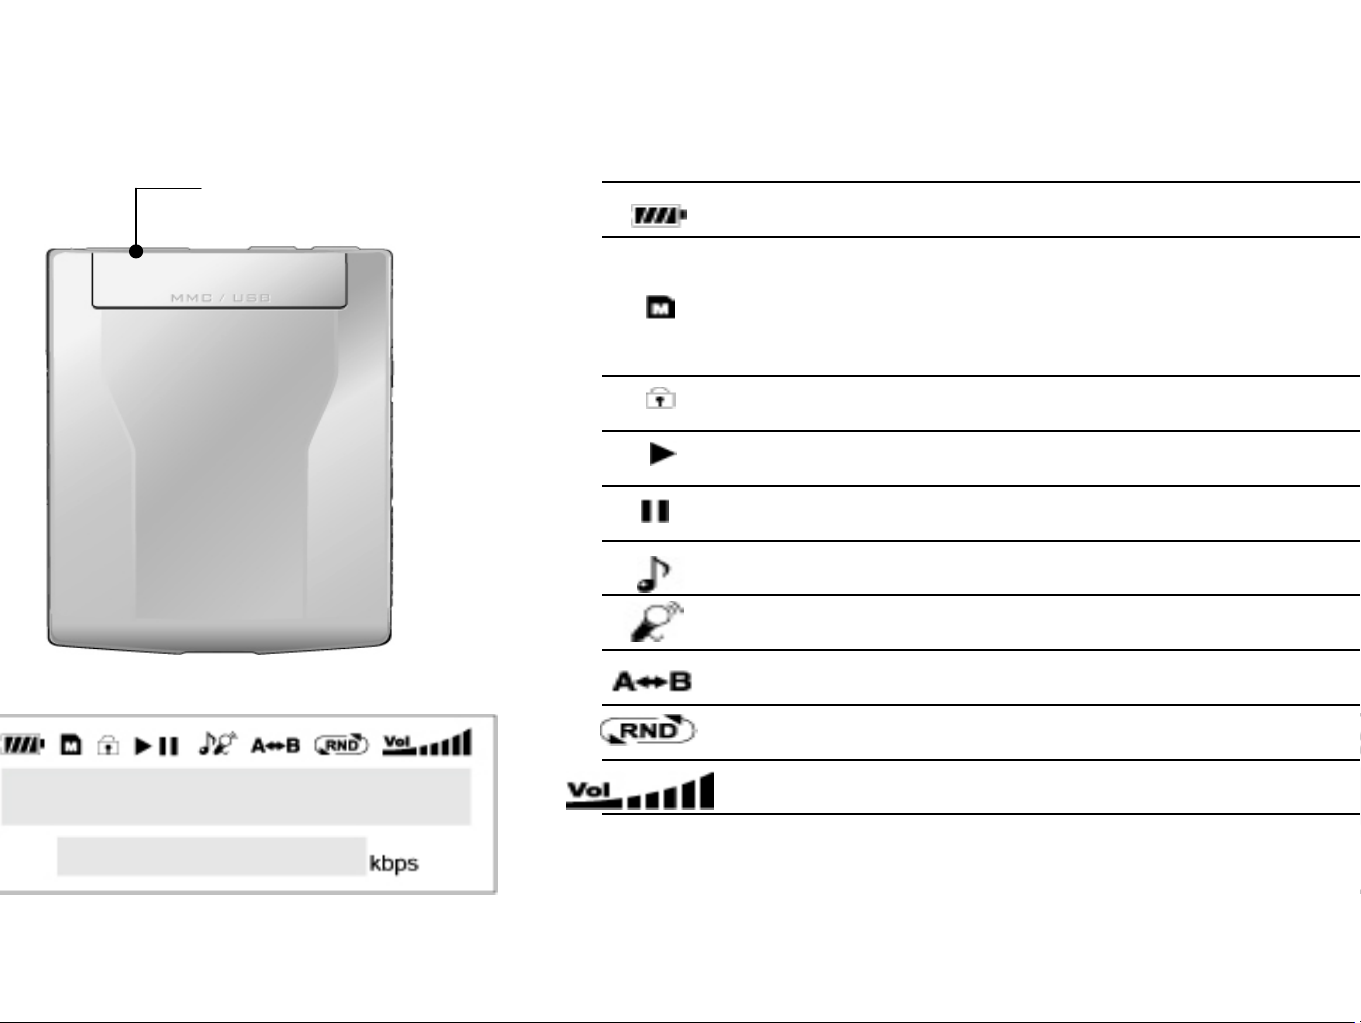
< Rear >
MMC & SD card slot
/ USB jack
Remaining battery capacity
MMC / SD card icon
This icon will blink while the song in
MMC or SD card is played.
Hold icon
Play icon
Pause icon
Music recording icon
Voice recording icon
Local repeat icon
Play mode icon
Volume level
Page 9
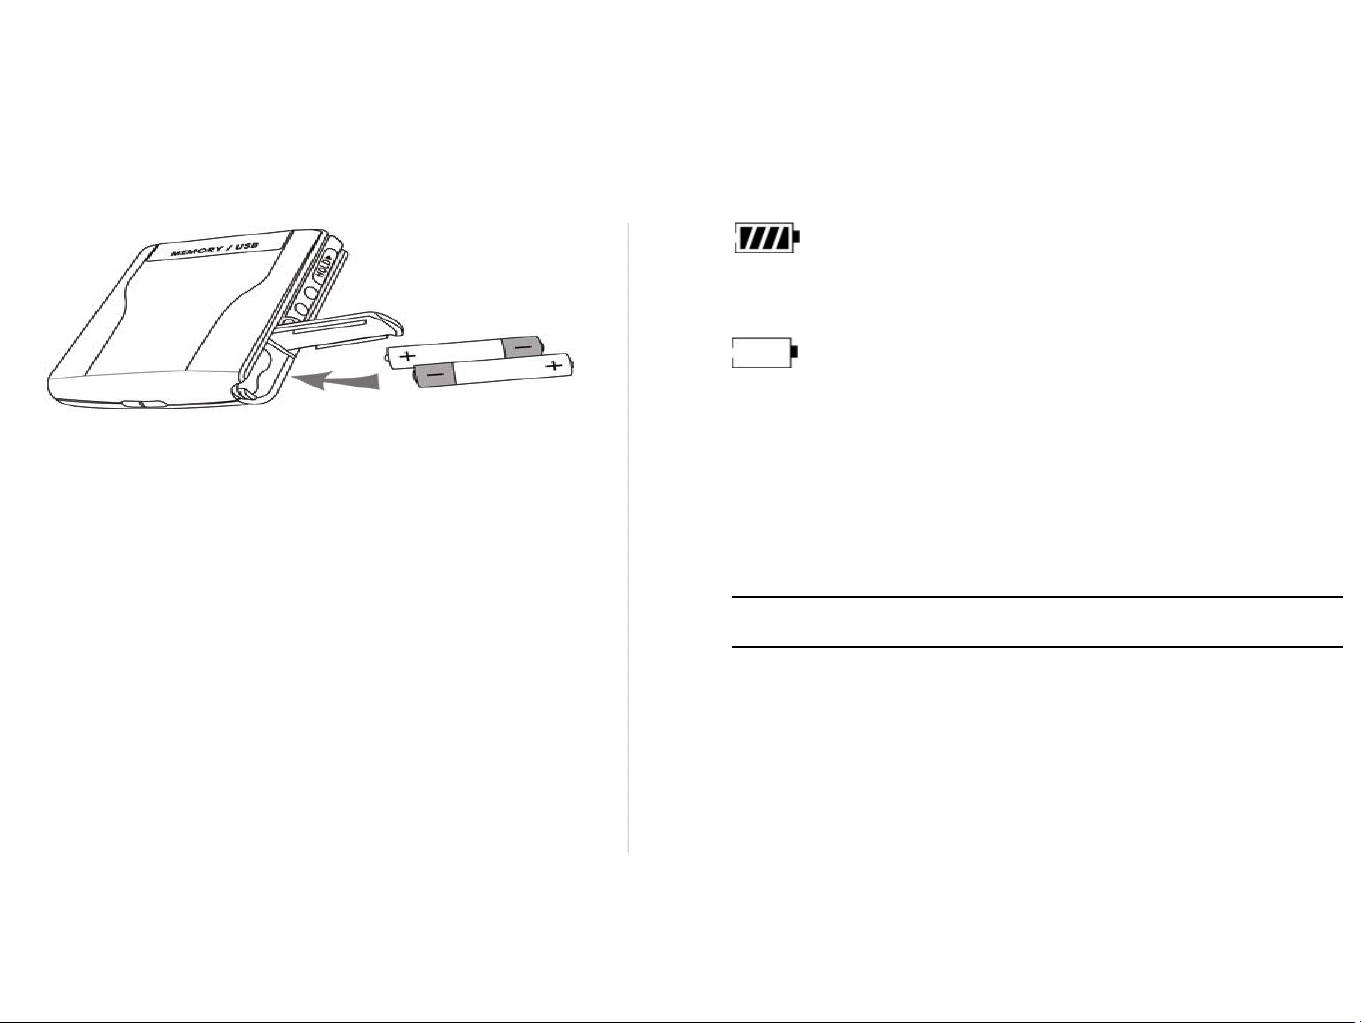
Inserting Battery
① Slide open the cover as shown
in the figure.
②Insert 2 AAA alkaline batteries
The bars inside a battery icon displays
the remaining battery capacity.
The icon will blink when the batteries
have almost run out. This unit will be
automatically powered off in 30
minutes from this time.
MP3Battery lifetime
(supplied). Slide the cover back to
close.
③ Use the alkaline batteries.
Note
If you do not use the batteries
correctly, it may become damaged.
Be sure to check the polarity of the
batteries (+,-), while inserting the
batteries.
13 hours2 alkaline batteries
Page 10
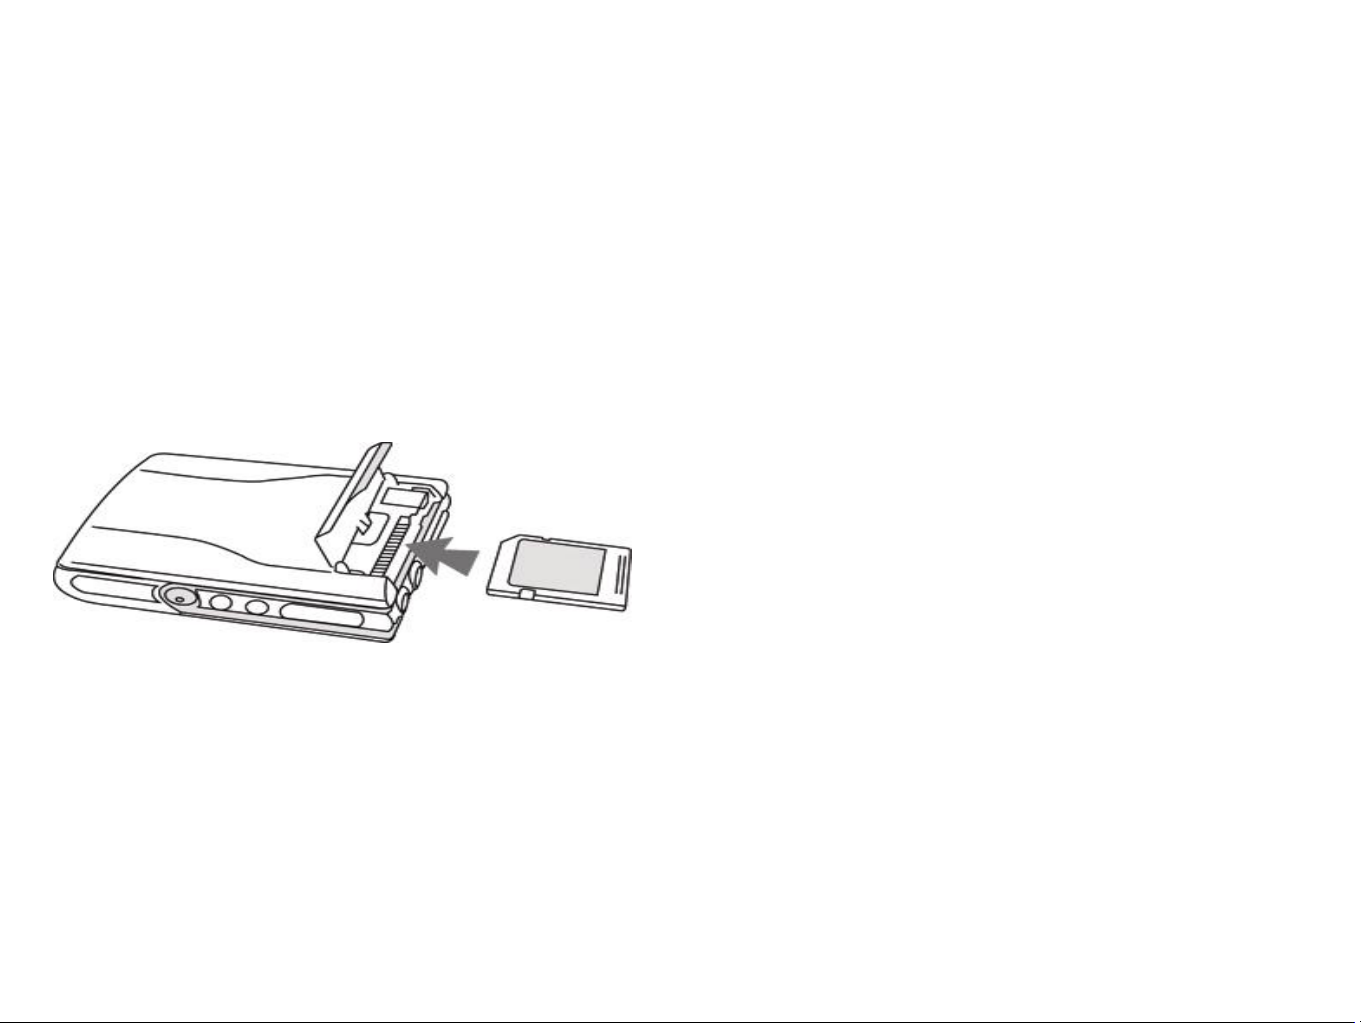
Adding MMC / SD card
If you need additional memory, you can purchase the MMC (the Multi Media
Card) or SD card(Secure Digital memory card) as shown in the figure.
① Align the MMC or SD card with the
slot as shown in the figure and insert it
to the end.
② Turn on the unit to display the
memory capacity of the MMC or SD
card on the LCD.
Eject MMC / SD card,
① Press the MMC / SD card in the
direction of the arrow.
② MMC / SD card will pop up.
③ Pull out the MMC / SD card.
Note
- Be sure to turn off this unit when you
insert or eject the MMC / SD card.
- Format the memory data to down load
the MP3 file.(32page)
- Downloading to the MMC or SD card is
the same as downloading to internal
memory.(28page)
Page 11
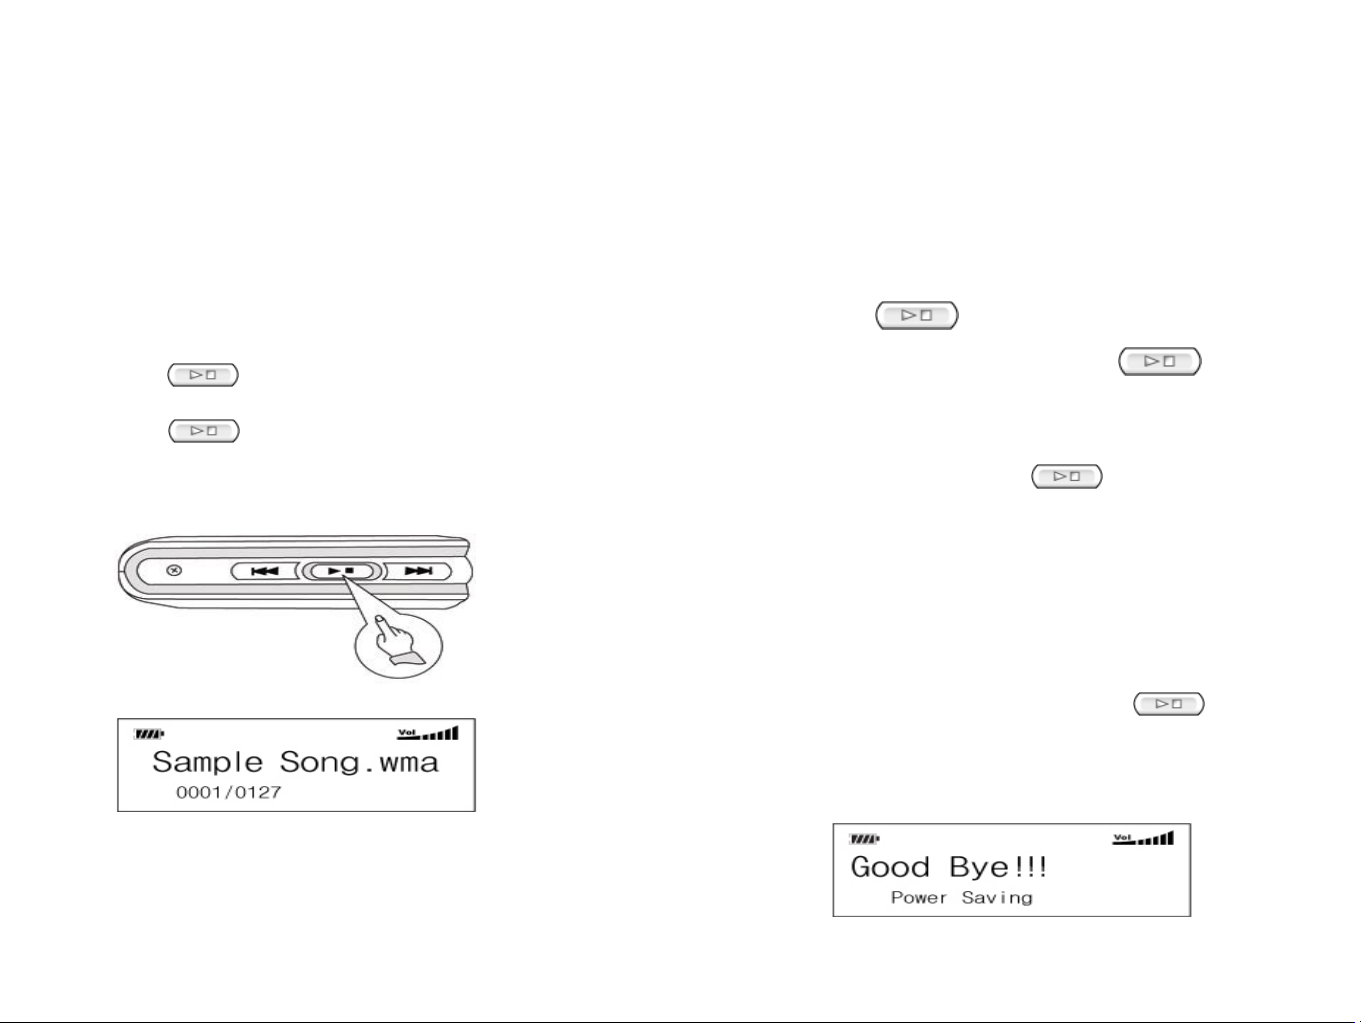
Playing songs on “RipFlash DX”
< Playing / turn on >
① Insert the batteries and connect
the earphones to the player.
② Press to turn on.
③ Press again to play a song.
< Pause >
① Press to pause while playing.
② When paused, press to play.
< stop / turn off>
① Press and hold for 3 seconds
to stop.
② When stopped, press and hold
for 3 seconds to turn off.
The unit automatically turns off 5
minutes after it stops playing.
③ When stopped, press to play.
Page 12
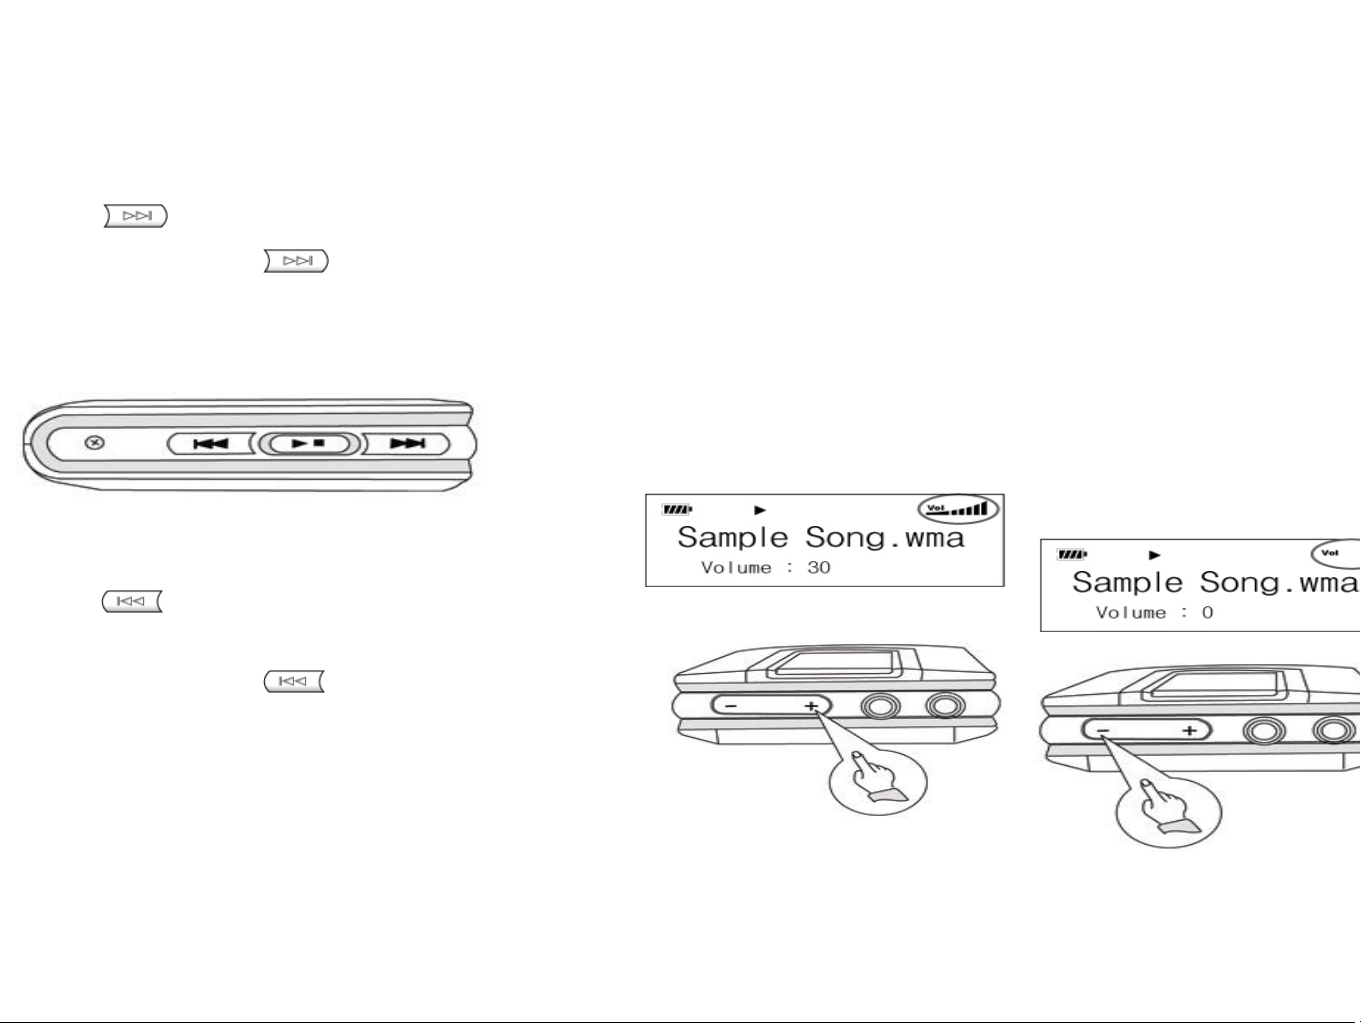
Selecting the track / Volume control
Press +/- button to adjust the volume
………………………………………………………………………………
while playing.
the current track.
the current track.
playing MP3 files of 64kbps or less.
Press +/- button to adjust step by
step.
Volume range from 0 to 30.
Press and hold +/- button to adjust
continuously.
Page 13
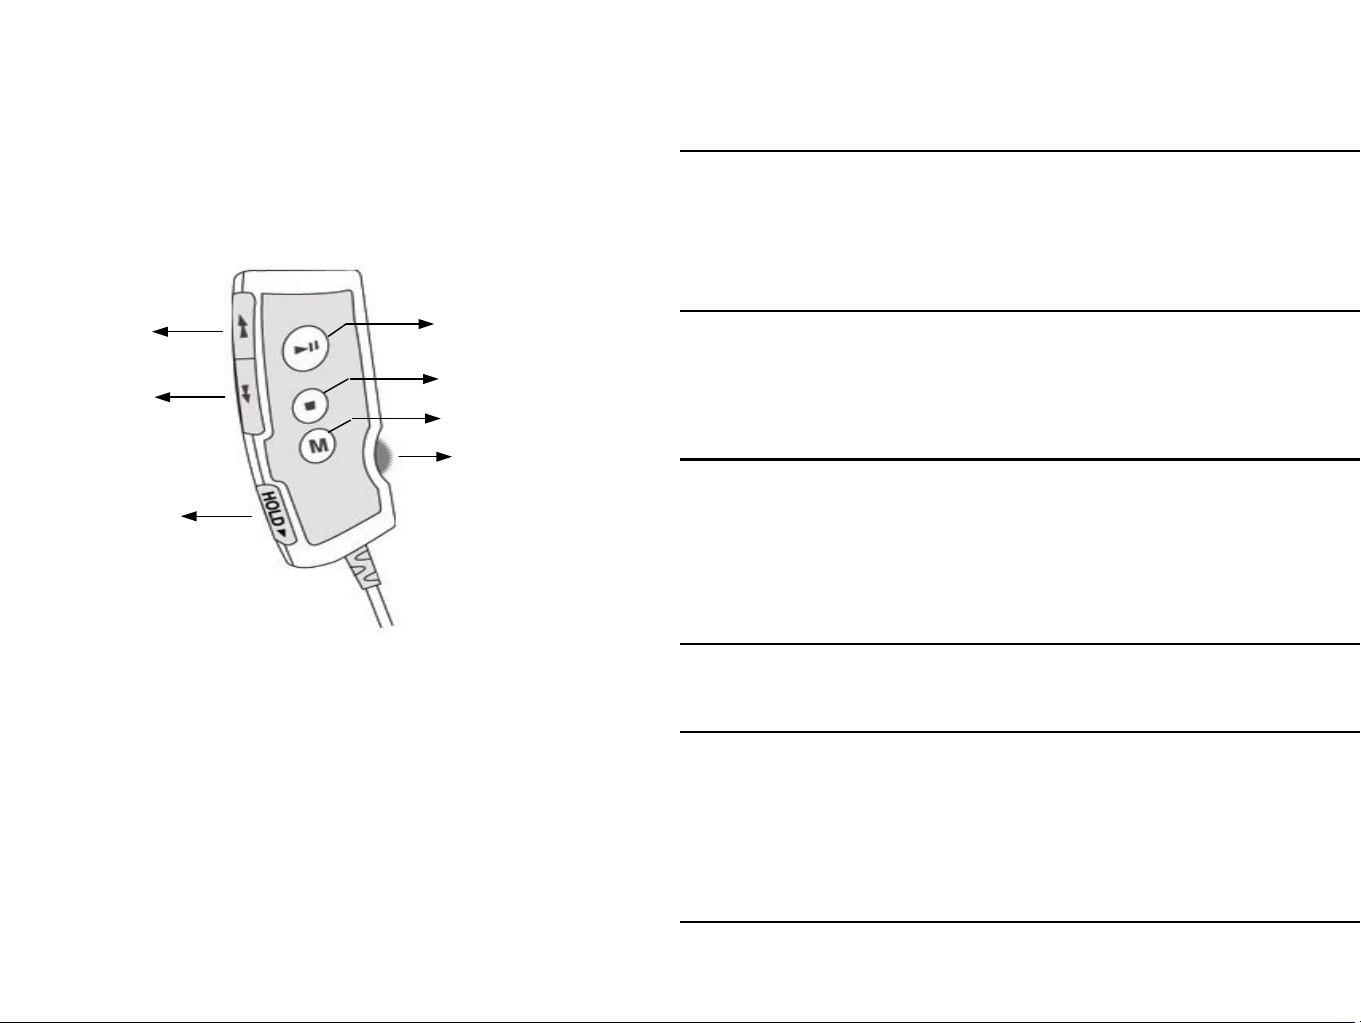
Using the Remote Control
① Press and hold ▶ ▍▍ to turn on
Rewind
Forward
HOLD
☼ note :
Play / Paused
Stop
Menu
Volume
▶ ▍▍
█
the player.
② Press ▶ ▍▍ to play.
③ Press ▶ ▍▍ to pause.
Press to skip to the next track.
Press and hold to fast forward
the current track.
Press to locate the beginning
of the track or the previous track.
Press and hold to rewind the
current track.
Press █ to stop the playing.
Press and hold █ to turn off.
press Ⓜ to change REPEAT mode,
Under hold mode, no buttons on the
remote control will work. You can
adjust the volume while playing.
Ⓜ
from NORMAL REPEAT→REPEAT
ONE→REPEAT
ALL→RANDOM PLAY→RANDOM ALL.
Page 14
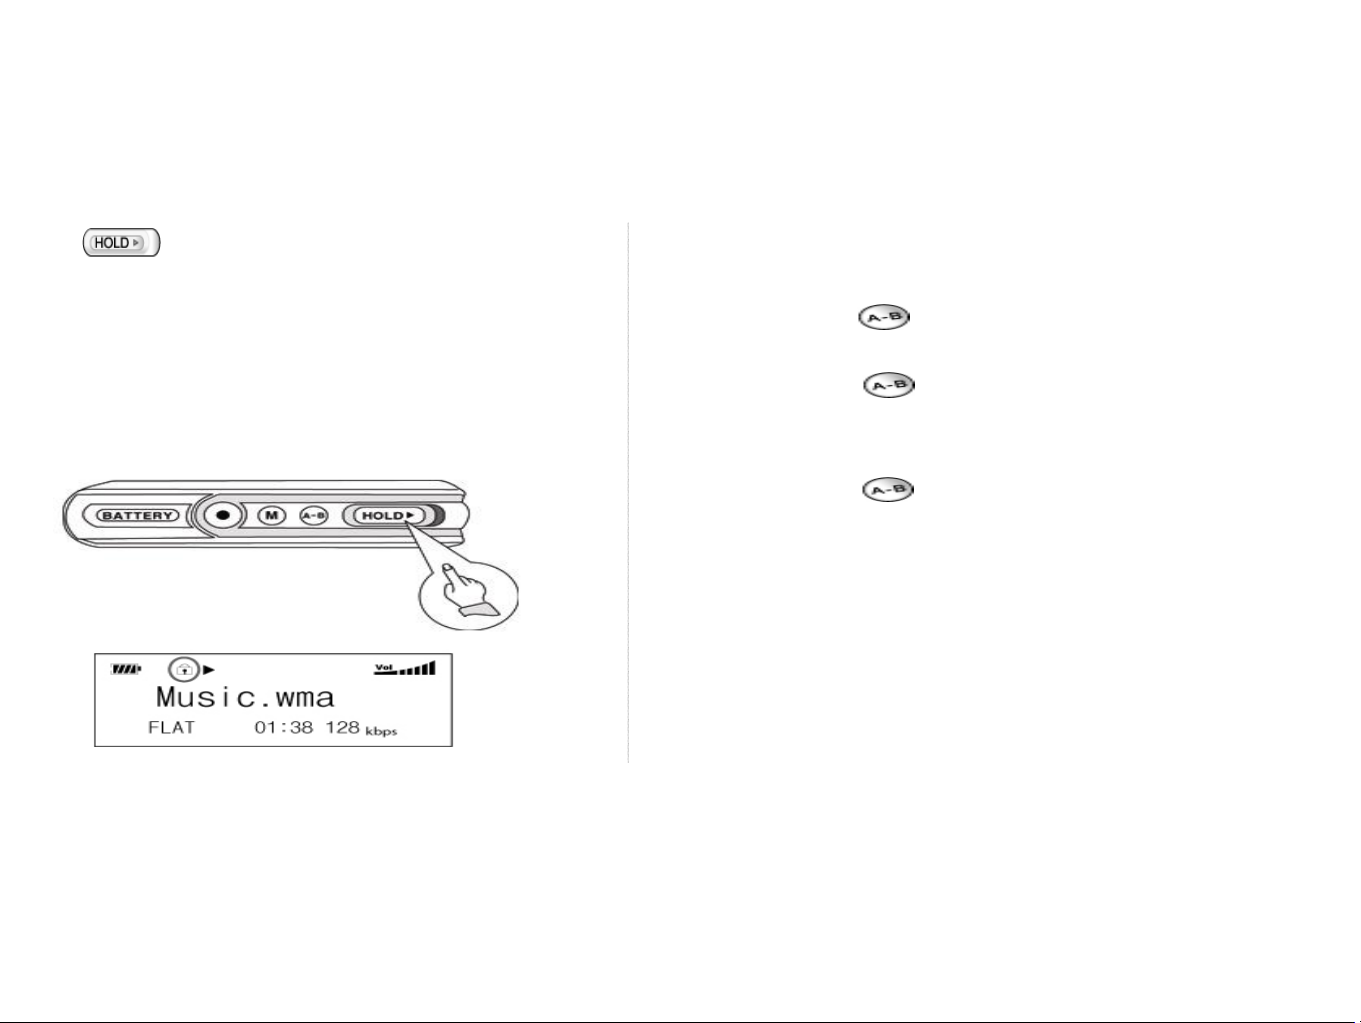
Hold function / Local Repeat
Hold mode
Local Repeat mode
To repeat a part of the current track,
① Press to start the local recording.
② Press to finish the local recording.
③ Repeat the recorded part.
④ Press to finish the local repeat and
play the current track.
Page 15
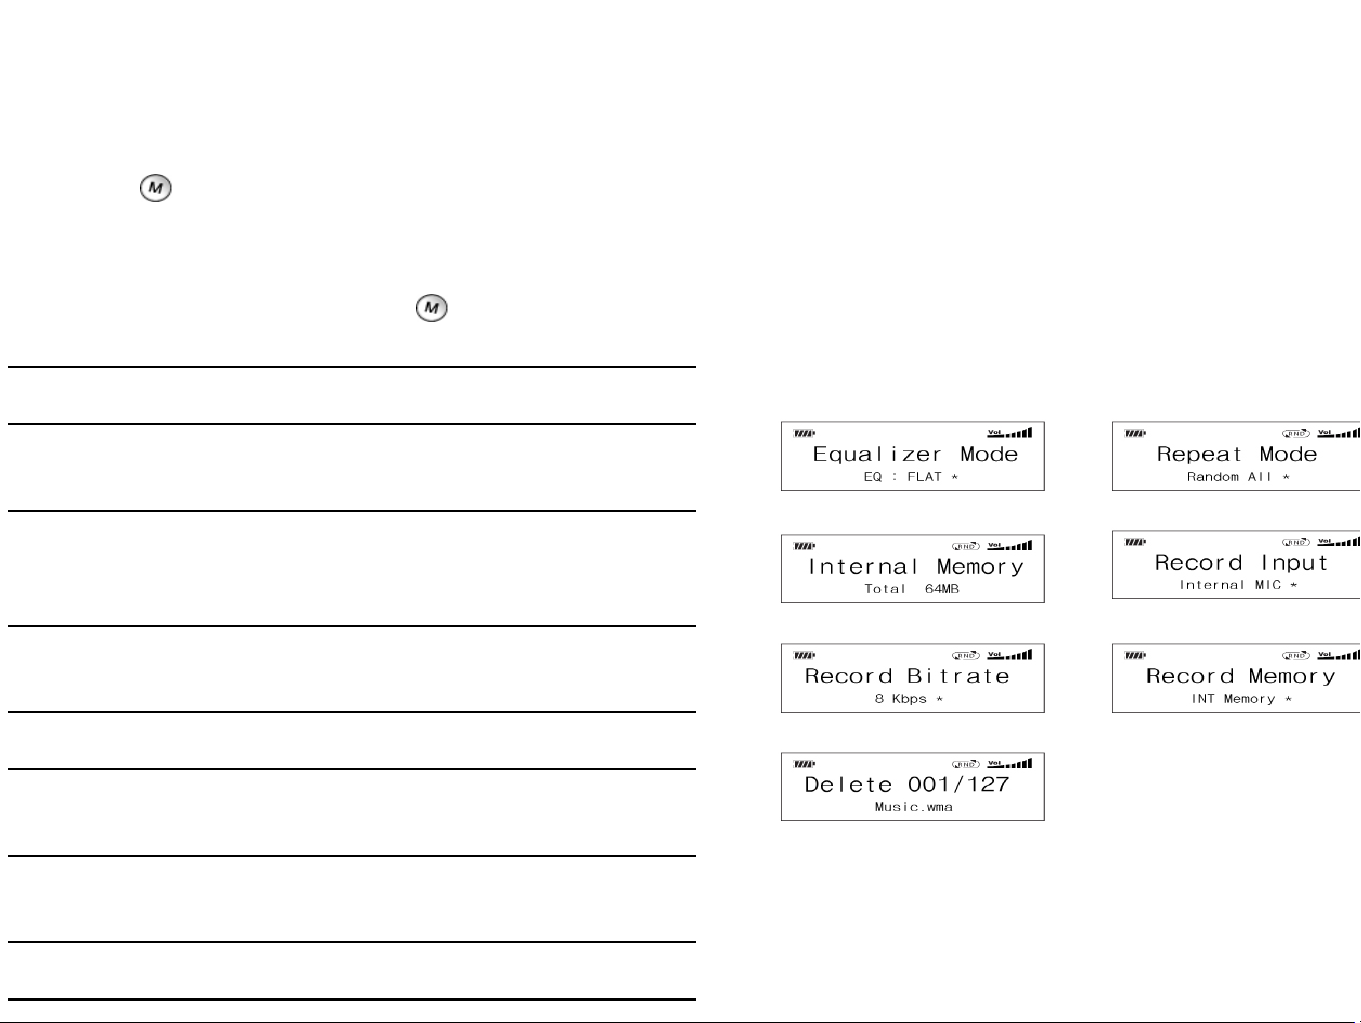
Using mode options and settings
Use the mode button to select the following mode options.
The player displays a mode in the order of ‘EQ’→’REPEAT’→memory
information→’Record Input’→’Record Bitrate’→‘Record Memory’→‘CD-Ripping’
→’Delete’ as you press .
LIVE/JAZZ/ROCK/FLATEqualizer
Repeat
(file order)
Memory
Information
Record Input
Record
Memory
CD-Ripping
REPEAT ONE /
REPEAT ALL / RANDOM
INERNAL MEMORY TOTAL /
INERNAL MEMORY REMAIN /
EXTERNAL MEMORY
Internal Mic
Line in
8 ,16 ,32, 64, 128 kbpsRecord bitrate
INT Memory (Internal memory)
EXT Memory (External Memory)
Function ON / OFF
(automatic track recognition)
ERASE FILEDelete
CD-Ripping function is activated on Line-
in mode and Record bitrate over 64kbps.
Page 16
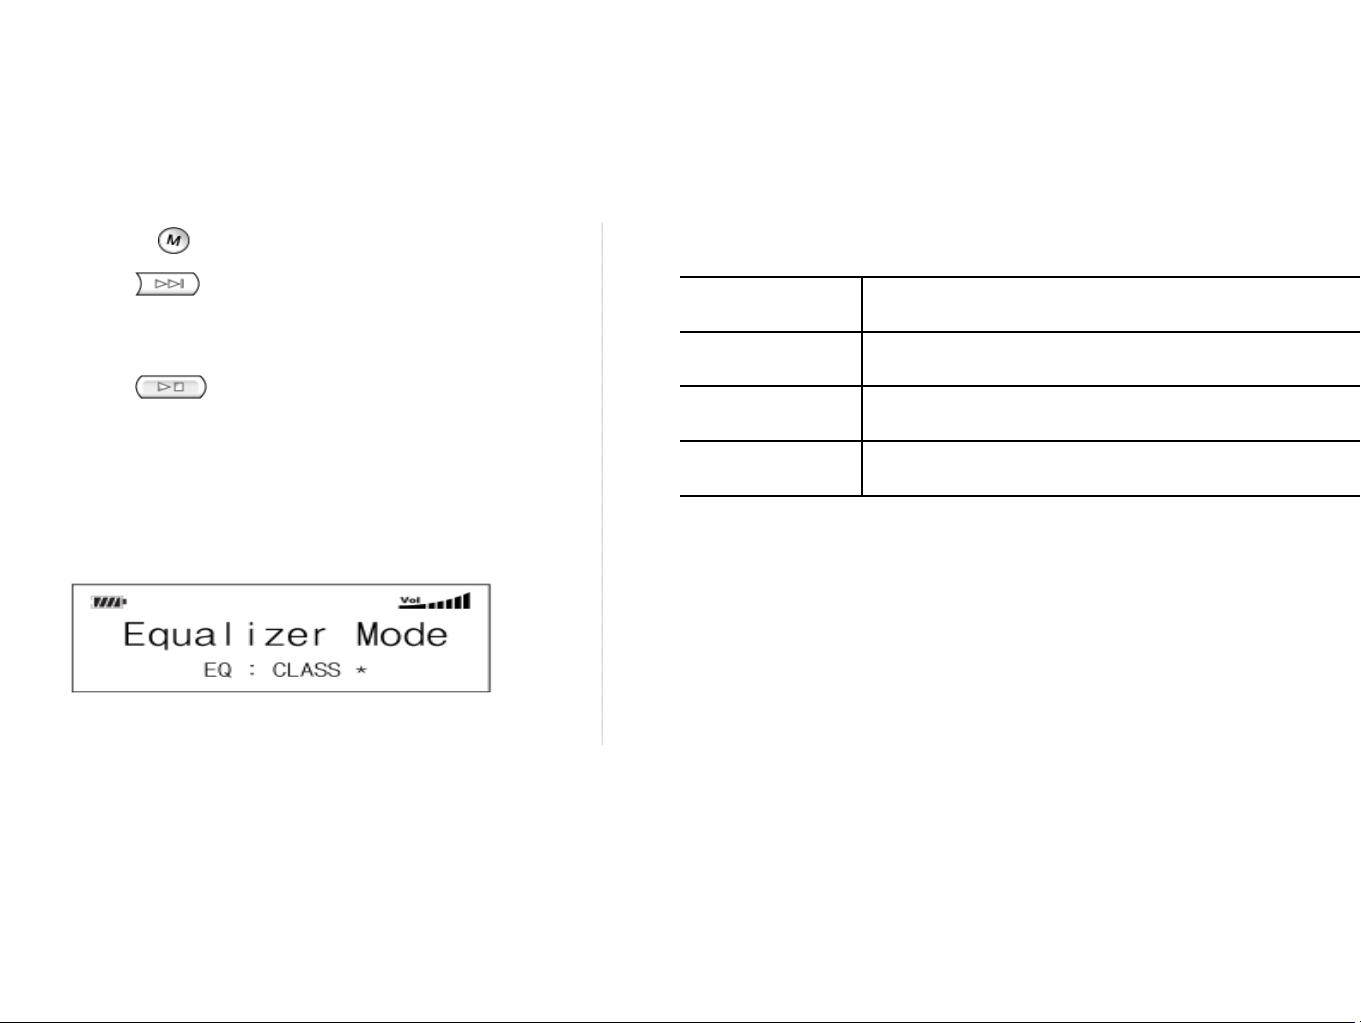
Setting up EQ(Equalizer)
following menus; FLAT, LIVE,
Preset for live musicLIVE
Preset for jazz musicJAZZ
Preset for rock musicROCK
Normal balanceFLAT
Page 17
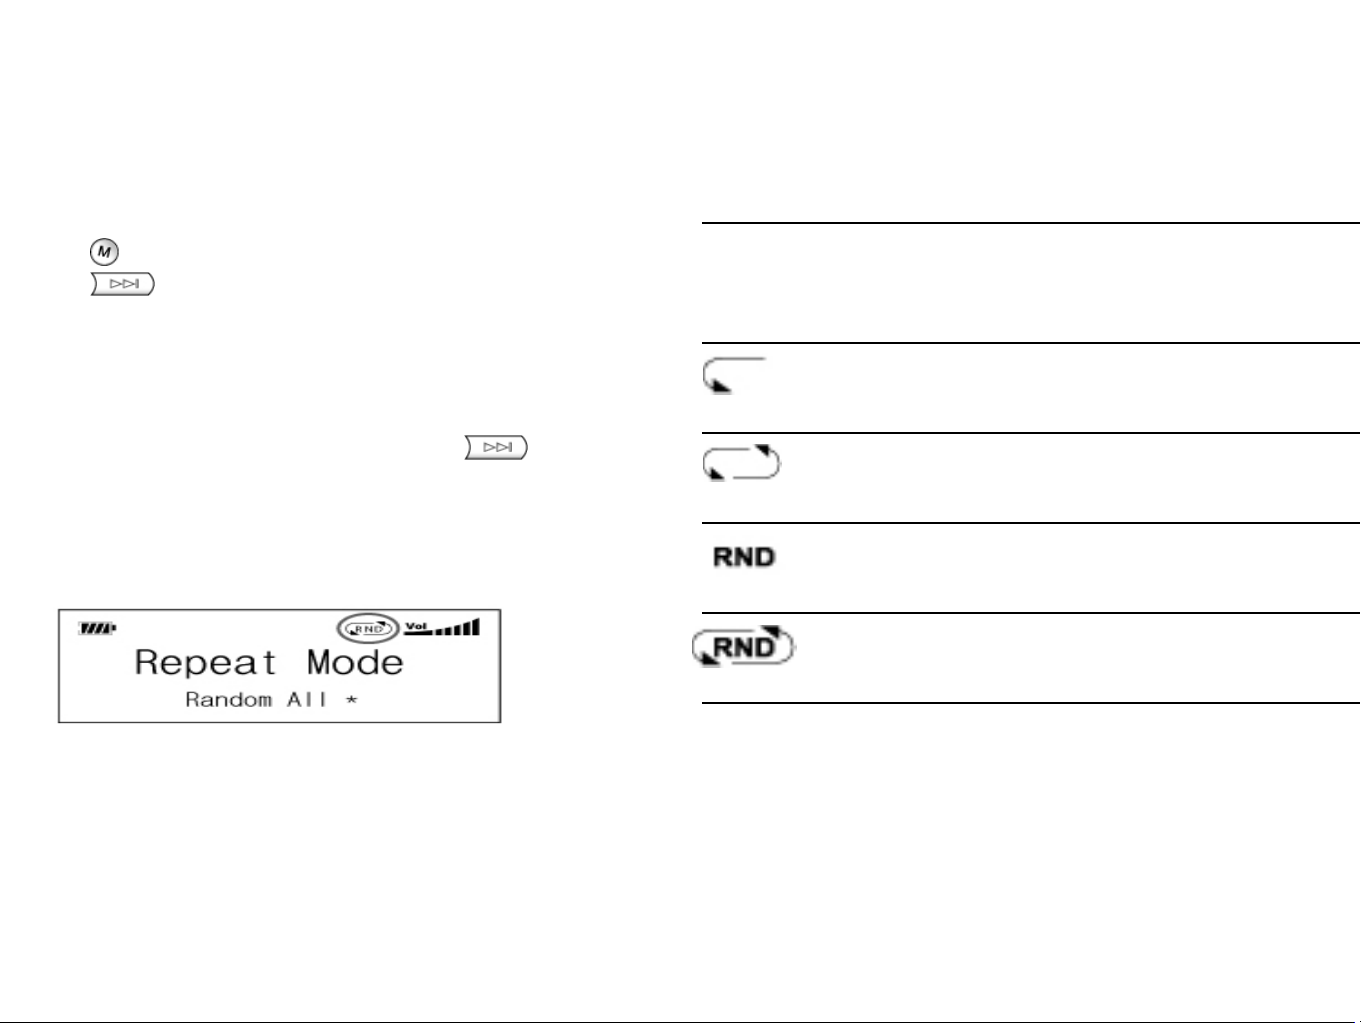
Repeating tracks
NORMAL REPEAT
- Play all the tracks in order one time.
REPEAT ONE
- Repeat the current track.
REPEAT ALL
- Repeat all tracks.
RANDOM PLAY
- Play tracks at random.
RANDOM ALL
- Repeat tracks at random
Page 18

Memory information
Press three times to display the memory information.
Press to indicate memory status in the order of ‘INTERNAL MEMORY
TOTAL’→’INTERNAL MEMORY REMAIN 128MB’→‘EXTERNAL MEMORY
TOTAL’ →’EXTERNAL MEMORY REMAIN ??MB’, as you press.
Page 19
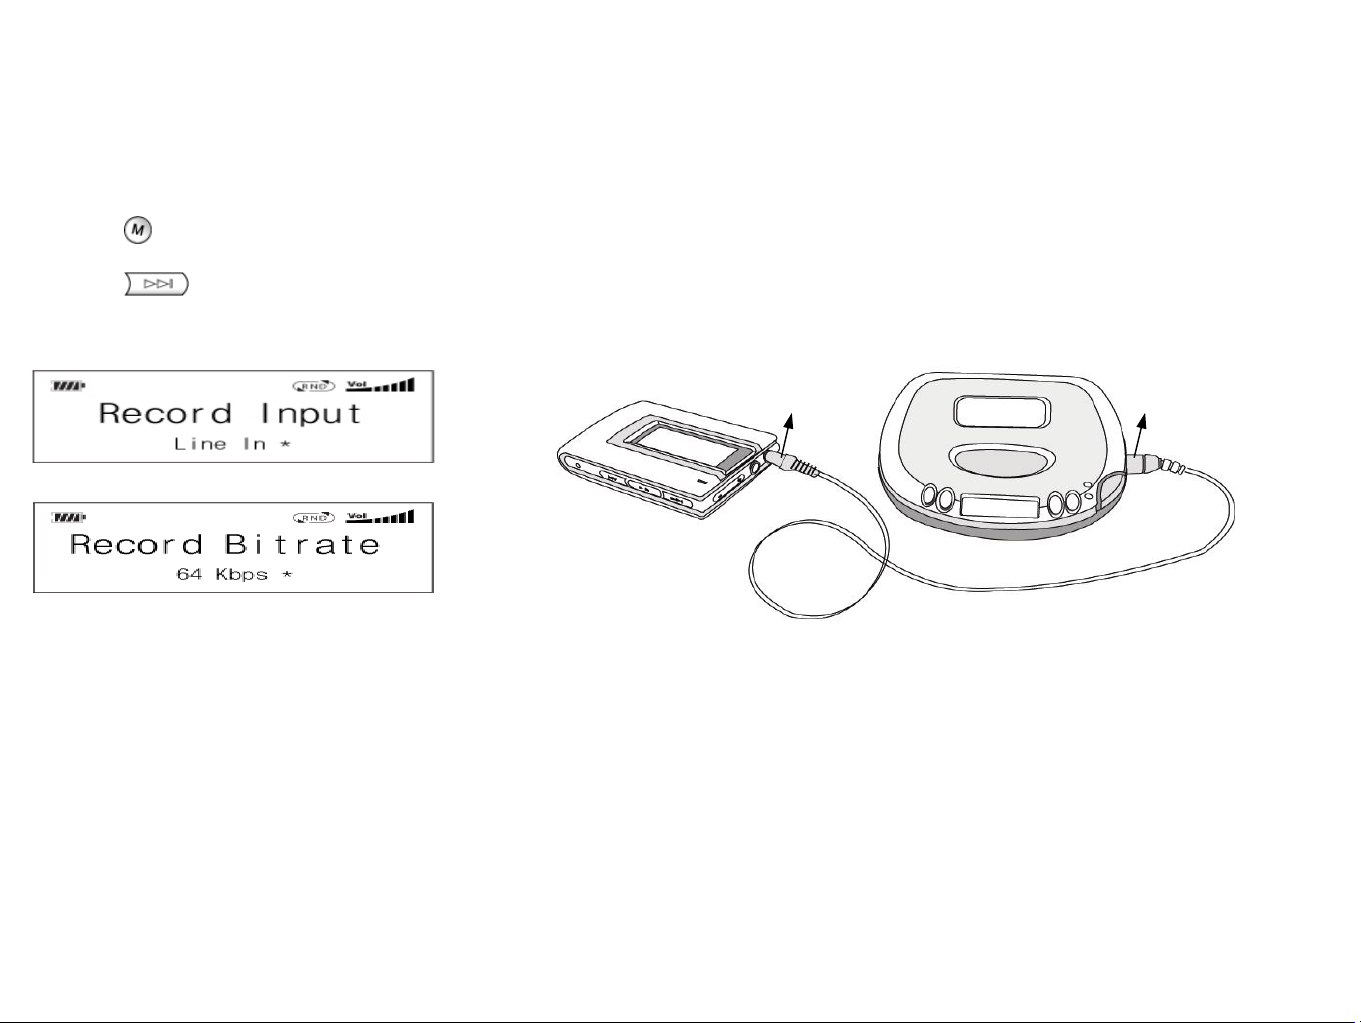
Record Input
Press four times to set up Record Input.
Press to select ‘Internal Mic” or “Line In”
Line In
Headphone
Page 20

Record bitrate
Record Memory
Press six times to set up RECORD MEMORY.
Press to search INT MEMORY (internal memory) or EXT MEMORY
(external memory).
Press to confirm Record Memory.
Page 21

CD-Ripping
The CD-Ripping function recognizes the tracks of the recorded material separately
during the transferring from a CD player to the unit.
When you record an album consisting of 12 songs from CD player to the unit, the unit
automatically creates 12 files with the CD-Ripping function.
First, set up Record Input on LINE IN and Record Bitrate on 64kbps or 128kbps.
① Press seven times to set up CD-Ripping function.
② Press to select Function ON or OFF
③ Press to confirm
The unit recognizes a new track which is next sound after no sound more one second.
If no sound is more five second, the recording is finished.
On voice recording or Line-in recording under 32kbps, this function is not activated.
Page 22
Delete
① Press seven times to delete a track (or eight times with CD-Ripping
function)
② Press to search the track.
③ Press to select the track.
④ When ‘Confirm:Yes’ is displayed, press to delete the track.
If you do not need to delete the track, press or to display
‘Confirm:No’ and press to return to the previous menu.
Page 23

Encoding function
First, set up Record Input mode on Line In.
① Turn on the player or stop the Playing.
② Plug in the Line-in cable into the Line in jack of the player and Line out jack
of other device.
③ Press of other device and press of the player to record.
Page 24
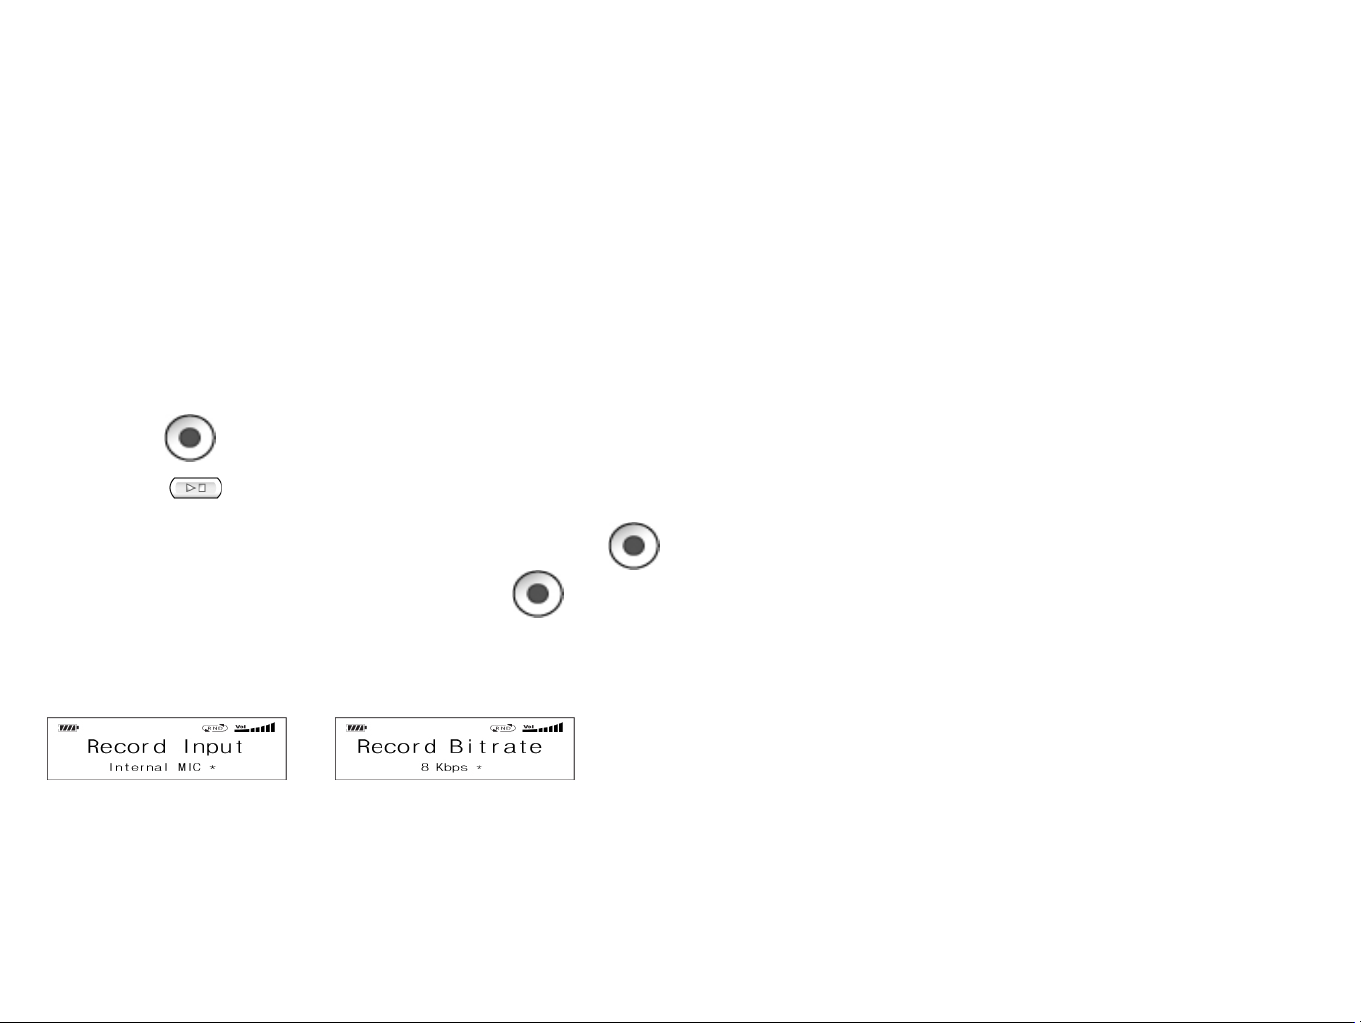
Recording Voice
First, set up Record Input mode on the
Internal Mic.
① Turn on the player or stop the
Playing.
② Press to record the voice.
③ Press to stop the recording.
To pause the voice recording, press
To record continuously, press again.
Note
When memory is full, ‘FULL’ is
displayed.
Voice is recorded only on the
internal memory.
Page 25
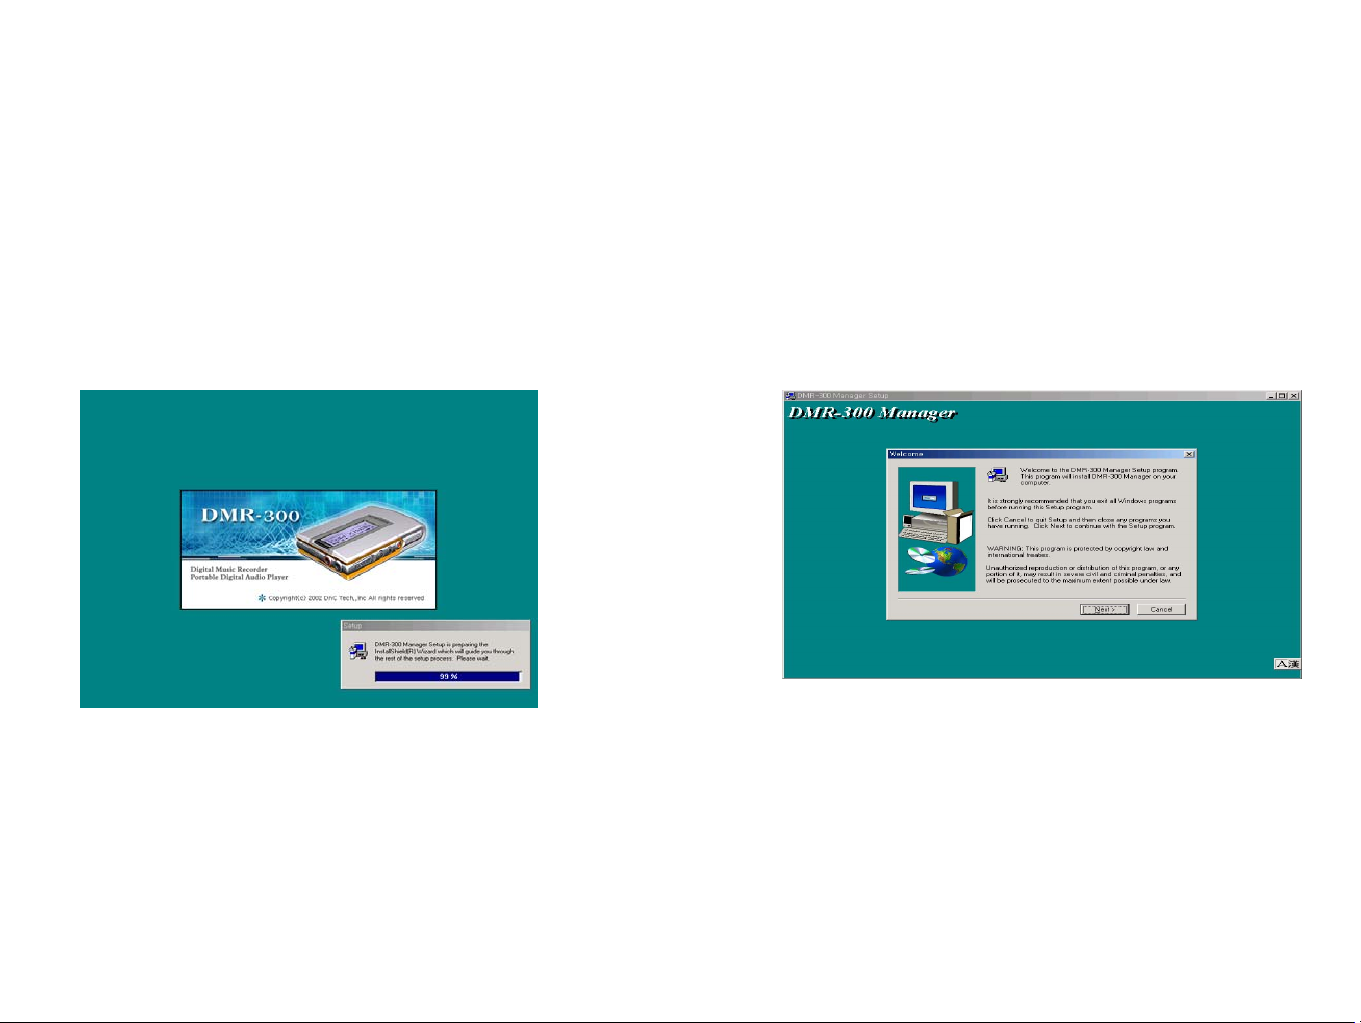
Installing Manager software
① Insert the installation CD into your
CD-ROM drive.
② The installation CD will auto-run
when loaded into a PC.
Note :
Do not connect the player to PC before this
installation. For manual setup,
③ Click [Next]in the Set Up window
to start the installation of DMR-300.
Click
① Click MP3 Explorer Plus in CD-ROM drive.
② Click setup icon in “MP3 Explorer Plus” folder.
Page 26
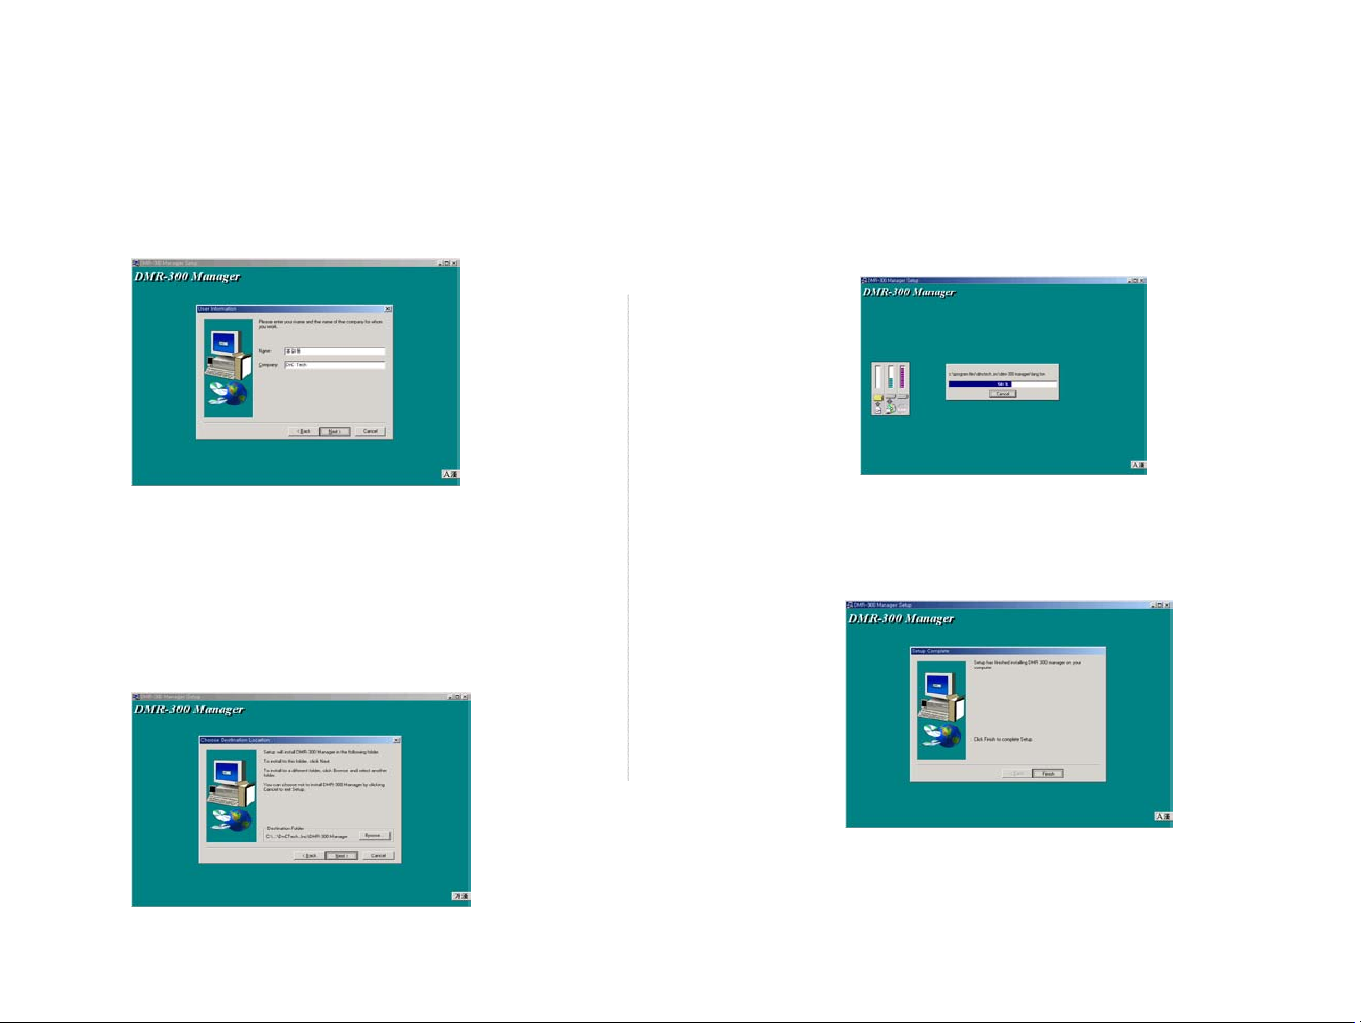
Installing Manager software
⑥ Installation of management software
is displayed.
⑦ Click [Finish] button to complete
the installation.
Page 27
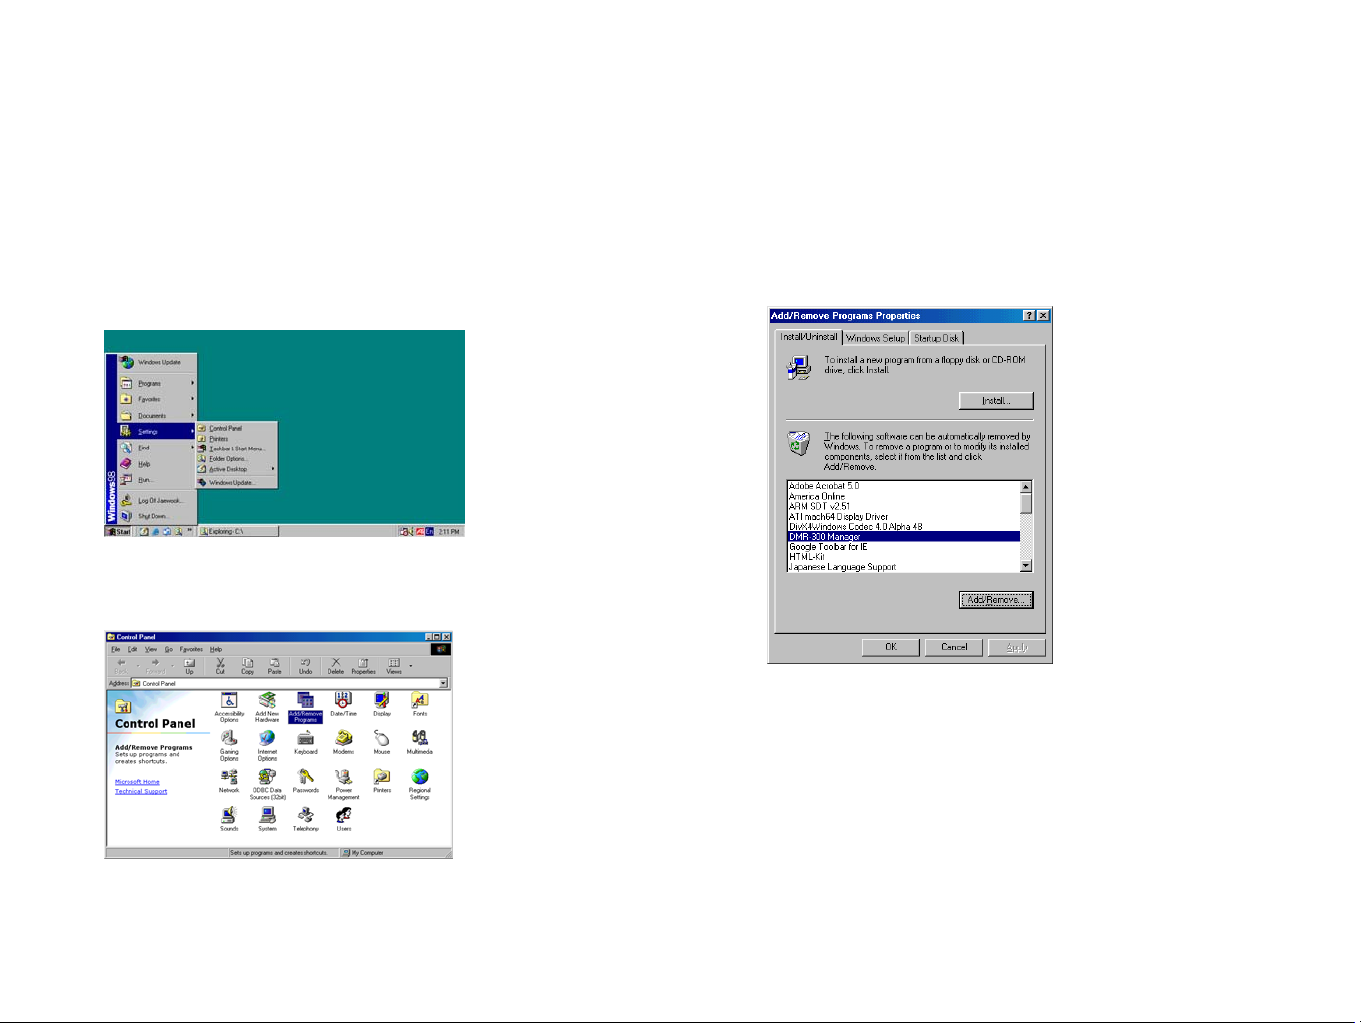
Deleting Manager software
To delete RipFlash DX Manager software,
Start → Settings → Control Panel
Click Add/Remove Programs.
Select RipFlash DX Manager.
Click Add/Remove.
Page 28
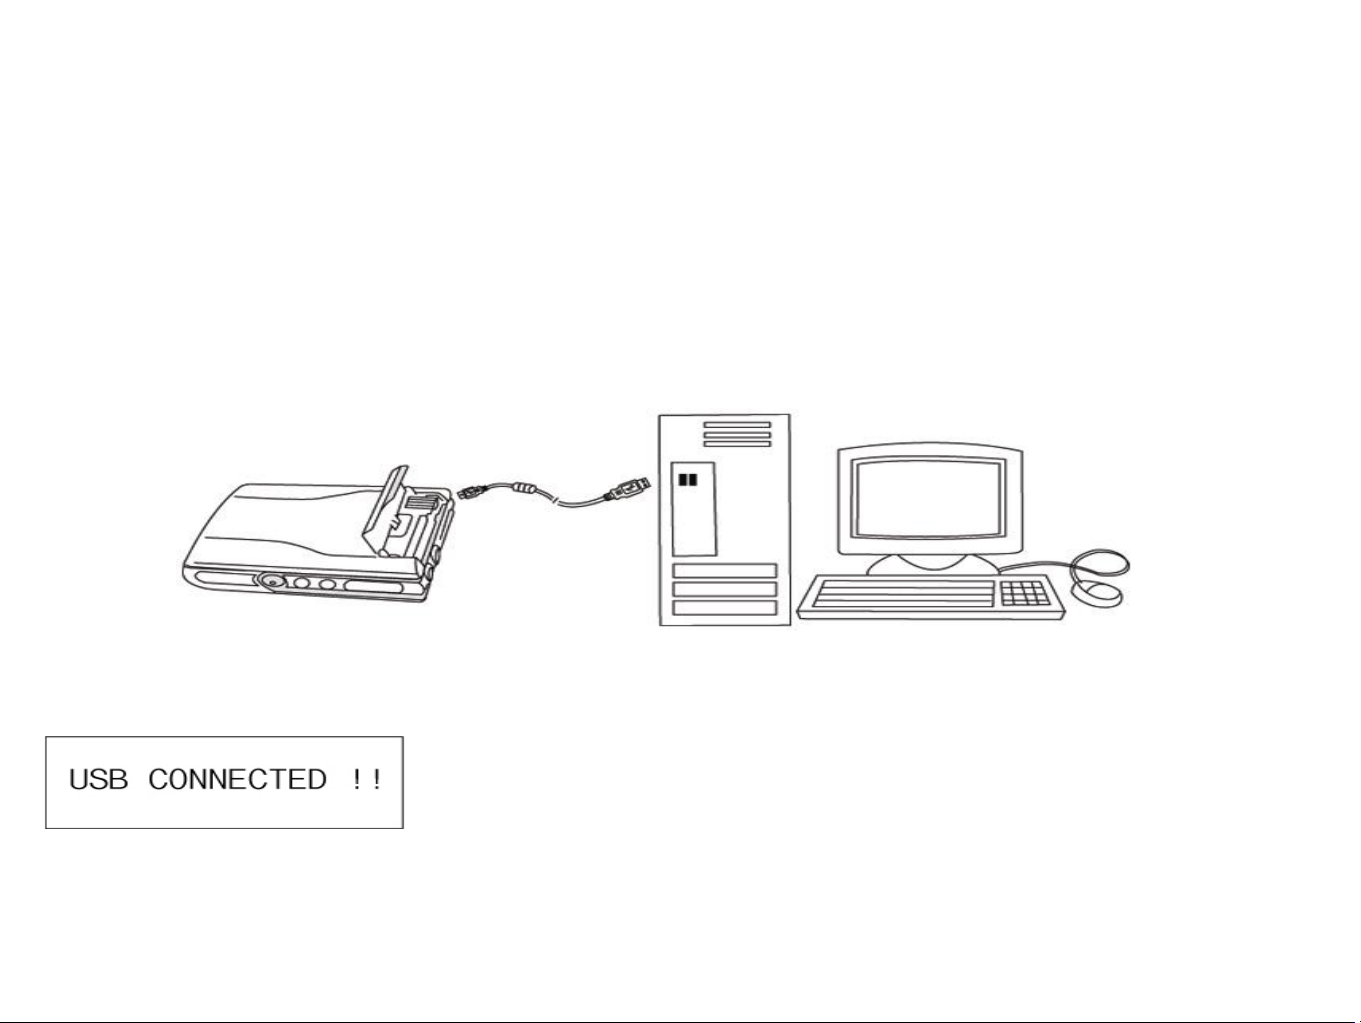
Connects to Computer
1. Plug the USB cable into the
USB port of computer.
3. “USB CONNECTED” will be displayed on the
LCD.
2. Slide the cover of MEMORY /
USB in the direction of the
arrow.
Page 29
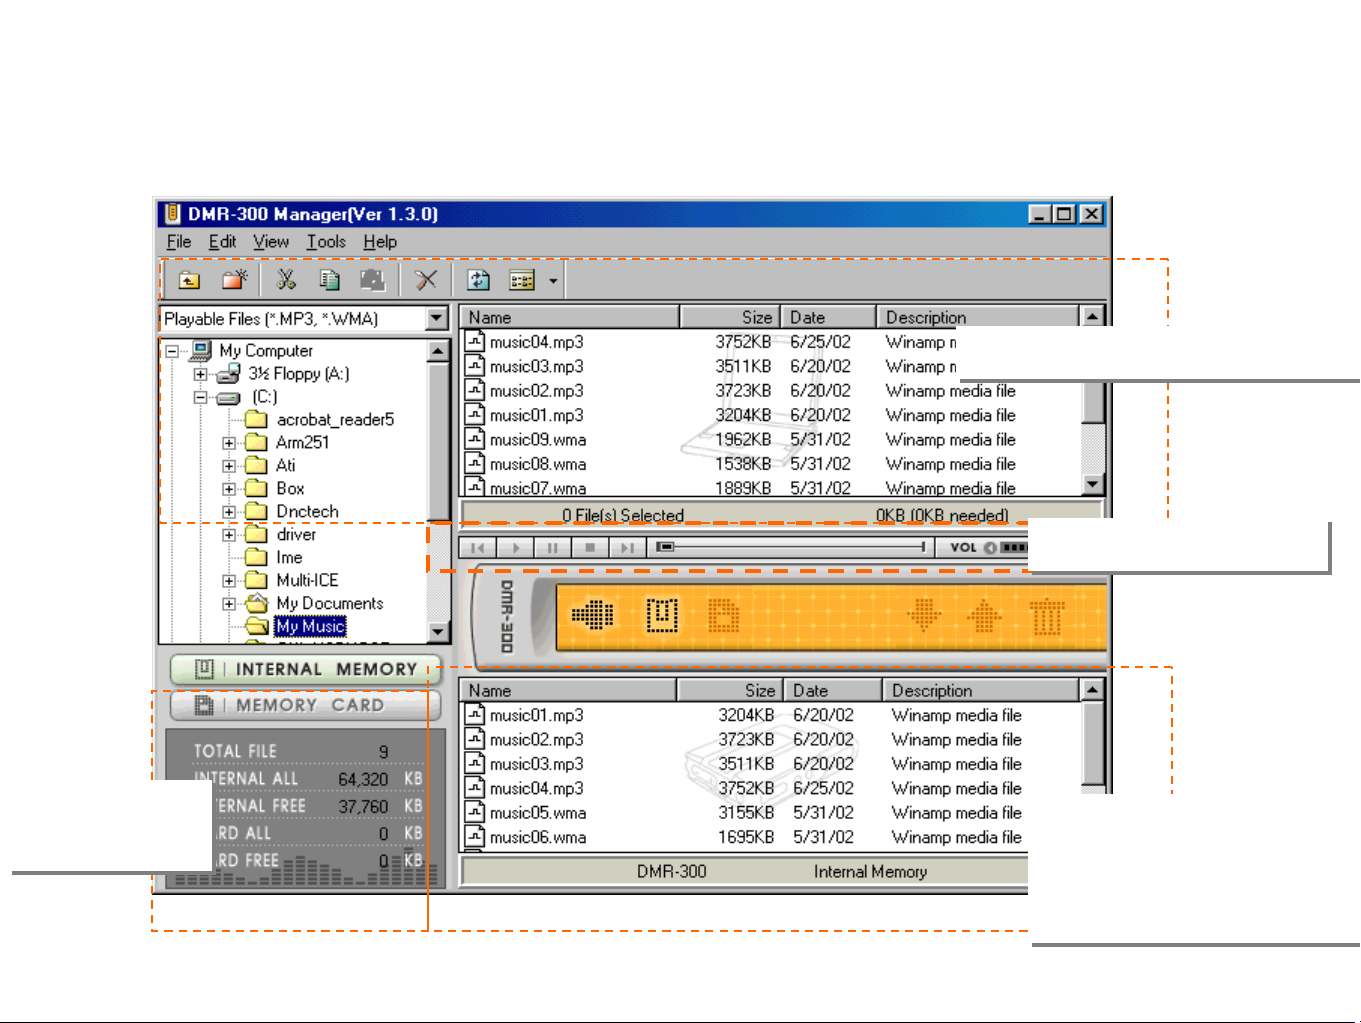
RipFlash DX Manager Software
File Management Window
File Management Window
MP3/WMA player
MP3/WMA player
Memory
Memory
Information
Information
Memory Manager
Memory Manager
Files currently in the
Files currently in the
unit’s memory.
unit’s memory.
Page 30
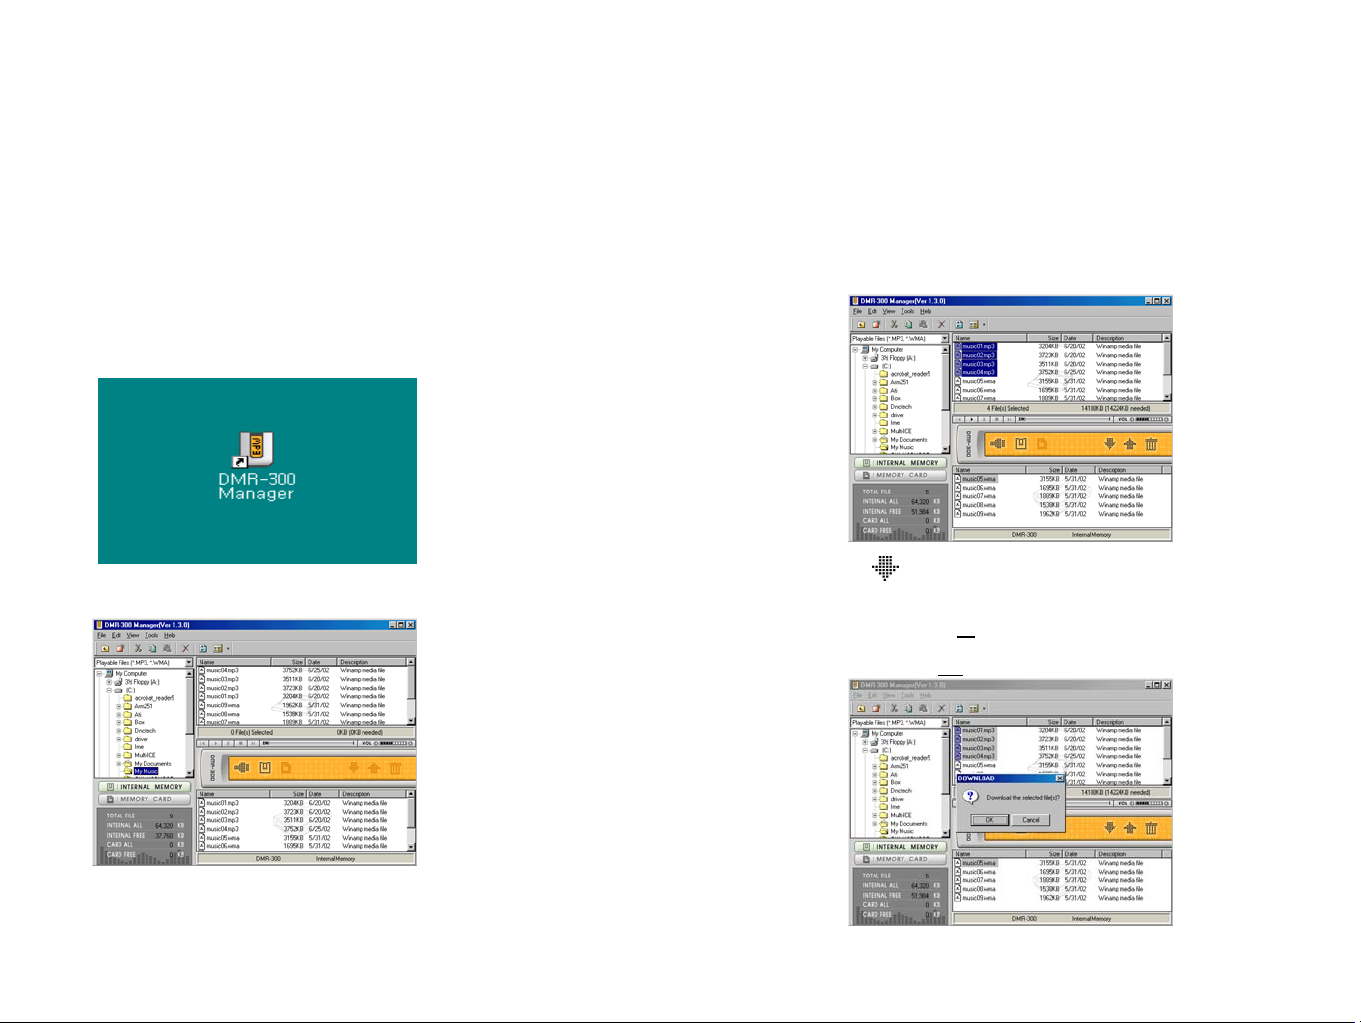
Downloading files to “RipFlash DX”(1)
① Double click the icon of the
Manager software on the desk.
② Select files to download to the player.
③ Click Download button.
Or, click ‘File(F
MP3 Player (D
)’ and ‘Download to
)’.
Page 31
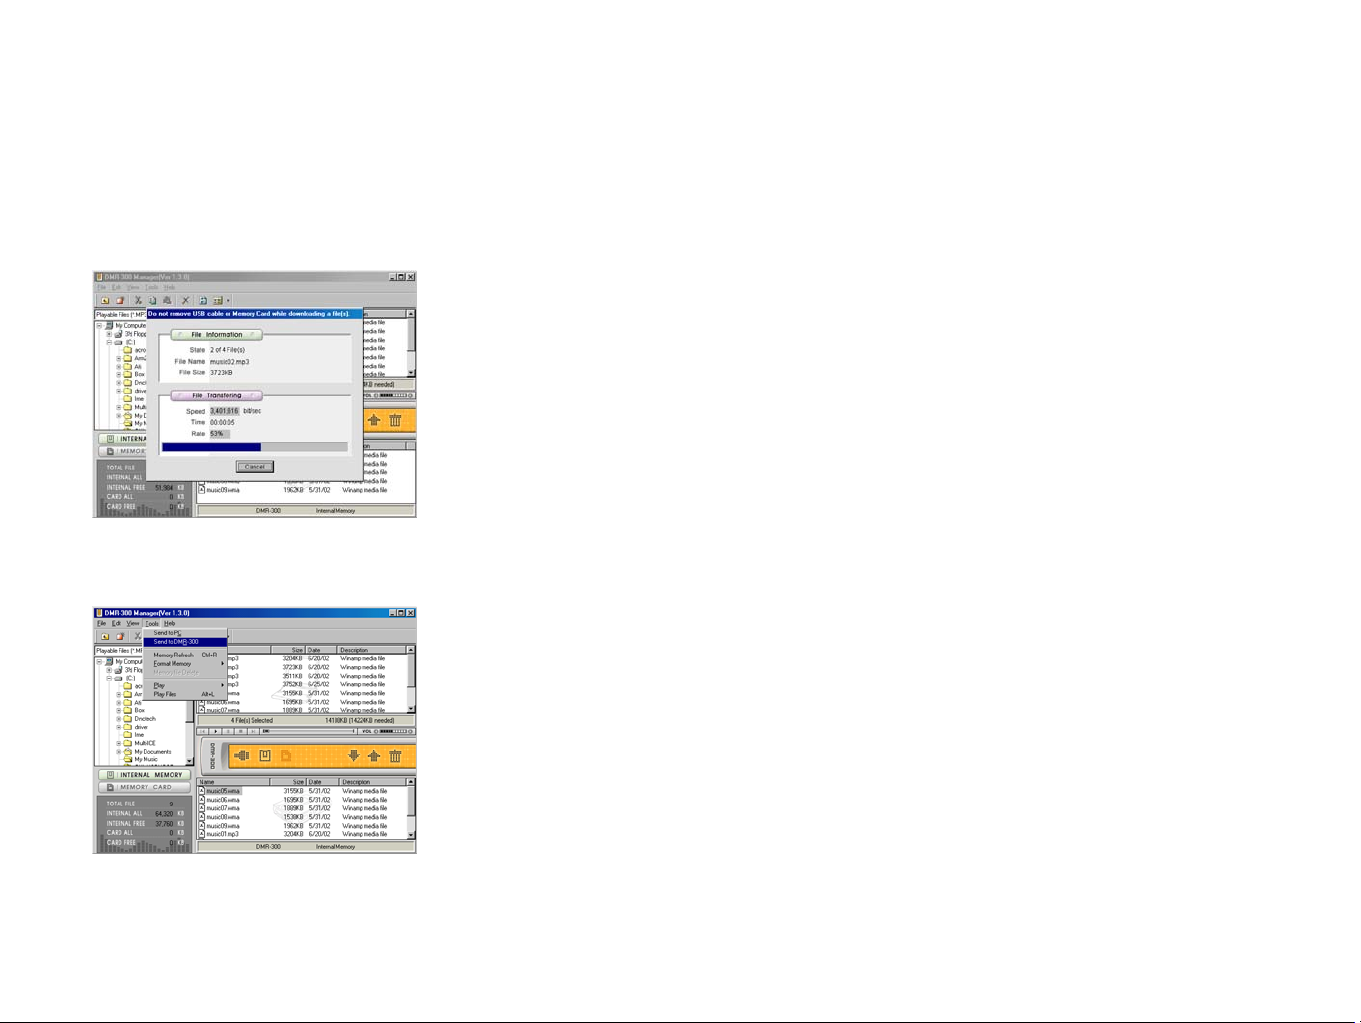
Downloading files to “RipFlash DX”(2)
3. Downloading is displayed.
Note
► Be sure the display “USB CONNECTED” is
on the LCD to download.
► MP3 file size is one MB per minute.
► To prevent damage, do not unplug USB cable or
eject MMC/SD card.
If the unit does not work. Reinsert batteries.
4. Complete the download.
This player does not support a few WMA files, which
is encoded under 64 kbps or applied
DRM. In this case, The player pops up the warning
massage and stops the downloading.
☼ The Maximum downloading to built-in memory,
MMC and SD card is 256 files.
SD card has rewriting protection function. In
rewriting protection, memory format, delete a file,
file downloading.
Page 32
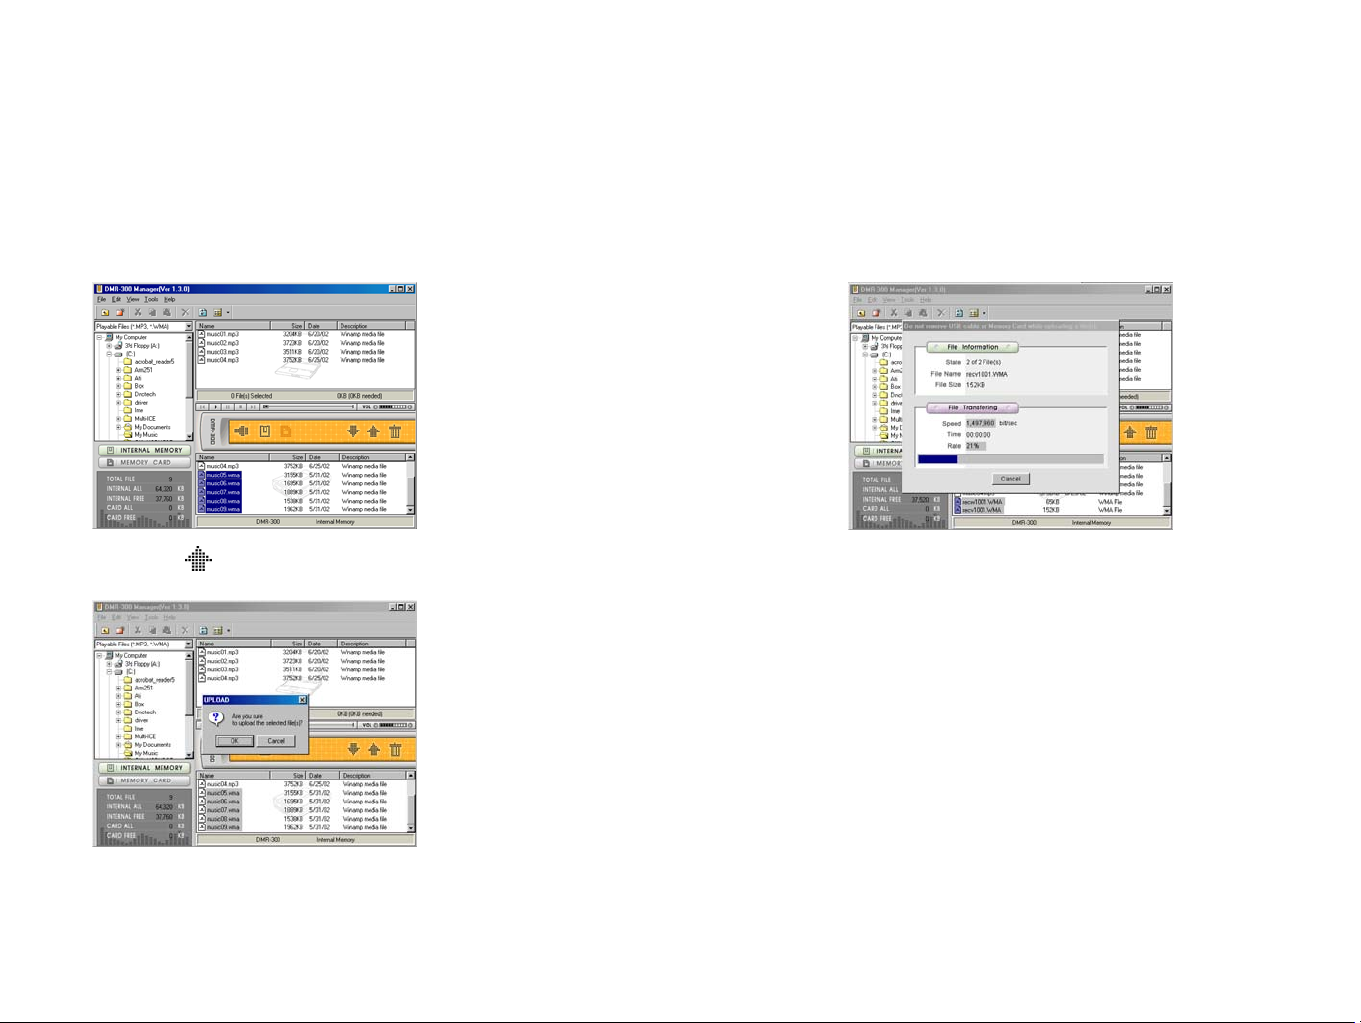
Uploading files to PC
1. Select the file to uploading.
2. Click ( ) upload button.
3. A selected file is transferred to PC.
Note
► You can upload general data files
(such as MS word files, MS excel files
etc.) to PC.
To protect the copyright, uploading
is prohibited for all of MP3 and WMA
files, excluding voice files.
Page 33
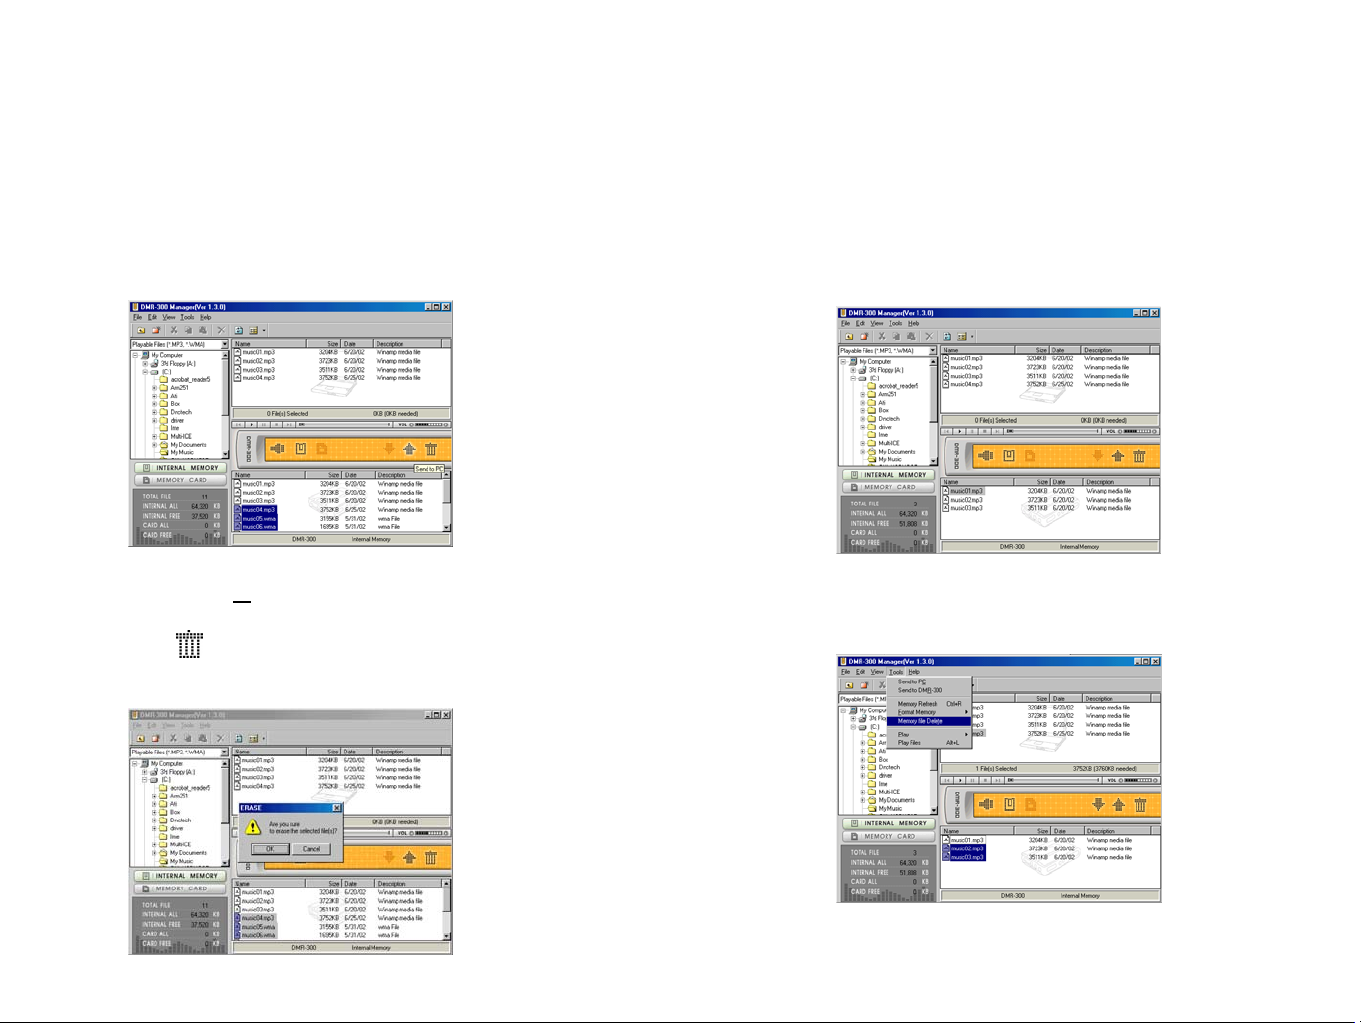
Deleting files
1. Select the file to delete.
2. Click [File (F
or, Click ( ) or, Click Right-click
File Delete
)] → [File Delete]
3. Click [Confirm].
3. Click [Confirm].
Page 34
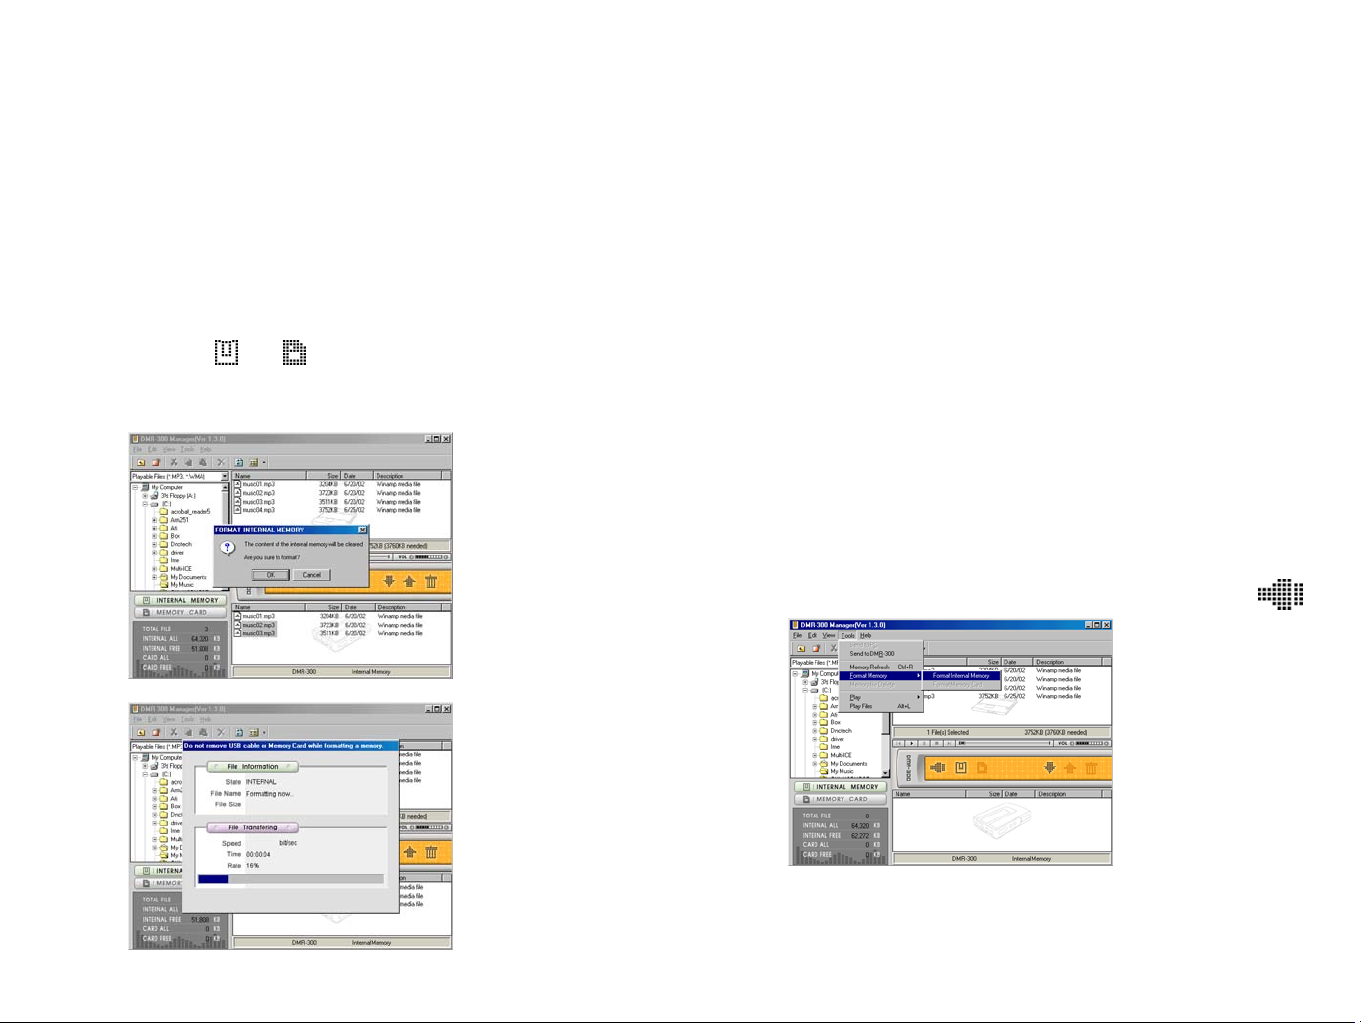
Formatting the memory.
1. Click [Memory] → [internal/External memory
format]
Or, Select ( / ).
2. Click [confirm]
Note
► This player has to be connected to
PC before formatting.
► In case the Ripflash DX Manager is
disconnected to the player, Click .
Page 35

What is MoodLogic?
MoodLogic is music mix management software. It is designed to enhance the experience
with your RipFlash. The MoodLogic Light Version is included with your MP3 Manager CD.
It is recommended that you install MoodLogic to manage your songs and create mixes. You
can then transfer your music to your RipFlash and enjoy your music on the go!
What is unique about MoodLogic?
The MoodLogic software connects to a data service that can identify your digital music files
and automatically categorize and correctly label your songs.
MoodLogic allows you to easily filter your songs based on their Genre, Artist, Tempo,
Release Year, and Mood. You can also pick your favorite song and let MoodLogic instantly
create a mix with similar songs for you! Select a song and click the Mix button to see the
MoodLogic Instant MusicMix feature in action.
Using MoodLogic, you can rediscover your MP3 collection! It is fun to create new mixes and
refresh the content of your RipFlash every day!
Page 36

How to install MoodLogic from the CD
To install MoodLogic:
1) Place the MP3 Manager CD in the CD-ROM drive of your computer. The
MP3 Download Program window is displayed.
2) Click the MoodLogic button. The MoodLogic installer launches.
3) Follow the instructions in the MoodLogic installer to add your
songs to the
software. The MoodLogic Light Version connects to the data
service and
automatically categorizes 25 of your MP3 files for easy use. This
process is
called “Activation” of your music.
You must be connected to the Internet to install MoodLogic, add, and activate songs
because the MoodLogic software retrieves data from an Internet-based service.
How to create mixes and transfer songs to my RipFlash using MoodLogic Light
The MoodLogic Light Version is included with your RipFlash. You can use it to manually
create mixes and transfer songs to your device. Using the Light Version, your main view will
be the Search View in MoodLogic, as it lists all the songs you added to the software.
Page 37

Manually creating playlists:
To manually create a playlist, click the New Playlist button and name the playlist. Then, go
to the Search View and find your favorite tracks. Drag the songs you like and drop them
onto your newly created playlist.
Transferring songs and mixes to your RipFlash:
You have two options to transfer your music to your RipFlash:
1) Direct transfer from within MoodLogic: Click the MP3 Player view in
MoodLogic and follow the instructions on the screen to download the
MoodLogic PoGo! RipFlash plug-in.
2) Using the RipFlash MP3 Manager software: Start the MP3 Manager
software and drag and drop your songs and mixes from MoodLogic to the MP3
Manager. Use the MP3 Manager to transfer the songs to the RipFlash.
Using MoodLogic Light with your RipFlash is easy! Manually create your mixes and transfer
them to your device. Read on to learn more about how to supercharge your RipFlash using
the full version of MoodLogic.
Page 38
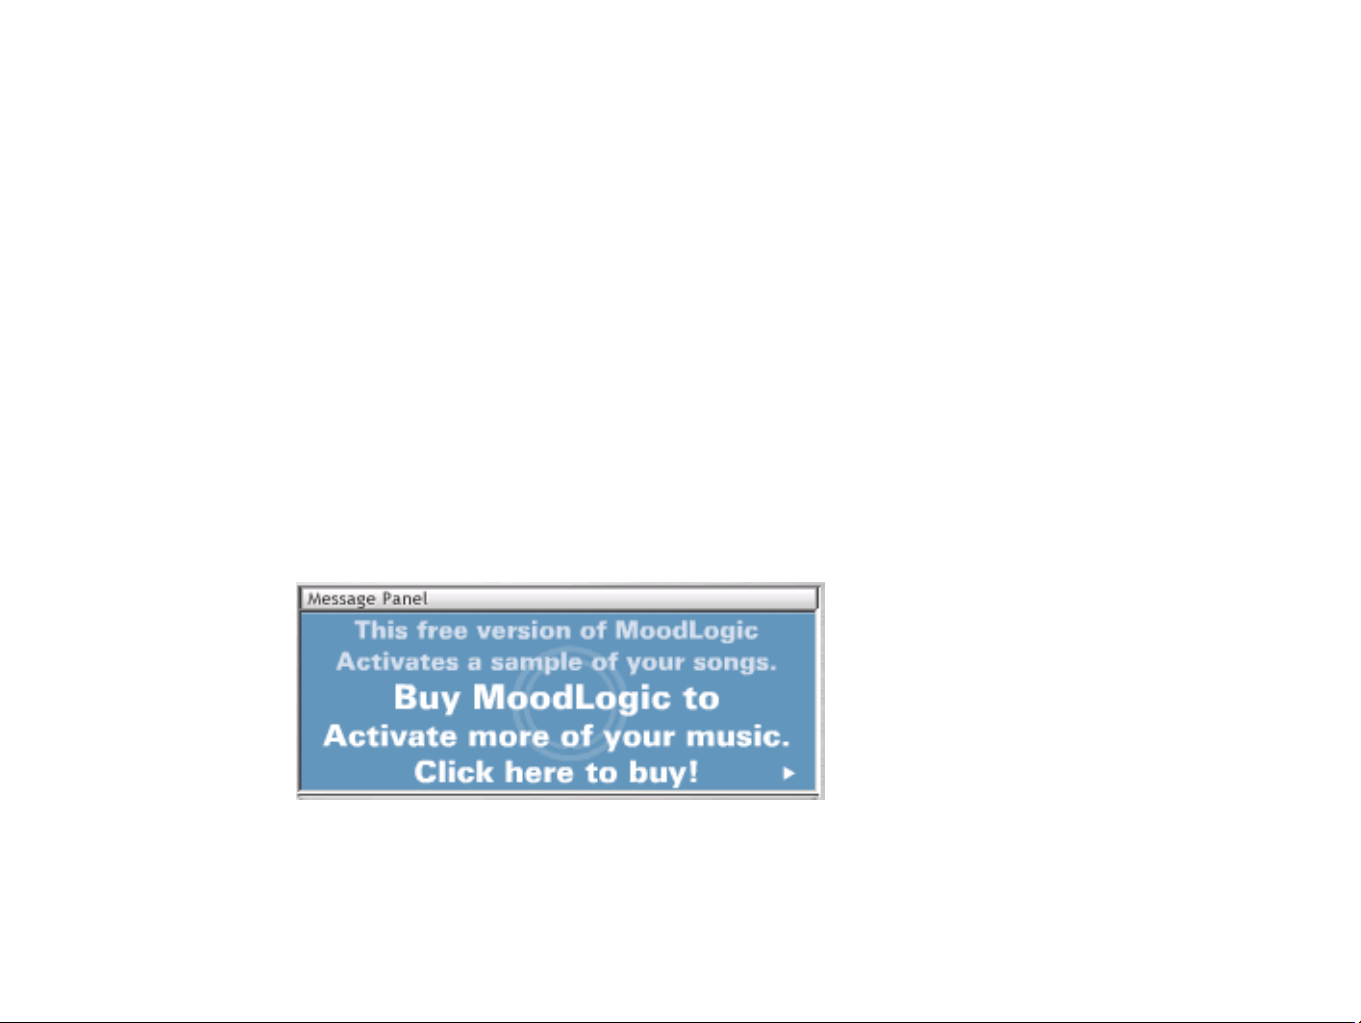
What are the features available in the full version of MoodLogic?
The MoodLogic Light Version activates 25 of your songs for more advanced browsing by
Genre, Artist, Tempo, Release Year, and Mood. The full version allows you to activate up to
10,000 songs! Go to the My Active Music View to get a taste of the full version, see your
songs cleaned up and organized, and experiment with the Genre, Artist, Tempo, Release
Year, and Mood filters.
The following pages explain the features of the full version and how to fully use MoodLogic
with your RipFlash. You can upgrade to the full version by clicking “Buy” in the Activation
Center.
Page 39
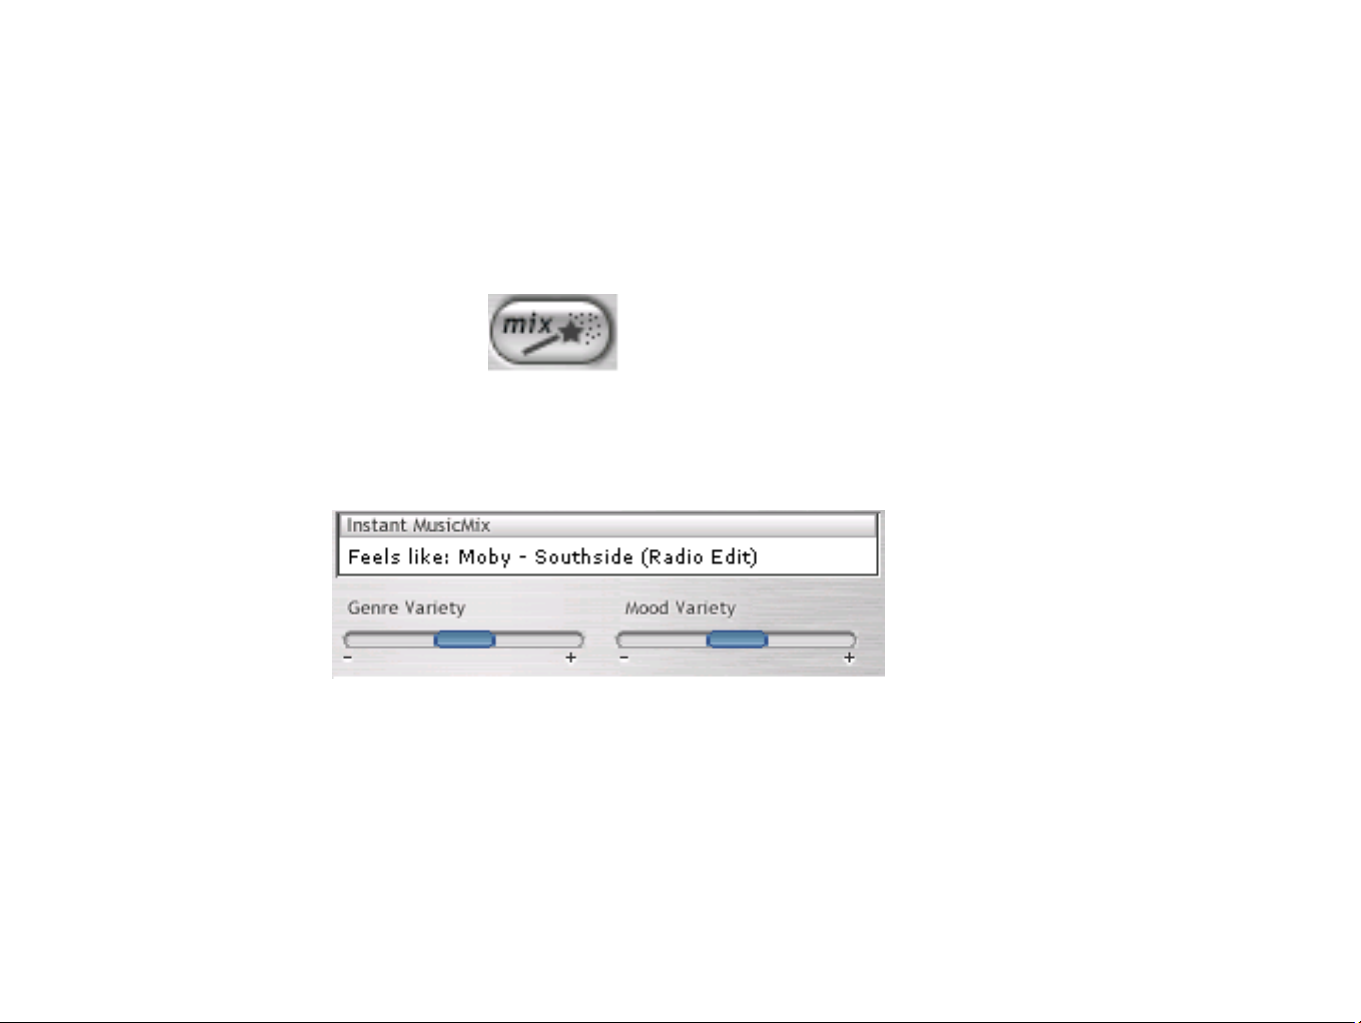
Creating an Instant MusicMix:
The easiest way to create a mix in MoodLogic is to use the Instant MusicMix feature.
Simply go to My Active Music, select a song that you like, and click the Mix button on the
bottom right corner in MoodLogic.
MoodLogic creates an Instant MusicMix for you, by scanning your collection and showing
songs that are similar to your selected song. The more music you have, the more songs
you will “rediscover” using the MoodLogic Instant MusicMix!
Move the Genre Variety and Mood Variety to increase or decrease the number of songs in
the Instant MusicMix. You can save the playlist for later use, change the sequence of the
songs, and delete tracks from your Instant MusicMix.
Refresh your RipFlash in three easy steps. 1. Find your favorite track. 2. Create an Instant
MusicMix. 3. Transfer to device.
Page 40
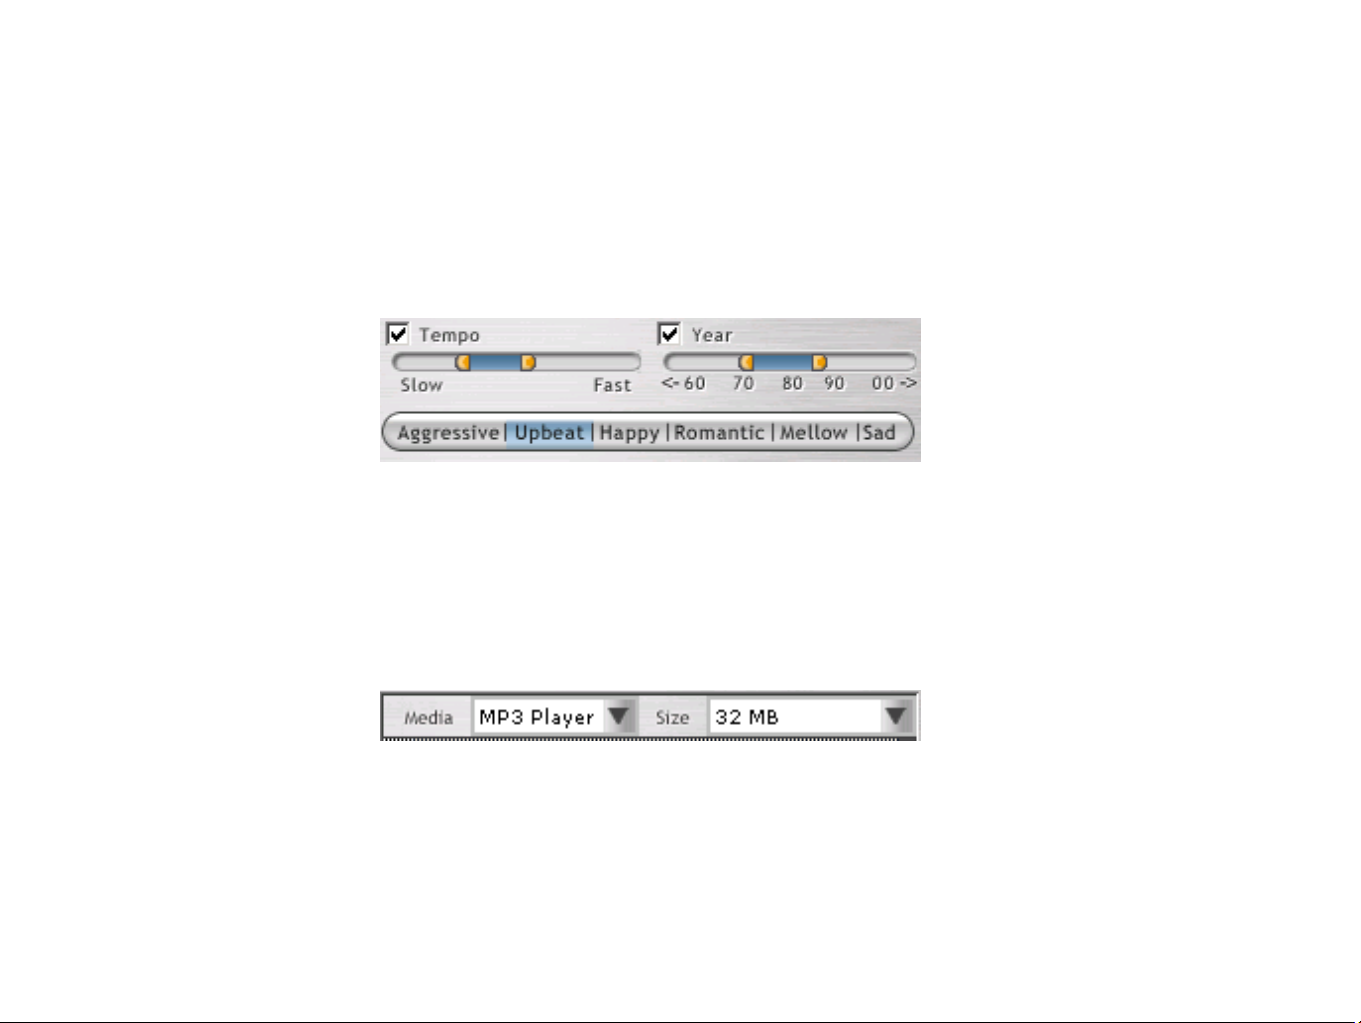
Using My Active Music filters:
In My Active Music, you can use MoodLogic filters to locate songs of a particular genre or
by a particular artist, as well as by Tempo, Release Year, and Mood. These filters help you
find your “mellow jazz songs of the ‘70s” for your commute or your “fast, aggressive, rock
songs” for your workout.
Playlist splitting:
Using the full version of MoodLogic, you can split your playlists into various sizes to fit your
RipFlash storage capacity. This option is available from your Instant MusicMix View, from
all saved playlists, and the Search View.
Select the appropriate duration of your playlist in megabytes and use the right-click menu
options to select a certain segment and transfer it to your RipFlash.
Page 41
How to add and activate new songs
To add songs to MoodLogic, click Add Music in the Activation Center. Whenever you add
songs to your computer, you should add them to MoodLogic.
To activate songs (identify the songs in your collection and allow them to be filtered in My
Active Music), click Activate Music in the Activation Center.
How to activate songs that are ripped using the RipFlash recording feature
You can use RipFlash to rip CDs directly from your CD player without the need of a
computer (refer to the RipFlash manual for more information). These tracks will not have
correct artist and song information.
Using the full version of MoodLogic, you can connect to the MoodLogic data service and
automatically organize and label these tracks and add them to your growing MP3 collection
Page 42

First, copy the ripped songs onto your computer and add these files to MoodLogic.
If you installed the PoGo! RipFlash plug-in from MoodLogic, you can copy these songs
to your computer from your MoodLogic MP3 player view. Select the songs you want
to copy and use the Copy from device right-click menu option.
If you did not install the PoGo! RipFlash plug-in, use your MP3 Manager software to
upload your songs to your computer.
Then, use the MoodLogic Activation Center to Add Music and Activate your songs.
Using the combination of MoodLogic and your RipFlash you can start growing a fully
organized music collection. Simply rip songs into your RipFlash and let MoodLogic
automatically identify them and add them to your Active Music collection.
Page 43
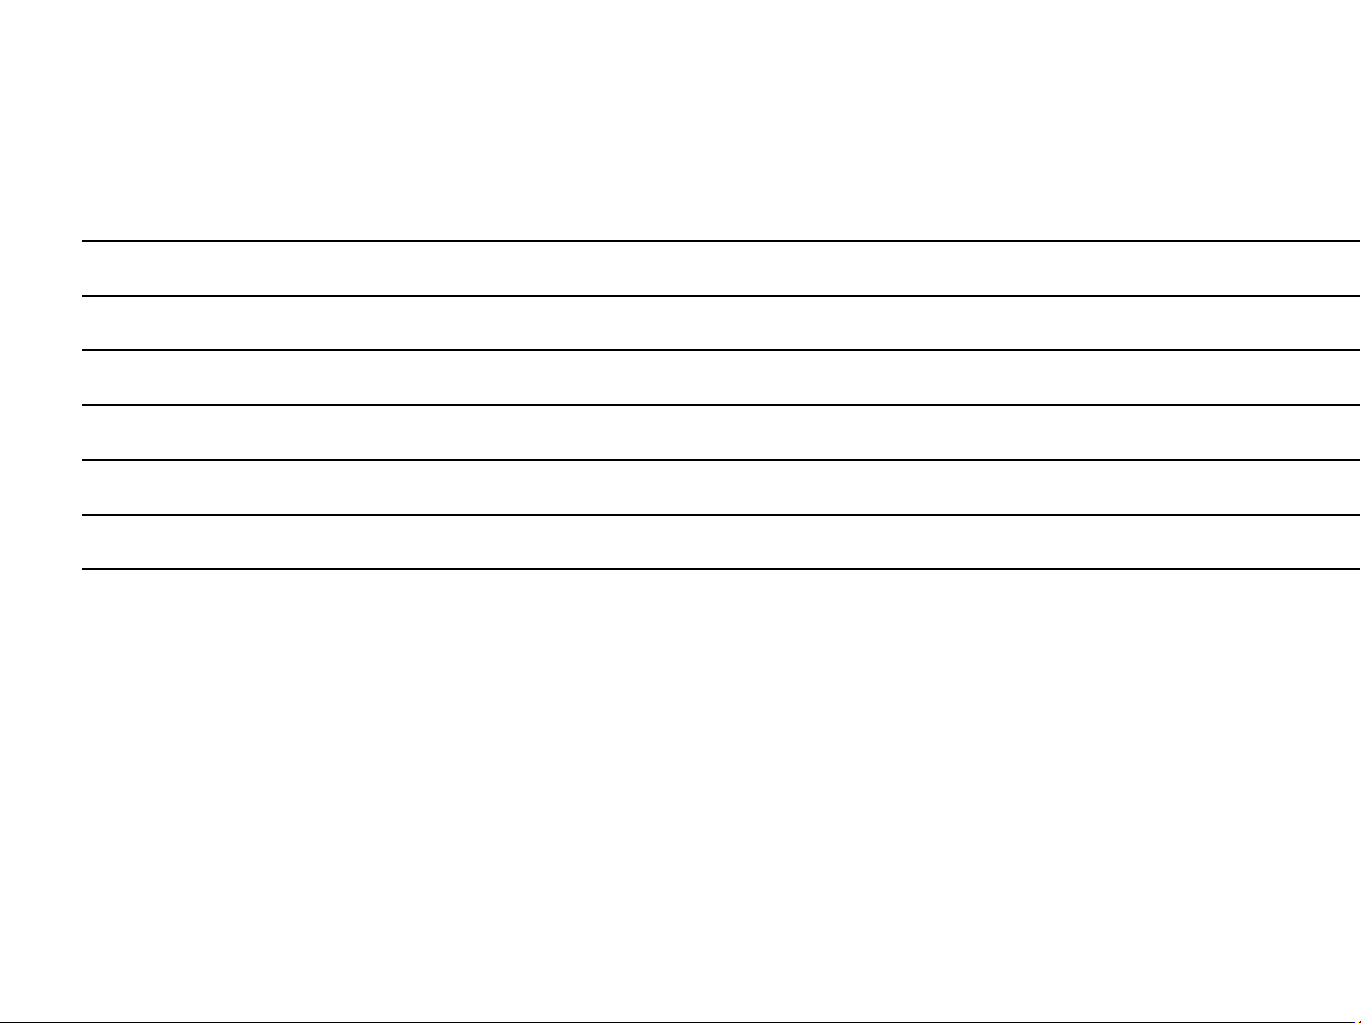
System Requirements
IBM
CD-Rom drive
Available USB port
® PC / AT and compatibles
Pentium 133MHz or HigherCPU
32MB and aboveMain Memory
Windows 95 / 98 / ME / 2000 / XPOperating system
☼ note
While up-loading the voice file or data to PC, hard disk space for the
file is required.
Page 44
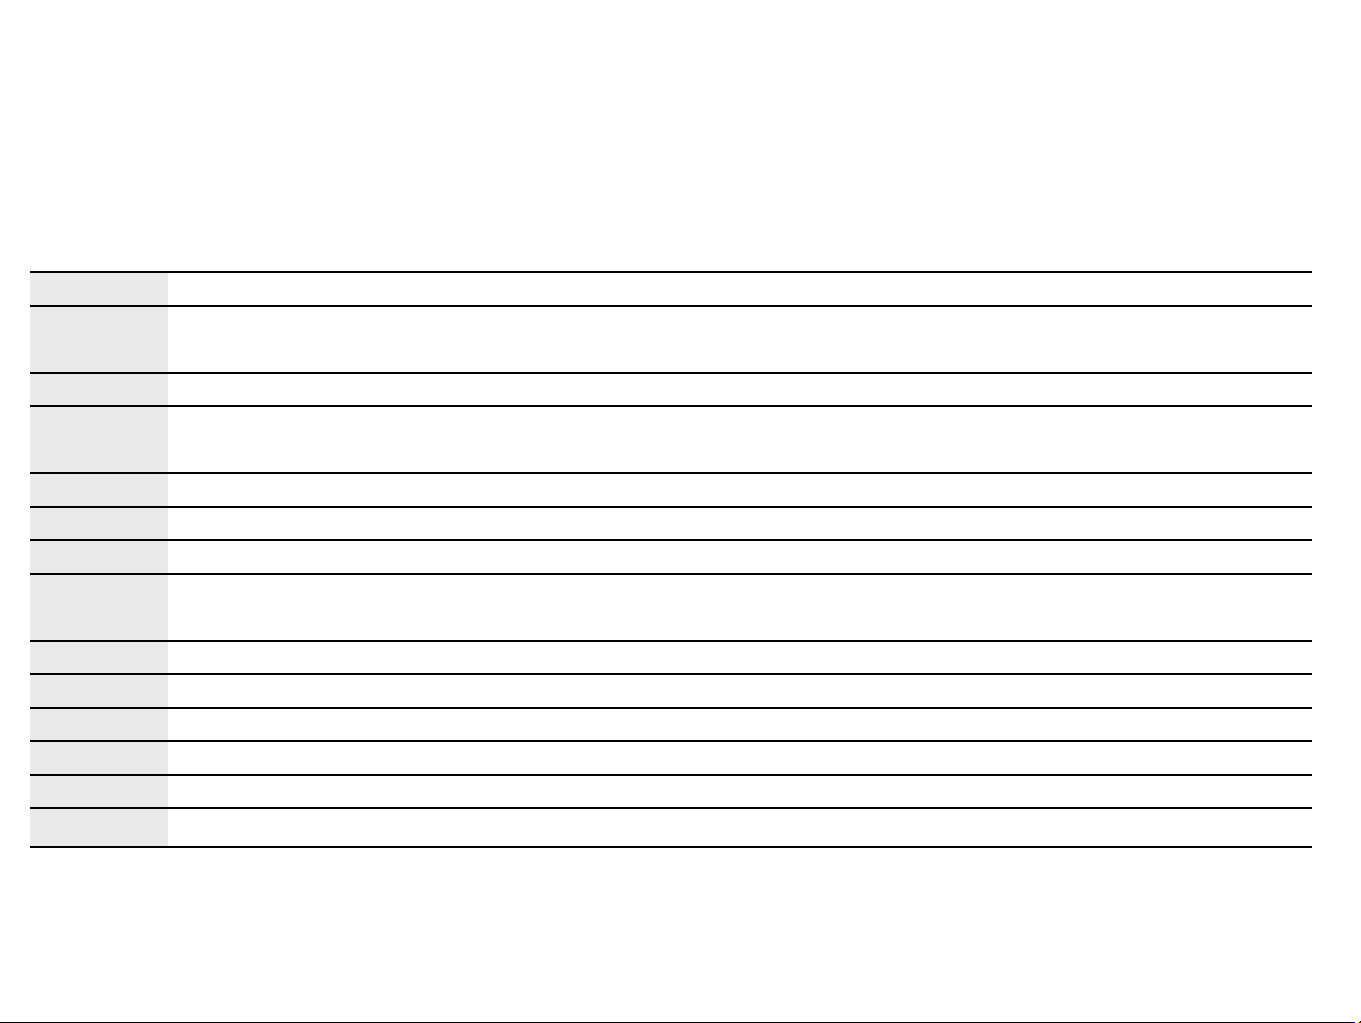
Trouble shooting
< On the software >
Q
A
Q
A
Q
A
Q
A
Q
A
Q
Q
A
Memory space is full.
Upload files to PC or delete files. You can recognize the memory space with
DMR-300 manager.
USB cable is disconnected
Make sure USB cable is plugged to PC correctly and confirm the message
“CONNECTED”on LCD.
Error appears
It is a temporary memory error by static electricity. Format your memory.
You can not install DMR-300 Manager software.
Make sure you have the correct OS. The available OS is Win95 OSR 2.1 and over
/ Win98 / 98SE / ME / 2000 / XP.
I do not have USB connector
Upgrade your PC.
I did not install the drive.
Install Management software Manually. “Installing Manager software”A
My computer does not support USB.
Upgrade your computer or add the patch software.
Page 45
Frequently asked question
< The controls on the unit do not work. >
Q
< There’s no sound. >
Q
A
Q
A
No battery, the power is almost out or the inserted batteries are in the
wrong polarity.
Check batteries in the player. Replace or reinsert the batteries.A
Sound is too low.
Press (+) to increase volume.
In (HOLD) mode
Unlock your Hold button.
Page 46

Specification
20㎐ ~ 20㎑Frequency range
DMR-300T4:128MBMemory capacity
AAA alkaline battery.Battery
5㎽ + 5㎽(1㎑, 0㏈/16Ω)Output level
LIVE/JAZZ/ROCK/FLATEqualizer
3.5㎜Earphone jack
2.83” X 1.96” X 0.70”Dimensions
Approximately 13 hrs2 alkaline batteries
54g(without batteries)weight
 Loading...