


User’s Manual (RipFlash PRO 2)
COPYRIGHT NOTICE
The copyright owner of this manual is PoGo! Products Inc., and unauthorized reproduction
or distribution of the manual, or any portion of it, may result in severe civil and criminal
penalties.
FreeRip is a registered trademark of MG Shareware
WMA is a registere d trad emark of the Microsoft Corporation.
The copyright owner of the MP3 MANAGER software for the RipFlash PRO 2 is PoGo!
Products Inc, and unauthorized reproduction or distribution of this program without
permission, may result in severe civil and criminal penalties.
What is the RipFlash PRO 2?
1.The RipFlash PRO 2 is a portable digital audio player that can play both WMA (Windows
Media Audio Microsoft Corporation) and MP3 music files.
2.The RipFlash PRO 2 can record audio files directly from any audio source like a
voicerecorder, CD player or record player and encode the files directly to MP3.
3. With its built-in FM radio, the RipFlash PRO 2 can save sounds received from FM stations
as MP3 files.
Table of Contents
1. Getting Started
Quick Software & Drivers Installation Guide
Features ---------------------2
Standard Accessories -------------------3
Names of Components ---------------------4
LCD Window --------------------5
Inserting the Battery --------------------6
Charging the Battery --------------------7
Getting Started ------------------8
2. Basic Functions
Power On/Off -------------- ------9
Setting up the Hold Function------------------9

Modes ---------------------------------------------10
Adjusting the Volume Level -----------------11
Menus ---------------------------------------------11
FM Mode Menus -------------------------------12
Voice Recording ------------------13
Line In -----------------------------13
Setting up FM Modes ------------------13
3. Playing Mode
Playing the Track ---------------------14
Selecting the Track ---------------------14
Stopping/Pausing Playback ---------------------14
Adjusting the Equalizer ---------------------14
Setting up the Repeat Mode ------------------15
Repeating the Selected Section ------------------15
Controlling the Playback Speed ---------------------16
Setting up the Time for LCD Backlight --------------------16
4. Recording Mode
1) Voice Recordin g
Starting a Voice Recording -----------------17
Pausing a Voice Recording ---------------------17
Finishing a Voice Recording -----------------17
Playing a Recorded Voice File ------------------18
Setting up the VAD Recording ------------------18
Setting up the Recording Quality (Bit-rate) ------------------18
Adjusting the Voice Bit-rate --------18
2} Line In Recording
Setting up the Line In Recording Modes ------------------19
Setting up the Line In Recording ------------------20
- Starting the Line In Recording
- Pausing the Line In Recording
- Finishing the Line In Recording
- Listening to the Recorded files
Setting up the Silence Detection Level ------------------20
Adjusting the Sampling Frequency ------21
5. FM Mode
Listening to the FM Radio --------------21

Adjusting the Frequency in Search Mode ------21
Saving a Broadcast Frequency Automatically ------------23
Saving a Broadcast Frequency Manually ------------23
Selecting the Frequency Set in Preset Mode --23
Setting up Sleep Time ---------24
Selecting the Stereo/Mono Mode ---------------24
Adjusting the Frequency Band ------------24
Setting up FM Recording ------------------24
6. Managing the Memory
Erasing Files ------------------25
- Erasing One File
- Erasing All Files
Formatting the Memory ------------------- 26
Remaining Memory
7. Installing the PC Software ------27
8. Using the Manager Program -----28
9. Connecting the USB Cable to a PC ---------31
Connecting the USB Cable
Installing the USB Drive
10. Customer Support
Cautions -----------------34
Troubleshooting ---------------------35
Specifications ---------------------36
Warranty ---------------------37
Contact Information --------------37
1. Quick Software & Drivers Installation Guide.
Follow these instructions to load the software and drivers for your new RipFlash PRO 2
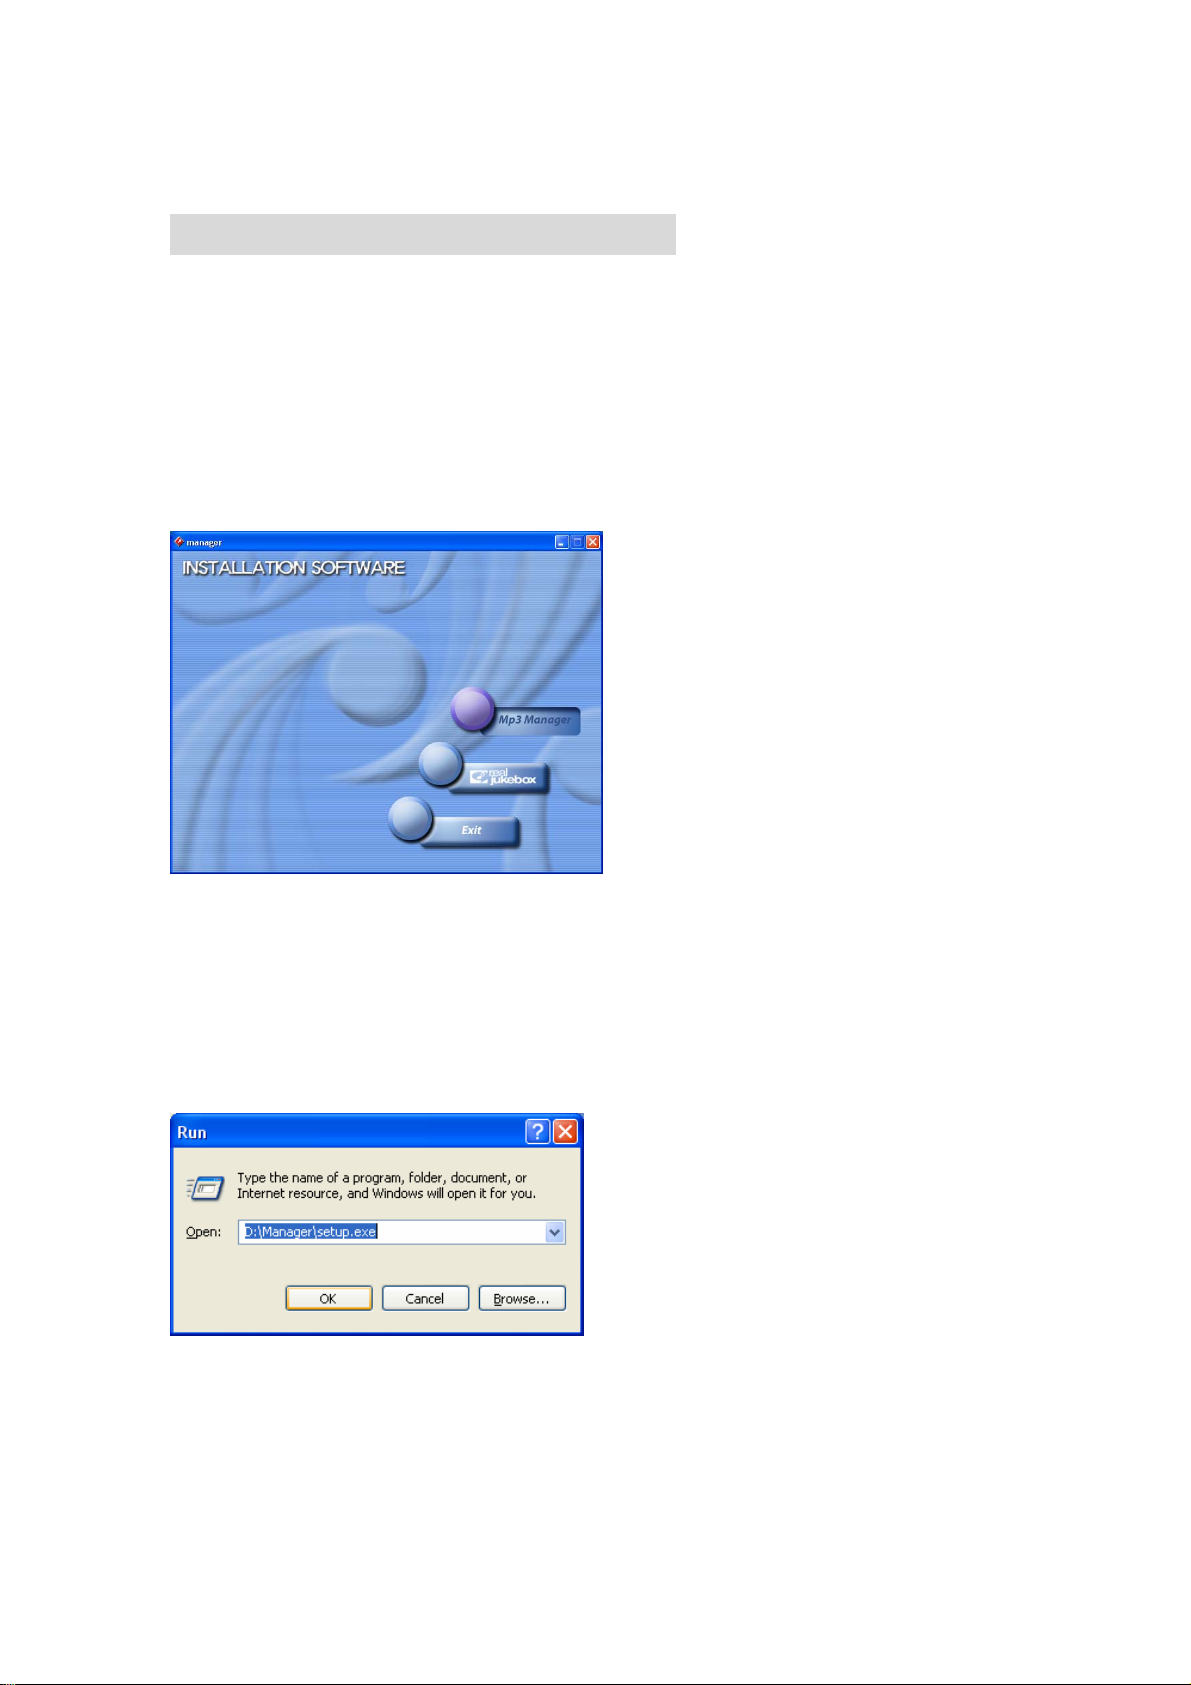
1. Place the software CD label side up into your computer’s CD-ROM drive. After a few seconds
you should see the image below.
Click the MP3 manager icon and Follow the Install shield wizard through.
Note: If the Installation Software screen does not load automatically, please click the START
button in the bottom left corner of your computer screen and click RUN.
Type D:\Manager\setup.exe and click ok
(If your PC uses a letter other than “D” substitute that letter)
You should now see the screen below ( follow the wizard through)
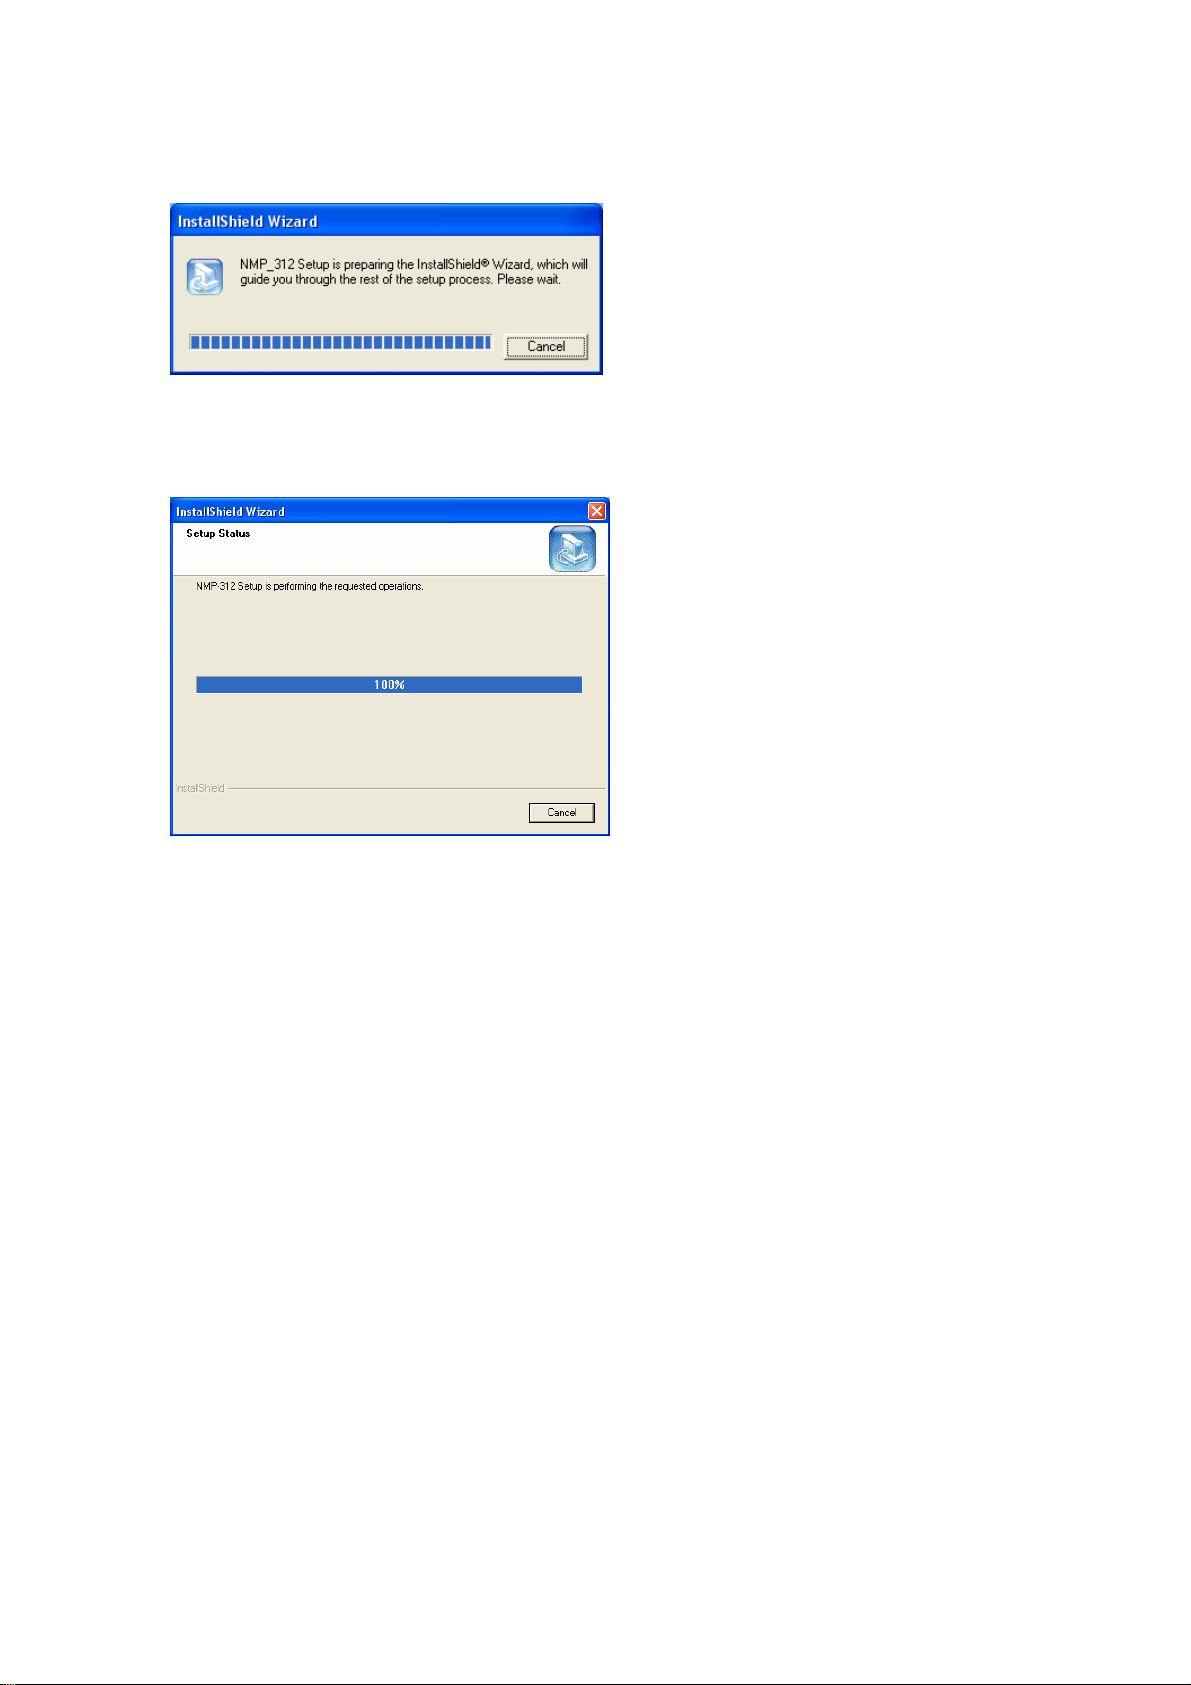
Once the screen below disappears, you have finished installing the software.
2. Plug in your RipFlash PRO 2 into your computer’s USB port and power it on.
Tip> To power on your unit hold play for 2-3 seconds
Your computer now should display “Found new hardware” and your RipFlash PRO 2 should
display USB ON-Line.
You should see the Found New Hardware screen below just click next
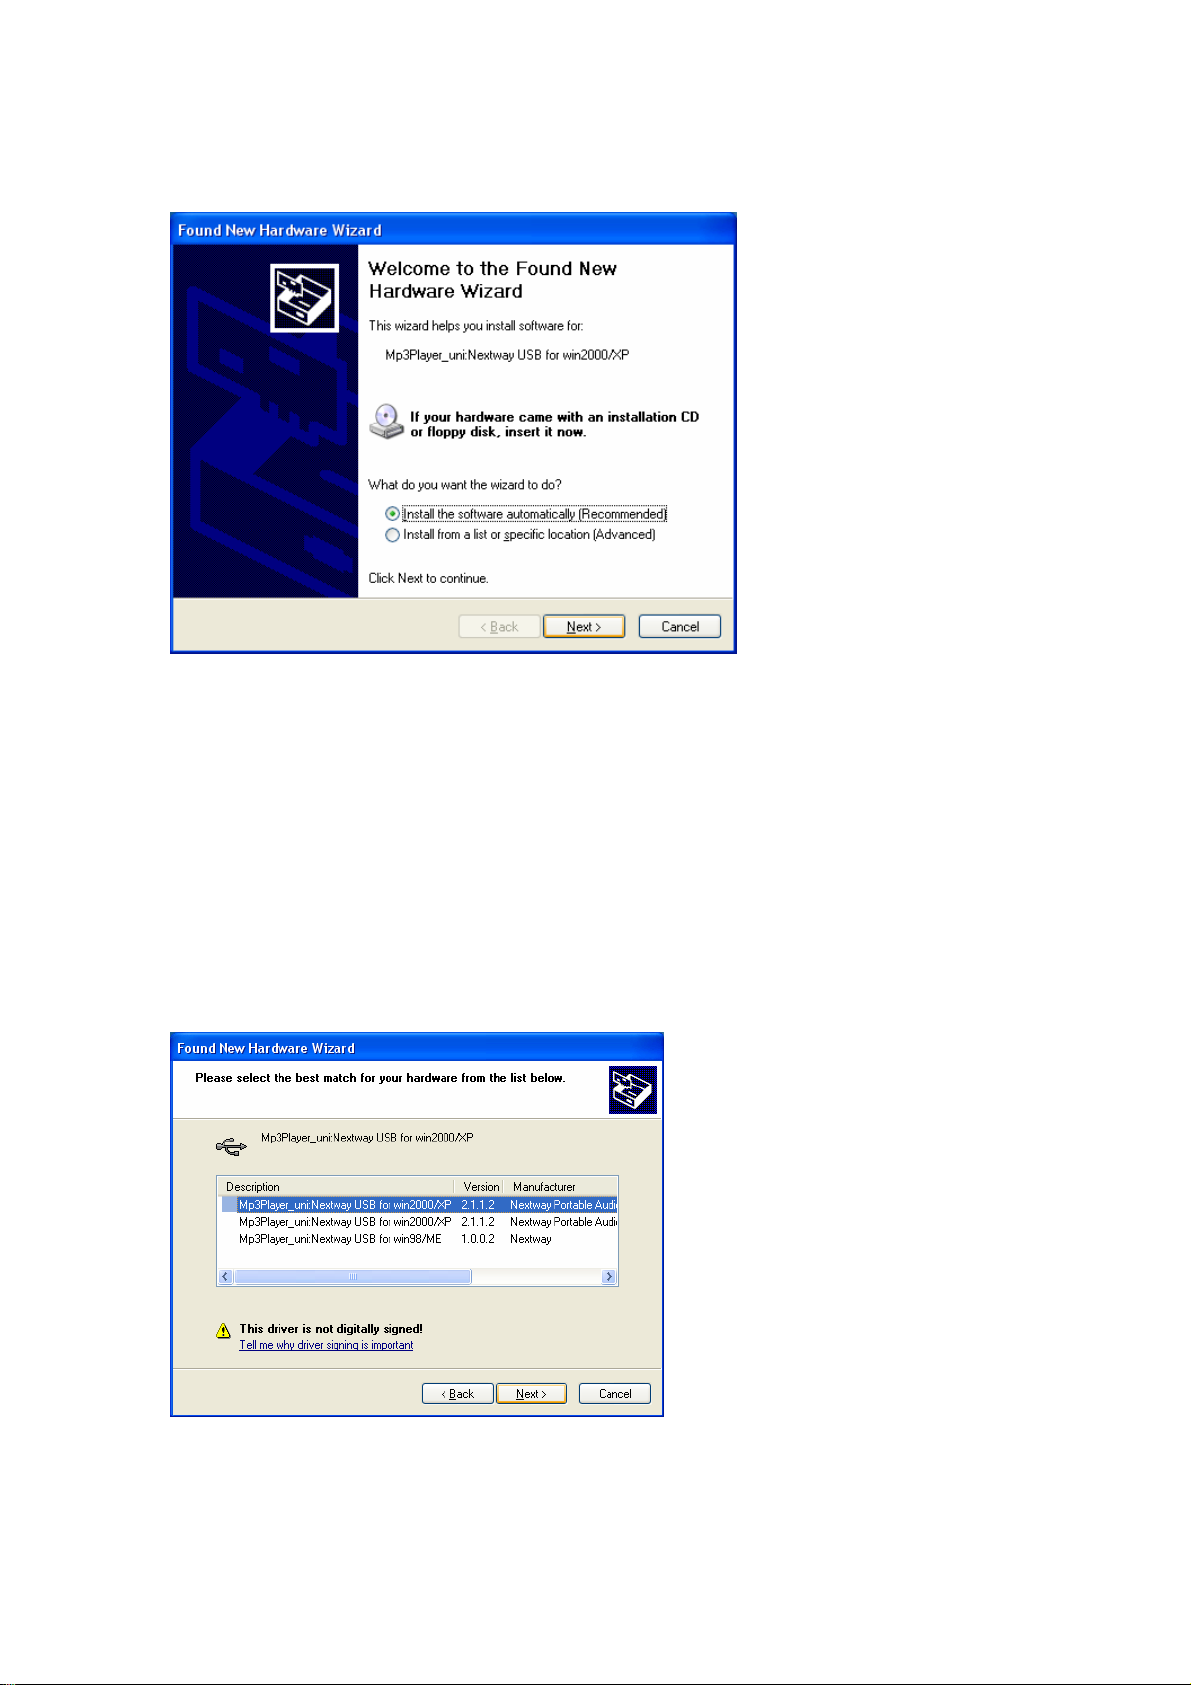
If you see the screen below select your OS (2000/XP or 98/ME) driver and then click next
Click continue anyways (Do not worry this will not HARM your PC we have tested this software
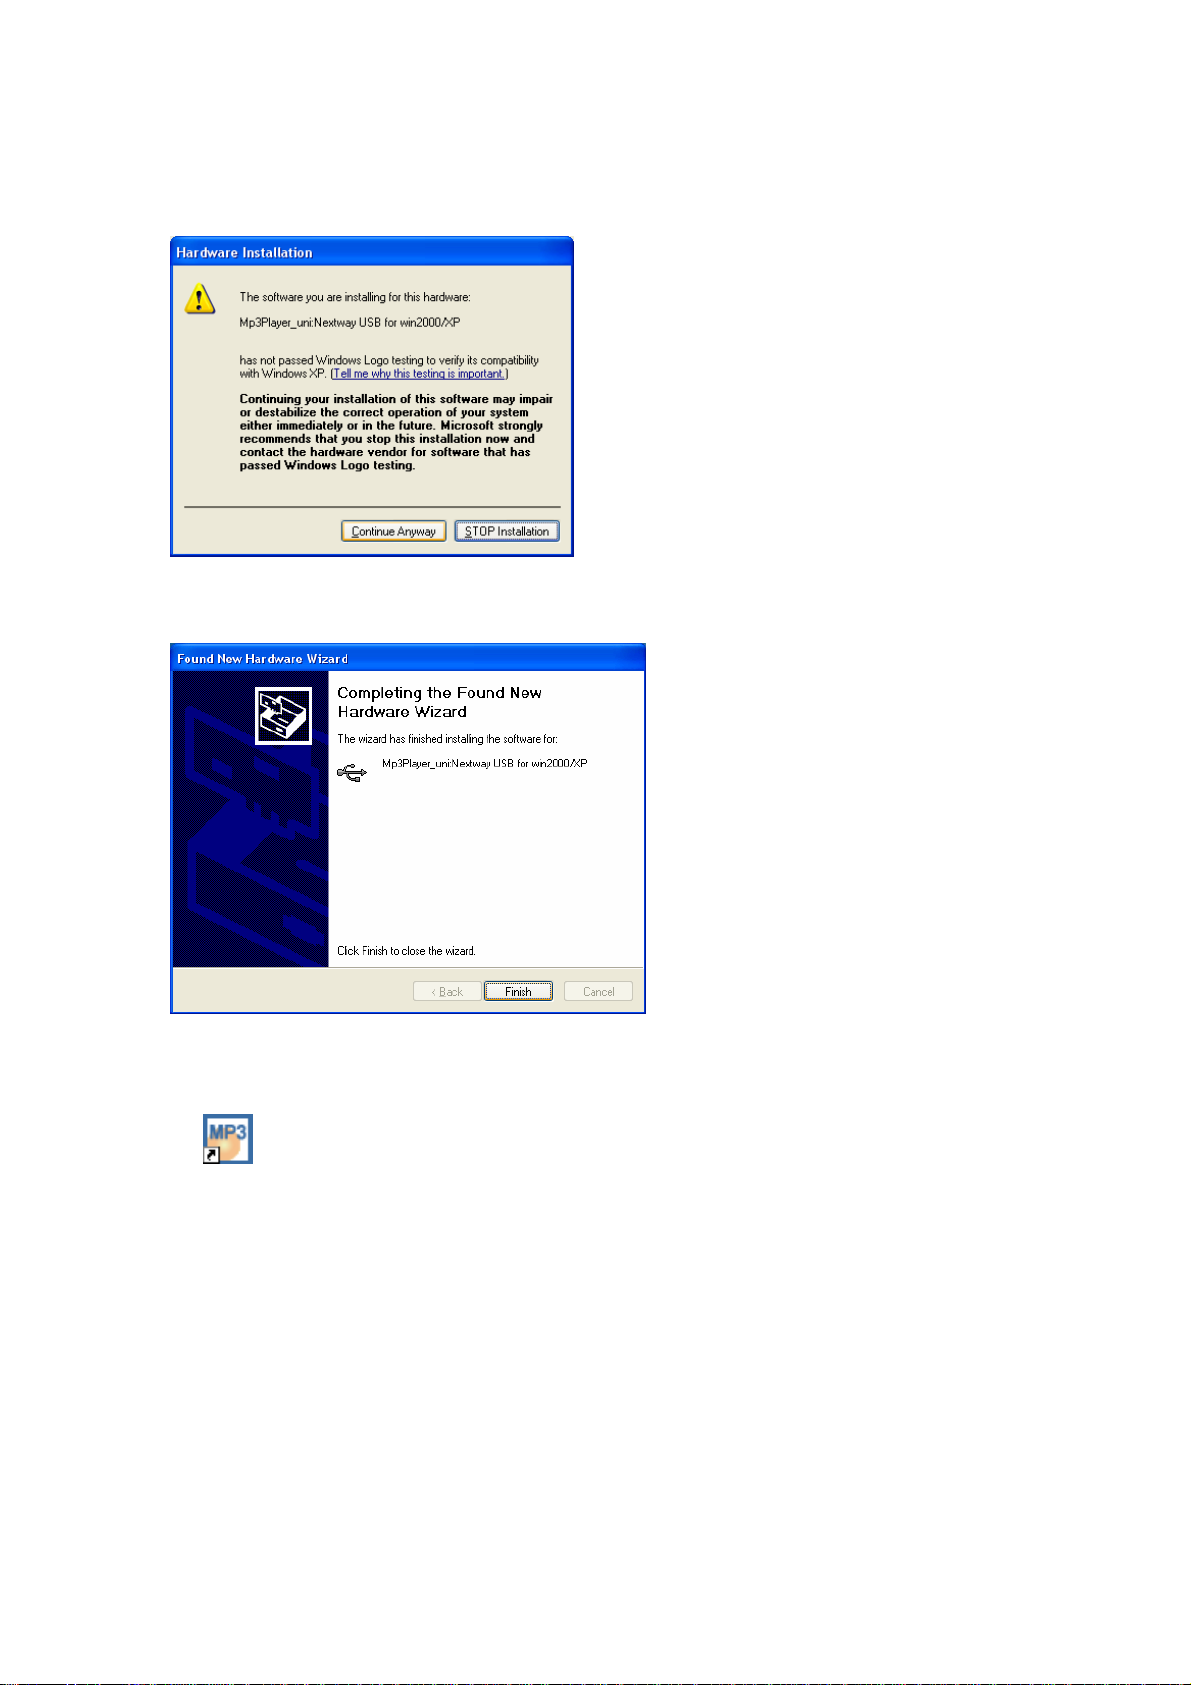
to be compatible with your OS)
When you see the screen below click finish.
Click the Mp3 manager icon on your desktop (with the player plugged in)
Nmp-312.lnk
Now click format
Congratulations your unit is installed and ready to use.
Features
● Playing MP3/WMA music files
Stores and plays both WMA (Microsof t Corporation) and MP3 files.
● FM radio
Receives FM radio signals and can record those signals as MP3 files.
● Built-in backlight/LCD window supports multilingual setting
Supplies multilingual ID3 TAGS. You can easily see the operation status with the
backlight.
● High quality voice recording in MP3
You can record voice to MP3 and play it back.
● Line in digital recorder
Directly converts and saves sound signals from all analog audio equipment into an
MP3 file without a PC.
● Setting up the variable bit-rates
You can use the memory effectively by controlling the recording quality with the
variable bit-rates (8KBps~256KBps) du ring voice or Line in recording.
● VAD (Voice Activity Detection) Record ing
You can optimize the recording time with the VAD recording function that starts
recording only when sound occurs.

● Speed control
Controls the playback speed.
● Resume
This product has a resume function that enables the player to always start playing
tracks where it left off.
● Firmware upgrade
You can easily upgrade the functions of this product with a firmware upgrade.
● Supplied PC software for MP3 encoding
Supplies the FreeRip application which can encode a CD (CDA) into an MP3 file.
For help with FreeRip, please visit the site below:
http://www.freerip.com/support.html
Standa rd Accessories
1 NMP-312 (Recordable MP3 player)
2 Stereo earphone
3 Installation CD
4 User’s manual
5 USB cable
6 Line in cable
7 Hand strap
※ Caution! When you purchase the RipFlash PRO 2, check the accessories and If there
are any missing, contact your distributor.
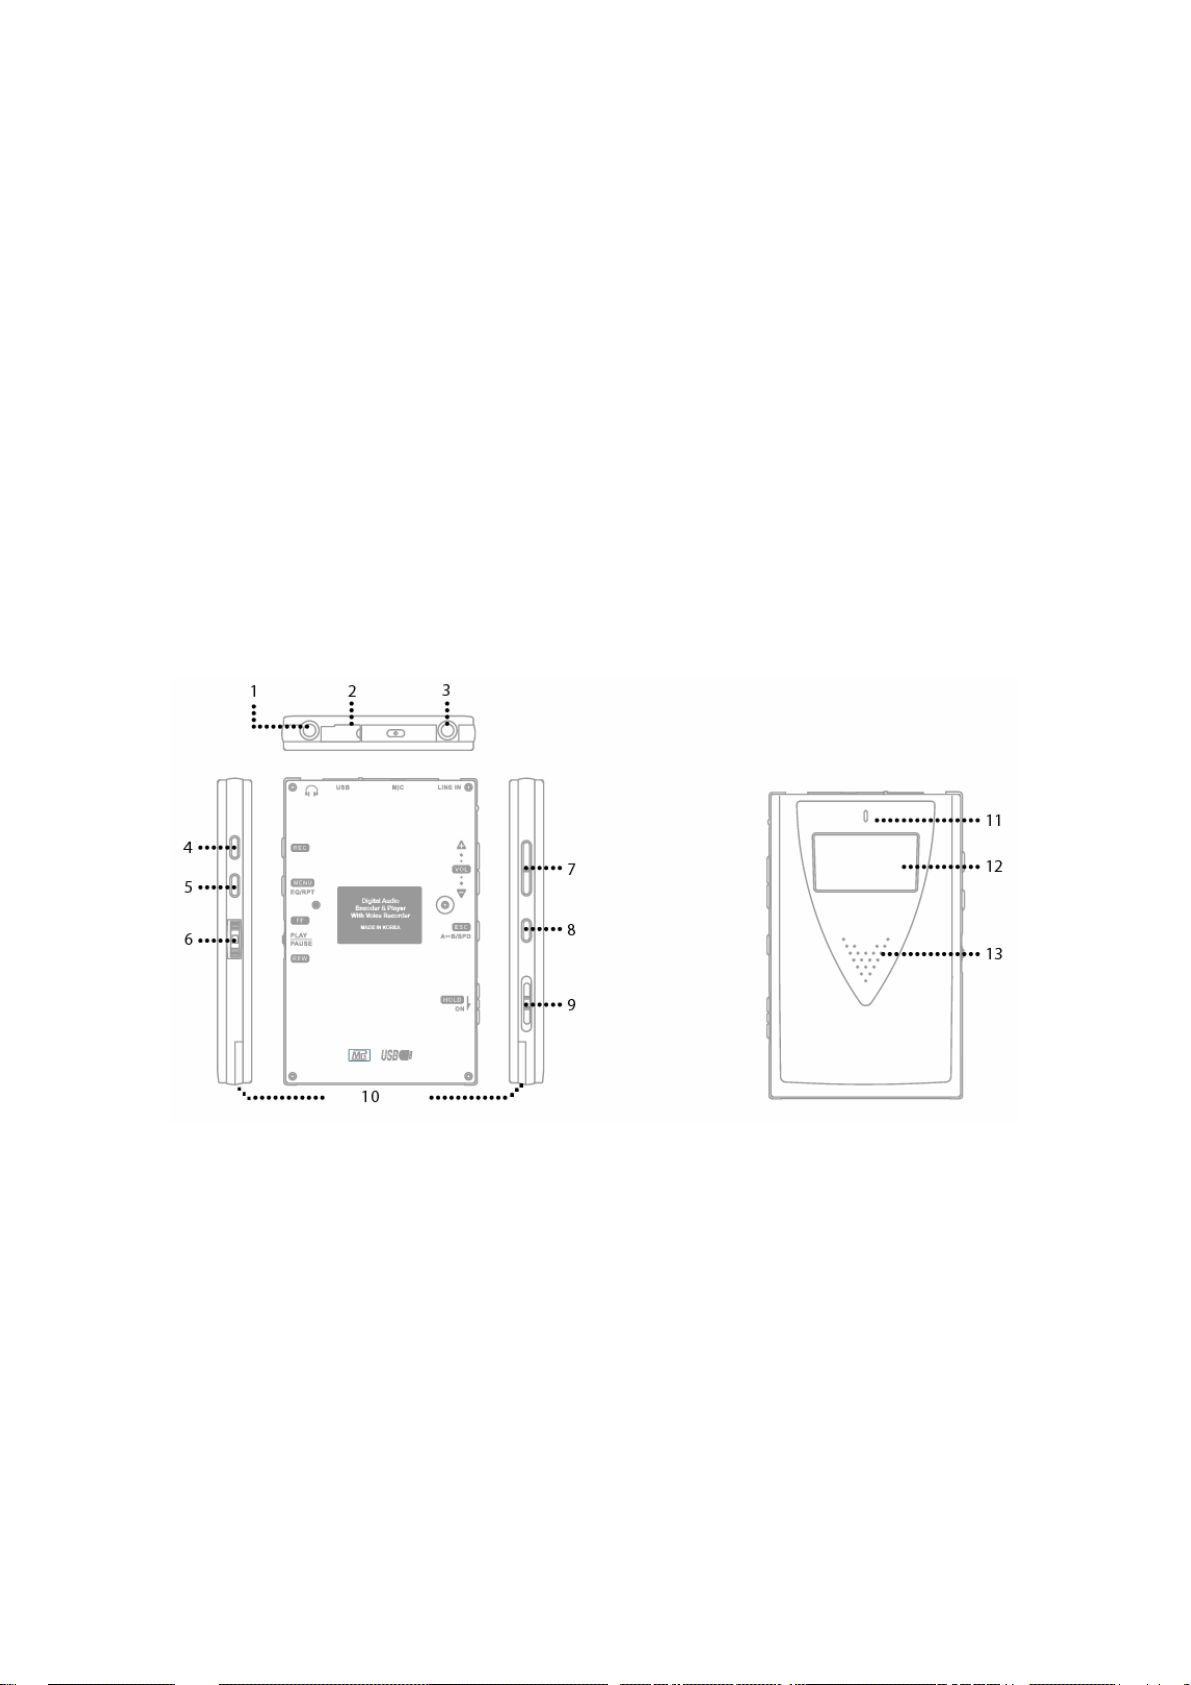
Names of the Components
¾ 1 Earphone jack
¾ 2 USB jack
¾ 3 Line in jack
¾ 4 RECORDING button
¾ 5 EQ/REPEAT PLAYBACK/MENU button
¾ 6 PLAY/STOP/PAUSE button, FAST FORWARD/REWIND JOG control key
¾ 7 ADJUSTING VOLUME button
¾ 8 ESC/SECTION REPEAT button
¾ 9 MUSIC/HOLD/FM mode selection switch

¾ 10 BATTERY COVER
¾ 11 LED
¾ 12 LCD window
¾ 13 Built-in SPEAKER
¾ 14 Built-in Microphone
Tip> Press the PLAY [icon] for more than 2 seconds to turn the player on. Press PLAY
[icon] again for more than 2 seconds to turn it off.
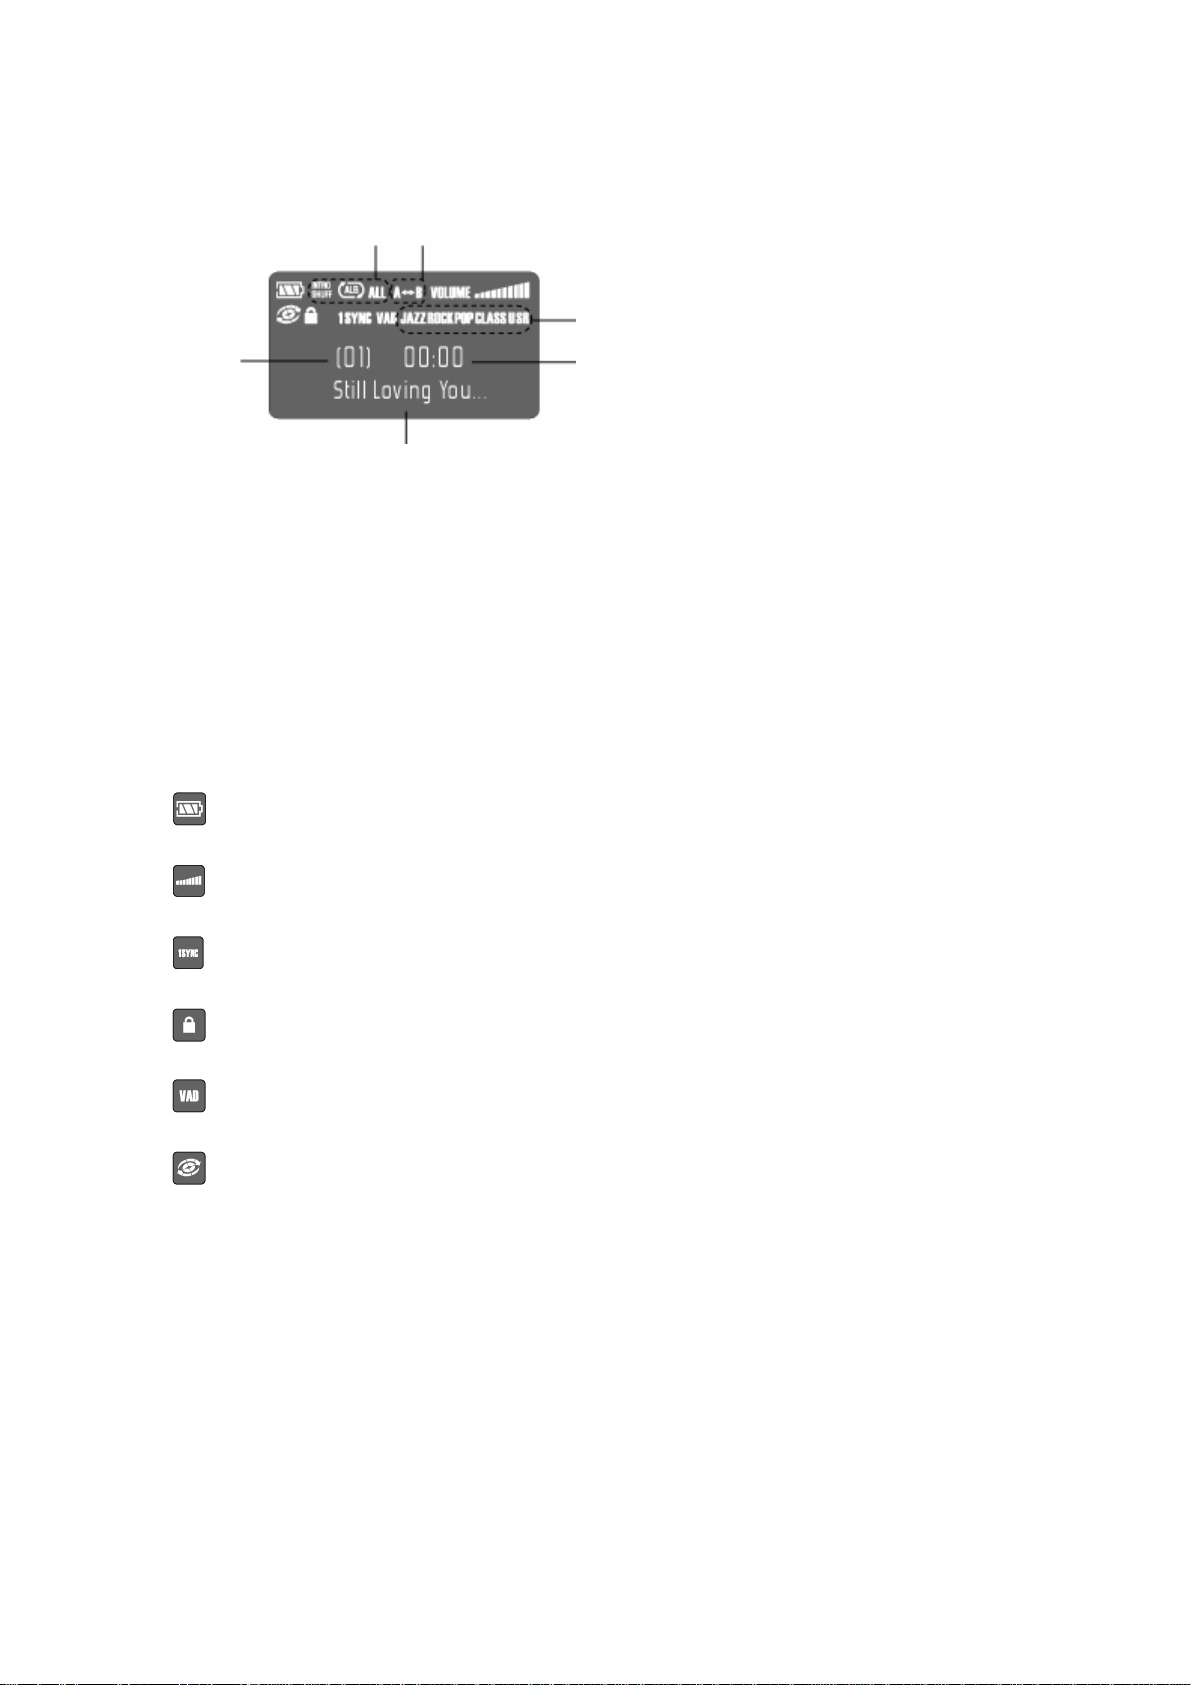
LCD Window
Repeat mode
Repeat Playback mode
Track number/menu
Sound effect
Playback time/menu
Bit-rate, title and other information
Remaining battery
Volume
SYNC
Hold status
VAD
Playback

Power Cconsumption
Low battery warning
The [
discharged, the player automatically shuts off.
Tip> Remaining battery
When this [
is blinking, the power will automatically be shut off in less than a minute. Replace the battery.
] mark is lowered according to the battery consumption. When the battery is fully
] mark is displayed, you can use the player for about one hour. If the [ ] mark

2. Basic Functions
Power On
Press the PLAY [▶] button for 1~2 seconds to turn on the
RipFlash PRO 2.
Power Off
Power Off
Press the PLAY [▶] button for about 2 seconds during playback to turn the RipFlash PRO FM off.
▷ When the power is turned off, a "Good Bye" message is displayed on the LCD window .
Setting up the Hold Function
The hold function is designed to prevent accidental use of the player. It can prevent
unnecessary consumption of the battery.
To setup the Hold mode,
Move the slide switch to the middle position (HOLD mark).
When the [Icon] appears on the LCD window, the player is in Hold mode.
▷ If you setup Hold mode during the playback of a song, you will not be able to use any of the
buttons on the player. However, you would be able to listen to the rest of the song. After the
song is finished, the player would turn off.
▷ If you setup Hold mode when the player is stopped, the power is automatically shut off in 5
seconds.

To exit the Hold mode,
Move the slide switch to the MUSIC or FM position.
The [Icon] now disappears from the LCD window. .
Tip> If you turn the player on in Hold mode, the power is automatically shut off after 5 seconds.
Make sure you select MUSIC or FM before turning the RipFlash PRO FM on.
Setting up the Modes
RipFlash PRO 2 consists of 4 modes as follows
▷Music Playback mode used for listening to music in an MP3/WMA format
▷Voice Re cording mode used to record voices
▷Line in Recording mode used to record from virtually any audio source without a PC.
▷FM Radio mode used to Receive/Record FM broadcasts
Adjusting the volume level
You can adjust the volume 0~20.

To increase the volume,
Press the upward arrow on the volume key.
Keep it pressed down to increase the volume faster.
To decrease the volume,
Press the downward arrow on the volume key.
Keep it pressed down to decrease the volume faster.
Setting up the Menu
The RipFlash PRO FM has 2 menus for MUSIC and FM modes.
Setting up the Music Mode
First, move the slide switch to MUSIC.
Now while the player is stopped, press the menu key on the left side.
Every time you press the menu key, the menu changes as shown below.

Setting up Voice Recordi ng Mode
Move the Mode Selection switch to MUSIC.
Press the REC button.
The red LED light goes on and the voice recording starts.
Setting up Line In Recording Mode
Move the Mode Selection switch to MUSIC.
Connect the supplied line in cable to the external audio equipment as shown in the figure.

Press the REC button.
The red LED light goes on and the line in recording starts.
Setting up the FM Mode
Move the Mode Selection switch to FM.
Press the REC button to record FM radio.
3. Playing Mode
Setting up Music Mode
First, move the Mode Selection switch to MUSIC.
Playing Tracks
Press PLAY[▶] to play an MP3 or WMA audio file saved in the memory.
Selecting a Track
Move the jog key FF[▶▶] or REW[◀◀] to select a track.
If you Keep FF[▶▶] or REW[◀◀]held down, you will scroll through the tracks very fast.
If you Keep FF[▶▶] or REW[◀◀]held down during playback, it will allow you to search the current
track and play it where you release the jog key.
Stopping/Pausing Playback

Press PLAY[▶] to pause a track in Playback mode.
The [icon] blinks and the current track is paused.
Press PLAY[▶] again to play the track again.
Tip1> To stop a track, first press PLA Y[▶] to pause a track and then FF[▶▶] or REW[◀◀] to stop it.
Tip2> The power is automatically turned off if the unit is in stop/pause mode for more that 1
minute.
Tip3> This produ ct has a resume function. This allows you to play a track where you left off last.
If you stop a track you can’t resume. Resume only works when you turn the unit off (Hold PLAY
for 2-3 seconds.)
Adjusting the Equalizer
Press the EQ/RPT button.
Every time you press the button, the Equalizer mode changes
as follows; Normal(No icon)Jazz→Rock→Pop→Classic→USER.
Release the button to select the Equalizer mode you want.
You can adjust the User EQ in the range shown below. Select the USER EQ mode (per above
instructions) and then hit the menu untill you see User EQ (mid,bass,treb) now press play to
select the desired one
Bass : Adjusts in the range of -6 ~ +6 dB
Mid : Adjusts in the range of -6 ~ +6 dB FW/RW to adjust
Treble : Adjusts in the range of -6 ~ +6 dB FW/RW to adjust
Tip> Move FF[▶▶] or REW[◀◀]up and down to select the desired dB
Setting up the Repeat Playback mode,

Press the EQ/RPT button for about 2 seconds.
The Repeat Playback mode icon blinks.
Every time you press the button, the Equalizer mode will change as follows; One→Rpt one→All→
Rpt all→INTRO→SHUFF.
Release the button to select the Repeat Playback mode you want.
EXAMPLE: listening to track #2 of 7,
Plays the track #2 only one time. --------------
Repeats the track #2 continuously. -------------Plays all (seven) tracks one at a time (in turns). ---Repeats all (seven) tracks after the all play.----
Plays the first 10 seconds of all (seven) tracks. ---Plays all (seven) tracks one time (randomly).----
Repeat playback [A↔B]
To repeat a section of a track, press the [A↔B/SPD] key during
playback at the beginning of that section.
The [A→] icon appears and blinks.
Press the [A↔B/SPD] key again at the end of the section.
The [A↔B] icon blinks and the selected section plays repeatedly.
Press the [A↔B/SPD] key again to stop this mode.
The [A↔B] icon disappears and regular playback starts again.
Controlling the Playback Speed
Press the [A↔B/SPD] key for 2-3 seconds during playback.
The [Speed: SL1] icon is displayed.
Every time you press the key, the steps for playback speed displayed as follows; Normal(no

icon)→SL1→SL2.
To play the track at the speed you want, select the speed you want and wait without pressing
any key.
Tip> This function is u seful for language study because you can control the playback speed.
Normal -------------------- Normal playback speed
Slow 1--------------------- Reduced by 1/2 the normal speed
Slow 2--------------------- Reduced by 1/3 the normal speed
Setting up the LCD Backlight Time
Press the MENU key in stop mode until you see B/L TIME: 5sec.
Move FF[▶▶] or REW[◀◀] up and down to select the timer for the LCD backlight. Press the
EQ/RPT button to slect this time.
Time setting : OFF, 5, 10, 15, 20, 25, 30sec, Always
※ Caution! If the backlight is on in FM mode, bad noise can be heard. Set the backlight OFF
to avoid this condition.
Tip> If you set the backlight to B/L TIME: 5 sec, the backlight is turned on for 5 seconds and
then turned off automatically. If you set it to B/L OFF, the backlight is never turned on. In this
mode, you can save unnecessary battery consumption.
4. Recording Mode
Voice Record ing
Starting a Voice Recording
Press the RECORD button in Music mode.
The red LED blinks and voice recording starts. The bit-rate for the recording is displayed in the
LCD window .

The track number and the recording time for the new file are also displayed.
Tip> Press the MENU during playback to check the remaining time available for your voice
recording.
Pausing a Voi ce Recording
Press RECORD during a voice recording.
The red LED will blink and a "REC PAUSE" mark appears on the LCD.
Press RECORD again to continue the voice recording.
Finishing a Voice Recording,
Press the PLAY[▶] button.
The file number and the information for the recorded file are displayed and the recorded file is
saved to the memory.
Playing a Recorded Voi ce File
Press PLAY[▶] after selecting a recorded file.
The way to play a recorded voice file is same as playback. Refer to the Playback mode section
for more info.
Setting up VAD Recording
The VAD (Voice Activity Detection) recording is a function which starts the recording when a
voice is detected and pauses it when a voice is not detected. It is used to save the memory by
optimizing the file size of the voice recording.
Press the MENU key until you see VAD OFF.
Move FF[▶▶] or REW[◀◀] up and down to select the VAD mode you want. Press the EQ/RPT

button to select that mode.
Tip> VAD OFF : Normal recording mode.
VAD ON : Memory saving recording mode that records only the voice detected
Setting up the Recording Quality (Bit-rate)
You can adjust the bit-rate of any recording. Basically the higher the bit-rate, the better the
recording quality will be. However, more memory is used. You can record about two hours at
112kbps and as much as 30+ hours at 8kbps (lower quality recording).
Tip> Use higher bit rates for quality recordings
Adjust the Voice Bit-rate,
Press the MENU key in Stop mode until you see
VOICE : 32Kbps.
Move FF[▶▶] or REW[◀◀] up and down to select the bit-rate you want. Press the EQ/RPT button
to setup that bit-rate.
VOICE recording : 8, 16, 24, 32, 40, 48, 56, 64, 80, 96, 112 Kbps → 16 KHz
Tip> Available recording time for each bit-rate [ba sed on the 128 MB memory]
▷ Generally, for voice recording use 32 kbps.
Line In Recording
Setting up the Line In Recording
Press the MENU key in Stop mode until you see LINE :

128 Kbps.
Move FF[▶▶] or REW[◀◀]up and down to select the bit-rate you want. Press the EQ/RPT button
to setup that bit-rate.
LINE IN recording : 32, 40, 48, 56, 64, 80, 96, 112, 128, 160, 192, 224, *256 Kbps
* 256 Kbps (48 KHz)
SYNC OFF: Records all the files transferred from the external
equipment as one file until you press the STOP button.
SYNC ON: Records all the files transferred from the external equipment
and seperates them as individual files.
1 SYNC: Records only the first file transferred from the external
equipment and then stops automatically.
Setting up the Line In Recording
Starting the Line In Recording
First, connect the supplied audio connection (line in) cable as
shown in the figure.
Press the RECORD button.
The LINE RECORDING mark appears and the line in recording starts.
The file number and the recording time are displayed.

Tip> Press the MENU button during a recordin g to check the remaining time.
Pausing a Line In Recording
Press RECORD during a recording.
The red LED blinks and the "REC PAUSE" mark appears.
Press the RECORD button again to continue the line in recording.
Finish a Line In Recording
Press the PLAY[▶] button.
The file number and the information for the recorded file are displayed, and the recorded file is
saved to the memory.
Listening to a line in recording file
Press the PLAY[▶] button after selecting the desired file.
The way to play a line in recorded file is same as music playback. Refer to the Playback mode
section.
Setting up the Silence Detection Level
In SYNC mode, this is used to setup the silence detection level between the line in source
tracks.
To setup the line in detection level,
Press the MENU key in Stop mode until you see
SILENCE(L) MID.
Move FF[▶▶] or REW[◀◀] up and down to select the rate you want. Press the EQ/RPT button to
setup.

The line in detection levels are as follows;
SILENCE (L) HIGH—Sets up the detection level high used whent the detection levels between
the sound source/tracks are low or the noise is low.
SILENCE (L) MID------------Setup for a normal line in reco rding (default).
SILENCE (L) LOW-----------Sets up the detection level low; used when the detection levels
between the sound/source tracks are high or the noise is loud.
※ Caution : If the sound source level is too low, the recording may not be available.
Adjusting the Sampling Frequency of a Line in Recording
Press the MENU key while the player is Stopped until
you see S/Frequency : 44.1kHz.
Move FF[▶▶] or REW[◀◀]up and down to select the sampling frequency you want. Press the
EQ/RPT button to setup.
Every time you press FF[▶▶] or REW[◀◀] , [S/Freq: 44.1KHza48KHza32KHz] is displayed in
order.. Press the EQ/RPT button to setup the desired frequency.
Tip> Generally, a good setup is 44.1KHz.
5. FM Mode
Listening to the FM Radio
Move the Mode Selection switch to FM.
Connect an earphone.
NOTE: In this product, earphones play the role of the antenna.
Adjust the Frequency in Search Mode,

Press the EQ/RPT button to select Search mode.
Move the jog key FF[▶▶] or REW[◀◀] and hold it to find the next station.
The "Searching…" mark appears and broadcasting frequencies are automatically selected.
If you release the jog key for a moment and slide in continuously, the next broadcasting
frequency is automatically selected.
NOTE: Move the jog key FF[▶▶] or REW[◀◀] quickly in Search mode to change the
broadcasting frequency one by one (ex, 89.0→89.1).
Saving a Broadcasting Frequency Automatically (Auto Scan Memory)
Press the EQ/RPT button for more than 2 seconds in Search
mode.
The Auto scan will st art and 16 broadcast frequencie s are saved automatically .
Use the Preset mode below to select saved broadcast frequencies.
Saving a Broadcasting Frequency Manually
Select the frequency you want in Search mode.
Press the MENU button for about 2 seconds.
Move the jog key FF[▶▶] or REW[◀◀] to go to the memory number you want to save.
Press the MENU button again to save it.
To select a saved frequency in Preset mode

Press the EQ/RPT button to select Preset mode.
Move the jog key FF[▶▶] or REW[◀◀] continuously to select the frequency you want.
Hold the jog key FF[▶▶] or REW[◀◀] to select a saved broadcast frequency faster.
Setting up Sleep
Press the MENU key until you see Sleep time : off.
Move the FF[▶▶] or REW[◀◀] jog key to select the Sleeping time you want.
Press the EQ/RPT button to setup this time.
Sleeping Tim e 30 60 90 off
Sleeping time Off in 30-min Off in 60-min Off in 90-min Disabled
This function is only available in FM mode.
Selecting Stereo/Mono Mode
Figure : Press the menu until you see FM Mono/Stereo.
Move the FF[▶▶] or REW[◀◀] jog key to select “STEREO” or “Mono”. Press the EQ/RPT button
to setup the mode.
Adjusting the Frequency Band

Press the MENU key.
Move the jog key FF[▶▶] or REW[◀◀] to select the proper frequency band for your area.
1.87.5MHz~108.0MHz (USA)
2.74MHz~108.0MHz (Japan)
Press the EQ/RPT button to setup the frequency.
Setting up the FM Recording bit rate
Press the MENU key until you see FM REC: 64kbps.
Move the jog key FF[▶▶] or REW[◀◀] and select the bit-rate you want.
Press the EQ/RPT button to setup that bit-rate.
Tip> Press the record button to record FM. The procedure is the same as for voice recording.
Refer to the voice recording section for more info.
6. Managing the File Memory
Erasing files
- Erasing One File
(The ID3 TAG appears in the LCD window.)
Move the FF[▶▶] or REW[◀◀] jog key up and down to select the file number you want to erase.
Press the MENU key in Stop mode until you see Erase 01. [No].

Press PLAY[▶], the Erase. [Yes] mark is displayed.
If you press the PLAY[▶] key again, the “Wait! File Erase” is displayed and the file is erased
※ Caution : Once you erase the file, it cannot be recovered. Be sure to check the file carefully
before erasing.
Erase all Files
Press the MENU key in Stop mode until you see Erase ALL :
[NO].
Move the FF[▶▶] or REW[◀◀] jog key up and down to select Erase ALL. [Yes].
If you press the PLAY[▶] key again, the “Wait! File Erase” is displayed and all files are erased
simultaneously.
Formatting the Memory
Formatting the Memory
Press the MENU key in Stop mode unti l you see Format !! [NO].
Move the FF[▶▶] or REW[◀◀] jog key up and down to select Format !! [Yes].
If you press the PLAY[▶] again, "Formatting…" is displayed and the memory is formatted.
The default settings after formatting the memory are:
VOLUME : 10 EQ: NORMAL REPEAT : Repeats all tracks once
SYNC : NO SYNC VAD: OFF
LINE-IN Recording SAMPLING FREQUENCY : 44.1KHz
RECORDING BIT -RATE : LINE-IN : 128Kbps VOICE Recording : 32Kbps

EL ON TIME : 5 SEC
FM SLEEP : OFF / FM RECORDING BIT-RATE : 64Kbps
BAND : FM BAND 87.5~108MHz(US)
MONO/STEREO : STEREO
Memory Information
Checking the Memory Information
Press the MENU key in Stop mode until you see
"MEMORY:000.0/000.0M FILES:000". The remaining memory information is displayed as a
scrolling format.
7. Installing the PC Software
Insert the supplied software installation CD in the CD-ROM drive of your PC.
The installation program automatically runs and the default setting screen appears.
▷MP3 MANAGER : The software which uploads/downloads the files in the player and PC.
▷FreeRip : The application for the PC player which encodes music from a CD into an MP3 file,
For help with FreeRip, please visit the site below:
Install the Mp3manager software referring to the figures and instructions below.
1. Select the S/W to install. 2. The installation runs automatically.
http://www.freerip.com/support.html

3. Press the Next to continue. 4. Press the Next to continue.
5. Installing the S/W to a PC.
6. The installation process is automatically completed after installing the program.
※ Caution : The minimum requirements for installing this software are as follows;
Pentium MMX or higher/CD-ROM drive/Over 400 MB free hard disk space (with TTS)/USB
port/Windows98/ME/2000/XP
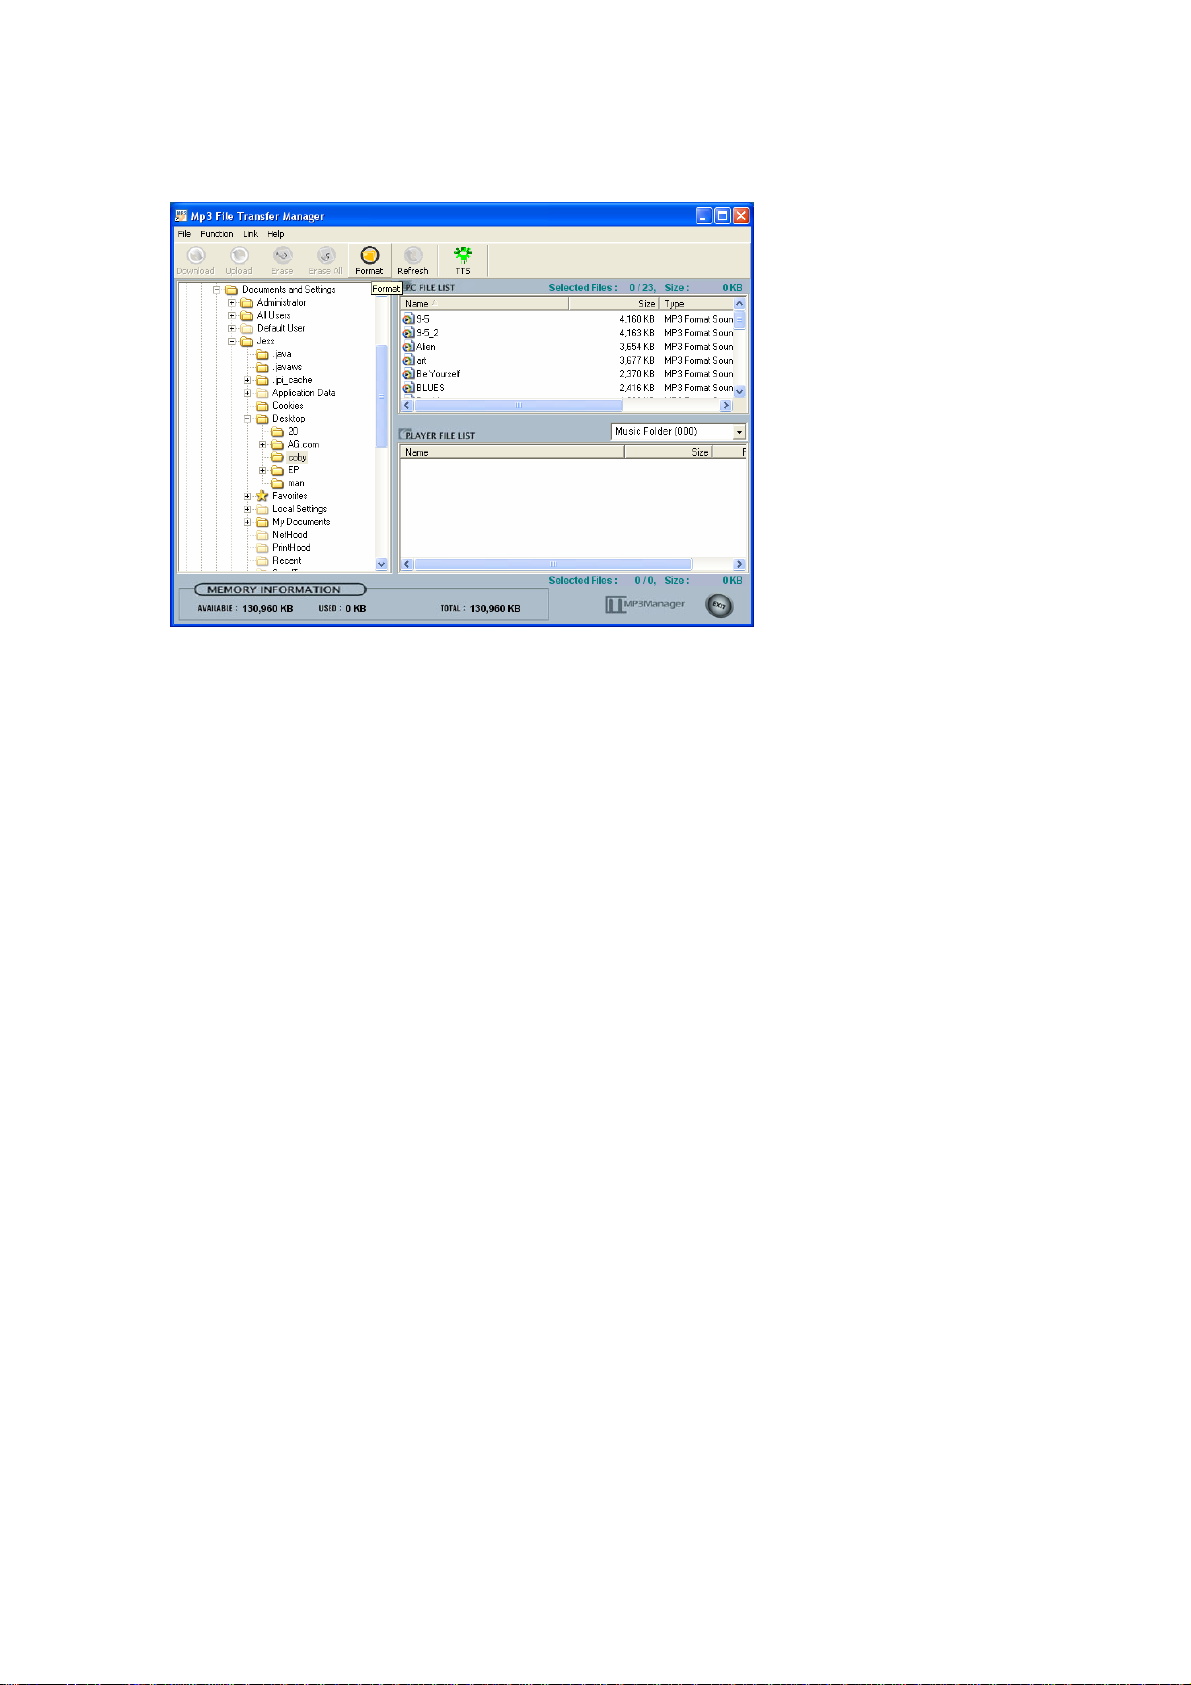
8. Using the Manager Program
Double-click the MP3 MANAGER icon from your Windows desktop to run the program.
The MP3 MANAGER runs and the figure shown below is displayed.

Memory Format
To download a file, the memory has to be formatted first.
If the built-in memory is not formatted, press the [
] button.
Tip> The default settings after formatting the memory are:
Volume: Volume 10
Equalizer: Normal (no icon)
Repeat Playback mode (RPT): Repeating all files once
VAD (Voice Activity Detection) OFF (Standard recording)
MP3 voice recording bit-rate: 32 kbps
Line in recording bit-rate: 128 kbps
Line in recoding silence detection level: Mid (Standard)
Line in recording type (SYNC): OFF
Download/Upload
1) Download
To download the files from the PC, select the files and press the [
] button.
2) Upload
To upload voice recording files, line in recording files and general data files, select the files and
press the [ ] button.
Tip> The MP 3, WMA, and TTS files cannot be uploaded.

※ Caution : Do not disconnect the USB cable during download/upload process. If the USB
cable is disconnected, connect it again.
Refresh
Press the [
Erasing files
Erasing the files : Press the [
Erasing all files : Press the [
Sorting the file order
You can sort the files in the player manually. Just drag and drop the files.
] button to check the saved files in the built-in memory.
] button to erase the selected files.
] button to erase all files in the built-in memory.
9. Connecting the USB Cable to the PC
Connecting the USB Cable
Connect the PC and the player with the USB cable to download/upload the files from the PC.
Tip> Because this player uses the USB power source of the PC, you can download and upload
files, even if the battery is not inserted or fully discharged.
Connect the USB cable to the USB port of the PC as shown in the figure.
Connect the opposite jack to the player as shown in the figure.
Installing the USB driver

In Windows 98/ME, the USB driver is installed automatically with the MP3 Manager program.
So, you don’t need to install the driver separately, but you can reinstall it after deleting the driver ,
in case of a communications problem between the MP3 Manager and the MP3 player.
Install the software
1. Press the Next button. 2. Click the item as shown in the figure and
press the Next button.
3. Press the Have Disk and Find in as shown in the figure. 4. Select the USB driver file in the
supplied CD and press the Next button.
5. After checking the installed USB driver, 6. Press the Finish button to complete the
driver installation.

The USB driver is installed successfully, if the PC and the player is
connected with the USB cable and.
The USB ON Line message is displayed on the player.
10. Customer Services
Cautions for Use
Before using this product, read the following instructions carefully and use it properly to keep
your safety and avoid the loss of property.
1. Avoid the impact and do not drop the product as it may cause a malfunction.
2. Do not place the product in such locations described below.
- A place of high temperature (above 60 °c)
- A place subject to direct sunlight and near heating devices
- Inside a closed car (especially in summer)
- A place subject to high moisture like a bathroom
- A place subject to excessive dust
3. Do not apply heavy force to the LCD window .
It may cause a breakage or abnormal display on the LCD.
4. Do not place magnetic cards (ex, cash card, fare card) near the product.The magnetism may
be transformed due to magnetic influences and you may not use them anymore.
5. PoGo Products will not be responsible for any loss from the use of this product and indemnity
from any third party.
6. PoGo Products will not be responsible for the loss of files resulting from malfunction, repair
and any other kind of reason.
7.Have Fun with the RipFlash PRO 2!
Cautions for Safety

1. Do not repair, disassemble or modify this product by yourself
2. Remove the battery immediately if smoke or distortion occurs due to overheating.
3. Do not use the product in an airplane or any restricted area.
4. Do not use while you are driving or working. It may cause an accident.
Troubleshooting
Check the following items first if any problem happens.
1. Playing does not work and the LCD window is not turned on.
- Check if the battery is correctly inserted.
- Replace the battery with new one or
- Charge the rechargeable battery.
2. Cannot hear any sound.
- Check if a memory file is saved.
- Check if the volume is set to 0 (zero).
- Check if the earphones are connected correctly.
3. The button key does not work.
- Check if the HOLD button is set.
4. Cannot download anything.
- Check if the USB cable is connected correctly.
- Install the USB driver file again.
Specifications
Model name : NMP-312
Built-in memory : 32M/64M/128M/192M/256M
LCD window : Supports ID3 tags/EL Backlight
Download/Upload speed : Maximum 5 Mbps
MP3 decoding :
Supports ISO MPEG 1/2 layer 3 including variable bit-rate.
* MPEG1 Layer3 : 32 KHz/44.1 KHz/48 KHz

32, 40, 48, 56, 64, 80, 96, 112, 128 , 160, 192, 224, 256, 320 Kbps
MONO/STEREO/ JOINT STEREO MODE
* MPEG1 Layer3 : 16 KHz/22.05 KHz/24 KHz
8, 16, 24, 32, 40, 48, 56, 64, 80, 96, 112, 128, 144, 160 Kbps
MONO/STEREO MODE
* Variable bit-rate
WMA decoding :
Supports the high bit-rate version and the middle bit-rate version.
Bit-rate : 32Kbps ~ 192Kbps
Sampling frequency : 48 KHz, 44.1 Khz, 32 Khz, 22.05 Khz, 16 Khz, 11.025 Khz, 8 Khz
MP3 encoding : 8kbps ~ 256kbps
Earphone output : 8mW/8mW (left/right)
S/N (Signal-to-noise ratio) : Over 60 dB (without filter)
Playback time : Over 8 hours/over 12 hours in the FM mode
Voice recording time : Over 8 hours (Based on 128M memory and 32kbps encoding)
Line in recording time : Over 2 hours (Based on 128M memory and 128kbps encoding)
PC interface : USB
Power source : Ni-MH rechargeable battery x 1 EA or Size AAA battery x 1 EA

Warranty
● If any defect or error occurs, stop using the product and contact the shop you
purchased or Pogo Products Inc. General Directory Number: (714) 671-1854
● Warranty (Warranty Regulation)
Pogo! Products guarantees a free repair or service for a period of one year from the
original date of purchase only.
If any defect or error occurs during the warranty period, please contact us.
A dated order/receipt is REQUIRED for all warranty claims.
Ensure the above information is provided and if it not, consult with the shop you
purchased to obtain it.
(Free Repair or Service)
A. This product is manufactured under a strict quality control and inspection process.
B. If any defect or error occurs under normal operation, in accordance with the caution
or notes in this manual during the warranty period, you are entitled to a free repair
or exchange from our company.
C. The free repair/service does NOT include shipping charges.
3. Even during the warranty period, you will be charged for the following
defect/damage or error:
1) Without a dated purchase order/receipt.
2) If the original date of purchase is passed the warranty period or the dated
purchase order/receipt is modified in any way.
3) For any defect or damage resulting from misuse, abnormal use, abnormal
condition, improper storage and/or exposure to direct sunlight or moisture.
4) For any defect or damage resulting from any unauthorized modification or repair.
5) For any defect or damage resulting from disasters such as fire, air pollution,
earthquake or war.
6) For any defect or damage resulting from a leak of the battery.
7) Consumable such as battery.
4. The warranty is valid only for service in the USA.

(Caution Upon Shipping or Transporting)
Upon shipping or transporting the product, please be careful about the following:
1. Enclose the original dated purchase order/receipt with the product during the
warranty period.
2. Avoid damage to the product during shipping/transportation using proper packing
materials.
The customer shall bear the cost of shipping/transportation.
3. Use registered and/or insured mail to prevent a loss.
● If any defect occurs during the use of this product, contact the shop you purchased or Pogo
Products Inc.
● Replacement, repairs (charge/free) or refunds must be in accordance with our policy and can
be found at:
http://www.pogoproducts.com/support.html
● If you have any further questions about this product, please contact Pogo Products Inc.
PoGo! Products Inc.
590 W. Central Ave Suite E
Brea, CA 92821
Phone: 714-671-1854
The warranty may be used only in the USA. Please keep your dated purchase order/receipt
safely as it is required for any warranty service.
 Loading...