

Pogo RIPDRIVE User Manual

Notice to Users
This manual is protected by copyright laws and all rights are reserved. No portion of this manual may be
reproduced in any form or translat ed into other languages without written per mission from the manufacturer
and publisher of this manual.
The content of this manual is provided “a s is” and the manufacturer is under NO obli gation to notify users of
revisions or modifications to the product or procedures.
Every effort has been taken to ensure the accuracy of the information herein. However, the manufacturer is
not responsible for any inaccurac ies or o missions that may affect the Ri pDrive’s operation.
All programs or accessories included with the RipDrive are under copyright protection. No part of these
programs may be reproduced without written per mission from the manufa cturer and publish er.
All product names used in this manual ar e protected by each product’s trademark, service mark, or regist ered
brand.

Safety Checkpoints
Thank you for purchasing the RipDrive! Please read this manual carefully prior to using the
RipDrive.
1. DO NOT alter the RipDrive in any way. Such tampering may result in a fire, injury, electric shock,
or serious damage to the RipDrive or to the user.
2. Keep the RipDrive away from water. Water may cause fire, electric shock, and mechanical or
electrical breakdown.
3. DO NOT leave the RipDrive in a car or other locations in whi ch there are the possibil ities of high
temperatures or high humidit y. Keep it away from direct sunlight or drastic temperature changes.
Being exposed to high temperatures or humidity may b e harmful to the RipDrive compon ents and
could cause a fire.
4. Avoid dropping the RipDrive from high places. It may cause a malfunction or serious damage to
the unit.
5. DO NOT clean the RipDrive with alcohol or any strong detergent. It may cause the fading
of the RipDrive’s exterior surface.
6. DO NOT use any accessories other than the ones recommended by the manufacturer. The
manufacturer IS NOT responsible for any malf unction or breakdown caused by the use of thirdparty accessories.
7. Use only the recommended battery charger. Other chargers may cause a fire or the product to
malfunction.
8. DO NOT disassemble the RipDrive.
9. In the event of problems, contact th e After Service (A/S) Center at 714-671-185 4.

Contents
1. Introduction ................................................................................................................................. 1
Checking Package Contents......................................................................................................... 2
2. Product Overview......................................................................................................................... 3
Product Features......................................................................................................................... 4
Mass Storage ........................................................................................................................ 4
MP3 and WMA Playback....................................................................................................... 4
10 Hours Use with Each Charge ............................................................................................. 4
Direct MP3 Encoding without a PC ........................................................................................ 4
FM Tuner ............................................................................................................................ 4
Search Function .................................................................................................................... 4
Text View ............................................................................................................................. 4
Name of Each Part...................................................................................................................... 5
Functional Description of Each Part............................................................................................. 6
3. Preparation .................................................................................................................................. 8
Charging the Battery................................................................................................................... 9
Connecting the Battery Charger.............................................................................................. 9
Battery Remaining Indicator ................................................................................................ 10
Connecting Earphones/Line-in Cable ......................................................................................... 11
Earphones Connection......................................................................................................... 11
Line-in Connection.............................................................................................................. 11
Connecting to Your PC.............................................................................................................. 12
Installing the USB Driver.......................................................................................................... 13
Automatic Installation ......................................................................................................... 13
Manual Installation.............................................................................................................. 13
Checking the Installation ..................................................................................................... 18
Removing the RipDrive....................................................................................................... 19
4. Basic Operation.......................................................................................................................... 21
Turning Power on..................................................................................................................... 22
Turning Power off..................................................................................................................... 22

Initial Screen............................................................................................................................ 23
LCD Screen Indicators.............................................................................................................. 24
Major Modes............................................................................................................................ 26
1. Browser Mode................................................................................................................. 28
Playback....................................................................................................................... 28
Pause............................................................................................................................ 29
Fast Forward ................................................................................................................. 29
Rewind......................................................................................................................... 29
Viewing Popup Menu during Playback............................................................................ 30
Adjusting the Volume..................................................................................................... 31
2. Tuner Mode .................................................................................................................... 32
Listening to Radio ......................................................................................................... 32
Presetting Stations ......................................................................................................... 33
Viewing Popup Menu During Playback ........................................................................... 33
3. Encoding Mode............................................................................................................... 34
Encoding....................................................................................................................... 34
Voice Recording............................................................................................................ 34
4. PlayList Mode................................................................................................................. 35
5. T e xt Mode....................................................................................................................... 36
6. Setup Mode..................................................................................................................... 37
Tree V i ew ..................................................................................................................... 38
Search View.................................................................................................................. 38
7. Exit Mode....................................................................................................................... 40
5. Advanced Operation ................................................................................................................... 41
Using Options.......................................................................................................................... 42
DISPLAY........................................................................................................................... 42
SYSTEM............................................................................................................................ 43
MUSIC-OPTION................................................................................................................ 44
OTHER-OPTION ............................................................................................................... 46
A-B Repeat Play....................................................................................................................... 47
Managing Files......................................................................................................................... 47
Upgrading Firmware................................................................................................................. 49
6. Specifications............................................................................................................................. 50

7. Troublesho oting......................................................................................................................... 52
8. Warranty .................................................................................................................................. 53
9. FCC Notice................................................................................................................................ 55


1. Introduction
Thank you for purchasing the RipDrive. We appreciate your patronage. You will now enjoy the advantage of
having a mass storage device that sol ves the capacity limitation proble ms of most existing MP3 player s. The
RipDrive’s Playback feature supports MP3 and WMA formats so you can handle variou s music files wit h ease.
In addition, the Setup mode provi des vario us menu s that you can config ure to sui t your per sonal pref erences.
The RipDrive can be connected to your PC via a USB cable. Once connected to your PC, the unit is
automatically recognized by your P C as a mass storage device (driv e letter). In addition, you can continue to
enjoy the benefits of improved product perfor mance thr ough fir mware upgrade s.
You can obtain information about our company, PoGo! Products, and other innovative technologies we’ve
developed by consulting on our website at
information about our other innovative products an d receive technic al support service s.
The topic in this section:
Checking Package Contents
www.pogoproducts.com. You can sign up to receive free
1
Checking Package Contents
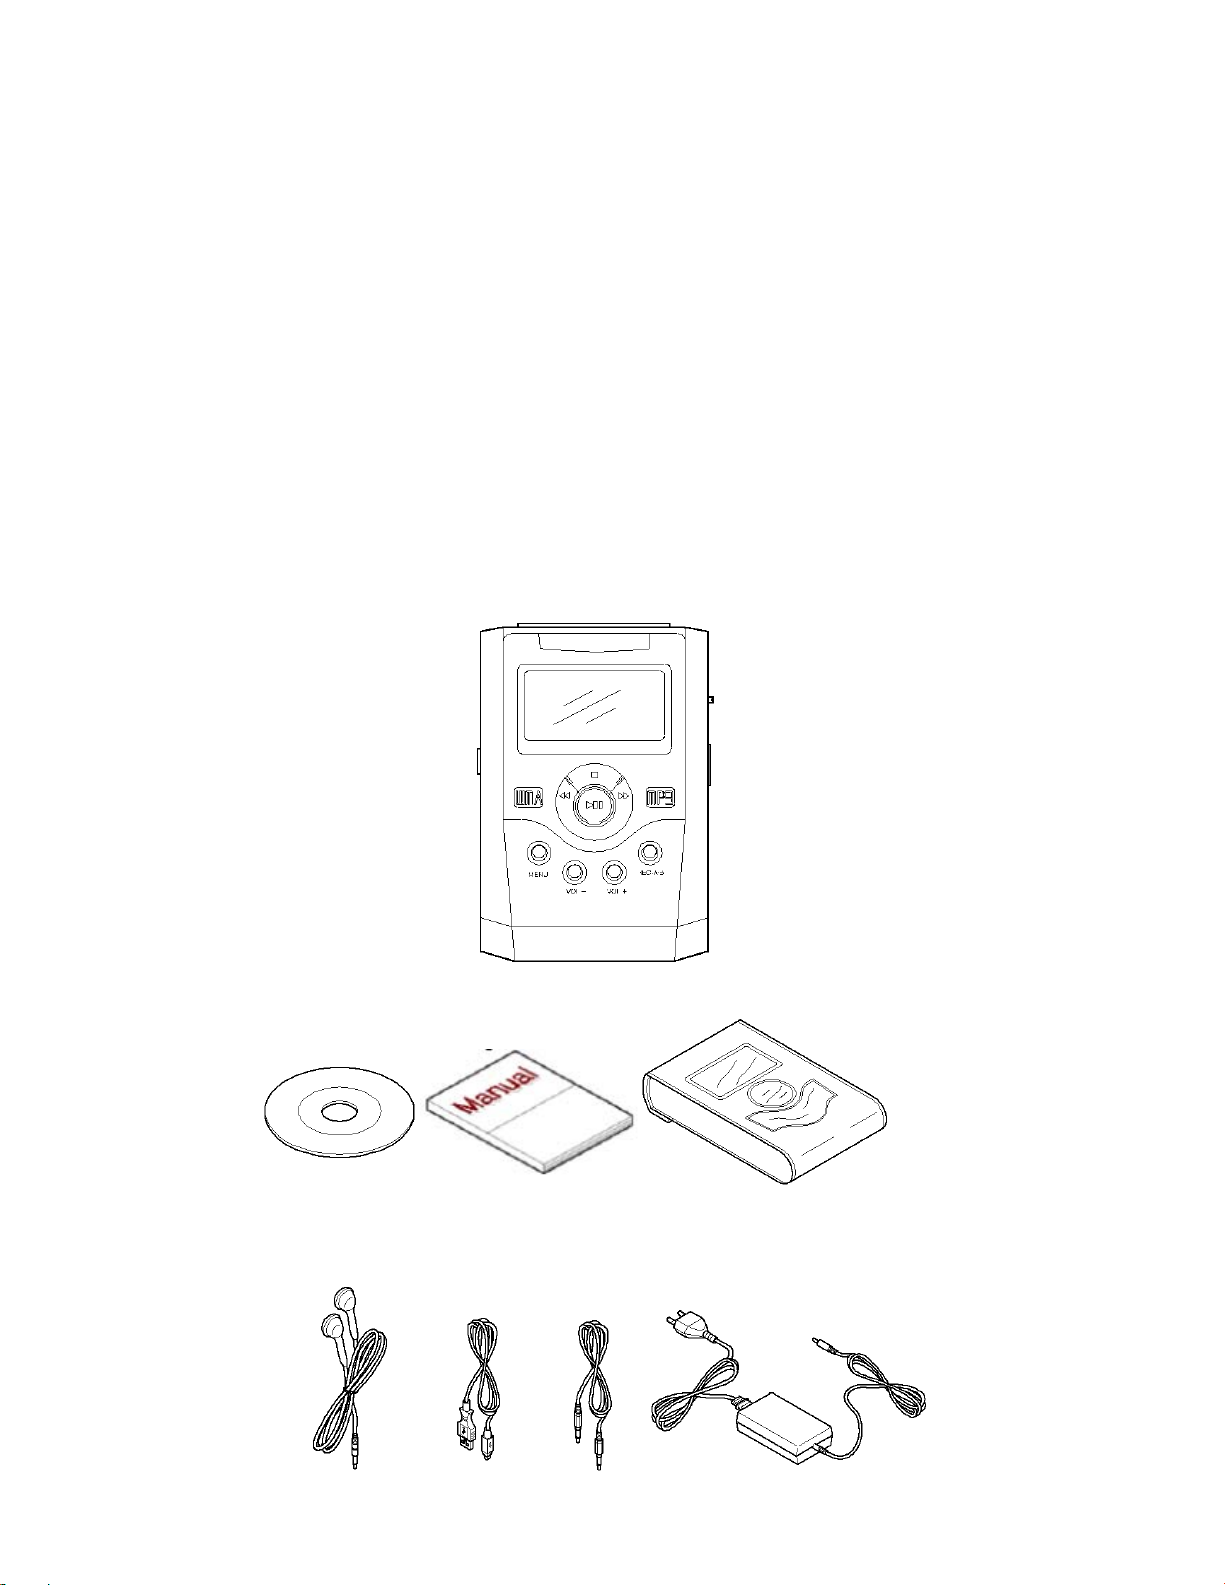
Check your RipDrive package to make sure it has the following items:
Main Unit
User's Manual
USB Cable
AC Adapter/Charger
USB Driver Installation CD (for Windows 98)
Earphones
Line-in Cable
Carrying Case
2

2. Product Overview
The RipDrive is a portable HDD Type MP3 Player that is compatible with your PC. It features a portable
20GB hard disk and a 160 x 105 full-graphic LCD screen.
This product supports various langu ages, maki ng it conv enient to u se anywher e you go.
This section describes the main features of the product as well as the names and functions of the components.
Read through this information carefully so you’l l be able to use the pro duct easily and effectively.
The topics in this section:
Product Features
Name of Each Part
Functional Description of Each Part
3

Product Features
Mass Storage
RipDrive uses mass storage technol ogy that exceeds the capacity of most existing MP3 player s and permits
you to use it as a removable dr ive.
MP3 and WMA Playback
You can pl ay MPEG1-Lay er3 ( MP3) and Windows Media Audio (WMA) files.
Extended Use with Each Charge
You can enjoy up to 10 hour s of music playback with ju st one battery charge.
Direct MP3 Encoding without a PC
You can encode music from just about any audio source to MP3 by connecting the line-in cable of the
RipDrive to an earphone jack of any exter nal device. No P C is requir ed!
FM Tuner
You can li sten to FM r adio by usin g the Auto Scan or Preset function.
Search Function
RipDrive’s user-friendly search feature enables you to quickly find the files you want.
You can se arch for a mu sic files e asily by u sing the Sear ch Funct ion.
Text View
You can vi ew text f iles stor ed in the Ri pDrive a nytime and anywhere.
4
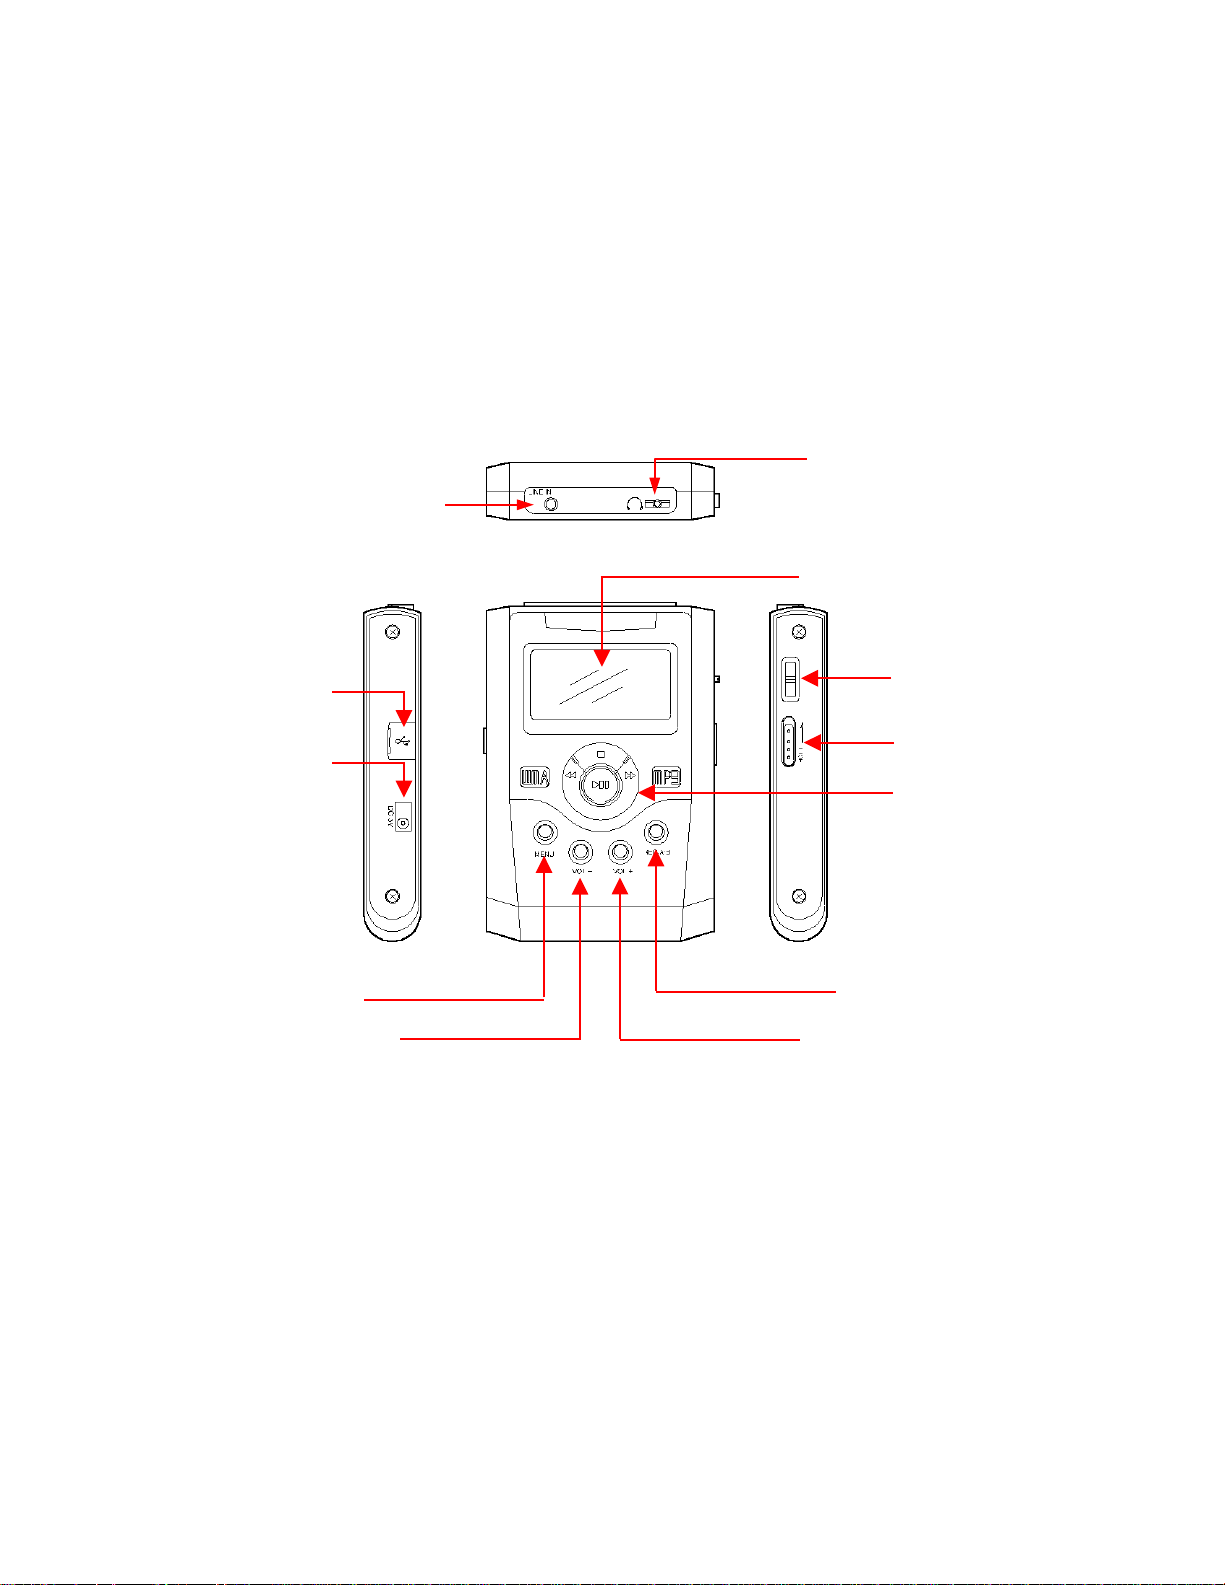
Name of Each Part
The following illustration indicates the n ames and locat ions of each part of the unit.
USB port
Charger jack
MENU button
Volume Down button
Headphone jack
Line-in jack
LCD screen
Jog key
Hold switch
Multi buttons
REC button
Volume Up button
5

Functional Descriptions of Each Part
Line-in jack
Headphone jack
LCD screen
USB port
Jog key
Hold switch
PLAY/PAUSE
Input audio signals from any external audio source to encode directly to
an MP3 format.
Connects headphones to the RipDrive.
Shows information about the operational status of the unit.
Enables data exchange with your PC. Connect the USB cable using this
port.
When pushed up or down:
- Selects a file or folder.
When pressed:
- Opens the selected file.
- Opens the selected folder.
Locks all buttons to prevent accidental use. Slide the switch up to
activate the Hold function and slide it down to deactivate it.
When selecting a file, press this button to start playback. If playback has
already started, pressing the button pauses playback. It also resumes a
paused recording and functions as the power switch.
Multi
buttons
6
STOP
REW
FF
When pressed lightly:
- Stops playback and enters Browser mode.
- Takes you back to a higher-level folder when in a subfolder
When held down:
- The unit will automatically power off when this button is held down for
about 3 seconds.
- The unit will force a power off when this button is held down longer
than 10 seconds.
- Used to select the previous file from the folder list.
- During playback, hold down this button to rewind the current song, or
press lightly to play the previous song.
- Used to select the next file from the folder list.
- During playback, hold it down to fast-forward the current song, or press
lightly to play the next song.

MENU button
Volume Down button
Volume Up button
REC button/A • B
- Hold it down to switch modes, or briefly to return to Browser mode.
- If Tree View and Search View on the Display section are set to
"Enable,” lightly press the MENU button and it will toggle between Tree
View and Search View.
Turns the volume down on this unit.
Turns the volume up on this unit.
FM/Line-In/Voice Encoding function/A↔B Repeat function button. Also
pauses a recording.
7

3. Preparation
The RipDrive uses an AC adapter to charge the battery. The battery has to be charged PRIOR to using the
RipDrive for the first time after purchasing.
Earphones are included with the RipDrive. U se the earphones to listen to music and voi ce recording files. An
optional remote control is av ailable for greater convenience. Visit our website at
more detail s.
This RipDrive supports multiple OS platf orms, including Windows 98SE, ME, 2000, XP, and Mac OS 9.1.x+,
and OSX v10.1.2+. You can install a USB driver on your PC according to the OS you are using, th en connect
the RipDrive to your PC.
The topics of this section:
Charging the Battery
www.pogoproducts.com for
Connecting the Earphones/Line-in Cable
Connecting to Your PC
Installing the USB Driver
8
Charging the Battery
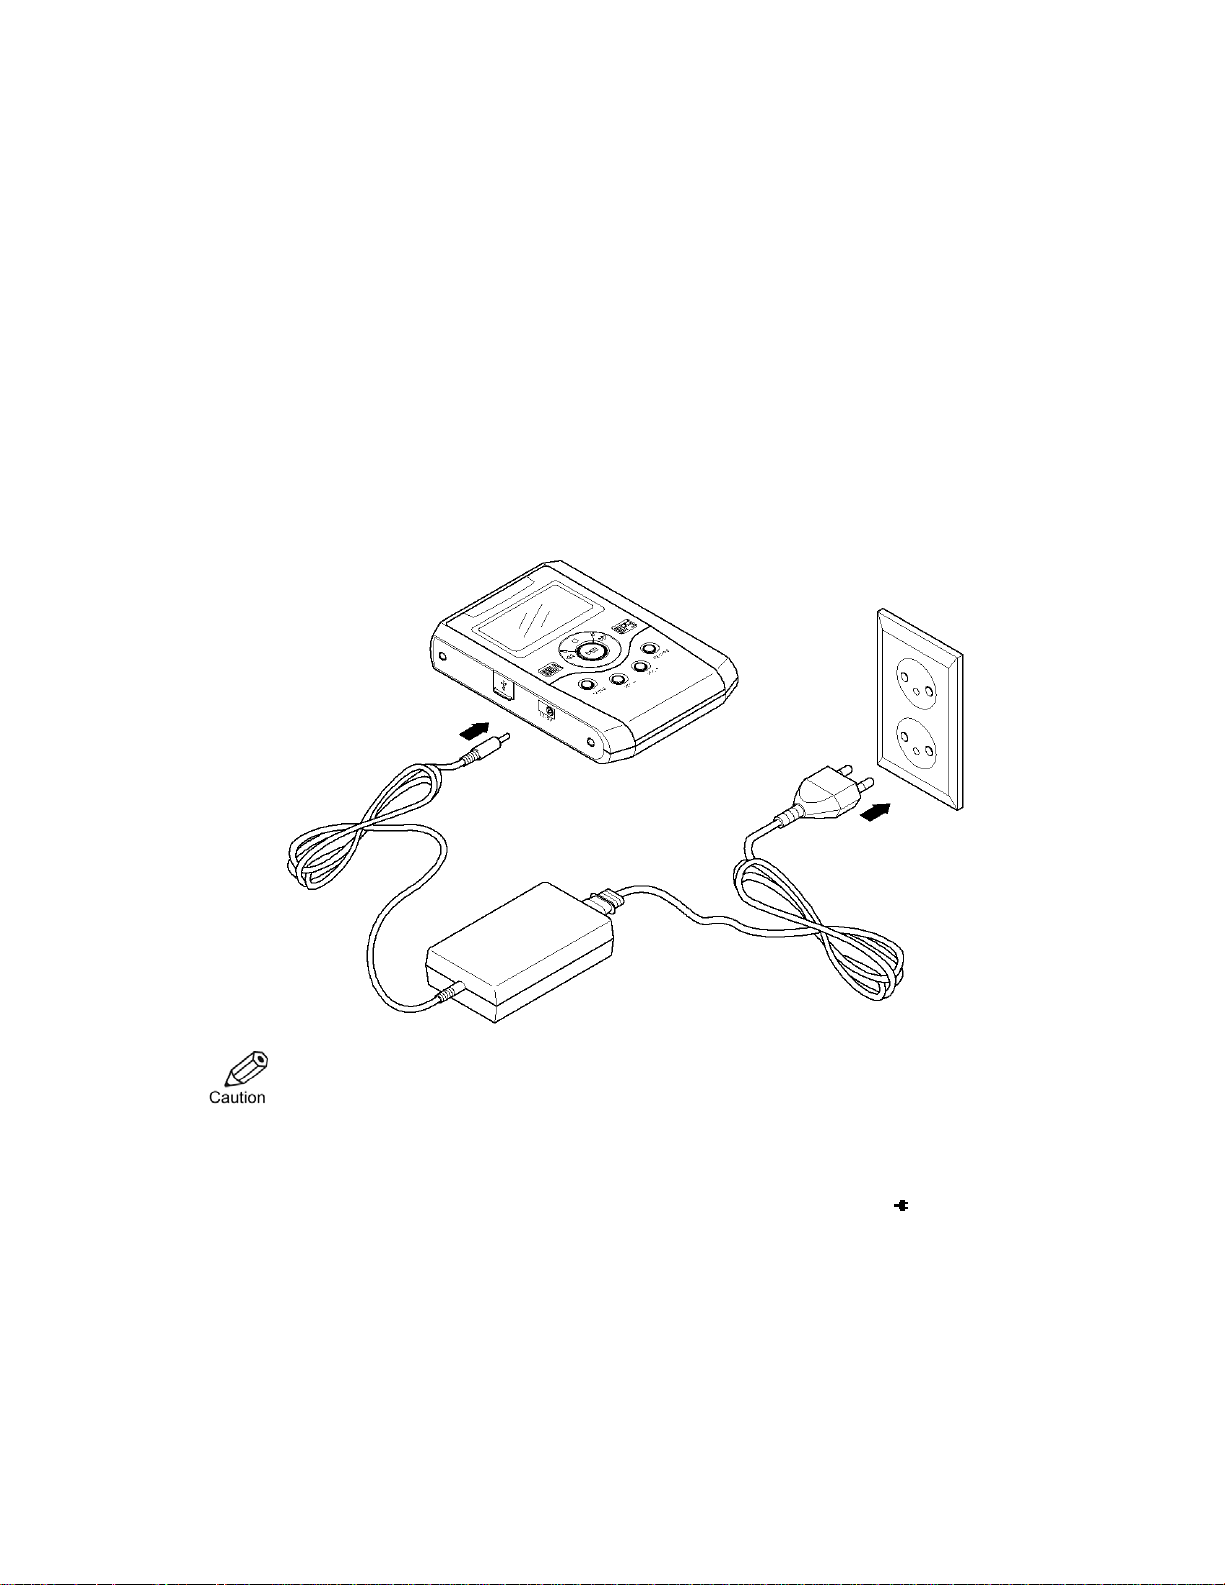
Connecting the Battery Charger
When using the RipDrive for the first time, be sure to charge the battery FIRST:
1. Plug the AC adapter/charger into an AC outlet.
2. Plug the AC adapter/charger's barrel plug into the DC 3V jack on the left side of the RipDrive.
3. Power on the unit (Hold Play/Pause button down)
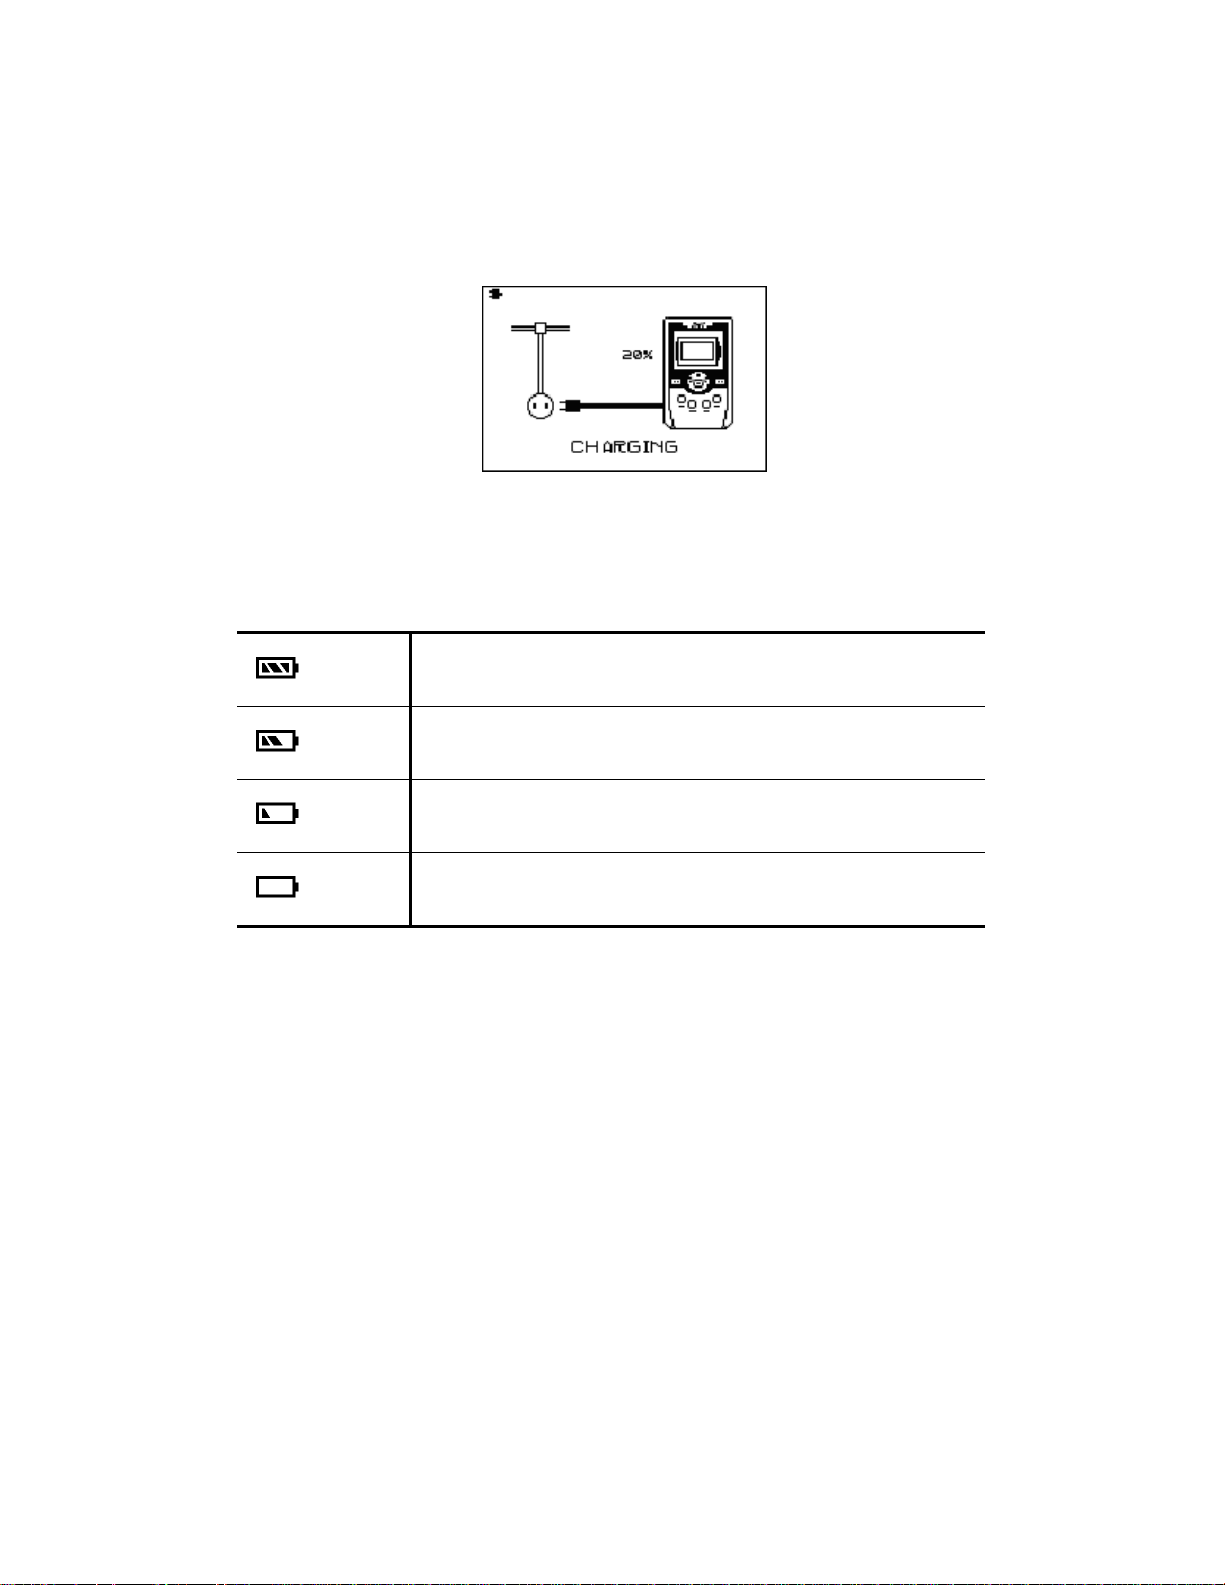
When charging the battery (after plugging the AC adapter/charger's barrel plug into the charger jack)
you must press the Play/Pause button. If the AC adapter/charger connection is correct, the following
graphic below will appear on the LCD screen. During playback, the charging icon (
in the top left hand corner.
Note: In order to use the AC adaptor for playback
1.Power on the unit first (Hold Play/Pause button down)
2.Plug the AC adapter/charger's barrel plug into the DC 3V jack on the left side of the RipDrive.
) should appear
9
Battery Remaining Indicator
The Battery Remaining Indicator displays the amount of power remaining based on four symbols:
When the battery level is above 70%
Full
When the battery level is above 40%
Middle
When the battery level is above 10%
Low
When the battery level is below 10% (the indicator flashes at
Blank
one-second intervals)
10
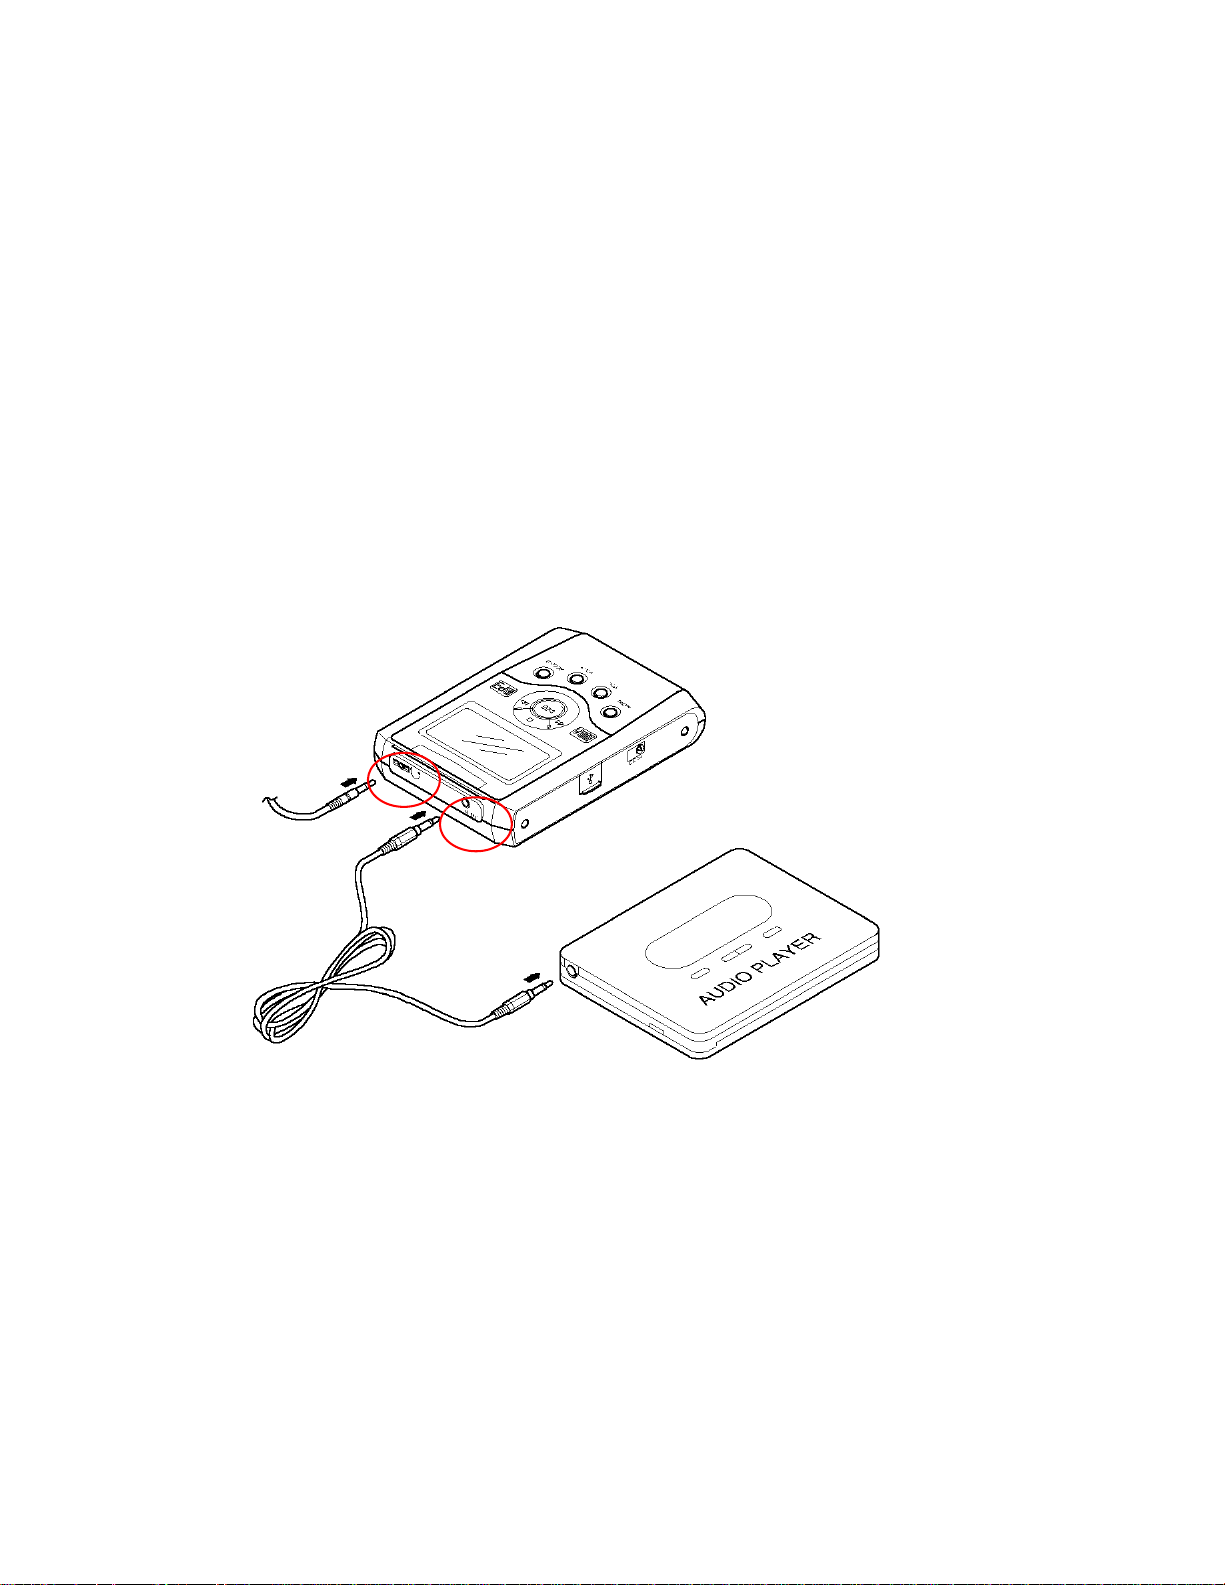
Connecting Earphones/Line-in Cable
You must use earphones to listen to music or voice recordings. There are no external speakers. You can
use the line-in cable to connect an external audio source to the line-jack of the RipDrive for MP3
encoding.
The following illustration illustrates the earphones and line-in connections:
Earphones Connection
1. Plug the earphones into the headphone jack on the top right side of the RipDrive.
Earphone Connection
Make sure the earphones are completely inserted in the jack.
2. Play a music file to check for a proper connection.
Line-in Connection
Line-in Connection
1. Plug one end of the line-in cable into the line out or earphone jack of an external audio device.
2. Plug the other end into the line-in jack on the top left side of the RipDrive.
11
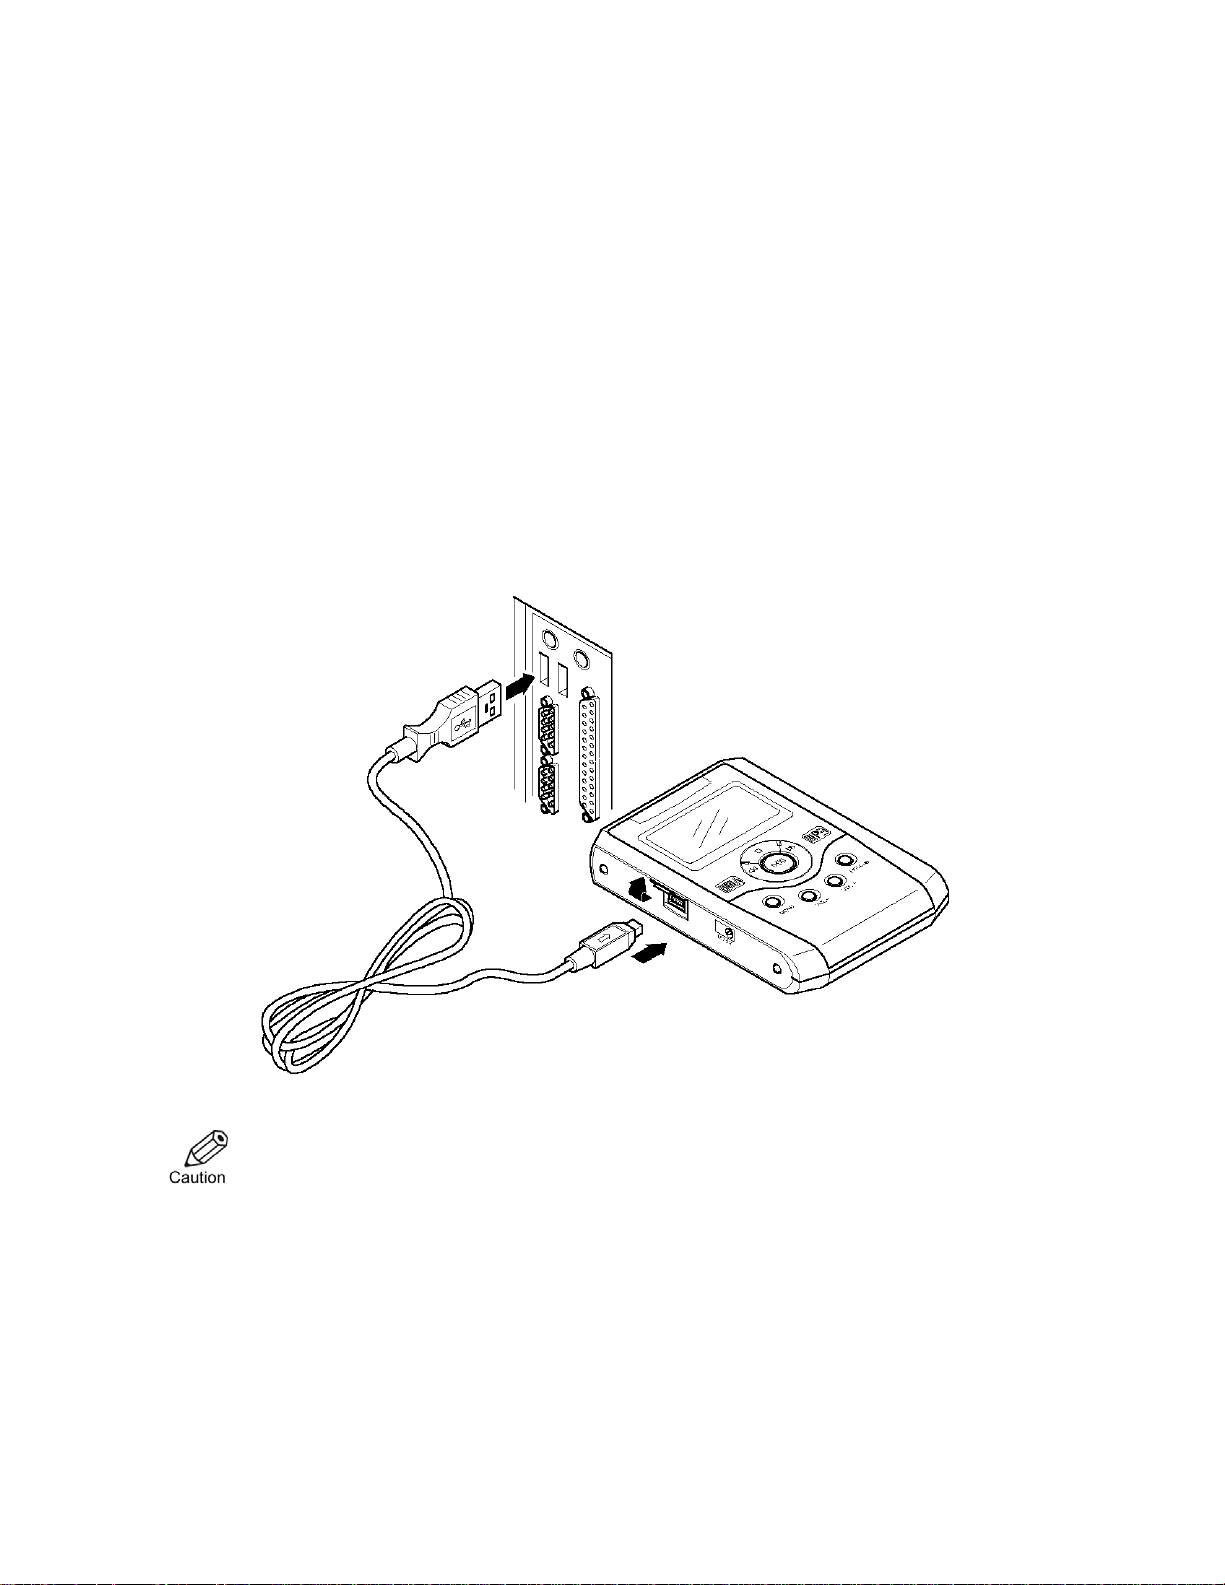
Connecting to Your PC
Use the included USB cable to connect the RipDrive to your PC as a mass storage device to easily use its
various features. You can upload or download files to and from your PC. The RipDrive is USB 1.0, 1.1, and
2.0 compliant and reaches a maximum speed of 480Mbps for data transfer (WARNING: You should not
upload MP3 or WMA files that infringe on copyright laws.)
1. Connect one end of the USB cable (as shown below) to the USB por t on the back of your PC.
2. Turn on the power of the RipDrive and connect the other end of the cable (as shown) to the
USB port of the RipDrive.
If you connect the USB cable during the playback of a file, an error may occur. Be sure to connect the USB
cable when the RipDrive is not playing. The RipDrive turns off automatically when you disconn ect the USB
cable.
Note:
Please refer to “Removing the Device” (page 18) when removing the USB cable.
12

Installing the USB Driver
If you are running Windows ME, 2000, or XP on your PC, th e installation will be performed automatically
when you connect the RipDrive to your PC. However, on a PC running Windows 98, you
manually install the required USB driver.
WILL need to
Automatic Installation
1. Connect one end of the USB cable to your PC.
2. Turn on the power on the RipDrive.
3. Connect the other end of the cable to the USB port of the RipDrive.
4. Your PC will automatically recognize the RipDrive and the required USB driver is installed
automatically.
Note:
If the installation does not start automatically, restart your PC and repeat the procedure above.
Manual Installation
If your PC is running Windows 98, you will need to manually install a USB driver. Insert the supplied CDROM into the CD-ROM drive of your PC.
1. Connect the RipDrive to your PC and power it on. The “Add New Hardware Wizard”
dialog box will appear.
2. Follow the on-screen instructions pictured below and on the next few pages. "Specify
A Location" and browse, scrolling down to the HD-500_driver_v_5.16 file on the CDROM.
3. Click on the driver name to highlight it. Click “Next.” The location and HD-500 driver
you’ve selected will appear in the next dialog box.
4. Click “Next,” which will install the driver.
5. When completed, click “Finish.”
13
 Loading...