

MAKE IT POSSIBLE
Quick Guide
™
AlienBees Adapter
with
Please read this Quick Guide thoroughly before operating. Also, review
the product manuals for your camera, ash systems, and PocketWizard
radios.
This PocketWizard radio runs on powerful software called
®
- Control The Light. It can be congured for your specic
ControlTL
needs using the PocketWizard Utility which can be downloaded at:
www.PocketWizard.com/support/downloads
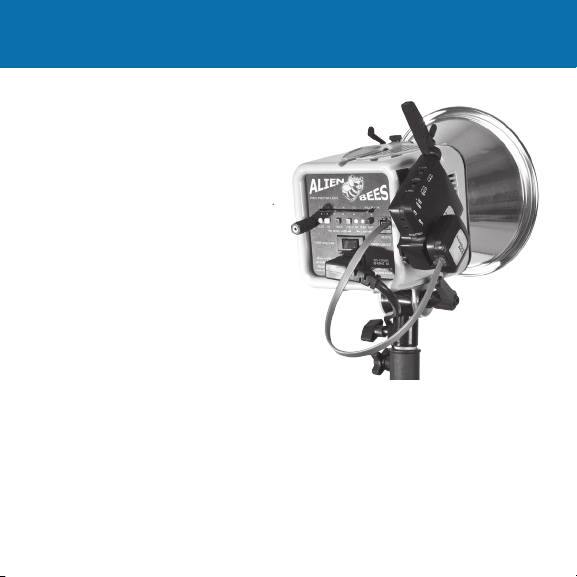
The AC9 AlienBees Adapter requires a FlexTT5 used as a receiver,
a transmitting PocketWizard radio, and a compatible Paul C. Buff ash
with a REMOTE terminal:
• AlienB ees B400, B 800, B1600, or ABR8 00
• White Lightning X-series, U ltraZ AP, or Ultra flas hes i nclud ing:
X800, X1600, X2400 , X3200 , UZ800, UZ16 00, Ult ra600, Ultr a1200, Ultr a1800
• Zeus P ower Pack s Z1250 and Z2500
The AC9 requ ires no b atter ies. It is power ed from the FlexTT5.
®
for for Canon
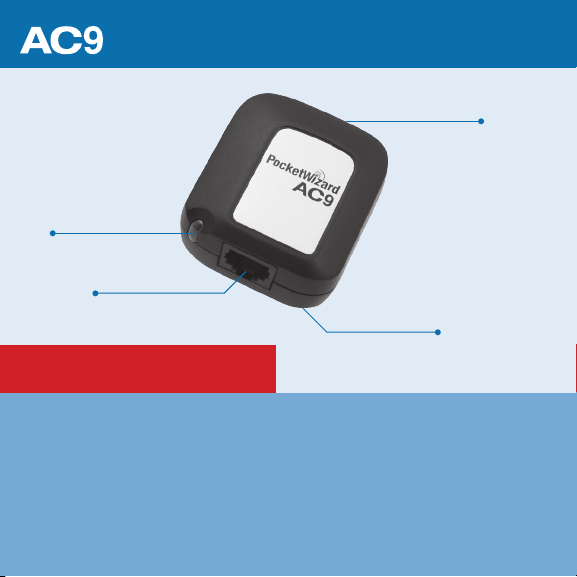
AlienBees Adapter
Relea se Bu tton
Statu s LED
REMOT E Por t
Canon Hot Shoe
READ ME FIRST:
UPDATE FIRMWARE: Update all of your ControlTL radios to the latest rmware with the
PocketWizard Utility before using.
All equipment should be turned OFF when making connections; unwanted triggering or other
erratic behavior may occur.
The rst exposure after making initial connections or powering on may not be properly exposed and
ash power levels may not be set as expected. Always test at least twice.
All information in this Quick Guide is subject to change. Visit www.PocketWizard.com/support
to nd the latest ash and features compatibility, Quick Guides, and Owner’s Manuals.
To use your AC9:
1. Prepare your ash: Turn on the modeling light and
set it to Cycle or Ready mode as desired. Disable the
optical slave by inserting a plug or adapter into the
sync port.
2. Slide the AC9 onto your remote FlexTT5 and
connect the REMOTE cable from the AC9 to the ash.
3. On the FlexTT5, set Zone A, B, or C with the Zone
Switch. Default = A
4. Turn on the ash, then the remote FlexTT5 radio.
5. Set up your PocketWizard transmitter and take
pictures normally.
Make sure all your radios are set to the same
PocketWizard channel. See the Quick Guide or
Owner’s Manual for your FlexTT5 radio for more
information on channels
The green Status LED blinks occasionally to indicate normal operation.
NOTE: The AC9 overrides ash output settings you make directly on your ash. If you wish to control the ash from
its control panel, then you need to disconnect the REMOTE cord and connect a regular sync cord from the P2 port on
your FlexTT5 to your ash.
If you have a ControlTL transmitter like the MiniTT1 or
FlexTT5 then you can control your ash’s output level
remotely. Add the AC3 ZoneController for even more
control.
Read the PowerTracking section for more information on
using the AC9 when no AC3 is present, or when using an
AC3 in Auto Mode.
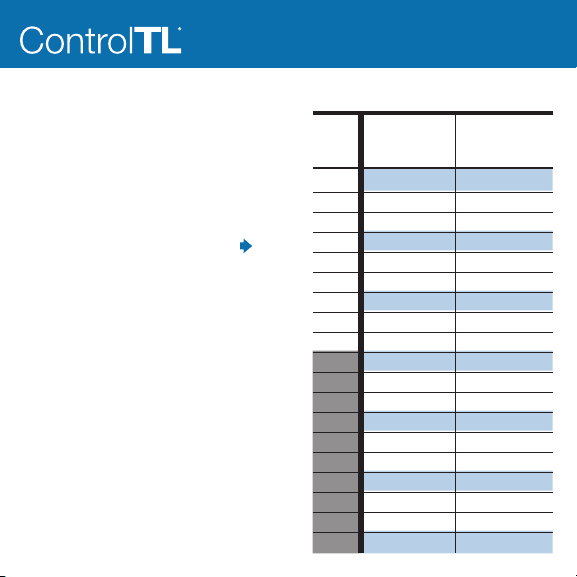
In AC3 Manual Mode, the AC3 Power Dial sets the ash
power output as shown in the table on the right.
The numbers in the table are within +/- 0.1 stops.
You can use any PocketWizard ControlTL receiving radios
together in the same exposure, including ControlTL radios.
Remember that studio and manual ash output will not
be calculated as part of an E-TTL / i-TTL exposure.
AlienBees, White L ightning, Zeus
Manual Power Settings
AC3
Power
Dial =
Most Models
3
2.7
2.3
2
1.7
1.3
1
0.7
0.3
0
0.3
0.7
1
1.3
1.7
2
2.3
2.7
3
1/1
1/2 + 0.7
1/2 + 0.3
1/2
1/4 + 0.7
1/4 + 0.3
1/4
1/8 + 0.7
1/8 + 0.3
1/8
1/16 + 0.7
1/16 + 0.3
1/16
1/32 + 0.7
1/32 + 0.3
1/32
1/32
1/32
1/32
White Lightning
X1600, X2400
& X3200 only:
Low Range Mode
1/4
1/8 + 0.7
1/8 + 0.3
1/8
1/16 + 0.7
1/16 + 0.3
1/16
1/32 + 0.7
1/32 + 0.3
1/32
1/64 + 0.7
1/64 + 0.3
1/64
1/128 + 0.7
1/128 + 0.3
1/128
1/128
1/128
1/128

PowerTracking
PowerTracking allows you to adjust your remote studio ash’s output power via the
camera’s FEC, ISO and aperture controls.
PowerTracking happens automatically when you have a MiniTT1 or FlexTT5 on a Canon or
Nikon camera and you are controlling a compatible studio ash connected to a remote
FlexTT5 with an AC9 AlienBees Adapter.
Center Point: The center point for PowerTracking is 3 stops down from your ash’s
maximum output power. All PowerTracking adjustments are based on this center point.
Your ash’s maximum output power is 1/1, so the center point is 1/8.
PowerTracking with your camera’s controls: If there is no AC3 ZoneController on your transmitter, ash output
power on your remote studio ash will track up and down with FEC changes on your camera. Zero (0) on your
camera’s FEC control is the center point and equals 3 stops down from your ash’s maximum output setting.
Adjust FEC to raise or lower your ash power per the table on the previous page. See Camera FEC Range section
for more information.
Nikon: With no AC3 ZoneController on the transmitter, only the camera’s FEC control will
adjust ash power output level.
Canon: With no AC3 ZoneController on the transmitter, the camera’s ISO and FEC controls will
adjust ash power output level. The ISO in use for your rst picture will be used as the center point
for PowerTracking.
In the PocketWizard Utility for your transmitting ControlTL radio, this is called Full Manual and is the default operation
for PowerTracking when no AC3 ZoneController is in use. See below for settings in the PocketWizard Utility that allow
you to customize PowerTracking to also use your camera’s aperture controls for Canon and Nikon, or ISO controls
for Nikon.

PowerTracking
PowerTracking with an AC3 ZoneController: When using an AC3 in A (Auto Mode), ash output power on your
remote ash will automatically track up and down with aperture, ISO, or FEC changes on your camera as well as the
Power Dial on the AC3. For example: If you narrow your aperture by 1 stop, ash power will increase by 1 stop to
keep the exposure the same.
Zero (0) on the AC3 Power Dial is centered on the aperture and ISO used for your rst picture. For example, if your
rst picture is at ISO 200 and F:8, then those values will be used as the center point for PowerTracking which is 3
stops down from your ash’s maximum output power.
Follow these steps to set the aperture and ISO values that will be used as the center point:
1. Turn on your camera and MiniTT1 or FlexTT5, but wait to press your shutter button or take any pictures.
2. Set the aperture and ISO you wish to use at the center point. Set the shutter speed as desired, however
changes to shutter speed will not affect PowerTracking.
3. Press the shutter button to take a picture. The center point is now set.
4. Adjust your camera’s ISO, aperture, or FEC to control ash output from the camera automatically
via PowerTracking.
To change the values used for the center point, turn off your transmitter then turn it back on and follow these
steps again.
Set the AC3 zone to Manual Mode to turn off PowerTracking.
Center on ISO & Aperture with First Shot is the default operation. For more information, see the PocketWizard Utility
section on adjusting this setting via the PowerTracking Tab for your transmitter.
IMPORTANT NOTE: Shooting in Shutter Priority/Tv, Program, Full Auto, or shooting quickly or making rapid exposure
changes is not recommended. The ash values may change rapidly and your remote ash may not be able to keep
up. Honor your ash’s ready wait time or “dump” as necessary.

FEC NOTE: Flash Exposure Compensation (FEC) can be set in many places and all values are added together.
FEC can be set:
• On the Power Dials of the AC3 ZoneController
• On the camera for all zones except AC3 Manual zones
• For transmitting radios, the PocketWizard Utility can adjust the PowerTracking center point for ISO and
aperture which affects all zones
• For a receiving FlexTT5 with an AC9, the PocketWizard Utility can adjust FEC for the directly connected ash
on the PowerTracking tab
If the combined FEC settings are more or less than your ash’s capabilities, then the ash will operate at maximum
or minimum output accordingly.
CAMERA FEC RANGE: The center point for PowerTracking is 3 stops down from your ash’s maximum, so normally
+3 on your camera’s FEC would equal ash maximum power. If your camera has a maximum FEC of +2 stops,
and you want that setting to equal your ash’s maximum output, set Flash Exposure Compensation on your remote
FlexTT5 receiver with AC9 attached to +1.0. When you have made this setting, Zero (0) on your camera’s FEC will
now be 2 stops down from ash max instead of 3. If your camera’s highest FEC is +1, set this control to +2.0. You
can use this control to align your camera’s lowest FEC setting with your ash’s minimum power similarly.
See the AC9 Flash Exposure Compensation in the FlexTT5 Receiver settings section below for more information.

PocketWizard Utility
Some settings require the PocketWizard Utility software and your ControlTL
radio connected to a computer via the Mini-USB port. Download the Utility at
www.PocketWizard.com/support
FlexTT5 Receiver settings:
PowerTracking Tab
AC9 Flash Exposure Compensation (FEC): Use this control to adjust the FEC of the ash directly connected
to the AC9 in this receiving radio’s hot shoe. This setting is cumulative with other FEC values set in the system.
See the FEC NOTE for more information. FEC can be adjusted in +/- 3 stops. Default = 0.0
This setting can be used as a simple FEC control for an individual ash, or it can be used to set ashes on the same
zone to different power outputs or to balance them. For example, you could set it to -1.0 to make an AlienBees B800
match the power of a B400.
This control can also be used to adjust where the PowerTracking center point aligns with your camera’s FEC control.
See the CAMERA FEC RANGE section for more information
Flash Tab
Flash Idle Time Out Mode/Delay: The modeling light will turn off after the set time if no triggers are received.
Uncheck the box to have the modeling light stay on. Default = Enabled at 600 seconds (10 minutes)
The remaining settings on the Flash Tab do not apply to the AC9

FlexTT5 or MiniTT1 Transmitter settings that affect the use of an AC9:
Modeling Tab
Modeling Light Control: Check this box to control modeling light behavior from the transmitter. Default = Enabled
Control Mode: Determines when the modeling light will go to its active setting. Set to Camera Wake to have the
modeling light go active when the camera’s shutter release is half-pressed. Set to AF-Assist to have the
modeling light go active only when the camera requests auto-focus assist. Default = Camera Wake
Modeling Light Autotrack: Enable this control for the modeling light level to track with the camera exposure
or AC3 Power Dial settings. Default = Enabled
Modeling Light Active XX%: Sets the active output level of the modeling light if Autotrack is not used.
Default = 100%
Modeling Light Sleep: Check this box to have the modeling light automatically go to a set output level after
a set time. If this box is unchecked, the modeling light will never sleep. Default = Enabled
Modeling Light Sleep XX%: Sets the output level of the modeling light when it sleeps. Default = 10%
Modeling Light Delay After Camera Sleeps: Sets the number of seconds after the camera sleeps (meters go
inactive) when the modeling light will go to its sleep value. Default = 30 seconds

PowerTracking Tab
Speedlite Control: Adjusts how Canon Speedlites will respond to the AC3 or ControlTL Transmitter with no AC3.
It does not affect the AC9. Default = Normal E-TTL
PowerTracking Control: Adjusts how ControlTL-capable remote studio ashes, like ashes connected to an AC9,
respond to the AC3 in Auto Mode, or to a ControlTL Transmitter with no AC3. See the PowerTracking section for
information.
Full Manual (default): Turns off PowerTracking for aperture and ISO.
With an AC3 ZoneController on the transmitter, any zones set to Auto Mode will operate as Center on ISO &
Aperture with First Shot (see below) when this control is set to Full Manual. AC3 Manual Mode can be used to
adjust ash output power manually with an AC3.
Nikon: With no AC3 ZoneController on the transmitter, only the camera’s FEC control will
adjust ash power output level.
Canon: With no AC3 ZoneController on the transmitter, the camera’s ISO and FEC controls will
adjust ash power output level.
Center on ISO & Aperture with First Shot: The aperture and ISO as set on the camera for the rst exposure
after powering on the MiniTT1 or FlexTT5 will be used as the center values for PowerTracking. For example if
your camera is set to ISO 100 and F:5.6 for its rst exposure, then those exposure settings will equal 3 stops
down from your ash’s maximum output power. Adjustments to aperture, ISO, and FEC will adjust ash output
power accordingly, as will adjusting the Power Dial on AC3 zone in Auto Mode. See the PowerTracking section
for more information.
Center on ISO & Aperture: Lets you control the exposure settings where the center for PowerTracking will
begin. Adjust the drop-down boxes for the Aperture Center-On and and ISO Center-On values you want to use
as the center point (3 stops down from your ash’s maximum) for PowerTracking.
Center on Aperture Only: PowerTracking will only work with aperture changes. Set the desired aperture using
the Aperture Center-On control. ISO changes will be ignored for PowerTracking.

Center on ISO Only: PowerTracking will only work with ISO changes. Set the desired ISO using the
ISO Center-On control. Aperture changes will be ignored for PowerTracking.
No Change (trigger only): Turns off PowerTracking and the Power Dials on the AC3 will not adjust the
power output of your remote ash. Use this setting if another AC3 is controlling the ash’s manual power
output, like when sharing ashes with another photographer and you want to use the exact same manual
ash output power.
AC9 Flash Exposure Compensation: This control is only for receiving FlexTT5 radios with an AC9 AlienBees
Adapter in the hot shoe. Adjusting this setting on a transmitting FlexTT5 will have no affect on your ashes.
See the FlexTT5 Receiver section above for more information.
For other PocketWizard Utility settings, refer to the Owner’s Manuals for the MiniTT1, FlexTT5, AC3 ZoneController,
AC9 AlienBees Adapter, or other ControlTL radios or accessories.
Temperature
Operating Temperature: Above -15° C (5° F) and below 50° C (120° F)
Storage Temperature: Above -30° C (-22° F) and below 85° C (185° F)

Warranty:
This PocketWizard product is covered under a one-year limited manufacturer’s warranty. For warranty details, and to
register your product, please go to www.PocketWizard.com/support or contact your local PocketWizard Distributor.
Distributor contact information can also be found at www.PocketWizard.com. To receive a copy of the one-year limited
manufacturer’s warranty on this PocketWizard product, e-mail us at warranty@lpadesign.com or write to us at
LPA Design, Inc., 21 Gregory Drive, Suite 140, South Burlington, VT 05403, United States of America, Attn: Warranty.
© 2010 LPA Design, Inc. All rights reserved. Product features and specications are subject to change without notice. PocketWizard, ControlTL, MiniTT1, FlexTT5,
PowerST4, AC3, AC9, HyperSync, Plus II and MultiMAX are either trademarks or registered trademarks of LPA Design, Inc. All other trademarks contained herein are
the property of their respective owners.
For more information on this product, including detailed features, specications, etc., go to www.PocketWizard.com.
LPF673 v1.0
MAKE IT POSSIBLE
™
 Loading...