

Page 1

Stereo Power Amplifier
Page 2

2
Page 3

CONGRATULATIONS
CONGRATULATIONS on your decision to become the proud owner of this
CONGRATULATIONSCONGRATULATIONS
Plinius P8 Power Amplifier.
This manual has been prepared to help you understand the operation of your amplifier, and to provide
information about its design and the variety of ways it may be used.
We have designed and manufactured this amplifier to reproduce your favourite music faithfully and
accurately. With a little care and a full understanding of the operating recommendations in this manual,
your Plinius P8 Power Amplifier will provide years of high-quality, trouble-free performance.
Serial Number: ..................................................................................
Date of Manufacture: ..................................................................................
Final Test Certified By: ..................................................................................
IMPORTANT
IMPORTANT:::: PLEASE TAKE THE TIME TO REA
IMPORTANTIMPORTANT
PLEASE TAKE THE TIME TO READ THIS MANUAL
PLEASE TAKE THE TIME TO REAPLEASE TAKE THE TIME TO REA
THOROU
THOROUGHLY BEFORE USING YOUR AM
THOROUTHOROU
GHLY BEFORE USING YOUR AMPLIFIER.
GHLY BEFORE USING YOUR AMGHLY BEFORE USING YOUR AM
D THIS MANUAL
D THIS MANUALD THIS MANUAL
PLIFIER.
PLIFIER.PLIFIER.
3
Page 4

Introduction ...................................................................................................................................Page 3
Precautions ...................................................................................................................................Page 5
Amplifier Features – Front Panel ..................................................................................................Page 6
Amplifier Features – Rear Panel ...................................................................................................Page 7
Installation and Operation ..............................................................................................................Page 9
Input/Output Connection ..............................................................................................................Page 10
P8 Features .................................................................................................................................Page 12
Loudspeaker Selection ................................................................................................................Page 13
Specifications .............................................................................................................................Page 14
Index ...........................................................................................................................................Page 15
Contact Details ............................................................................................................................Page 16
4
Page 5

Please take special note of the following precautions before operating your new amplifier:
• The Plinius P8 Power Amplifier can deliver in excess of 175 watts into 8 ohms. This amplifier is
also capable of a very large peak current delivery.
• The Plinius P8 Power Amplifier operates in Class AB. It is capable of generating heat that could
have an adverse effect on other electronic equipment, furniture, etc. DO NOT leave flammable
material on the amplifier whilst running, as this could pose a serious fire risk.
• This amplifier operates at hazardous voltage levels. We recommend that any work requiring
removal of the lid be referred to a suitably qualified and experienced service technician.
• DO NOT attempt to connect any input of this amplifier to its own outputs.
• DO NOT earth any output terminal or connect any of these terminals together without following the
instructions in this manual or seeking qualified assistance.
• DO NOT place this amplifier in any position where liquids, or any foreign material may accidentally
enter it.
• DO NOT connect any voltage source, short circuit, earth/ground or appliance (other than suitable
high fidelity loudspeakers) to the amplifier output terminals.
5
Page 6
FFFF
RONT
RONT
PPPP
ANEL
ANEL
LLLL
AYOUT
RONT RONT
DISPLAY LED
DISPLAY LED
DISPLAY LEDDISPLAY LED
An LED on the front panel indicates that the power is on. When first switched on, the display LED will
pulse for ten seconds - this is an initialisation sequence, after which the LED remains lit during the time
the amplifier is powered on. Whenever remote trigger is activated the LED will dim.
ANEL ANEL
AYOUT
AYOUT AYOUT
SSSS
HOWING
HOWING
HOWING HOWING
DDDD
ISPLAY
ISPLAY
ISPLAY ISPLAY
LED
LED
LEDLED
6
Page 7
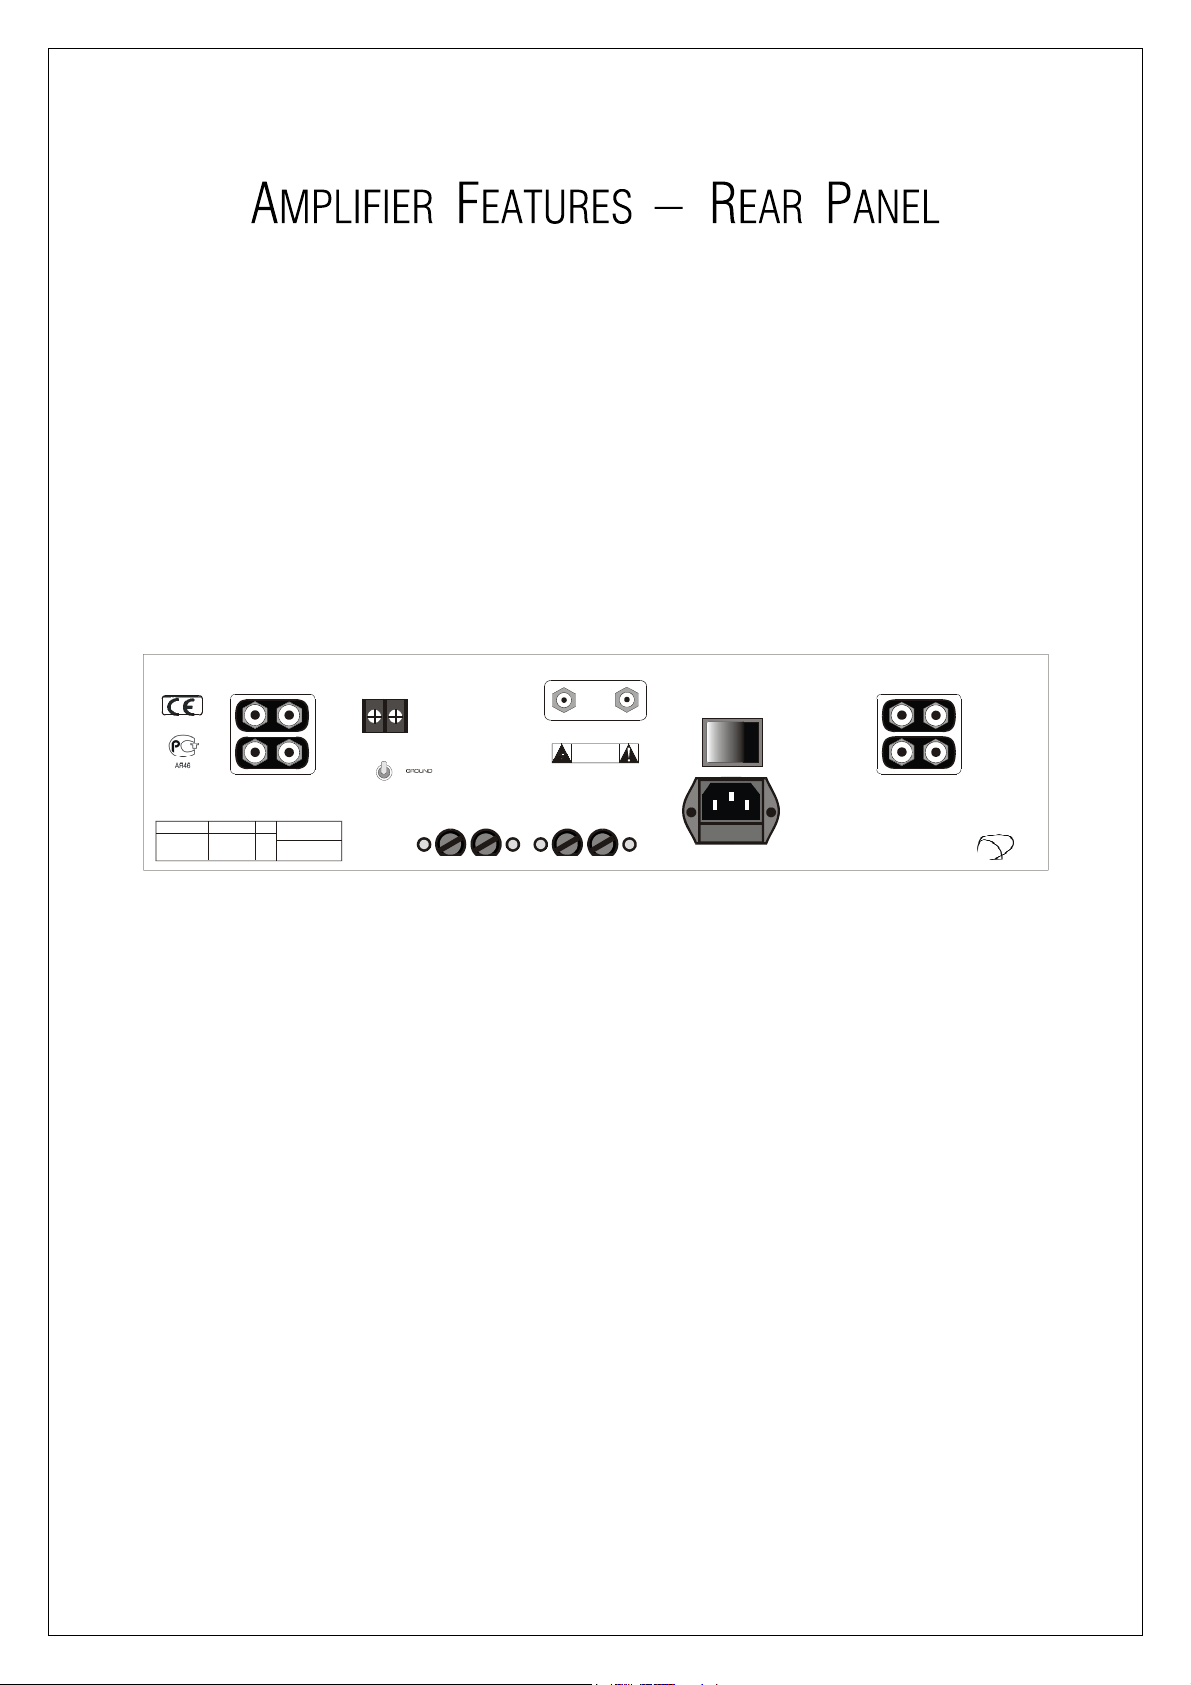
This panel incorporates the terminals for connecting the input signal from the preamplifier, outputs to the
loudspeakers, and mains supply.
Please remember that your Plinius P8 Power Amplifier is a high quality electronic instrument capable of
an exceptional level of performance. Be sure that you understand your system’s requirements fully before
you make any connection to this amplifier.
RIGHT CHANNEL LEFT CHANNEL
PLINIUS P8
STEREO POWER AMPLIFIER
VOLTAGE Hz
SERIAL No.
MAINS SWITC
MAINS SWITCHHHH
MAINS SWITCMAINS SWITC
CONSUMPTION
50/
600V/A
60
Rear Panel Showing In
Rear Panel Showing Input And Output Terminals
Rear Panel Showing InRear Panel Showing In
REMOTE
TRIGGER
TERMINALS
+12V GND
CHASSIS
LIFT
OPEN
POWER
Ground Li
Ground Lift Switch, Mains Switch
Ground LiGround Li
RIGHT CHANNEL FUSES LEFT CHANNEL FUSES
put And Output Terminals, Remote Trigger,
put And Output Terminalsput And Output Terminals
ft Switch, Mains Switch And Mains Soc
ft Switch, Mains Switch ft Switch, Mains Switch
INPUTS
CAUTION
RISK OF ELECTRICAL SHOCK
DO NOT OPEN
CAUTION:
TO REDUCE RISK OF
ELECTRICAL S HOCK D O NOT REMOVE
COVER. NO USER SERVICEABLE
PARTS INSIDE. REFER SERVICING TO
QUALIFIED SERVICING PE RSONNEL.
ON / OFF
DESIGNED AND MANUFACTURED IN
NEW ZEALAND BY
AUDIBLE TE CHNOLOGIE S LTD
MAINS FUSE
REPLACE ONLY
WITH F10AL
, Remote Trigger,
, Remote Trigger,, Remote Trigger,
And Mains Socket.
And Mains SocAnd Mains Soc
P.O. BO X 1836
PALME RSTO N NOR TH
ket.
ket.ket.
The heavy-duty rocker switch in the centre of the panel turns the Mains/Line Power to the amplifier ON or
OFF. The amplifier draws a moderately high current when switched on, so it is not good practice to
rapidly turn the Mains switch on and off repeatedly.
INPUT TERMINAL
INPUT TERMINALSSSS
INPUT TERMINAL INPUT TERMINAL
The input terminals for your Plinius P8 Power Amplifier are easily accessible at the top centre of the rear
panel. These standard RCA terminals are for use with unbalanced signals (single ended RCA) from a line
level output preamplifier. Consult your PLINIUS
PLINIUS dealer for further advice if required.
PLINIUSPLINIUS
7
Page 8

OUTPUT TERMIN
OUTPUT TERMINALS
OUTPUT TERMINOUTPUT TERMIN
Connections for the loudspeakers are provided on the left and right sides of the rear panel. Two parallel
pairs of five way binding posts for each channel are fitted – these provide ease of use with bi-wiring and
multiple cables requiring a large contact area.
GROUND LIF
GROUND LIFT SWITCH
GROUND LIFGROUND LIF
This switch is located below the remote trigger terminals, and allows the signal ground to be
disconnected from the chassis. In some installations a hum loop may exist due to duplicate ground paths
from different equipment. Use this switch to remove the connection from 0V to ground thus allowing
some flexibility in your particular set-up.
REMOTE TRI
REMOTE TRIGGER TERMINALS
REMOTE TRIREMOTE TRI
In order to integrate more effectively into a home theatre system, the Plinius P8 has remote trigger
terminals fitted to the rear panel. By connecting a processor with a 5-12V remote trigger signal to these
terminals, the P8 can be put in and out of standby/mute by the processor to which it is connected. When
in standby/mute the amplifier draws less current and will operate at minimum temperature. The output
relays are also open, disconnecting the loudspeakers. This may be of advantage in a multi-amplifier
and/or remote installations. The standby/mute mode can only be activated via the remote trigger
terminals.
ALS
ALSALS
T SWITCH
T SWITCHT SWITCH
GGER TERMINALS
GGER TERMINALSGGER TERMINALS
MAINS P
MAINS POWER CORD IEC SOCKET
MAINS PMAINS P
This connector is where the mains supply cable from your wall connects to the amplifier. You will notice
that a fuse holder is mounted within this connection, and it holds a mains fuse to provide surge and
overload protection for your amplifier.
RRRRAIL FUSES
AIL FUSES
AIL FUSESAIL FUSES
These tubular fuse holders house the positive and negative rail protection fuses. Depress and turn anticlockwise to open. An LED is fitted next to each fuse holder to indicate a blown fuse.
OWER CORD IEC SOCKET
OWER CORD IEC SOCKETOWER CORD IEC SOCKET
8
Page 9

PLACEMEN
PLACEMENT AND VENTILATION
PLACEMENPLACEMEN
Your Plinius P8 may operate at a moderately high temperature, especially when being driven hard. The
ideal location is upon a rigid stand, or floor mounted away from direct contact with any temperature
sensitive materials or deep pile carpets. Ventilation through and around the amplifier should also be kept
unimpeded, so ensure that the heat vents (slots in the lid and base) are not covered or restricted in any
way.
The Plinius P8 design incorporates a very high level of mechanical de-coupling of the input and output. It
can however still be influenced by acoustical feedback in the operating environment. The use of acoustic
cones, or a suitably spiked amplifier stand or table, may further enhance the performance of this amplifier.
Consult your PLINIUS
MAINS VOLTA
MAINS VOLTAGE CONNECTION
MAINS VOLTAMAINS VOLTA
Firstly, check that the mains supply voltage printed on the rear of this amplifier is similar to the mains
supply voltage in your area. If in doubt, please consult your PLINIUS
T AND VENTILATION
T AND VENTILATIONT AND VENTILATION
PLINIUS dealer for further advice if required.
PLINIUSPLINIUS
GE CONNECTION
GE CONNECTIONGE CONNECTION
PLINIUS dealer.
PLINIUSPLINIUS
Mains supply power connection is via the supplied plug-in lead. A standard IEC socket connects the
mains power at the amplifier end, while a local mains plug is required at the wall end.
The wiring code used inside all Plinius product is:
Green to Earth/Ground
Green to Earth/Ground
Green to Earth/GroundGreen to Earth/Ground
Blue to Neutral
Blue to Neutral
Blue to NeutralBlue to Neutral
Brown to Phase/Live
Brown to Phase/Live
Brown to Phase/LiveBrown to Phase/Live
Should a ‘local’ plug need fitting to the wall end of the lead, ensure that a suitably qualified service
technician wires the plug correctly.
IMPORTANT
IMPORTANT:
IMPORTANTIMPORTANT
: DO NOT POWER UP YOUR AMPLIFIER UNTIL YOU
: :
DO NOT POWER UP YOUR AMPLIFIER UNTIL YOU HAVE CONNECTED
DO NOT POWER UP YOUR AMPLIFIER UNTIL YOU DO NOT POWER UP YOUR AMPLIFIER UNTIL YOU
YOUR INPUT/OUTPUT
YOUR INPUT/OUTPUTS CORRECTLY FOR YOUR SYSTEM, (AS
YOUR INPUT/OUTPUTYOUR INPUT/OUTPUT
EXPLAI
EXPLAINED IN THE NEXT SECTION).
EXPLAIEXPLAI
NED IN THE NEXT SECTION).
NED IN THE NEXT SECTION).NED IN THE NEXT SECTION).
S CORRECTLY FOR YOUR SYSTEM, (AS
S CORRECTLY FOR YOUR SYSTEM, (ASS CORRECTLY FOR YOUR SYSTEM, (AS
HAVE CONNECTED
HAVE CONNECTEDHAVE CONNECTED
9
Page 10

It is important that you connect your loudspeakers (outputs) and preamplifier (inputs) to the Plinius P8
Power Amplifier correctly to ensure the amplifier is not damaged, and sounds its best with your system.
Now that you have read and familiarised yourself with the connections on the back of the amplifier, as
covered in the previous section, we will describe in detail how to connect the amplifier to your system.
Connect your preamplifier to the RCA inputs on the back of the Plinius P8. Make sure you connect the red
coded cable to the red RIGHT RCA input, and the black (or white) cable to the black LEFT RCA input. Also
make sure the RCA connectors are a snug fit and are inserted all the way in.
Next, connect your loudspeaker wires to the output posts. Connect your right loudspeaker (i.e. the one on
the right of you when seated in your normal listening position) to the right output terminals, ensuring that
the red positive (+) terminal is connected to the red terminal on your loudspeaker. Do the same with the
black or negative (-) terminals.
TERMINATION
TERMINATION QUALITY
TERMINATION TERMINATION
Quality of the connections must be examined to ensure that high-performance, trouble-free operation is
enjoyed. Check that the connections are tight but do not over tighten. If bare wires are used make sure
that no loose strands of wire short across the other terminals or the amplifier chassis. When using plugs
such as bananas, be sure to use good quality plugs with a firm fit.
QUALITY
QUALITYQUALITY
BI-WIRIN
BI-WIRINGGGG
BI-WIRINBI-WIRIN
Bi-wiring uses two pairs of loudspeaker cables for each channel loudspeaker. You will notice that the rear
panel of your Plinius P8 has two pairs of output terminals for this purpose. When using bi-wires, always
connect positive (+) to positive (+) and the same for the negative (-) terminals.
PHASING (OR POLARI
PHASING (OR POLARITY)
PHASING (OR POLARIPHASING (OR POLARI
It is important to achieve good stereo imaging in your listening room. By observing the wiring
instructions above, each power amplifier/loudspeaker combination should be in phase. If you experience
poor stereo image and/or a lack of bass, check that the loudspeaker wiring has been connected correctly.
We recommend that you use one of the easily obtainable ‘test discs’ to help you ensure both phasing and
channel orientation are correct. If in doubt, consult your PLINIUS
TY)
TY)TY)
PLINIUS dealer for advice.
PLINIUSPLINIUS
10
Page 11

Naturally it is also important to make sure all the leads carrying signals for the RIGHT channel loudspeaker
are connected to the RIGHT input to the amplifier from your preamplifier or CD player etc. Signals for the
LEFT channel should be wired in a similar fashion.
CONNECTING THE
CONNECTING THE MAINS SUPPLY
CONNECTING THE CONNECTING THE
Now that your Plinius P8 Power Amplifier is configured correctly, the mains cable can be plugged into the
IEC socket on the back of the amplifier. Turn on the power switch on the rear panel. The power LED will
pulse for ten seconds as the internal microprocessor allows the internal circuitry to stabilise. You can
now enjoy your new Plinius P8 Power Amplifier.
WA
WARM-UP PERIOD
RM-UP PERIOD
WAWA
RM-UP PERIODRM-UP PERIOD
You will find that the Plinius P8 will become noticeably ‘purer’ in sound after being on for a period of
time. We usually recommend waiting at least 24 hours before expecting the best quality of sound
reproduction from your amplifier. Also, as the Plinius P8 uses very little power while on, we suggest
leaving the unit turned on so that it will always be at it’s sonic best.
MAINS SUPPLY
MAINS SUPPLYMAINS SUPPLY
11
Page 12

FUSE PRO
FUSE PROTECTION
FUSE PROFUSE PRO
When any rail fuse is damaged one or more fuse warning LED’s will light. These LED’s are located next to
the fuse that has blown. To replace the fuse, steady the amplifier, then firmly push in the round fuse cap
with your fingers. When the cap cannot push in any further, rotate the cap anticlockwise (to the left) until
it comes to a stop. Release inward pressure on the fuse cap and it can now be removed from the
amplifier. If any of the rail fuses need to be replaced, do so only with 7.5 amp normal blow fuses.
To re-fit the fuse, insert the fuse and gently turn it as far as possible anticlockwise (to the left). Now push
the fuse cap in firmly, then turn clockwise (to the right) until it comes to a stop. Release inward pressure
on the cap and the fuse will be fitted securely.
IMPORTANT
IMPORTANT:::: DO NOT
IMPORTANTIMPORTANT
Note that fuse failure may indicate a severe problem. Check all speakers and speaker cables for
damage/short circuit, etc. Should the amplifier continue to suffer rail fuse failure, contact your PLINIUS
dealer.
TECTION
TECTIONTECTION
DO NOT FIT A FUSE WITH A HIGHER RATING.
DO NOT DO NOT
FIT A FUSE WITH A HIGHER RATING.
FIT A FUSE WITH A HIGHER RATING.FIT A FUSE WITH A HIGHER RATING.
PLINIUS
PLINIUSPLINIUS
MAINS/LINE
MAINS/LINE FUSE
MAINS/LINE MAINS/LINE
A Mains/Line fuse is fitted within the IEC socket on the rear of the amplifier. A small drawer at the bottom
of this socket may be removed (after the IEC plug is removed) by levering it out with a flat blade
screwdriver. The fuse fitted should be rated at no greater than 10 amps normal blow.
IMPORTANT
IMPORTANT:
IMPORTANTIMPORTANT
In the unusual event that this fuse should blow, you must first establish the cause of this failure (such as
power surges, damaged mains cable, etc.) before replacing the fuse with one of the same rating and type.
Should the amplifier continue to suffer mains fuse failure, contact your PLINIUS
FUSE
FUSEFUSE
: DO NOT FIT A FUSE WITH A HIGHER RATING.
: :
DO NOT FIT A FUSE WITH A HIGHER RATING.
DO NOT FIT A FUSE WITH A HIGHER RATING.DO NOT FIT A FUSE WITH A HIGHER RATING.
PLINIUS dealer.
PLINIUSPLINIUS
12
Page 13

Your Plinius P8 Power Amplifier is designed for use with high fidelity loudspeakers. It should not be used
to operate any other type of appliance or equipment.
Choice of loudspeakers is one of personal taste, providing the chosen loudspeakers are suitable for use
with your amplifier. Be certain that your loudspeakers can handle most of the rated output power of this
amplifier. You may find loudspeaker specifications confusing or misleading, so you should discuss this
with your audio dealer prior to purchase. As a general rule, the use of high power (200 Watt RMS or
greater) loudspeakers is recommended and desirable. However, our experience indicates that medium to
low power loudspeakers (100 to 200 Watt RMS) are quite often suitable for use on this amplifier, provided
the volume is maintained at a level where no distortion is audible.
Impedance of the loudspeaker load is important to ensure the rated performance of this amplifier. Any
combination of loudspeakers may be used, but the total average impedance load for each channel should
be within a range of 4 to 8 ohms. Again, if you have doubts about the impedance of your loudspeaker
configuration, we recommend you speak to your PLINIUS
PLINIUS dealer.
PLINIUSPLINIUS
13
Page 14

222200-WATTS RMS PER
00-WATTS RMS PER CHANNEL INTO
00-WATTS RMS PER 00-WATTS RMS PER
BOTH CHANNELS DRI
BOTH CHANNELS DRIVEN FROM 20Hz TO 20kHz AT LE
BOTH CHANNELS DRIBOTH CHANNELS DRI
DISTORTION.
DISTORTION.
DISTORTION.DISTORTION.
S FFFFREQUENCY
REQUENCY R
REQUENCY REQUENCY
S DDDDISTORTION
ISTORTION: Typically <0.05% THD at rated power. 0.2% THD and IM worst case prior to clipping.
ISTORTIONISTORTION
S 4 O
4 OHM
HM P
HM HM
4 O4 O
S CCCCURRENT
URRENT O
URRENT URRENT
S SSSSLEWING
LEWING:
LEWINGLEWING
S HHHHUM
UM & N
UM UM
S IIIINPUT
NPUT S
NPUT NPUT
S GGGGAIN
AIN:
AINAIN
RESPONSE
RR
POWER
OWER:
OWEROWER
PP
OUTPUT
UTPUT:
UTPUTUTPUT
OO
: 50V/µs.
::
& NOISE
OISE:
OISEOISE
& N& N
SENSITIVITY
ENSITIVITY:
ENSITIVITYENSITIVITY
SS
: 27dB.
::
ESPONSE:
ESPONSEESPONSE
: 300 Watts per channel or greater.
::
: 90dB below rated output 20Hz to 20kHz unweighted.
::
CHANNEL INTO 8 OHMS.
CHANNEL INTO CHANNEL INTO
VEN FROM 20Hz TO 20kHz AT LESS THAN 0.2% TOTAL HARMONIC
VEN FROM 20Hz TO 20kHz AT LEVEN FROM 20Hz TO 20kHz AT LE
: 20Hz to 20kHz ±0.2dB. -3dB at 5Hz and -3dB at 70kHz.
::
: 40A short duration peak per channel. Fuse protected.
::
: 1.75V RMS for rated output at 1kHz.
::
8 OHMS.
8 OHMS.8 OHMS.
SS THAN 0.2% TOTAL HARMONIC
SS THAN 0.2% TOTAL HARMONICSS THAN 0.2% TOTAL HARMONIC
S IIIINPUT
NPUT I
NPUT NPUT
S HHHHEIGHT
EIGHT:
EIGHTEIGHT
IDTH
S WWWW
S DDDDEPTH
S WWWW
IDTH:
IDTHIDTH
EPTH:
EPTHEPTH
EIGHT
EIGHT:
EIGHTEIGHT
IMPEDANCE
MPEDANCE:
MPEDANCEMPEDANCE
II
: 120mm (4 3/4")
: :
: 450mm (17 3/4")
: :
: 385mm (15 1/4")
: :
: 14kg (30lbs)
: :
: 47kΩ.
: :
14
Page 15

Bi-wiring......................................................................................................................................Page 10
Date of Manufacture .......................................................................................................................Page 3
Front Panel Layout..........................................................................................................................Page 6
Fuse Protection ............................................................................................................................Page 12
IEC Power Connector............................................................................................................... Pages 8,11
Input Terminals .......................................................................................................................Pages 8,11
Loudspeaker Impedance...............................................................................................................Page 13
Loudspeaker Power ......................................................................................................................Page 13
Mains/Line Fuse...........................................................................................................................Page 12
Mains Supply Connection.............................................................................................................Page 11
Mains Switch .................................................................................................................................Page 7
Operating Temperature ..............................................................................................................Pages 5,9
Output Terminals.....................................................................................................................Pages 7,10
Phasing........................................................................................................................................Page 10
Placement.................................................................................................................................Pages 5,9
Rail Fuses ...............................................................................................................................Pages 8,12
Rear Panel Layout...........................................................................................................................Page 7
Remote Trigger ..............................................................................................................................Page 8
Safety Precautions..........................................................................................................................Page 5
Serial Number................................................................................................................................Page 3
Terminations ................................................................................................................................Page 10
Ventilation.................................................................................................................................Pages 5,9
Warm-Up Period ..........................................................................................................................Page 11
15
Page 16

All operational, technical and descriptive material published here is subject to change at any time without
notice. For further product information or queries, please contact us at the address below.
PLINIUS
PLINIUS products are designed and manufactured by:
PLINIUSPLINIUS
Audible Technologies Ltd.
Audible Technologies Ltd.
Audible Technologies Ltd.Audible Technologies Ltd.
P.O. Box 18
P.O. Box 1836
P.O. Box 18P.O. Box 18
Palmerston North
Palmerston North
Palmerston NorthPalmerston North
New Zealand
New Zealand
New ZealandNew Zealand
Phone:
Phone: 64 6 354 8583
Phone:Phone:
Facsimile:
Facsimile: 64 6 354 8586
Facsimile:Facsimile:
36
3636
Email:
Email: [email protected]
Email:Email:
Internet:
Internet: www.pliniusaudio.com
Internet:Internet:
©2003 Audible Technologies.
16
 Loading...