


Plinius SA-50 instruction manual. Page 1
CONGRATULATIONS on your decision to become the proud owner of the Plinius SA-50 power amplifier.
This manual has been prepared to help you understand the operation of your amplifier and to provide some information about its design and the variety of ways it may be used.
We have designed and manufactured this amplifier to faithfully and accurately reproduce music. This hand built instrument should give a lifetime of pleasure and with a little care and a full understanding of the operating recommendation in this manual the Plinius SA-50 should provide trouble free performance.
THE PLINIUS SA-50 STEREO POWER AMPLIFIER
PLEASE TAKE TIME TO READ THIS MANUAL THOROUGHLY BEFORE USING YOUR AMPLIFIER.
Plinius SA-50 instruction manual. Page 2
LIST OF CONTENTS |
|
Warnings and precautions. |
Page 3 |
Amplifier Facilities and Features. FRONT PANEL. |
4 |
Amplifier Facilities and Features. REAR PANEL |
6 |
Amplifier Configuration Selector (ACS) |
9 |
Installation and operation. |
12 |
Mains / Line power connection. |
13 |
Changing the Mains / Line voltage congfiguration |
14 |
Connections for stereo operation. |
15 |
Connections for Mono / Bridged operation. |
18 |
Loudspeakers. |
20 |
Why is Class A better. |
21 |
Specifications |
22 |
Index. |
23 |
Plinius SA-50 instruction manual. Page 3
WARNING
The SA-50 power amplifier can be operated in bridged mode and may deliver in excess of 200 Watts into 8 Ohms. This amplifier is also capable of a very large peak current delivery.
This SA-50 power amplifier operates in Class A and is therefore capable of generating a moderately high temperature which requires careful placing to avoid any effect this heat may have on other equipment, furniture and fittings etc.
DO NOT remove the top cover from this amplifier. Hazardous voltages are present. Any repair work should be referred to a suitable qualified and experienced service person.
DO NOT attempt to connect any input of this amplifier to any of its outputs.
DO NOT earth any output terminal or connect any of these terminals together without following the instructions in this manual or seeking qualified assistance.
DO NOT place this amplifier in any position where liquids or any foreign material may accidentally enter it.
DO NOT connect any voltage source, short circuit, earth / ground or appliance ( other than suitable HiFi quality loudspeakers ) to any output terminal.
Some preamplifiers, processors, CD players etc, produce large switching pulses when switched on, causing a loud click through the loudspeakers. For this reason, turn on all other equipment in your system and operate the
MUTE circuit of the amplifier before turning on the SA-50. NOTE: Plinius preamplifiers do not cause this problem.
Plinius SA-50 instruction manual. Page 4
AMPLIFIER FACILITIES AND FEATURES FRONT PANEL
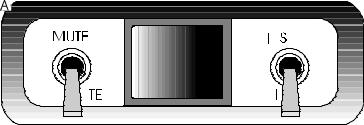
The front panel of the SA-50 power amplifier incorporates a small panel fitted with three switches. These switches control the day to day functions of the amplifier. The operation of these switches is, from the left;
MUTE SWITCH. It is not recommended practice to interfere with the input cables while the amplifier is switched on and connected to the loudspeaker/s. Therefore we have fitted a MUTE switch to interrupt the input signal (by shorting it to ground). This allows the user to connect and disconnect the input cables without the necessity of turning the amplifier mains power off. The switch should be on OPERATE (down) for all normal listening situations. Switch this switch to MUTE (up) to disconnect the input signal. NOTE. This switch does not isolate , mute or disconnect the OUTPUT of the power amplifier. Observe all normal precautions when handling or changing the output (loudspeaker) leads.
MAINS SWITCH. This heavy duty rocker switch in the centre of this panel switches the MAINS / LINE Power to the amplifier ON or OFF. A LED immediately above the switch illuminates to indicate that the power is ON.
This amplifier draws a moderately high current when switched on.
It is not good practice to repeatedly active this switch ON and OFF rapidly.
FRONT PANEL LAYOUT SHOWING MAINS, MUTE & BIAS SWITCHES
Plinius SA-50 instruction manual. Page 5
FRONT PANEL FACILITIES AND FEATURES CONTINUED
BIAS SWITCH. This switch on the right of the panel alters the operating
Bias of the amplifier. Switch UP is BIAS A/B while switch DOWN is BIAS A.
BIAS A/B position reduces the bias on the output stage to operate the amplifier in class aB. This is a bias configuration used by the majority of High End amplifier designers for their products. In "Class AB" the SA-50 produces a very high quality of sound suitable for all occasions where "super" critical listening is not a priority. The quality of performance in this mode may exceed that of many other amplifiers so a dual benefit exists in that this facility provides the user with a much cooler operating temperature and a much reduces demand on electricity particularly at idle,
(ie. while the amplifier is not reproducing music). This unique feature allows the user to leave the SA-50 switched ON at all times rendering the amplifier READY for use and requiring only a few minutes of WARM UP in "class a" before the very best of the amplifier's sonic qualities may be experienced.
BIAS A position provides a true class a bias to the output stage, therefore ensuring the optimum performance of the amplifier during all critical or casual listening events. Class A amplifiers run hotter that class AB amplifiers hence our specially designed and distinctive heat sinks. Operating the amplifier in BIAS A creates a small number of precautions that should be observed.
1.On switching the BIAS A the temperature of the amplifier will quickly increase and the amplifier will become quite hot. Be certain that you have left adequate space around the amplifier for ventilation. Ensure that no objects are resting on the amplifier and check that the heatsink (cooling fins) are not obstructed in any way.
2.The current required from the mains / line supply by the amplifier in BIAS A is now approximately 650 Watts.
This amplifier should not be connected to a wall outlet that is shared with other heavy current appliances such as heaters or electric motors. If you are in doubt, check with your Plinius dealer for advice.
Plinius SA-50 instruction manual. Page 6

FRONT PANEL FACILITIES AND FEATURES CONTINUED
REAR PANEL
The facilities on the rear panel of the SA-50 may seem complex. The rear panel incorporates all of the terminals for connecting the input signals and output to the loudspeakers. A reasonable understanding of this amplifier and a logical approach should ensure that you are listening to this amplifier in a very short space of time without any difficulties at all.
Please remember that this Plinius SA-50 power amplifier is a high quality electronic instrument capable of an exceptional level of performance. Be sure that you understand your requirement fully before you make any connection to this amplifier or adjust the ACS ( Amplifier Configuration Selector )
REAR PANEL OF THE SA-50 SHOWING ALL OF THE AVAILABLE FACILITIES INCLUDING INPUT AND OUTPUT TERMINALS, THE ACS (AMPLIFIER CONFIGURATION SELECTOR), MAINS INPUT AND MAINS FUSE.
Plinius SA-50 instruction manual. Page 7
FRONT PANEL FACILITIES AND FEATURES CONTINUED
INPUT TERMINALS STEREO
Input terminals for this SA-50 power amplifier are easily accessible and fitted to the top centre area of the rear panel.
RCA INPUTS LEFT & RIGHT. These standard type RCA terminals are for use with unbalanced signals from most signal sources such as audio preamplifiers.
XLR BALANCED INPUTS LEFT & RIGHT. XLR connectors fitted to the amplifier are for use with balanced line signals from audio preamplifiers etc. Balanced signals are carried via a three way cable that
connects all three pins at each end of the interconnect cable. XLR pin wiring information is discussed on page 15.
DO NOT Operate this amplifier with both RCA and XLR cables connected at the same time.
INPUT TERMINALS BRIDGED / MONO
RCA. Connect to RIGHT channel RCA INPUT only.
XLR. Connect to RIGHT BALANCED XLR INPUT only.
DO NOT Operate this amplifier with both RCA and XLR cables connected at the same time.
 Loading...