

Page 1
Quick Start Guide
Page 2

Page 3
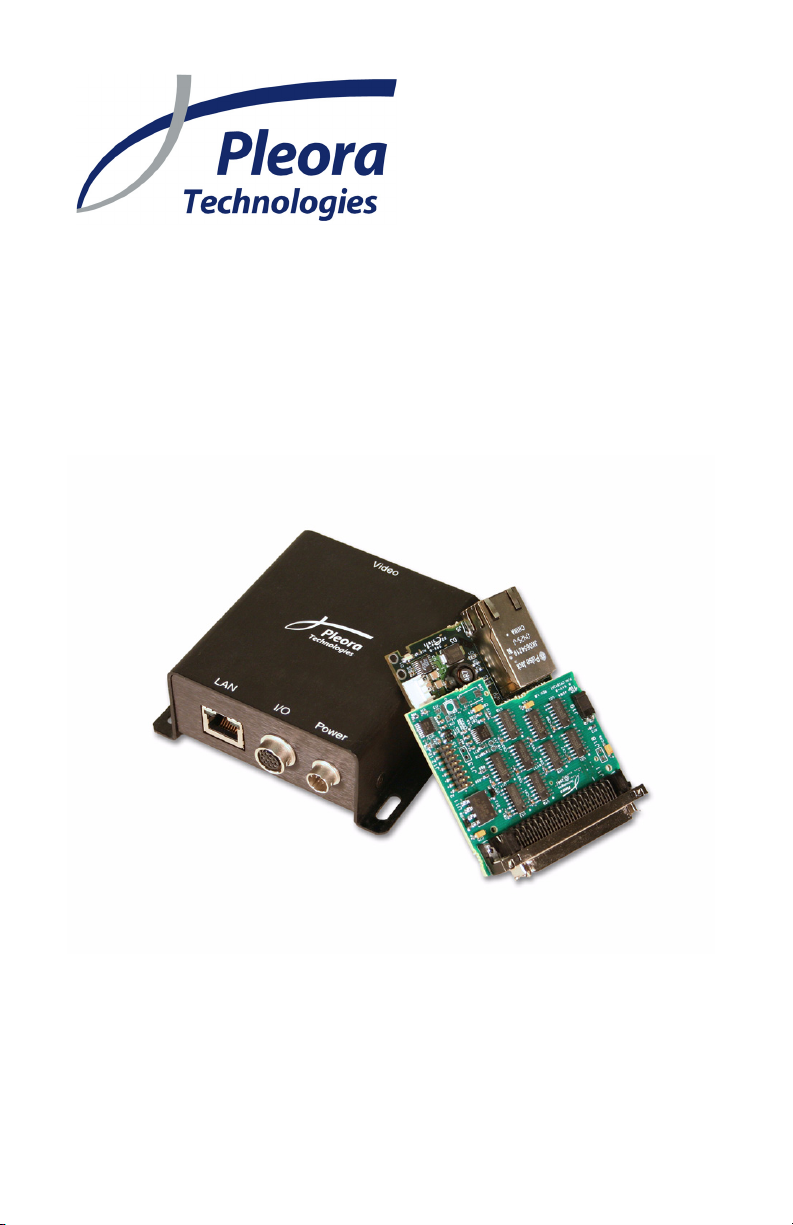
...high-performance imaging data and video over Ethernet
Page 4

Ver 2.4
Item number: 222A000000002
Product code: PT1000DOC-QSG
The products are not intended for use in life support appliances, devices, or systems where
malfunction of these products can reasonably be expected to result in personal injury.
Pleora Technologies Inc. (Pleora) customers using or selling these products for use in such
applications do so at their own risk and agree to indemnify Pleora for any damages
resulting from such improper use or sale.
Copyright © 2008 Pleora Technologies Inc. All information provided in this manual is
believed to be accurate and reliable. No responsibility is assumed by Pleora for its use.
Pleora reserves the right to make changes to this information without notice. Redistribution of this manual in whole or in part, by any means, is prohibited without obtaining prior
permission from Pleora.
1/22/08
Page 5

Contents
Setting up your iPORT IP Engine ..................................... 1
Installing eBUS .................................................................. 3
Cabling your camera to your PC ...................................... 5
Connecting to your iPORT IP Engine .............................. 9
Acquiring images with your camera .............................. 17
Using the iPORT SDK...................................................... 27
Technical support ............................................................ 29
Page 6

Page 7
Setting up your iPORT IP
Engine
This guide explains how to set up your iPORT™ IP
Engine and acquire your first images. It gives you a solid
understanding of the introductory concepts, but also lets
you set up your system right away, if you prefer. It is
intended as a supplement to the documentation included
on your iPORT Software CD.
1
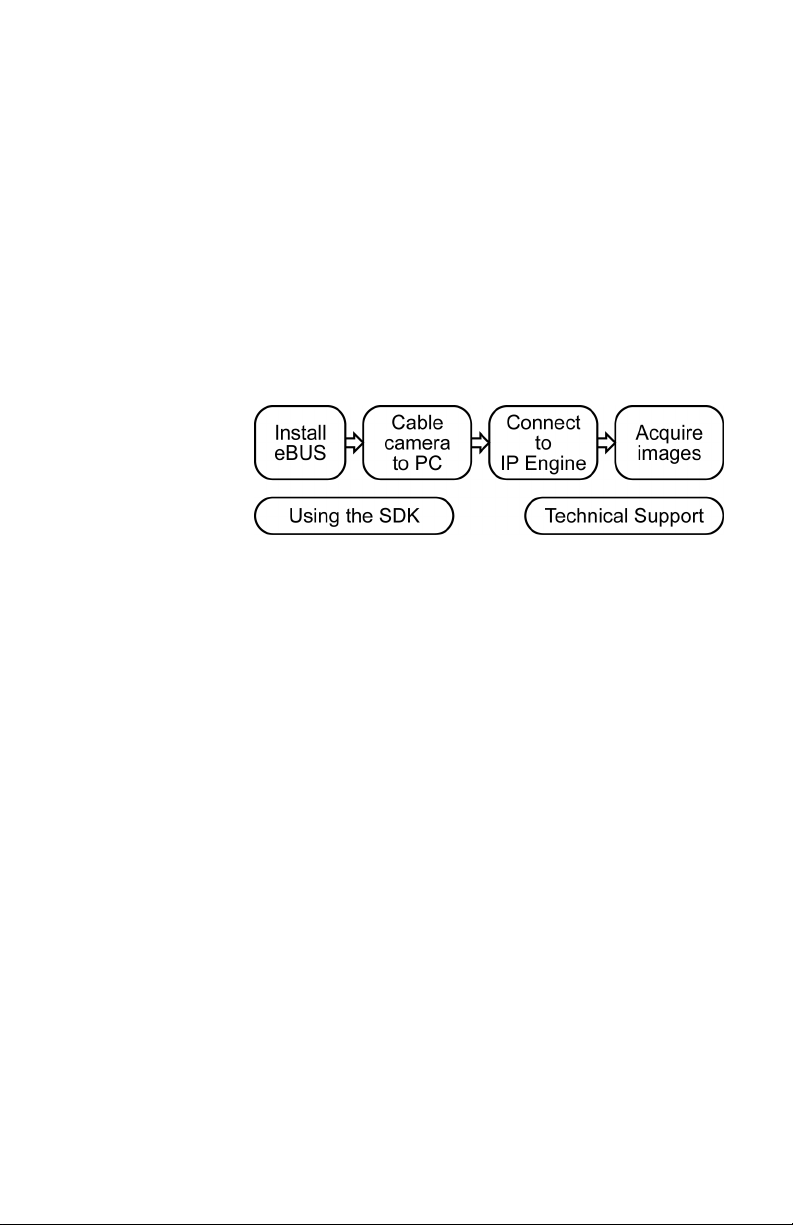
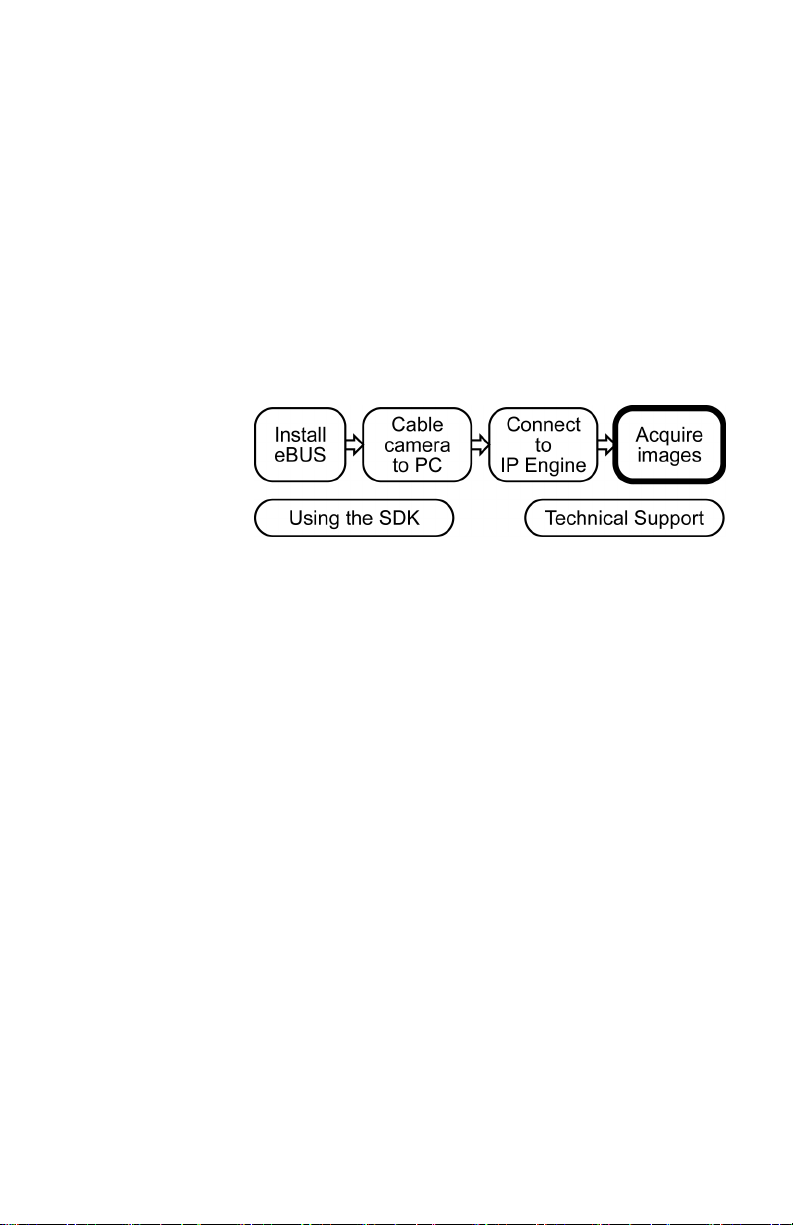
To acquire your first images using your iPORT IP Engine:
1. Follow the directions in the eBUS Quick Start Guide to install your eBUS Driver Suite and iPORT Vision Suite. You will also choose and install the NIC driver that best meets your needs.
2. Cable your camera, IP Engine, and PC together. See “Cabling your camera to your PC” on page 5.
3. Connect to your IP Engine. See “Connecting to your iPORT IP Engine” on page 9.
4. Acquire images using your camera. See “Acquiring images with your camera” on page 17.
Copyright © 2008 Pleora Technologies Inc.
Page 8

2 Setting up your iPORT IP Engine
Copyright © 2008 Pleora Technologies Inc.
Page 9

Installing eBUS
To interface with your camera, your PC requires iPORT
software.
Your iPORT Software CD contains both the eBUS Driver
Suite and the iPORT Vision Suite.
3
To install eBUS:
• Follow the directions in the eBUS Quick Start Guide.
The procedure will also install the iPORT Vision
Suite.
NOTE! To learn about the documentation, get software
upgrades, and more, see “Technical support” on
page 29.
Copyright © 2008 Pleora Technologies Inc.
Page 10

4 Installing eBUS
Copyright © 2008 Pleora Technologies Inc.
Page 11
Cabling your camera to your
PC
When it comes to cabling, your iPORT IP Engine gives
you a lot of flexibility. However, if you’re cabling it for
the first time, we recommend that you make a dedicated
connection between your IP Engine and PC. For the best
performance, connect to an Intel PRO/1000 NIC.
5
To cable your camera to your PC:
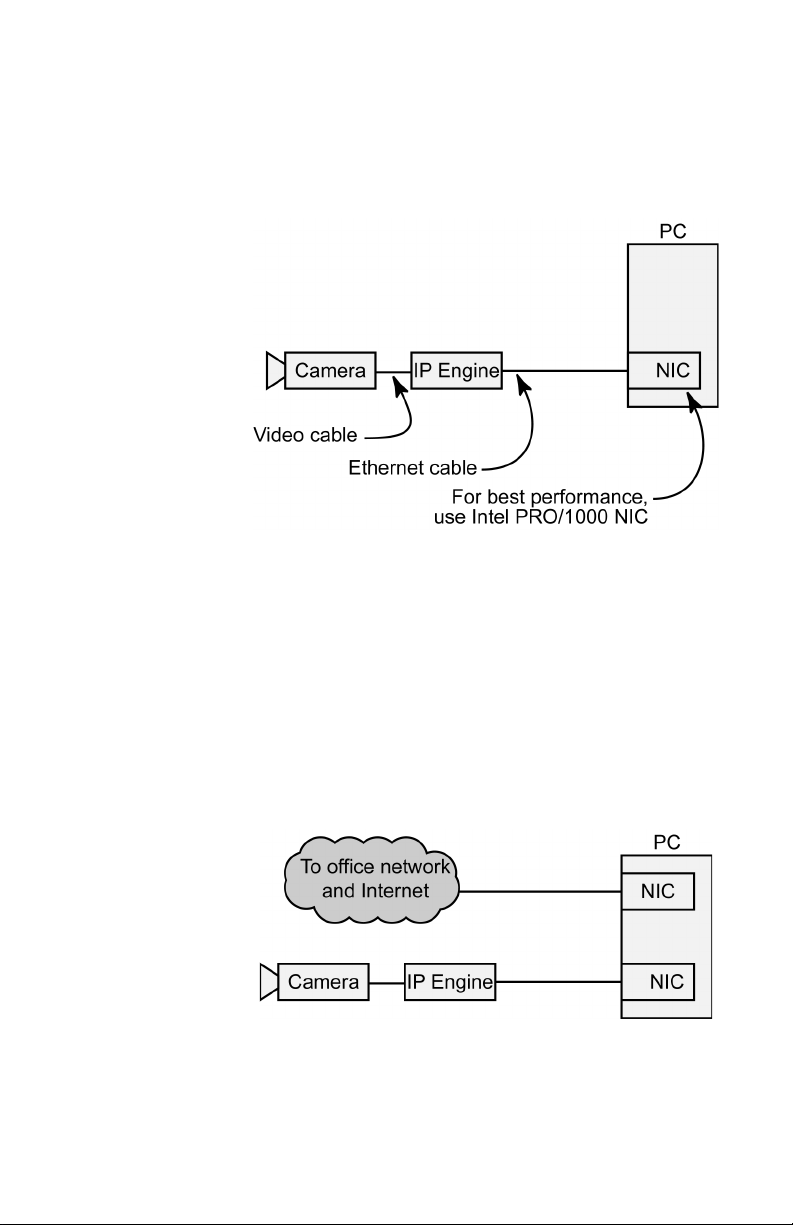
• Cable your system as described in either “Dedicated
connection” on page 6, or “Dedicated connection with
a second regular NIC” on page 6. Power cables aren’t
shown.
NOTE! If your iPORT IP Engine is a PT2000 series unit
(two LAN connections), consult your hardware
guide before proceeding.
Copyright © 2008 Pleora Technologies Inc.
Page 12
6 Cabling your camera to your PC
Dedicated connection
If you require a very high bandwidth connection to your
iPORT IP Engine but don’t require corporate network connectivity, use the configuration below.
This configuration might be used for a standalone machine
vision system. For best performance, cable your IP Engine
to an Intel PRO/1000 NIC. The Intel PRO/1000 is reliable
and lets you use the efficient eBUS Optimal Driver.
Dedicated connection with a second regular NIC
If you intend to use your NIC as a dedicated connection to
your camera, use the configuration below. In this configuration, you have a second NIC for corporate network connectivity.
Copyright © 2008 Pleora Technologies Inc.
Page 13
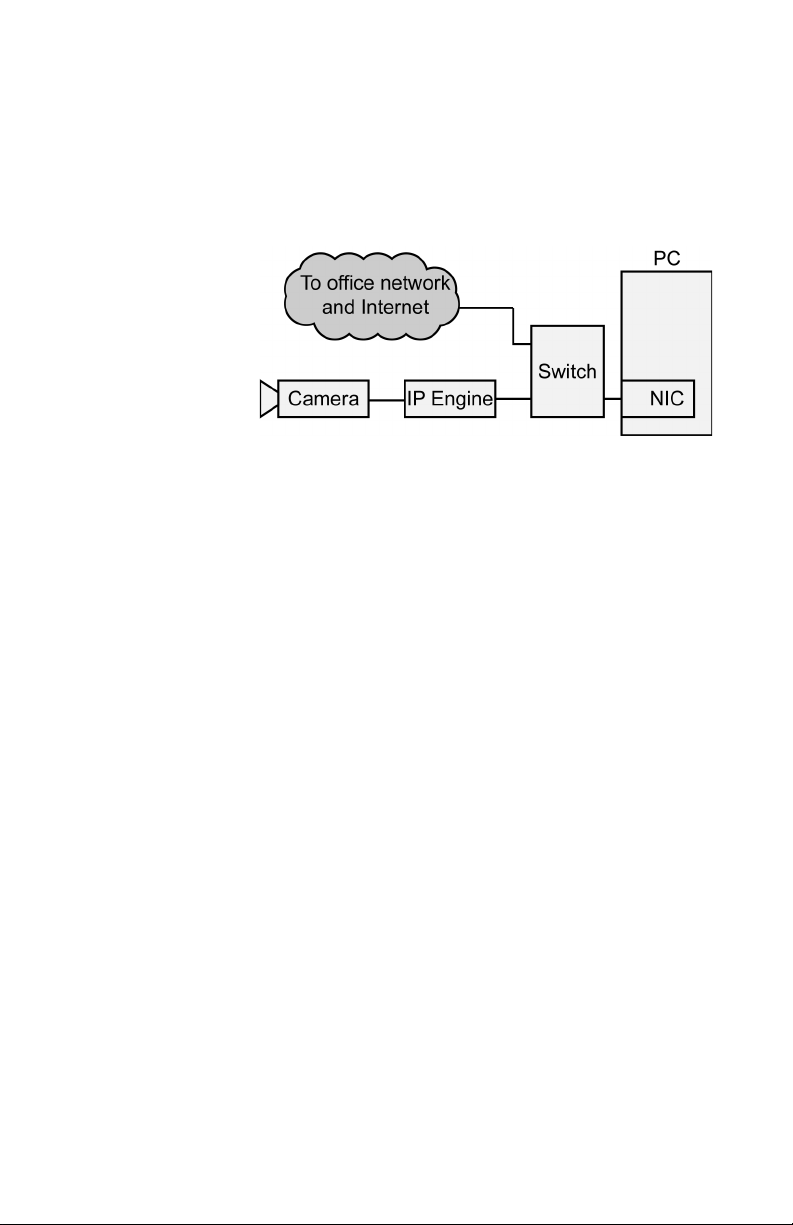
Switched connection (not recommended)
If you intend to use a single NIC for both the connection to
your camera and corporate network connectivity, use the
configuration below.
If you’re setting up your iPORT IP Engine for the first
time, we advise against using this configuration. Such an
arrangement may cause the following problems:
• You may experience data loss, delay, or network
slowdowns if the switch employs blocking architecture or insufficient packet forwarding
capability.
• You may experience connectivity problems due
to a switch that is nonstandard or improperly
configured (jumbo frames not enabled).
• Switches that use a spanning tree algorithm often
incur a significant delay (several minutes) when
establishing a connection between the PC and the
IP Engine. We recommend that you turn off
spanning tree implementations on the switch.
7
Copyright © 2008 Pleora Technologies Inc.
Page 14

8 Cabling your camera to your PC
Copyright © 2008 Pleora Technologies Inc.
Page 15
Connecting to your iPORT
IP Engine
Coyote is a powerful and versatile camera interface
application that lets you quickly configure your iPORT IP
Engine and begin capturing camera images with your PC.
9
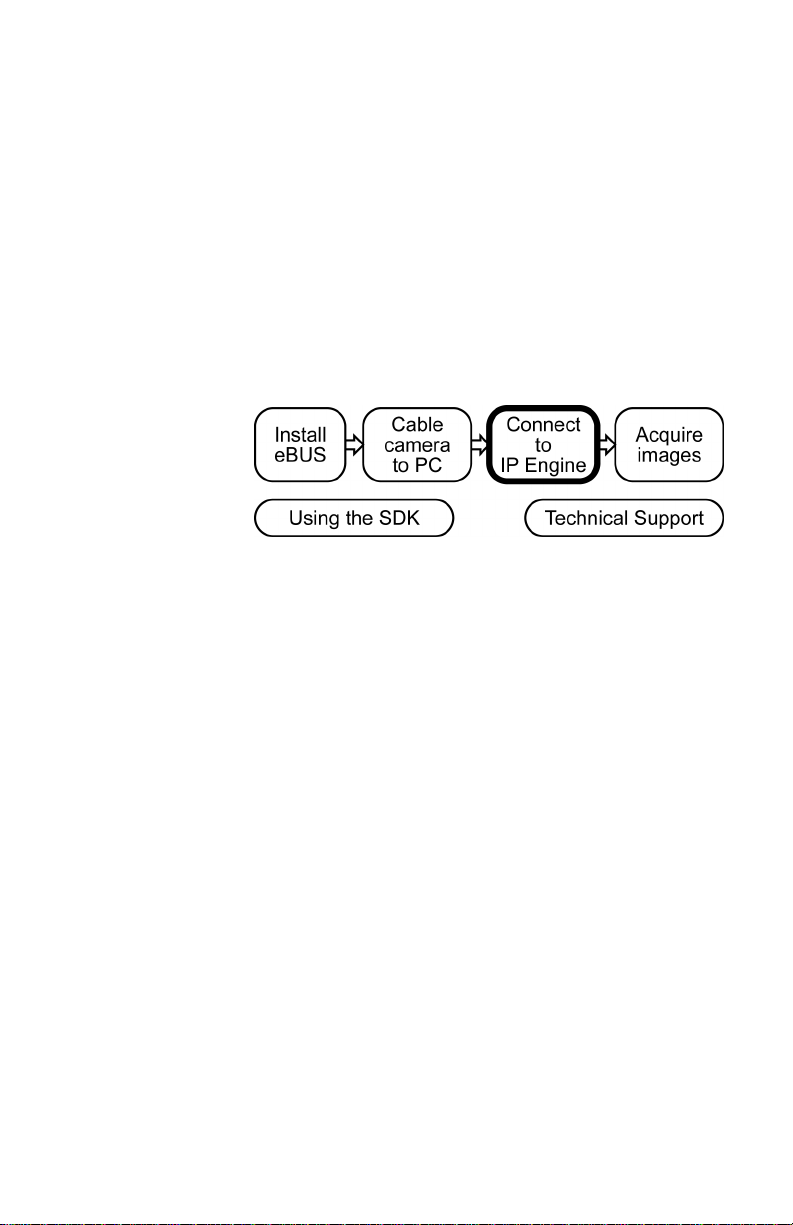
To connect to your iPORT IP Engine:
1. Start Coyote. See “Starting Coyote” on page 9.
2. Click Detect to find your iPORT IP Engine on your network. See “Detecting your iPORT IP Engine on your network” on page 11.
3. Click Select to select a camera. See “Selecting your camera” on page 14.
4. Click Connect to connect your PC to your IP Engine and camera.
Starting Coyote
Before launching Coyote, ensure that your camera and
iPORT IP Engine are properly connected and powered.
Ensure that your NIC has the appropriate driver. To learn
more, see “Setting up your iPORT IP Engine” on page 1.
To launch Coyote for the first time, see “Configuring the
Windows XP Firewall” on page 10. Otherwise, see
“Launching Coyote” on page 11.
Copyright © 2008 Pleora Technologies Inc.
Page 16

10 Connecting to your iPORT IP Engine
Configuring the Windows XP Firewall
In its default configuration, the Windows XP Firewall may
block certain network packets between your IP Engine and
Coyote (or your own image-acquisition program).
Follow the directions to ensure Windows XP Firewall
works with Coyote (or modify the directions for your own
program). Finally, and only if you prefer, you can use the
directions to disable the firewall completely.
To configure the Windows XP Firewall:
1. From the Windows Start menu, select Start > Control Panel.
The Control Panel appears.
2. Open the Windows Firewall. If the firewall is set to Off (such as for closed
systems), no further changes are required.
3. On the General tab, allow exceptions by unchecking Don’t allow exceptions.
4. Select the Exceptions tab.
5. Click Add Program. The Add a Program dialog appears.
6. Select Coyote Application and click OK (if it
doesn’t appear, the default location is: C:\Program
Files\Pleora Technologies Inc.\iPORT
Software\Binaries\Coyote.exe).
The Add a Program dialog closes and Coyote
Application appears in the Programs and Services
field.
7. Click OK to close the Windows Firewall dialog. The Windows XP Firewall now allows Coyote to send
and receive network packets.
You can now launch Coyote. See “Launching Coyote”
on page 11.
Copyright © 2008 Pleora Technologies Inc.
Page 17
Launching Coyote
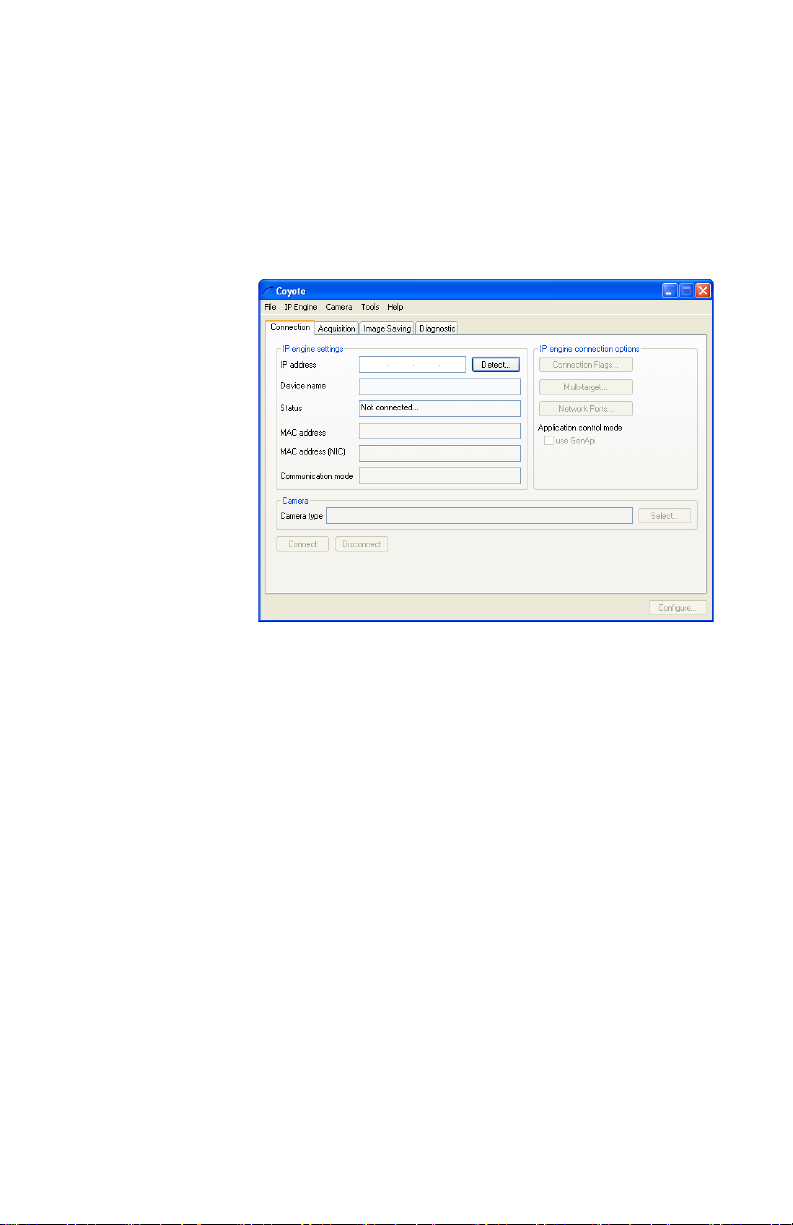
To launch Coyote:
• From the Windows Start menu, select Start > All
Programs > Pleora Technologies Inc > iPORT
Vision Suite > Coyote Application.
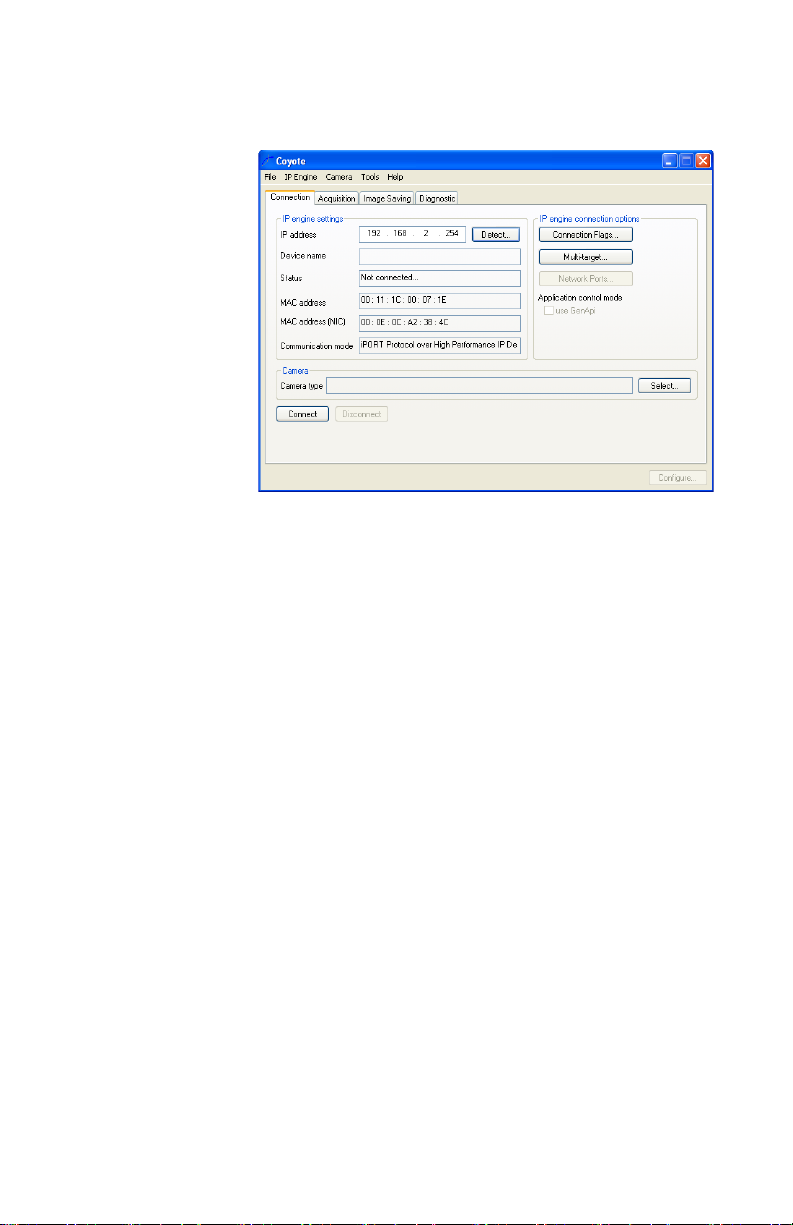
The main page of the Coyote application appears.
11
Detecting your iPORT IP Engine on your network
When you detect IP Engines, Coyote finds all the IP
Engines it can, using all the NICs on your PC as well as
any that are indirectly connected through switches.
To detect your iPORT IP Engine:
1. Start Coyote. See “Starting Coyote” on page 9.
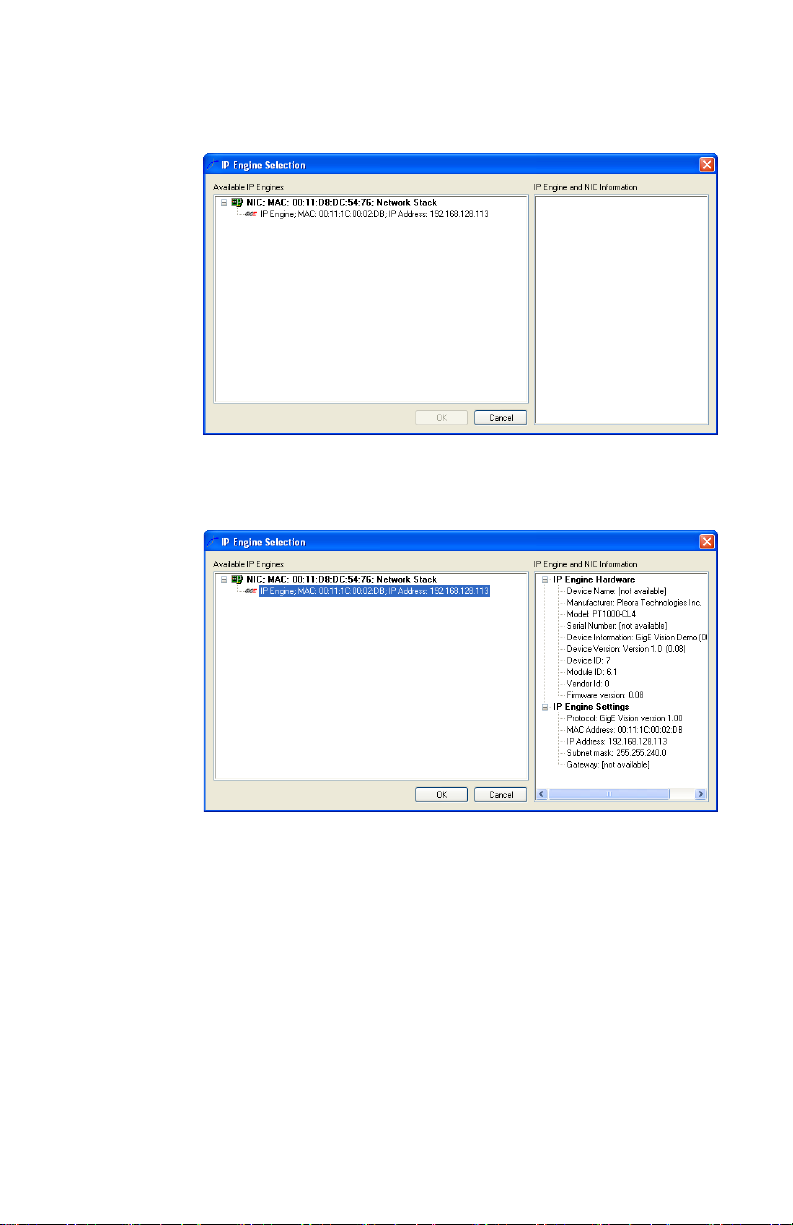
2. In the IP Engine settings pane, click Detect. The IP Engine selection dialog appears, listing the
iPORT IP Engines that each NIC found. NICs
Copyright © 2008 Pleora Technologies Inc.
Page 18
12 Connecting to your iPORT IP Engine
connected to a switched network may find multiple IP
Engines.
3. In the Available IP Engines pane, select your IP Engine.
Information about your selection appears in the IP
Engine and NIC information pane.
Copyright © 2008 Pleora Technologies Inc.
Page 19
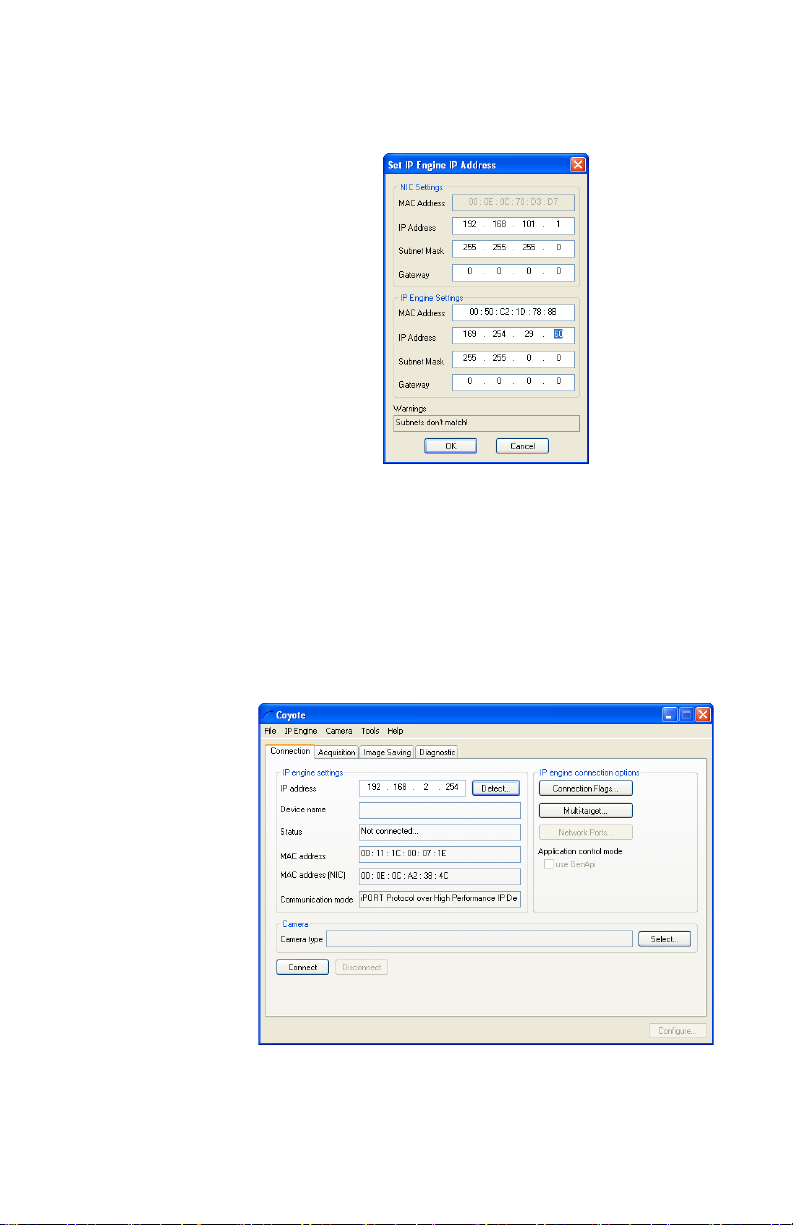
4. Click OK. The Set IP Engine IP address dialog appears.
5. In the IP Engine settings pane, enter the IP address
and Subnet mask. If you’re connecting to your
iPORT IP Engine through a network switch (not
recommended for an initial connection), consult with
your office IT department to ensure that your chosen
IP address isn’t used by another machine.
The Warni ngs pane lets you know if values you enter
are valid.
6. Click OK to close the IP Engine selection dialog. The updated information appears in the IP engine
settings pane.
13
To speed the process of connecting to your iPORT IP
Engine in the future, see “Saving your settings” on
Copyright © 2008 Pleora Technologies Inc.
Page 20
14 Connecting to your iPORT IP Engine
page 15. Proceed to “Acquiring images with your
camera” on page 17.
Selecting your camera
Coyote requires that you specify your camera when you
connect to your IP Engine. However, in some cases, you
may want to connect without a camera. For example, you
may be trying to connect to the IP Engine for the first time
or you might be following the tutorials described in the
iPORT Programmable Logic Controller reference guide.
When prompted, choose the first camera on the list
(without that camera you obviously won’t be able to
acquire any images.)
For a better understanding of what the selections mean,
see “Acquiring images with your camera” on page 17.
Copyright © 2008 Pleora Technologies Inc.
Page 21
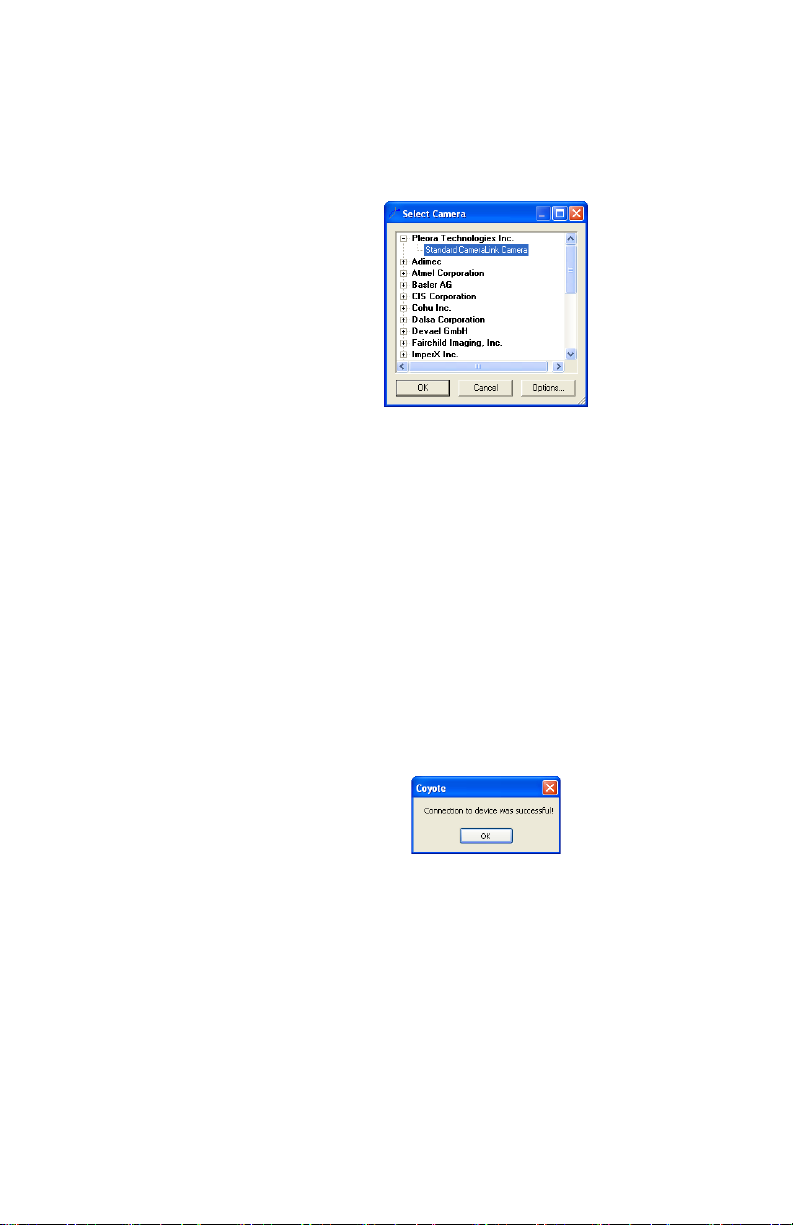
To select your camera:
1. From the main page of Coyote, click Select. The Select Camera dialog appears with a list of all
cameras supported by the IP Engine.
2. Select a camera and click OK. Only cameras supported by your IP Engine will appear.
The Select Camera dialog closes and your selection
appears on the main page of Coyote.
Testing your connection
When you connect to an IP Engine for the first time using
an eBUS driver, Windows recognizes the IP Engine as
new hardware.
15
To test your iPORT IP Engine:
• From Coyote’s menu, select IP Engine >
Test connection.
A dialog appears explaining the results of the test.
Saving your settings
To avoid reconfiguring every time you restart the program,
Coyote lets you save your current settings as an XML file.
The XML file contains all the information for your iPORT
connection, plus all the information for your camera
connection (described in “Acquiring images with your
camera” on page 17).
Copyright © 2008 Pleora Technologies Inc.
Page 22

16 Connecting to your iPORT IP Engine
To save the settings for your iPORT IP Engine and camera:
1. From the main menu, select File > Save.
2. Type your file name and click Save. Coyote saves your configuration.
To load the settings for your iPORT IP Engine and camera:
1. Launch Coyote. See “Launching Coyote” on page 11.
2. From the main menu, select File > Open.
3. Select your file and click Open. Coyote loads your saved configuration. (If File >
Ignore connectivity information is checked, you
have to manually connect to your IP Engine before
loading the settings. See the iPORT Coyote software
guide.)
Copyright © 2008 Pleora Technologies Inc.
Page 23
17
Acquiring images with your
camera
Now that you’ve connected your iPORT IP Engine, you
can connect to your camera and begin acquiring images.
In general, the camera manufacturer’s software will let
you get the most out of your camera’s features. However,
how you connect to your camera depends on the type of
software that came with it.
To acquire images using your camera (in order of preference):
• If your camera included image acquisition software,
see “Using the camera manufacturer’s software only”
on page 18.
• If your camera included software for controlling the
camera but doesn’t include image acquisition
software, see “Using the camera manufacturer’s
software and Coyote” on page 18.
• If your camera doesn’t include any controlling
software, see “Using Coyote with presets” on
page 19.
• If after trying option 3, you find your camera doesn’t
have a preset configuration, see “Using Coyote with
manual configuration” on page 21.
• If you wish to configure your camera using a
command prompt, see “Using command line configuration” on page 24.
Copyright © 2008 Pleora Technologies Inc.
Page 24
18 Acquiring images with your camera
If you encounter difficulties, see “Common image capture
troubles” on page 25. Alternately, see “Technical support”
on page 29.
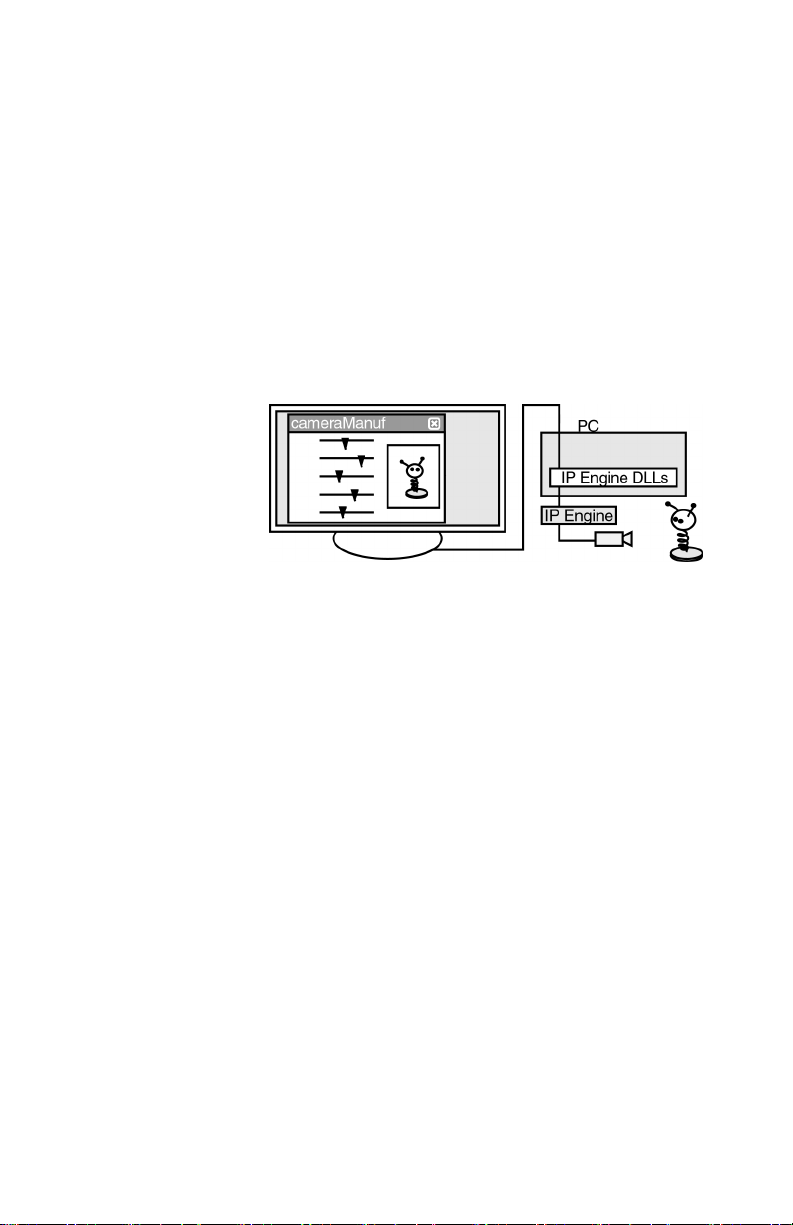
Using the camera manufacturer’s software only
Image acquisition software created by your camera manufacturer will let you get the most out of your camera.
Generally, this software works directly with the iPORT IP
Engine and doesn’t require additional setup from you.
The camera manufacturer’s software is designed to work
with the full library of iPORT DLLs. (Knowing how the
software connects to the camera isn’t critical now, but will
be useful as you move toward developing your own applications.)
To control your camera and acquire images with the camera manufacturer’s software:
• Launch the manufacturer’s software. Consult your
camera manufacturer’s documentation for complete
directions. If your camera manufacturer requires that
you perform any additional setup, see “Using Coyote
with manual configuration” on page 21.
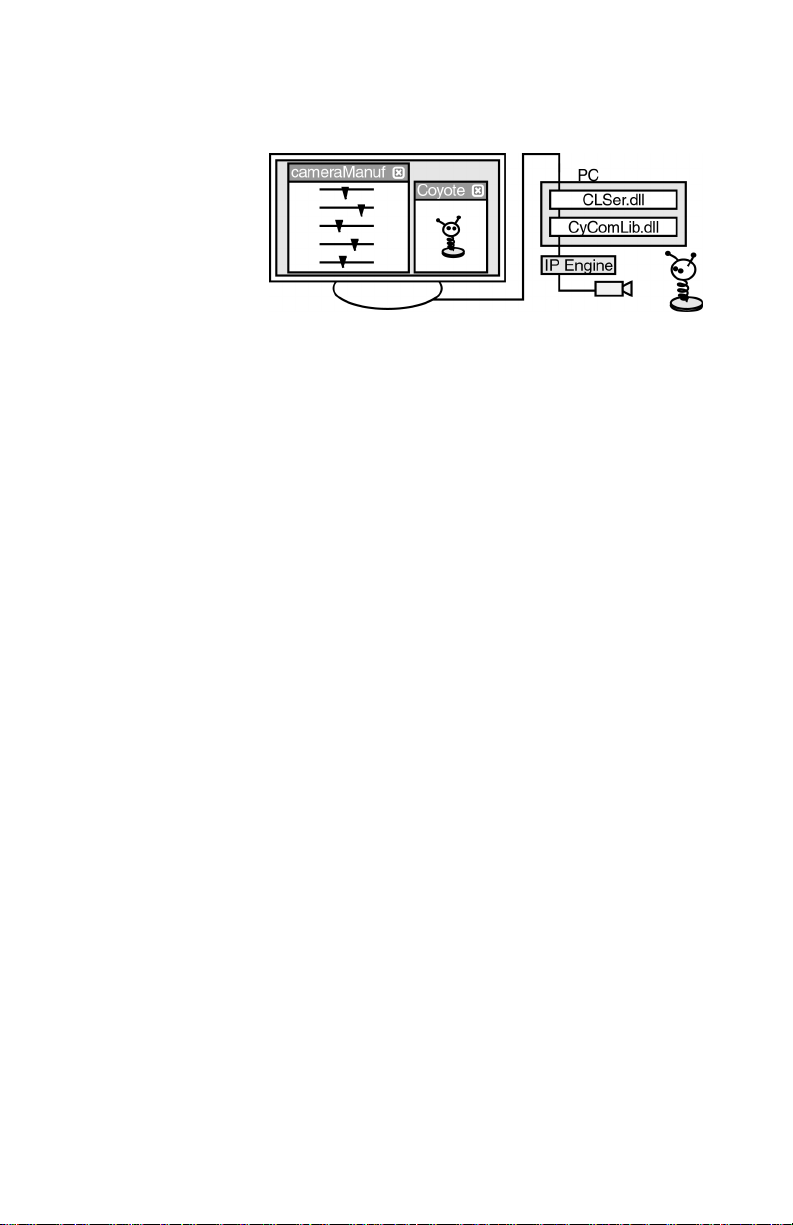
Using the camera manufacturer’s software and Coyote
If your camera manufacturer included software for
controlling your camera that doesn’t include integrated
image acquisition software, you can control the camera
using the manufacturer’s software and acquire images
Copyright © 2008 Pleora Technologies Inc.
Page 25
19
with Coyote. Typically, the manufacturer uses the CLSer
family of DLLs.
NOTE! Although ANL and LV cameras will work with
the Camera Link Serial DLLs, most manufacturers don’t offer software that lets you exercise this
option.
To function properly, you must ensure that the settings in
Coyote match those in your manufacturer’s software. The
image may not display correctly (or at all) if Coyote
receives an image with an unexpected image width/height/
depth or an incorrect number of taps.
Although Coyote uses the full library of iPORT DLLs, the
camera manufacturer’s software communicates only with
the Camera Link Serial family of DLLs (clser*.dll).
These DLLs, which conform to the Camera Link Serial
Communication standard, interface with CyCom-
Lib.dll, which communicates with the iPORT IP
Engine.
To control your camera with the camera manufacturer’s software and acquire images with Coyote:
1. Configure Coyote by following the procedure
described in “Using Coyote with manual configuration” on page 21.
2. Launch your manufacturer’s software. Consult your camera manufacturer’s documentation for complete directions.
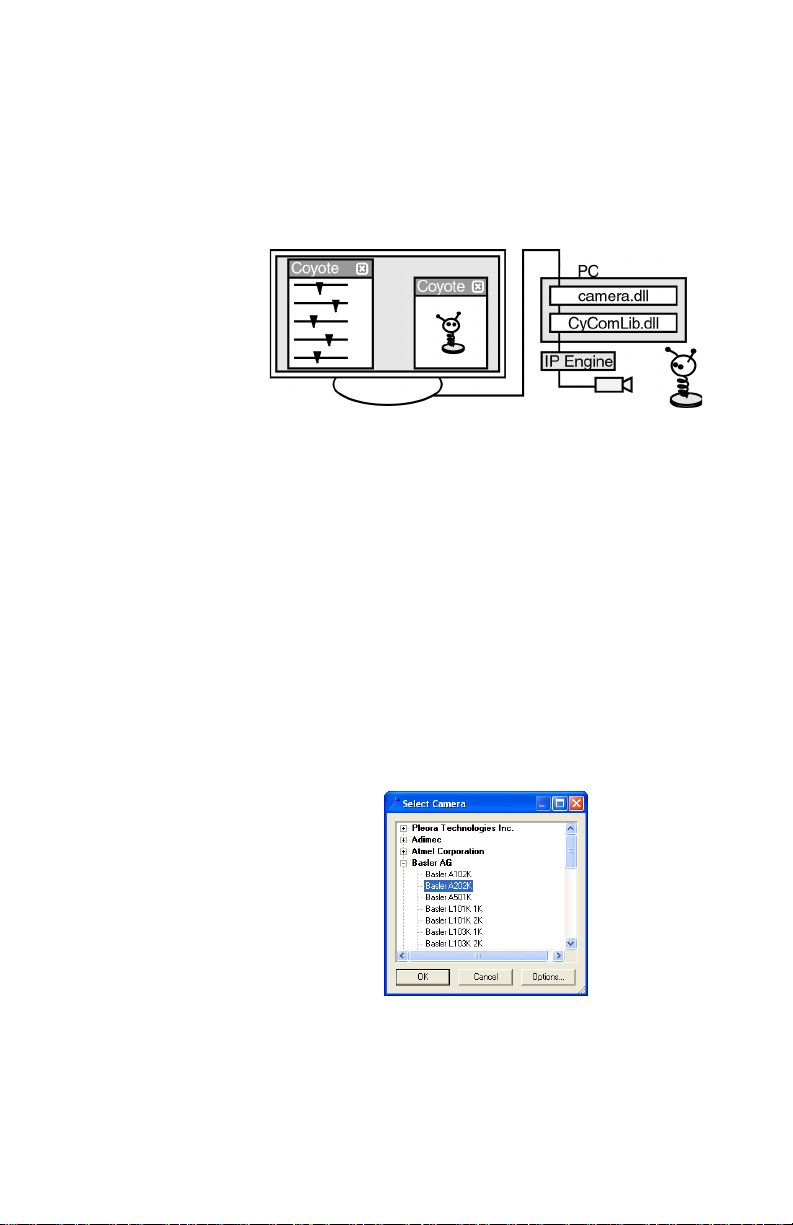
Using Coyote with presets
To reduce the effort needed to configure your camera for
the first time, Pleora offers ready-made configurations.
For many cameras, Pleora created a DLL that lets you
access the camera-specific features and commands. While
the DLLs were fully tested and worked well when they
Copyright © 2008 Pleora Technologies Inc.
Page 26
20 Acquiring images with your camera
were first created, camera manufacturers gradually change
their hardware specifications and firmware over time.
Thus, the once-valid configurations may no longer be upto-date or may not work at all. Pleora includes these
settings in the SDK as a bonus, but takes no responsibility
for updating or maintaining outdated configurations.
If the ready-made configuration doesn’t work, you have
the following options.
• Modify the ready-made configuration as needed.
• Configure your camera manually. See “Using
Coyote with manual configuration” on page 21.
Coyote communicates with a camera-specific DLL
(CyCam<manuf>.dll). That DLL communicates with
CyComLib.dll.
To connect to your camera:
1. Launch Coyote. See “Launching Coyote” on page 11.
2. In the Camera pane, click Select. The Select Camera dialog appears.
3. Select the appropriate make and model of your camera.
4. Click OK. The Select Camera dialog closes.
5. Click Connect. You have now connected to your camera. To avoid
reproducing these steps, save your settings (see
“Saving your settings” on page 15). To begin
Copyright © 2008 Pleora Technologies Inc.
Page 27

acquiring images, proceed to “Acquiring images with
Coyote”, below.
Acquiring images with Coyote
Once you’ve connected to your camera using Coyote, you
can begin acquiring images. Due to the many possible
camera settings, acquiring images for the first time can
require significant setup and repeated attempts. Work
carefully and patiently.
To acquire images:
1. Load the configurations for your iPORT IP Engine and camera. See “Saving your settings” on page 15.
2. Select the Acquisition tab.
3. In the Control pane, select Grab - Continuous from the Mode menu.
4. In the Options pane, enable Keep partial images. (This setting isn’t necessary, but it helps you see an image even if Coyote is slightly misconfigured. Once you’re sure that Coyote is properly configured, you can uncheck this option.)
5. In the Control pane, click Start. Your camera image appears in a new window.
21
To make image adjustments:
1. Select the Acquisition tab.
2. Click Configure.
3. The Configuration - Advanced dialog appears.
4. Make changes as you require. (Consult your camera manual for advice.)
5. Click OK.
Using Coyote with manual configuration
If you wish to configure your camera manually, follow this
procedure. You could also use this procedure to make a
Copyright © 2008 Pleora Technologies Inc.
Page 28
22 Acquiring images with your camera
few initial settings before controlling your camera using
the manufacturer’s software.
Before manually configuring your camera, consult your
camera’s documentation for the following:
• Camera type (i.e. area scan or line scan)
• Camera sensor size (i.e. image width and height)
• Camera read out mode (i.e. single tap, dual tap
right-side inverted)
• Number of taps (i.e. 1, 2)
• Pixel depth (i.e. 8, 12, 14, 16, 24 bits)
• Color space (i.e. gray, RGB, YUV, Bayer)
Some cameras have unusual features or requirements. For
example, some cameras won’t begin transmitting images
without first receiving an external trigger input. Even
properly configured, such cameras will appear to not
work. Thus, having a full understanding of your camera is
essential.
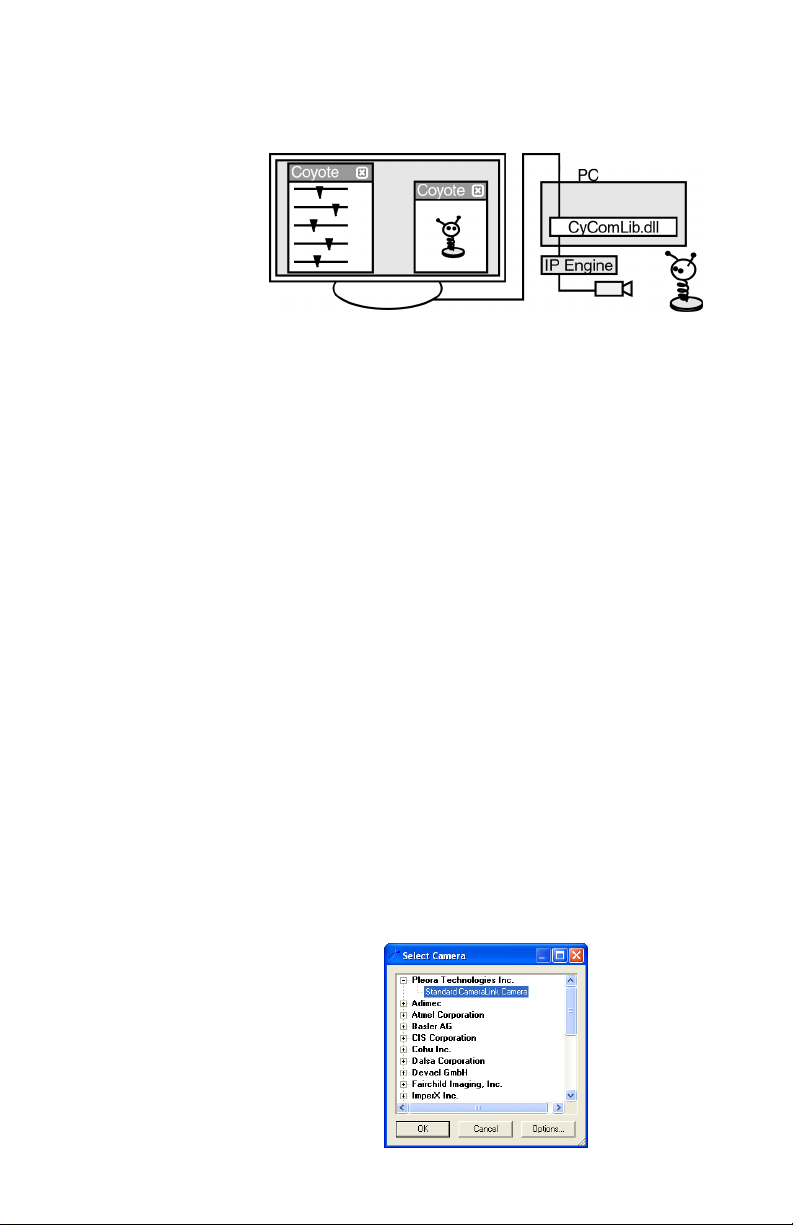
Coyote communicates directly with CyComLib.dll to
tell the iPORT IP Engine the parameters it should expect
from the camera.
To manually configure your camera:
1. Ensure you have properly connected to your iPORT IP Engine. See “Connecting to your iPORT IP Engine” on page 9.
2. From the main page of Coyote, click Select Camera. The Select Camera dialog appears.
Copyright © 2008 Pleora Technologies Inc.
Page 29
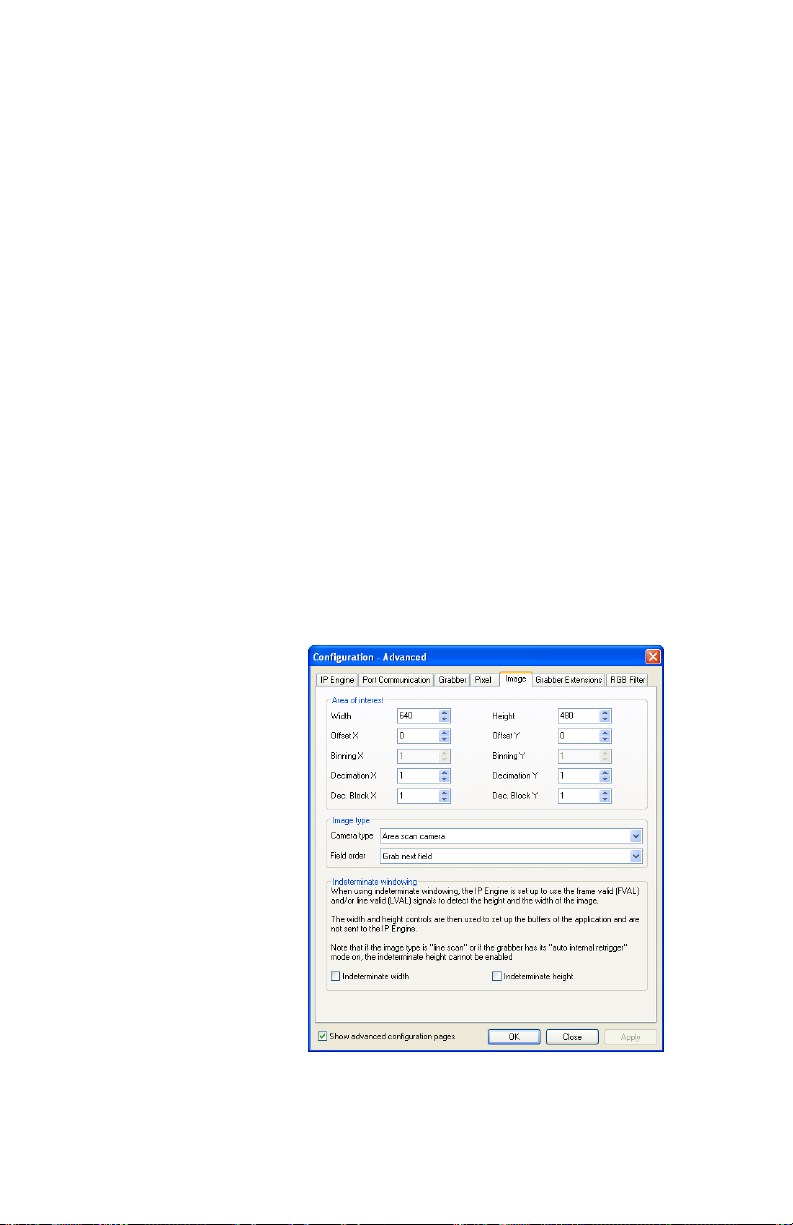
3. Expand the Pleora Technologies Inc. entry.
NOTE! Don’t select your specific camera from the list
(i.e. don’t select your camera manufacturer’s
name). Doing so activates a camera-specific DLL
that will conflict with the camera manufacturer’s
software. To use the camera-specific configurations, see “Using Coyote with presets” on
page 19.
4. If your IP Engine model number contains the letters “ANL”, select Video Decoder. For “LV” models, select LVDS Camera. Otherwise, select Standard CameraLink Camera. Only options that are supported by your model of IP Engine will appear.
5. Click OK.
6. From the main page of Coyote, click Apply.
7. Click Configure. The Configuration - Advanced dialog appears. If the
Configuration - Basic dialog appears, check Show
advanced configuration pages. You can now
manually configure your camera. Camera setup is
complicated, with many options, so work carefully
and thoroughly. Be sure to have a good working
understanding of your camera’s documentation and
functionality.
23
8. Closely examine the Image tab and the Pixel tab. Set your configuration values as required.
Copyright © 2008 Pleora Technologies Inc.
Page 30
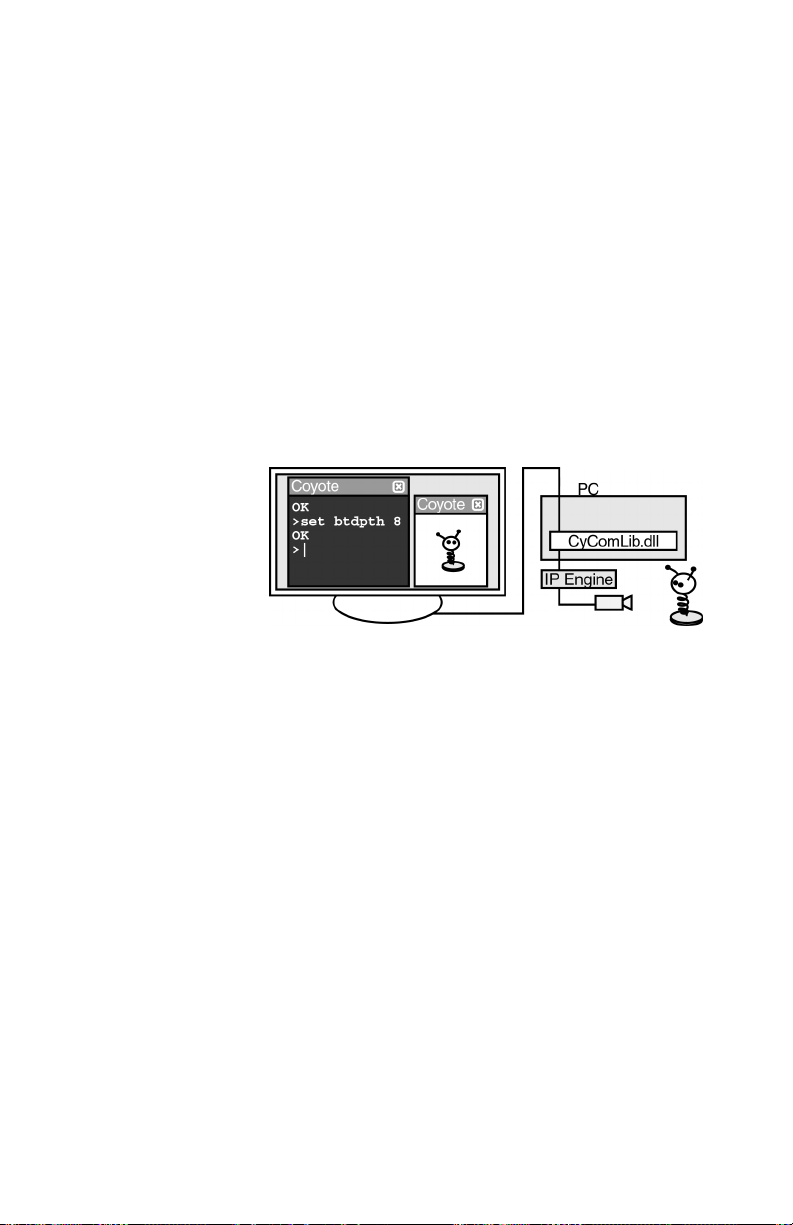
24 Acquiring images with your camera
9. When you have made the necessary changes, click OK.
Your changes take effect. To permanently save your
changes, see “Saving your settings”. Proceed to
“Acquiring images with Coyote” on page 21.
Using command line configuration
Some cameras can receive “command line” instructions.
In some cases, the instruction set is powerful enough to let
you easily configure the camera using this method. Some
cameras also have instructions for saving the configuration
to the camera’s flash memory, for triggering the camera to
begin acquiring images, or for performing low-level
diagnosis and setup.
If your camera supports it, you can use Coyote’s built-in
prompt to send commands to the camera.
To control your camera with command line instructions:
1. From the main page of Coyote, click Configure. The Configuration - Advanced dialog appears. If the
Configuration - Basic dialog appears, check Show
advanced configuration pages.
2. Select the Port Communication tab.
3. In the Port Selection pane, select Serial Port 0.
4. Consult your camera’s documentation then configure the Send pane as required. Include the configurations accessible through the Configure button in the Port pane.
Copyright © 2008 Pleora Technologies Inc.
Page 31
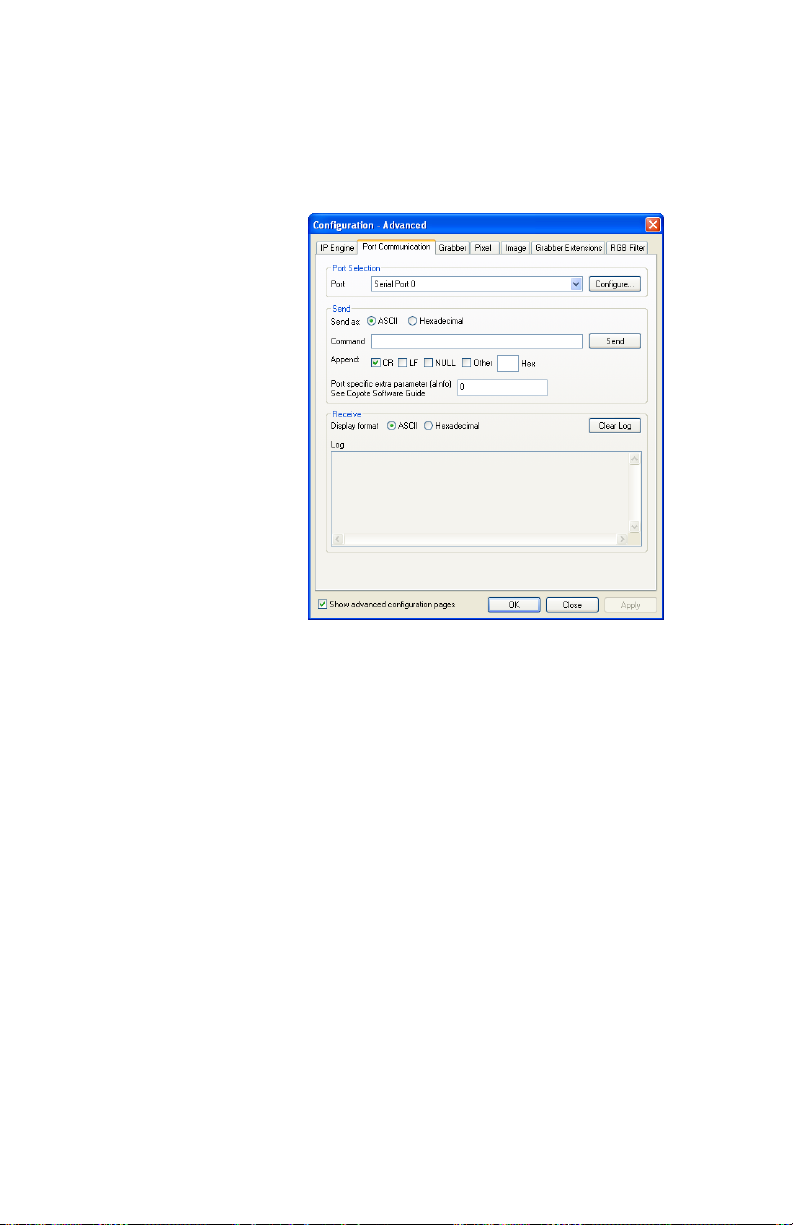
5. In the Command field, type your command line camera instruction and click Send.
The command appears in the Log field. If your
camera replies (and not all do), the results also appear
in the Log field.
25
Common image capture troubles
In some cases, a working camera seems to not work due to
a small issue.
Low light and bright light cameras
Some cameras are designed to work with very low light or
very bright light. When exposed to the light levels typical
of an office, the image may be completely white/black,
giving the impression that no signal is being received.
To test for low/bright light cameras:
• If the image is white, cover the camera lens. If the
image is dark, shine a bright light into the lens.
If the camera required more or less light, the image
will brighten or darken.
Copyright © 2008 Pleora Technologies Inc.
Page 32

26 Acquiring images with your camera
Incorrect image size
If Coyote expects to receive a larger image than your
camera sends, Coyote may discard the image as bad.
To test for incorrect image size settings:
• Set the width and height settings to a value equal to or
lower than your camera image size. In Coyote, click
Configure, then select the Image tab.
•In the Acquisition tab, enable Keep partial images.
If the expected image size was too large, partial or
distorted images will appear.
Awaiting trigger
Some cameras won’t send an image without receiving a
trigger input.
To determine if your camera is awaiting a trigger signal:
• Consult your camera’s documentation. Common
terms include free-running, auto retrigger, continuous
trigger, continuous acquisition, and rolling shutter.
If your camera can be set in free-running mode,
images will appear. Some cameras require a
continuous enable signal to remain in free-running
mode.
Copyright © 2008 Pleora Technologies Inc.
Page 33
27
Using the iPORT SDK
Now that you’ve successfully connected to your iPORT IP
Engine and acquired your first images, you’re ready to
begin developing your own application.
Included in your iPORT Software CD are sample applications, the iPORT Run-Time Library Distribution reference
guide, and the iPORT C++ SDK reference guide (which
contains an architecture overview, directions for setting up
your compiler, and many example programs).
We encourage you to use the samples as a framework for
creating your own application. As you become familiar
with the SDK, we’re confident that you’ll find it a flexible
tool for harnessing the power of your iPORT IP Engine.
To access the samples:
• From the Windows Start menu, select Start > All
Programs > Pleora Technologies Inc > iPORT
Vision Suite > Code Samples.
Copyright © 2008 Pleora Technologies Inc.
Page 34

28 Using the iPORT SDK
Copyright © 2008 Pleora Technologies Inc.
Page 35
29
Technical support
If you’re having any problems using the iPORT
Development Kit, the first place to look is in the documentation that came with your iPORT Development Kit and
your camera. You can also find additional information on
the Pleora website.
If you need help beyond that, email and phone support is
available. For best results, please read this entire section
before deciding how to proceed.
Documentation
iPORT Development Kit
The iPORT Development Kit documentation includes
user’s manuals, specifications, and step-by-step directions.
The documentation also includes a troubleshooting guide
that addresses many of the common problems.
To view the iPORT Development Kit documentation:
• From the Windows Start menu, select Start > All
Programs > Pleora Technologies Inc > iPORT
Vision Suite > Documentation.
Copyright © 2008 Pleora Technologies Inc.
Page 36

30 Technical support
NOTE! By default, the documentation files are located in
C:\Program Files\Pleora Technologies
Inc\iPORT Software\Documentation.
Camera documentation
Cameras are complicated devices with many settings and
features; many image acquisition troubles are actually a
misconfiguration or a working camera awaiting a trigger
signal. For some of the more common camera-related
acquisition issues, see “Common image capture troubles”
on page 25. For additional information, consult the documentation that accompanied your camera.
Website
To get software updates, view online documentation, and
more, visit the Resource Center at www.pleora.com and
register for partner access.
Email support
If the above options don’t solve your issue, contact Pleora.
To better help you, your iPORT Development Kit includes
the Information Gathering Tool which automagically
summarizes your system configuration and saves it as a
text file. Including this file with your first email will speed
problem resolution.
To gather system information required by Pleora’s support staff:
1. Ensure your iPORT IP Engine is powered and properly connected to your PC.
Copyright © 2008 Pleora Technologies Inc.
Page 37
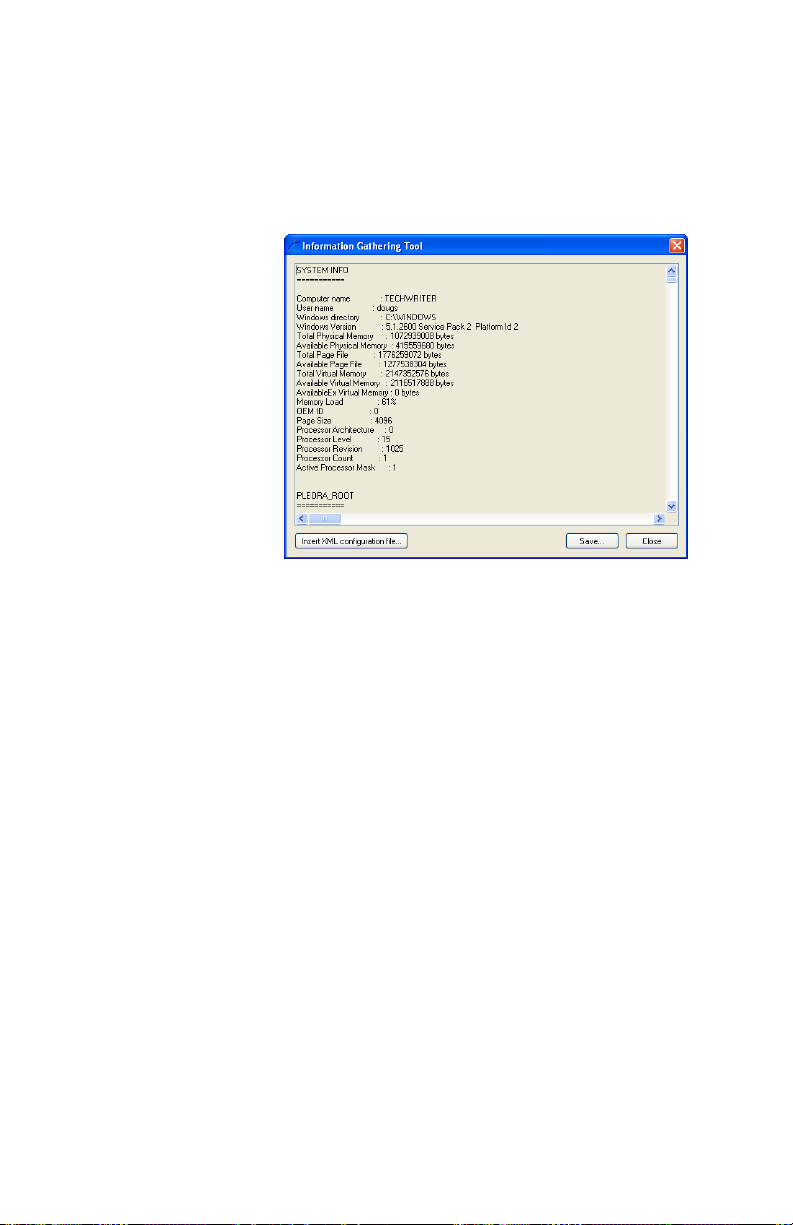
2. From the Windows Start menu, select Start > All
Programs > Pleora Technologies Inc > iPORT
Vision Suite > Information Gathering Tool.
The main page of the Information Gathering Tool
appears. It may take a few moments for the tool to
gather all the necessary system information.
3. If your setup includes an XML configuration file,
click Insert XML configuration file and select the
file. (The XML configuration file is the file you
normally load in Coyote.) If you have a standard configuration but haven’t saved it as an XML file, please
do so before running this tool. See “Saving your
settings” on page 15.
Your XML file is appended to the list.
4. Click Save. The Save As dialog appears.
5. Name your file and click Save. Your system information is now summarized in a text
file.
31
To contact Pleora by email:
• Send an email to your iPORT reseller or distributor.
Include your camera make and model; the physical
connection arrangement; and a detailed description of
your issue. Attach the file you created with the
Information Gathering Tool. If you bought your
iPORT IP Engine directly from Pleora, send an email
to [email protected].
Copyright © 2008 Pleora Technologies Inc.
Page 38

32 Technical support
Phone support
To best resolve your problem, we require detailed
information about your system. When you call, you will
need to know the following:
• Operating system and version. (To see the version
• Firmware version. (To see the firmware version
• Software version. (To see the software version
• If your issue is image or frame related, include
• If your issue is network related, include the driver
• A brief description of your application and how
in Windows, select Start > Control Panel. Click
System. The version information is in the
General pane.)
using Coyote, select the Device pane, and click
Detect. Hover your pointer over the relevant
entry. The firmware version appears at the
bottom of the dialog box.)
using Coyote, select Help > About.)
the image size, pixel type, frame rate, and synchronization type.
type, connection type, packet size, network
topology, and networking equipment
you’re using your iPORT IP Engine.
To obtain phone support:
• Ensure you have the information described above,
then call your iPORT reseller or distributor. If you
bought your IP Engine directly from Pleora, call +1613-270-0625, x303.
NOTE! The Information Gathering Tool automagically
gathers almost all the information you need into a
text file that can be easily sent by email. Thus,
email support is likely to be faster and easier for
you. To learn more, see “Email support” on
page 30.
Copyright © 2008 Pleora Technologies Inc.
 Loading...