

Page 1

Voyager® PRO UC
Wireless Headset System
WG200/B
User Guide
Page 2

Welcome
Congratulations on purchasing your new Plantronics product. This user guide contains instructions for setting up and using your Voyager
PRO UC WG200/B (BUA-200 USB Adapter + WH200/B (Voyager® PRO) Headset) Wireless Headset System.
Please refer to the separate safety instructions for important product safety information prior to installation or use of the product.
Plantronics Voyager PRO UC User Guide
Page 3

Contents
1 Package Contents and Features .................................4
1.1 USB Adapter ............................................................ 4
1.2 Headset ................................................................... 4
2 Set Up ........................................................................ 6
2.1 Connecting USB Adapter to PC .............................. 6
2.2 Charging Headset .................................................... 6
2.3 Fitting Headset ........................................................ 6
3 Test Call ......................................................................8
3.1 Making a Test Call .................................................... 8
4 System Information .....................................................9
Muting Headset During a Call ........................................ 9
USB Adapter Indicator Light .......................................... 9
Headset Controls and Indicators ................................... 9
Checking Battery Status .............................................. 10
Automatic Battery Status Alerts .................................. 10
Out of Range Warning ................................................. 10
Pairing Headset to USB Adapter ................................. 10
5 Using Your Headset with Your Bluetooth
Mobile Phone ............................................................11
Pairing Your Headset to Your Bluetooth
Mobile Phone ............................................................... 11
Placing, Answering and Ending Calls
with Your Headset and Bluetooth Mobile Phone ......... 11
6 PerSono® Suite Software ..........................................12
Softphone Support ...................................................... 12
Battery Life ................................................................... 12
Settings Screen – Headset and USB Adapter ............. 13
Help for USB Adapter Settings .................................... 13
PC Panel Screen .......................................................... 14
Advanced Settings ....................................................... 14
Support Screen ............................................................ 14
Updates ....................................................................... 14
7 Troubleshooting and Common Questions .................15
Plantronics Voyager PRO UC User Guide
Page 4
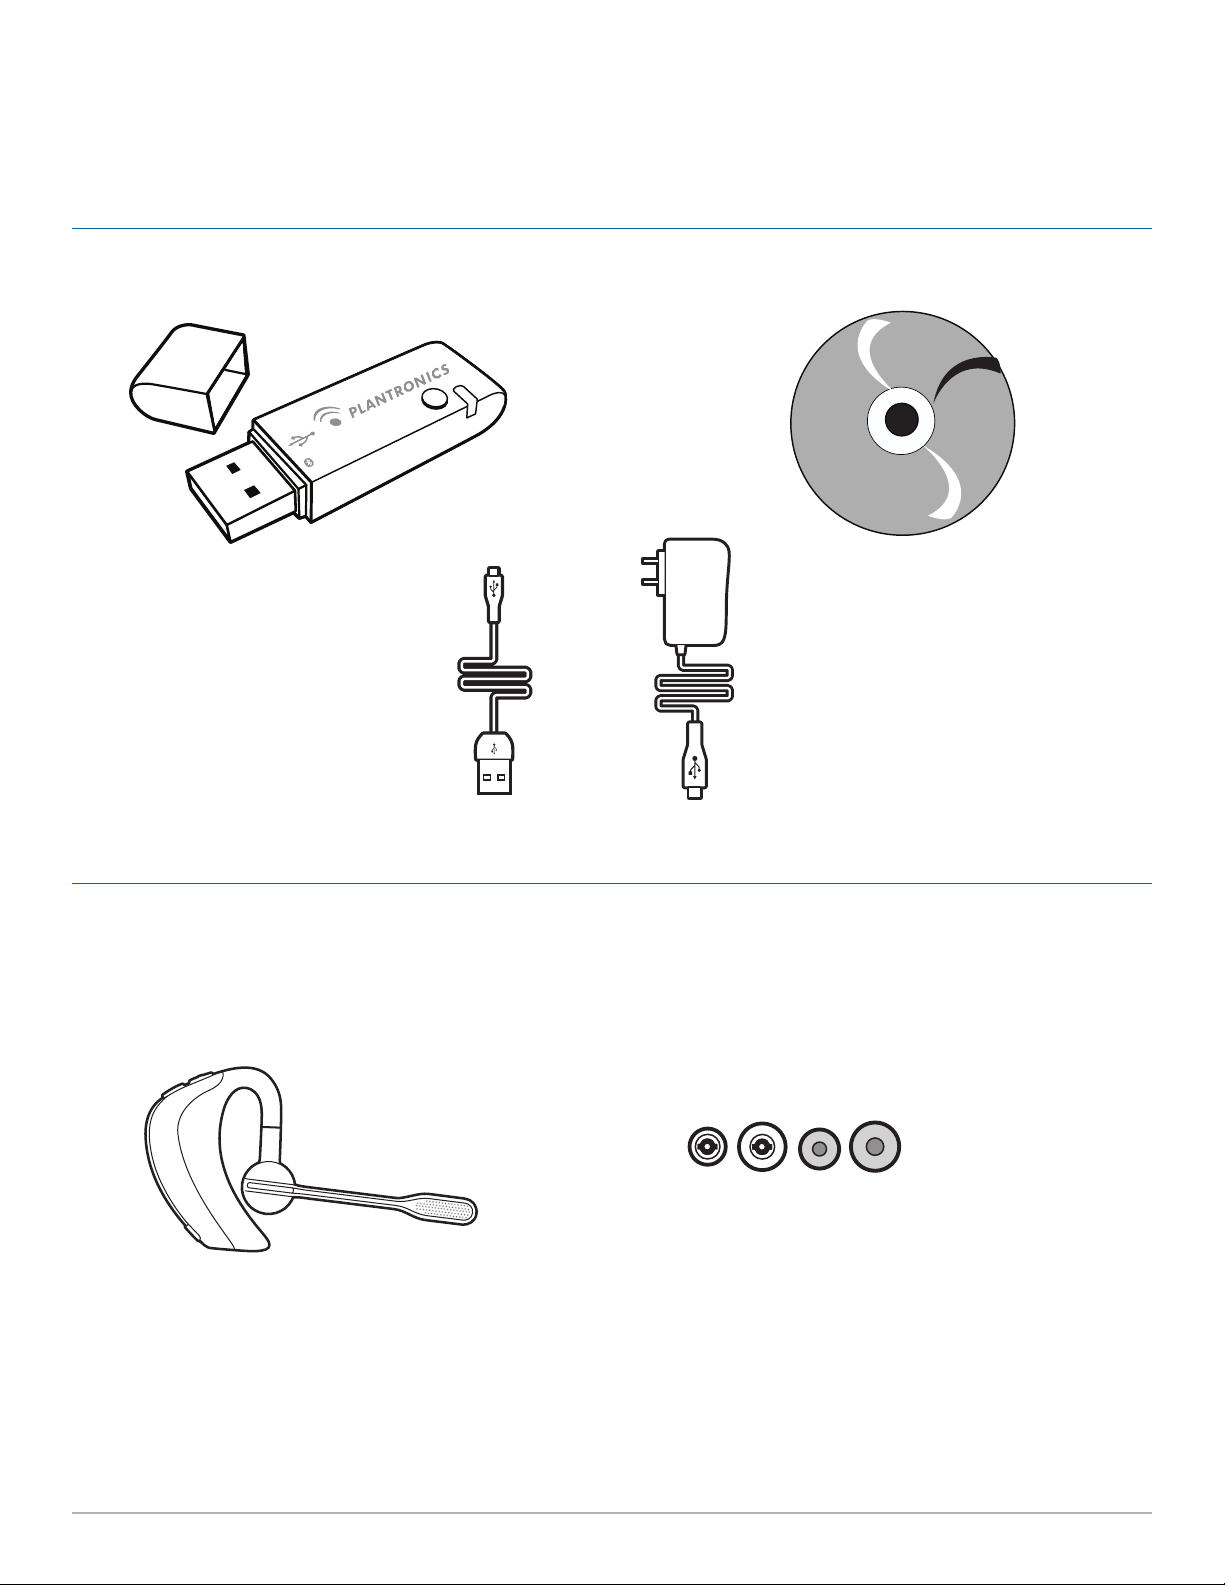
1 Package Contents and Features
1.1 Voyager PRO UC USB Adapter and Charger
USB Adapter
CD includes:
• PerSono® Suite Software
• Complete User Guide
USB Charging Cable
1.2 Voyager PRO UC WH200/B Headset
Headset with Pre-Installed Medium
Eartip
AC Charger
Soft Gel Eartips (Small & Large)
and Foam Eartip Covers
Plantronics Voyager PRO UC User Guide 4
Page 5
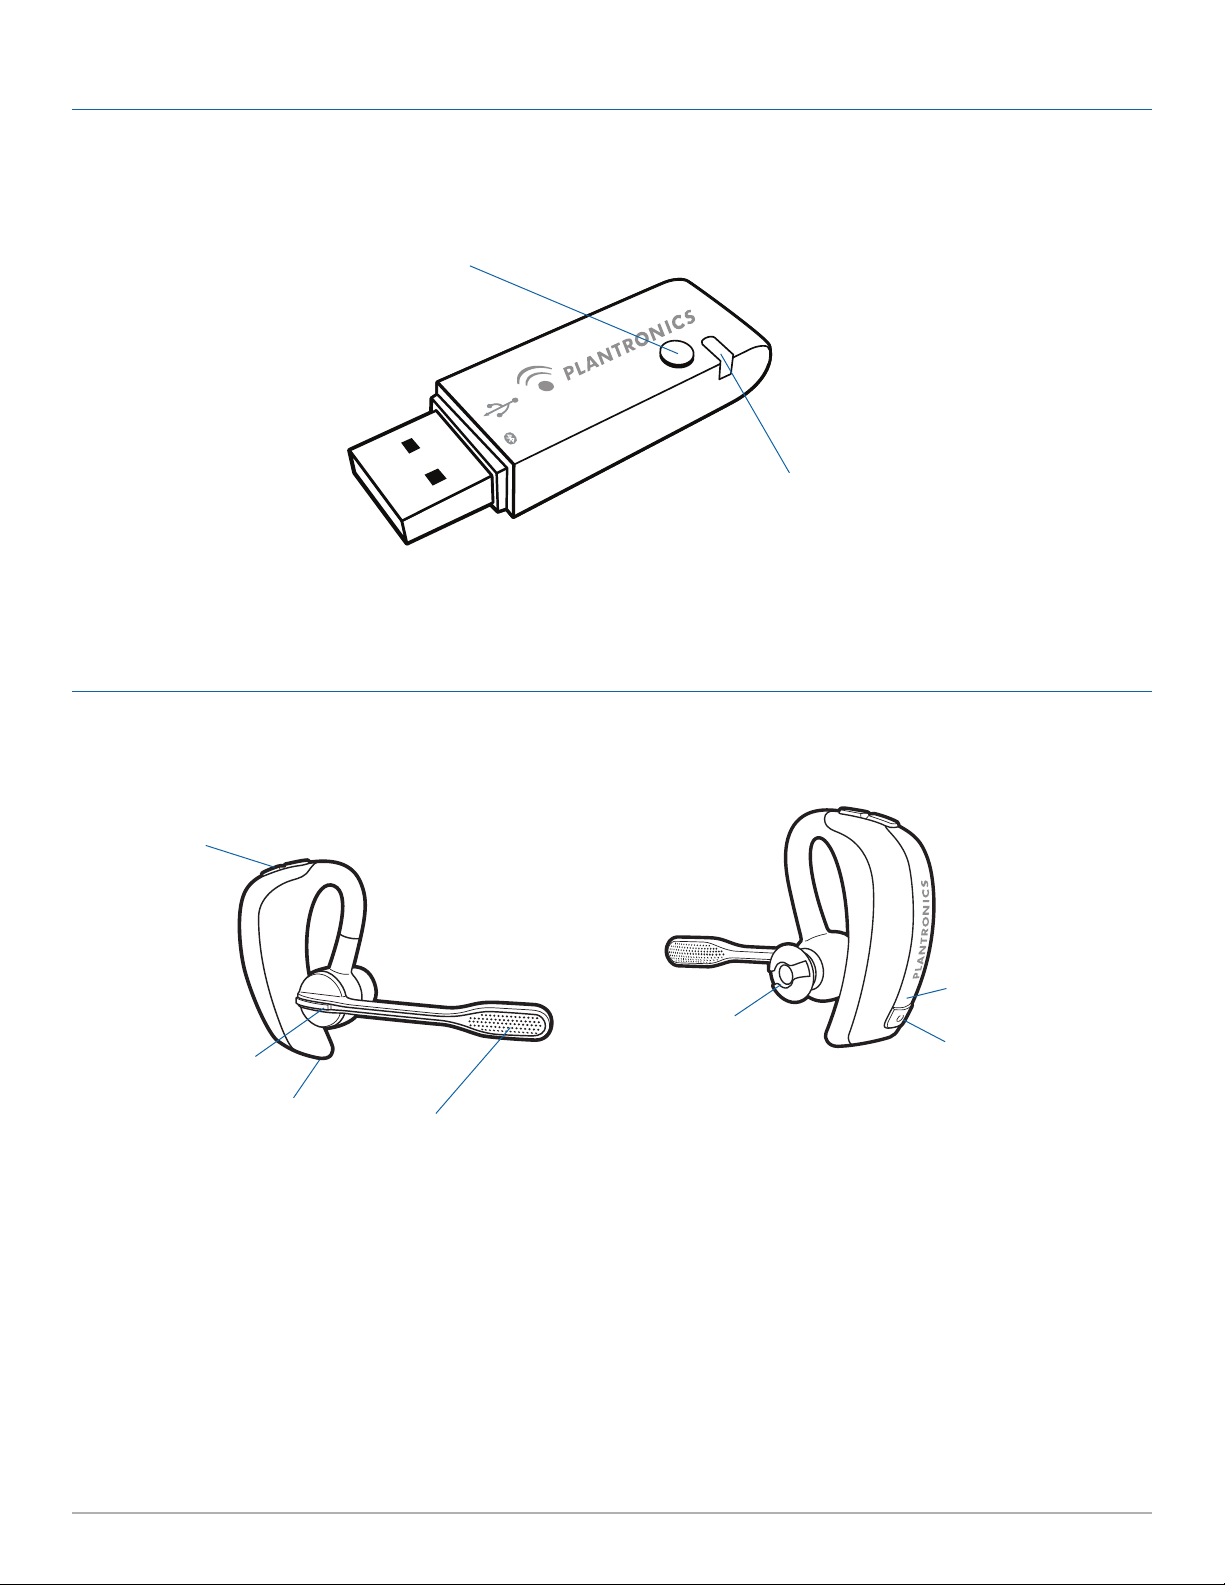
Voyager PRO UC USB Adapter Features
Pairing Button
Indicator Light
Voyager PRO UC WH200/B Headset Features
Volume Up (+) and Down (-) Buttons
(also controls mute)
Call Control Button
Micro USB Charging Jack
Dual Microphones with
Wind Screens
Status Indicator Light
Eartip
Power On/Off
Check Battery Button
Plantronics Voyager PRO UC User Guide 5
Page 6
2 Set Up
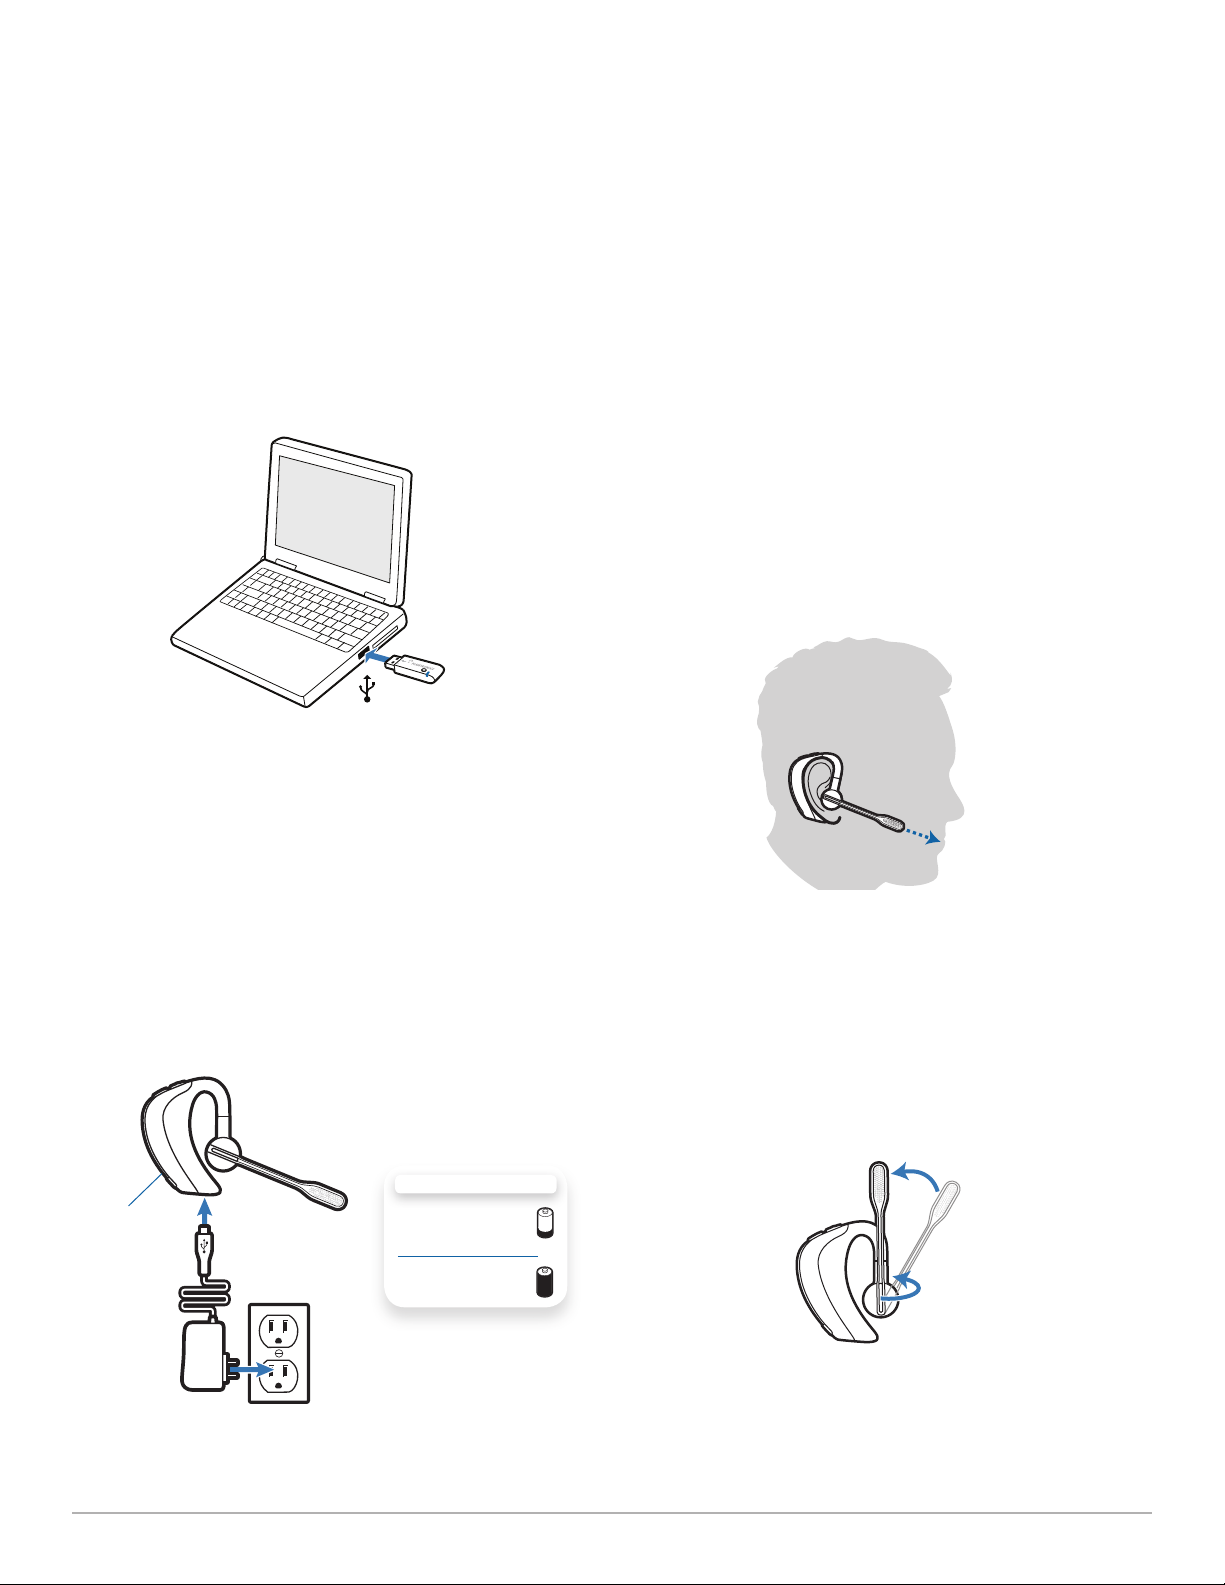
2.1 Connecting USB Adapter to PC
1 Insert the USB adapter into USB Port on PC. The indicator
light on the USB adapter will be solid red to indicate the USB
adapter is powered on.
IMPORTANT NOTE For best performance it is recommended
that Windows is updated with Service Pack levels listed below:
Microsoft Windows® XP-Service Pack 3 (SP3) or later
Microsoft Windows Vista®-Service Pack 1 (SP1) or later
NOTE The USB charging cable can also be used to charge the
headset. To successfully charge your headset with the USB cable
the PC must be on and in active state (not standby). The charging
time will vary according to the number of other devices drawing
power from the PC’s USB port(s).
2.3 Fitting Headset
The headset comes configured for the right ear. Ensure a proper
fit for optimal sound clarity and comfort.
1 Guide the earloop behind your ear and place the
headset so that the speaker and eartip rest comfortably
in your ear.
1
2
2.2 Charging Headset
1 Connect the AC charger to outlet and headset.
The indicator light on the headset will be solid red to indicate
that the headset battery is charging.
2 Charge for at least 30 minutes prior to the first use.
A full charge takes 1.5 hours.
CHARGING TIME
Indicator
Light
NOTE Always charge at near room temperatures; never charge
battery at temperatures below 0ºC (32ºF) or above 40ºC (104ºF).
30 min .....................
Minimum charge
before first use
1.5 hours ................
Full charge
2 For optimal voice clarity, pivot the boom up or down to
point the microphones toward the corner of your mouth.
The headset can be worn on either ear by adjusting the
microphone boom. To convert for wearing on the left ear:
3 Pivot the boom into an upright position.
4 Rotate the boom and speaker to the other side of the
headset.
3
4
Plantronics Voyager PRO UC User Guide 6
Page 7

Changing Eartips
The headset comes with the medium eartip installed. You can
replace it with the optional small or large eartip provided.
1 To remove the eartip, grip the eartip with your thumb and
forefinger. Gently push it into the speaker housing and
rotate it a quarter turn to the left. Gently lift the eartip
away from the headpiece.
1
2 To attach a new eartip, align the tabs on the eartip with
the slots on the speaker housing. Gently push the eartip
into housing while turning it a quarter turn to the right.
The eartip will stop rotating when it is attached.
2
NOTE The optional foam eartip cover can be used for a more
comfortable and stable fit.
Plantronics Voyager PRO UC User Guide 7
Page 8

3 Test Call
3.1 Making a Test Call
1 Power the headset on by pressing the Power On/Off
button for two seconds. The headset indicator light will be
remain solid blue for two seconds to confirm that the headset
is powered on.
NOTE The USB adapter indicator light will remain solid blue
when the headset is powered on and paired to the headset. The
indicator light will remain solid red when the headset is powered
on but not paired to the headset.
2 With your headset on, press the call control button on
the headset.
3 Set the headset and microphone volume to a
comfortable level using your softphone or unified
communication (UC) application set up.
4 Place a test call using your softphone or UC application.
5 Adjust the receive and listen volume to comfortable
levels using the volume control in your softphone or UC
application audio set up.
6 You can also fine tune the listening volume on the
headset by pressing the volume up button [+] to
increase the volume and the volume down button [-] to
decrease the volume.
7 To end the test call, press the call control button on the
headset.
NOTE Listening and speaking volume levels can also be adjusted
using the PC “Sounds and Audio Devices” (Windows XP) or the
“Sound Option” (Windows Vista) from your PC Control Panel.
For your safety, do not use headset at high volumes
for extended periods of time. Doing so can cause
hearing loss. Always listen at moderate levels. For more
information on headsets and hearing visit:
www.plantronics.com/healthandsafety.
Plantronics Voyager PRO UC User Guide 8
Page 9

4 System Information
Muting Headset During a Call
To mute a call, press and hold the volume + and - buttons
simultaneously until you hear a status prompt. The sequence
will start with low-high tones plus a voice prompt “Mute On” (in
English). The low-high tones repeat after 15 minutes to advise
mute is activated. The full sequence repeats every 30 minutes
until mute is de-activated.
To unmute a call, press and hold the volume + and - buttons
simultaneously until you hear high-low tones followed by a voice
prompt “Mute Off” (in English).
USB Adapter Indicator Light
USB Adapter Status Indicator Light
Headset in talk mode
Adapter and headset pairing Flashes red and blue
Connected, no activity Solid blue
Powered on - headset not paired Solid red
Flashes blue
Volume Up (+) and Down (-) Buttons
Headset Controls and Indicators
Action Indicator Light Tone
Power on/off Press power/off button 2
seconds
Check if headset is powered on Short press call control button
or volume + or - button
Incoming call None Flashes blue Three single low tones
Call answer/end Short press call control button Short blue flash Single low tone followed by low-
Adjust the volume (during a call)
Call indicator light
(enable/disable)
Reconnect after leaving range
for more than 30 seconds
Short press volume + or -
button
With headset powered on, press
power, volume + and - buttons
simultaneously for 1 second
Short press call control button Single blue flash Single low tone
On: solid blue for 2 seconds
Off: solid red for 2 seconds
Short blue flash None
Single blue flash Tone at each change in volume.
Turn indicator on: blue glow
increases for 2 seconds
Turn indicator off: blue glow
fades for 2 seconds
On: ascending tone
Off: descending tone
low-high tones
Double tone when min/max
volume level reached
Single low tone
Plantronics Voyager PRO UC User Guide 9
Page 10

Checking Battery Status
To check the battery status, the headset must be powered on.
Short press the power button. The indicator light flashes red to
show the battery charge level as shown below.
Charge Indicator Lights
Red Flashes Battery Level
S More than 2/3 full
S S
1/3 to 2/3 full
Pairing Headset to USB Adapter
The headset and USB adapter are supplied paired to each other.
However, if you wish to use a replacement headset with your
existing USB adapter, the units can be paired to each other by the
following method:
1 Ensure your replacement headset is fully charged.
2 Press and hold the power button until the indicator light
flashes red and blue. The headset is now in pairing mode.
NOTE If you don’t see the red and blue flash, press and hold the
power button to turn your headset off. Then press and hold the
power button again until you see the red and blue flash.
S S S
Less than 1/3 full
Automatic Battery Status Alerts
When the battery charge is very low, a tone and voice prompt in
English will automatically occur. See below.
Low Battery Warnings
Battery Level Tone Voice Prompt
30 minutes of talk
time remaining
(this alert only occurs
during an active call)
10 minutes of talk
time remaining
Double high tone
every 15 minutes
Triple high tone
every 30 seconds
“Battery Low”
repeats every
30 minutes
“Recharge Battery”
repeats every 3
minutes
3 Place the USB adapter in pairing mode by pressing
and holding the pairing button on the adapter for two
seconds. The pairing light will flash red and blue.
4 When the pairing light on the USB adapter goes solid
blue, the headset and the USB adapter are paired.
NOTE Take caution pairing the USB adapter. Do not press hard.
Please “press” with both fingers rather than push on the USB
adapter to avoid damage to the USB adapter or USB port.
Out of Range Warning
If you are on a call you will hear the audio degrade as you move
out of range.
If you stay out of range, active calls will be suspended. Calls will
be re-established upon walking back into range.
Plantronics Voyager PRO UC User Guide 10
Page 11

5 Using Your Headset with your
®
Bluetooth
Mobile Phone
Pairing your Headset to your Bluetooth
Mobile Phone
1 Turn on your mobile phone and enable Bluetooth. For
most phones select Settings>Tools>Connections>
Bluetooth>On. See your phones user guide for more
information.
2 Press and hold the power button on the headset until
the indicator light flashes red and blue. The headset is
now in pairing mode.
NOTE If you don’t see the red and blue flash, press and hold the
power button to turn your headset off. Then press and hold the
power button again until you see the red and blue flash.
The headset will stay in pairing mode for three minutes.
3 Use the commands on your phone to locate the headset.
For most phones select Settings>Tools>Connections>
Bluetooth>Search>PROPlantronics. See your phones user
guide for more information.
4 When prompted for a passkey, enter 0000 (4 zeros). The
headset indicator light will flash blue when paired successfully.
NOTE To pair your headset with an additional phone, turn on the
phone then repeat steps 2 through 4.
NOTE For detailed pairing instructions for popular mobile phones
visit: www.plantronics.com/easytopair.
Placing, Answering, and Ending Calls with your Headset and Bluetooth Mobile Phone
To place a call Dial number on your mobile phone keypad.
To answer a call Short press call control button.
To answer a call when already on
an active UC application call
To end a call Short press call control button.
Redial last number* Double press call control button. There will be a double low tone on each press. A final tone
Activate voice dialing* Press and hold call control button for two seconds. First tone on key press start followed by
Reject a call Press call control button for one second until you a single low tone.
Missed call Tap any button to clear the indicator light. The indicator light will triple flash purple every 10
Transfer a call from your mobile phone to
your headset
Transfer a call from your headset to your
mobile phone
* Only available on mobile phones and carriers that support these features.
Short press the call control button to end the UC application call, then press again to
answer your mobile phone call.
indicates the last number has been redialed.
a second tone which indicates voice dial is activated.
seconds for 5 minutes or until cleared.
While on a call, press the call control button for one second until you hear a single tone
followed by double low tones.
While on a call, press the call control button for one second until you hear a single tone
followed by double low tones.
Plantronics Voyager PRO UC User Guide 11
Page 12
6 PerSono Suite Software
PerSono Suite.ex e
It is highly recommended that you install the PerSono Suite
software. Though your Voyager PRO UC system will operate
without the software running it will limit the system’s capabilities.
PerSono Suite software allows you to do the following with your
Voyager PRO UC system:
• Answer/end calls from the PC remotely with the headset
(requires use of supported softphone)
• Customize your headset and adapter settings to your personal
preferences
• Automatically manage your PC multimedia so you never miss a call
• Quickly access links to product support and software/rmware
upgrade information
Softphone Support
For a list softphones supported by PerSono Suite refer to www.
plantronics.com/SoftphoneCompatibility PerSono Suite
software supports all the softphones on the list with no additional
steps by the user except Skype™.
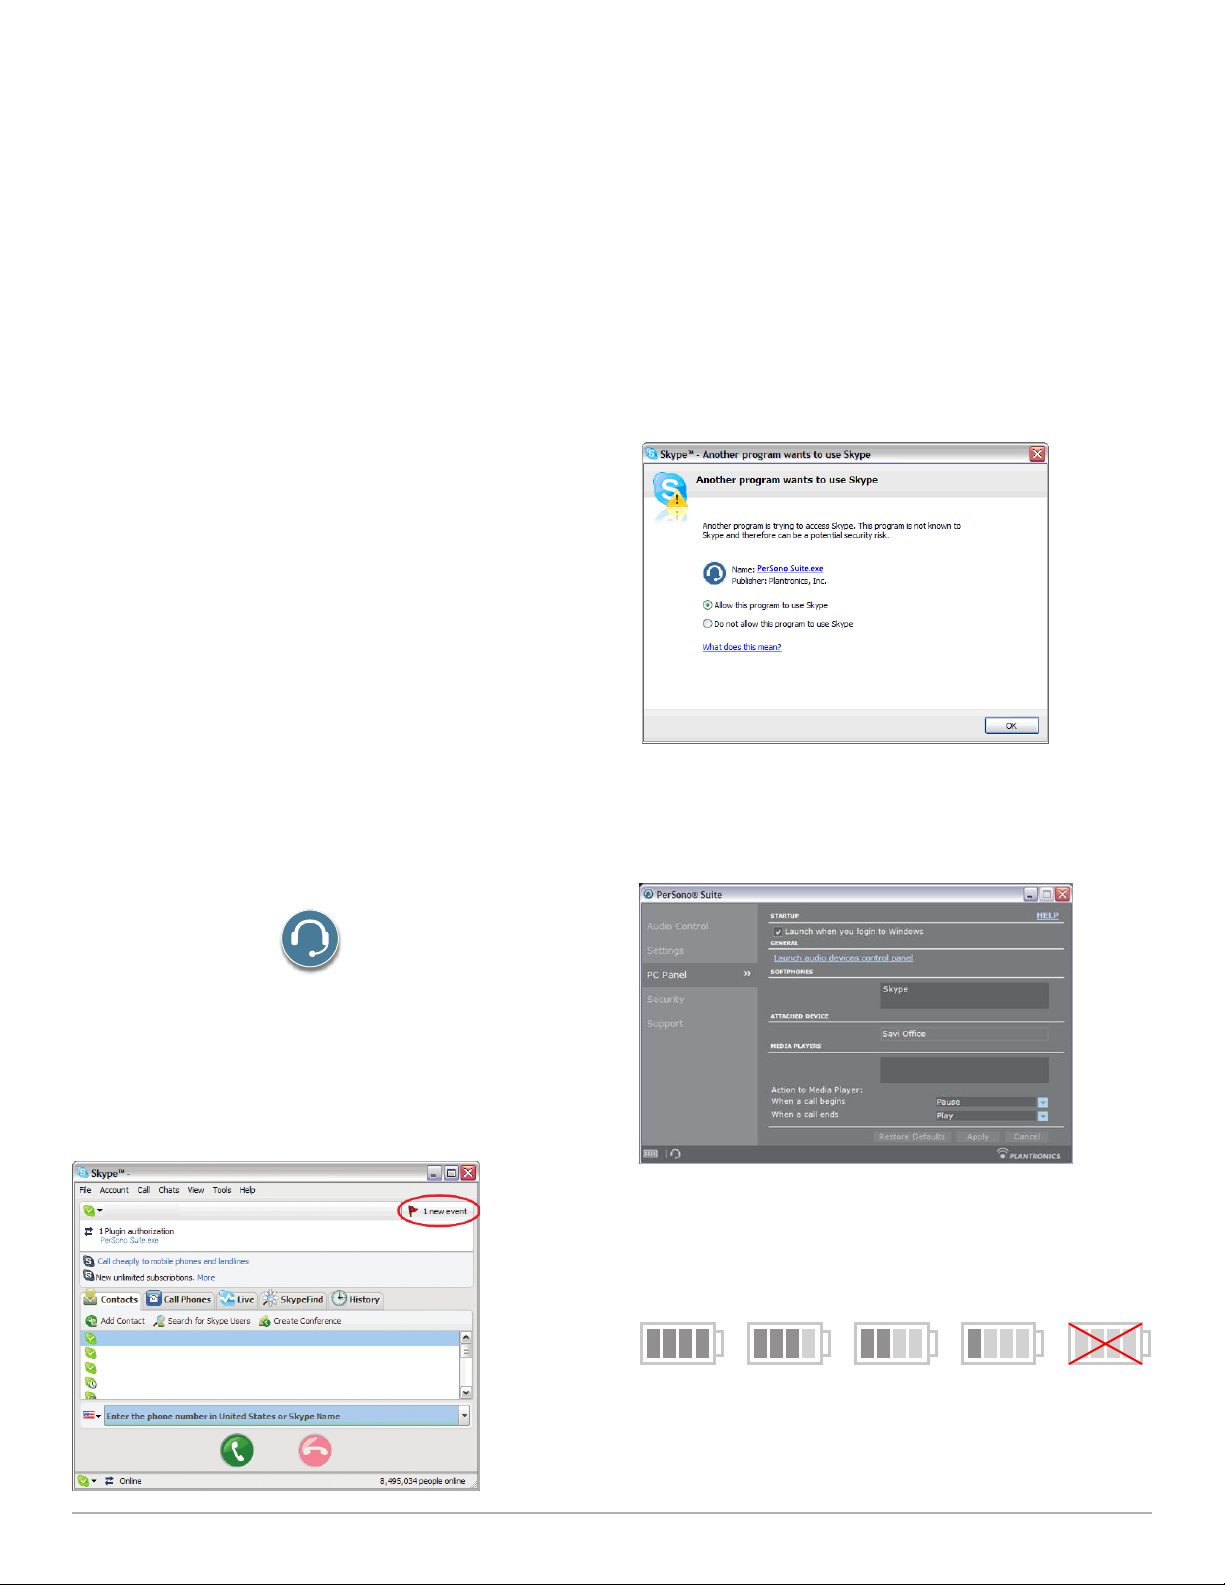
To allow Skype to be a supported softphone in PerSono Suite
please follow these steps:
1 Ensure PerSono Suite software is running on your PC.
You will see a headset icon in the lower right portion of
the PC tray bar when PerSono Suite software is running.
3 The “Manage API Access Control” screen will pop
up stating that “Another program is trying to access
Skype”. The name of the program will appear as
“PerSonoSuite.exe” with the publisher “Plantronics,
Inc.” You must select “Allow this program to use Skype”
and click OK.
4 To confirm that PerSono Suite is now supporting Skype,
go to the “PC Panel” tab in PerSono Suite and ensure
that Skype is listed under “Softphones”.
2 If Skype is running on your PC, Skype will notify you of
the event that “PerSonoSuite.exe wants to use Skype”.
Go to the “new event” tab located in the upper right of
the Skype window and click on the red flag. You then
will need to click on the “PerSonoSuite.exe” link to be
taken to the “Manage API Access Control” screen.
Battery Life
At the lower left corner of the screen (and for all software
screens), you will see one of the following icons indicating the
approximate charge left in the headset battery.
100% 75% 50% 25% Less than 5 Mins
Plantronics Voyager PRO UC User Guide 12
Page 13

Settings Screen – Headset and USB Adapter
The Settings Screen allows you to customize the adapter and headset to your preference. The Voyager PRO UC System is shipped with the
default settings and can be changed as described in the Settings column below.
NOTE Some parameters may appear as grayed out. PerSono Suite automatically grays out parameters that do not apply to a particular
Plantronics device.
Settings – Headset
Feature Settings Default
Mute tone On/off On
Ring tone – PC Sound 1/sound 2/sound 3 Sound 2
Ring tone volume – PC On/off On
Ring Tone - Mobile Sound 1/sound 2/sound 3 Sound 1
Ring Tone Volume - Mobile On/off On
Second Inbound Call Ring continuously/ring once/ignore Ring continuously
Settings – USB Adapter
Feature Settings Default
Audio bandwidth – PC Wideband/narrowband Wideband
Ring both headset/PC On/Off On
Help for USB Adapter Settings
Audio
Bandwidth
The system will support both narrowband and wideband audio from the PC.
Wideband audio delivers heightened speech clarity and life-like fidelity. However, wideband audio
consumes more battery power and has more stringent access criteria which reduces the number of
systems that can be deployed in a small area.
All PCs support wideband audio.
When switching between narrowband and wideband audio, you must re-establish the audio link for the
changes to take effect.
Wideband
PC
Plantronics Voyager PRO UC User Guide 13
Page 14

PC Panel Screen
Support Screen
• Choose whether you want PerSono Suite software to launch
when you login to Windows.
• See a list of supported softphones running on your PC.
• See which Plantronics device is attached to your PC and
working with PerSono Suite software.
• Customize how you want the PerSono Suite software to
manage your multimedia when a call begins/ends.
Advanced Settings
Microsoft Office Communicator Dial-tone Enabled
If this feature is set to ON, when a PC radio link is established,
Microsoft Office Communicator will assume the user is trying to
place a VOIP call and provide a dial tone.
If this feature is set to OFF, when a PC radio link is established,
Microsoft Office Communicator will sit idle.
“Microsoft Office Communicator Dial-tone Enabled” can be set to
ON or OFF.
Microsoft Office Communicator Certified product:
Default Setting = ON
Standard product: Default Setting = OFF
Audio Sensing Enabled
Audio Sensing is a special feature supported by Plantronics
wireless devices that can detect audio signal at the USB port
and automatically establish a PC radio link between the base and
wireless headset without the user having to press the PC call
control button. If the parameter “Microsoft Office Communicator
Dial-tone Enabled” is set to ON, every time the user presses the
PC call control button the Microsoft Office Communicator dial
tone will be heard. However, the user may have pressed the PC
call control button to listen to music, etc., and does not want to
hear the dial-tone. In this case, if the user sets the “Audio Sensing
Enabled” parameter to “ON”, the radio link will be established
automatically when any PC audio is detected at the USB port,
thus eliminating the need for the user to press the PC call control
button.
The support screen provides on-line access to this printable user
guide, frequently asked questions, how to contact Plantronics,
and software upgrade information. The current version of software
and firmware currently running on your system is also shown here.
Updates
All the required software and firmware for your Plantronics device
can be remotely updated if and when updates are available. You
can control how frequently the system will check for available
updates. When updates are available, you can view all pending
updates and decide when to download and install any one of
them.
The particular version of PerSono Suite software and headset/
base firmware running on your system is always reflected in the
VERSIONS fields.
Notify me when updates are available: By enabling this check
box, you will activate a periodic automatic check for available
software and firmware updates.
When this parameter is enabled, automatic check for updates will
be activated and the frequency field will be highlighted allowing
you to choose the frequency of checking for updates, e.g., once
every 3 months, once every month or once every week.
When this parameter is disabled, automatic check for software/
firmware updates is disabled.
Check For Updates: You can choose to check for available
software/firmware updates at any time by clicking on the Check
For Updates button.
Available Updates: Following an automatic or manual check for
updates, this field will be populated with any applicable software
and firmware updates.
“Audio Sensing Enabled” can be set to ON or OFF.
Microsoft Office Communicator Certified product: Default Setting
= ON
Standard product: Default Setting = OFF
Plantronics Voyager PRO UC User Guide 14
Page 15

7 Troubleshooting and Common Questions
Troubleshooting — UC Application Usage
My headset doesn’t work with
my UC application.
The sound is distorted or I hear
an echo in the headset.
While on my UC application call
I want to accept a call from my
mobile phone.
Reconnecting the Bluetooth link
between your headset and USB
adapter.
Talk time performance is
significantly degraded even
after a full recharge.
Make sure your headset is charged.
Make sure your headset is on and connected.
Press the call control button on your headset.
Fine tune the listening volume with the call control button.
If the volume is still too low, adjust the listening volume on the PC using your UC application.
Reduce speaking volume on the PC using your UC application.
Point microphone towards your chin.
If the distortion is still present, lower the volume using the call control button.
Press the call control button for less than 1 second (this will disconnect the UC application call.)
Press the call control button again to connect with your mobile phone.
If you turn on the headset beyond Bluetooth range, and then return within it, you may need to
reestablish the Bluetooth link by pressing the USB adapter button.
Battery is wearing out. Contact www.plantronics.com/support for factory service information.
Plantronics Voyager PRO UC User Guide 15
Page 16

Troubleshooting — Mobile Phone Usage
My headset does not
work with my phone.
My phone did not locate the
headset.
I could not enter my PIN code. Turn both your phone and headset off and on, and then repeat the pairing process on page 11.
I cannot hear caller/dial tone. The headset is not turned on. Press the call control button for approximately 2 seconds until you
Audio quality is poor. Your headset is out of range. Move the headset closer to the Bluetooth phone.
Make sure the headset is fully charged.
Make sure headset is paired with the Bluetooth phone you are trying to use.
See “Pairing Your Headset to your Bluetooth Mobile Phone” on page 11.
Turn both your phone and headset off and on, and then repeat the pairing process on page 11.
Your PIN code, or Passkey, is 0000 (4 zeros).
hear a tone or see the indicator glow blue.
Your headset is out of range. Move the headset closer to the Bluetooth phone.
Your headset battery is drained. Charge your battery. See “Charging Headset” on page 6.
The listening volume is too low. Incremental tapping of the call control button will adjust volume.
Make sure that the headset fits properly. See “Fitting Headset” on page 6.
Callers cannot hear me. Make sure that headset is sitting correctly in ear with boom pointing towards corner of mouth.
See “Fitting Headset” on page 6.
My headset falls off my ear. Make sure that headset is sitting correctly on your ear with boom pointing towards corner of
mouth.
See “Fitting Headset” on page 6.
Plantronics Voyager PRO UC User Guide 16
Page 17

Plantronics, Inc.
345 Encinal Street
Santa Cruz, CA 95060
United States
www.plantronics.com
For product support contact us at www.plantronics.com/support or call 1-800-544-4660.
© 2009 Plantronics, Inc. All rights reserved. Plantronics, the logo design, PerSono, Plantronics Voyager, and Sound
Innovation are trademarks or registered trademarks of Plantronics, Inc. Microsoft, Windows and Vista are trademarks or
registered trademarks of Microsoft Corporation. Skype is a trademark of Skype Limited or other related Skype companies.
The Bluetooth word mark is owned by Bluetooth SIG, Inc. and any use of the mark by Plantronics is under license.
Patents US 5,210,791; Patents Pending.
81979-41 (10.09)
 Loading...