

Page 1
User Guide
Guide d’Utilisation
Guía para el usuario
Manual de usuário
DuoSet™ Headset
Models H141/H141N/P141
Page 2

Printed in the U.S.A. 46471-01 (© 11•99)
345 Encinal Street
Santa Cruz, California 95060
1.831.458.7700
www.plantronics.com
Page 3
i
A B
C
D
E
F
G
H
I
J
K
Page 4
ii
DIAGRAM
1
2
3
4
5
6
1
2
3
4
8
7
8
7
5
6
Page 5

iii
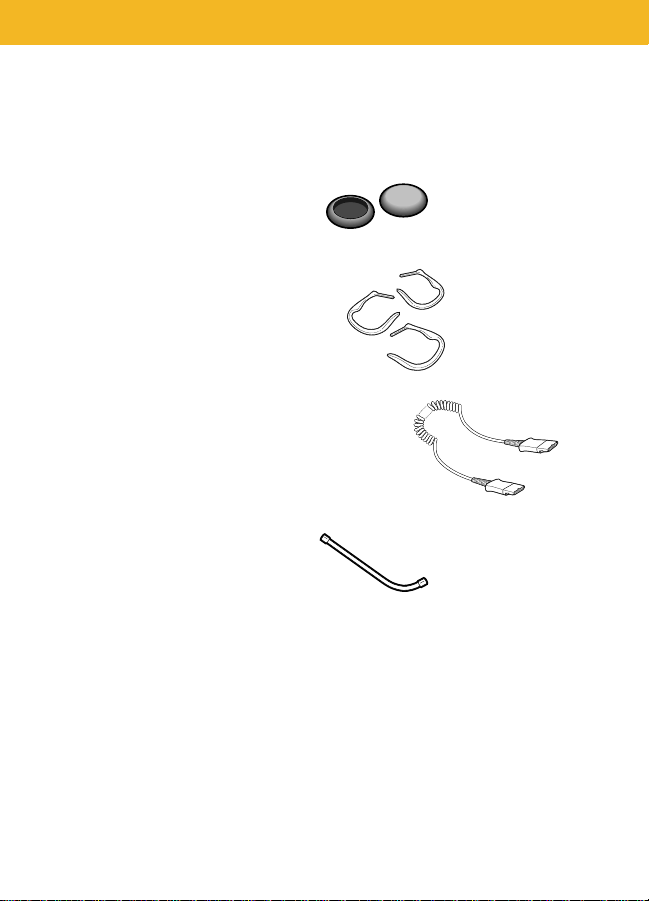
Adjustable Headband
(P/N 43298-01)
Ear Cushion Assembly
(P/N 43299-01)
Headset Assembly
Voice Boom
Cord
Clothing Clip
(P/N 43220-01)
Pivot Ball Ring
(P/N 45650-01)
Flexible Earhook
(P/N 45651-01)
3
6
5
1
2
4
7
Headset
(Both Configurations Shown)
8
DIAGRAM KEY
Page 6

Page 7

Page 8

WELCOME
Thank you for selecting the DuoSet™
Headset from Plantronics. This User
Guide will help you install your
DuoSet™ Headset and learn its basic
operation. The Amplifier is described
in a separate guide which should be
read following familarisation with
the headset.
Page 9
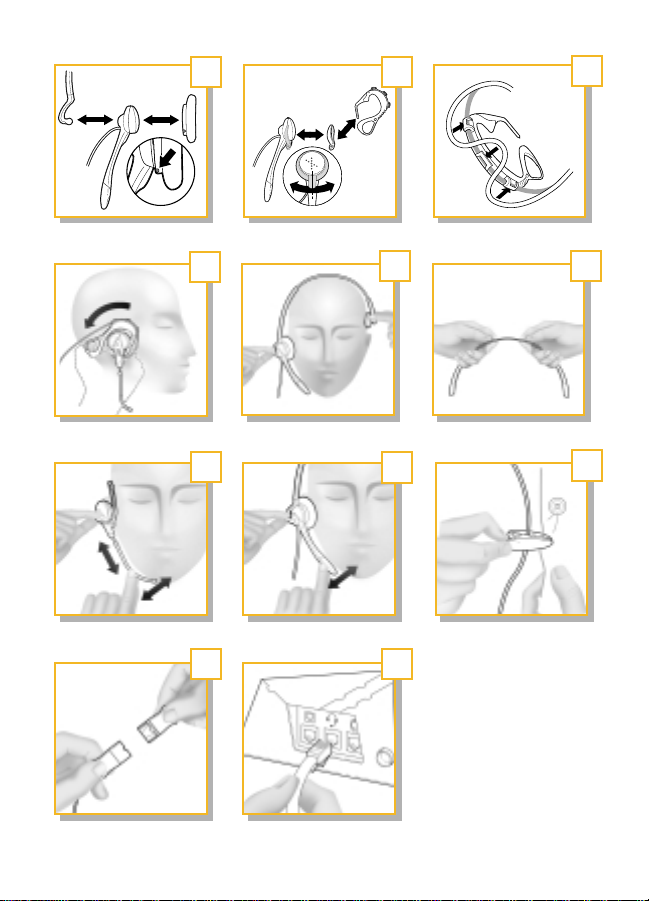
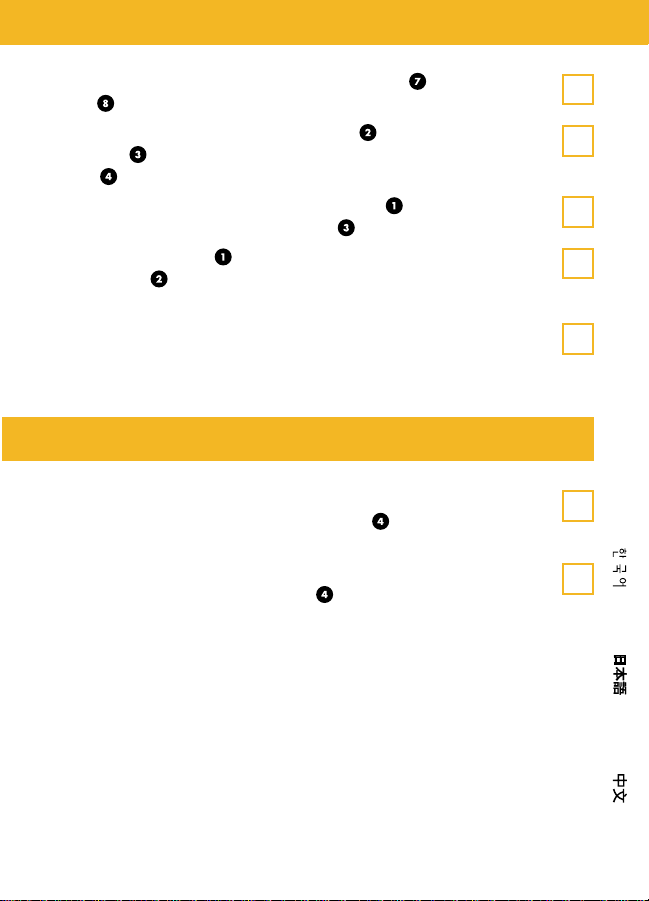
If already in place, unsnap the Headband from the rear of
the Headset Assembly .
If already in place, remove the Ear Cushion and Rubber
Ring from the Headset Assembly .
Press the Pivot Ball Ring onto the Headset Assembly
aligning the Pivot Ball Ring with the Voice Boom .
Insert the Ear Hook into either side of the Pivot Ball Ring
depending on whether the headset is to be worn over the left
or the right ear.
For added stability, press the Headset Cord under the Cord
Guides on the Ear Hook.
Expand the Ear Hook around your ear as shown and release.
Rotating the Pivot Ball Ring on the Headset Assembly
may provide a better fit.
B
A
B
C
D
A
OVER-THE-EAR CONFIGURATION
2
Page 10
ENGLISH FRANÇAIS ESPAN
˜
OL PORTUGUE
ˆ
S KOREAN JAPANESE CHINESE
OVER-THE-HEAD-CONFIGURATION
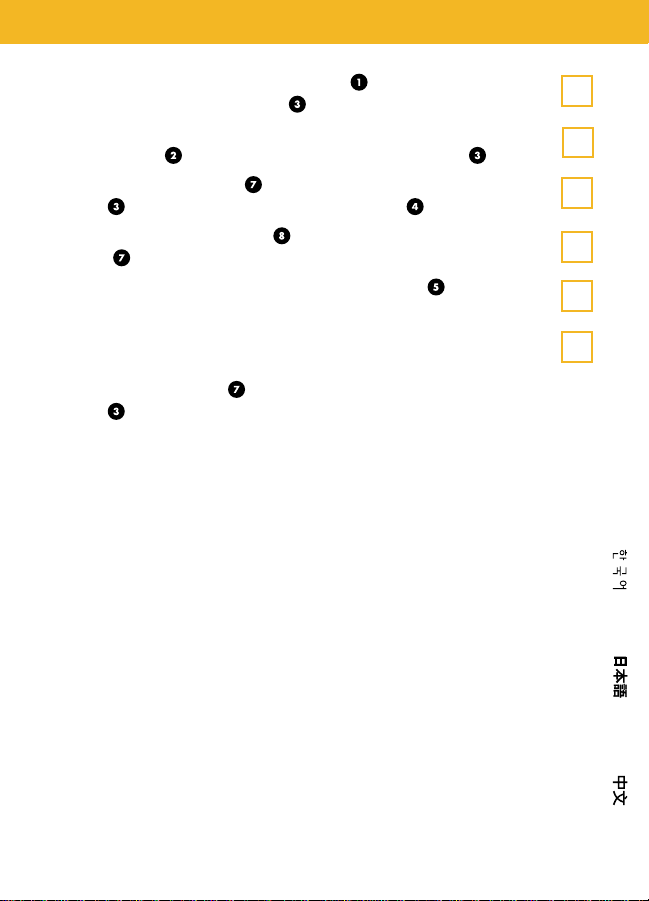
If already in place, remove the Pivot Ball Ring and Ear
Hook .
Press the Ear Cushion and Rubber Ring onto the Headset
Assembly . Align the notch in the ring with the Voice
Boom .
Snap the ball on the end of the Headband into the socket
on the rear of the Headset Assembly .
Place the Headband over the top of your head, with the
Ear Cushion resting gently against your ear and the T-Bar
positioned above the opposite ear.
If the headband is too tight or too loose, grasp the metal part
of headband and gently bend in the middle. The headband
length may be adjusted for fit and comfort.
A
F
B
A
E
POSITIONING THE BOOM
If you have the Voice Tube version of the product, pull out,
push-in, rotate, or swivel the Voice Boom into a position
near the corner of your mouth that best transmits your voice.
If you have the Noise-Cancelling version of the product,
position the tip of the Voice Boom as near to the corner of
your mouth as you comfortably can.
G
H
3
Page 11

SECURING THE HEADSET
Attach the Clothing Clip at about chest level. The clip keeps
the headset properly seated and free of the weight of the
Headset Cable . This is particularly important in the Ear
Hook configuration.
I
Using the Quick Disconnect™ Module
Use the Quick Disconnect™ (QD) Module to place a call on
hold and move away from the phone without removing the
headset.
To put your call on hold, grasp the QD Module as shown and
pull straight apart.
To resume your conversation, reconnect the two halves.
Polaris™ Headset Variations
Polaris™ Headset Variations, designed for use with phones
with a clearly marked headset jack, do not require an
Amplifier. Insert the Polaris connector directly into the headset
jack. Consult your telephone's instruction manual for more
information.
You are now ready to install the Amplifier.
CONNECTING THE HEADSET
J
K
4
Page 12

ENGLISH FRANÇAIS ESPAN
˜
OL PORTUGUE
ˆ
S KOREAN JAPANESE CHINESE
CALLERS CANNOT HEAR ME
For Voice Tube models, determine if the Voice Tube is clogged
or positioned improperly.
For Noise-Cancelling models, make sure the microphone is
positioned properly at the corner of your mouth.
If you have a separate Amplifier, verify that the Speak Volume
is set properly.
If you have a separate Amplifier, verify that the Mute function
has not been activated.
I CANNOT HEAR CALLERS
Verify that the Quick Disconnect Module is connected.
Make sure the Headset Assembly is centered on your ear.
If you have a separate Amplifier, verify that it is installed
correctly.
If you have a separate Amplifier, verify that the Listen Volume
is set properly.
EAR HOOK IS UNSTABLE
Experiment with the insertion of the Ear Hook into the Pivot
Ball Ring.
Rotate the Pivot Ball Ring on the Headset Assembly.
If a comfortable fit cannot be achieved using the Ear Hook,
consider using the Headband.
TROUBLESHOOTING
5
Page 13
For information on supplies and accessories, call your
Plantronics distributor or visit our website at
www.plantronics.com. See also Diagram Key for
additional part numbers.
Cushions (2) (P/N 43937-01)
Replace when torn or soiled.
Ear Hooks (3 Sizes) (P/N 43297)
Non-flexible earhooks offer fit variations.
Extension Cord (P/N 40711-01)
Increase mobility in your work area; lets you stay on the
line while moving away from the amplifier.
Voice Tube (P/N 29960-01)
Replace if clogged or damaged.
SUPPLIES AND ACCESSORIES
6
Page 14
FCC REQUIREMENTS—PART 68
This equipment complies with Part 68 of the FCC rules. On the bottom of the
modular adapter is a label that contains, among other information, the FCC
registration number and ringer equivalence number (REN) for this equipment.
If requested, this information must be provided to the Telephone Company.
The Telephone Company may make changes in its facilities, equipment,
operation or procedures that could affect the operation of the equipment. If this
happens, the Telephone Company should provide you advance notice in order
for you to make the necessary modifications to maintain uninterrupted services.
If you experience problems with your headset, please refer to the warranty
section for information on warranty and repair service. If the problem is causing
harm to the telephone network, the Telephone Company may request that you
remove the equipment until the problem is resolved. In extreme cases, the
Telephone Company may be forced to disconnect your service before notifying
you of the problem.
FCC REGISTRATION INFORMATION
INDUSTRY CANADA NOTICE
This Class B digital apparatus complies with Canada ICES003.
Notice: The Industry Canada label identifies certified equipment. This
certification means that the equipment meets certain telecommunications network
protective, operational and safety requirements. The Department does not
guarantee the equipment will operate to the users satisfaction.
Before installing this equipment, users should ensure that it is permissible to be
connected to the facilities of the local telecommunications company. The
equipment must also be installed using an acceptable method of connection. In
some cases, the company’s inside wiring associated with a single line individual
service may be extended by means of a certified connector assembly (telephone
extension cord). The customer should be aware that compliance with the above
conditions may not prevent degradation of service in some situations.
Repairs to certified equipment should be made by an authorized Canadian
maintenance facility designated by the supplier. Any repairs or alterations made
by the user to this equipment, or equipment malfunctions, may give the
7
ENGLISH FRANÇAIS ESPAN
˜
OL PORTUGUE
ˆ
S KOREAN JAPANESE CHINESE
Page 15

INDUSTRY CANADA NOTICE
telecommunications company cause to request the user to disconnect
the equipment.
Users should ensure for their own protection that the electrical ground
connections of the power utility, telephone lines and internal metallic water pipe
system, if present, are connected together. This precaution may be particularly
important in rural areas.
Caution: Users should not attempt to make such connections themselves, but
should contact the appropriate electric inspection authority, or electrician, as
appropriate.
Notice: The Ringer Equivalence Number (REN) assigned to each terminal device
provides and indication of the maximum number of terminals allowed to be
connected to a telephone interface. The termination on an interface may consist
of any combination of devices subject only to the requirement that the sum of the
Ringer Equivalence Numbers of all devices does not exceed 5.
See label on unit for REN No., as applicable.
WARRANTY AND SERVICE
The following warranty and service information applies
only to the U.S. and Canada. For information in other
countries, please contact your local distributor.
Limited Warranty
Plantronics, Inc. (“Plantronics”) warrants to the original consumer purchaser
that, except for limitations and exclusions set forth below, this product shall be
free from defects in materials and workmanship for a period of two (2) years
from the date of original retail purchase (“Warranty Period”). The obligation of
Plantronics under this warranty shall be limited to repair or replacement, at
Plantronics’ option, without charge, of any part or unit that proves to be
defective in material or workmanship during the Warranty Period.
8
Page 16

Exclusions From Warranty
This Warranty applies only to defects in factory materials and factory
workmanship. Any condition caused by accident, abuse, misuse or improper
operation, violation of instructions furnished by Plantronics, destruction or
alteration, improper electrical voltages or currents, or repair or maintenance
attempted by anyone other than Plantronics or an authorized service center, is
not a defect covered by this Warranty. In such cases, Plantronics may charge
you for materials and labor, even during the warranty period. Parts subject to
wear and tear in normal usage are not covered by the Warranty.
Implied Warranties
Under state law, you may be entitled to the benefit of certain implied
warranties. THESE IMPLIED WARRANTIES WILL CONTINUE IN FORCE ONLY
DURING THE WARRANTY PERIOD. Some states do allow limitations on how
long an implied warranty lasts, so the above limitation may not apply to you.
Incidental or Consequential Damages
NEITHER PLANTRONICS NOR YOUR RETAIL DEALER OR SELLING
DISTRIBUTORS HAS ANY RESPONSIBILITY FOR ANY INCIDENTAL OR
CONSEQUENTIAL DAMAGES INCLUDING WITHOUT LIMITATION,
COMMERCIAL LOSS OR PROFIT, OR FOR ANY INCIDENTAL EXPENSES,
EXPENSES, LOSS OF TIME, OR INCONVENIENCE. Some states do not allow
exclusion or limitation of incidental or consequential damage, so the above
limitation or exclusion may not apply to you.
Other Legal Rights
This Warranty gives you specific legal rights and you may also have other
rights which vary from state to state.
How to Obtain Warranty Repairs
To obtain in or out of warranty service, please prepay shipment and return the
unit to the appropriate facility listed below:
IN THE UNITED STATES IN CANADA (ONLY)
Plantronics Service Centre Plantronics Service Center
345 Encinal Street 1455 Pitfield Boulevard
Santa Cruz, CA 95060 Saint-Laurent, Quebec H4S 1G3
Tel. 1.800.544.4660 Tel. 1.800.540.8363
1.831.458.7700 1.514.956.8363
Fax 1.800.279.0162 Fax 1.514.956.1825
WARRANTY AND SERVICE
9
ENGLISH FRANÇAIS ESPAN
˜
OL PORTUGUE
ˆ
S KOREAN JAPANESE CHINESE
Page 17

10
WARRANTY AND SERVICE
Please use the original container, or pack the unit(s) in a sturdy carton with
sufficient packing material to prevent damage. Include the following
information:
1. A proof-of-purchase indicating model number and date of purchase.
2. Bill-to address
3. Ship-to address
4. Number and description of units shipped
5. Name and telephone number of person to call, should contact be necessary
6. Reason for return and description of the problem
Damage occurring during shipment is deemed the responsibility of the carrier,
and claims should be made directly with the carrier.
PLANTRONICS HELP DESK
The Plantronics Help Desk is ready to assist you!
Dial 1.831.458.7700 Monday through Friday 8:00 a.m. to
5:00 p.m. Pacific Standard Time or visit our website at
www.plantronics.com.
The name Plantronics and the Plantronics logo are registered trademarks of
Plantronics, Inc. DuoSet, Quick Disconnect, Polaris and the clear colour and
curvature of the voice tube are trademarks of Plantronics, Inc.
Page 18

ENGLISH FRENCH SPANISH PORTUGUESE KOREAN JAPANESE CHINESE
BIENVENUE
Merci d’avoir choisi le casque
DuoSet™ de Plantronics. Ce guide
d’utilisation vous aidera à installer
votre casque DuoSet™ et à prendre
connaissance de son application de
base. L’amplificateur est décrit dans
un guide lié à celui-ci; il est
recommandé d’en prendr
connaissance après s’être familiarisé
avec le casque lui-même.
Page 19

Serre-tête réglable
(P/N 43298-01)
Assemblage du coussinet d’oreille
(P/N 43299-01)
Plaque de montage du casque
Perche
Câble
Pince à vêtements
(P/N 43220-01)
Joint à rotule
(P/N 45650-01)
Crochet auriculaire flexible
(P/N 45651-01)
3
6
5
1
2
4
7
CASQUE
(Démonstration des deux configurations)
8
LÉGENDE DU DIAGRAMME
2
Page 20
Si déjà en position, retirer le serre-tête de l’arrière de la
plaque de montage du casque .
Si déjà en position, enlever le coussinet d’oreille et l’anneau
en caoutchouc de la plaque de montage du casque .
Emboutir le joint a rotule dans la plaque de montage du
casque en alignant la rotule avec la perche .
Insérer le crochet auriculaire d’un côté ou de l’autre du joint
à rotule selon qu’il soit porté sur l’oreille gauche ou droite.
Pour plus de stabilité, insérer le câble du casque sous les
guides de câbles sur le crochet auriculaire.
Distendre le crochet auriculaire autour de votre oreille, tel
qu’illustré, et relâcher.
Pivoter le joint à rotule sur la plaque de montage du
casque pour améliorer l’ajustement.
B
A
B
C
D
A
CONFIGURATION EN CROCHET AURICULAIRE
3
ENGLISH FRANÇAIS ESPAN
˜
OL PORTUGUE
ˆ
S KOREAN JAPANESE CHINESE
Page 21

CONFIGURATION EN SERRE-TÊTE
Si déjà en place, retirer le joint à rotule et le crochet
auriculaire .
Placer le coussinet et l’anneau de caoutchouc sur la plaque
de montage du casque . Aligner l’encoche de l’anneau de
caoutchouc avec la perche .
Emboutir la rotule à l’extrémité du serre-tête dans la cage
de rotule à l’arrière de la plaque de montage .
Placer le serre-tête sur le dessus de la tête, avec le
coussinet posé légèrement contre l’oreille et la barre en ‘T’
au dessus de l’oreille opposée.
Si le serre-tête est trop serré ou trop lâche, saisir la partie en
métal du serre-tête et plier légèrement au centre. Le serre-tête
peut être modifié pour qu’il soit bien ajusté et confortable.
A
F
B
A
E
POSITIONNEMENT DE LA PERCHE
Si vous avez le modèle à Tube de Son, retirer, repousser,
tourner ou pivoter la perche afin d’obtenir la position qui
favorisera le mieux la transmission de votre voix.
Si vous avez le modèle anti-bruit, positionnez le bout de la
perche le plus près possible du coin de votre bouche.
G
H
4
Page 22

G
H
STABILISER LE CASQUE
Attacher la pince à vêtements au niveau de votre poitrine.
La pince maintient le casque en position et libre de toutes
contraintes du poids du câble. Ceci est particulièrement
important avec la configuration en crochet auriculaire.
I
Utilisation du Module Connecteur à Déconnection Rapide™
Utiliser le module Connecteur à Déconnection Rapide™ pour
placer une communication en attente et s’éloigner du
téléphone sans retirer le casque.
Pour ceci, saisir le Connecteur à Déconnexion Rapide™
comme indiqué et le séparer en deux en tirant.
Pour reprendre la conversation, rebrancher les deux moitiés.
Différents Casques Polaris™
Les différents casques Polaris™, conçus pour être utilisés avec
des téléphones ayant une prise pour casque nettement
identifiée, n’ont pas besoin d’un Amplificateur. Brancher la
fiche Polaris directement dans la prise pour casque. Consulter
le manuel d’instructions du téléphone pour plus
d’informations.
Vous êtes maintenant prêt à installer l’Amplificateur.
BRANCHER LE CASQUE
J
K
5
ENGLISH FRANÇAIS ESPAN
˜
OL PORTUGUE
ˆ
S KOREAN JAPANESE CHINESE
Page 23

LES INTERLOCUTEURS NE PEUVENT PAS
M’ENTENDRE
Pour les modèles à Tube de Son, s’assurer que celui-ci n’est
pas bouché ou positionné au mauvais endroit.
Pour les modèles anti-bruit, s’assurer que le micro est
positionné au bon endroit au coin de la bouche, éloigné
d’environ 25mm.
Si un amplificateur séparé est utilisé, s’assurer que la
commande de volume de transmission est réglée correctement.
Si un amplificateur séparé est utilisé, s’assurer que la
commande secret n’est pas activée.
JE NE PEUX PAS ENTENDRE LES INTERLOCUTEURS
S’assurer que le Connecteur à Déconnexions Rapide™ est
bien branché.
S’assurer que la plaque de montage de l’écouteur (avec
son coussinet pour la configuration par-dessus la tête) est
positionnée correctement sur l’oreille.
S’assurer que l’amplificateur est installé correctement.
Augmenter la molette de Volume à l’Arrivée sur
l’amplificateur.
LES CROCHETS AURICULAIRES NE SONT PAS
CONFORTABLES
Faire des essais en insérant le crochet auriculaire dans le joint
à rotule.
Pivoter le joint à rotule sur la plaque de montage du casque.
Si un ajustement satisfaisant ne peut être atteint en utilisant le
crochet auriculaire, considérer le port du serre-tête.
DÉPANNAGE
6
Page 24

Pour toute information sur les accessoires et rechanges,
appeler Plantronics au 1.831.458.7700, ou visitez notre site
sur le web à: www.plantronics.com. Aussi voir la légende du
diagramme pour des numéro de pièces additionnelles.
Coussins Auriculaires (2)
(No de Pièce 43937-01)
Remplacer lorsqu’ils sont déchirés ou sales.
Crochets Auriculaires (3)
(No de Pièce 43297)
Crochets auriculaires non-flexible offrant une
variétés de choix d’ajustements.
Corde de Rallonge
(No de Pièce 40711-01)
Augmente la portée et la mobilité d’une façon
considérable. Vous permet de demeurer en ligne
lorsque vous vous éloignez de l’amplificateur.
Tube de Son
(No de Pièce 29960-01)
Remplacer lorqu’il est bouché
ou endommagé.
RECHANGES ET ACCESSOIRES
7
ENGLISH FRANÇAIS ESPAN
˜
OL PORTUGUE
ˆ
S KOREAN JAPANESE CHINESE
Page 25

Cet équipement numérique de Classe B est conforme àla
norme Canada ICES003.
Notice: L’étiquette Industry Canada identifie un équipement homologué. Cette
homologation signifie que l’équipement satisfait à certaines exigences des
réseaux de télécommunications du point de vue protection, fonctionnement et
sécurité. Le Département ne garantit pas que l’équipement fonctionnera à la
satisfaction de l’utilisateur.
Avant d’installer cet équipement, les utilisateurs devront s’assurer qu’il est permis
de les connecter aux services de la compagnie locale de télécommunications.
L’équipement devra aussi être installé en employant une méthode de connexion
acceptable. Dans certains cas, le câblage interne de la compagnie associé à un
service individuel d’une seule ligne pourra être prolongé par un ensemble de
connexion agréé (fil de rallonge téléphonique). Le client doit être conscient que le
respect des conditions ci-dessus peut ne pas empêcher une dégradation du
service dans certaines situations.
Les réparations des équipements homologués devront être réalisées par un atelier
de réparation canadien agréé, désigné par le fournisseur. Toute réparation ou
modification apportée par l’utilisateur de cet équipement, ou un mauvais
fonctionnement de l’équipement, peut permettre à la compagnie de
télécommunications de demander à l’utilisateur de déconnecter l’équipement.
Pour leur propre protection, les utilisateurs devront s’assurer que les mises à la
terre des câblages électriques d’alimentation, des lignes téléphoniques et des
tuyauteries métalliques internes d’eau, si présentes, sont bien interconnectées.
Cette précaution peut être particulièrement importante en zones rurales.
Attention: Les utilisateurs ne devront pas essayer de réaliser ces connexions
eux-mêmes, mais devront contacter les autorités appropriées de contrôle
électrique, ou un électricien, selon le cas.
Notice: Le Chiffre d’Équivalence de Sonnerie (REN) affecté à chaque dispositif
terminal fournit une indication du nombre maximal de terminaux qui pourront
être connectés à une interface téléphonique. Cet aboutissement sur une interface
pourra être constituée de toute combinaison de dispositifs, à condition seulement
que la somme des REN de tous les dispositifs ne dépasse pas 5.
Voir sur l’étiquette de l’équipement le chiffre REN applicable.
NOTICE INDUSTRY CANADA
8
Page 26

GARANTIE ET SERVICE
Les informations suivantes sur la garantie et le service
ne s’appliquent qu’aux USA et au Canada. Pour toute
information sur d’autres pays, veuillez contacter
votre concessionnaire local.
Garantie Limitée
Plantronics, Inc. ("Plantronics") garantit à l’acheteur/consommateur original que,
sauf pour les limitations et exclusions définies ci-dessous, ce produit sera exempt
de tout défaut matériel ou de main d’oeuvre pendant une période d’un (1) an à
partir de la date d’achat originale ("Période de Garantie"). Les obligations de
Plantronics selon cette garantie se limiteront à la réparation ou au remplacement
gratuits, à l’option de Plantronics, de toute pièce ou élément s’avérant défectueux
en matériau ou main d’oeuvre pendant la Période de Garantie.
Exclusions de la Garantie
Cette Garantie ne s’applique qu’aux défauts matériels ou de main d’oeuvre en
usine. Toute condition causée par un accident, abus, emploi ou mise en oeuvre
incorrects, non-respect des instructions fournies par Plantronics, destruction ou
modification, mauvais voltages ou courants électriques, ou réparation ou entretien
entrepris par toute personne autre que Plantronics ou un service de réparation
agréé, n’est pas un défaut couvert par cette garantie. Dans ces cas, Plantronics
pourra facturer les matériaux et la main d’oeuvre, même pendant la période de
garantie. Les pièces sujettes à l’usure en cours de fonctionnement normal ne sont
pas couvertes par cette Garantie.
Garanties Implicites
Selon les lois provinciales, vous pourriez bénéficier de certaines garanties
implicites. CES GARANTIES IMPLICITES NE RESTERONT EN VIGUEUR QUE
PENDANT LA PÉRIODE DE GARANTIE. Certaines provinces ne permettent pas
de limiter la durée d’une garantie implicite, donc la limitation ci-dessus peut ne
pas s’appliquer à votre cas.
Dommages Accessoires ou Conséquents
NI PLANTRONICS NI VOTRE DÉTAILLANT OU CONCESSIONNAIRE VENDEUR
N’EST RESPONSABLE D’AUCUN DOMMAGE ACCESSOIRE OU CONSÉQUENT,
Y COMPRIS ET SANS LIMITATION LES PERTES ET BÉNÉFICES COMMERCIAUX,
LES DÉPENSES ACCESSOIRES, COÛTS, PERTES DE TEMPS, OU INCONVÉNIENTS.
Certaines provinces ne permettent pas d’exclusion ou de limitation de dommages
accessoires ou conséquents, donc la limitation ci-dessus peut ne pas s’appliquer
à votre cas.
9
ENGLISH FRANÇAIS ESPAN
˜
OL PORTUGUE
ˆ
S KOREAN JAPANESE CHINESE
Page 27

GARANTIE ET SERVICE
Autres Droits Légaux
Cette Garantie vous accorde certains droits, et vous pourriez avoir d’autres droits
qui varient d’une province à l’autre.
Comment Obtenir des Réparations sous Garantie
Garantie Limitée
Plantronics, Inc. ("Plantronics") garantit à l’acheteur/consommateur original que,
sauf pour les limitations et exclusions définies ci-dessous, ce produit sera exempt
de tout défaut matériel ou de main d’oeuvre pendant une période de deux (2)
ans à partir de la date d’achat originale ("Période de Garantie"). Les obligations
de Plantronics selon cette garantie se limiteront à la réparation ou au
remplacement gratuits, à l’option de Plantronics, de toute pièce ou élément
s’avérant défectueux en matériau ou main d’oeuvre pendant la Période de
Garantie.
CENTRE D’ASSISTANCE TECHNIQUE PLANTRONICS
Le Centre d’Assistance Technique Plantronics est prêt à
vous aider!
Appeller nous au 1.831.458.7700 du Lundi au Vendredi entre
8:00 et 17:00 heures à l’heure du Pacifique ou visitez notre
site sur le web à: www.plantronics.com.
The name Plantronics and the Plantronics logo are registered trademarks of
Plantronics, Inc. DuoSet, Quick Disconnect, Polaris and the clear colour and
curvature of the voice tube are trademarks of Plantronics, Inc.
10
Page 28

BIENVENIDOS
Le agradecemos por haber
seleccionado el auricular DuoSet™
de Plantronics. Esta Guía para el
Usuario le ayudará a instalar su
Auricular DuoSet™ y le enseñará su
funcionamiento básico. Al
Amplificador se lo describe en una
guía separada la cual deberá leer
después de haberse familiarizado
con el auricular.
Page 29

Banda para la cabeza ajustable
(P/N 43298-01)
Unidad de la almohadilla para la oreja
(P/N 43299-01)
Unidad del auricular
Tubo acústico para la voz
Cable
Presilla para la ropa
(P/N 43220-01)
Anillo de la Esfera Giratoria
(P/N 45650-01)
Ganchos para la oreja flexibles
(P/N 45651-01)
3
6
5
1
2
4
7
Auricular
(Se muestran ambas configuraciones)
8
CLAVE DEL DIAGRAMA
2
Page 30

Si la Banda para la Cabeza ya se encuentra ubicada en su
lugar, desengánchela de la Unidad del Auricular .
Si la Almohadilla para la oreja y el Anillo de Goma ya se
encuentran en su lugar, quítelos de la Unidad del Auricular .
Oprima el Anillo de la Esfera Giratoria en la Unidad del
Auricular alineando el Anillo de la Esfera Giratoria con el
Tubo acústico para la voz .
Coloque el Gancho para la Oreja en cualquiera de los dos
costados del Anillo de la Esfera Giratoria de acuerdo al
costado en que va a utilizar el auricular, es decir, sobre la
oreja izquierda o derecha.
Para proporcionar mayor estabilidad, oprima el Cable del
Auricular por debajo de las Guías para el Cable del
Gancho para la Oreja.
Expanda el Gancho para la Oreja alrededor de su oreja
según se indica y libérelo.
Si hace girar el Anillo de la Esfera Giratoria de la Unidad
del Auricular podría lograr un mejor calce.
B
A
B
C
D
CONFIGURACION SOBRE LA OREJA
3
ENGLISH FRANÇAIS ESPAN
˜
OL PORTUGUE
ˆ
S KOREAN JAPANESE CHINESE
A
Page 31

CONFIGURACION POR ENCIMA DE LA CABEZA
Si ya se encuentran en su lugar, quite el Anillo de la Esfera
Giratoria y el Gancho para la Oreja .
Oprima la Almohadilla para la Oreja y el Anillo de Goma
en la Unidad del Auricular . Aliñe la muesca del anillo con
el Tubo acústico para la voz .
Haga calzar la esfera del extremo de la banda para la
cabeza en la parte posterior de la Unidad del Auricular .
Coloque la Banda para la Cabeza por encima de la parte
superior de su cabeza, con la Almohadilla para la Oreja
delicadamente apoyada contra su oreja y la Barra T ubicada
por encima de la oreja opuesta.
Si la banda para la cabeza resulta demasiado ajustada o
demasiado floja, tome la parte de metal de la banda para la
cabeza y dóblela delicadamente en el medio. La longitud de
la banda para la cabeza puede ajustarse para mayor
comodidad y mejor calce.
A
F
B
A
E
UBICACION DEL TUBO ACUSTICO
Si usted tiene la versión de este producto con Tubo para la
voz, jale, coloque hacia adentro, haga rotar o haga girar el
Tubo Acústico para la Voz para llegar hasta una posición
tal que el mismo quede cerca de la comisura de su boca para
transmitir su voz del mejor modo posible.
Si usted cuenta con la versión de este producto con
Cancelación de Sonidos, ubique el extremo del Tubo para la
Voz tan cerca de la comisura de su boca como pueda, para
que le resulte cómodo.
G
H
4
Page 32

MODO DE ASEGURAR EL AURICULAR
Coloque la Presilla para la Ropa más o menos a nivel del
pecho. La presilla mantiene al auricular asentado
adecuadamente y libre del peso del cable del auricular .
Esto resulta de particular importancia en la configuración que
cuenta con el gancho para la oreja.
I
Modo de Utilizar el Módulo de Desconexión Rápida
[Quick Disconnect™]
Utilice el Módulo de Desconexión Rápida ("QD", por sus
siglas en inglés) para poner a esperar a una llamada y
alejarse del teléfono sin tener que quitarse el auricular.
Para poner a esperar una llamada, tome el Módulo de
desconexión rápida "QD" según se indica y desconecte. Para
continuar con su conversación, vuelva a conectar las dos
mitades.
Variaciones del Auricular Polaris™
Las Variaciones del Auricular Polaris™ que van a ser
utilizadas con teléfonos que cuentan con una ficha para el
auricular claramente marcada, no necesitan un Amplificador.
Coloque el conector Polaris directamente en la ficha del
auricular. Para obtener más información, consulte con el
manual de instrucciones del teléfono
Ahora usted está listo/a para instalar el Amplificador.
MODO DE CONECTAR EL AURICULAR
J
K
5
ENGLISH FRANÇAIS ESPAN
˜
OL PORTUGUE
ˆ
S KOREAN JAPANESE CHINESE
Page 33

GARANTIA Y SERVICIO
La siguiente información relacionada con la garantía y con el servicio es
pertinente solamente para los Estados Unidos de América y Canadá. Para
obtener información acerca de otros países, por favor, comuníquese con su
distribuidor local.
El nombre Plantronics, el logotipo de Plantronics son marcas registradas de
Plantronics, Inc. DuoSet, Quick Disconnect, Polaris y el color transparente
así como la curvatura del tubo para la voz son marcas registradas de
Plantronics, Inc.
ESCRITORIO DE ASISTENCIA DE PLANTRONICS
¡El Escritorio de Asistencia de Plantronics está listo
para asistirlo! Marque el: 1.831.458.7700 de lunes a viernes
en el horario de 8:00 a.m. a 5:00 p.m. Horario del Pacífico o
visite nuestra dirección en la red: www.plantronics.com.
6
Page 34

BEM-VINDO
Obrigado por ter escolhido o
Headset DuoSet™ da Plantronics.
Este Manual de Usuário lhe ajudará
a instalar seu Headset DuoSet™ e a
aprender sua operação básica. O
Amplificador está descrito num guia
separado que deveria ser lido após a
familiarização com o Headset.
Page 35

Aro de cabeça ajustável
(P/N 43298-01)
Como montar a Almofada de orelha
(P/N 43299-01)
Como montar o Headset
Microfone
Fio
Clipe de roupa
(P/N 43220-01)
Anel de Bola de pivô
(P/N 45650-01)
Gancho de orelha flexível
(P/N 45651-01)
3
6
5
1
2
4
7
Headset
(Ambas as Configurações Mostradas)
8
CHAVE DO DIAGRAMA
2
Page 36

Com ele já no lugar, solte o aro da cabeça da par te de trás
do Headset .
Com ele já no lugar,remova a Almofada de Orelha e Anel de
Borracha do Headset .
Aperte o Anel Pivô sobre o Headset alinhando o Anel
Pivô com o Microfone .
Insira o Gancho de Orelha em qualquer lado do Anel
Pivô dependendo se o Headset for ser usado em cima da
orelha esquerda ou direita.
Para estabilidade adicional, aperte o fio do Headset
debaixo dos Guias de Fio no Gancho de Orelha.
Alongar o Gancho de Orelha ao redor da sua orelha como é
demonstrado, soltando-o em seguida.
Girando o Anel Pivô no Headset você pode prover um
melhor ajuste.
B
A
B
C
D
A
CONFIGURAÇÃO PARA USO SOBRE A ORELHA
3
ENGLISH FRANÇAIS ESPAN
˜
OL PORTUGUE
ˆ
S KOREAN JAPANESE CHINESE
Page 37

CONFIGURAÇÃO PARA USO COM ARO DE CABEÇA
Com ele já no lugar, remova o Anel Pivô e Gancho de
Orelha .
Aperte a Almofada de Orelha e Anel de Borracha sobre o
Headset . Alinhe o entalhe no anel com o Microfone .
Aperte a bola até o fim do Aro de Cabeça na cavidade na
parte de trás do Headset .
Coloque o Aro de Cabeça em cima do topo de sua
cabeça, com a Almofada de Orelha encostando com
delicadeza contra sua orelha e a barra-T posicionada sobre
a orelha oposta.
Se o aro de cabeça estiver muito apertado ou muito solto,
pegue a parte de metal do aro de cabeça e com delicadeza
dobre no meio. O comprimento do aro de cabeça pode ser
ajustado para um melhor conforto.
A
F
B
A
E
POSICIONANDO O MICROFONE
Se você tem a versão do produto com Tubo de Voz, puxe para
fora, empurre para dentro, gire, ou rode o Microfone numa
posição perto do canto da sua boca na qual lhe
proporcionará transmitir sua voz de uma melhor forma.
Se você tem a versão do produto com Cancelamento de Ruído
(Noise Canceling), posicione a ponta do Microfone o mais
confortável e perto do canto da sua boca que você puder.
G
H
4
Page 38

ASSEGURANDO O HEADSET
Prenda o Clipe de Roupa ao nível do seu tórax. O clipe
mantém o Headset posicionado corretamente e livre do peso
do fio do Headset . Isto é particularmente importante na
configuração do Gancho de Orelha.
I
Usando o Módulo de Quick Disconnect™
(Desconexão Rápida)
Use o Módulo Quick Disconnect™ (QD) para interromper
uma chamada podendo ficar distante do telefone sem
remover o Headset.
Para colocar a sua chamada na espera, pegue o Módulo de
QD, como está sendo demonstrado, e separe as duas partes.
Para voltar a sua chamada, conectar novamente as duas
partes.
Variações de Headset Polaris™
Variações de Headset Polaris™, desenhada para uso com
telefones com uma tomada de Headset claramente marcada,
não requer um Amplificador. Insira o conector da Polaris
diretamente na tomada do fone de ouvido. Consulte o manual
de instrução do seu telefone para mais informações.
Você está agora pronto para instalar o Amplificador.
COMO CONECTAR O HEADSET
J
K
5
ENGLISH FRANÇAIS ESPAN
˜
OL PORTUGUE
ˆ
S KOREAN JAPANESE CHINESE
Page 39

QUEM LIGA não me OUVE
Para os modelos de Tubo de Voz, determinar se o Tubo de
Voz está entupido ou está posicionado incorretamente.
Para os modelos com Cancelamento de Ruído, ter certeza que
o microfone está posicionado corretamente ao canto da boca.
Se você tem um Amplificador separado, verificar se o
"Volume para Falar" está ajustado corretamente.
Se você tem um Amplificador separado, verificar se a função
de "Silenciar" não foi ativada.
EU NÃO POSSO OUVIR QUEM CHAMA
Tenha cer teza que o Módulo Quick Disconnect está
conectado.
Tenha cer teza que o Headset está centralizado na sua orelha.
Se você tem um Amplificador separado, verificar se está
instalado corretamente.
Se você tem um Amplificador separado, verificar se o Volume
para Ouvir está corretamente ajustado.
O GANCHO DE ORELHA ESTÁ INSTÁVEL
Faça um teste com a inserção do Gancho de Orelha no
Anel Pivô.
Gire o Anel Pivô no Headset.
Se você não consegue um ajuste confortável para o uso do
Gancho de Orelha, considere usar o Aro de Cabeça.
ELIMINANDO PROBLEMAS
6
Page 40

Para informação sobre materiais e acessórios, ligue para a
Plantronics no n. 1.831.458.7700 ou visite o nosso website
no endereço www.plantronics.com. Também veja o
Diagrama Chave para números de partes adicionais.
Almofadas (2) (P/N 43937-01)
Substitua quando estiver rasgada ou suja.
Gancho de Orelha (3 Tamanhos)
(P/N 43297)
Gancho de Orelha não flexível oferece ajustes
variados.
Fio de extensão (P/N 40711-01)
Aumenta a mobilidade na sua área de trabalho; lhe
permitindo ficar na linha enquanto se move e se distancia
do amplificador.
Tubo de voz (P/N 29960-01)
Substituir se entupir ou danificar.
MATERIAIS E ACESSÓRIOS
7
ENGLISH FRANÇAIS ESPAN
˜
OL PORTUGUE
ˆ
S KOREAN JAPANESE CHINESE
Page 41

DEPARTAMENTO DE ASSISTÊNCIA DA PLANTRONICS
O Departamento de Assistência da Plantronics está pronto
para lhe ajudar!
Ligue para 1.831.458.7700, de segunda à sexta-feira, das
8:00 às 17:00 horas (horário Pacífico EUA) ou visite o nosso
website no endereço www.plantronics.com.
GARANTIA E SERVIÇO
A seguinte garantia e informação de serviço só serve para os EUA e Canadá.
Para informação em outros países, por favor contacte seu distribuidor local.
Use os nossos Serviços de Informação de Fax em demanda pelo telefone:
1.831.458.7700 (lembrete N˚ 4).
O nome e o logotipo da Plantronics são marcas registradas da Plantronics, Inc.
DuoSet, Quick Disconnect, Polaris e a cor transparente e curvatura do tubo de
voz são marcas registradas de Plantronics, Inc.
8
Page 42

Page 43

3
6
5
1
2
4
7
8
2
Page 44

B
A
A
B
C
D
1 3
2 3
7
3
7
8
5
7
3
4
3
ENGLISH FRANÇAIS ESPAN
˜
OL PORTUGUE
ˆ
S KOREAN JAPANESE CHINESE
Page 45

2
A
F
B
A
E
G
H
4
4
3
1 3
1 2
4
4
Page 46

I
J
K
5
ENGLISH FRANÇAIS ESPAN
˜
OL PORTUGUE
ˆ
S KOREAN JAPANESE CHINESE
Page 47

6
Page 48

7
ENGLISH FRANÇAIS ESPAN
˜
OL PORTUGUE
ˆ
S KOREAN JAPANESE CHINESE
Page 49

8
Page 50

Page 51

3
6
5
1
2
4
7
8
2
Page 52

B
A
A
B
C
D
1
3
2 3
7
3
7
8
5
7
3
4
3
ENGLISH FRANÇAIS ESPAN
˜
OL PORTUGUE
ˆ
S KOREAN JAPANESE CHINESE
Page 53

7
A
F
B
A
E
4
G
H
8
2
4
1
2
1
3
3
4
4
Page 54

5
6
I
J
K
ENGLISH FRANÇAIS ESPAN
˜
OL PORTUGUE
ˆ
S KOREAN JAPANESE CHINESE
5
Page 55

6
Page 56

7
ENGLISH FRANÇAIS ESPAN
˜
OL PORTUGUE
ˆ
S KOREAN JAPANESE CHINESE
Page 57

8
Page 58

ENGLISH FRENCH SPANISH PORTUGUESE KOREAN JAPANESE CHINESE
ENGLISH FRENCH SPANISH PORTUGESE KOREAN JAPANESE CHINESE
Page 59

2
3
6
5
1
2
4
7
8
Page 60

3
B
A
A
B
C
1 3
23
7 3
7
5
4
3 7
8
D
ENGLISH FRANÇAIS ESPAN
˜
OL PORTUGUE
ˆ
S KOREAN JAPANESE CHINESE
Page 61

4
87
A
F
B
A
E
G
H
2 3 4
1 3
1 2
4
4
Page 62

5
6
I
J
K
ENGLISH FRANÇAIS ESPAN
˜
OL PORTUGUE
ˆ
S KOREAN JAPANESE CHINESE
5
Page 63

6
Page 64

7
ENGLISH FRANÇAIS ESPAN
˜
OL PORTUGUE
ˆ
S KOREAN JAPANESE CHINESE
 Loading...