

Page 1
EN
user's manual
10020003_8
Page 2

Page 3

TABLE OF CONTENTS
1 INTRODUCTION ..............................................................................................1
2 SYMBOLS ........................................................................................................1
3 PREVENTIVE MAINTENANCE ........................................................................1
4 WARNINGS AND CAUTIONS .........................................................................2
5 USING OPERATING LIGHT ............................................................................3
5.1 Switching operating light on and off ............................................................................... 3
5.2 Adjusting brightness of operating light ........................................................................... 4
5.3 Adjusting handle positions ............................................................................................. 5
5.4 Adjusting patient mirror position ..................................................................................... 6
5.5 Attaching USB device to operating light ......................................................................... 7
6 CLEANING .......................................................................................................8
6.1 Light assembly ............................................................................................................... 8
6.2 Arm ................................................................................................................................ 9
7 INDICATION OF ERRONEOUS OPERATION ..............................................10
8 DISPOSAL OF OPERATING LIGHT .............................................................11
9 TECHNICAL SPECIFICATIONS .................................................................... 12
10 MAINTENANCE PARTS ................................................................................21
User’s manual
Planmeca SingLED operating light i
Page 4

TABLE OF CONTENTS
The manufacturer, assembler and importer are responsible for the safety,
reliability and performance of the unit only if:
- installation, calibration, modification and repairs are carried out by
qualified and authorized personnel
- electrical installations are carried out according to the appropriate
requirements such as IEC 60364
- equipment is used according to the operating instructions.
Planmeca pursues a policy of continual product development. Although
every effort is made to produce up-to-date product documentation this
publication should not be regarded as an infallible guide to current
specifications. We reserve the right to make changes without prior notice.
COPYRIGHT PLANMECA
Publication number 10020003 Revision 8
Released 11 April 2014
ii Planmeca SingLED operating light
User’s manual
Page 5
1 INTRODUCTION
2 SYMBOLS
INTRODUCTION
Planmeca SingLED operating light is meant for
illuminating the dental treatment area with a light
corresponding to daylight. This manual describes how to
use the operating light. Please read this manual before
using the light.
The operating light reaches all the areas of the oral cavity
and the long operating light arm ensures that the entire
mandibular area is illuminated.
The device system including the Planmeca SingLED
operating light must fulfil the medical device EMC
requirements of the Standard IEC 60601-1-2.
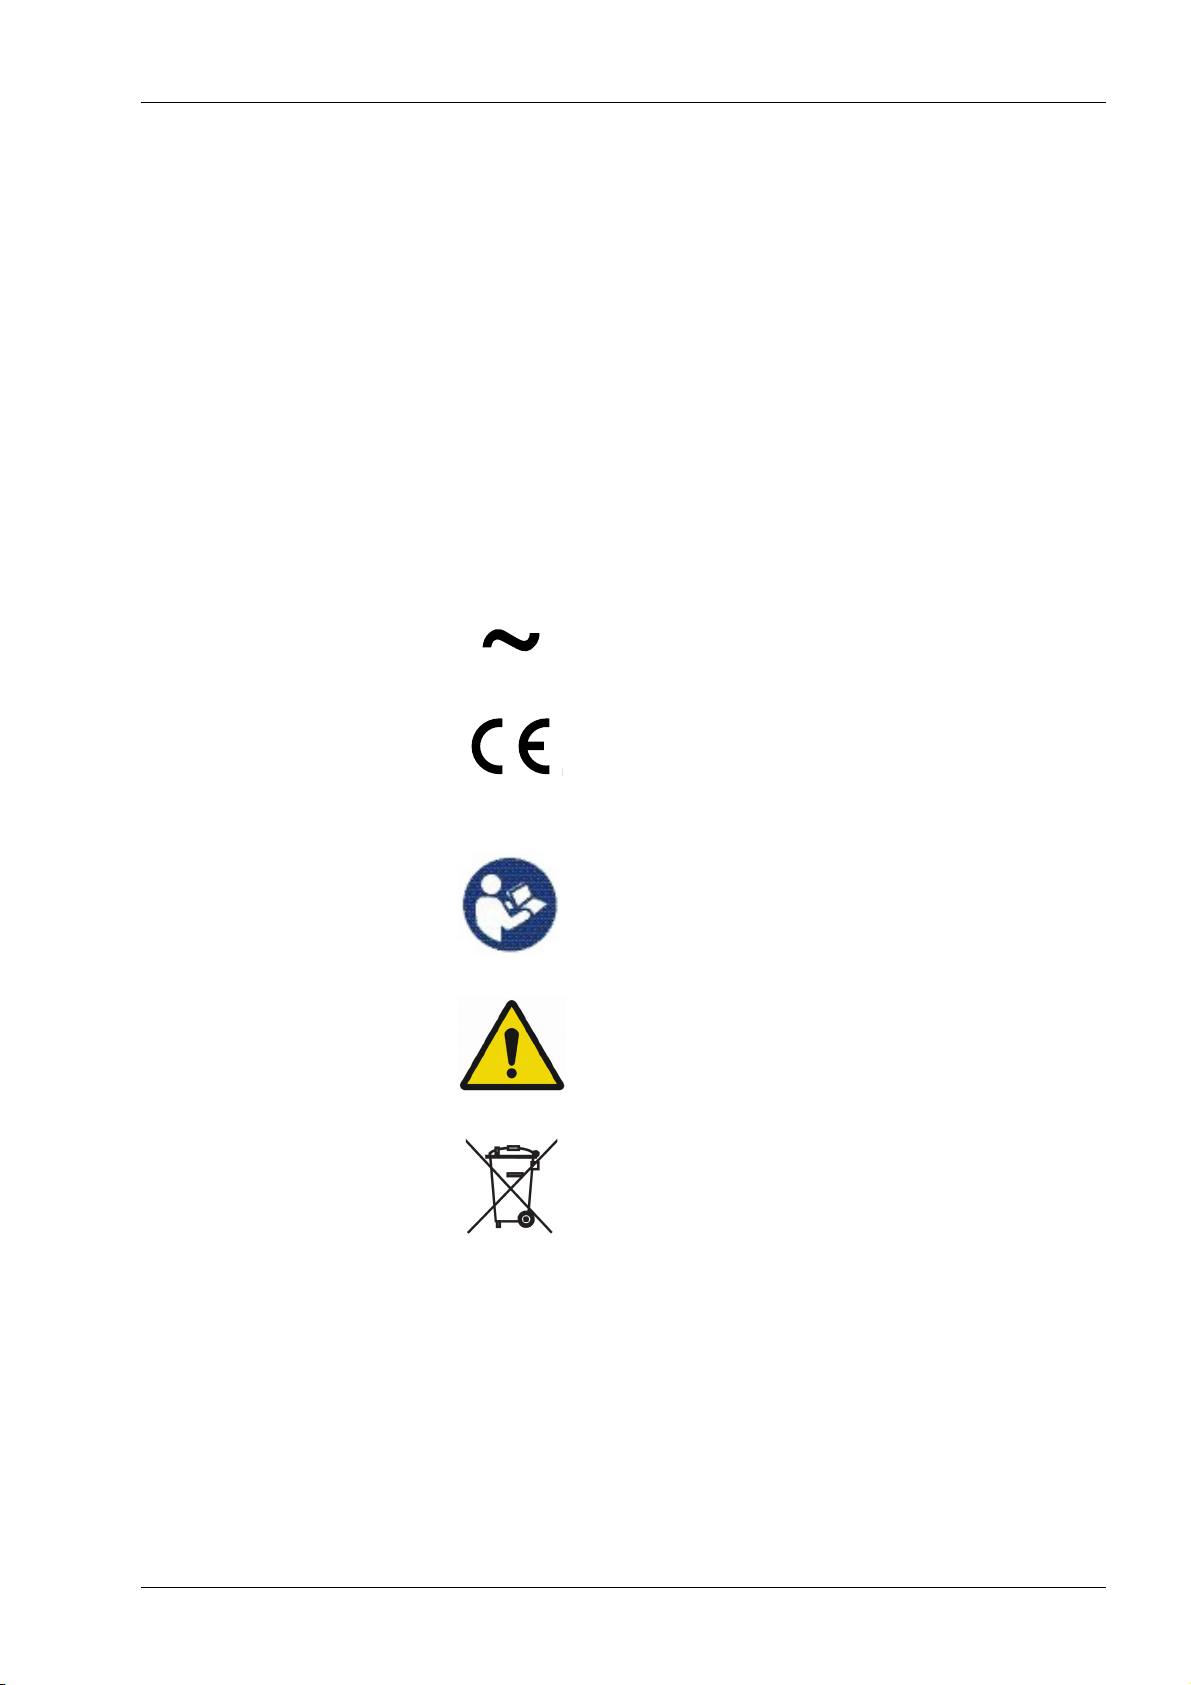
Alternating current (Standard IEC 60417)
Planmeca SingLED operating light with power control
fulfils the requirements of Directive 93/42/EEC.
Attention, consult accompanying documents (Standard
ISO 7010).
General warning (Standard ISO 7010).
Separate collection for electrical and electronic equipment
according to Directive 2002/96/EC (WEEE).
3 PREVENTIVE MAINTENANCE
To guarantee the operating light’s proper operation, the
light must be checked and serviced once a year by a
qualified PLANMECA service technician.
User’s Manual
Planmeca SingLED operating light 1
Page 6

WARNINGS AND CAUTIONS
WARNING
4 WARNINGS AND CAUTIONS
The LED housing and protective fascia
heat up when the operating light is used.
Allow these parts to cool before cleaning
or removing the protective fascia. Always
first turn off the power to the light externally before cleaning.
CAUTION Do not use the operating light without
protective fascia.
CAUTION Advise the patient not to stare into the light
beam. The patient should always wear
protective glasses.
CAUTION Do not allow the patient to grab the
operating light handles or arm when getting
seated or getting up from the patient chair.
CAUTION The light source of the SingLED operating
light may cause retinal injury if viewed upon
directly. Protect the patient’s and dental
treatment staff’s eyes with protective
glasses that block high-energy visible light
(HEV light) or limit the direct exposure to 10
minutes.
CAUTION Do not leave the operating light on
unattended.
CAUTION Never splash water on the operating light or
power supply.
CAUTION Do not open the power supply.
CAUTION Planmeca SingLED operating light is not
suitable for use in the presence of a
flammable anaesthetic mixture with air or
with oxygen or nitrous oxide.
NOTE The power supply must not be placed on the floor.
NOTE Planmeca SingLED operating light fulfills the
requirements of Standard IEC 601-1-2. However,
electromagnetic interference between the light and
other devices can occur in very extreme conditions.
Do not use the light in close conjunction with sensitive
devices. The disturbances can be made smaller by
switching off the light or by increasing the distance
between the devices.
Do not use the light in close conjunction with devices
creating high electromagnetic disturbances. Remove
the cause of the disturbance or increase the distance
between the devices.
2 Planmeca SingLED operating light
User’s Manual
Page 7
5 USING OPERATING LIGHT
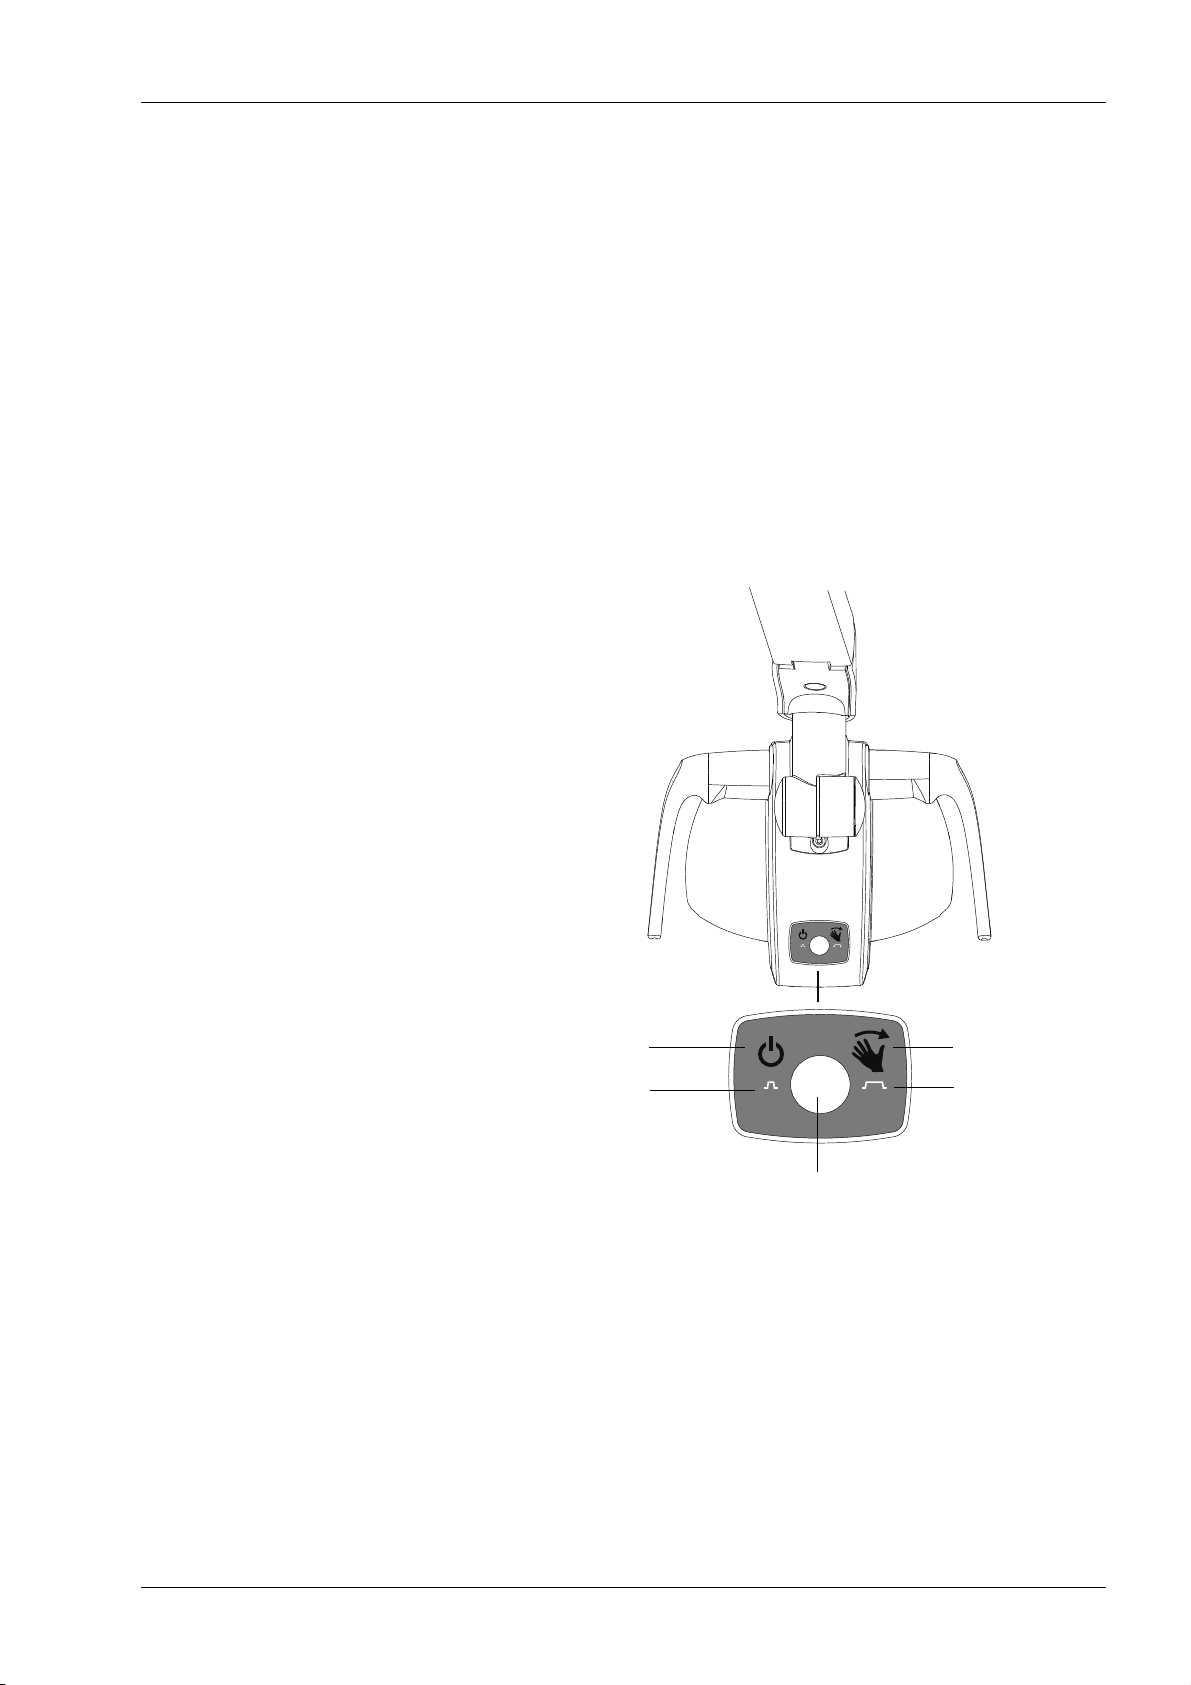
On/off switch
Sensor
indicator
light
Power indicator light
Indicator light for
brief press
Indicator light
press
for long
NOTE If the Planmeca SingLED operating light is attached to
a Planmeca dental unit, the light’s operation is
described in the dental unit’s user’s manual.
NOTE The light must be moved from the handles only. Do
NOT move the light from the arm or from the light body.
NOTE The light beam may speed up the hardening of some
filling materials. Move the light so that the light beam
is not directed to filling material or dim the light.
5.1 Switching operating light on and off
The on/off switch, power indicator light and sensor
indicator light are located at the rear of the light head.
USING OPERATING LIGHT
User’s Manual
You can switch the operating light on/off either from the
on/off switch, with the help of the infrared sensor, or
simultaneously with the mains power.
Planmeca SingLED operating light 3
Page 8

USING OPERATING LIGHT
Sensor
indicator
light
From on/off switch
With sensor
Press the switch briefly to switch the light on. Pressing the
switch a second time will switch the light off.
The power indicator light is on when the light has power.
When you press the on/off switch for longer than 3
seconds the infrared light sensor is switched on/off (you
will hear a signal tone). The sensor indicator light is on
when the sensor is on.
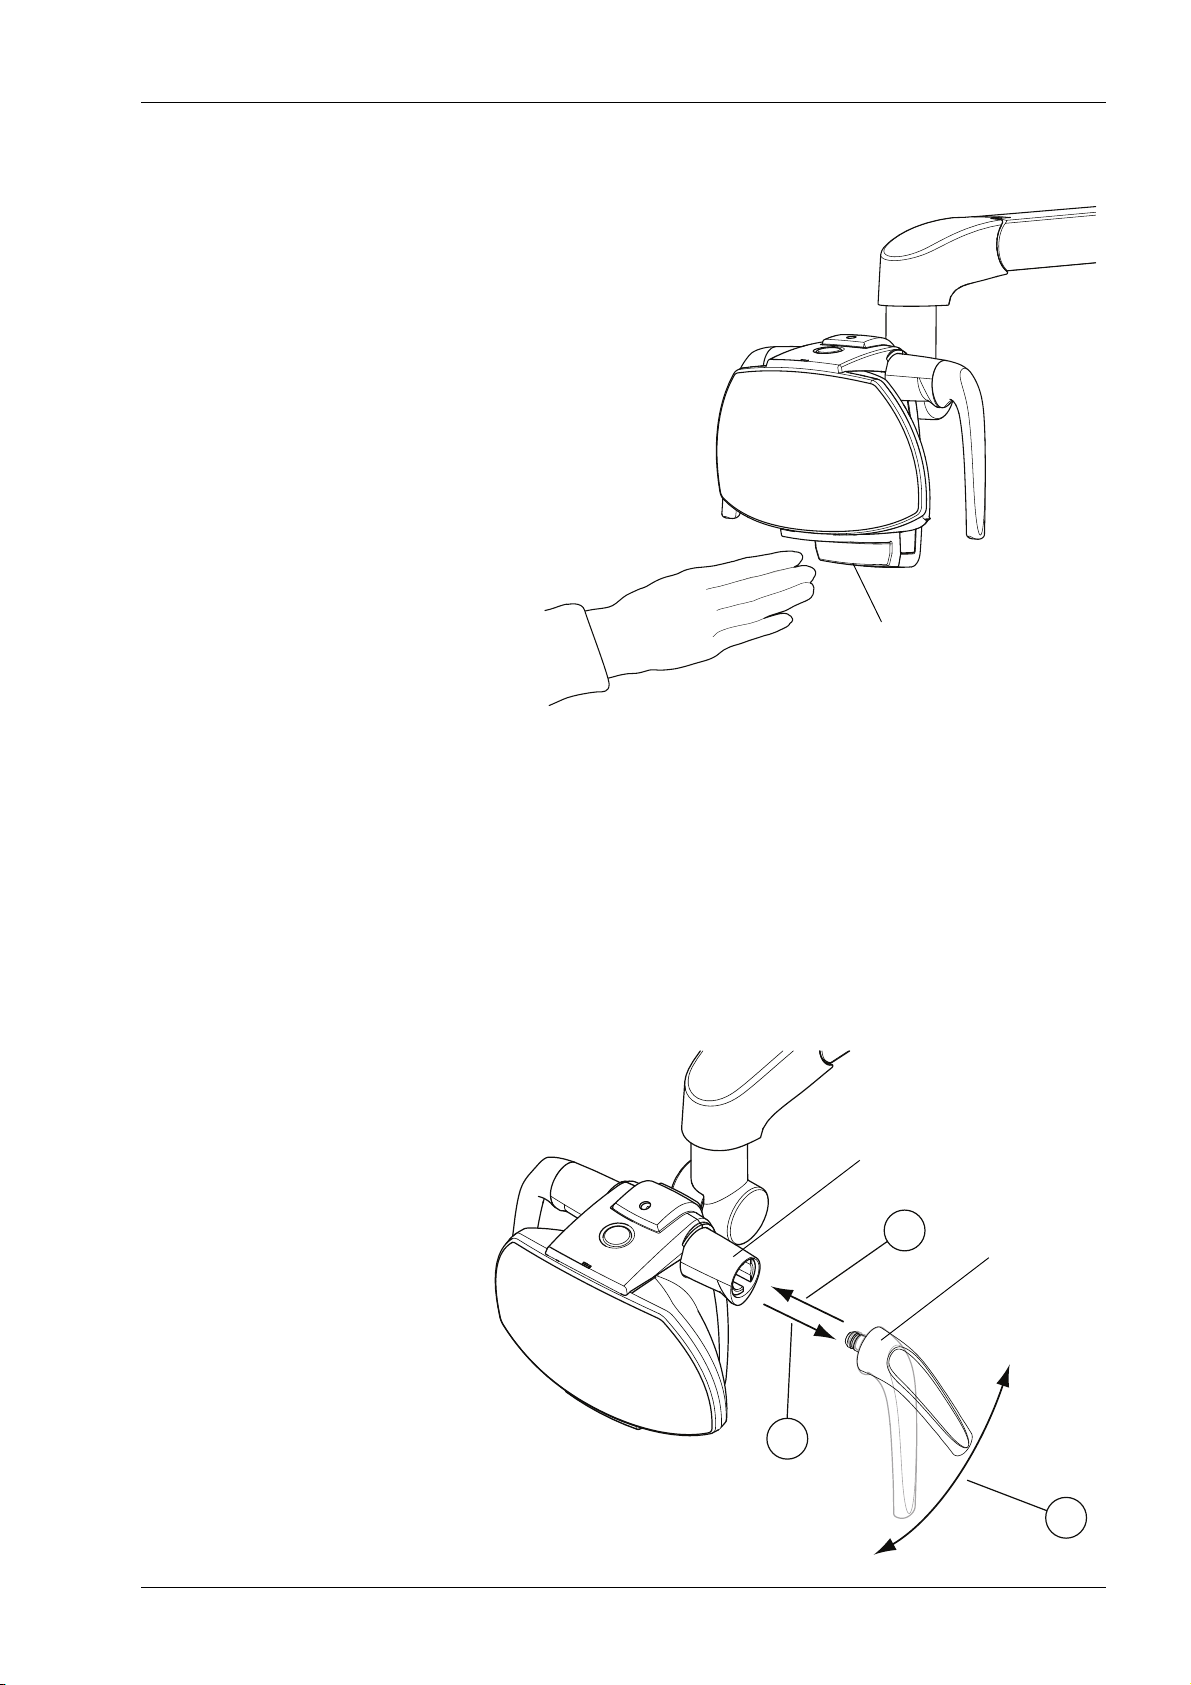
Wave your hand shortly in front of the sensor to switch on/
off the operating light. The light will switch on/off after you
have moved your hand away from the sensor activation
area. Also, you will hear a signal tone.
The sensor detects your hand movement from up to
13 cm (5.1 in.) distance from the infrared sensor.
Simultaneously with mains power
When you press the on/off switch for longer than 15
seconds the operating light goes into a mode where the
operating light is turned on/off at the same time with the
mains power. While pressing the switch you will hear two
signal tones; one after 3 and one after 15 seconds.
This mode is not available when the operating light is
installed to a Planmeca Compact or a Planmeca
Sovereign dental unit.
NOTE If the operating light is installed to the Planmeca
Compact i dental unit you can change the operation
mode of the light by pressing the on/off switch for
longer than 15 seconds (you will hear two signal
tones; one after 3 and one after 15 seconds):
1) The operating light can be switched on/off and its
brightness can be adjusted from both the light and
dental unit.
2) Brightness adjustment can be done only from the
operating light. The light can be switched on/off from
both the light and dental unit.
5.2 Adjusting brightness of operating light
4 Planmeca SingLED operating light
The infrared light sensor of the operating light enables
you to change the brightness of the light by waving your
hand in front of the sensor. The sensor indicator light is on
when the sensor is on.
The sensor detects your hand movement from up to
13 cm (5.1 in.) distance from the infrared sensor.
Once the operation light is lit, keep your hand longer in
front of the sensor to adjust the brightness of the light.
The adjustment range is from 70% to 100% in steps of 1.
User’s Manual
Page 9
USING OPERATING LIGHT
Sled_3.eps
Infrared light sensor
3
1
2
Sled_4.eps
Handle
Plastic sleeve
You will hear a signal tone when the maximum/minimum
brightness is reached.
NOTE If the operating light is installed to another
5.3 Adjusting handle positions
manufacturer’s dental unit, the brightness adjustment
can be done only from the operating light.
Remove the handle by pulling it carefully outwards (1).
Rotate the handle to desired angle (2) and push it back to
its position (3).
Rotate the plastic sleeve so that it fits the handle.
User’s Manual
Planmeca SingLED operating light 5
Page 10
USING OPERATING LIGHT
SingLED_mirror_1.eps
SingLED_mirror_2.eps
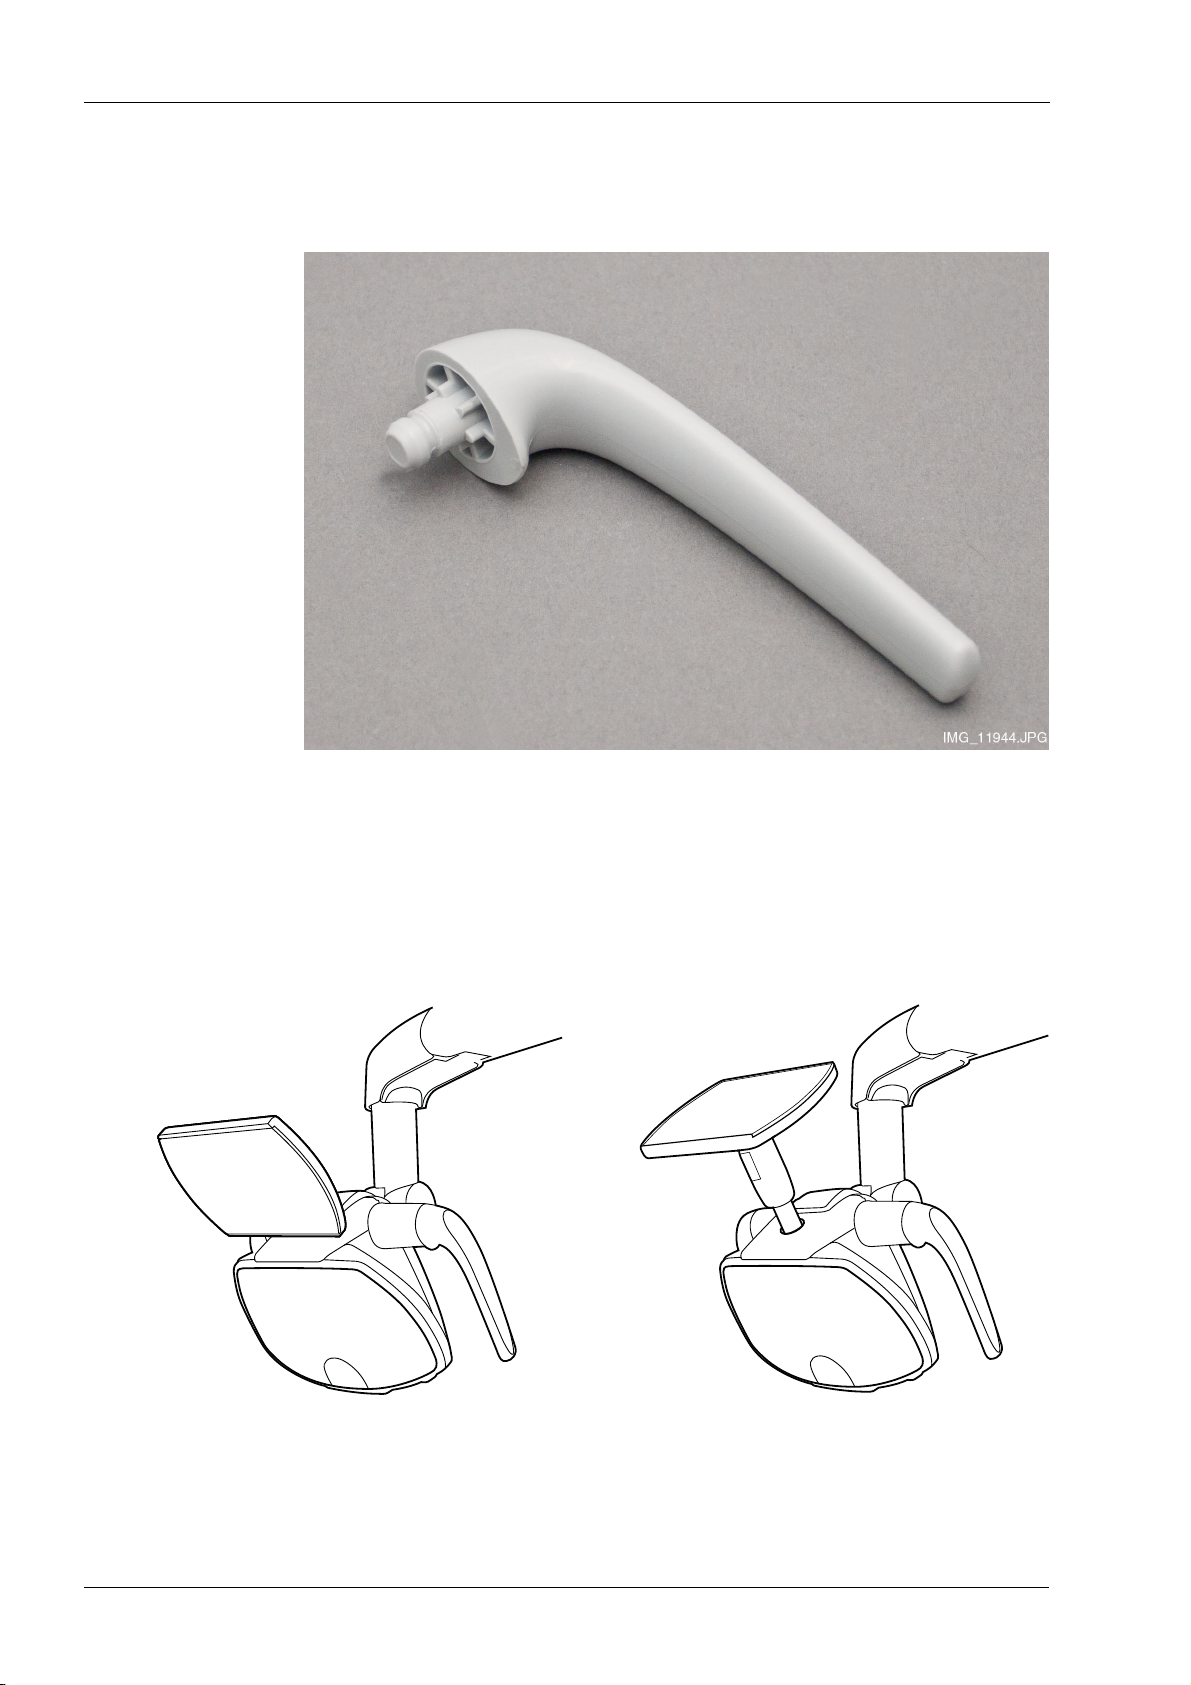
Replace the handles when needed, e.g. when they come
off too easily. Use only handles supplied by Planmeca
(see picture below).
5.4 Adjusting patient mirror position
When you want to turn the mirror away from the patient,
turn the mirror upward as shown below. Do not turn the
mirror to the sides.
6 Planmeca SingLED operating light
User’s Manual
Page 11
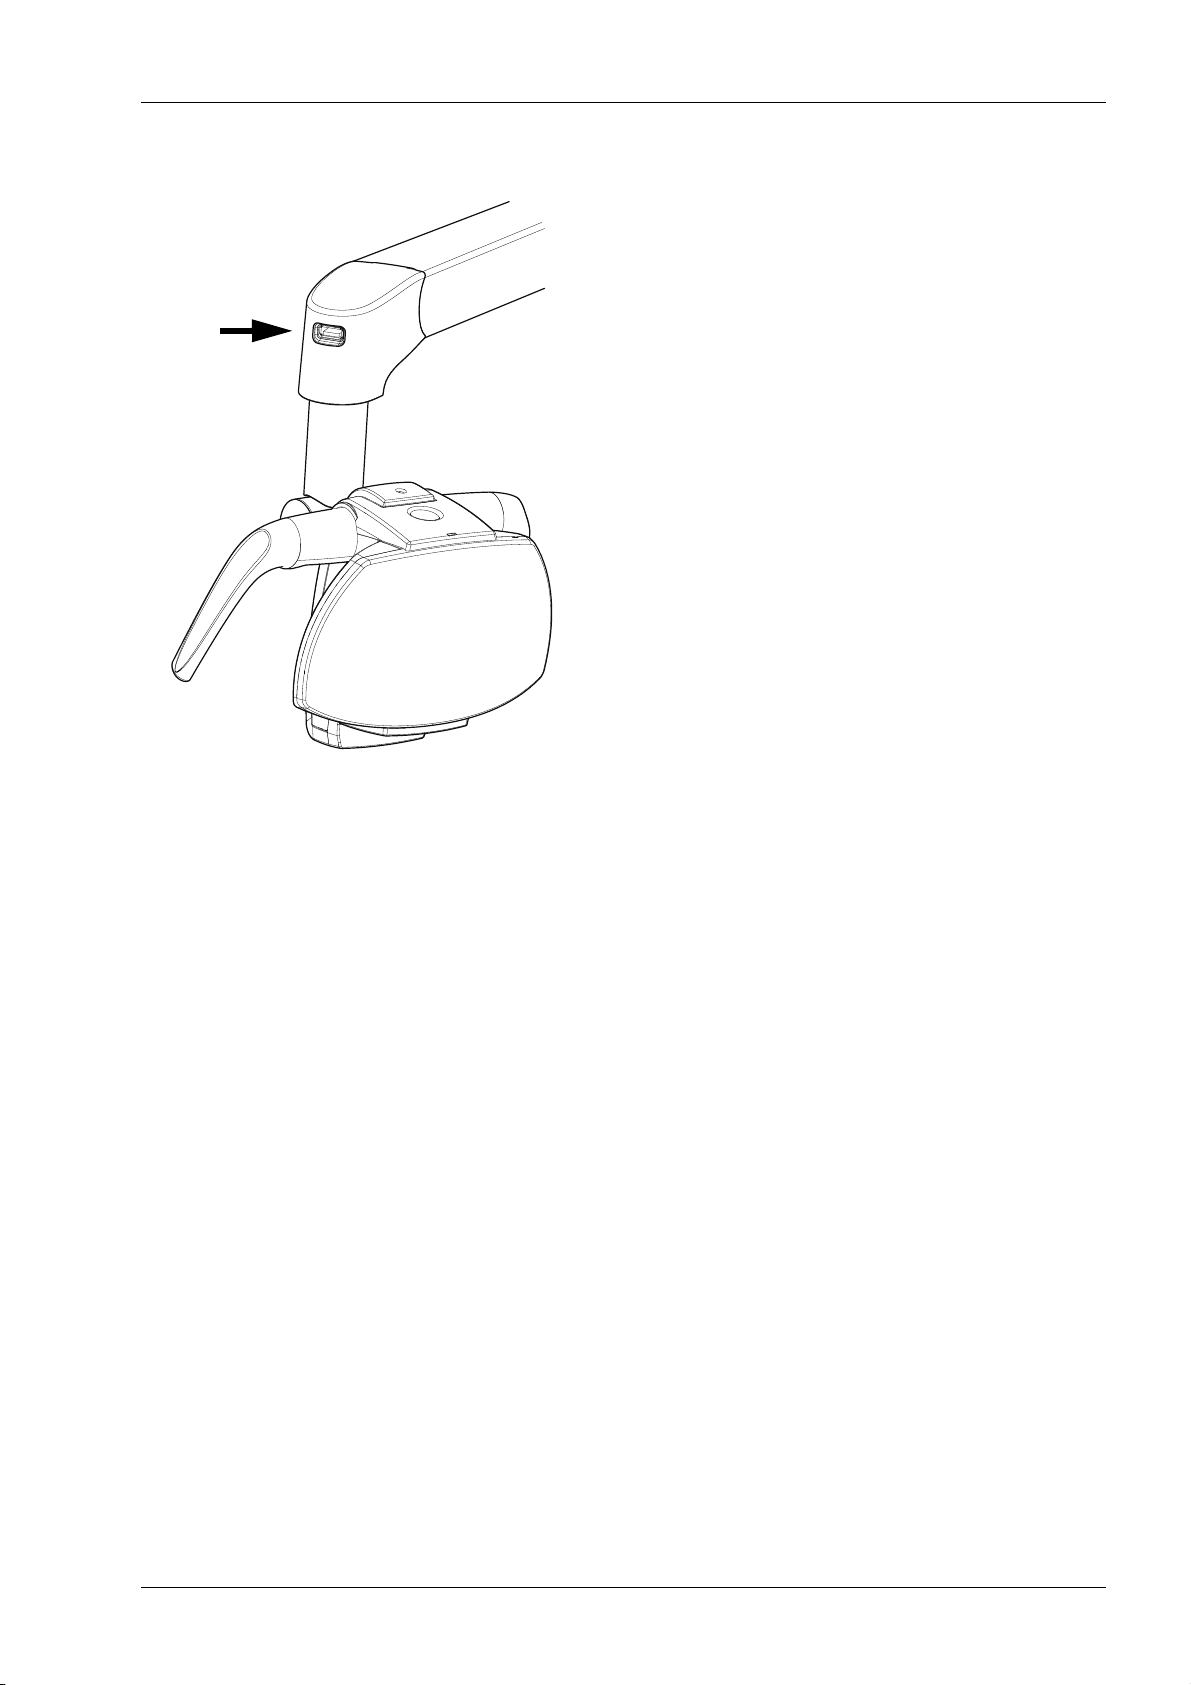
5.5 Attaching USB device to operating light
SingLED_USB.eps
The operating light has a USB port to which you can
attach a USB device.
USING OPERATING LIGHT
User’s Manual
Planmeca SingLED operating light 7
Page 12

CLEANING
WARNING
6CLEANING
6.1 Light assembly
The LED housing and protective fascia
heat up when the operating light is used.
Allow these parts to cool before cleaning
or removing the protective fascia. Always
first turn off the power to the light externally before cleaning.
The Planmeca SingLED operating light is dustproof and
impervious to spray vapour.
All exposed surfaces should be periodically wiped clean
with a non-abrasive cleaning agent designed for cleaning
dental units. When cleaning the light assembly make sure
that the cloth is almost dry.
Stronger agents can be used for disinfecting the
surfaces of the light. We recommend Dürr System
Hygiene FD 333 or a similar disinfecting solution.
When needed, polish the cover with a dry and soft lint-free
cloth.
Patient mirror
Clean the patient mirror with a mild soap- and water
solution. Do not use alcohol-based cleaning agents.
8 Planmeca SingLED operating light
User’s Manual
Page 13
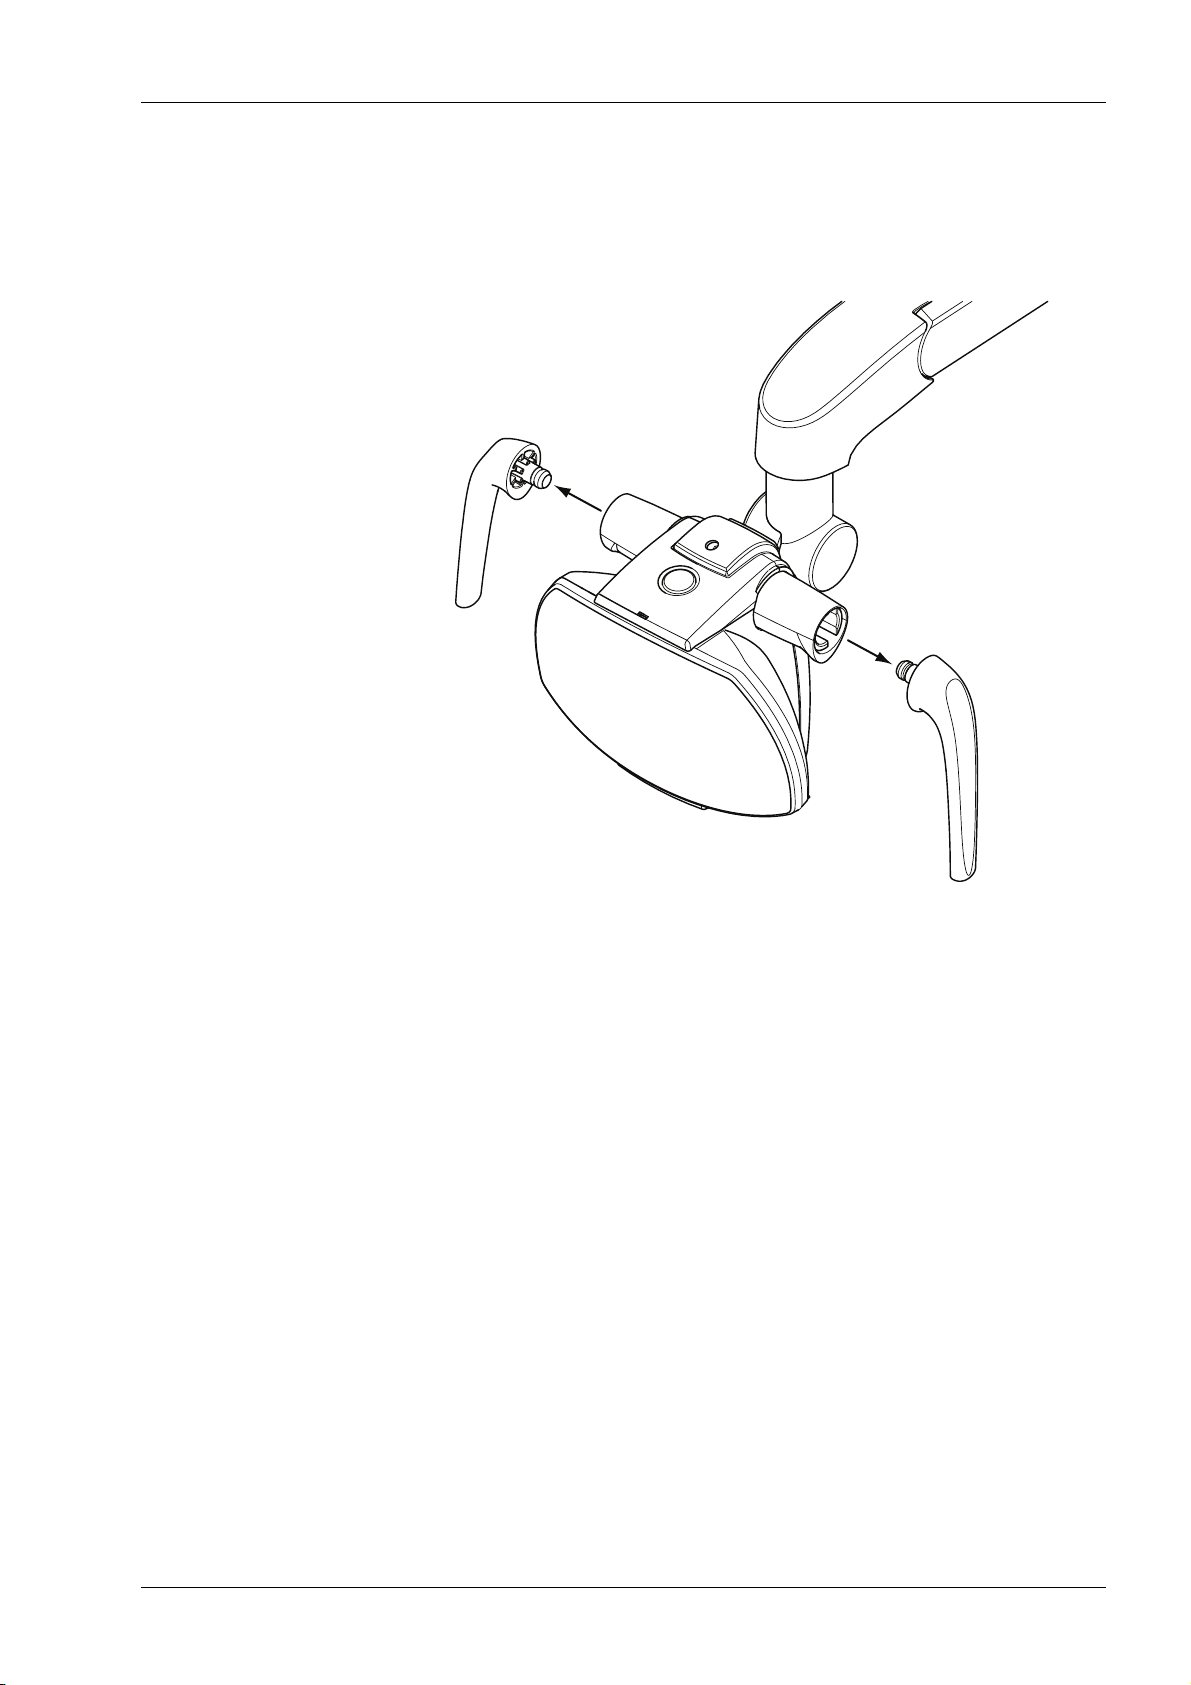
Handles
Sled_6.eps
Remove the handle
for cleaning
CLEANING
The two handles of the operating light can be removed
and autoclaved up to 135°C. Remove the handle by
carefully pulling it outwards.
6.2 Arm
The arm should be periodically wiped clean with a nonabrasive cleaning agent designed to be used with dental
units. Stronger agents can be used for disinfecting. We
recommend Dürr System Hygiene FD 333 or a similar
disinfecting solution.
User’s Manual
Planmeca SingLED operating light 9
Page 14

INDICATION OF ERRONEOUS OPERATION
Sensor
indicator
light
7 INDICATION OF ERRONEOUS OPERATION
If the Planmeca SingLED operating light detects a
malfunction in the normal operation, the sensor indicator
light starts to flash.
The reason for an erroneous operation may be one of the
following:
• Error in the infrared sensor
• Broken LED
• Too low supply voltage
• Overheating of the LED
• Broken temperature sensor
In case of an erroneous operation, please contact your
local Planmeca service technician.
10 Planmeca SingLED operating light
User’s Manual
Page 15

DISPOSAL OF OPERATING LIGHT
8 DISPOSAL OF OPERATING LIGHT
In order to reduce the environmental load over the
product’s entire lifecycle, Planmeca products are
designed to be as safe as possible to manufacture, use
and dispose of.
Parts which can be recycled should always be taken to
the appropriate processing centres, after hazardous
waste has been removed. Disposal of obsolete lights is
the responsibility of the waste possessor.
All parts and components containing hazardous materials
must be disposed of in accordance with waste legislation
and instructions issued by the environmental authorities.
The risks involved and the necessary precautions must be
taken into account when handling waste products.
Disposal of Planmeca SingLED operating light
X = action, (X) = action in cases where processing is available
Part
Frame and covers
- metal
- plastic
- rubber
- glass
Main materials
for disposal
Aluminium,
galvanized steel
Stainless steel
PE,
PE1000
PC+ABS,
PC, bright,
ABS,
POM,
PSU
Recyclable
material
X
X
X
X
X
X
X
X
X
X
X
X
Waste
disposal
site
Hazardous
waste
(separate
collection)
Component boards (X)
Cables Copper X
Packing cardboard,
Other parts X
User’s Manual
paper
X
X
Planmeca SingLED operating light 11
Page 16

TECHNICAL SPECIFICATIONS
9 TECHNICAL SPECIFICATIONS
Planmeca SingLED
Illumination intensity of 700 mm 8000 lx - 35000 lx (factory limitation)
Optimum colour temperature 5000-5500K
Classification Class I, type B
Colour of the operating light arm RAL 9016
Weight of SingLED light 8.1 kg (18.3 lbs)
Connection to supply +15 VDC/0.9 A…+32 VDC/0.4 A
24 VAC/0.6 A50/60 Hz
Separation for main supply 4 kV
Air clearances 5 mm
Creepage distances 8 mm
Power supply must fulfill IEC60601-1 ed.3
(2005)
Power input < 25 W
Power control (MENB1030A2402F01) (Optional)
Connection to supply 100 - 240 VAC
Supply frequency 50 / 60 Hz
Power output 24V/1.33A max
NOTE: When the Planmeca SingLED operating light is connected to other
equipment, the current must be limited to max. 2 A with e.g. a fuse.
Environmental requirements
Operating conditions:
Temperatures: +15°C to +35°C (+59°F to +95°F)
Relative humidity: Non-condensing humidity; 5% RH to 95% RH
Air pressure: 800 hPa to 1060 hPa (12 psi to 15 psi)
Altitude: < 2000 m (less than 1.25 miles)
Storage conditions:
Temperatures: -5°C to +60°C (+23°F to +140°F)
Relative humidity: Non-condensing humidity; 5% RH to 95% RH
Air pressure: 700 hPa to 1060 hPa (10 psi to 15 psi)
If the unit has been stored at temperatures below +10 °C (50 °F) for more than few
hours, time must be allowed for the unit to reach the room temperature in its own
package, before connecting the dental unit to mains voltage.
Transportation conditions:
Temperatures: -20°C to +60°C (-4°F to 140°F)
Relative humidity: Non-condensing humidity; 5% RH to 95% RH
Air pressure: 700 hPa to 1060 hPa (10 psi to 15 psi)
12 Planmeca SingLED operating light
User’s Manual
Page 17

Conformance with standard ISO 9680-2007
The measured sample does not fulfil the following parts of ISO/FDIS 9680:2007(E)
standard:
5.2.7 Shadow: the hard shadow is too large in vertical and horizontal direction.
5.2.8 Colour rendering index: Ra is too low for diagnostic purposes.
5.2.9 UV irradiance: not measured 180nm to 200nm, because limition of measuring
device.
TECHNICAL SPECIFICATIONS
User’s Manual
Planmeca SingLED operating light 13
Page 18
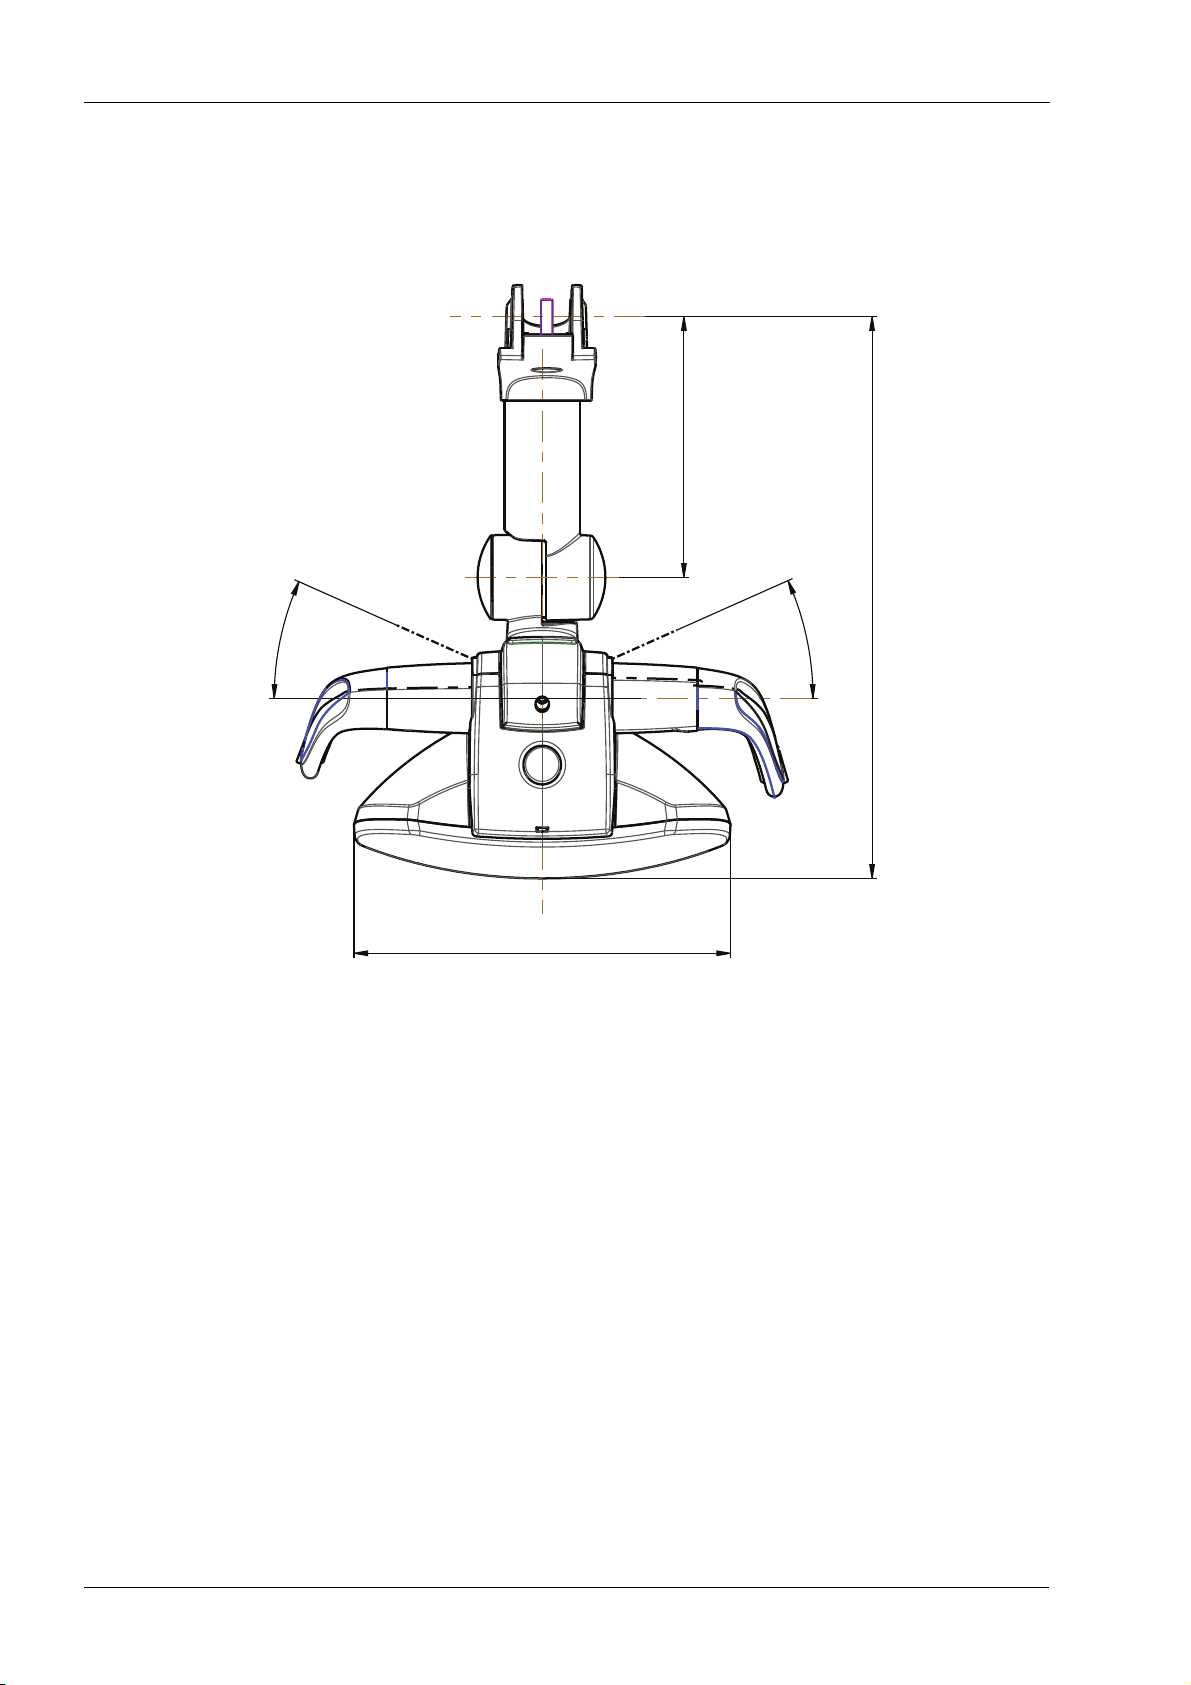
TECHNICAL SPECIFICATIONS
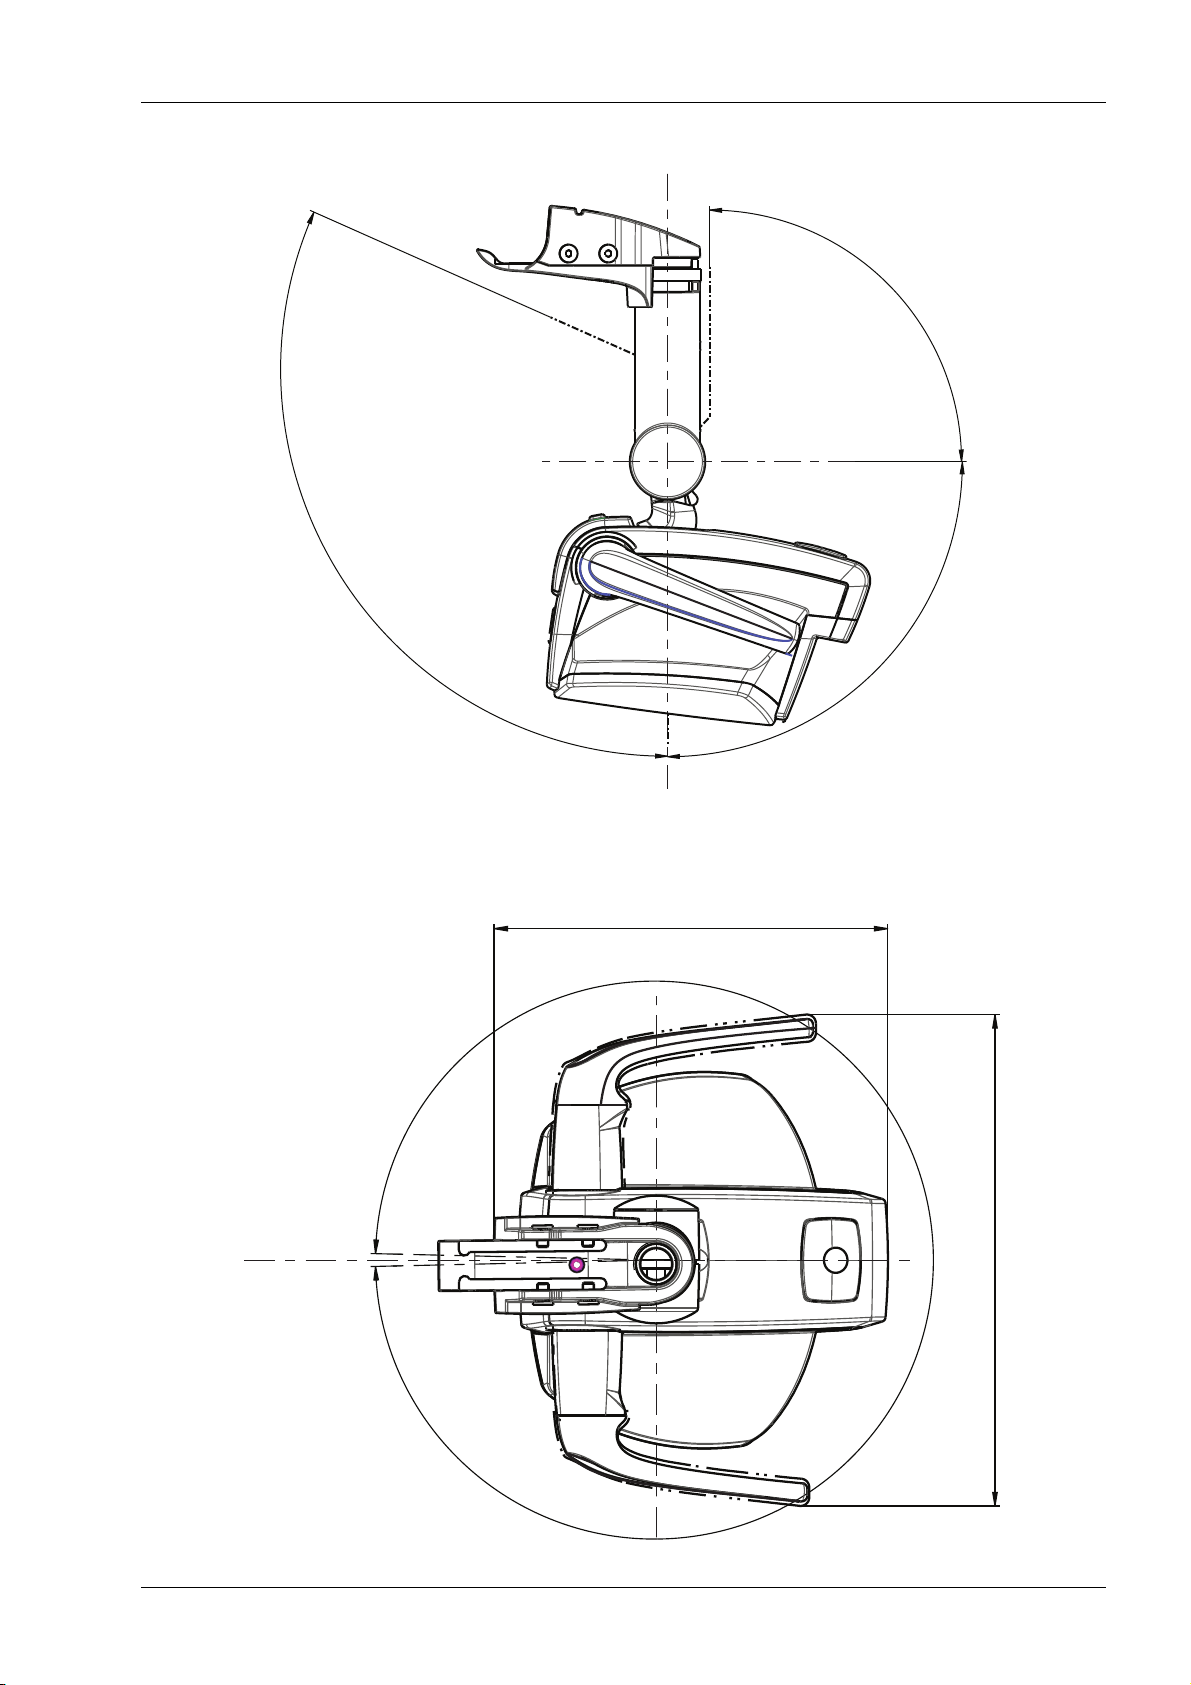
Dimensions
24°
115
24°
248
166
14 Planmeca SingLED operating light
User’s Manual
Page 19
TECHNICAL SPECIFICATIONS
114°
90°
90°
°0
63
217
174
User’s Manual
Planmeca SingLED operating light 15
Page 20
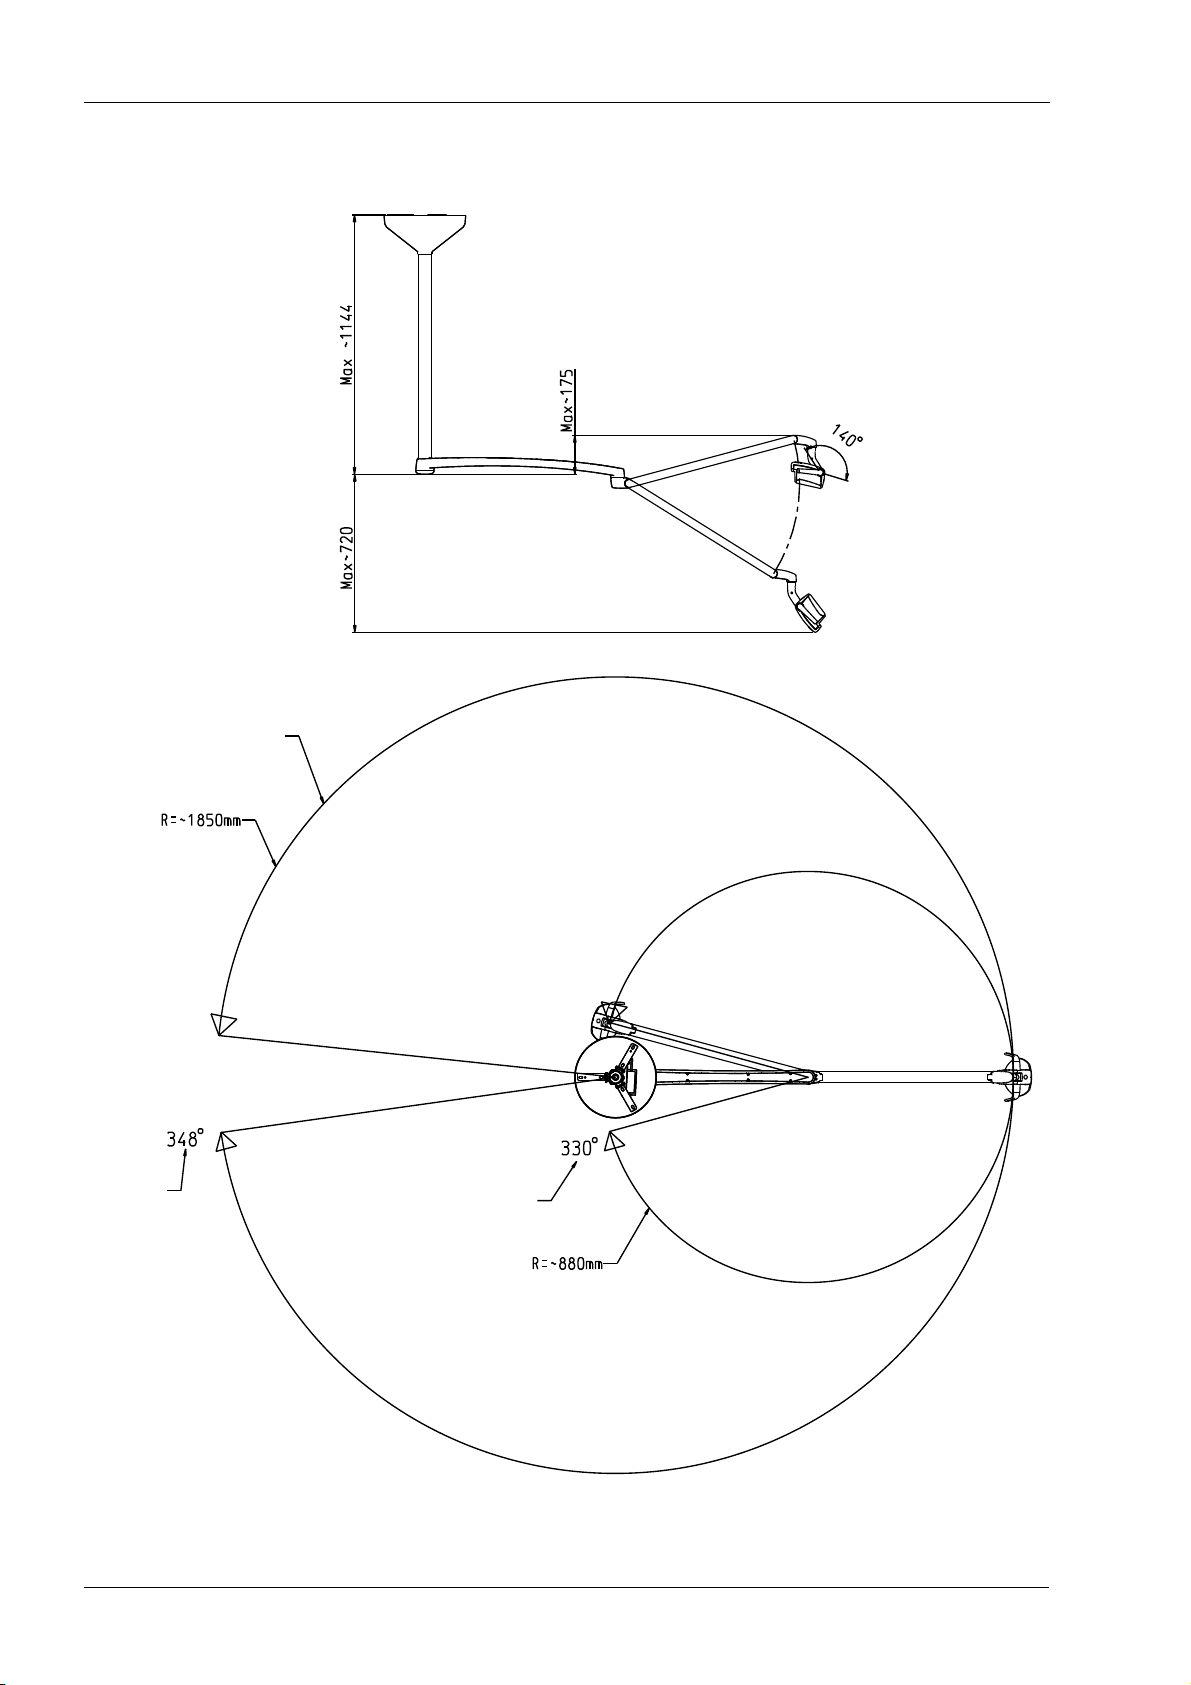
TECHNICAL SPECIFICATIONS
Top view
Side vie
Maximum room
height 3000 mm
First joint rotation angle with rotation limit of ceiling adapter
Second joint rotation
angle with rotation limit
Maximum reach of
outermost point
of operating light
Ceiling installation
16 Planmeca SingLED operating light
User’s Manual
Page 21
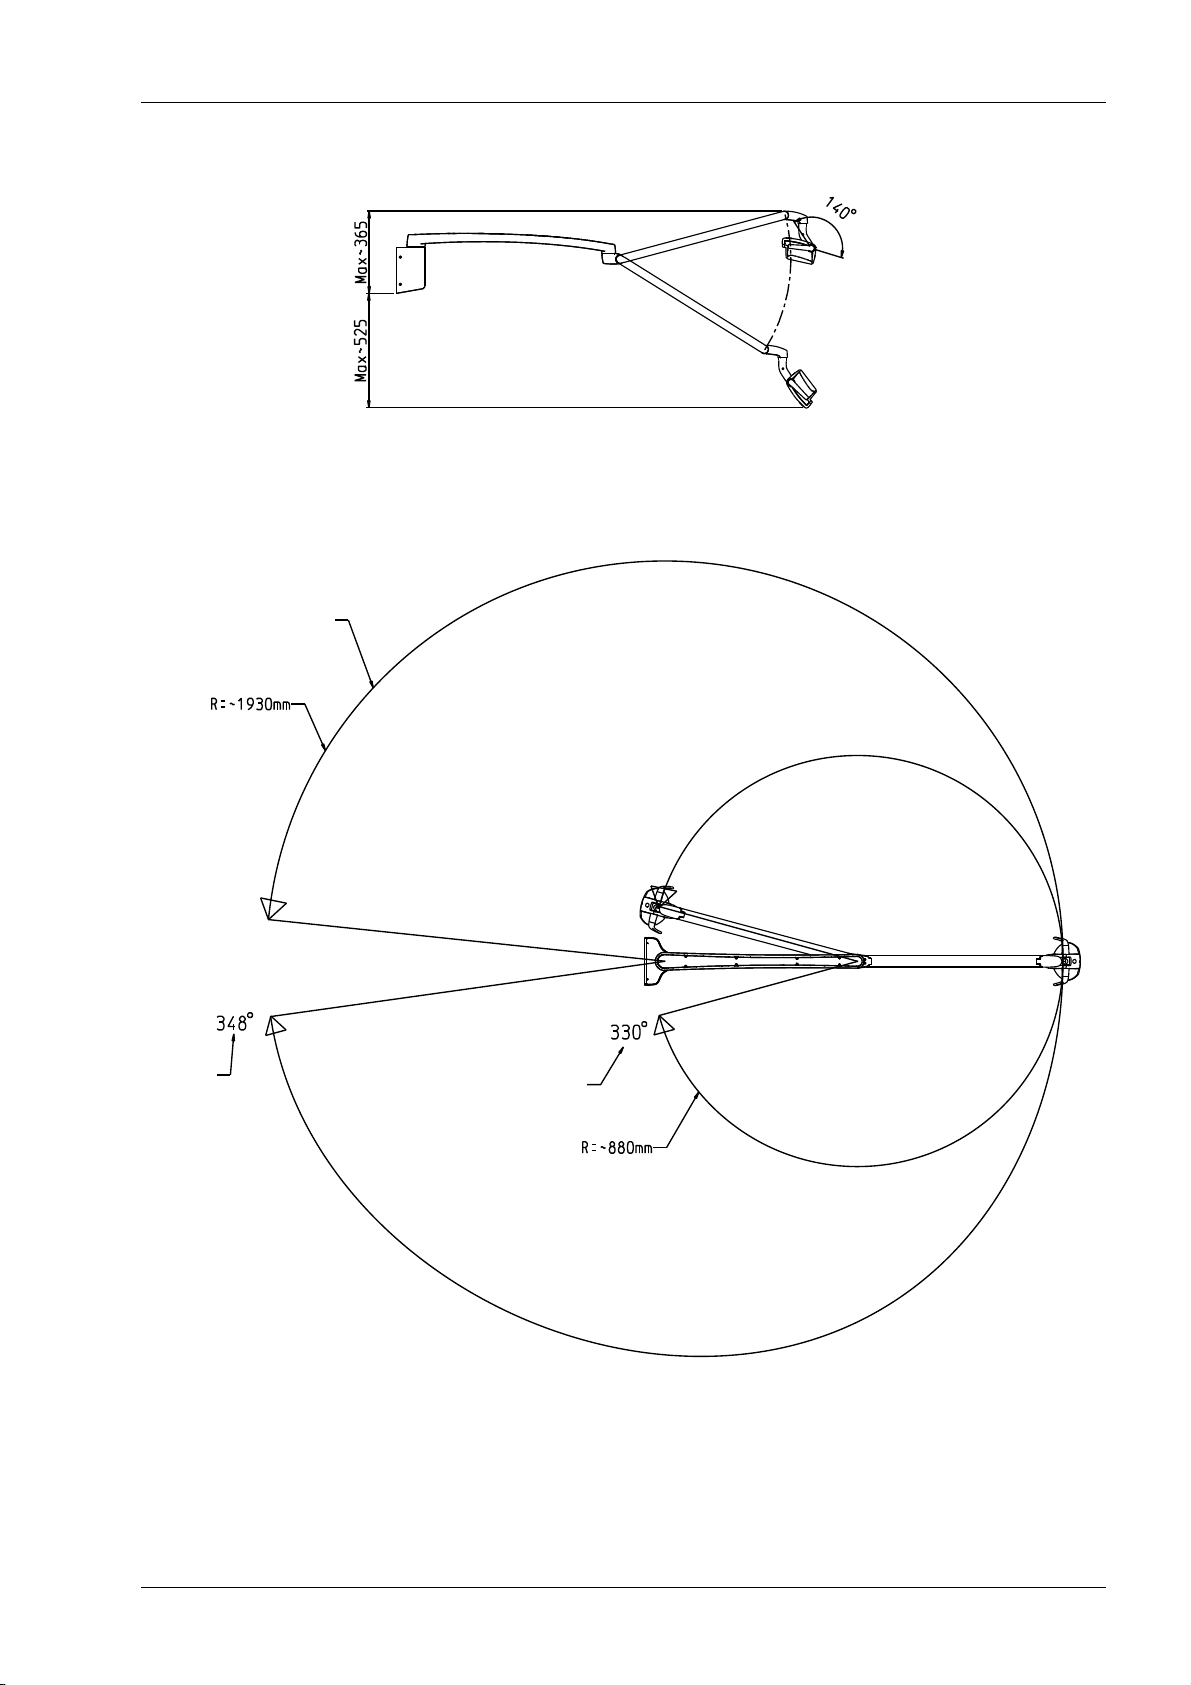
Side view
Top view
Recommended max.
height from floor
1670 mm
Maximum reach of
outermost point
of operating light
First joint rotation angle with rotation limit
Second joint rotation
angle with rotation limit
TECHNICAL SPECIFICATIONS
Wall installation
User’s Manual
Planmeca SingLED operating light 17
Page 22
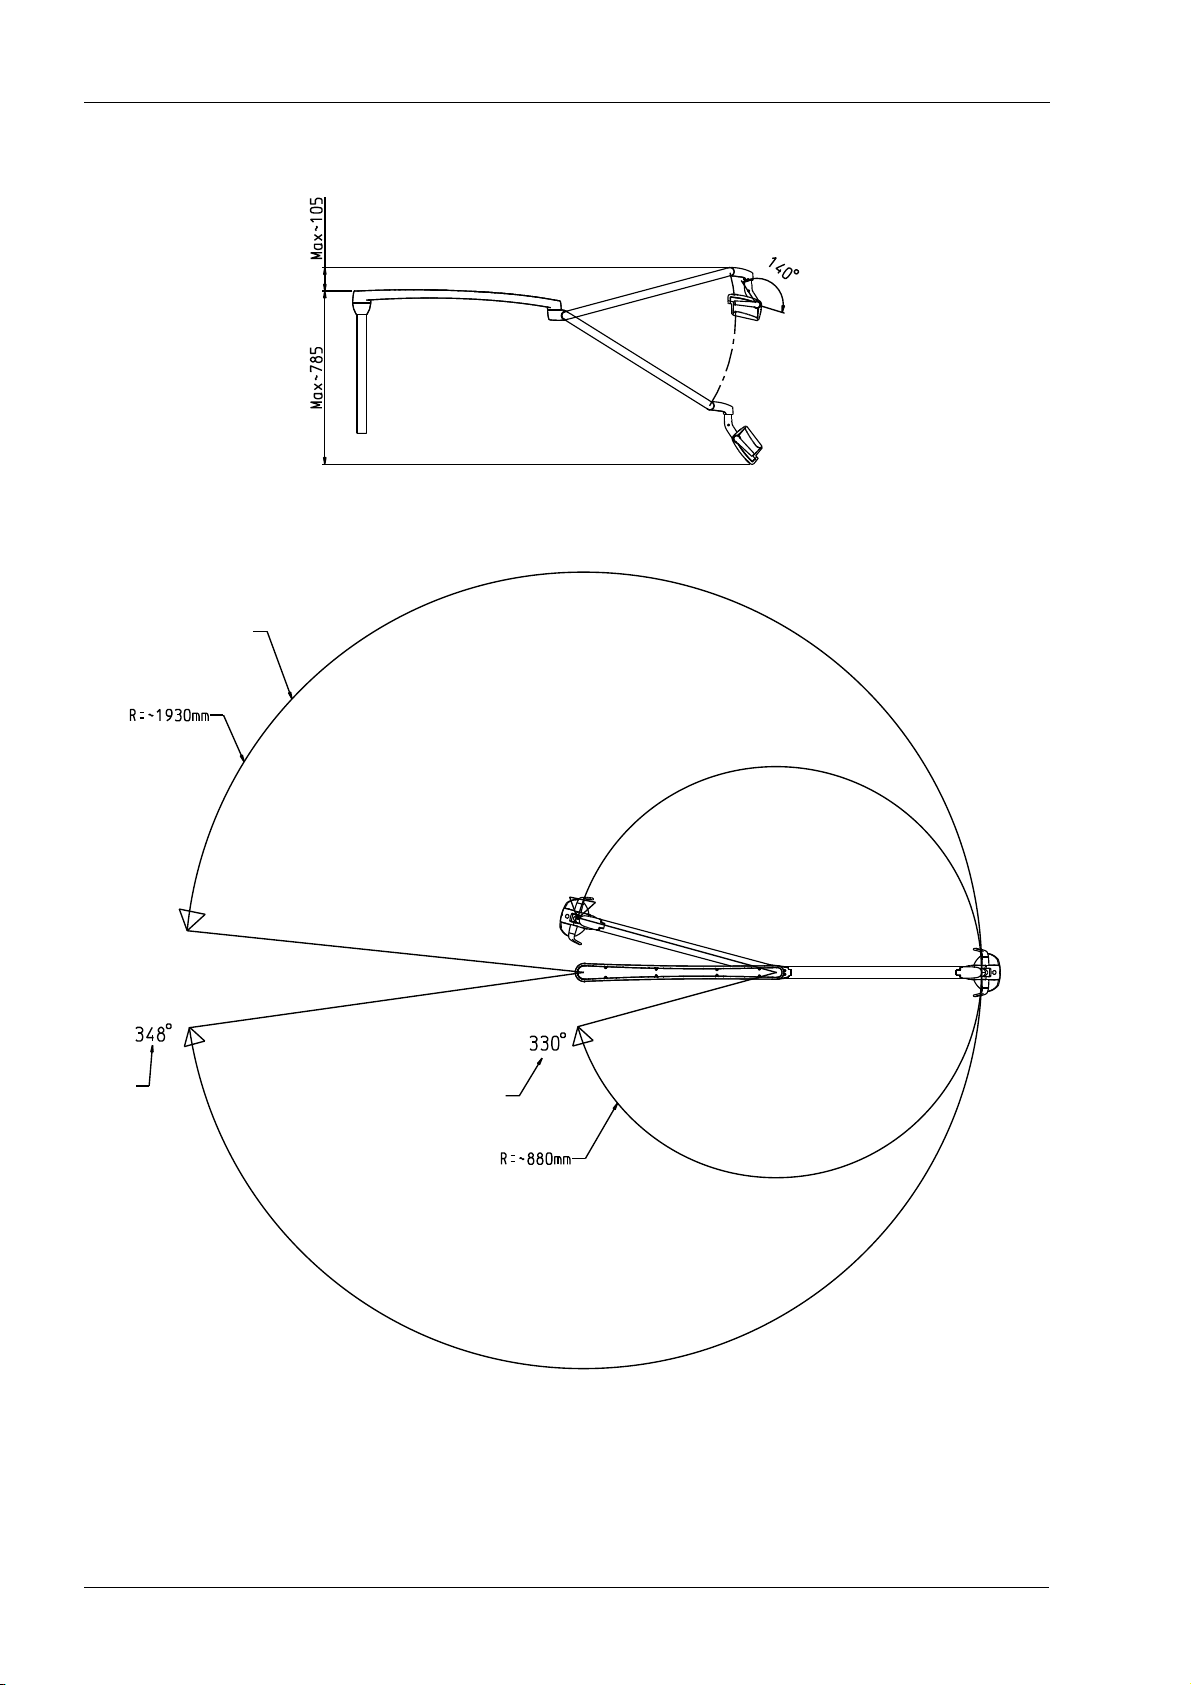
TECHNICAL SPECIFICATIONS
Side view
Top view
Maximum reach of
outermost point
of operating light
Second joint rotation
angle with rotation limit
First joint rotation angle with rotation limit
Dental unit installation
18 Planmeca SingLED operating light
User’s Manual
Page 23
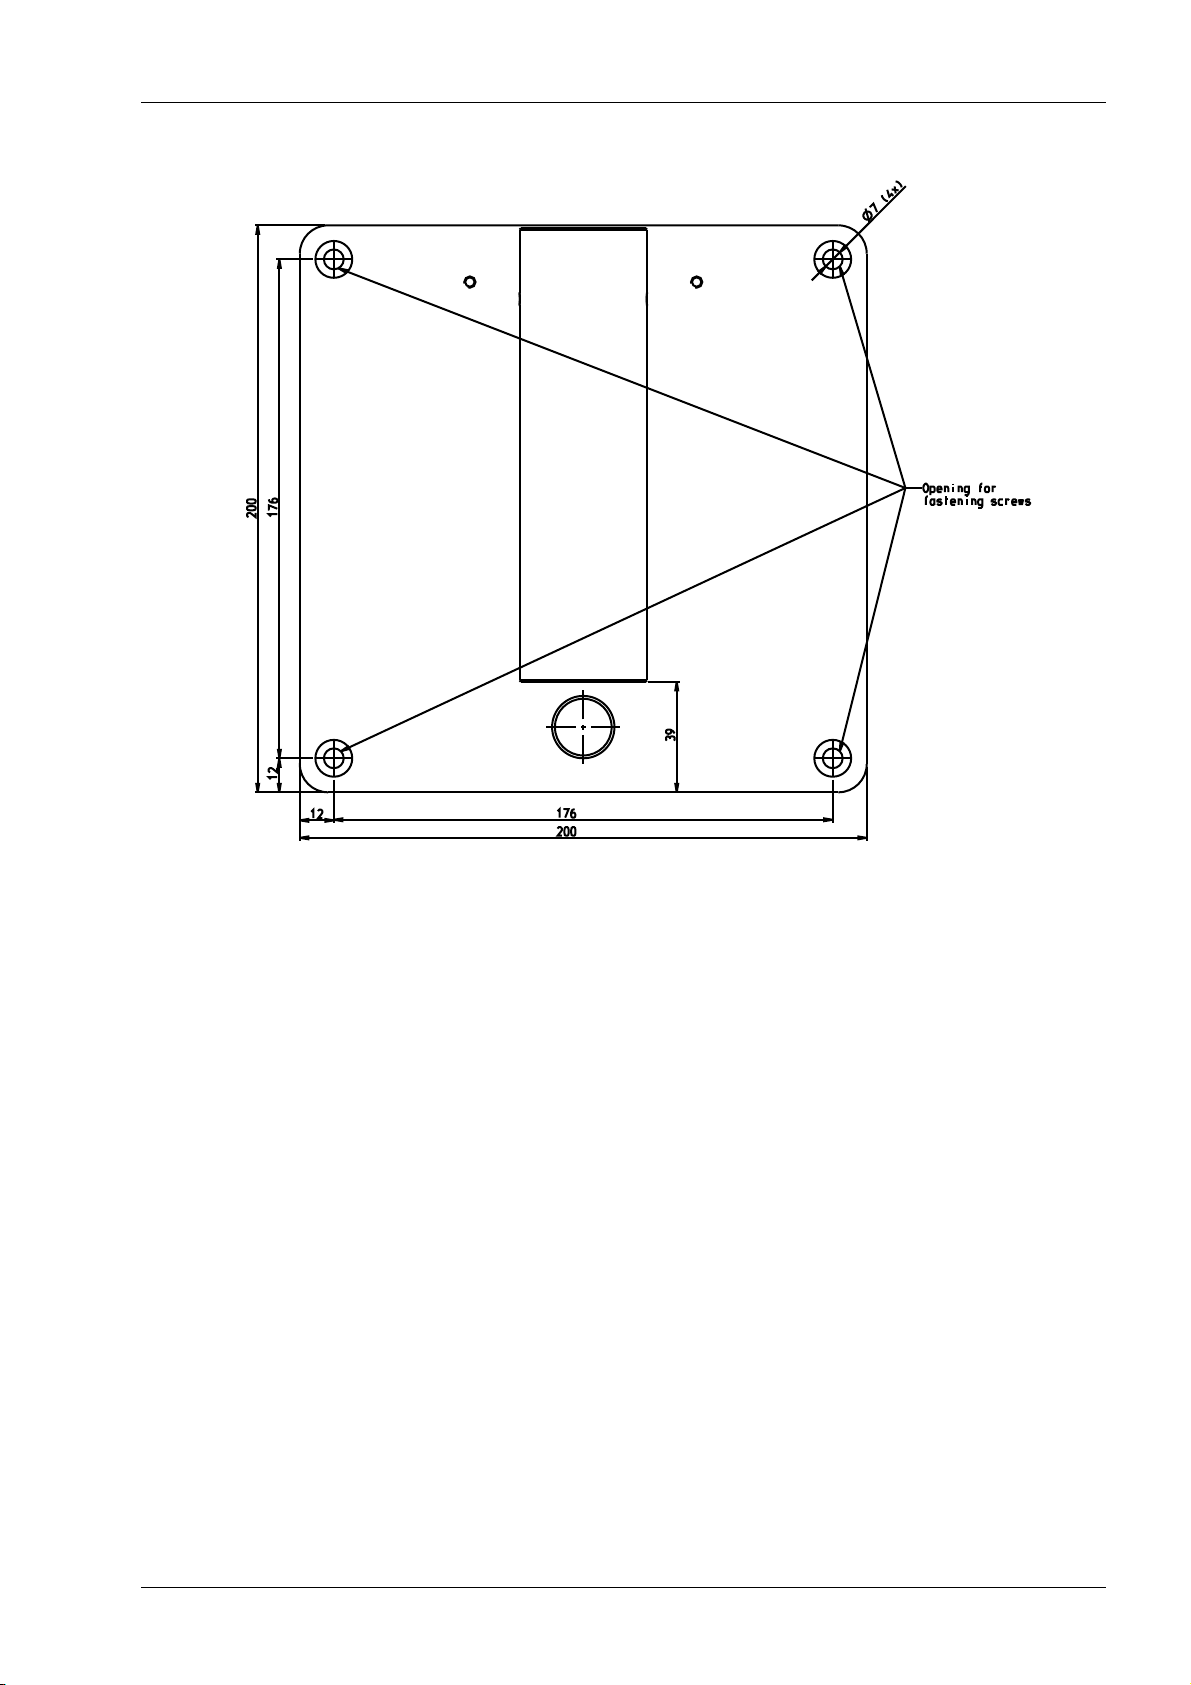
Dimensions of the wall plate (in mm)
TECHNICAL SPECIFICATIONS
User’s Manual
Planmeca SingLED operating light 19
Page 24
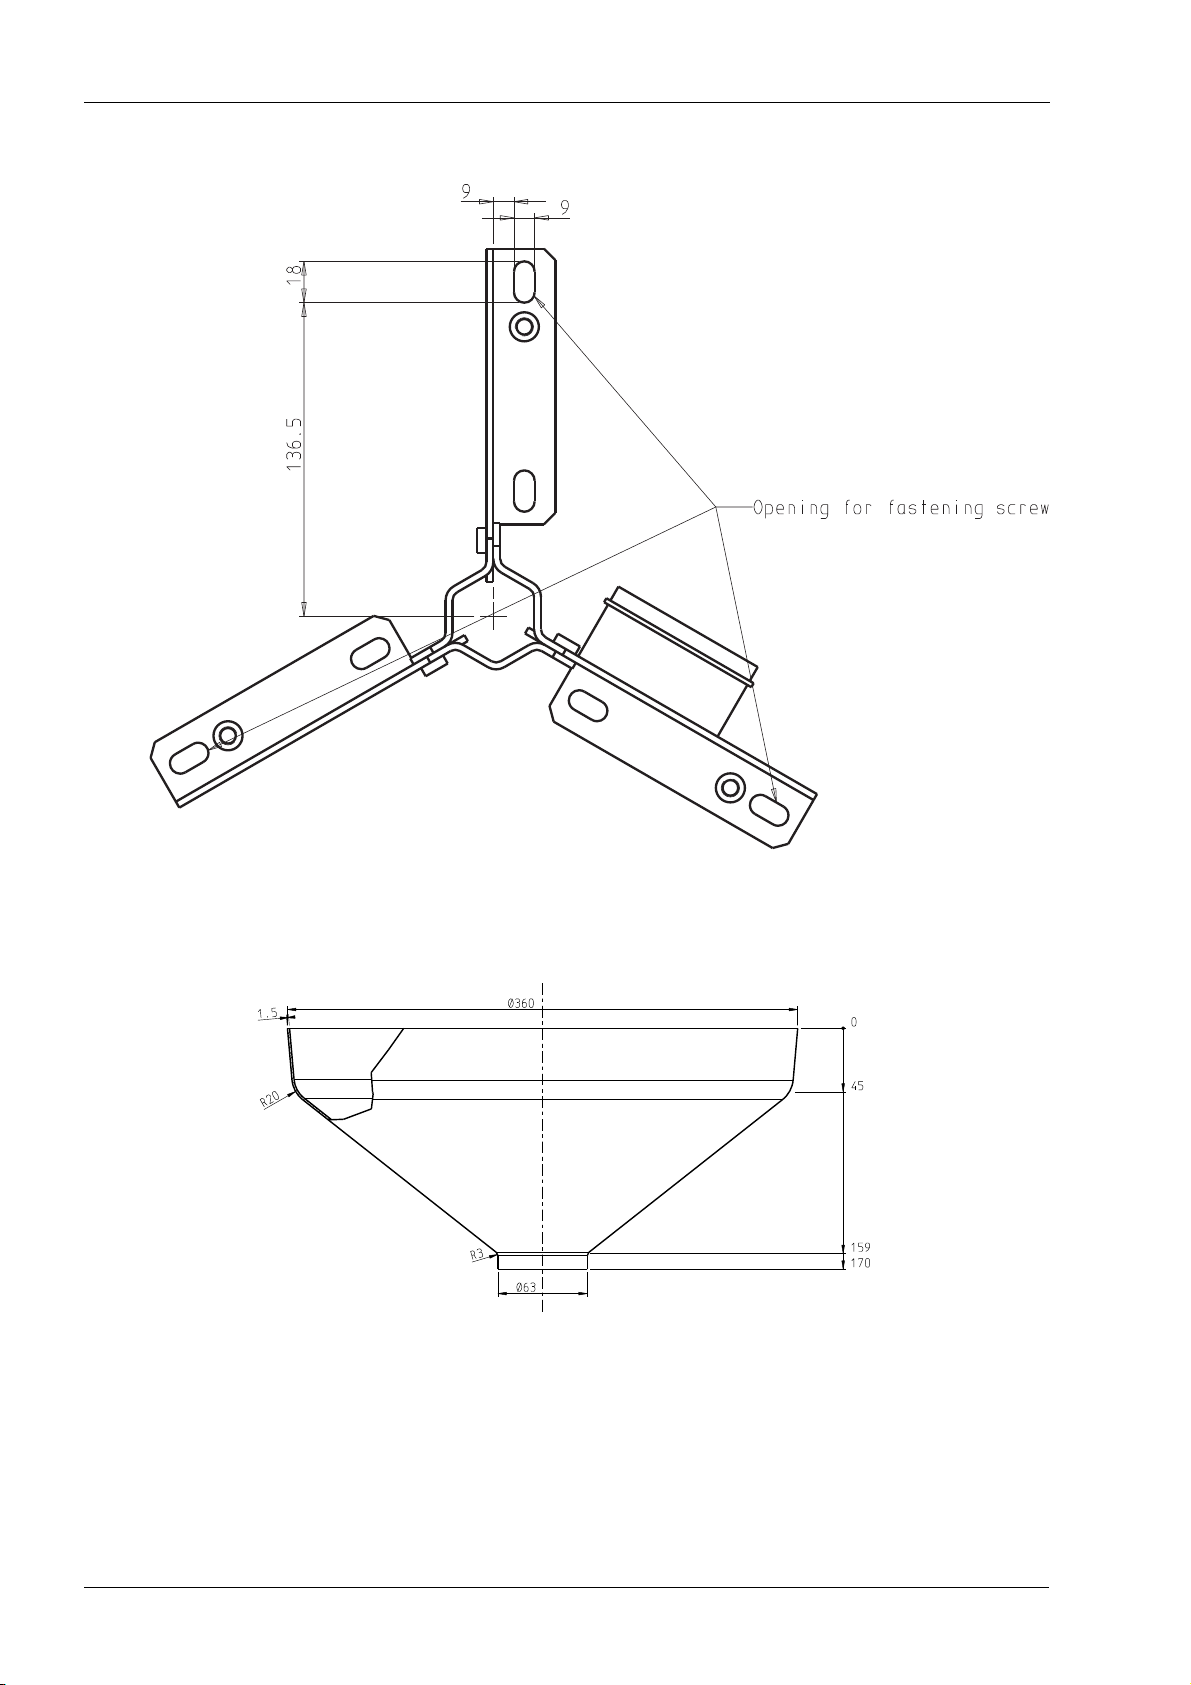
TECHNICAL SPECIFICATIONS
Dimensions of the ceiling adapter (in mm)
Dimensions of ceiling adapter cover (in mm)
20 Planmeca SingLED operating light
User’s Manual
Page 25

10 MAINTENANCE PARTS
Part Part number
Power supply MENB1030A2402F01
24V DC, (100-240VAC) 10017273
Handle 10020763
MAINTENANCE PARTS
User’s Manual
Planmeca SingLED operating light 21
Page 26

Page 27

Page 28

Planmeca Oy | Asentajankatu 6 | 00880 Helsinki | Finland
tel. +358 20 7795 500 | fax +358 20 7795 555 | [email protected] | www.planmeca.com
 Loading...