

Page 1
EN
cephalostat
user's manual
10010940_3
Page 2

Page 3

TABLE OF CONTENTS
1 INTRODUCTION ..............................................................................................1
2 WARNINGS AND PRECAUTIONS .................................................................. 2
3 CHECKLIST - BEFORE USING THE CEPHALOSTAT ...................................3
4 PLANMECA PROLINE XC PAN/CEPH X-RAY UNIT .....................................4
4.1 The XC Cephalostat CM ................................................................................................ 4
4.2 Main parts of the Proline XC Cephalostat ......................................................................4
4.3 Removing and replacing the ear posts and the nasial positioner .................................. 5
4.4 Emergency stop button .................................................................................................. 5
5 PREPARATIONS FOR THE CEPHALOMETRIC EXPOSURE .......................6
5.1 Switching on the X-ray unit ............................................................................................ 6
5.2 Preparing the patient ...................................................................................................... 6
6 ENTERING CEPHALOMETRIC PROGRAM ...................................................7
6.1 Selecting cephalometric exposure program ................................................................... 7
7 TAKING AN EXPOSURE - LATERAL CEPH ................................................10
8 TAKING AN EXPOSURE - ANTERIOR-POSTERIOR AND
POSTERIOR-ANTERIOR ...............................................................................15
9 TAKING AN EXPOSURE - SUBMENTO-VERTEX ........................................18
10 TAKING AN EXPOSURE - WATERS VIEW ..................................................20
11 TAKING AN EXPOSURE - AP TOWNE ........................................................22
12 DISPOSAL OF THE PAN/CEPH UNIT ..........................................................24
User’s Manual
Planmeca Proline XC Cephalostat i
Page 4

TABLE OF CONTENTS
The manufacturer, assembler, and importer are responsible for the safety, reliability and performance of the unit only if:
- installation, calibration, modification and repairs are carried out by qualified
authorized personnel
- electrical installations are carried out according to the appropriate requirements such as IEC364
- equipment is used according to the operating instructions
Planmeca pursues a policy of continual product development. Although every
effort is made to produce up-to-date product documentation this publication
should not be regarded as an infallible guide to current specifications. We reserve the right to make changes without prior notice.
COPYRIGHT PLANMECA 2008-04
PUBLICATION PART NUMBER 10010940 Revision 3
ii Planmeca Proline XC Cephalostat
User’s Manual
Page 5

1 INTRODUCTION
0537
INTRODUCTION
The Planmeca Proline XC Cephalostat CM uses
cephalometric techniques to produce X-ray images for the
diagnosis of dentomaxillofacial anatomy. The unit is
allowed to be used only under supervision of a dental/
health care professional.
This guide describes how to use the Planmeca Proline XC
cephalostat CM. Version of the CM CEPHALOSTAT is
available for both 18cm x 24cm and 8” X 10” film sizes.
Please read these instructions carefully before using the
cephalostat. This manual should be used in conjunction
with the Planmeca Proline Panoramic X-ray unit’s user’s
manual.
The Proline X-ray unit fulfills the requirements of Directive
93/42/EEC. The Proline XC X-ray unit fulfills the
requirements of standard EN 55011, class A.
NOTE Federal law restricts this device to sale by or on the
order of a dentist.
CAUTION This X-ray unit may be dangerous to both patient
and operator unless safe exposure values are
used and correct operating procedures are
observed.
NOTE The X-ray unit’s software revisions are shown on the
main display when the X-ray unit is switched on. This
manual is valid for software revisions: PG 6.54 or later
and PK 6.52 or later.
The display values shown in this guide are only examples
and should not be interpreted as recommended values
unless otherwise stated.
The exposure values given in these instructions are
based on Kodak Ektavision green sensitive film and
Kodak Ektavision screens. If you are using a different film
and screen combination you may have to use different
exposure values.
The exposure values required to produce good X-ray
images will vary considerably according to the build and
age of the patient, the film processor used and processing
procedures being followed. Therefore, the exposure
values given in this guide are average values and are only
meant to guide the user. Users are encouraged to
develop their own radiographic techniques based on
these values.
Make sure that you are fully acquainted with the
appropriate radiation protection measures and these
instructions before using the unit.
User’s manual
Planmeca Proline XC Cephalostat 1
Page 6
WARNINGS AND PRECAUTIONS
2 WARNINGS AND PRECAUTIONS
NOTE It is very important that the place where the unit is to
be used and the position from which the user is to
operate the unit are correctly shielded. Since radiation
safety requirements vary from country to country and
state to state it is the responsibility of the user to
ensure that all local safety requirements are met.
NOTE If the X-ray unit has been stored at temperatures under
+10°C for more than a few hours, time must be allowed
for the unit to reach room temperature before turning
it on.
NOTE Electromagnetic interference between the equipment
and other devices can occur in very extreme
conditions. Do not use the equipment in close
conjunction with sensitive devices, or devices
creating high electromagnetic disturbances.
NOTE FOR US USERS:
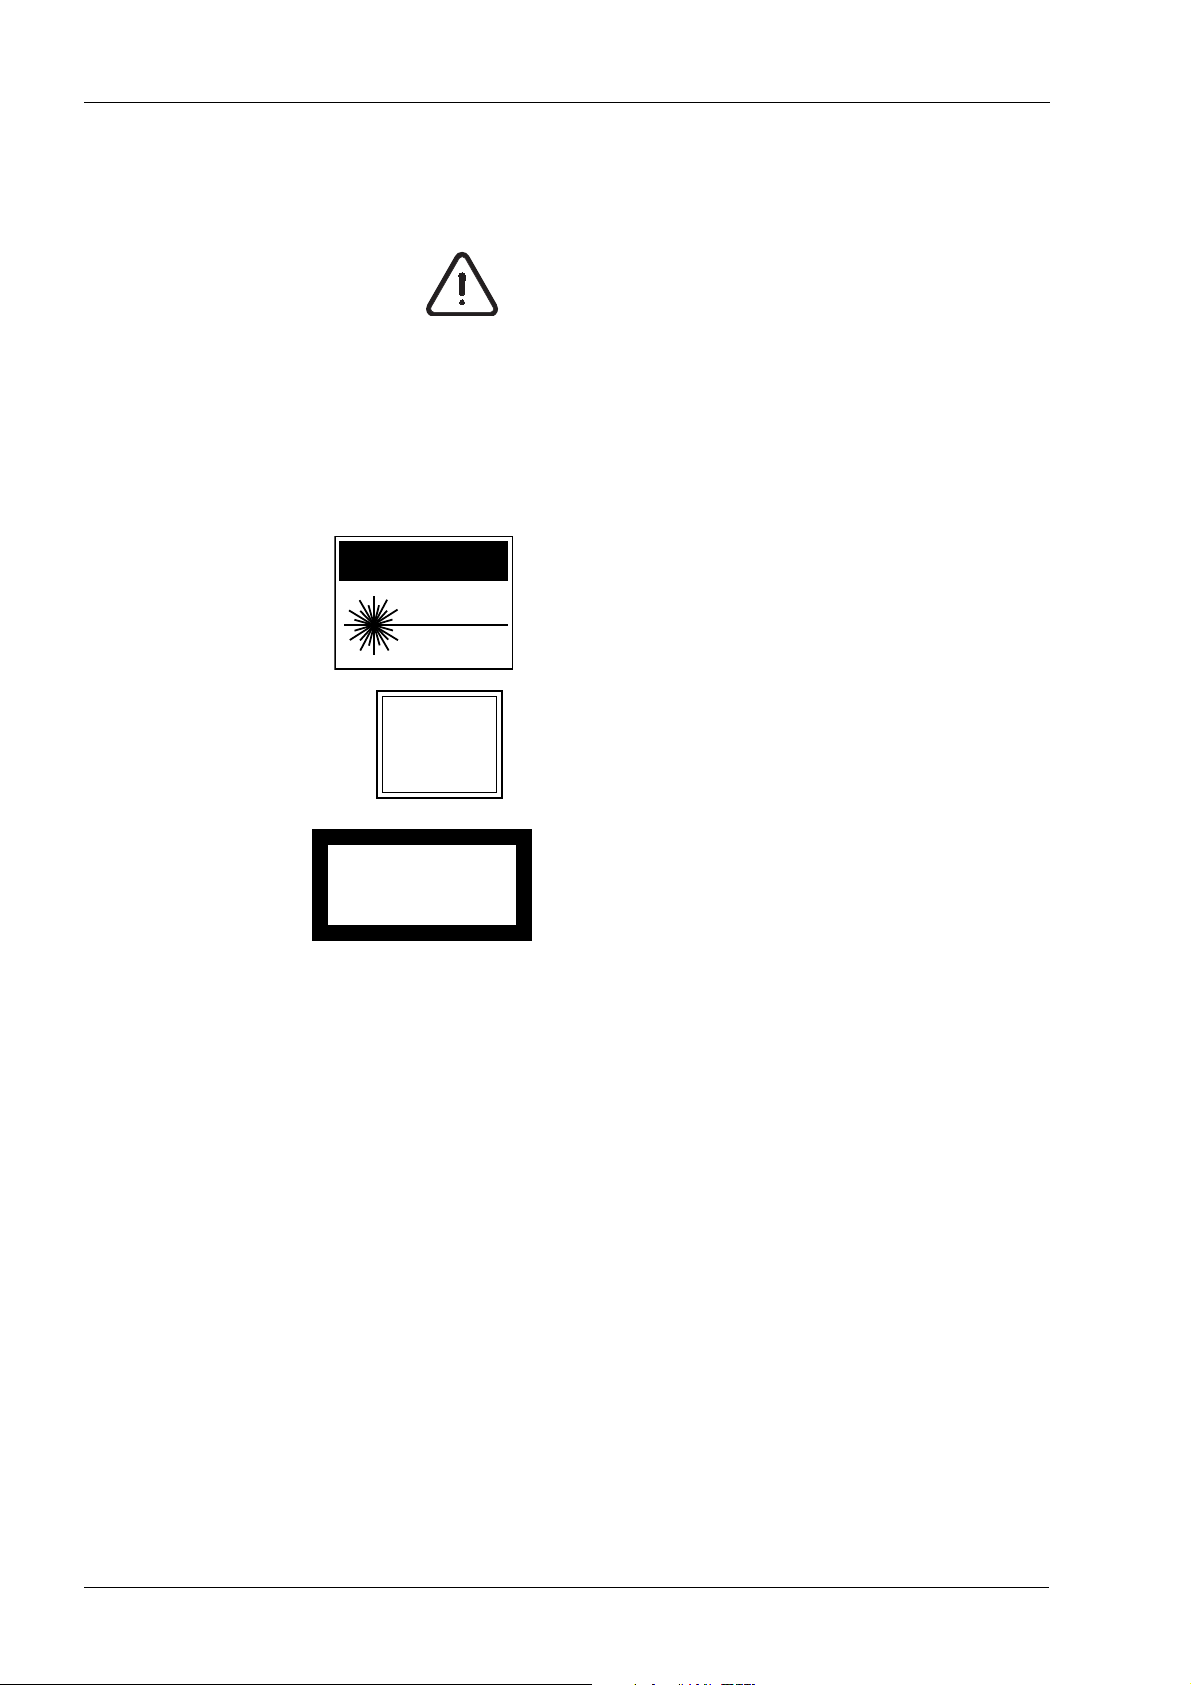
CAUTION
LBL-X-099
LASER RADIATION -
DO NOT STARE
INTO BEAM
1mW
635nm
CLASS II
LASER
PRODUCT
The patient positioning lights are class II laser products
(21 CFR § 1040.10).
AVOID
EXPOSURE-
Laser radiation
is emitted from
this aperture.
CLASS 1 LASER PRODUCT
APPAREIL À LASER DE CLASSE 1
EN 60825-1:1994
LBL-X-100
NOTE EMC requirements have to be considered, and the
NOTE Portable and mobile RF communications equipment
NOTE Never place heavy objects on any part of the unit or
NOTE Maintain audio and visual contact with the patient and
NOTE FOR EUROPEAN USERS:
Class 1 laser product (Standard EN 60825-1:1994).
The patient positioning lights are class 1, inherently safe
laser lights.
equipment must be installed and put into service
according to the specific EMC information provided in
the accompanying documents.
can affect Planmeca Proline XC
X-ray unit.
hang objects from the unit’s arm structures.
Do not put containers of liquid on any part of the unit.
the unit during the exposure.
2 Planmeca Proline XC Cephalostat
User’s manual
Page 7

CHECKLIST - BEFORE USING THE CEPHALOSTAT
3 CHECKLIST - BEFORE USING THE CEPHALOSTAT
• Make sure that you are fully acquainted with the
appropriate radiation protection measures and the
instructions in this manual before using the
cephalostat.
• Make sure that you have access to a film processor
that is in working order and is ready for use.
• Make sure that you are using the correct film
processing chemicals for the film you are using.
• Make sure that the processing chemicals you are
using are fresh and are at the correct processing
temperatures and concentrations.
• Make sure that the safelight you are using in the
darkroom is suitable for the film being used.
• Make sure that the film you are going to use is fresh.
Do not use old film.
• Make sure that the film and intensifying screen you are
using are compatible. Do not mix films and screens of
different color sensitivity.
• Make sure that the film and screen are the right type
for the technique you plan to use.
• Make sure that the intensifying screen is free of dust
and is not scratched or damaged.
• Never leave the cassette open in daylight.
User’s manual
Planmeca Proline XC Cephalostat 3
Page 8
PLANMECA PROLINE XC PAN/CEPH X-RAY UNIT
4 PLANMECA PROLINE XC PAN/CEPH X-RAY UNIT
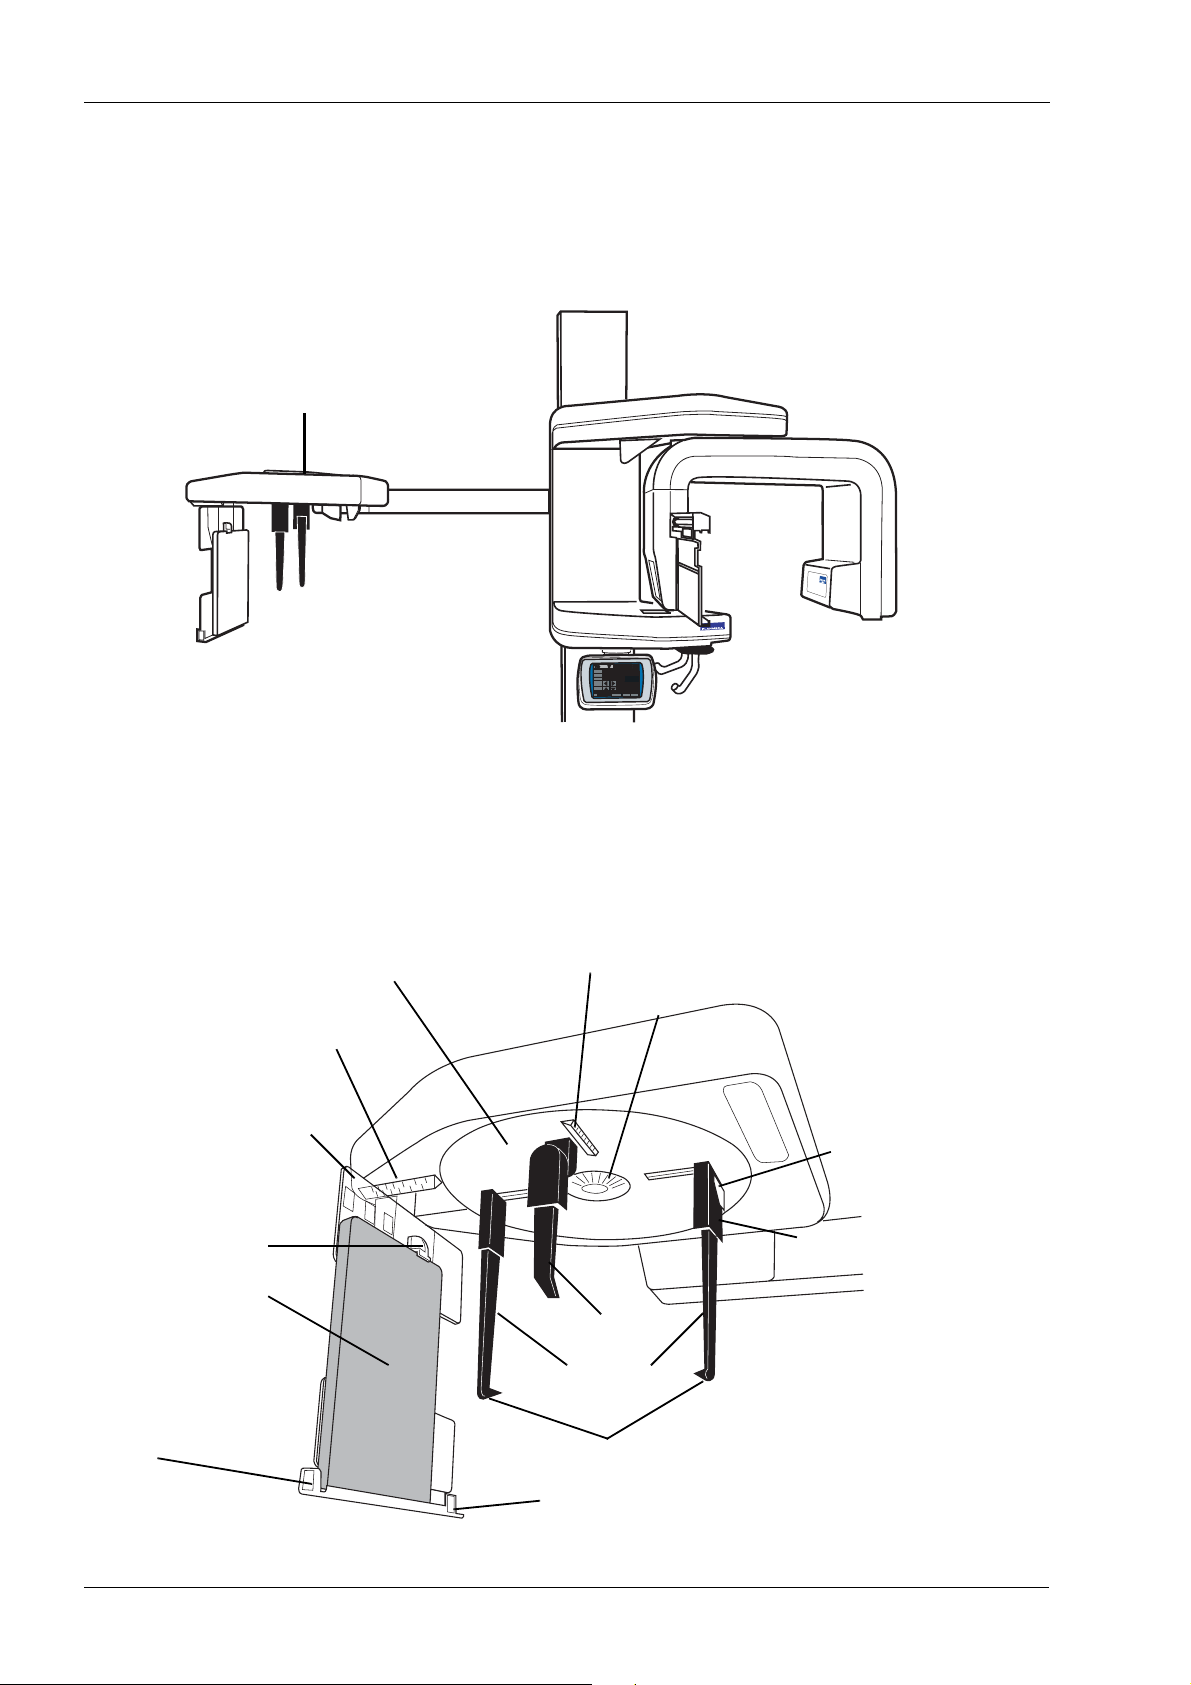
4.1 The XC Cephalostat CM
Cephalostat
4.2 Main parts of the Proline XC Cephalostat
Rotatable head support
Magnification scale
Cassette holder
Cassette clip
Cassette
Left-hand cassette stop
Soft tissue filter scale
Rotation scale
Nasial positioner
Ear posts
Positioning cones
Release lever
Ear post holder
4 Planmeca Proline XC Cephalostat
Right-hand cassette stop
User’s manual
Page 9
PLANMECA PROLINE XC PAN/CEPH X-RAY UNIT
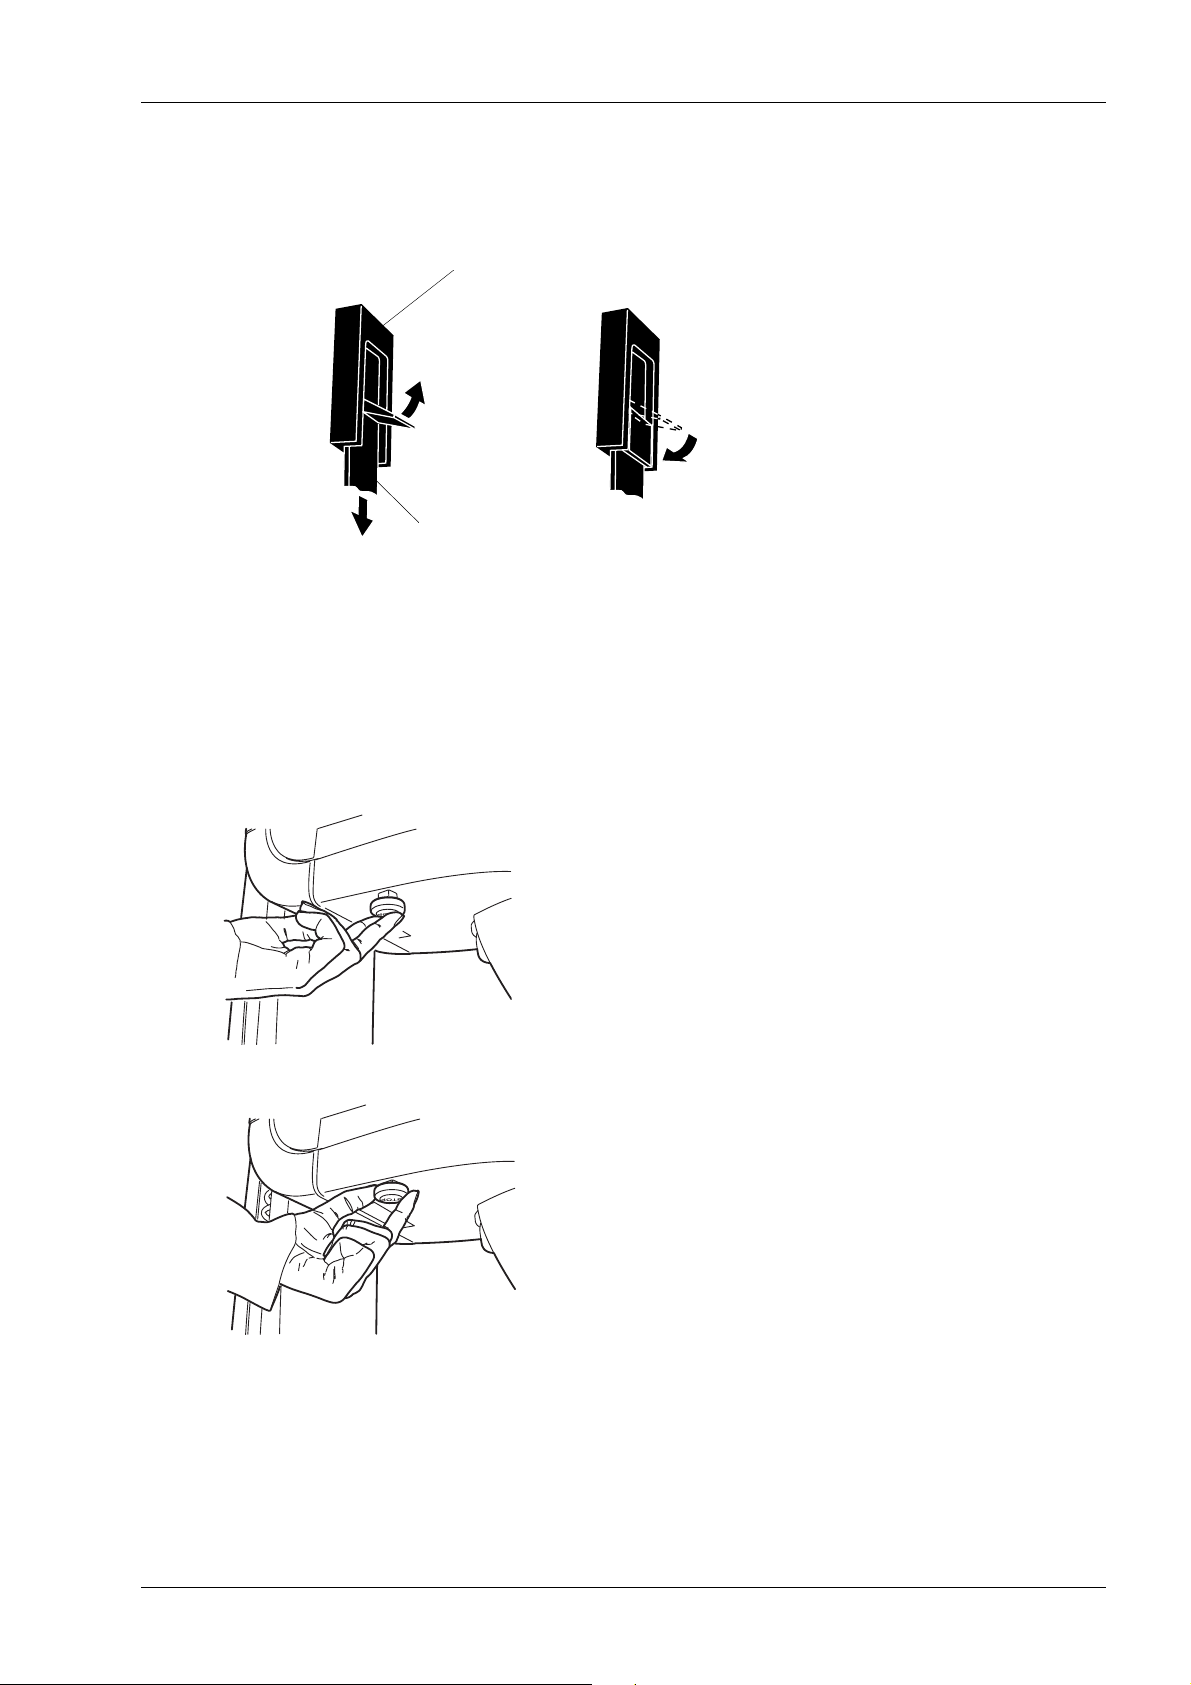
4.3 Removing and replacing the ear posts and the nasial positioner
Holder
Lift to release
Press down to lock
Ear post/nasial positioner
Note
When replacing the ear posts push them firmly
to their position.
4.4 Emergency stop button
The emergency stop button is located on the underside of
the vertical carriage. Press the button to stop the vertical
carriage movement in an emergency.
The Error message Er53 will appear on the main display.
Touch OK to clear the error code from the display and pull
the stop button out to start the unit again.
User’s manual
Planmeca Proline XC Cephalostat 5
Page 10
PREPARATIONS FOR THE CEPHALOMETRIC EXPOSURE
5 PREPARATIONS FOR THE CEPHALOMETRIC EXPOSURE
5.1 Switching on the X-ray unit
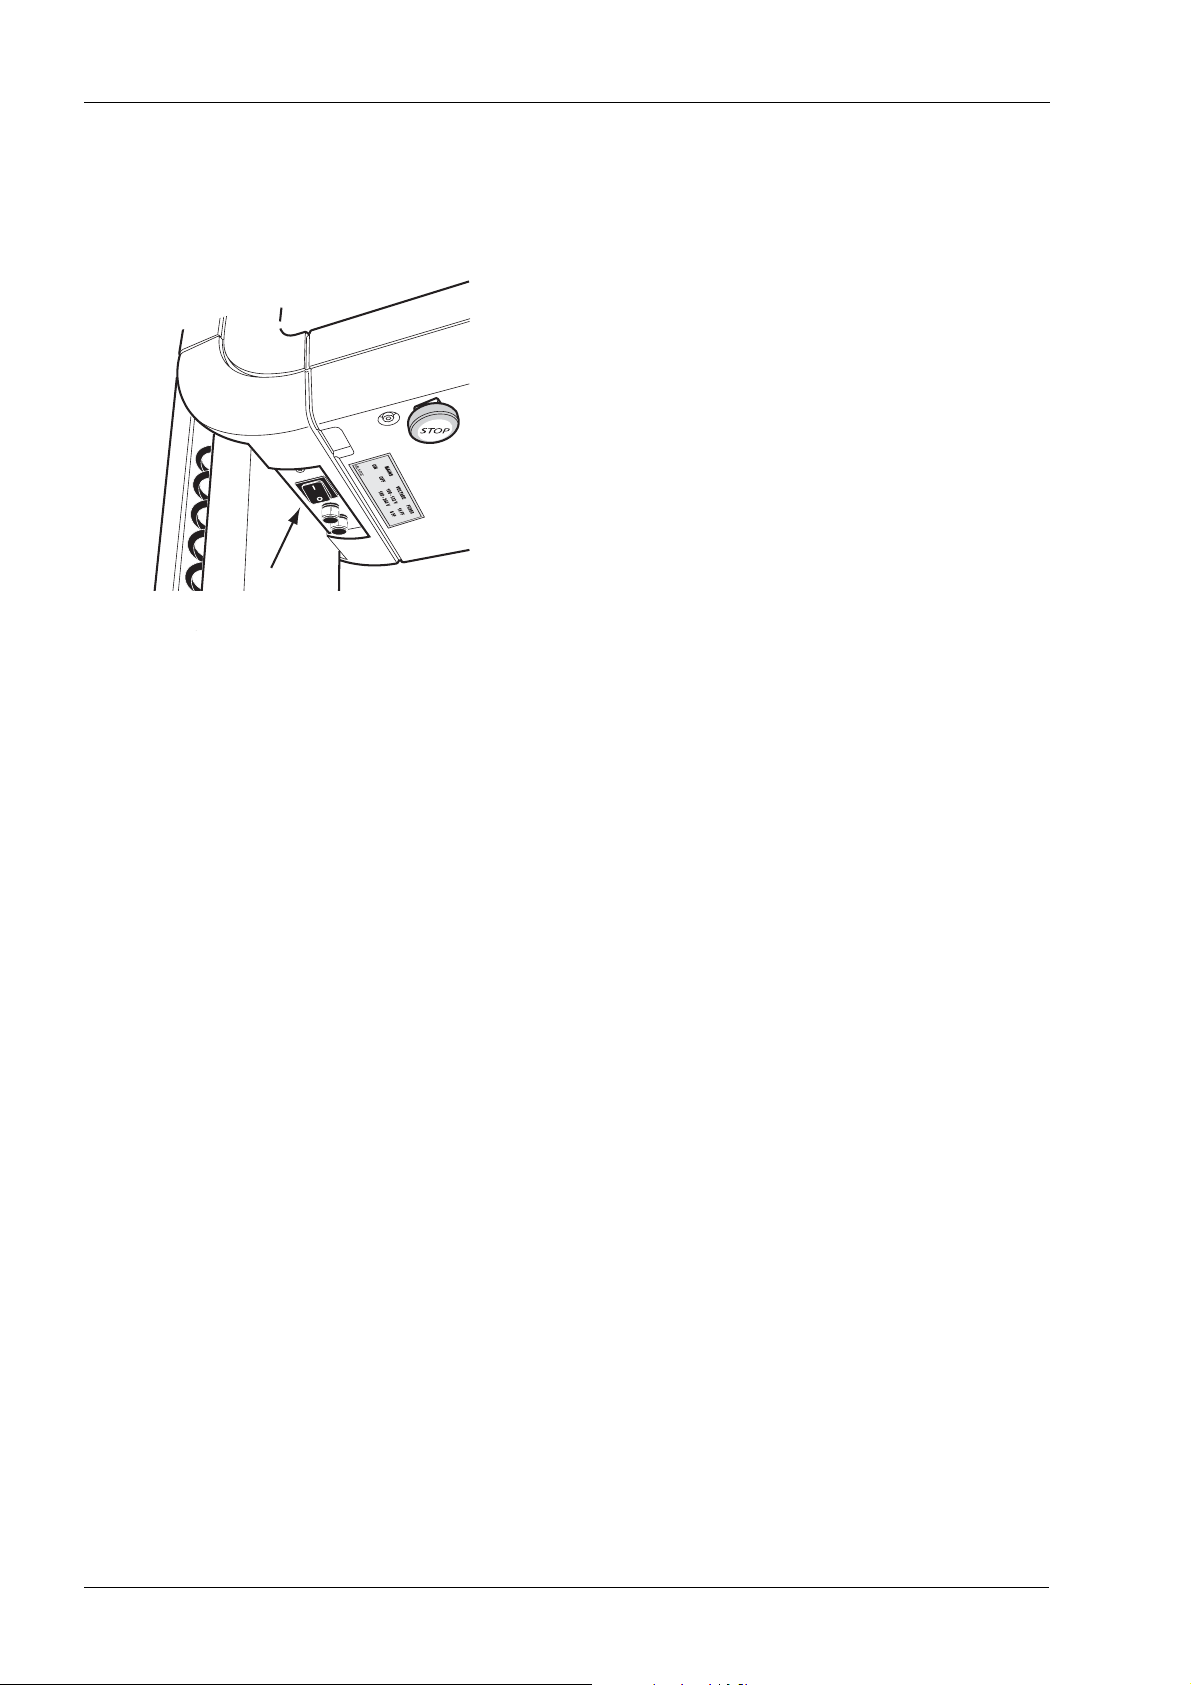
Switch the unit on with the on/off switch which is located
on the underside of the vertical carriage on the left-hand
side. The unit will carry out a self-test which will last a few
seconds.
XC_on_off.eps
Select the cephalometric exposure program and exposure
parameters according to the instructions given in the
section “6 ENTERING CEPHALOMETRIC PROGRAM”
on page 7.
5.2 Preparing the patient
Ask the patient to remove any spectacles, hearing aids,
dentures, and personal jewellery such as earrings,
necklaces, and hairpins. Place a protective lead apron
over the patient’s shoulders if required.
6 Planmeca Proline XC Cephalostat
User’s manual
Page 11
ENTERING CEPHALOMETRIC PROGRAM
6 ENTERING CEPHALOMETRIC PROGRAM
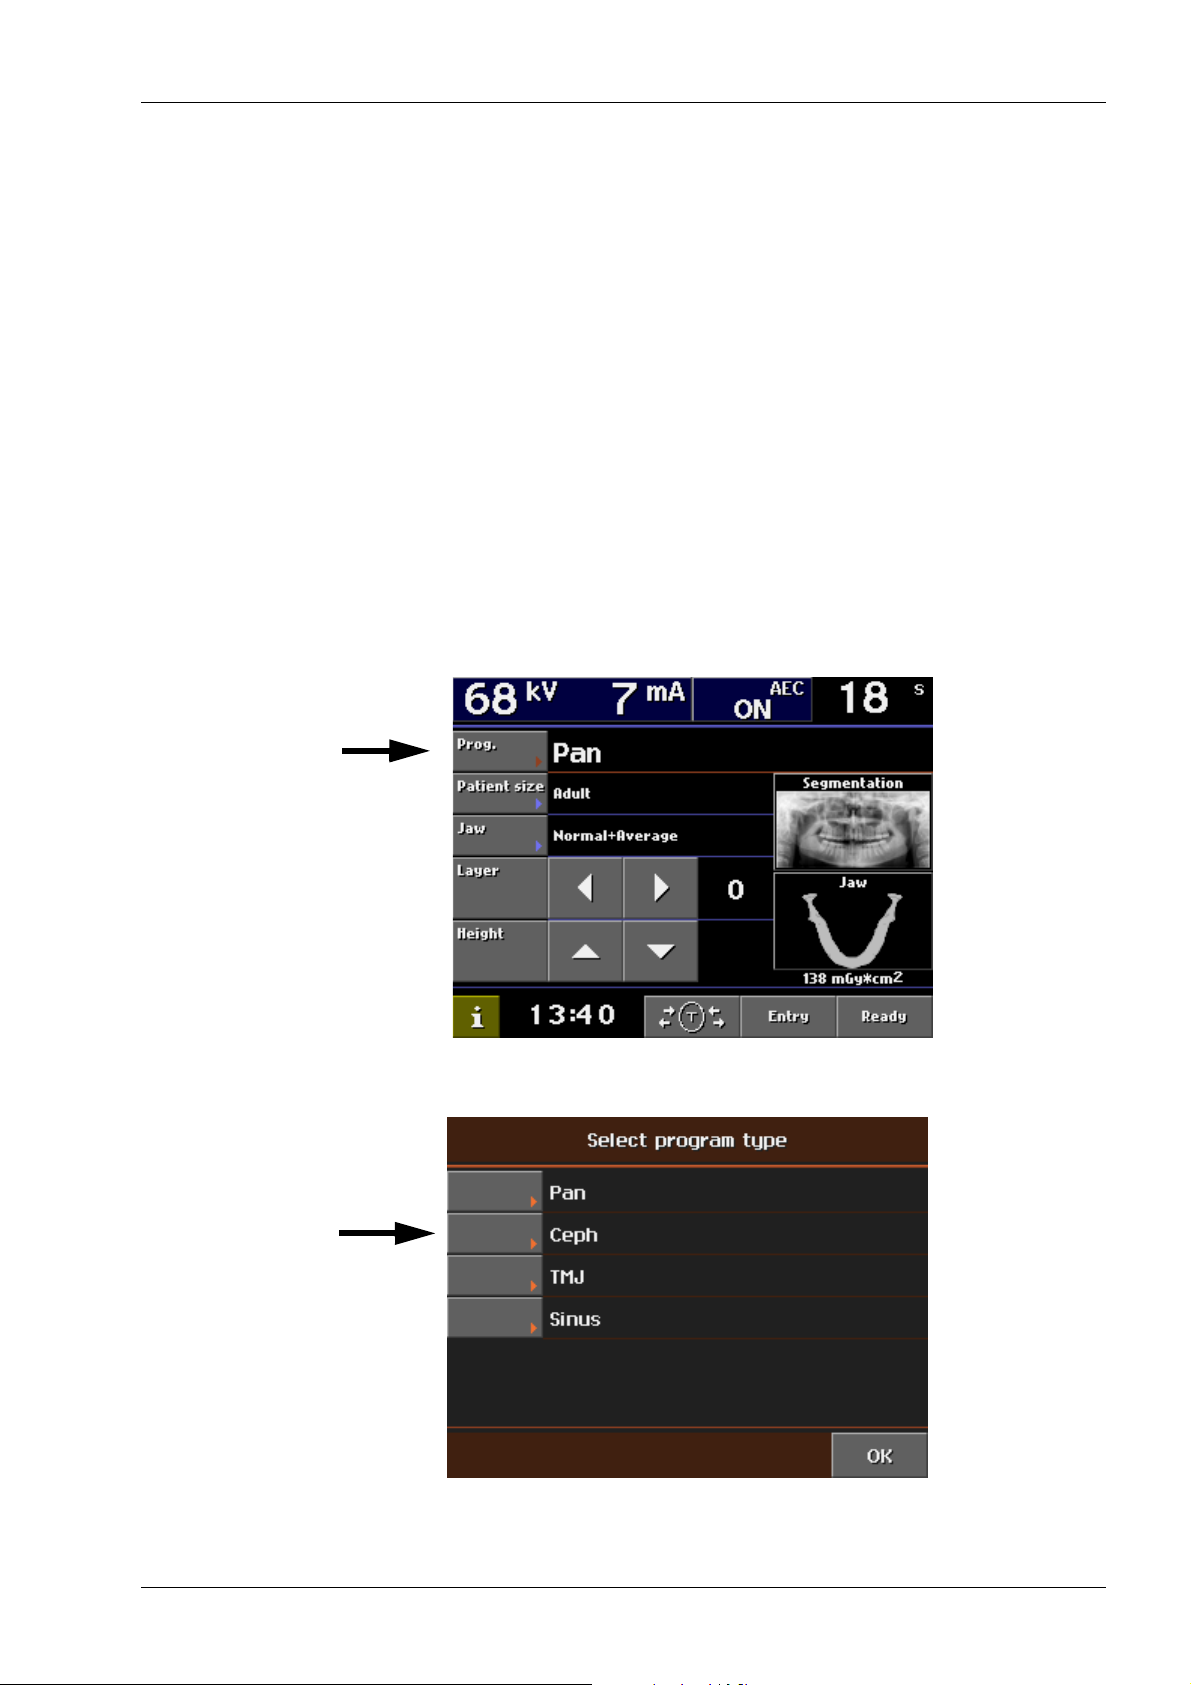
To make a selection on the control panel, simply touch the
screen with your finger on a text field or on an icon. For
example, to select the program type touch the Prog. field
with your finger. You will hear a signal tone when a field or
an icon is activated.
To cancel a selection, touch the Cancel field.
Only the text fields and icons on the screen are touch
sensitive, and touching areas outside them will not
activate an icon.
NOTE Refer to the Proline XC X-ray unit User’s Manual for
information on how to select the panoramic,
temporomandibular joint (TMJ) and sinus exposure
programs.
6.1 Selecting cephalometric exposure program
To select the cephalometric exposure program touch the
Prog. field on the main display.
User’s manual
The Select program type display shown below appears.
Select the program type Ceph.
When you have selected the program type Ceph the main
display will be shown again.
Planmeca Proline XC Cephalostat 7
Page 12
ENTERING CEPHALOMETRIC PROGRAM
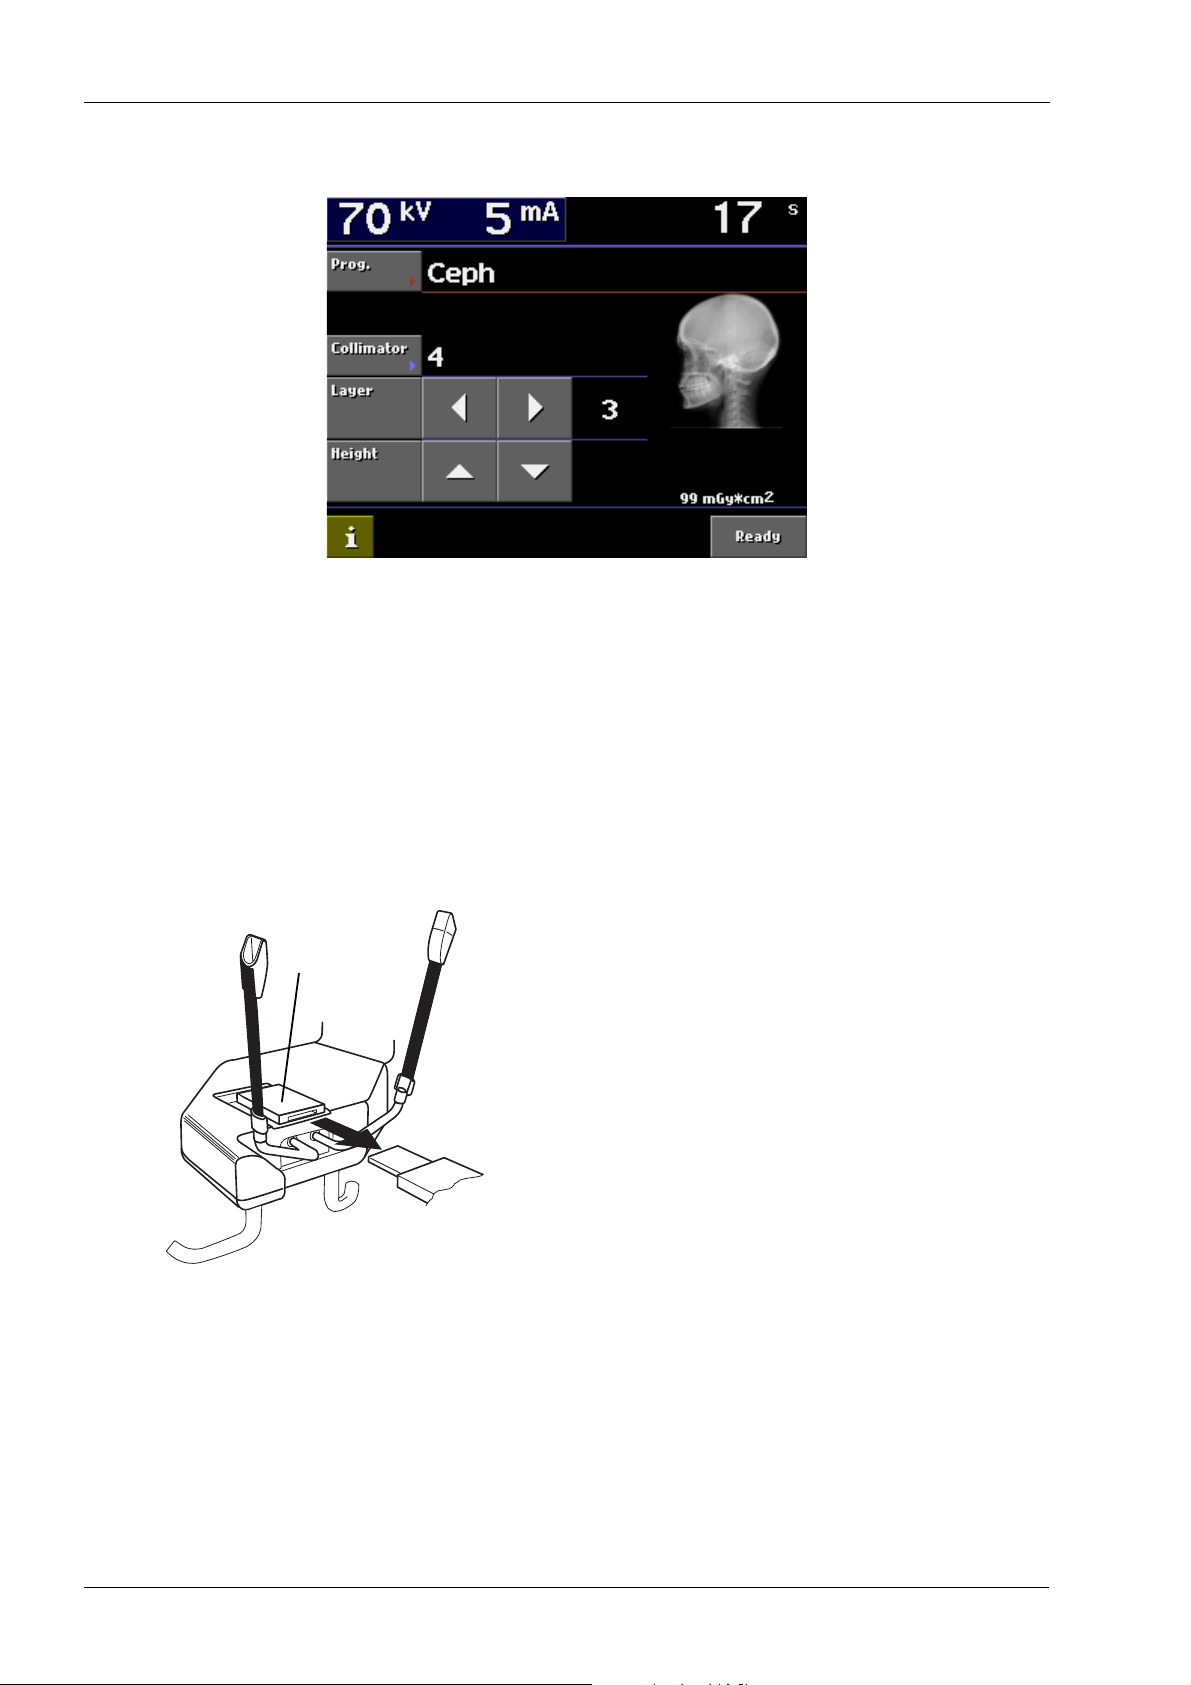
After selecting the Ceph program, the Ready field is green
indicating that the unit is in ready position.
Select the collimator for the exposure by touching the
Collimator field. There are three collimator alternatives to
choose from:
4 vertical asymmetric
5 vertical symmetric
6 horizontal symmetric
Patient positioning
mechanism
Chin rest
Remove the chin rest or chin support from the patient
positioning mechanism.
8 Planmeca Proline XC Cephalostat
User’s manual
Page 13
carriage
ENTERING CEPHALOMETRIC PROGRAM
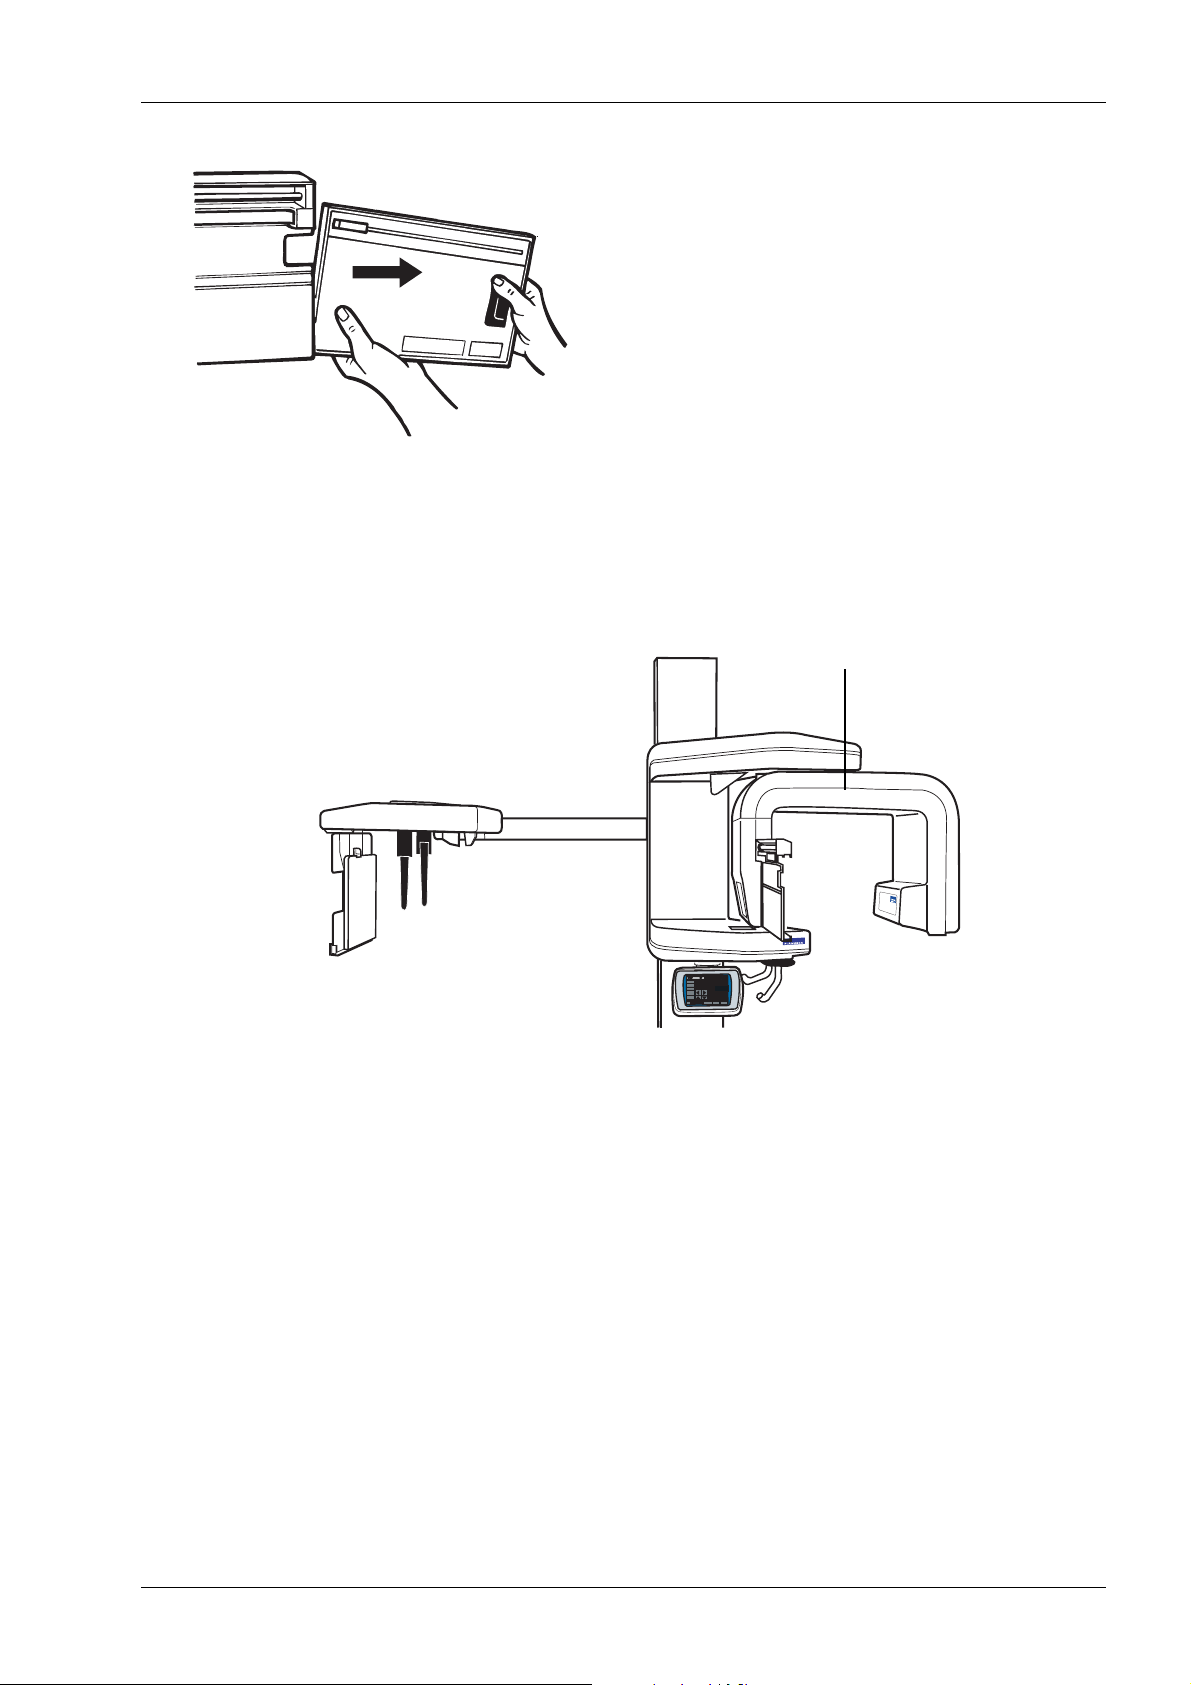
If there is a panoramic cassette in the cassette carriage
remove the cassette.
CassetteCassette
The rotating unit will move automatically to the correct
position for taking cephalometric exposures.
Rotating unit in correct position
for taking ceph exposures
User’s manual
Planmeca Proline XC Cephalostat 9
Page 14
TAKING AN EXPOSURE - LATERAL CEPH
7 TAKING AN EXPOSURE - LATERAL CEPH
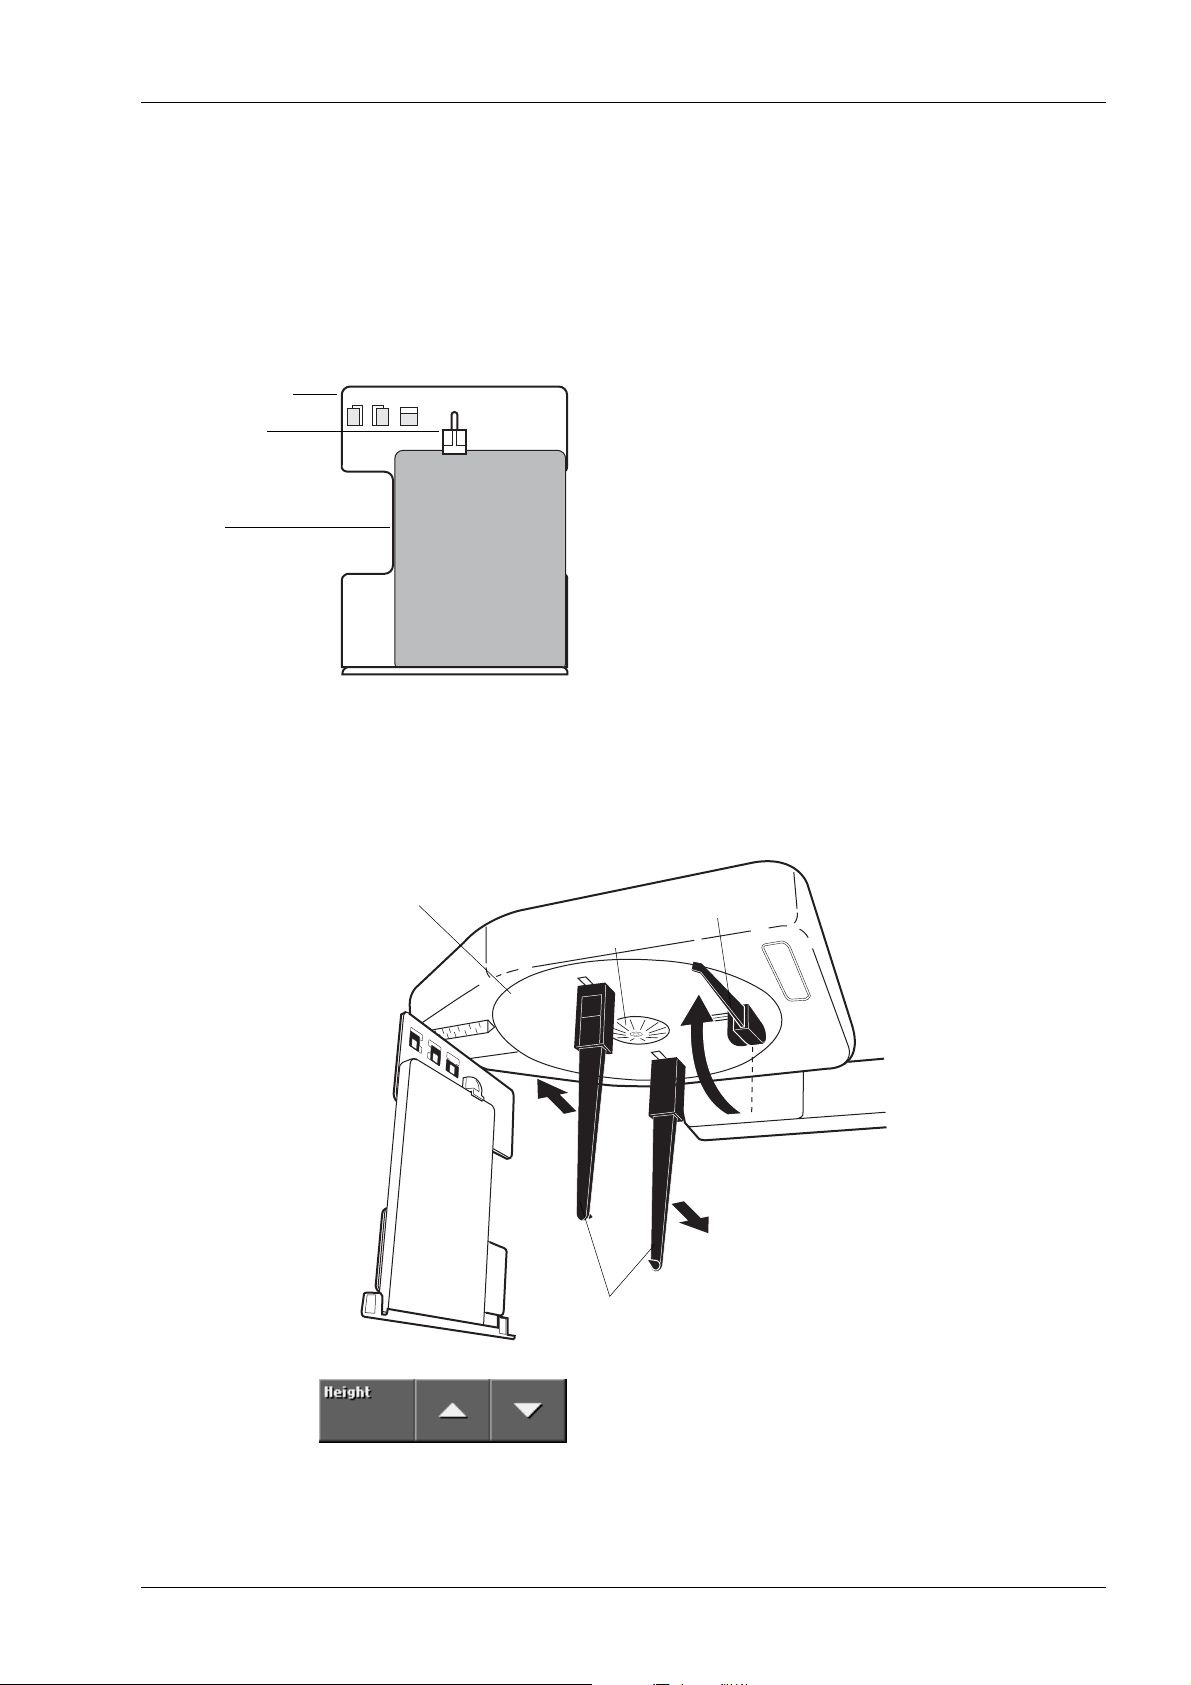
In the darkroom place a film inside the cassette. Handle
the film in accordance with the manufacturer’s instructions
and be careful not to damage the intensifying screens
inside the cassette.
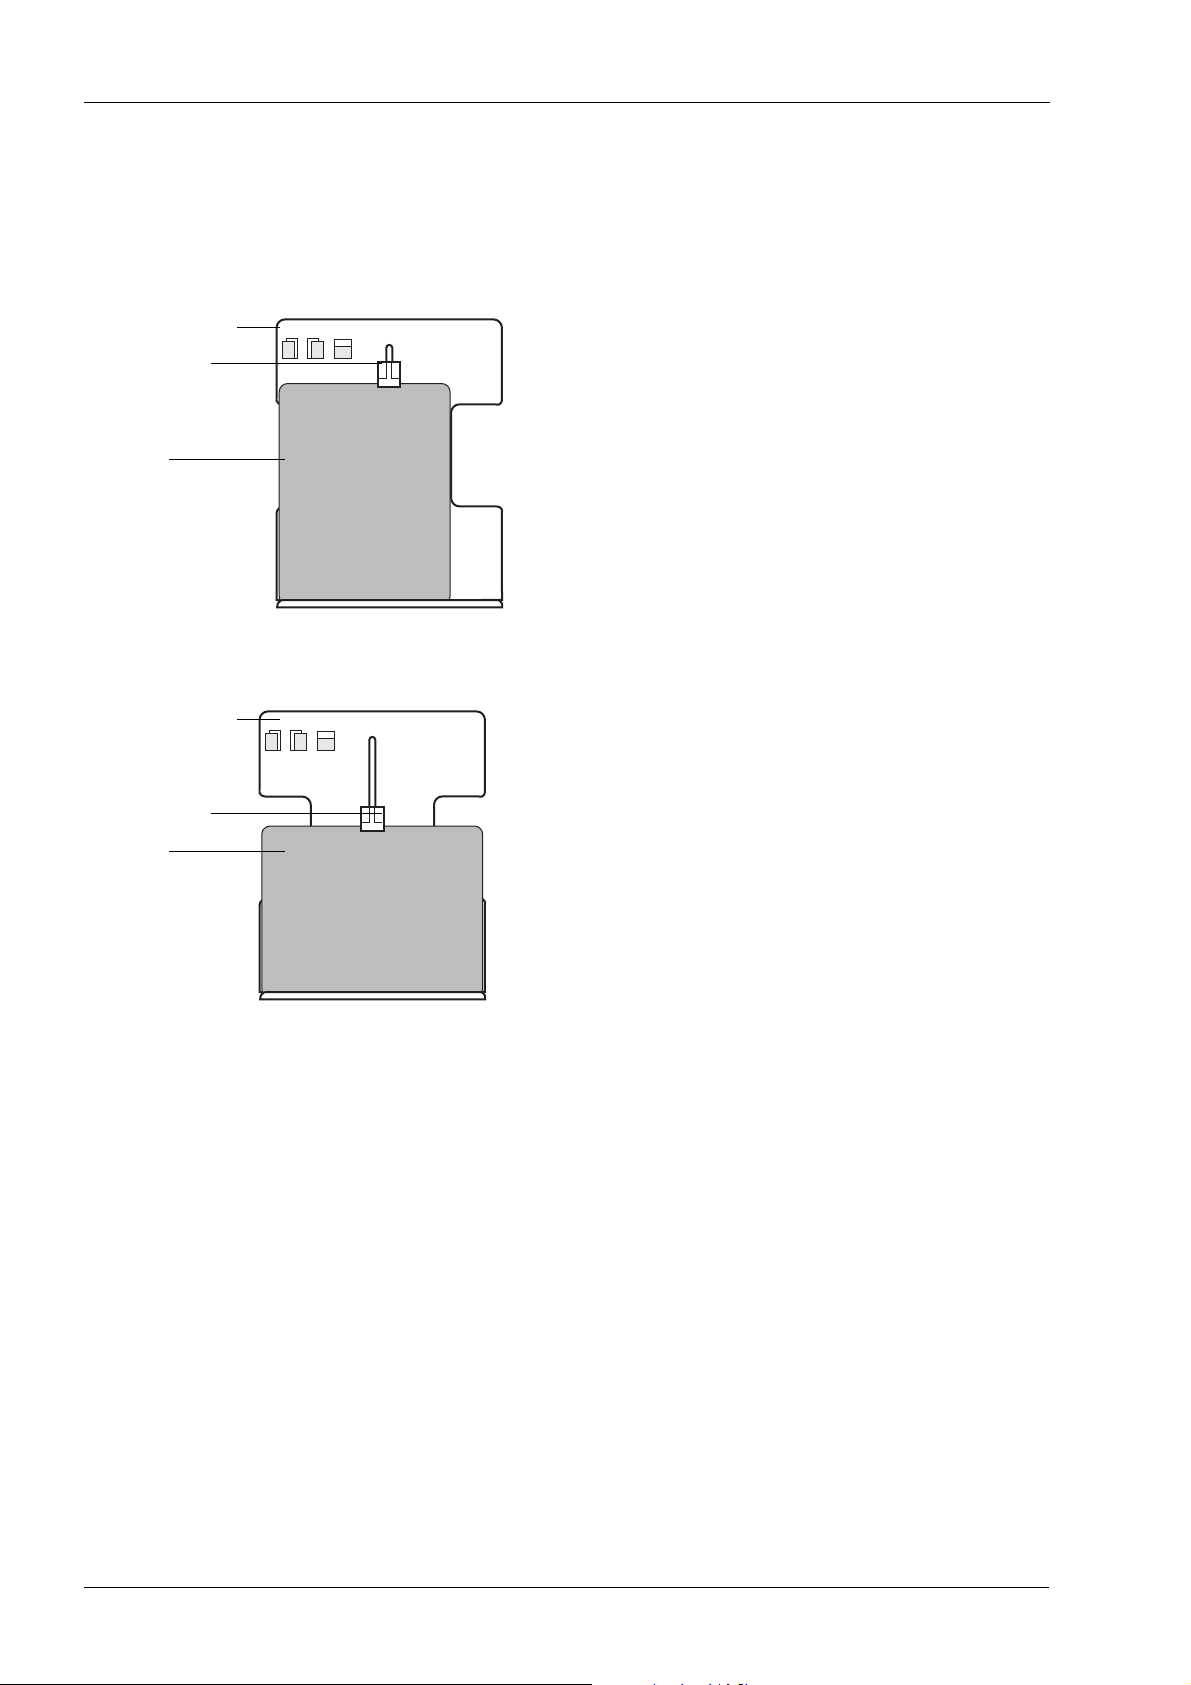
Cassette holder
Cassette clip
Cassette
When you are taking a vertical asymmetric lateral
exposure orientate the cassette so that it is vertical and
then slide the cassette into the cassette holder and
position it so that the left-hand side of the cassette is flush
with the left-hand side of the cassette holder.
Select the cephalometric exposure mode and collimator
number 4, see section “6.1 Selecting cephalometric
exposure program” on page 7.
Cassette holder
Cassette clip
Cassette
When you are taking a horizontal symmetric lateral
exposure orientate the cassette so that it is horizontal and
then slide the cassette into the cassette holder until the
cassette is centered in the cassette holder.
Select the cephalometric exposure mode 6, see section
“6.1 Selecting cephalometric exposure program” on page
7.
10 Planmeca Proline XC Cephalostat
User’s manual
Page 15
Head support
4
5
TAKING AN EXPOSURE - LATERAL CEPH
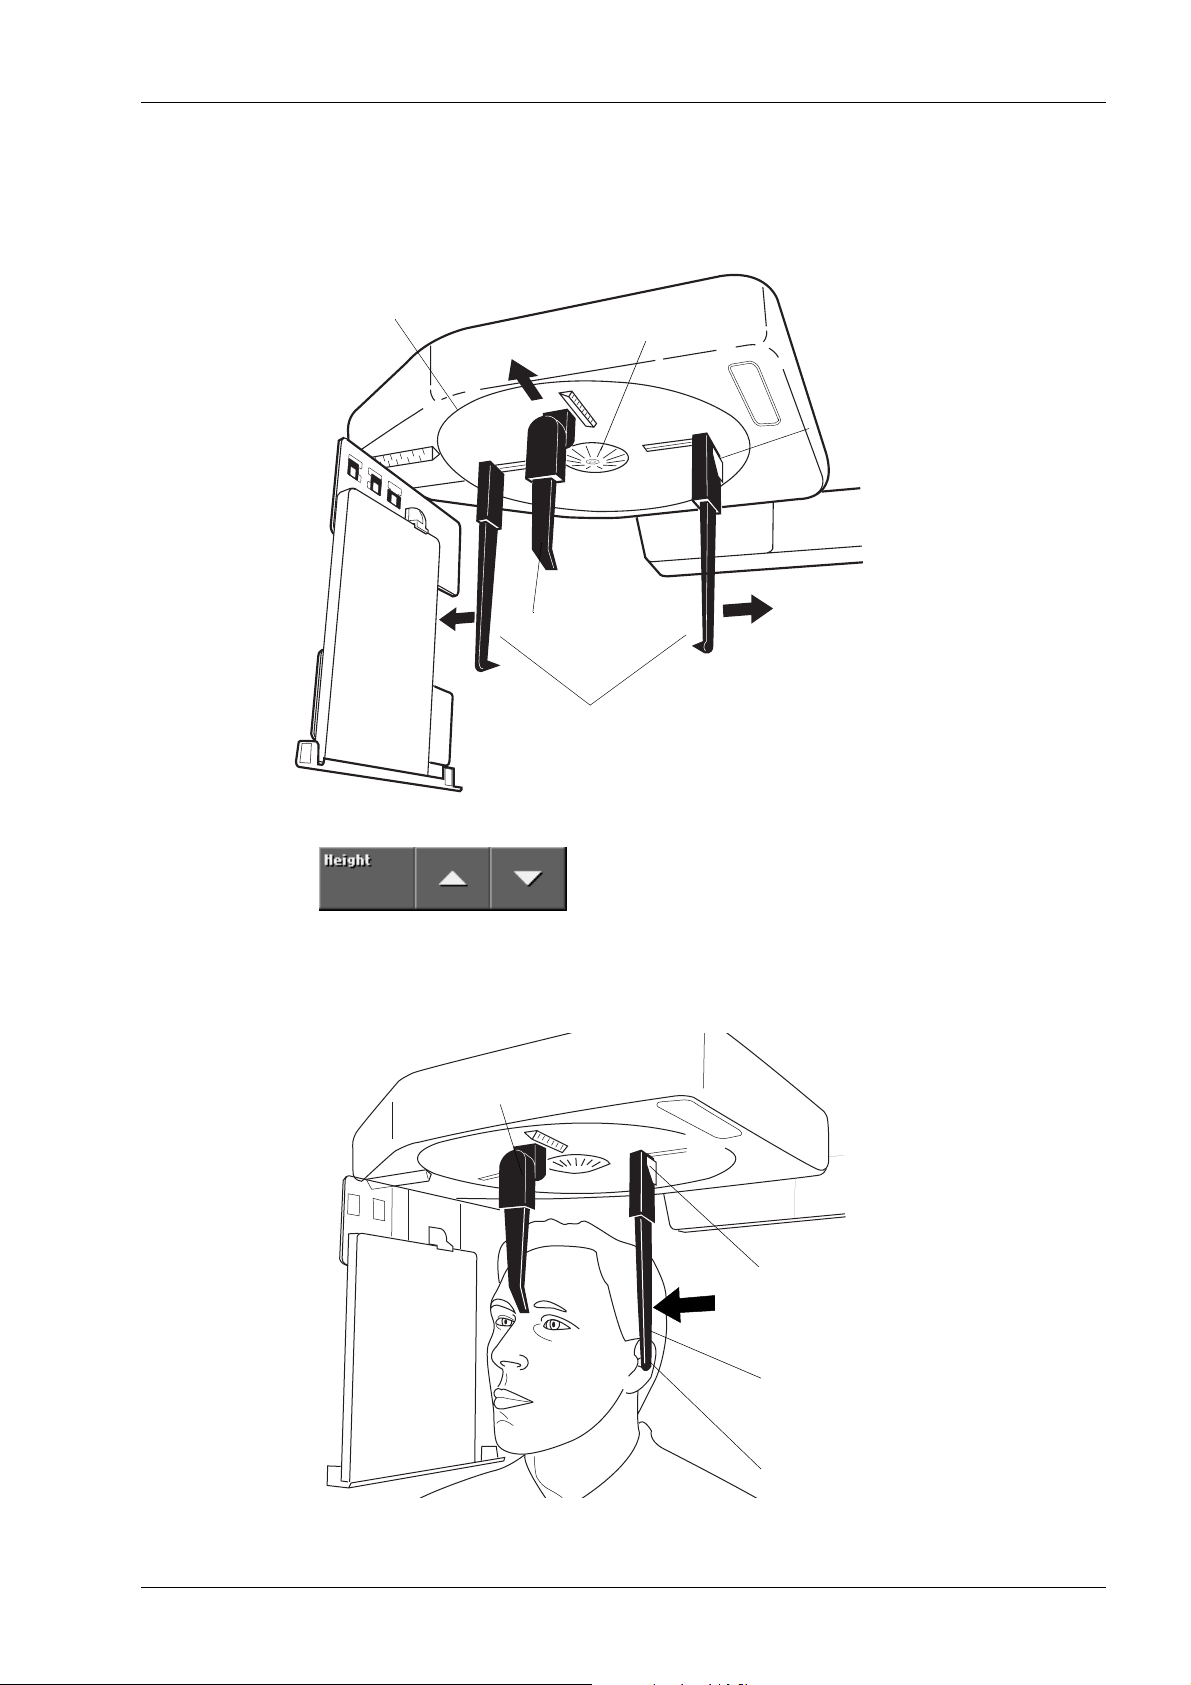
Rotate the head support to the 90° position, the angle can
be seen on the rotation scale. Press the release lever on
the side of the left-hand ear post holder and slide the ear
posts out as far as they will go. Also slide the nasial
positioner out as far as it will go.
Rotation scale
Release lever
6
Nasial positioner
Nasial positioner
Ear posts
Adjust the height of the cephalostat until the positioning
cones at the ends of the ear posts are level with the
patient’s ears.
Position the patient between the two ear posts so that the
patient is facing the nasial positioner.
Press the release lever on the side of the left-hand ear
post holder and carefully slide the positioning cones into
the patient’s ears.
Release lever
User’s manual
Left-hand ear post
Positioning cones
Planmeca Proline XC Cephalostat 11
Page 16
TAKING AN EXPOSURE - LATERAL CEPH
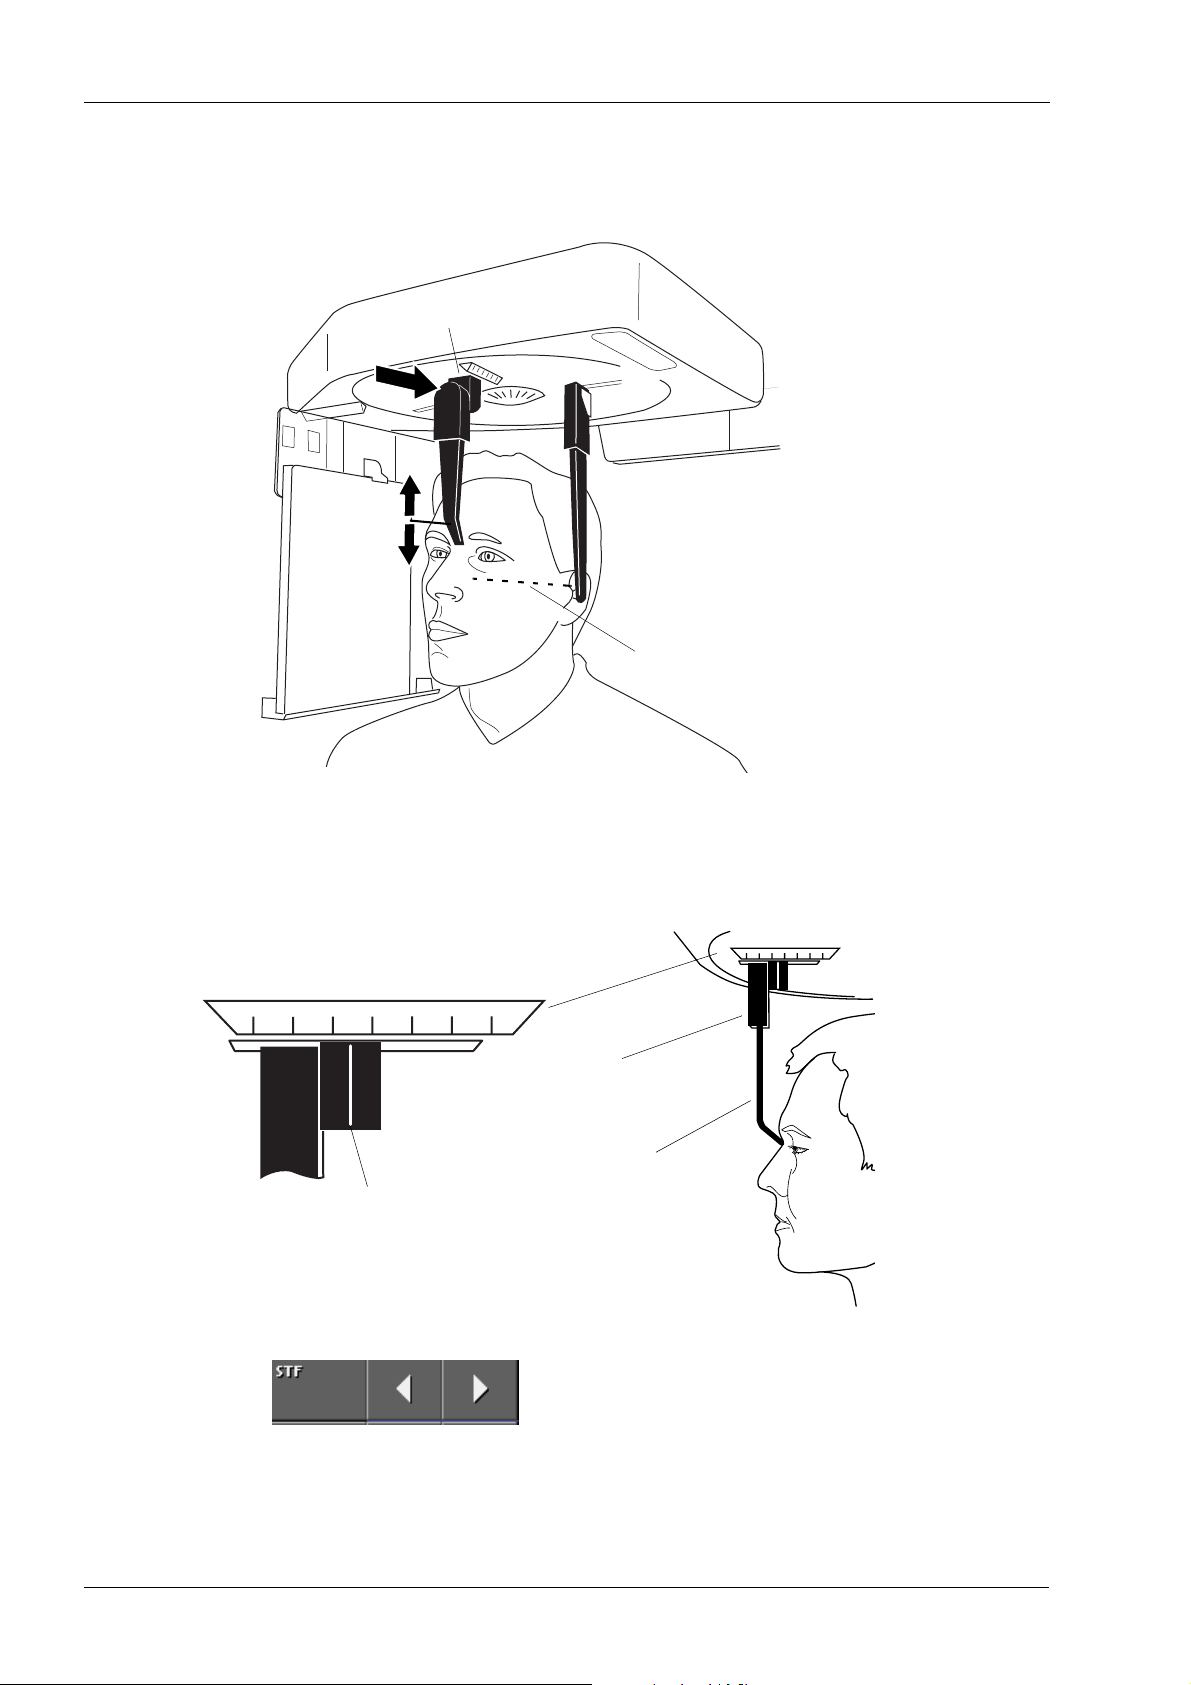
Nasial positioner
Slide the nasial positioner towards the patient until it
touches the patient’s nasion and then, by sliding the
nasial positioner up or down, adjust the angle of the
patient’s head until the Frankfort plane is horizontal.
Frankfort plane
Soft tissue filter scale
0 10 20 30 40 50 60
Line
Note the position of the nasial positioner (the line on the
holder indicates its position) on the soft tissue filter scale.
The value on the scale is used to determine the position
of the soft tissue filter.
0 10 20 30 40 50 60
Holder
Nasial positioner
Touch either of the soft tissue filter arrows to drive the soft
tissue filter (it is attached to the cassette carriage) to the
same position that appears on the soft tissue filter scale.
The position will appear on the main display.
The left arrow will decrease the area filtered (the soft
tissue filter will move away from the patient) and the right
arrow will increase the area filtered (the soft tissue filter
will move towards the patient).
12 Planmeca Proline XC Cephalostat
User’s manual
Page 17
Magnification scale
200
190 1
80
170 160
1.13 1.12 1.11
150 140
1
.10
TAKING AN EXPOSURE - LATERAL CEPH
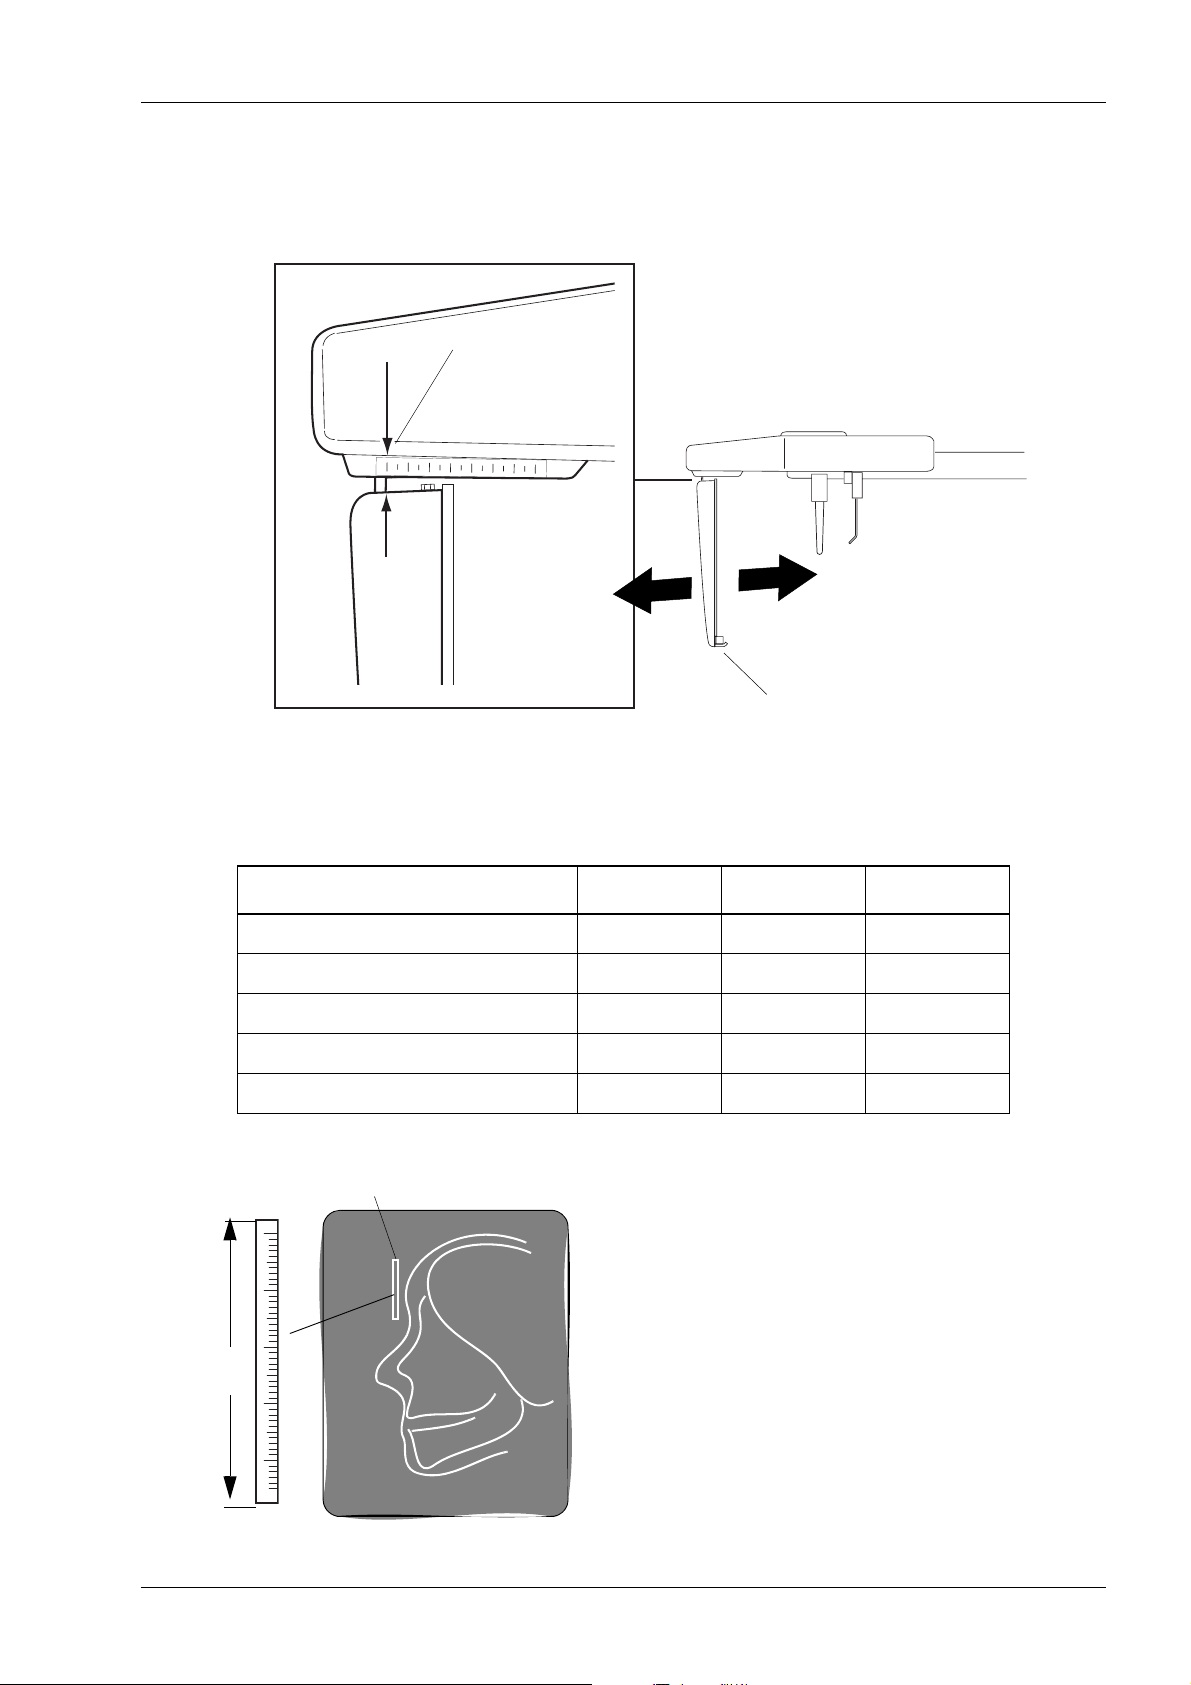
Select the exposure magnification by sliding the cassette
holder towards or away from the patient. The
magnification can be seen on the magnification scale
above the cassette holder.
130
1.09
Actual size
50mm
Cephscale1298.eps
Cassette holder
Select the exposure values and exposure time for the
patient being X-rayed according to the values in the table
below.
PATIENT kV VALUE mA VALUE TIME
Child up to 6 years 66 12 0.3
Child 7- 12 years 68 12 0.4
Adult female or small male 68 12 0.6
Adult male 70 12 0.8
Large adult male 72 12 1.0
Move at least two meters (seven feet) from the X-ray.
Image of measuring scale
Protect yourself from unnecessary exposure to radiation.
Press and hold down the exposure button on the remote
control for the duration of the exposure. During the
exposure period the radiation warning light will come on
and you will hear the radiation warning tone. When the
radiation warning tone stops the ear posts can be slid out
and the patient can be guided from the unit.
Remove the cassette from the cassette holder and
process the film.
7.0.1 Measuring scale
Measuring
scale
User’s manual
Lateral exposure
Embedded in the nasial positioner is a metal scale an
image of which will appear on the exposed film. By
Planmeca Proline XC Cephalostat 13
Page 18

TAKING AN EXPOSURE - LATERAL CEPH
measuring the image of the scale that appears on the film
and comparing its size with the actual size of the scale
accurate measurements of the patient’s teeth and bone
structure can be made.
The actual length of the scale is 50mm and it is divided
into millimeter increments.
14 Planmeca Proline XC Cephalostat
User’s manual
Page 19
TAKING AN EXPOSURE - ANTERIOR-POSTERIOR AND POSTERIOR-ANTERIOR
8 TAKING AN EXPOSURE - ANTERIOR-POSTERIOR AND
POSTERIOR-ANTERIOR
In the darkroom place a film inside the cassette. Handle
the film in accordance with the manufacturer’s instructions
and be careful not to damage the intensifying screens
inside the cassette.
Cassette holder
Cassette clip
Cassette
Orientate the cassette so that it is vertical and then slide
the cassette into the cassette holder, either from the left or
right, and position it so that the right-hand side of the
cassette is flush with the right-hand side of the cassette
holder.
Select the cephalometric exposure mode and collimator
number 5, see section “6.1 Selecting cephalometric
exposure program” on page 7.
Rotate the head support to the 0 or 180° position to take
an anterior-posterior or a posterior-anterior exposure.
Press the release lever on the side of the left-hand ear
post holder and slide the ear posts out as far as they will
go. Swing the nasial positioner up to the horizontal
position.
Head support
Nasial positioner
Rotation scale
User’s manual
4
5
6
Ear posts
Adjust the height of the cephalostat until the positioning
cones at the ends of the ear posts are level with the
patient’s ears.
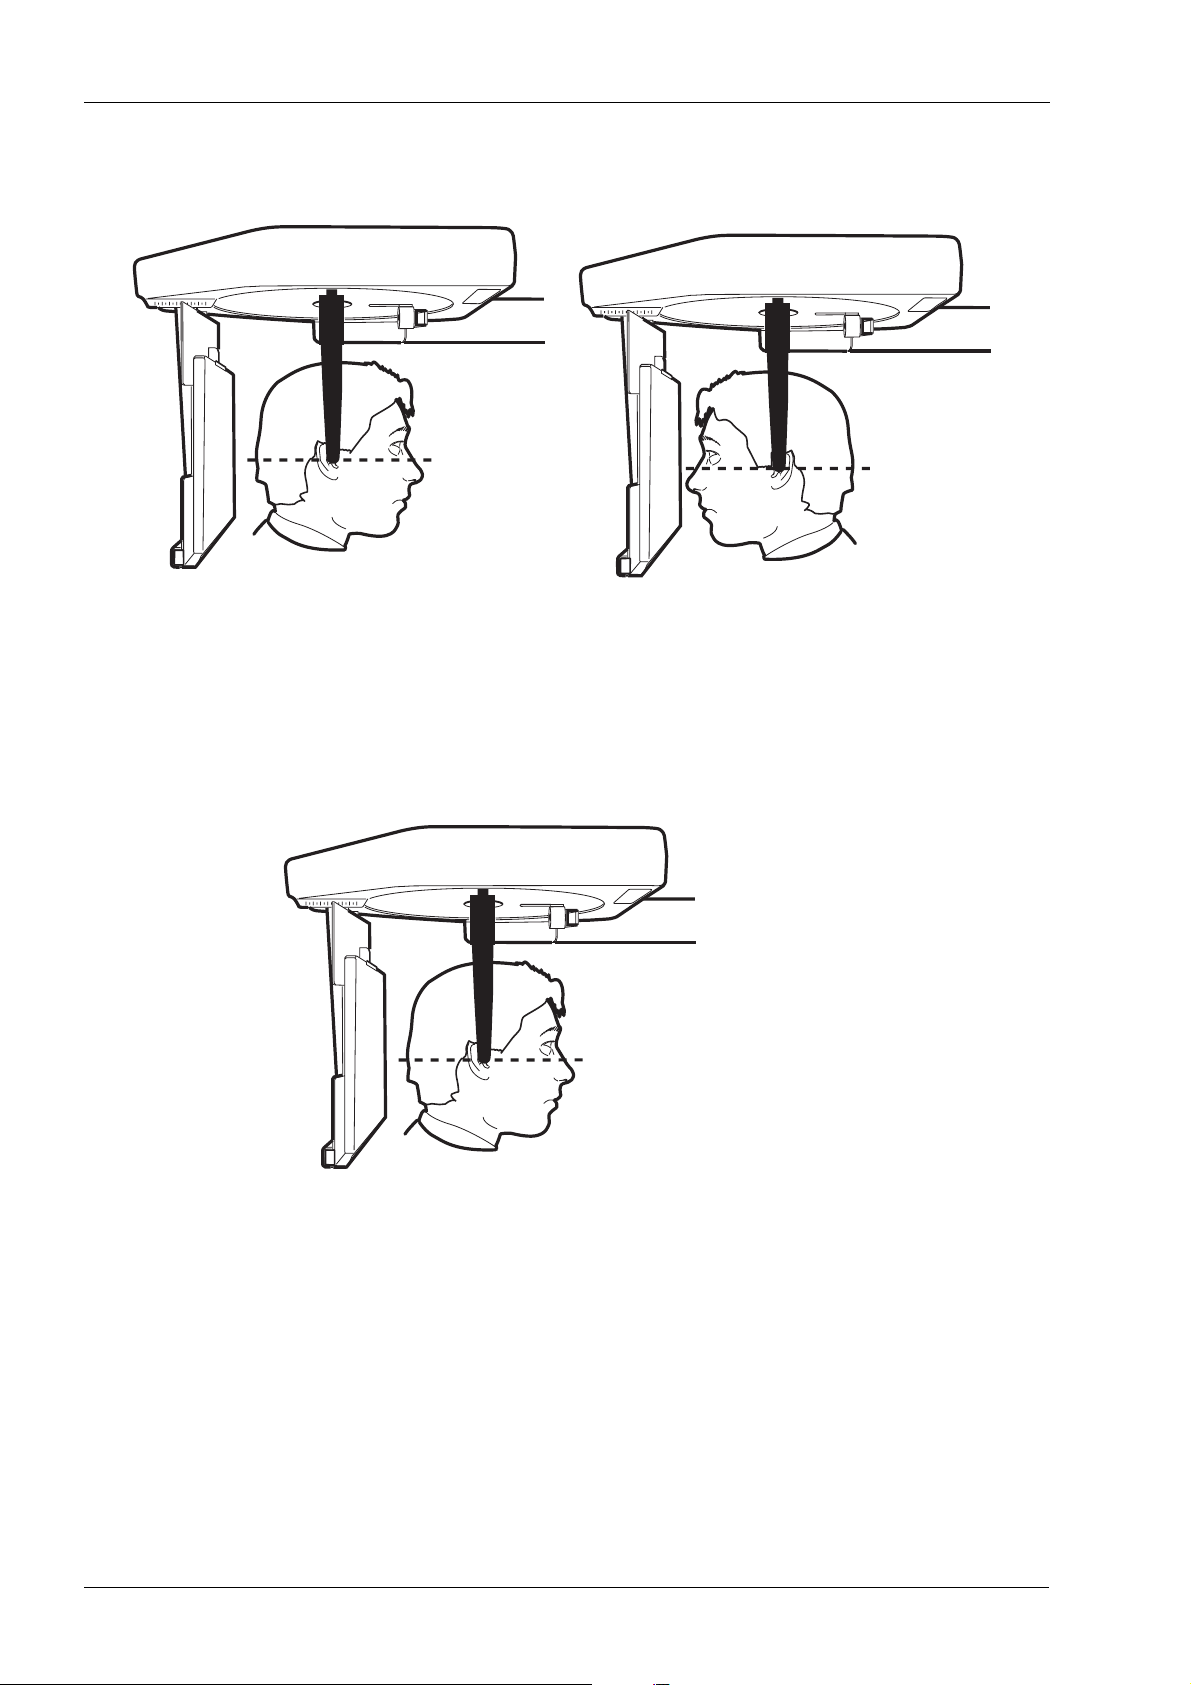
Position the patient between the two ear posts. If you are
taking an anterior-posterior exposure position the patient
Planmeca Proline XC Cephalostat 15
Page 20
TAKING AN EXPOSURE - ANTERIOR-POSTERIOR AND POSTERIOR-ANTERIOR
so that they are looking away from the cassette and if you
are taking a posterior-anterior exposure position the
patient so that they are facing the cassette.
200 190 180 170 160 150 140 130
1.13 1.12 1.09
Adjust the tilt of the patient’s head so that the Frankfort
plane is parallel to the floor.
Press the release lever on the side of the left-hand ear
post holder and VERY carefully slide the positioning
cones into the patient’s ears.
200 190 180 170 160 150 140 130
1.13 1.12 1.09
Posterior-anterior positionAnterior-posterior position
200 190 180 170 160 150 140 130
1.13 1.12 1.09
Frankfort plane
Anterior-posterior position
16 Planmeca Proline XC Cephalostat
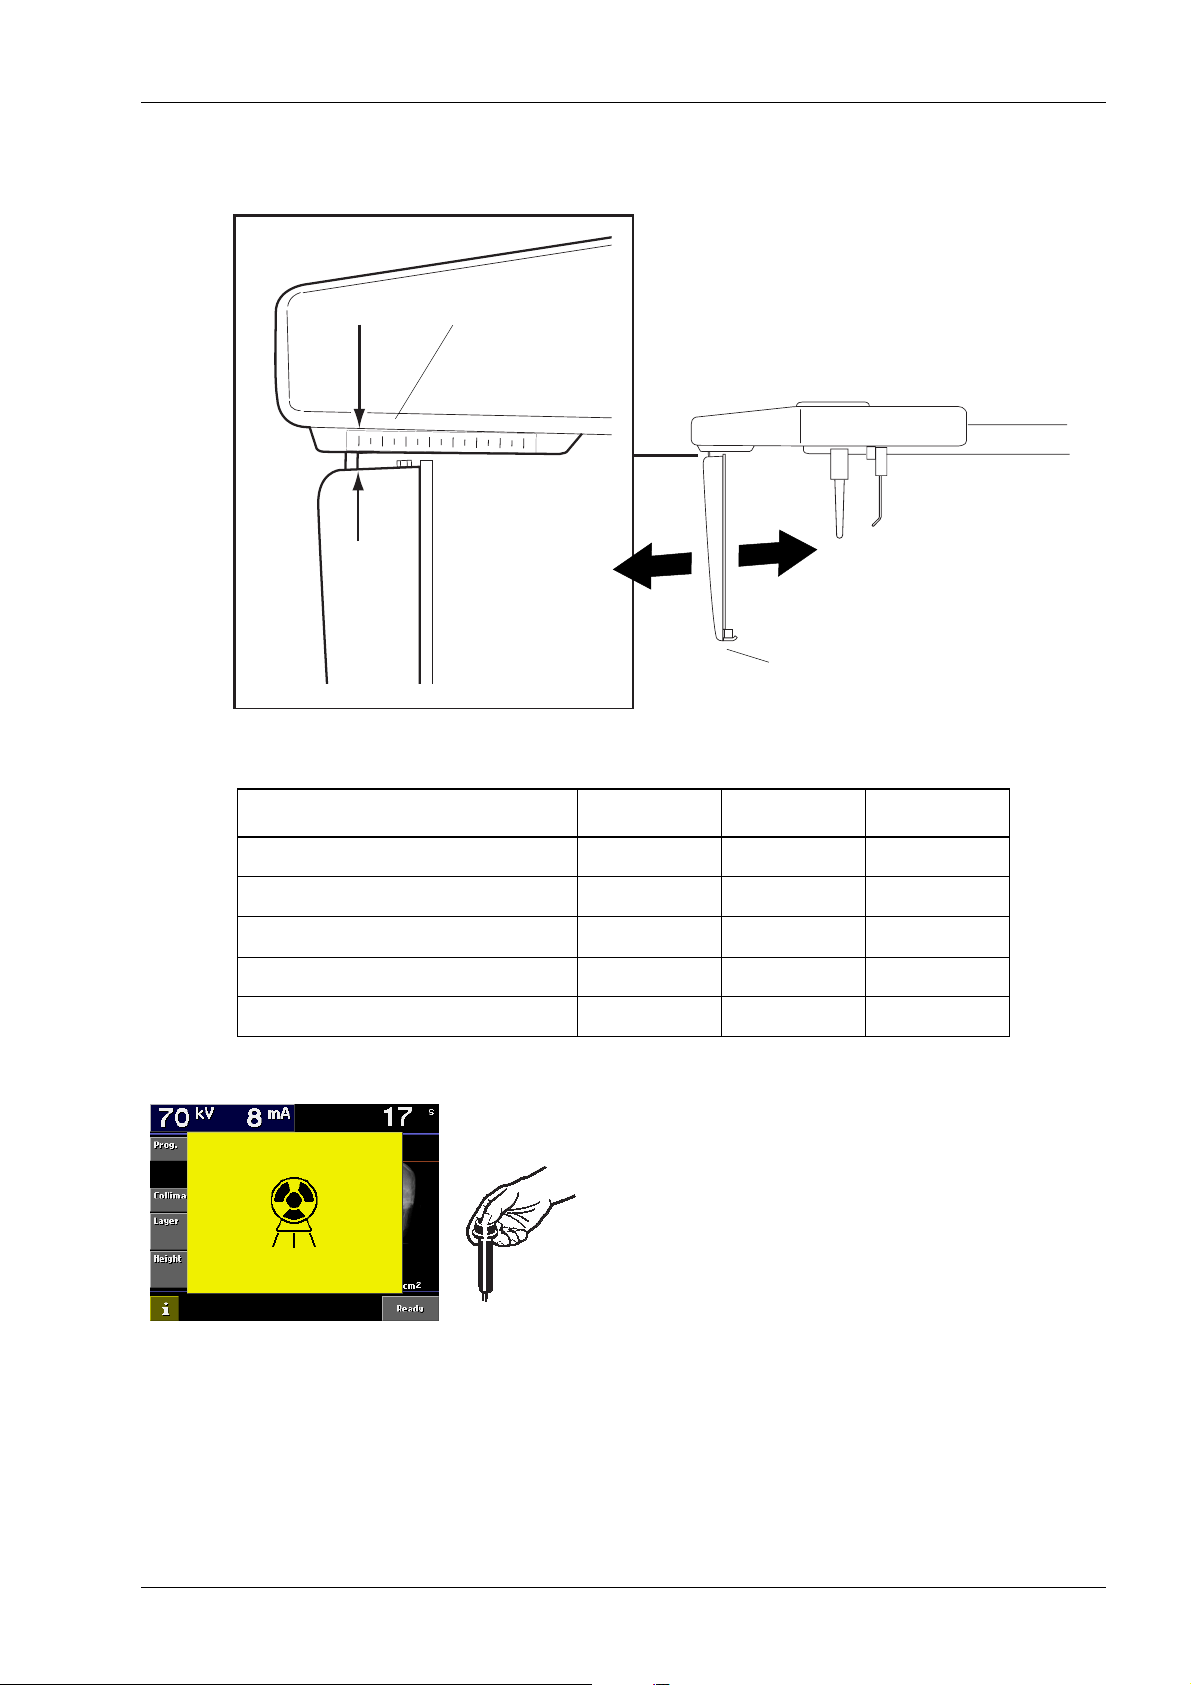
Select the exposure magnification by sliding the cassette
holder towards or away from the patient. The
User’s manual
Page 21
TAKING AN EXPOSURE - ANTERIOR-POSTERIOR AND POSTERIOR-ANTERIOR
magnification can be seen on the magnification scale
above the cassette holder.
Magnification scale
200
190
180
170 160
150
14
0
1.13 1.12 1
.11
1.10 1
130
.09
Cassette holder
Cephscale1298.eps
Select the exposure values and exposure time for the
patient being X-rayed according to the values in the table
below.
PATIENT kV VALUE mA VALUE TIME
Child up to 6 years 72 12 0.6
Child 7- 12 years 74 12 1.0
Adult female or small male 78 12 1.2
Adult male 80 12 1.6
Hand exposure 60 4 0.2
Move at least two meters (seven feet) from the X-ray.
Protect yourself from unnecessary exposure to radiation.
Press and hold down the exposure button on the remote
control for the duration of the exposure. During the
exposure period the radiation warning light will come on
and you will hear the radiation warning tone. When the
radiation warning tone stops the ear posts can be slid out
and the patient can be guided from the unit.
Remove the cassette from the cassette holder and
process the film.
User’s manual
Planmeca Proline XC Cephalostat 17
Page 22
TAKING AN EXPOSURE - SUBMENTO-VERTEX
9 TAKING AN EXPOSURE - SUBMENTO-VERTEX
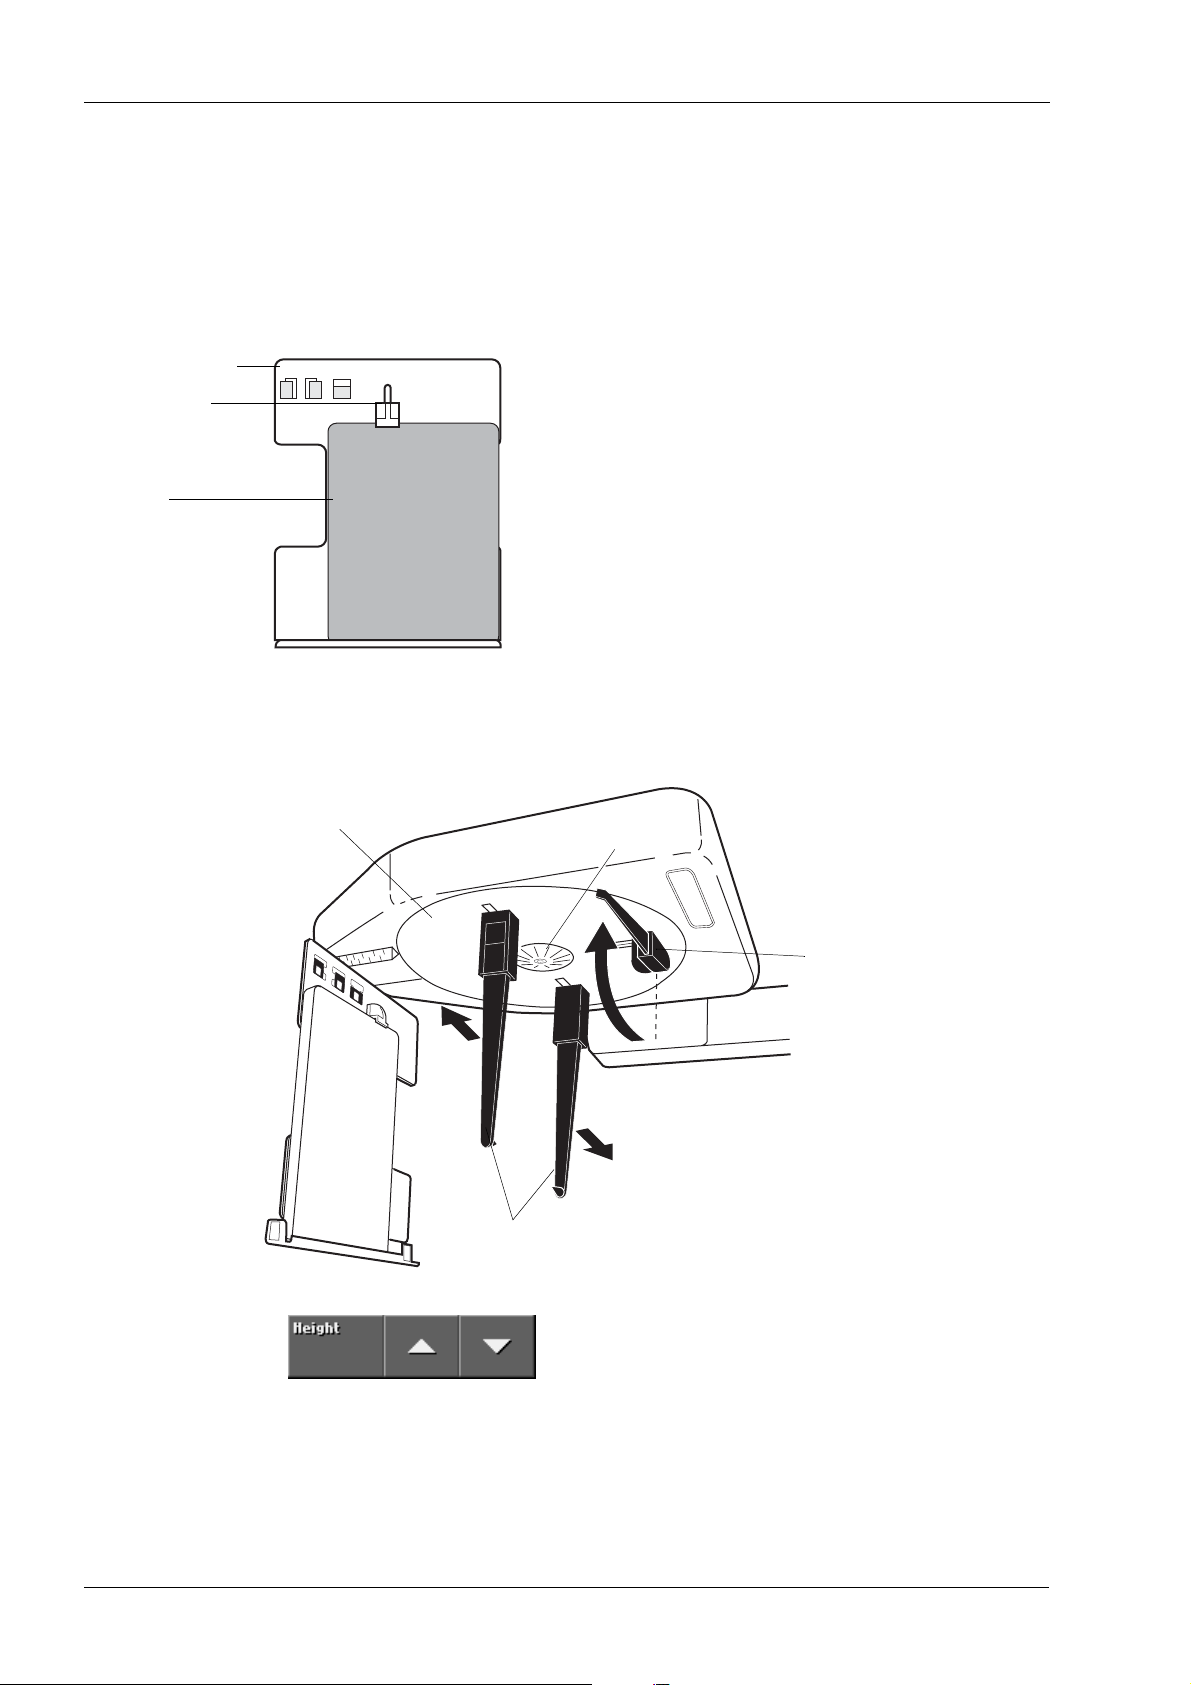
In the darkroom place a film inside the cassette. Handle
the film in accordance with the manufacturer’s instructions
and be careful not to damage the intensifying screens
inside the cassette.
Cassette holder
Cassette clip
Cassette
Orientate the cassette so that it is vertical and then slide
the cassette into the cassette holder, either from the left or
right, and position it so that the right-hand side of the
cassette is flush with the right-hand side of the cassette
holder.
Select the cephalometric exposure mode and collimator
number 5, see section “6.1 Selecting cephalometric
exposure program” on page 7.
Rotate the head support to the 0° position. Press the
release lever on the side of the left-hand ear post holder
and slide the ear posts out as far as they will go. Swing
the nasial positioner up to the horizontal position.
Head support
Rotation scale
4
5
6
Nasial positioner
Ear posts
Adjust the height of the cephalostat until the positioning
cones at the ends of the ear posts are level with the
patient’s ears.
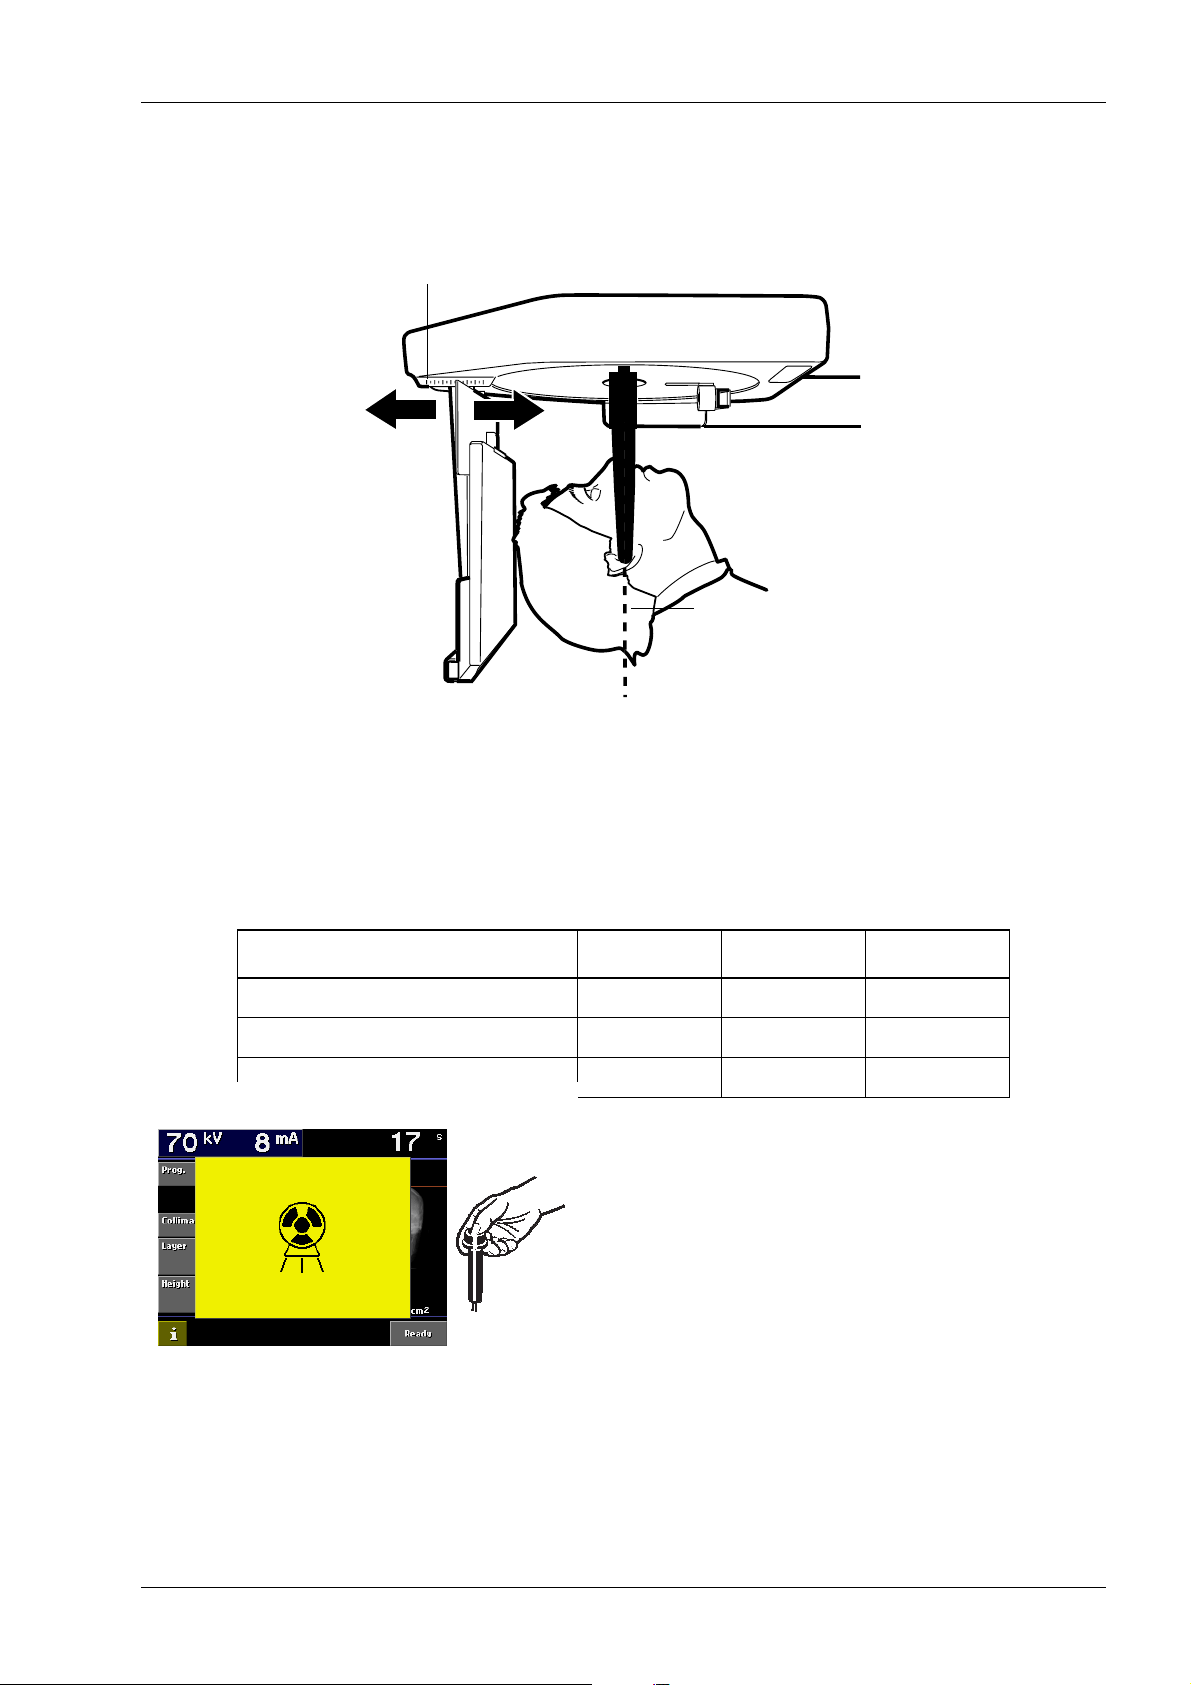
Position the patient between the two ear posts and then
adjust the tilt of the patient’s head until the alar-tragal line
18 Planmeca Proline XC Cephalostat
User’s manual
Page 23
Magnification scale
200 190 180 170 160 150 140 130
1.13 1.12 1.09
TAKING AN EXPOSURE - SUBMENTO-VERTEX
is perpendicular to the floor.
Press the release lever on the side of the left-hand ear
post holder and VERY carefully slide the positioning
cones into the patient’s ears.
Alar-tragal line
Select the exposure magnification by sliding the cassette
holder towards or away from the patient. The
magnification can be seen on the magnification scale
above the cassette holder.
Select the exposure values and exposure time for the
patient being X-rayed according to the values in the table
below.
PATIENT kV VALUE mA VALUE TIME
Child 76 12 1.2
Adult 78121.6
Large adult 80 12 1.8
Move at least two meters (seven feet) from the X-ray.
Protect yourself from unnecessary exposure to radiation.
Press and hold down the exposure button on the remote
control for the duration of the exposure. During the
exposure period the radiation warning light will come on
and you will hear the radiation warning tone. When the
radiation warning tone stops the ear posts can be slid out
and the patient can be guided from the unit.
Remove the cassette from the cassette holder and
process the film.
User’s manual
Planmeca Proline XC Cephalostat 19
Page 24
TAKING AN EXPOSURE - WATERS VIEW
10 TAKING AN EXPOSURE - WATERS VIEW
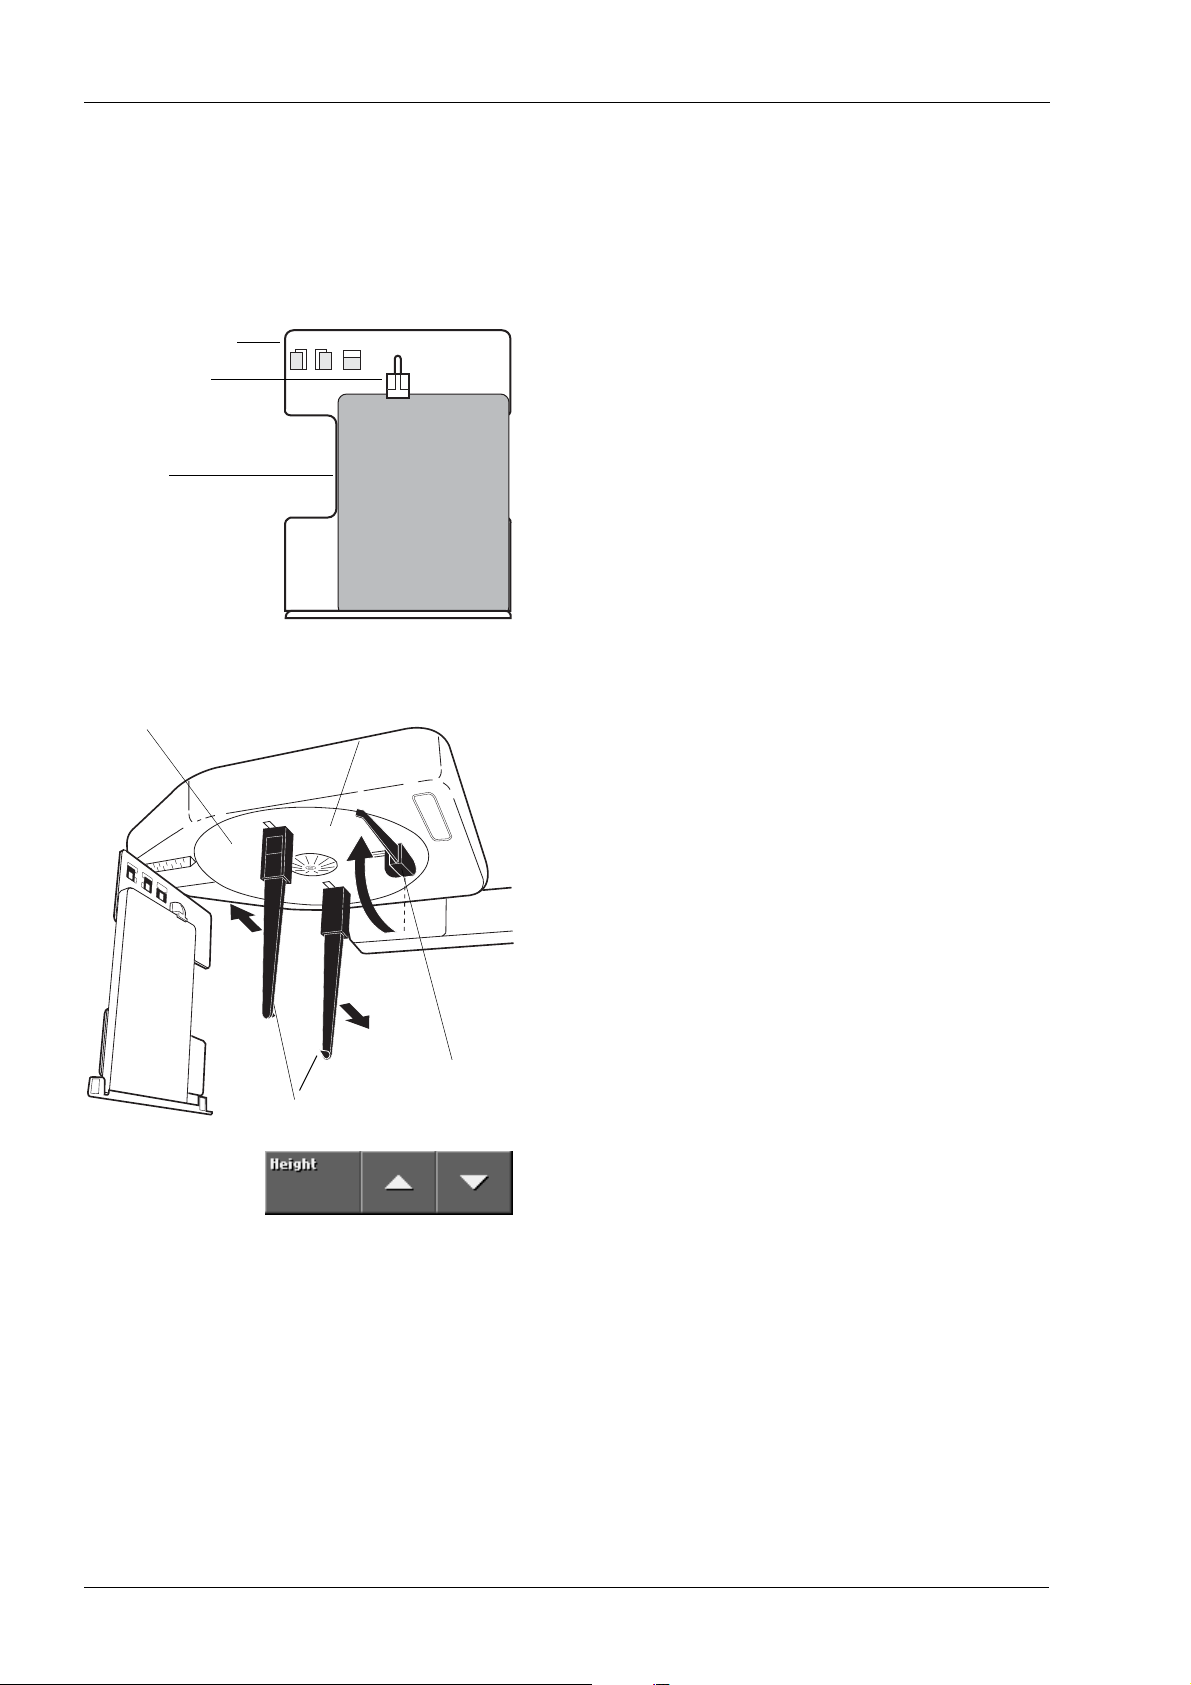
In the darkroom place a film inside the cassette. Handle
the film in accordance with the manufacturer’s instructions
and be careful not to damage the intensifying screens
inside the cassette.
Cassette holder
Cassette clip
Cassette
Head support
4
5
6
Rotation scale
Orientate the cassette so that it is vertical and then slide
the cassette into the cassette holder, either from the left or
right, and position it so that the right-hand side of the
cassette is flush with the right-hand side of the cassette
holder.
Select the cephalometric exposure mode and collimator
number 5, see section “6.1 Selecting cephalometric
exposure program” on page 7.
Rotate the head support to the 0° position. Press the
release lever on the side of the left-hand ear post holder
and slide the ear posts out as far as they will go. Swing
the nasial positioner up to the horizontal position.
Nasial positioner
Ear posts
20 Planmeca Proline XC Cephalostat
Adjust the height of the cephalostat until the positioning
cones at the ends of the ear posts are level with the
patient’s ears.
Position the patient between the two ear posts so that
they are facing the cassette.
User’s manual
Page 25
Magnification scale
200 190 180 170 160 150 140 130
1.13 1.12 1.09
TAKING AN EXPOSURE - WATERS VIEW
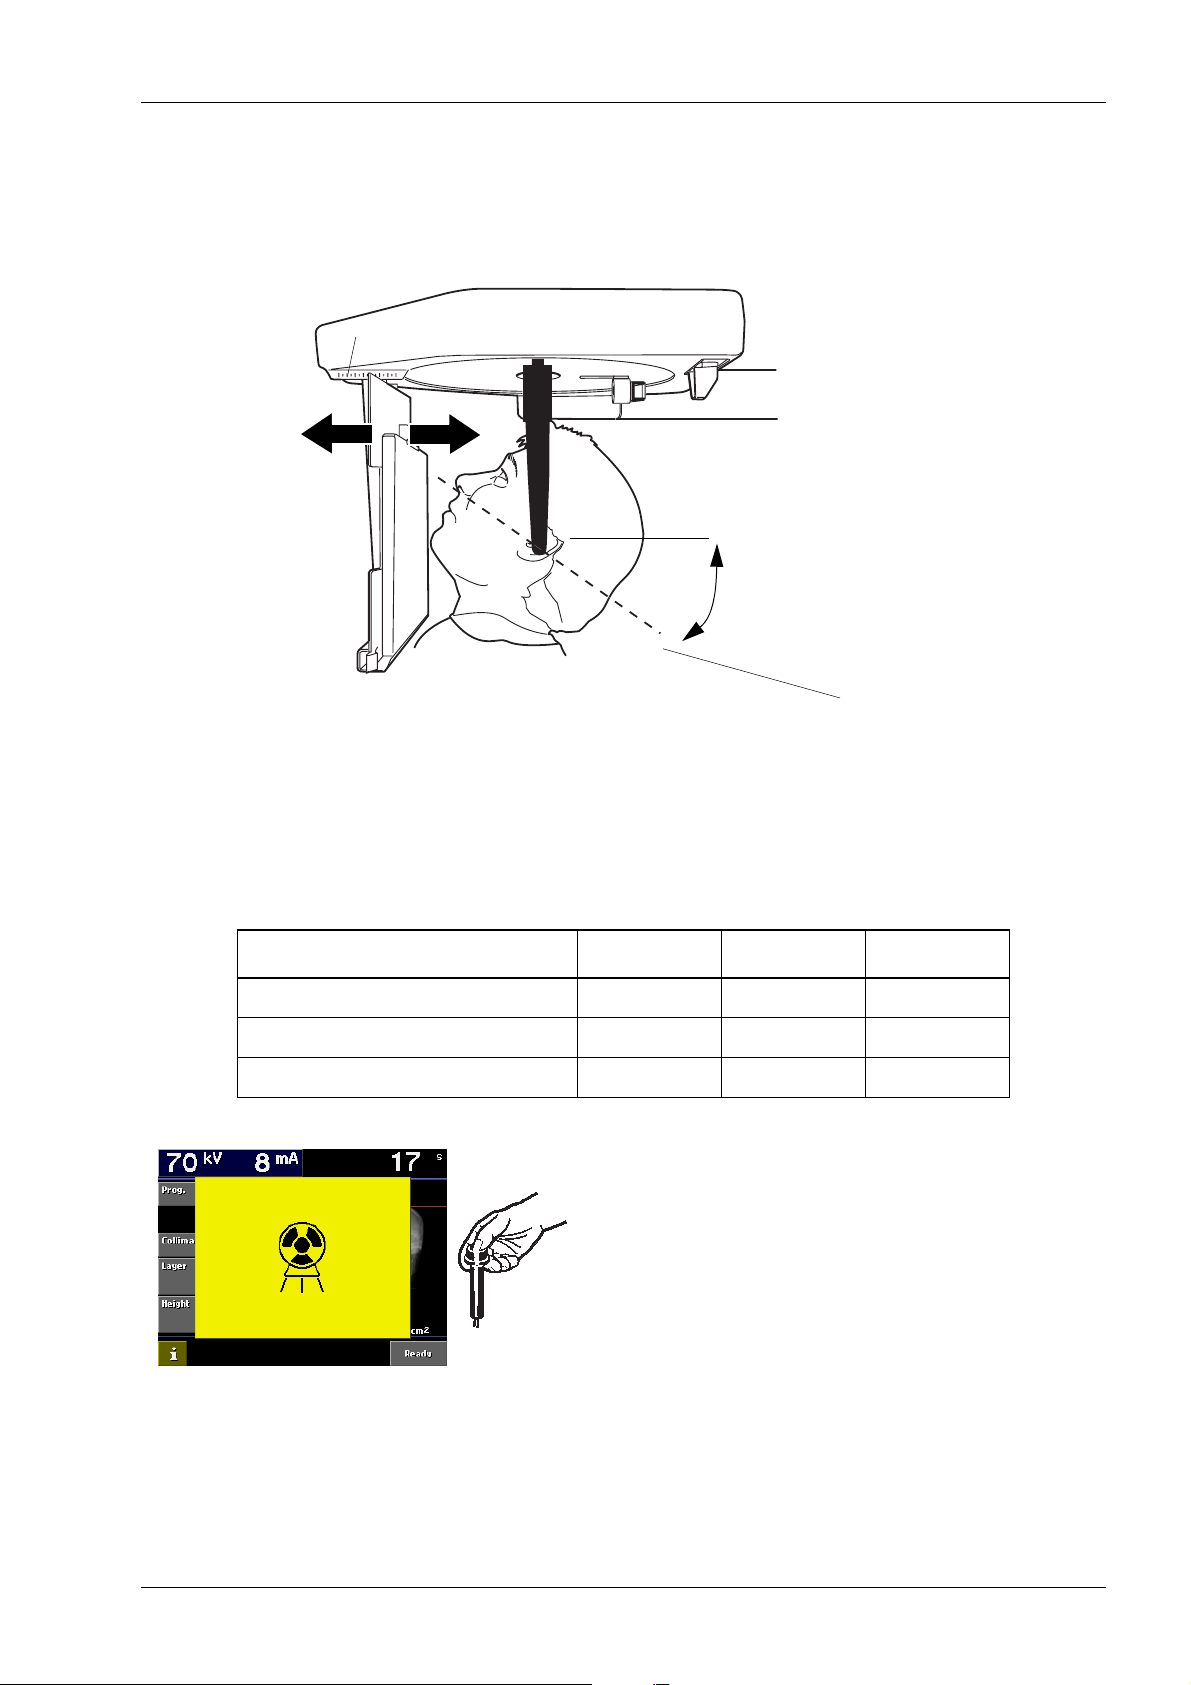
Adjust the tilt of the patient’s head until the alar-tragal line
is 35° to 40° from the horizontal.
Press the release lever on the side of the left-hand ear
post holder and VERY carefully slide the positioning
cones into the patient’s ears.
35-40°
Alar-tragal line
Select the exposure magnification by sliding the cassette
holder towards or away from the patient. The
magnification can be seen the magnification scale above
the cassette holder.
Select the exposure values and exposure time for the
patient being X-rayed according to the values in the table
below.
PATIENT kV VALUE mA VALUE TIME
Child 74 12 1.0
Adult 78121.2
Large adult 80 12 1.6
Move at least two meters (seven feet) from the X-ray.
Protect yourself from unnecessary exposure to
radiation.
Press and hold down the exposure button on the remote
control for the duration of the exposure. During the
exposure period the radiation warning light will come on
and you will hear the radiation warning tone. When the
radiation warning tone stops the ear posts can be slid out
and the patient can be guided from the unit.
Remove the cassette from the cassette holder and
process the film.
User’s manual
Planmeca Proline XC Cephalostat 21
Page 26
TAKING AN EXPOSURE - AP TOWNE
11 TAKING AN EXPOSURE - AP TOWNE
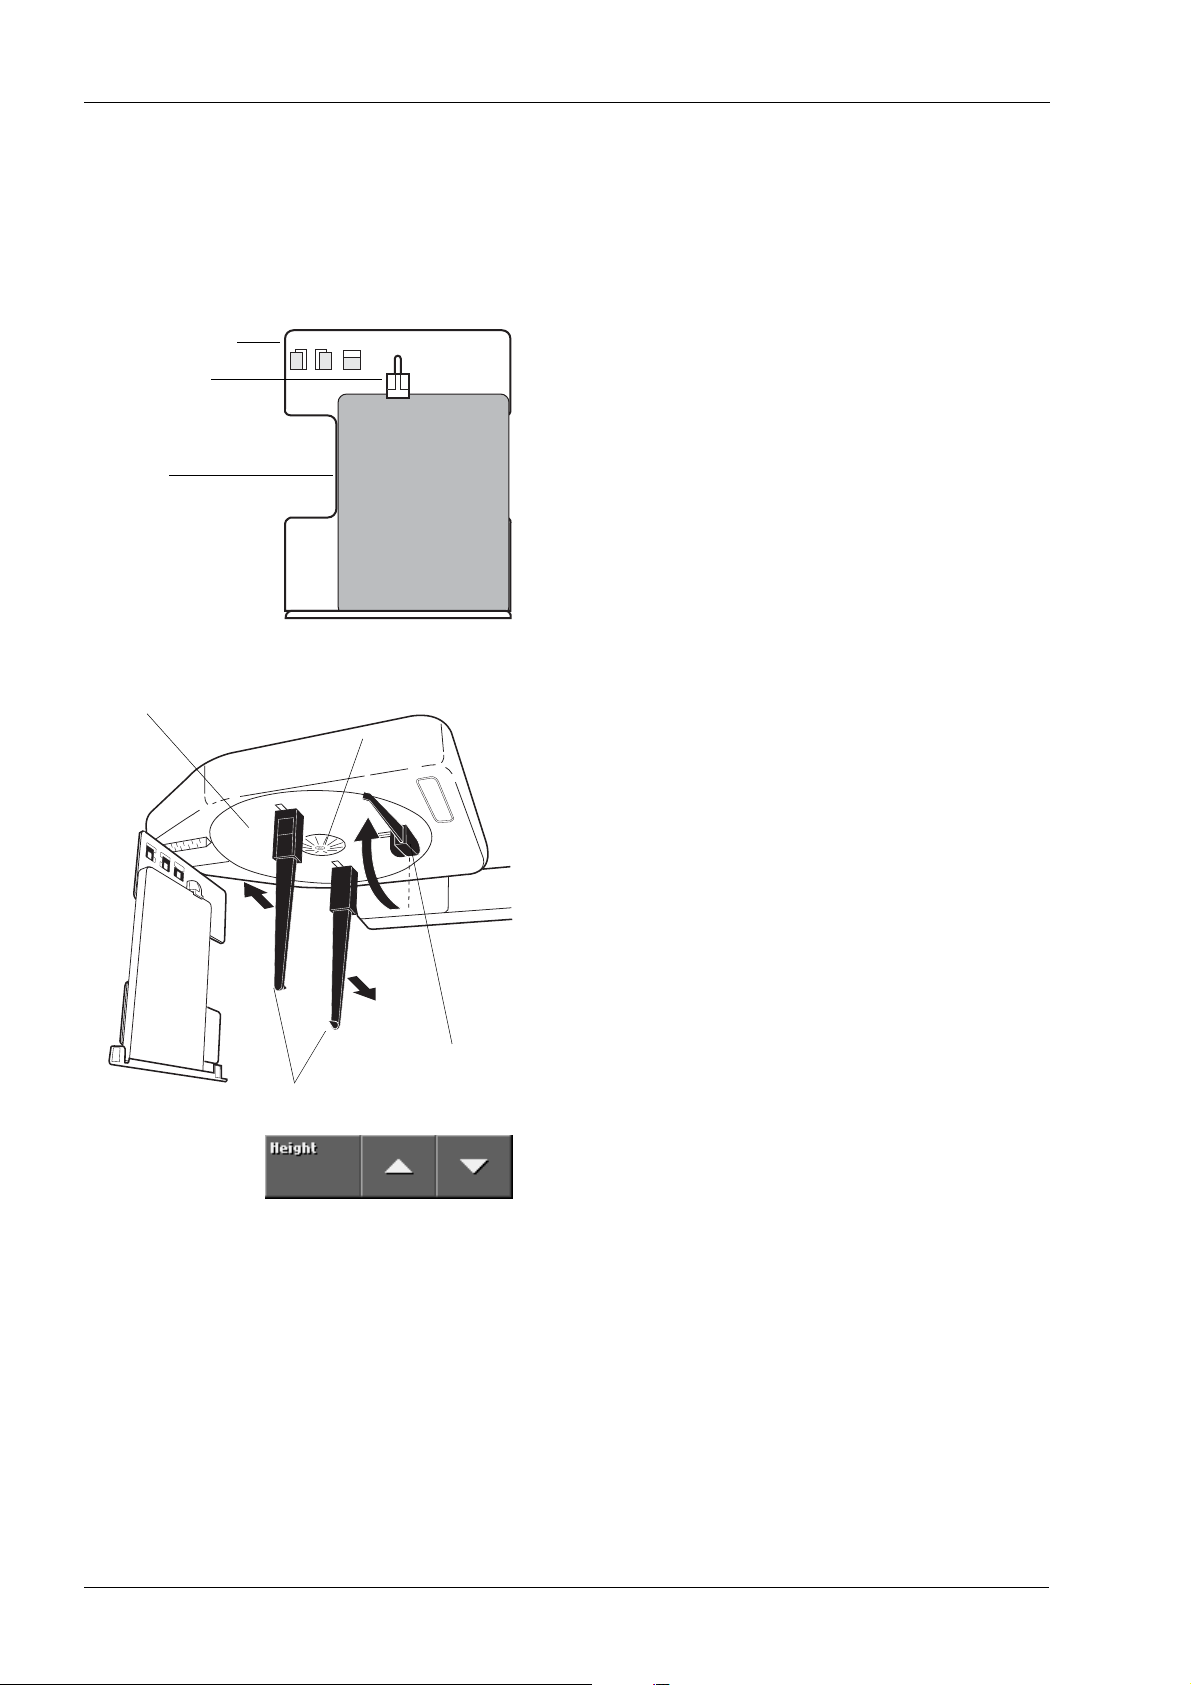
In the darkroom place a film inside the cassette. Handle
the film in accordance with the manufacturer’s instructions
and be careful not to damage the intensifying screens
inside the cassette.
Cassette holder
Cassette clip
Cassette
Head support
4
5
6
Rotation scale
Orientate the cassette so that it is vertical and then slide
the cassette into the cassette holder, either from the left or
right, and position it so that the right-hand side of the
cassette is flush with the right-hand side of the cassette
holder.
Select the cephalometric exposure mode and collimator
number 5, see section “6.1 Selecting cephalometric
exposure program” on page 7.
Rotate the head support to the 0° position. Press the
release lever on the side of the left-hand ear post holder
and slide the ear posts out as far as they will go. Swing
the nasial positioner up to the horizontal position.
Nasial positioner
Ear posts
22 Planmeca Proline XC Cephalostat
Adjust the height of the cephalostat until the positioning
cones at the ends of the ear posts are level with the
patient’s ears.
Position the patient between the two ear posts so that
they are facing away from the cassette.
User’s manual
Page 27
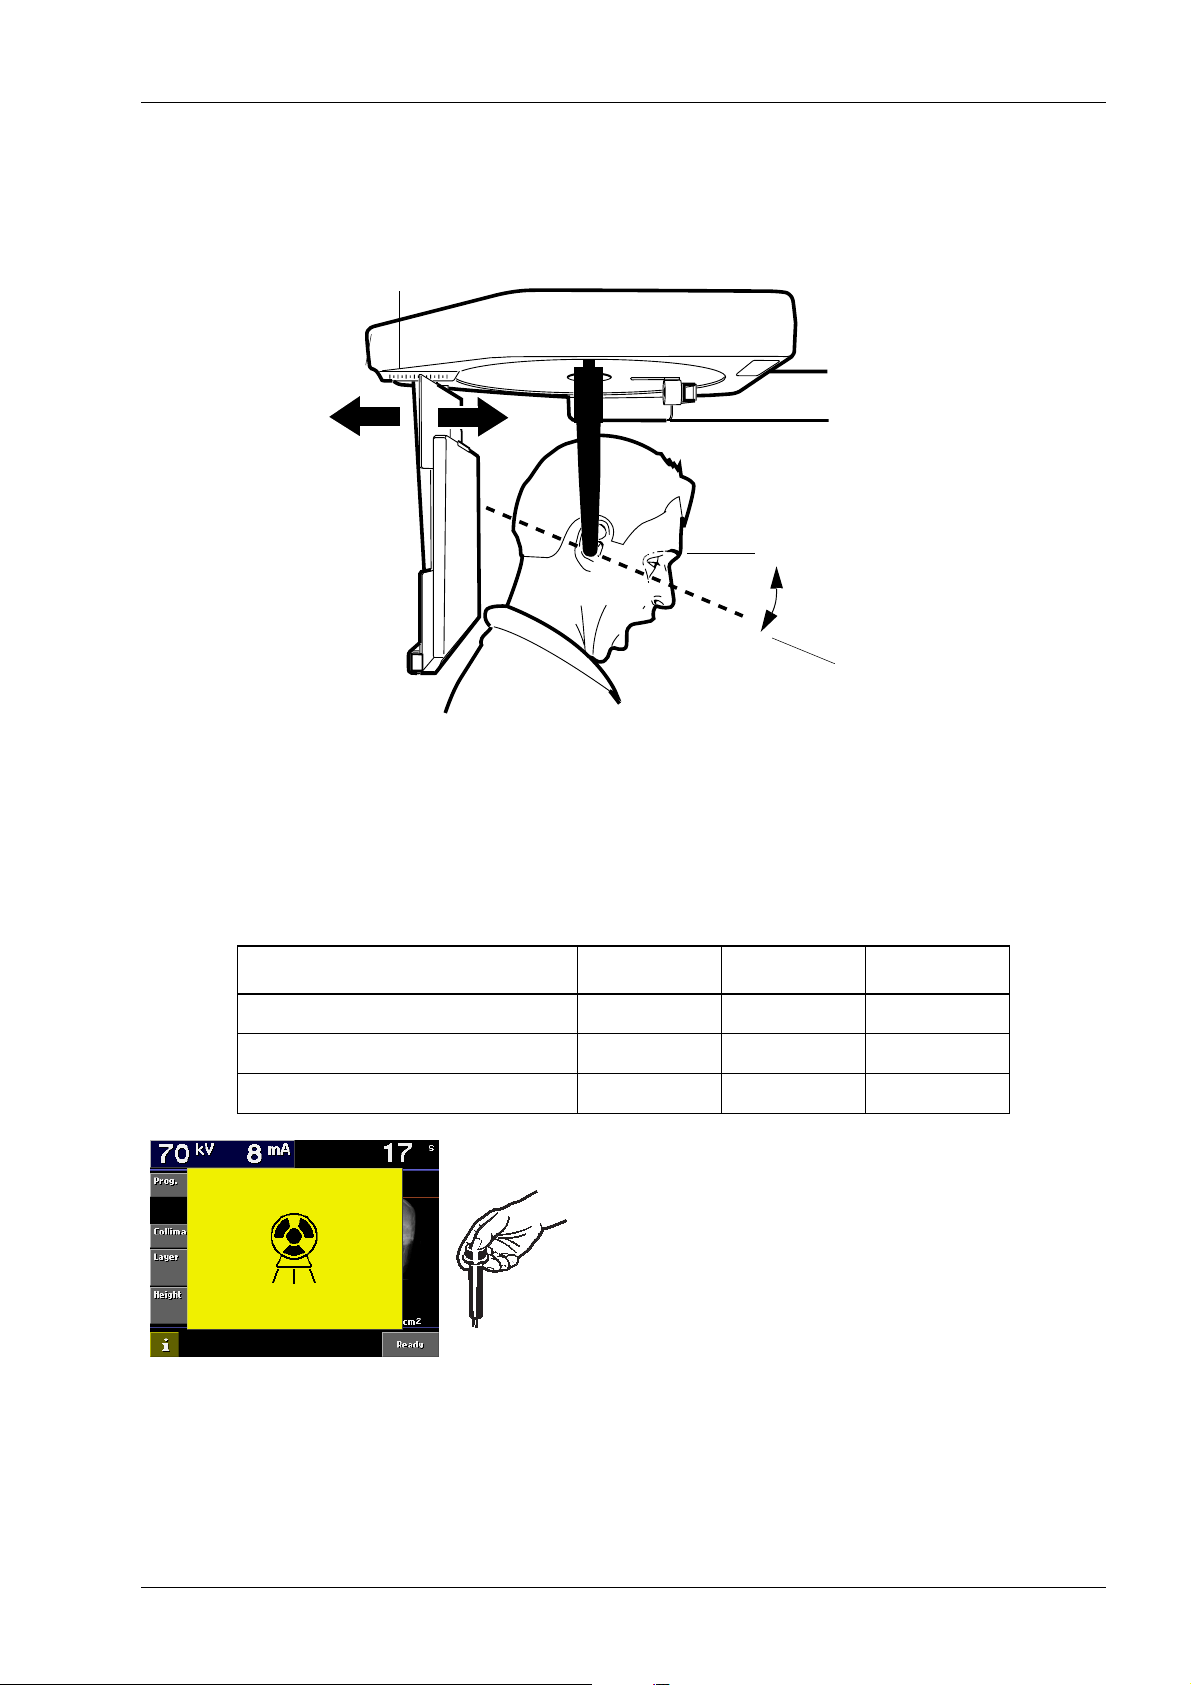
Magnification scale
200 190 180 170 160 150 140 130
1.13 1.12 1.09
TAKING AN EXPOSURE - AP TOWNE
Adjust the tilt of the patient’s head until the Frankfort plane
is tilted down 30°. Ask the patient to open his or her mouth
as wide as possible. Press the release lever on the side of
the left-hand ear post holder and VERY carefully slide the
positioning cones into the patient’s ears.
30°
Frankfort plane
Select the exposure magnification by sliding the cassette
holder towards or away from the patient. The
magnification can be seen the magnification scale above
the cassette holder.
Select the exposure values and exposure time for the
patient being X-rayed according to the values in the table
below.
PATIENT kV VALUE mA VALUE TIME
Child 74 12 1.0
Adult 78121.2
Large adult 80 12 1.6
Move at least two meters (seven feet) from the X-ray.
Protect yourself from unnecessary exposure to radiation.
Press and hold down the exposure button on the remote
control for the duration of the exposure. During the
exposure period the radiation warning light will come on
and you will hear the radiation warning tone. When the
radiation warning tone stops the ear posts can be slid out
and the patient can be guided from the unit.
Remove the cassette from the cassette holder and
process the film.
User’s manual
Planmeca Proline XC Cephalostat 23
Page 28
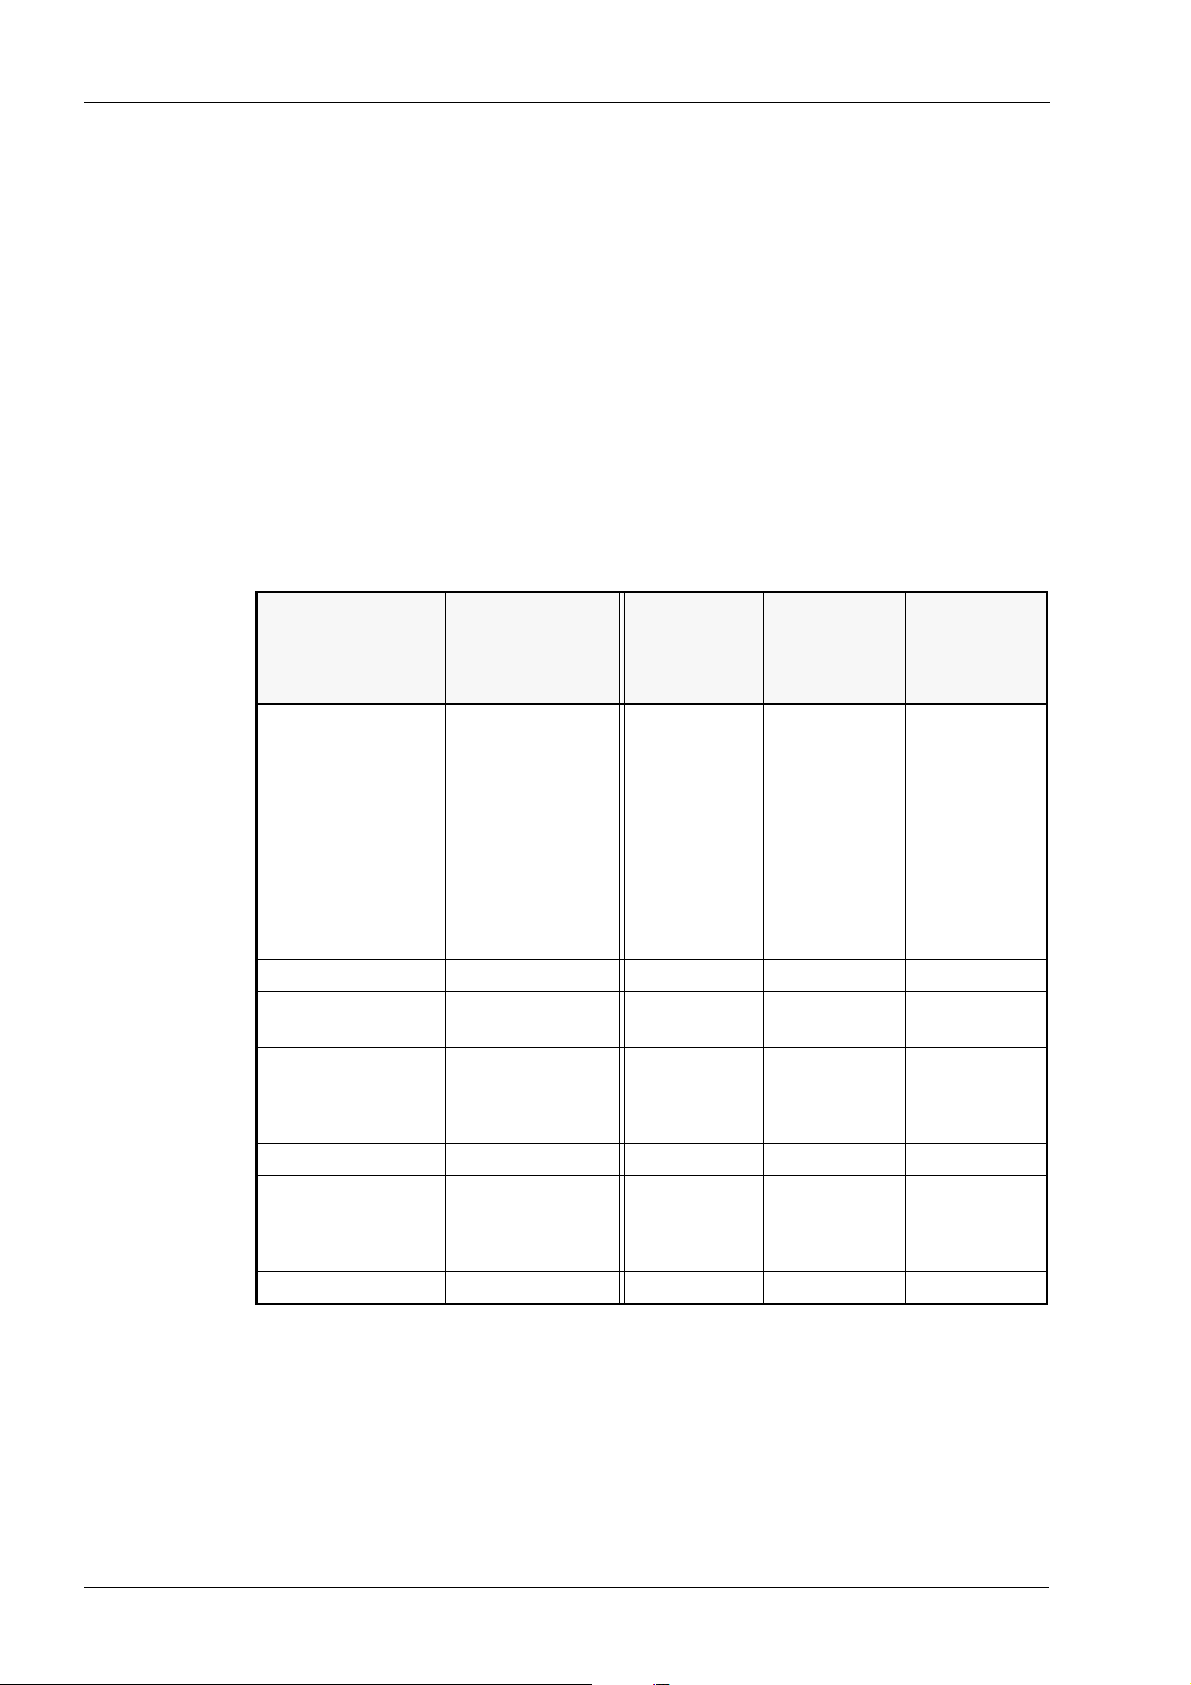
DISPOSAL OF THE PAN/CEPH UNIT
12 DISPOSAL OF THE PAN/CEPH UNIT
In order to reduce the environmental load over the
product’s entire lifecycle, PLANMECA’s products are
designed to be as safe as possible to manufacture, use
and dispose of.
Parts which can be recycled should always be taken to
the appropriate processing centres, after hazardous
waste has been removed. Disposal of obsolete units is
the responsibility of the waste possessor.
All parts and components containing hazardous materials
must be disposed of in accordance with waste legislation
and instructions issued by the environmental authorities.
The risks involved and the necessary precautions must be
taken into account when handling waste products.
Part
Frame and covers
- metal
- plastic
Motors (X)
Component
boards
Cables,
transformers
X-ray tube X
Packing Wood,
Other parts X
Main materials
for disposal
Aluminium,
galvanized steel,
lead
PUR,
other plastics
Copper,
steel,
transformer oil
cardboard,
paper
Recyclable
material
X
X
X
(X)
X
X
X
X
X
Waste
disposal
site
X
X
Hazardous
waste
(separate
collection)
X
24 Planmeca Proline XC Cephalostat
User’s manual
Page 29

Page 30

Planmeca Oy | Asentajankatu 6 | 00880 Helsinki | Finland
tel. +358 20 7795 500 | fax +358 20 7795 555 | [email protected] | www.planmeca.com
 Loading...