

5/8-Port Industrial Fast Ethernet Switch
ISW-500/ISW-800
User's Manual

Trademarks
Copyright © PLANET Technology Corp. 2006.
Contents subject to which revision without prior notice.
PLANET is a registered trademark of PLANET Technology Corp. All other trademarks belong to their
respective owners.
Disclaimer
PLANET Technology does not warrant that the hardware will work properly in all environments and
applications, and makes no warranty and representation, either implied or expressed, with respect to the
quality, performance, merchantability, or fitness for a particular purpose.
PLANET has made every effort to ensure that this User's Manual is accurate; PLANET disclaims liability
for any inaccuracies or omissions that may have occurred.
Information in this User's Manual is subject to change without notice and does not represent a
commitment on the part of PLANET. PLANET assumes no responsibility for any inaccuracies that may be
contained in this User's Manual. PLANET makes no commitment to update or keep current the
information in this User's Manual, and reserves the right to make improvements to this User's Manual
and/or to the products described in this User's Manual, at any time without notice.
If you find information in this manual that is incorrect, misleading, or incomplete, we would appreciate
your comments and suggestions.
FCC Warning
This equipment has been tested and found to comply with the limits for a Class A digital device, pursuant
to Part 15 of the FCC Rules. These limits are designed to provide reasonable protection against harmful
interference when the equipment is operated in a commercial environment. This equipment generates,
uses, and can radiate radio frequency energy and, if not installed and used in accordance with the
Instruction manual, may cause harmful interference to radio communications. Operation of this
equipment in a residential area is likely to cause harmful interference in which case the user will be
required to correct the interference at whose own expense.
CE Mark Warning
This is a Class A product. In a domestic environment, this product may cause radio interference, in which
case the user may be required to take adequate measures.
WEEE Warning
To avoid the potential effects on the environment and human health as a result of the
presence of hazardous substances in electrical and electronic equipment, end users of
electrical and electronic equipment should understand the meaning of the crossed-out
wheeled bin symbol. Do not dispose of WEEE as unsorted municipal waste and have
to collect such WEEE separately.
Revision
PLANET Industrial Fast Ethernet Switch User's Manual
FOR MODELS: ISW-500 / ISW-800
Revision: 1.0(February.2006)
Part No. EM_ISW500800v1 (2011-AH0010-000)

Table of Contents
1. INTRODUCTION................................................................................................................... 4
1.1 Packet Contents.............................................................................................................. 4
1.2 How to Use This Manual ................................................................................................. 4
1.3 Product Feature............................................................................................................... 4
1.4 Product Specification....................................................................................................... 5
2. HARDWARE INSTALL ATION .............................................................................................. 6
2.1 Product Description......................................................................................................... 6
2.2 Mounting Installation ....................................................................................................... 9
3. NETWORK INSTALLATION................................................................................................11
4. TROUBLESHOOTING........................................................................................................ 13
4.1 Incorrect connections.................................................................................................... 13
4.2 Diagnosing LED Indicators............................................................................................ 13
Appendix A Networking Connection ................................................................................... 15
A.1 Switch‘s RJ-45 Pin Assignments .................................................................................. 15
A.2 RJ-45 cable pin assignment ......................................................................................... 15

1. INTRODUCTION
The 5/8-Port 10/100BaseTX Industrial Fast Ethernet Switch is a cost- effective solution and meets the
high reliability requirements demanded by industrial applications. It provides the redundant power inputs
that prevent the power failure.
1.1 Packet Contents
Check the contents of your package for following parts:
▫ Industrial Fast Ethernet Switch x1
▫ DIN-Rail kit (screwed on the switch)
▫ Wall-mount kit (wall-mount plate with 6 screws)
▫ CD-ROM user's manual x1
If any of these are missing or damaged, please contact your dealer immediately, if possible, retain the
carton including the original packing material, and use them against to repack the product in case there is
a need to return it to us for repair.
1.2 How to Use This Manual
This User Manual is structured as follows:
Chapter 2, HARDWARE INSTALLATION
The chapter explains the functions of the Switch and how to physically install the Switch.
Chapter 3, NETWORK INSTALLATION
The chapter explains how to install the Switch in the Network.
Chapter 4, TROUBLE SHOOTING
The chapter explains how to trouble shooting of the Switch.
Chapter 5, APPENDIX A Networking Connection
The chapter contains cable information of the Switch.
1.3 Product Feature
Hardware Feature:
▫ Comply with IEEE 802.3, IEEE 802.3u
▫ CSMA/CD Protocol
▫ RJ-45 Port support auto MDI/MDI-X function
▫ Wide-range redundant power design
▫ Store and forward switch architecture
▫ DIN rail and 3-way wall mount design

Industrial Conformance:
▫ 12~48V DC, redundant power with polarity reverse protect function and connective
removable terminal block for master and slave power
▫ 0 to 60 Degree C operation temperature
▫ IP-30 Aluminum case
▫ EMI complies with FCC Class A, CE EN6100-4-2, CE EN6100-4-3, CE EN6100-4-4, CE
EN6100-4-5 and CE EN6100-4-6
▫ Stability testing with IEC60068-2-32(Free fall), IEC60068-2-27(Shock) and
IEC60068-2-6(Vibration)
1.4 Product Specification
Model ISW-500 ISW-800
Standard IEEE 802.3, IEEE 802.3u, 10/100Base-TX
10/100Mbps TP 5 8
Protocol CSMA/CD
Switching Architecture Store and forward
Transfer Rate 144,880 pps for Ethernet port and 1448,800 pps for Fast Ethernet port
MAC address 1K 2K
Memory Buffer 512Kbits 1Mbit
Network Cable 10Base-T : 2-pair UTP/STP Cat 3, 4, 5 cable
100Base-TX: 2-pair UTP/STP Cat. 5 cable
10Base-T: EIA/TIA-568 100-ohm (100m)
LED Per port : Link/Activity (Green), Full duplex/Collision (Green)
Per unit: Power 2 (Green), Power 1 (Green), Power (Green)
Backplane 1Gbps 1.6Gbps
Packet throughput ability 0.74Mpps@64bytes (5TX) 1.19Mpps@64bytes (8TX)
Power Supply 12~48 VDC, Redundant power with polarity reverse protection function
Power Consumption 2.8 Watts / 9.5BTU 4.6 Watts / 15BTU
Installation Provide DIN rail kit and wall mount plate for 3-way installation
Operating environment 0~60 Degree C, 5%~90%RH (Non-condensing)
Storage environment -40~85 Degree C, 5%~90%RH (Non-condensing)
Dimension (W x D x H) 54 × 105 × 155 mm
Emission FCC Class A, CE mark
Stability testing IEC60068-2-32(Free fall), IEC60068-2-27(Shock), IEC60068-2-6(Vibration)

2. HARDWARE INSTALLATION
This section describes the functionalities of the Switch's components and guides how to install it on the
rack or mount to the wall. Basic knowledge of networking is assumed. Please read this chapter
completely before continuing.
2.1 Product Description
The PLANET entry level Industrial Ethernet Switch is industrially hardened Ethernet switch specifically
designed to operate reliably in electrically harsh and climatically demanding environments.utilization.
2.1.1 Product Overview
The switch provides a high level of immunity to electromagnetic interference and heavy electrical surges
typical of environments found on plant floors or in curb side traffic control cabinets. An operating
temperature range of -0 to +60 Degree C coupled with hazardous location certification (Class 1 Division 2)
allows the switch to be placed in almost any location.
The switch is packaged in a compact, IP-30 standard aluminum that allows either DIN or panel mounting
for efficient use of cabinet space. The switch provides an integrated power supply with a wide range of
voltages (12-48VDC) for worldwide operability or dual-redundant, reversible polarity, 24VDC and 48VDC
power supply inputs for high availability applications requiring dual or backup power inputs.
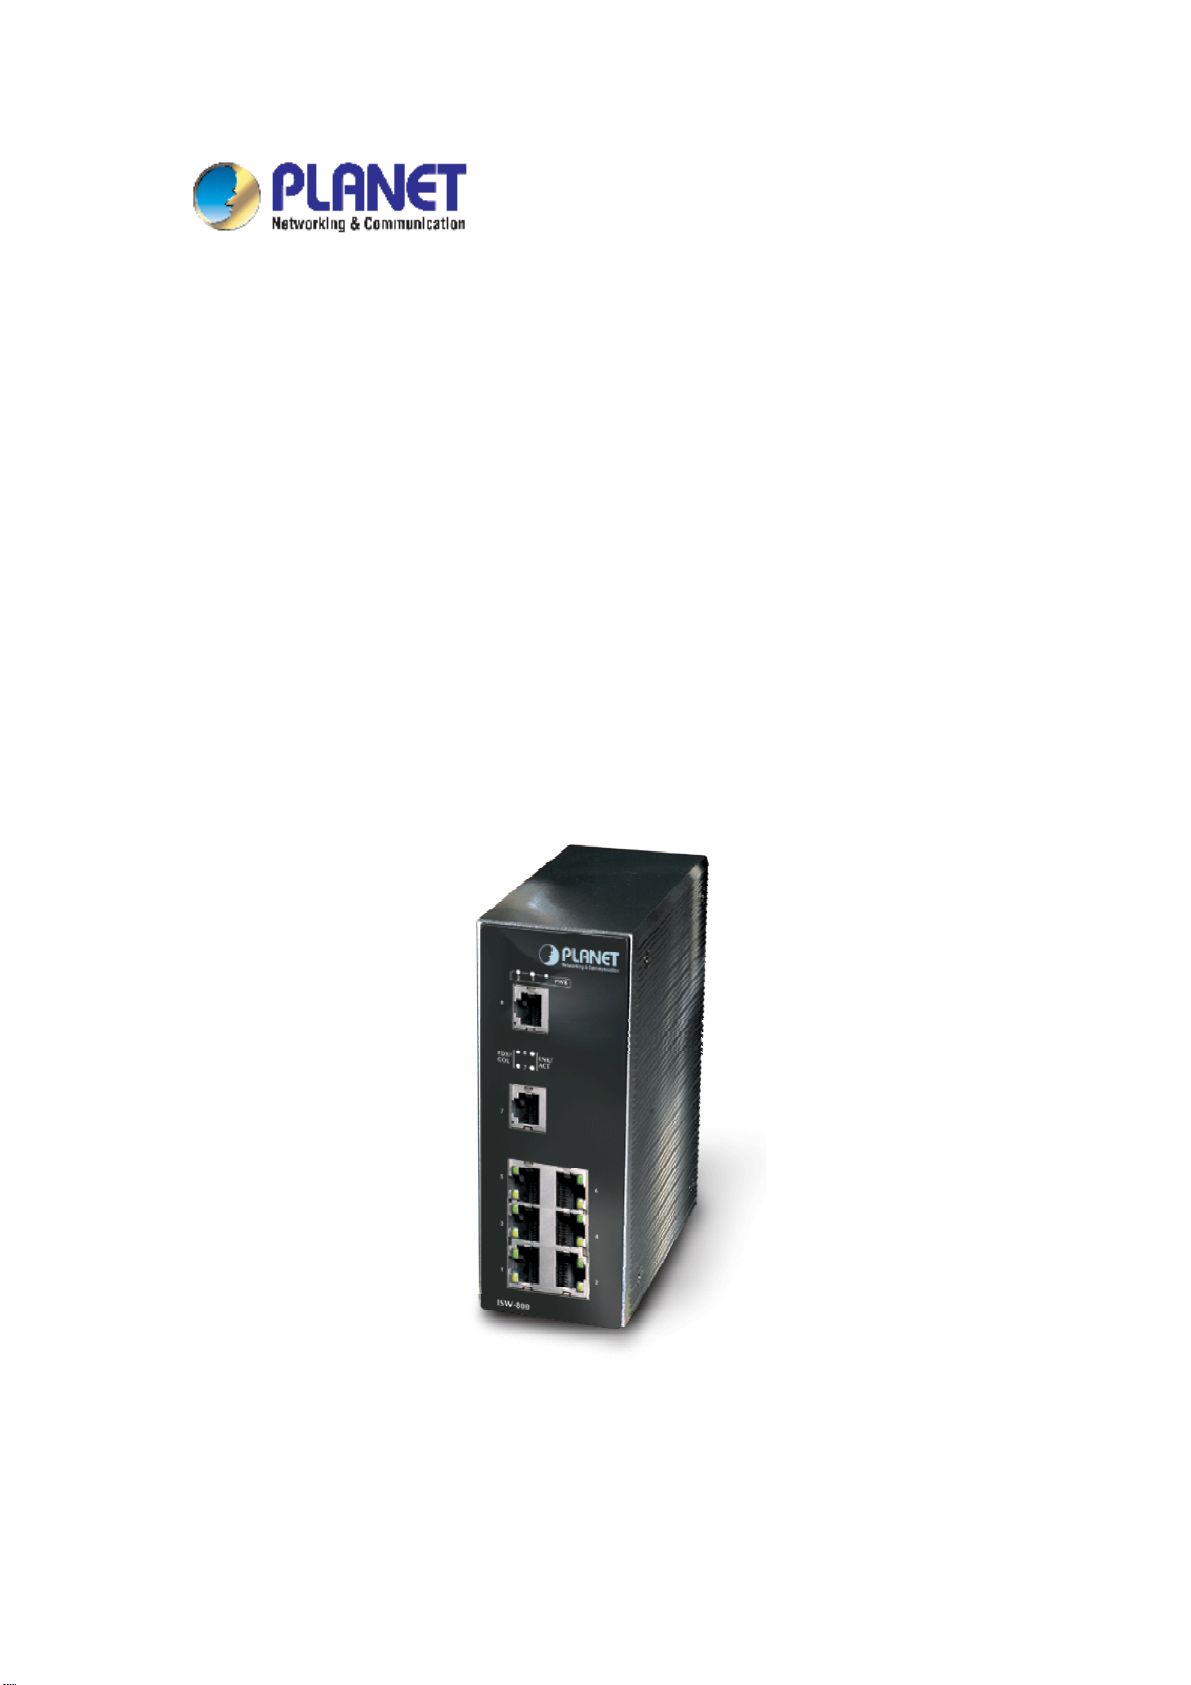
2.1.2 Switch Front Panel
Figure 2-1 shows the front panel of the switch.
Figure 2-1 ISW-800 Front Panel Figure 2-2 ISW-500 Front Panel

2.1.3 LED Indications
LED Status Meaning
Power
Power 1
Power 2
LNK/ACT
(port 7&8 of ISW-800,
port 5 of ISW-500)
FDX/COL
Green
When the industrial switch has power input s the LED
will light on
Off No any power inputs
Green Power on
Off No power inputs
Green Power on
Off No power inputs
Green The port is linking with its link partner
The port is transmitting or receiving packets from the TX
Blinks
device.
Off No device attached
Orange The port is operating in full-duplex mode.
(port 7&8 of ISW-800,
port 5 of ISW-500)
LED Indicator
(port 1 ~ 6 of ISW-800,
port 1 ~ 4 of ISW-500)
Blinks Collision of Packets occurs in the port.
Off The port in half-duplex mode or no device attached
Orange The port is operating in full-duplex mode.
Blinking
(Orange)
Off The port is in half-duplex mode or no device is attached.
Green A network device is detected.
Blinking
(Green)
Off No device is attached.
Collision of Packets occurs.
The port is transmitting or receiving packets from the TX
device.

2.1.4 Switch Bottom Panel
The bottom panel of the 5/8-Port 10/100BaseTX Industrial Switch consist one terminal block connector
within two DC power inputs and one DC IN power jack for extra AC/DC power adapter. Figure 2-3 shows
the bottom panel of the switch.
Figure 2-3 ISW-500/800 Bottom Panel.
2.1.5 Wiring the Power Inputs
Please follow below steps to insert the power wire.
V - V + V - V +
1. Insert the positive and negative wires into the V+ and V- connector on the terminal block connector.
2. To tighten the wire-clamp screws for preventing the DC wires to loose.
Power Notice:
The wire range of terminal block is from 12~ 24 AWG.

2.2 Mounting Installation
This section describes how to install the Ethernet Switch and make connections to it. Please read the
following topics and perform the procedures in the order being presented.
2.2.1 DIN-Rail mounting
The DIN-Rail is screwed on the industrial switch when out of factory. If the DIN-Rail is not screwed on the
industrial switch, please see the following figure to screw the DIN-Rail on the switch. To hang the
industrial switch, follow the below steps:
Step1: Insert the top of DIN-Rail into the track.
Step2: Lightly push the button of DIN-Rail into the track.

Step3: Check the DIN-Rail is tightly on the track.
Step4: To remove the industrial switch from the track, reverse steps above.
2.2.2 Wall Mount Plate Mounting
To install the switch on the wall, please follows the instructions described below.
Step1: Remove the DIN-Rail from the industrial switch; loose the screws to remove the DIN-Rail.
Step2: Place the wall mount plate on the rear panel of the industrial switch.
Step3: Use the screws to screw the wall mount plate on the industrial switch.
Step4: Use the hook holes at the corners of the wall mount plate to hang the industrial switch on the wall.
Step5: To remove the wall mount plate, reverse steps above.

3. NETWORK INSTALLATION
In this paragraph, we will describe how to install the 5/8-Port 10/100Base-TX Industrial Switch and the
installation points for the attention.
Installation Steps
Step
1: Unpack the Industrial switch.
Step2: Check the DIN-Rail is screwed on the Industrial switch. (Please refer to DIN-Rail Mounting
section for DIN-Rail installation If the DIN-Rail is not screwed on the Industrial switch). If you want to wall
mount the Industrial switch, then please refer to Wall Mount Plate Mounting section for wall mount plate
installation.
Step3: To hang the Industrial switch on the DIN-Rail track or wall, please refer to the Mounting
Installation section.
Step4: Power on the Industrial switch. (Please refer to the Wiring the Power Inputs section for power
input) The power LED on the Industrial switch will light up. Please refer to the LED Indicators section for
meaning of LED lights.
Step5: Prepare the twisted-pair, straight through Category 5 cable for Ethernet connection.
Step6: Insert one side of Category 5 cables into the Industrial switch Ethernet port (RJ-45 port) and
another side of category 5 cables to the network devices' Ethernet port (RJ-45 port), ex: switch, Pc or
Server. The UTP port (RJ-45) LED on the Industrial switch will light up when the cable connected with the
network device. Please refer to the LED Indicators section for LED light meaning.

#Notice:
Be sure the connected network devices support MDI/MDI-X. If it does not support then use the crossover
category 5 Cable.
Step7: When all connections are all set and LED lights all show in normal, the installation is complete.

4. TROUBLESHOOTING
This section is intended to help you solve the most common problems on the industrial Ethernet switch.
4.1 Incorrect connections
The switch port can auto detect straight or crossover cable when you link switch with other Ethernet
device. For the RJ-45 connector should use correct UTP or STP cable, 10/100Mbps port use 2-pairs
twisted cable. If the RJ-45 connector is not correct pin on right position then the link will fail. For fiber
connection, please notice that fiber cable mode and fiber module should be match.
4.1.1 Faulty or loose cables
Look for loose or obviously faulty connections. If they appear to be OK, make sure the connections are
snug. IF that does not correct the problem, try a different cable.
4.1.2 Non-standard cables
Non-standard and miss-wired cables may cause numerous network collisions and other network problem,
and can seriously impair network performance. A category 5-cable tester is a recommended tool for
every 100Base-T network installation.
4.1.3 Improper Network Topologies
It is important to make sure that you have a valid network topology. Common topology faults include
excessive cable length and too many repeaters (hubs) between end nodes. In addition, you should make
sure that your network topology contains no data path loops. Between any two ends nodes, there should
be only one active cabling path at any time. Data path loops will cause broadcast storms that will severely
impact your network performance.
4.1.4 Incorrect Power Input
Verify that you are using the right power cord/adapter (DC 12-48V), please don't use the power adapter
with DC output bigger than 48V, or it will burn this converter down.
4.2 Diagnosing LED Indicators
The Switch can be easily monitored through panel indicators to assist in identifying problems, which
describes common problems you may encounter and where you can find possible solutions.
IF the power indicator does turn on when the power cord is plugged in, you may have a problem with

power outlet, or power cord. However, if the Switch powers off after running for a while check for loose
power connections, power losses or surges at power outlet. IF you still cannot resolve the problem,
contact your local dealer for assistance.
4.2.1 Cabling
RJ-45 ports: use unshielded twisted-pair (UTP) or shield twisted-pair (STP) cable for RJ-45 connections:
100Ω Category 3, 4 or 5 Cable for 10Mbps connections or 100Ω Category 5 cable for 100Mbps
connections. Also be sure that the length of any twisted-pair connection does not exceed 100 meters
(328 feet).
Diagnosing LED Indicators: the Switch can be easily monitored through panel indicators to assist in
identifying problems, which describes common problems you may encounter and where you can find
possible solutions.
IF the power indicator does not turn on when the power cord is plugged in, you may have a problem with
power cord. Than check for loose power connections, power losses or surges at power outlet. IF you still
cannot resolve the problem, contact your local dealer for assistance.
If the Industrial switch LED indicators are normal and the connected cables are correct and the packets
still cannot transmit. Please check your system's Ethernet devices' configuration or status.

Appendix A Networking Connection
A.1 Switch‘s RJ-45 Pin Assignments
Contact MDI MDI-X
1 1 (TX +) 3
2 2 (TX -) 6
3 3 (RX +) 1
6 6 (RX -) 2
4, 5, 7, 8 Not used Not used
A.2 RJ-45 cable pin assignment
2 1
3 6
2 1 3 6
6
3
2
1
There are 8 wires on a standard UTP/STP cable and each wire is color-coded. The following shows the
pin allocation and color of straight cable and crossover cable connection:
Figure A-1: Straight-Through and Crossover Cable
Please make sure your connected cables are with same pin assignment and color as above picture
before deploying the cables into your network.
2011-AH0010-000
 Loading...