


 Loading...
Internet Telephony PBX System
IPX-300 Series User’s manual
Version 1.0.0

Copyright
Copyright (C) 2007 PLANET Technology Corp. All rights reserved.
The products and programs described in this User’s Manual are licensed products of PLANET Technology, This User’s Manual contains proprietary information protected by copyright, and this User’s Manual and all accompanying hardware, software, and documentation are copyrighted.
No part of this User’s Manual may be copied, photocopied, reproduced, translated, or reduced to any electronic medium or machine-readable form by any means by electronic or mechanical. Including photocopying, recording, or information storage and retrieval systems, for any purpose other than the purchaser's personal use, and without the prior express written permission of PLANET Technology.
Disclaimer
PLANET Technology does not warrant that the hardware will work properly in all environments and applications, and makes no warranty and representation, either implied or expressed, with respect to the quality, performance, merchantability, or fitness for a particular purpose.
PLANET has made every effort to ensure that this User’s Manual is accurate; PLANET disclaims liability for any inaccuracies or omissions that may have occurred.
Information in this User’s Manual is subject to change without notice and does not represent a commitment on the part of PLANET. PLANET assumes no responsibility for any inaccuracies that may be contained in this User’s Manual. PLANET makes no commitment to update or keep current the information in this User’s Manual, and reserves the right to make improvements to this User’s Manual and/or to the products described in this User’s Manual, at any time without notice.
If you find information in this manual that is incorrect, misleading, or incomplete, we would appreciate your comments and suggestions.
CE mark Warning
The is a class B device, In a domestic environment, this product may cause radio interference, in which case the user may be required to take adequate measures.
WEEE Warning
To avoid the potential effects on the environment and human health as a result of the presence of hazardous substances in electrical and electronic equipment, end users of electrical and electronic equipment should understand the meaning of the crossed-out wheeled bin symbol. Do not dispose of WEEE as unsorted municipal waste and have to collect such WEEE separately.
Trademarks
The PLANET logo is a trademark of PLANET Technology. This documentation may refer to numerous hardware and software products by their trade names. In most, if not all cases, their respective companies claim these designations as trademarks or registered trademarks.
2
Revision
User’s Manual for PLANET Internet Telephony PBX System:
Model: IPX-300/IPX-300W
Rev: 1.0 (December, 2007)
Part No. EM-IPX300 Series V1
3

TABLE OF CONTENTS
Chapter 1 ................................................................................................ |
3 |
Introduction............................................................................................ |
3 |
Overview............................................................................................................................ |
3 |
Package Content ............................................................................................................... |
3 |
Physical Details ................................................................................................................. |
3 |
Front Panel Indicators................................................................................................. |
3 |
Rear Panel Indicators.................................................................................................. |
3 |
Chapter 2 Preparations & Installation.................................................. |
3 |
Physical Installation Requirement .................................................................................. |
3 |
Network Interface quick configurations..................................................................... |
3 |
Chapter 3 IP PBX Setup ........................................................................ |
3 |
SIP Basic Setting ........................................................................................................ |
3 |
User Extensions Setup................................................................................................ |
3 |
Attendant Extension ................................................................................................... |
3 |
Dialing Rules .............................................................................................................. |
3 |
Time Rules.................................................................................................................. |
3 |
Record Voice Menu .................................................................................................... |
3 |
Call Parking ................................................................................................................ |
3 |
Gereral Setting............................................................................................................ |
3 |
Chapter 4 Network Setup ...................................................................... |
3 |
WAN & LAN Setup.................................................................................................... |
3 |
DHCP ......................................................................................................................... |
3 |
WLAN Setting (For IPX-300W) ................................................................................ |
3 |
Access Policy (For AP and WISP&AP mode) ........................................................... |
3 |
Static Route................................................................................................................. |
3 |
NAT ............................................................................................................................ |
3 |
Packet Filter................................................................................................................ |
3 |
URL Filter................................................................................................................... |
3 |
Security....................................................................................................................... |
3 |
UPnP........................................................................................................................... |
3 |
Call Out Block List..................................................................................................... |
3 |
SNTP .......................................................................................................................... |
3 |
Chapter 5 Management ......................................................................... |
3 |
Admin Account........................................................................................................... |
3 |
Date & Time ............................................................................................................... |
3 |
Ping Test ..................................................................................................................... |
3 |
Save & Restore ........................................................................................................... |
3 |
|
4 |
Factory Default........................................................................................................... |
3 |
Admin Account........................................................................................................... |
3 |
Appendix A............................................................................................. |
3 |
How to use Call Parking function ................................................................................... |
3 |
Appendix B............................................................................................. |
3 |
How to use Call Pick-up function.................................................................................... |
3 |
Appendix C............................................................................................. |
3 |
Record Voice Guide Process ............................................................................................ |
3 |
Appendix D............................................................................................. |
3 |
Voice Communication Samples ....................................................................................... |
3 |
IP Phone and Wi-Fi Phone register to IPX-300W...................................................... |
3 |
IP Phone and Wi-Fi Phone make off-Net calls via Gateway...................................... |
3 |
Appendix E............................................................................................. |
3 |
IPX-300 Series Specifications .......................................................................................... |
3 |
5

IntroductionChapter 1 1
Overview
PLANET IPX-300/IPX-300W IP PBX telephony systems (“IP PBX” in the following term) are designed and optimized for the small business in daily communications. It can support up to 100 user registrations and easy to install and manage a fully working system with the convenience and cost advantages. The future IP PBX telephony system offers all of the essential features of telephony which is required by small business users for their telecommunication/data needs.
The IP PBX series are the feature-rich SIP based IP PBX telephony system that integrates NAT functions to make it perfect for small business usage. The IP PBX integrates traditional PBX system functions and provides many advanced functions including voice mail to email, web management etc. Designed to run on a variety of VoIP applications, the IP PBX provide IP-based communications, voice conferencing, call detailed record (CDR), centralized Auto-Attendant (AA), and Interactive Voice Responses (IVR). The IP PBX utilizes standard PSTN / GSM lines via the interfaces of FXO / GSM gateway to become a feature-rich IP PBX telephony system that supports seamless communications among existing local calls, SIP-based endpoints including low cost of long distance service, telephone number portability and one network for both voice and data.
With a built-in IEEE 802.11b/g wireless AP / CPE, the Wi-Fi IP PBX (IPX-300W) offers wireless connectivity via 54Mbps data transmissions. Users may integrate PLANET IP Phone VIP-154T series, VIP-155PT/ 350PT/ 550PT, the VIP-156/ 157/ 158/ 161W of ATA (analog telephone adapter) series, the VIP-191/ 192 of Wi-Fi Phone, and Gateway series VIP-281/ 281GS/ 480 to build up the VoIP network deployment in minutes.
IP PBX Features
•PBX Features
-Automated Attendant (AA)
-Interactive Voice Responses (IVR)
-Voicemail support (VM)
-Voicemail to E-Mail
-Call Detailed Record (CDR)
-User Management via Web Browser
-Call/Pickup Group
-Display 100 Registered User’s Status: Unregistered / Registered / On-Call
•Call Features
-Call Forward Immediate
-Call Forward on Busy
-Call Forward on No Answer
-Call Pickup / Call Park
-Caller ID
-Music on Hold / Music on Transfer
-Call Transfer / Call Hold / Call Waiting
-Three-way conference with feature phones (VIP-154T series, VIP-155PT/ 350PT/ 550PT and VIP-156/ 157/ 158/ 161W series)
•Router/Firewall Features
-DHCP Server for LAN Users
-Access Control / URL Filter
-Virtual Server / DMZ / Port Mapping
-Static Route
-Pass-through
-UPnP
•Wireless Features (IPX-300W)
-IEEE 802.11b/ 802.11g
-AP / AP-Client / WISP & AP Mode
-64/128 bits WEP Date Encryption
-WPA/ WPA-PSK/ WPA2/ WPA2-PSK/ Mix Mode
-WPAPSK/ WPS2PSK Mix Mode
7

Package Content
The contents of your product should contain the following items:
Internet Telephony PBX system unit
Power Adapter
Quick Installation Guide
User’s Manual CD
Physical Details
The following figure illustrates the front/rear panel of IP PBX.
Front Panel Indicators
Figure 1-1. Front Panel of IPX-300
Figure 1-2. Front Panel of IPX-300W
Front Panel LED |
State |
Descriptions |
|
PWR |
On |
PBX Power ON |
|
Off |
PBX Power OFF |
||
|
|||
|
On |
PBX network connection established |
|
WAN Port |
Flashing |
Data traffic on cable network |
|
|
Off |
Waiting for network connection |
|
|
On |
LAN is connected successfully |
|
LAN Port |
Flashing |
Data is transmitting |
|
|
Off |
Ethernet not connected to PC |
|
WLAN Port |
On |
WLAN is connected successfully |
|
Flashing |
Data is transmitting |
||
(IPX-300W only) |
|||
Off |
Ethernet not connected to PC |
||
|
Table1-1. Front Panel description of IP PBX
8
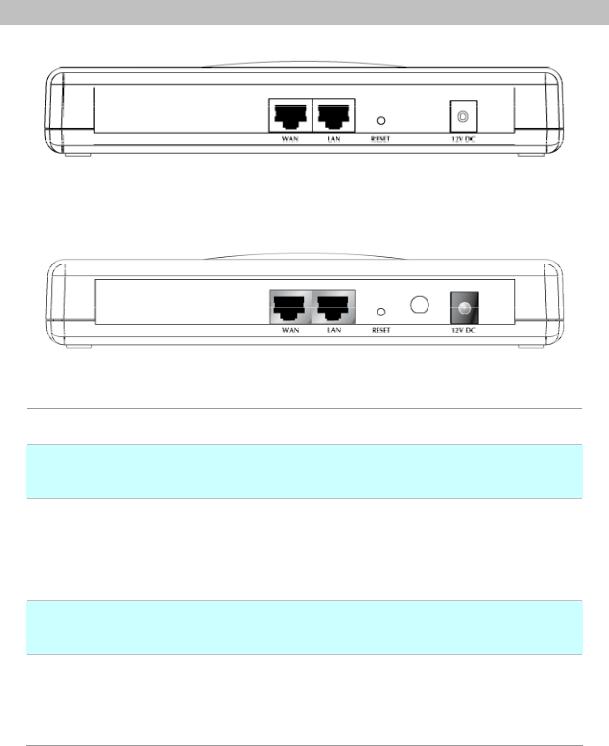
Rear Panel Indicators
1
2
3
4
5
Figure 1-3. Rear Panel of IPX-300
Figure 1-4. Rear Panel of IPX-300W
12V DC Power input outlet
The reset button, when pressed, resets the IP PBX without the need to unplug the power cord.
The WAN port supports auto negotiating Fast Ethernet 10/100Base-T networks. This port allows your IP PBX to be connected to an Internet Access device, e.g. router, cable modem, ADSL modem, through a CAT.5 twisted pair Ethernet cable.
The LAN port allows your PC or Switch/Hub to be connected to the IP PBX through a CAT.5 twisted pair Ethernet cable.
Used to Wirelessly Connect to 802.11b/g networks 802.11b: 11/5.5/2 Mbps
802.11g: 54/48/36/24/19/12/6Mbps
Table 1-2. Rear Panel description of IP PBX
9
Chapter 2 2
Preparations & Installation
Physical Installation Requirement
This chapter illustrates basic installation of IP PBX
•Network cables. Use standard 10/100BaseT network (UTP) cables with RJ45 connectors.
•TCP/IP protocol must be installed on all PCs.
For Internet Access, an Internet Access account with an ISP, and either of a DSL or Cable modem (for WAN port usage)
Administration Interface
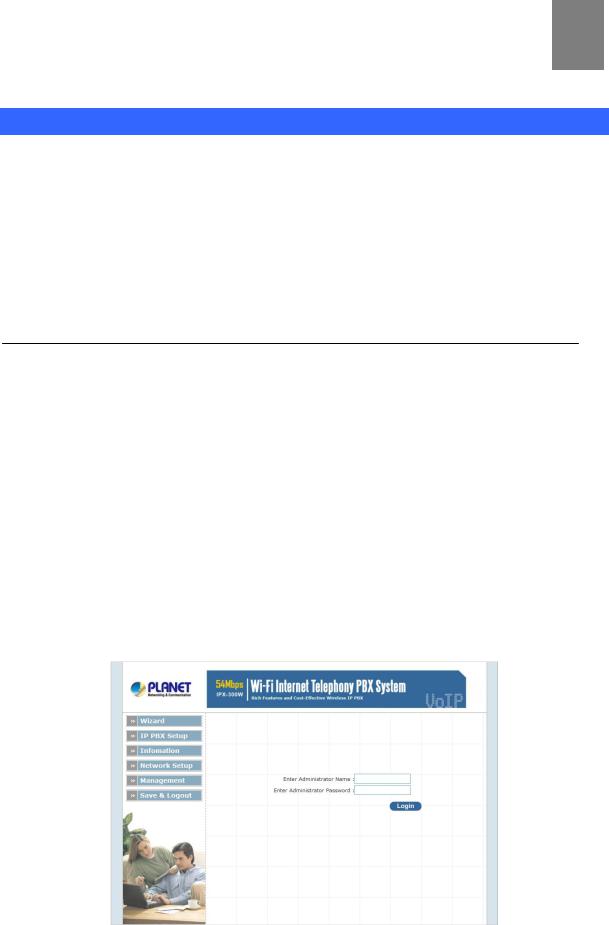
PLANET IP PBX provides GUI (Web based, Graphical User Interface) for machine management and administration.
Web configuration access:
To start IP PBX web configuration, you must have the web browsers installed on computer for management
•Microsoft Internet Explorer 6.0.0 or higher with Java support
Default LAN interface IP address of IP PBX is 192.168.0.1. You may now open your web browser, and insert 192.168.0.1 in the address bar of your web browser to logon IP PBX web configuration page.
IP PBX will prompt for logon username/password, please enter: admin / 123 to continue machine administration.
Figure 2-1. Input prompt
In order to connect machine for administration, please Note locate your PC in the same network segment (192.168.0.x)
of IP PBX. If you’re not familiar with TCP/IP, please refer to related chapter on user’s manual CD or consult your network administrator for proper network configurations.
Network Interface quick configurations
Wizard for Quick Setup of the IP PBX, after finishing the authentication, please click “Wizard” to enter quick start:
Figure 2-2. Wizard-Operating Mode settings
¾Step1. Operation Mode (For IPX-300W)
For most users, Internet access is the primary application. The IP PBX supports the WAN, LAN and WLAN interface for Internet access and remote access. When you click “Operation Mode” from within the Wizard Setup, the following setup page will be show.
Three WLAN modes of operation are available for Internet Access:
AP Mode:
In this mode the IP PBX supports AP functionality only. The IP PBX has the following network interfaces: WAN, LAN and Wireless LAN.
AP-Client Mode:
In this mode the IP PBX accesses a remote AP. Please be sure that you have an account to access your wireless service provider AP. In this mode the WAN interface is used a 2nd LAN interface.
WISP & AP Mode
11
The IP PBX must access remote AP .Please be sure that have account to access from remote AP. In this WISP & AP mode the network interface will change from WAN port to LAN port and all of network access will through by remote AP.
¾ Step2. Internet Setting (AP Mode)
WAN Setting
|
NAT Mode |
|
Network Address Translation (NAT) serves connecting multiple |
|
computers to the Internet using one IP address. |
||
|
|
||
|
|
|
|
|
|
|
Bridge mode serves to connect a local area network (LAN / |
|
Bridge Mode |
|
Wireless) to another local area network that uses the same |
|
|
|
protocol. |
|
|
|
|
|
WAN Port IP |
|
Three methods are available for Internet Access. Static IP / |
|
|
DHCP / PPPoE type for your select .you should refer to “Network |
|
|
Assignment |
|
|
|
|
Setting” in user menu. |
|
|
|
|
|
|
|
|
|
|
|
|
Table 2-1. WAN description of IP PBX |
Figure 2-3. Wizard-Internet settings
AP Setting (For IPX-300W)
For configuring correctly the WLAN port in client mode. the below instructions will provide a quick start. It is advised if possible to use the simplest network settings for first try.
For making sure the IP PBX is connecting to your wireless router (AP). You need to set up the following: SSID, Frequency Channel, Authentication method and Encryption parameters (Type/Encryption length/Keys.)
12

Figure 2-4. Wizard-AP settings
¾ Step3. NAT Setting
LAN IP Setting
|
LAN IP Address |
|
Private IP address for connecting to a local private network. |
||
|
|
(Default: 192.168.0.1) |
|||
|
|
|
|
||
|
|
|
|
|
|
|
Subnet Mask |
|
|
Subnet mask for the local private network (Default: |
|
|
|
|
255.255.255.0) |
|
|
|
|
|
|
|
|
|
|
|
|
|
|
|
DHCP Server |
|
Enable to open LAN port DHCP server |
||
|
|
|
|
||
|
Assigned DHCP IP Address |
|
|
DHCP server range from start IP to end IP |
|
|
|
|
|
|
|
|
DHCP IP Lease Time |
|
Client to ask DHCP server refresh time, range from 60 to |
||
|
|
86400 seconds |
|||
|
|
|
|
||
Table 2-2. LAN IP description of IP PBX
Figure 2-5. Wizard-NAT settings
13
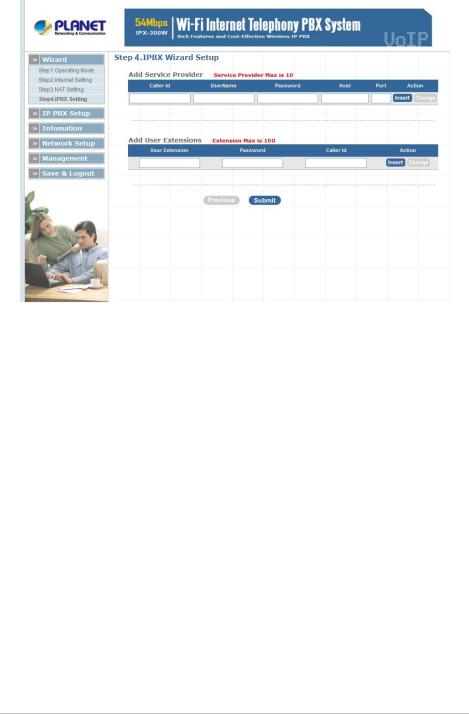
¾Step4. IPPBX Setup
The IP PBX allows multiple ITSP providers / User Extensions registration by simply fill-in the required information in the provided table.
|
Figure 2-6. Wizard-IP PBX settings |
|
Service Provider: |
|
|
|
Caller ID |
Service provider name |
|
|
|
|
Username |
Input Provider name |
|
|
|
|
Password |
Input Provider password |
|
|
|
|
Host |
Input Providers server address |
|
|
|
|
Port |
Providers server port |
|
|
|
|
Table 2-3. Service provider description |
|
User Extensions: |
|
|
|
User Extension |
Input Extension number |
|
|
|
|
Password |
Input Extension password |
|
|
|
|
Caller Id |
Input Extension caller id |
Table 2-4. User extension description
After completing the wizard setup, click “Submit” button, The IP PBX will save configuration and reboot IP PBX automatically, after 50 seconds, you can re-load setting page again.
14
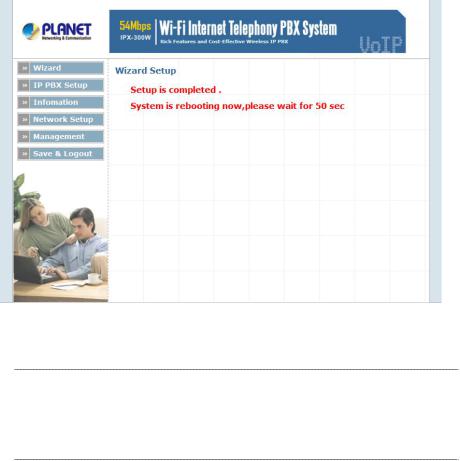
Figure 2-7. Wizard-Rebooting
Please consult your ISP personnel to obtain proper PPPoE/IP Note address related information, and input carefully.
If Internet connection cannot be established, please check the physical connection or contact the ISP service staff for support information.
15

Chapter 3 3
IP PBX Setup
SIP Basic Setting
SIP (Session Initiation Protocol) is a request-response protocol, dealing with requests from clients and responses from servers. Participants are identified by SIP URLs. Requests can be sent through any transport protocol. SIP determines the end system to be used for the session, the communication media and media parameters, and the called party's desire to engage in the communication. Once these are assured, SIP establishes call parameters at either end of the communication, and handles call transfer and termination.
¾SIP Configuration
|
Figure 3-1. SIP configuration settings |
|
|
|
|
UDP Port to bind to |
This is SIP Local Port 5060, if you have any specific reason for |
|
change this port. |
||
|
||
|
|
|
Domain |
IP PBX Server’s IP address. |
|
|
|
|
Allow guest calls |
Enable/Disable guest calls. Default is Enable. Default is all IP. |
|
|
|
|
Overlap dialing support |
Enable/Disable overlaps dialing support. Default is Enable. |
|
|
|
|
Allow Transfers |
Enable Call Transfers. |
Enable DNS SRV lookups Enable DNS SRV lookups on calls
(on outbound calls)
Maximum duration of incoming registration/subscriptions we allow.
|
Max Registration Time |
|
Default 3600 seconds. |
|
|
|
|
||
|
|
|
|
|
|
Min Registration Time |
|
Minimum duration of registrations/subscriptions. Default 60 |
|
|
|
seconds |
|
|
|
|
|
|
|
|
|
|
|
|
|
Default |
|
|
|
|
Incoming/Outgoing |
|
Default duration (in seconds) of incoming / outgoing registration. |
|
|
Registration Time |
|
|
|
|
|
|
|
|
|
Min RoundtripTime |
|
Minimum roundtrip time for messages to monitored hosts, Defaults |
|
|
(T1 Time) |
|
to 200 ms |
|
|
|
|
|
|
|
Language |
|
Set default language for all users. |
|
|
|
|
|
|
|
Enable Relaxed DTMF |
|
Use relaxed DTMF detection. Default is Disable. |
|
|
|
|
|
|
|
Server UserAgent |
|
Enable you to change the trunk User agent string, Default is PBX. |
|
|
|
|
|
|
|
DTMF Mode |
|
Set default DTMF mode for sending DTMF. Default: rfc2833. |
|
|
|
|
|
|
|
|
Table 3-1. SIP configuration description |
||
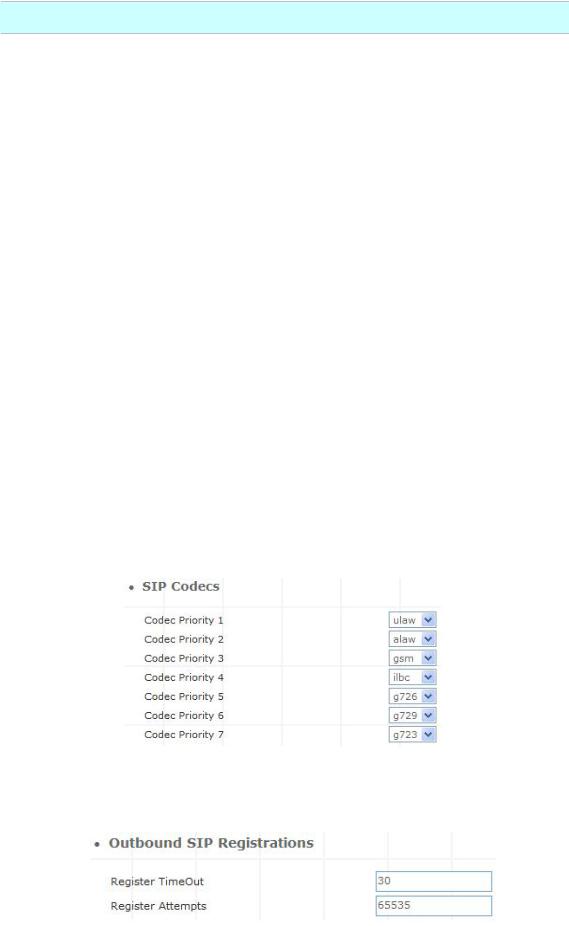
¾SIP Codecs
The Codec is used to compress the voice signal into data packets. Each Codec has different bandwidth requirement. There are 7 kinds of codec. To determine the priority, selects one codec algorithm from the pull-down menus individually.
Figure 3-2. SIP codecs settings
¾Outbound SIP Registrations
Figure 3-3. Outbound SIP Registrations settings
17
Register TimeOut |
Retry registration calls at every 'x' seconds (default 20). |
Number of registration attempts before we give up; 0 =
Register Attempts
continue forever.
Table 3-2. Outbound DIP registration description
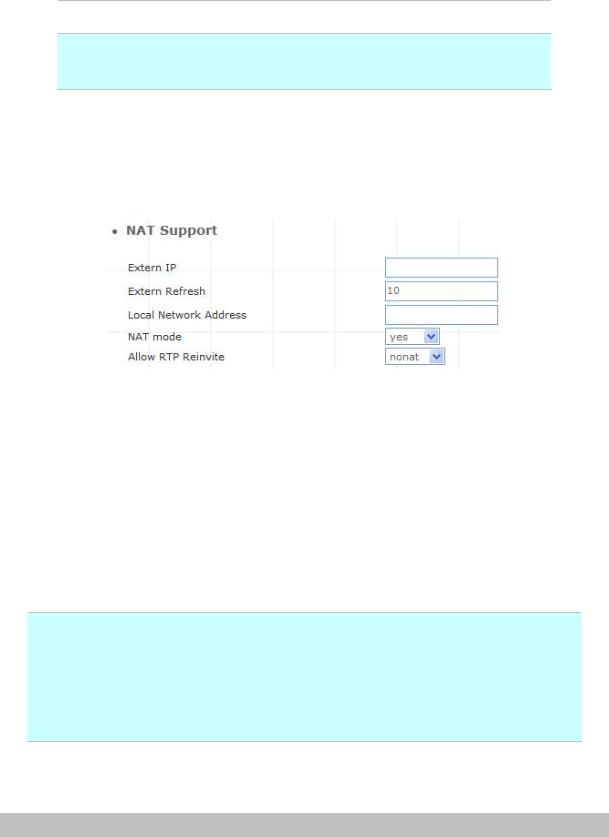
¾NAT Support
The externip, externhost and localnet settings are used if you use IP PBX behind a NAT device to communicate with services on the outside.
|
|
|
Figure 3-4. NAT support settings |
|
|
|
|
|
Extern IP |
|
Address that we're going to put in outbound SIP messages if we're |
|
|
behind a NAT. |
|
|
|
|
|
|
|
|
|
|
|
|
Alternatively you can specify an external host, and IP PBX will perform |
|
Extern Host |
|
DNS queries periodically. Not recommended for production |
|
|
|
environments! Use externip instead. |
|
|
|
|
|
Extern Refresh |
|
How often to refresh externhost if used. You may specify a local network |
|
|
in the field below. |
|
|
|
|
localnet=192.168.0.0/255.255.0.0; All RFC 1918 addresses are local
|
networks |
|
|
Local Network |
|
||
localnet=11.0.0.0/255.0.0.0 |
; Also RFC1918 |
||
Address |
|||
localnet=171.16.0.0/12 |
; Another RFC1918 with CIDR notation |
||
|
localnet=168.254.0.0/255.255.0.0; Zero conf local network
Table 3-3. NAT support description
User Extensions Setup
¾Extension List
18
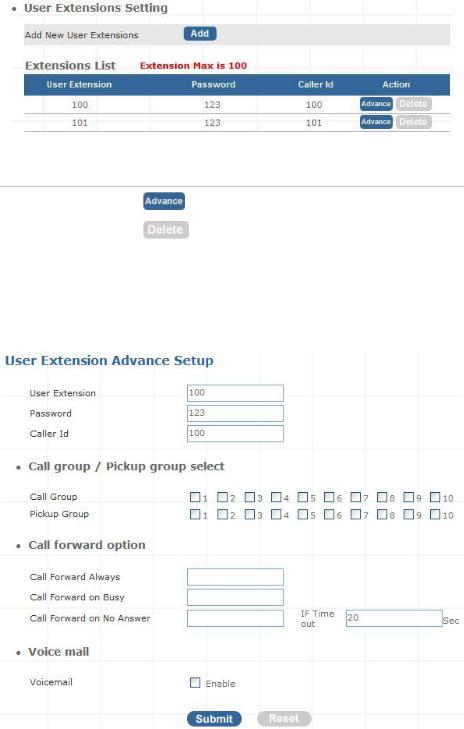
Figure 3-5. User extension settings
Advance |
Click |
to edit an extension other setting. |
|
||
|
|
|
Delete |
Click |
to delete an extension. |
|
|
|
|
Table 3-4. User extension description |
|
¾Advance Setup
|
Figure 3-6. Extension advance settings |
|
|
User Extension |
Input Extension number |
|
|
Password |
Input Extension password |
|
|
Caller Id |
Input Extension caller id |
|
|
|
Table 3-5. Extension advance description |
19

-Call group / Pickup group select :
Call Group
Pickup Group
-Call forward option :
|
Call forward always |
Input forward always number |
||
|
|
|
|
|
|
Call forward on busy |
Input forward on busy number |
||
|
|
|
|
|
|
Call forward no answer |
Input forward no answer number |
||
|
|
|
|
|
|
If time out “XXX” sec |
This is the maximum number allowed no answer time out used |
||
|
|
|
|
|
|
|
|
Table 3-7. Call forward description |
|
- Voice mail : |
|
|
||
|
|
|
|
|
|
|
Voice mail select |
Enable / Disable voice mail function |
|
|
|
|
|
|
|
|
Voice mail name |
Input voice mail name |
|
|
|
|
|
|
|
|
E-Mail address |
Input E-mail address |
|
|
|
|
|
|
|
|
Send voice to mail |
Enable / Disable send voice to mail |
|
|
|
|
|
|
Delete voice mail after send Save / Delete voice mail after send
Table 3-8. Voice mail description
Attendant Extension
Attendant Extension in IP PBX system helps you to configure internal dial plan for extension setup. It can allow more calls to be handled by IVR from Gateway's FXO, and FXS port. Attendant Extension
Provide 10 sets of IVR.
Figure 3-7. Attendant extension settings
20
The IP PBX will handle incoming Caller ID and show to remote / local registered IP-Phone.
If your Gateway can bypass Mobile/Analog Phone number, The Note IP PBX will handle incoming caller ID and show to remote
/ local registered IP-Phone.
¾Sample:
Figure 3-8. Auto-attendant sample
Dialing Rules
The “Dialing Rules” need to be setup when the user uses the method of Peer-to-Peer SIP VoIP call or SIP Proxy Server Mode.
¾Outgoing Prefix
Figure 3-9. Outgoing prefix settings
Outgoing Prefix No |
Set a prefix number for when making outgoing call via server. This |
|
number is used set to initiate the call with the server provider. |
||
|
||
|
|
|
|
Table 3-9. Outgoing prefix description |
¾Dialing Rules
In the “Dialing Rules” settings: Maximum Entries: 100 records
21
Loading...